
STPP Payment Pages Setup Guide
Payment Pages Setup Guide Version: 3.11 Published: 28 January 2015 Payment Pages Setup Guide About this Document This document has been designed to provide the reader with a clear understanding of the STPP Payment Pages system. Conventions Terminology conventions on “merchant” and “customer” The supplier-customer chain within Secure Trading’s systems has two levels of customer, Secure Trading therefore make a clear definition between the two: Merchant relates to a customer of Secure Trading that uses the system to process requests, such as those for online payments. Customer relates to a customer of the merchant. Note on bulleting conventions There are two forms of bulleting conventions included within this document. Notes with useful but not Mandatory information for your consideration, these are displayed using the following: Please note that… Notes that are requirements and need to be followed in order to prevent future issues with your code are indicated with an exclamation mark and are outlined in bold. It is imperative that… System Time Secure Trading’s System Time is in Greenwich Mean Time (GMT). © Secure Trading Limited 2015 28 January 2015 Page 2 / 68 Payment Pages Setup Guide Table of Contents 1 Introduction ...................................................................................................................................... 5 1.1 1.2 1.3 1.4 2 Process Overview ............................................................................................................................ 9 2.1 2.2 2.3 2.4 3 Configuring the HTTP POST.................................................................................................... 14 The result of the POST ............................................................................................................ 15 Verify Card Type ...................................................................................................................... 17 Change Payment Options ........................................................................................................ 19 Success Page .......................................................................................................................... 20 “Cancel” and “Continue shopping” buttons .............................................................................. 22 Testing...................................................................................................................................... 23 Allowed Fields ................................................................................................................................ 24 4.1 4.2 4.3 4.4 4.5 4.6 4.7 4.8 4.9 4.10 4.11 4.12 4.13 5 Configure Your System to use Payment Pages......................................................................... 9 Payment Pages Standard Authorisation .................................................................................. 10 Settlement ................................................................................................................................ 13 Split Shipments ........................................................................................................................ 13 Posting Information ....................................................................................................................... 14 3.1 3.2 3.3 3.4 3.5 3.6 3.7 4 What are Payment Pages? ........................................................................................................ 5 Payment Pages Summary ......................................................................................................... 6 Parties Participating ................................................................................................................... 7 Account Configuration ................................................................................................................ 8 Required Fields ........................................................................................................................ 24 Address Verification System (AVS) ......................................................................................... 25 Billing Fields ............................................................................................................................. 26 Customer Fields ....................................................................................................................... 27 Locale ....................................................................................................................................... 28 Settlement Deferral .................................................................................................................. 28 Settlement Status ..................................................................................................................... 28 Order Reference ...................................................................................................................... 28 Pre-Authorisations and Final Authorisations ............................................................................ 29 Charset ..................................................................................................................................... 30 Custom Fields .......................................................................................................................... 30 Postcode validation .................................................................................................................. 31 County validation ...................................................................................................................... 31 PayPal.............................................................................................................................................. 32 5.1 Delivery Address ...................................................................................................................... 32 6 Security ........................................................................................................................................... 34 7 Additional Request Types ............................................................................................................. 38 7.1 7.2 7.3 7.4 7.5 7.6 Risk Decision ........................................................................................................................... 38 Account Check ......................................................................................................................... 39 3-D Secure ............................................................................................................................... 43 Subscription ............................................................................................................................. 44 Currency Rate .......................................................................................................................... 44 How to configure Additional Request Types ............................................................................ 51 8 Customisation ................................................................................................................................ 52 9 Enhanced Post ............................................................................................................................... 53 9.1 9.2 9.3 9.4 Getting Started ......................................................................................................................... 53 Sending an Enhanced Post Request ....................................................................................... 54 PayPal and Enhanced Post ..................................................................................................... 57 Subscriptions and Enhanced Post ........................................................................................... 58 © Secure Trading Limited 2015 28 January 2015 Page 3 / 68 Payment Pages Setup Guide 10 10.1 10.2 11 11.1 11.2 12 12.1 12.2 12.3 12.4 13 13.1 13.2 13.3 13.4 13.5 14 14.1 14.2 14.3 14.4 iframe........................................................................................................................................... 59 Configuring your Website ......................................................................................................... 60 Changing the appearance of the iframe................................................................................... 60 Google Analytics ........................................................................................................................ 62 Using Google Analytics Tracking Code ................................................................................... 62 Google Analytics and Ecommerce Tracking ............................................................................ 63 Going Live ................................................................................................................................... 64 Notifications and Redirects for Live Site Reference ................................................................ 64 Contact Secure Trading ........................................................................................................... 64 Change your website ............................................................................................................... 64 Live testing ............................................................................................................................... 64 Testing......................................................................................................................................... 65 Testing Authorisation ............................................................................................................... 65 Address Verification (AVS) and Security Code Checks ........................................................... 66 Testing Fraud Control .............................................................................................................. 67 Testing Account Check ............................................................................................................ 67 Testing Currency Rate ............................................................................................................. 67 Further Information and Support ............................................................................................. 68 Secure Trading Support ........................................................................................................... 68 Secure Trading Sales ............................................................................................................... 68 Useful Documents .................................................................................................................... 68 Frequently Asked Questions .................................................................................................... 68 © Secure Trading Limited 2015 28 January 2015 Page 4 / 68 Payment Pages Setup Guide 1 Introduction 1.1 What are Payment Pages? Secure Trading Payment Pages are for merchants who want a simple and easily implemented way of adding e-payment capability to their online commerce systems. Secure Trading Payment Pages works with custom-designed ecommerce systems as well as with many commercially available shopping cart applications. Using Secure Trading Payment Pages you can: Process payments on our own dedicated HTTPS servers (that use the SSL protocol) that allow you to process secure and reliable transactions. Process payments without storing credit card details on your server. Customise the Payment Pages with custom CSS to maintain the look and feel of your online store. Accept a large variety of currencies. Track all transactions using our online transaction management system, MyST. Figure 1 - Appearance of Payment Pages As a Payment Service Provider (PSP), Secure Trading is required to undergo Payment Card Industry Data Security Standards (PCI DSS) accreditation. If you were to process the customer’s payment details on your own server, you would also be required to undergo this accreditation process. If you do not wish to undergo full PCI accreditation, using Payment Pages is the solution for your system. If you are processing Mail Order/Telephone Order payments, you still need to undergo accreditation, even when using Payment Pages. For information on PCI accreditation, please contact your acquiring bank. © Secure Trading Limited 2015 28 January 2015 Page 5 / 68 Payment Pages Setup Guide 1.2 Payment Pages Summary The following diagram outlines the steps involved in processing payments using Payment Pages: The customer opts to make a payment on your website. You transfer the customer to Secure Trading’s Payment Pages. The customer inputs their payment details on Secure Trading’s servers. ST submits these details to your bank over a secure connection. If the payment has been successful, a confirmation is shown to the customer. © Secure Trading Limited 2015 If the payment has failed, an error is shown to the customer. The customer can amend their details and try again. 28 January 2015 Page 6 / 68 Payment Pages Setup Guide 1.3 Parties Participating There are a number of different parties that are included when performing transactions through Secure Trading Payment Pages. These parties are detailed below: The Customer - The purchaser of goods or services. They will log on to the merchant’s website and process an order. They will then process a payment using their own details, usually by using their credit or debit card. The Merchant – Seller of goods or services. They require their own website and will transfer the customer to Secure Trading’s servers in order to complete payment. The merchant will be exchanging goods or services online for the customer to purchase using Payment Pages. Secure Trading – Facilitates the transaction. The customer will be transferred to Secure Trading’s secure servers where they will input their payment details. Secure Trading validate these submitted details, and then connect securely to the acquiring bank in order to perform authorisation. The Acquiring Bank – Sends the transaction to the customer’s card issuer for authorisation. They also send the address information to a separate supplier to check they match the address registered for the card. The Customer’s Card Issuer – As mentioned above, the card issuer performs the authorisation by running checks, such as if the card inputted by the customer has not been reported stolen and that card has available funds. It is at this stage that the security code and address checks are also performed on the submitted information. If the transaction is performed using 3-D Secure, then the customer is transferred to their card issuer’s server where they will enter their password for online transactions. rd Additional 3 Parties – If enabled on the merchant’s account, the process can include rd additional 3 parties, such as PayPal. For transactions of this nature, Secure Trading rd performs all the integration with the 3 Party. The merchant’s part in the process will not alter. They transfer the customer to Secure Trading’s secure servers as with any other transaction, and the remainder of the transaction will be handled between Secure rd Trading and the 3 Party. © Secure Trading Limited 2015 28 January 2015 Page 7 / 68 Payment Pages Setup Guide 1.4 Account Configuration There are a few steps you will need to have considered to begin processing payments through Secure Trading’s Payment Pages. 1.4.1 Internet Merchant Account An Internet Merchant Account is required if you would like to process online e-commerce transactions. Secure Trading have relationships in place with certain acquirers and will therefore be able to assist you. For contact details of our sales team, please refer to section 14.2 Secure Trading Sales on page 68. 1.4.2 Secure Trading Account In order to process transactions through Secure Trading’s servers, you will need to have a Secure Trading account and a Secure Trading site reference. You are provided with a Secure Trading site reference when you sign up and this is used to uniquely identify your account when you send any data to Secure Trading. It should also be quoted with any correspondence with Secure Trading. For more information on becoming a Secure Trading merchant, please contact our Sales team (see section 14.2 Secure Trading Sales on page 68). If you believe you already have a Secure Trading account, but do not know your site reference, please contact our support team (see section 14.1 Secure Trading Support on page 68). After you have signed up, you will possess a “live” account and a “test” account. For the remainder of this document, we will assume that your test site reference is test_site12345 and your live site reference is site12346. 1.4.3 Merchant’s website You will need your own website or web page in order to transfer the customer to Secure Trading’s servers. 1.4.4 IP Ranges You may need to open your firewall for Secure Trading’s IP Ranges. Current IP Ranges can be viewed at http://webapp.securetrading.net/ips.html 1.4.5 MyST When you first sign up with Secure Trading you will be provided with a MyST username (email address) and password. MyST is a secure interface providing online real-time access to your payment history. The status of every transaction can be tracked, allowing your Secure Trading account to be managed more effectively. Secure Trading recommends regularly signing into MyST to ensure there are no issues with recent transactions processed on your account that require your attention. You can sign in using the following URL: https://myst.securetrading.net/login Alternatively, click the “MYST LOGIN” link, shown in the top right of the Secure Trading home page: http://www.securetrading.com For information on how to use MyST, please refer to the MyST User Guide. 1.4.6 Notifications In addition to using MyST, Secure Trading recommends that all merchants using Secure Trading’s Payment Pages solution configure notifications to be kept informed of transactions processed on their accounts. For more information, please refer to the Notifications documentation (see section 14.3 Useful Documents on page 68). © Secure Trading Limited 2015 28 January 2015 Page 8 / 68 Payment Pages Setup Guide 2 Process Overview 2.1 Configure Your System to use Payment Pages This section of the document provides a brief overview on setting up a payment page with Secure Trading. The stages described here are explained in more detail later on in the document. 2.1.1 Contact Secure Trading and Sign Up The first step of the process is to contact Secure Trading and to sign up for a Secure Trading account. You will need to have a merchant account with an acquiring bank in order to process transactions online. Secure Trading can help with obtaining a merchant id if needed, as they have relationships in place with numerous acquirers. To sign up with Secure Trading, contact our sales team (see section 14.2 Secure Trading Sales). 2.1.2 Configure Your Website Once you have set up an account with Secure Trading, you will be provided with two site references. A site reference for testing (e.g. “test_site12345”) and another for processing live transactions (e.g. “site12346”). The site references are used to uniquely identify your Secure Trading account in Secure Trading’s system. In order to direct customers to your payment page, your webserver will need to submit a number of required fields in a HTTP POST to Secure Trading’s servers. Secure Trading recommend that you test your setup, prior to going live, by performing transactions using your test site reference. For information on configuring your website, please refer to section 3 Posting Information. You can perform a test transaction using the test details provided in section 13 Testing. 2.1.3 Going Live Now you have successfully set up your website to perform a test transaction, and you are ready to begin processing live transactions, please send an email to [email protected] to request to go live and you will receive a response when you can begin processing live payments. For transactions to your live site, you need to ensure requests are processed using the site reference of your live site in place of your test site reference. For further information on switching to your live account, please refer to section 12 Going Live. If you require any assistance with going live, please contact Secure Trading support (see section 14.1 Secure Trading Support). © Secure Trading Limited 2015 28 January 2015 Page 9 / 68 Payment Pages Setup Guide 2.2 Payment Pages Standard Authorisation The purpose of the Payment Pages system is to accept a payment from a customer in a secure manner and to process it on your behalf. This section provides the reader with a detailed breakdown of the stages within a standard e-commerce authorisation using STPP Payment Pages. CUSTOMER MERCHANT SECURE TRADING ACQUIRING BANK Step 1 Customer is using merchant’s website. Step 2 Merchant’s website captures the customer’s order and sends the customer to the Payment Pages. No Step 3 The customer enters their payment details on Secure Trading’s secure servers. Are the payment details valid? Yes Step 4 Secure Trading sends the payment details to the bank, which performs checks on the customer’s account with the card Issuer. A failure message is displayed to the customer. The customer can try to make the payment again, using a different card or payment type. No Did the bank authorise the payment? Yes Step 6 Secure Trading interprets the response from the acquiring bank and updates their records. Step 7 The customer is displayed a Success page. CUSTOMER © Secure Trading Limited 2015 MERCHANT SECURE TRADING 28 January 2015 Step 5 The acquiring bank sends an Auth Code to Secure Trading, along with results of security checks performed. ACQUIRING BANK Page 10 / 68 Payment Pages Setup Guide Steps 1-2: The merchant captures the customer’s order The first step of the process involves the customer logging on to the merchant’s website. The website is designed to capture the customer’s order, and has an option to pay via Secure Trading. At this point the merchant’s website will need to submit details to Secure Trading’s payment gateways via a HTTP/HTTPS POST. For information on the fields required, and optional fields that can also be submitted, please refer to section 4 Allowed Fields. Step 3: Customer enters their payment details on Secure Trading’s servers A payment page will be displayed, allowing the customer to enter their payment details on Secure Trading’s servers. Once the customer has entered their payment details, Secure Trading will perform validation checks on the details supplied. If all validation checks pass, Secure Trading securely connects to the merchant’s acquiring bank for authorisation. If the validation checks fail, the Payment Pages is redisplayed with an error message informing the customer their attempt failed. The customer can then amend their details and try again, or try a different payment method. Step 4: Authorisation performed by acquiring bank and card issuer The authorisation process is performed between the merchant’s acquiring bank and the customer’s card issuer. It is at this point that the AVS (Address Verification System), CVV2 (security code) checks and checks on availability of funds are performed. Please note that the nature of checks performed will depend on the payment types, card issuers, card issuer region and acquirers involved in the transaction. Please refer to the STPP AVS & CVV2 document for further information on address and security code checks. Step 5: Result sent from acquiring bank to Secure Trading The acquiring bank sends a response to Secure Trading indicating whether or not the transaction has been authorised. If the transaction has been authorised, then an authorisation code is returned to Secure Trading, along with the results of the address and security code checks. Please note that although a transaction has been authorised, it does not necessarily mean that the funds will have been transferred to your bank account immediately. For the majority of card issuers, the funds are reserved against the customer’s account until the settlement procedure is performed. For more information on the settlement process, please refer to section 2.3 Settlement. Step 6: Secure Trading interprets response Secure Trading interprets the response from the Acquiring Bank and updates their records with the result of the transaction. Step 7: Customer is displayed a success page Outcome of the payment is displayed to the customer on Secure Trading’s server (default) The response page that is displayed to the customer is dependent on whether the transaction is authorised or not: If the transaction is authorised, a success page hosted by Secure Trading is displayed. If the card issuer declines the transaction, the Payment Page is redisplayed to the customer with an error message. The customer can then amend their details and try again, or try a different payment method. © Secure Trading Limited 2015 28 January 2015 Page 11 / 68 Payment Pages Setup Guide Redirect to Merchant’s Website (optional) As an alternative to displaying the success/failure pages on Secure Trading’s servers, the merchant has the ability to perform redirect (HTTP 302) back to their site upon the completion of a customer’s order. The customer’s browser is redirected to a URL on the merchant’s server, which can include fields supported by Secure Trading from the processed transaction. Please note that when using the redirect, if the URL the customer is being returned to is not on HTTPS, the customer will receive a “You are about to leave a secure connection” message, after inputting their card details. In order to set up a redirect, please see section titled Payment Pages Redirects within the MyST User Guide which provides detailed instructions on configuring redirects within MyST. © Secure Trading Limited 2015 28 January 2015 Page 12 / 68 Payment Pages Setup Guide 2.3 Settlement Please note that the procedure outlined in the section of the document applies to card-based payment methods. For further information on other payment types, please refer to additional Secure Trading documentation on our website, or contact your acquiring bank / payment provider. Once a transaction has been authorised the funds are then reserved against the customer’s account for up to seven days while awaiting settlement. The instruction to transfer the funds is scheduled daily when Secure Trading submits a batch of all transactions that are pending settlement to the merchant’s bank. This process is called settlement and is outlined below. Please note that settlement can be deferred for certain transactions. You can request this (see section 4.6 Settlement Deferral), or transactions may be deferred by Secure Trading’s internal fraud system (if enabled on your account). You should therefore sign in to MyST on a regular basis, to check the status of your transactions. Please refer to the MyST User Guide for further information. Step 1: Secure Trading submit settlement file to the Acquiring Bank The initial phase of the settlement process occurs when Secure Trading submits a file to the merchant’s acquiring bank. The file contains all transactions that are in status ‘pending settlement’, and this occurs daily. Step 2: The funds are transferred to the Merchant’s bank account When the merchant’s acquiring bank has received the settlement file from Secure Trading, the bank commences the process of physically settling the money into the merchant’s nominated bank account. The time frame of this payment differs between banks, and is beyond Secure Trading’s control. The authorised funds are only reserved for up to seven days, after which if not claimed in the settlement process, they are released back onto the customer’s card. If a transaction has been authorised, it is not guaranteed you will receive the funds. Therefore, it is important that you regularly log in to MyST to check the status of your payments on the Secure Trading System. Please refer to the MyST User Guide for further information. 2.4 Split Shipments Split shipments provide you with more control over when reserved funds are settled. Instead of performing a single settlement within 7 days as is the case with a standard authorisation, with split shipments you can perform multiple partial settlements. STPP supports split shipments for certain acquirers. For further information, please refer to the Split Shipment Guide. © Secure Trading Limited 2015 28 January 2015 Page 13 / 68 Payment Pages Setup Guide 3 Posting Information In order to transfer your customers to Secure Trading’s Payment Pages, you will need to perform an HTTP or HTTPS POST request. Based on the information posted, the system will then interpret this information and display the appropriate page to the customer. 3.1 Configuring the HTTP POST Once you have a Secure Trading account set up and are ready to begin testing, you will need to establish a way of transferring a customer from your site to Secure Trading. Please note that for the example outlined in this section, please submit your test site reference (e.g. test_site12345). When you go live, you will need to use your live site reference. It is possible to set up a POST to the Payment Page. This can be achieved by creating a form on your webserver that will submit the information. If you copy the below to an HTML file, and open that page in your web browser, you will be displayed a button that will POST the information to Secure Trading’s servers when clicked. <html> <head> </head> <body> <!--YOUR HTML--> <form method="POST" action="https://payments.securetrading.net/process/payments/choice"> <input type="hidden" name="sitereference" value="test_site12345"> <input type="hidden" name="currencyiso3a" value="USD"> <input type="hidden" name="mainamount" value="100.00"> <input type="hidden" name="version" value="1"> <input type="hidden" name="orderreference" value="myorder12345"> <input type="submit" value="Pay"> </form> </body> </html> The above example includes the required fields that need to be included in the POST (highlighted above in bold). The optional field orderreference has also been included. All optional fields can be submitted in this way. For more information on these fields or the additional fields that can be included, please refer to section 4 Allowed Fields on page 24. Please note that you can download orderpage.html from Secure Trading’s website (http://www.securetrading.com/support/downloads-stpp.html), which is a form page you can use to perform a POST to Secure Trading. Please note that the method above describes how to process an Authorisation Request through the Payment Pages. It is possible to perform additional request types, as described in section 7 Additional Request Types. © Secure Trading Limited 2015 28 January 2015 Page 14 / 68 Payment Pages Setup Guide 3.2 The result of the POST Once you have successfully completed the setup of the POST, then either the link or the button when pressed should return a page similar to Figure 2. Figure 2 - Default payment choice page Figure 2 is a screenshot of the default payment choice page with default styling. On this page, the customer will choose the payment type with which they would like to make the payment. If the customer wishes to process a credit/debit card transaction, they will be redirected to a page similar in appearance to that shown in Figure 3. Please note the appearance of the billing details page will vary depending on payment type chosen. The billing details page for most major cards will have the layout shown in Figure 3. © Secure Trading Limited 2015 28 January 2015 Page 15 / 68 Payment Pages Setup Guide Figure 3 - Billing details page for a card © Secure Trading Limited 2015 28 January 2015 Page 16 / 68 Payment Pages Setup Guide 3.3 Verify Card Type It is possible to configure the customer’s ability to pay in a different payment types, after they have chosen their preferred payment type on the payment choice page (Figure 2). Secure Trading offers three configurations to handle customers who select a card type on the payment choice page (Figure 2), but enter the details of a different card type on the details page (Figure 3). These configurations are outlined in detail, below. To change the verify card type solution to be used on your site, please contact Secure Trading support (see section 14.1 Secure Trading Support on page 68). Please note that by default, new sites are configured to use the “Auto Correct” configuration. Although Secure Trading correctly identifies the majority of cards submitted to the Payment Pages, we may not always correctly assign the card type when our Bank Identification Number (BIN) records differ from the records maintained by our supported acquirers. 3.3.1 Auto Correct (Default) – Configuration “0” The payment is processed in the correct payment type, but the customer is not informed beforehand if the card details they have entered did not match the card type they selected on the payment choice page. The customer can change to a different payment type after they have selected one from the payment choice screen by selecting a new payment type from the Change Payment Options at the top of the billing details page (see section 3.4 Change Payment Options on page 19). 3.3.2 Fail if PAN doesn’t match – Configuration “1” This configuration prevents a customer from changing the payment type they are paying with after they have reached the billing details page. This is designed for merchants who have implemented their own hosted payment choice page, allowing customers to select a payment type before inputting their payment details on Secure Trading’s hosted billing details page (as shown in Figure 3). If the customer enters card details that do not match the card type, and attempt to process a payment, the payment will not be processed and a red warning message is shown at the top of the page (Figure 4). They cannot proceed with the payment until they enter payment details for the pre-specified payment type. Figure 4 - Payment details entered does not match pre-specified payment type (Error) © Secure Trading Limited 2015 28 January 2015 Page 17 / 68 Payment Pages Setup Guide 3.3.2.1 Posting directly to the billing details page When using verify card type, you may wish to bypass the payment choice page by redirecting the user directly to the billing details page with a pre-defined payment type. This section outlines how to perform this operation. To post directly to Secure Trading’s hosted billing details page (as shown in Figure 3), follow the steps outlined in section 3.1 Configuring the HTTP POST on page 14, substituting the URL with “https://payments.securetrading.net/process/payments/details”, and including the additional field paymenttypedescription, which has the payment type the customer is using to make the payment. Using verify card type configuration “1” ensures the customer will not be able to pay in any other payment type other than the one specified in the POST. Example Differences from the POST to Secure Trading’s hosted payment choice page are highlighted in bold: <html> <head> </head> <body> <!--YOUR HTML--> <form method="POST" action="https://payments.securetrading.net/process/payments/details"> <input type="hidden" name="sitereference" value="test_site12345"> <input type="hidden" name="currencyiso3a" value="USD"> <input type="hidden" name="mainamount" value="100.00"> <input type="hidden" name="version" value="1"> <input type="hidden" name="paymenttypedescription" value="VISA"> <input type="submit" value="Pay"> </form> </body> </html> 3.3.3 Payment Pages redisplay choice if PAN doesn’t match – Configuration “2” The customer is shown a yellow warning at the top of the page (Figure 5), if the card details they have entered did not match the card type they selected on the payment choice page. The customer needs to click “Pay” again in order to make the payment with the card type associated with the previously submitted details. They can amend their address and billing details before paying, or opt to pay using a different payment type by choosing an alternative from the Change Payment Options at the top of the page (see section 3.4 Change Payment Options on page 19). Figure 5 - Payment details entered does not match pre-specified payment type (Warning) © Secure Trading Limited 2015 28 January 2015 Page 18 / 68 Payment Pages Setup Guide 3.4 Change Payment Options For sites configured to use verify card type configurations “0” and “2” (see sections 3.3.1 and 3.3.3, respectively), customers will always be shown Change Payment Options along the top of the billing details page (as shown in Figure 6). Please note if your site is only configured to accept payments in one payment type, the Change Payment Options will not be shown. Figure 6 – Change Payment Options as seen on billing details page When the customer clicks this grey bar, they are shown all payment types configured on your account for the submitted currency (as shown in Figure 7), from which a new payment type can be chosen to process the payment. Figure 7 – Change Payment Options after they are clicked Please note that sites using verify card type configuration “1” will never show the Change Payment Options, even if the customer enters invalid payment details, or the payment is otherwise unsuccessful. This means that once the customer is viewing the billing details page, they cannot change the payment type they are paying in. © Secure Trading Limited 2015 28 January 2015 Page 19 / 68 Payment Pages Setup Guide 3.5 Success Page Following a successful authorisation, the customer will be shown a success page (as shown in Figure 8). This page contains information about the processed authorisation that is useful for the customer to take note of for future reference. Figure 8 - Success page for a card Secure Trading recommends emailing these details to the customer following authorisation. Information on configuring email notifications for your account can be found in the Notifications section of the STPP MyST User Guide (please refer to section 14.1 Secure Trading Support on page 68). © Secure Trading Limited 2015 28 January 2015 Page 20 / 68 Payment Pages Setup Guide 3.5.1 Refresh warning After a successful authorisation request, by default the customer is shown a success page with a unique reference number for the request. If the customer navigates back to the billing details or payment choice pages using the navigation buttons in their browser and attempts to make another payment, they will be redirected to the same success page (with the same reference number as before). A warning will be displayed at the top of the page (as shown in Figure 9) to remind the customer a payment has already been processed. This is to assist in preventing duplicate authorisation requests from being processed accidentally. Figure 9 - Refresh warning on success page © Secure Trading Limited 2015 28 January 2015 Page 21 / 68 Payment Pages Setup Guide 3.6 “Cancel” and “Continue shopping” buttons 3.6.1 “Cancel” buttons Secure Trading Payment Pages can be configured to show “Cancel” buttons on the payment choice page and/or the billing details page. When clicked, the customer is redirected to a URL of your choosing. Figure 10 - Payment choice page configured to show “Cancel” button Figure 11 - Billing details page configured to show “Cancel” button 3.6.2 “Continue shopping” button Secure Trading Payment Pages can be configured to show a “Continue shopping” button on the success page, following a successful authorisation request. When clicked, the customer is redirected to a URL of your choosing. Figure 12 - Success page configured to show “Continue shopping” button © Secure Trading Limited 2015 28 January 2015 Page 22 / 68 Payment Pages Setup Guide 3.6.3 Configuration To set up these buttons on Payment Pages, please contact Secure Trading support (refer to section 14.1 Secure Trading Support on page 68). Please inform support of the required URL(s) and buttons required for your solution. 3.7 Testing You can test the different payment configurations through your Payment Pages using the testing details found in section 13 Testing on page 65 of this document. Secure Trading recommends that you test your system thoroughly before processing real transactions through your live account. © Secure Trading Limited 2015 28 January 2015 Page 23 / 68 Payment Pages Setup Guide 4 Allowed Fields The examples provided in previous sections of the document focus on the fields required by Secure Trading. Secure Trading recommends that you submit as much information as possible with your transactions, as this can help you gain more information about a customer that can be used to tackle fraud. This section of the document lists both the required and the additional field names that can be included within the POST submitted from your website to Secure Trading, and the benefits of including this information. It is important that the field names you post match those within the following tables, as only these fields are recognised by Secure Trading’s servers. The field names are case sensitive. Please note that the system does not support multiple fields with the same name, unless explicitly stated. 4.1 Required Fields The table below includes the required field names that need to be passed through to Secure Trading in order to display your payment page. Field name sitereference currencyiso3a mainamount version © Secure Trading Limited 2015 Details The unique Secure Trading site reference that you receive when you sign up. The currency that the transaction will be processed in. There is a list of available currencies on our website: http://webapp.securetrading.net/currencycodes.html The amount of the transaction should be in main units, with no commas, so £1000 would be 1000.00 Currencies such as Japanese Yen which do not require a decimal place can be submitted without. So 1000 Yen would be 1000 This value will be set to 1. 28 January 2015 Page 24 / 68 Payment Pages Setup Guide 4.1.1 VISA Additional Authorisation Data Merchant Category Code (MCC) 6012 VISA has mandated that UK-based merchants with a Merchant Category Code (MCC) of 6012 are required to send the customer’s date of birth, account / card number, last name and postcode, as outlined below: Field name customerdob customeraccountnumber type Details The account holder’s date of birth. Must be in the format YYYY-MM-DD. Either “CARD” or “ACCOUNT”. If account number type is “ACCOUNT”, the account holder’s account number. customeraccountnumber customerlastname customerpostcode customercountryiso2a If account number type is “CARD”, the account holder’s card number. The account holder’s last name. The customer’s postcode. The country for the account holder’s billing address. This will need to be in ISO2A format. List of Country Codes: http://webapp.securetrading.net/countrycodes.html Your Merchant Category Code (MCC) is a four-digit number assigned to you by your acquirer. It is used to classify the business by the type of products or services it provides. If you are unsure of the value of your merchant category code, please contact Secure Trading Support (section 14.1). 4.2 Address Verification System (AVS) The Address Verification System provides a further level of security to a transaction as it allows you to carry out checks regarding the validity of the address information supplied by the customer in relation to the card used. 4.2.1 What is Address Verification? A customer’s billing address is checked against the address that the card issuer holds for that card. Your bank will indicate whether there is a match between the entered address and the card address on record. When obtaining an authorisation for a transaction, Secure Trading will pass the customer’s address (if provided) to the acquiring bank along with the details required for authorisation. 4.2.2 Availability The availability of the Address Verification System is dependent on the acquiring bank and card issuer, although it should be noted that most cards support this functionality. The ability to conduct address checks is dependent on the location of your acquiring bank in relation to the location of the issuing bank of the card being presented. Most acquirers do support the process but only on locally issued cards. All UK cards and a number of US cards are address checked by all UK acquirers. Please contact Secure Trading for further information on the supported acquirers and card types (see section 14.1 Secure Trading Support on page 68). Please refer to the STPP AVS & CVV2 document (see section 14.3 Useful Documents on page 68) for further information on AVS. © Secure Trading Limited 2015 28 January 2015 Page 25 / 68 Payment Pages Setup Guide 4.2.3 Address Field Names In order to perform Address Verification on a card, you will need to include the address details within your POST. Please note that in order for the AVS checks to be performed, it is the billing address details that need to be included. The table below includes the various field names that you can pass to Secure Trading’s system in order for the address details to be checked. Field name billingpremise billingstreet billingtown billingcounty billingpostcode 4.3 Details The house number or first line of the customer’s billing address. The street entered for the customer’s billing address The town entered for the customer’s billing address. The county entered for the customer’s billing address. This is displayed as “State code (eg. NY)” on pages with US locale and “County” on other configurations. For US addresses, the state would be entered in this field. Valid formats: Preferred: Two character state code, e.g. “NY”. Full state name (no abbreviations), e.g. “New York”. The postcode entered for the customer’s billing address. Billing Fields You may also submit the following billing fields through Secure Trading’s systems. Field name billingprefixname billingfirstname billinglastname billingcountryiso2a billingemail billingtelephone billingtelephonetype © Secure Trading Limited 2015 Details This will be the customer’s prefix. The options available are Mr, Mrs, Miss, Dr, Ms, Prof and Rev. The customer’s first name. The customer’s last name. The customer’s country for their billing address. This will need to be in iso2a format. For a list of countries, please see: http://webapp.securetrading.net/countrycodes.html The customer’s e-mail address. This can then be used for correspondence with the customer. Maximum length of 255 (maximum of 64 characters before the”@” symbol). The customer’s telephone number. Requires billingtelephonetype to be specified. Valid characters: Numbers 0-9 Spaces Special characters: + - ( ) The type of telephone number inputted. The options available are: H = Home M = Mobile W = Work Required if billingtelephone is entered. 28 January 2015 Page 26 / 68 Payment Pages Setup Guide 4.4 Customer Fields You may also submit details with regards to an additional address for the customer. This usually relates to the delivery address. These fields are included below. Field name customerpremise customerstreet customertown customercounty Details The house number or first line of the customer’s additional/delivery address. The street entered for the customer’s additional/delivery address The town entered for the customer’s additional/delivery address. The county entered for the customer’s additional/delivery address. This is displayed as “State code (eg. NY)” on pages with US locale and “County” on other configurations. customerpostcode customertelephone customertelephonetype customercountryiso2a customeremail © Secure Trading Limited 2015 For US addresses, the state would be entered in this field. Preferred format: Two character state code, e.g. “NY”. The postcode entered for the customer’s additional/delivery address. The customer’s telephone number associated with their additional/delivery address. Requires customertelephonetype if entered. Valid characters: Numbers 0-9 Spaces Special characters: + - ( ) The type of telephone number entered. The options available are: H = Home M = Mobile W = Work Only required if customertelephone is entered. The country for the customer’s additional/delivery address. This will need to be in ISO2A format. For a list of country codes, please see: http://webapp.securetrading.net/countrycodes.html The customer’s e-mail address associated with their additional/delivery details. This can then be used for correspondence with the Customer. Maximum length of 255. 28 January 2015 Page 27 / 68 Payment Pages Setup Guide 4.5 Locale For customers from the United States, Secure Trading provides an option to use US English for names of fields displayed on the Payment Pages (this does not affect the name of fields processed by STPP): Field name locale Details By default, Payment Pages will use UK English, unless otherwise specified, using the values below: en_US = US English for field names. (e.g. postcode becomes zipcode and county becomes state). en_GB = UK English for field names (as default). 4.6 Settlement Deferral It is possible to defer settlement on transactions by submitting settleduedate through the Payment Pages system. This field is detailed below (for more information on settlement, please see section 2.3): Field name settleduedate Details The date the merchant wishes for the transaction to settle. This needs to be in the format YYYY-MM-DD. Please note that the due date can be up to a maximum of 7 days after the authorisation date. 4.7 Settlement Status You can set the status of a transaction by submitting the settlestatus field to Secure Trading’s system: Field name settlestatus 4.8 Details This value relates to the status of the transaction. The possible vales are: 0 – Pending Settlement. 1 – Pending Settlement, manually overridden. 2 – Suspended. 100 – Settled (This is only currently available for certain acquirers. For more information, contact Secure Trading Support; please see section 14.1 Secure Trading Support on page 68). The default value is 0. Order Reference You can pass your own reference for a transaction, to be stored in the database. Field name orderreference © Secure Trading Limited 2015 Details Your own reference for the transaction. This can be useful when matching transactions to orders within your system. 28 January 2015 Page 28 / 68 Payment Pages Setup Guide 4.9 Pre-Authorisations and Final Authorisations MasterCard Europe have mandated that MasterCard and Maestro transactions processed with certain European acquiring banks must be flagged as either pre-authorisation or final authorisation. Such transactions are subject to acquirer-specific conditions. We recommend that you contact your acquirer for information on whether this mandate applies to your configuration and to clarify whether to process your transactions as pre-authorisations or final authorisations. By default, Secure Trading will process MasterCard and Maestro authorisations as final authorisations. You can change this default behaviour to submit pre-authorisations, by contacting Secure Trading Support (see section 14.1). Alternatively, see section 4.9.2 for information on overriding the default behaviour on a transaction-by-transaction basis. 4.9.1 About Pre-Authorisations and Final Authorisations Pre-authorisation and final authorisation can be summarised as follows: Pre-Authorisation: Settlement can be deferred by up to 7 days following authorisation. During this time, the amount to be settled can be updated to a value that is lower than the amount authorised. Pre-authorisations are more flexible than final authorisations, but may be subject to higher processing fees by your acquiring bank. Final authorisation: Settlement can only be deferred by up to 4 days following (1) (2) authorisation . (1) Following authorisation, the amount value should not be changed . Final authorisations are less flexible than pre-authorisations, but may be subject to lower processing fees by your acquiring bank. (1) Failure to adhere to these conditions may incur a fine from MasterCard. (2) Secure Trading will allow final authorisations to be settled up to 7 days after authorisation, but you should aim to settle within 4 days to avoid incurring a fine. For full terms and conditions, please contact your acquiring bank. Split shipments require the initial authorisation to be sent through as a preauthorisation. Please refer to the Split Shipment Guide for further information. 4.9.2 Override You can include the authmethod field in the HTTP POST to indicate whether the payment is a pre-authorisation or a final authorisation. This overrides the default behaviour when submitted. The values that can be submitted are: “PRE” - Requests a “pre-authorisation”. “FINAL” - Requests a “final authorisation” (default). © Secure Trading Limited 2015 28 January 2015 Page 29 / 68 Payment Pages Setup Guide 4.10 Charset In order for data to be transmitted, the customer’s browser encodes it using a character encoding. Secure Trading’s servers need to know this encoding (or charset) in order to correctly decode the data. Many browsers do not provide this information, in which case Secure Trading will assume the character encoding is ISO-8859-1. This is compatible with all browsers but can result in some characters (in particular non-western characters) being interpreted incorrectly. You can tell the browser to specify the correct charset by including a hidden field “_charset_” within your HTML form. Browsers will automatically fill the value of this field with the charset they are using, so there is no need to specify a value for this field, for example: <INPUT TYPE=hidden NAME=”_charset_” /> Please note that you can find more information on charset, by referring to http://en.wikipedia.org/wiki/Character_encoding 4.11 Custom Fields Secure Trading allows you to pass custom fields through their system. The field names do not need to be a specific case and will not be saved in the database. You can include these custom fields within the HTTP POST to Secure Trading’s Payment Pages. No customisation is required of the Payment Pages system. The maximum allowed length of custom fields submitted to STPP is 100 characters. Any custom fields exceeding this limit will be truncated or cause an error. Please note that the field names should not be the same as the Secure Trading field names outlined above, or end with “_html”. Please note that if you would like to receive any custom fields back in a POST from Secure Trading’s servers, please refer to the MyST User Guide for more information on configuring notifications (see section 14.3 Useful Documents on page 68). © Secure Trading Limited 2015 28 January 2015 Page 30 / 68 Payment Pages Setup Guide 4.12 Postcode validation If included within the request, validation is performed on the postcode. Please note that postcode validation is dependent on the country supplied. If no country is supplied, then no additional validation is performed. The following table outlines the format the postcode needs to be in when it is submitted to Secure Trading. T represents Text (A-Z or a-z) and N represents Number (0-9): Country United States (US) Great Britain (GB) Canada (CA) Other 4.13 Validation Needs to be a 5 or 9 digit zip code. NNNNN NNNNNNNNN Needs to be between 6 and 8 characters long, including spaces. Can be one of the following formats: TN NTT TNT NTT TNN NTT TTN NTT TTNN NTT TTNT NTT Needs to be 6 or 7 characters long, including spaces. Can be one of the following formats: TNT NTN TNTNTN The format of postcodes for other countries is not validated by Secure Trading. County validation If the country is entered and is United States (US), the county field needs to be a valid twodigit state code (e.g. “NY” for New York). For a list of US state codes, see: http://webapp.securetrading.net/usstatecodes.html © Secure Trading Limited 2015 28 January 2015 Page 31 / 68 Payment Pages Setup Guide 5 PayPal PayPal is an international e-commerce business allowing payments and money transfers to be made online. To enable PayPal, please follow the steps outlined in the Enabling PayPal guide. Please note that PayPal do not support iframe integration. Once you have completed the steps outlined in the Enabling PayPal guide, the PayPal logo will be shown alongside existing payment methods. You do not need to change your request to Secure Trading. When a customer chooses to pay with PayPal, they will be redirected to PayPal’s website to verify their identity. Upon successful verification, Secure Trading will automatically contact PayPal to retrieve the delivery details. If using Enhanced Post with PayPal, you may need to modify your request to the Payment Pages. Please refer to section 9.3 for additional information. 5.1 Delivery Address By default, the customer selects their delivery address from their PayPal account. Alternatively, the customer can use the address entered on your website. This behaviour is controlled by sending the paypaladdressoverride field in the initial request to the Payment Pages: paypaladdressoverride Result 0 Customer will be offered a choice between the delivery address entered on your website and addresses on their PayPal account. 1 Customer will use the delivery address entered on your website. 2 Customer will not be prompted to choose a delivery address on PayPal’s website (best suited to online services and downloads). © Secure Trading Limited 2015 28 January 2015 Page 32 / 68 Payment Pages Setup Guide 5.1.1 PayPal address fields (Only applicable when paypaladdressoverride is 0 or 1) All customer delivery fields (see section 4.4) can be submitted to PayPal, however the following fields are required: customerprefixname * customerfirstname * customermiddlename * customerlastname * customersuffixname * customerpremise customertown customercountryiso2a *You must submit at least one of the customer name fields. To ensure the customer cannot modify the delivery address submitted to the Payment Pages, the fields must be included in your Site Security. This is detailed in section 6. 5.1.1.1 Example of POST using address override Fields required for address override are highlighted in bold: <html> <head> </head> <body> <!--YOUR HTML--> <form method="POST" action="https://payments.securetrading.net/process/payments/choice"> <input type="hidden" name="sitereference" value="test_site12345"> <input type="hidden" name="currencyiso3a" value="USD"> <input type="hidden" name="mainamount" value="100.00"> <input type="hidden" name="version" value="1"> <input type="hidden" name="paypaladdressoverride" value="1"> <input type="hidden" name="customerprefixname" value="Mr"> <input type="hidden" name="customerfirstname" value="James"> <input type="hidden" name="customerlastname" value="Thompson"> <input type="hidden" name="customerpremise" value="789"> <input type="hidden" name="customertown" value="Bangor"> <input type="hidden" name="customercountryiso2a" value="GB"> <input type="submit" value="Pay"> </form> </body> </html> © Secure Trading Limited 2015 28 January 2015 Page 33 / 68 Payment Pages Setup Guide 6 Security To ensure the request to Secure Trading has not been modified by a malicious user, a field called sitesecurity can be included in the POST to the Payment Pages. This field contains a cryptographic hash of a predefined set of field values. Any field that you do not want the customer to modify must be included in your site security hash. For example: If you are submitting address details in the request to Payment Pages, you must include the fields in the site security hash in order to prevent the customer changing their address. Follow the steps below to use this security feature: Step 1: Field Selection You will need to notify Secure Trading Support (see section 14.1 Secure Trading Support on page 68) of the fields to include in the hash. The default fields are authmethod, currencyiso3a, mainamount, sitereference, settlestatus and settleduedate. Secure Trading recommends including as many unique fields when creating the hash as possible. Including only the merchant and currency fields will end up creating the same hash even though the amount field may have been compromised. To prevent anyone from changing the amount, we recommend including the mainamount field. Please note that although the fields authmethod, settlestatus and settleduedate are optional, they can affect settlement. Even if these fields are not submitted to Secure Trading, we recommend including them when you set up the fields with support. The way the hash is generated will not change, but it will mean that a malicious user will not be able to affect the settlement of a transaction through your account. Once the fields have been chosen, you will need to provide Secure Trading with a password that is appended to the end of the hash. If you would like to change the password or add/remove fields from the hash you must notify Secure Trading support. Secure Trading will never ask for your Site Security password after first-time configuration. Never share your Site Security password with third parties. Do not store hard copies of this password. © Secure Trading Limited 2015 28 January 2015 Page 34 / 68 Payment Pages Setup Guide Step 2: Hash Generation You will need to set up your system to build the hash. When generating the hash, only the field values are used. Please note that the order of the fields within the hash must be correct. If the correct details are not supplied, the transaction will be stopped. There are three different algorithm types currently supported: md5 sha1 sha256 The recommended default algorithm type is sha256 (included in the examples, below). If your preferred algorithm is not listed, please contact support (see section 14.1 Secure Trading Support on page 68). For the examples, the values supplied are: Field Name currencyiso3a mainamount sitereference settlestatus settleduedate authmethod password Field Value USD 100.00 test_site12345 PASSWORD Position st 1 nd 2 rd 3 th 4 th 5 th 6 th 7 Please note that the password must be appended to the end of the string before generating the hash. Please note that the examples demonstrate where the optional fields settlestatus, settleduedate and auhmethod are not included in the POST to Secure Trading, but have been set as default values for the hash. Python Example #!/usr/bin/python import hashlib stringToHash= "USD100.00test_site12345PASSWORD" print hashlib.sha256(stringToHash).hexdigest() PHP Example <?php echo hash("sha256", "USD100.00test_site12345PASSWORD"); ?> © Secure Trading Limited 2015 28 January 2015 Page 35 / 68 Payment Pages Setup Guide Java Example import java.math.BigInteger; import java.security.MessageDigest; public class mysha256 { public static void main(String args[]) throws Exception { String stringToHash = "USD100.00test_site12345PASSWORD"; MessageDigest digestObj = MessageDigest.getInstance("SHA-256"); digestObj.update(stringToHash.getBytes()); String merchantHash = String.format("%064x",new BigInteger(1,digestObj.digest())); System.out.println(merchantHash); } } Perl Example #!/usr/bin/perl use Digest::SHA qw(sha256_hex); $stringToHash = "USD100.00test_site12345PASSWORD"; $merchantHash = sha256_hex($stringToHash); print $merchantHash; Step 3: Submitting the Hash The field sitesecurity must be included in the post to the Payment Pages. The value of sitesecurity needs to be the hash generated. To ensure the latest version of the site security feature is used, the hash must be prefixed with a “g” before submitting to Secure Trading. For more information, see 3.1 Configuring the HTTP POST on page 14. Please note that it is important that the generated hash is prefixed with a “g”. Failure to do so could invalidate the hash and stop legitimate transactions. For any payment that is attempted with an incorrect hash, the customer will be presented with an error (such as shown in Figure 13) and no payment will be processed. Figure 13 - Security Hash mismatch error © Secure Trading Limited 2015 28 January 2015 Page 36 / 68 Payment Pages Setup Guide Example of URL with Security Hash Using the same values from the steps, above, here is an example of a request to Payment Pages with the sitesecurity field appended (using the sha256 algorithm type): <html> <head> </head> <body> <!--YOUR HTML--> <form method="POST" action="https://payments.securetrading.net/process/payments/choice"> <input type="hidden" name="sitereference" value="test_site12345"> <input type="hidden" name="currencyiso3a" value="USD"> <input type="hidden" name="mainamount" value="100.00"> <input type="hidden" name="version" value="1"> <input type="hidden" name="orderreference" value="myorder12345"> <input type="hidden" name="sitesecurity" value="g0e6f21313833b21d2693a8d113b56a2bede3648e84c4c2a6f61f107f46c1f1 71"> <input type="submit" value="Pay"> </form> </body> </html> This ensures that if the customer modifies any of the fields used to create the hash that are passed in the request, Secure Trading will not process the payment (as when the hash is regenerated on Secure Trading’s systems, the values will differ). © Secure Trading Limited 2015 28 January 2015 Page 37 / 68 Payment Pages Setup Guide 7 Additional Request Types This section describes the additional request types that can be processed along with a payment processed through Payment Pages. To enable these request types on your site please contact Secure Trading support. For more information, see section 7.6 How to configure Additional Request Types on page 44. 7.1 Risk Decision The purpose of Risk Decision requests is to minimise fraud by analysing customer details and highlighting possible fraudulent activity by using Secure Trading’s Fraud Control system. This is to assist you in making a decision of whether or not to process a customer’s transaction, based on the perceived level of risk. This is achieved by checking the industry’s largest negative database and also searching for suspicious patterns in user activity. The system uses neural-based fraud assessments that can be configured specifically for your account and is constantly updating the fraud checks used to combat new risks. Based on the decision returned by the Fraud Control system a customer that is deemed as suspicious can be prevented from processing a payment. To enable Fraud Control on your account, please contact Secure Trading Support (see section 14.1 Secure Trading Support on page 68). 7.1.1 Process Once the customer submits their details to the Payment Pages a Risk Decision assessment is processed by the Fraud Control system, where the billing, delivery and payment details are analysed by a rule-based system and includes: The industry’s largest negative database. Neural-based fraud assessments. Tumbling or swapping, where there is an unusual usage pattern in the card number, expiration date or customer details associated with a transaction. Please note dependent on your Fraud Control profile, the rules can be configured specifically for your account. For more information, contact Secure Trading Support (see section 14.1 Secure Trading Support on page 68). The Fraud Control system will analyse these details and respond with one of the following results: ACCEPT - The details are not deemed suspicious. DENY- The details are suspicious and a transaction should not be performed. CHALLENGE - Further investigation is recommended. 7.1.2 Performing Authorisations automatically based on Risk Decision responses Based on the result of the Risk Decision, you can decide whether to automatically proceed with the Authorisation or not. By default, the Payment Pages have the following process flow: 1. If the Risk Decision returns an Accept, then continue with the authorisation. 2. If the Risk Decision returns a Challenge or Deny, then process the authorisation, but suspend the transaction allowing for further investigation. © Secure Trading Limited 2015 28 January 2015 Page 38 / 68 Payment Pages Setup Guide Please note the default process flow can be customised. For example, you could choose not to process the authorisation if the Risk Decision returns a Deny. For more information, contact Secure Trading Support (see section 14.1 Secure Trading Support on page 68). Please note the test details to use with the Secure Trading test Fraud Control system can be found in section 13.3 Testing Fraud Control on page 67. 7.1.3 Additional fields The following optional fields can be posted to the payment pages to improve the Fraud Control risk decision process: Field Name Details billingdob The Customer’s Date of Birth. Must be in the format YYYY-MM-DD. The shipping method. Can be one of the following values: customershippingmethod C = Low Cost D = Designated by Customer I = International M = Military N = Next Day/Overnight O = Other P = Store Pickup T = 2 day Service W = 3 day Service Secure Trading recommends submitting as much data as possible to assist the Fraud Control risk decision process. 7.2 Account Check An Account Check is an optional request to help minimise fraud. It allows payment details to be validated, and checks that the details entered by the customer matches those on the card issuer’s records. No funds will be reserved or transferred by the Account Check request. Please note that Account Checks are only available for certain Acquiring Banks. Please contact the Secure Trading support team for more information (see section 14.1 Secure Trading Support). © Secure Trading Limited 2015 28 January 2015 Page 39 / 68 Payment Pages Setup Guide The checks performed by an Account Check Request consist of the following: Use of the Address Verification System (AVS) to check if the provided first line of the billing address for the customer matches that on the card issuer’s records. Checks to see if the billing postcode provided by the customer matches that on record for their card. Checks to see if the security code (CVV2) provided by the customer matches that on record for their card. Please note that the checks performed on an Account Check Request are the same as those carried out on a regular e-commerce Authorisation (AUTH) Request. Please refer to the STPP AVS & CVV2 document (see section 14.3 Useful Documents on page 68) for further information on address and security code checks. No funds will be reserved as part of an Account Check. The results of these checks are returned in the security response of the Account Check. The security response consists of three different fields, each containing the result of an individual check. The names of the fields are listed, below: Field name securityresponseaddress securityresponsepostcode securityresponsesecuritycode Comment The results of the checks performed by the AVS on the first line of the billing address. The results of the checks on the billing postcode. The results of the security code checks. An Account Check Request will analyse the details provided by the customer and respond with the following results for each check performed: Security response value Description 0 “Not Given” 1 “Not Checked” 2 “Matched” 4 “Not Matched” Comment Your bank was not provided with the information required to perform this check. Your bank was unable to perform checks on the information provided. The information provided by the customer matches that on the card issuer’s records. The information provided by the customer does NOT match that on the card issuer’s records. For example, if the securityresponseaddress and securityresponsepostcode have a value of 2, but the securityresponsesecuritycode has a value of 4, this indicates that the first line of the address and the postcode match those on the card issuer’s records, but the security code (CVV2) entered by the customer does not match the code found on the back of their card. © Secure Trading Limited 2015 28 January 2015 Page 40 / 68 Payment Pages Setup Guide Alternatively, you can view security responses in the Single Transaction View for the Account Check transaction in MyST (see Figure 14). Please refer to the MyST User Guide (see section 14.3 Useful Documents) for more information. Figure 14 - Security Response in MyST If an amount is submitted in an Account Check Request, it is only stored for the purpose of inheritance by future requests (such as performing a later Authorisation request), which refers to this parent Account Check transaction. The amount sent in an Account Request is not reserved, as Account Checks never reserve funds. Please note that the settlestatus submitted with an Account Check will be inherited by any subsequent requests that refer to it as a parent. Account Check requests can be processed for all payment types, which are supported by your acquirer that can process Account Checks through Secure Trading. To enable Account Check on your account, please contact Secure Trading Support (14.1 Secure Trading Support on page 68). 7.2.1 Account Check Rules Rules can be assigned on your account by the Secure Trading support team, which will use the results of the Account Check to decide whether or not to process an associated Authorisation transaction. The recommended process flow is as follows: 1. If the Account Check returns a ‘Matched’ Response, then process the Authorisation. 2. If the Account Check returns a ‘Not Checked’ Response, then process the Authorisation, but suspend the transaction allowing for manual investigation to take place. 3. If the Account Check returns a ‘Not Matched’ Response, then do NOT process an Authorisation. Please note the default process flow can be customised. For example, you could choose to process the Authorisation if the Account Check returns ‘Not Matched’. For more information, contact Secure Trading Support (see section 14.1 Secure Trading Support on page 68). © Secure Trading Limited 2015 28 January 2015 Page 41 / 68 Payment Pages Setup Guide 7.2.2 ACH Account Checks You can also perform Account Checks with payments processed using the Automated Clearing House (ACH) payment method, but please be aware that there are differences in the nature of checks performed, as described below: 7.2.2.1 Account Verification Check Your bank will perform checks to verify that the customer’s account is valid and in good standing. The response returned following these checks indicates the level of risk associated with processing transactions using the account details provided by the customer. Transactions that do not receive a definitive response may be checked against the negative database (see section 7.2.2.2 Negative Database Check). Please note that the availability of the Negative Database check will depend on the configuration of your account by your acquirer. Please contact your acquirer for further information. 7.2.2.2 Negative Database Check Your bank may also search a large National database for negative reports against the payment details submitted in your request. This database contains information on over 150 million accounts. This information can be used to determine if the account details are low risk or high risk (these are the only responses possible during this check). 7.2.2.3 Security Response for ACH Account Checks After performing an ACH Account Check, you are returned a security response from the acquiring bank, in the form of a number, which indicates the result of the checks performed on the customer’s bank account details. The securityresponsesecuritycode field within the security response provides the result of the checks performed by your acquiring bank on the customer’s payment details. The table below lists all of the possible security responses that can be returned in the securityresponsesecuritycode field: Security response 1 2 4 Comment Undetermined risk: The acquiring bank was unable to complete checks on the information you provided in the request. Low risk: The information you provided in the request is deemed low or medium risk by the acquiring bank and is therefore considered acceptable for further transactions. High risk: The information you provided in the request is deemed high risk by the acquiring bank and is therefore considered inappropriate for further transactions. MyST description “Not Checked” “Matched” “Not Matched” Secure Trading recommends against proceeding with further transactions using payment details that return a high risk (4 – “Not Matched”) response. When performing combined ACH Account Check and Authorisation Requests, it is recommended that you set up rules, which use the results of the Account Check carried out by the acquiring bank to either allow or prevent future authorisations. See section 7.2.2.4 ACH Account Check Rules. © Secure Trading Limited 2015 28 January 2015 Page 42 / 68 Payment Pages Setup Guide 7.2.2.4 ACH Account Check Rules Rules can be assigned on your account by the Secure Trading support team, which will use the results of the Account Check to decide whether or not to process an associated Authorisation transaction. The recommended process flow is as follows: If the Account Check returns a low risk (2 – “Matched”) or undetermined risk (1 – “Not Checked”) response, then process the Authorisation. If the Account Check returns a high risk (4 – “Not Matched”) response, then do NOT process an Authorisation. Please note the default process flow can be customised. For more information, contact Secure Trading Support (see section 14.1 Secure Trading Support on page 68). 7.3 3-D Secure 3-D Secure is a protocol designed to reduce fraud and Chargebacks during e-commerce Internet transactions. Cardholders are asked to identify themselves at the point of sale before the purchase can be completed. This usually means entering a PIN or other password after entering their credit card details. In the event of a dispute with the transaction at a later date, the card issuer will usually take responsibility of the Chargeback instead of the merchant. The liability issues involved with 3-D Secure transactions are out of the scope of this document. For a detailed indication of the liabilities involved, contact your bank. 3-D Secure transactions may be processed to reduce the likelihood of fraudulent transactions on your account. It may take several weeks to enable 3-D Secure depending on your acquirer. Please contact Secure Trading support for more information (14.1 Secure Trading Support on page 68). Please note that only certain payment types support 3-D Secure. 7.3.1 Process A THREEDQUERY request is used to determine whether the customer’s card is enrolled in the 3-D Secure scheme. The THREEDQUERY request submits information to a directory server hosted by a card issuer (e.g. Visa). If the card is in the 3-D Secure scheme, then after the customer has entered their payment details, they will be redirected to a log-in screen that enables them to validate their identity through an Access Control Server (ACS), hosted by their card issuer. Please note that the size of the ACS page displayed in the customer’s browser is controlled by the ACS provider (cannot be modified by merchants or Secure Trading). As a guideline, Visa US states that the Verified by Visa authentication window should be 390x400 pixels in size. © Secure Trading Limited 2015 28 January 2015 Page 43 / 68 Payment Pages Setup Guide 7.4 Subscription Subscription payments allow transactions to be automatically re-processed without the need for the customer to re-enter their payment details e.g. payments can be scheduled to be processed on the first of each month for £10.00. 7.4.1 Process Processing a Subscription payment is the same as processing a standard Authorisation using the Payment Pages, with additional fields included to schedule the subscription. The additional fields define how many Subscription payments are to be processed and the gap between these payments. Once the initial transaction is processed, the subsequent Subscription payments are scheduled to be processed by the Secure Trading Subscription Engine. For more information, refer to the STPP Subscriptions and Payment Pages (see section 14.3 Useful Documents on page 68). 7.5 Currency Rate Currency Rate Requests are used when performing Dynamic Currency Conversion (DCC) transactions. The CURRENCYRATE Request contains the currency information required for the currency conversion provider to return a conversion rate based on the current rates. By enabling CURRENCYRATE Requests on your Payment Pages, the customer is able to choose an alternative currency in which to perform the payment, provided their card supports the currency conversion. Please note that in order to perform DCC, you will need to have a merchant number that allows this functionality. For more information, please contact your acquiring bank. In addition, an account with a currency rate provider is required. To set up a currency rate provider on your Secure Trading account, please contact Secure Trading Sales (see section 14.2 Secure Trading Sales on page 68). © Secure Trading Limited 2015 28 January 2015 Page 44 / 68 Payment Pages Setup Guide 7.5.1 Process The steps to process a payment with a CURRENCYRATE request are the same as processing a standard authorisation using the Payment Pages (see section 3 Posting Information), with additional DCC fields included in the request. A DCC payment consists of two parts: 1. A CURRENCYRATE Request – Requests an up-to-date conversion rate from a DCC provider. 2. An AUTH Request – Requests the acquiring bank to authorise the payment in the customer’s preferred currency. Please note that in certain configurations, these additional fields are not required. Please see section 7.5.4 Configuration, for more information. The customer is initially shown a choice page, where they can select the payment type that they wish to use. This is the same as the normal payment type choice page, except the amount is initially hidden (Figure 15). This is because the currencies and respective amounts to be offered to the customer have yet to be established. Figure 15 - DCC Payment Pages: Payment type choice page © Secure Trading Limited 2015 28 January 2015 Page 45 / 68 Payment Pages Setup Guide If the customer chooses a payment type that supports DCC, they are informed that they are able to pay in an alternative currency to the merchant currency submitted, as shown in Figure 16. Here they will be able to see the amount in the merchant currency. Secure Trading’s implementation of DCC is currently only supported by MasterCard and Visa branded cards. Figure 16 - DCC Payment Pages: DCC first page Secure Trading will use the card number (PAN) entered by the customer to establish their local currency, by submitting the information in a CURRENCYRATE Request. The conversion rate partner will supply a conversion rate that is used to convert the amount in the merchant currency to an amount in the customer’s local currency, rounded upward to the next base unit (using a ceiling function): £1.021 would go to £1.03 £1.026 would also go to £1.03 Please note that if the cardholder’s local currency is the same as the currency you submitted, the customer will not be shown a conversion rate and instead will make the payment in your account’s currency. Please note that amounts paid in the customer’s currency have a small fee added to them to cover the cost of the conversion by the third-party conversion rate provider. This fee is determined by calculating a percentage of the amount in the customer’s currency and adding this to the total amount. For more information, please contact your conversion rate provider. © Secure Trading Limited 2015 28 January 2015 Page 46 / 68 Payment Pages Setup Guide The amounts in both currencies are displayed on the payment page. The customer will be able to choose between paying in either currency (Figure 17). Figure 17 - DCC Payment Pages: “DCC” currency choice page for VISA If the customer changes their card number (PAN) at this stage, before clicking “Pay”, Secure Trading will need to perform a new CURRENCYRATE Request to re-establish the customer’s local currency using the new card. The customer will be redisplayed the billing details page (Figure 16) along with the following warning that the new amounts calculated may differ from the amounts previously shown: Once the payment currency has been selected, a subsequent AUTH Request is performed by Secure Trading to your acquiring bank. This uses the currency and respective amount chosen by the customer on the Payment Pages. © Secure Trading Limited 2015 28 January 2015 Page 47 / 68 Payment Pages Setup Guide 7.5.2 Success Page Following a successful DCC payment, the customer is shown a success page with details of the transaction processed (Figure 18). This includes information on the currency conversion performed on the transaction. Figure 18 - Success page following a DCC transaction 7.5.3 Required DCC Disclaimer Text Secure Trading actively ensures that the text shown in the default Payment Pages for DCC payments complies with rules specified by the relevant card schemes and third parties. For this reason, we strongly recommend against modifying any of the text shown relating to the currency conversion performed and the exchange rates provided, both on the billing details and receipt pages. If you customise your site’s Payment Pages, it is your responsibility to ensure your solution is still compliant with all rules specified by relevant card schemes and third parties. © Secure Trading Limited 2015 28 January 2015 Page 48 / 68 Payment Pages Setup Guide 7.5.4 Configuration To set up DCC on your Secure Trading account, please contact the support team (see section 14.1 Secure Trading Support on page 68). There are two ways that DCC can be enabled on your account. 1. The support team can configure your live site in such a way that all requests, where the customer’s payment type supports DCC, are processed as DCC. The request you make to the payment pages remains unchanged from a standard Authorisation. 2. Appending “dcctype=DCC” to your POST (see section 3.1 Configuring the HTTP POST on page 14) will result in DCC being performed on a request, if the customer’s payment type supports it. Not including these fields in your POST will result in normal Authorisation Requests without the customer being able to choose an alternative currency. For DCC requests, it is imperative that you submit a currency that is supported by your account. This is to ensure the correct currencies are used when performing currency conversion. 7.5.5 DCC Fields Following CURRENCYRATE Requests, Secure Trading returns additional DCC fields for future reference, as listed in the table, below. These fields are displayed in the “Single Transaction View” for the CURRENCYRATE and AUTH Requests in MyST (please refer to the MyST User Guide in section 14.3 Useful Documents on page 68, for more information). Please note that a CURRENCYRATE Request is only shown as a parent (in the Related Transactions tab) to the child DCC AUTH Request when the customer has opted to pay in an alternative currency (when offered is ‘1’). It is possible to view CURRENCYRATE Requests associated with any DCC AUTH Request in MyST submitting the orderreference on the transaction search page. The orderreference for the CURRENCYRATE is the same as the AUTH. © Secure Trading Limited 2015 28 January 2015 Page 49 / 68 Payment Pages Setup Guide The fields can be returned in a URL or email notification on completion of a transaction. For more information, please refer to the Notifications documentation (see section 14.3 Useful Documents on page 68). When adding a destination, please select the fields shown below in order to include DCC information: Field name dccbaseamount dcccurrencyiso3a dccenabled dccconversionrate dccconversionratesource dccmainamount dccmarginratepercentage dccoffered dccprovider dcctype 7.5.6 Comment The base amount the customer has paid in the submitted currency (£10.50 is 1050). The currency you submitted in the POST to Payment Pages. Whether or not DCC is enabled on your account. 1 - Your Secure Trading account is enabled for DCC. 0 - Your Secure Trading account is not enabled for DCC. The conversion rate used to convert the amount in the submitted currency to the amount in the customer’s currency. The source of the conversion rate provided by the DCC provider. The main amount the customer has paid in the submitted currency (£10.50 is 10.50). The percentage used to calculate the currency conversion fee, applied to the amount in the customer’s currency. This value represents whether the customer has chosen to pay in the submitted currency or their local currency. 1 - Customer has chosen to pay in their local currency. 2 - An error has occurred, which has prevented the customer from paying in their local currency, so they are paying in the submitted currency, instead. 3 - The customer has chosen to pay in the submitted currency. The institution that provides the conversion rate. “DCC” Updating DCC Authorisations It is possible to perform transaction updates to DCC Authorisations, by using MyST (please refer to the MyST User Guide in section 14.3 Useful Documents on page 68, for more information). It is NOT possible to change the currency of the payment after it has been authorised by the acquiring bank. When updating the settle amount, it is in the amount in the currency chosen by the customer to make the payment that will be changed. Deferred settlement is NOT supported for DCC transactions. © Secure Trading Limited 2015 28 January 2015 Page 50 / 68 Payment Pages Setup Guide 7.5.7 Refunding settled DCC transactions STPP supports the refunding of DCC transactions. Please consider the two options available: 7.5.7.1 Option 1 – Perform a refund using MyST A new CURRENCYRATE transaction is performed when performing a refund through the MyST, in order to refund the customer in their chosen currency using an up-to-date conversion rate. Instructions on how to perform refunds using MyST can be found in the MyST User Guide All Secure Trading documents can be found on our website. 7.5.7.2 Option 2 – Submit an XML Refund Request using STAPI / Web Services You can choose to use the same currency conversion rate as the original transaction or perform a new CURRENCYRATE transaction in order to obtain an up-to-date currency conversion rate. For information on performing refunds for DCC transactions STAPI / Web Services, please consult the following documentation: using XML Specification document Web Services User Guide DCC XML Specification All Secure Trading documents can be found on our website. 7.5.8 Subscriptions with DCC Payments Secure Trading does not support the use of DCC payments with Subscriptions. 7.6 How to configure Additional Request Types Once enabled, Additional Request Types are automatically processed with every payment made through your payment page, without any additional configuration on your system. To enable any of the request types outlined in this section on your Secure Trading Payment Pages account, please contact Secure Trading support (see section 14.1 Secure Trading Support). Please note that Subscriptions require additional fields to be submitted in order to be scheduled in the Secure Trading Subscription Engine. For further information, please refer to the STPP Subscriptions and Payment Pages document. Please note that Currency Rate Requests may require additional fields to be submitted in order to process currency conversions. Please see section 7.5.4 Configuration, for further information. For advanced functionality, Secure Trading offer an Enhanced Post feature, which allows you to specify which request types are processed for individual transactions through the Payment Pages. For further information, see section 9 Enhanced Post. © Secure Trading Limited 2015 28 January 2015 Page 51 / 68 Payment Pages Setup Guide 8 Customisation Secure Trading allows merchants to customise their Payment Pages solution by uploading files to their account using MyST and modifying the HTTPS POST to reference these files. Merchant’s Payment Pages are called. Custom files are called to restyle the Payment Pages. Customised Payment Pages are displayed to the customer. The steps required to customise the Payment Pages can be found in the Payment Pages Customisation document. This supplement can be downloaded from the following URL: http://www.securetrading.com/files/documentation/STPP-Payment-PagesCustomisation.pdf © Secure Trading Limited 2015 28 January 2015 Page 52 / 68 Payment Pages Setup Guide 9 Enhanced Post Secure Trading allows for customisation of processed request types that are posted through the Payment Pages. A standard Payment Pages transaction consists of an Authorisation (AUTH) Request, which can be accompanied by any of the additional request types described in section 7 Additional Request Types. However, with Enhanced Post enabled on your account, you are able to choose to process combinations of specific request types by specifying the fields passed through in each HTTP Post. Please note that to ONLY process a RISKDEC or ACCOUNTCHECK Request through the Payment Pages, without an associated AUTH, you must use the Enhanced Post feature. 9.1 Getting Started Secure Trading recommends that you read section 3 Posting Information on page 14, before reading this section as it contains additional information which is relevant to this section. To perform an Enhanced Post, you must first contact Secure Trading support (see section 14.1 Secure Trading Support on page 68) to enable this functionality, and to specify all the request types you would like your site to be able to process. You can choose from the following: Request Type AUTH RISKDEC ACCOUNTCHECK THREEDQUERY** SUBSCRIPTION** CURRENCYRATE** ORDER** ORDERDETAILS** Description An Authorisation Request for a payment from a customer. A Risk Decision Request, to check for suspicious activity relating to the customer’s account (see section 7.1 Risk Decision). An Account Check Request, to check the status of the customer’s account (see section 7.2 Account Check). A 3-D Query Request, to perform 3-D Secure on the customer’s account, if they are enrolled (see section 7.3 3-D Secure). A Subscription Request, where payments will be processed automatically at pre-specified intervals (see section 7.4 Subscription). A Currency Rate Request, to perform currency conversion between two different currencies (see section 7.5 Currency Rate). An Order Request, used to initiate a payment using PayPal. Required when offering PayPal as a payment option An Order Details Request, used to retrieve updated information about the transaction from PayPal after the customer has logged in and confirmed the payment (optional). See section 9.3 for more information. ** THREEDQUERY, SUBSCRIPTION, CURRENCYRATE, ORDER and ORDERDETAILS Requests must be submitted with an accompanying AUTH Request. © Secure Trading Limited 2015 28 January 2015 Page 53 / 68 Payment Pages Setup Guide 9.2 Sending an Enhanced Post Request Once Secure Trading has enabled Enhanced Post and any combination of the aforementioned request types on your site, you can use Enhanced Post on a payment page by passing a standard HTTP POST to the Payment Pages, with the required fields (included in the examples that follow and detailed in section 4.1 Required Fields), and the Enhanced Post field(s), called “requesttypedescriptions”. Please note that the Enhanced Post fields are not mandatory, but when they are not submitted, an AUTH Request will always occur, amongst all other request types enabled for your site, as the default behaviour. To set up a POST to the Payment Pages, create a form on your webserver that will submit the required fields, along with fields called “requesttypedescriptions” and the values of the request types you would like to be processed for the customer. The following HTML examples will render a webpage with a button that will direct the customer to your site’s payment page. The requesttypedescriptions field is highlighted in bold. 9.2.1.1 Example of sending an AUTH with Enhanced Post This request will process an AUTH request using the payment details entered. <html> <head> </head> <body> <form method="POST" action="https://payments.securetrading.net/process/payments/choice"> <input type="hidden" name="sitereference" value="test_site12345"> <input type="hidden" name="currencyiso3a" value="USD"> <input type="hidden" name="mainamount" value="100.00"> <input type="hidden" name="version" value="1"> <input type="hidden" name="requesttypedescriptions" value="AUTH"> <input type="submit" value="Pay"> </form> </body> </html> 9.2.1.2 Example of sending an ACCOUNTCHECK with Enhanced Post This request will ONLY process an ACCOUNTCHECK request using the payment details entered. <html> <head> </head> <body> <form method="POST" action="https://payments.securetrading.net/process/payments/choice"> <input type="hidden" name="sitereference" value="test_site12345"> <input type="hidden" name="currencyiso3a" value="USD"> <input type="hidden" name="mainamount" value="100.00"> <input type="hidden" name="version" value="1"> <input type="hidden" name="requesttypedescriptions" value="ACCOUNTCHECK"> <input type="submit" value="Pay"> </form> </body> </html> © Secure Trading Limited 2015 28 January 2015 Page 54 / 68 Payment Pages Setup Guide 9.2.1.3 Example of sending an AUTH and ACCOUNTCHECK with Enhanced Post This request will process an ACCOUNTCHECK and an AUTH request with the payment details entered. <html> <head> </head> <body> <form method="POST" action="https://payments.securetrading.net/process/payments/choice"> <input type="hidden" name="sitereference" value="test_site12345"> <input type="hidden" name="currencyiso3a" value="USD"> <input type="hidden" name="mainamount" value="100.00"> <input type="hidden" name="version" value="1"> <input type="hidden" name="requesttypedescriptions" value="AUTH"> <input type="hidden" name="requesttypedescriptions" value="ACCOUNTCHECK"> <input type="submit" value="Pay"> </form> </body> </html> 9.2.2 The result of the POST The page displayed to customers following an HTTP Post for an Enhanced Post is the same as for a regular Payment Pages transaction. Please refer to section 3.2 The result of the POST for more information. 9.2.3 Request Sequence If multiple request types are sent in a single Enhanced Post request, they are always processed in a specific order defined by Secure Trading; regardless of the order the request types are submitted. This order is as follows: Order (starting from 1) 1 2 3 4 5 6 7 8 © Secure Trading Limited 2015 Request Type CURRENCYRATE RISKDEC ACCOUNTCHECK ORDER THREEDQUERY ORDERDETAILS AUTH SUBSCRIPTION 28 January 2015 Page 55 / 68 Payment Pages Setup Guide 9.2.4 Request Priority With the enhanced POST feature, there are priorities that are assigned to certain request types. Request types are classed as High-Priority if they are required in order to transfer funds and Low-Priority if they are NOT able to directly transfer funds, as shown in the table, below: Request Type(s) AUTH SUBSCRIPTIONS ACCOUNTCHECK CURRENCYRATE ORDER ORDERDETAILS RISKDEC THREEDQUERY Priority HIGH LOW If a SINGLE (e.g. AUTH) High-Priority request type is sent, then the payment methods shown are ones that are able to process the high priority request. If MULTIPLE (e.g. AUTH and SUBSCRIPTION) High-Priority request types are sent in a single request, then the payment methods shown will be those that can perform both request types (e.g. Maestro which cannot perform SUBSCRIPTIONS will not be shown) If a High-Priority (e.g. AUTH) request type is sent along with a Low-Priority (e.g. ACCOUNTCHECK) request type in a single request, then the High-Priority request takes precedence over the Low-Priority. Only the payment types that are able to process the HighPriority request will be shown to the customer(s) (even though they may not be able to process the Low-Priority request). If a SINGLE Low-Priority (e.g. ACCOUNTCHECK) request type is sent on its own, this behaves the same as a High-Priority request, and displays all payment types that are able to process that request type. If MULTIPLE Low-Priority (e.g. ACCOUNTCHECK and RISKDEC) request types are sent in a single request, then the payment methods shown will be those that can perform both request types. © Secure Trading Limited 2015 28 January 2015 Page 56 / 68 Payment Pages Setup Guide 9.3 PayPal and Enhanced Post When offering PayPal as a choice on your Payment Pages solution, you are required to include requesttypedescriptions for both ORDER and AUTH in the HTTP POST. Your system can optionally include requesttypedescriptions for ORDERDETAILS, as highlighted in the example, below. The inclusion of the ORDERDETAILS field affects the transaction performed as following: Including ORDERDETAILS Not including ORDERDETAILS Secure Trading will contact PayPal after the customer has returned to the Payment Pages, and retrieve billing details the customer opted to use while on PayPal’s checkout pages for the authorisation request. Secure Trading will not contact PayPal after the customer has returned to the Payment Pages, and will instead only record billing details passed to Secure Trading in the HTTP POST. The customer may alter these details while on PayPal’s checkout pages, but these changes will not be reflected in the authorisation request. <html> <head> </head> <body> <form method="POST" action="https://payments.securetrading.net/process/payments/choice"> <input type="hidden" name="sitereference" value="test_site12345"> <input type="hidden" name="currencyiso3a" value="USD"> <input type="hidden" name="mainamount" value="100.00"> <input type="hidden" name="version" value="1"> <input type="hidden" name="requesttypedescriptions" value="ORDER"> <input type="hidden" name="requesttypedescriptions" value="ORDERDETAILS"> <input type="hidden" name="requesttypedescriptions" value="AUTH"> <input type="submit" value="Pay"> </form> </body> </html> © Secure Trading Limited 2015 28 January 2015 Page 57 / 68 Payment Pages Setup Guide 9.4 Subscriptions and Enhanced Post To process Subscriptions through the Payment Pages, you must always provide the Subscription-specific fields outlined in the STPP Subscriptions and Payment Pages document (see section 14.3 Useful Documents). When using Subscriptions with Enhanced Post you must also include requesttypedescriptions for an AUTH and SUBSCRIPTION in the HTTP Post, as shown in the following example: <html> <head> </head> <body> <form method="POST" action="https://payments.securetrading.net/process/payments/choice"> <input type="hidden" name="sitereference" value="test_site12345"> <input type="hidden" name="currencyiso3a" value="USD"> <input type="hidden" name="mainamount" value="100.00"> <input type="hidden" name="version" value="1"> <input type="hidden" name="requesttypedescriptions" value="AUTH"> <input type="hidden" name="subscriptionunit" value="DAY"> <input type="hidden" name="subscriptionfrequency" value="1"> <input type="hidden" name="subscriptionfinalnumber" value="5"> <input type="hidden" name="subscriptiontype" value="RECURRING"> <input type="hidden" name="subscriptionbegindate" value="2013-04-30"> <input type="hidden" name="requesttypedescriptions" value="SUBSCRIPTION"> <input type="submit" value="Pay"> </form> </body> </html> Please note that Subscriptions require the additional Subscription fields (shown above) to be submitted in order to be scheduled in the Secure Trading Subscription Engine. For more information, please refer to the STPP Subscriptions and Payment Pages (see section 14.3 Useful Documents on page 68). © Secure Trading Limited 2015 28 January 2015 Page 58 / 68 Payment Pages Setup Guide 10 iframe Secure Trading allows you to display your payment page within an iframe. This enables you to display the payment page within the layout of your website. This section of the document outlines how you could set up your payment page within an iframe. The screenshot below is an example of how the iframe would look. It is imperative that all web pages on your site are encrypted using Secure Socket Layer (SSL) to ensure correct functionality of iframes across all browsers. Figure 22 - Payment Page in iframe Please note that iframes may not be rendered correctly in certain web browsers (e.g. certain mobile web browsers). Please note that PayPal cannot currently be integrated within an iframe. © Secure Trading Limited 2015 28 January 2015 Page 59 / 68 Payment Pages Setup Guide 10.1 Configuring your Website In order to include the iframe within your website, you need to include a line similar to the example below within the HTML on your page: <iframe src="https://payments.securetrading.net /process/payments/choice?sitereference= test_site12345&mainamount=10.00¤cyiso3a=GBP&version=1" width="100%" height="600" scrolling="auto" style="border:0px;"></iframe> The example above includes the minimum required fields needed in the link (highlighted in bold). For more information on these fields, or additional fields that can be included, please refer to section 4 Allowed Fields on page 24. 10.2 Changing the appearance of the iframe By following the instructions outlined in section 10.1, the standard payment page is included within your webpage. You can format the payment page to be displayed in a more iframefriendly way, by modifying the CSS (see section 8 Customisation on page 52). Figure 23 – Billing details in iframe © Secure Trading Limited 2015 28 January 2015 Page 60 / 68 Payment Pages Setup Guide It is possible to use CSS to customise which fields are shown within the iFrame. As can be seen below, the delivery and Customer fields have been hidden, in order to ensure the payment details are visible within the iframe. The information from the omitted fields is still passed through the system if they were submitted from the merchant’s website. Figure 24 – Payment details in iframe, using CSS © Secure Trading Limited 2015 28 January 2015 Page 61 / 68 Payment Pages Setup Guide 11 Google Analytics Google Analytics allow you to track users and monitor activity on your site. 11.1 Using Google Analytics Tracking Code Google Analytics can be used with STPP Payment Pages by using custom JavaScript code. Follow the example below to use this feature. Step 1: Creating the JavaScript Upload a file using the MyST File Manager called analytics.js containing the following code: // Adding Google Analytics to SecureTrading Payment Pages. var _gaq = _gaq || []; _gaq.push(['_setAccount', 'UA-XXXXX-X']); _gaq.push(['_trackPageview']); (function() { var ga = document.createElement('script'); ga.type = 'text/javascript'; ga.async = true; ga.src = ('https:' == document.location.protocol ? 'https://ssl' : 'http://www') + '.google-analytics.com/ga.js'; var s = document.getElementsByTagName('script')[0]; s.parentNode.insertBefore(ga, s); })(); Figure 25 JavaScript for Google Analytics Replace the text marked in bold, “UA-XXXXX-X” to be your Google Analytics web property ID. Please note for more information on the MyST File Manager, please refer to the STPP MyST User Guide (see section 14.3 Useful Documents) for more information. © Secure Trading Limited 2015 28 January 2015 Page 62 / 68 Payment Pages Setup Guide Step 2: Reference the JavaScript In your request to the Payment Pages, add the parameter childjs with the value “analytics”. The below example references the analytics.js file uploaded above. <html> <head> </head> <body> <!--YOUR HTML--> <form method="POST" action="https://payments.securetrading.net/process/payments/choice"> <input type="hidden" name="sitereference" value="test_site12345"> <input type="hidden" name="currencyiso3a" value="USD"> <input type="hidden" name="mainamount" value="100.00"> <input type="hidden" name="version" value="1"> <input type="hidden" name="orderreference" value="myorder12345"> <input type="hidden" name="childjs" value="analytics"> <input type="submit" value="Pay"> </form> </body> </html> Please note that when submitting the JavaScript filename, the file extension “.js” should not be included. Please note that Google Analytics will set cookies on the customer’s browser. For more information on Google Analytics, visit http://www.google.com/analytics/index.html. 11.2 Google Analytics and Ecommerce Tracking You can use Google Analytics and Ecommerce Tracking to link a specific referral source to payments made through your STPP Payment Pages. As the Ecommerce Tracking feature needs a completed transaction, the code should be added to your redirect pages (see Redirect To Merchant’s Website in section 2.2 Payment Pages Standard Authorisation), not the payment page itself. For more information on Google Analytics and Ecommerce tracking, https://developers.google.com/analytics/devguides/collection/gajs/gaTrackingEcommerce © Secure Trading Limited 2015 28 January 2015 visit Page 63 / 68 Payment Pages Setup Guide 12 Going Live 12.1 Notifications and Redirects for Live Site Reference When you are ready to switch your account live, you will need to consider any notifications and redirects that may have been configured on your test site reference, as these will need to be reconfigured on your live site reference to ensure they update your system as expected. 12.2 Contact Secure Trading Once you have tested your system and you are ready to go live, please send an email to [email protected] with your site reference and request to go live. You will receive a response when your live site is ready to begin processing payments. 12.3 Change your website The POST will need to be updated to use your live site reference. This is done by modifying the sitereference field submitted to Secure Trading. For the example outlined in section 3.1 Configuring the HTTP POST, the change is outlined below (please note the data changed is marked in bold): <html> <head> </head> <body> <form method="POST" action="https://payments.securetrading.net/process/payments/choice"> <input type="hidden" name="sitereference" value="site12346"> <input type="hidden" name="currencyiso3a" value="GBP"> <input type="hidden" name="mainamount" value="100.00"> <input type="hidden" name="version" value="1"> <input type="submit" value="Pay"> </form> </body> </html> The appearance of the button on the page or the page the customer is transferred to would be exactly the same as on your test site, but now that the live site reference has been used, the account will process transactions to your acquiring bank. 12.4 Live testing Once you have switched to your live account, Secure Trading recommend that you perform a test transaction using a live card to ensure the transaction is processed as expected. You can sign in to MyST to manage your transactions. Therefore you can cancel transactions processed on live cards. Please note that you should not use the same live card too many times, as the requests will still be authorised, and could cause the issuer to suspect fraud or the cardholder could exceed their limit. © Secure Trading Limited 2015 28 January 2015 Page 64 / 68 Payment Pages Setup Guide 13 Testing 13.1 Testing Authorisation During integration testing, the following test card details can be used. It should be noted that these are TEST card details, and will not return the expected responses in a LIVE environment. Name of payment type American Express Diners Discover JCB Maestro MasterCard MasterCard Debit V PAY Visa Visa Debit Visa Electron Visa Purchasing Payment type field Authorisation Decline AMEX DINERS DISCOVER JCB MAESTRO MASTERCARD MASTERCARDDEBIT VPAY VISA DELTA ELECTRON PURCHASING 340000000000611 3000000000000111 6011000000000301 3528000000000411 5000000000000611 5100000000000511 5124990000000101 4370000000000061 4111110000000211 4310720000000091 4245190000000311 4484000000000411 340000000000512 3000000000000012 6011000000000202 3528000000000312 5000000000000512 5100000000000412 5124990000000002 4370000000000012 4111110000000112 4310720000000042 4245190000000212 4484000000000312 For these cards, when performing tests, the tester needs to input an expiry date that is in the future in order for the transactions to be authorised by Secure Trading’s fake bank. A main amount of 700.00 will always return a declined response for a test account. A main amount of 600.10 will always return a bank system error for a test account. © Secure Trading Limited 2015 28 January 2015 Page 65 / 68 Payment Pages Setup Guide 13.2 Address Verification (AVS) and Security Code Checks The following tables list test details that can be submitted to obtain different responses from the address verification (AVS) and security code checks. This information can be used with any of the card numbers included in section 13.1 Testing Authorisation, above. Please note that only the billing premise, billing postcode and security code fields dictate the outcome of the AVS and CVV2 checks performed. As such, entering any details into the other address fields will not affect the outcome of the AVS and CVV2 checks. 13.2.1 Premise Billing Premise No 789 No 123 No 333 Leave blank 13.2.2 Security Response Caption Matched Not Matched Not Checked Not Given Security Response Security Response Caption 2 4 1 0 Matched Not Matched Not Checked Not Given Security Response 2 4 1 0 Security Response Caption Matched Not Matched Not Checked Not Given Postcode / ZIP Code UK Billing Postcode TE45 6ST TE12 3ST TE33 3ST Leave blank 13.2.3 Security Response 2 4 1 0 US Billing Postcode 55555 12345 33333 Leave blank Security code Security Code 123 214 333 Leave blank AMEX Security Code 1234 2144 3333 Leave blank © Secure Trading Limited 2015 28 January 2015 Page 66 / 68 Payment Pages Setup Guide 13.3 Testing Fraud Control The following main amounts can be submitted to the Payment Pages request to test the different Fraud Control – Risk Decision responses: Risk Decision Response ACCEPT DENY CHALLENGE 13.4 Main Amount 11.11 11.22 11.33 Testing Account Check If you wish to test an Account Check request, then you can use any of the card numbers included in section 13.1 Testing Authorisation. You can also test the Security Code and Address Verification System by using the Security Code, Address and Postcode details supplied in section 13.2. This is only available for some Acquiring Banks. Please contact Secure Trading Support (see section 14.1 Secure Trading Support). 13.5 Testing Currency Rate During your integration, you can use the following international test card details in order to test your system for successful DCC transactions. Currency GBP EUR USD JPY CHF HKD 13.5.1 VISA 4300 0000 0000 2211 4500 0000 0000 0007 4111 1111 1111 1111 MasterCard 5311 1100 0000 1511 5500 0000 0000 0004 5400 0000 0000 1011 5100 0000 0000 2111 4600 0000 0000 0006 4130 0000 0000 1011 Maestro 6759 0000 0000 0711 5000 0000 0000 0611 5600 0000 0000 0001 Testing DCC The card numbers above are associated with specific local currencies. When performing DCC (as described in section 7.5 on page 44) and using a card with a currency that is different to the merchant’s currency, the amount in both the customer’s local currency and the merchant’s currency are returned to the customer. These are shown as two options to choose between before processing the test Authorisation Request. © Secure Trading Limited 2015 28 January 2015 Page 67 / 68 Payment Pages Setup Guide 14 Further Information and Support This section provides useful information with regards to documentation and support for the Merchant’s Secure Trading solution. 14.1 Secure Trading Support If you have any questions regarding integration or maintenance of the system, please contact our support team using one of the following methods. Method Telephone Fax Email Website 14.2 Details +44 (0) 1248 672 050 +44 (0) 1248 672 099 [email protected] http://www.securetrading.com/support/support.html Secure Trading Sales If you do not have an account with Secure Trading, please contact our Sales team and they will inform you of the benefits of a Secure Trading account. Method Telephone Telephone (Int’l) Fax Email Website 14.3 Details 0800 028 9151 +44 (0) 1248 672 070 +44 (0) 1248 672 079 [email protected] http://www.securetrading.com Useful Documents The documents listed below should be read in conjunction with this document: STTP MyST User Guide – This document outlines how to use MyST to monitor your transactions and manage your account. STPP XML Specification – This defines the XML that is submitted in requests to Secure Trading via STAPI and Web Services, for AUTH, ACCOUNTCHECK and REFUND Requests. XML Reference 3-D Secure – This document outlines how to process a 3-D Secure transaction. STPP Subscriptions and Payment Pages – This document outlines how to process Subscriptions through the Payment Pages. STPP AVS & CVV2 – This document describes the checks performed on the address and security code submitted by the customer. STPP Notifications – This document outlines how to configure notifications for events that occur on your Secure Trading account. Payment Pages Customisation – This document outlines how to customise your Payment Pages using CSS and JavaScript. Any other document regarding the STPP system can be found on Secure Trading’s website (http://www.securetrading.com). Alternatively, please contact our support team as outlined above. 14.4 Frequently Asked Questions Please visit the FAQ section on our website (http://www.securetrading.com/support/faq). © Secure Trading Limited 2015 28 January 2015 Page 68 / 68
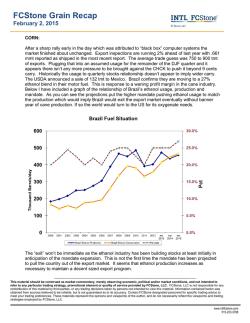


© Copyright 2026