
Capnovet-10 Operating Manual
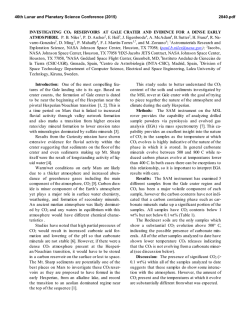
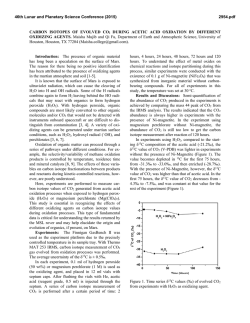
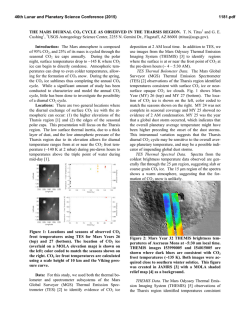
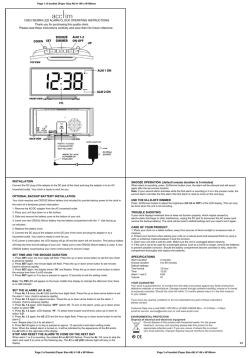
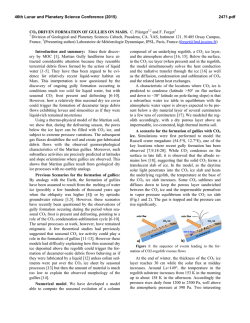
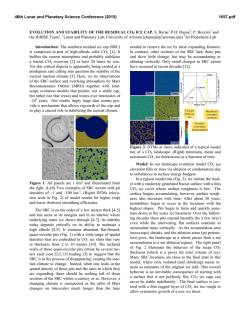
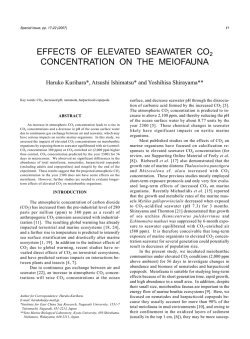
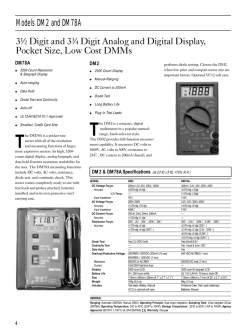
The Capnovet- 10 by Vetronic Services Ltd
Contents page
Introduction to the Capnovet-10…………………………………….. 2
Overview and Main Working parts…………………………………... 3
Capnovet- 10 IMPORTANT NOTICE…………………………………4
Using the Capnovet-10 for the first time……………………………. .5
Screen Display in Time-capnogram mode………………………….. 5
Screen symbols, Time-Capnogram mode……………………………5
Symbol descriptions – Time-Capnogram mode……………………. .5, 6, 7
Screen Display in Bargraph mode……………………………………. 7
Screen symbols, Bargraph mode……………………………………. .8
Symbol descriptions – Bargraph mode…………………………… ….8
The SETUP options …………………………………………………… 9, 10
Changing the SETUP options………………………………………… 10, 11
Setting the Alarms…………………………………………………….. .12
Connecting the Capnovet-10 to a patient…………………………….13
Changing the screen mode…………………………………………….13
Changing the Sweep Speed………………………………………… 13
Responding to alarms…………………………………………………..14
Recharging the internal batteries………………………………………14
Capnovet-10 recalibration………………………………………………14
User Calibration………………………………………………….. ……..15
Factory Calibration……………………………………………………....16
Appendix A……………………………………………………………….17
Section1: Using the Capnovet- 10
Page 1 of 18
Introduction to the Capnovet-10
The Capnovet-10 is a new, microprocessor-controlled, hand-held Carbon Dioxide
monitoring device designed to monitor the end-tidal CO2 values of veterinary
patients. Using side-stream technology the Capnovet-10 is suitable for a range of
patients from a few hundred grammes upwards. The Capnovet-10 has two
distinct modes for displaying the information. In the first mode the end-tidal value
is shown as a numeric value and the real time CO2 values are plotted as a timecapnogram. In the second mode the end-tidal value is again shown as a numeric
value but the real time CO2 values are shown as a bargraph display. In both
modes the respiratory rate is also displayed in breaths per minute. The
Capnovet-10 has some unique features, which are configurable by the user. The
sweep speed across the screen of the time-capnogram can be altered to suit the
respiratory rate of the patient being monitored. There are 5 sweep speeds, which
can be changed simply and quickly by the user. Also selectable by the user is the
gas withdrawal rate or sampling rate. For gas to be analysed in a side-stream
device it is sucked down a small tube to the main unit. For very small animals this
can start to be a problem when the gas being withdrawn approaches the tidal
volume of the patient. In the Capnovet-10 this sampling rate can be altered to
suit the patient. Three sampling rates can be selected and these are 50ml, 100ml
and 200ml per minute. Further features of the Capnovet-10 are the ability to set
alarms for high and low CO2 settings, alarms for Apnoea time and the option to
display CO2 units in millimetres of mercury or as a percentage.
With rechargeable batteries the Capnovet-10 is suitable for outdoor use or preproom use as well as main theatre use.
Section1: Using the Capnovet- 10
Page 2 of 18
Overview
Display Screen
Main working parts
Battery Re-charging port
NEXT Switch
Standard sensor housing
CHANGE Switch
ON/OFF Switch
How It Works
The Capnovet-10 continuously draws a small sample of gas from the airway
attached to the patient and measures the carbon dioxide content of it by an
optical means inside the unit. Gas that has been sampled is pumped out of the
unit and may be returned to the anaesthetic circuit or vented in the normal way.
The capnograph continuously measures the CO2 content of the airway looking
for a maximum value. When the patient starts to breathe in again the maximum
found CO2 value is shown on the screen. This is the peak end-tidal CO2 value
and will remain unchanged until the next breath is measured. At the same time,
the screen also shows the instantaneous result of the measurements either as a
time-based waveform (time-capnogram) or as a CO2-based bargraph. In this way
it is possible to monitor not only the end-tidal value but also the waveform during
the expiratory/inspiratory phase. This waveform can provide important
information on patient status. The concentration of inspired CO2 is also shown on
the display.
IMPORTANT
Because the Capnovet-10 continuously sucks air into the sensing chamber
it is very important that contaminants such as dust or fluid are not allowed
to enter the unit. For this reason external filters are fitted to the unit to trap
fluid and particles. Under no circumstances operate the Capnovet-10 unit
without these filters in place. If fluid or particles enter the sensor unit it will
cease to function and require cleaning and calibration by the manufacturer.
This is not covered by the guarantee.
Section1: Using the Capnovet- 10
Page 3 of 18
CAPNOVET-10 IMPORTANT NOTE
Like all sidestream devices, the Capnovet-10 sucks expired gases into the
detecting chamber within the instrument. For this reason sidestream devices are
susceptible to moisture and other liquid contaminants and must NEVER be
operated without an in-line filter. If a filter becomes blocked with repeated use or
with saliva then it should be replaced. These filters can then be flushed gently
with sterile saline and left to dry. Once dry they can be re-used.
The simplest way to avoid moisture contamination is to position the filter vertically
above the airway so that moisture/fluid cannot drip into it.
Remember, if moisture enters the unit it will probably be
necessary to return it to us for a complete recalibration.
This is not covered by the guarantee and will cost
approximately £200 + VAT.
Using the Capnovet-10 for the first time
Remove the Capnovet-10 from its packing and connect the sampling tubes to the
main unit by mating the male luer-lock fittings with the fittings on the back of the
unit. One pipe leads to the scavenging circuit and one pipe leads to the sensor
unit. The sensor portion has 15mm (male & female) connectors either end to fit in
line with a standard ET tube or into a face mask.
Press the ON/OFF button and a screen appears with some date information and
the option to enter the SETUP menu by pressing the CHANGE button. If the
CHANGE button is not pressed then the unit will wait 8 seconds (while
initialisation and calibration occurs) before going straight into monitoring mode.
The unit will then show a monitoring screen, either in time-capnogram mode or
bargraph mode.
Section1: Using the Capnovet- 10
Page 4 of 18
TIME-CAPNOGRAM MODE
Screen display in Time-Capnogram mode
1
2
3
4
5
In time-capnogram mode there are two elements to the screen. The main portion
of the screen shows the actual capnogram trace running from left to right and the
right hand portion of the screen shows the respiratory rate in breaths per minute
and the end-tidal CO2 and Inspired CO2 values in either mmHg or %.
Screen symbols, time-capnogram mode
1
2
3
4
5
Battery symbol
Screen sweep speed
Respiratory rate in breaths per minute
End-tidal and Inspired CO2 value in mmHg or %
Free-running time capnogram
Symbol descriptions – Time-Capnogram mode
1. Battery symbols / blocked pump
This symbol provides continuous feedback on the battery status. When the
battery is fully charged the battery icon will appear filled in. As the battery
discharges the battery icon will empty. The Capnovet-10 needs recharging when
the battery icon appears empty as in the third icon above.
Section1: Using the Capnovet- 10
Page 5 of 18
This symbol appears when the inlet or outlet to the pump is blocked and normal
function is interrupted. Once the blockage is removed the normal battery symbol
will return within 5-10 seconds. Readings from the unit are unreliable whilst this
symbol is active.
2. Screen Sweep speed
This symbol shows the selected sweep speed for the display.
e.g. Sweep: 2 x
There are 5 sweep speeds selectable from 1 - 5. These equate to screen sweep
speeds of 1,2,4,8 and 16 mm/second respectively. To change the screen sweep
speed press the CHANGE button once, this will change to the next fastest sweep
speed. Once speed 5 is reached the next key press will select speed 1 and the
process will repeat. Select the sweep speed that is most consistent with the
respiratory rate and visualisation of the time-capnogram.
3. Respiratory rate in breaths per minute
This value appears to the right and below the letters BPM. The respiratory rate is
continuously updated with every breath. If after 15 seconds there has been no
breath then the display will change – the word APNOEA will replace BPM and a
reverse-video (light on dark) counter will begin counting seconds of apnoea. The
reverse-video is to avoid confusion between a respiratory rate and an apnoea
time.
e.g.
BPM
APNOEA
23
23
Respiratory rate is 23
breaths per minute
Patient has not breathed
for 23 seconds
4. End tidal and Inspired CO2 value
a) ET Value
To the right of the screen and below the CO2 % is a value, which is the last
measured end-tidal CO2 value expressed as a percentage. If mmHg are selected
as the units of end-tidal CO2 then the value will appear under the text CO2 mmHg.
Section1: Using the Capnovet- 10
Page 6 of 18
b) IN Value
Below the End-Tidal value is another value in the same units. This is the inspired
CO2 level, which will normally read at or around zero - 0.0
5. Free-running time- capnogram.
The main area of the screen is bounded by two graticular scales between which
is a graphical display of the time-capnogram. Each gradation on the scale
approximates to 1% CO2 (8mmHg). The display continuously sweeps from the
left hand side to the right hand side at a rate determined by the screen sweep
speed (see above). An increase in the measured CO2 is shown as an increase in
height of the time-capnogram.
Switching between Time-Capnogram mode and Bargraph mode
To switch from one screen to the other simply press the NEXT button from either
screen.
BARGRAPH MODE
Screen display in Bargraph mode:
1
3
2
4
5
In bargraph mode the CO2 representation is shown by a thin solid bargraph at
the bottom of the screen. This bargraph is a real-time measure of the CO2 value
and will rise and fall with exhalation/inspiration. To the right of the screen at the
bottom is the reported end-tidal CO2 value for the last breath. At the top of the
screen is another bargraph, which is a measure of the breaths per minute for the
patient. The actual value of breaths per minute is shown to the right of this
bargraph at the top right.
Section1: Using the Capnovet- 10
Page 7 of 18
Screen symbols – Bargraph mode
1
2
3
4
5
Breaths per minute legend
Breaths per minute bargraph
Respiratory rate in breaths per minute
End-tidal and Inspired CO2 values
Free-running CO2 bargraph
Symbol descriptions – Bargraph mode
1. Breaths per minute legend – BPM
2. Breaths per minute bargraph
This hashed bargraph is a representation of the breathing rate of the
patient. The full extent of the bargraph represents a breathing rate of 120
breaths per minute. Hence a respiratory rate of around 60 breaths per
minute will appear as a bargraph of half the screen width.
3. Respiratory rate in breaths per minute
Appearing above the Breaths per Minute bargraph is a numerical value for
the actual breaths per minute. After a period of apnoea for 15 seconds or
the duration of the active apnoea alarm (whichever is the shorter) the
apnoea time in seconds will replace the respiratory rate. This apnoea time
is shown in reverse-video (light on dark) to avoid confusion with a
respiratory rate.
4. End-tidal and Inspired CO2 values
On the bottom right of the screen is a value for the last measured end-tidal
CO2 value and the Inspired CO2 value. Depending on the units selected
(see SETUP) this will either be in mmHg or as a percentage value. The
End-Tidal value is updated at the end of every breath and the Inspired
value at the beginning of every breath. These values will return to zero
after 15 seconds of apnoea.
5. Free running CO2 bargraph
This solid bargraph display shows the instantaneous CO2 value on a scale
from zero to full scale, where full scale is either 10% or 76mmHg.
Section1: Using the Capnovet- 10
Page 8 of 18
SETUP Options
The SETUP screen
To enter SETUP mode press the CHANGE key at turn-on. If the unit is already
ON you will need to turn the unit OFF and back ON again to enter SETUP mode.
The SETUP screen
SETUP options
There are two SETUP screens, a Quick Setup and an Advanced Setup.
Quick Setup
Backlight - Options: ON, OFF.
Turns the LCD screen backlight ON or OFF. Having the backlight
ON will improve readability but will reduce the working battery life
between re-charges.
Sound - Options: OFF, SHORT, LONG
Selects the audible beep option. Selecting OFF produces no beep
on detection of a breath. SHORT gives a short low-pitched beep,
LONG gives a longer higher-pitched beep.
Pump – Options: LOW, MEDIUM, HIGH
Selects the withdrawal rate of gas for sampling. Sampling rates
may vary slightly but the target rates are as follows.
LOW – 50ml/minute
MEDIUM – 100ml/minute
HIGH 200 ml/minute
CO2 Unit – Options: % or mmHg
Selects the units to display CO2 values in.
Section1: Using the Capnovet- 10
Page 9 of 18
Advanced Setup
Hi ETCO2 – Options: OFF, CO2 values from 0.1% to 10%, or 1mmHg to
76mmHg. The value of the HIGH ET CO2 alarm.
LowETCO2 – Options: OFF, CO2 values from 0.1% to 10%, or 1mmHg to
76mmHg. The value of the LOW ET CO2 alarm.
ET Avg – The End-Tidal CO2 value can be instantaneous or averaged over 4 or
8 breaths. 4 is the default setting and gives a smooth continuous readout
Apnoea – Options: OFF, 5 seconds to 60 seconds of apnoea time.
The allowed period of apnoea before the alarm sounds
Changing the SETUP options
To change any value, scroll down to the appropriate setting using the NEXT
button and then select the required option using the CHANGE button. Once all
the selections have been made scroll down to the OK option (using the NEXT
button) and then press CHANGE to record all the changes made. If at any time
you wish to abort the changes made, either scroll down to the CANCEL option or
turn the unit OFF. To move between Quick Setup and Advanced Setup scroll to
either Next or Prev and press the CHANGE button.
Setting the Backlight option
The unit may be operated with the internal screen backlight either ON or OFF.
With the backlight ON the screen may be more readable in dim light. With the
backlight ON the operating time of the unit is reduced as the backlight consumes
appreciable battery power. In normal well-lit rooms turn the backlight OFF to
save power. To change whether the backlight is ON or OFF go into SETUP
mode by pressing the CHANGE button after the unit has just been turned ON.
The first option indicated by the right-pointing arrow is the Backlight option.
Pressing the CHANGE button now will toggle the setting between ON and OFF.
Once the selection has been made, scroll down to OK at the bottom of the
screen and press CHANGE to exit and save the changes.
Section1: Using the Capnovet- 10
Page 10 of 18
Changing the Sound option
During patient monitoring each breath can be marked by a beep, which can be a
high or low pitch or the beeps may be turned OFF. To change the respiratory
beep settings go into SETUP mode by pressing the CHANGE button after the
unit has just been turned ON. Use the NEXT button to scroll down to ‘Sound’.
Pressing the CHANGE button will iterate through the options of OFF, SHORT or
LONG. Choose the required option and then scroll down to OK at the bottom of
the screen and press CHANGE to exit and save the changes.
Changing the Pump option
The Capnovert-10 can be set up to withdraw 50ml, 100ml or 200ml per minute
from the patient’s airway. In any side-stream system there is a trade-off between
sampling rate and signal quality. With more gas presented to the sensor the
better the signal quality will be. However for smaller patients the higher
withdrawal rates may represent samples that start to approach the tidal volume
of the patient itself. In these circumstances gas in the expiratory limb will be
pulled into the unit mixing with the exhaled gas and giving a falsely depressed
reading. For these patients a low sampling rate will give a better end-tidal value
at the expense of a slightly rounded waveform.
To change the pump value go into SETUP mode by pressing the CHANGE
button just after the unit has been turned ON. Scroll down to the Pump option
using the NEXT button. Pressing the CHANGE button will now iterate between
LOW, MEDIUM and HIGH, representing the 50, 100 and 200 ml per minute
sampling rates respectively. When the rate has been selected, scroll down to OK
using the NEXT button and press CHANGE to exit and save the changes.
Changing the CO2 units
The value for the end-tidal CO2 can be expressed either as a percentage or in
millimetres of mercury (see Appendix A for conversions). To change the CO2
units, go into SETUP mode by pressing the CHANGE button just after the unit
has been turned ON. Scroll down to the CO2 option and press the NEXT button
to iterate between % and mm Hg. When the selection has been made scroll
down to OK using the NEXT button and press CHANGE to exit and save the
changes.
Please note that when changing between CO2 units the alarm values for
mmHg and %CO2 are independent of each other and need to be set
explicitly for the units selected.
Section1: Using the Capnovet- 10
Page 11 of 18
Setting the Alarms
TO set an alarm, turn the unit ON and immediately press the CHANGE button.
The SETUP screen appears. Using the NEXT button scroll down to the alarm
parameter that you want to change.
Setting an upper limit for ET CO2
An alarm can be set to sound if the patient’s CO2 value exceeds the value in the
HI ET CO2 setting. Scroll down to HI ET CO2 using the NEXT button. Then use
the CHANGE button to alter the value. Note that you cannot set a HI ET CO2
value lower than the LO ET CO2 value. Pressing the CHANGE button once
increments the value by 0.1% or 1mmHg. If the CHANGE button is pressed and
held, then the numbers increment automatically. When the numbers reach the
upper limit the values pause at the OFF state for a couple of seconds before
incrementing again.
Setting a lower limit for ET CO2
An alarm can be set to sound if the patient’s CO2 value falls below the value in
the LO ET CO2 setting. Scroll down to LO ET CO2 using the NEXT button. Then
use the CHANGE button to alter the value. Note that you cannot set a LO ET
CO2 value higher than the HI ET CO2 value. Pressing the CHANGE button once
increments the value by 0.1% or 1mmHg. If the CHANGE button is pressed and
held, then the numbers increment automatically. When the numbers reach the
upper limit the values pause at the OFF state for a couple of seconds before
incrementing again.
Please note that when changing between CO2 units the alarm values for
mmHg and %CO2 are independent of each other and need to be set
explicitly for the units selected.
Setting the Averaging for End-Tidal values
The End-Tidal value can be displayed as an instantaneous value (breath to
breath) or as an averaged value over 4 or 8 breaths. This option is selected by
using the NEXT button to scroll down to Next in the Quick Setup screen and then
pressing the CHANGE button. This takes you to the Advanced Setup screen.
Scroll down to the ET avg line and press CHANGE. The value changes between
1, 4 and 8 repeatedly. Once the required selection has been made, scroll down
to Ok on the bottom line and press CHANGE.
Section1: Using the Capnovet- 10
Page 12 of 18
Setting an APNOEA alarm time
An alarm can be set to sound if the patient fails to take a breath. The apnoea
alarm time limits are between 5 and 60 seconds in one-second increments.
Scroll down to Apnoea using the NEXT button. Then use the CHANGE button to
alter the value. To turn the function OFF again or to scroll to a lower value than
shown, then press and hold the CHANGE button. The values will auto-increment
until the upper limit is reached when they will pause on the OFF value before
incrementing again.
Connecting the Capnovet-10 to a patient
The Capnovet-10 comes complete with an in-line 15mm connector that will
connect directly to the 15mm connector on the endo-tracheal tube or to the back
of a standard face mask. The Capnovet-10 uses side-stream technology to
determine the patient’s CO2 value. This means that a continuous sample of gas
is removed from the patient’s airway and taken to the main unit via the small-bore
tubing. Once sampled, this gas can be dealt with in two ways. It may be vented
to the normal scavenging system by connecting the outlet port to the scavenging
system or it may be returned to the inspiratory side of the circuit in a rebreathing
system. It is important that this sampled gas is dealt with correctly; otherwise it
may effectively act as a source of gas contamination to the environment.
Also supplied with the Capnovet-10 is a set of ET tube connectors with side port
connectors allowing the sampling tube to be connected at the very end of the ET
tube. This significantly improves the waveform seen in the smaller animals.
With the sampling connector in place turn the Capnovet-10 ON, make any
necessary changes to the SETUP options and proceed with monitoring the
patient.
.
Changing the screen mode
Every time the Capnovet-10 is turned OFF, the display mode you were viewing is
remembered and will re-appear when you next turn it ON. To change the display
mode press the NEXT button. This will allow you to toggle back and forth
between display modes. Note that when in Bargraph mode the CHANGE button
will have no effect.
Changing the Sweep Speed
With the Time-capnogram mode display the rate at which the display is swept
across the screen can be altered. Simply pressing the CHANGE button whilst in
this mode will advance the sweep rate. Five sweep rates are available from 1-5.
Section1: Using the Capnovet- 10
Page 13 of 18
Responding to alarms
When an alarm condition is detected (Apnoea time exceeded or end-tidal CO2
value detected outside of the alarm limits) an intermittent alarm will sound. If the
alarm condition is self-righted, as for example the patient taking a breath during
an Apnoea alarm, the alarm will stop. Otherwise the alarm will continue to sound
until the condition has been righted or the alarm is temporarily silenced. The
Capnovet-10 has an in-built 60-second alarm silence function, which is activated
during an alarm condition. While an alarm is sounding pressing either the NEXT
or CHANGE button will silence the alarm for 60 seconds only. At the end of this
60-second period the alarm will again sound if the alarm condition has not been
rectified. Note also that Apnoea takes priority in the alarms. If an alarm has been
silenced for a HI ET CO2 cause and the patient is then apnoeic, the apnoea
alarm will then sound even though 60 seconds may not have elapsed since the
previous alarm was silenced.
Recharging the internal batteries
The Capnovet-10 uses internal NimH batteries which maybe re-charged using
the supplied charger. NimH batteries offer a high energy density power source
with quick re-charging times and no memory effect, as seen with NiCad batteries.
When the battery symbol shows that the battery levels are low (see page 5,
Battery Symbols) plug the charger into the mains and connect the small plug to
the unit using the connector on the right-hand side of the unit. The time taken to
fully re-charge the batteries is around 5 hours but will depend on how run down
they are. The unit can still be used whilst the batteries are charging although the
re-charging time will be extended.
The Capnovet-10 has an in-built intelligent charging circuit so that even if the
charger is left connected for extended periods no damage will result.
Be aware that if the batteries become completely exhausted then the user
settings will be lost. These settings include the alarm limits, pump speeds, sound
and backlight options. Also if the unit has been re-calibrated the user calibration
settings will also be lost.
Capnovet-10 recalibration
The Capnovet-10 has been factory calibrated prior to despatch. To maintain the
accuracy of your Capnovet-10 it is important that the unit be re-calibrated once a
year. On the opening screen is a re-calibration date, which is when the next
calibration is due. Calibration can be performed in two ways: User calibration and
factory calibration.
Section1: Using the Capnovet- 10
Page 14 of 18
User calibration
User calibration requires the use of a 5% Carbon Dioxide mixture and access to
fresh air. 5% Carbon Dioxide mixtures can be obtained from a variety of
sources. If you do not have access to a calibrated 5% source, then contact the
supplier of your Capnovet-10 for information on how to obtain some.
Procedure for User calibration
Hold down the CHANGE button firmly whilst turning the unit ON. A screen will
appear which looks like the screen on the next page:
User Calibration main screen
Initially the cursor arrow will be against the Factory reset option. Press
CHANGE to enter this option. The current user delta values will be shown as 3
values on the screen. If the user deltas have not been set before then they will
read
1
1
0
Press CHANGE to reset the delta values to 1,1,0 and then press NEXT to exit
this screen.
Now move the cursor, using the NEXT button to the Air adjustment option and
press CHANGE. Make sure the unit is sampling from clean fresh air outside of
the building. Room air can become stale and CO2 levels can rise to 0.4 or 0.5 %,
which is too high for accurate re-calibration. When the screen value is steady,
press the CHANGE button. The word “Calibration” will appear and the running
dots after it indicate the unit is busy. After a few seconds the screen display will
change to 0.0% and the zero point is set. Press NEXT to leave this option.
Now move the cursor using the NEXT button to the 5% CO2 adjustment option
and press CHANGE. You now need to flow your 5% carbon dioxide gas through
the ET connector/sensor at a rate of around 200mL/minute. Wait for the screen
value to stabilise and then press the CHANGE button. The same process of
Section1: Using the Capnovet- 10
Page 15 of 18
auto-calibration will be performed as is done with the Air calibration. Wait for the
screen value to change to 5.0% and then press the NEXT button to leave this
option.
Finally, leave this User Calibration facility by placing the cursor next to the Done
option and pressing the CHANGE button.
Calibration is complete.
Factory Calibration
This requires sending the Capnovet-10 unit back to your supplier. Contact the
supplier listed on the back of this manual to arrange this service.
Section1: Using the Capnovet- 10
Page 16 of 18
Appendix A
Specifications & conversions
The Capnovet-10 can display end-tidal CO2 values in either mmHg (millimetres
of mercury) or as a percentage (%).
To convert from one set of units to the other use the following:
1% CO2 is equivalent to 7.6mmHg
1mmHg is equivalent to 0.132% CO2
(Note this is based on conditions at STP of 760mmHg per atmosphere)
Technical Specifications
Mechanical
Dimensions
25cm x 12cm x 10cm
Weight
625g
Construction
Rugged Polyamide construction in dark grey
General
Screen size
Screen type
Sensor connection
Sampling rate
60mm x 38 mm viewing area
Reflective LCD 128 x 64 pixels with integral backlight
3mm x 60cm nylon tubing connecting to 15mm Tconnector
20Hz
Electrical Supply
Power
Current consumption
Battery life
Recharging time
Internal rechargeable NimH batteries
1800mW
300mA nominal
6 hours continuous use
5 hours
CO2 detection range
0-10%
0-76mmHg
Alarms
Respiratory rate range
Apnoea alarm settings
High/Low CO2 levels, apnoea time
1-120 breaths per minute
5-60 seconds
Display modes
1) Time-capnograph, capnometer & respiratory rate
2) CO2 bargraph, capnometer & respiratory rate
1,2,4,8,16 mm/second screen sweep speed
Sweep speeds
Side-stream
withdrawal rates
50, 100 & 200 ml/minute for LOW, MEDIUM and
HIGH respectively
Section1: Using the Capnovet- 10
Page 17 of 18
Extras for your Capnovet- 10
Part Number: VSL-1948
Description: 15M-15F Swivel stem
6mm
Part Number:VSL - 2710
Description: Leur Elbow clip for 7.6mm
Port – latex free
Part Number: VSL - 2731
Description: Monitor Line 1.8M MaleFemale Leur Lock
Part Number: VSLETSP + Size
Description: ET Connector with side port
available in sizes 2.5, 3.0 or 3.5mm Male
end
Part Number: VSLETSP + Size
Description: ET Connector with side
port available in sizes 4.0 or 5.0 mm Male
end
Part Number: VSLSRP15
Description: Filter for Capnovet lines
For other products and consumables see our web page:
http//www.vetronic.co.uk
Section1: Using the Capnovet- 10
Page 18 of 18


© Copyright 2026