
DVR-0031-3 user manual
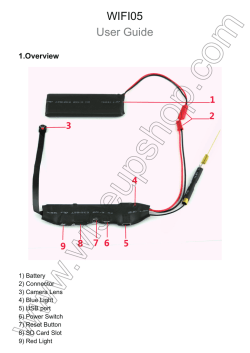
DVR-0031-3 WIFI SPY CAMERA
User Guide
Contents
Chapter 1: Before you begin
1. Overview
2. Accessories
3. Charging
Chapter 2: Connecting this product to a smartphone or tablet PC
1. P2PLiveCam
2. Watching the P2P live video on your smartphone or tablet PC
3. Setting up the camera for remote viewing
4 Motion detection
5. Setting time
Before you begin
1. Overview
1) Camera lens
2) Reset button
3) UID
4) USB interface
5) Power switch
2. Accessory
1) A/C Power adapter
2) USB cable
3) A piece of hardware with 2 screws
3. Charging
---connect the product to a power outlet by using the USB cable and the
DC5V charging adapter (Recommended).
--- connect the product to a computer by using the USB cable included.
Important:
If you want to use the camera 7/24 hours, please put the outlet power
supply on to the camera all the time in case it would run out of the battery.
Connecting this product to a smartphone or tablet PC
1. P2PLiveCam
To connect this product to a smartphone or tablet PC, the application “P2PLiveCam”
should be installed on your smartphone or tablet PC.
2. Watching the P2P live video on your smartphone or tablet PC
To watch the P2P live video, you need to do the steps shown as follows:
1) Slide the power switch to turn the power on. The lights will go through a few changes
shown as follows:
Red light goes on for 2 seconds---red light goes out and blue light comes on for 30 seconds---red
light and blue light flash quickly for 100 seconds--- red light goes out and blue light stays on for
40 seconds—the red light and blue light flash slowly indicating the camera’s WI-FI is on.
So you need altogether around 3 minutes for the camera’s WI-FI to be on after you have
turned the power on.
( If you can’t find the camera’s WI-FI for a long time after you have switched the power on and
pressed the wifi button, you can press the reset button for around 10 seconds.)
[Notice]
To press the reset button, you need a thin stick like a paper clip. Do not use something that may be
broken such as a lead of a mechanical pencil. A broken lead may cause a problem.
2) Connect your phone or tablet PC to the camera’s WI-FI on the WI-FI setting
screen.( The camera WI-FI name is the same as the camera’s UID. It will be shown as
“ ********* “ in the following pictures)
3) Lauch ” P2PLiveCam” on your phone. Click the “+” sign at the top right hand corner of
your phone.
4) Click “Search( Lan)”
5)Click camera
6) Click “ok”
7) You have added the device to your app now. Click the camera to watch the P2P live
video on your phone or tablet PC.
3 Setting up the camera for remote view
After
. you can watch the P2P live video on your phone, you can go ahead to set
up the camera for remote viewing. The steps are shown as follows:
1) Click the settings button
2) Click “ Advance Config”
3) Click “WIFI config”
4) Select an available wifi network and input the password
(After you have clicked “ok”. Both red and blue lights will do some changes. You need to wait
about half a minute until the red light stays on and the blue light flashes continuously indicating
the camera has connected to the network you have selected)
5) Connect your phone or tablet PC to another available network which must be different
from the previous one.
6) Launch” P2PLiveCam” and you can now watch the live video on your phone or tablet
PC remotely.
4. Motion detection
After you have connected your phone with the camera, you can select motion
detection recording. To do this, you need to do the steps shown as follows:
1) Launch” P2PLiveCam” and click the settings button
2) Click “Advance Config”
3) Click “Alarm Config”
4) Click “Motion Detection Sensitivity”.
5) Select one level you want.
6) Click “ok” to save the setting. The camera will take pictures automatically when it
detects motion. Click “ Alarm” at the bottom to see the pictures.
7) Go back to the “Advance Config” pageClick “SDCard Record Config” (Note: make sure
a micro sd card was formatted on your PC computer and was inserted into the
camera)
8) Click “Record”
9) Choose “ On alarm”.
( you can choose "All day" to let the camera record videos all the time)
10) Click “Ok”. The camera now enters into motion detection mode. It will record video
automatically when it detects motion and save the file to disc.
11) On the “SDCard Record Config” page, you can choose “ Loop recording” to let the
camera delete the first video it has taken when the SD card memory is full. Then click “ ok
“ to save settings.
12) On the “SDCard Record Config” page, you can choose the the video clip length of
each motion detective recording from 1-60 minutes. Then click “ ok “ to save settings.
5. Setting time
To set the time, you need to do the steps shown as follows:
1) Launch” P2PLiveCam” and click the settings button
2)Click “Alarm Config”
3) Click “time setting”
4) Click “sync with phone time”
If you want to view this camera remotely on your PC computer, please download the PC
software at the link below:
http://www.wiseupshop.com/var/downloadfile/PC%20Software%20
for%20DVR-0031-3%20Wifi%20Spy%20Camera%20Smoke%20D
etector.zip
DVR-0031-3 WIFI-Spion-Kamera
Benutzerhandbuch
Inhalt
Kapitel 1: Bevor Sie beginnen
1. Übersicht
2 Zubehör
3 Der Ladevorgang
Kapitel 2: Verbinden Sie dieses Produkt einem Smartphone oder
Tablet-PC
1. P2PLiveCam
2. Betrachtet man die P2P Live-Video auf Ihrem Smartphone oder Tablet-PC
3. Einrichten der Kamera für die Fernüberwachung
4. Bewegungserkennung
5. Abbindezeit
Bevor Sie beginnen
1. Übersicht
1) Kameraobjektiv
2) Reset-Taste
3) UID
4) USB-Schnittstelle
5) Netzschalter
2. Zubehör
1) A / C-Netzteil
2) USB-Kabel
3) Ein Stück Hardware mit 2 Schrauben
3. Der Ladevorgang
--- schließen Sie das Produkt an eine Steckdose an, indem Sie das
USB-Kabel und die DC5V-Ladeadapter (empfohlen).
--- Schließen Sie das Gerät an einen Computer unter Verwendung des
USB-Kabel im Lieferumfang enthalten.
Wichtig: Wenn Sie die Kamera verwenden, 24.07 Uhr möchten, setzen Sie
bitte die Steckdose Stromversorgung an die Kamera die ganze Zeit in dem Fall
wäre es aus der Batterie laufen.
Anschließen dieses
Tablet-PC
1. P2PLiveCam
Produkt
einem
Smartphone
oder
Um dieses Produkt zu einem Smartphone oder Tablet-PC zu verbinden, sollte
die Anwendung "P2PLiveCam" auf Ihrem Smartphone oder Tablet-PC
installiert sein.
2. Betrachtet man die P2P Live-Video auf Ihrem Smartphone oder
Tablet-PC
Um die P2P Live-Video zu sehen, um die gezeigten Schritte zu tun wie folgt
benötigen Sie:
1) Schieben Sie den Netzschalter, um das Gerät einzuschalten. Die Beleuchtung wird
durch ein wie folgt dargestellt paar Änderungen gehen:
Rotes Licht geht für 2 Sekunden --- rote Licht erlischt und blauem Licht kommt auf 30 Sekunden
--- rotes Licht und blaues Licht Blitz schnell 100 Sekunden --- rote Licht erlischt und blaues Licht
bleibt für 40 Sekunden -die rote Licht und blaues Licht blinken langsam Angabe der Kamera WI-FI
ist.
So dass Sie insgesamt ca. 3 min Notwendigkeit der Kamera WI-FI auf, nachdem Sie das
Gerät eingeschaltet haben.
(Wenn Sie nicht finden können, der Kamera-WI-FI für eine lange Zeit, nachdem Sie das Gerät
eingeschaltet haben und drückte den Wifi-Taste können Sie die Reset-Taste etwa 10 Sekunden
lang gedrückt halten.)
[Beachten]
Um die Reset-Taste drücken, benötigen Sie einen dünnen Stift wie eine Büroklammer. Verwenden Sie
nicht etwas, das gebrochen werden kann, wie beispielsweise einem Vorsprung von einem Druckbleistift.
Eine gebrochene Leitung kann zu einem Problem führen.
2) Schließen Sie Ihr Handy oder Tablet-PC auf die Kamera WI-FI auf dem
Wi-Fi-Einstellungsbildschirm. (Die Kamera WI-FI-Name ist der gleiche wie der
Kamera-UID. Es wird als "******* angezeigt ** "in den folgenden Bildern)
3) Lauch "P2PLiveCam" auf Ihrem Telefon. Klicken Sie auf das "+" Zeichen in der oberen
rechten Ecke des Telefons.
4) Klicken Sie auf "Suche (LAN)"
5) Klicken Sie auf Kamera
6) Klicken Sie auf "ok"
7) Sie haben das Gerät an den App jetzt aufgenommen. Klicken Sie auf die Kamera, um
die P2P Live-Video auf Ihrem Handy oder Tablet-PC zu sehen.
3. Einrichten der Kamera für die Fernsicht
Nachdem Sie die P2P Live-Video auf dem Handy zu sehen, können Sie
weitermachen zum Einrichten der Kamera für die Fernüberwachung. Die
Schritte sind wie folgt dargestellt:
1) Klicken Sie auf die Schaltfläche Einstellungen
2) Klicken Sie auf "Advance-Config"
3) Klicken Sie auf "WIFI config"
4) Wählen Sie ein verfügbares WLAN-Netzwerk und geben Sie das Passwort
(Nachdem Sie geklickt haben, das "ok". Sowohl rote und blaue Lichter werden einige
Änderungen zu tun. Sie müssen sich über eine halbe Minute warten, bis das rote Licht bleibt an
und das blaue Licht blinkt ständig, die die Kamera an das Netzwerk Sie ausgewählt haben,
verbunden )
5) Schließen Sie Ihr Handy oder Tablet-PC zu einem anderen verfügbaren Netz, das
anders als die vorherige sein müssen .
6) Starten Sie "P2PLiveCam" und Sie können jetzt das Live-Video auf Ihrem Handy oder
Tablet-PC aus der Ferne beobachten.
4. Bewegungserkennung
Nachdem Sie Ihr Telefon mit der Kamera verbunden haben, können Sie
Bewegungserkennung auswählen. Um dies zu tun, um die wie folgt gezeigten
Schritte tun, müssen Sie:
1) Starten Sie "P2PLiveCam" und klicken Sie auf die Schaltfläche Einstellungen
2) Klicken Sie auf "Advance-Config"
3) Klicken Sie auf "Alarm Config"
4) Klicken Sie auf "Motion Detection Sensitivity".
5) Wählen Sie eine Ebene Sie wollen.
6) Klicken Sie auf "OK", um die Einstellung zu speichern. Die Kamera Bilder automatisch
an, wenn es eine Bewegung erkennt. Klicken Sie auf "Alarm" am unteren Rand, um die
Bilder zu sehen.
7) Zurück zum "Advance-Config" pageClick "SDCard Nehmen Config" (Hinweis: stellen
Sie sicher, eine Micro-SD-Karte wurde auf Ihrem PC Computer formatiert und in die
Kamera eingelegt ist)
8) Klicken Sie auf "Record"
9) Wählen Sie "Ein Alarm".
(Sie können "Alle Tage" wählen, um die Kamera Videos aufzeichnen lassen Sie die ganze
Zeit)
10) Klicken Sie auf "Ok". Die Kamera wechselt nun in Bewegungserfassungsmodus. Es
wird Video automatisch aufzeichnen, wenn es Bewegung erkennt und speichern Sie die
Datei auf der Disc.
11) Auf der "SDCard Nehmen Config" Seite können Sie "Loop-Aufnahme" wählen zu
lassen, löschen Sie die Kamera das erste Video die es getroffen hat, wenn die
SD-Kartenspeicher voll ist. Klicken Sie dann auf "OK", um die Einstellungen zu speichern.
12) Auf der "SDCard Nehmen Config" -Seite können Sie den Videoclip Länge jedes
Bewegungsdetektivaufnahme 1-60 Minuten zu wählen. Klicken Sie dann auf "OK", um die
Einstellungen zu speichern.
5. Abbindezeit
Um die Zeit einzustellen, um die gezeigten Schritte zu tun wie folgt benötigen
Sie:
1) Starten Sie "P2PLiveCam" und klicken Sie auf die Schaltfläche Einstellungen
2) Klicken Sie auf "Alarm Config"
3) Klicken Sie auf "Zeiteinstellung"
4) Klicken Sie auf "Synchronisieren mit Telefon time"
Wenn Sie diese Kamera fern auf Ihrem PC-Computer anzeigen möchten, laden Sie bitte
die PC-Software unter dem folgenden Link:
http://www.wiseupshop.com/var/downloadfile/PC%20Software%20
for%20DVR-0031-3%20Wifi%20Spy%20Camera%20Smoke%20D
etector.zip
DVR-0031-3 WIFI caméra espion
Mode d'emploi
Contenu
Chapitre 1: Avant de commencer
1. Vue d'ensemble
2 Accessoires
3 Charge
Chapitre 2: Raccorder ce produit à un smartphone ou une tablette
PC
1 P2PLiveCam
2 Regarder le P2P vidéo en direct sur votre smartphone ou tablette PC
3 Mise en place de la caméra pour la visualisation à distance
4 détection de mouvement
5 Réglage de l'heure
Avant de commencer
1. Vue d'ensemble
1) l'objectif de l'appareil photo
2) bouton Réinitialiser
3) UID
4) interface USB
5) Interrupteur
2. Accessoire
1) Adaptateur secteur A / C
2) Câble USB
3) Une pièce de matériel avec 2 vis
3. Charge
--- connecter le produit à une prise de courant en utilisant le câble USB et
l'adaptateur de charge DC5V (recommandé).
--- Connecter le produit à un ordinateur en utilisant le câble USB inclus.
Important: Si vous voulez utiliser l'appareil photo 7/24 heures, s'il vous plaît placez
pas l'alimentation de sortie à la caméra tout le temps dans le cas où il serait à court de la
batterie.
Raccordement ce produit à un smartphone ou une tablette PC
1. P2PLiveCam
Pour connecter ce produit à un smartphone ou une tablette PC, l'application
"P2PLiveCam" doit être installé sur votre smartphone ou tablette PC.
2. Regarder le P2P vidéo en direct sur votre smartphone ou tablette
PC
Pour visionner la vidéo en direct P2P, vous devez suivre les étapes indiquées
comme suit:
1) Faites glisser le commutateur d'alimentation pour mettre l'appareil sous tension. Les
lumières vont passer par quelques modifications indiquées comme suit:
La lumière rouge se poursuit pendant 2 secondes --- lumière rouge sort et la lumière bleue
apparaît pendant 30 secondes --- lumière rouge et bleu clair rapidement pendant 100 secondes --lumière rouge sort et la lumière bleue reste allumé pendant 40 secondes -la lumière rouge et bleu
flash de lumière indiquant lentement Wi-Fi de l'appareil est allumé.
Donc, vous devez tout autour de 3 minutes pour Wi-Fi de l'appareil photo pour être sur
après avoir mis l'appareil sous tension.
(Si vous ne pouvez pas trouver WI-FI de l'appareil photo pendant une longue période après avoir
mis sous tension et appuyé sur le bouton wifi, vous pouvez appuyer sur le bouton de
réinitialisation pendant environ 10 secondes.)
[Avis]
Pour appuyer sur le bouton de réinitialisation, vous avez besoin d'un bâton mince comme un trombone.
Ne pas utiliser quelque chose qui peut être brisé comme un plomb d'un crayon mécanique. Un plomb
cassée peut provoquer un problème.
2) Connectez votre téléphone ou tablette PC au Wi-Fi de l'appareil photo sur l'écran de
réglage WI-FI. (Le nom WI-FI appareil photo est le même que l'UID de la caméra. Il sera
affiché comme "******* ** "dans les images suivantes)
3) Lauch "P2PLiveCam" sur votre téléphone. Cliquez sur le signe "+" dans le coin en haut
à droite de votre téléphone.
4) Cliquez sur «Rechercher (Lan)"
5) Cliquez sur l'appareil photo
6) Cliquez sur "OK"
7) Vous avez mis l'appareil à votre app. Cliquez sur l'appareil photo pour regarder la vidéo
en direct sur P2P votre téléphone ou tablette PC.
3. Mise en place de l'appareil photo pour une vue à distance
Après vous pouvez regarder le P2P vidéo en direct sur votre téléphone, vous
pouvez aller de l'avant pour mettre en place la caméra pour la visualisation à
distance. Les étapes sont représentées comme suit:
1) Cliquez sur le bouton Paramètres
2) Cliquez sur "Advance Config"
3) Cliquez sur "config WIFI"
4) Sélectionnez un réseau wifi disponible et entrée du mot de passe
(Une fois que vous avez cliqué. Les deux lumières rouges et bleues "OK" faire quelques
changements. Vous devez attendre environ la moitié d'une minute jusqu'à ce que la lumière
rouge reste allumé et les flashs de lumière bleue indiquant en permanence la caméra est
connectée au réseau que vous avez sélectionné )
5) Connectez votre téléphone ou tablette PC à un autre réseau disponible qui doit être
différente de la précédente.
6) Lancement "P2PLiveCam" et vous pouvez maintenant regarder la vidéo en direct sur
votre téléphone ou votre tablette PC à distance.
4. détection de mouvement
Après avoir connecté votre téléphone avec l'appareil photo, vous pouvez
sélectionner l'enregistrement de détection de mouvement. Pour ce faire, vous
devez suivre les étapes indiquées comme suit:
1) Lancement "P2PLiveCam" et cliquez sur le bouton Paramètres
2) Cliquez sur "Advance Config"
3) Cliquez sur "Alarm Config"
4) Cliquez sur "Sensibilité de détection de mouvement".
5) Sélectionnez un niveau que vous voulez.
6) Cliquez sur "OK" pour enregistrer le réglage. L'appareil photo prend des photos
automatiquement lorsqu'il détecte un mouvement. Cliquez sur "Alarm" en bas pour voir
les photos.
7) Retour à la pageClick "Advance Config" "SDCard Enregistrez Config" (Remarque:
assurez-vous d'une carte micro SD a été formatée sur votre ordinateur PC et a été
inséré dans l'appareil photo)
8) Cliquez sur "Enregistrer"
9) Choisissez "alarme".
(Vous pouvez choisir "Toute la journée" pour permettre l'enregistrement de la caméra
vidéo tout le temps)
10) Cliquez sur "Ok". L'appareil photo passe maintenant en mode de détection de
mouvement. Il va enregistrer de la vidéo automatiquement quand il détecte un
mouvement et enregistrer le fichier sur le disque.
11) Sur la page "SDCard Enregistrez Config", vous pouvez choisir "enregistrement en
boucle" pour permettre à la caméra de supprimer la première vidéo qu'il a prise lorsque la
carte mémoire SD est pleine. Puis cliquez sur "OK" pour enregistrer les paramètres.
12) Sur la page "SDCard Enregistrez Config", vous pouvez choisir la longueur du clip
vidéo de chaque détective de mouvement enregistrement à partir de 1-60 minutes. Puis
cliquez sur "OK" pour enregistrer les paramètres.
5. Réglage de l'heure
Pour régler l'heure, vous devez suivre les étapes indiquées comme suit:
1) Lancement "P2PLiveCam" et cliquez sur le bouton Paramètres
2) Cliquez sur "Alarm Config"
3) Cliquez sur "réglage de l'heure"
4) Cliquez sur "synchroniser avec le temps de téléphone"
Si vous voulez voir ce caméra à distance sur votre ordinateur PC, s'il vous plaît
télécharger le logiciel de PC sur le lien ci-dessous:
http://www.wiseupshop.com/var/downloadfile/PC%20Software%20
for%20DVR-0031-3%20Wifi%20Spy%20Camera%20Smoke%20D
etector.zip
DVR-0031-3 WIFI SPY CAMERA
Guida utente
Contenuto
Capitolo 1: Prima di iniziare
1 Panoramica
2 Accessori
3 ricarica
Capitolo 2: Collegamento di questo prodotto a uno smartphone o
tablet PC
1. P2PLiveCam
2. Guardando il video live P2P sul vostro smartphone o tablet PC
3. Impostazione della fotocamera per la visualizzazione remota
Rilevazione di
4. Proposta
5. Tempo di presa
Prima di iniziare
1. Panoramica
1) Obiettivo della fotocamera
2) pulsante Reset
3) UID
4) Interfaccia USB
5) Interruttore di alimentazione
2. Accessori
1) A / C adattatore di alimentazione
2) Cavo USB
3) Un pezzo di hardware con 2 viti
3. ricarica
--- collegare il prodotto ad una presa di corrente utilizzando il cavo USB e il
DC5V adattatore di ricarica (scelta consigliata).
--- Collegare il prodotto a un computer utilizzando il cavo USB incluso.
Importante: Se si desidera utilizzare la fotocamera 7/24 ore, si prega di
mettere l'alimentazione presa alla telecamera per tutto il tempo in caso
sarebbe a corto di batteria.
Collegamento a uno smartphone o tablet PC
1. P2PLiveCam
Per collegare il prodotto a uno smartphone o tablet PC, l'applicazione
"P2PLiveCam" deve essere installato sul vostro smartphone o tablet PC.
2. Guardando il video live P2P sul vostro smartphone o tablet PC
Per guardare il video in diretta P2P, è necessario fare i passi indicati come
segue:
1) Far scorrere l'interruttore di alimentazione per accendere la fotocamera. Le luci
passerà attraverso alcune modifiche indicate come segue:
Luce rossa continua per 2 secondi --- luce rossa si spegne e la luce blu si accende per 30 secondi
--- luce rossa e la luce blu del flash velocemente per 100 secondi --- luce rossa si spegne e la luce
blu rimane accesa per 40 secondi -la luce rossa e blu flash chiaro lentamente indicando la
fotocamera WI-FI è acceso.
Quindi è necessario tutto circa 3 minuti per la fotocamera WI-FI per essere dopo aver
attivato l'alimentazione.
(Se non si riesce a trovare la fotocamera WI-FI per molto tempo dopo aver acceso
l'apparecchio e premuto il tasto wifi, è possibile premere il pulsante di reset per
circa 10 secondi.)
[Avviso]
Per premere il pulsante di reset, è necessario un bastone sottile come una graffetta. Non usare qualcosa
che può essere suddiviso come un vantaggio di una matita meccanica. Un cavo rotto potrebbe causare
un problema.
2) Collegare il telefono o tablet PC di WI-FI della telecamera sullo schermo di
impostazione WI-FI. (La telecamera nome WI-FI è lo stesso UID della fotocamera. Sarà
mostrato come "******* ** "nei seguenti immagini)
3) Lauch "P2PLiveCam" sul telefono. Fare clic sul segno "+" in alto a destra del telefono.
4) Fare clic su "Search (Lan)"
5) Fare clic fotocamera
6) Fare clic su "ok"
7) È stato aggiunto il dispositivo per la vostra applicazione ora. Fare clic sulla telecamera
per vedere il video live P2P sul vostro telefono o tablet PC.
3. Impostazione della telecamera per la vista a distanza
Dopo è possibile guardare il video in diretta P2P sul telefono, si può andare
avanti per impostare la fotocamera per la visione a distanza. I passaggi sono
indicati come segue:
1) Fare clic sul pulsante Impostazioni
2) Fare clic su "Advance Config"
3) Fare clic su "WIFI config"
4) Selezionare una rete wifi disponibile e inserire la password
(Dopo aver cliccato. Sia luci rosse e blu "OK" fare alcuni cambiamenti. È necessario attendere
circa mezzo minuto fino a quando la luce rossa rimane accesa e la luce blu lampeggia indicando
continuamente la fotocamera è collegata alla rete è stato selezionato )
5) Connettere il telefono o tablet PC a un'altra rete disponibile che deve essere diversa
da quella precedente ..
6) Lancio "P2PLiveCam" e ora è possibile guardare il video in diretta sul tuo telefono o
tablet PC da remoto.
4. Rilevazione di Proposta
Dopo aver collegato il telefono con la fotocamera, è possibile selezionare la
registrazione di rilevazione di movimento. Per fare questo, è necessario fare i
passi indicati come segue:
1) Avviare "P2PLiveCam" e fare clic sul pulsante Impostazioni
2) Fare clic su "Advance Config"
3) Fare clic su "Allarme Config"
4) Cliccare su "Motion Detection Sensitivity".
5) Selezionare un livello che si desidera.
6) Fare clic su "OK" per salvare le impostazioni. La fotocamera scatterà automaticamente
le immagini quando rileva il movimento. Fai clic su "Allarme" in basso per vedere le foto.
7) Torna il "Advance Config" pageClick "SDCard Record Config" (Nota: assicuratevi una
scheda micro SD è stata formattata sul computer PC ed è stata inserita nella
fotocamera)
8) Fare clic su "Record"
9) Scegliere "In caso di allarme".
(È possibile scegliere "Tutto il giorno" per lasciare che i registrare video della fotocamera
per tutto il tempo)
10) Fare clic su "Ok". La fotocamera passa ora alla modalità di rilevazione di movimento.
Sarà registrare video automaticamente quando rileva il movimento e salvare il file su
disco.
11) Nella pagina "SDCard Record Config", è possibile scegliere "registrazione Loop" per
lasciare che la fotocamera eliminare il primo video che ha preso quando la memoria della
scheda SD è piena. Quindi fare clic su "OK" per salvare le impostazioni.
12) Nella pagina "SDCard Record Config", è possibile scegliere la lunghezza del clip
video di ogni movimento detective registrazione da 1-60 minuti. Quindi fare clic su "OK"
per salvare le impostazioni.
5. Tempo di presa
Per impostare l'ora, è necessario fare i passi indicati come segue:
1) Avviare "P2PLiveCam" e fare clic sul pulsante Impostazioni
2) Fare clic su "Allarme Config"
3) Fare clic su "impostazione del tempo"
4) Fare clic su "Sincronizza con il tempo il telefono"
Se si desidera visualizzare la telecamera in remoto sul computer PC, scaricare il software
per PC al link qui sotto:
http://www.wiseupshop.com/var/downloadfile/PC%20Software%20
for%20DVR-0031-3%20Wifi%20Spy%20Camera%20Smoke%20D
etector.zip
DVR-0031-3 SPY WIFI CAMARA
Guía del usuario
Contenido
Capítulo 1: Antes de comenzar
1. Información general
2 Accesorios
3 Carga
Capítulo 2: Conexión de este producto a un smartphone o tablet
PC
1 P2PLiveCam
2 Observando el P2P de vídeo en directo en el teléfono inteligente o tablet PC
3 Configuración de la cámara para la visualización remota
4 Detección de movimiento
5 Tiempo de fraguado
Antes de que empieces
1. Información general
1) Lente de la cámara
2) botón Reset
3) UID
4) Interfaz USB
5) Interruptor de encendido
2. accesorios
1) A / C Adaptador de corriente
2) Cable USB
3) Una pieza de hardware con 2 tornillos
3. Carga
--- conecte el producto a una toma de corriente mediante el cable USB y el
adaptador de carga DC 5V (Recomendado).
--- Conecte el producto a un equipo mediante el cable USB incluido.
Importante:
Si desea utilizar la cámara 7/24 horas, por favor ponga la fuente de
alimentación de salida a la cámara todo el tiempo en caso de que se quedaría sin la
batería.
Conexión de este producto a un smartphone o tablet PC
1. P2PLiveCam
Para conectar este producto a un smartphone o tablet PC, la aplicación "P2PLiveCam"
debe estar instalado en su smartphone o tablet PC.
2. Observando el P2P de vídeo en directo en el teléfono inteligente
o tablet PC
Para ver el video en vivo P2P, que tiene que hacer los pasos que se muestran
de la siguiente manera:
1) Deslice el interruptor de encendido para encender la cámara. Las luces se apagarán a
través de algunos cambios que se muestran de la siguiente manera:
La luz roja se enciende durante 2 segundos --- la luz roja se apaga y la luz azul se enciende
durante 30 segundos --- luz roja y flash de luz azul con rapidez durante 100 segundos --- la luz
roja se apaga y la luz azul permanece encendida durante 40 segundos -la luz roja y azul destello
de luz que indica lentamente de la cámara WI-FI está encendida.
Por lo que necesita en total alrededor de 3 minutos para el de la cámara WI-FI para estar
en después de haber conectado la alimentación.
(Si usted no puede encontrar la cámara WI-FI durante mucho tiempo después de desconectar la
alimentación y se presiona el botón de wifi, puede pulsar el botón de reinicio durante unos 10
segundos.)
[Aviso]
Para presionar el botón de reinicio, se necesita un palo delgado como un clip de papel. No utilice algo
que puede ser roto, como un ejemplo de un lápiz mecánico. Un plomo roto puede causar un problema.
2) Conecta tu teléfono o tablet PC a WI-FI de la cámara en la pantalla de configuración de
Wi-Fi. (El nombre WI-FI cámara es el mismo que el UID de la cámara. Se muestra como
"******* ** "en las siguientes fotos)
3) Lauch "P2PLiveCam" en su teléfono. Haga clic en el signo "+" en la esquina superior
derecha de su teléfono.
4) Haga clic en "Buscar (Lan)"
5) Haga clic en la cámara
6) Haga clic en "ok"
7) Ha agregado el dispositivo a su aplicación. Haga clic en la cámara para ver el P2P
vídeo en directo en tu teléfono o tablet PC.
3. Configuración de la cámara para la visión a distancia
Después se puede ver el P2P de vídeo en directo en su teléfono, usted puede
seguir adelante para configurar la cámara para la visualización remota. Los
pasos se muestran como sigue:
1) Haga clic en el botón de configuración
2) Haga clic en "Avance Config"
3) Haga clic en "configuración WIFI"
4) Seleccione una red wifi disponible y la entrada de la contraseña
(Después de haber hecho click en "OK". Ambas luces rojas y azules harán algunos cambios. Es
necesario esperar aproximadamente medio minuto hasta que la luz roja permanece encendida y
la luz azul parpadea indicando continuamente la cámara se ha conectado a la red que haya
seleccionado )
5) Conecte el teléfono o tablet PC a otra red disponible que debe ser diferente de la
anterior .
6) Lanzamiento "P2PLiveCam" y ahora se puede ver el vídeo en directo en tu teléfono o
tablet PC de forma remota.
4. Detección de movimiento
Después de conectar el teléfono con la cámara, puede seleccionar la
grabación de detección de movimiento. Para hacer esto, usted tiene que hacer
los pasos que se muestran de la siguiente manera:
1) Lanzamiento "P2PLiveCam" y haga clic en el botón de configuración
2) Haga clic en "Avance Config"
3) Haga clic en "Alarma Config"
4) Haga clic en "Movimiento Sensibilidad de detección".
5) Seleccione un nivel que desea.
6) Haga clic en "Aceptar" para guardar la configuración. La cámara tomará fotografías de
forma automática cuando detecta movimiento. Haga clic en "alarma" en la parte inferior
para ver las imágenes.
7) Vuelva a la "Avance Config" PÁGINAHAGA CLIC "tarjeta SD Grabar Config" (Nota:
asegúrese de que la tarjeta micro sd se formateó en su ordenador PC y se insertó
en la cámara)
8) Haga clic en "Grabar"
9) Seleccione "On alarma".
(Se puede elegir "Todos los días" para que los grabar vídeos de la cámara todo el tiempo)
10) Haga clic en "Aceptar". La cámara entra ahora en el modo de detección de
movimiento. Se grabará vídeo de forma automática cuando detecta movimiento y guardar
el archivo en disco.
11) En la página de "tarjeta SD Grabar Config", puede elegir "la grabación Loop" para
dejar que la cámara elimine el primer video que ha adoptado cuando la memoria de la
tarjeta SD está llena. Luego haga clic en "Aceptar" para guardar la configuración.
12) En la página de "tarjeta SD Grabar Config", se puede elegir la longitud del clip de
vídeo de cada detective movimiento grabación de 1-60 minutos. Luego haga clic en
"Aceptar" para guardar la configuración.
5. Tiempo de fraguado
Para ajustar la hora, lo que necesita hacer los pasos que se muestran de la
siguiente manera:
1) Lanzamiento "P2PLiveCam" y haga clic en el botón de configuración
2) Haga clic en "Alarma Config"
3) Haga clic en "configuración de tiempo"
4) Haga clic en "sincronizar con tiempo de teléfono"
Si desea ver esta cámara de forma remota en el equipo PC, descargue el software para
PC en el siguiente enlace:
http://www.wiseupshop.com/var/downloadfile/PC%20Software%20
for%20DVR-0031-3%20Wifi%20Spy%20Camera%20Smoke%20D
etector.zip


© Copyright 2026