
Scheduling Agent Procedures
Kaseya 2 Agent Procedures User Guide Version 7.0 English January 29, 2015 Agreement The purchase and use of all Software and Services is subject to the Agreement as defined in Kaseya’s “Click-Accept” EULATOS as updated from time to time by Kaseya at http://www.kaseya.com/legal.aspx. If Customer does not agree with the Agreement, please do not install, use or purchase any Software and Services from Kaseya as continued use of the Software or Services indicates Customer’s acceptance of the Agreement.” ©2014 Kaseya. All rights reserved. | www.kaseya.com Contents Agent Procedures Overview ...................................................................................................................... 1 Schedule / Create ........................................................................................................................................ 1 Action Buttons ..................................................................................................................................... 2 Scheduling Agent Procedures ........................................................................................................... 3 Creating / Editing Agent Procedures ................................................................................................. 4 IF-ELSE-STEP Commands .................................................................................................................. 5 64-Bit Commands .............................................................................................................................. 25 Using Variables .................................................................................................................................. 26 Variable Manager ............................................................................................................................... 28 Manage Files Stored on Server ........................................................................................................ 29 Folder Rights ...................................................................................................................................... 30 Distribution ................................................................................................................................................ 30 Agent Procedure Status............................................................................................................................ 32 Pending Approvals .................................................................................................................................... 32 Patch Deploy .............................................................................................................................................. 33 Application Deploy .................................................................................................................................... 35 Creating Silent Installs ...................................................................................................................... 36 Packager ..................................................................................................................................................... 37 Get File........................................................................................................................................................ 38 Distribute File ............................................................................................................................................. 39 Application Logging .................................................................................................................................. 40 Index ........................................................................................................................................................... 43 i Agent Procedures Overview Agent Procedures Overview Agent Procedures The Agent Procedures modules creates and schedules agent procedures (page 1) on managed machines. You can view the status of all procedures run on a managed machine using Agent Procedure Status (page 32). You can also spread out the impact agent procedures have on network traffic and server loading using Distribution (page 30). The Agent Procedures module also provides: File Transfers - Transfer files to and from managed machines using Get File (page 38) and Distribute File (page 39). Customized Installations - When a pre-defined install solution cannot be used, use Packager (page 37) to create a self-extracting file ready for automated distribution. Patch and Application Deployment - You can schedule the installation of Microsoft and non-Microsoft applications and patches using Patch Deploy (page 33) and Application Deploy (page 35). Note: See Patch Management to install Microsoft patches on managed machines. Functions Description Schedule / Create (page 1) Automates user-defined tasks on managed machines by creating and scheduling agent procedures. Distribution (page 30) Minimizes network traffic and server loading by executing agent procedures evenly throughout the day. Agent Procedure Status (page 32) Shows the status of agent procedures executed on managed machines. Patch Deploy (page 33) Use this wizard tool to create procedures to deploy Microsoft patches to managed machines. Application Deploy (page Use this wizard tool to create procedures to deploy non-Microsoft 35) install packages (setup.exe) to managed machines. Packager (page 37) An external application that allows users to create customized installation packages deployable on managed machines. Get File (page 38) View and manage files uploaded to the Kaseya Server from managed machines using the getFile() agent procedure command. Distribute File (page 39) Write files to all selected managed machines and maintain them. Schedule / Create Agent Procedures > Manage Procedures > Schedule / Create The Schedule / Create page automates user-defined tasks on managed machines by creating and scheduling agent procedures. See the following topics for details: Action Buttons (page 2) Scheduling Agent Procedures (page 3) Creating / Editing Agent Procedures (page 4) IF-ELSE-STEP Commands (page 5) 1 Schedule / Create 64-Bit Commands (page 25) Using Variables (page 26) Variable Manager (page 28) Manage Files Stored on Server (page 29) Folder Rights (page 30) Related Topics Agent Procedure Failure Alerts - The Alerts - Agent Procedure Failure page triggers an alert when an agent procedure fails to execute on a managed machine. For example, if you specify a file name, directory path or registry key in an agent procedure, then run the agent procedure on a machine ID for which these values are invalid, you can be notified about the agent procedure failure using this alerts page. Logging Failed Steps in Procedures - The System > Configure page includes the following option Enable logging of procedure errors marked "Continue procedure if step fail" - If checked, failed steps in procedures are logged. If blank, failed steps in procedures are not logged. Preventing the Logging of Successful Child Script Execution - The System > Configure page includes the following option - Enable logging of successful child script execution in agent procedure log - If unchecked, child script success entries are not included in the agent procedure log. This can reduce the size of the agent procedure log tremendously. It takes up to 5 minutes for the KServer to read this setting change. View Definitions - You can filter the display of machine IDs on any agent page using the following agent procedure options in View Definitions. With procedure scheduled/not scheduled Last execution status success/failed Procedure has/has not executed in the last N days Action Buttons Agent procedures are organized using two folder trees in the middle pane, underneath Private and Shared cabinets. The following action buttons display, depending on the object selected in the folder tree. When a Cabinet is Selected Collapse All - Collapses all branches of the folder tree. Expand All - Expands all branches of the folder tree. Always Available Manage Files - See Manage Files Stored on Server (page 29) for more information. Manage Variables - See Variable Manager (page 28) for more information. (Apply Filter) - Enter text in the filter edit box, then click the funnel icon to apply filtering to the folder trees. Filtering is case-insensitive. Match occurs if filter text is found anywhere in the folder trees. When a Folder is Selected Share Folder - Shares a folder with user roles and individual users. Applies to shared cabinet folders only. Note: See guidelines for share rights to objects within folder trees in the Folder Rights (page 30) topic. 2 Schedule / Create New Procedure - Opens the agent procedure editor to create a new procedure in the selected folder of the folder tree. See Creating / Editing Agent Procedures (page 4). New Folder - Creates a new folder underneath the selected cabinet or folder. Delete Folder - Deletes a selected folder. Rename Folder - Renames a selected folder. Import Folder/Procedure - Imports a folder or procedure as children to the selected folder in the folder tree. Applies to private cabinet folders only. Export Folder - Exports the selected folder and all its procedures as an XML file. The XML file can be re-imported. Additional Actions When a Procedure is Selected Edit Procedure - Opens the agent procedure editor to edit the selected procedure. See Creating / Editing Agent Procedures (page 4). Rename Procedure - Renames the selected procedure. Delete Procedure - Deletes the selected procedure. Agent procedures that are used by other agent procedures cannot be deleted. Export Procedure - Exports the selected procedure. Scheduling Agent Procedures Manage the scheduling of agent procedures using tabs in the right hand pane. When a procedure is selected in the middle pane, the following tabs display In the right-hand pane. Schedule - Select one or more machine IDs in this tab's table, then click one of the following action buttons: Schedule Procedure - Schedule a task once or periodically. Each type of recurrence—Once, Hourly, Daily, Weekly, Monthly, Yearly—displays additional options appropriate for that type of recurrence. Periodic scheduling includes setting start and end dates for the recurrence. Not all options are available for each task scheduled. Options can include: Schedule will be based on the timezone of the agent (rather than server) - If checked, time settings set in the Scheduler dialog reference the local time on the agent machine to determine when to run this task. If blank, time settings reference server time, based on the server time option selected in System > Preferences. Defaults from the System > Default Settings page. Distribution Window - Reschedules the task to a randomly selected time no later than the number of periods specified, to spread network traffic and server loading. For example, if the scheduled time for a task is 3:00 AM, and the distribution window is 1 hour, then the task schedule will be changed to run at a random time between 3:00 AM and 4:00 AM. Skip if offline - If checked and the machine is offline, skip and run the next scheduled period and time. If blank and the machine is offline, run the task as soon as the machine is online again. Power up if offline - Windows only. If checked, powers up the machine if offline. Requires Wake-On-LAN or vPro and another managed system on the same LAN. Exclude the following time range - Applies only to the distribution window. If checked, specifies a time range to exclude the scheduling of a task within the distribution window. Specifying a time range outside of the distribution window is ignored by the scheduler. Note: You can stagger the running of scheduled agent procedures using Agent Procedures > Distribution (page 30). 3 Schedule / Create Run Now - Run this agent procedure on each selected machine ID immediately. Cancel - Cancel the scheduled agent procedure on each selected machine ID. View Procedure - Provides a display only view of the procedure. A user can execute an agent procedure and view it without necessarily being able to edit it. See Folder Rights (page 30) for more information. Used by - Displays a list of other procedures that execute this procedure. Agent procedures that are used by other agent procedures cannot be deleted. Creating / Editing Agent Procedures Creating / Editing Agent Procedures To create a new procedure, select a cabinet or folder in the middle pane, then click the New Procedure button to open the Creating / Editing Agent Procedures (page 4). To edit an existing procedure, select the procedure, then click the Edit Procedure button to open the Creating / Editing Agent Procedures (page 4). You can also double-click a procedure to edit it. Note: Access to creating or editing a procedure depends on your Folder Rights (page 30). The Agent Procedure Editor All statements you can add to an agent procedure display in the left-hand pane. Agent procedures display in the middle pane of the editor on one more tabs. The parameters for each statement display in the right-hand pane. Note: See IF-ELSE-STEP Statements (page 5) for a detailed explanation of each statement's parameters. Action Buttons These buttons display in the middle pane of the procedure editor. Procedure New - Creates an empty tab for a new procedure. Open - Edits an existing procedure. Save - Saves the currently selected procedure. Save As - Saves the procedure to a different name. A dialog enables you to select the folder used to save the procedure. Edit - The following buttons are only enabled when one or more statements are selected. Undo - Undoes the last edit. Redo - Redoes the last edit. Cut - Cuts selected lines. Copy - Copies selected lines. Paste - Pastes copied lines. Remove - Removes selected lines. Goto Line - Selects the line number you specify. Search - Searches for matching text in commands, parameters and values. Insert Lines - Inserts a blank line that you can then begin typing into. This displays a drop-down list of commands that you can select a command from and insert into the procedure. Indent Lines - Indents selected lines 4 Schedule / Create Outdent Lines - Outdents selected lines. Help Help Tips - Display tooltips on how to use the procedure editor. Online Help - Displays online help. Drag and Drop Drag and drop any statement above or below any other statement. Drag and drop any comment above or below any statement. A statement is automatically indented when dropped below an IF statement, except for an ELSE statement. You can nest steps within multiple IF or ELSE statements. Just drag-and-drop an IF or ELSE statement below an IF statement to insert it as a child statement. Guidelines Click any STEP, IF or ELSE statement in the middle pane to see its settings in the right-hand pane. You can edit these settings in the right hand pane or click any value in a statement directly to edit it. Multiple lines can be selected and acted on at one time. Right click selected lines to get additional options. Enter a value at the top of the left pane to filter the list of statements you can select. Hovering the cursor over any statement in the left or middle pane displays a tooltip description of that statement. The same description displays at the top of the third pane. Hovering the cursor to the left of selected statements displays icons. Click these icons to remove, indent or outdent selected statements. When entering a value for a variable into a parameter: Enter a < to select from a list of system variables. Enter a # to select from a list of user defined variables (page 26). Open and work on multiple procedures simultaneously. Each procedure you open displays in a separate tab. Copy and paste selected statements between tabs. You can set a STEP to Continue on Fail. This allows a procedure to continue running even if that particular STEP fails. Click the blank line at the bottom of the procedure to edit the description for the entire procedure. IF-ELSE-STEP Commands The following is a summary of standard IF-ELSE-STEP commands used in VSA agent procedures. IF Definitions checkVar() (page 9) Evaluates the given agent variable. See Using Variables (page 26). else (page 9) Adds an Else branch to run steps when an If branch returns a False result. eval() (page 9) Compares a variable with a supplied value. getOS() (page 10) Determines if the current Windows OS is 32 or 64-bit. getRAM() (page 10) Evaluates the total amount of memory reported by the latest audit of the agent. 5 Schedule / Create getRegistryValue() (page 10) Evaluates the given registry value. hasRegistryKey() (page 10) Tests for the existence of the given registry key. isAppRunning() (page 11) Checks to see if a specified application is currently running on the managed machine. isServiceRunning() (page 11) Determines if a service is running on the managed machine. isUserActive() (page 11) Determines whether the user is either: Idle or not logged on, or Active isUserLoggedin() (page 11) Tests whether a specific user, or any user, is logged in or not. isYesFromUser() (page 11) Presents a Yes/No dialog box to the user. testFile() (page 11) Tests for the existence of a file. testFileInDirectoryPath() (page 12) Tests for the existence of a file in the current directory path returned by getDirectoryPathFromRegistry(). true (page 12) Always returns True, executing If branch. STEP Definitions 6 alarmsSuspend() (page 12) Suppresses alarms on a machine for a specified number of minutes. alarmsUnsuspendAll() (page 12) Stops the suppression of alarms on a machine. captureDesktopScreenshot() (page 12) Captures a desktop screenshot of the agent machine and uploads it to the Kaseya Server. changeDomainUserGroup() (page 12) Changes a domain user's membership in a domain user group. changeLocalUserGroup() (page 12) Changes a local user's membership in a local user group. closeApplication() (page 13) Closes a running application. comment() (page 13) Adds a one-line comment to the procedure. copyFile() (page 13) Copies a file from one directory to another. copyUseCredentials() (page 13) Copies a file from one directory to another using a user credential. createDomainUser() (page 13) Adds a new user to an Active Directory domain when run on a domain controller. createEventLogEntry() (page 13) Creates an event log entry in either the Application, Security or System event log types. You can create a Warning, Error or Informational event with your own description. createLocalUser() (page 13) Adds a new local user account to a machine. createWindowsFileShare() (page 13) Creates a new file share on a Windows machine. deleteDirectory() (page 14) Deletes a directory from the agent machine. deleteFile() (page 14) Deletes a file from the managed machine. deleteFileInDirectoryPath() (page 14) Deletes file in directory returned by getDirectoryPathFromRegistry(). deleteRegistryKey() (page 14) Deletes a key from the registry. delete64BitRegistryKey() (page 14) Deletes a 64-bit (page 25) key from the registry. deleteRegistryValue() (page 14) Deletes a value from the registry. delete64BitRegistryValue() (page 14) Deletes a 64-bit (page 25) value from the registry. deleteUser() (page 14) Deletes a user from the agent machine. disableUser() (page 14) Disables a user, preventing logon to the agent machine. disableWindowsService() (page 14) Disables a Windows service. Schedule / Create enableUser() (page 14) Enables a previously disabled user, allowing the user to logon to the OS. executeFile() (page 14) Executes any file as if it was run from the Run item in the Windows Start menu. executeFileInDirectoryPath() (page 15) Same as execute file. File location is relative to the directory returned by getDirectoryPathFromRegistry(). executePowershell() (page 15) Executes a powershell file, or command with arguments or both. executePowerShell32BitSystem (page 15) Executes a powershell file, or command with arguments or both, as a 32 bit system command. executePowerShell32BitUser (page 15) Executes a powershell file, or command with arguments or both, as a 32 bit user command. executePowerShell64BitSystem (page 15) Executes a powershell file, or command with arguments or both, as a 64 bit system command. executePowerShell64BitUser (page 15) Executes a powershell file, or command with arguments or both, as a 64 bit user command. executeProcedure() (page 15) Starts another VSA agent procedure on the current machine. executeShellCommand() (page 16) Runs any command from a command shell. executeShellCommandToVariable() (page Executes a shell command and returns output created during and 16) after its execution to a variable. executeVBScript() (page 16) Runs a Vbscript, with or without command line arguments. getDirectoryPathFromRegistry() (page 16) Returns the directory path stored in the registry at the specified location. Result used in subsequent steps. getFile() (page 16) Gets a file from the managed machine and saves it to the Kaseya Server. getFileInDirectoryPath() (page 17) Gets a file from the managed machine located relative to the directory returned by getDirectoryPathFromRegistry() and saves it to the Kaseya Server. getURL() (page 17) Returns the text and HTML contents of a URL and stores it to a file on the managed machine. getURLUsePatchFileSource() (page 17) Downloads a file from a given URL to a target folder and file for that agent. Uses the Patch Management > File Source settings. getVariable() (page 17) Gets a value from the agent on the managed machine and assigns it to a variable. See Using Variables (page 26). getVariableRandomNumber() (page 17) Generates a random number. getVariableUniversalCreate() (page 17) Gets a variable that persists outside of the immediate procedure's execution. getVariableUniversalRead() (page 17) Reads up to three variables you have previously created using the getVariableUniversalCreate() step. giveCurrentUserAdminRights() (page 18) Adds the current user to the local administrator’s group on the agent machine, either permanently or for a temporary period of time. impersonateUser() (page 18) Specifies the user account to use when executing a file or shell when Execute as the logged on user is specified in a subsequent command. installAptGetPackage() (page 18) Silently installs a package using the apt-get command in Linux. installDebPackage() (page 18) Silently installs a Debian package on any Linux OS that supports .deb packages. installDMG() (page 18) Silently installs a .DMG package in OS X. installMSI() (page 18) Installs an MSI file for Windows. 7 Schedule / Create 8 installPKG() (page 18) Silently installs a .PKG package in OS X. installRPM() (page 18) Silently installs an RPM package on any Linux OS that supports installing RPMs. logoffCurrentUser() (page 18) Automatically logs off the current user. pauseProcedure() (page 18) Pauses the procedure for N seconds. reboot() (page 19) Reboots the managed machine. rebootWithWarning() (page 19) Reboots a machine, displaying a warning message to the end-user before the reboot process occurs. removeWindowsFileShare() (page 19) Removes a file share from a Windows agent. renameLockedFile() (page 19) Renames a file that is currently in use. renameLockedFileInDirectoryPath() (page 19) Renames a file currently in use in directory returned by getDirectoryPathFromRegistry(). scheduleProcedure() (page 19) Schedules an agent procedure to run on a specified machine. sendAlert() (page 19) Creates an alert based on a previous getVariable() command. sendEmail() (page 21) Sends an email to one or more recipients. sendMessage() (page 21) Displays a message in a dialog box on the managed machine. sendURL() (page 21) Opens a browser to the specified URL on the managed machine. setRegistryValue() (page 21) Sets the registry value to a specific value. set64BitRegistryValue() (page 21) Sets the 64-bit (page 25) registry value to a specific value. sqlRead() (page 22) Returns a value from the database and stores it to a named variable by running a selected SQL "read" statement. sqlWrite() (page 22) Updates the database by running a selected SQL "write" statement. startWindowsService() (page 22) Runs a Start command for a Windows service, if it exists. stopWindowsService() (page 22) Runs a Start command for a Windows service if it exists. transferFile() (page 23) Transfers a file from the agent machine running this step to another agent machine. uninstallbyProductGUID() (page 23) Silently uninstalls a product based on its MSI GUID. unzipFile() (page 23) Extracts the contents of a specified zip file to a target folder. updateSystemInfo() (page 23) Updates the selected System Info field with the specified value. useCredential() (page 23) Specifies that Set Credential should be used when Execute as the logged on user is specified in a subsequent command. windowsServiceRecoverySettings() (page 23) Sets the Service Recovery Settings for any given service in Windows. writeDirectory() (page 23) Writes a directory from the server to the managed machine. writeFile() (page 24) Writes a file stored on the Kaseya Server to the managed machine. writeFileFromAgent() (page 24) Transfers a file from another agent machine to the agent machine running this step. writeFileInDirectoryPath() (page 24) Writes a file stored on the Kaseya Server to the managed machine using the directory returned by getDirectoryPathFromRegistry(). writeProcedureLogEntry() (page 24) Writes a string to the Agent Procedure Log. writeTextToFile() (page 24) Writes text to a file on the agent machine. zipDirectory() (page 24) Compresses a directory and any subdirectories or files it contains into a zip file on the agent machine. zipFiles() (page 24) Compresses a single file or files into a zip file on the agent machine. Schedule / Create IF Commands checkVar() Enter a variable name, in the form #var_name#, in the space provided. checkVar() evaluates the current values assigned #var_name# and compares it with the supplied value. The supplied value may also be another variable name in the form of #var_name2#. If the check is true, IF commands are executed. If the check is false, ELSE steps are executed. See Using Variables (page 26). The available tests are: Exists : true if the variable exists. Does Not Exist : true if the variable does not exist. = : true if value of the variable equals the test value. Not = : true if value of the variable does not equal the test value. > : true if value of the variable is greater than the test value. >= : true if value of the variable is greater than or equal to the test value. < : true if value of the variable is less than the test value. <= : true if value of the variable is less than or equal to the test value. Contains : true if the test value is a sub string of the variable value. Not Contains : true if the test value is not a sub string of the variable value. Begins With : true if the variable value begins with the test value. Ends With : true if the variable value ends with the test value. For the tests =, Not =, >, >=, <, and <= the variables compared may be a string, a number, a date in the format of yyyy/mm/dd or yyyy/mm/dd hh:mm or yyyy/mm/dd hh:mm:ss, or a version number containing dots or commas such as 1.2.3 or 4,5,6,7. Values in variables are stored as strings, so compared numbers must be of equal string length. If a date format is specified, it may be offset using + dd:hh:mm:ss or - dd:hh:mm:ss. Only dd days are required; hh hours, mm minutes, and ss seconds may be omitted and are assumed to be zero when absent. CURRENT_TIMESTAMP may be specified to indicate that the current time be substituted in the comparison at the time the procedure is executed. e.g. CURRENT_TIMESTAMP - 7:12:00:00 will be evaluated as 7 days and 12 hours subtracted from the time that the procedure is executed. else Adds an Else command underneath a corresponding If command. Any steps listed under the Else command are executed when the corresponding If command returns a False result. eval() Enter an expression containing one or more variable names, in the form #var_name#, in the space provided. eval() uses the current value assigned to each #var_name#, evaluates the mathematical expression, and compares it with the supplied value. The supplied value may also be another expression. The mathematical expression may contain +, -, *, /, (, and ). e.g. (3.7 + (200 * #countA#)) / (#countB# - #countC#). If the check is true, IF steps are executed. If the check is false, ELSE steps are executed. The available tests are: = : true if value of the variable equals the test value. Not = : true if value of the variable does not equal the test value. 9 Schedule / Create > : true if value of the variable is greater than the test value. >= : true if value of the variable is greater than or equal to the test value. < : true if value of the variable is less than the test value. <= : true if value of the variable is less than or equal to the test value. Note: Cannot be used with Exists, Does Not Exist, Contains, or Not Contains operators. getOS() Determines if the current Windows OS is 32 or 64-bit. Operating systems supported: Windows getRAM() Evaluates the total amount of memory reported by the latest audit of the agent. This could come in helpful in ensuring a system meets the resource requirements of an application before an installation is attempted. Operating systems supported: Windows, OS X, Linux getRegistryValue() / get64BitRegistryValue() (page 25) After entering the registry path, the value contained in the key is returned. A check can be made for existence, absence, equality, or size differences. For example, HKEY_LOCAL_MACHINE\Software\Microsoft\Windows\CurrentVersion\AppPaths\AgentMon.ex e\path contains the directory path identifying where the agent is installed on the target machine. The test determines if the value stored for this key exists, thereby verifying the agent is installed. The available tests are: Exists : true if the registry key exists in the hive. Does Not Exist : true if the registry key does not exist in the hive. = : true if value of the registry key equals the test value. Not = : true if value of the registry key does not equal the test value. > : true if value of the registry key is greater than the test value (value must be a number). >= : true if value of the registry key is greater than or equal to the test value (value must be a number). < : true if value of the registry key is less than the test value (value must be a number). <= : true if value of the registry key is less than or equal to the test value (value must be a number). Contains : true if the test value is a sub string of the registry key value (value must be a string). Not Contains : true if the test value is not a sub string of the registry key value (value must be a string). Using the Backslash Character (\) A backslash character \ at the end of the key returns the default value of that key. HKEY_LOCAL_MACHINE\SOFTWARE\Microsoft\Windows\CurrentVersion\App Paths\WORDPAD.EXE\ returns a default value, such as %ProgramFiles%\Windows NT\Accessories\WORDPAD.EXE The last single backslash in a string is used to delimit the registry key from the registry value. To include backslashes as part of the value string, specify double slashes for each slash character. For example, the string HKEY_LOCAL_MACHINE\SOFTWARE\SomeKey\Value\\Name is interpreted as the key HKEY_LOCAL_MACHINE\SOFTWARE\SomeKey with a value of Value\Name. hasRegistryKey() / has64bitRegisterKey() (page 25) Tests for the existence of a registry key. hasRegistryKey() differs from getRegistryValue() since it can 10 Schedule / Create check for a directory level registry entry that only contains more registry keys (no values). isAppRunning() Checks to see if a specified application is currently running on the managed machine. If the application is running, the IF command is executed; otherwise, the ELSE command is executed. When this option is selected from the drop-down list, the Enter the application name field appears. Specify the process name for the application you want to test. For example, to test the Calculator application, specify calc.exe, which is the process name that displays in the Processes tab of the Windows Task Manager. isServiceRunning() Determines if a service is running on the managed machine. Specify the service name. True if the service name is running. False if the service name is stopped or does not exist. Note: Be sure to use the service name of the service, not the display name of the service. For example, the display name of the service for Microsoft SQL Server is SQL Server (MSSQLSERVER), but the service name of the service is MSSQLSERVER. For Windows machines, right click any service in the Services window and click the Properties option to see the service name of that service. isUserActive() Determines whether the user is either: Idle or not logged on, or Active Operating systems supported: Windows, OS X, Linux isUserLoggedin() Tests to see if a specific user or any user is logged on the managed machine. Enter the machine user's logon name or leave the field blank to check for any user logged on. The IF commands are executed if a user is logged on. The ELSE steps are executed if the user is not logged on. isYesFromUser() Displays a dialog box on the managed machine with Yes and No buttons. Also carries out the ELSE command if a specified amount of time has timed out. If Yes is selected by the machine user, the IF command is executed. If the selection times out or the machine user selects No, the ELSE command is executed. This function requests the machine user's permission to proceed with the agent procedure. This query is useful for agent procedures that require a reboot of the managed machine before completion. Procedure variables, for example #varName#, may be used inside isYesFromUser() fields to dynamically generate messages based on procedure data. testFile() Determines if a file exists on a managed machine. Enter the full path and file name. testFile() compares the full path and file name with the supplied value. If the check is true, IF commands are executed. If the check is false, ELSE steps are executed. Note: Environment variables such as %windir%\notepad.exe are acceptable. The available tests are: Exists : true if the full path and file name exists. Does not Exist : true if the full path and file name does not exist. 11 Schedule / Create Contains : true if the test value is a sub string of the file content. Not Contains : true if the test value is not a sub string of the file content. Begins With : true if the test value begins with the variable value. Ends With : true if the test value ends with the variable value. testFileInDirectoryPath() Tests the specified file located at the path returned using the getDirectoryPathFromRegistry() step. The available tests are: Exists : true if the file name exists. Does not Exist : true if the file name does not exist. Contains : true if the test value is a sub string of the file content. Not Contains : true if the test value is not a sub string of the file content. Begins With : true if the test value begins with the variable value. Ends With : true if the test value ends with the variable value. true Selecting True directs the IF commands to execute. Use True to directly execute a series of steps that do not require any decision points, such as determining whether a file exists using testFile(). STEP Commands alarmsSuspend() Suppresses alarms on a machine for a specified number of minutes. Updates the status of machines on the Monitor > Status > Suspend Alarm page. alarmsUnsuspendAll() Stops the suppression of alarms on a machine. Updates the status of machines on the Monitor > Status > Suspend Alarm page. captureDesktopScreenshot() Captures a desktop screenshot of the agent machine and uploads it to the Kaseya Server. The screenshot is saved as a PNG file with a unique name in a folder dedicated to that agent. You can access these files from the Audit > Documents page or from Live Connect. End-user notification options must be selected based on the level of user notification desired, silently capturing a screenshot, notifying the user that the capture will take place, or asking to approve the capture. A custom message can be entered if end-user notification or permission requesting is selected. Otherwise a standard message displays. Operating systems supported: Windows, OS X changeDomainUserGroup() Changes a domain user's membership in a domain user group. This STEP must be run on a domain controller. Enter the domain username of the member being added or removed from the domain user group. Then select whether to add or remove membership. Then select the domain user group. Operating systems supported: Windows changeLocalUserGroup() Changes a local user's membership in a local user group. Enter the local username of the member being added or removed from the local user group. Then select whether to add or remove membership. Then select the group. 12 Schedule / Create Operating systems supported: Windows closeApplication() If the specified application is running on the managed machine, then that application is closed down. Specify the process name for the application you want to close. For example, to close the Calculator application, specify calc.exe, which is the process name that displays in the Processes tab of the Windows Task Manager. comment() Adds a one line comment to the procedure. copyFile() Copies a file from one directory to another on the agent machine. If the target file exists, you must check a box to overwrite an existing file. Be sure to keep in mind folder syntax when running this STEP across different operating systems, for example, c:\temp\tempfile.txt for Windows and /tmp/tempfile.txt for OS X and Linux. Operating systems supported: Windows, OS X, Linux copyUseCredentials() Copies a file from a directory on a machine and attempts to copy the file to a target directory and filename. The copy process uses either: The user credential specified for an agent using Agent > Set Credentials, or The user credential specified by an impersonateUser() step before this step. This STEP is mostly used for accessing files across network UNC shares. If the target file exists, you must check a box to overwrite an existing file. Be sure to keep in mind folder syntax when running this STEP across different operating systems, for example, c:\temp\tempfile.txt for Windows and /tmp/tempfile.txt for OS X and Linux. Operating systems supported: Windows, OS X, Linux createDomainUser() Adds a new user to an Active Directory domain when run on a domain controller. Enter a domain user name to create, then a password that meets the domain's complexity requirements for user accounts, then select the domain group the user will be added to, either Domain Users or Domain Admins. Operating systems supported: Windows createEventLogEntry() Creates an event log entry in either the Application, Security or System event log types. You can create a Warning, Error or Informational event with your own description. The created event is hard-coded to use an Event ID of 607. Operating systems supported: Windows createLocalUser() Adds a new local user account to a machine. Enter a local user name to create, then a password that meets local user account complexity requirements, then select the group the user will be added to. Operating systems supported: Windows, OS X, Linux createWindowsFileShare() Creates a new file share on a Windows machine. You must type in the name of the file share as it will be accessed over the network, and enter the source folder on the agent for the file share. This folder 13 Schedule / Create will be created if it does not yet exist. Operating systems supported: Windows deleteDirectory() Deletes a directory from an agent machine. Ensure you have your directory syntax correct for Windows vs. OS X/ Linux. To ensure all sub-directories and files are also removed, check the Recursively delete subdirectories and files checkbox. Operating systems supported: Windows, OS X, Linux deleteFile() Deletes a file on a managed machine. Enter the full path and filename. Note: Environment variables are acceptable if they are set on a user's machine. For example, using a path %windir%\notepad.exe would be similar to C:\windows\notepad.exe. Note: You can delete a file that is currently in use using the renameLockedFile() command. deleteFileInDirectoryPath() Deletes the specified file located at the path returned using the getDirectoryPathFromRegistry() command. deleteRegistryKey() / delete64BitRegistryKey() (page 25) Deletes the specified registry key and all its sub-keys. deleteRegistryValue() / delete64BitRegistryValue() (page 25) Deletes the value stored at the specified registry key. The last single backslash in a string is used to delimit the registry key from the registry value. To include backslashes as part of the value string, specify double slashes for each slash character. For example, the string HKEY_LOCAL_MACHINE\SOFTWARE\SomeKey\Value\\Name is interpreted as the key HKEY_LOCAL_MACHINE\SOFTWARE\SomeKey with a value of Value\Name. deleteUser() Deletes a user from the agent machine. Operating systems supported: Windows, OS X, Linux disableUser() Disables a user, preventing logon to the agent machine. Operating systems supported: Windows, OS X, Linux disableWindowsService() Disables a Windows service. Operating systems supported: Windows enableUser() Enables a previously disabled user, allowing the user to logon to the OS. Operating systems supported: Windows, OS X executeFile() Executes the specified file on the managed machine. This function replicates launching an application using the Run… command located in the Microsoft Windows Start menu. This function takes three 14 Schedule / Create parameters: Full path filename to the .exe file. Argument list to pass to the .exe file Option for the procedure to wait until the .exe completes or not. Note: Environment variables are acceptable, if they are set on a user's machine. For example, using a path %windir%\notepad.exe, would be similar to C:\windows\notepad.exe. If Execute as the logged on user is selected, then a credential must be specified by running either the impersonateUser() (page 18) or useCredential() (page 23) command before this command. If run Execute as the system account is selected, execution is restricted to the agent's system level access. executeFileInDirectoryPath() Same as Execute File except the location of the .exe file is located at the path returned from a getDirectoryPathFromRegistry() command. If Execute as the logged on user is selected, then a credential must be specified by running either the impersonateUser() (page 18) or useCredential() (page 23) command before this command. If run Execute as the system account is selected, execution is restricted to the agent's system level access. executePowershell() Executes a powershell script, including: a Powershell .PS1 file a Powershell command with special arguments a combination of both Operating systems supported: Windows XP SP3+/Server 2008 with Powershell add-on, Windows 7, Windows Server 2008 There are five variants of this command available. executePowershell() - Executes a powershell file, or command with arguments, or both. When running this command on either a 32bit or 64bit machine, no system credential or user credential is provided. executePowerShell32BitSystem - Executes a powershell file, or command with arguments, or both, as a 32 bit system command. executePowerShell32BitUser - Executes a powershell file, or command with arguments, or both, as a 32 bit user command. executePowerShell64BitSystem - Executes a powershell file, or command with arguments, or both, as a 64 bit system command. executePowerShell64BitUser - Executes a powershell file, or command with arguments, or both, as a 64 bit user command. System and user commands: System - If a system command is run, execution is restricted to the agent's system level access. User - If a user command is selected, then a credential must be specified by running either the impersonateUser() (page 18) or useCredential() (page 23) command before this command. executeProcedure() Causes another named procedure to execute. Use this capability to string multiple IF-ELSE-STEP procedures together. If the procedure no longer exists on the Kaseya Server, an error message displays next to the procedure drop-down list. You can use this command to run a system procedure. You can nest procedures to 10 levels. 15 Schedule / Create executeShellCommand() Allows the procedure to pass commands to the command interpreter on the managed machine. When this command is selected, the field Enter the command to execute in a command shell is displayed. Enter a command in the field. The command must be syntactically correct and executable with the OS version on the managed machine. Commands and parameters containing spaces should be surrounded by quotes. Since the command is executed relative to the agent directory, absolute paths should be used when entering commands. Note: executeShellCommand() opens a command prompt window on a managed Windows machine to execute in. If you do not want a window opening on a managed Windows machine, because it might confuse users, put all the commands in a batch file. Send that file to the managed Windows machine using the writeFile() command. Then run the batch file with the executeFile() command. executeFile() does not open a window on a managed Windows machine. If Execute as the logged on user is selected, then a credential must be specified by running either the impersonateUser() (page 18) or useCredential() (page 23) command before this command. If run Execute as the system account is selected, execution is restricted to the agent's system level access. executeShellCommandToVariable() Executes a shell command and returns output created during and after its execution to a variable. The variable must be referred to in subsequent steps as #global:cmdresults#. Operating systems supported: Windows, Linux, OS X executeVBScript() Runs a Vbscript, with or without command line arguments. If the Vbscript displays a popup window or notifies the end user, check the box for Use Wscript instead of Cscript. Operating systems supported: Windows getDirectoryPathFromRegistry() Returns a file path stored in the specified registry key. Use this command to fetch the file location. For instance, use this command to find the directory where an application has been installed. The result can be used in subsequent steps by: deleteFileInDirectoryPath() executeFileInDirectoryPath() getFileInDirectoryPath() renameLockedFileInDirectoryPath() testFileInDirectoryPath() (an IF command) writeFileInDirectoryPath() getFile() Upload the file at the specified path from the managed machine. Be sure to enter a full path filename that you want to upload. Example: news\info.txt. Folders are created when the getFile() command is run, if they don't already exist. The file is stored on the Kaseya Server in a private directory for each managed machine. View or run the uploaded file using Agent Procedures > Get File (page 38). Optionally, existing copies of uploaded files are renamed with a .bak extension prior to the next upload of the file. This allows you to examine both the latest version of the file and the previous version. Optionally create a Get File alert if the uploaded file differs or is the same from the file that was uploaded previously. You must create a Get File alert for a machine ID using the Monitor > Alerts - Get File page to enable the sending of an alert using the getFile() command. Once defined for a machine ID, the same Get File alert is active for any agent procedure that uses a getFile() command 16 Schedule / Create and is run on that machine ID. Turn off alerts for specific files in the agent procedure editor by selecting one of the without alerts options. getFileInDirectoryPath() Just like the getFile() command but it adds the path returned from the getDirectoryPathFromRegistry() command to the beginning of the remote file path. Access the uploaded file using the Agent Procedures > getFile() (page 38) function. getURL() Returns the text and HTML contents of a URL and stores it to a file on the managed machine. To demonstrate this to yourself, try specifying www.kaseya.com as the URL and c:\temp\test.htm as the file to store the contents of this URL. A copy of the web page is created on the managed machine that contains all of the text and HTML content of this webpage. You can search the contents of the file on the managed machine in a subsequent command. Another use is to download an executable file that is available from a web server, so that you don't need to upload the file to the VSA server nor use the VSA's bandwidth to write the file down to each agent. You can use a subsequent command to run the downloaded executable on the managed machine. Note: This command can download files from a LAN file source instead of the URL using Agent > Configure Agents > LAN Cache. Files have to be larger than 4k bytes. getURLUsePatchFileSource() Downloads a file from a given URL to a target folder and file for that agent. Uses the Patch Management > File Source settings. Operating systems supported: Windows getVariable() Defines a new agent variable. When the procedure step executes, the system defines a new variable and assigns it a value based on data fetched from the managed machine's agent. Note: See Using Variables (page 26) for the types of variable values supported by the getVariable() command. getVariableRandomNumber() Generates a random number which can then be accessed as the variable #global:rand# in a subsequent step. Operating systems supported: Windows, OS X, Linux getVariableUniversalCreate() Gets a variable that persists outside of the immediate procedure's execution. This can be useful for passing a variable to another agent procedure using the scheduleProcedure() step. You can create up to three variables. You can enter either string data or variables created in an earlier step. Variables created using this step can only be read using the Get Variable – Universal – Read step in any subsequent step. Operating systems supported: Windows, OS X, Linux getVariableUniversalRead() Reads up to three variables you have previously created using the Get Variable – Universal – Create step. These variables must be referred to as #global:universal1#, #global:universal2#, and 17 Schedule / Create #global:universal3#. Please see the initial Get Variable – Universal – Create step for more detail. Operating systems supported: Windows, OS X, Linux giveCurrentUserAdminRights() Adds the current user to the local administrator’s group on the agent machine, either permanently or for a temporary period of time. This change does not take effect until the user logs off. It is recommended you leverage the logoffCurrentUser() step. Operating systems supported: Windows impersonateUser() Enter a username, password, and domain for the agent to logon with. This command is used in a procedure before an executeFile(), executeFileInDirectoryPath() or executeShellCommand() that specifies the Execute as the logged on user option. Leave the domain blank to log into an account on the local machine. Use impersonateUser() to run an agent procedure using a credential specified by agent procedure. Use useCredential() to run an agent procedure using a credential specified by managed machine. installAptGetPackage() Silently installs a package using the apt-get command in Linux. Operating systems supported: Linux installDebPackage() Silently installs a Debian package on any Linux OS that supports .deb packages. Operating systems supported: Linux installDMG() Silently installs a .DMG package in OS X. If the package is formatted as an Application, it is copied to the /Applications folder. If the .DMG contains a .PKG installer within it, Kaseya attempts to install it. Operating systems supported: OS X installMSI() Installs an MSI file for Windows. Options can be selected to either run a quiet installation or to avoid automatically restarting the computer after installation if it is requested. Operating systems supported: Windows installPKG() Silently installs a .PKG package in OS X. Operating systems supported: OS X installRPM() Silently installs an RPM package on any Linux OS that supports installing RPMs. Operating systems supported: Linux logoffCurrentUser() Automatically logs off the current user. An optional warning that the log-off process is about to begin can be entered and displayed to the end-user. Operating systems supported: Windows, OS X 18 Schedule / Create pauseProcedure() Pause the procedure for N seconds. Use this command to give Windows time to complete an asynchronous task, like starting or stopping a service. reboot() Unconditionally reboots the managed machine. To warn the user first, use the isYesFromUser() command before this command. A isYesFromUser() command prompts the user before rebooting their machine. rebootWithWarning() Reboots a machine, displaying a warning message to the end-user before the reboot process occurs. Operating systems supported: Windows, OS X removeWindowsFileShare() Removes a file share from a Windows agent. Operating systems supported: Windows renameLockedFile() Renames a file that is currently in use. The file is renamed the next time the system is rebooted. The specified filename is a complete file path name. Can be used to delete a file that is currently in use if the "new file name" is left blank. The file is deleted when the system is rebooted. renameLockedFileInDirectoryPath() Renames a file that is currently in use that is located in the path returned from a getDirectoryPathFromRegistry() command. The file is renamed the next time the system is rebooted. Can be used to delete a file that is currently in use if the "new file name" is left blank. The file is deleted when the system is rebooted. scheduleProcedure() Schedules a procedure to run on a specified machine. Optionally specifies the time to wait after executing this step before running the procedure and the specified machine ID to run the procedure on. If no machine is specified, then the procedure is run on the same machine running the agent procedure. Enter the complete name of the machine, for example, machine.unnamed.org. This command allows an agent procedure running on one machine to schedule the running of an agent procedure on a second machine. You can use this command to run a system procedure. You can nest procedures to 10 levels. sendAlert() This step command takes no parameters. Instead one or more getVariable() (page 17) steps—run prior to the sendAlert() step—specify alert action variables that determine the actions triggered by the sendAlert() step. All alert action variables are optional. If no alert action variables are defined, an alarm will be created with a system default message. An alert action variable can be used to disable the default alarm action. Alert action variables, if used, must use the specific names corresponding to their actions: alertSubject - Subject for alert message. A system default message is used if you do not define one in the agent procedure. See System Parameters below. alertBody - Body for alert message. A system default message is used if you do not define one in the agent procedure. See System Parameters below. alertDisableAlarm - When a default alarm enabled, enter any value to disable. alertGenerateTicket - Enter any value to generate. 19 Schedule / Create alertScriptName - Valid agent procedure name to execute on current machine. alertEmailAddressList - Comma-separated email addresses. Required to send email. alertAdminNameList - Comma-separated list of VSA user names. Required to send messages to the Info Center > Inbox. alertNotificationBarList - Comma-separated list of VSA user names. Required to send messages to the Notification Bar. alertNotificationBarMasterAdmins - Enter any value to send notifications to the Notification Bar for all master users. System Parameters You can override the default alertSubject and alertBody text sent by the sendAlert() command. If you do you can embed the following system parameters in the alertSubject and alertBody variables you create using getVariable() commands. Double angle brackets are required when embedding them in text. You do not create these embedded system parameters using a getVariable() command. They are always available. <<id>> - Machine display name on which the agent procedure is being executed. <<gr>> - Machine group name on which the agent procedure is being executed. <<at>> - Alert date/time (server time). <<ata>> - Alert date/time (agent time). <<apn>> - Agent procedure name being executed. Custom Parameters You can embed custom parameters in alertSubject and alertBody getVariable() commands. First, create another variable using the getVariable() command. The value stored with this first variable can be dynamic, determined when the agent procedure is run. Second, insert the name of this first variable—surrounded by # and # brackets—into the text value specified by the alertSubject and alertBody getVariable() commands. Examples include: #filename# #logentry# #registrykey# #registryvalue# Specifying getVariable() Commands before sendAlert() in an Agent Procedure For example, assume an agent procedure: 1. Creates a variable called runTimeVar using the getVariable() command. The values entered are: Constant Value Procedure terminated. Could not access 'File Server 123'. runTimeVar All Operating Systems Continue on Fail 2. Then a second getVariable() command is created in the same agent procedure. This second getVariable() command specifies the body of a sendAlert() message. This body message embeds both system and custom parameters. The values entered for this second getVariable() command are: Constant Value This alert was generated by <<apn>> on machine <<id>> at <<ata>>: #runTimeVar#. alertBody 20 Schedule / Create All Operating Systems Continue on Fail 3. Finally the sendAlert() command is run and the alert message is created. Note: The sequence of parameter variables and alert action variables does not matter. But all of them have to run before the sendAlert() command that makes use of them. sendEmail() Sends an email to one or more recipients. Specifies the subject and body text of the email. sendMessage() Sends the entered message to a managed machine. An additional checkbox, if checked, sends the message immediately. If unchecked, sends the message after the user clicks the flashing agent system tray icon. sendURL() Displays the entered URL in a web browser window on the managed machine. An additional checkbox, if checked, displays the URL immediately. If unchecked, the URL is displayed after the user clicks the flashing agent system tray icon. setRegistryValue() / set64BitRegistryValue() (page 25) Writes data to the specified registry value. This function takes three parameters: Enter the full path to a registry key containing a value Specify the (Default) value for a registry key by adding a trailing backslash \. Otherwise specify a name for an existing value or to create a new value. See the Name column in image below. Example of setting the (Default) value: HKEY_LOCAL_MACHINE\SOFTWARE\000Sample\ The last single backslash in a string is used to delimit the registry key from the registry value. To include backslashes as part of the value string, specify double slashes for each slash character. For example, the string HKEY_LOCAL_MACHINE\SOFTWARE\SomeKey\Value\\Name is interpreted as the key HKEY_LOCAL_MACHINE\SOFTWARE\SomeKey with a value of Value\Name. Enter the data to write to the registry value Select the data type REG_SZ - String value. REG_BINARY - Binary data displayed in hexadecimal format. DWORD - Binary data limited to 32 bits. Can be entered in hexadecimal or decimal format. REG_EXPAND_SZ - An "expandable" string value holding a variable. Example: %SystemRoot%. REG_MULTI_SZ - A multiple string array. Used for entering more than one value, each one separated by a \0 string. Use \\0 to include \0 within a string array value. 21 Schedule / Create sqlRead() Returns a value from the database and stores it to a named variable by running a selected SQL "read" statement. Global "read" statements are specified in the following location: <KaseyaInstallationDirectory>\xml\Procedures\AgentProcSQL\0\SQLRead\<filename.xml > Filenames can be any name with an .xml extension so long as they are formatted correctly internally. Multiple statements specified using one or more XML files display as a single combined combo box list in the user interface. Each SQL statement in the XML file has a unique label, and only the labels are shown in the combo box. If no SQL statements are defined, then *No Approved SQL* displays in the combo box. Partition-Specific Statements Partition-specific folders can contain partition-specific SQL statements. For example: <KaseyaInstallationDirectory>\xml\Procedures\AgentProcSQL\123456789\SQLRead\<file name.xml>. Users can select and run all 0 folder SQL "read" statements and all SQL "read" statements located in the partition path that matches the partition they are using. Example Format <?xml version="1.0" encoding="utf-8" ?> <queryList> <queryDef label="Agent Machine Name" sql="SELECT machName FROM dbo.machNameTab WHERE agentGuid = #vMachine.agentGuid#" /> </queryList> sqlWrite() Updates the database—such as updating the value in a column or inserting a row—by running a selected SQL "write" statement. Global "write" statements are specified in the following location: <KaseyaInstallationDirectory>\xml\Procedures\AgentProcSQL\0\SQLWrite\<filename.xm l> Filenames can be any name with an .xml extension so long as they are formatted correctly internally. Multiple statements specified using one or more XML files display as a single combined combo box list in the user interface. Each SQL statement in the XML file has a unique label, and only the labels are shown in the combo box. If no SQL statements are defined, then *No Approved SQL* displays in the combo box. Partition-Specific Statements Partition-specific folders can contain partition-specific SQL statements. For example: <KaseyaInstallationDirectory>\xml\Procedures\AgentProcSQL\123456789\SQLWrite\<fil ename.xml>. Users can select and run all 0 folder SQL "write" statements and all SQL "write" statements located in the partition path that matches the partition they are using. Example Format <?xml version="1.0" encoding="utf-8" ?> <queryList> <queryDef label="Update Table" sql="UPDATE table1 SET column2 = value2 WHERE column1 = value1" /> </queryList> startWindowsService() Runs a Start command for a Windows service, if it exists. Operating systems supported: Windows 22 Schedule / Create stopWindowsService() Runs a Stop command for a Windows service if it exists. Operating systems supported: Windows transferFile() Transfers a file from the agent machine running this step to another agent machine. Enter the fully qualified machine ID of the target machine, for example, mymachine.root.kaseya. Then enter the full path and file name of the source file you wish to send from the currently selected agent. Then enter the full path and file name of the target file on the target machine. Operating systems supported: Windows uninstallbyProductGUID() Silently uninstalls a product based on its MSI GUID. Operating systems supported: Windows unzipFile() Extracts the contents of a specified zip file to a target folder, with an option to automatically overwrite any previously existing target files or folders. Operating systems supported: Windows, OS X, Linux updateSystemInfo() Updates the selected System Info field with the specified value for the machine ID this procedure runs on. The System Info fields you can update include all columns in vSystemInfo except agentGuid, emailAddr, Machine_GroupID, machName, and groupName. vSystemInfo column information is used by Audit > System Info, Agent > System Status, the Filter Aggregate Table in View Definitions, and the Aggregate Table report.You can update a System Info field using any string value, including the value of any previously defined agent procedure variable. useCredential() Uses the credentials set for the machine ID in Set Credential. This command is used in a procedure before an executeFile(), executeFileInDirectoryPath() or executeShellCommand() that specifies the Execute as the logged on user option. Also used to access a network resource requiring a credential from a machine when a user is not logged on. Use impersonateUser() to run an agent procedure using a credential specified by agent procedure. Use useCredential() to run an agent procedure using a credential specified by managed machine. Note: A procedure execution error is logged if a Set Credential procedure command encounters an empty username. Note: Patch Management > Patch Alert can alert you—or run an agent procedure—if a machine ID's credential is missing or invalid. windowsServiceRecoverySettings() Sets the Service Recovery Settings for any given service in Windows. Specify the name of the service you wish to modify, then set both the first and second restart failure options and any subsequent restart failure options. Operating systems supported: Windows writeDirectory() Writes a selected directory, including subdirectories and files, from Manage Files Stored on Server 23 Schedule / Create (page 29) to the full path directory name specified on the managed machine. writeFile() Writes a file selected from Manage Files Stored on Server (page 29) to the full path filename specified on the managed machine. Enter a new filename if you want the file to be renamed. Each time a procedure executes the writeFile() command, the agent checks to see if the file is already there or not by hashing the file to verify integrity. If not, the file is written. If the file is already there, the procedure moves to the next step. You can repeatedly run a procedure with writeFile() that sends a large file to a managed machine and know that the VSA only downloads that file once. Note: Environment variables are acceptable if they are set on a user's machine. For example, using the path %windir%\notepad.exe would be equivalent to C:\windows\notepad.exe. Note: This command can download files from a LAN file source instead of the VSA using Agent > Configure Agents > LAN Cache. Files have to be larger than 4k bytes. writeFileFromAgent() Transfers a file from another agent machine to the agent machine running this step. Transfers a file between agents. Similar to the previous transferFile() step, though in this case you enter the fully qualified machine ID of the source machine that has the file you wish to send to the currently selected agent. First enter the full path and file name of the file you wish to send from the source machine. You then enter the full path and the file name to be created on the target machine. Operating systems supported: Windows writeFileInDirectoryPath() Writes the specified filename to the path returned from a getDirectoryPathFromRegistry() command. writeProcedureLogEntry() Writes the supplied string to the Agent Procedure Log for the machine ID executing this agent procedure. writeTextToFile() Writes text to a file on the agent machine, either by appending text to an existing file or by creating a new file if none exists. You enter the text to write to the file, then enter the full path and file name on the agent machine the text will be written to. You can optionally overwrite the entire file with the text you have entered if the file already exists. Operating systems supported: Windows, OS X, Linux zipDirectory() Compresses a directory and any subdirectories or files it contains into a zip file on the agent machine. Enter the full path to be compressed, which can contain wildcards. Then enter the full path and file name of the zip file to be created or updated. If the target zip file already exists, optionally check a box to overwrite it. Operating systems supported: Windows, OS X, Linux zipFiles() Compresses a single file or files into a zip file on the agent machine. Enter the full path of the file or files to be compressed. Then enter the full path and filename of the zip file to be created or updated. If the target zip already exists, optionally check a box to overwrite it. Operating systems supported: Windows, OS X, Linux 24 Schedule / Create 64-Bit Commands Accessing 64-bit Registry Values Five 64-bit registry commands and one 64-bit parameter are available in agent procedures. 64-bit Windows isolates registry usage by 32-bit applications by providing a separate logical view of the registry. The redirection to the separate logical view is enabled automatically and is transparent for the following registry keys: HKEY_LOCAL_MACHINE\SOFTWARE HKEY_USERS\*\SOFTWARE\Classes HKEY_USERS\*_Classes Since the Kaseya agent is a 32-bit application, you must use the following commands and parameter to access the registry data that are stored in the above keys by the 64-bit applications. IF Commands get64BitRegistryValue() has64bitRegistryKey() STEP Commands delete64BitRegistryValue() delete64BitRegistryKey() set64BitRegistryValue() 64-bit Registry Value parameter in the getVariable() command Specifying 64-bit Paths in File Commands The following commands... deleteFile() writeFile() executeFile() renameLockedFile() getFile() get-variable() File Content parameter ... can specify 64-bit directories using the following variables: Use This Environment Variable To Target This Directory %windir%\sysnative <drive>:\Windows\System32 %ProgramW6432% <drive>:\Program Files %CommonProgramW6432% <drive>:\Program Files\Common Files For compatibility reasons, Microsoft has placed 64-bit system files in the \Windows\system32 directory and 32-bit system files in the \Windows\SysWOW64 directory. Similarly, 64-bit application files are installed to the \Program Files and 32-bit application files are installed to the \Program Files (x86) folder. Since the Kaseya agent is a 32-bit application, when a file path containing \Windows\system32 or \Program Files is specified on a 64-bit machine, the file access is automatically redirected to the \Windows\SysWOW64 or \Program Files (x86) folders. To access files in \Windows\system32 and \Program Files folders, use these environment variables when specifying parameters for these file commands. 25 Schedule / Create In Directory Path Commands The getDirectoryPathFromRegistry() command—and any subsequent ...In Directory Path command—cannot be used to access files in the \Program Files and \Windows\System32 directories on a target 64-bit machine. These commands can still access 32-bit or 64-bit files in any other folder. Identifying 64-bit Machines 64-bit machine IDs typically display a x64 in the Version column of audit pages. Using Variables Use variables to store values that can be referenced in multiple procedure steps. Variables are passed automatically to nested procedures. Three Methods for Creating Variables: Procedure Variables - Use the getVariable() command within a procedure to create a new variable name without any special characters. Example: VariableName. In subsequent steps, including steps in nested procedures, reference the variable by bracketing the variable name with the # character. Example: #VariableName#. Note: Procedures variables cannot be referenced outside of the procedure or nested procedures that use them except for GLOBAL variables. A procedure variable is only visible to the section of the procedure it was created in and any child procedures. Once a procedure leaves the THEN clause or ELSE clause the variable was created in, the variable is out of scope and no longer valid. Use GLOBAL Variables, described below, to maintain visibility of a variable after leaving the THEN clause or ELSE clause the variable was created in. 26 Managed Variables - Use the Variable Manager (page 28) to define variables that can be used repeatedly in different procedures. You can maintain multiple values for each managed variable, with each value applied to one or more group IDs. Managed variables cannot be re-assigned new values within a procedure. Within a procedure, reference a managed variable by bracketing the variable name with the < and > character. Example: <VariableName>. GLOBAL Variables - Non-GLOBAL variables cannot return a changed value of a procedure variable defined by its parent procedure. Non-GLOBAL variables initialized in the child procedure also cannot be passed back to the parent. Variables named with the prefix GLOBAL: (case-insensitive followed by a colon) can pass changed values from the child to the parent, whether the variable is initialized in the parent or the child procedure. Subsequent child procedures can makes use of any GLOBAL variable initialized in any earlier step, regardless of whether that global variable is initialized in a parent procedure or another child procedure. Variable Names - Variable names cannot include the following characters: , % ' " / \ : * ? < > | and the space character. Where Used - Once variables are created you can include them, in their bracketed format, in any text entry field displayed by an IF-ELSE-STEP dialog box. Case Sensitivity - Variable names are case sensitive. Reserved Characters - Because the <, > and # characters are used to identify variable names, these characters must be entered twice as regular text in a command line. For example the following command c:\dir >> filelist.txt is interpreted at procedure runtime as c:\dir > filelist.txt. Types of Variable Values Possible - The following are the types of variable values typically obtained by using the getVariable() parameter. Schedule / Create Registry Value and 64-Bit Registry Value - See 64-Bit Commands (page 25) - Data from the specified registry value on the managed machine. The last single backslash in a string is used to delimit the registry key from the registry value. To include backslashes as part of the value string, specify double slashes for each slash character. For example, the string HKEY_LOCAL_MACHINE\SOFTWARE\SomeKey\Value\\Name is interpreted as the key HKEY_LOCAL_MACHINE\SOFTWARE\SomeKey with a value of Value\Name. File Content - Data from a specified file on the managed machine. See 64-Bit Commands (page 25). Constant Value - Specified constant as typed in the procedure editor. Agent Install Directory Path - Directory in which the agent is installed on the managed machine. Agent Install Drive - Drive in which the agent is installed on the managed machine, such as c:\. Agent Working Directory Path - Working directory on the managed machine as specified using Agent > Working Directory. Warning: Do not delete files and folders in the working directory. The agent uses the data stored in the working directory to perform various tasks. User Temporary Directory Path - The temporary directory for the user currently logged on the managed machine. This path is the expansion of the %TEMP% environment variable for the currently logged on user. If no user is logged on, it is the default Windows temporary directory. Machine.Group ID - Machine ID of the agent executing the procedure. File Version Number - The software version number of the specified file on the managed machine. For example, an exe or dll file often contain the version number of their release. File Size - Size in bytes of the specified file on the managed machine. File Last Modified Date - The last modified date and time in universal time, coordinated (UTC) of the specified file on the managed machine in the format of yyyy/mm/dd hh:mm:ss. Automatic SQL View Data Variables - SQL view parameters are available as automatically declared procedure variables. Automatic variables enable you to skip using the GetVariable command before making use of the variable in a step. Use the format #SqlViewName.ColumnName# in a procedure to return the value of a dbo.SqlView.Column for the agent running the agent procedure. See System > Database Views for a list of the SQL views and columns that are available. Note: SQL View Data - This older method of returning a database view value is only necessary if you are trying to return a value from a different machine than the machine running the agent procedure. Use the GetVariable command with the SQL View Data option to create a new procedure variable and set it to the value of a dbo.SqlView.Column value. Use the format SqlViewName/ColumnName/mach.groupID or SqlViewName/ColumnName. If the optional machine ID is omitted, then the value for the agent executing the procedure is retrieved. If ColumnName contains a space, surround it with square brackets. Example: vSystemInfo/[Product Name]. See System > Database Views for a list of the SQL views and columns that are available. Automatic Administrator Variables - Three administrator variables are declared automatically. These automatic administrator variables allow agent procedures to access values not present from an SQL view. #adminDefaults.adminEmail# - Email address of the VSA user who scheduled the agent procedure. 27 Schedule / Create #adminDefaults.adminName# - Name of the VSA user who scheduled the agent procedure. #scriptIdTab.scriptName# - Name of the agent procedure. WMI Property - A WMI namespace, class, and property. The format of the specified WMI property is NameSpace:Class.Property. For example, root\cimv2:Win32_OperatingSystem.FreePhysicalMemory. Specify an instance using the following syntax: NameSpace:Class[N].Property where [N] is the instance number. For example, root\cimv2:Win32_OnboardDevice[3].Description. The first instance may be specified with or without specifying the [1] instance number. Expression Value - Specify an expression that consists of procedure variables and six mathematical operators +, -, *, /, (, and ) that are evaluated and assigned to a new procedure variable. For example, ((#variable1# + #variable2#) + 17.4) / (#variable3# * 4). The procedure variables must contain numeric values. Prompt when procedure is scheduled - Displays a message prompt to enter a value when an agent procedure is run. The value is stored in the variable name you specify. Specify the prompt text and variable name. For example, each time this procedure is run, a VSA user could enter a different machine directory. Alert Variables - An agent procedure can be assigned to run when an alert is triggered. In most cases the alert passes predefined variables to the agent procedure. These alert variables are documented by alert topic. See Alerts - New Agent Installed for an example. Windows Environment Variables - You can reference Windows environmental variables within the executeFile(), Execute File in Path and executeShellCommand() only. Enclose the whole command in quotes, because the environmental variable may contain spaces which might affect execution. For other agent procedure commands, use getVariable() to get the registry key containing the environmental variables, located under HKEY_LOCAL_MACHINE\SYSTEM\CurrentControlSet\Control\Session Manager\Environment. Variable Manager Use the Variable Manager to define variables that can be used repeatedly in different agent procedures. You can maintain multiple values for each managed variable, with each value applied to one or more group IDs. Managed variables cannot be re-assigned new values within a procedure. Within a procedure, reference a managed variable by bracketing the variable name with the < and > character. Example: <VariableName>. See Using Variables (page 26). Using managed variables, managed machines can run agent procedures that access locally available resources based on the group ID or subgroup ID. Note: Using System > Naming Policy, this benefit can be applied automatically by IP address even to a highly mobile workforce that travels routinely between different enterprise locations. Select Variable Select a variable name from the drop-down list or select <New Variable> to create a new variable. Variable names are case sensitive and cannot include the following characters: , % ' " / \ : * ? < > | and the space character. Rename/Create Variable Enter a new name for the new variable you are creating or for an existing variable you are renaming. Select the delete icon to delete the entire variable from all groups. 28 Schedule / Create Public Selecting the Public radio button allows the variable to be used by all users. However, only master role users can create and edit shared variables. Private Selecting the Private radio button allows the variable to be used only by the user who created it. Apply Enter the initial value for a variable. Then select one or more Group IDs and click Apply. Empty values are not allowed. Remove Select one or more group IDs, then click Delete to remove the value for this variable from the group IDs it is assigned to. Select All/Unselect All Click the Select All link to check all rows on the page. Click the Unselect All link to uncheck all rows on the page. Group ID Displays all group IDs the logged in user is authorized to administer. Value Lists the value of the variable applied to the group ID. Manage Files Stored on Server Agent Procedures > Manage Procedures > Schedule / Create > Manage Files Use the Manage Files Stored on Server popup window to upload a file and store it on the Kaseya Server. You can also list, display and delete files already stored on the Kaseya Server. Agent procedures can distribute these files to managed machines using the writeFile() or writeFileInDirectoryPath() commands. Note: This store of files is not machine-specific. getFile() (page 38) uploads and stores machine-specific files on the server. To upload a file: Click Private files or Shared files to select the folder used to store uploaded files. Files stored in the Private files folder are not visible to other users. Click Browse... to locate files to upload. Then click Upload to upload the file to the Kaseya Server. Note: You can modify the maximum file size allowed for uploads. To delete a file stored on the Kaseya Server: Click Private files or Shared files to select the folder used to store uploaded files. Click the delete icon next to a file name to remove the file from the Kaseya Server. Note: An alternate method of uploading files is to copy them directly to the managed files directory on the IIS server. This directory is normally located in the C:\Kaseya\WebPages\ManagedFiles directory. In that directory are several sub-directories. Put private files into the directory named for that user. Put shared files into the VSASharedFiles directory. Any files located in this directory will automatically update what is available in the Manage Files Stored on Server user interface at the next user logon. 29 Distribution Folder Rights Private Folders Objects you create—such as reports, procedures, or monitor sets—are initially saved in a folder with your user name underneath a Private cabinet. This means only you, the creator of the objects in that folder, can view those objects, edit them, run them, delete them or rename them. To share a private object with others you first have to drag and drop it into a folder underneath the Shared cabinet. Note: A master role user can check the Show shared and private folder contents from all users checkbox in System > Preferences to see all shared and private folders. For Private folders only, checking this box provides the master role user with all access rights, equivalent to an owner. Shared Folders The following Share Folder guidelines apply to folders underneath a Shared cabinet: All child folders inherit rights from their parent folder unless the child's folders are explicitly set. If you have rights to delete a folder, deleting that folder deletes all objects and subfolders as well, regardless of share rights assigned to those subfolders. Note: Scopes have nothing to do with the visibility of folders and objects in a folder tree. Scopes limit what your folder objects can work with. For example, you can be shared folders containing reports, procedures or monitor sets but you will only be able to use these objects on machine groups within your scope. To set share rights to a folder, select the folder, then click the Share Folder button to display the Share Folder dialog. You can share specific rights to a folder with any individual user or user role you have visibility of. You have visibility of: Any user roles you are a member of, whether you are currently using that user role or not. Any individual users that are members of your current scope. Adding a user or user role to the Shared Pane allows that user to run any object in that folder. No additional rights have to be assigned to the user or user role to run the object. Checking any additional rights—such as Edit, Create, Delete, Rename, or Share—when you add the user or user role provides that user or user role with those additional rights. You have to remove the user or user role and re-add them to make changes to their additional rights. Share means the user or user role can assign share rights for a selected folder using the same Share Folder dialog box you used to assign them share rights. Distribution Agent Procedures > Manage Procedures > Distribution The Distribution page spreads network traffic and server loading by executing agent procedures evenly throughout the day or a specific block of time in a day. Applies to agent procedures currently scheduled to run on a recurring basis only. 30 Distribution Note: Recurring procedures listed here include function-specific procedures that are not visible as agent procedures in the Schedule / Create (page 1) folder tree, such as procedures created using a Patch Management wizard. Procedures can cause excessive network loading by pushing large files between the Kaseya Server and agent. Performing these operations with hundreds of agents simultaneously may cause unacceptable network loading levels. Procedure Histograms The system plots a histogram for each procedure currently scheduled to run on a recurring basis. Setting the histogram period to match the recurring interval of the procedure counts how many machines execute the procedure in a specific time interval. Peaks in the histogram visually highlight areas where a lot of machines are trying to execute the procedure at the same time. Click a peak to display a popup window listing all machine IDs contributing to that peak load. Use the controls, described below, to reschedule the procedure such that the network loading is spread evenly over time. Only machine IDs currently matching the Machine ID / Group ID filter are counted in the histogram. Reschedule selected procedure evenly through the histogram period Pick this radio control to reschedule selected procedures running on all machines IDs currently matching the Machine ID / Group ID filter. Procedure execution start times are staggered evenly across the entire histogram period. Reschedule selected procedure evenly between <start time> and <end time> Pick this radio control to reschedule selected procedures running on all machines IDs currently matching the Machine ID / Group ID filter. Procedure execution start times are staggered evenly, beginning with the start time and ending with the end time. Run recurring every <N> <periods> This task is always performed as a recurring task. Enter the number of times to run this task each time period. Skip if Machine Offline Check to perform this task only at the scheduled time, within a 15 minute window. If the machine is offline, skip and run the next scheduled period and time. Uncheck to perform this task as soon as the machine connects after the scheduled time. Distribute Click the Distribute button to schedule selected procedures, using the schedule parameters you've defined. Note: The procedure recurring interval is replaced with the histogram period. Select Histogram Period Selects the schedule time period to display histograms. Histogram Plots Each recurring procedure displays a histogram of all the machine IDs that are scheduled to run that procedure within the selected histogram period. Only machine IDs currently matching the Machine ID / Group ID filter are counted in the histogram. Above the histogram is a: Procedure name - name of the procedure. Check the box next to the procedure name to select this procedure for distribution. Peak - the greatest number of machines executing the procedure at the same time. 31 Agent Procedure Status Total - total number of machines executing the procedure. Agent Procedure Status Agent Procedures > Manage Procedures > Agent Procedure Status Similar information is displayed in the Pending Procedures tab of the Live Connect and Machine Summary pages. The Agent Procedure Status page displays the status of agent procedures for a selected machine ID. The list of machine IDs you can select is based on the Machine ID / Group ID filter. Users can, at a glance, find out what time a agent procedure was executed and whether it was successfully executed. See Agent Procedures > Schedule / Create (page 1) for more information about agent procedures. Check-in status These icons indicate the agent check-in status of each managed machine. Hovering the cursor over a check-in icon displays the agent Quick View window. Online but waiting for first audit to complete Agent online Agent online and user currently logged on. Agent online and user currently logged on, but user not active for 10 minutes Agent is currently offline Agent has never checked in Agent is online but remote control has been disabled The agent has been suspended Machine.Group ID The list of Machine.Group IDs displayed is based on the Machine ID / Group ID filter and the machine groups the user is authorized to see using System > User Security > Scopes. Procedure Name The name of the agent procedure. Time The date and time the agent procedure was last executed. Status Displays the results of the executed agent procedure. Overdue date/time stamps display as red text with yellow highlight. Recurring agent procedures display as red text. Admin Displays the VSA user who scheduled the agent procedure. Pending Approvals Agent Procedures > Manage Procedures > Pending Approvals This page only displays for master role users. The Pending Approvals page approves signed agent procedures, enabling them to be run using the Schedule / Create (page 1) page, or selected and run elsewhere throughout the VSA. 32 Patch Deploy Signed Agent Procedures A signed agent procedure helps detect unauthorized changes to an agent procedure. Unsigned agent procedures cannot be run anywhere in the VSA. An agent procedure is digitally signed when it is saved by any user using the agent procedure editor. Signed agent procedures created by standard users require approval using the Pending Approvals page. Only users who are using a role that provides access rights to the Pending Approvals page can manually approve pending, signed agent procedures. Agent procedures imported by standard users are signed but not yet approved. Automatically Signed and Approved Agent Procedures Agent procedures are automatically signed and approved when they are: Created by master role users. Imported by master role users. In the database when the VSA is upgraded to 7.0. Actions Approve Procedure - Approves selected signed agent procedures. Refresh - Refreshes the page. Table Columns Script Name - The name of the agent procedure. Modified By - The user who last edited the agent procedure. Date Modified - The date/time the agent procedure was last modified. Location - The location of the agent procedure in the agent procedure folder tree. Patch Deploy Agent Procedures > Installer Wizards > Patch Deploy The Patch Deploy wizard is a tool that creates an agent procedure to distribute and apply Microsoft patches. The wizard walks you through a step by step process resulting in an agent procedure you can schedule, to deploy a patch to any managed machine. Microsoft releases many hot fixes as patches for very specific issues that are not included in the Microsoft Update Catalog or in the Office Detection Tool, the two patch data sources the Patch Management module uses to manage patch updates. Patch Deploy enables customers to create a patch installation procedure for these hot fixes, via this wizard, that can be used to schedule the installation on any desired machine. See Methods of Updating Patches, Configuring Patch Management, Patch Processing, Superseded Patches, Update Classification and Patch Failure for a general description of patch management. Step 1: Enter 6-digit knowledge base article number. Microsoft publishes a vast assortment of information about its operating system in the Microsoft Knowledge Base. Each article in the Knowledge Base is identified with a 6-digit Q number (e.g. Q324096.) All Microsoft patches have an associated knowledge base article number. Note: Entering the article number is optional. Leave it blank if you do not know it. 33 Patch Deploy Step 2: Select the operating system type. Sometimes patches are specific to a certain operating system. If the patch you are trying to deploy applies to a specific OS only, then select the appropriate operating system from the drop-down control. When the wizard creates the patch deploy procedure, it restricts execution of the procedure to only those machines with the selected OS. This prevents inadvertent application of operating system patches to the wrong OS. Step 3: Download the patch. This step is just a reminder to fetch the patch from Microsoft. Typically there is a link to the patch on the knowledge base article describing the patch. Step 4: How do you want to deploy the patch? The Patch Deploy wizard asks you in step 4 if you want to Send the patch from the KServer to the remote machine and execute it locally or Execute the patch from a file share on the same LAN as the remote machine. Pushing the patch down to each machine from the VSA may be bandwidth intensive. If you are patching multiple machines on a LAN no internet bandwidth is used to push out the patch. Each machine on the LAN can execute the patch file directly from a common file share. Step 5: Select the patch file or Specify the UNC path to the patch stored on the same LAN as the remote machine. If Send the patch from the KServer to the remote machine and execute it locally was selected, then the patch must be on the VSA server. Select the file from the drop-down list. Note: If the patch file does not appear in the list then it is not on the Kaseya Server. Click the Back button and upload the file to the Kaseya Server by clicking the first here link. If Execute the patch from a file share on the same LAN as the remote machine was selected, then the patch must be on the remote file share prior to running the patch deploy procedure. The specified path to the file must be in UNC format such as \\computername\dir\. Note: If the file is not already on the remote file share, you can put it their via FTP. Click the Back button and then the second here link takes you to FTP. Step 6: Specify the command line parameters needed to execute this patch silently. To deploy a patch silently you need to add the appropriate command line switches used when executing the patch. Each knowledge base article lists the parameters for silent install. Typical switch settings are /q /m /z. Note: Command line parameters are optional. Leave it blank if you do not know it. Step 7: Name the procedure. Enter a name for the new agent procedure you can run to deploy the patch. Step 8: Reboot the machine after applying the patch. Check this box to automatically reboot the managed machine after applying the patch. The default setting is to not reboot. Click the Create button. A new agent procedure is created. Use Agent Procedure > Schedule / Create (page 1) to display the new agent procedure in the folder tree, under your private folder user name. You can run this new agent procedure to deploy the patch to any managed machine. 34 Application Deploy Application Deploy Agent Procedures > Installer Wizards > Application Deploy The Application Deploy page is a wizard tool that creates an agent procedure to distribute vendor installation packages, typically setup.exe. The wizard walks you through a step by step process resulting in an agent procedure you can schedule, to deploy an application to any managed machine. Deploying Software Vendor's Install Packages Most vendors provide either a single file when downloaded from the web or set of files when distributed on a CD. Executing the installer file, typically named setup.exe or abc.msi, installs the vendor's application on any operating system. The Application Deploy wizard takes you though an interview process to determine the type of installer and automatically generates a procedure to deploy install vendor packages. The VSA provides a small utility to automatically identify all supported installer types. Download and run kInstId.exe to automatically identify the installer type. Note: See Creating Silent Installs (page 36) to ensure vendor installation packages don't pause for user input during installation. Step 1: How do you want to deploy the application? The wizard generated procedure tells the managed machine where to get the application installation file to execute. The Application Deploy wizard asks you in step 1 if you want to Send the installer from the VSA server to the remote machine and execute it locally or Execute the installer from a file share on the same LAN as the remote machine. Pushing the application installation file to each machine from the VSA may be bandwidth intensive. If you are installing to multiple machines on a LAN no internet bandwidth is used to push out the application installation file. Each machine on the LAN can execute the application installation file directly from a common file share. Step 2: Select the application install file or Specify the UNC path to the installer stored on the same LAN as the remote machine. If Send the installer from the VSA server to the remote machine and execute it locally was selected, then the installer file must be on the VSA server. Select the file from the drop-down list. Note: If the installer file does not appear in the list then it is not on the VSA server. Click the here link to upload the file to the server. If Execute the installer from a file share on the same LAN as the remote machine was selected, then the installer file must be on the remote file share prior to running the application deploy procedure. The specified path to the file must be in UNC format such as \\computername\dir\. When specifying a UNC path to a share accessed by an agent machine—for example \\machinename\share—ensure the share's permissions allow read/write access using the credential specified for that agent machine in Agent > Set Credential. Note: If the file is not already on the remote file share, you can put it there via FTP. Click the here link to start FTP. Step 3: What kind of installer is this? The wizard need to know what kind of installer was used by your software vendor to create the install package. The VSA provides a small utility to automatically identify all supported installer types. Download and run kInstId.exe to automatically identify the installer type. Supported installer types are: 35 Application Deploy Windows Installer (MSI files) Wise Installer Installshield - Package For The Web Installshield - Multiple Files Other Step 4: Name the agent procedure. Enter a name for the new agent procedure you can run to install the application. Step 5: Reboot the machine after installing the application. Check this box to automatically reboot the managed machine after running the install. The default setting is to not reboot. Click the Create button. A new agent procedure is created. Use Agent Procedure > Schedule / Create (page 1) to display the new agent procedure in the folder tree, under your private folder user name. You can run this new agent procedure to install the application to any managed machine. Creating Silent Installs Most vendors provide either a single file, when downloaded from the web, or set of files, when distributed on a CD. Executing the installer file, typically named setup.exe, installs the vendor's application on any operating system. Vendors typically use one of three applications to create install packages: InstallShield, Windows Installer, or Wise Installer. Each of these applications provides a method for creating silent installs. When automating the installation of vendor install packages, you'll want to ensure the installation package does not pause for user input during installation. Silent Installs with InstallShield InstallShield has a record mode that captures answers to all dialog boxes in the installation procedure. InstallShield requires the recorded response iis file to be on the managed machine during the installation. To deploy, the agent procedure must use the writeFile() command to send both the setup.exe and record.iis files from VSA server to the managed machine and then use executeFile() (page 14) to run setup.exe with the options /s /f"<path>\record.iis". Refer to your InstallShield help guide for more information regarding the silent installation capability with a recorded response file. Create a custom install package by following these steps: 1. Verify the install package was made with InstallShield. a. Launch the install package. b. Confirm InstallShield Wizard displays at the end of the window title bar. 2. Launch the install package in record mode from a command prompt. a. If the install package is a single file - Run setup.exe /a /r /f1c:\temp\record.iss. Setup.exe is the name of the install package. c:\temp\record.iss is the full path filename to save the recorded output. b. If the Install package is a set of files - Run setup.exe /r /f1c:\temp\record.iss. Setup.exe is the name of the install package. c:\temp\record.iss is the full path filename to save the recorded output. 3. Deploy the install package with the recorded dialog box responses. Use the writeFile() agent procedure command to copy both the vendor's install package and record.iss file to each managed machine or to a file server accessible by each managed machine. 36 Packager 4. Execute the install package with silent mode command line parameters using the executeFile() procedure command. a. If the install package is a single file - Run setup.exe /s /a /s /f1c:\temp\record.iss. Setup.exe is the name of the install package. c:\temp\record.iss is the full path filename location of the recorded settings. b. If the Install package is a set of files - Run setup.exe /s /f1c:\temp\record.iss. Setup.exe is the name of the install package. c:\temp\record.iss is the full path filename location of the recorded settings. Silent Installs with Windows Installer Windows Installer does not have a record mode. As such it can only silently install the Typical install configuration. To silently install a Windows Installer package write a procedure to perform the following: 1. Use the writeFile() agent procedure command to copy the vendor's install package to each managed machine or to a file server accessible by each managed machine. 2. Run the install package with the /q parameter using the executeFile() agent procedure command. Silent Installs with Wise Installer Wise Installer does not have a record mode. As such it can only silently install the Typical install configuration. To silently install a Wise Installer package write a procedure to perform the following: 1. Use the writeFile() agent procedure command to copy the vendor's install package to each managed machine or to a file server accessible by each managed machine. 2. Run the install package with the /s parameter using the executeFile() agent procedure command. Packager Agent Procedures > Custom Installer > Packager The Packager is a wizard tool used to create a package when a pre-defined install solution cannot be used. Packager evaluates the state of a source machine before and after an installation and/or resource change. The Packager compiles the differences into a single executable file—the package—that can be distributed via agent procedures to any managed machine. Distribute a package any way you choose. You can email it, or store it on a server where a custom procedure (page 1) can perform a silent installation on any managed machine. Step 1: Download the Packager application to the machine you plan to build your install package on. For best results, we recommend you create a package on a representative machine; that is, a machine that closely resembles the managed machines on which the package will be deployed. Each Package is OS dependent. To deploy to multiple operating systems, you need to build a package for each OS. During installation, Packager checks the target machine's operating system and does not continue if the package is being deployed on an OS different than the source OS. Step 2: Execute Packager.exe and follow the on-screen instructions to create a distribution package. The following tasks are performed: 1. Packager takes a snapshot of the source system. 2. Install any application and/or resource on the source system. 3. Execute Packager again. Packager records the changes in the source system and creates a package. 37 Get File Packager picks up everything you do to a machine between the time you take the first snapshot and create the package. Be careful what additional tasks you perform on the source machine as any system changes will be rolled into the package. Close all applications before running Packager. This prevents open applications from modifying the system during package creation. Step 3: Distribute the package via a procedure. Use Agent Procedure > Schedule / Create (page 1) to create an agent procedure that downloads the package to managed machines and runs it. Packages can only be executed on machines with agents installed. If the package fails to install, Packager has complete rollback capability. The rollback executable and associated restore files are located in the agent directory on the target machine in the directory C:\Program Files\Kaseya\KPackage. Get File Agent Procedures > File Transfer > Get File The Get File page accesses files previously uploaded from a managed machine. Files can be uploaded to a machine-specific directory on the Kaseya Server using the getFile() or getFileInDirectoryPath() commands. Clicking the machine ID displays all uploaded files for that machine ID. Click the link underneath a file to display the file or run it. Note: The files stored on the Kaseya Server using the getFile() command are machine-specific. Use Manage Files Stored on Server (page 29) to access files stored on the Kaseya Server that are not machine-specific. Each file is displayed as a link. Click any filename to access that file. Remove files by clicking the delete icon next to the file. Example 1: Checking Large Number of Managed Machines Simultaneously Get File is designed to support automated checks on a large number of managed machines simultaneously. Note: If all you want to do is get a file from a managed machine as a one-time event then Remote Control > FTP is the simplest way. Use Get File in conjunction with an agent procedure to perform some automated task on a set of managed machines. For example, if you have a utility that reads out some information unique to your client computers you can write a procedure to do the following: 1. Send the utility to the managed machine using either the writeFile() procedure command or the Distribute File page. 2. Execute the utility using either the executeShellCommand() or executeFile() agent procedure command and pipe the output to a text file, such as results.txt. 3. Upload the file to the Kaseya Server using the getFile() command. Example 2: Comparing Versions of a File As an option in the getFile() agent procedure command, existing copies of uploaded files can be renamed with a .bak extension prior to the next upload of the file. This allows you to examine both the latest version of the file and the previous version. For example, use the IF-ELSE-STEP agent procedure editor to create a simple getFile() agent procedure. The first time the getFile() agent procedure command executes on a managed machine the agent sends c:\temp\info.txt to the Kaseya Server and the Kaseya Server stores it as news\info.txt. The second time getFile() agent procedure executes, the Kaseya Server renames the original copy of 38 Distribute File news\info.txt to news\info.txt.bak then uploads a fresh copy and saves it as news\info.txt. Also as an option, an email alert can be sent when a change in the uploaded file has been detected, compared to the last time the same file was uploaded. The getFile() command must have either the Overwrite existing file and send alert if file changed setting or the Save existing version, get file, and send alert if file changed setting selected. Example 3: Get File Changes Alerts To perform continuous health checks on managed machines, run the agent procedure on a recurring schedule and activate a Get File Changes alert using Monitor > Alerts - Get Files. The VSA instantly notifies you of any changes to the results. Troubleshooting Patch Installation Failures When patch scan processing reports patch installations have failed, a KBxxxxxx.log (if available) and the WindowsUpdate.log are uploaded to the Kaseya Server. Additionally, for those patches that required an "Internet based install", a ptchdlin.xml file will be uploaded to the Kaseya Server. These files can be reviewed using Agent Procedures > getFile() (page 38) for a specific machine and can help you troubleshoot patch installation failures. Info Center > Reporting > Reports > Logs > Agent Procedure Log contains entries indicating these log files have been uploaded to the Kaseya Server for each machine. Distribute File Agent Procedures > File Transfer > Distribute File The Distribute File function sends files stored on your VSA server to managed machines. It is ideal for mass distribution of configuration files, such as virus foot prints, or maintaining the latest version of executables on all machines. The VSA checks the integrity of the file every full check-in. If the file is ever deleted, corrupted, or an updated version is available on the VSA, the VSA sends down a new copy prior to any procedure execution. Use it in conjunction with recurring procedures to run batch commands on managed machines. Note: The procedure command writeFile() performs the same action as Distribute File. Each time a procedure executes the writeFile() command, the agent checks to see if the file is already there or not. If not, the file is written. writeFile() is better than Distribute File for sending executable files you plan to run on managed machines using agent procedures. Select server file Select a file to distribute to managed machines. These are the same set of files managed by clicking the Manage Files... link on this page. Note: The only files listed are your own private managed files or shared managed files. If another user chooses to distribute a private file you can not see it. Specify full path and filename to store file on remote machine Enter the path and filename to store this file on selected machine IDs. Manage Files... Click the Manage Files (page 29)... link to display the Manage Files Stored on Server popup window. Use this window to add, update, or remove files stored on the Kaseya Server. This same window displays when you click the Managed Files button using Schedule / Create (page 1). Private files are listed with (Priv) in front of the filename. 39 Application Logging Distribute Click the Distribute button to start distribution management of the file selected in Select server file and write it to the location specified in Specify full path and filename to store file on remote machine. This effects all checked machine IDs. Clear Click the Clear button to remove the distribution of the file selected in Select server file from all checked machine IDs. Warning: Clear and Clear All do not delete the file from either managed machines or the Kaseya Server. These functions simply stop the integrity check and update process from occurring at each full check-in. Clear All Clear All removes all file distributions from all checked managed machines. Select All/Unselect All Click the Select All link to check all rows on the page. Click the Unselect All link to uncheck all rows on the page. Check-in status These icons indicate the agent check-in status of each managed machine. Hovering the cursor over a check-in icon displays the agent Quick View window. Online but waiting for first audit to complete Agent online Agent online and user currently logged on. Agent online and user currently logged on, but user not active for 10 minutes Agent is currently offline Agent has never checked in Agent is online but remote control has been disabled The agent has been suspended Machine.Group ID The list of Machine.Group IDs displayed is based on the Machine ID / Group ID filter and the machine groups the user is authorized to see using System > User Security > Scopes. Server File The name of the file being distributed. Agent File Location The target directory on the managed machine. To the left of each target file location for a specific machine ID are two icons. Click to cancel that file distribution for that machine ID. Click the destination path and filename for that machine ID. Application Logging Agent Procedures > Administration > Application Logging The Application Logging page displays a log of Agent Procedures module activity by: Event ID Event Name 40 to edit Application Logging Message Admin Event Date This table supports selectable columns, column sorting, column filtering and flexible columns widths (http://help.kaseya.com/webhelp/EN/VSA/7000000/index.asp#6875.htm). 41 Index Index 6 64-Bit Commands • 25 A Action Buttons • 2 Agent Procedure Status • 32 Agent Procedures Overview • 1 Agent Time • 1 Application Deploy • 35 Application Logging • 40 C Creating / Editing Agent Procedures • 4 Creating Silent Installs • 36 D Distribute File • 39 Distribution • 30 F Folder Rights • 30 G Get File • 38 I IF-ELSE-STEP Commands • 5 M Manage Files Stored on Server • 29 P Packager • 37 Patch Deploy • 33 Pending Approvals • 32 S Schedule / Create • 1 Scheduling Agent Procedures • 3 U Using Variables • 26 V Variable Manager • 28 43

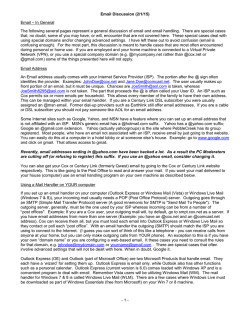
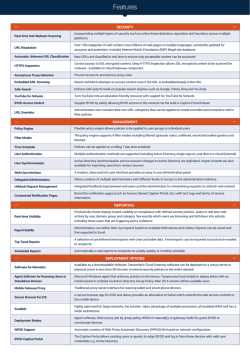
© Copyright 2026