
Particle Playground 2 - Manual (NEXT).pages
A PARTICULAR PROUD PRODUCT BY
POLYFIED.COM
NEXT
THE PARTICLE PLAYGROUND 2 MANUAL
1 of 68
PARTICLE PLAYGROUND 2, SCRIPT & VISUAL PARTICLE SYSTEM FRAMEWORK FOR UNITY® SOFTWARE.
NEXT
WHAT WILL YOU CREATE?
2 of 68
INTRODUCTION
TARGETING VERTICES IN THE SCENE IS ONE OF THE MANY FEATURES IN THE PLAYGROUND.
WHAT’S NEXT?
NEXT is a jump-start guide and the manual to
Particle Playground 2, intended to inspire and
give ideas how to bend particles your way.
INTRODUCTION
WELCOME TO THE PLAYGROUND
Particle Playground 2 is a framework which
extends the capabilities of the Shuriken
particle system in Unity®. Along come abilities
to build particles from skinned, procedural or
regular meshes, images, paint, projection and
splines - all live in the scene.
All settings can be controlled intuitively
through the Unity® Inspector where gizmos
and handles are available in Scene View.
Give your particles life through turbulent
forces and let manipulators guide them based
on their position to give them new properties.
The Event system gives particles the ability to
talk to other Particle Playground systems and
game logic in the scene. Through the list of
Snapshots you can load particle settings and
jump through live particle states.
Store your particles in form of presets and
load them whenever needed. Did you create
something amazing? - Use the Preset Wizard
to export presets to share your creations with
others. License includes redistribution.
Under the hood you will find multithreading,
extensive classes, a script mode for emission
with a set of script- and scene examples to get
started. The framework is entirely written in
C# where source code is available and ready
for you to extend.
Particle Playground 2 is available for all
platforms.
4 of 68
GETTING STARTED
GETTING STARTED
Particle Playground 2 all starts with the
Playground Wizard found through Window >
Particle Playground. From here you can start
fresh with a new Particle Playground system
or launch any previously made particle
presets through the Presets list. Example
presets from first install is also available to
give you an idea of the multitude of
capabilities a Particle Playground system has.
You can create new presets in the Preset Wizard
found by way of the Preset Wizard-button or by
any Particle Playground system’s Inspector.
Through the Preset Wizard you can also
export your particle systems to a
UnityPackage to publish your presets.
The Playground Wizard also serves as a
window to the available Playground Manager in
the scene. The Playground Manager is the
object driving all active Particle Playground
systems. It also contains all Global Manipulators
and main settings for how you wish your
Playground to be presented.
For your convenience the Playground Wizard
will notify you if any updates are available and
contains the overall settings where you can
handle languages, Editor limits and project
paths.
5 of 68
OVERVIEW
GET READY TO PLAY.
6 of 68
THE INSPECTOR
A Particle Playground system’s all settings is
available through the Inspector UI once
selected in the Hierarchy.
THE INSPECTOR
Quick Overview
Source-tab
The source of which particles are created by.
Particle Settings-tab
From here you can set various conditions for your particle system,
for instance how many particles are simulated, their size and their
lifetime.
Forces-tab
Set conditions such as initial movement and movement over
lifetime by pre-set forces and turbulence.
Collision-tab
Determines if particles should detect colliders in the scene.
Rendering-tab
How particles are presented visually.
Manipulators-tab
The list of Manipulators affecting this particle system. A
Manipulator can alter a particle’s behavior based on its position.
Events-tab
The list of Events communicating with other particle systems and
scripts in the scene.
Snapshots-tab
The list of Snapshots with stored settings and particle positions to
load upon request.
Advanced-tab
The in-depth settings for this particle system. Here you can
determine if particles should be simulated in World- or Local space
and enable extensive features such as Rebirth appearance, AutoPause Calculation and apply any Lock values to the particle system.
Playground Manager
A window to the Playground Manager’s list of Particle Systems,
Global Manipulators and Advanced settings is available on any
Particle Playground system.
7 of 68
THE PLAYGROUND MANAGER
THE PLAYGROUND MANAGER
All Particle Playground systems are driven by
the Playground Manager within the scene.
From the Inspector UI you can see all available
Particle Systems and Global Manipulators once
selected in the Hierarchy. These serves as
jump-lists to their attached GameObjects. You
can rearrange the lists by up- and down
buttons, where + clones- and - removes an
object. Through the Advanced-tab you can
setup your Playground in more detail. Edit the
values in Editor Limits to extend how far sliders
can go in the Inspector.
In terms of scripting the PlaygroundC class is
the Playground Manager. From here you can
create new Particle Playground systems and
when scripting towards one you’ll find handy
wrapper functions available. All classes and
functions in Particle Playground lives in the
ParticlePlayground namespace.
GOOD TO KNOW
Only one Playground Manager can exist within a scene.
8 of 68
SOURCE
A SET OF WORLD OBJECT PARTICLE SYSTEMS WORKING TOGETHER ON THE UNITY® SAMPLE ASSETS CAR.
Paint
Paint source positions by free hand through the Inspector and
Scene View tools or at runtime by the PlaygroundC.Paint() functions.
You can use a single point or setup your own brush with a texture,
then apply different properties to how Paint should behave. An
eraser is available which can remove painted positions within
distance of the mouse cursor. Painting by free hand demands that
you paint on colliders within the scene. 3d- and 2d collisions are
available where you can determine collision layers.
All painted positions will have a Transform parent, where moving,
rotating and scaling the Transform will make each source reposition
accordingly.
A Source is a way of describing how particle
birth positions will distribute. There are
several options with ability to structure
particles from textures, meshes, paint, image
projection and splines.
SOURCE
Quick Overview
State
Create particles from textures or static meshes. The State Source
serves as a list where you can switch between items. Assign a
Transform to move and rotate the particle positions.
Transform
Emit from chosen Transforms within the scene.
Projection
Project by letting an image’s pixels flow through the scene from a
Transform. Every collider within layer it hits will create a source
position. From the collision surface’s normal you can offset each
particle’s source position by depth. 3d- and 2d collisions are
available.
World Object
Structure particles from a mesh vertices in the scene. The mesh can
be procedural where the mesh’s vertices and normals will be
extracted each calculation.
Skinned World Object
Let particles flow from an animated mesh in the scene. With Source
Down Resolution you can skip vertices by dividing the original
mesh’s vertex count.
Script
Create your own emission positions by running your particle
system in script mode. PlaygroundParticlesC.Emit() has a multitude of
overloads for most common emission scenarios.
Spline
Emit particles along a Playground Spline within the scene. The
particle count determines the density. A Playground Spline is not
exclusive for particles and can be used with any other type of
component as well.
GOOD TO KNOW
Using Only Source Positions in the Forces-tab will make particles
stick onto their source position each frame.
10 of 68
PARTICLE SETTINGS
PARTICLE SETTINGS
Take control over particle emission, sizes,
rotations, sorting over lifetime and extensive
Source structuring.
Quick Overview
Particle Count
How many particles that should be simulated. Every change will
restructure the Particle Cache.
Overflow Offset
You can Overflow Offset your particles from its Source origin. Each
overflow iteration is based on how many Source Points your Source
has. With Overflow Mode you determine the offset’s global or local
direction.
Source Scatter
Scramble the Source positions within minimum- and maximum
global X-, Y-, and Z range. Using Local Simulation Space found in
Advanced-tab will make them rotate along the Source.
Emission
In the Emission options you can toggle emission. Disable Loop to
not enter another lifetime cycle and enable Disable On Done to
inactivate or destroy the GameObject once the first loop is done.
Emission Rate determines the percentage of total particles that
should emit.
Size
The size of a particle is set by random within minimum- and
maximum float values. Scale will amp the current given random
size. Lifetime Size will set size (Y) over normalized lifetime (X). Array
Size will set size (Y) over normalized array of particles (X).
Rotation
A particle’s initial rotation and rotation over lifetime is set by
random within minimum- and maximum float values. To make a
particle rotate based on its velocity enable Rotate Towards
Direction. The Rotation Normal determines the vectors to rotate
around. A common operation would be to pass in the forward of
the Main Camera’s Transform to always rotate along the camera’s
perspective.
11 of 68
Particle Mask
The Particle Mask lets you visually remove set amount of particles.
The Mask Time will determine the duration of fade in/out once the
Particle Mask amount changes. The Mask Sorting determines the
mask order in the particle array. All particles will still be simulated
behind the mask and will let you change the amount of particles on
screen over time.
PARTICLE SETTINGS
Lifetime
The Lifetime determines how many seconds a particle will live
during its cycle. Lifetime Sorting will structure the particles
emission pattern with different techniques - use Custom to sort
particles normalized emission (Y) along the normalized lifetime (X).
Lifetime Offset will scrub initial starting point within the range of
the particle’s lifetime. Lifetime Emission will determine the rate of
emission over the specified lifetime.
COMBINING LIFETIME SORTING OF NEAREST NEIGHBOR AND OVERFLOW OFFSET ON A WORLD OBJECT SPHERE.
12 of 68
Forces
SIMPLEX TURBULENCE UNLEASHED.
FORCES
The movement pattern of a particle is
depending on the velocity given at birth and
the surrounding forces during its lifetime. At
birth you can mold its velocity shape, use
Local Velocity to give directions based on the
Source and its current movement in the
scene.
During a particle’s lifetime you can use
animation curves to give exact force at certain
time, give it constant forces through gravity
and bend their velocity path and apply
turbulence.
Should you not want forces - Make particles
attach completely to their Source and rely on
its appearance in the scene by enabling Only
Source Positions. You can also annihilate any
axis to ensure that they live in the correct
dimension and set a maximum velocity to
never exceed.
Quick Overview
Force Annihilation
Disable forces by different techniques. Lifetime Positioning will
make particles move with AnimationCurves. Transition Back To
Source will make particles move back to their origin over time.
Set Axis Constraints to never apply velocity to set axis.
Initial Velocity
Velocity in X-, Y- and Z values. Local Velocity will take Source
direction into account. The Initial Velocity Shape determines the
scale of velocity (Y) to apply depending on when a particle emits in
its normalized Lifetime (X).
Lifetime Velocity
The velocity (Y) to add over normalized Lifetime (X).
Velocity Bending
Make particles bend around their current velocity path depending
on their Source Position or Delta Position from previous frame.
Turbulence
Apply movement patterns by Simplex- or Perlin Noise algorithms.
Strength determines the force applied. Scale determines the noise
resolution in the Scene. Time Scale determines how fast the noise
progresses.
Constant Force
Gravity sets a constant velocity towards X- Y- and Z vectors.
Damping determines the amount of inertia to apply over time.
Velocity Scale will scale the overall forces applied to all particles.
14 of 68
COLLISION
COLLISION
Each particle can look for any colliders in its
way. Once collided you can randomly bounce
within the range of the hit normal, apply
lifetime loss and push any rigidbodies within
the scene. Collision is done by Raycasting
from a particle’s previous position towards its
current. This gives a collision behavior which
is nondependent of the particle’s velocity and
the current frame-rate.
Lifetime Loss
The normalized amount to subtract from a colliding particle’s
current lifetime.
Bounciness & Random Bounce
Bounciness determines the remaining force a particle should have
once reflected from the collider’s surface. Random Bounce will
apply a random value within minimum- and maximum normalized
X-, Y- and Z value from the collider’s hit normal.
Collision Planes
To limit the particles within the world space you can setup collision
planes by Transforms in the scene where Offset in global
coordinates can be applied.
Collision Exclusion
Choose which objects in the scene which are not seen by the
collision.
Quick Overview
Collision Type & Collision Mask
The method for detecting colliders in the scene. 3D- and 2D
colliders are available. Use Collision Mask to determine which
layers to detect.
Collide With Rigidbodies, Inverse & Mass
Determine if particles should affect the Rigidbody of a hit collider.
Inverse will reverse the collision effect. Use Mass to scale the force
applied to the Rigidbody.
Collision Radius
The spherical size of the particle’s collider.
15 of 68
RENDERING
The visual presentation of a particle’s mesh,
material and color is all determined in the
Rendering-tab.
RENDERING
Quick Overview
Material
The Material to apply to a particle system. A material’s shader
affects how a particle will blend within the scene and the texture
can set its visual shape.
Color Source
Color Source determines what type of coloring should be applied to
the particles. Source means that you will pickup any available color
from a Source’s texture or painted color. Enable Source Uses
Lifetime Alpha to apply the alpha from the Lifetime Color. Lifetime
Color is a gradient which will apply over the particle’s lifetime.
Lifetime Colors are gradients which each particle will pair up with
upon birth. Use the Color Method to determine if color should be
applied over Lifetime or by the Particle Array.
Render Mode
Render the particles flat facing different directions (HorizontalVertical
Billboard), Stretch them based on their current velocity or render
them as a Mesh.
Shadows
Determines if particles should cast- and receive shadows. Note that
you need a shader which handles shadows.
Sorting
Use Sorting Mode to determine the order of particles in the system.
The Sorting Layer and Order In Layer will affect the rendering order
of your particles when using 2D view.
Texture Sheet Animation
Animates the UV of particles. Reference the Shuriken Particle
System manual for usage.
GO CRAZY WITH LIFETIME COLORS, THEY’RE PERFORMING EQUALLY AS ONE GRADIENT.
16 of 68
MANIPULATORS
17 of 68
COMBINING A VORTEX MANIPULATOR WITH EVENTS.
MANIPULATORS
Every particle can be affected by objects the
framework calls Manipulators. Each
Manipulator is connected to a Transform in
the scene and contain settings for how to
influence a particle’s appearance.
There are Local- and Global Manipulators. A
Local Manipulator is attached to a Particle
Playground system and will only affect its own
particles within range. A Global Manipulator is
attached to the Playground Manager and will
affect all particle systems within layer and
range. A Local Manipulator will serialize along
with the particle system, a Global Manipulator
will serialize with the Playground Manager
within the scene.
There is a multitude of available Manipulators
with different setups and abilities, but they all
share the same goal of bending particles
based on their position to your favor.
A Manipulator is rendered in Scene View as a
sphere or a box with Size- and Strength
handles. Its color shows whether it belongs to
a Local- or Global Manipulator and if
Invert Shape should affect all particles
outside instead of inside the shape’s extents.
Quick Overview
Attractor
Attract particles in a funnel pattern towards center.
Attractor Gravitational
Attract particles in a gravitational pattern towards center.
Repellent
Push particles away from center.
Vortex
Attract particles in a vortex towards center. The rotation of the
Manipulator’s Transform decides the directional flow.
Property
The Property Manipulator contains a list of properties to give
particles within the Manipulator’s range such as Size, Color,
Velocity, Turbulence and different Target methods. You will also see
the main Manipulators in this list which are injected to cooperate
with the Combined Manipulator.
Combined
Combine any Manipulators into one, using the same field area and
main strength.
18 of 68
EVENTS
19 of 68
FLOATING LIGHT PARTICLES WHERE EACH EMIT SMOKE AND POP INTO A SPHERE UPON DEATH.
EVENTS
Through Events particle systems can
communicate with one another and other
game logic in the scene. The particle system
carrying the Event will send its Instructions to
another particle system Target set to Script as
Source or any Event Listeners in your scripts.
Each Target will list their Controller(s) in the
Source-tab where a Target can receive
Instructions from several Controllers.
Quick Overview
Broadcasting Type
The method how an Event is sent. Targets and Event Listeners (see InDepth section Deeper Into Events) can receive information from an
Event.
Target
The particle system to get instructions upon the Event.
Type
The action which triggers this Event to send instructions. Available
actions are Birth, Death, Collision and Time.
Position
The Source Instruction to send to the Target. This is where the
Event Target’s emitting particle will appear in world space. Available
Source Instructions are User, Particle and Source. User will be a fixed
X- Y and Z vector, Particle will be the current particle’s position and
Source will be the Source Position of the controller.
Velocity
The Velocity Instruction to send to the Target. Available Velocity
Instructions are User (behaves like Initial Velocity), Particle (inherited
from current particle) and Source (set by Controller’s all Initial
Velocity values in the Forces-tab). Use the Velocity Multiplier to amp
the Velocity Instruction.
Color
The Color Instruction to send to the Target. Available Color
Instructions are User (set by the Instruction’s Color), Particle (set by
current particle) and Source (set by the Controller’s Color Source in
the Rendering-tab).
20 of 68
SNAPSHOTS
SNAPSHOTS
The list of stored Snapshots ables you to Save
and Load particle system settings and live
particles within the scene. You can toggle
whether to load the stored particles saved in
the scene, the particle system’s settings or
both - and in-between do a transition. The
Snapshots are stored and parented as
separate particle systems to your main
particle system, set to not simulate. Toggle the
Advanced button to edit them after creation.
Quick Overview
Transition Time
A snapshot can transition over time to another. Should your
loading particle system have another particle count then filler- or
fading particles will be handled during transition.
Transition Type
The type of transition over time where Linear (no easing), Ease In
(slow start) and Ease Out (slow finish) is available.
Load From Start
Load the selected snapshot when the particle system’s GameObject
enables.
Snapshot-list
Each snapshot is stored in a list. Enable Transform, toggle Settings
and/or Particles to set what data to load. Particles contains live
particle information within the scene. Enable Advanced for more
control over the assigned components, their name, transition type
and time multiplying. This will also expose the snapshots in
Hierarchy under your particle system for editing.
GOOD TO KNOW
Through script you can save and load particle systems upon
calling PlaygroundParticlesC.Save (”Name”) and
PlaygroundParticlesC.Load (int).
21 of 68
ADVANCED
The Advanced-tab of a Particle Playground
system contains extra- and fine-tuning options
to its functionality and appearance.
ADVANCED
Quick Overview
Simulation Space
Determines if the particle system should simulate in Global- or
Local Space. Simulating in Local Space will make all settings and live
particles be based upon the particle system’s movement and
rotation. The particle system must be at zero vectors to not offset
from its globally calculated Source. Enabling Movement
Compensation will make particles follow the movement of its
Source in the scene similar to Shuriken’s original Local Space.
Time
The Update Rate determines the frames to calculate particles.
Time Scale determines the local simulation time, set this to 0 to
pause a particle system within the scene.
Rebirth Options
All particles lives inside cached arrays, these are reused when a
particle enters another lifetime cycle. Sometimes you want them to
appear the same, sometimes you want to mix things up. Set new
random rebirth values to your particles by Size, Rotation, Scatter and
Velocity through this panel. Delta Position Adjustment will ensure a
linear distribution of particles upon rebirth.
Locks
Apply particle system Transform locks for Position, Rotation and Scale
by this panel.
On Enable
Prewarm will ensure live particles within the Scene whenever the
particle system is loaded. Lifetime Cycles determines where in the
particle system lifetime cycle prewarming should finish. Cycles
(Resolution) determines how many calculation loops should be
spent during prewarm, this affects how fine forces will be
computed.
Out Of View
Auto-Pause Calculation will halt calculation when the particle
system is outside the main camera frustum. Use the Calculation
Trigger to set the area of triggering calculation.
Misc
Sync Particles To Main-Thread will sync all threaded particle
positions, rotations and timings to appear correct in the main loop.
You may experience movement tearing and UV animation jitter
having this disabled.
Particle Thread Method determines how this particle system should
be handled by the Thread Aggregation.
The Particle Pool can Clear out and Rebuild the Particle Cache upon
request. Any settings will remain untouched.
22 of 68
IN-DEPTH
POP THE HOOD, LET’S SEE WHAT WE’VE GOT.
23 of 68
THE ASSETS
THE ASSETS
Let’s take a look at how Particle Playground 2
will affect your project more physically. Along
with the Particle Playground 2 package there’s
example scenes, script examples, ready-to-go
particle presets, brushes and a pack of
particle materials and textures.
The Playground Structure
Example Scenes
Along with the Particle Playground 2 package there’s a couple of
example scenes found in Particle Playground/Examples/Example
Scenes/. These are intended to give ideas of how to setup your
particle systems and to show the different mechanics.
Example Project
Together with the example scenes there’s also a showcase project
called Particle Playground 2.2 Video Scene. This is the project used for
the 2.2 release video where you’ll find additional particle system
effects.
These will be seen as User by the Playground Wizard. All User
presets will be exported to your final build so you can instantiate
them by using PlaygroundC.InstantiatePreset(”Name”).
Should you not want a User preset to export to the final build you
can convert it to an Example in the Playground Wizard by switching
to presets List view and toggle the Convert to Example-button.
Every preset can have an icon, these are stored in Particle
Playground/Graphics/Editor/Icons/. They must have the same name as
your preset and be of type PNG and a resolution of 32x32 pixels for
best presentation.
Brushes
The Source Paint can have brushes to paint with. You can create
your own brushes with predefined settings through the Brush
Wizard found in Source > Paint > Brush > Brush Presets > Create inside
the Particle Playground system’s Inspector. Every brush is stored in
Particle Playground/Playground Assets/Brushes/.
Changing the structure
Should you want to change the folder structure you can edit the
paths in the Playground Manager > Settings > Paths.
Presets
In the folder Particle Playground/Playground Assets/ you will find the
preinstalled particle system presets. These presets are seen as
Example by the Playground Wizard. When you create your own
presets they will be stored in Particle Playground/Resources/Presets/.
GOOD TO KNOW
Convert any Presets you won’t use to Examples through the
Playground Wizard to not export any unnecessary
dependency assets to your final build.
24 of 68
PERFORMANCE
PERFORMANCE
Particle Playground 2 is centered around
multithreaded solutions to give good
performance on a wide variety of devices. All
particle systems are running on bundled
thread calls, where some heavy functions calls
for yet another. Inside the calculation loop the
Playground is iterating through particle data
stored within built-in arrays, which naturally
gives a great boost to the time spent on each
particle.
What is multithreading?
Threads enables CPUs (Central Processing Units) to manage and
process multiple requests of data at a time. This means a thread
will be processed asynchronously alongside other routines. Often
you’ll see that a CPU has several cores or hyper-threading
techniques. Where available, running data on a second thread in
Unity® will relieve the main-thread where most MonoBehaviour
and logic runs.
How Particle Playground 2 uses threads
Every particle system runs on multithreaded calls to relieve the
main-thread where MonoBehaviour runs. Some functions will
create yet another thread for performance, such as when updating
chunks for the Particle Cache, calculating positions for Skinned
World Objects and running the turbulence algorithms.
Certain functions in the Playground can’t run on a second thread
due to the non thread-safe Physics class. This affects all methods
relying on Raycasting such as collisions, painting and projections.
Your particle system will still be calculated on a second thread but
leave the non thread-safe calculations to run alongside a particle
system’s Update loop. Every thread causes a small amount of
memory garbage which will need to be collected at some point.
Using threads yourself
The threading solution is very simple and you can make use of the
Playground’s multithreading by wrapping your own code in a
lambda expression to PlaygroundC.RunAsync(), such as:
PlaygroundC.RunAsync(()=>{
// My demanding calculations here
});
Note that you need to work with thread-safe classes in Unity® to
send data to another thread.
Changing how threads should work
By default all particle system calculations are running in automatic
bundled thread calls. You can change this setup from the
Playground Manager in Advanced > Multithreading. You can also set
how an individual particle system should calculate in Advanced >
Particle Thread Method. Please see the Reference section for more
details in how every setting will impact how Playground perform.
You also have the example scene Multithreading Skinned Meshes to
test the different techniques.
25 of 68
PERFORMANCE
Particle pooling
Particle Playground 2 is running all particle data with built-in arrays,
which is the fastest arrays available in Unity®. Each particle is
paired with a position of the arrays within the PlaygroundCache class
where upon calculation these are worked through and reused. The
cache is stored within the particle system's playgroundCache
variable. Should you need to extend any logic from a script you can
use the Playground Cache to reach into the particle data.
Pinpointing the bottleneck
In the Unity® Editor you will much likely see less performing
particles due to all other logic which needs to be present. There’s a
few tricks that should be considered, when in Play Mode hiding the
Scene View and deselecting any Particle Playground system to not
render its Inspector can improve performance.
calculations should distribute, set from Playground Manager >
Advanced > Multithreading. Another way is to skip frames through
Advanced > Update Rate, another is if you’re using a skinned mesh,
use Source > Skinned World Object > Source Down Resolution to
generate fewer Source Positions. The most obvious is to ease the
amount of particles calculated, perhaps you can combine several
particles onto one texture in its material to make it look like more
points are simulated on screen. Also make sure you’re not using
any unnecessary features, such as having Collision enabled where
you don’t have any objects to collide with or projecting with Live
Update onto a static surface where the projection doesn't move.
If you’re a Unity® Pro owner, you can always use the Editor’s
Profiler to see how well your game logic is performing.
Use the Hierarchy icon for awareness of simulating- (yellow),
calculation disabled- (grey) or heavy calculated (red) particle
systems. This helps to see which particle system is currently
hogging any performance.
Always consider your end target device(s). Experiment to gain
performance from having many particle systems versus just a
single one, simulating many of your effects on screen. Instantiating
a particle system will create memory garbage and need to initiate
its Particle Cache. Many times you can cache and reuse your
particle systems (script example SwitchCachedParticleSystemC.cs
included to work with particle system pooling) to get around any
stuttering if your target device has more limited resources.
You can always tweak your particle system to demand less
resources. One way is to change how the multithreaded
26 of 68
DEEPER INTO EVENTS
DEEPER INTO EVENTS
An Event is a particle’s way of communicating
with other particle systems or scripts within
the scene. Setting up Events with a particle
system Target is very straight forward in the
Inspector UI, but to listen to Events requires a
bit more user contribution. Let’s have a look.
Events and subscribe a function to the Event Delegate of
particleEvent.
Whenever a particle triggers an Event for Event Listeners, it will
send a PlaygroundEventParticle which can be reached through the
function you’ve added onto the Event Delegate.
Event Listener example:
using UnityEngine;
using System.Collections;
using ParticlePlayground;
public class AddEventListener : MonoBehaviour {
What happens in the broadcast?
Each time an Event gets triggered from a particle, it broadcast data
to a Target (PlaygroundParticlesC object) and/or to any Event
Listeners out there. Sending information to a Target will issue an
Emit() with position, velocity and color included. This opens up for
visual events, but lacks the ability of adding any game logic.
The information sent to an Event Listener will have much richer
data, where a PlaygroundEventParticle object will be passed to a
corresponding delegate. This ables you to get more exact
information from a particle, for instance its size, the collider it has
hit, if it has been affected by a manipulator property, where it was
the previous frame and what original target (Source) position it has.
The Event Listener
An Event Listener is what you use if you want a particle to affect
any logic in your game, for instance compromise the health of a
player or add points upon collision. Adding an Event Listener to
your script is a simple task, where you call a particle system’s list of
PlaygroundParticlesC particles;
PlaygroundEventC playgroundEvent;
void Start () {
particles = GetComponent<PlaygroundParticlesC>();
playgroundEvent = PlaygroundC.GetEvent (0, particles);
playgroundEvent.particleEvent += OnEvent;
}
}
void OnEvent (PlaygroundEventParticle particle) {
Debug.Log (particle.position);
}
In the example above we have a reference to the particle system
(particles) where we fetch the first Event in its Events List and
attach the function OnEvent to the particleEvent Event Delegate.
The function will receive data from any particle triggering the Event
in form of a PlaygroundEventParticle where you can extract
detailed information. Please see the example scene Event Listener
for a more practical example of how to influence the world around
your particles.
27 of 68
DEEPER INTO EVENTS
Tracking events from several particle systems
Hooking up event listeners can become a cumbersome task if you
have several particle systems you’d wish to receive events from. In
the settings for an event when having Broadcast Type of
EventListeners or Both you will find the option Send To Manager.
Enabling Send To Manager will broadcast the event to the global
event delegates found in the PlaygroundC class (the Playground
Manager). Available event delegates are:
-
PlaygroundC.particleEventBirth
PlaygroundC.particleEventDeath
PlaygroundC.particleEventCollision
PlaygroundC.particleEventTime
Adding a function to one of these delegates would look like this:
PlaygroundC.particleEventBirth += OnEventParticleBirth;
Where the function could look like this:
void OnEventParticleBirth (PlaygroundEventParticle particle) {
Debug.Log (particle.position);
}
28 of 68
PARTICLE MANIPULATION
PARTICLE MANIPULATION
Should you want to alter a particle’s behavior
based on its position rather than time,
Manipulators to the rescue.
The mechanic behind a Manipulator
All Manipulators will calculate inside the particle’s multithreaded
calculation loop. Every particle system will process data from the
assigned Local- as well as the Global Manipulators. Based on a
Manipulator’s settings a particle within the scope of a Manipulator’s
influencing area will be affected in different ways.
Global or Local
If you want to affect several particle systems within the scene, with
the same behavior of a Manipulator you’d create a Global
Manipulator on the Playground Manager. You can still determine
which particle systems to affect through layers. A Global
Manipulator will serialize along with the Playground Manager
within the scene. Should you on the other hand want to only affect
one particle system and/or make it follow along a preset, you’d
create a Local Manipulator on the particle system. A Local
Manipulator will serialize along with the particle system, which
makes the solution good for stand-alone situations.
Manipulator types
A Manipulator can have a main type, property type or a
combination of property types. The main types are fast and tiny
algorithms for changing a particle’s velocity path. A property type is
a deeper nested structure where you can access a particle’s color,
size, life and give it targets within the scene (where velocity won’t
be taken into account but rather try to dampen it). The Death
property will force the particle to an earlier death, you cannot
extend a single particle’s lifetime as that would break any set
lifetime patterns (due to the pooling structure of reusing particles
for performance). Should you want several properties changed
from one Manipulator you can use the Combined type, where a list
of properties will be iterated for that single Manipulator. Every
main type can be injected into a property, to give access inside the
Combined Manipulator.
A closer look into tweaking
Every Manipulator requires a Transform assigned. It’s not
recommended to use the same Transform or exact position as your
particle system as that will result in an unwanted behavior for
velocity properties - where particles will have a hard time gaining
initial momentum. Based on the type of Manipulator you’ll be
presented with different values in Inspector to tweak. Every
property has its own strength whereas the Manipulator itself has a
main strength. A resemblance would be a mixer table, where the
mixer has a main gain and each channel has an individual volume
parameter. Each property can transition over time using linear
interpolation from its current property value towards the final
Manipulator value. This will have a different effect based on the
selected property. An example would be when using targets, where
if you don’t transition the particle will instantly jump onto the target
position.
The main strength of a Manipulator can apply a Smoothing- and
Distance (from Manipulator origin) effect where the algorithms or
properties will be applied in different manors. You can also inverse
the bounds of the Manipulator’s area effect.
29 of 68
MANIPULATOR EVENTS
MANIPULATOR EVENTS
A Manipulator can keep track of its particles
and send events to any event listeners you’ve
setup through script.
Start tracking
All Manipulators can track particles within their confined space. To
start tracking you enable Track Particles (found in Manipulator >
Events). Any Manipulator tracking particles will by default send
Enter, Exit, Birth, Death and Collision events. These will send a
PlaygroundEventParticle onto their respectively event delegate.
The mechanic behind Manipulator Events
The particles are stored within a list which contains the particle’s ID
and its particle system’s ID (for Global Manipulators). Whenever a
particle enters or leaves the Manipulator the list will be altered.
Whenever you call GetParticles() on a Manipulator the list of particles
will convert into a List<PlaygroundEventParticle>, which contains
detailed information about each particle currently living inside the
Manipulator’s extents. You can use this to single out particles within
a predetermined area of your scene to apply any logic you need
through script. Tracking particles will require more CPU the more
particles are tracked and will produce memory garbage accordingly.
Please see the example scene Manipulator Events for scripting
examples.
30 of 68
PUBLISHING PRESETS
PUBLISHING PRESETS
With the ownership of Particle Playground,
publishing your own particle systems is
encouraged. Use this to for instance create
particle system packages or apply an effect to
any other assets you may distribute. In short,
feel free to turn your particles into money.
Using the Preset Wizard to prepare a UnityPackage
You will find the Preset Wizard through the Playground Wizard by
pressing Preset Wizard or on any Particle Playground system at the
very top by pressing Create Preset. From here you can create new
presets and Publish presets.
Any preset can be exported as a UnityPackage using the Preset
Wizard to prepare it for publishing. There are some ground rules to
follow, where you may not export a full version of Particle
Playground (where any of the Editor scripts are disallowed) along
your UnityPackage. The Preset Wizard will let you export just what’s
needed without having to second-guess that anything unwanted
tags along your package.
The simple steps of exporting presets
1) Select the Publish toggle in the Preset Wizard.
2) Select your preset in the Preset-list. Using an icon is only for
display in the Playground Wizard. Change name if needed.
3) Press Create. The UnityPackage will be stored in your chosen
directory.
Anyone installing the UnityPackage will not need to own the
Particle Playground framework, but will in that case not be
presented with all settings to tweak the particle system through the
Inspector. Should you have any features to your particle system
you wish anyone to be able to edit, it’s recommended to create a
script which will alter your feature’s behavior.
Publishing
Feel free to publish and sell your asset(s) through any channel you
prefer. You agree that Polyfied cannot be held responsible for the
quality of your asset when publishing assets connected to the
Particle Playground framework.
Please contact contact@polyfied.com if you have any inquiries.
31 of 68
REFERENCE
EXPLAINING WHY, WHERE AND HOW
32 of 68
PLAYGROUND PARTICLE SYSTEM
PLAYGROUND PARTICLE SYSTEM
Particle Playground introduces new possibilities
along with some new naming conventions for
particle systems. Let’s have a look at each
individual setting for a particle system,
beginning at the top of the Inspector.
Source
It all starts here, the Source determines from which position particles will emit within the scene. Every Source ranging from Transforms,
Meshes, Textures, Paint and Projections has different settings and approaches for how to structure Source Positions within the scene.
State
Emit from pre-defined positions created from an image or mesh. All Particle Playground systems uses a list of states to store data from
a mesh's vertices or an image’s pixels. When creating a new State from an image you can define Texture, Depthamp (with Depthmap
Strength), Name, Scale, Offset and a parent Transform. When creating a State from a mesh you can define Mesh, Texture, Name, Scale,
Offset and Transform. Using a Transform will make you able to position, rotate and scale the State.
Name
The name of this State.
Texture
Takes a Texture2D which will structure the State in color and positions from the Texture2D’s pixels. If you use a texture when
creating the State from a mesh, the positions will be colored from the UV-mapping of the mesh.
Depthmap
Takes a Texture2D which will define the Z-value in normalized value by grayscale. A black pixel is 0.0 and a white is 1.0.
Depthmap Strength
33 of 68
PLAYGROUND PARTICLE SYSTEM
The amount the Depthmap will multiply the Z-positioning. A Depthmap Strength of 1.0 will affect the Z-positions one Unit
ranging from black to white.
Mesh
The mesh to construct your State from. Each vertex in the mesh will define a position in the State.
Transform
To be able to position, rotate and scale a State you will need a Transform assigned from the scene.
Scale
The world scale of this State. Each pixel will originally be a square of 1x1 Units. To make the final size of a State smaller, use a
number below 1.0. Using a number below 0 will invert the State in X- and Y positions.
Offset
A State will be created in Vector3(0, 0, 0) in world coordinates (or local coordinates if a stateTransform is set) with origin of the
image’s bottom left or a mesh’s pivot. Use the offset to place it elsewhere, with offset from world’s or stateTransform’s Vector3(0,
0, 0) measured in Units.
Chroma Key
Filters out a specific color within Spread range. This is useful if the State’s texture doesn’t have any alpha information.
Transform
Emit from one or several Transform components within your scene.
Treat As One Transform
Determines the birth distribution of particles over the assigned transforms.
World Object
Emit from a Mesh component within your scene.
Mesh Vertices Update
Enable this if the World Object's mesh is procedural and changes vertices over time.
34 of 68
PLAYGROUND PARTICLE SYSTEM
Mesh Normals Update
Enable this if the World Object's mesh is procedural and changes normals over time.
Skinned World Object
Emit from a Skinned Mesh component within your scene.
Force Update On Main-Thread
Enable Main-Thread updating to ensure correct birth positions on the live vertices. This can have a noticeable impact on
performance as the skinned mesh vertex extraction won’t be multithreaded.
Mesh Vertices Update
Enable this if the Skinned World Object's mesh is procedural and changes vertices over time.
Mesh Normals Update
Enable this if the Skinned World Object's mesh is procedural and changes normals over time.
Source Down Resolution
The source vertex skipping. Use this to lower the distribution of particles needed along your complete skinned mesh. Each
position will be determined by jumping over vertices in the vertex list. The amount of calculated positions will be divided by how
many positions you’ve decided to skip. This is in many cases needed to amp performance when using skinned meshes in your
scene, especially when you target mobile platforms.
Script
Control all particle emission behavior through custom scripts (advanced). Use PlaygroundParticlesC.Emit(position, velocity, color) to
create a particle at position. Several overloads are available where you also can emit a number of particles instantly. Please see the Ink
example scene for basic usage. Through the Inspector you’re presented with some basic control to try emission before putting them
into a script call,
Emission Index
The particle’s array position that will emit when you call Emit() on this PlaygroundParticlesC object.
35 of 68
PLAYGROUND PARTICLE SYSTEM
Position
The particle’s initial emission position when you call Emit() on this PlaygroundParticlesC object.
Velocity
The velocity of the particle that will emit when you call Emit() on this PlaygroundParticlesC object.
Color
The color of the particle that will emit when you call Emit() on this PlaygroundParticlesC object.
Paint
Paint positions and color by using your own brushes, or by a single point with color information. Creating your own brushes can be
done through the Brush Wizard, which you’ll find in the Brush Preset menu when selecting Brush as Paint Mode. All painting features
relies on colliders being hit in the scene. To paint live into the scene in script please see the example script PaintAtMousePositionC.
Paint Mode
This is an Editor-specific feature which lets you switch between painting with a single point (Dot), using predefined brushes (Brush)
or erasing paint positions (Eraser).
Brushes
Painting with brushes lets you fill a larger area with a predefined texture rather than a single point (like Paint Mode: Dot). You can
define the texture yourself along with how the brush should function, such as detail, scale and spacing. When painting, each pixel
(depending on chosen Detail level) will represent a ray into the scene at screen position. Each ray need to hit a collider to create a
Paint Position at world point.
Brush Presets
A list of predefined brushes with specific settings which will define current paint settings upon selection. You can create your
own presets by pressing the ”Create”-button which will open the Brush Wizard. A preset is stored in Particle Playground/
Resources/Brushes and can be edited through the Inspector. To remove a preset from the Brush Preset list either delete the
prefab in the ”Brushes”-folder or change the presentation mode to ”List” instead of ”Icons” and press the button ”-”.
Brush Shape
36 of 68
PLAYGROUND PARTICLE SYSTEM
The texture to project onto the surface where you choose to paint. The texture’s amount of pixels (width and height) will be
calculated for the amount of Paint Positions that will be created (amount is shown in the ”Paint” progress bar). All brush
textures need to have Read/Write Enabled and use True Color (non-compressed) in their Import Settings.
Brush Detail
The detail represents how many of the original pixels that should be read from the Brush Shape texture. This will affect how
many positions that will be created on every brush stroke. Keep in mind that it’s by rare occasions you ever need a perfect
copy of your brush’s full pixel amount onto a surface.
Perfect
Every pixel will be read (100% of existing texture pixels).
High
Every second pixel will be read (50% of existing texture pixels).
Medium
Every forth pixel will be read (25% of existing texture pixels).
Low
Every sixth pixel will be read (16.6% of existing texture pixels).
Brush Scale
The scale of a brush measured by the ratio of the original Brush Shape texture. For instance, a texture with 32x32 pixels and
a scale of 0.5 will represent a screen space area of 16x16 pixels.
Brush Distance
How far the brush sees from its origin position into the scene (in the Editor the origin is the Scene View’s camera). If the
distance is shorter than the target collider you want to paint on then no Paint Positions will be created.
Use Brush Color
Each Paint Position is created along with the Brush Shape’s color information at the ray’s pixel coordinate. Disabling this will
use the Color chosen by you instead, the alpha information will still be used from the Brush Shape texture.
37 of 68
PLAYGROUND PARTICLE SYSTEM
Color
The color to paint with when using the Dot Paint Mode. If you disable ”Use Brush Color” for a brush then Color will determine each
Paint Position color instead.
Paint Mask
Determines which layer of colliders the paint function sees in the scene. Available for all Paint Modes (Dot, Brush and Eraser). Use
this to see through certain objects or mask out a single object in the scene to avoid spilling paint.
Paint Spacing
The space needed for next paint position to occur. This is measured from the last paint position’s world point towards where next
will end up while painting. A transparent green disc will show the spacing area in Scene View while painting. Use this to distribute
paint more evenly along a surface for instance.
Max Paint Positions
The max positions allowed to be stored by this Paint object. Use this to limit the existing Paint Positions within a scene. Exceed Max
Stops Paint will determine if no more painting can occur or if Paint Positions will be removed (ascending from first position in list)
when reaching the max limit.
Paint - Inspector information
The amount of Paint Positions currently in the scene. ”Max Paint Positions” will determine where 100% of the progress bar is. If you
suddenly can’t see all Paint Positions the reason is much likely that you need to extend the Particle Count in Particle Settings.
Start/Stop Paint
Use this to begin or abort painting into the scene.
Clear
Removes all Paint Positions from the scene.
Projection
Project particles from a transform using a texture. This behaves similarly to the Unity Projector. This can be used to for instance create
fog, dust or splashes on certain surfaces. Choose to offset the origin texture and the projected source position from the surface using
38 of 68
PLAYGROUND PARTICLE SYSTEM
the projected normal’s direction. Use Live Update to update the projection position every frame. You can scale your projection in any
direction with the projection transform.
Projection Texture
The image to use where each pixel will wander through the scene in form of a Raycast.
Transform
The transform to project from.
Live Update
Determines if the projection should update every frame. Enable this if your projection transform moves or you have projected
objects moving inside the projection area.
Origin Offset
Offset the texture’s origin in X- and Y values.
Projection Distance
Determines how far the projection rays can travel into the scene, measured in Units.
Projection Scale
The scale of projection in Units. A scale of one will make each pixel one Unit. When using local simulation space, use this to scale
rather than the projection transform to ensure correct projection depth.
Surface Offset
Determines how far away the source position will be distributed from surface. Using the projected surface normal.
Projection Mask
The layer mask of which colliders within layer can be seen by the projection rays in the scene.
Spline
Emit particles from one or several Playground Splines in the scene. A Playground Spline is multithreading friendly and can be updated
live during runtime. Each node and bezier handle can be set towards a Transform, for easier live manipulation.
39 of 68
PLAYGROUND PARTICLE SYSTEM
Time Offset
The offset of the spline’s curves. This can be used to move particles over time on the spline.
Treat As One Spline
Determines the birth distribution of particles over the assigned splines.
Particle Settings
In the Particle Settings you can set the amount of particles within the scene, determine what size and rotation they should have, further tweak
their source position and apply lifetime emission patterns.
Particle Count
The amount of particles that should be actively simulated by the particle system.
Overflow Mode
Use this to set which method to calculate Overflow Offset by. Available methods are Source Transform (transform point), World (global)
and Source Point (normal point direction).
Source Transform
Offset by calculating the source’s transform point.
World
Offset by calculating the world position.
Source Point
Offset by calculating the source position using the source point's normal direction.
Overflow Offset The offset each overflow iteration from the source’s number of points. This will make the source copy itself in direction, based on the
selected Overflow Mode. For instance, using the Unity Sphere mesh as Source that consists of 525 vertices and using a Particle Count of
1050, the Overflow Offset will determine where the later 525 overflowing particles will position in relation to the first. The result is that
you will get a perfect copy of your sphere at the offset position. This can for instance be used intuitively to recreate the lights on a
40 of 68
PLAYGROUND PARTICLE SYSTEM
runway, especially together with a Lifetime Sorting of Linear or Reversed. Using a Transform with your Source will make you able to rotate
and scale the Overflow Offset.
Source Scatter The spread of source positions within minimum- to maximum range. Use this to scramble your source positions to make them appear
more randomly distributed. The Method determines if the distribution should be rectangular or spherical, where using a linear method
will take the particle array into account. With Scale you can change the size of the scatter area without recalculating the scatter array.
Use Advanced > Rebirth Options > Random Scatter to apply a new scattered position each time a particle is born.
Emit
Determines whether this Particle Playground system should emit particles or not. A Particle Playground system reuses each particle in
a cached pool where turning Emit Particles off will make the calculation loop halt upcoming rebirths.
Loop
Determines if this particle system should loop its lifetime cycle or just run the first.
Disable On Done
When loop is set to false, this determines if the GameObject should disable or destroy when the lifetime cycle has run through to the
end of last particle.
Clear On Stop
Determines if any existing particles should be removed when emission stops.
Emission Rate
The percentage of flow (normalized from 0 - 1) in burst sequences. This is calculated with the Lifetime Sorting for a Particle Playground
system to give a linear consistent behavior.
Size
The size of particles within minimum- and maximum float range.
Scale
The scale of minimum- and maximum Size.
41 of 68
PLAYGROUND PARTICLE SYSTEM
Lifetime Size
The particles size over lifetime. This is determined by an AnimationCurve where x-axis 0.0 to x-axis 1.0 is the complete lifetime and yaxis is the size in Units.
Array Size
The particles size over the particle array. This is determined by an AnimationCurve where x-axis 0.0 to x-axis 1.0 is the complete particle
array and y-axis is the size in Units.
Initial Rotation Speed
The minimum- and maximum initial rotation of a spawned particle.
Rotation
The minimum- and maximum rotation speed of each particle. To extend above 360 degrees please see Playground Manger > Editor Limits
> Particle Rotation.
Rotate Towards Direction
Apply rotation based on each particle’s velocity. This creates a direction which the particle will turn towards. To offset the rotation use
Initial Rotation Speed.
Rotation Normal
When using Rotate Towards Direction, the rotation normal determines which vector to rotate around. This is always a normalized value
set in vector coordinates. A common operation would be to rotate around the Main Camera’s (negative or positive) transform's forward
to make the rotation always appear the same for the user. For instance, PlaygroundParticlesC.rotationNormal =
Camera.main.transform.forward.
Lifetime
The particles lifetime in seconds. Toggle between Constant and Random Between Two Values.
Lifetime Sorting
The sorting of how the lifetime initially should be structured in this Particle Playground system. Use this to create different patterns in
appearance of their source position.
42 of 68
PLAYGROUND PARTICLE SYSTEM
Scrambled
Particles will be randomly distributed.
ScrambledLinear
Particles will be randomly distributed but ensured to never appear at the same time.
Burst
Particles will be created all at once.
Linear
Particles will be distributed linearly over their lifetime with sorting from source positions.
Reversed
Particles will be distributed linearly reversed with sorting from source positions.
Nearest Neighbor
Particles will be distributed by distance to nearestNeighborOrigin. This will create a water ripple effect in their lifetime
appearance from origin and out. Choose method by Source Point, Vector3 or Transform.
Nearest Neighbor Reversed
Particles will be distributed by distance from nearestNeighborOrigin. This will create an inverse water ripple effect in their
lifetime appearance from max distance towards origin. Choose method by Source Point, Vector3 or Transform.
Custom
Particles will be distributed by a normalized AnimationCurve where X is total amount of particles and Y is total lifetime.
Examples when using two positions on the curve: X1Y1, X0Y0: Linear
X0Y0, X1Y1: Reversed
X1Y1, X1Y1: Burst
Lifetime Offset
43 of 68
PLAYGROUND PARTICLE SYSTEM
Offsets the lifetime cycle. This can be used to set particle systems in sequences to each other. For instance, using the Playground
Runway preset you can determine if two (or more) runways should be similarly synced or offset in their blinking lights. You can also use
this to annihilate any fade-ins at first particle cycle by setting negative values. This can for instance be useful in a situation where you
want clouds similar to the Cloud preset to be fully visible from first frame in the first particle cycle.
Lifetime Emission
Determines the emission rate over the specified lifetime.
Particle Mask
The amount of masked (hidden) particles in current simulation. Due to the Particle Playground’s caching structure in built-in arrays,
you’re not able to change particle count over time as it must reinitialize the cache. The Particle Mask enables you to visually change
particle count where Mask Time will determine a fade until full mask effect is reached.
Mask Time
The time it takes in seconds for Particle Mask to reach full effect.
Mask Sorting
The method to sort the particle mask by the particle array. Use linear, reversed or scrambled.
Forces
Here you’ll find methods to move your particles. You can determine initial forces upon birth, forces over lifetime and apply turbulence.
Only Source Positions
Overrides all velocities and set every particle towards their source position every Update-cycle. This can be a desired behavior when
particles doesn’t move by force, but by their attached source’s Transform. You can still set all other type of lifetime behaviors and
offsets. Please see the example preset Matrix Cube or Holobot for basic usage.
Lifetime Positioning
Overrides all velocities and set every particle to move along three normalized AnimationCurves in X-, Y- and Z values based on their
lifetime. A curve’s X axis represents a particle’s lifetime from 0 to 1, where the Y axis represents units. Each AnimationCurve axis has a
repeat multiplier (starting at value 1), which determines how many times the curve will iterate over a particle’s lifetime. This can be used
to for instance create spiral movements.
44 of 68
PLAYGROUND PARTICLE SYSTEM
Position Scale
Set the scale of the Lifetime Positioning curves along a normalized AnimationCurve based on the particle’s lifetime. This will
control how much each X-, Y-, and Z curve will affect the particles positioning.
Time Scale
Set the scale of the particles lifetime along a normalized AnimationCurve. This will control how fast the particles are moving
along the Lifetime Positioning path.
Scale
The overall scale applied to all curves.
Use Source Normal Direction
This determines whether the source’s normal direction should be the base of direction for the Lifetime Positioning axis curves.
What this basically means is that the direction and rotation of the source will have affect on the direction of the particles
movement. When using Transform as Source, this will behave equally as if the particle system was simulated in local space.
Transition Back To Source
Determines if particles should return to their origin. The rate they should return in is specified by a normalized AnimationCurve.
Axis Constraints
The world axes to constrain forces for a particle. When working with 2D environments you will most likely want to enable constraints
for the Z-axis to hinder particles wandering off into the third dimension.
Max Velocity
The maximum velocity magnitude allowed for a particle.
Calculate Delta Movement
A Playground Particle system can calculate birth velocity from each Source point’s delta movement. What this practically does is to give
the particle an extra knock in the direction of the Source position’s movement. Use Delta Movement Strength to set the velocity scale
that should apply.
45 of 68
PLAYGROUND PARTICLE SYSTEM
Delta Movement Strength
The strength of the calculated Delta Movement. Particles with high Delta Movement Strength will appear lighter than particles with low Delta
Movement Strength.
Initial Global Velocity
The initial velocity for each particle. Use this to create a constant initial force towards direction. These are set by minimum- and
maximum vector values to create a spread within range. Use Initial Velocity Shape to control how the Initial Velocity distributes over the
particle birth pattern.
Initial Local Velocity
The initial velocity for each particle in local coordinates. The local coordinates are determined by the Source’s Transform direction and
any normals (where applicable). Use this to emit particles in the direction of the normals of a mesh or in the local position with rotation
of a transform. These are set by minimum- and maximum vector values to create a spread within range. Use Initial Velocity Shape to
control how the Initial Velocity distributes over the particle birth pattern.
Initial Velocity Shape
Shape your own initial velocity by Vector3AnimationCurves. The shape applies to an emitted particle’s force where X is total amount of
Source positions and Y is multiplier for total initial velocity. Use this to create shapes in how your particles spread out in the scene.
For instance, try a transform with overflow offset to see the basics of how this distribute velocities to each particle’s Initial Velocity at
birth with respect to Source positions.
Lifetime Velocity
The particles velocity over time. This is represented by three normalized AnimationCurves in X-, Y- and Z values. Use this to create
controlled movement patterns for your particles.
Velocity Bending
Bend a particle’s velocity path. Depending on the selected Type, the direction from each particle’s Source Position or current Particle
Position towards their current is seen as a normal plane to set a new direction for the particle. You can use this to create interesting
movement patterns without having to use turbulence or Manipulators (combine them to create a really interesting behavior).
Turbulence
46 of 68
PLAYGROUND PARTICLE SYSTEM
Two types of turbulence algorithms can affect particles velocity pattern, either by Simplex- or Perlin noise. Simplex noise will produce a
natural branch pattern. Perlin noise will produce a more confined, wave-like pattern. These turbulence types keeps iterating over the
whole scene space leaving no particle untouched within the particle system. Fine-tuning how the turbulence affects each particle is
done by Strength, Scale, Time Scale and Lifetime Strength.
Strength
How much the turbulence will affect the current velocity of each particle.
Scale
The resolution scale of the turbulence field. Having a higher scale of resolution will create a denser field, applying more
branches/waves for particle movement.
Time Scale
The time for how fast the turbulence field is moving. Setting Time Scale to 0 will pause the field generation, but not the velocity
within it.
Lifetime Strength
The strength to apply considering the particle’s lifetime. This is done by a normalized AnimationCurve where X is lifetime and Y is
strength.
Gravity
Creates a constant force towards this Vector3.
Damping
The inertia over time of each particle.
Velocity Scale
The overall scale of velocity applied to each particle.
Collision
Determines whether the particles should collide or not. This will calculate collisions from any 2D- or 3D colliders within your scene using
Raycasts from each particle.
47 of 68
Collision Type
Determines whether a 2D- or 3D collision method should be used.
PLAYGROUND PARTICLE SYSTEM
Collision Mask
A LayerMask which determines which objects these particles can collide with.
Collide With Rigidbodies
Determines whether each collision should affect rigidbodies and apply forces to them. This can only happen if a particle collides with a
GameObject which also has a Rigidbody as component.
Inverse Rigidbody Collision
Determines if the effect on the rigidbody collision should be reversed.
Mass
The mass of each particle. This is used when calculating how much each particle will affect a Rigidbody. A particle with a higher mass
will affect the Rigidbody more than a particle with a lower mass.
Collision Radius
The collision radius of each particle.
Lifetime Loss
The amount of lifetime (energy) to loose on collision measured by remaining lifetime span in a normalized value. A lifetime loss of 0.5
on a particle in 50% of its lifetime will set it to 25% of its lifetime.
Bounciness
The bounciness of each particle. This value will determine how much of the original force the particle will detain after collision. For
instance, using a value of 0.5 will make the particle loose half its force, using a value of 1.0 will make the particle have all force in
remain.
Random Bounce
48 of 68
The random offset bounce determined within minimum- and maximum Vector3-value from the collision surface’s normal. Use this to
simulate uneven surfaces.
PLAYGROUND PARTICLE SYSTEM
Collision Planes
The infinite collision planes. These are created from Transforms within the scene using the Transform’s upward axis to determine if a
particle is within or passed the infinite plane. A particle cannot live outside of the passed plane when using collisions. Use this to
contain particles within a determined space. The planes are updated within the calculation cycle to always match their assigned
Transform.
Collision Exclusion
Add any objects by Transform you wish to exclude from collision calculation in your Scene.
Rendering
From here you can set the visual presentation of the particle. This regards what Material it uses, what Color Source it has, Lifetime Color
gradient(s) and the Render Mode. The Material, Render Mode and Max Particle Size is directly inherited from the Shuriken component.
Material
The material of the particle system. Depending on the material’s shader, texture and color you will achieve different visual results how a
particle renders on screen.
Color Source
Choose which type of method to colorize your particles with Color Source. Using a State with a texture, painted positions from a brush
with a texture or assigned color by script is examples of Color Sources. If no Source is used a fallback to Lifetime Color will occur. You can
choose whether to render from the Source, a Lifetime Color or several Lifetime Colors. You also have the possibility to only set alpha from
Lifetime Color while the colors are picked up from the Source.
Color Method
Choose to color the particles by their lifetime or by their linear position in the particle array.
Lifetime Color(s)
The color each particle uses in this Particle Playground system during their lifetime. This is determined by a gradient. You can also
choose to use a list of Lifetime Colors, where a particle will pair up with a gradient upon birth.
49 of 68
PLAYGROUND PARTICLE SYSTEM
Source Uses Lifetime Alpha
Determines if the Source Color should use alpha from its Source (such as a transparent pixel) or from Lifetime Color.
Render Mode
The presentation of a particle whether it should be billboarded (horizontal and/or vertical), stretch by velocity values or use a custom
mesh. This is directly connected to the Shuriken particle system. Rendering stretched particles will present some fine-tuning options.
Camera Scale
The stretch scale applied by camera movement.
Speed Scale
The stretch scale applied by particle’s speed.
Length Scale
The length scale of the applied stretch.
Stretch Speed
How fast the stretching reacts to all scaling.
Start Stretch
The initial stretching direction and amount.
Lifetime Stretch
The amount of stretching over particles lifetime in normalized values of an Animation Curve. X is lifetime where 1.0 is a full
lifetime cycle and Y is strength of stretch. Having a strength greater than 1 on the curve may result in unexpected behavior.
Max Particle Size
The normalized screen size of a particle. This is directly connected to the Shuriken particle system.
Renderer
Determines if the particle system should render.
50 of 68
PLAYGROUND PARTICLE SYSTEM
Cast Shadows
Determines if the particles should cast shadows (a shadow casting shader must be used).
Receive Shadows
Determines if the particles should receive shadows (a shadow receiving shader must be used).
Sorting Mode
The method to sort particles within the particle system. Refer to the Shuriken manual.
Sorting Fudge
Bias of particle sort ordering. Refer to the Shuriken manual.
Sorting Layer
The depth layer of which this particle system is ordered by. This is only applicable when using 2D.
Order In Layer
The order within the Sorting Layer. This is only applicable when using 2D.
Texture Sheet Animation
The UV animation of particles. Refer to the Shuriken manual for further details. Set Minimum Shuriken Lifetime to 0 if you experience
non-rendered tiles on short-lived particles.
Manipulators
The list of Local Manipulators of this particle system. A Manipulator has the ability to change a particle’s properties based on their world
location. A Local Manipulator will only affect the particle system it’s attached to. The benefit of using Local Manipulators is that they will
serialize together with prefabs. To create a Global Manipulator you use Playground Manager > Manipulators. A Global Manipulator can affect all
particle systems within the selected layers in the scene.
Enabled
Determines if this Manipulator is active.
Transform
51 of 68
PLAYGROUND PARTICLE SYSTEM
The Transform to assign to this Manipulator. A Manipulator will need a Transform assigned to be able to have an origin position within
the world space. Use a Transform from another GameObject within your scene, this can be moved around freely and intuitively affect
particles within range in realtime.
Type
The behavior of this Manipulator. There are main-, property- and combined types. Main types (such as the Attractor, Vortex and
Repellent) can be injected into property types (such as Color, Size and Target) where a combined type is a container for all properties.
The main types are constructed of fast algorithms to affect a particle’s velocity, the property types are a deeper nested structure where
you can pass more thorough information to alter a particle.
None
The behavior will be inactive.
Attractor
The behavior will attract particles with funnel-like features.
AttractorGravitational
The behavior will attract particles with gravity-like features.
Repellent
The behavior will repel particles with magnetic repellent-like features.
Property
The behavior will alter the property of each particle within range. A property can be a particle’s color, a predetermined velocity, a
new size, a sooner death or a specified target. All main Manipulator types (such as the Attractor, Vortex and Repellent) can also
inject into a property to let a Combined Manipulator carry their behavior. Each property also has its own Strength value, which
becomes necessary when working with Combined Manipulators. Any property can transition by linear interpolation, to let a
particle fade into the newly inherited property by the Manipulator. Use Transition Lerp/Linear to change a property over time. The
Manipulator’s and property’s Strength will determine how fast the property changes.
None
52 of 68
Don’t alter any properties. This will however flag each particle within range in the PlaygroundCache and set its value of
changedByProperty to true.
PLAYGROUND PARTICLE SYSTEM
Color & Lifetime Color
Alter the color of a particle within range. Either by a specified color or let it inherit a new Lifetime Color gradient.
Only Color In Range
Determines if the new color will be kept by the particle or go back to its original when out of the Manipulator’s
range.
Keep Color Alphas
Determines if the new color will inherit the original alpha from the particle’s source color or get the alpha from the
new color.
Velocity
Alter the velocity of particle within range.
Local Rotation
Determines if the velocity should be calculated from the Transform direction of the Manipulator.
Additive Velocity
Add velocity to particle’s current velocity.
Size
Alter the size of particle within range.
Target
Set node targets in form of Transforms for particles. The particles will be moved by linear interpolation when using
Transition where a Zero Velocity Strength parameter will be available to fade out their current velocity.
Death
Force a sooner death upon particles.
53 of 68
PLAYGROUND PARTICLE SYSTEM
Mesh Target
Set a mesh target in form of vertices for particles. The particles will be moved by linear interpolation when using Transition
where a Zero Velocity Strength parameter will be available to fade out their current velocity.
Skinned Mesh Target
Set a skinned mesh target in form of vertices for particles. The particles will be moved by linear interpolation when using
Transition where a Zero Velocity Strength parameter will be available to fade out their current velocity.
Turbulence
Apply turbulence within the range of a manipulator. The same abilities are available as in the Forces > Turbulence except
that a manipulator’s turbulence will respond to the Smoothing- and Distance Effect as well. Having 0 effect on distance will
make the turbulence behave the same over the whole field of the manipulator.
State Target
Target a particle state within the Scene. Use Target Sorting to set how particles get their destination.
Spline Target
Target a Playground Spline within the Scene. Use Target Method to set how particles get their destination.
Combined
Combine Manipulator properties into one Manipulator call using the same position and radius. This is where any individual
property’s Strength will come in handy to fine-tune how they all affect the particle together.
Vortex
A simulated vortex where particles will spin towards its center. The rotation of the Transform will determine the velocity
direction.
Affects - Global Manipulators only
The layers this Global Manipulator will affect.
Shape
54 of 68
PLAYGROUND PARTICLE SYSTEM
The shape this Manipulator has, either a Sphere or a Box. Use the Scene View along with the handles when a Manipulator is unfolded
from the Manipulator list to see and edit how far it reaches.
Size (Sphere)
The spherical size of this Manipulator in Units. For instance, a spherical Manipulator at the world position Vector3(0, 0, 0) and a
value of 1 will make the spherical extents reach between Vector3(-0.5, -0.5, -0.5) and Vector3(0.5, 0.5, 0.5). All particles outside of
the spherical extent will be ignored (unless if it uses Inverse Bounds).
Bounds (Box)
The bounding box of this Manipulator in form of a Rect measured in Units. The Box is calculated from the Manipulator’s
Transform rotation. Through the Center values you can offset from the Manipulator's origin, where Extents will determine the size
on each axis.
Manipulator Strength
The strength of this Manipulator. All particles within the bounding area of this Manipulator will be affected. The outcome of the
behavior is dependent on the selected Type. Use the Scene View along with the handles when a Manipulator is unfolded from the
Manipulator’s list to see and edit their Strength.
Lifetime Filter
Filter particles within a specified lifetime span of normalized minimum- to maximum float value. Using a value of 0 will have immediate
affect upon birth. You can use this to apply properties when a particle has reached a certain lifetime and is within a certain lifetime
span.
Particle Filter
Filter particles based on the particle system’s particle count of normalized minimum- to maximum float value. The span is directly
connected to the list position in the Playground- and Particle Cache.
Inverse Bounds
Invert the bounding space this Manipulator affects.
Track Particles
55 of 68
PLAYGROUND PARTICLE SYSTEM
Determines if the Manipulator should keep track of the particles within its confined space. This is necessary if you want to extract
information from the particles affected by this Manipulator or if you want the Manipulator to send events.
Tracking Method
The method to track particles with. Using ManipulatorId will be fast, but may not return correct when having overlapping
Manipulators. Using ParticleId will be slow, but will ensure correct compare of particles within any overlapping Manipulators.
Send Enter Events
Send information about each particle entering the Manipulator.
Send Exit Events
Send information about each particle exiting the Manipulator.
Send Birth Events
Send information about each particle birth inside the Manipulator.
Send Death Events
Send information about each particle dying inside the Manipulator.
Send Collision Events
Send information about each particle colliding inside the Manipulator.
Events
From the Events-tab you can setup the list of Events a particle will trigger when a specific condition is met, such as particle Birth, Death, Collision
or by Time. You can specify how it will broadcast, towards another particle system Target and/or any Event Listeners by an event delegate which
can be reached from your game logic. Each Event can send different information, either from the particle, particle system or user specified
values. Using an Event Listener will have detailed information about the particle in the occurring Event.
Broadcast Type
The method to send the Event by. Using another Target particle system will send emission information and issue an Emit(). Using Event
Listeners will broadcast information from the triggering particle to an event delegate found inside the Event object by name particleEvent.
Please see the example scene Event Listener for basic usage.
56 of 68
PLAYGROUND PARTICLE SYSTEM
Target
The particle system which will receive information from the occurring Event. The particle system will need to be running in the
Source Script mode to receive information. Please see the example scene Event Targets for basic usage.
Type
The type of condition to trigger this Event. Available conditions are particle Birth, Death, Collision or by a specified Time.
Position
The method which will set position information. Available values are User, Particle and Source. User will make the Event pass a
predetermined position set by the user, Particle will pass the particle’s position and Source will pass the particle’s Source Position upon
birth.
Velocity
The method which will set velocity information. Available values are User, Particle and Source. User will make the Event pass a
predetermined velocity set by the user, Particle will pass the particle’s velocity and Source will pass the particle’s initial velocity upon
birth.
Color
The method which will set color information. Available values are User, Particle and Source. User will make the Event pass a
predetermined color set by the user, Particle will pass the particle’s color and Source will pass the particle’s color upon birth.
Snapshots
A snapshot is a stored particle system state (all its settings and current particle values within the scene). Through the list of Snapshots you can
Load any stored settings at any time. Each stored state is childed to the particle system carrying the snapshot as a separate particle system,
should you want to edit them you can enable Playground Manager > Advanced > Show Snapshots. Please see the example scene Snapshots for
basic usage.
Load From Start
Determines if the selected snapshot should load when the particle system enables.
Transition Time
57 of 68
Enable this if you want to transition over time between current and loaded particle values.
PLAYGROUND PARTICLE SYSTEM
Transition Type
The type of transition over time. Linear will transition without easing, Ease In will start slow, Ease Out will end slow.
Transform
The stored snapshot carries information about where the Transform was in the scene when the snapshot was made. Enable this to
make the particle system jump to that position and rotation.
Settings & Particles
Toggle between Settings & Particles, Settings Only and Particle Only. Settings indicates that you will load all particle system settings, Particles
indicates that you will load all live particles and their individual values from when the snapshot was made.
Advanced/Simple Snapshots
Toggle the Advanced/Simple button in Inspector to show the particle system snapshots in Hieararchy and expose advanced controls in
the Snapshots-list.
Advanced
The Advanced section will expose some mechanical fine-tuning parts of a particle system. From here you can change the rate of update, the
simulated space and how a particle will behave upon rebirth.
Simulation Space
Determines if particles are simulated in World- or Local space. This is directly connected to the Shuriken particle system. However, it
affects how particles are calculated where world to local space is converted throughout the whole framework.
Movement Compensation
Available when using Local Simulation Space. This emulates the behavior of locally moved particles when moving the Source,
where all particles will follow any repositioning in world space.
Update Rate
58 of 68
PLAYGROUND PARTICLE SYSTEM
The update rate of this Particle Playground system. This determines how often the calculation loop will run. For instance, 1 will make
the calculation run each frame, 2 will make it run each second frame. The higher the number the more choppy the particles will move
over time, but hog up less of the main thread. Use this to balance quality of appearance with performance.
Time Scale
The local time scale of the particle system. Set this to 0 to pause simulation.
Rebirth Options
Control if certain actions should be run upon particle rebirth.
Random Lifetime
Particle will get a new lifetime within minimum- and maximum range of lifetimeMin and lifetime. This is only applicable when using
a Lifetime of Random Between Two Values.
Random Size
Particle will get a new size within minimum- and maximum range of sizeMin and sizeMax.
Random Rotation
Particle will get a new initial rotation within minimum- and maximum range of initialRotationMin and initialRotationMax.
Random Scatter
Particle will get a new scatter position within minimum- and maximum range of sourceScatterMin and sourceScatterMax. This is
only applicable when using Source Scatter.
Random Velocity
Particle will get a new initial velocity within minimum- and maximum range of initialVelocityMin and initialVelocityMax.
Force Initial Color
Particle will get its initially calculated color. By rare occasions this is needed for any particles that will flicker upon rebirth due to
the multithreading.
Delta Position Adjustment
59 of 68
PLAYGROUND PARTICLE SYSTEM
Determines if the delta time from birth to current should adjust its initial positioning. This will make particles appear linearly, but
naturally create a gap from its birth position.
Calculate Manipulator
Determines if each particle should calculate its affecting Manipulators immediately on rebirth.
Locks
Apply locks for Position, Rotation and Scale for a particle system’s Transform.
Prewarm
Determines if the particle system should start in a predetermined state in its lifetime upon load.
Prewarm Lifetime Cycles
This tells prewarming where to end the simulation time and where particles should be within their lifetime cycle upon load.
Prewarm Cycles (Resolution)
This determines how many calculation cycles should be spent in the prewarming process. Using a higher value will have more
detailed velocity results but requires more computation time.
Auto-Pause Calculation
Determines if a particle system should halt calculations when outside of the main camera’s frustum.
Calculation Trigger
The Transform used to trigger calculation. The particle system transform will be used if null.
Calculation Trigger Size
The area around the Calculation Trigger.
Calculation Trigger Offset
The offset from the Calculation Trigger.
Draw Gizmo
60 of 68
PLAYGROUND PARTICLE SYSTEM
Show the trigger area in Scene View.
Sync Particles To Main-Thread
Due to the multithreading you may sometimes experience movement tearing or other time differentials. Syncing particles onto mainthread will make particles move inside the MonoBehaviour’s Update loop and even out any visually teared particles.
Particle Thread Method
The multithreading method for a single particle system. Use this to bypass the selected Particle Thread Method on the Playground
Manager. You can use this effectively to fine-tune how each particle system should calculate to gain performance on special setups.
Inherit
Makes the particle system calculate as set by the Playground Manager’s Particle Thread Method. This is the default value.
NoThreads
Makes the particle system calculate on the main-thread.
OnePerSystem
Creates a new thread for this particle system. This makes sure the particle system will have its own calculated thread each
calculated frame. Use this when you wish to give a particle system extra attention in performance.
OneForAll
Creates a bundled thread for all particle systems using this setting. This can be a good alternative when having many similar
particle systems with few particles.
Particle Pool
This is an Editor feature where you can Clear out all currently simulated particles (source positions will remain intact) and Rebuild them
towards their Source Positions.
61 of 68
PLAYGROUND MANAGER
PLAYGROUND MANAGER
Every particle system is driven by the
Playground Manager, it also contains the Global
Manipulators and some settings to fine-tune the
Playground.
Particle Systems
The list of Particle Playground systems within the scene. Use this list in the Editor to create new, jump between (by pressing the name), to copy,
sort or remove the particle systems. To access a particle system through script you can use Playground.GetParticles(int), where int will be the
position in the list. This will return a reference to the particle system in form of a PlaygroundParticlesC object.
Manipulators
The list of Global Manipulators used within the scene. Please see the Playground Particle System-section for more details.
Advanced
In the Advanced-tab you’ll be able to fine-tune your Particle Playground.
Calculate Particles
Turn this off to override calculation settings for all Particle Playground systems and turn calculation off in the entire scene.
Group Automatically
Determines if a newly created- or non-childed Particle Playground system should automatically get the Playground Manager as parent.
This behavior is only for user convenience where a particle system won’t be affected by the Hierarchy.
Build Zero Alpha Pixels
Determines if an image’s completely transparent pixels should be built as particles or not. Have this setting off if you want to spare the
number of particles. Turn it on if you for instance want to linearly interpolate from one state that has transparent pixels to another
which doesn’t.
62 of 68
Scene Gizmos
Show Gizmos from any Particle Playground visual helpers within Scene View.
PLAYGROUND MANAGER
Source Positions
Render the Source Positions in Scene View. This should be considered for debug purposes only where having plenty Source Positions
can be heavy for the Unity Editor to render.
Spline Preview
Render the Playground Splines bezier curves in Scene View.
Wireframes
Render wireframes around particles in Scene View.
Paint Toolbox
Show toolbox when painting in Scene View.
Show Shuriken
Show the Shuriken component of each Particle Playground system.
Advanced Snapshots
Determines if more advanced options should be available for Snapshots. This will make the Snapshot GameObjects visible in the
Hierarchy under the corresponding particle system.
Pixel Filter Mode
The method to filter pixels with when reading textures, either Bilinear or Pixel32.
Multithreading
Particle Playground is using multithreading to relieve the CPU’s main-thread from its calculations and to distribute all particle systems,
turbulence and skinned mesh vertex extraction into different thread calls. You can alter how Particle Playground should distribute
these threads to fine-tune how the calculation performs on your end-platform. This is done in realtime and can be switched through
63 of 68
script (in Editor and runtime), see the Multithreading Skinned Meshes scene for scripting example. To successfully fine-tune performance
you should monitor the number of active threads, your current FPS, GC allocation and how your particle system behaves visually.
PLAYGROUND MANAGER
Particle Thread Method
The multithreading method of the simulated particle systems. This determines how particle systems calculate over the CPU, if
their calculations should be bundled, separated or not make use of multithreading. Keep in mind each thread will generate
memory garbage which will be collected at some point.
No Threads
No calculation threads will be created. This will in most cases have a negative impact on performance as Particle Playground
will calculate along all other logic on the main-thread. Use this for debug purposes or if you know there's no multi- or
hyperthreading possibilities on your target platform.
One Per System
One calculation thread per particle system will be created. Use this when having heavy particle systems in your scene.
Note that this method will never bundle calculation calls unless specified in each individual particle system’s Particle Thread
Method.
One For All
One calculation thread for all particle systems will be created. Use this if you have other multithreaded logic which has
higher performance priority than Particle Playground or your project demands strict use of garbage collection. Consider
using Automatic for best performance.
Automatic
Let calculation threads distribute evenly for all particle systems in your scene. This will bundle calculation calls to match
the platform's SystemInfo.processorCount. This is the recommended and overall fastest method to calculate particle
systems. Having fewer particle systems than processing units will create one thread per particle system. Having more
particle systems than processing units will initiate thread bundling.
Turbulence- and Skinned Mesh Thread Method
Determines how turbulence and skinned meshes should be calculated over the CPU.
64 of 68
Inside Particle Calculation
No new threads will be created. The calculation will run inside the selected Particle Thread Method.
PLAYGROUND MANAGER
One Per System
Each calculated frame will create a new thread. Use this when having few particle systems with heavy calculations.
One For All
One thread for all particle systems will be created. Use this when having plenty of particle systems with light calculations.
Max Threads
When using a Particle Thread Method of Automatic you can use Max Threads to set the highest possible threads created.
Time Simulation Reset
Reset the global time simulation.
65 of 68
PLAYGROUND SETTINGS
PLAYGROUND SETTINGS
In the Playground Wizard window you’ll find
overall settings where you can handle
languages, Editor limits and project paths. All
settings are serialized into your project.
Check For Updates
Playground will check for new releases having this enabled. When a new release is available you’ll be notified with a message in the
Playground Wizard.
Prefab Connection
Determines if your instantiated presets should have their prefab connection intact.
Hierarchy Icon
Determines if the Playground Hierarchy icon should be visible. The icon indicates if a particle system is currently simulating (yellow), inactive
(grey) or has detected a heavy calculation loop (red).
Language
The active language of Particle Playground. Here you can create new, install, edit and export languages.
Editor Limits
All limits constraining the Editor GUI controls in terms of minimum- and maximum values.
Paths
The different static paths Particle Playground uses to keep track of its assets.
66 of 68
SUPPORT
Your experience is important, whether it’s to
give feedback or to get help troubleshooting,
make sure to stay in touch.
SUPPORT
Opening a support errand
Should you have any inquiries, requests or bug-reports please send a mail to support@polyfied.com.
The support comes free of charge and may have a couple days of wait.
Learning more about the Playground
Please visit the official Particle Playground website http://playground.polyfied.com/ for more information.
About this document
Particle Playground Version: 2.2
Document updated: January 30, 2015
67 of 68
Particle Playground 2 and the NEXT manual is proudly
presented by Polyfied, Stockholm Sweden 2015.
polyfied.com


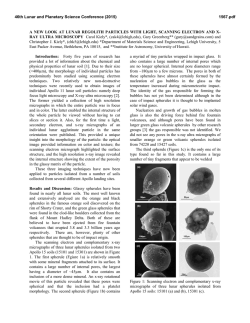
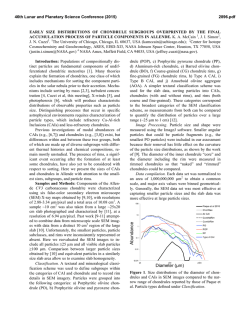
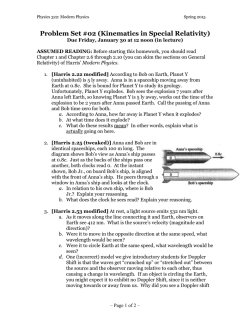
© Copyright 2026