
CURV 500 IAMP
USER´S MANUAL
BEDIENUNGSANLEITUNG
MANUEL D`UTILISATION
MANUAL DE USUARIO
INSTRUKCJA OBSŁUGI
MANUALE D‘ USO
CURV 500 IAMP
4 CHANNEL CLASS D INSTALLATION AMPLIFIER
LDCURV500IAMP
CONTENTS / INHALTSVERZEICHNIS / CONTENU / CONTENIDO / TREŚĆ / CONTENUTO
ENGLISH
ESPAÑOL
PREVENTIVE MEASURES
3-4
INTRODUCTION4
CONNECTIONS, OPERATING AND DISPLAY ELEMENTS
5
OPERATION6-10
TECHNICAL DATA
10
MANUFACTURER’S DECLARATIONS
11
MEDIDAS DE SEGURIDAD
31-32
INTRODUCCIÓN32
CONEXIONES, ELEMENTOS DE MANEJO E INDICACIÓN
33-34
FUNCIONAMIENTO34-38
DATOS TÉCNICOS
38-39
DECLARACIONES DEL FABRICANTE
39
DEUTSCH
POLSKI
SICHERHEITSHINWEISE12-13
EINFÜHRUNG13
ANSCHLÜSSE, BEDIEN- UND ANZEIGEELEMENTE
14
BEDIENUNG15-19
TECHNISCHE DATEN
20
HERSTELLERERKLÄRUNGEN21
ŚRODKI OSTROŻNOŚCI
40-41
WPROWADZENIE41
GNIAZDA, PANEL OBSŁUGI I WSKAŹNIKI
42
OBSŁUGA43-47
DANE TECHNICZNE
47-48
DEKLARACJE PRODUCENTA
48
FRANCAIS
ITALIANO
MESURES PRÉVENTIVES
22-23
INTRODUCTION23
RACCORDEMENTS, ÉLÉMENTS DE COMMANDE ET D’AFFICHAGE
24
MODE D’EMPLOI
25-29
CARACTÉRISTIQUES TECHNIQUES
29-30
DECLARATIONS30
MISURE PRECAUZIONALI
49-50
INTRODUZIONE50
RACCORDI, ELEMENTI DI COMANDO E DI VISUALIZZAZIONE 51
COMANDO52-56
DATI TECNICI
56-57
DICHIARAZIONI DEL PRODUTTORE
57
ENGLISH
ENGLISH
YOU‘VE MADE THE RIGHT CHOICE!
We have designed this product to operate reliably over many years. LD Systems stands for this with its name and many years of experience
as a manufacturer of high-quality audio products. Please read this User‘s Manual carefully, so that you can begin making optimum use of
your LD Systems product quickly.
You can find more information about LD-SYSTEMS at our Internet site WWW.LD-SYSTEMS.COM
PREVENTIVE MEASURES
DEUTSCH
1. Please read these instructions carefully.
2. Keep all information and instructions in a safe place.
3. Follow the instructions.
4. Observe all safety warnings. Never remove safety warnings or other information from the equipment.
5. Use the equipment only in the intended manner and for the intended purpose.
6. Use only sufficiently stable and compatible stands and/or mounts (for fixed installations). Make certain that wall mounts are properly installed and
secured. Make certain that the equipment is installed securely and cannot fall down.
7. During installation, observ e the applicable safety regulations for your country.
8. Never install and operate the equipment near radiators, heat registers, ovens or other sources of heat. Make certain that the equipment is always
installed so that is cooled sufficiently and cannot overheat.
9. Never place sources of ignition, e.g., burning candles, on the equipment.
10. Ventilation slits must not be blocked.
11. Do not use this equipment in the immediate vicinity of water (does not apply to special outdoor equipment - in this case, observe the
special instructions noted below. Do not expose this equipment to flammable materials, fluids or gases. Avoid direct sunlight!
12. Make certain that dripping or splashed water cannot enter the equipment. Do not place containers filled with liquids, such as vases or
drinking vessels, on the equipment.
13. Make certain that objects cannot fall into the device.
14. Use this equipment only with the accessories recommended and intended by the manufacturer.
15. Do not open or modify this equipment.
16. After connecting the equipment, check all cables in order to prevent damage or accidents, e.g., due to tripping hazards.
17. During transport, make certain that the equipment cannot fall down and possibly cause property damage and personal injuries.
18. If your equipment is no longer functioning properly, if fluids or objects have gotten inside the equipment or if it has been damaged in anot
her way, switch it off immediately and unplug it from the mains outlet (if it is a powered device). This equipment may only be repaired by
authorized, qualified personnel.
19. Clean the equipment using a dry cloth.
20. Comply with all applicable disposal laws in your country. During disposal of packaging, please separate plastic and paper/cardboard.
21. Plastic bags must be kept out of reach of children.
FRANCAIS
ESPAÑOL
POLSKI
FOR EQUIPMENT THAT CONNECTS TO THE POWER MAINS
22. CAUTION: If the power cord of the device is equipped with an earthing contact, then it must be connected to an outlet with a protective
ground. Never deactivate the protective ground of a power cord.
23. If the equipment has been exposed to strong fluctuations in temperature (for example, after transport), do not switch it on immediately.
Moisture and condensation could damage the equipment. Do not switch on the equipment until it has reached room temperature.
24. Before connecting the equipment to the power outlet, first verify that the mains voltage and frequency match the values specified on the
equipment. If the equipment has a voltage selection switch, connect the equipment to the power outlet only if the equipment values and the
mains power values match. If the included power cord or power adapter does not fit in your wall outlet, contact your electrician.
25. Do not step on the power cord. Make certain that the power cable does not become kinked, especially at the mains outlet and/or power
adapter and the equipment connector.
26. When connecting the equipment, make certain that the power cord or power adapter is always freely accessible. Always disconnect the
equipment from the power supply if the equipment is not in use or if you want to clean the equipment. Always unplug the power cord and
power adapter from the power outlet at the plug or adapter and not by pulling on the cord. Never touch the power cord and power adapter
with wet hands.
27. Whenever possible, avoid switching the equipment on and off in quick succession because otherwise this can shorten the useful life of
the equipment.
28. IMPORTANT INFORMATION: Replace fuses only with fuses of the same type and rating. If a fuse blows repeatedly, please contact an
authorised service centre.
29. To disconnect the equipment from the power mains completely, unplug the power cord or power adapter from the power outlet.
30. If your device is equipped with a Volex power connector, the mating Volex equipment connector must be unlocked before it can be removed. However, this also means that the equipment can slide and fall down if the power cable is pulled, which can lead to personal injuries
and/or other damage. For this reason, always be careful when laying cables.
31. Unplug the power cord and power adapter from the power outlet if there is a risk of a lightning strike or before extended periods of disuse.
ITALIANO
3
ENGLISH
CAUTION:
To reduce the risk of electric shock, do not remove cover (or back). There are no user serviceable parts
inside. Maintenance and repairs should be exclusively carried out by qualified service personnel.
The warning triangle with lightning symbol indicates dangerous uninsulated voltage inside the unit, which may cause an
electrical shock.
DEUTSCH
The warning triangle with exclamation mark indicates important operating and maintenance instructions.
Warning! This symbol indicates a hot surface. Certain parts of the housing can become hot during operation. After use, wait for a
cool-down period of at least 10 minutes before handling or transporting the device.
POLSKI
ESPAÑOL
FRANCAIS
Warning! This device is designed for use below 2000 metres in altitude.
Warning! This product is not intended for use in tropical climates.
CAUTION! HIGH VOLUMES IN AUDIO PRODUCTS!
This device is meant for professional use. Therefore, commercial use of this equipment is subject to the respectively applicable national accident
prevention rules and regulations. As a manufacturer, Adam Hall is obligated to notify you formally about the existence of potential health risks.
Hearing damage due to high volume and prolonged exposure: When in use, this product is capable of producing high sound-pressure levels (SPL)
that can lead to irreversible hearing damage in performers, employees, and audience members. For this reason, avoid prolonged exposure to
volumes in excess of 90 dB.
NOTE: This equipment has been tested and found to comply with the limits for a Class B digital device, pursuant to Part 15 of the FCC
Rules. These limits are designed to provide reasonable protection against harmful interference in a residential installation. This equipment
generates, uses and can radiate radio frequency energy and, if not installed and used in accordance with the instructions, may cause
harmful interference to radio communications. However, there is no guarantee that interference will not occur in a particular installation. If
this equipment does cause harmful interference to radio or television reception, which can be determined by turning the equipment off and
on, the user is encouraged to try to correct the interference by one or more of the following measures:
- Reorient or relocate the receiving antenna.
- Increase the separation between the equipment and receiver.
- Connect the equipment into an outlet on a circuit different from that to which the receiver is connected.
- Consult the dealer or an experienced radio/TV technician for help.
INTRODUCTION
ITALIANO
The iAMP is a 4-channel power amplifier in a 19" rack format, specifically developed for installations of CURV-500-Systems. The flat design
with class-D topology and DSP control has a highly efficient switch mode power supply and a frequency response of 10 Hz - 22 kHz. Each
channel features parametric EQ and delay and provides 240 watts RMS at 4 ohms with a total harmonic distortion of less than 0.01%.
The iAMP is easily and intuitively operated via a push-and-turn dial and a high-contrast, easily readable OLED display. It is equipped with a
soft start and low-noise temperature-controlled fans and protected against direct current, overloading, overheating and short-circuiting. The
balanced inputs are XLR sockets and terminal block connections. The iAMP can power up to six CURV-500 satellites or one CURV500ISUB
subwoofer per channel via its Speakon-compatible output jacks or terminal block connections. Presets for speakers from the CURV500 series are pre-installed. PC software for management of the iAMP is available to download from the product page at WWW.LD-SYSTEMS.COM.
4
CONNECTIONS, OPERATING AND DISPLAY ELEMENTS
ENGLISH
2
1
3
1 DISPLAY
Multi-functional OLED graphics display for information such as preset and audio signal level. It also shows menu items to view system
settings as required.
DEUTSCH
2 MENU
Combined push-and-turn dial to access the edit menu and select and edit individual menu items.
3 VENTILATION GRILL
In order to avoid overheating of the device, ensure that the ventilation grill is not covered and that air can circulate freely.
5
11
6
7
11
9
8
10
FRANCAIS
4
4 POWER SOCKET AND FUSE HOLDER
IEC mains socket with built-in fuse holder. A suitable power cable is included.
IMPORTANT: Replace the fuse only with a fuse of the same type. Follow the instructions printed on the housing. In the event of repeated
fuse failure, please contact an authorised service centre.
ESPAÑOL
5 POWER ON / OFF
On / Off switch for power supply to the device.
6 OUTPUT CH A - CH D (speakON-compatible)
SpeakON-compatible loudspeaker outputs for channels A to D. To avoid damage to the equipment, make sure that the total impedance
of the connected speakers is at least 2.7 ohms per channel. The speakON-compatible connectors and the screw connections of each
corresponding channel are wired in parallel.
POLSKI
7 OUTPUT CH A - CH D (screw connection)
Loudspeaker outputs for channels A to D with terminal block connections (screw connectors supplied). To avoid damage to the equipment,
make sure that the total impedance of the connected speakers is at least 2.7 ohms per channel. The speakON-compatible connectors and
the screw connections of each corresponding channel are wired in parallel.
8 INPUTS 1 - 4 (3-pin XLR)
ITALIANO
Balanced line inputs for channels 1 to 4 with 3-pin XLR sockets. The XLR sockets and the terminal block connections of each corresponding
channel are wired in parallel.
9 INPUTS 1 - 4 (terminal block connections)
Balanced line inputs for channels 1 to 4 with terminal block connections (connectors supplied). The XLR sockets and the terminal block
connections of each corresponding channel are wired in parallel.
10 DATA USB
USB interface (Type B) for updating device firmware and loudspeaker presets, managing global presets and resetting the lock PIN. The
corresponding Windows PC programme and current update files can be found along with a manual in the download area of the product at
WWW.LD-SYSTEMS.COM
11 HOUSING FAN
In order to avoid overheating of the device, ensure that the fan is not covered and that air can circulate freely.
5
ENGLISH
OPERATION
DISPLAY MAIN DISPLAY
After switching on the power amplifier, the greeting "Welcome" is displayed briefly. The main display then appears with the following
information: amplifier name (editable), amplifier channel (CH A - D) with links, speaker preset, audio level with peak indicator and channel
mute. Following about 10 minutes of no input, sections of the display fade out and only amplifier channel with links, audio level meter with
peak display and channel mute are displayed.
Amplifier name
DEUTSCH
Amplifier channel
with links
Amplifier channel
with links
Speaker preset
Audio level with peak indicator (PK)
and channel mute (mute)
Audio level with peak indicator (PK)
and channel mute (mute)
Menu item for setting channel volume. Press the rotary MENUdial to access the selection menu for device settings, and turn the dial to
select the menu item CHANNEL VOLUME (bright background). Now press the dial and select the channel on which you want to adjust the
volume by turning the dial. Press the dial again and then turn it to set the desired volume (anticlockwise = reduce volume, anticlockwise
past -60dB, = mute, clockwise = increase volume). Press and hold the dial for about 2 seconds to mute or unmute the selected channel
(MUTE). To restore the volume of a muted channel to its previous unmuted level, turn the dial clockwise to increase the volume level slowly
and then press for about 2 seconds. Confirm your entry by pressing the dial. Repeat this procedure to set the desired volume level for the
other channels. To return to the selection menu, turn the dial to select the menu item CH VOLUME EXIT and confirm by pressing the dial.
Access the main display by turning the dial to select EXIT (light background) and confirm by pressing the dial. Following approximately 10
seconds of no input, the main display will appear automatically.
POLSKI
ESPAÑOL
FRANCAIS
CHANNEL VOLUME
ITALIANO
MASTER VOLUME
The overall volume can be set directly from the main display if this option has been activated in the appropriate menu item, and even if the
controls have been locked. Press the rotary MENUdial to access the selection menu for device settings and turn the dial to select the menu
item MASTER VOLUME (bright background). Press the dial twice then turn it to the left to select “ON” and confirm the entry by pressing the
dial (if the option to set overall volume is not available, select “OFF”). Turn the dial to select the arrow symbol and confirm by pressing the
dial to return to the selection menu. To return to the main display, turn the dial to select the menu item EXIT and confirm by pressing the
dial. Following approximately 10 seconds of no input, the main display will appear automatically.
Now you can adjust the overall volume level by turning the MENU dial in the desired direction, without having to press it beforehand
(anticlockwise = reduce volume, clockwise = increase volume). The display then changes to MASTER VOLUME (0 to 100). Following
approximately 2 seconds of no input, the main display will appear automatically.
6
DELAY
ENGLISH
Menu item for the configuring the channel delay (delay line). Press the rotary MENUdial to access the selection menu for device settings
and turn the dial to select the menu item DELAY (bright background). Now press the dial, and then turn it to select the channel on which
you want to adjust the delay. Press the dial again and set the desired value by turning the dial (anticlockwise = maximum delay, clockwise = fine
tuning from 0 ms). The delay is shown in milliseconds (ms), as well as in metres (m) or feet (ft) (see SETUP -> DELAY UNIT). Confirm your entry by
pressing the dial. Repeat this procedure to set the desired delay for the other channels. To return to the selection menu, turn the dial to select the
menu item DELAY EXIT and confirm by pressing the dial. Access the main display by turning the dial to select EXIT (light background) and confirm
by pressing the dial. Following approximately 10 seconds of no input, the main display will appear automatically.
DEUTSCH
ROUTING
FRANCAIS
Menu item for setting the input source for channels A to D. Press the MENUdial to access the device settings selection menu and turn the dial
to select the menu item ROUTING (light background). Now press the dial and then turn it to select the input source that you want to configure
(Channel A - D, each input source 1 - 4). Press the dial again, select the desired setting by rotating the dial (framed number = activated
input source, number without frame = deactivated input source) and confirm input by pressing the dial. To return to the selection menu,
turn the dial to select the menu item ROUTING EXIT and confirm by pressing the dial. Access the main display by turning the dial to select
EXIT (light background) and confirm by pressing the dial. Following approximately 10 seconds of no input, the main display will appear
automatically.
ESPAÑOL
EQUALIZER
POLSKI
Menu item for configuring the 10-band parametric equaliser for channels A to D. Press the MENUdial to access the device settings selection
menu, then turn the dial to select the menu item EQUALIZER (light background). Now press the dial and then turn it to select the channel
that you want to configure (channel A - D). Press the dial again, select the desired equalisation band 01 to 10 by rotating the dial, then
confirm by pressing the dial. Turn the dial to select FREQ (Frequency), Q (filter quality, low shelf LS and high Shelf HS) and GAIN and confirm
by pressing the dial. Edit the corresponding parameters as required and confirm by pressing the dial. To return to channel selection, turn the
dial to select the menu item EXIT EQ and confirm by pressing the dial. Repeat this procedure to set the desired EQ for the other channels.
Access the main display by turning the dial to select EXIT (light background) and confirm by pressing the dial. Following approximately 10
seconds of no input, the main display will appear automatically.
ITALIANO
7
LINK SETT
Channels A to D can be linked as required in order to have parallel settings for volume, delay and EQ on the selected channels. This means that
the settings on one of the linked channels will be transferred simultaneously to the other linked channels. Settings that have been configured
prior to linking will be retained until the value of the corresponding parameter is changed. This means that if settings are changed for one
channel, they will be transferred to the linked channel. Press the MENUdial to access the device settings selection menu, then turn the dial to
select the menu item LINK SETT(bright background). Now press the dial and then turn it to select the channel that you want to link with other
channels. Press the dial again and then turn it to select the desired link (UNLINK to deactivate a link). Confirm your selection by pressing the dial.
A link is indicated by a “connection bar” between the corresponding letters shown in the display. To return to the main display, turn the dial to
select the menu item LINK EXIT and confirm by pressing the dial. To return to the main display, turn the dial to select the menu item EXIT (light
background) and confirm by pressing the dial. Following approximately 10 seconds of no input, the main display will appear automatically.
ITALIANO
POLSKI
ESPAÑOL
DEUTSCH
Menu item for setting the polarity of channels A to D. Press the MENUdial to access the device settings menu and then turn it to select
the menu item POLARITY (light background). Now press the dial and then turn it to select the channel that you want to configure (channel
A - D). Press the dial again, select the required polarity and confirm by pressing the dial (NORMAL = normal polarity, INVERTED = inverted
polarity). Repeat this procedure to select the polarity for the other channels. To return to the selection menu, turn the dial to select the menu
item POLARITY EXIT and confirm by pressing the dial. Access the main display by turning the dial to select EXIT (light background) and
confirm by pressing the dial. Following approximately 10 seconds of no input, the main display will appear automatically.
FRANCAIS
ENGLISH
POLARITY
PRESET
Menu item for selecting loudspeaker presets for speakers from the LD CURV series. For example, select the preset 6 CURV-SATon the
Smart Link® adapter for the appropriate channel if you wish to connect 6 x CURV 500 array satellites; select the preset 1 CURV SUB if you
want to connect the CURV 500 installation-subwoofer (note: select the preset that corresponds with the number of satellites per SmartLink®
adapter). Press the rotary MENUdial to access the device settings selection menu and then turn the dial to select the menu item PRESET
(bright background). Now press the dial and then turn it to select the desired channel for the preset. Press the dial again and then turn it
to select the desired preset. Confirm your selection by pressing the dial. Repeat this procedure to configure presets for the other channels.
To return to the main display, turn the dial to select the menu item PRESET EXIT and confirm by pressing the dial. To return to the main
display, turn the dial to select the menu item EXIT (light background) and confirm by pressing the dial. Folloing approximately 10 seconds of
no input, the main display will appear automatically.
8
DEVICE CONFIGURATION (SETUP)
ENGLISH
Menu item for editing device configuration, reading device firmware, resetting the device and managing global presets. Press the rotary
MENUdial to access the selection menu for device settings and turn the dial to select the menu item SETUP (bright background). Confirm by
pressing the dial.
DEUTSCH
This will take you to the sub-menu with the following menu items (turn the MENU dial to select, then confirm by pressing MENU):
SETUP
The device firmware version is displayed in the top line of the display.
NAME
Configure individual amplifier name (8 digits):
Press the MENU dial -> Turn the MENU dial to select 1 to 8 -> Press MENU -> Rotate MENU to select letters,
numbers, or characters -> Press MENU -> To exit, rotate MENU dial clockwise to arrow icon -> Press MENU.
PIN
Activate automatic locking of controls to prevent accidental and unauthorised
operation (except MASTER VOLUME, if enabled):
Press MENU twice -> Rotate MENU to ON -> Press MENU -> To exit, rotate MENU to arrow symbol -> Press
MENU
ON / OFF / EDIT
FRANCAIS
FIRMWARE
Deactivate automatic locking:
Enter PIN to unlock menu (4-digit PIN factory setting: 1234) -> Rotate MENU to SETUP -> Press MENU ->
Rotate MENU to PIN -> Press MENU twice -> Rotate MENU to OFF Press MENU -> To exit, rotate MENU to
arrow symbol -> Press MENU
DELAY TEMP
Configuring distance calculation based on air temperature (sound speed is dependent upon air
temperature):
Press MENU twice -> Rotate MENU to select temperature from 0°C to 40°C -> Press MENU -> To exit, rotate
MENU to arrow symbol -> Press MENU
CONNECT GND
YES / NO
Floating switching for disconnecting the signal ground from equipment grounding
(to prevent ground loops):
Press MENU twice -> Rotate MENU to YES for ground connection / NO for ground lift -> Press MENU -> To
exit, rotate MENU to arrow symbol -> Press MENU
FACTORY SETTING
NO / YES
Reset to factory settings (e.g. resetting PIN to 1234 and OFF):
Press MENU -> Rotate MENU to NO = do not reset device / YES = reset device -> press MENU
GLOBAL PRESET
Save all settings except amplifier name and PIN in global presets
(16 internal memory slots):
Press MENU -> Rotate MENU to SAVE PRESET -> Press MENU -> Rotate MENU to desired memory slot ->
Press MENU -> Configure preset name: Rotate MENU to select digit (9 digits) -> Press MENU -> Rotate MENU
to select letter, number or character -> Press MENU etc. -> Rotate MENU to YES -> Press MENU -> Rotate
MENU to EXIT to go back -> Press MENU -> To exit, rotate MENU to EXIT -> Press MENU
ITALIANO
Configuring unit of measurement for channel delay METRES/FEET:
Press MENU -> Rotate MENU to select METERSor FEET -> Press MENU -> To exit, rotate MENU to arrow
symbol -> Press MENU
POLSKI
DELAY UNIT
METRES / FEET
ESPAÑOL
Set personal PIN:
Press MENU twice -> Rotate MENU to EDIT Press MENU -> Rotate MENU to select 0 - 9 for first digit -> Press
MENU -> Rotate MENU to select 0 -9 for second digit -> Press MENU etc. In the event of the PIN becoming
lost, it can be reset to the factory setting (1234) by using the PC software and USB interface (downloadable
from the product page at WWW.LD-SYSTEMS.COM).
Loading a global preset from internal memory:
Press MENU -> Rotate MENU to LOAD PRESET -> Press MENU -> Rotate MENU to required preset -> Press
MENU -> Rotate MENU to YES -> Press MENU -> Rotate MENU to EXIT to go back -> Press MENU -> To exit,
rotate MENU to EXIT -> Press MENU
EXIT SETUP
To exit the setup-menu, rotate the MENU dial to EXIT SETUP and confirm by pressing MENU
9
EXIT
ENGLISH
To exit the selection menu and show the main display, turn the MENU dial to EXIT (light background) and confirm by pressing the MENU dial.
ITALIANO
POLSKI
ESPAÑOL
FRANCAIS
DEUTSCH
TECHNICAL DATA
10
Model number:
LDCURV500IAMP
Product type:
DSP controlled amplifier
Type:
4-Channel
Rated output power (1 kHz @ 2,7 Ohm):
4 x 240 W (depending on preset)
Rated output power (1 kHz @ 4 Ohm):
4 x 240 W (depending on preset)
Rated output power (1 kHz @ 8 Ohm):
4 x 120 W (depending on preset)
Rated output power (1 kHz @ 16 Ohm):
4 x 60 W (depending on preset)
Output circuitry:
Class D
Frequency response +/- 1dB:
10 Hz - 22000 Hz (depending on preset)
THD:
< 0,01 % @ 1 kHz (depending on preset)
Protection circuits:
Over-current, soft-start, DC, thermal overload, short circuit, Multiband limiter
Controls:
Push-Turn-Control
Indicators:
OLED Display
AD/DA converter sampling frequency:
48 kHz
AD/DA converter resolution:
24 Bit
Dynamic range:
114 dB
Maximum delay / Channel:
59 m/ 166 ms
Equalizer:
10x Parametric / Channel
Line inputs:
4
Line input connectors:
XLR (symmetrical), screw-/plug-in-terminals
Loudspeaker outputs:
4
Speaker output connections:
Speakon compatible, screw-/plug-in-terminals
Ground Lift:
Yes, GUI integrated
Cooling:
temperature controlled low-noise fan, noiseless in idle mode
Operating voltage:
Switching power supply, 115 V AC / 230 V AC, 50/60Hz (automatic conversion)
Fuse:
110 - 120V AC: T10AL / 250V
220 - 240V AC: T5AL / 250V
Power consumption @ full load:
1100 W
Ambient temperature (in operation):
0°C - 35°C
Relative humidity (in operation):
<80% (non condensing)
Width:
482 mm
Height:
44 mm
Depth:
420 mm
Weight:
6,8 kg
Features:
4-channel DSP controlled, Purpose-designed for CURV500 installations, Smart 19“/ 1U
housing, Each channel can drive up to six CURV500 satellites or one CURV500ISUB subwoofer,
Single push encoder operation, High contrast OLED display, Temperature controlled low-noise
fan, High efficiency switch mode power supply (PFC)
MANUFACTURER´S DECLARATIONS
ENGLISH
MANUFACTURER‘S WARRANTY & LIMITATIONS OF LIABILITY
You can find our current warranty conditions and limitations of liability at: http://www.adamhall.com/media/shop/downloads/documents/
manufacturersdeclarations.pdf. To request warranty service for a product, please contact Adam Hall GmbH, Daimler Straße 9,
61267 Neu Anspach / Email: [email protected] / +49 (0)6081 / 9419-0.
DEUTSCH
CORRECT DISPOSAL OF THIS PRODUCT
(valid in the European Union and other European countries with a differentiated waste collection system)
This symbol on the product, or on its documents indicates that the device may not be treated as household waste. This is to avoid
environmental damage or personal injury due to uncontrolled waste disposal. Please dispose of this product separately from other waste
and have it recycled to promote sustainable economic activity. Household users should contact either the retailer where they purchased
this product, or their local government office, for details on where and how they can recycle this item in an environmentally friendly manner.
Business users should contact their supplier and check the terms and conditions of the purchase contract. This product should not be mixed
with other commercial waste for disposal.
FCC STATEMENT
This device complies with Part 15 of the FCC Rules. Operation is subject to the following two conditions:
(1) This device may not cause harmful interference, and
(2) This device must accept any interference received, including interference that may cause undesired operation
FRANCAIS
CE Compliance
Adam Hall GmbH states that this product meets the following guidelines (where applicable):
R&TTE (1999/5/EC) or RED (2014/53/EU) from June 2017
Low voltage directive (2014/35/EU)
EMV directive (2014/30/EU)
RoHS (2011/65/EU)
The complete declaration of conformity can be found at www.adamhall.com.
Furthermore, you may also direct your enquiry to [email protected].
ESPAÑOL
POLSKI
ITALIANO
11
ENGLISH
DEUTSCH
SIE HABEN DIE RICHTIGE WAHL GETROFFEN!
Dieses Gerät wurde unter hohen Qualitätsanforderungen entwickelt und gefertigt, um viele Jahre einen reibungslosen Betrieb zu gewährleisten.
Dafür steht LD Systems mit seinem Namen und der langjährigen Erfahrung als Hersteller hochwertiger Audioprodukte. Bitte lesen Sie diese
Bedienungsanleitung sorgfältig, damit Sie Ihr neues Produkt von LD Systems schnell optimal einsetzen können.
Mehr Informationen zu LD SYSTEMS finden Sie auf unserer Internetseite WWW.LD-SYSTEMS.COM
ITALIANO
POLSKI
ESPAÑOL
FRANCAIS
DEUTSCH
SICHERHEITSHINWEISE
1. Lesen Sie diese Anleitung bitte sorgfältig durch.
2. Bewahren Sie alle Informationen und Anleitungen an einem sicheren Ort auf.
3. Befolgen Sie die Anweisungen.
4. Beachten Sie alle Warnhinweise. Entfernen Sie keine Sicherheitshinweise oder andere Informationen vom Gerät.
5. Verwenden Sie das Gerät nur in der vorgesehenen Art und Weise.
6. Verwenden Sie ausschließlich stabile und passende Stative bzw. Befestigungen (bei Festinstallationen). Stellen Sie sicher, dass Wandhalterungen
ordnungsgemäß installiert und gesichert sind. Stellen Sie sicher, dass das Gerät sicher installiert ist und nicht herunterfallen kann.
7. Beachten Sie bei der Installation die für Ihr Land geltenden Sicherheitsvorschriften.
8. Installieren und betreiben Sie das Gerät nicht in der Nähe von Heizkörpern, Wärmespeichern, Öfen oder sonstigen Wärmequellen. Sorgen
Sie dafür, dass das Gerät immer so installiert ist, dass es ausreichend gekühlt wird und nicht überhitzen kann.
9. Platzieren Sie keine Zündquellen wie z.B. brennende Kerzen auf dem Gerät.
10. Lüftungsschlitze dürfen nicht blockiert werden.
11. Betreiben Sie das Gerät nicht in unmittelbarer Nähe von Wasser. Bringen Sie das Gerät nicht mit brennbaren Materialien, Flüssigkeiten
oder Gasen in Berührung. Direkte Sonneneinstrahlung vermeiden!
12. Sorgen Sie dafür, dass kein Tropf- oder Spritzwasser in das Gerät eindringen kann. Stellen Sie keine mit Flüssigkeit gefüllten Behältnisse
wie Vasen oder Trinkgefäße auf das Gerät.
13. Sorgen Sie dafür, dass keine Gegenstände in das Gerät fallen können.
14. Betreiben Sie das Gerät nur mit dem vom Hersteller empfohlenen und vorgesehenen Zubehör.
15. Öffnen Sie das Gerät nicht und verändern Sie es nicht.
16. Überprüfen Sie nach dem Anschluss des Geräts alle Kabelwege, um Schäden oder Unfälle, z. B. durch Stolperfallen zu vermeiden.
17. Achten Sie beim Transport darauf, dass das Gerät nicht herunterfallen und dabei möglicherweise Sach- und Personenschäden verursachen kann.
18. Wenn Ihr Gerät nicht mehr ordnungsgemäß funktioniert, Flüssigkeiten oder Gegenstände in das Geräteinnere gelangt sind, oder das
Gerät anderweitig beschädigt wurde, schalten Sie es sofort aus und trennen es von der Netzsteckdose (sofern es sich um ein aktives Gerät
handelt). Dieses Gerät darf nur von autorisiertem Fachpersonal repariert werden.
19. Verwenden Sie zur Reinigung des Geräts ein trockenes Tuch.
20. Beachten Sie alle in Ihrem Land geltenden Entsorgungsgesetze. Trennen Sie bei der Entsorgung der Verpackung bitte Kunststoff und
Papier bzw. Kartonagen voneinander.
21. Kunststoffbeutel müssen außer Reichweite von Kindern aufbewahrt werden.
BEI GERÄTEN MIT NETZANSCHLUSS
22. ACHTUNG: Wenn das Netzkabel des Geräts mit einem Schutzkontakt ausgestattet ist, muss es an einer Steckdose mit Schutzleiter
angeschlossen werden. Deaktivieren Sie niemals den Schutzleiter eines Netzkabels.
23. Schalten Sie das Gerät nicht sofort ein, wenn es starken Temperaturschwankungen ausgesetzt war (beispielsweise nach dem Transport).
Feuchtigkeit und Kondensat könnten das Gerät beschädigen. Schalten Sie das Gerät erst ein, wenn es Zimmertemperatur erreicht hat.
24. Bevor Sie das Gerät an die Steckdose anschließen, prüfen Sie zuerst, ob die Spannung und die Frequenz des Stromnetzes mit den auf
dem Gerät angegebenen Werten übereinstimmen. Verfügt das Gerät über einen Spannungswahlschalter, schließen Sie das Gerät nur an die
Steckdose an, wenn die Gerätewerte mit den Werten des Stromnetzes übereinstimmen. Wenn das mitgelieferte Netzkabel bzw. der mitgelieferte Netzadapter nicht in Ihre Netzsteckdose passt, wenden Sie sich an Ihren Elektriker.
25. Treten Sie nicht auf das Netzkabel. Sorgen Sie dafür, dass spannungsführende Kabel speziell an der Netzbuchse bzw. am Netzadapter
und der Gerätebuchse nicht geknickt werden.
26. Achten Sie bei der Verkabelung des Geräts immer darauf, dass das Netzkabel bzw. der Netzadapter stets frei zugänglich ist. Trennen Sie
das Gerät stets von der Stromzuführung, wenn das Gerät nicht benutzt wird, oder Sie das Gerät reinigen möchten. Ziehen Sie Netzkabel und
Netzadapter immer am Stecker bzw. am Adapter und nicht am Kabel aus der Steckdose. Berühren Sie Netzkabel und Netzadapter niemals mit
nassen Händen.
27. Schalten Sie das Gerät möglichst nicht schnell hintereinander ein und aus, da sonst die Lebensdauer des Geräts beeinträchtigt werden könnte.
28. WICHTIGER HINWEIS: Ersetzen Sie Sicherungen ausschließlich durch Sicherungen des gleichen Typs und Wertes. Sollte eine Sicherung
wiederholt auslösen, wenden Sie sich bitte an ein autorisiertes Servicezentrum.
29. Um das Gerät vollständig vom Stromnetz zu trennen, entfernen Sie das Netzkabel bzw. den Netzadapter aus der Steckdose.
30. Wenn Ihr Gerät mit einem verriegelbaren Netzanschluss bestückt ist, muss der passende Gerätestecker entsperrt werden, bevor er entfernt
werden kann. Das bedeutet aber auch, dass das Gerät durch ein Ziehen am Netzkabel verrutschen und herunterfallen kann, wodurch Personen
verletzt werden und/oder andere Schäden auftreten können. Verlegen Sie Ihre Kabel daher immer sorgfältig.
31. Entfernen Sie Netzkabel und Netzadapter aus der Steckdose bei Gefahr eines Blitzschlags oder wenn Sie das Gerät länger nicht verwenden.
12
ENGLISH
ACHTUNG
Entfernen Sie niemals die Abdeckung, da sonst das Risiko eines elektrischen Schlages besteht. Im
Inneren des Geräts befinden sich keine Teile, die vom Bediener repariert oder gewartet werden können.
Lassen Sie Wartung und Reparaturen ausschließlich von qualifiziertem Servicepersonal durchführen.
Das gleichseitige Dreieck mit Blitzsymbol warnt vor nichtisolierten, gefährlichen Spannungen im Geräteinneren, die einen elektrischen
Schlag verursachen können.
Das gleichseitige Dreieck mit Ausrufungszeichen kennzeichnet wichtige Bedienungs- und Wartungshinweise.
DEUTSCH
Warnung! Dieses Symbol kennzeichnet heiße Oberflächen. Während des Betriebs können bestimmte Teile des Gehäuses heiß werden.
Berühren oder transportieren Sie das Gerät nach einem Einsatz erst nach einer Abkühlzeit von mindestens 10 Minuten.
Warnung! Dieses Gerät ist für eine Nutzung bis zu einer Höhe von maximal 2000 Metern über dem Meeresspiegel bestimmt.
Warnung! Dieses Gerät ist nicht für den Einsatz in tropischen Klimazonen bestimmt.
FRANCAIS
ACHTUNG HOHE LAUTSTÄRKEN BEI AUDIOPRODUKTEN!
Dieses Gerät ist für den professionellen Einsatz vorgesehen. Der kommerzielle Betrieb dieses Geräts unterliegt den jeweils gültigen
nationalen Vorschriften und Richtlinien zur Unfallverhütung. Als Hersteller ist Adam Hall gesetzlich verpflichtet, Sie ausdrücklich auf mögliche
Gesundheitsrisiken hinzuweisen. Gehörschäden durch hohe Lautstärken und Dauerbelastung: Bei der Verwendung dieses Produkts können
hohe Schalldruckpegel (SPL) erzeugt werden, die bei Künstlern, Mitarbeitern und Zuschauern zu irreparablen Gehörschäden führen können.
Vermeiden Sie länger anhaltende Belastung durch hohe Lautstärken über 90 dB.
ESPAÑOL
EINFÜHRUNG
Der iAMP ist eine 4-Kanal-Endstufe in 19“ Bauweise, die speziell zur Installation von CURV-500-Systemen entwickelt wurde. Das flache
Design mit Class-D-Topologie und DSP-Steuerung besitzt ein hocheffizientes Schaltnetzteil und einen Frequenzgang von 10 Hz – 22 kHz.
Jeder Kanal verfügt über parametrische Klangregelung und Delay und leistet 240 Watt RMS an 4 Ohm bei einem Klirrfaktor unter 0,01%.
POLSKI
Der iAMP wird über einen Push-Encoder und das kontrastreiche, leicht lesbare OLED-Display ganz einfach und intuitiv bedient. Er ist mit
einem Soft Start und geräuscharmen temperaturgesteuerten Lüfter ausgestattet und gegen Gleichstrom, Überstrom, Überhitzung und
Kurzschluss geschützt. Die symmetrische Eingänge sind als XLR-Buchsen und Schraub-Steckverbindungen ausgeführt. Der iAMP kann
pro Kanal bis zu sechs CURV-500-Satelliten oder einen CURV500ISUB Subwoofer über speakON-kompatible Ausgangsbuchsen oder
Schraub-Steckverbindungen ansteuern. Presets für die Lautsprecher der CURV500 Serie sind vorinstalliert. Eine PC Software für die
Verwaltung des iAMP ist auf der Produktseite auf WWW.LD-SYSTEMS.COM als Download erhältlich.
ITALIANO
13
ENGLISH
ANSCHLÜSSE, BEDIEN- UND ANZEIGEELEMENTE
2
1
3
1 DISPLAY
DEUTSCH
Multifunktionales OLED-Grafikdisplay für die Anzeige von Informationen wie z.B. Preset und Audiosignal-Pegel. Zeigt weiterhin die Menüpunkte an, um Systemeinstellungen nach Wunsch vorzunehmen.
2 MENU
Kombinierter Drück-Dreh-Geber, um in das Bearbeitungsmenü zu gelangen und die einzelnen Menüpunkte auszuwählen und zu editieren.
3 LÜFTUNGSGITTER
FRANCAIS
Um Überhitzung des Geräts zu vermeiden, achten Sie darauf, dass das Lüftungsgitter nicht abgedeckt wird und Luft ungehindert zirkulieren kann.
4
5
11
6
7
11
9
8
10
4 NETZBUCHSE UND SICHERUNGSHALTER
IEC Netzbuchse mit integriertem Sicherungshalter. Ein geeignetes Netzkabel befindet sich im Lieferumfang.
ESPAÑOL
WICHTIGER HINWEIS: Ersetzen Sie die Sicherung ausschließlich durch eine Sicherung des gleichen Typs. Achten Sie auf den Aufdruck auf
dem Gehäuse. Sollte die Sicherung wiederholt auslösen, wenden Sie sich bitte an ein autorisiertes Servicezentrum.
5 POWER ON / OFF
Ein- / Ausschalter für die Spannungszufuhr des Geräts.
6 OUTPUT CH A - CH D (speakON-kompatibel)
POLSKI
SpeakON-kompatible Lautsprecherausgänge der Kanäle A bis D. Um Schäden am Gerät zu vermeiden, achten Sie darauf, dass die
Gesamtimpedanz angeschlossener Lautsprecher pro Kanal minimal 2,7 Ohm beträgt. Die Kontakte der speakON-kompatiblen Buchsen und
der Schraub-Steckverbindungen der entsprechenden Kanäle sind parallel verdrahtet.
7 OUTPUT CH A - CH D (Schraub-Steckverbindung)
Lautsprecherausgänge der Kanäle A bis D mit Schraub-Steckverbindung (Schraub-Steckverbinder im Lieferumfang). Um Schäden am
Gerät zu vermeiden, achten Sie darauf, dass die Gesamtimpedanz angeschlossener Lautsprecher pro Kanal minimal 2,7 Ohm beträgt. Die
Kontakte der speakON-kompatiblen Buchsen und der Schraub-Steckverbindungen der entsprechenden Kanäle sind parallel verdrahtet.
8 INPUT IN 1 - 4 (3-Pol XLR)
ITALIANO
Symmetrische Line-Eingänge der Kanäle 1 bis 4 mit 3-Pol XLR-Buchsen. Die Kontakte der XLR-Buchsen und der Schraub-Steckverbindungen
der entsprechenden Kanäle sind parallel verdrahtet.
9 INPUT IN 1 - 4 (Schraub-Steckverbindung)
Symmetrische Line-Eingänge der Kanäle 1 bis 4 mit Schraub-Steckverbindung (Schraub-Steckverbinder im Lieferumfang). Die Kontakte der
XLR-Buchsen und der Schraub-Steckverbindungen der entsprechenden Kanäle sind parallel verdrahtet.
10 DATA USB
USB-Schnittstelle (Typ B) zum Updaten der Geräte-Firmware und der Lautsprecher-Presets, zum Verwalten der Global Presets und zum
Zurücksetzen der Sperr-PIN. Das entsprechende Windows PC-Programm und aktuelle Update-Files finden Sie mit einer Anleitung im
Download-Bereich des Produkts auf WWW.LD-SYSTEMS.COM
11 GEHÄUSELÜFTER
14
Um Überhitzung des Geräts zu vermeiden, achten Sie darauf, dass die Lüfter nicht abgedeckt werden und Luft ungehindert zirkulieren kann.
BEDIENUNG
DISPLAY HAUPTANZEIGE
ENGLISH
Nach dem Einschalten des Verstärkers wird als Begrüßungstext für kurz Zeit „WELCOME“ angezeigt, danach erscheint die Hauptanzeige mit
folgenden Informationen: Verstärkername (editierbar), Verstärkerkanal (CH A - D) mit Verlinkung, Lautsprecher-Preset, Audiopegel mit
Peak-Anzeige und Kanal-Stummschaltung (Mute). Erfolgt für circa 10 Minuten keine Eingabe, werden Teile der Anzeige ausgeblendet und
nur Verstärkerkanal mit Verlinkung, Audiopegel mit Peak-Anzeige und Kanal-Stummschaltung werden angezeigt.
Verstärkername
Verstärkerkanal
mit Verlinkung
Lautsprecher-Preset
Audiopegel mit Peak-Anzeige (PK)
und Kanal-Stummschaltung (Mute)
DEUTSCH
Verstärkerkanal
mit Verlinkung
Audiopegel mit Peak-Anzeige (PK)
und Kanal-Stummschaltung (Mute)
CHANNEL VOLUME
FRANCAIS
ESPAÑOL
Menüpunkt für die Einstellung der Kanallautstärke. Drücken Sie auf den Drück-Dreh-Geber MENU, um ins Auswahlmenü für die Geräteeinstellungen zu gelangen und wählen durch Drehen des Gebers den Menüpunkt CHANNEL VOLUME aus (hell hinterlegt). Drücken Sie nun
auf den Geber und wählen durch Drehen des Gebers den Kanal aus, dessen Lautstärke Sie ändern möchten. Drücken Sie wiederum auf den
Geber und stellen die gewünschte Lautstärke durch Drehen am Geber ein (Drehung nach links = Lautstärke reduzieren, Drehung nach links
über -60dB hinaus = Mute, Drehung nach rechts = Lautstärke anheben). Drücken und halten Sie den Geber für circa 2 Sekunden, um den
angewählten Kanal stummzuschalten (MUTE), bzw. die Stummschaltung wieder aufzuheben. Wenn Sie einen Kanal stummschalten, dann
den Geber nach rechts drehen, um die Lautstärke langsam anzuheben und dann für circa 2 Sekunden drücken, wird der letzte bestätigte
Wert wiederhergestellt. Bestätigen Sie Eingaben durch Drücken auf den Geber. Stellen Sie nun in gleicher Weise die Lautstärke für die
anderen Kanäle nach Wunsch ein. Um zum Auswahlmenü zurückzugelangen, wählen Sie nun durch Drehen des Gebers den Menüpunkt CH
VOLUME EXIT aus und bestätigen abermals durch Drücken auf den Geber. Zur Hauptanzeige gelangen Sie, indem Sie nun durch Drehen
am Geber EXIT auswählen (hell hinterlegt) und durch Drücken auf den Geber bestätigen. Erfolgt circa 10 Sekunden keine Eingabe, erscheint
automatisch die Hauptanzeige.
POLSKI
ITALIANO
15
ESPAÑOL
FRANCAIS
DEUTSCH
ENGLISH
MASTER VOLUME
Die Einstellung der Gesamtlautstärke kann direkt aus der Hauptanzeige erfolgen, sofern diese Option im entsprechenden Menüpunkt
aktiviert wurde, selbst dann, wenn die Sperrung der Bedienelemente aktiviert wurde. Drücken Sie auf den Drück-Dreh-Geber MENU, um ins
Auswahlmenü für die Geräteeinstellungen zu gelangen und wählen durch Drehen des Gebers den Menüpunkt MASTER VOLUME aus (hell
hinterlegt). Drücken Sie nun 2-mal auf den Geber, wählen durch Drehen des Gebers nach links „ON“ aus und bestätigen die Eingabe durch
Drücken auf den Geber (Soll die Einstellung der Gesamtlautstärke nicht verfügbar sein, wählen Sie entsprechend „OFF“ aus). Wählen Sie
nun durch Drehen am Geber das Pfeilsymbol aus und bestätigen durch Drücken auf den Geber, um in das Auswahlmenü zurückzugelangen.
Um zur Hauptanzeige zurückzugelangen, wählen Sie nun durch Drehen des Gebers den Menüpunkt EXIT aus und bestätigen abermals
durch Drücken auf den Geber. Erfolgt circa 10 Sekunden keine Eingabe, erscheint automatisch die Hauptanzeige.
Sie können nun die Gesamtlautstärke einstellen, indem Sie den Drück-Dreh-Geber MENU in die gewünschte Richtung drehen, ohne ihn vorher
zu drücken (Drehung nach links = Lautstärke reduzieren, Drehung nach rechts = Lautstärke anheben). Die Anzeige im Display wechselt dabei
auf MASTER VOLUME (0 bis 100). Nach circa 2 Sekunden ohne Eingabe erscheint automatisch die Hauptanzeige.
DELAY
Menüpunkt für die Einstellung der Kanalverzögerung (z.B. Delay-Line). Drücken Sie auf den Drück-Dreh-Geber MENU, um ins Auswahlmenü
für die Geräteeinstellungen zu gelangen und wählen durch Drehen des Gebers den Menüpunkt DELAY aus (hell hinterlegt). Drücken Sie nun
auf den Geber und wählen durch Drehen des Gebers den Kanal aus, dessen Verzögerung (Delay) Sie einstellen möchten. Drücken Sie wiederum auf den Geber und stellen den gewünschten Wert durch Drehen am Geber ein (Drehung nach links = maximale Verzögerung, Drehung nach
rechts = Feineinstellung ab 0ms). Die Verzögerung wird sowohl in Millisekunden (ms), als auch in Metern (m), bzw. Feet (ft) angezeigt (siehe SETUP
-> DELAY UNIT). Bestätigen Sie die Eingabe durch Drücken auf den Geber. Stellen Sie nun in gleicher Weise die Verzögerung für die anderen Kanäle
nach Wunsch ein. Um zum Auswahlmenü zurückzugelangen, wählen Sie nun durch Drehen des Gebers den Menüpunkt DELAY EXIT aus und
bestätigen abermals durch Drücken auf den Geber. Zur Hauptanzeige gelangen Sie, indem Sie nun durch Drehen am Geber EXIT auswählen (hell
hinterlegt) und durch Drücken auf den Geber bestätigen. Erfolgt circa 10 Sekunden keine Eingabe, erscheint automatisch die Hauptanzeige.
Menüpunkt zum Einstellen der Eingangsquelle in den Kanälen A bis D. Drücken Sie auf den Drück-Dreh-Geber MENU, um ins Auswahlmenü für
die Geräteeinstellungen zu gelangen und wählen durch Drehen des Gebers den Menüpunkt ROUTING aus (hell hinterlegt). Drücken Sie nun auf
den Geber und wählen durch Drehen des Gebers die Eingangsquelle aus, die Sie konfigurieren möchten (Kanal A - D, jeweils Eingangsquelle
1 - 4). Drücken Sie wiederum auf den Geber, wählen die gewünschte Einstellung durch Drehen am Geber aus (Zahl mit Rahmen = Eingangsquelle aktiviert, Zahl ohne Rahmen = Eingangsquelle deaktiviert) und bestätigen die Eingabe durch Drücken auf den Geber. Um zum
Auswahlmenü zurückzugelangen, wählen Sie nun durch Drehen des Gebers den Menüpunkt ROUTING EXIT aus und bestätigen abermals
durch Drücken auf den Geber. Zur Hauptanzeige gelangen Sie, indem Sie nun durch Drehen am Geber EXIT auswählen (hell hinterlegt) und
durch Drücken auf den Geber bestätigen. Erfolgt circa 10 Sekunden keine Eingabe, erscheint automatisch die Hauptanzeige.
ITALIANO
POLSKI
ROUTING
16
EQUALIZER
ENGLISH
Menüpunkt zum Einstellen des 10-Band parametrischen Equalizers in den Kanälen A bis D. Drücken Sie auf den Drück-Dreh-Geber MENU,
um ins Auswahlmenü für die Geräteeinstellungen zu gelangen und wählen durch Drehen des Gebers den Menüpunkt EQUALIZER aus (hell
hinterlegt). Drücken Sie nun auf den Geber und wählen durch Drehen des Gebers den Kanal aus, den Sie bearbeiten möchten (Kanal A - D).
Drücken Sie wiederum auf den Geber, wählen das gewünschte Equalizer-Band 01 bis 10 durch Drehen am Geber aus und bestätigen durch
Drücken auf den Geber. Wählen Sie nun durch Drehen des Gebers FREQ (Frequenz), Q (Filtergüte, Low Shelf LS und High Shelf HS) und
GAIN (Verstärkung) aus, bestätigen durch Drücken auf den Geber, bearbeiten den entsprechenden Parameter nach Wunsch und bestätigen
durch Drücken auf den Geber. Um zur Kanalauswahl zurückzugelangen, wählen Sie nun durch Drehen des Gebers nach rechts den Menüpunkt EXIT EQ aus und bestätigen abermals durch Drücken auf den Geber. Stellen Sie nun in zuvor beschriebener Weise die Equalizer der
anderen Kanäle nach Wunsch ein. Zur Hauptanzeige gelangen Sie, indem Sie nun durch Drehen am Geber EXIT auswählen (hell hinterlegt)
und durch Drücken auf den Geber bestätigen. Erfolgt circa 10 Sekunden keine Eingabe, erscheint automatisch die Hauptanzeige.
DEUTSCH
FRANCAIS
POLARITY
ESPAÑOL
Menüpunkt zum Einstellen der Polarität der Kanäle A bis D. Drücken Sie auf den Drück-Dreh-Geber MENU, um ins Auswahlmenü für die
Geräteeinstellungen zu gelangen und wählen durch Drehen des Gebers den Menüpunkt POLARITY aus (hell hinterlegt). Drücken Sie nun auf
den Geber und wählen durch Drehen des Gebers den Kanal aus, den Sie bearbeiten möchten (Kanal A - D). Drücken Sie wiederum auf den
Geber, wählen durch Drehen am Geber die Polarität wie gewünscht aus und bestätigen durch Drücken auf den Geber (NORMAL = normale
Polarität, INVERTED = invertierte Polarität). Stellen Sie nun in gleicher Weise die Polarität anderen Kanäle nach Wunsch ein. Um zum Auswahlmenü zurückzugelangen, wählen Sie nun durch Drehen des Gebers den Menüpunkt POLARITY EXIT aus und bestätigen abermals durch
Drücken auf den Geber. Zur Hauptanzeige gelangen Sie, indem Sie nun durch Drehen am Geber EXIT auswählen (hell hinterlegt) und durch
Drücken auf den Geber bestätigen. Erfolgt circa 10 Sekunden keine Eingabe, erscheint automatisch die Hauptanzeige.
POLSKI
ITALIANO
17
Die Kanäle A bis D können beliebig verknüpft werden, um Lautstärke-, Delay- und Equalizer-Einstellungen in den ausgewählten Kanälen parallel
durchführen zu können. Das heißt, dass Einstellungen, die in einem der miteinander verknüpften Kanäle vorgenommen werden, simultan von
den anderen verknüpften Kanälen übernommen werden. Werte, die vor der Verlinkung eingestellt wurden, bleiben so lange erhalten, bis der
Wert des entsprechenden Parameters verändert wird. Das heißt, dass erst beim Ändern eines Werts in einem Kanal, der Wert im verlinkten
Kanal übernommen wird. Drücken Sie auf den Drück-Dreh-Geber MENU, um ins Auswahlmenü für die Geräteeinstellungen zu gelangen und
wählen durch Drehen des Gebers den Menüpunkt LINK SETT. aus (hell hinterlegt). Drücken Sie nun auf den Geber und wählen durch Drehen
des Gebers den Kanal aus, den Sie mit anderen Kanälen verknüpfen möchten. Drücken Sie wiederum auf den Geber und wählen die gewünschte Verknüpfung durch Drehen am Geber aus (UNLINK für das Lösen einer Verknüpfung). Bestätigen Sie die Auswahl durch Drücken auf den
Geber. Eine Verknüpfung wird durch einen „Verbindungsbalken“ zwischen den entsprechenden Buchstaben im Display grafisch dargestellt. Um
zur Hauptanzeige zurückzugelangen, wählen Sie nun durch Drehen des Gebers den Menüpunkt LINK EXIT aus und bestätigen abermals durch
Drücken auf den Geber. Um zur Hauptanzeige zurückzugelangen, wählen Sie durch Drehen am Geber EXIT aus (hell hinterlegt) und bestätigen
durch Drücken auf den Geber. Erfolgt circa 10 Sekunden keine Eingabe, erscheint automatisch die Hauptanzeige.
FRANCAIS
DEUTSCH
ENGLISH
LINK SETT
Menüpunkt für die Auswahl der Lautsprecher-Presets für die Lautsprecher der LD CURV Serie. Wählen Sie beispielsweise das Preset 6
CURV-SAT, wenn Sie am entsprechenden Kanal 6 Stück CURV 500 Array Satelliten am SmartLink® Adapter, das Preset 1 CURV-SUB,
wenn Sie den CURV 500 Installations-Subwoofer anschließen möchten (Hinweis: Wählen Sie das der Anzahl der Satelliten pro SmartLink®
Adapter entsprechende Preset aus). Drücken Sie auf den Drück-Dreh-Geber MENU, um ins Auswahlmenü für die Geräteeinstellungen zu
gelangen und wählen durch Drehen des Gebers den Menüpunkt PRESET aus (hell hinterlegt). Drücken Sie nun auf den Geber und wählen
durch Drehen des Gebers den Kanal aus, für den Sie das gewünschte Preset einstellen möchten. Drücken Sie wiederum auf den Geber
und wählen das gewünschte Preset durch Drehen am Geber aus. Bestätigen Sie die Auswahl durch Drücken auf den Geber. Stellen Sie
nun in gleicher Weise die Presets für die anderen Kanäle ein. Um zur Hauptanzeige zurückzugelangen, wählen Sie nun durch Drehen des
Gebers den Menüpunkt PRESET EXIT aus und bestätigen abermals durch Drücken auf den Geber. Um zur Hauptanzeige zurückzugelangen,
wählen Sie durch Drehen am Geber EXIT aus (hell hinterlegt) und bestätigen durch Drücken auf den Geber. Erfolgt circa 10 Sekunden keine
Eingabe, erscheint automatisch die Hauptanzeige.
ITALIANO
POLSKI
ESPAÑOL
PRESET
GERÄTEKONFIGURATION (SETUP)
Menüpunkt zum Editieren von Gerätekonfiguration, zum Auslesen der Geräte-Firmware, zum Zurücksetzen des Geräts und zum Verwalten
der Global Presets. Drücken Sie auf den Drück-Dreh-Geber MENU, um ins Auswahlmenü für die Geräteeinstellungen zu gelangen, wählen
durch Drehen des Gebers den Menüpunkt SETUP aus (hell hinterlegt) und bestätigen durch Drücken auf den Geber.
18
Daraufhin gelangen Sie in das Untermenü mit folgenden Menüpunkten (Auswahl durch Drehen des Gebers MENU, bestätigen durch Drücken
auf MENU):
In der obersten Zeile des Displays wird die Geräte-Firmware-Version angezeigt.
NAME
Individuellen Verstärkernamen einstellen (8-stellig):
MENU drücken -> MENU drehen für die Auswahl der Stelle 1 bis 8 -> MENU drücken -> MENU drehen für die
Auswahl von Buchstabe, Zahl, oder Zeichen -> MENU drücken -> zum Verlassen MENU nach rechts drehen
auf Pfeilsymbol -> MENU drücken
PIN
ON / OFF / EDIT
Automatische Sperrung der Bedienelemente aktivieren, um unbeabsichtigte und unbefugte
Bedienung zu verhindern (außer MASTER VOLUME, sofern aktiviert):
MENU 2x drücken -> MENU drehen auf ON -> MENU drücken -> zum Verlassen MENU drehen auf Pfeilsymbol
-> MENU drücken
DEUTSCH
FIRMWARE
ENGLISH
SETUP
Automatische Sperrfunktion deaktivieren:
Entsperren durch PIN-Eingabe (4-stellige PIN ab Werk: 1234) -> MENU drehen auf SETUP -> MENU drücken
-> MENU drehen auf PIN -> MENU 2x drücken -> MENU drehen auf OFF -> MENU drücken -> zum Verlassen
MENU drehen auf Pfeilsymbol -> MENU drücken
DELAY TEMP
Einstellen der Distanzberechnung auf die Lufttemperatur (Schallgeschwindigkeit ist u.a. abhängig von
Lufttemperatur):
MENU 2x drücken -> MENU drehen für Temperatureinstellung von 0°C bis 40°C -> MENU drücken -> zum
Verlassen MENU drehen auf Pfeilsymbol -> MENU drücken
CONNECT GND
YES / NO
Erdfrei-Schaltung zum Trennen der Signalmasse von der Geräteerdung
(verhindern von Brummschleifen):
MENU 2x drücken -> MENU drehen auf YES für Masseverbindung / NO für Massetrennung (Ground Lift) ->
MENU drücken -> zum Verlassen MENU drehen auf Pfeilsymbol -> MENU drücken
FACTORY SETTING
NO / YES
Zurücksetzen auf Werkseinstellung (u.a. zurücksetzen der PIN auf 1234 und OFF):
MENU drücken -> MENU drehen auf NO = Gerät nicht zurücksetzen / YES = Gerät zurücksetzen -> MENU
drücken
GLOBAL PRESET
Sichern aller Einstellungen außer Verstärkername und PIN-Einstellungen in Global Presets
(16 interne Speicherplätze):
MENU drücken -> MENU drehen auf SAVE PRESET -> MENU drücken -> MENU drehen auf gewünschten
Speicherplatz -> MENU drücken -> Preset Name einstellen: MENU drehen für Auswahl der Stelle (9 Stellen) ->
MENU drücken -> MENU drehen für die Auswahl von Buchstabe, Zahl, oder Zeichen -> MENU drücken usw.
-> MENU drehen auf YES -> MENU drücken -> zurück mit MENU drehen auf EXIT -> MENU drücken -> zum
Verlassen MENU drehen auf EXIT -> MENU drücken
POLSKI
Einstellen der Längenmaßeinheit der Kanalverzögerung METERS / FEET:
MENU drücken -> MENU drehen, für die Auswahl METERS, oder FEET -> MENU drücken -> zum Verlassen
MENU drehen auf Pfeilsymbol -> MENU drücken
ESPAÑOL
DELAY UNIT
METERS / FEET
FRANCAIS
Individuelle PIN festlegen:
MENU 2x drücken -> MENU drehen auf EDIT -> MENU drücken -> MENU drehen für die Auswahl einer Zahl
von 0 bis 9 für die erste Stelle -> MENU drücken -> MENU drehen für die Auswahl einer Zahl von 0 bis 9 für
die zweite Stelle -> Menu drücken usw.. Geht die PIN verloren, kann diese mit Hilfe der PC-Software über
die USB-Schnittstelle auf Werkseinstellung (1234) zurückgesetzt werden (Download von der Produktseite auf
WWW.LD-SYSTEMS.COM).
EXIT SETUP
ITALIANO
Laden eines Global Presets vom internen Speicher:
MENU drücken -> MENU drehen auf LOAD PRESET -> MENU drücken -> MENU drehen auf gewünschtes
Preset -> MENU drücken -> MENU drehen auf YES -> MENU drücken -> zurück mit MENU drehen auf EXIT
-> MENU drücken -> zum Verlassen MENU drehen auf EXIT -> MENU drücken
Zum Verlassen des Setup-Menüs den Geber MENU auf EXIT SETUP drehen und bestätigen durch Drücken auf
MENU
EXIT
Zum Verlassen des Auswahlmenüs und zum Anzeigen der Hauptanzeige wählen Sie durch Drehen des Gebers den Menüpunkt EXIT aus (hell
hinterlegt) und bestätigen durch Drücken auf den Geber.
19
ENGLISH
TECHNISCHE DATEN
Modellnummer:
LD CURV 500 IAMP
Produkttyp:
DSP-gesteuerter Verstärker
Typ:
4-Kanal
Nennausgangsleistung (1 kHz an 2,7
Ohm):
4 x 240 W (je nach Voreinstellung)
Nennausgangsleistung (1 kHz an 4 Ohm): 4 x 240 W (je nach Voreinstellung)
ITALIANO
POLSKI
ESPAÑOL
FRANCAIS
DEUTSCH
Nennausgangsleistung (1 kHz an 8 Ohm): 4 x 120 W (je nach Voreinstellung)
20
Nennausgangsleistung (1 kHz an 16
Ohm):
4 x 60 W (je nach Voreinstellung)
Ausgangsschaltung:
Klasse D
Frequenzgang +/- 1 dB:
10 Hz - 22000 Hz (je nach Voreinstellung)
Klirrfaktor:
< 0,01 % bei 1 kHz (je nach Voreinstellung)
Schutzschaltungen:
Überstrom, Soft Start, Gleichstrom, thermische Überlast, Kurzschluss, Multiband-Limiter
Steuerungen:
Drück-Dreh-Geber
Anzeigen:
OLED-Display
AD/DA-Wandlerabtastrate:
48 kHz
AD-D/A-Wandlerauflösung:
24 Bit
Dynamikbereich:
114 dB
Maximale Verzögerung/Kanal:
59 m/166 ms
Equalizer:
10-Band parametrisch/Kanal
Line-Eingänge:
4
Anschlüsse Line-Eingänge:
XLR (symmetrisch), Schraub-Steckverbindung
Lautsprecherausgänge:
4
Anschlüsse Lautsprecherausgänge:
speakON-kompatibel, Schraub-Steckverbindung
Erdfreischalter:
Ja, in grafische Benutzeroberfläche integriert
Kühlung:
Temperaturgesteuerter geräuscharmer Lüfter, im Leerlauf geräuschlos
Betriebsspannung:
Schaltnetzteil, 115 V AC/230 V AC, 50/60 Hz (automatische Wandlung)
Sicherung:
110 - 120V AC: T10AL / 250 V
220 - 240 V AC: T5AL / 250 V
Leistungsaufnahme bei Volllast:
1100 W
Raumtemperatur (bei Betrieb):
0 °C - 35 °C
Relative Luftfeuchtigkeit (bei Betrieb):
< 80 % (nicht kondensierend)
Breite:
482 mm
Höhe:
44 mm
Tiefe:
420 mm
Gewicht:
6,8 kg
Merkmale:
4 Kanäle mit DSP-Steuerung; speziell für CURV 500-Anlagen; praktisches Gehäuse 19“/1 Einheit. Jeder Kanal kann bis zu sechs CURV-500-Satelliten oder einen CURV500ISUB-Subwoofer
steuern. Bedienung über einen Push-Encoder. Kontrastreiches OLED-Display. Temperaturgesteuerter, geräuscharmer Lüfter. Zuverlässiges Schaltnetzteil (PFC).
HERSTELLERERKLÄRUNGEN
ENGLISH
HERSTELLERGARANTIE & HAFTUNGSBESCHRÄNKUNG
Unsere aktuellen Garantiebedingungen und Haftungsbeschränkung finden Sie unter: http://www.adamhall.com/media/shop/downloads/
documents/manufacturersdeclarations.pdf. Im Service Fall wenden Sie sich bitte an Adam Hall GmbH, Daimlerstraße 9, 61267 Neu Anspach
/ E-Mail [email protected] / +49 (0)6081 / 9419-0.
DEUTSCH
KORREKTE ENTSORGUNG DIESES PRODUKTS
(Gültig in der Europäischen Union und anderen europäischen Ländern mit Mülltrennung) Dieses Symbol auf dem Produkt oder
dazugehörigen Dokumenten weist darauf hin, dass das Gerät am Ende der Produktlebenszeit nicht zusammen mit dem normalen
Hausmüll entsorgt werden darf, um Umwelt- oder Personenschäden durch unkontrollierte Abfallentsorgung zu vermeiden. Bitte entsorgen
Sie dieses Produkt getrennt von anderen Abfällen und führen es zur Förderung nachhaltiger Wirtschaftskreisläufe dem Recycling zu. Als
Privatkunde erhalten Sie Informationen zu umweltfreundlichen Entsorgungsmöglichkeiten über den Händler, bei dem das Produkt erworben
wurde, oder über die entsprechenden regionalen Behörden. Als gewerblicher Nutzer kontaktieren Sie bitte Ihren Lieferanten und prüfen
die ggf. vertraglich vereinbarten Konditionen zur Entsorgung der Geräte. Dieses Produkt darf nicht zusammen mit anderen gewerblichen
Abfällen entsorgt werden.
FRANCAIS
CE-Konformität
Hiermit erklärt die Adam Hall GmbH, dass dieses Produkt folgenden Richtlinien entspricht (soweit zutreffend):
R&TTE (1999/5/EG) bzw. RED (2014/53/EU) ab Juni 2017
Niederspannungsrichtlinie (2014/35/EU)
EMV-Richtlinie (2014/30/EU)
RoHS (2011/65/EU)
Die vollständige Konformitätserklärung finden Sie unter www.adamhall.com.
Des Weiteren können Sie diese auch unter [email protected] anfragen.
ESPAÑOL
POLSKI
ITALIANO
21
FRANCAIS
ENGLISH
VOUS AVEZ FAIT LE BON CHOIX!
Cet appareil a été développé et fabriqué en appliquant des exigences de qualité très élevées : il garantit des années de fonctionnement sans
problème. Grâce à de nombreuses années d‘expérience, LD Systems est un nom connu dans le domaine des produits audio haut de gamme. Veuillez lire attentivement ce Manuel Utilisateur : vous apprendrez rapidement à utiliser votre appareil LD Systems de façon optimale.
Pour plus d‘informations sur LD Systems, visitez notre site Web, WWW.LD-SYSTEMS.COM
MESURES PRÉVENTIVES
POLSKI
ESPAÑOL
FRANCAIS
DEUTSCH
1. Veuillez lire attentivement ce manuel.
2. Rangez tous les documents d‘information et d‘instructions en lieu sûr.
3. Veuillez suivre toutes les instructions
4. Observez tous les messages d‘avertissement N‘enlevez pas de l‘appareil les étiquettes de sécurité ou autres informations.
5. N‘utilisez l‘appareil que pour des applications et de la façon appropriées.
6. Utilisez exclusivement des pieds et des dispositifs de fixation stables et adaptés lorsque l‘appareil est utilisé en installation fixe. Assurez-vous que les fixations murales ont été montées correctement, et qu‘elles sont sécurisées. Vérifiez que l‘appareil est installé en toute
sécurité, et qu‘il ne peut pas tomber.
7. Lors de l‘installation, observez les règlementations de sécurité en vigueur dans votre pays.
8. N‘installez et n‘utilisez pas l‘appareil à proximité de radiateurs, d‘accumulateurs de chaleur, de fours ou de toute autre source de chaleur. Vérifiez
que l‘appareil est installé de façon à bénéficier en permanence d‘un refroidissement efficace et qu‘il ne peut pas chauffer de façon excessive.
9. Ne placez aucune source de flamme sur l‘appareil – par exemple, une bougie allumée.
10. Ne bloquez pas les ouïes d‘aération. Éviter toute exposition directe aux rayons du soleil !
11. N‘utilisez pas l‘appareil à proximité immédiate d‘eau (à moins qu‘il ne s‘agisse d‘un appareil conçu pour une utilisation en extérieur –
dans ce cas, respectez les instructions correspondantes ci après) Ne mettez pas l‘appareil en contact avec des matériaux, des liquides ou
des gaz inflammables.
12. Vérifiez qu‘aucune projection ou liquide ne puisse s‘introduire dans l‘appareil. Ne posez sur l‘appareil aucun objet renfermant du liquide
: vase, verre d‘eau...
13. Vérifiez qu‘aucun petit objet ne puisse tomber à l‘intérieur de l‘appareil.
14. N‘utilisez avec cet appareil que des accessoires recommandés et approuvés par le fabricant.
15. N‘ouvrez pas l‘appareil, et n‘essayez pas de le modifier.
16. Lors du branchement de l‘appareil, sécurisez le passage du câble secteur, afin d‘éviter tout dommage ou accident, par exemple quelqu‘un qui trébuche sur le câble.
17. Lors du transport, vérifiez que l‘appareil ne peut tomber, ce qui pourrait provoquer des dommages matériels et/ou corporels.
18. Si votre appareil ne fonctionne plus correctement, que de l‘eau ou des objets ont pénétré à l‘intérieur, ou qu‘il a été endommagé de
quelque façon que ce soit, éteignez-le immédiatement et débranchez sa prise secteur (s‘il s‘agit d‘un appareil alimenté). Cet appareil ne
doit être réparé que par un personnel autorisé.
19. Pour le nettoyage de l‘appareil, utilisez un chiffon sec/
20. Observez toutes les réglementations en vigueur dans votre pays pour mettre l‘appareil au rebut. Lorsque vous jetez l‘emballage de
l‘appareil, veuillez séparer plastique, papier et carton.
21. Les films plastique doivent être mis hors de portée des enfants.
ITALIANO
APPAREILS RELIÉS AU SECTEUR
22. ATTENTION : Si le câble de l‘appareil est muni d‘un fil de terre, il doit être relié à une prise murale avec terre. Ne désactivez jamais la
mise à la terre d‘un appareil.
23. N‘allumez pas l‘appareil immédiatement s‘il a subi une grande différence de température ambiante (par exemple, lors du transport). L‘humidité
et la condensation pourraient l‘endommager. Ne mettez l‘appareil sous tension que lorsqu‘il est parvenu à la température de la pièce.
24. Avant de relier l‘appareil à la prise murale, vérifiez que la valeur et la fréquence de tension secteur sur laquelle il est réglé correspondent bien à la valeur et à la fréquence de la tension secteur locale. Si l‘appareil possède un sélecteur de tension, ne le branchez sur la prise
murale qu‘après avoir vérifié que la valeur réglée correspond à la valeur effective de la tension secteur. Si la fiche du cordon secteur ou du
bloc adaptateur livré avec votre appareil ne correspond pas au format de votre prise murale, veuillez consulter un électricien.
25. Ne piétinez pas le câble secteur. Assurez-vous que le câble secteur n‘est pas trop pincé, notamment au niveau de l‘arrière de l‘appareil
(ou de son adaptateur secteur) et de la prise murale.
26. Lors du branchement de l‘appareil, vérifiez que l‘accès au câble secteur ou au bloc adaptateur reste facile. Sortez la fiche secteur de la
prise murale dès que vous n‘utilisez pas l‘appareil pendant un certain temps, ou si vous désirez nettoyer l‘appareil. Pour ce faire, tirez toujours
sur la fiche elle-même, ou sur le bloc secteur lui-même ; ne tirez jamais sur le câble. Ne manipulez jamais le câble secteur ou l‘adaptateur
secteur avec des mains mouillées.
27. N‘éteignez/rallumez pas l‘appareil rapidement plusieurs fois de suite : vosu risquez de réduire la longévité de ses composants internes.
28. CONSEIL IMPORTANT : Ne remplacez le fusible que par un fusible de même type et du même calibre. Si le fusible fond de façon répétée,
veuillez consulter un centre de réparations agréé.
29. Pour séparer complètement l‘appareil du secteur, débranchez le cordon secteur ou l‘adaptateur de la prise murale.
30. Si votre appareil est muni d‘un connecteur secteur verrouillable (Volex), il faut d‘abord déverrouiller le mécanisme avant d‘enlever le
cordon secteur. Attention, lorsque vous retirez le câble secteur, à ne pas faire bouger l‘appareil, ce qui pourrait se traduire par un risque de
chute, de blesser quelqu‘un, ou tout autre dommage. Manipulez toujours le cordon secteur avec soin.
31. Débranchez la fiche secteur ou l‘adaptateur de la prise murale en cas d‘orage, ou si vous n‘utilisez pas l‘appareil pendant une longue période.
22
ENGLISH
ATTENTION :
Ne démontez jamais le couvercle de l‘appareil, vous risquez de recevoir un choc électrique.
L‘appareil ne renferme aucune pièce ni composant réparable ou remplaçable par l‘utilisateur. Ne
confiez l‘entretien et la réparation qu‘à un personnel qualifié.
Le pictogramme en forme de triangle équilatéral contenant un éclair terminé d‘une flèche avertit l‘utilisateur de la présence
d‘une tension dangereuse à l‘intérieur de l‘appareil, tension susceptible de provoquer un choc électrique.
Le pictogramme en forme de triangle équilatéral renfermant un point d‘exclamation signale à l‘utilisateur la présence
d‘instructions importantes concernant l‘utilisation ou l‘entretien de l‘appareil.
DEUTSCH
ATTENTION ! Ce symbole correspond à des surfaces chaudes. En cours de fonctionnement, certaines parties de l’appareil
peuvent devenir chaudes. Après utilisation, ne manipulez ou ne transportez l’appareil qu’au bout de 10 minutes de
refroidissement.
Attention ! Cet appareil est conçu pour une utilisation à une altitude maximale de 2000 m au-dessus du niveau de la mer.
FRANCAIS
Attention ! Ce produit ne convient pas à une utilisation dans les climats tropicaux.
ESPAÑOL
ATTENTION ! NIVEAUX SONORES ÉLEVÉS SUR LES PRODUITS AUDIO
Cet appareil a été conçu en vue d‘une utilisation professionnelle. L‘utilisation commerciale de cet appareil est soumise aux réglementations
et directives en vigueur dans votre pays en matière de prévention d‘accident. En tant que fabricant, Adam Hall est tenu de vous avertir
formellement des risques relatifs à la santé. Risques provoqués par une exposition prolongée à des niveaux sonores élevés : Lors de
l‘utilisation de ce produit, il est possible d‘atteindre des niveaux de pression sonore (exprimés en dB SPL) élevés, susceptibles de provoquer
des dommages auditifs irréparables chez les artistes, les techniciens et le public. Évitez toute exposition prolongée à des niveaux de
pression sonore élevés (supérieurs à 90 dB SPL).
INTRODUCTION
L’iAMP est un amplificateur de puissance 4 canaux rackable 19 pouces, spécialement développé pour utiliser les systèmes CURV 500
en installation fixe. De faible épaisseur, doté d’une topologie en classe D et d’un système de commande DSP, cet appareil offre une
alimentation à découpage très performante et une réponse en fréquence allant de 10 Hz à 22 kHz. Chaque canal est assorti d’un égaliseur
paramétrique et d’un delay, pour une puissance efficace de 240 W RMS sous 4 ohms, pour un taux de distorsion inférieur à 0,01 %.
POLSKI
L’utilisation de l’iAMP est très intuitive, ce dernier étant piloté via un encodeur à touches et un écran OLED au contraste élevé, facilement lisible.
L’appareil intègre une temporisation de mise sous tension et un ventilateur silencieux, contrôlé en température, ainsi que des protections
contre les composantes continues, les surcharges, la surchauffe et les courts-circuits. Les entrées audio symétriques se présentent sous forme
de connecteurs XLR et de borniers à vis. Chaque canal de l’iAMP peut alimenter jusqu'à six satellites CURV 500 ou un caisson de basses
CURV500ISUB, via les embases de sortie compatibles SpeakON ou les borniers à vis. Les haut-parleurs de la série CURV500 sont préconfigurés.
Un logiciel pour PC destiné à la gestion de l’iAMP peut par ailleurs être téléchargé sur la page du produit du site
WWW.LD-SYSTEMS.COM.
ITALIANO
23
ENGLISH
RACCORDEMENTS, ÉLÉMENTS DE COMMANDE ET D’AFFICHAGE
2
1
3
1 ÉCRAN
DEUTSCH
Afficheur graphique multifonctionnel à LED destiné à la visualisation de données comme les valeurs préconfigurées (presets) et le niveau du
signal audio. Affiche les options de menu permettant de procéder au réglage des paramètres du système.
2 MENU
À la fois bouton de commande et potentiomètre de réglage, permet d’accéder aux différentes options de menu et de les modifier.
3 GRILLE DE VENTILATION
FRANCAIS
Pour éviter la surchauffe de l’appareil, veiller à ne pas couvrir la grille de ventilation et à assurer une bonne circulation de l’air.
4
5
11
6
7
11
9
8
10
4 EMBASE SECTEUR ET PORTE-FUSIBLE
Embase secteur au format CEI, avec porte-fusible intégré. Un câble d’alimentation adapté est fourni.
ESPAÑOL
REMARQUE IMPORTANTE : Remplacer le fusible exclusivement par un fusible neuf de même type. Respecter les indications figurant sur le
boîtier. Si le fusible saute de façon récurrente, contacter un centre de réparation agréé.
5 POWER ON / OFF
Interrupteur de mise en marche et d’arrêt pour mise sous tension de l’appareil.
6 OUTPUT CH A - CH D (compatible speakON)
POLSKI
Sorties de haut-parleur compatibles SpeakON des canaux A à D. Pour éviter tout dommage de l’appareil, veiller à ce que l’impédance totale
des haut-parleurs raccordés soit au minimum de 2,7 ohms par canal. Les contacts des connecteurs compatibles speakON et des borniers à
vis des différents canaux sont montés en parallèle.
7 OUTPUT CH A - CH D (bornier à vis)
Sorties de haut-parleur des canaux A à D avec bornier à vis (connecteurs à vis fournis). Pour éviter tout dommage de l’appareil, veiller à ce
que l’impédance totale des haut-parleurs raccordés soit au minimum de 2,7 ohms par canal. Les contacts des connecteurs compatibles
speakON et des borniers à vis des différents canaux sont montés en parallèle.
8 INPUT IN 1 - 4 (XLR à 3 broches)
ITALIANO
Les entrées de ligne symétriques des canaux 1 à 4 se présentent sous forme de connecteurs XLR à 3 broches. Les contacts des connecteurs
XLR et des borniers à vis des canaux correspondants sont montés en parallèle.
9 INPUT IN 1 - 4 (bornier à vis)
Entrées de ligne symétriques des canaux A à D avec bornier à vis (connecteurs à vis fournis). Les contacts des connecteurs XLR et des
borniers à vis des différents canaux sont montés en parallèle.
10 DATA USB
Interface USB (type B) pour la mise à jour du firmware et des haut-parleurs préconfigurés, la gestion des programmes préconfigurés (Global
Presets) et la réinitialisation du code PIN de verrouillage. Le logiciel pour PC adapté fonctionnant sous Windows et les derniers fichiers de
mise à jour peuvent être téléchargés sur la page dédiée au produit du site WWW.LD-SYSTEMS.COM.
11 VENTILATEUR DE L’APPAREIL
24
Pour éviter la surchauffe de l’appareil, veiller à ne pas couvrir le boîtier et à assurer une bonne circulation de l’air.
MODE D’EMPLOI
ÉCRAN PRINCIPAL
ENGLISH
À la mise sous tension de l’amplificateur, un message de bienvenue s’affiche brièvement (WELCOME). L’écran principal met ensuite à
disposition les informations suivantes : désignation de l’amplificateur (modifiable), canal d’ampli (CH A - D) avec liaison correspondante,
haut-parleurs préconfigurés, niveau audio avec valeur-crête et canal mis en sourdine (Mute). Au bout d’environ 10 minutes d’inactivité,
certains éléments sont masqués et seules les informations suivantes sont affichées : canal d’ampli et liaison correspondante, niveau audio
avec valeur crête et canal mis en sourdine.
Nom de l’amplificateur
Canal d’ampli avec
liaison correspondante
Haut-parleurs préconfigurés
Niveau audio avec valeur crête (PK)
et canal mis en sourdine
CHANNEL VOLUME
DEUTSCH
Canal d’ampli avec
liaison correspondante
Niveau audio avec valeur
crête (PK) et canal mis en
sourdine
FRANCAIS
ESPAÑOL
Option de menu permettant de régler le volume du canal correspondant. Appuyer sur le bouton de réglage MENU pour accéder au menu
de sélection des paramètres de l’appareil et le tourner pour sélectionner l’option CHANNEL VOLUME (mise en surbrillance). Appuyer sur le
bouton de réglage et le tourner pour sélectionner le canal pour lequel le volume doit être modifié. Appuyer une nouvelle fois sur le bouton
de réglage et le tourner pour sélectionner le volume voulu (rotation en sens antihoraire = réduction du volume, rotation en sens antihoraire
au-delà de -60 dB = sourdine, rotation en sens horaire = augmentation du volume). Appuyer sur le bouton et le maintenir enfoncé pendant
environ 2 secondes pour mettre en sourdine le canal sélectionné (MUTE) ou désactiver la mise en sourdine. Lorsqu’un canal est mis en
sourdine, tourner le bouton de réglage dans le sens horaire pour augmenter progressivement le volume, puis le maintenir enfoncé pendant
environ 2 secondes pour rétablir la dernière valeur confirmée. Confirmer la saisie en appuyant sur le bouton de réglage. Procéder de la
même façon pour régler le volume des autres canaux. Pour revenir à l’écran principal, tourner le bouton de réglage et sélectionner l’option
CH VOLUME EXIT, puis confirmer en appuyant sur le bouton de réglage. Pour accéder à l’écran principal, tourner le bouton de réglage
et sélectionner l’option EXIT (mise en surbrillance), puis confirmer en appuyant sur le bouton de réglage. Au bout d’environ 10 secondes
d’inactivité, l’écran principal s’affiche.
POLSKI
MASTER VOLUME
ITALIANO
Le réglage du volume global peut être effectué directement sur l’écran principal, à condition que cette option ait été activée dans le menu
correspondant, y compris lorsque les éléments de commande sont verrouillés. Appuyer sur le bouton de réglage pour accéder au menu
de sélection des paramètres de l’appareil et le tourner pour sélectionner l’option MASTER VOLUME (en surbrillance). Appuyer 2 fois sur
le bouton de réglage, puis le tourner dans le sens antihoraire pour sélectionner l’option « ON ». Confirmer la sélection en appuyant sur le
bouton de réglage (si l’option de réglage du volume global n’est pas disponible, sélectionner « OFF »). Positionner le bouton de réglage sur
le symbole de la flèche. Confirmer en appuyant sur le bouton de réglage pour revenir au menu de sélection. Pour revenir à l’écran principal,
tourner le bouton de réglage et sélectionner l’option PRESET EXIT, puis confirmer en appuyant sur le bouton de réglage. Au bout d’environ
10 secondes d’inactivité, l’écran principal s’affiche.
Le volume global peut désormais être réglé en tournant le bouton de réglage MENU dans le sens voulu (ne pas appuyer sur le bouton au
préalable ; rotation en sens antihoraire = réduction du volume, rotation en sens horaire = augmentation du volume). L’écran affiche le MASTER
VOLUME (compris entre 0 et 100). Au bout d’environ 2 secondes d’inactivité, l’écran principal s’affiche.
25
Option de menu permettant de régler le délai de temporisation du canal (Delay Line, par ex.). Appuyer sur le bouton de réglage MENU pour accéder
au menu de sélection des paramètres de l’appareil et le tourner pour sélectionner l’option DELAY (mise en surbrillance). Appuyer sur le bouton
de réglage et le tourner pour sélectionner le canal pour lequel le délai de temporisation (Delay) doit être réglé. Appuyer une nouvelle fois sur le
bouton de réglage et le tourner pour régler la valeur voulue (rotation en sens antihoraire = délai de temporisation maximal, rotation en sens horaire
= réglage précis à partir de 0 ms). Le délai de temporisation est affiché en millisecondes (ms) et en mètres (m) / pieds (ft) (cf. SETUP -> DELAY
UNIT). Confirmer la saisie en appuyant sur le bouton de réglage. Procéder de la même façon pour régler le délai de temporisation des autres
canaux. Pour revenir à l’écran principal, tourner le bouton de réglage et sélectionner l’option DELAY EXIT, puis confirmer en appuyant sur
le bouton de réglage. Pour accéder à l’écran principal, tourner le bouton de réglage et sélectionner l’option EXIT (mise en surbrillance), puis
confirmer en appuyant sur le bouton de réglage. Au bout d’environ 10 secondes d’inactivité, l’écran principal s’affiche.
DEUTSCH
ENGLISH
DELAY
Option de menu permettant de régler la source d’entrée des canaux A à D. Appuyer sur le bouton de réglage MENU pour accéder au menu de
sélection des paramètres de l’appareil et le tourner pour sélectionner l’option ROUTING (mise en surbrillance). Appuyer sur le bouton de réglage
et le tourner pour sélectionner la source d’entrée à configurer (canal A - D, source d’entrée 1 - 4). Appuyer une nouvelle fois sur le bouton de
réglage et le tourner pour sélectionner la valeur voulue (chiffre encadré = source d’entrée activée, chiffre non encadré = source d’entrée
désactivée), puis confirmer en appuyant sur le bouton de réglage. Pour revenir à l’écran principal, tourner le bouton de réglage et sélectionner l’option ROUTING EXIT, puis confirmer en appuyant sur le bouton de réglage. Pour accéder à l’écran principal, tourner le bouton de
réglage et sélectionner l’option EXIT (mise en surbrillance), puis confirmer en appuyant sur le bouton de réglage. Au bout d’environ 10 secondes
d’inactivité, l’écran principal s’affiche.
ESPAÑOL
FRANCAIS
ROUTING
Option de menu permettant de régler l’égaliseur paramétrique 10 bandes pour les canaux A à D. Appuyer sur le bouton de réglage MENU
pour accéder au menu de sélection des paramètres de l’appareil et le tourner pour sélectionner l’option EQUALIZER (mise en surbrillance).
Appuyer sur le bouton de réglage et le tourner pour sélectionner le canal voulu (A - D). Appuyer une nouvelle fois sur le bouton de réglage
et le tourner pour sélectionner la bande voulue de l’égaliseur (1 à 10). Confirmer en appuyant sur le bouton de réglage. Tourner le bouton de
réglage pour sélectionner les options FREQ (fréquence), Q (qualité du filtre, Low Shelf LS et High Shelf HS) et GAIN. Confirmer en appuyant
sur le bouton de réglage. Modifier les paramètres voulus et confirmer en appuyant sur le bouton de réglage. Pour revenir à l’écran de
sélection des canaux, tourner le bouton de réglage et sélectionner l’option EXIT EQ, puis confirmer en appuyant sur le bouton de réglage.
Procéder de la même façon pour régler l’égaliseur des autres canaux. Pour accéder à l’écran principal, tourner le bouton de réglage et
sélectionner l’option EXIT (mise en surbrillance), puis confirmer en appuyant sur le bouton de réglage. Au bout d’environ 10 secondes
d’inactivité, l’écran principal s’affiche.
ITALIANO
POLSKI
EQUALIZER
26
POLARITY
ENGLISH
Option de menu permettant de régler la polarité des canaux A à D. Appuyer sur le bouton de réglage MENU pour accéder au menu de sélection
des paramètres de l’appareil et le tourner pour sélectionner l’option POLARITY (mise en surbrillance). Appuyer sur le bouton de réglage et le
tourner pour sélectionner le canal voulu (A - D). Appuyer une nouvelle fois sur le bouton de réglage et le tourner pour sélectionner la polarité
voulue. Confirmer en appuyant sur le bouton de réglage (NORMAL = polarité normale, INVERTED = polarité inversée). Procéder de la même
façon pour régler la polarité des autres canaux. Pour revenir à l’écran principal, tourner le bouton de réglage et sélectionner l’option POLARITY
EXIT, puis confirmer en appuyant sur le bouton de réglage. Pour accéder à l’écran principal, tourner le bouton de réglage et sélectionner
l’option EXIT (mise en surbrillance), puis confirmer en appuyant sur le bouton de réglage. Au bout d’environ 10 secondes d’inactivité, l’écran
principal s’affiche.
DEUTSCH
LINK SETT
FRANCAIS
Les canaux A à D peuvent être reliés librement pour pouvoir appliquer en parallèle les paramètres de réglage du volume, du délai de
temporisation et de l’égaliseur aux canaux sélectionnés. En d’autres termes, les paramètres réglés pour l’un des canaux reliés entre eux
sont appliqués simultanément aux autres canaux. Les valeurs réglées avant l’établissement de la liaison entre les canaux sont valables
jusqu’à ce que le paramètre correspondant soit modifié. Autrement dit, la valeur relative à un canal doit être modifiée pour pouvoir être
appliquée aux canaux auxquels il est relié. Appuyer sur le bouton de réglage MENU pour accéder au menu de sélection des paramètres
de l’appareil et le tourner pour sélectionner l’option LINK SETT (mise en surbrillance). Appuyer sur le bouton de réglage et le tourner pour
sélectionner le canal à relier aux autres canaux. Appuyer une nouvelle fois sur le bouton de réglage et le tourner pour sélectionner la liaison
voulue (sélectionner UNLINK pour défaire une liaison). Confirmer la sélection en appuyant sur le bouton de réglage. À l’écran, la liaison est
représentée par des barres reliant les lettres correspondantes. Pour revenir à l’écran principal, tourner le bouton de réglage et sélectionner
l’option LINK EXIT puis confirmer en appuyant sur le bouton de réglage. Pour revenir à l’écran principal, tourner le bouton de réglage et
sélectionner l’option EXIT (mise en surbrillance), puis confirmer en appuyant sur le bouton de réglage. Au bout d’environ 10 secondes
d’inactivité, l’écran principal s’affiche.
ESPAÑOL
POLSKI
ITALIANO
27
Option de menu permettant de sélectionner les haut-parleurs préconfigurés de la série LD CURV (presets). Sélectionner, par exemple, le
preset 6 CURV-SAT pour raccorder 6 enceintes satellites CURV 500 en line array à l’adaptateur SmartLink® ou le preset 1 CURV-SUB pour
relier un caisson de basse fixe CURV 500 (remarque : sélectionner le preset correspondant au nombre d’enceintes satellites raccordées par
adaptateur SmartLink®). Appuyer sur le bouton de réglage MENU pour accéder au menu de sélection des paramètres de l’appareil et le
tourner pour sélectionner l’option PRESET (mise en surbrillance). Appuyer sur le bouton de réglage et le tourner pour sélectionner le canal
auquel le preset voulu doit être appliqué. Appuyer une nouvelle fois sur le bouton de réglage et le tourner pour sélectionner le preset voulu.
Confirmer la sélection en appuyant sur le bouton de réglage. Procéder de la même façon pour les autres canaux. Pour revenir à l’écran
principal, tourner le bouton de réglage et sélectionner l’option PRESET EXIT puis confirmer en appuyant sur le bouton de réglage. Pour revenir
à l’écran principal, tourner le bouton de réglage et sélectionner l’option EXIT (en surbrillance) puis confirmer en appuyant sur le bouton de
réglage. Au bout d’environ 10 secondes d’inactivité, l’écran principal s’affiche.
DEUTSCH
ENGLISH
PRESET
FRANCAIS
Option de menu permettant de modifier la configuration de l’appareil, de charger le firmware, de réinitialiser l’appareil et de gérer les
programmes préconfigurés (Global Presets). Appuyer sur le bouton de réglage MENU pour accéder au menu de sélection des paramètres de
l’appareil et le tourner pour sélectionner l’option SETUP (en surbrillance). Confirmer en appuyant sur le bouton de réglage.
ESPAÑOL
CONFIGURATION DE L’APPAREIL (CONFIGURATION (SETUP)
Cela permet d’accéder à un sous-menu proposant les options suivantes (sélectionner en tournant le bouton MENU, confirmer en appuyant
sur le bouton MENU) :
POLSKI
SETUP
FIRMWARE
La ligne supérieure de l’écran indique la version du firmware.
NAME
Réglage d’une désignation univoque de l’amplificateur (8 caractères) :
Appuyer sur le bouton MENU -> Tourner le bouton MENU pour sélectionner l’emplacement 1 à 8 -> Appuyer
sur le bouton MENU -> Tourner le bouton MENU pour sélectionner une lettre, un chiffre ou un caractère
générique -> Appuyer sur le bouton MENU -> Pour quitter, tourner le bouton MENU dans le sens horaire et le
positionner sur le symbole de la flèche -> Appuyer sur le bouton MENU
PIN
Activer le verrouillage automatique des éléments de commande pour empêcher toute utilisation
de l’appareil par une personne non autorisée (ne concerne par l’option MASTER VOLUME si activée) :
Appuyer deux fois sur le bouton MENU -> Tourner le bouton MENU pour sélectionner l’option ON -> Appuyer
sur le bouton MENU -> Pour quitter, positionner le bouton MENU sur le symbole de la flèche -> Appuyer sur le
bouton MENU
ON / OFF / EDIT
ITALIANO
Désactivation de la fonction de verrouillage automatique :
Pour déverrouiller les éléments de commande, saisir le code PIN (4 caractères, réglage usine : 1234) -> Tourner le bouton MENU pour sélectionner l’option SETUP -> Appuyer sur le bouton MENU -> Tourner le bouton
MENU pour sélectionner PIN -> Appuyer deux fois sur le bouton MENU -> Tourner le bouton MENU pour
sélectionner l’option OFF -> Appuyer sur le bouton MENU -> Pour quitter, positionner le bouton MENU sur le
symbole de la flèche -> Appuyer sur le bouton MENU
Définition d’un code PIN individuel :
Appuyer deux fois sur le bouton MENU -> Tourner le bouton MENU pour sélectionner l’option EDIT -> Appuyer
sur le bouton MENU -> Tourner le bouton MENU pour sélectionner le premier chiffre (entre 0 et 9) -> Appuyer
sur le bouton MENU -> Tourner le bouton MENU pour sélectionner le deuxième chiffre (entre 0 et 9) ->
Appuyer sur le bouton MENU, etc. En cas de perte du code PIN, ce dernier peut être réinitialisé via le logiciel
pour PC et l’interface USB (rétablissement du réglage usine : 1234) (logiciel téléchargeable sur la page dédiée
au produit du site WWW.LD-SYSTEMS.COM).
28
Réglage du calcul de la distance sur la température ambiante (La vitesse de propagation du son
dépend, entre autres, de la température ambiante) :
Appuyer deux fois sur le bouton MENU -> Tourner le bouton MENU pour régler une température comprise entre 0° C et 40° C -> Appuyer sur le bouton MENU -> Pour quitter, positionner le bouton MENU sur le symbole
de la flèche -> Appuyer sur le bouton MENU
CONNECT GND
YES / NO
Montage sans terre pour isoler de la mise à la terre de l’appareil
(permet d’éviter les boucles de masse) :
Appuyer deux fois sur le bouton MENU -> Positionner le bouton MENU sur YES en cas de liaison à la masse
/ NO en cas de levage de masse (ground lift) -> Appuyer sur le bouton MENU -> Pour quitter, positionner le
bouton MENU sur le symbole de la flèche -> Appuyer sur le bouton MENU
FACTORY SETTING
NO / YES
Rétablissement des valeurs par défaut (réglage usine, notamment code PIN sur 1234 et OFF) :
Appuyer sur le bouton MENU -> Tourner le bouton MENU pour sélectionner l’option NO = Ne pas réinitialiser
l’appareil / YES = Réinitialiser l’appareil -> Appuyer sur le bouton MENU
GLOBAL PRESET
Enregistrement de tous les paramètres sous Global Presets à l’exception de la désignation de
l’amplificateur et des réglages du code PIN
(16 emplacements-mémoire internes) :
Appuyer sur le bouton MENU -> Tourner le bouton MENU pour sélectionner l’option SAVE PRESET -> Appuyer
sur le bouton MENU -> Tourner le bouton MENU pour accéder à l’emplacement-mémoire voulu -> Appuyer sur
le bouton MENU -> Définir le nom du preset : Tourner le bouton MENU pour sélectionner l’emplacement voulu
(9 emplacements) -> Appuyer sur le bouton MENU -> Tourner le bouton MENU pour sélectionner un lettre,
un chiffre ou un caractère -> Appuyer sur le bouton MENU, etc. -> Positionner le bouton MENU sur YES ->
Appuyer sur le bouton MENU -> Retour via positionnement du bouton MENU sur EXIT -> Appuyer sur le bouton
MENU -> Pour quitter, positionner le bouton MENU sur EXIT -> Appuyer sur le bouton MENU
FRANCAIS
DELAY TEMP
DEUTSCH
Réglage de l’unité de longueur utilisée pour le calcul du délai de temporisation du canal METERS
/ FEET :
Appuyer sur le bouton MENU -> Tourner le bouton MENU pour sélectionner l’option METERS ou FEET -> Appuyer sur le bouton MENU -> Pour quitter, positionner le bouton MENU sur le symbole de la flèche -> Appuyer
sur le bouton MENU
ENGLISH
DELAY UNIT
METERS / FEET
ESPAÑOL
Chargement d’un programme préconfiguré (Global Preset) de la mémoire interne :
Appuyer sur le bouton MENU -> Tourner le bouton MENU pour accéder à l'option LOAD PRESET -> Appuyer
sur le bouton MENU -> Tourner le bouton MENU pour sélectionner le preset voulu -> Appuyer sur le bouton
MENU -> Tourner le bouton MENU pour sélectionner l'option YES -> Appuyer sur le bouton MENU -> Retour
via positionnement du bouton MENU sur EXIT -> Appuyer sur le bouton MENU -> Pour quitter, positionner le
bouton MENU sur EXIT -> Appuyer sur le bouton MENU
EXIT SETUP
Pour quitter le menu de configuration (Setup), tourner le bouton MENU pour sélectionner l’option EXIT SETUP et
confirmer en appuyant sur le bouton MENU
POLSKI
EXIT
Pour quitter le menu de sélection et revenir à l’écran principal, tourner le bouton de réglage et sélectionner l’option EXIT (mise en surbrillance)
et confirmer en appuyant sur le bouton MENU.
ITALIANO
CARACTÉRISTIQUES TECHNIQUES
Référence du modèle :
LDCURV500IAMP
Type de produit :
Amplificateur contrôlé par DSP
Type :
4 canaux
Puissance de sortie (1 kHz @ 2,7 ohms) : 4 x 240 W (en fonction du preset)
Puissance de sortie (1 kHz @ 4 ohms) :
4 x 240 W (en fonction du preset)
Puissance de sortie (1 kHz @ 8 ohms) :
4 x 120 W (en fonction du preset)
Puissance de sortie (1 kHz @ 16 ohms) :
4 x 60 W (en fonction du preset)
Type de commutation :
Classe D
Réponse en fréquence +/- 1 dB :
10 Hz - 22 000 Hz (en fonction du preset)
Taux de distorsion (THD) :
< 0,01 % @ 1 kHz (en fonction du preset)
29
ENGLISH
DEUTSCH
FRANCAIS
ESPAÑOL
Surtension, Temporisation au démarrage, Courant continu, Surchauffe, Court-circuit, Limiteur
multibande
Réglages :
Bouton-poussoir rotatif
Indicateurs :
Écran OLED
Fréquence d'échantillonnage du convertisseur A/N-N/A :
48 kHz
Résolution du convertisseur A/N-N/A :
24 bits
Plage dynamique :
114 dB
Délai maximum / Canal :
59 m / 166 ms
Égaliseur :
10 x Paramétrique / Canal
Entrées :
4
Connecteurs d'entrée ligne :
XLR (symétrique), bornes à visser
Sorties haut-parleur :
4
Connecteurs de sortie enceintes :
Bornes à visser, compatibles Speakon
Ground lift :
Oui, IUG intégrée
Refroidissement :
Ventilateur asservi en température peu bruyant, silencieux en mode Standby
Tension secteur :
Bloc secteur, 115 / 230 volts CA, 50/60 Hz (commutation automatique)
Fusible :
110 -120 V CA : T10AL / 250 V
220 - 240 V CA : T5AL / 250 V
Intensité consommée (à pleine charge) :
1 100 W
Température ambiante (en fonctionnement) :
0 °C - 35 °C
Humidité relative (en fonctionnement) :
< 80 % (sans condensation)
Largeur :
482 mm
Hauteur :
44 mm
Profondeur :
420 mm
Poids :
6,8 kg
Caractéristiques :
Contrôle DSP 4 canaux, Spécifiquement conçu pour les installations CURV500, Élégant boîtier
19 pouces (1U de rack), Chaque canal permet de piloter jusqu'à six satellites CURV500 ou un
caisson de basses CURV500ISUB, Fonctionnement au moyen d'un unique encodeur-poussoir,
Écran OLED à contraste élevé, Ventilateur peu bruyant et asservi en température, Alimentation
de haute efficacité à découpage avec correction de facteur de puissance (PDC)
DECLARATIONS
GARANTIE FABRICANT & LIMITATION DE RESPONSABILITÉ
Nos conditions actuelles de garantie et de limitation de responsabilité sont disponibles à l‘adresse suivante : http://www.adamhall.com/media/
shop/downloads/documents/manufacturersdeclarations.pdf. Pour les réparations, veuillez contacter Adam Hall GmbH, Daimlerstraße 9,
61267 Neu Anspach / E-Mail [email protected] / +49 (0)6081 / 9419-0.
TRI ET MISE AUX DÉCHETS CORRECTE DE CE PRODUIT
(Valid in the European Union and other European countries with waste separation)
(Applicable dans l‘Union Européenne et les autres pays européens pratiquant le tri des déchets) La présence de ce symbole sur le
produit ou sur la documentation correspondante indique qu‘en fin de vie, le produit ne doit pas être jeté avec les déchets normaux, afin
d‘éviter tout dommage à l‘environnement ou aux personnes consécutive à une élimination non contrôlée des déchets. Séparez-le des autres types de déchets et recyclez-le, afin de promouvoir la réutilisation durable des ressources naturelles. Nous conseillons aux utilisateurs
non professionnels de contacter le revendeur chez qui ils ont acheté le produit, ou un représentant gouvernemental local, pour plus de
détails sur le lieu de collecte et la façon de recycler cet appareil dans le meilleur respect de l‘environnement possible.. Nous invitons les
utilisateurs professionnels à contacter leur fournisseur et à vérifier les termes et conditions de leur contrat d‘achat. Ce produit ne doit pas
être mélangé à d‘autres déchets commerciaux lors de la collecte.
ITALIANO
POLSKI
Circuits de protection :
Conformité CE
La société Adam Hall GmbH déclare par la présente que ce produit est compatible avec les régulations suivantes (le cas échéant) :
R&TTE (1999/5/EG) et RED (2014/53/EU) à partir de juin 2017
Directive basse tension (2014/35/EU)
Directive CEM (2014/30/EU)
RoHS (2011/65/EU)
La Déclaration de Conformité complète est disponible sur le site Web www.adamhall.com.
Pour toute information complémentaire, contactez-nous : [email protected].
30
ESPAÑOL
ENGLISH
¡GRACIAS POR ELEGIR LD-SYSTEMS!
Este equipo está diseñado y fabricado con los estándares de calidad más exigentes, para garantizar un correcto funcionamiento durante
muchos años. Los productos de LD-Systems se caracterizan por su gran calidad, avalada por el prestigio de la marca y una dilatada experiencia como fabricante. Lea atentamente este manual de usuario para poder aprovechar rápidamente toda la funcionalidad de su nuevo
producto de LD Systems.
Si desea obtener información sobre LD-SYSTEMS, visite nuestro sitio web WWW.LD-SYSTEMS.COM
MEDIDAS DE SEGURIDAD
DEUTSCH
1. Lea atentamente las instrucciones de este manual.
2. Guarde toda la información en un lugar seguro para futuras consultas.
3. Siga las instrucciones indicadas.
4. Siga todas las advertencias. No quite las instrucciones de seguridad ni cualquier otra información indicada en el equipo.
5. Utilice el equipo únicamente según la finalidad prevista.
6. Utilice solo soportes y fijaciones que sean robustos y adecuados cuando instale el equipo en instalaciones fijas. Asegúrese de que los soportes de
pared están correctamente instalados y firmemente fijados. Asegúrese de que el equipo está sólidamente instalado y no se puede caer.
7. Al instalar el equipo, respete las normas de seguridad aplicables en su país.
8. Evite instalar el equipo cerca de radiadores, acumuladores de calor, estufas o cualquier otra fuente de calor. Asegúrese de que el equipo esté
instalado en un lugar con ventilación suficiente para evitar cualquier sobrecalentamiento.
9. No coloque sobre el equipo fuentes de llamas sin protección, por ejemplo, velas encendidas.
10. Evite bloquear las rejillas de ventilación. ¡Evite la luz solar directa!
11. No utilice este equipo cerca del agua (excepto los equipos específicamente diseñados para uso en exterior, en cuyo caso tenga en cuenta las
indicaciones mencionadas a continuación). No exponga este equipo a materiales, líquidos o gases inflamables.
12. Evite exponer el equipo a gotas o salpicaduras que puedan caer dentro del mismo. No coloque recipientes llenos de líquido, como floreros o
vasos, sobre el equipo.
13. Asegúrese de no dejar caer ningún objeto dentro del equipo.
14. Emplee el equipo únicamente con los accesorios recomendados por el fabricante.
15. No abra el equipo ni intente modificarlo.
16. Una vez conectado el equipo, compruebe que en toda la longitud del cableado no hay peligro de que provoque una caída, por ejemplo.
17. Durante el transporte, asegúrese de que el equipo no se caiga y pueda causar daños personales o materiales.
18. Si el equipo no funciona correctamente, o si se ha vertido líquido sobre él, o si un objeto ha caído en su interior o si ha sufrido algún
desperfecto, apague inmediatamente el equipo y desenchufe el cable eléctrico (si se trata de un equipo activo). Únicamente un técnico
especialista debe reparar el equipo.
19. Para limpiar el equipo utilice un paño seco.
20. Procure seguir las normas vigentes en su país sobre reciclaje de desechos. Separe los componentes de plástico, papel y cartón del paquete
para reciclarlos en sus contenedores respectivos.
21. No deje las bolsas de plástico al alcance de los niños.
FRANCAIS
ESPAÑOL
POLSKI
PARA LOS EQUIPOS CON TOMA ELÉCTRICA
22. ADVERTENCIA: Si el cable eléctrico está provisto de un contacto de protección, debe conectarse a una toma eléctrica con conexión a tierra. No
desactivar nunca esta conexión de protección a tierra del cable eléctrico.
23. Si el equipo ha estado expuesto a un cambio brusco de temperatura (por ejemplo, después del transporte), no lo encienda inmediatamente. La
condensación o la humedad podrían dañar el equipo. Deje que el equipo alcance la temperatura ambiente antes de encenderlo.
24. Antes de conectar el cable eléctrico a la toma de corriente, compruebe si la tensión y la frecuencia del suministro eléctrico coinciden
con las especificaciones de este equipo. Si el equipo dispone de un selector de tensión, antes de enchufarlo a la red eléctrica, asegúrese de
que el valor seleccionado coincide con la tensión de suministro. Si el enchufe o el adaptador de corriente no encajan en la toma eléctrica,
consulte a un electricista.
25. Asegúrese de que el cable eléctrico no está pinzado. Evite que el cable resulte pellizcado, sobre todo en los extremos de conexión al equipo y en
la toma eléctrica.
26. Al conectar el equipo, asegúrese de que el cable eléctrico o el adaptador de corriente estén siempre accesibles. Desconecte el equipo de la
toma de corriente cuando no esté en uso o antes de limpiarlo. Para ello, desconecte el cable eléctrico y el adaptador de corriente del conector del
equipo en vez de desenchufar el cable de la toma eléctrica. No tocar el cable eléctrico ni el adaptador de corriente con las manos húmedas.
27. No encienda y apague el equipo en cortos intervalos de tiempo, ya que se reduce así la vida útil del sistema.
28. NOTA IMPORTANTE: Sustituya los fusibles únicamente por otros del mismo tipo y de las mismas características. Si el fusible se funde continuamente, póngase en contacto con un servicio técnico autorizado.
29. Para desconectar completamente el equipo de la tensión eléctrica, desenchufe el cable eléctrico o el adaptador de corriente de la toma eléctrica.
30. Si el equipo dispone de un enchufe eléctrico Volex, deberá desbloquearse el Volex del equipo para desenchufarlo. Esto implica que un tirón en el
cable eléctrico puede desplazar el equipo y provocar daños personales o materiales. Por tanto, asegúrese de instalar los cables con sumo cuidado.
31. Si es probable que caiga un rayo por una tormenta eléctrica o si no va a emplear el equipo durante mucho tiempo, desenchufe el cable eléctrico
y el adaptador de corriente.
ITALIANO
31
ENGLISH
ATENCIÓN:
Para evitar el riesgo de descarga eléctrica, no retire la tapa. El equipo no contiene elementos que
el usuario pueda reparar o sustituir. Para cualquier tarea de mantenimiento o reparación, acuda a
un técnico cualificado.
El símbolo de rayo dentro de un triángulo equilátero advierte al usuario de la presencia de tensiones peligrosas sin aislamiento
dentro del equipo que pueden causar una descarga eléctrica.
DEUTSCH
El símbolo de exclamación dentro de un triángulo equilátero advierte al usuario de la existencia de importantes instrucciones
de uso y mantenimiento.
¡Advertencia! Este símbolo indica la presencia de superficies calientes. Durante el funcionamiento, algunas partes de la
carcasa pueden llegar a calentarse bastante. Por ello, una vez apagado el equipo, espere al menos 10 minutos antes de
manipularlo o transportarlo.
¡Advertencia! Este equipo no está diseñado para funcionar en climas tropicales.
¡ADVERTENCIA: ALTO VOLUMEN!
Este equipo se destina a un uso profesional. Por consiguiente, si se aplica a un uso comercial, estará sujeto a las normas y reglamentos
de la Asociación para la prevención de accidentes de su sector profesional. Como fabricante, Adam Hall tiene la obligación de informar
formalmente a los usuarios de la existencia de posibles riesgos para la salud. Daños auditivos por exposición prolongada a un nivel SPL
alto: este equipo puede generar fácilmente un nivel de presión sonora (SPL) lo suficientemente elevado como para causar daños auditivos
permanentes a los artistas, el personal de producción y el público. Deben tomarse precauciones para evitar la exposición prolongada a un
SPL de más de 90 dB.
INTRODUCCIÓN
El iAMP es un amplificador de 4 canales en formato de 19", especialmente diseñado para la instalación de sistemas CURV 500. Su diseño
plano con topología de clase D y control por DSP cuenta con una fuente de alimentación conmutada de alto rendimiento y una respuesta en
frecuencia de 10 Hz a 22 kHz. Cada canal dispone de un ecualizador paramétrico y función de retardo, y entrega una potencia de 240 vatios
RMS a 4 ohmios con una distorsión armónica por debajo de 0,01 %.
El iAMP se maneja de manera fácil e intuitiva mediante un control giratorio y una nítida pantalla OLED de alto contraste. Dispone de arranque
suave, un ventilador silencioso controlado por temperatura y protección contra nivel de corriente continua, sobreintensidad, sobrecalentamiento
y cortocircuito. Las entradas simétricas están realizadas como tomas XLR y bloque de terminales enroscables/enchufables. El iAMP puede
controlar por cada canal hasta seis satélites CURV 500 o un subwoofer CURV500ISUB a través de las salidas compatibles speakON o los
bloques de terminales enroscables/enchufables. Los ajustes predeterminados para los altavoces de la serie CURV500 vienen preinstalados.
Hay un software para PC que permite gestionar el iAMP, y que se puede descargar en la página del producto en
WWW.LD-SYSTEMS.COM.
ITALIANO
POLSKI
ESPAÑOL
FRANCAIS
¡Advertencia! Este equipo está diseñado para ser utilizado a una altura que no supere los 2000 metros sobre el nivel del mar.
32
CONEXIONES, ELEMENTOS DE MANEJO E INDICACIÓN
ENGLISH
2
1
3
1 DISPLAY
Display gráfico OLED multifuncional para ver información como, p. ej., los ajustes predeterminados y el nivel de la señal de audio. También
muestra los puntos del menú para emprender los ajustes deseados en el sistema.
DEUTSCH
2 MENÚ
Pulsador giratorio para acceder al menú de edición, y seleccionar y editar los diferentes puntos del menú.
3 REJILLA DE VENTILACIÓN
Para evitar el sobrecalentamiento del equipo, compruebe que la rejilla de ventilación no esté cubierta y que el aire puede circular libremente.
5
11
6
7
11
9
8
10
FRANCAIS
4
4 TOMA DE RED Y SOPORTE DE FUSIBLE
Toma de red IEC con soporte de fusible integrado. El volumen de suministro incluye un cable de red apropiado.
NOTA IMPORTANTE: Sustituya el fusible únicamente por otro del mismo tipo. Tenga en cuenta la impresión sobre la carcasa. Si el fusible
salta de forma recurrente, diríjase a un centro de servicio técnico autorizado.
ESPAÑOL
5 POWER ON / OFF
Interruptor de encendido/apagado para la alimentación eléctrica del aparato.
6 OUTPUT CH A - CH D (compatible con speakON)
Salidas de altavoces compatibles con speakON de los canales A a D. Para evitar daños en el equipo, asegúrese de que la impedancia total
de los altavoces conectados por canal ascienda a 2,7 ohmios como mínimo. Los contactos de las tomas compatibles con speakON y los
bloques de terminales enroscables/enchufables de los diferentes canales están cableados en paralelo.
POLSKI
7 OUTPUT CH A - CH D (bloque de terminales enroscables/enchufables)
Salidas de altavoces de los canales A a D con bloque de terminales enroscables/enchufables (los conectores enroscables/enchufables están
incluidos en el volumen de suministro). Para evitar daños en el equipo, asegúrese de que la impedancia total de los altavoces conectados por
canal ascienda a 2,7 ohmios como mínimo. Los contactos de las tomas compatibles con speakON y los bloques de terminales enroscables/
enchufables de los diferentes canales están cableados en paralelo.
ITALIANO
8 INPUT IN 1 - 4 (XLR de 3 pines)
Entradas simétricas de línea de los canales 1 a 4 con tomas XLR de 3 pines. Los contactos de las tomas XLR y los bloques de terminales
enroscables/enchufables de los diferentes canales están cableados en paralelo.
9 INPUT IN 1 - 4 (bloque de terminales enroscables/enchufables)
Entradas simétricas de línea de los canales A a D con bloque de terminales enroscables/enchufables (los conectores enroscables/enchufables
están incluidos en el volumen de suministro). Los contactos de las tomas XLR y los bloques de terminales enroscables/enchufables de los
diferentes canales están cableados en paralelo.
10 DATA USB
Puerto USB (tipo B) para actualizar el firmware del equipo y los ajustes predeterminados de los altavoces, así como para administrar los
ajustes predeterminados globales y restablecer el PIN de bloqueo. El correspondiente programa de Windows para PC y los últimos archivos
de actualización, junto con sus instrucciones, están disponibles en la zona de descarga del producto en WWW.LD-SYSTEMS.COM
33
FUNCIONAMIENTO
PANTALLA PRINCIPAL DEL DISPLAY
Tras encender el amplificador, como texto de saludo se muestra brevemente "WELCOME"; después aparece la pantalla principal con la
siguiente información: nombre del amplificador (editable), canal del amplificador (CH A - D) con vinculación, ajuste predeterminado del
altavoz, nivel de audio con indicador de pico y silenciado del canal (Mute). Si no se realiza ninguna acción durante unos 10 minutos, algunas
partes de la información en pantalla desaparecen y solo se muestran el canal del amplificador con vinculación, nivel de audio con indicador
de pico y silenciado del canal.
Nombre del amplificador
Canal del
amplificador
con vinculación
Ajuste predeterminado del altavoz
Canal del
amplificador
con vinculación
Nivel de audio con indicador de pico (PK)
y silenciado del canal (Mute)
Nivel de audio con indicador de pico (PK)
y silenciado del canal (Mute)
CHANNEL VOLUME
Punto del menú para ajustar el volumen del canal. Presione MENU en el pulsador giratorio para acceder a los ajustes del equipo en el
menú de selección y elija el punto del menú CHANNEL VOLUME (resaltado con color claro) girando el pulsador. Presione ahora el pulsador
y seleccione el canal cuyo volumen desee modificar, girando el pulsador. Presione de nuevo el pulsador y gírelo para introducir el volumen
deseado (giro a la izquierda = reducir volumen; giro a la izquierda más allá de -60dB = Mute: giro a la derecha = aumentar volumen).
Mantenga presionado el pulsador unos 2 segundos para silenciar el canal escogido (MUTE) o para volver a anular el silenciado. Si silencia
un canal, gire el pulsador hacia la derecha para aumentar lentamente el volumen y presiónelo unos 2 segundos, así se restablece el último
valor confirmado. Confirme las entradas presionando el pulsador. Del mismo modo, configure el volumen para los otros canales a su gusto.
Para regresar al menú de selección, escoja el punto del menú CH VOLUME EXIT girando el pulsador, y confírmelo presionándolo. Para ir a
la pantalla principal, seleccione EXIT (resaltado con color claro) girando el pulsador y presiónelo para confirmar la selección. Si no se realiza
ninguna entrada en unos 10 segundos, aparece automáticamente la pantalla principal.
ITALIANO
POLSKI
ESPAÑOL
FRANCAIS
DEUTSCH
ENGLISH
11 VENTILADORES DE LA CARCASA
Para evitar el sobrecalentamiento del equipo, compruebe que estos ventiladores no están cubiertos y que el aire puede circular libremente.
34
MASTER VOLUME
ENGLISH
La configuración del volumen general se puede realizar directamente en la pantalla principal siempre que esta opción se haya activado
en el punto pertinente del menú, incluso si se activó el bloqueo de los elementos de manejo. Presione MENU en el pulsador giratorio para
acceder a los ajustes del equipo en el menú de selección y elija el punto del menú MASTER VOLUME (resaltado con color claro) girando
el pulsador. Ahora presione el pulsador dos veces, seleccione “ON” girándolo a la izquierda y confirme la entrada presionándolo (si no
estuviera disponible el ajuste del volumen general, seleccione entonces “OFF”). Escoja ahora el símbolo de la flecha girando el pulsador, y
confírmelo presionándolo para regresar al menú de selección. Para regresar a la pantalla principal, escoja el punto del menú EXIT girando el
pulsador, y confírmelo presionándolo. Si no se realiza ninguna entrada en unos 10 segundos, aparece automáticamente la pantalla principal.
Ahora puede configurar el volumen general girando el pulsador MENU en la dirección deseada sin presionarlo antes (giro a la izquierda =
reducir volumen; giro a la derecha = aumentar volumen). La indicación del display cambia a MASTER VOLUME (0 a 100). Si no se realiza
ninguna entrada en unos 2 segundos, aparece automáticamente la pantalla principal.
DEUTSCH
DELAY
FRANCAIS
Punto del menú para ajustar el retardo del canal (p. ej., Delay Line). Presione MENU en el pulsador giratorio para acceder a los ajustes del
equipo en el menú de selección y elija el punto del menú DELAY (resaltado con color claro) girando el pulsador. Presione ahora el pulsador y
seleccione el canal cuyo retardo (Delay) desee ajustar, girando el pulsador. Presione de nuevo el pulsador y configure el valor deseado girándolo
(giro a la izquierda = retardo máximo; giro a la derecha = ajuste preciso a partir de 0 ms). El retardo se indica tanto en milisegundos (ms) como
también en metros (m) o pies (ft) (véase SETUP -> DELAY UNIT). Confirme la entrada presionando el pulsador. Del mismo modo, configure el retardo
para los otros canales a su gusto. Para regresar al menú de selección, escoja el punto del menú DELAY EXIT girando el pulsador, y confírmelo
presionándolo. Para ir a la pantalla principal, seleccione EXIT (resaltado con color claro) girando el pulsador y presiónelo para confirmar la selección.
Si no se realiza ninguna entrada en unos 10 segundos, aparece automáticamente la pantalla principal.
ESPAÑOL
ROUTING
POLSKI
Punto del menú para configurar la fuente de entrada de los canales A a D. Presione MENU en el pulsador giratorio para acceder a los ajustes
del equipo en el menú de selección y elija el punto del menú ROUTING (resaltado con color claro) girando el pulsador. Ahora presione el
pulsador y, girándolo, seleccione la fuente de entrada que desea configurar (canal A - D, cada uno con una fuente de entrada 1 - 4). Presione
el pulsador de nuevo, escoja el ajuste deseado girándolo (número con marco = fuente de entrada activada; número sin marco = fuente de
entrada desactivada) y confirme la entrada presionando el pulsador. Para regresar al menú de selección, escoja el punto del menú ROUTING
EXIT girando el pulsador, y confírmelo presionándolo. Para ir a la pantalla principal, seleccione EXIT (resaltado con color claro) girando el
pulsador y presiónelo para confirmar la selección. Si no se realiza ninguna entrada en unos 10 segundos, aparece automáticamente la
pantalla principal.
ITALIANO
35
Punto del menú para configurar el ecualizador paramétrico de 10 bandas en los canales A a D. Presione MENU en el pulsador giratorio para
acceder a los ajustes del equipo en el menú de selección y elija el punto del menú EQUALIZER (resaltado con color claro) girando el pulsador.
Ahora presione el pulsador y, girándolo, seleccione el canal que desea editar (canal A - D). De nuevo, presione el pulsador, seleccione la banda
deseada del ecualizador (01 a 10) girándolo y confirme presionando el pulsador. Ahora seleccione FREQ (frecuencia), Q (calidad del filtro,
Low Shelf LS y High Shelf HS) y GAIN (amplificación) girando el pulsador, confirme presionándolo, edite los parámetros pertinentes como
quiera, y confirme presionando el pulsador. Para regresar a la selección de canales, escoja el punto del menú EXIT EQ girando el pulsador
hacia la derecha, y confírmelo presionándolo. Del modo descrito antes, configure el ecualizador de los otros canales a su gusto. Para ir a la
pantalla principal, seleccione EXIT (resaltado con color claro) girando el pulsador y presiónelo para confirmar la selección. Si no se realiza
ninguna entrada en unos 10 segundos, aparece automáticamente la pantalla principal.
ITALIANO
POLSKI
ESPAÑOL
FRANCAIS
DEUTSCH
ENGLISH
ECUALIZADOR
POLARITY
Punto del menú para configurar la polaridad de los canales A a D. Presione MENU en el pulsador giratorio para acceder a los ajustes del equipo en
el menú de selección y elija el punto del menú POLARITY (resaltado con color claro) girando el pulsador. Ahora presione el pulsador y, girándolo,
seleccione el canal que desea editar (canal A - D). Presione de nuevo el pulsador, gírelo para elegir la polaridad deseada y confírmela presionando
el pulsador (NORMAL = polaridad normal; INVERTED = polaridad invertida). Del mismo modo, configure la polaridad de los otros canales a su gusto.
Para regresar al menú de selección, escoja el punto del menú POLARITY EXIT girando el pulsador, y confírmelo presionándolo. Para ir a la pantalla
principal, seleccione EXIT (resaltado con color claro) girando el pulsador y presiónelo para confirmar la selección. Si no se realiza ninguna entrada
en unos 10 segundos, aparece automáticamente la pantalla principal.
LINK SETT
Los canales A a D se pueden vincular de cualquier manera para poder realizar en paralelo los ajustes de volumen, retardo y ecualizador en
los canales seleccionados; o sea, los ajustes que se emprenden en uno de los canales vinculados, se adoptan simultáneamente en los otros
canales vinculados. Los valores configurados antes de la vinculación, se mantienen así hasta que cambia el valor del parámetro pertinente.
Es decir, cuando cambia un valor en un canal, se adopta dicho valor en el canal vinculado. Presione MENU en el pulsador giratorio para
acceder a los ajustes del equipo en el menú de selección y elija el punto del menú LINK SETT (resaltado con color claro) girando el pulsador.
Ahora presione el pulsador y, girándolo, seleccione el canal que desea vincular a otros canales. Presione de nuevo el pulsador y gírelo para
seleccionar la vinculación deseada (UNLINK para eliminar la vinculación). Confirme la selección presionando el pulsador. La vinculación se
representa gráficamente en el display mediante una “barra de unión” entre las letras pertinentes. Para regresar a la pantalla principal, escoja el
punto del menú LINK EXIT girando el pulsador, y confírmelo presionándolo. Para regresar a la pantalla principal, seleccione EXIT (resaltado con
color claro) girando el pulsador y presiónelo para confirmar. Si no se realiza ninguna entrada en unos 10 segundos, aparece automáticamente
la pantalla principal.
36
PRESET
ENGLISH
Punto del menú para seleccionar los ajustes predeterminados de los altavoces de la serie LD CURV. Por ejemplo, escoja el ajuste predeterminado
6 CURV-SAT si desea conectar 6 satélites de array del CURV 500 con el adaptador SmartLink® en el canal pertinente, y el ajuste predeterminado
1 CURV-SUB si desea conectar el subwoofer para instalación fija del CURV 500 (nota: seleccione el ajuste predeterminado conforme al número de
satélites por adaptador SmartLink®). Presione MENU en el pulsador giratorio para acceder a los ajustes del equipo en el menú de selección
y elija el punto del menú PRESET (resaltado con color claro) girando el pulsador. Ahora presione el pulsador y, girándolo, seleccione el
canal para el que desea configurar el ajuste predeterminado deseado. Presione de nuevo el pulsador y gírelo para seleccionar el ajuste
predeterminado deseado. Confirme la selección presionando el pulsador. Del mismo modo, configure los ajustes predeterminados para los
otros canales a su gusto. Para regresar a la pantalla principal, escoja el punto del menú PRESET EXIT girando el pulsador, y confírmelo presionándolo. Para regresar a la pantalla principal, seleccione EXIT (resaltado con color claro) girando el pulsador y presiónelo para confirmar.
Si no se realiza ninguna entrada en unos 10 segundos, aparece automáticamente la pantalla principal.
DEUTSCH
CONFIGURACIÓN DEL EQUIPO (SETUP)
FRANCAIS
Punto del menú para editar la configuración del equipo, para ver el firmware del equipo, para restaurar el equipo y para administrar los
ajustes predeterminados globales. Presione MENU en el pulsador giratorio para acceder a los ajustes del equipo en el menú de selección,
elija el punto del menú SETUP (resaltado con color claro) girando el pulsador, y confirme presionándolo.
ESPAÑOL
Entonces accederá al submenú con los siguientes puntos de menú (seleccione girando el pulsador MENU, y confirme presionando en MENU):
SETUP
En la fila superior del display se muestra la versión del firmware del equipo.
NAME
Configurar nombre personalizado del amplificador (8 caracteres):
Presionar MENU -> Girar MENU para seleccionar la posición 1 a 8 -> Presionar MENU -> Girar MENU para seleccionar la letra, número o símbolo -> Presionar MENU -> Para salir, girar MENU hacia la derecha al símbolo
de la flecha -> Presionar MENU
PIN
Activar el bloqueo automático de los elementos de manejo para evitar el uso involuntario y no
autorizado (excepto MASTER VOLUME, siempre que esté activado):
Presionar MENU 2 veces -> Girar MENU a ON -> Presionar MENU -> Para salir, girar MENU al símbolo de la
flecha -> Presionar MENU
ON / OFF / EDIT
POLSKI
FIRMWARE
Desactivar la función de bloqueo automático:
Desbloqueo mediante la introducción del PIN (PIN inicial de 4 caracteres: 1234) -> Girar MENU a SETUP ->
Presionar MENU -> Girar MENU a PIN -> Presionar MENU 2 veces -> Girar MENU a OFF -> Presionar MENU
-> Para salir, girar MENU al símbolo de la flecha -> Presionar MENU
ITALIANO
Personalizar PIN:
Presionar MENU 2 veces -> Girar MENU a EDIT -> Presionar MENU -> Girar MENU para seleccionar un
número de 0 a 9 para la primera posición -> Presionar MENU -> Girar MENU para seleccionar un número de
0 a 9 para la segunda posición -> Presionar MENU, etc. En caso de pérdida del PIN, se puede restaurar a la
configuración de fábrica (1234) con el software para PC a través del puerto USB (descarga desde el sitio del
producto en WWW.LD-SYSTEMS.COM).
DELAY UNIT
METERS / FEET
Ajuste de la unidad de longitud del retardo del canal METERS / FEET:
Presionar MENU -> Girar MENU para seleccionar METERS o FEET -> Presionar MENU -> Para salir, girar
MENU al símbolo de la flecha -> Presionar MENU
DELAY TEMP
Ajuste del cálculo de la distancia con la temperatura del aire (la velocidad del sonido depende, entre
otras cosas, de la temperatura del aire):
Presionar MENU 2 veces -> Girar MENU para ajustar la temperatura de 0 °C a 40 °C -> Presionar MENU ->
Para salir, girar MENU al símbolo de la flecha -> Presionar MENU
37
ENGLISH
Conexión aislada de tierra para desconectar la masa de señal de la toma de tierra del equipo
(para evitar bucles de masa):
Presionar MENU 2 veces -> Girar MENU a YES para la conexión de masa / NO para la desconexión de masa
(Ground Lift) -> Presionar MENU -> Para salir, girar MENU al símbolo de la flecha -> Presionar MENU
FACTORY SETTING
NO / YES
Restaurar la configuración de fábrica (entre otras cosas, restaurar el PIN a 1234 y OFF):
Presionar MENU -> Girar MENU a NO = No restaurar equipo / YES = Restaurar equipo -> Presionar MENU
GLOBAL PRESET
Guardar todos los ajustes excepto el nombre del amplificador y la configuración del PIN en los
ajustes predeterminados globales
(16 posiciones de memoria internas):
Presionar MENU -> Girar MENU a SAVE PRESET -> Presionar MENU -> Girar MENU a la posición de memoria
deseada -> Presionar MENU -> Configurar el nombre del ajuste predeterminado: Girar MENU para seleccionar
la posición de la letra, número o carácter (9 posiciones) -> Presionar MENU -> Girar MENU para seleccionar la
letra, número o carácter -> Presionar MENU, etc. -> Girar MENU a YES -> Presionar MENU -> Regresar con
MENU, girar a EXIT -> Presionar MENU -> Para salir, girar MENU a EXIT -> Presionar MENU
Carga de un ajuste predeterminado global de la memoria interna:
Presionar MENU -> Girar MENU a LOAD PRESET -> Presionar MENU -> Girar MENU al ajuste predeterminado
deseado -> Presionar MENU -> Girar MENU a YES -> Presionar MENU -> Regresar con MENU, girar a EXIT ->
Presionar MENU -> Para salir, girar MENU a EXIT -> Presionar MENU
EXIT SETUP
Para salir del menú de Setup, girar el pulsador MENU a EXIT SETUP y confirmar presionando en MENU
EXIT
Para salir del menú de selección y para ver la pantalla principal, gire el pulsador para ver el punto del menú EXIT (resaltado con color claro)
y confírmelo presionando el pulsador.
DATOS TÉCNICOS
ITALIANO
POLSKI
ESPAÑOL
FRANCAIS
DEUTSCH
CONNECT GND
YES / NO
38
Número de modelo:
LDCURV500IAMP
Tipo de producto:
Amplificador controlado por DSP
Tipo:
4 canales
Potencia nominal de salida (1 kHz a 2,7
ohmios):
4 × 240 W (depende del programa seleccionado)
Potencia nominal de salida (1 kHz a 4
ohmios):
4 × 240 W (depende del programa seleccionado)
Potencia nominal de salida (1 kHz a 8
ohmios):
4 × 120 W (depende del programa seleccionado)
Potencia nominal de salida (1 kHz a 16
ohmios):
4 × 60 W (depende del programa seleccionado)
Circuitería de salida:
Clase D
Respuesta de frecuencia +/- 1 dB:
10 Hz - 22000 Hz (depende del programa seleccionado)
Distorsión armónica total:
< 0,01 % a 1 kHz (depende del programa seleccionado)
Circuitos de protección:
Sobretensión, arranque suave, corriente continua, sobrecalentamiento, cortocircuito, limitador
multibanda
Controles:
Pulsador giratorio
Indicadores:
Pantalla OLED
Frecuencia de muestreo del conversor
AD/DA:
48 kHz
Resolución del conversor AD/DA:
24 bits
Rango dinámico:
114 dB
Retardo máximo por canal:
59 m/ 166 ms
Ecualizador:
Paramétrico 10 bandas / canal
Entradas de línea:
4
Compatible con Speakon, terminales enroscables/enchufables
Desconexión de toma de tierra:
Sí, integrada en la interfaz gráfica
Refrigeración:
ventilador de bajo ruido controlado por temperatura, silencioso en modo reposo
Voltaje de funcionamiento:
Fuente de alimentación conmutada, 115 V AC / 230 V AC, 50/60Hz (conversión automática)
Fusible:
110 - 120V AC: T10AL / 250V
220 - 240V AC: T5AL / 250V
Consumo de electricidad a plena
potencia:
1100 W
Temperatura ambiente (en funcionamiento):
0 - 35 °C
Humedad relativa (en funcionamiento):
<80 % (sin condensación)
Anchura:
482 mm
Altura:
44 mm
Profundidad:
420 mm
Peso:
6,8 kg
Características:
4 canales controlados por DSP, diseñado especialmente para instalaciones con CURV500,
carcasa inteligente de 19 pulgadas / 1U, cada canal puede alimentar hasta seis satélites
CURV500 o un subwoofer CURV500ISUB, funcionamiento con pulsador giratorio, pantalla
OLED de alto contraste, ventilador de bajo ruido controlado por temperatura, fuente de
alimentación conmutada de alta eficiencia (CFP)
FRANCAIS
4
Conexiones de salida de altavoz:
DEUTSCH
XLR (simétricos), terminales enroscables/enchufables
Salidas de altavoz:
ENGLISH
Conectores de entrada de línea:
DECLARACIÓN DEL FABRICANTE
ESPAÑOL
GARANTÍA DEL FABRICANTE Y LIMITACIÓN DE RESPONSABILIDAD
Consulte nuestras condiciones de garantía y limitaciones de responsabilidad en: http://www.adamhall.com/media/shop/downloads/documents/manufacturersdeclarations.pdf. En caso de necesitar servicio técnico, póngase en contacto con Adam Hall GmbH, Daimlerstraße 9,
61267 Neu Anspach (Alemania); correo electrónico [email protected]; +49 (0)6081 / 9419-0.
POLSKI
ELIMINACIÓN CORRECTA DE ESTE PRODUCTO
(Aplicable en la Unión Europea y en los países europeos que dispongan de un sistema de recogida selectiva) El símbolo que aparece
sobre el producto o en la documentación adjunta indica que al final de la vida útil del equipo, no deberá desecharlo con los demás
residuos domésticos, con el fin de evitar posibles efectos negativos en el medio ambiente y en la salud humana debidos al vertido
incontrolado de desechos. La recogida selectiva ayuda a su posterior reciclaje y fomenta la reutilización sostenible de los componentes de
este equipo. Si es un particular, póngase en contacto con el distribuidor donde adquirió este producto, o con el ayuntamiento, para
informarse sobre el reciclaje adecuado de este equipo. Si es una empresa, póngase en contacto con su proveedor para informarse sobre los
términos y condiciones de su contrato de compra-venta. Este producto no debe mezclarse con otros residuos industriales.
ITALIANO
Conformidad CE
Adam Hall GmbH declara por la presente que este producto es conforme con las siguientes directivas (según sea aplicable):
R&TTE (1999/5/CE) o RED (2014/53/UE) a partir de junio de 2017
Directiva de baja tensión (2014/35/UE)
Directiva EMC (2014/30/UE)
RoHS (2011/65/UE)
Puede consultar la declaración de conformidad completa en www.adamhall.com.
También puede solicitarla a [email protected].
39
ENGLISH
POLSKI
GRATULUJEMY WYBORU!
To urządzenie zostało zaprojektowane i wyprodukowane przy zastosowaniu najwyższych kryteriów jakościowych w celu zapewnienia wieloletniej bezawaryjnej eksploatacji. Firma LD Systems gwarantuje to swoją marką i wieloletnim doświadczeniem w wytwarzaniu wysokiej
jakości produktów audio. Proszę starannie przeczytać niniejszą instrukcję obsługi, aby móc jak najszybciej zacząć użytkować ten produkt
marki LD Systems.
Dalsze informacje na temat firmy LD SYSTEMS dostępne są na naszej stronie internetowej WWW.LD-SYSTEMS.COM
ITALIANO
POLSKI
ESPAÑOL
FRANCAIS
DEUTSCH
ŚRODKI OSTROŻNOŚCI
1. Należy dokładnie przeczytać niniejszą instrukcję.
2. Wszystkie informacje i instrukcje przechowywać w bezpiecznym miejscu.
3. Należy przestrzegać zaleceń.
4. Należy przestrzegać wszystkich wskazówek ostrzegawczych. Nie wolno usuwać wskazówek bezpieczeństwa ani innych informacji
znajdujących się na urządzeniu.
5. Używać urządzenia wyłącznie w sposób zgodny z jego przeznaczeniem.
6. Stosować wyłącznie stabilne i pasujące statywy, ew. elementy mocujące (w przypadku instalacji stałych). Należy zadbać o prawidłową instalację
uchwytów ściennych i ich odpowiednie zabezpieczenie. Zapewnić bezpieczną instalację urządzenia i upewnić się, że urządzenie nie spadnie.
7. Podczas instalacji przestrzegać obowiązujących w danym kraju przepisów bezpieczeństwa.
8. Urządzenie instalować i eksploatować z dala od grzejników, zasobników ciepła, pieców i innych źródeł ciepła. Zadbać o zainstalowanie urządzenia w
taki sposób, aby zawsze było ono wystarczająco chłodzone i nie mogło ulec przegrzaniu.
9. Nie umieszczać na urządzeniu źródeł zapłonu, takich jak np. palące się świece.
10. Nie wolno blokować szczelin wentylacyjnych. Unikać bezpośredniego działania promieni słonecznych!
11. Nie używać urządzenia w bezpośrednim sąsiedztwie wody (nie dotyczy specjalnych urządzeń do stosowania na zewnątrz – w takim
przypadku należy przestrzegać podanych poniżej wskazówek specjalnych). Urządzenie nie może mieć kontaktu z palnymi materiałami,
płynami ani gazami.
12. Zabezpieczyć urządzenie przed wniknięciem kapiącej lub pryskającej wody. Nie wolno stawiać na urządzeniu pojemników napełnionych
płynami, takich jak wazony czy naczynia z piciem.
13. Należy zadbać o to, aby do urządzenia nie wpadały żadne przedmioty.
14. Urządzenie można eksploatować tylko przy użyciu akcesoriów zalecanych i przewidzianych przez producenta.
15. Nie otwierać urządzenia ani nie dokonywać w nim zmian.
16. Po podłączeniu urządzenia sprawdzić wszystkie ciągi kablowe, aby zapobiec szkodom lub wypadkom np. w wyniku potknięcia.
17. Podczas transportu zadbać o to, aby urządzenie nie upadło, gdyż może to spowodować uszkodzenie mienia i obrażenia ciała.
18. Jeśli urządzenie nie działa prawidłowo, do jego wnętrza dostały się płyny lub przedmioty lub jeśli urządzenie zostało uszkodzone w inny
sposób, należy je natychmiast wyłączyć i odłączyć od gniazda sieciowego (jeśli urządzenie jest aktywne). Naprawę takiego urządzenia może
wykonać tylko autoryzowany personel specjalistyczny.
19. Do czyszczenia urządzenia stosować suchą ściereczkę.
20. Przestrzegać obowiązujących w danym kraju przepisów dotyczących usuwania odpadów. Podczas utylizacji opakowania oddzielić
tworzywo sztuczne od papieru i tektury.
21. Worki z tworzywa sztucznego należy przechowywać w miejscu niedostępnym dla dzieci.
DOTYCZY URZĄDZEŃ Z ZASILANIEM SIECIOWYM
22. UWAGA: jeśli kabel sieciowy urządzenia jest wyposażony w zestyk ochronny, należy go podłączyć do gniazda z przewodem uziemiającym. Nigdy nie wolno dezaktywować przewodu uziemiającego kabla sieciowego.
23. Nie włączać urządzenia bezpośrednio po narażeniu go na silne wahania temperatury (np. po transporcie). Wilgoć i skropliny mogą uszkodzić
urządzenie. Włączyć urządzenie dopiero wtedy, gdy osiągnie temperaturę pokojową.
24. Przed podłączeniem urządzenia do gniazda elektrycznego należy sprawdzić, czy napięcie i częstotliwość sieci elektrycznej odpowiada wartościom podanym na urządzeniu. Jeśli urządzenie jest wyposażone w przełącznik napięcia, należy podłączyć je do gniazda tylko
wówczas, gdy wartości urządzenia odpowiadają wartościom sieci elektrycznej. Jeśli dołączony kabel sieciowy lub dołączony adapter
sieciowy nie pasuje do gniazda elektrycznego, należy skontaktować się z elektrykiem.
25. Nie stawać na kablu sieciowym. Należy zadbać o to, aby kable przewodzące napięcie nie były zagięte przy gnieździe sieciowym, przy
adapterze sieciowym ani przy gnieździe urządzenia.
26. Przy podłączaniu urządzenia zawsze należy zadbać o to, aby kabel sieciowy lub adapter sieciowy był zawsze łatwo dostępny. Odłączyć
urządzenie od źródła zasilania, gdy nie jest ono używane lub gdy ma zostać poddane czyszczeniu. Zawsze należy wyjmować kabel sieciowy
i adapter sieciowy z gniazda, chwytając za wtyczkę lub adapter, a nie za kabel. Nigdy nie dotykać kabla sieciowego i adaptera sieciowego
mokrymi dłońmi.
9. W miarę możliwości nie włączać i wyłączać urządzenia w krótkich odstępach czasu, gdyż może to mieć negatywny wpływ na jego żywotność.
28. WAŻNA INFORMACJA: bezpieczniki należy wymieniać wyłącznie na bezpieczniki tego samego typu i o takich samych wartościach. Jeśli bezpiecznik
stale się przepala, należy skontaktować się z autoryzowanym centrum serwisowym.
29. Aby całkowicie odłączyć urządzenie od sieci, należy wyjąć kabel sieciowy lub adapter sieciowy z gniazda.
30. Jeśli urządzenie jest wyposażone w przyłącze sieciowe Volex, konieczne jest odblokowanie odpowiedniej wtyczki urządzenia Volex, zanim
będzie możliwe jej odłączenie. Oznacza to także, iż w wyniku pociągnięcia za kabel urządzenie może się przesunąć i spaść, co może spowodować
obrażenia ciała i/lub inne szkody, dlatego ważne jest, aby przewody były odpowiednio poprowadzone.
31. W przypadku zagrożenia uderzeniem pioruna lub jeśli urządzenie przez dłuższy czas nie jest używane, należy wyjąć kabel sieciowy i
adapter sieciowy z gniazda.
40
Trójkąt równoboczny z symbolem błyskawicy sygnalizuje nieizolowane, niebezpieczne napięcie we wnętrzu urządzenia, które
może spowodować porażenie prądem.
ENGLISH
UWAGA:
Nigdy nie zdejmować pokrywy, gdyż grozi to porażeniem prądem. We wnętrzu urządzenia nie ma
żadnych części, które mogłyby zostać naprawione bądź poddane czynnościom konserwacyjnym przez
użytkownika. Czynności konserwacyjne i naprawy może przeprowadzać wyłącznie wykwalifikowany
personel serwisowy.
Trójkąt równoboczny z wykrzyknikiem oznacza ważne wskazówki dotyczące obsługi i konserwacji.
DEUTSCH
Ostrzeżenie! Ten symbol ostrzega przed gorącymi powierzchniami. Podczas użytkowania niektóre elementy mogą się nagrzać.
Urządzenie można dotykać lub transportować dopiero po jego ostygnięciu (po odczekaniu co najmniej 10 minut).
Ostrzeżenie! To urządzenie przeznaczone jest do użytku do maksymalnej wysokości 2000 m n.p.m.
FRANCAIS
Ostrzeżenie! To urządzenie nie jest przewidziane do użytku w tropikalnych strefach klimatycznych.
UWAGA! WYSOKI POZIOM GŁOŚNOŚCI PRODUKTÓW AUDIO!
To urządzenie przewidziane jest do zastosowań profesjonalnych. Komercyjne stosowanie tego urządzenia podlega obowiązującym w danym kraju
przepisom i wytycznym dotyczącym zapobiegania wypadkom. Firma Adam Hall jest jako producent zobowiązana do wyraźnego informowania o
potencjalnym zagrożeniu dla zdrowia. Utrata słuchu w wyniku wysokiego poziomu głośności i długotrwałego narażenia: podczas stosowania tego
produktu może powstać wysoki poziom ciśnienia akustycznego (SPL), który może doprowadzić do nieodwracalnego uszkodzenia słuchu u artystów,
pracowników i widzów. Należy unikać długotrwałego narażenia na wysoki poziom głośności powyżej 90 dB.
ESPAÑOL
WPROWADZENIE
iAMP to 4-kanałowy wzmacniacz w 19” obudowie, opracowany z myślą o instalacji w systemach CURV-500. Ten sterowany procesorem
DSP wzmacniacz klasy D odznacza się płaską konstrukcją. Wyposażono go w bardzo wydajny zasilacz impulsowy. Pasmo przenoszenia
wynosi 10 Hz–22 kHz. Wszystkie kanały wyposażone są w parametryczny regulator barwy dźwięku oraz opóźniacz i zapewniają RMS na
poziomie 240 W przy 4 ohmach, przy czym poziom zakłóceń harmonicznych wynosi mniej niż 0,01%.
POLSKI
Obsługa iAMP jest łatwa i intuicyjna dzięki enkoderowi z przyciskiem oraz kontrastowemu, czytelnemu wyświetlaczowi OLED. Urządzenie
posiada funkcję soft startu oraz cichy wentylator sterowany temperaturą. Jest też odpowiednio zabezpieczone przed prądem stałym,
prądem przetężeniowym, przegrzaniem i zwarciami. Symetryczne wejścia mają postać gniazd XLR oraz złączy śrubowych. Do gniazd
wyjściowych kompatybilnych ze złączami speakON lub do złączy śrubowych wzmacniacza iAMP można podłączyć maks. sześć satelitów
CURV-500 lub jeden subwoofer CURV500ISUB. Presety dla głośników serii CURV500 zostały zainstalowane fabrycznie. Oprogramowanie PC
do sterowania wzmacniaczem iAMP dostępne jest do pobrania na stronie produktu WWW.LD-SYSTEMS.COM.
ITALIANO
41
ENGLISH
GNIAZDA, PANEL OBSŁUGI I WSKAŹNIKI
2
1
3
1 WYŚWIETLACZ
DEUTSCH
Na wielofunkcyjnym wyświetlaczu graficznym OLED widoczne są informacje, takie jak presety oraz poziom sygnału audio. Wyświetlane są
też na nim opcje menu, które umożliwiają modyfikowanie ustawień systemu zgodnie z potrzebami użytkownika.
2 MENU
Za pomocą pokrętła przyciskowego można wejść w menu edycji i wybierać poszczególne opcje celem ich modyfikacji.
3 KRATKA WENTYLATORA
FRANCAIS
Aby zapobiec przegrzaniu się urządzenia, nie wolno zakrywać kratki wentylatora i należy zapewnić swobodną cyrkulację powietrza.
4
5
11
6
7
11
9
8
10
4 GNIAZDO SIECIOWE I PODSTAWA BEZPIECZNIKOWA
Gniazdo sieciowe IEC ze zintegrowaną podstawą bezpiecznikową. Kabel sieciowy znajduje się w zestawie.
ESPAÑOL
UWAGA: Bezpiecznik wymieniać wyłącznie na bezpiecznik tego samego typu. Należy zapoznać się z etykietami na obudowie. Jeżeli bezpiecznik
zadziała wielokrotnie, proszę zwrócić się do autoryzowanego centrum serwisowego.
5 POWER ON / OFF
Włącznik zasilania sieciowego urządzenia.
6 OUTPUT CH A - CH D (kompatybilne ze złączami speakON)
POLSKI
Wyjścia głośnikowe kanałów od A do D są kompatybilne ze złączami speakON. Aby uniknąć uszkodzeń urządzenia, należy dopilnować, aby
całkowita impedancja podłączanych głośników wynosiła co najmniej 2,7 ohma na dany kanał. Styki gniazd kompatybilnych ze złączami
speakON oraz złączy śrubowych poszczególnych kanałów połączone są równolegle.
7 OUTPUT CH A - CH D (złącza śrubowe)
Wyjścia głośnikowe kanałów od A do D ze złączami śrubowymi (wtyk śrubowy dołączony jest do zestawu). Aby uniknąć uszkodzeń urządzenia,
należy dopilnować, aby całkowita impedancja podłączanych głośników wynosiła co najmniej 2,7 ohma na dany kanał. Styki gniazd kompatybilnych
ze złączami speakON oraz złączy śrubowych poszczególnych kanałów połączone są równolegle.
8 INPUT IN 1 - 4 (3-biegunowe XLR)
ITALIANO
Symetryczne wejścia liniowe kanałów od 1 do 4 z 3-biegunowymi gniazdami XLR. Styki gniazd XLR oraz złączy śrubowych poszczególnych
kanałów są połączone równolegle.
9 INPUT IN 1 - 4 (złącza śrubowe)
Symetryczne wejścia liniowe kanałów od 1 do 4 ze złączami śrubowymi (wtyk śrubowy dołączony jest do zestawu). Styki gniazd XLR oraz
złączy śrubowych poszczególnych kanałów są połączone równolegle.
10 DATA USB
Interfejs USB (typu B) służący do aktualizowania oprogramowania sprzętowego oraz presetów głośnika, zarządzania globalnymi presetami
oraz resetowania kodu PIN blokady. Odpowiedni program Windows PC oraz aktualne pliki aktualizacyjne wraz z instrukcjami dostępne są
do pobrania na stronie produktu WWW.LD-SYSTEMS.COM.
11 WENTYLATOR OBUDOWY
42
Aby zapobiec przegrzaniu się urządzenia, nie wolno zakrywać wentylatora i należy zapewnić swobodną cyrkulację powietrza.
OBSŁUGA
GŁÓWNE WSKAŹNIKI WYŚWIETLACZA
ENGLISH
Po włączeniu wzmacniacza wyświetli się krótki tekst powitalny „WELCOME”, a następnie pojawi się ekran główny z
następującymi informacjami: nazwa wzmacniacza (edytowalna), kanał wzmacniacza (CH A – D) z połączeniem, preset głośnika, poziom
sygnału audio ze wskaźnikiem szczytowym oraz wskaźnik wyciszenia kanału (Mute). Po około 10 minutach bezczynności elementy
wyświetlacza zgasną i wyświetlać się będzie jedynie nazwa kanału wzmacniacza z połączeniem, poziom sygnału audio ze wskaźnikiem
szczytowym oraz wskaźnik wyciszenia kanału.
Nazwa wzmacniacza
Kanał wzmacniacza
z połączeniem
Preset głośnika
CHANNEL VOLUME
Poziom sygnału audio ze wskaźnikiem
szczytowym (PK)
oraz wskaźnik wyciszenia kanału (Mute)
DEUTSCH
Kanał wzmacniacza
z połączeniem
Poziom sygnału audio ze wskaźnikiem szczytowym (PK) oraz wskaźnik
wyciszenia kanału (Mute)
FRANCAIS
ESPAÑOL
Opcja menu służąca do regulacji głośności kanału. Nacisnąć pokrętło MENU, aby wejść w menu ustawień urządzenia. Obracając pokrętłem,
wybrać opcję CHANNEL VOLUME (opcja ta zostanie podświetlona). Nacisnąć pokrętło i obracać je, aby wybrać kanał, którego głośność ma
zostać zmieniona. Ponownie nacisnąć pokrętło i obracać nim, aby ustawić żądaną głośność (obrót w lewo = zmniejszanie głośności; obrót
w lewo poniżej wartości -60 dB = wyciszenie; obrót w prawo = zwiększanie głośności). Nacisnąć i przytrzymać pokrętło przez około 2
sekundy, aby wyciszyć wybrany kanał (MUTE) lub ponownie włączyć fonię. Po wyciszeniu kanału można obracać pokrętłem w prawo celem
stopniowego zwiększania głośności, a następnie nacisnąć je na około 2 sekundy, aby ponownie ustawić ostatnią potwierdzoną wartość.
Potwierdzić wprowadzone ustawienia, naciskając pokrętło. W razie potrzeby w taki sam sposób ustawić głośność dla pozostałych kanałów.
Aby wrócić do menu wyboru, należy za pomocą pokrętła wybrać opcję CH VOLUME EXIT. Potwierdzić, naciskając pokrętło. Aby przejść do
ekranu głównego, należy obrócić pokrętło do pozycji EXIT (opcja ta zostanie podświetlona), a następnie nacisnąć je, aby potwierdzić wybór.
Po około 10 sekundach bezczynności ekran główny automatycznie zgaśnie.
POLSKI
MASTER VOLUME
43
ITALIANO
Ogólną głośność można ustawić bezpośrednio z poziomu ekranu głównego, o ile opcja ta została włączona w menu. Głośność można będzie
modyfikować nawet po włączeniu blokady elementów obsługi. Nacisnąć pokrętło MENU, aby wejść w menu ustawień urządzenia. Obracając
pokrętłem, wybrać opcję MASTER VOLUME (opcja ta zostanie podświetlona). Dwukrotnie nacisnąć pokrętło i obrócić je w lewo, aby wybrać
opcję „ON”, a następnie nacisnąć je celem potwierdzenia wyboru (jeśli nie ma możliwości ustawienia ogólnej głośności głośników, należy
wybrać opcję „OFF”). Obracając pokrętłem wybrać symbol strzałki i nacisnąć je, aby potwierdzić i wrócić do menu wyboru. Aby wrócić do
ekranu głównego, należy za pomocą pokrętła wybrać opcję menu EXIT, a następnie potwierdzić wybór, naciskając pokrętło. Po około 10
sekundach bezczynności ekran główny automatycznie zgaśnie.
Ogólną głośność dźwięku można ustawić, obracając pokrętło MENU w dowolnym kierunku bez wcześniejszego wciskania go (obrót w lewo =
zmniejszanie głośności, obrót w prawo = zwiększanie głośności). Na wyświetlaczu włączy się trybMASTER VOLUME (od 0 do 100). Po około 2
sekundach bezczynności ekran główny automatycznie zgaśnie.
Ta opcja menu służy do ustawiania opóźnienia kanału (np. Delay-Line). Nacisnąć pokrętło MENU, aby wejść w menu ustawień urządzenia,
i obracać nim, aby wybrać opcję DELAY (opcja ta zostanie podświetlona). Nacisnąć pokrętło i obracać nim, aby wybrać kanał, który ma
zostać opóźniony (Delay). Ponownie nacisnąć pokrętło i obracać nim, aby wybrać żądaną wartość (obrót w lewo = maksymalne opóźnienie;
obrót w prawo = precyzyjna regulacja od 0 ms). Wartość opóźnienia można wyświetlać zarówno w milisekundach (ms), jak i w metrach (m)
lub ewentualnie w stopach (ft) (patrz opcje SETUP -> DELAY UNIT (KONFIGURACJA -> JEDNOSTKA OPÓŹNIENIA)). Potwierdzić wprowadzone
ustawienia, naciskając pokrętło. W razie potrzeby w taki sam sposób ustawić opóźnienie dla pozostałych kanałów. Aby wrócić do menu
wyboru, należy przekręcając pokrętło wybrać opcję DELAY EXIT. Nacisnąć pokrętło, aby potwierdzić wybór. Aby przejść do ekranu
głównego, należy obrócić pokrętło do pozycji EXIT (opcja ta zostanie podświetlona), a następnie nacisnąć je, aby potwierdzić wybór. Po
około 10 sekundach bezczynności ekran główny automatycznie zgaśnie.
DEUTSCH
ENGLISH
DELAY
Opcja menu służąca do ustawiania źródła wejściowego dla kanałów od A do D. Nacisnąć pokrętło MENU, aby wejść do menu wyboru dla
ustawień urządzenia. Obracać pokrętłem, aby wybrać opcję ROUTING (opcja ta zostanie podświetlona). Ponownie nacisnąć pokrętło i obracać
nim celem wybrania źródła wejściowego, które ma zostać skonfigurowane (odpowiednie źródło sygnału 1–4 dla kanałów od A do D). Jeszcze
raz nacisnąć pokrętło i obracając nim, wybrać żądane ustawienie (liczba w ramce = włączone źródło wejściowe; liczba bez ramki = wyłączone
źródło wejściowe). Następnie potwierdzić wybór, naciskając pokrętło. Aby wrócić do menu wyboru, należy przekręcając pokrętło wybrać opcję
ROUTING EXIT. Następnie potwierdzić wybór, naciskając pokrętło. Aby przejść do ekranu głównego, należy obrócić pokrętło do pozycji EXIT
(opcja ta zostanie podświetlona), a następnie nacisnąć je, aby potwierdzić wybór. Po około 10 sekundach bezczynności ekran główny
automatycznie zgaśnie.
ESPAÑOL
FRANCAIS
ROUTING
Opcja menu służąca do ustawiania 10-pasmowego equalizera parametrycznego w kanałach od A do D. Nacisnąć pokrętło MENU, aby
wejść do menu wyboru dla ustawień urządzenia i obracając pokrętłem, wybrać opcję EQUALIZER (zostanie ona podświetlona). Ponownie
nacisnąć pokrętło i obracać nim celem wybrania kanału, który ma zostać skonfigurowany (kanały od A do D). Ponownie nacisnąć pokrętło i
wybrać żądane pasmo equalizera (od 01 do 10). W tym celu należy obracać pokrętłem, a po ustawieniu żądanej wartości nacisnąć je celem
potwierdzenia wyboru. Obracając pokrętłem, wybrać opcję FREQ (częstotliwość), Q (jakość filtra, Low Shelf LS i High Shelf HS) lub GAIN
(wzmocnienie). Potwierdzić wybór, naciskając pokrętło. W razie potrzeby zmodyfikować poszczególne parametry, a następnie potwierdzić
wprowadzone zmiany poprzez naciśnięcie pokrętła. Aby wrócić do menu wyboru kanału, należy obrócić pokrętło w prawo i wybrać opcję
EXIT EQ. Potwierdzić wybór, naciskając pokrętło. W razie potrzeby w taki sam sposób ustawić equalizer dla pozostałych kanałów. Aby
przejść do ekranu głównego, należy obrócić pokrętło do pozycji EXIT (opcja ta zostanie podświetlona), a następnie nacisnąć je, aby potwierdzić wybór. Po około 10 sekundach bezczynności ekran główny automatycznie zgaśnie.
ITALIANO
POLSKI
EQUALIZER
44
POLARITY
ENGLISH
Opcja menu służąca do ustawiania polaryzacji dla kanałów od A do D. Nacisnąć pokrętło MENU, aby wejść w menu wyboru dla ustawień
urządzenia. Obracając pokrętło, wybrać opcję POLARITY (zostanie ona podświetlona). Ponownie nacisnąć pokrętło i obracać nim celem wybrania kanału, który ma zostać skonfigurowany (kanały od A do D). Ponownie nacisnąć pokrętło i obracać nim, aby wybrać tryb polaryzacji.
Nacisnąć pokrętło, aby potwierdzić wybór (NORMAL = zwykła polaryzacja, INVERTED = odwrócona polaryzacja) W razie potrzeby w taki sam
sposób ustawić polaryzację dla pozostałych kanałów. Aby wrócić do menu wyboru, należy za pomocą pokrętła wybrać opcję POLARITY EXIT.
Potwierdzić, naciskając pokrętło. Aby przejść do ekranu głównego, należy obrócić pokrętło do pozycji EXIT (opcja ta zostanie podświetlona), a
następnie nacisnąć je, aby potwierdzić wybór. Po około 10 sekundach bezczynności ekran główny automatycznie zgaśnie.
DEUTSCH
LINK SETT
FRANCAIS
Kanały od A do D można dowolnie łączyć, aby możliwe było równoległe ustawianie głośności, opóźnienia oraz opcji equalizera dla wybranych
kanałów. Oznacza to, że w razie zmodyfikowania ustawienia w jednym z kanałów, zostanie ono jednocześnie zmienione również w pozostałych
połączonych z nim kanałach. Wartość ustawiona przed połączeniem kanałów zostanie zapamiętana, aż do momentu wprowadzenia zmiany dla
danego parametru. Oznacza to, że zmiana wartości dla jednego z kanałów zostanie wprowadzona w pozostałych połączonych z nim kanałach.
Nacisnąć pokrętło MENU, aby wejść w menu ustawień urządzenia. Obracając pokrętłem wybrać opcję LINK SETT (opcja ta zostanie podświetlona). Ponownie nacisnąć pokrętło i obracać nim celem wybrania kanału, który ma zostać połączony z innymi kanałami. Jeszcze raz nacisnąć
pokrętło i obracać nim celem wybrania żądanego połączenia (aby rozłączyć, należy wybrać opcję UNLINK). Potwierdzić wybór, naciskając
pokrętło. Połączenie zostanie graficznie przedstawione za pomocą myślników łączących poszczególne litery na wyświetlaczu. Aby wrócić do
ekranu głównego, należy obracając pokrętłem wybrać opcję menu głównego LINK EXIT, a następnie potwierdzić wybór, naciskając pokrętło.
Aby wrócić do ekranu głównego, należy obrócić pokrętło do położenia EXIT (opcja ta zostanie podświetlona), a następnie potwierdzić wybór,
naciskając pokrętło. Po około 10 sekundach bezczynności ekran główny automatycznie zgaśnie.
ESPAÑOL
POLSKI
PRESET
ITALIANO
Opcja menu, która służy do wybierania presetów dla głośników z serii LD CURV. Wybrać, przykładowo, preset 6 CURV-SAT, jeśli za pomocą
adaptera SmartLink® do odpowiedniego kanału podłączonych ma zostać 6 satelitów CURV 500 Array lub preset 1 CURV-SUB, jeśli
podłączony ma zostać subwoofer przeznaczony do instalacji w systemach CURV 500 (wskazówka: wybrać odpowiedni preset odpowiadający liczbie satelitów podłączanych za pomocą adaptera SmartLink®). Nacisnąć pokrętło MENU, aby wejść w menu ustawień urządzenia
i obracając pokrętłem wybrać opcję PRESET (opcja ta zostanie podświetlona). Ponownie nacisnąć pokrętło i obracać nim celem wybrania
kanału, dla którego ma zostać ustawiony żądany preset. Jeszcze raz nacisnąć pokrętło i obracać nim celem wybrania żądanego presetu.
Potwierdzić wybór, naciskając pokrętło. W razie potrzeby w taki sam sposób ustawić presety dla pozostałych kanałów. Aby wrócić do ekranu
głównego, należy obracając pokrętłem wybrać opcję menu głównego PRESET EXIT. Potwierdzić wybór, naciskając pokrętło. Aby wrócić do
ekranu głównego, należy obrócić pokrętło do położenia EXIT (opcja ta zostanie podświetlona), a następnie potwierdzić wybór, naciskając
pokrętło. Po około 10 sekundach bezczynności ekran główny automatycznie zgaśnie.
45
Ta opcja menu służy do edytowania konfiguracji urządzenia, wybierania oprogramowania sprzętowego, resetowania urządzeń i zarządzania
globalnymi presetami. Nacisnąć pokrętło MENU, aby wejść w menu wyboru ustawień urządzenia i obracając nim wybrać opcję PRESET
(opcja ta zostanie podświetlona). Następnie potwierdzić wybór, naciskając pokrętło.
Wejść do podmenu,w którym dostępne są następujące opcje (wybierać, przekręcając pokrętło MENU i potwierdzać, naciskając je):
SETUP
FRANCAIS
DEUTSCH
ENGLISH
KONFIGURACJA URZĄDZENIA (SETUP)
FIRMWARE
U góry wyświetlacza wyświetla się wersja oprogramowania sprzętowego urządzenia.
NAZWA
Ustawianie niestandardowej nazwy wzmacniacza (8 cyfr):
nacisnąć pokrętło MENU -> obracać pokrętłem MENU celem wybrania pozycji od 1 do 8 -> nacisnąć pokrętło
MENU -> obracać pokrętłem MENU celem wybrania litery, cyfry lub znaku -> nacisnąć pokrętło MENU-> aby
wyjść z MENU, należy obrócić pokrętło w prawo, do położenia strzałki -> nacisnąć pokrętło MENU
PIN
Automatyczne blokowanie aktywnych elementów sterujących pozwala uniknąć przypadkowej lub
niepożądanej
obsługi urządzenia (z wyjątkiem opcji MASTER VOLUME, jeśli jest włączona):
dwukrotnie nacisnąć pokrętło MENU -> obrócić pokrętło MENU do położenia ON -> nacisnąć pokrętło MENU
-> aby wyjść, obrócić pokrętło MENU do położenia strzałki -> nacisnąć pokrętło MENU
ON / OFF / EDIT
ESPAÑOL
Wyłączanie automatycznej blokady:
urządzenie można odblokować, wprowadzając kod PIN (fabrycznie ustawiony 4-cyfrowy kod PIN to: 1234) ->
obrócić pokrętło MENU do położenia SETUP -> nacisnąć pokrętło MENU -> obrócić pokrętło MENU do położenia PIN -> dwukrotnie nacisnąć pokrętło MENU -> obrócić pokrętło MENU do położenia OFF -> nacisnąć
pokrętło MENU -> aby wyjść, obrócić pokrętło MENU do symbolu strzałki -> nacisnąć pokrętło MENU
ITALIANO
POLSKI
Ustawianie niestandardowego kodu PIN:
dwukrotnie nacisnąć pokrętło MENU -> obrócić pokrętło MENU do położenia EDIT -> nacisnąć pokrętło MENU
-> obrócić pokrętło MENU, aby wybrać pierwszą cyfrę od 0 do 9 -> nacisnąć pokrętło MENU -> obrócić
pokrętło MENU, aby wybrać drugą cyfrę od 0 do 9 -> nacisnąć pokrętło MENU itd. W razie utracenia kodu
PIN można go przywrócić do wartości fabrycznej (1234) za pomocą komputera PC z oprogramowaniem.
Urządzenie można podłączyć, korzystając z gniazda USB. Oprogramowanie można znaleźć na stronie produktu
WWW.LD-SYSTEMS.COM).
46
DELAY UNIT
METERS / FEET
Opcja ta służy do ustawiania jednostek długości opóźnienia kanału na METERS / FEET (metry lub
stopy):
nacisnąć pokrętło MENU -> obrócić pokrętło MENU, aby wybrać METERS (metry) lub FEET (stopy) -> nacisnąć
pokrętło MENU -> aby wyjść, obrócić pokrętło MENU do symbolu strzałki -> nacisnąć pokrętło MENU
DELAY TEMP
Obliczanie odległości na podstawie temperatury powietrza (prędkość dźwięku jest zależna, między
innymi, od temperatury powietrza):
dwukrotnie nacisnąć pokrętło MENU -> obracać pokrętłem MENU celem ustawienia temperatury od 0°C
do 40°C -> nacisnąć pokrętło MENU -> aby wyjść, ustawić pokrętło MENU na symbol strzałki -> nacisnąć
pokrętło MENU
CONNECT GND
YES / NO
Połączenie nieuziemione do odłączania masy sygnału od uziemienia urządzenia
(zapobiega powstawaniu pętli uziemienia):
dwukrotnie nacisnąć pokrętło MENU -> obrócić pokrętło MENU do położenia YES celem podłączenia masy /
NO celem odłączenia masy (Ground Lift) -> nacisnąć pokrętło MENU -> aby wyjść, obrócić pokrętło MENU do
symbolu strzałki -> nacisnąć pokrętło MENU
FACTORY SETTING
NO / YES
Resetowanie do ustawień fabrycznych (np. przywracanie fabrycznego kodu PIN 1234 i wyłączanie):
nacisnąć pokrętło MENU -> obrócić pokrętło MENU do położenia NO = nie resetować urządzenia / YES =
zresetować urządzenie -> nacisnąć pokrętło MENU
GLOBAL PRESET
ENGLISH
Zapisywanie wszystkich ustawień w presetach globalnych — z wyjątkiem nazwy wzmacniacza
oraz kodów PIN
(16 miejsc w pamięci wewnętrznej):
nacisnąć pokrętło MENU -> obrócić pokrętło MENU do położenia SAVE PRESET -> nacisnąć pokrętło MENU
-> obrócić pokrętło MENU do żądanego miejsca w pamięci -> nacisnąć pokrętło MENU -> wprowadzić
nazwę presetu: obracając pokrętłem MENU, wybrać żądaną pozycję (9 pozycji) -> nacisnąć pokrętło MENU ->
obracać pokrętłem MENU, aby wybrać literę, liczbę lub znak -> nacisnąć pokrętło MENU-> ustawić pokrętło
MENU w położeniu YES -> nacisnąć pokrętło MENU -> ustawić pokrętło MENU w położeniu EXIT -> nacisnąć
pokrętło MENU -> aby wyjść, obrócić pokrętło MENU do położenia EXIT -> nacisnąć pokrętło MENU
EXIT SETUP
DEUTSCH
Wczytywanie globalnych presetów z pamięci wewnętrznej:
nacisnąć pokrętło MENU -> ustawić pokrętło MENU w położeniu LOAD PRESET -> nacisnąć pokrętło MENU
-> za pomocą pokrętła MENU wybrać żądany preset -> nacisnąć pokrętło MENU -> obrócić pokrętło MENU do
położenia YES -> nacisnąć pokrętło MENU -> ponownie obrócić pokrętło MENU do położenia EXIT -> nacisnąć
pokrętło MENU -> aby wyjść, obrócić pokrętło MENU do położenia EXIT -> nacisnąć pokrętło MENU
Aby wyjść z menu konfiguracji, należy ustawić pokrętło MENU w położeniu EXIT SETUP, a następnie potwierdzić
wybór naciskając pokrętło MENU
EXIT
FRANCAIS
Aby wyjść z menu wyboru i wyświetlić wskaźniki ekranu głównego, należy za pomocą pokrętła wybrać opcję menu EXIT (opcja ta zostanie
podświetlona), a następnie potwierdzić wybór, naciskając pokrętło.
wzmacniacz sterowany procesorem DSP
Typ:
4-kanałowy
Znamionowa moc wyjściowa (1 kHz przy
2,7 ohma):
4 x 240 W (zależnie od presetu)
Znamionowa moc wyjściowa (1 kHz przy
4 ohmach):
4 x 240 W (zależnie od presetu)
Znamionowa moc wyjściowa (1 kHz przy
8 ohmach):
4 x 120 W (zależnie od presetu)
Znamionowa moc wyjściowa (1 kHz przy
16 ohmach):
4 x 60 W (zależnie od presetu)
Zespół wyjściowych obwodów elektrycznych:
klasa D
Pasmo przenoszenia +/- 1 dB:
10 Hz – 22000 Hz (zależnie od presetu)
THD:
< 0,01% przy 1 kHz (zależnie od presetu)
Układy ochronne:
zabezpieczenie przed prądem przetężeniowym i stałym, przeciążeniem termicznym i spięciami, funkcja soft-startu i ogranicznik wielopasmowy
Element sterujący:
pokrętło-przycisk
Wskaźniki:
wyświetlacz OLED
Częstotliwość próbkowania konwertera
AD/DA:
48 kHz
Rozdzielczość konwertera AD/DA:
24 bit
Zakres dynamiczny:
114 dB
Maksymalne opóźnienie/ kanał:
59 m/ 166 ms
Equalizer:
parametryczny 10x/ kanał
Wejścia liniowe:
4
Złącza wejść liniowych:
XLR (symetryczne), zaciski śrubowe/wtykowe
Wyjścia głośnikowe:
4
ITALIANO
LDCURV500IAMP
Typ produktu:
POLSKI
Numer modelu:
ESPAÑOL
DANE TECHNICZNE
47
ENGLISH
DEUTSCH
FRANCAIS
Złącza wyjściowe głośnika:
kompatybilne ze złączami Speakon, zaciski śrubowe/wtykowe
Przełącznik Ground Lift:
dostępny, zintegrowany w GUI
Chłodzenie:
cichy wentylator sterowany temperaturą, bezszelestny w trybie bezczynności
Napięcie pracy:
zasilacz impulsowy, 115 V AC / 230 V AC, 50/60 Hz (automatyczna konwersja)
Bezpiecznik:
110–120 V AC: T10AL / 250 V
220–240 V AC: T5AL / 250 V
Pobór mocy przy pełnym obciążeniu:
1100 W
Temperatura otoczenia (podczas pracy):
0°C–35°C
Wilgotność względna (podczas pracy):
<80% (bez kondensacji)
Szerokość:
482 mm
Wysokość:
44 mm
Głębokość:
420 mm
Masa:
6,8 kg
Charakterystyka:
4-kanałowy; sterowany procesorem DSP; zaprojektowany z myślą o instalacjach CURV500;
inteligentna obudowa 19“/1U; każdy kanał może zasilać nawet sześć satelitów CURV500 lub
jeden subwoofer CURV500ISUB; sterowanie enkoderem za pomocą przycisku; wyświetlacz
OLED o wysokim kontraście; cichy wentylator sterowany temperaturą; wysoko wydajny
zasilacz impulsowy (PFC).
DEKLARACJE PRODUCENTA
ESPAÑOL
Deklaracja zgodności CE
Firma Adam Hall GmbH niniejszym oświadcza, że produkt ten jest zgodny z następującymi dyrektywami (o ile mają zastosowanie):
dyrektywa w sprawie urządzeń radiowych i końcowych urządzeń telekomunikacyjnych (1999/5/WE) lub dyrektywa w sprawie urządzeń
radiowych (2014/53/UE) od czerwca 2017 r.
dyrektywa niskonapięciowa (2014/35/UE)
dyrektywa w sprawie kompatybilności elektromagnetycznej (2014/30/UE)
dyrektywa w sprawie ograniczenia stosowania niektórych niebezpiecznych substancji w sprzęcie elektrycznym i elektronicznym (2011/65/UE)
Pełna wersja deklaracji zgodności znajduje się na stronie internetowej www.adamhall.com.
Ponadto zapytania w tej sprawie można przesyłać na adres e-mail [email protected].
ITALIANO
PRAWIDŁOWA UTYLIZACJA NINIEJSZEGO PRODUKTU
(Obowiązuje w Unii Europejskiej i innych krajach europejskich stosujących system sortowania odpadów) Niniejszy symbol na produkcie lub związanych z nim dokumentach wskazuje, iż urządzenie po zakończeniu okresu użytkowania nie może być utylizowane razem
ze standardowymi odpadami domowymi, aby uniknąć szkód w środowisku lub szkód na osobie powstałych w wyniku niekontrolowanego
usuwania odpadów. Niniejszy produkt należy utylizować oddzielnie od innych odpadów i przekazać do punktu recyklingu w celu ponownego
wykorzystania użytych w nim materiałów w ramach idei zrównoważonego rozwoju. Klienci prywatni otrzymują informacje w zakresie przyjaznych dla środowiska możliwości usuwania odpadów od sprzedawcy, u którego produkt został zakupiony, lub w odpowiednich placówkach
regionalnych. Użytkownicy będący przedsiębiorcami proszeni są o kontakt ze swoimi dostawcami i ewentualne sprawdzenie uzgodnionych
umownie warunków utylizacji urządzeń. Niniejszy produkt nie może być utylizowany razem z innymi odpadami przemysłowymi.
POLSKI
GWARANCJA PRODUCENTA I OGRANICZENIE ODPOWIEDZIALNOŚCI
Nasze aktualne warunki gwarancji i informacje dotyczące ograniczenia odpowiedzialności znajdą Państwo na stronie: http://www.adamhall.
com/media/shop/downloads/documents/manufacturersdeclarations.pdf. W razie konieczności skorzystania z serwisu proszę skontaktować
się z firmą Adam Hall GmbH, Daimlerstraße 9, 61267 Neu Anspach / e-mail [email protected] / +49 (0)6081 / 9419-0.
48
ITALIANO
ENGLISH
AVETE FATTO LA SCELTA GIUSTA!
Quest‘apparecchio è stato sviluppato e prodotto secondo elevati standard qualitativi che garantiscono un funzionamento regolare per molti anni.
Per questo motivo LD Systems, con il suo nome e la pluriennale esperienza, rappresenta un‘azienda produttrice di prodotti audio di qualità. Leggete
attentamente questo manuale d‘uso per utilizzare al meglio il vostro nuovo prodotto LD Systems.
Per maggiori informazioni su LD SYSTEMS, consultate la nostra pagina web WWW.LD-SYSTEMS.COM
MISURE PRECAUZIONALI
DEUTSCH
1. Leggere attentamente il presente manuale di istruzioni.
2. Conservare tutte le indicazioni e le istruzioni in un luogo sicuro.
3. Seguire le istruzioni.
4. Rispettare tutte le avvertenze. Non rimuovere dal dispositivo le indicazioni sulla sicurezza o altre informazioni.
5. Utilizzare il dispositivo solo nei modi previsti dal manuale.
6. Utilizzare esclusivamente stativi e fissaggi stabili e adatti (per installazioni fisse). Verificare che i supporti a parete siano installati e fissati a
regola d‘arte. Verificare che il dispositivo sia installato in modo stabile e non possa cadere.
7. Durante l‘installazione, osservare le normative sulla sicurezza in vigore nel proprio Paese.
8. Non installare né azionare il dispositivo in prossimità di radiatori, accumulatori termici, stufe o altre fonti di calore. Accertarsi che il dispositivo
sia sempre installato in modo che venga raffreddato a sufficienza e non possa surriscaldarsi.
9. Non appoggiare sul dispositivo fonti di combustione, quali candele accese.
10. Le fessure di areazione non devono essere bloccate. Evitare l‘esposizione diretta ai raggi solari.
11. Non attivare il dispositivo nelle immediate vicinanze di acqua (questo punto non interessa i dispositivi specifici per l‘esterno, per i quali
valgono le speciali indicazioni riportate di seguito). Non portare mai il dispositivo a contatto con materiali, liquidi o gas infiammabili.
12. Accertarsi che all‘interno del dispositivo non possa penetrare acqua per gocciolamento o spruzzo. Non collocare sul dispositivo oggetti
contenenti liquidi, quali vasi, tazze o bicchieri.
13. Assicurarsi che non sia possibile la caduta di oggetti nel dispositivo.
14. Azionare il dispositivo esclusivamente con gli accessori appositamente consigliati e previsti dal produttore.
15. Non aprire né modificare il dispositivo.
16. Una volta collegato il dispositivo, verificare tutti i cavi per evitare danni o incidenti, ad esempio per inciampo.
17. Durante il trasporto, assicurarsi che il dispositivo non possa cadere e causare possibili danni a cose e/o persone.
18. Se il dispositivo non funzionasse più correttamente, vi fosse caduto sopra del liquido o un oggetto o fosse stato danneggiato in altro
modo, spegnerlo immediatamente e staccare la spina (se si tratta di un dispositivo attivo). La riparazione del dispositivo deve essere affidata
esclusivamente a personale qualificato autorizzato.
19. Per la pulizia del dispositivo utilizzare un panno pulito.
20. Rispettare le leggi sullo smaltimento in vigore nel Paese di installazione. Al momento di smaltire l‘imballo, separare la plastica dalla
carta e dal cartone.
21. I sacchetti di plastica devono essere tenuti lontani dalla portata dei bambini.
FRANCAIS
ESPAÑOL
ITALIANO
49
POLSKI
DISPOSITIVI CON ALLACCIAMENTO DI RETE
22. ATTENZIONE: se il cavo di rete è dotato di contatto di protezione, deve essere collegato a una presa di rete con messa a terra. Non
disattivare mai la connessione di messa a terra di un cavo di rete.
23. Non accendere il dispositivo subito dopo essere stato sottoposto a forti variazioni di temperatura (ad esempio dopo il trasporto). Umidità
e condensa potrebbero danneggiare il dispositivo. Accendere il dispositivo solo dopo che ha raggiunto la temperatura ambiente.
24. Prima di collegare il dispositivo alla presa, controllare innanzitutto se la tensione e la frequenza della rete elettrica coincidono con i
valori indicati sul dispositivo stesso. Nel caso di dispositivo munito di selettore di tensione, collegarlo alla presa unicamente se i valori del
dispositivo coincidono con quelli della rete elettrica. Se il cavo di rete o l‘adattatore di rete forniti in dotazione non sono compatibili con la
presa, rivolgersi a un elettricista.
25. Non calpestare il cavo di rete. Accertarsi che i cavi sotto tensione, in particolare della presa di rete o dell‘adattatore di rete,
non vengano pizzicati.
26. Durante il cablaggio del dispositivo, verificare sempre che il cavo di rete e l‘adattatore di rete siano costantemente accessibili. Staccare
sempre il dispositivo dall‘alimentazione di rete quando non è utilizzato o durante la pulizia. Per staccare dalla presa il cavo di rete e l‘adattatore
di rete, tirare sempre dalla spina o dall‘adattatore e non dal cavo. Non toccare mai il cavo di alimentazione e l’alimentatore con le mani umide.
27. Evitare per quanto possibile di accendere e spegnere velocemente il dispositivo per non pregiudicarne la durata.
28. NOTA IMPORTANTE: Sostituire i fusibili esclusivamente con fusibili dello stesso tipo e valore. Se un fusibile continua a saltare, rivolgersi a
un centro di assistenza autorizzato.
29. Per staccare completamente il dispositivo dalla rete elettrica, rimuovere il cavo di rete o l‘adattatore di rete dalla presa.
30. Per staccare un dispositivo provvisto di presa Volex, è prima necessario sbloccare la relativa spina Volex del dispositivo stesso. Tirando il
cavo di rete, però, il dispositivo potrebbe spostarsi e cadere, provocando danni alle persone o di altro genere. Prestare quindi la più scrupolosa attenzione durante la posa dei cavi.
31. In caso di pericolo di caduta di fulmine, o se il dispositivo rimane inutilizzato a lungo, staccare sempre il cavo di rete e l‘adattatore di
rete dalla presa.
ENGLISH
ATTENZIONE:
non togliere mai il coperchio di protezione perché sussiste il pericolo di scosse elettriche.
L‘interno del dispositivo non contiene parti che possono essere riparate o sottoposte a
manutenzione da parte dell‘utente. Per gli interventi di manutenzione e di riparazione rivolgersi
esclusivamente a personale qualificato.
Il triangolo equilatero con il simbolo del lampo segnala la presenza di tensioni pericolose non isolate all‘interno
dell‘apparecchio che possono causare scosse elettriche.
DEUTSCH
Il triangolo equilatero con punto esclamativo segnala la presenza di importanti informazioni relative all’uso e alla manutenzione.
Avvertimento! Questo simbolo indica superfici calde. Alcune parti della cassa potrebbero scaldarsi durante l‘impiego. Dopo aver
usato l‘apparecchiatura, lasciarla raffreddare per almeno 10 minuti prima di toccarla o trasportarla.
Avvertimento! Questo dispositivo non è destinato all’uso nei climi tropicali.
ESPAÑOL
ATTENZIONE! PRODOTTI AUDIO con LIVELLI SONORI ELEVATI!
Questo dispositivo è destinato a uso professionale. Il suo utilizzo in ambito commerciale è soggetto alle normative e alle direttive nazionali
vigenti in materia di prevenzione di infortuni. In qualità di produttore, Adam Hall è tenuto per legge a informare espressamente gli utenti
degli eventuali rischi per la salute. Danni all‘udito provocati da un’esposizione prolungata a un livello sonoro elevato: l‘utilizzo di questo
prodotto può generare elevati livelli di pressione sonora (SPL) che possono provocare danni irreparabili all‘udito di artisti, collaboratori e
spettatori. Evitare l‘esposizione prolungata a livelli sonori elevati, superiori a 90 dB.
INTRODUZIONE
POLSKI
FRANCAIS
Avvertimento! Questo dispositivo è destinato per l’utilizzo a un’altitudine non superiore ai 2.000 metri sul livello del mare.
L'iAMP viene comandato in maniera semplice e intuitiva grazie al codificatore con pulsante e al display OLED di facile lettura. Dispone di
un dispositivo di avvio progressivo e di ventole termoregolate a bassa rumorosità, oltre ad essere protetto contro la corrente continua, la
sovracorrente, il surriscaldamento e i cortocircuiti. Gli ingressi simmetrici si presentano come connettori XLR e raccordi a vite/connettori a
spina. Ogni canale dell'iAMP può comandare fino a sei satelliti CURV-500 o un subwoofer CURV500ISUB tramite prese d'uscita speakON
compatibili o raccordi a vite/connettori a spina. I preset per gli altoparlanti della serie CURV500 sono preinstallati. Sul sito del prodotto
WWW.LD-SYSTEMS.COM è inoltre disponibile per il download un software per PC per la gestione dell'iAMP.
ITALIANO
L'iAMP è un finale di potenza a 4 canali con alloggiamento da 19", sviluppato specificamente per l'installazione dei sistemi CURV-500. Il
design piatto con topologia in classe D e controller DSP vanta un alimentatore switching ad alta efficienza e una risposta in frequenza da
10 Hz a 22 kHz. Ogni canale dispone di una regolazione parametrica del suono e delay, e vanta una potenza di 240 watt RMS a 4 ohm con
fattore di distorsione inferiore allo 0,01%.
50
RACCORDI, ELEMENTI DI COMANDO E DI VISUALIZZAZIONE
ENGLISH
2
1
3
1 DISPLAY
Display grafico OLED multifunzione per la visualizzazione di informazioni quali preset e livelli del segnale audio. Visualizza inoltre le voci di
menu per applicare le impostazioni di sistema desiderate.
DEUTSCH
2 MENU
Trasduttore di pressione/rotazione combinato, per accedere al menu operativo e selezionare e modificare le singole voci di menu.
3 GRIGLIE DI VENTILAZIONE
Per evitare il surriscaldamento del dispositivo, verificare che le griglie di ventilazione non vengano coperte e che l'aria possa circolare liberamente.
5
11
6
7
11
9
8
10
FRANCAIS
4
4 PRESE DI RETE E PORTAFUSIBILI
Prese di rete IEC con portafusibili integrato. Il cavo di alimentazione è in dotazione.
INFORMAZIONI IMPORTANTI: Sostituire il fusibile solo con un altro dello stesso tipo. Prestare attenzione alla stampa sull’alloggiamento.
Qualora il fusibile dovesse scattare ripetutamente, rivolgersi a un centro assistenza autorizzato.
ESPAÑOL
5 POWER ON / OFF
Interruttore per l’alimentazione elettrica del dispositivo.
6 OUTPUT CH A - CH D (speakON compatibile)
Uscite degli altoparlanti dei canali A-D speakON compatibili. Per evitare eventuali danni al dispositivo, verificare che l’impedenza complessiva
degli altoparlanti collegati sia pari ad almeno 2,7 ohm per canale. I contatti delle prese speakON compatibili e dei raccordi a vite/connettori a
spina dei relativi canali sono cablati in parallelo.
POLSKI
7 OUTPUT CH A - CH D (raccordi a vite/connettori a spina)
Le uscite degli altoparlanti dei canali A-D sono provviste di raccordi a vite/connettori a spina (in dotazione). Per evitare eventuali danni al
dispositivo, verificare che l’impedenza complessiva degli altoparlanti collegati sia pari ad almeno 2,7 ohm per canale. I contatti delle prese
speakON compatibili e dei raccordi a vite/connettori a spina dei relativi canali sono cablati in parallelo.
8 INPUT IN 1 - 4 (XLR a 3 poli)
ITALIANO
Ingressi in linea simmetrici dei canali 1-4 con connettori XLR a 3 poli. I contatti dei connettori XLR e dei raccordi a vite/connettori a spina dei
relativi canali sono cablati in parallelo.
9 INPUT IN 1 - 4 (raccordi a vite/connettori a spina)
Gli ingressi in linea simmetrici dei canali A-D sono provvisti di raccordi a vite/connettori a spina (in dotazione). I contatti dei connettori XLR e
dei raccordi a vite/connettori a spina dei relativi canali sono cablati in parallelo.
10 DATA USB
Interfaccia USB (di tipo B) per l’aggiornamento del firmware del dispositivo e dei preset degli altoparlanti, per la gestione dei preset globali
e per la reimpostazione del PIN di blocco. Il programma per Windows corrispondente e i file di aggiornamento correnti sono disponibili
nell’area download del sito del prodotto WWW.LD-SYSTEMS.COM
11 VENTOLE DELL’ALLOGGIAMENTO
Per evitare il surriscaldamento del dispositivo, verificare che le ventole non vengano coperte e che l’aria possa circolare liberamente.
51
SCHERMATA PRINCIPALE DEL DISPLAY
In seguito all'accensione dell'amplificatore, verrà visualizzato brevemente il saluto "WELCOME" e, successivamente, comparirà la schermata
principale con le seguenti informazioni: nome amplificatore (modificabile), canale amplificatore (CH A - D) con collegamento, preset degli
altoparlanti, livello audio con visualizzazione del picco e muting del canale. Se dopo circa 10 minuti non avviene alcuna immissione, parti della
schermata vengono nascoste e restano visibili soltanto il canale dell'amplificatore con collegamento, il livello audio con visualizzazione del picco
e il muting del canale.
Nome amplificatore
Canale
amplificatore
con collegamento
DEUTSCH
ENGLISH
COMANDO
Canale
amplificatore
con collegamento
Preset altoparlanti
Livello audio con visualizzazione
del picco (PK) e muting del canale
Livello audio con visualizzazione
del picco (PK) e muting del canale
Voce di menu per l’impostazione del volume dei canali. Premere sul trasduttore di pressione/rotazione MENU per accedere al menu di
selezione delle impostazioni del dispositivo e, ruotando il trasduttore, selezionare la voce di menu CHANNEL VOLUME (evidenziata).
Premere il trasduttore e, ruotandolo, selezionare il canale di cui si desidera modificare il volume. Premere nuovamente il trasduttore e
impostare il volume desiderato ruotando il trasduttore (rotazione verso sinistra = riduzione del volume, rotazione verso sinistra oltre -60
dB = mute, rotazione verso destra = aumento del volume). Tenere premuto il trasduttore per circa 2 secondi per silenziare (MUTE) il canale
selezionato o per rimuovere il muting. Quando si silenzia un canale, ruotare il trasduttore verso destra per aumentare lentamente il volume,
quindi premere per circa 2 secondi per ripristinare l’ultimo valore confermato. Confermare l’immissione premendo il trasduttore. Impostare il
volume degli altri canali seguendo la medesima procedura. Per tornare al menu di selezione, selezionare la voce di menu CH VOLUME EXIT
ruotando il trasduttore e confermare nuovamente premendo il trasduttore. Per accedere alla schermata principale, ruotare il trasduttore per
selezionare EXIT (evidenziato) e confermare premendo il trasduttore. Se dopo circa 10 secondi non avviene alcuna immissione,
la schermata principale comparirà in automatico.
POLSKI
ESPAÑOL
FRANCAIS
CHANNEL VOLUME
ITALIANO
MASTER VOLUME
È possibile impostare il volume globale direttamente dalla schermata principale, purché tale opzione sia stata attivata dalla voce di menu
corrispondente e se è stato attivato il blocco dei dispositivi di comando. Premere sul trasduttore di pressione/rotazione MENU per accedere
al menu di selezione delle impostazioni del dispositivo e, ruotando il trasduttore, selezionare la voce di menu MASTER VOLUME
(evidenziata). Premere 2 volte il trasduttore, quindi, ruotandolo verso sinistra, selezionare “ON” e confermare premendolo (se l’impostazione
del volume globale non è disponibile, selezionare “OFF”). Ruotando il trasduttore selezionare il simbolo della freccia e confermare premendo
il trasduttore per tornare al menu di selezione. Per tornare alla schermata principale, selezionare la voce di menu EXIT ruotando il trasduttore e
confermare nuovamente premendo il trasduttore. Se dopo circa 10 secondi non avviene alcuna immissione, la schermata principale comparirà
in automatico.
È ora possibile impostare il volume globale ruotando il trasduttore di pressione/rotazione MENU nella direzione desiderata, senza prima
premerlo (rotazione verso sinistra = riduzione del volume, rotazione verso destra = aumento del volume). La schermata visualizzata sul
display passa a MASTER VOLUME (da 0 a 100). Se dopo circa 2 secondi non avviene alcuna immissione, la schermata principale comparirà
in automatico.
52
DELAY
ENGLISH
Voce di menu per l’impostazione del ritardo dei canali (ad es. delay line). Premere sul trasduttore di pressione/rotazione MENU per accedere
al menu di selezione delle impostazioni del dispositivo e, ruotando il trasduttore, selezionare la voce di menu DELAY (evidenziata). Premere
il trasduttore e, ruotandolo, selezionare il canale per cui si desidera impostare il ritardo (delay). Premere nuovamente il trasduttore e impostare
il valore desiderato ruotando il trasduttore (rotazione verso sinistra = ritardo massimo, rotazione verso destra = regolazione di precisione da 0 ms). Il
ritardo viene visualizzato sia in millisecondi (ms) sia in metri (m) o piedi (ft) (v. SETUP -> DELAY UNIT). Confermare l’immissione premendo il trasduttore. Impostare il ritardo degli altri canali seguendo la medesima procedura. Per tornare al menu di selezione, selezionare la voce di menu DELAY
EXIT ruotando il trasduttore e confermare nuovamente premendo il trasduttore. Per accedere alla schermata principale, ruotare il trasduttore per
selezionare EXIT (evidenziato) e confermare premendo il trasduttore. Se dopo circa 10 secondi non avviene alcuna immissione, la schermata
principale comparirà in automatico.
DEUTSCH
ROUTING
FRANCAIS
Voce di menu per l’impostazione della sorgente di ingresso dei canali da A a D. Premere sul trasduttore di pressione/rotazione MENU per
accedere al menu di selezione delle impostazioni del dispositivo e, ruotando il trasduttore, selezionare la voce di menu ROUTING (evidenziata).
Premere il trasduttore e, ruotandolo, selezionare la sorgente di ingresso che si desidera configurare (canale A - D, sorgente di ingresso 1 - 4).
Premere nuovamente il trasduttore, selezionare l’impostazione desiderata ruotando il trasduttore (numero incorniciato = sorgente di ingresso
attivata, numero non incorniciato = sorgente di ingresso disattivata) e confermare l’immissione premendo il trasduttore. Per tornare al menu
di selezione, selezionare la voce di menu ROUTING EXIT ruotando il trasduttore e confermare nuovamente premendo il trasduttore. Per
accedere alla schermata principale, ruotare il trasduttore per selezionare EXIT (evidenziato) e confermare premendo il trasduttore. Se dopo
circa 10 secondi non avviene alcuna immissione, la schermata principale comparirà in automatico.
ESPAÑOL
EQUALIZZATORE
POLSKI
Voce di menu per l’impostazione dell’equalizzatore parametrico a 10 bande. Premere sul trasduttore di pressione/rotazione MENU per
accedere al menu di selezione delle impostazioni del dispositivo e, ruotando il trasduttore, selezionare la voce di menu EQUALIZER
(evidenziata). Premere il trasduttore e, ruotandolo, selezionare il canale che si desidera elaborare (canale A - D). Premere nuovamente
il trasduttore, selezionare la banda dell’equalizzatore desiderata da 01 a 10 ruotando il trasduttore e confermare premendo il trasduttore.
Ruotando il trasduttore, selezionare FREQ (frequenza), Q (qualità dei filtri, low shelf LS e high shelf HS) e GAIN (amplificazione), confermare
premendo il trasduttore, elaborare i parametri corrispondenti secondo necessità e confermare premendo il trasduttore. Per tornare alla
selezione dei canali, selezionare la voce di menu EXIT EQ ruotando il trasduttore verso destra e confermare nuovamente premendo il
trasduttore. Impostare l’equalizzatore degli altri canali seguendo la medesima procedura. Per accedere alla schermata principale, ruotare il
trasduttore per selezionare EXIT (evidenziato) e confermare premendo il trasduttore. Se dopo circa 10 secondi non avviene alcuna immissione,
la schermata principale comparirà in automatico.
ITALIANO
53
Voce di menu per l’impostazione della polarità dei canali da A a D. Premere sul trasduttore di pressione/rotazione MENU per accedere al menu di
selezione delle impostazioni del dispositivo e, ruotando il trasduttore, selezionare la voce di menu POLARITY (evidenziata). Premere il trasduttore
e, ruotandolo, selezionare il canale che si desidera elaborare (canale A - D). Premere nuovamente il trasduttore e, ruotandolo, selezionare la
polarità desiderata e confermare premendo il trasduttore (NORMAL = polarità normale, INVERTED = polarità invertita). Impostare la polarità degli
altri canali seguendo la medesima procedura. Per tornare al menu di selezione, selezionare la voce di menu POLARITY EXIT ruotando il
trasduttore e confermare nuovamente premendo il trasduttore. Per accedere alla schermata principale, ruotare il trasduttore per selezionare
EXIT (evidenziato) e confermare premendo il trasduttore. Se dopo circa 10 secondi non avviene alcuna immissione, la schermata principale
comparirà in automatico.
DEUTSCH
ENGLISH
POLARITY
I canali A-D possono essere collegati a piacere per impostare in parallelo il volume, il delay e l’equalizzatore dei canali selezionati. Di
conseguenza, le impostazioni applicate ad uno dei canali collegati, verranno applicati contemporaneamente anche a tutti gli altri canali collegati.
I valori impostati prima del collegamento vengono mantenuti finché il valore del parametro corrispondente non viene modificato. Ciò significa
che modificando un valore di un canale, tale valore verrà associato anche al canale collegato. Premere sul trasduttore di pressione/rotazione
MENU per accedere al menu di selezione delle impostazioni del dispositivo e, ruotando il trasduttore, selezionare la voce di menu MASTER
VOLUME (evidenziata). Premere il trasduttore e, ruotandolo, selezionare il canale che si desidera collegare ad altri canali. Premere nuovamente
il trasduttore e selezionare il collegamento desiderato premendo il trasduttore (UNLINK per eliminare un collegamento). Confermare la selezione
premendo il trasduttore. Il collegamento verrà visualizzato graficamente sul display con una “catena di collegamento” tra le lettere dei canali
interessati. Per tornare alla schermata principale, selezionare la voce di menu LINK EXIT ruotando il trasduttore e confermare nuovamente
premendo il trasduttore. Per tornare alla schermata principale, ruotare il trasduttore per selezionare EXIT (evidenziato) e confermare premendo
il trasduttore. Se dopo circa 10 secondi non viene avviene alcuna immissione, la schermata principale comparirà in automatico.
POLSKI
ESPAÑOL
FRANCAIS
LINK SETT
ITALIANO
PRESET
Voce di menu per la selezione dei preset degli altoparlanti della serie LD CURV. Selezionare, ad esempio, il preset 6 CURV-SAT, se si
desidera collegare allo stesso canale 6 satelliti array CURV 500 dell’adattatore SmartLink®, il preset 1 CURV-SUB, se si desidera collegare
il subwoofer CURV 500 (nota: selezionare il preset corrispondente al numero di satelliti per adattatore SmartLink®). Premere sul trasduttore
di pressione/rotazione MENU per accedere al menu di selezione delle impostazioni del dispositivo e, ruotando il trasduttore, selezionare la
voce di menu PRESET (evidenziata). Premere il trasduttore e, ruotandolo, selezionare il canale per cui si vuole impostare il preset desiderato.
Premere nuovamente il trasduttore e selezionare il preset desiderato premendo il trasduttore. Confermare la selezione premendo il trasduttore.
Impostare il preset degli altri canali seguendo la medesima procedura. Per tornare alla schermata principale, selezionare la voce di menu
PRESET EXIT ruotando il trasduttore e confermare nuovamente premendo il trasduttore. Per tornare alla schermata principale, ruotare il
trasduttore per selezionare EXIT (evidenziato) e confermare premendo il trasduttore. Se dopo circa 10 secondi non avviene alcuna immissione,
la schermata principale comparirà in automatico.
54
CONFIGURAZIONE DEL DISPOSITIVO (SETUP)
ENGLISH
Voce di menu per la modifica delle configurazioni del dispositivo, per la lettura del firmware del dispositivo, per il ripristino del dispositivo e per
la gestione dei preset globali. Premere sul trasduttore di pressione/rotazione MENU per accedere al menu di selezione delle impostazioni del
dispositivo e, ruotando il trasduttore, selezionare la voce di menu SETUP (evidenziata), quindi confermare premendo il trasduttore.
DEUTSCH
Si accederà quindi al sottomenu con le seguenti voci di menu (selezionare ruotando il trasduttore MENU, confermare premendo il MENU):
SETUP
Sulla riga più in alto del display viene visualizzata la versione del firmware del dispositivo.
NAME
Impostare il nome dell'amplificatore (8 caratteri):
Premere MENU -> Ruotare MENU per la selezione delle posizioni 1-8 -> Premere MENU -> Ruotare MENU per
la selezione delle lettere, dei numeri o dei simboli -> Premere MENU -> Per uscire, ruotare MENU a destra, sul
simbolo della freccia -> Premere MENU
PIN
Attivare il blocco automatico dei dispositivi di comando per impedire il comando involontario e
non autorizzato (tranne MASTER VOLUME, se attivato):
Premere 2 volte MENU -> Ruotare MENU su ON -> Premere MENU -> Per uscire, ruotare MENU sul simbolo
della freccia -> Premere MENU
ON / OFF / EDIT
FRANCAIS
FIRMWARE
Disattivare la funzione di blocco automatica:
sblocco con l'immissione del PIN (impostazione di fabbrica del PIN a 4 cifre: 1234) -> Ruotare MENU su SETUP
-> Premere MENU -> Ruotare MENU su PIN -> Premere MENU 2 volte -> Ruotare MENU su OFF -> Premere
MENU -> Per uscire, ruotare MENU sul simbolo della freccia -> Premere MENU
DELAY TEMP
Impostare il calcolo della distanza sulla temperatura dell'aria (velocità del suono dipende tra l'altro
dalla temperatura dell'aria):
Premere MENU 2 volte -> Ruotare MENU per impostare la temperatura da 0°C a 40°C -> Premere MENU ->
Per uscire, ruotare MENU sul simbolo della freccia -> Premere MENU
CONNECT GND
YES / NO
Collegamento isolato per la separazione della massa del segnale dalla messa a terra del dispositivo
(prevenzione dei ritorni di terra):
Premere 2 volte MENU -> Ruotare MENU su YES per il collegamento della massa / NO per la separazione della
massa (ground lift) -> Premere MENU -> Per uscire, ruotare MENU sul simbolo della freccia -> Premere MENU
FACTORY SETTING
NO / YES
Ritornare alle impostazioni di fabbrica (tra cui reimpostare il PIN su 1234 e OFF):
Premere MENU -> Ruotare MENU su NO = il dispositivo non verrà reimpostato / YES = il dispositivo verrà
reimpostato -> Premere MENU
ITALIANO
Impostazione dell'unità di misura della lunghezza del ritardo del canale METERS / FEET:
Premere MENU -> Ruotare MENU sulla voce METERS o FEET -> Premere MENU -> Per uscire, ruotare MENU
sul simbolo della freccia -> Premere MENU
POLSKI
DELAY UNIT
METERS / FEET
ESPAÑOL
Impostare PIN personalizzato:
Premere MENU 2 volte -> Ruotare MENU si EDIT -> Premere MENU -> Ruotare MENU per selezionare un
numero da 0 a 9 per la prima posizione -> Premere MENU -> Ruotare MENU per selezionare un numero da 0
a 9 per la seconda posizione -> Premere MENU, ecc. Se si perde il PIN, tramite il software per PC (scaricabile
dal sito del prodotto WWW.LD-SYSTEMS.COM) e l'interfaccia USB può essere reimpostato all'impostazione di
fabbrica (1234).
55
ENGLISH
GLOBAL PRESET
Fissare tutte le impostazioni eccetto nome dell'amplificatore e impostazioni del PIN nei preset
globali
(16 spazi di memoria interni):
Premere MENU -> Ruotare MENU su SAVE PRESET -> Premere MENU -> Ruotare MENU sullo spazio di
memoria desiderato -> Premere MENU -> Impostare il nome del preset: Ruotare MENU per la selezione della
posizione (9 posizioni) -> Premere MENU -> Ruotare MENU per selezionare le lettere, i numeri o i simboli ->
Premere MENU ecc. -> Ruotare MENU su YES -> Premere MENU -> Tornare indietro ruotando MENU su EXIT
-> Premere MENU -> Per uscire, ruotare MENU su EXIT -> Premere MENU
Caricare un preset globale da una memoria interna:
->
DEUTSCH
Premere MENU -> Ruotare MENU su LOAD PRESET
Premere MENU -> Ruotare MENU sul preset desiderato -> Premere MENU -> Ruotare MENU YES -> Premere MENU -> Tornare indietro ruotando MENU su EXIT
-> Premere MENU -> Per uscire, ruotare MENU su EXIT -> Premere MENU
EXIT SETUP
Per uscire dal menu di configurazione, ruotare il trasduttore MENU su EXIT SETUP e confermare premendo MENU
EXIT
FRANCAIS
Per uscire dal menu di selezione e per visualizzare la schermata principale selezionare la voce di menu EXIT (evidenziata) ruotando il
trasduttore e confermare premendo il trasduttore.
ITALIANO
POLSKI
ESPAÑOL
DATI TECNICI
56
Codice modello:
LDCURV500IAMP
Tipologia di prodotto:
amplificatore con controllo DSP
Tipo:
4 canali
Potenza d'uscita nominale (1 kHz a 2,7
ohm):
4 x 240 W (a seconda del preset)
Potenza d'uscita nominale (1 kHz a 4
ohm):
4 x 240 W (a seconda del preset)
Potenza d'uscita nominale (1 kHz a 8
ohm):
4 x 120 W (a seconda del preset)
Potenza d'uscita nominale (1 kHz a 16
ohm):
4 x 60 W (a seconda del preset)
Circuito d'uscita:
classe D
Risposta in frequenza +/- 1dB:
10 Hz - 22000 Hz (a seconda del preset)
THD:
< 0,01 % a 1 kHz (a seconda del preset)
Circuiti di protezione:
sovracorrente, avviamento progressivo, CC, sovraccarico termico, cortocircuito, limitatore
multibanda
Controlli:
manopola di controllo
Indicatori:
display OLED
Frequenza di campionamento convertitore AD/DA:
48 kHz
Risoluzione convertitore AD/DA:
24 bit
Range dinamico:
114 dB
Ritardo massimo / Canale:
59 m / 166 ms
Equalizzatore:
10x parametrico / canale
Ingressi in linea:
4
Connettori ingressi in linea:
XLR (simmetrici), morsetti a vite/terminali a innesto
Uscite altoparlante:
4
Connessioni d'uscita casse acustiche:
speakon compatibili, morsetti a vite/terminali a innesto
Ground lift:
sì, integrato nella GUI
Raffreddamento:
ventola di termoregolazione a basso rumore, silenziosa quando è inattiva
110 - 120 V CA: T10AL / 250 V
220 - 240V CA: T5AL / 250V
Consumo elettrico a pieno carico:
1100 W
Temperatura ambiente (in funzione):
0°C - 35°C
Umidità relativa (in funzione):
<80% (senza condensa)
Larghezza:
482 mm
Altezza:
44 mm
Profondità:
420 mm
Peso:
6,8 kg
Caratteristiche:
controllo DSP a 4 canali, progettato per impianti CURV500, comodo alloggiamento da 19" /
1 U, ogni canale può comandare fino a 6 satelliti CURV500 o un subwoofer CURV500ISUB,
encoder monopulsante, display OLED ad alto contrasto, ventola di termoregolazione a basso
rumore, alimentazione switching ad alta efficienza (PFC)
DEUTSCH
alimentatore switching, 115 V CA / 230 V CA. 50/60 Hz (conversione automatica)
Fusibile:
ENGLISH
Tensione operativa:
DICHIARAZIONI DEL PRODUTTORE
FRANCAIS
MANUFACTURER’S WARRANTY & LIMITATION OF LIABILITY
Le nostre attuali condizioni di garanzia e la limitazione di responsabilità sono consultabili alla pagina: http://www.adamhall.com/media/
shop/downloads/documents/manufacturersdeclarations.pdf. In caso di assistenza, rivolgersi a Adam Hall GmbH, Daimlerstraße 9,
61267 Neu Anspach / E-mail [email protected] / +49 (0)6081 / 9419-0.
ESPAÑOL
CORRETTO SMALTIMENTO DEL PRODOTTO
(In vigore nell‘Unione Europea e in altri Paesi europei in cui si attui la raccolta differenziata) Questo simbolo apposto sul prodotto o
sui relativi documenti indica che, per evitare danni all‘ambiente e alle persone causati da uno smaltimento incontrollato dei rifiuti,
alla fine del suo ciclo di vita l‘apparecchio non deve essere smaltito insieme ai normali rifiuti domestici. Il prodotto deve quindi essere
smaltito separatamente da altri rifiuti e riciclato nell‘ottica dell‘incentivazione di cicli economici sostenibili. I clienti privati possono richiedere
informazioni sulle possibilità di smaltimento ecosostenibile al rivenditore presso il quale è stato acquistato il prodotto o presso le autorità
regionali competenti. I clienti aziendali devono invece contattare il proprio fornitore e controllare le eventuali condizioni contrattuali inerenti
allo smaltimento degli apparecchi. Questo prodotto non deve essere smaltito assieme ad altri rifiuti industriali.
POLSKI
Conformità CE
Con la presente Adam Hall GmbH dichiara che questo prodotto soddisfa le seguenti direttive (ove pertinente):
Direttiva R&TTE (1999/5/CE) e RED (2014/53/UE) da giugno 2017
Direttiva bassa tensione (2014/35/CE)
Direttiva CEM (2014/30/UE)
RoHS (2011/65/UE)
La dichiarazione di conformità completa è reperibile al sito www.adamhall.com.
Per ulteriori informazioni è inoltre possibile scrivere a [email protected].
ITALIANO
57
WWW.LD-SYSTEMS.COM
Adam Hall GmbH | Daimlerstrasse 9 | 61267 Neu-Anspach | Germany
Tel. +49(0)6081/9419-0 | Fax +49(0)6081/9419-1000
web : www.adamhall.com | e-mail : [email protected]
REV: 01


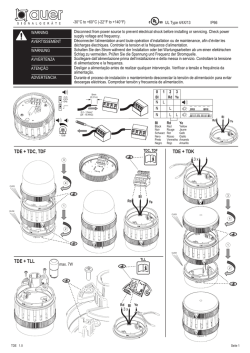
© Copyright 2026