
X-HM16 X-HM26 X-HM26D
SN29402699_X-HM16_26_26D_En_European.book 1 ページ 2016年7月22日 金曜日 午後7時2分 X-HM16 X-HM26 X-HM26D CD Receiver System Micro chaîne CD Sistema receptor de CD Sistema CD con amplificatore CD-Receiversystem CD Receiver System Система ресивера CD Register your product on/ Enregistrez votre produit sur / Registre su producto en Registrare il proprio prodotto su / Registrieren Sie hier Ihr Produkt / Registreer uw product op / Зарегистрируйте ваше изделие http://www.pioneer.eu (Europe / Europe / Europa / Europa / Europa / Europa / Европа) Operating Instructions Mode d’emploi Manual de instrucciones Istruzioni per l’uso Bedienungsanleitung Handleiding Инструкции по эксплуатации Дополнительная информация для клиентов в Российской Федерации Информация о сертификации Для моделей X-HM16/X-HM26 SN29402699_X-HM16_26_26D_En_European.book 2 ページ CAUTION TO PREVENT THE RISK OF ELECTRIC SHOCK, DO NOT REMOVE COVER (OR BACK). NO USER-SERVICEABLE PARTS INSIDE. REFER SERVICING TO QUALIFIED SERVICE PERSONNEL. D3-4-2-1-1_B1_En WARNING This equipment is not waterproof. To prevent a fire or shock hazard, do not place any container filled with liquid near this equipment (such as a vase or flower pot) or expose it to dripping, splashing, rain or moisture. 2016年7月22日 金曜日 午後7時2分 CAUTION The STANDBY/ON switch on this unit will not completely shut off all power from the AC outlet. Since the power cord serves as the main disconnect device for the unit, you will need to unplug it from the AC outlet to shut down all power. Therefore, make sure the unit has been installed so that the power cord can be easily unplugged from the AC outlet in case of an accident. To avoid fire hazard, the power cord should also be unplugged from the AC outlet when left unused for a long period of time (for example, when on vacation). D3-4-2-2-2a*_A1_En D3-4-2-1-3_A1_En WARNING To prevent a fire hazard, do not place any naked flame sources (such as a lighted candle) on the equipment. CAUTION This product is a class 1 laser product classified under the Safety of laser products, IEC 60825-1:2007. D3-4-2-1-7a_A1_En CLASS 1 LASER PRODUCT VENTILATION CAUTION When installing this unit, make sure to leave space around the unit for ventilation to improve heat radiation (at least 25 cm at top, 10 cm at rear, and 5 cm at each side). WARNING Slots and openings in the cabinet are provided for ventilation to ensure reliable operation of the product, and to protect it from overheating. To prevent fire hazard, the openings should never be blocked or covered with items (such as newspapers, table-cloths, curtains) or by operating the equipment on thick carpet or a bed. D3-4-2-1-7b*_A1_En D58-5-2-2a_A1_En This product is for general household purposes. Any failure due to use for other than household purposes (such as long-term use for business purposes in a restaurant or use in a car or ship) and which requires repair will be charged for even during the K041_A1_En warranty period. POWER-CORD CAUTION Handle the power cord by the plug. Do not pull out the plug by tugging the cord and never touch the power cord when your hands are wet as this could cause a short circuit or electric shock. Do not place the unit, a piece of furniture, etc., on the power cord, or pinch the cord. Never make a knot in the cord or tie it with other cords. The power cords should be routed such that they are not likely to be stepped on. A damaged power cord can cause a fire or give you an electrical shock. Check the power cord once in a while. When you find it damaged, ask your nearest our authorized service center or your dealer for a replacement. S002*_A1_En Operating Environment Operating environment temperature and humidity: +5 °C to +35 °C (+41 °F to +95 °F); less than 85 %RH (cooling vents not blocked) Do not install this unit in a poorly ventilated area, or in locations exposed to high humidity or direct sunlight D3-4-2-1-7c*_A1_En (or strong artificial light) SN29402699_X-HM16_26_26D_En_European.book 3 ページ 2016年7月22日 金曜日 午後7時2分 Information for users on collection and disposal of old equipment and used batteries Symbol for equipment These symbols on the products, packaging, and/or accompanying documents mean that used electrical and electronic products and batteries should not be mixed with general household waste. For proper treatment, recovery and recycling of old products and used batteries, please take them to applicable collection points in accordance with your national legislation. Symbol examples for batteries By disposing of these products and batteries correctly, you will help to save valuable resources and prevent any potential negative effects on human health and the environment which could otherwise arise from inappropriate waste handling. For more information about collection and recycling of old products and batteries, please contact your local municipality, your waste disposal service or the point of sale where you purchased the items. These symbols are only valid in the European Union. For countries outside the European Union: If you wish to discard these items, please contact your local authorities or dealer and ask for the correct method of disposal. Pb K058a_A1_En Radio wave caution WARNING This unit uses a 2.4 GHz radio wave frequency, which is a band used by other wireless systems (Microwave ovens and Cordless phones, etc.). In this event noise appears in your television image, there is the possibility this unit (including products supported by this unit) is causing signal interference with the antenna input connector of your television, video, satellite tuner, etc. In this event, increase the distance between the antenna input connector and this unit (including products supported by this unit). • We are not responsible for any malfunction of the compatible product due to communication error/malfunctions associated with your network connection and/or your connected equipment. Please contact your Internet service provider or network device manufacturer. • A separate contract with/payment to an Internet service provider is required to use the Internet. Store small parts out of the reach of children and infants. If accidentally swallowed, contact a doctor immediately. SN29402699_X-HM16_26_26D_En_European.book 4 ページ 2016年7月22日 金曜日 午後7時2分 Thank you for buying this Pioneer product. Please read through these operating instructions so that you will know how to operate your model properly. After you have finished reading the instructions, put them in a safe place for future reference. Contents 01 Before you start What’s in the box . . . . . . . . . . . . . . . . . . . . . . . . . . . . . . . .5 Loading the batteries in the remote control . . . . . . . . . . . .5 Using the remote control . . . . . . . . . . . . . . . . . . . . . . . 5 02 Part names and functions Remote control . . . . . . . . . . . . . . . . . . . . . . . . . . . . . . . . .6 Front panel . . . . . . . . . . . . . . . . . . . . . . . . . . . . . . . . . . . .7 Display . . . . . . . . . . . . . . . . . . . . . . . . . . . . . . . . . . . . . . . .8 Speaker system . . . . . . . . . . . . . . . . . . . . . . . . . . . . . . . . .8 03 Connections Speaker connection . . . . . . . . . . . . . . . . . . . . . . . . . . . . . .9 Connecting antennas . . . . . . . . . . . . . . . . . . . . . . . . . . . .10 Using external antennas . . . . . . . . . . . . . . . . . . . . . . 10 Plugging in . . . . . . . . . . . . . . . . . . . . . . . . . . . . . . . . . . . .11 04 Getting started To turn the power on . . . . . . . . . . . . . . . . . . . . . . . . . . . .12 Setting the clock . . . . . . . . . . . . . . . . . . . . . . . . . . . . . . .12 General control . . . . . . . . . . . . . . . . . . . . . . . . . . . . . . . . .12 Input function . . . . . . . . . . . . . . . . . . . . . . . . . . . . . . . 12 Display brightness control . . . . . . . . . . . . . . . . . . . . . 12 Volume auto set-in . . . . . . . . . . . . . . . . . . . . . . . . . . . 12 Volume control . . . . . . . . . . . . . . . . . . . . . . . . . . . . . . 12 Muting . . . . . . . . . . . . . . . . . . . . . . . . . . . . . . . . . . . . 12 Sound controls . . . . . . . . . . . . . . . . . . . . . . . . . . . . . . . . .13 Equalizer . . . . . . . . . . . . . . . . . . . . . . . . . . . . . . . . . . 13 P.BASS control . . . . . . . . . . . . . . . . . . . . . . . . . . . . . 13 BASS/TREBLE control. . . . . . . . . . . . . . . . . . . . . . . . 13 Setting the wake-up timer . . . . . . . . . . . . . . . . . . . . . . . .13 Calling the wake-up timer . . . . . . . . . . . . . . . . . . . . . 14 Cancelling the wake-up timer. . . . . . . . . . . . . . . . . . . 14 Using the wake-up timer . . . . . . . . . . . . . . . . . . . . . . 14 Using the sleep timer . . . . . . . . . . . . . . . . . . . . . . . . . . . .14 Using Headphones . . . . . . . . . . . . . . . . . . . . . . . . . . . . .14 05 Disc playback Playing discs or files . . . . . . . . . . . . . . . . . . . . . . . . . . . .15 Load the disc . . . . . . . . . . . . . . . . . . . . . . . . . . . . . . . 15 Play tracks on a CD . . . . . . . . . . . . . . . . . . . . . . . . . . 15 Play MP3 music files . . . . . . . . . . . . . . . . . . . . . . . . . 15 Advanced CD or MP3 disc playback . . . . . . . . . . . . . . . .16 Repeat play . . . . . . . . . . . . . . . . . . . . . . . . . . . . . . . . 16 Random play . . . . . . . . . . . . . . . . . . . . . . . . . . . . . . . 16 Programmed play (CD) . . . . . . . . . . . . . . . . . . . . . . . 17 About downloading MP3 . . . . . . . . . . . . . . . . . . . . . . 17 Switch the display contents . . . . . . . . . . . . . . . . . . . . 17 06 USB playback Playing USB storage devices . . . . . . . . . . . . . . . . . . . . .18 Repeat play . . . . . . . . . . . . . . . . . . . . . . . . . . . . . . . . 19 Random play . . . . . . . . . . . . . . . . . . . . . . . . . . . . . . . 19 Switch the display contents . . . . . . . . . . . . . . . . . . . . 19 4 En 07 Using the tuner Listening to FM (For European models)/Listening to FM or AM (For North American models) . . . . . . . . . . . . . . . . . . 20 Tuning. . . . . . . . . . . . . . . . . . . . . . . . . . . . . . . . . . . . . 20 Saving station presets. . . . . . . . . . . . . . . . . . . . . . . . . 20 Using the Radio Data System (RDS) (for European models only) . . . . . . . . . . . . . . . . . . . . 21 Listening to the DAB+ (X-HM26D only) . . . . . . . . . . . . . 23 About DAB+ (Digital Audio Broadcasting) . . . . . . . . . 23 Tuning. . . . . . . . . . . . . . . . . . . . . . . . . . . . . . . . . . . . . 23 Changing the information display . . . . . . . . . . . . . . . . 24 Memorising a station. . . . . . . . . . . . . . . . . . . . . . . . . . 24 DAB Frequency table (BAND III) . . . . . . . . . . . . . . . . 24 08 Other connections Connecting auxiliary components . . . . . . . . . . . . . . . . . . 25 Automatic switching to Audio In input (For North American models only) . . . . . . . . . . . . . . . . . . . . . . . . . . . . . . . . . . 25 09 Bluetooth® Audio playback Music playback using Bluetooth wireless technology . . . Remote control operation . . . . . . . . . . . . . . . . . . . . . . . . Pairing with the unit (Initial registration) . . . . . . . . . . . . . Listen to music on the unit from a Bluetooth capable device . . . . . . . . . . . . . . . . . . . . BT STANDBY . . . . . . . . . . . . . . . . . . . . . . . . . . . . . . . . . Radio wave caution . . . . . . . . . . . . . . . . . . . . . . . . . . . . . Scope of operation . . . . . . . . . . . . . . . . . . . . . . . . . . . Radio wave caution. . . . . . . . . . . . . . . . . . . . . . . . . . . Precautions regarding connections to products supported by this unit . . . . . . . . . . . . . . . . . 10 Additional information Troubleshooting . . . . . . . . . . . . . . . . . . . . . . . . . . . . . . . Playable discs and formats . . . . . . . . . . . . . . . . . . . . . . . Regarding copy protected CDs. . . . . . . . . . . . . . . . . . Supported audio file formats . . . . . . . . . . . . . . . . . . . . Cautions on use . . . . . . . . . . . . . . . . . . . . . . . . . . . . . . . When moving this unit. . . . . . . . . . . . . . . . . . . . . . . . . Place of installation . . . . . . . . . . . . . . . . . . . . . . . . . . . Do not place objects on this unit . . . . . . . . . . . . . . . . . About condensation . . . . . . . . . . . . . . . . . . . . . . . . . . Cleaning the product. . . . . . . . . . . . . . . . . . . . . . . . . . Cleaning the lens . . . . . . . . . . . . . . . . . . . . . . . . . . . . Handling discs . . . . . . . . . . . . . . . . . . . . . . . . . . . . . . . . Storing. . . . . . . . . . . . . . . . . . . . . . . . . . . . . . . . . . . . . Cleaning discs. . . . . . . . . . . . . . . . . . . . . . . . . . . . . . . About specially shaped discs . . . . . . . . . . . . . . . . . . . Auto power off setting . . . . . . . . . . . . . . . . . . . . . . . . . . . Restoring all the settings to the defaults . . . . . . . . . . . . . Specifications . . . . . . . . . . . . . . . . . . . . . . . . . . . . . . . . . 26 26 26 27 27 28 28 28 28 29 31 32 32 32 32 32 32 32 33 33 33 33 33 33 33 33 34 SN29402699_X-HM16_26_26D_En_European.book 5 ページ 2016年7月22日 金曜日 午後7時2分 Before you start 01 English Chapter 1: Before you start Loading the batteries in the remote control 1 Open the rear lid and load the batteries as illustrated below. Español Please confirm that the following accessories are in the box when you open it. • Remote Control • AAA batteries (R03) x 2 • Power cord • AM antenna cable*1 • FM wire antenna*2 • DAB/FM wire antenna*3 • Warranty card*4 • Operating instructions (this document) *1 North American models only *2 X-HM16/X-HM26 only *3 X-HM26D only *4 European models only • Do not heat batteries, disassemble them, or throw them into flames or water. • Batteries may have different voltages, even if they are the same size and shape. Do not use different types of batteries together. • To prevent leakage of battery fluid, remove the batteries if you do not plan to use the remote control for a long period of time (1 month or more). If the fluid should leak, wipe it carefully off the inside of the case, then insert new batteries. If a battery should leak and the fluid should get on your skin, flush it off with large quantities of water. • When disposing of used batteries, please comply with governmental regulations or environmental public institution’s rules that apply in your country/area. Français What’s in the box WARNING • Do not use or store batteries in direct sunlight or other excessively hot place, such as inside a car or near a heater. This can cause batteries to leak, overheat, explode or catch fire. It can also reduce the life or performance of batteries. Using the remote control The remote has a range of about 7 m at an angle of about 30º from the remote sensor. INPU T 30° 30° 2 Close the rear lid. 7m CAUTION • Do not use any batteries other than the ones specified. Also, do not use a new battery together with an old one. • When inserting the batteries, make sure not to damage the springs on the battery’s - terminals. This can cause batteries to leak or over heat. • When loading the batteries into the remote control, set them in the proper direction, as indicated by the polarity marks (+ and -). Keep in mind the following when using the remote control: • Make sure that there are no obstacles between the remote and the remote sensor on the unit. • Remote operation may become unreliable if strong sunlight or fluorescent light is shining on the unit’s remote sensor. • Remote controllers for different devices can interfere with each other. Avoid using remotes for other equipment located close to this unit. • Replace the batteries when you notice a fall off in the operating range of the remote. 5 En SN29402699_X-HM16_26_26D_En_European.book 02 6 ページ 2016年7月22日 金曜日 午後7時2分 Part names and functions Chapter 2: Part names and functions 5 Remote control PGM/MEMORY • Use to memory or program the CD (page 17). • Use to store FM/AM (page 20) or DAB (page 24) stations in memory. 6 TUNE +/– 2 Use to find radio frequencies (page 20). 10 11 3 Playback control buttons Use to control each function after you have selected it using the input function buttons (page 16). 1 12 4 PRESET +/– Use to select preset radio stations (page 20). 7 Sound control buttons Adjust the sound quality (page 13). 8 SLEEP See Using the sleep timer on page 14. 5 13 TIMER Use for setting the clock, as well as for setting and checking the timers (page 12). 6 14 7 8 9 9 10 Press to change the repeat play setting from a CD (page 16) or USB (page 19). 11 RANDOM 15 16 Press to randomize order play setting from a CD (page 16) or USB (page 19). 12 DISPLAY Press to change the display for MP3 (page 17), RDS (page 21) or DAB (page 24) information. 13 Press to return to the previous display. 1 Í Switches the receiver between standby and on (page 12). 2 Input function buttons Use to select the input source to this receiver (page 12). 14 Volume control buttons Use to set the listening volume (page 12). 15 Mutes/unmutes the sound (page 12). 16 DIMMER Use to set up or play the audio file using the Bluetooth network (page 26). 3 MENU Use to access the menu. 4 ///, ENTER Use to select/switch system settings and modes, and to confirm actions. 6 En Dims or brightens the display. The brightness can be controlled in four steps (page 12). SN29402699_X-HM16_26_26D_En_European.book 7 ページ 2016年7月22日 金曜日 午後7時2分 Part names and functions 02 1 2 3 4 5 English Front panel Français TIMER Español 6 1 7 8 Í STANDBY/ON Switches the receiver between standby and on (page 12). 2 Remote sensor 9 10 7 11 Headphone socket Use to connect headphones. When the headphones are connected, there is no sound output from the speakers. Receives the signals from the remote control. 8 3 Use to connect your USB mass storage device as an audio source (page 18). TIMER indicator Lights when the receiver is power off with timer setting. 4 Main display See Display on page 8. 5 Volume control Use to set the listening volume (page 12). 6 INPUT Selects the input source. 9 USB terminal Disc tray Place the disc, label side up (page 15). 10 Playback control buttons Selects the desired track or file to be played back. Use to stop the playback. Stops playback or resumes playback from the pause point. 11 Disc tray open/close button Use to open or close the disc tray (page 15). 7 En SN29402699_X-HM16_26_26D_En_European.book 02 8 ページ 2016年7月22日 金曜日 午後7時2分 Part names and functions Display 1 2 3 1 3 ; Lights when the sound is muted. Pause playback. 4 5 4 Note Timer function is set. • The mute icon will be displayed in red. 2 5 1 Speaker system 1 3 2 1 Tweeter 2 Woofer 3 Bass Reflex Duct Important • Speaker grille cannot be removed. • Both speakers can be used on either the right or the left side. 8 En Character display Displays various system information. Start playback. SN29402699_X-HM16_26_26D_En_European.book 9 ページ 2016年7月22日 金曜日 午後7時2分 Connections 03 English Chapter 3: Connections Speaker connection Right speaker Left speaker This unit’s rear panel Español • Push open the tabs and insert exposed wire. • Connect the black wire to (s) terminal, and the red wire to the (r) terminal. CAUTION • These speaker terminals carry HAZARDOUS LIVE voltage. To prevent the risk of electric shock when connecting or disconnecting the speaker cables, disconnect the power cord before touching any uninsulated parts. • Do not connect any speakers other than those supplied to this system. • Do not connect the supplied speakers to any amplifier other than the one supplied with this system. Connection to any other amplifier may result in malfunction or fire. • Do not attach these speakers to the wall or ceiling. They may fall off and cause injury. • These speakers are magnetically shielded. However, depending on the installation location, color distortion may occur if the speaker system is installed extremely close to the screen of a television set. If this happens, turn off the television set, and then turn it on after 15 to 30 minutes. If the problem persists, move the speaker system away from the television set. • Make sure that the speaker cable cores do not become exposed and make contact with other cable cores. This may cause malfunction of the product. • Do not allow the speaker cable core to come into contact with the receiver body. Français CAUTION • Be sure to turn off the power and unplug the power cord from the power outlet whenever making or changing connections. • Connect the power cord after all the connections between devices have been completed. • If the speaker cable core comes into contact with any metal portion of the receiver’s body, it may damage the speakers and cause smoke and fire. Insert speaker cables securely into the terminals and check that the cable does not come out of easily. Note • There is no difference between L and R speakers. 9 En SN29402699_X-HM16_26_26D_En_European.book 03 10 ページ 2016年7月22日 金曜日 午後7時2分 Connections 3 Place the AM antenna on a flat surface and in a direction giving the best reception. Connecting antennas • Connect the AM loop antenna and the FM (DAB/FM) wire antenna as shown below. • To improve reception and sound quality, connect external antennas (see Using external antennas). • Place the antenna near a window, etc. for the best reception. • Do not place the antenna near a computer or TV. It may result in noise. 4 Connect the FM (DAB/FM) wire antenna into the FM antenna socket. For North American models only For best results, extend the FM (DAB/FM) antenna fully and fix to a wall or door frame. Don’t drape loosely or leave coiled up. 2 3 1 Using external antennas To improve FM reception Use a PAL connector (not supplied) to connect an external FM (DAB/FM) antenna. 2 X-HM16/ X-HM26 4 3 One-touch PAL connector 1 For European models X-HM26D 75 coaxial cable X-HM16/X-HM26 4 X-HM26D 1 Connect the AM antenna wires. Holding the connector to connect. 2 Fix the AM loop antenna to the attached stand. Set up as illustrated above. 10 En SN29402699_X-HM16_26_26D_En_European.book 11 ページ Connections 2016年7月22日 金曜日 午後7時2分 03 Before making or changing the connections, switch off the power and disconnect the power cord from the AC outlet. After you’ve finished making all connections, plug the unit into an AC outlet. English Plugging in This unit’s rear panel Français Power cord Español To AC outlet CAUTION • Do not use any power cord other than the one supplied with this unit. • Do not use the supplied power cord for any purpose other than that described above. 11 En SN29402699_X-HM16_26_26D_En_European.book 04 12 ページ 2016年7月22日 金曜日 午後7時2分 Getting started Chapter 4: Getting started To turn the power on Press the Í to turn the power on. General control After use: Input function Press the Í to enter the power stand-by mode. When the INPUT on main unit is pressed, the current function will change to different mode. Press the INPUT repeatedly to select desired function. Setting the clock CD Audio In *1 *2 DAB*1 Bluetooth USB AM*2 FM X-HM26D only North American models only Display brightness control Press DIMMER to dims the display brightness. The brightness can be controlled in four steps. 1 Press Í to turn the power on. 2 Press TIMER on the remote control. “CLOCK” is shown on the main display. 3 Press ENTER. 4 Press / to set the day, then press ENTER. 5 Press / to set the hour, then press ENTER. 6 Press / to set the minute, then press ENTER to confirm. 7 Press ENTER. To confirm the time display: Press the TIMER. The time display will appear for about 10 seconds. To readjust the clock: Perform “Setting the clock” from step 1. Note • When power supply is restored after unit is plugged in again or after a power failure, reset the clock. 12 En Volume auto set-in If you turn off and on the main unit with the volume set to 31 or higher, the volume starts at 30 and sets in to the last set level. Volume control Turn the volume knob towards VOLUME (on main unit) or press VOL +/– (on remote control) to increase or decrease the volume. CAUTION • The sound level at a given volume setting depends on speaker efficiency, location, and various other factors. It is advisable to avoid exposure to high volume levels. Do not turn the volume on to full at switch on. Listen to music at moderate levels. Excessive sound pressure from earphones and headphones can cause hearing loss. Muting The volume is muted temporarily when pressing the the remote control. Press again to restore the volume. on SN29402699_X-HM16_26_26D_En_European.book 13 ページ 2016年7月22日 金曜日 午後7時2分 Getting started 04 Setting the wake-up timer Equalizer Used to change the existing timer setting, or to set a new timer. When the EQ is pressed, the current mode setting will be displayed. To change to a different mode, press the EQ repeatedly until the desired sound mode appears. A flat and basic sound A powerful sound that emphasizes low and high tones DIALOGUE A sound that allows the radio or vocals to be heard more easily NIGHT A sound that can be enjoyed at night even with lower volume P.BASS control When the power is first turned on, the unit will enter the P.bass mode which emphasises the bass frequencies. To cancel the P.bass mode, press the P.BASS on the remote control. BASS/TREBLE control Press the SOUND to select “BASS” or “TREBLE”, then press / to adjust the bass or treble. Note • The EQ and P.BASS cannot operate simultaneously. The most recently selected of these two functions will be the one used. • SOUND can operate alongside either the EQ or P.BASS. When one of the above two functions is selected, the function that is not selected will be displayed as follows. 1 2 Press and hold TIMER on the remote control. 3 Press / to select “ONCE” or “DAILY”, then press ENTER. ONCE – Once timer play works for one time only at a preset time. DAILY – Daily timer play works at the same preset time and days of week. 4 Press / to select “TIMER SET”, then press ENTER. 5 Press / to select the timer playback source, then press ENTER. Español ACTIVE Press Í to turn the power on. Français FLAT 1 English Sound controls CD, DAB (X-HM26D only), FM, AM (North American models only) and USB can be selected as the playback source. 6 Press / to select the timer day, then press ENTER. 7 Press / to set the hour, then press ENTER. 8 Press / to set the minute, then press ENTER. Set the time to finish as in steps 7 and 8 above. 9 Adjust the volume press VOL +/– , then press ENTER. “ ” appears on the display. 10 Press Í to enter the power standby mode. The TIMER indicator lights up. When P.BASS setting (ON/OFF) is changed • EQ : FLAT 2 When EQ setting is changed • P.BASS : OFF 13 En SN29402699_X-HM16_26_26D_En_European.book 04 14 ページ 2016年7月22日 金曜日 午後7時2分 Getting started Calling the wake-up timer It can be used to re-use an existing timer setting. Using Headphones 1 As well as steps 1 through 3 in “Setting the wake-up timer”. Connect to the jack plug of the headphones. When the headphones are connected, there is no sound output from the speakers. 2 Press / to select “TIMER ON”, then press ENTER. TIMER Cancelling the wake-up timer It can be used to turn off the timer setting. 1 As well as steps 1 through 3 in “Setting the wake-up timer”. 2 Press / to select “TIMER OFF”, then press ENTER. Using the wake-up timer 1 Press Í to turn the power off. 2 At the wake-up time, this unit will turn on automatically and play the selected input function. Note • If at the wake-up time the USB storage device is not connected to this unit or a disc is not inserted, this unit will be turned to on and not play back the track. • Some discs may not be played automatically at the wake-up time. • If you set the timer, take one minute or more between the start and end time. Using the sleep timer The sleep timer switches off the unit after a specified time so you can fall asleep without worrying about it. 1 Press SLEEP repeatedly to select a switch off time. Choose between 10 min, 20 min, 30 min, 60 min, 90 min, 120 min, 150 min, 180 min or OFF. The newly set value displays for 3 seconds, and then the setting is completed. Note • The sleep timer can be set by pressing SLEEP while the remaining time is displayed. 14 En • Do not turn the volume on to full at switch on and listen to music at moderate levels. Excessive sound pressure from earphones and headphones can cause hearing loss. • Before plugging in or unplugging the headphone, reduce the volume. • Be sure your headphone has a 3.5 mm diameter plug and impedance between 16 and 50 . The recommended impedance is 32 . SN29402699_X-HM16_26_26D_En_European.book 15 ページ 2016年7月22日 金曜日 午後7時2分 Disc playback 05 Disc playback Play MP3 music files MP3 track data is called “music file” and the location they are stored is called a “folder” in this document. e.g., Playing discs or files 1 Press Í to turn the power on. 2 Press CD on the remote control or INPUT repeatedly on the main unit to select CD input. 3 Press < on the main unit to open the disc tray. 4 Place the disc on the disc tray, label side up. 1 When the recognition is completed, press / to select the folder where the music file is stored ([ ]), then press or ENTER. • Repeat this step if there are other folders inside the selected folder. . • To return to the previous folder, press or Español Load the disc Français This system can play back a standard CD, CD-R/RW in the CD format and CD-R/RW with MP3 files, but cannot record on them. Some audio CD-R and CD-RW discs may not be playable due to the state of the disc or the device that was used for recording. • For details about MP3, see page 31. English Chapter 5: 2 Press / to select the music file ([ ]), and then press 1; or ENTER. • Once play starts, only music files inside the same folder can be played continuously. 5 Press < on the main unit to close the disc tray. Play tracks on a CD 1 When the recognition is completed, press 1; . After the last track is played, the unit will stop automatically. CAUTION • Do not place two discs in one disc tray. • Do not play discs of special shapes (heart, octagon, etc). It may cause malfunctions. • Do not push the disc tray whilst it is moving. • If the power fails whilst the tray is open, wait until the power is restored. • Be sure to place 8 cm disc in the middle of the disc tray. Note • Due to the structure of the disc information, it takes longer to read an MP3 disc than a normal CD (approximately 20 to 90 seconds). • When the beginning of the first track is reached during fast reverse, the unit will enter the playback mode (only for CD). • If TV or radio interference occurs during CD operation, move the unit away from the TV or radio. Tip • When no operation has done in CD mode and the audio file is not played for more than 20 minutes, the power will automatically turn off. In this case it is required that the Auto power off is switched to ON. • Auto power off can be switched to ON/OFF (page 33). 15 En SN29402699_X-HM16_26_26D_En_European.book 05 16 ページ 2016年7月22日 金曜日 午後7時2分 Disc playback Basic operations Function Main unit Remote control Operation Play Press in the stop mode. Stop Press in the playback mode. (when playing a CD) “RESUME” is displayed and the place where you stopped play is memorized. Press again and the memorized position is cleared. Pause Press in the playback mode. Press 1; to resume playback from the paused point. Track up/ down Press in the playback or stop mode. If you press the button in the stop mode, press 1; to start the desired track. Fast forward/ reverse Advanced CD or MP3 disc playback Repeat play Repeat play can play one track, all tracks or a programmed sequence continuously. To repeat one track: Press ENTER. repeatedly until “REPEAT ONE” appears. Press To repeat all tracks: Press ENTER. repeatedly until “REPEAT ALL” appears. Press (when playing MP3) You can only skip forward or back to music files inside the same folder. To repeat desired tracks: Press and hold down in the playback mode. To cancel repeat play: Release the button to resume playback. Perform steps 1 - 5 in “Programmed play (CD)” section (page 17) and then press repeatedly until “REPEAT ALL” appears. Press ENTER. Press ENTER. repeatedly until “REPEAT OFF” appears. Press Note • After performing repeat play, be sure to press ∫. Otherwise, the disc will play continuously. • During repeat play, random play is not possible. Random play The tracks on the disc can be played in random order automatically. To random play all tracks: Press RANDOM repeatedly until “RANDOM ON” appears. Press ENTER. To cancel random play: Press RANDOM repeatedly until “RANDOM OFF” appears. Press ENTER. Note • If you press the 9 during random play, you can move to the track selected next by the random operation. • In random play, the unit will select and play tracks automatically. (You cannot select the order of the tracks.) • During random play, repeat play is not possible. 16 En SN29402699_X-HM16_26_26D_En_European.book 17 ページ 2016年7月22日 金曜日 午後7時2分 Disc playback 05 Switch the display contents You can choose up to 24 selections for playback in the order you like. 1 1 Whilst in the stop mode, press PGM/ MEMORY on the remote control to enter the programming save mode. Press : 9 to select the desired tracks. 3 Press ENTER to save track number. 4 Repeat steps 2 - 3 for other tracks. Up to 24 tracks can be programmed. 5 Press 1; to start playback. To cancel the programmed play mode: To cancel the programmed play, press twice ∫ on the remote control. The display will show “PRG CLEAR” and all the programmed contents will be cleared. Adding tracks to the program: Press the PGM/MEMORY. Then follow steps 2 - 3 to add tracks. Title display Number of the track in a folder, remaining time display Artist display Number of the track in a folder, playback time display Album display Español • If you want to check the programmed tracks, press PGM/MEMORY. • If you make a mistake, the last programmed tracks will be canceled by pressing . Number of the track, title display Français 2 Press DISPLAY during playback. If the title, artist and album name has been written to the file, that information will be displayed. (You can view this unit is only alphanumeric characters. Non- alphanumeric character are displayed in the “∫”.) English Programmed play (CD) Note • “Not supported playback file” can not be playback. In this case, will be skipped automatically. • There may be cases where no information can be displayed. • Displaying title, artist, and albums is only supported with ID3 Version 1 (1.0 or 1.1). Note • When a disc is ejected, the program is automatically cancelled. • If you press the Í to enter the standby mode or change the function from CD to another, the programmed selections will be cleared. • During the program operation, random play is not possible. About downloading MP3 There are many music sites on the internet that you can download MP3 music files. Follow the instructions from the website on how to download the music files. You can then play back these downloaded music files by burning them to a CD-R/RW disc. • Your downloaded song/files are for personal use only. Any other usage of the song without owner’s permission, is against the law. 17 En SN29402699_X-HM16_26_26D_En_European.book 06 18 ページ 2016年7月22日 金曜日 午後7時2分 USB playback Chapter 6: USB playback Playing USB storage devices It is possible to listen to two-channel audio using the USB interface with MP3 files on the front of this receiver. • Pioneer does not guarantee that any file recorded on a USB storage device will play or that power will be supplied to a USB storage device. Also note that Pioneer will accept no responsibility whatsoever for loss of files on USB storage devices caused by connection to this unit. • For details about MP3, see page 31. 1 Press USB as the input source. “USB” is shown on the main display. 2 Connect the USB storage device. • This receiver does not support a USB hub. TIMER USB storage device (commercially available) 3 When the recognition is completed, press / to select the folder where the music file is stored ([ ]), then press or ENTER. • MP3 track data is called “music file” and the location they are stored is called a “folder” in this document. • Repeat this step if there are other folders inside the selected folder. . • To return to the previous folder, press or 4 Press / to select the music file ([ ]), and then press 1; or ENTER. • Once play starts, only music files inside the same folder can be played continuously. • For details about the basic operations, see page 16. • When changing to a different input source, stop the USB memory playback first, before changing. • Turn the power off before removing the USB storage device. 18 En Note • This unit may not recognize a USB storage device, play files or supply power to a USB storage device. For details, see When a USB storage device is connected on page 30. • When a USB storage device is not playing and the unit has not been operated for 20 minutes or more, the power will automatically turn off. In this case it is required that the Auto power off is switched to ON (page 33). SN29402699_X-HM16_26_26D_En_European.book 19 ページ USB playback Repeat play can play one track, all tracks or a programmed sequence continuously. To repeat one track: Press ENTER. repeatedly until “REPEAT ONE” appears. Press 06 English Repeat play 2016年7月22日 金曜日 午後7時2分 To repeat all tracks: repeatedly until “REPEAT ALL” appears. Press To cancel repeat play: Press ENTER. repeatedly until “REPEAT OFF” appears. Press Français Press ENTER. Note Random play Español • After performing repeat play, be sure to press ∫. Otherwise, the file of USB storage device will play continuously. • During repeat play, random play is not possible. The file of USB storage device can be played in random order automatically. To random play all tracks: Press RANDOM repeatedly until “RANDOM ON” appears. Press ENTER. To cancel random play: Press RANDOM repeatedly until “RANDOM OFF” appears. Press ENTER. Note • If you press the 9 during random play, you can move to the track selected next by the random operation. • In random play, the unit will select and play tracks automatically. (You cannot select the order of the tracks.) • During random play, repeat play is not possible. Switch the display contents This unit can switch the information recorded in the USB storage device. For details, see Switch the display contents on page 17. 19 En SN29402699_X-HM16_26_26D_En_European.book 07 20 ページ 2016年7月22日 金曜日 午後7時2分 Using the tuner Chapter 7: Using the tuner Listening to FM (For European models)/Listening to FM or AM (For North American models) The following steps show you how to tune in to FM and AM radio broadcasts using the automatic (search) and manual (step) tuning functions. Once you are tuned to a station you can memorize the frequency for recall later. See Saving station presets below for more on how to do this. • Full auto tuning can be achieved for RDS stations using Auto Station Program Memory (ASPM) mode, see page 22. To receive an FM stereo transmission: 1 Press TUNER until “FM” appears on the display. 2 Press MENU and then press / until “FM STEREO/ MONO” appears on the display. 3 Press ENTER and then press / until “AUTO” appears on the display. Improving poor FM reception: After performing the above steps 1 - 2, press ENTER and then press / until “MONO” appears on the display. This will change the tuner from stereo to mono and usually improve the reception. Saving station presets If you often listen to a particular radio station, it’s convenient to have the receiver store the frequency for easy recall whenever you want to listen to that station (Preset tuning). This saves the effort of manually tuning in each time. This unit can memorize up to 45 stations. (FM 30 stations/AM 15 stations) Tuning 1 Press the Í to turn the power on. 2 Press TUNER repeatedly to select desired frequency band (FM or AM). • (X-HM26D) You can select “FM” and “DAB”. For details about “DAB”, see page 23. 3 Press TUNE +/– on the remote control to tune in to the desired station. Automatic tuning: Press and hold TUNE +/–, scanning will start automatically and the tuner will stop at the first receivable broadcast station. 2 Press PGM/MEMORY. The preset number will flash. Press the TUNE +/– repeatedly to tune in to the desired station. 3 Press PRESET +/– to select the preset channel number. Note En Tune to a station you want to memorize. See Tuning above for more on this. Manual tuning: • When radio interference occurs, automatic tuning may stop automatically at that point. • Automatic tuning will skip weak signal stations. • To stop the automatic tuning, press ∫. • When an RDS (Radio Data System) station is tuned in, the frequency will be displayed first. Finally, the station name will appear. 20 1 4 Press PGM/MEMORY to store that station in memory. If the preset number has changed from flashing to lighting, before the station is memorised, repeat the operation from step 2. • Repeat steps 1 - 4 to set other stations, or to change a preset station. When a new station is stored in the memory, the station previously memorised for that preset channel number will be erased. SN29402699_X-HM16_26_26D_En_European.book 21 ページ 2016年7月22日 金曜日 午後7時2分 Using the tuner 07 Search for stations by Program Type To recall a memorised station Press PRESET +/– to select the desired station. To erase entire preset memory 1 Press TUNER on the remote control. 2 Press and hold until “MEMORY CLEAR” appears. Note • All stations will be erased. Using the Radio Data System (RDS) (for European models only) Radio Data System (RDS) is a system used by most FM radio stations to provide listeners with various kinds of information—the name of the station and the kind of show they’re broadcasting, for example. One feature of RDS is that you can search by type of program. For example, you can search for a station that’s broadcasting a show with the program type, Jazz Music. Information provided by RDS 1 Press TUNER until “FM” appears on the display. 2 Press DISPLAY repeatedly. Each time the DISPLAY is pressed, the display will switch as follows: Station name (PS) Frequency Programme type (PTY) Radio text (RT) • When tuning in to a station other than an RDS station or to an RDS station which sends weak signal, the display will change in the following order: NO RDS FM 98.80 MHz News – News Current Affairs – Current Affairs Information – General Information Sport – Sport Education – Educational Drama – Radio plays, etc. Cultures – National or regional culture, theater, etc. Science – Science and technology Varied Speech – Usually talkbased material, such as quiz shows or interviews. Pop Music – Pop music Rock Music – Rock music Easy Listening – Easy listening Light Classics M – ‘Light’ classical music Serious Classics – ‘Serious’ classical music Other Music – Music not fitting above categories Weather & Metr – Weather reports Finance – Stock market reports, commerce, trading, etc. Children’s Progs – Programs for children Social Affairs – Social affairs Religion – Programs concerning religion Phone In – Public expressing their views by Phone Travel & Touring – Holidaytype travel rather than traffic announcements Leisure & Hobby – Leisure interests and hobbies Jazz Music – Jazz Country Music – Country music National Music – Popular music in a language other than English Oldies Music – Popular music from the ‘50s and’ 60s Folk Music – Folk music Documentary – Documentary Alarm Test – Broadcasting when testing emergency broadcast equipment or receivers. Alarm - Alarm! – Emergency announcement made under exceptional circumstances to give warning of events causing danger of a general nature. Español The stations saved in the memory can be scanned automatically. (Preset memory scan) 1 Press and hold PRESET +/–. The preset number will appear and the programmed stations will be tuned in sequentially, for 5 seconds each. 2 Press PRESET +/– again when the desired station is located. Français To scan the preset stations 1 Press TUNER until “FM” appears on the display. 2 Press MENU and then press / until “FM RDS” appears on the display. 3 Press ENTER and then press / until “PTY” appears on the display. 4 Press ENTER. “SELECT” will appear for about 5 seconds. 5 Press / to select the program type you want to hear. Each time the button is pressed, the program type will appear. If the button is held down, the program type will appear continuously. 6 Whilst the selected program type is displayed (within 5 seconds), press ENTER. After the selected program type has been lit for 2 seconds, “SEARCH” will appear, and the search operation will start. The Program Types displayed are as follows: English Note • The backup function protects the memorised stations for a few hours should there be a power failure or the AC power cord become disconnected. • If the display has stopped flashing, start again from step 2. If the unit finds a desired program type, the corresponding channel number will lit for about 8 seconds, and then the station name will remain it. • If you want to listen to the same program type of another station, repeat steps 2 - 6. The unit will look for the next station. • If no station can be found, “NOT FOUND” will appear for 4 seconds. 21 En SN29402699_X-HM16_26_26D_En_European.book 07 22 ページ Using the tuner Using the Auto Station program Memory (ASPM) Whilst in the ASPM operation mode, the tuner will automatically search for new RDS stations. Up to 30 stations can be stored. If you have already stored some stations in memory, the number of new stations you can store will be less. 1 Press TUNER until “FM” appears on the display. 2 Press MENU and then press / until “FM RDS” appears on the display. 3 Press ENTER and then press / until “ASPM” appears on the display. 4 Press ENTER. After “ASPM” has flashed for about 4 seconds, scanning will start (87.5 - 108 MHz). After scanning, the number of stations stored in memory will be displayed for 4 seconds, and then “END” will appear for 4 seconds. • To stop the ASPM operation before it is complete: Press ∫ whilst it is scanning for stations. The stations which are already stored in memory will be kept there. • If the same station is broadcasting on different frequencies, the strongest frequency will be stored in memory. • Any station which has the same frequency as the one stored in memory will not be stored. • If 30 stations have already been stored in memory, the scan will be aborted. If you want to redo the ASPM operation, erase the preset memory. • If no station have been stored in memory, “NOT FOUND” will appear for about 5 seconds. • If the RDS signals are very weak, station names may not be stored in memory. • The same station name can be stored in different channels. • In a certain area or during certain time periods, the station names may temporarily be different. 22 En 2016年7月22日 金曜日 午後7時2分 Note • If any of the following events occur, it does not mean that the unit is faulty: - “PS”, “NO PS” and a station name appear alternately, and properly. - If a particular station is not broadcasting properly or a station is conducting tests, the RDS reception function may not work properly. - When you receive an RDS station whose signal is too weak, information like the station name may not be displayed. - “NO PS”, “NO PTY” or “NO RT” will flash for about 5 seconds, and then the frequency will be displayed. • Notes for radio text: - The first 8 characters of the radio text will appear and then they will scroll across the display. - If you tune in to an RDS station which is not broadcasting any radio text, “NO RT” will be displayed when you switch to the radio text position. - Whilst radio text data is received or when the text contents change, “RT” will be displayed. SN29402699_X-HM16_26_26D_En_European.book 23 ページ 2016年7月22日 金曜日 午後7時2分 Using the tuner 07 About DAB+ (Digital Audio Broadcasting) You can make the auto scan again when you move the unit to other areas or add multiplex channels to the station list. 1 Press the TUNER until “DAB” appears on the display. 2 Press MENU and then press / until “DAB SCAN” appears on the display. 3 Press ENTER and then press / until “AUTO” appears on the display. 4 Press ENTER. Auto Scan scanning begins. After the scanning process is complete, the first station that was detected is selected. Manual tune DAB + SIGNAL SERVICES SERVICES COMPONENTS (STATIONS) Tuning Español MULTIPLEX (ENSEMBLE) You can manually store stations which Auto Scan cannot find. If reception is poor, you can adjust the sensitivity. Manual tune is only available after Auto tune. Perform Auto Scan first. 1 Press the TUNER until “DAB” appears on the display. 2 Press MENU and then press / until “DAB SCAN” appears on the display. 3 Press ENTER and then press / until “MANUAL” appears on the display. 4 Press ENTER. 5 Within 10 seconds, press the TUNE +/– to select the DAB+ frequency. 6 Within 10 seconds, press the ENTER. • If the level is too low, move the aerial or unit to improve reception. Français Digital Audio Broadcasting is a digital transmission system where audio signals are converted to digital signals for broadcasting. DAB+ is broadcast as a group of data called multiplex (ensemble) which may contain one or more stations (services). Each station contains a primary service and there may be one or more secondary services. This allows several programmes or services to be transmitted on a single frequency. Auto Scan English Listening to the DAB+ (X-HM26D only) 1 Press the TUNER until “DAB” appears on the display. When turned on for the first time, the unit scans radio stations automatically to create a station list. The stations will be stored in alphanumeric order and the first station on the list will be selected and you will hear it through the speakers. 2 Press the TUNE +/– to select the desired station. 3 Within 10 seconds, press the ENTER on the remote control to tune into the desired station. • If no station is found, “NO SIGNAL” appears. • Up to 100 appears for total received stations. 23 En SN29402699_X-HM16_26_26D_En_European.book 07 24 ページ Using the tuner Changing the information display You can switch DAB+ display information. Press the DISPLAY button. Each time the button is pressed, the information display changes in the following order. When “NO SIGNAL” appears, the DISPLAY button does not allow you to change the display. Label Frequency 174.928 MHz 5A 208.064 MHz 9D 176.640 MHz 5B 209.936 MHz 10A [Programme Name] 178.352 MHz 5C 211.648 MHz 10B Station name is displayed. (set by default) 180.064 MHz 5D 213.360 MHz 10C [Scrolling text] 181.936 MHz 6A 215.072 MHz 10D Information scrolls across the display when sent from the station. 183.648 MHz 6B 216.928 MHz 11A [Programe type] 185.360 MHz 6C 218.640 MHz 11B A description of the type of content being broadcast by the station. 187.072 MHz 6D 220.352 MHz 11C 188.928 MHz 7A 222.064 MHz 11D The name of the multiplex (ensemble) which provides the current service. 190.640 MHz 7B 223.936 MHz 12A 192.352 MHz 7C 225.648 MHz 12B [Frequency] 194.064 MHz 7D 227.360 MHz 12C 195.936 MHz 8A 229.072 MHz 12D 197.648 MHz 8B 230.784 MHz 13A [Transfer speed] 199.360 MHz 8C 232.496 MHz 13B The data transfer speed. 201.072 MHz 8D 234.208 MHz 13C [Signal quality] 202.928 MHz 9A 235.776 MHz 13D The signal quality is displayed as a number (0 - 100). [85-100: Good, 70-84: Fair, 0-69: Poor] 204.640 MHz 9B 237.488 MHz 13E 206.352 MHz 9C 239.200 MHz 13F The DAB+ frequency for the station. [Stereo mode] Display stereo mode. Memorising a station You can store 10 DAB stations in memory and recall them at the push of a button. (Preset tuning) 1 Tune to the desired DAB station. 2 Press the PGM/MEMORY. The preset number will flash. 3 Within 10 seconds, press the PRESET +/– to select the preset channel number. Store the stations in memory, in order, starting with preset channel 1. 4 Within 10 seconds, press the PGM/ MEMORY to store that station in memory. If the preset number indicators disappear before the station is memorised, repeat the operation from step 2. 5 Repeat steps 1 - 4 to set other stations, or to change a preset station. When a new station is stored in the memory, the station previously memorised for that preset channel number will be erased. En DAB Frequency table (BAND III) Frequency [Multiplex name] 24 2016年7月22日 金曜日 午後7時2分 Label SN29402699_X-HM16_26_26D_En_European.book 25 ページ 2016年7月22日 金曜日 午後7時2分 Other connections 08 English Chapter 8: Other connections Connect your auxiliary playback component using the AUDIO IN input on the rear panel. This function automatically switches to "AUDIO IN" when there is audio input to the AUDIO IN jack. 1 Press MENU and then press / until “Audio In detect” appears on the display. 2 Press ENTER and then press / to switch Audio In detect ON/OFF. • It is set to OFF in the factory setting. Español Connecting auxiliary components Automatic switching to Audio In input (For North American models only) Français CAUTION • Before making or changing the connections, switch off the power and disconnect the power cord from the AC outlet. • We will not accept responsibility for damage arising from the connection of equipment manufactured by other companies. Note • When the Audio In detect is ON, “Audio In Det ON” is displayed on the main display. • When the Audio In detect is OFF, “Audio In Det OFF” is displayed on the main display. Portable audio player, etc. 3.5 mm stereo miniplug cable (commercially available) 1 Press AUDIO as the input source. When AUDIO IN is selected, “Audio In” is displayed on the main display. Note • If the AUDIO IN mini-plug jack is connected to auxiliary phones jack, the volume of the unit will be adjusted by the volume on the playback component. If the sound is distorted after you lower the volume of the unit, try lowering the volume on the auxiliary playback component. 25 En SN29402699_X-HM16_26_26D_En_European.book 09 26 ページ 2016年7月22日 金曜日 午後7時2分 Bluetooth® Audio playback Chapter 9: Bluetooth® Audio playback X-HM26/26D only Music playback using Bluetooth wireless technology Remote control operation The remote control supplied with this unit allows you to play and stop media, and perform other operations. Note Bluetooth wireless technology enabled device: Cell phone • The Bluetooth wireless technology enabled device must support AVRCP profiles. • Remote control operations cannot be guaranteed for all Bluetooth wireless technology enabled devices. Bluetooth wireless technology enabled device: Digital music player Device not equipped with Bluetooth wireless technology: Digital music player + Bluetooth® audio transmitter (commercially available) Music data TIMER The unit is capable of playing back music stored on Bluetooth capable devices (cell phones, digital music players etc.) wirelessly. You can also use a Bluetooth audio transmitter (sold separately) to enjoy music from devices that do not have Bluetooth functionality. Please refer to the user’s manual for your Bluetooth capable device for more details. Note • The Bluetooth® word mark and logos are registered trademarks owned by the Bluetooth SIG, Inc. • The Bluetooth wireless technology enabled device must support A2DP profiles. • Connection is not always guaranteed with all Bluetoothenabled devices. 26 En Pairing with the unit (Initial registration) In order for the unit to playback music stored on a Bluetooth capable device, pairing must first be performed. Pairing should be performed when first using the unit with the Bluetooth capable device, or when the pairing data on the device has been erased for any reason. Pairing is a step required to allow communication using Bluetooth wireless technology to be carried out. • Pairing is only performed the first time that you use the unit and the Bluetooth capable device together. • In order to allow communication using Bluetooth wireless technology to take place, pairing must be performed on both the unit and the Bluetooth capable device. • After pressing the and switching to Bluetooth input, perform the pairing procedure on the Bluetooth capable device. If pairing has been performed correctly, you will not need to perform the pairing procedures for the unit as shown below. Please refer to the user’s manual for your Bluetooth capable device for more details. 1 Press the Í and turn the power to the unit on. 2 Press the . The unit switches to Bluetooth and “Pairing” will be displayed. 3 Turn on the power to the Bluetooth capable device that you wish to pair with, and perform pairing procedure on it. SN29402699_X-HM16_26_26D_En_European.book 27 ページ 2016年7月22日 金曜日 午後7時2分 Bluetooth® Audio playback Listen to music on the unit from a Bluetooth capable device 1 Press the . The unit will switch to Bluetooth input. 2 A Bluetooth connection will be created between the Bluetooth capable device and the unit. Procedures for connecting to the unit should be performed from the Bluetooth capable device. • Please refer to the user’s manual for your Bluetooth capable device for details of the connection procedures. 3 Playback music from the Bluetooth capable device. Note BT STANDBY settings 1 Press the . 2 Press MENU and then press / until “BT STANDBY” appears on the display. 3 Press ENTER and then press / to switch BT STANDBY ON/OFF. • It is set to OFF in the factory setting. Note Español If pairing with the Bluetooth capable device has been completed correctly, the name of the Bluetooth capable device will be displayed on the front panel of the unit. (Only single-byte alphanumeric characters can be displayed. Any character that cannot be displayed will be indicated by a “∫”.) • The following can be done when the unit is on standby with the BT STANDBY switched ON. • By selecting a Bluetooth capable device that already has a connection history (pairing has already been conducted) with this unit, this unit will automatically turn on with the Bluetooth function. Français 4 Confirm on the Bluetooth capable device that pairing has been completed. BT STANDBY English Note • This unit will be displayed as “Pioneer X-HM26” on all Bluetooth capable devices that you have. Pairing will start. • Place the Bluetooth capable device close to the unit. • Please refer to the user’s manual for your Bluetooth capable device for details on when pairing can be performed and the procedures required for pairing. • When PIN code entry is requested, enter “0000.” (This unit does not accept any PIN code setting other than “0000.”) 09 • When the BT STANDBY is ON, “BT STANDBY ON” is displayed on the main display. • When the BT STANDBY is OFF, “BT STANDBY OFF” is displayed on the main display. Connection while in BT STANDBY mode with Bluetooth capable device When connection history (pairing has already been conducted) with a Bluetooth capable device exists for the unit during BT STANDBY, the unit can receive a connection request directly from the connection history. The unit will start using the Bluetooth function, and connect with a Bluetooth capable device. Even devices that have already been paired with this unit will not connect during BT STANDBY in the following cases. In such cases, delete pairing history from the Bluetooth wireless technology device and perform pairing again. • This unit can store a maximum of 8 units in the pairing history. • If the settings are reset to the factory setting, all pairing history will be deleted. • When Bluetooth capable devise is not connected and no operations have been performed for more than 20 minutes, the unit will automatically power off. In this case it is required that the Auto power off is switched to ON. • Auto power off can be switched to ON/OFF (page 33). 27 En SN29402699_X-HM16_26_26D_En_European.book 09 28 ページ 2016年7月22日 金曜日 午後7時2分 Bluetooth® Audio playback Radio wave caution This unit uses a 2.4 GHz radio wave frequency, which is a band used by other wireless systems (see list below). To prevent noise or interrupted communication, do not use this unit nearby such devices, or make sure these devices are switched off during use. • Cordless phones • Cordless facsimiles • Microwave ovens • Wireless LAN devices (IEEE802.11b/g) • Wireless AV equipment • Wireless controllers for game systems • Microwave-based health aids • Some baby monitors Other, less common, equipment that may operate on the same frequency: • Anti-theft systems • Amateur radio stations (HAM) • Warehouse logistic management systems • Discrimination systems for train or emergency vehicles Note • In the event noise appears in your television image, there is the possibility that a Bluetooth wireless technology enabled device or this unit (including products supported by this unit) are causing signal interference with the antenna input connector of your television, video, satellite tuner, etc. In this event, increase the distance between the antenna input connector and the Bluetooth wireless technology enabled device or this unit (including products supported by this unit). • If there is something obstructing the path between this unit (including devices supported by this unit) and the device equipped with Bluetooth wireless technology (such as a metal door, concrete wall, or insulation containing tinfoil), you may need to change the location of your system to prevent signal noise and interruptions. Scope of operation Use of this unit is limited to home use. (Transmission distances may be reduced depending on communication environment). In the following locations, poor condition or inability to receive radio waves may cause the audio to be interrupted or stopped: • In reinforced concrete buildings or steel framed or ironframed buildings. • Near large metallic furniture. • In a crowd of people or near a building or obstacle. • In a location exposed to the magnetic field, static electricity or radio wave interference from radio communication equipment using the same frequency band (2.4 GHz) as this unit, such as a 2.4 GHz wireless LAN device (IEEE802.11b/g) or microwave oven. • If you live in a heavily populated residential area (apartment, townhouse, etc.) and if your neighbor’s microwave is placed near your system, you may experience radio wave interference. If this occurs, move your unit to a different place. When the microwave is not in use, there will be no radio wave interference. Radio wave reflections The radio waves received by this unit include the radio wave coming directly from the device equipped with Bluetooth wireless technology (direct wave) and waves coming from various directions due to reflections by walls, furniture and building (reflected waves). The reflected waves (due to obstacles and reflecting objects) further produce a variety of reflected waves as well as variation in reception condition depending on locations. If the audio cannot be received properly due to this phenomenon, try moving the location of the device equipped with Bluetooth wireless technology a little. Also note that audio may be interrupted due to the reflected waves when a person crosses or approaches the space between this unit and the device equipped with Bluetooth wireless technology. Precautions regarding connections to products supported by this unit • Complete connections for all devices supported by this unit, including all audio cords and power cables before connecting them to this unit. • After completing connections to this unit, check the audio and power cables to confirm that they not twisted together. • When disconnecting this unit, confirm that you have sufficient working space in the surrounding area. • When changing connections of audio or other cables for products supported by this unit, confirm that you have sufficient working space in the surrounding area. 28 En SN29402699_X-HM16_26_26D_En_European.book 29 ページ 2016年7月22日 金曜日 午後7時2分 Additional information 10 Additional information Incorrect operations are often mistaken for trouble and malfunctions. If you think that there is something wrong with this component, check the points below. Sometimes the trouble may lie in another component. Investigate the other components and electrical appliances being used. If the trouble cannot be rectified even after exercising the checks listed below, ask your nearest Pioneer authorized service center or your dealer to carry out repair work. • If the unit does not operate normally due to external effects such as static electricity disconnect the power plug from the outlet and insert again to return to normal operating conditions. Problem Check Remedy Settings you have made have been cleared. Was the power cord unplugged? When power cord is unplugged, the settings you have made is cleared. Please set the clock again. If you do not want to clear the settings, do not unplug the power cord. Difference in volume between CDs, MP3, Tuner, and AUDIO IN. This is not a problem with this unit. The volume may sound differently depending on the input source and recording format. Español General problem Français Troubleshooting English Chapter 10: When using an analogue player with this unit, connect a device equipped with phono equalizer. This unit cannot be operated Are you operating from far away? with the remote control. Operate within 7 m, 30º of the remote sensor on the front panel (page 5). Is the remote control sensor The remote control signals may not be received properly if the exposed to direct sunlight or strong remote control sensor is exposed to direct sunlight or strong artificial light from a fluorescent bulb, artificial light from a fluorescent bulb, etc. etc.? Are the batteries dead? Disc cannot be played or Is the disc scratched? disc is ejected automatically. Is the disc dirty? Folder or file names are not recognized. The unit turns off automatically. Replace the batteries (page 5). Scratched discs may not play. Wipe the dirt off the disc (page 33). Is this unit placed in a humid location? There could be condensation inside. Wait a while for the condensation to evaporate. Do not place this unit near an airconditioner, etc. (page 32). Have you exceeded the maximum number of folder or file names this unit can recognize? The unit can recognize up to 999 files on a single disc or on a single USB memory device. The number of folders is up to 255. Depending on the folder structure, there may be folders or files that the unit cannot recognize. If no play back and no operation has done for 20 minutes or more, the unit turns off automatically. In this case it is required that the Auto power off is switched to ON (page 33). 29 En SN29402699_X-HM16_26_26D_En_European.book 10 30 ページ 2016年7月22日 金曜日 午後7時2分 Additional information When a USB storage device is connected Problem Check Remedy USB storage device is not recognized. Is the USB storage device properly connected? Connect the device securely (all the way in). Is the USB storage device connected via a USB hub? This unit does not support USB hubs. Connect the USB storage device directly. This unit only supports USB mass storage class devices. This unit supports portable flash memory and digital audio playback devices. Only the FAT16 and FAT32 file systems are supported. Other file systems (exFAT, NTFS, HFS etc.) are not supported. This device does not support the use of external hard disc drives. This is not a problem with this unit. Turn the power off then back on. Some USB storage devices may not be recognized properly. File cannot be played. Is the file copyright-protected (by DRM)? Copyright-protected files cannot be played. This is not a problem with this unit. Files stored on a computer cannot be played. It may not be possible to play some files. 30 En Folder or file names are not Do the folder of file names contain displayed or are not properly more than 30 characters? displayed. The maximum number of characters displayable for the folder and file names is 30. Folder or file names are not displayed in alphabetical order. This is not a problem with this unit. The order of the folder and file names displayed depends on the order in which the folders or files were recorded on the USB storage device. Much time is required to recognize the USB storage device. What is the USB storage devices capacity? Some time may be required to load the data when large capacity USB storage devices are connected (this could take several minutes). SN29402699_X-HM16_26_26D_En_European.book 31 ページ 2016年7月22日 金曜日 午後7時2分 Additional information 10 When the Bluetooth wireless technology device is connected or operated Remedy The Bluetooth wireless technology device cannot be connected or operated. Sound from the Bluetooth wireless technology device is not emitted or the sound is interrupted. Check that no object that emits electromagnetic waves in the 2.4 GHz band (microwave oven, wireless LAN device or Bluetooth wireless technology apparatus) is near the unit. If such an object is near the unit, set the unit far from it. Or, stop using the object emitting the electromagnetic waves. * The distance given is to be used as a rough guide. The actual allowable distance between devices may vary depending on conditions in the surrounding environment. Español Check that the Bluetooth wireless technology device is not too far from the unit and that obstructions are not set between the Bluetooth wireless technology device and the unit. Set the Bluetooth wireless technology device and the unit so that the distance between them is less than about 10 m* and no obstructions exist between them. Français Problem English X-HM26/26D only The Bluetooth wireless technology device may not be set to the communication mode supporting the Bluetooth wireless technology. Check the setting of the Bluetooth wireless technology device. Check if this unit is connected with a Bluetooth wireless technology device with an input source other than Bluetooth selected. Perform paring procedure after selecting Bluetooth as the input source. Playable discs and formats Audio CD MP3 • Commercially available audio CDs • CD-R/ -RW/ -ROM discs containing music recorded in the CD-DA format MP3 files recorded on CD-R/ -RW/ -ROM discs or USB storage devices • Only the discs that have been finalized can be played. • Discs recorded in packet write mode (UDF format) are not compatible with this unit. • Corporation and product names mentioned herein are trademarks or registered trademarks of the respective corporations. • Only discs recorded in ISO9660 Level 1, Level 2 and Joliet can be played. • Files protected by DRM (Digital Rights Management) cannot be played. MP3: MP3 is a form of compression. It is an acronym which stands for MPEG Audio Layer 3. MP3 is a type of audio code which is processed by significant compression from the original audio source with very little loss in sound quality. • This system supports MPEG-1/2 Audio Layer 3 (Sampling rates: 32 kHz to 48 kHz; Bit rates: 8 kbps to 320 kbps). • During VBR file playback, time counter in the display may differ from its actual playback time. • The folder and file order information which is recorded on the media depends on the writing software. There maybe possibilities that this unit will playback the files not according to our expected playback order. • From a media with MP3 files up to 255 folders and 999 files (including non playable files) can be read. Note • This unit does not support multisession discs or multiborder recording. • Multisession/multiborder recording is a method in which data is recorded on a single disc in two or more sessions/borders. A “session” or “border” is one recording unit, consisting of a complete set of data from lead-in to lead-out. 31 En SN29402699_X-HM16_26_26D_En_European.book 10 32 ページ Additional information Regarding copy protected CDs About condensation This unit is designed to conform to the specifications of the audio CD format. This unit does not support the playback or function of discs that do not conform to these specifications. If this unit is moved suddenly from a cold place into a warm room (in winter, for example) or if the temperature in the room in which this unit is installed rises suddenly due to heater operation, etc., water droplets (condensation) may form inside (on operating parts and the lens). When condensation is present, this unit will not operate properly and playback is not possible. Let this unit stand at room temperature for 1 or 2 hours with the power turned on (the time depends on the extent of condensation). The water droplets will dissipate and playback will become possible. Condensation can also occur in the summer if this unit is directly exposed to the air flow from an air-conditioner. If this happens, move this unit to a different place. Supported audio file formats This unit does not support lossless encoding. Cautions on use When moving this unit When moving this unit, be sure to first check that there is no disc loaded and disconnect the USB storage device. Then press Í, wait for “STAND BY” disappears on main display to turn off, then unplug the power cord. Damage may occur if the unit is transported or moved with a disc inserted, or when another device is connected to the USB terminal, or AUDIO IN mini-plug jack. Place of installation • Choose a stable place near the TV or stereo system being used with this unit. • Do not place this unit on top of a TV or color monitor. Also install it away from cassette decks and other devices easily affected by magnetic forces. Avoid the following locations: • • • • • • Places exposed to direct sunlight Humid or poorly ventilated places Extremely hot places Places exposed to vibrations Places in which there is much dust or cigarette smoke Places exposed to soot, steam or heat (kitchens, etc.) Do not place objects on this unit Do not place any objects on top of this unit. Do not obstruct the ventilation holes. Do not use this unit on shaggy rugs, beds, sofas, etc., or wrapped in cloth, etc. Doing so will prevent the heat from dispersing, leading to damage. Do not expose to heat. Do not place this unit on top of an amplifier or other component that generates heat. When rack mounting it, to avoid the heat given off by the amplifier or other audio component, place it on a shelf below the amplifier. • Turn off the unit’s power when not using it. • Depending on signal conditions, striped patterns may appear on a TV screen and noise may enter the sound of radio broadcasts when the unit’s power is on. If this happens, turn the unit’s power off. 32 En 2016年7月22日 金曜日 午後7時2分 SN29402699_X-HM16_26_26D_En_European.book 33 ページ 2016年7月22日 金曜日 午後7時2分 Additional information 10 Cleaning the lens Handling discs Storing • Always place discs in their cases and store them vertically, avoiding hot, humid places, places exposed to direct sunlight and extremely cold places. • Be sure to read the cautions included with the disc. Cleaning discs About specially shaped discs Specially shaped discs (heart-shaped, hexagonal, etc.) cannot be played on this unit. Do not attempt to play such discs, as they could damage this unit. Español This unit’s lens should not become dirty in normal use, but if for some reason it should malfunction due to dust or dirt, consult your nearest Pioneer authorized service center. Although lens cleaners for players are commercially available, we advise against using them since some may damage the lens. • Do not attach pieces of paper or stickers to discs. Doing so could warp discs, making it impossible to play them. Also note that rental discs often have labels attached to them, and the label’s glue may have oozed out. Check that there is no glue around the edges of such labels before using rented discs. Français • Unplug the power cord from the power outlet when cleaning this unit. • Clean this unit using a soft cloth. For tough dirt, apply some neutral detergent diluted in 5 to 6 parts water to a soft cloth, wring out thoroughly, wipe off the dirt, then wipe again with a soft, dry cloth. • Alcohol, thinner, benzene, insecticides, etc., could cause the print or paint to peel off. Also, leaving rubber or vinyl products in contact with this unit for long periods of time could mar the cabinet. • When using chemical-impregnated wipes, etc., read the cautions included with the wipes carefully. English Cleaning the product Auto power off setting 1 Press MENU on the remote control. “Auto Power Down” will be displayed on the main display. 2 Press ENTER on the remote control. 3 Press / to switch auto power off setting ON/OFF. • Initial setting is set to ON. • Discs may not play if there are fingerprints or dust on them. In this case, use a cleaning cloth, etc., to gently wipe the disc from the inside towards the outside. Do not use dirty cleaning cloths. Note • When the auto power off is set to ON, “APD ON” will be displayed on the main display. • When the auto power off is set to OFF, “APD OFF” will be displayed on the main display. Restoring all the settings to the defaults • Do not use benzene, thinner or other volatile chemicals. Also do not use record spray or antistatic agents. • For tough dirt, apply some water to a soft cloth, wring out thoroughly, wipe off the dirt, then wipe off the moisture with a dry cloth. • Do not use damaged (cracked or warped) discs. • Do not let the signal surface of discs get scratched or dirty. Use the steps below to restore the all settings to their defaults. 1 Press Í to turn the power on. 2 Press MENU and then press / until “Factory Reset” appears on the display. 3 Press ENTER. “OK?” will appear. 4 Press ENTER. • “Resetting” is displayed while the settings are being restored. Power is turned off. 33 En SN29402699_X-HM16_26_26D_En_European.book 10 34 ページ Additional information Specifications • Amplifier section RMS Power Output: . . . . . . . . . . . . . . . . . . . . 15 W + 15 W (1 kHz, 10 %, T.H.D., 8 ) • Tuner section Frequency Range (FM) . . . . . . . . . 87.5 MHz to 108.0 MHz Antenna Input (FM). . . . . . . . . . . . . . . . . . 75 unbalanced Frequency Range (AM) (For North American models) . . . . . . . . . . . . . . . . . . . . . . . . . . . . . . 530 kHz to 1710 kHz Antenna (AM) . . . . . . . . . . . . . . . . . . . . . . . . .Loop antenna • Bluetooth (X-HM26/26D only) Version . . . . . . . . . . . . . . . .Bluetooth Specification Ver. 4.1 Output . . . . . . . . . . . . . . . . . Bluetooth Specification Class 2 Estimated line-of-sight transmission distance* . . . . . . . . . . . . . . . . . . . . . . . . . . . . . . . . . . . . . About 10 m Frequency range . . . . . . . . . . . . . . . . . . . . . . . . . . 2.4 GHz Modulation . . . . . . . . . FH-SS (Frequency Hopping Spread Spectrum) Supported Bluetooth profiles . . . . . . . . . . . . A2DP, AVRCP Supported Codec . . . . . . . . . . . . . . SBC (Subband Codec) Supported contents protection . . . . . . . . . . . . . . . . SCMS-T PIN code . . . . . . . . . . . . . . . . . . . . . . . . . . . . . . . . . . . .0000 * The line-of-sight transmission distance is an estimate. Actual transmission distances supported may differ depending on surrounding conditions. • Miscellaneous USB terminal . . . . . . . . . . . . . . . . . . . . . . . . . . 5 V, 500 mA Power source (For European models) . . . . . . . . . . . . . . . . . . . AC 220 V to 240 V, 50 Hz/60 Hz (For North American models) . . . . . . . . . . . . . . . . . . . . . . . . . . . . . . . AC 120 V, 60 Hz Power consumption Power on . . . . . . . . . . . . . . . . . . . . . . . . . . . . . . . . 20 W Power stand-by . . . . . . . . . . . . . . . . . . . . . 0.5 W or less Power stand-by (BT STANDBY ON) . . . . . 0.5 W or less Dimensions . . . . . . 215 mm (W) x 95 mm (H) x 315 mm (D) Weight (without package) . . . . . . . . . . . . . . . . . . . . . . 2.0 kg • Speaker Enclosure . . . . . . . . . . . . . . . . Bass-reflex, book-shelf type (Magnetically shielded) Configuration . . . . . . . . . . . . . . . . . . . . . . . . . . . . . 2-way Tweeter . . . . . . . . . . . . . . . . . . . . . . . . . . . . . 2 cm dome Woofer . . . . . . . . . . . . . . . . . . . . . . . . . . . . . 10 cm cone Maximum input power . . . . . . . . . . . . . . . . . . . . . . . . 15 W Impedance . . . . . . . . . . . . . . . . . . . . . . . . . . . . . . . . . . . 8 Dimensions . . . 130 mm (W) x 212 mm (H) x 228.5 mm (D) Weight . . . . . . . . . . . . . . . . . . . . . . . . . . . . . . . 2.0 kg/each 34 En 2016年7月22日 金曜日 午後7時2分 • Accessories Remote control . . . . . . . . . . . . . . . . . . . . . . . . . . . . . . . . . AAA batteries (R03). . . . . . . . . . . . . . . . . . . . . . . . . . . . . . AM antenna cable*1 . . . . . . . . . . . . . . . . . . . . . . . . . . . . . FM wire antenna*2 . . . . . . . . . . . . . . . . . . . . . . . . . . . . . . DAB/FM wire antenna*3 . . . . . . . . . . . . . . . . . . . . . . . . . . Power cord . . . . . . . . . . . . . . . . . . . . . . . . . . . . . . . . . . . . Warranty card*4. . . . . . . . . . . . . . . . . . . . . . . . . . . . . . . . . Operating instructions (This document). . . . . . . . . . . . . . . *1 North American models only *2 X-HM16/HM26 only *3 X-HM26D only *4 European models only 1 2 1 1 1 1 1 1 Note • The specifications are applicable when the power supply is 230 V. • Specifications and the design are subject to possible modifications without notice, due to improvements. “Pioneer” is a trademark of Pioneer Corporation, and is used under license. © 2016 Onkyo & Pioneer Corporation. All rights reserved SN29402699_X-HM16_26_26D_En_European.book 39 ページ 2016年7月21日 木曜日 午前10時20分 X-HM16_26_26D_Fr.book 2 ページ 2016年7月22日 金曜日 午後5時11分 ATTENTION POUR ÉVITER TOUT RISQUE D’ÉLECTROCUTION, NE PAS ENLEVER LE COUVERCLE (NI LE PANNEAU ARRIÈRE). AUCUNE PIÈCE RÉPARABLE PAR L’UTILISATEUR NE SE TROUVE À L’INTÉRIEUR. CONFIER TOUT ENTRETIEN À UN PERSONNEL QUALIFIÉ UNIQUEMENT. D3-4-2-1-1_B1_Fr AVERTISSEMENT Cet appareil n’est pas étanche. Pour éviter les risques d’incendie et de décharge électrique, ne placez près de lui un récipient rempli d’eau, tel qu’un vase ou un pot de fleurs, et ne l’exposez pas à des gouttes d’eau, des éclaboussures, de la pluie ou de l’humidité. D3-4-2-1-3_A1_Fr ATTENTION L’interrupteur STANDBY/ON de cet appareil ne coupe pas complètement celui-ci de sa prise secteur. Comme le cordon d’alimentation fait office de dispositif de déconnexion du secteur, il devra être débranché au niveau de la prise secteur pour que l’appareil soit complètement hors tension. Par conséquent, veillez à installer l’appareil de telle manière que son cordon d’alimentation puisse être facilement débranché de la prise secteur en cas d’accident. Pour éviter tout risque d’incendie, le cordon d’alimentation sera débranché au niveau de la prise secteur si vous prévoyez une période prolongée de non utilisation (par exemple avant un départ en vacances). D3-4-2-2-2a*_A1_Fr AVERTISSEMENT Pour éviter les risques d’incendie, ne placez aucune flamme nue (telle qu’une bougie allumée) sur l’appareil. D3-4-2-1-7a_A1_Fr PRÉCAUTION DE VENTILATION Lors de l’installation de l’appareil, veillez à laisser un espace suffisant autour de ses parois de manière à améliorer la dissipation de chaleur (au moins 25 cm sur le dessus, 10 cm à l’arrière et 5 cm de chaque côté). AVERTISSEMENT Les fentes et ouvertures du coffret sont prévues pour la ventilation, pour assurer un fonctionnement stable de l’appareil et pour éviter sa surchauffe. Pour éviter les risques d’incendie, ne bouchez jamais les ouvertures et ne les recouvrez pas d’objets, tels que journaux, nappes ou rideaux, et n’utilisez pas l’appareil posé sur un tapis épais ou un lit. ATTENTION Cet appareil est un produit laser de Classe 1, classé selon l’article IEC 60825-1:2007 relatif à la Sécurité des produits laser. APPAREIL À LASER DE CLASSE 1 D58-5-2-2a_A2_Fr Ce produit est destiné à une utilisation domestique générale. Toute panne due à une utilisation autre qu'à des fins privées (comme une utilisation à des fins commerciales dans un restaurant, dans un autocar ou sur un bateau) et qui nécessite une réparation sera aux frais du client, même pendant la période de garantie. K041_A1_Fr D3-4-2-1-7b*_A1_Fr NOTE IMPORTANTE SUR LE CABLE D’ALIMENTATION Milieu de fonctionnement Température et humidité du milieu de fonctionnement : De +5 °C à +35 °C (de +41 °F à +95 °F) ; Humidité relative inférieure à 85 % (orifices de ventilation non obstrués) N’installez pas l’appareil dans un endroit mal ventilé ou un lieu soumis à une forte humidité ou en plein soleil (ou à une forte lumière artificielle). D3-4-2-1-7c*_A1_Fr Tenir le câble d’alimentation par la fiche. Ne pas débrancher la prise en tirant sur le câble et ne pas toucher le câble avec les mains mouillées. Cela risque de provoquer un court-circuit ou un choc électrique. Ne pas poser l’appareil ou un meuble sur le câble. Ne pas pincer le câble. Ne pas faire de noeud avec le câble ou l’attacher à d’autres câbles. Les câbles d’alimentation doivent être posés de façon à ne pas être écrasés. Un câble abîmé peut provoquer un risque d’incendie ou un choc électrique. Vérifier le câble d’alimentation de temps en temps. Contacter le service après-vente PIONEER le plus proche ou le revendeur pour un remplacement. S002*_A1_Fr X-HM16_26_26D_Fr.book 3 ページ 2016年7月22日 金曜日 午後5時11分 Information à destination des utilisateurs sur la collecte et l’élimination des équipements et batteries usagés Marquage pour les équipements Ces symboles qui figurent sur les produits, les emballages et/ou les documents d’accompagnement signifient que les équipements électriques et électroniques et batteries usagés ne doivent pas être jetés avec les déchets ménagers et font l’objet d’une collecte sélective. Pour assurer l’enlèvement et le traitement appropriés des produits et batteries usagés, merci de les retourner dans les points de collecte sélective habilités conformément à la législation locale en vigueur. Exemples de marquage pour les batteries En respectant les circuits de collecte sélective mis en place pour ces produits, vous contribuerez à économiser des ressources précieuses et à prévenir les impacts négatifs éventuels sur la santé humaine et l’environnement qui pourraient résulter d’une mauvaise gestion des déchets. Pour plus d’information sur la collecte et le traitement des produits et batteries usagés, veuillez contacter votre municipalité, votre service de gestion des déchets ou le point de vente chez qui vous avez acheté ces produits. Pb Ces symboles ne sont valables que dans les pays de l’Union Européenne. Pour les pays n’appartenant pas à l’Union Européenne : Si vous souhaitez jeter ces articles, veuillez contacter les autorités ou revendeurs locaux pour connaître les méthodes d’élimination appropriées. K058a_A1_Fr Précaution concernant les ondes radio AVERTISSEMENT Cet appareil utilise comme onde radio une fréquence de 2,4 GHz, c’est-à-dire une bande utilisée par d’autres systèmes sans fil (Fours à micro-ondes, téléphones sans fil, etc.). Si des parasites apparaissent sur les images télévisées, il est possible que cet appareil (y compris ceux qu’il prend en charge) provoquent des interférences sur le connecteur d’entrée de votre téléviseur, les images vidéo, le tuner satellite, etc. Dans ce cas, augmentez la distance entre la prise d’entrée d’antenne et cet appareil (y compris les produits pris en charge par cet appareil). • Pioneer n’est pas responsable d’un mauvais fonctionnement du produit Pioneer compatible due à une erreur/défaillance de la connexion réseau et/ou de l’appareil raccordé. Veuillez contacter votre fournisseur de service Internet ou le fabricant du périphérique du réseau. • Un abonnement payant auprès d’un fournisseur d’accès Internet est nécessaire pour utiliser Internet. Rangez les petites pièces hors de portée des petits enfants. En cas d’ingestion accidentelle, consultez immédiatement un médecin. X-HM16_26_26D_Fr.book 4 ページ 2016年7月22日 金曜日 午後5時11分 Nous vous remercions d’avoir acheté ce produit Pioneer. Veuillez lire attentivement ce mode d'emploi de manière à pouvoir utiliser votre modèle correctement. Lorsque vous avez terminé, rangez ces instructions en lieu sûr afin de pouvoir vous y référer à l’avenir. Table des matières 01 Préparatifs Contenu de l’emballage . . . . . . . . . . . . . . . . . . . . . . . . . . .5 Mise en place des piles dans la télécommande . . . . . . . .5 Utilisation de la télécommande . . . . . . . . . . . . . . . . . . 5 02 Les organes et leurs fonctions Télécommande . . . . . . . . . . . . . . . . . . . . . . . . . . . . . . . . .6 Panneau avant . . . . . . . . . . . . . . . . . . . . . . . . . . . . . . . . .7 Afficheur . . . . . . . . . . . . . . . . . . . . . . . . . . . . . . . . . . . . . .8 Enceintes Acoustiques . . . . . . . . . . . . . . . . . . . . . . . . . . .8 03 Connexions Raccordement des enceintes . . . . . . . . . . . . . . . . . . . . . .9 Raccordement des antennes . . . . . . . . . . . . . . . . . . . . . .10 Utilisation des antennes externes . . . . . . . . . . . . . . . 10 Branchement . . . . . . . . . . . . . . . . . . . . . . . . . . . . . . . . . .11 04 Pour commencer Pour allumer l’appareil . . . . . . . . . . . . . . . . . . . . . . . . . . .12 Réglage de l’horloge . . . . . . . . . . . . . . . . . . . . . . . . . . . .12 Commandes générales . . . . . . . . . . . . . . . . . . . . . . . . . .12 Fonction d’entrée . . . . . . . . . . . . . . . . . . . . . . . . . . . . 12 Contrôle de la luminosité de l’affichage . . . . . . . . . . . 12 Réglage automatique du volume initial . . . . . . . . . . . 12 Commande de volume. . . . . . . . . . . . . . . . . . . . . . . . 12 Sourdine. . . . . . . . . . . . . . . . . . . . . . . . . . . . . . . . . . . 12 Commandes de son . . . . . . . . . . . . . . . . . . . . . . . . . . . .13 Equalizer . . . . . . . . . . . . . . . . . . . . . . . . . . . . . . . . . . 13 Touche P.bass . . . . . . . . . . . . . . . . . . . . . . . . . . . . . . 13 Touche de réglage grave/aigu . . . . . . . . . . . . . . . . . . 13 Réglage de l’alarme de réveil . . . . . . . . . . . . . . . . . . . . .13 Rappel de l’alarme de réveil . . . . . . . . . . . . . . . . . . . 14 Annulation de l’alarme de réveil. . . . . . . . . . . . . . . . . 14 Utilisation du réveil. . . . . . . . . . . . . . . . . . . . . . . . . . . 14 Utilisation du minuteur de mise en veille . . . . . . . . . . . . .14 Utilisation avec un casque . . . . . . . . . . . . . . . . . . . . . . . .14 05 Lecture de disque Lecture de disques ou de fichiers . . . . . . . . . . . . . . . . . .15 Charger le disque. . . . . . . . . . . . . . . . . . . . . . . . . . . . 15 Lire les pistes du CD . . . . . . . . . . . . . . . . . . . . . . . . . 15 Lire les fichiers musicaux MP3 . . . . . . . . . . . . . . . . . 15 Lecture avancée de disques CD ou MP3 . . . . . . . . . . . .16 Lecture répétée . . . . . . . . . . . . . . . . . . . . . . . . . . . . . 16 Lecture aléatoire . . . . . . . . . . . . . . . . . . . . . . . . . . . . 16 Lecture des morceaux programmés (CD) . . . . . . . . . 17 À propos du téléchargement de fichiers MP3 . . . . . . 17 Sélection des informations affichées . . . . . . . . . . . . . 17 06 Lecture USB Lecture à partir d’un périphérique USB . . . . . . . . . . . . . .18 Lecture répétée . . . . . . . . . . . . . . . . . . . . . . . . . . . . . 19 Lecture aléatoire . . . . . . . . . . . . . . . . . . . . . . . . . . . . 19 Sélection des informations affichées . . . . . . . . . . . . . 19 4 Fr 07 Utilisation du tuner Écoute en FM (Pour les modèles européens)/Écoute en FM ou AM (Pour les modèles nord-américains) . . . . . . . . . . 20 Accord. . . . . . . . . . . . . . . . . . . . . . . . . . . . . . . . . . . . . 20 Mémorisation des stations . . . . . . . . . . . . . . . . . . . . . 20 Utilisation du RDS (Radio Data System) (pour les modèles européens uniquement) . . . . . . . . 21 Écoute du DAB+ (X-HM26D uniquement) . . . . . . . . . . . 23 À propos de DAB+ (Digital Audio Broadcasting, radio numérique) . . . . . . . . . . . . . . . . . . . . . . . . . . . . . . . . . 23 Tuner. . . . . . . . . . . . . . . . . . . . . . . . . . . . . . . . . . . . . . 23 Changement de l’écran d’informations . . . . . . . . . . . . 24 Mémorisation d’une station . . . . . . . . . . . . . . . . . . . . . 24 Tableau de fréquence DAB (BANDE III). . . . . . . . . . . 24 08 Autres raccordements Connexion de composants auxiliaires . . . . . . . . . . . . . . 25 Commutation automatique sur l’entrée Audio In (Pour les modèles nord-américains uniquement) . . . . . . 25 09 Lecture audio Bluetooth® Lecture de musique par la technologie sans fil Bluetooth . . . . . . . . . . . . . . . . . . . . . . . . . . . . . . . . . . . . 26 Fonctionnement par télécommande . . . . . . . . . . . . . . . . 26 Association avec l’appareil (enregistrement initial) . . . . . 26 Écouter de la musique sur l’appareil à partir d’un périphérique sans fil Bluetooth . . . . . . . . . . . . . . . . . . . . 27 BT STANDBY . . . . . . . . . . . . . . . . . . . . . . . . . . . . . . . . . 27 Précaution concernant les ondes radio . . . . . . . . . . . . . 28 Limite de fonctionnement . . . . . . . . . . . . . . . . . . . . . . 28 Réflexions des ondes radio. . . . . . . . . . . . . . . . . . . . . 28 Précautions relatives aux connexions à des produits pris en compte par cet appareil . . . . . . . . . . . . . . . . . . . . . 28 10 Informations supplémentaires Guide de dépannage . . . . . . . . . . . . . . . . . . . . . . . . . . . Types de disque et formats de fichier lisibles . . . . . . . . . À propos des CD protégés contre la copie . . . . . . . . . Formats de fichiers audio pris en charge . . . . . . . . . . Précautions d’utilisation . . . . . . . . . . . . . . . . . . . . . . . . . Lors d’un déplacement de l’appareil . . . . . . . . . . . . . . Emplacement d’installation . . . . . . . . . . . . . . . . . . . . . Ne posez pas d’objets sur cet appareil . . . . . . . . . . . . À propos de la condensation . . . . . . . . . . . . . . . . . . . Nettoyage de l’appareil . . . . . . . . . . . . . . . . . . . . . . . . Nettoyage de la lentille . . . . . . . . . . . . . . . . . . . . . . . . Manipulation d’un disque . . . . . . . . . . . . . . . . . . . . . . . . Rangement . . . . . . . . . . . . . . . . . . . . . . . . . . . . . . . . . Nettoyage des disques . . . . . . . . . . . . . . . . . . . . . . . . À propos des disques de forme particulière . . . . . . . . Configuration de la fonction de mise hors tension automatique . . . . . . . . . . . . . . . . . . . . . . . . . . . . . . . . . . Rétablissement de tous les réglages à leur valeur par défaut . . . . . . . . . . . . . . . . . . . . . . . . . . . . . . . . . . . . . . . Spécifications . . . . . . . . . . . . . . . . . . . . . . . . . . . . . . . . . 29 31 32 32 32 32 32 32 32 32 32 33 33 33 33 33 33 34 X-HM16_26_26D_Fr.book 5 ページ 2016年7月22日 金曜日 午後5時11分 Préparatifs 01 English Chapitre 1 : Préparatifs Utilisation de la télécommande La télécommande a une portée d’environ 7 mètres avec un angle de 30° par rapport au capteur de télécommande. T 2 Refermez le couvercle arrière. 30° ATTENTION • N’utilisez que les piles spécifiées à l’exclusion de toute autre. N’utilisez pas non plus une pile neuve avec une pile usée. • Lors de l’insertion des piles, veillez à ne pas endommager les ressorts des bornes - de chaque pile. Les piles risqueraient de fuir ou de surchauffer. • Lorsque vous insérez les piles dans la télécommande, orientez-les correctement, comme indiqué par les symboles de polarité (+ et -). Pyccкий 7m Gardez à l’esprit ce qui suit lorsque vous utilisez la télécommande : • Assurez-vous de l’absence d’obstacles entre la télécommande et le capteur de l’appareil. • La télécommande risque de ne pas fonctionner correctement si la lumière du soleil ou une lampe fluorescente puissante éclaire le capteur de l’appareil. • Les télécommandes d’autres appareils peuvent interférer les unes sur les autres. Évitez d’utiliser des télécommandes, contrôlant d’autres équipements placés à proximité de cet appareil. • Remplacez les piles lorsque vous constatez une diminution de la portée de fonctionnement de la télécommande. Nederlands INPU 30° Deutsch 1 Ouvrez le couvercle arrière et insérez les piles comme sur l’illustration ci-dessous. AVERTISSEMENT N’utilisez ni ne conservez les piles sous la lumière directe du soleil ou dans un endroit excessivement chaud, comme une voiture ou à proximité d’un appareil de chauffage. Les piles risqueraient de fuir, de surchauffer, d’exploser ou de s’enflammer. Leur durée de vie et/ou leur performance pourrait également être réduite. Italiano Mise en place des piles dans la télécommande • Español Veuillez vérifier que les accessoires suivants sont présents dans la boîte quand vous l’ouvrez. • Télécommande • Piles « AAA (R03) » x 2 • Cordon d’alimentation • Câble d’antenne AM*1 • Antenne FM à fil*2 • Antenne filaire DAB/FM*3 • Carte de garantie*4 • Mode d’emploi (ce document) *1 Modèles nord-américains uniquement *2 X-HM16/X-HM26 uniquement *3 X-HM26D uniquement *4 Modèles européens uniquement • Ne chauffez pas les piles, ne les ouvrez pas et ne les jetez pas au feu ou dans l’eau. • Les piles peuvent avoir des tensions différentes, même si elles ont une taille et une forme identiques. N’utilisez pas ensemble différents types de piles. • Pour éviter toute fuite d’électrolyte, retirez les piles si vous prévoyez de ne pas utiliser la télécommande pendant un certain temps (1 mois ou plus). Si une pile devait suinter, essuyez soigneusement l’intérieur du logement, puis insérez de nouvelles piles. Si l’électrolyte d’une pile devait couler et se répandre sur votre peau, nettoyez le liquide avec une grande quantité d’eau. • Lorsque vous éliminez des piles / batteries usées, veuillez vous conformer aux normes gouvernementales ou aux règles des institutions publiques environnementales en vigueur dans votre pays ou région. Français Contenu de l’emballage 5 Fr X-HM16_26_26D_Fr.book 02 6 ページ 2016年7月22日 金曜日 午後5時11分 Les organes et leurs fonctions Chapitre 2 : Les organes et leurs fonctions 5 Télécommande PGM/MEMORY • Utiliser pour mémoriser ou programmer le CD (page 17). • Utiliser pour mettre en mémoire les stations FM/AM (page 20) ou DAB (page 24). 1 6 Touches de commande de la fonction de lecture 2 Ces touches permettent de contrôler chacune des fonctions après avoir sélectionné la fonction désirée à l’aide des touches de fonctions d’entrée (page 16). 10 11 3 TUNE +/– Utiliser pour trouver des fréquences radio (page 20). PRESET +/– 12 Ces touches permettent de sélectionner des stations de radio préréglées (page 20). 4 13 5 7 8 SLEEP Voir la section Utilisation du minuteur de mise en veille à la page 14. 6 14 Touches de contrôle du son Pour ajuster la qualité du son (page 13). 9 TIMER Pour le réglage de l’horloge, ainsi que pour la programmation et la vérification des minuteries (page 12). 7 15 16 8 9 10 Appuyer pour changer le paramètre de répétition de lecture d'un CD (page 16) ou de l'USB (page 19). 11 RANDOM Appuyer pour rendre aléatoire l'ordre de lecture d'un CD (page 16) ou de l'USB (page 19). 12 DISPLAY 1 Í Cette touche permet d’allumer le récepteur et de le mettre en veille (page 12). 2 Touches de fonction d’entrée Pour sélectionner la source d’entrée de ce récepteur (page 12). 3 Fr Appuyer pour revenir sur l’affichage précédent. 14 Touches de commande de préréglage Volume Pour ajuster le volume d’écoute (page 12). MENU Permet de couper/restaurer le son (page 12). / // , ENTER Utilisez ces touches pour sélectionner les paramètres du système, basculer entre les modes et confirmer les actions. 6 13 Pour configurer ou lire le fichier audio via le réseau Bluetooth (page 26). Pour accéder au menu. 4 Appuyer pour changer les informations d'affichage des MP3 (page 17), RDS (page 21) ou DAB (page 24). 15 16 DIMMER Permet d’obscurcir ou d’éclaircir l’affichage. Quatre étapes sont nécessaires pour commander la luminosité (page 12). X-HM16_26_26D_Fr.book 7 ページ 2016年7月22日 金曜日 午後5時11分 Les organes et leurs fonctions 02 1 2 3 4 5 English Panneau avant Français TIMER Español 1 7 8 9 Í STANDBY/ON 10 7 11 Prise casque / écouteurs Cette touche permet d’allumer le récepteur et de le mettre en veille (page 12). Permet de raccorder un casque. Lorsque le casque est branché, les enceintes ne fournissent aucun son. 2 8 Capteur de télécommande 3 Témoin TIMER Prise USB Utilisé pour raccorder votre périphérique de stockage USB comme source audio (page 18). S’allume lorsque l’appareil est en veille avec la fonction de minuterie activée. 9 4 10 Touches de commande de la fonction de lecture Afficheur principal Voir la section Afficheur à la page 8. Commande de volume Pour ajuster le volume d’écoute (page 12). 6 INPUT Permet de sélectionner la source d’entrée. Ces touches permettent de sélectionner la piste ou le fichier à lire. Pour arrêter la lecture. Pour arrêter la lecture ou reprendre la lecture à partir de l’endroit où elle a été mise en pause. 11 Touche d’ouverture/fermeture du tiroir disque Nederlands 5 Tiroir d’insertion du disque Placez le disque côté étiquette vers le haut (page 15). Deutsch Reçoit les signaux provenant de la télécommande. Italiano 6 Permet d’ouvrir ou de refermer le tiroir disque (page 15). Pyccкий 7 Fr X-HM16_26_26D_Fr.book 02 8 ページ 2016年7月22日 金曜日 午後5時11分 Les organes et leurs fonctions Afficheur 1 2 3 4 1 3 ; S’allume lorsque le son est coupé. Pour mettre la lecture en pause. 5 4 Remarque La fonction réveille-matin est activée. • L’icône de silence est affichée en rouge. 2 5 1 Enceintes Acoustiques 1 3 2 1 Aigu 2 Grave 3 Bornes d’enceintes Important • La grille du haut-parleur ne peut pas être enlevée. • Chacune des deux enceintes peut être utilisée indifféremment comme enceinte droite ou gauche. 8 Fr Afficheur alphanumérique Affiche diverses informations sur le système. Permet de lancer la lecture. X-HM16_26_26D_Fr.book 9 ページ 2016年7月22日 金曜日 午後5時11分 Connexions 03 English Chapitre 3 : Connexions • Poussez sur les languettes pour les ouvrir et insérez le fil dénudé. • Branchez le fil noir à la borne (s), et le fil rouge à la borne (r). Enceinte gauche Deutsch Panneau arriere de cet apparei Italiano Enceinte droite Español Raccordement des enceintes ATTENTION • Les bornes des haut-parleurs sont sous une tension ACTIVE DANGEREUSE. Pour éviter tout risque de décharge électrique lors du branchement et du débranchement des câbles de haut-parleur, débranchez le cordon d’alimentation avant de toucher des parties non isolées. • Ne raccordez à ce système aucun haut-parleur autre que ceux qui sont fournis. • Ne raccordez pas les haut-parleurs fournis à un amplificateur autre que celui fourni avec ce système. Une telle connexion pourrait provoquer une défaillance, voire un incendie. • Ne fixez pas ces enceintes sur un mur ou au plafond. Ils pourraient causer des blessures en tombant. • Ces enceintes sont protégées contre les interférences électromagnétiques. Toutefois, selon l’emplacement d’installation, un phénomène de distorsion des couleurs peut se produire dans le cas où les enceintes sont installées à proximité immédiate de l’écran du téléviseur. Dans ce cas, mettez le téléviseur hors tension puis remettez-le sous tension après 15 à 30 minutes. Si le problème persiste, éloignez les enceintes du téléviseur. • Vérifiez que les âmes des câbles d’enceintes ne soient pas exposées et qu’elles ne viennent pas en contact avec les âmes des autres câbles. Ceci pourrait causer un dysfonctionnement de l’appareil. • Ne laissez pas l’âme des câbles d’enceintes venir en contact avec le boîtier du récepteur. Français ATTENTION • Veillez à mettre l’appareil hors tension et à débrancher le cordon d’alimentation de la prise secteur à chaque fois que vous effectuez ou que vous modifiez des connexions. • Branchez le cordon d’alimentation une fois que toutes les connexions entre les différents équipements ont été effectuées. Nederlands Pyccкий • Si l’âme des câbles d’enceintes entraient en contact avec une partie métallique du boîtier du récepteur, cela créerait un court-circuit qui pourrait endommager les enceintes et provoquer un départ de feu. Insérez correctement les câbles d’enceintes dans les bornes et vérifiez que les câbles ne peuvent pas se détacher facilement. Remarque • Il n’y a aucune différence entre les enceintes gauche (L) et droite (R). 9 Fr X-HM16_26_26D_Fr.book 03 10 ページ 2016年7月22日 金曜日 午後5時11分 Connexions Raccordement des antennes • Raccordez l’antenne cadre AM et l’antenne filaire FM (DAB/FM) comme indiqué ci-dessous. • Pour améliorer la réception et la qualité du son, raccordez les antennes externes (voir la section Utilisation des antennes externes ci-dessous). 3 Placez l’antenne AM sur une surface plane en l’orientant vers une direction qui offre la meilleure réception. • Placez l’antenne à proximité d’une fenêtre ou autre, pour obtenir la meilleure réception. • Ne placez pas l’antenne à proximité d’un ordinateur ou d’une télévision. Il peut en résulter des parasites. 4 Raccordez l’antenne filaire FM (DAB/FM) à la prise d’antenne FM. Pour les modèles nord-américains uniquement Pour de meilleurs résultats, déroulez l’antenne FM (DAB/ FM) et fixez-la sur un mur ou sur un encadrement de porte. Tendez-la, elle ne doit pas être enroulée. 2 Utilisation des antennes externes 3 1 Pour améliorer la réception FM Utilisez un connecteur de type PAL (non fourni) pour raccorder une antenne FM (DAB/FM) externe. 2 X-HM16/ X-HM26 4 Connecteur PAL simple 3 1 Pour les modèles européens X-HM16/X-HM26 4 X-HM26D 1 Branchez le cordon de l’antenne AM. Saisissez le connecteur pour le raccorder à la prise AM. 2 Reliez l’antenne cadre AM au pied joint. Configurez comme illustré ci-dessus. 10 Fr X-HM26D Câble coaxial 75 Ω X-HM16_26_26D_Fr.book 11 ページ 2016年7月22日 金曜日 午後5時11分 Connexions 03 Avant d’effectuer ou de modifier les raccordements, mettez l’appareil hors tension et débranchez le cordon d’alimentation au niveau de la prise secteur. Après avoir effectué toutes les connexions, branchez l’appareil sur une prise secteur. Français Panneau arrière de cet appareil English Branchement Español Cordon d’alimentation ATTENTION • N’utilisez aucun autre cordon d’alimentation que celui fourni avec cet appareil. • N’utilisez pas le cordon d’alimentation fourni pour un usage autre que celui décrit ci-dessus. Italiano À la prise secteur Deutsch Nederlands Pyccкий 11 Fr X-HM16_26_26D_Fr.book 04 12 ページ 2016年7月22日 金曜日 午後5時11分 Pour commencer Chapitre 4 : Pour commencer Pour allumer l’appareil Commandes générales Appuyez sur la touche Í pour mettre l’appareil sous tension. Après utilisation : Fonction d’entrée Appuyez sur Í pour passer en mode veille. La touche INPUT située sur le panneau supérieur de l’appareil permet de permuter la source d’entrée. Appuyez sur la touche INPUT à plusieurs reprises pour sélectionner la source souhaitée. Réglage de l’horloge CD Audio In *1 *2 DAB*1 Bluetooth USB AM*2 FM X-HM26D uniquement Modèles nord-américains uniquement Contrôle de la luminosité de l’affichage 1 Appuyez sur Í pour la mise sous tension. 2 Appuyez sur la touche TIMER de la télécommande. « CLOCK » apparaît sur l’afficheur principal. 3 Appuyez sur la touche ENTER. 4 Utilisez les touches / puis appuyez sur ENTER. pour régler le jour, 5 Utilisez les touches / pour régler l’heure, puis appuyez sur ENTER. 6 Utilisez les touches / pour régler les minutes, puis appuyez sur ENTER pour confirmer. 7 Appuyez sur la touche ENTER. Pour vérifier l’heure : Appuyez sur TIMER. L’afficheur indiquera l’heure pour 10 secondes environ. Pour remettre l’horloge à l’heure : Suivez la procédure de « Réglage de l’horloge » à partir de l’étape 1. Remarque • Remettre l’horloge à l’heure lorsque l’alimentation est rétablie après que l’appareil ait été rebranché ou après une panne d’électricité. 12 Fr Appuyez sur la touche DIMMER pour atténuer la luminosité de l’affichage. Quatre étapes sont nécessaires pour commander la luminosité. Réglage automatique du volume initial Si vous avez arrêté l’appareil avec le volume réglé à un niveau supérieur ou égal à 31, le volume est abaissé à 30 lors de la prochaine utilisation de l’appareil, avant d’être rétabli au niveau précédemment réglé. Commande de volume Tourner le bouton du volume vers VOLUME (sur l’appareil principal) ou appuyer sur VOL +/– (sur la télécommande) pour augmenter ou baisser le volume. ATTENTION • Le niveau sonore émis à un réglage donné du volume dépend, entre autres facteurs, du rendement des enceintes et du lieu d’utilisation. Il est conseillé d’éviter l’exposition à des niveaux de volume élevés. Éviter de trop élever le volume. Écoutez de la musique à des niveaux modérés. Un volume sonore excessif émis par les écouteurs et le casque peut endommager l’ouïe. Sourdine Pour couper le son temporairement, maintenez enfoncé la touche de la télécommande. Appuyer de nouveau pour restaurer le volume. X-HM16_26_26D_Fr.book 13 ページ 2016年7月22日 金曜日 午後5時11分 Pour commencer 04 Réglage de l’alarme de réveil Equalizer Vous pouvez modifier les réglages de l’alarme de réveillematin en cours ou définir une nouvelle alarme. FLAT Son de base à caractéristique plate Son puissant avec accentuation des registres grave et aigu DIALOGUE Son permettant une meilleure écoute de la radio et de la parole NIGHT Son permettant une meilleure écoute à bas volume, par exemple la nuit Lors de la première mise sous tension de l’appareil, le mode P.bass est activé. Ce mode accentue les fréquences graves. Pour annuler le mode P.bass, appuyez sur la touche P.BASS de la télécommande. Appuyez sur SOUND pour sélectionner « BASS » ou « TREBLE », puis appuyez sur / pour régler les graves ou les aigus. Remarque Lorsqu’une des deux fonctions ci-dessus est sélectionnée, la fonction qui n’est pas sélectionnée est affichée comme suit. • EQ : FLAT 2 Lorsque le réglage de la fonction EQ est changé. 4 Appuyez sur la touche / pour sélectionner l’option « TIMER SET », puis appuyez sur la touche ENTER. 5 Appuyez sur la touche / pour sélectionner la source de lecture utilisée par le réveil, puis appuyez sur la touche ENTER. CD, DAB (X-HM26D uniquement), FM, AM (Modèles nordaméricains uniquement), et USB peuvent être sélectionnés comme source de lecture. 6 Appuyez sur la touche / pour sélectionner le jour de l’alarme, puis appuyez sur la touche ENTER. 7 Appuyez sur la touche / pour régler l’heure, puis appuyez sur ENTER. 8 Appuyez sur la touche / pour définir les minutes, puis appuyez sur ENTER. Programmer l’heure d’arrêt comme décrit dans les étapes 7 et 8. 9 Réglez le volume à l’aide de la touche VOL +/–, puis appuyez sur ENTER. « » apparait sur l'afficheur. 10 Appuyez sur Í pour passer en mode veille. Le voyant TIMER s’allume. Pyccкий 1 Lorsque le réglage de la fonction P.BASS (ON/OFF) est changé. ONCE – La programmation unique se déroule une seule fois à l’heure programmée. DAILY – L’alarme quotidienne (DAILY) du réveil se déclenche les jours de la semaine et à l’heure qui ont été préréglés. Nederlands • Les fonctions EQ et P.BASS ne peuvent pas être utilisées simultanément. La dernière fonction à avoir été utilisée sera utilisée la prochaine fois. • La fonction SOUND peut être utilisée simultanément avec les fonctions EQ ou P.BASS. 3 Appuyez sur la touche / pour sélectionner « ONCE » (une fois) ou « DAILY » (tous les jours), puis appuyez sur ENTER. Deutsch Touche de réglage grave/aigu 2 Appuyez de façon prolongée sur TIMER sur la télécommande. Italiano Touche P.bass Appuyez sur Í pour la mise sous tension. Español ACTIVE 1 Français Lorsque vous appuyez sur la touche EQ, le mode en cours est affiché. Pour changer de mode, appuyez à plusieurs reprises sur la touche EQ jusqu’à ce que le mode audio souhaité s’affiche. English Commandes de son • P.BASS : OFF 13 Fr X-HM16_26_26D_Fr.book 04 14 ページ 2016年7月22日 金曜日 午後5時11分 Pour commencer Rappel de l’alarme de réveil Cette procédure permet de réutiliser les réglages d’une alarme existante. 1 Suivez les étapes 1 à 3 de la procédure « Réglage de l’alarme de réveil ». Utilisation avec un casque Branchez le casque sur la prise PHONES située sur le panneau avant de l’appareil. Lorsque le casque est branché, les enceintes ne fournissent aucun son. 2 Appuyez sur / pour sélectionner « TIMER ON », puis appuyez sur ENTER. TIMER Annulation de l’alarme de réveil Cette procédure permet de désactiver lalarme de réveil. 1 Suivez les étapes 1 à 3 de la procédure « Réglage de l’alarme de réveil ». 2 Appuyez sur / pour sélectionner « TIMER OFF », puis appuyez sur ENTER. Utilisation du réveil 1 Appuyez sur Í pour couper l’alimentation. 2 Au moment du réveil, cet appareil sera automatiquement mis sous tension et il fera entendre la source d’entrée sélectionnée. Remarque • Si à l'heure du réveil le périphérique de stockage USB n'est pas raccordé à cet appareil ou si aucun disque n'est présent, cet appareil se mettra en marche mais ne lira aucune piste. • Certains disques ne conviennent pas à une lecture automatique au moment du réveil. • Lorsque vous réglez le minuteur, définissez une durée supérieure ou égale à une minute entre le début et la fin. Utilisation du minuteur de mise en veille Le minuteur de mise en veille met l’appareil hors tension après le délai spécifié pour que vous puissiez vous endormir l’esprit tranquille. 1 Appuyez de façon répétée sur SLEEP pour sélectionner la durée avant la mise à l’arrêt. Choisissez enter 10 min, 20 min, 30 min, 60 min, 90 min, 120 min, 150 min, 180 min ou Hors service. La nouvelle valeur programmée s’affiche pendant 3 secondes et le réglage est ainsi terminé. Remarque • Le minuteur de mise en veille peut être réglé en appuyant sur SLEEP pendant que la durée restante est affichée. 14 Fr • Ne pas tourner le volume à fond à la mise en route et écouter la musique à des niveaux modérés. Un volume sonore excessif émis par les écouteurs et le casque peut endommager l’ouïe. • Avant de brancher ou de débrancher le casque, réduire le niveau sonore. • Utiliser un casque muni d’une fiche de 3,5 mm de diamètre et ayant une impédance de 16 à 50 ohms. L’impédance préconisée est de 32 ohms. X-HM16_26_26D_Fr.book 15 ページ 2016年7月22日 金曜日 午後5時11分 Lecture de disque 05 Lecture de disque Lire les fichiers musicaux MP3 Les données d'une piste MP3 sont appelées « music file » et l'endroit où ils sont stockés est appelé « folder » dans ce document. Ex : Lecture de disques ou de fichiers 1 Appuyez sur Í pour la mise sous tension. 3 Appuyez sur la touche < de l'appareil principal pour ouvrir le plateau du disque. 4 Placez le disque sur le tiroir disque, côté étiquette vers le haut. • Répétez cette étape s'il y a d'autres dossiers dans le dossier sélectionné. • Pour revenir dans le dossier précédent, appuyez sur ou sur . • Une fois que la lecture démarre, seuls les fichiers musicaux présents à l'intérieur d'un même dossier peuvent être lus à la suite. Lire les pistes du CD Après la lecture de la dernière plage, l’appareil s’arrête automatiquement. Remarque • L’appareil prend plus de temps (environ 20 à 90 secondes) pour lire un disque MP3 qu’un CD ordinaire à cause de la structure de ses informations. • Lorsque le début de la première piste est atteint en cours de retour rapide, l’appareil passe en mode lecture (uniquement pour les CD). • En cas de parasites sur télévision ou radio au cours de l’utilisation de disques, éloigner l’appareil du téléviseur ou du poste de radio. Pyccкий 1 Lorsque la reconnaissance est terminée, appuyez sur 1;. Nederlands 5 Appuyez sur la touche < de l'appareil principal pour fermer le plateau du disque. ATTENTION • Ne placez pas deux disques dans un seul tiroir de disque. • Ne pas utiliser de disques de formes spéciales (cœur, octogone, etc.). Ceci risque de provoquer des dysfonctionnements. • Ne pas pousser le tiroir en cours de mouvement. • S’il se produit une panne de courant alors que le tiroir est ouvert, attendre le rétablissement du courant. • Penser à placer le disque de 8 cm au centre du tiroir de disque. Deutsch 2 Appuyez sur / pour sélectionner le fichier musical ([ ]), puis appuyez sur 1; ou ENTER. Italiano 2 Appuyez sur la touche CD de la télécommande ou utilisez la touche INPUT de l’appareil pour sélectionner la source d’entrée CD. 1 Lorsque la reconnaissance est terminée, appuyez sur / pour sélectionner le dossier où le fichier musical est stocké ([ ]), puis appuyez sur ou sur ENTER. Español Charger le disque Français Ce système peut lire les CD, CD-R/RW au format CD et les CD-R/RW contenant des fichiers MP3 mais il ne peut pas les enregistrer. Certains CD-R et CD-RW audio pourraient ne pas pouvoir être lus à cause de leur état ou du dispositif qui a été utilisé pour les enregistrer. • Pour avoir des détails sur le MP3, lire la page 31. English Chapitre 5 : 15 Fr X-HM16_26_26D_Fr.book 05 16 ページ 2016年7月22日 金曜日 午後5時11分 Lecture de disque Astuce • Si aucune opération n’a été effectuée en mode CD ou si le fichier audio n’a pas été lu depuis plus de 20 minutes, l’appareil se met automatiquement hors tension. Pour cela, il est nécessaire d’activer (ON) la fonction d’arrêt automatique la fonction de mise hors tension automatique. • La fonction de mise hors tension automatique peut être activée/désactivée (ON/OFF) (page 33). Lecture avancée de disques CD ou MP3 Commandes de base Fonction Appareil principal Télécommande Opération Lecture Presser en mode d’arrêt. Arrêt Utilisable en cours de lecture. (en lisant un CD) « RESUME » s'affiche et la position où vous avez arrêté la lecture est mémorisée. Appuyez de nouveau et la position mémorisée est effacée. Lecture répétée Utilisable en cours de lecture. Appuyez sur la touche 1; pour reprendre la lecture à partir du point où la lecture a été mise en pause. Pour répéter tous les morceaux : Presser en mode de lecture ou d’arrêt. Si vous appuyez sur ces touches lorsque la lecture est à l’arrêt, appuyez ensuite sur la touche 1; pour commencer la lecture de la piste souhaitée. (En lisant un MP3) Vous ne pouvez que naviguer parmi les fichiers musicaux présents à l'intérieur d'un même dossier. Effectuez les étapes 1 - 5 de la section « Lecture des morceaux programmés (CD) » (page 17) puis appuyez Pause Plage haut/bas Avance rapide/ inversion Presser en mode de lecture et la maintenir enfoncée. Relâcher la touche pour reprendre la lecture. Avec répétition lecture, l’appareil peut relire continuellement une piste toutes les pistes ou une séquence programmée. Pour répéter la lecture d’une piste : Appuyez à plusieurs reprises sur la touche jusqu’à ce que l’indication « REPEAT ONE » apparaisse. Appuyez sur la touche ENTER. Appuyez à plusieurs reprises sur la touche jusqu’à ce que l’indication « REPEAT ALL » apparaisse. Appuyez sur la touche ENTER. Pour répéter des morceaux souhaités : plusieurs fois sur jusqu'à ce que « REPEAT ALL » apparaisse. Appuyez sur ENTER. Pour annuler la répétition : Appuyez à plusieurs reprises sur la touche jusqu’à ce que l’indication « REPEAT OFF » apparaisse. Appuyez sur la touche ENTER. Remarque • Après avoir utilisé la lecture répétée, n’oubliez pas d’appuyer sur la touche ∫. Sinon, le disque sera lu continuellement. • Pendant la lecture répétée, la lecture aléatoire n’est pas disponible. Lecture aléatoire Les plages du disque peuvent être lues automatiquement en ordre aléatoire. Pour lire tous les morceaux dans un ordre aléatoire : Appuyez à plusieurs reprises sur la touche RANDOM jusqu’à ce que l’indication « RANDOM ON » apparaisse. Appuyez sur la touche ENTER. 16 Fr X-HM16_26_26D_Fr.book 17 ページ 2016年7月22日 金曜日 午後5時11分 Lecture de disque Appuyez à plusieurs reprises sur la touche RANDOM jusqu’à ce que l’indication « RANDOM OFF » apparaisse. Appuyez sur la touche ENTER. Remarque On peut sélectionner 24 morceaux (maxi) pour la lecture dans un ordre souhaité. 2 Appuyez sur : 9 pour sélectionner les pistes de votre choix. 4 Répétez les étapes 2 - 3 pour les autres pistes. Il est possible de programmer jusqu'à 24 pistes. 5 Appuyez sur 1; pour lancer la lecture du disque. Pour annuler la lecture des morceaux programmés : Ajout de pistes à la programmation : Appuyez sur PGM/MEMORY. Puis suivez les étapes 2 et 3 pour ajouter des pistes. Affichage du titre Numéro de la piste dans le dossier, affichage de la durée restante Affichage de l'artiste Numéro de la piste dans le dossier, affichage de la durée de lecture Affichage de l'album Remarque • « Not supported playback file » ne peut pas être lu. Dans ce cas, il sera passé automatiquement. • Dans certains cas, il est possible qu’aucune information ne puisse être affichée. • Les affichages du titre, du nom de l'artiste et des albums sont uniquement pris en charge par l'ID3 Version 1 (1.0 ou 1.1). Pyccкий Pour annuler la programmation de lecture, appuyez deux fois sur la touche ∫ de la télécommande. L’indication « PRG CLEAR » apparaît sur l’écran et tous les contenus programmés sont effacés. Numéro de la piste, affichage du titre Nederlands • Si vous souhaitez vérifier les pistes programmées, appuyez sur PGM/MEMORY. • En cas d’erreur, les dernières pistes programmées peuvent être effacées de la programmation en appuyant sur la touche . Appuyez sur DISPLAY durant la lecture. Si le titre, le nom de l’artiste et le nom de l’album ont été enregistrés dans le fichier, ces informations apparaissent sur l’affichage. (Cet appareil ne peut afficher que les caractères alphanumériques. Les caractères autres qu’alphanumériques sont remplacés à l’affichage par un astérisque « ∫ ».) Deutsch 3 Appuyez sur ENTER pour mémoriser le dossier et le numéro de piste. 1 Italiano 1 En mode arrêt, appuyez sur la touche PGM/ MEMORY pour accéder au mode de lecture programmée. Sélection des informations affichées Español Lecture des morceaux programmés (CD) Il y a de nombreux sites de musique sur l’Internet d’où on peut télécharger des fichiers musicaux MP3. Suivre les instructions de ces sites pour télécharger ce type de fichiers. Il est alors possible de lire ces fichiers musicaux téléchargés en les gravant sur un disque CD-R/RW. • Les chansons/fichiers téléchargés sont pour usage personnel seulement. Toute autre utilisation d’une chanson sans la permission du propriétaire est illégale. Français • Si vous appuyez sur la touche 9 pendant la lecture en mode aléatoire, vous pouvez accéder à la piste suivante sélectionnée par la fonction de lecture aléatoire. • Lors de la lecture au hasard, l’appareil reproduit des morceaux dans un ordre aléatoire. (Vous ne pouvez pas choisir l’ordre de lecture des pistes.) • Pendant la lecture aléatoire, la lecture répétée n’est pas disponible. À propos du téléchargement de fichiers MP3 English Pour annuler la lecture aléatoire : 05 Remarque • Lorsqu’un disque est éjecté, la programmation est automatiquement effacée. • Si vous appuyez sur la touche Í pour passer en mode veille ou si vous sélectionnez une source différente de CD, la programmation sera effacée. • La lecture aléatoire n’est pas possible en mode de lecture programmée. 17 Fr X-HM16_26_26D_Fr.book 06 18 ページ 2016年7月22日 金曜日 午後5時11分 Lecture USB Chapitre 6 : Lecture USB Lecture à partir d’un périphérique USB Il est possible d'écouter du son provenant de deux canaux avec les fichiers MP3 en utilisant l'interface USB située à l'avant de cet ampli-tuner. • Pioneer ne garantit pas que tout fichier enregistré sur un périphérique de stockage USB puisse être lu par l’appareil, ni que ce dernier puisse fournir l’alimentation nécessaire au périphérique de stockage USB. Notez aussi que Pioneer décline toute responsabilité en cas de perte de fichiers d’une clé USB, résultant de la connexion à cet appareil. • Pour avoir des détails sur le MP3, lire la page 31. 1 Sélectionnez USB comme source d’entrée. « USB » apparaît sur l’afficheur principal. 2 Connectez le périphérique de stockage USB. • Cet appareil ne prend pas en charge les concentrateurs USB. TIMER Périphérique de stockage USB (disponible dans le commerce) 3 Lorsque la reconnaissance est terminée, appuyez sur / pour sélectionner le dossier où le fichier musical est stocké ([ ]), puis appuyez sur ou sur ENTER. • Les données d'une piste MP3 sont appelées « music file » et l'endroit où ils sont stockés est appelé « folder » dans ce document. • Répétez cette étape s'il y a d'autres dossiers dans le dossier sélectionné. • Pour revenir dans le dossier précédent, appuyez sur ou sur . 18 Fr 4 Appuyez sur / pour sélectionner le fichier musical ([ ]), puis appuyez sur 1; ou ENTER. • Une fois que la lecture démarre, seuls les fichiers musicaux présents à l'intérieur d'un même dossier peuvent être lus à la suite. • Pour avoir plus de détails sur les commandes de base, lire la page 16. • Si vous souhaitez changer de source d’entrée, arrêtez d’abord la lecture de la musique stockée sur le périphérique USB, avant de changer de source. • Mettez l’appareil hors tension avant de débrancher le périphérique de stockage USB. Remarque • Il se peut que cet appareil ne reconnaisse pas certaines clés USB et qu’il ne puisse pas lire les fichiers ou fournir le courant à une clé mémoire USB. Pour plus de détails, voir la section Lorsqu’un périphérique de stockage USB est connecté à la page 30. • Si une clé mémoire USB n’est pas en cours de lecture et que l’appareil n’est pas utilisé pendant 20 minutes ou davantage, l’alimentation sera automatiquement coupée. Pour cela, il est nécessaire d’activer (ON) la fonction d’arrêt automatique la fonction de mise hors tension automatique (page 33). X-HM16_26_26D_Fr.book 19 ページ 2016年7月22日 金曜日 午後5時11分 Lecture USB Avec répétition lecture, l’appareil peut relire continuellement une piste toutes les pistes ou une séquence programmée. Pour répéter la lecture d’une piste : Appuyez à plusieurs reprises sur la touche jusqu’à ce que l’indication « REPEAT ONE » apparaisse. Appuyez sur la touche ENTER. Appuyez à plusieurs reprises sur la touche jusqu’à ce que l’indication « REPEAT ALL » apparaisse. Appuyez sur la touche ENTER. Pour annuler la répétition : Remarque Lecture aléatoire Un fichier sur un périphérique de stockage USB peut être lu automatiquement en ordre aléatoire. Appuyez à plusieurs reprises sur la touche RANDOM jusqu’à ce que l’indication « RANDOM ON » apparaisse. Appuyez sur la touche ENTER. Pour annuler la lecture aléatoire : Remarque Sélection des informations affichées Pyccкий • Si vous appuyez sur la touche 9 pendant la lecture en mode aléatoire, vous pouvez accéder à la piste suivante sélectionnée par la fonction de lecture aléatoire. • Lors de la lecture au hasard, l’appareil reproduit des morceaux dans un ordre aléatoire. (Vous ne pouvez pas choisir l’ordre de lecture des pistes.) • Pendant la lecture aléatoire, la lecture répétée n’est pas disponible. Nederlands Appuyez à plusieurs reprises sur la touche RANDOM jusqu’à ce que l’indication « RANDOM OFF » apparaisse. Appuyez sur la touche ENTER. Deutsch Pour lire tous les morceaux dans un ordre aléatoire : Italiano • Après avoir utilisé la lecture répétée, n’oubliez pas d’appuyer sur la touche ∫. Sinon, la lecture du fichier sur le périphérique de stockage USB continuera sans fin. • Pendant la lecture répétée, la lecture aléatoire n’est pas disponible. Español Appuyez à plusieurs reprises sur la touche jusqu’à ce que l’indication « REPEAT OFF » apparaisse. Appuyez sur la touche ENTER. Français Pour répéter tous les morceaux : English Lecture répétée 06 Cet appareil peut également afficher les informations enregistrées sur le périphérique de stockage USB. Pour plus de détails, voir la section Sélection des informations affichées à la page 17. 19 Fr X-HM16_26_26D_Fr.book 07 20 ページ 2016年7月22日 金曜日 午後5時11分 Utilisation du tuner Chapitre 7 : Utilisation du tuner Écoute en FM (Pour les modèles européens)/Écoute en FM ou AM (Pour les modèles nord-américains) Les étapes suivantes décrivent la façon de régler les bandes FM et AM à l’aide de la recherche automatique et des fonctions de réglage manuel. Une fois que le tuner est réglé sur une station, vous pouvez mémoriser sa fréquence pour accéder facilement à cette station plus tard. Voir la section Mémorisation des stations ci-dessous pour en savoir plus sur la façon de procéder. Remarque • En cas d’interférence/parasites radio, la recherche automatique peut s’arrêter automatiquement. • La recherche automatique ignore les stations de radio dont le signal est faible. • Pour arrêter la recherche automatique, appuyez sur ∫. • Lorsqu’une station de radio RDS (Radio Data System) est trouvée, sa fréquence s’affiche en premier. Le nom de la station apparaît ensuite. • La recherche automatique complète des stations peut être effectuée pour les stations RDS en utilisant le mode ASPM de mémorisation automatique des stations de radio (voir page 22). Pour recevoir une émission FM stéréo : 1 Appuyez sur TUNER jusqu'à ce que « FM » apparaisse sur l'afficheur. 2 Appuyez sur MENU puis appuyez sur / jusqu'à ce que « FM STEREO/MONO » apparaisse sur l'afficheur. 3 Appuyez sur ENTER puis appuyez sur / jusqu'à ce que « AUTO » apparaisse sur l'afficheur. Amélioration d'une mauvaise réception FM : Accord 1 Appuyez sur la touche Í pour mettre l’appareil sous tension. 2 Appuyez sur TUNER à plusieurs reprises pour sélectionner la bande de fréquence (FM ou AM). • (X-HM26D) Vous pouvez choisir entre « FM » et « DAB ». Pour avoir des détails sur le « DAB », lire la page 23. 3 Appuyez sur la touche TUNE +/– de la télécommande pour rechercher la station souhaitée. Réglage automatique : Appuyez sans relâcher sur la touche TUNE +/– ; le balayage des fréquences commence automatiquement et la recherche s’arrête à la première station de radio pouvant être captée. Accord manuel : Appuyez à plusieurs reprises sur la touche TUNE +/– de la télécommande pour rechercher la station souhaitée. 20 Fr Après avoir effectué les étapes 1 et 2 ci-dessus, appuyez sur ENTER puis appuyez sur / jusqu'à ce que « MONO » apparaisse sur l'afficheur. Le tuner passe du mode stéréo au mode mono, ce qui permet d’améliorer la qualité de réception en cas de mauvaise réception. Mémorisation des stations Si vous écoutez souvent une station de radio, il peut être pratique d’enregistrer sa fréquence dans le récepteur afin de pouvoir y accéder facilement lorsque vous le souhaitez (Stations préréglées). Ceci vous évite d’avoir à rechercher la fréquence chaque fois que vous désirez écouter cette station. Cet appareil peut mémoriser jusqu’à 45 stations. (30 stations FM / 15 stations AM) X-HM16_26_26D_Fr.book 21 ページ 2016年7月22日 金曜日 午後5時11分 Utilisation du tuner Pour plus d’information à ce sujet, voir la section Accord audessus. 2 Appuyez sur PGM/MEMORY. L’affichage du numéro de préréglage clignote. 4 Appuyez sur la touche PGM/MEMORY pour enregistrer la station dans la mémoire. • La fonction de sauvegarde conserve les réglages mémorisés pendant quelques heures en cas de panne de courant ou lorsque le cordon d’alimentation secteur est débranché. Rappel d’une station mémorisée Pour balayer les stations préréglées Pour effacer toute la mémoire 1 Appuyez sur la touche TUNER de la télécommande. Remarque Lorsqu’il s’agit d’une station non-RDS ou d’une station RDS portant de faibles signaux, l’affichage change comme suit : NO RDS FM 98.80 MHz Recherche des stations par type de programme 1 Appuyez sur TUNER jusqu'à ce que « FM » apparaisse sur l'afficheur. 2 Appuyez sur MENU puis appuyez sur / jusqu'à ce que « FM RDS » apparaisse sur l'afficheur. 3 Appuyez sur ENTER puis appuyez sur / jusqu'à ce que « PTY » apparaisse sur l'afficheur. 4 Appuyez sur ENTER. « SELECT » apparait pendant environ 5 secondes. 5 Appuyez sur / pour sélectionner le type de programme à écouter. Le type de programme affiché change à chaque pression sur la touche. Si vous maintenez la touche enfoncée, l’affichage des types de programme défile en continu. 6 Pendant que le type de programme sélectionné est affiché (5 secondes), appuyez sur ENTER. Le type de programme sélectionné s’affiche pendant 2 secondes, puis l’indication « SEARCH » apparaît et la recherche commence. Pyccкий 2 Appuyez sur la touche jusqu’à ce que l’indication « MEMORY CLEAR » apparaisse. Radio text (RT) Nederlands On peut balayer les stations mises en mémoire automatiquement. (Balayage dans la mémoire de présélection) 1 Appuyez sans relâcher sur la touche PRESET +/–. Le numéro de préréglage s’affiche et le tuner fait défiler les stations mémorisées en s’arrêtant 5 secondes sur chacune. 2 Appuyez de nouveau sur PRESET +/– lorsque le tuner passe sur la station souhaitée. Frequency Programme type (PTY) Deutsch Appuyez sur la touche PRESET +/– pour sélectionner la station souhaitée. Station name (PS) Italiano Remarque 1 Appuyez sur TUNER jusqu'à ce que « FM » apparaisse sur l'afficheur. 2 Appuyez plusieurs fois sur DISPLAY. À chaque pression sur la touche DISPLAY, l’affichage change comme suit : Español Si l’affichage du numéro de préréglage passe du mode clignotant au mode fixe avant que la station ne soit mise en mémoire, reprenez la procédure à partir de l’étape 2. • Renouveler les étapes 1 - 4 pour mémoriser d’autres stations ou remplacer une station mise en mémoire. Lorsqu’une nouvelle station est mémorisée, la station mémorisée auparavant sur le même numéro de chaîne sera effacée. Remarques au sujet du fonctionnement RDS Français 3 Appuyez sur la touche PRESET +/– pour choisir le numéro. L’une des fonctions du système RDS permet d’effectuer une recherche par type de programme. Par exemple, vous pouvez rechercher une station qui diffuse une émission ayant pour type de programme Jazz Music. English 1 Réglez une station que vous souhaitez mémoriser. 07 • Toutes les stations seront effacées. Utilisation du RDS (Radio Data System) (pour les modèles européens uniquement) Le système RDS (système de radiocommunication de données) est utilisé par la plupart des stations de radio FM pour fournir aux auditeurs différents types d’informations— notamment le nom de la station et le type d’émissions diffusées. 21 Fr X-HM16_26_26D_Fr.book 07 22 ページ 2016年7月22日 金曜日 午後5時11分 Utilisation du tuner Les types de programme affichés sont les suivants : News – Informations Current Affairs – Analyse de l’actualité Information – Informations d’ordre général Sport – Sport Education – Éducation Drama – Pièces radiophoniques, etc. Cultures – Culture nationale ou régionale, théâtre, etc. Science – Science et technologie Varied Speech – Habituellement programmes de discussion, quiz ou entretiens. Pop Music – Musique pop Rock Music – Musique rock Easy Listening – Écoute aisée Light Classics M – Musique classique « légère » Serious Classics – Musique classique « sérieuse » Other Music – Musique ne correspondant à aucune des catégories ci-dessus Weather & Metr – Bulletins météorologiques Finance – Rapports de bourse, commerce, ventes, etc. Children’s Progs – Programmes pour enfants Social affairs – Affaires sociales Religion – Programmes religieux Phone In – Opinion publique par téléphone Travel & Touring – Voyages et vacances, plutôt qu’annonces de circulation routière Leisure & Hobby – Loisirs et hobbies Jazz Music – Jazz Country Music – Musique country National Music – Musique populaire dans une autre langue que l’anglais Oldies Music – Musique populaire des années 50 et 60 Folk Music – Musique folk Documentary – Documentaires Alarm Test – Programme spécialement prévu pour tester les équipements ou les récepteurs radio d’urgence. Alarm - Alarm! – Annonce urgente, dans un cas exceptionnel, qui avertit d’un danger à venir. • Si l’affichage arrête de clignoter, renouveler l’opération depuis l’étape 2. Si l’appareil trouve une émission correspondant au type de programme sélectionné, le numéro de la station s’affiche pendant 8 secondes puis le nom de la station reste affiché. • Si vous désirez écouter le même type de programme d'une autre station, répétez les étapes 2 - 6. L'appareil cherchera la station suivante. • Si aucune station n’est trouvée, « NOT FOUND » apparaît pendant 4 secondes. Utilisation de la fonction de mémorisation automatique des stations de radio (ASPM) En mode ASPM, le tuner recherche automatiquement de nouvelles stations RDS. Jusqu’à 30 stations programmables. S’il y a des stations déjà mises en mémoire, le nombre de stations mémorisables est réduit d’autant. 1 Appuyez sur TUNER jusqu'à ce que « FM » apparaisse sur l'afficheur. 2 Appuyez sur MENU puis appuyez sur / jusqu'à ce que « FM RDS » apparaisse sur l'afficheur. 3 Appuyez sur ENTER puis appuyez sur / jusqu'à ce que « ASPM » apparaisse sur l'afficheur. 4 Appuyez sur ENTER. Le voyant « ASPM » clignote pendant environ 4 secondes, et le balayage démarre (87,5 - 108 MHz). 22 Fr Une fois le balayage terminé, le nombre de stations mémorisées s’affiche pendant 4 secondes, puis « END » apparaît pendant 4 secondes. • Pour arrêter l'ASPM avant la fin : Appuyez sur ∫ pendant le balayage des stations. Les stations qui auront déjà été mémorisées le resteront. • Si une station diffuse sur deux fréquences différentes, la plus forte sera mise en mémoire. • L’appareil ignore une station utilisant la même fréquence que celle de la station déjà mise en mémoire. • S’il y a 30 stations déjà stockées en mémoire, la recherche sera annulée. Pour refaire l’opération ASPM, effacer des stations. • Si aucune stations n’est mise en mémoire, l’appareil affiche « NOT FOUND » pendant 5 secondes environ. • Si des signaux RDS sont faibles, le nom de station peut ne pas être mémorisé. • Il est possible de stocker une station dans deux canaux différents. • Selon la région ou l’époque de l’année, les noms de stations peuvent changer. Remarque • Il ne s’agit pas d’un mauvais fonctionnement même si l’un des cas suivants se présente : - L’indication « PS », « NO PS » et un nom de station s’affichent tour à tour et de manière correcte. - Lorsqu’il s’agit d’une station ne diffusant pas correctement ou d’une station en cours d’essai, la fonction RDS ne fonctionne pas de façon souhaitée. - S’il s’agit d’une station RDS portant de faibles signaux, l’appareil n’arrive pas à afficher le nom de la station. - « NO PS », « NO PYT » ou « NO RT » clignote environ 5 secondes et la fréquence s’affiche. • Remarques au sujet du texte radio : - Les 8 premiers caractères des données texte de la station radio s’affichent, puis le reste du texte défile à l’affichage. - Si on capte une station RDS n’émettant pas de texte radio, l’appareil affiche « NO RT » au passage en position de texte radio. - L’appareil affiche « RT » pendant la réception de texte radio ou chaque fois que le texte change. X-HM16_26_26D_Fr.book 23 ページ 2016年7月22日 金曜日 午後5時11分 Utilisation du tuner 07 SIGNAL DAB+ MULTIPLEX (ENSEMBLE) Tuner Accord manuel Vous pouvez stocker manuellement des stations que le balayage automatique ne peut pas trouver. Si la réception est faible, vous pouvez régler la sensibilité. Un accord manuel n’est possible qu’après un accord automatique. Effectuez tout d’abord un balayage automatique. 1 Appuyez sur TUNER jusqu’à ce que « DAB » s’affiche sur l’écran. 2 Appuyez sur MENU puis appuyez sur / jusqu'à ce que « DAB SCAN » apparaisse sur l'afficheur. 3 Appuyez sur ENTER puis appuyez sur / jusqu'à ce que « MANUAL » apparaisse sur l'afficheur. 4 Appuyez sur ENTER. 5 Dans les 10 secondes, appuyez sur TUNE +/– pour sélectionner la fréquence DAB+. 6 Dans les 10 secondes, appuyez sur ENTER. • Si le niveau est trop faible, déplacez l’antenne ou l’appareil pour améliorer la réception. Nederlands Pyccкий 1 Appuyez sur TUNER jusqu’à ce que « DAB » s’affiche sur l’écran. Vous pourrez effectuer de nouveau le balayage automatique si vous déplacez l'appareil dans un autre endroit ou si vous ajoutez des canaux multiplex à la liste des stations. 1 Appuyez sur TUNER jusqu’à ce que « DAB » s’affiche sur l’écran. 2 Appuyez sur MENU puis appuyez sur / jusqu'à ce que « DAB SCAN » apparaisse sur l'afficheur. 3 Appuyez sur ENTER puis appuyez sur / jusqu'à ce que « AUTO » apparaisse sur l'afficheur. 4 Appuyez sur ENTER. Le balayage automatique commence. Après la fin du balayage, la première station trouvée est sélectionnée. Deutsch COMPOSANTS DES SERVICES (STATIONS) Balayage automatique Italiano SERVICES • Si aucune station n’est trouvée, l’indication « NO SIGNAL » s’affiche. • Un total de 100 stations reçues peut s’afficher. Español Digital Audio Broadcasting est un système de transmission numérique dans lequel les signaux audio sont convertis en signaux numériques pour la diffusion. La radio DAB+ est diffusée en tant que groupe de données appelé un multiplex (ensemble) qui peut contenir une ou plusieurs stations (services). Chaque station contient un service principal et un ou plusieurs services secondaires. Ceci permet la transmission de plusieurs programmes ou services sur une même fréquence. 3 Dans les 10 secondes qui suivent, appuyez sur ENTER sur la télécommande pour accorder la station souhaitée. Français À propos de DAB+ (Digital Audio Broadcasting, radio numérique) 2 Appuyez sur TUNE +/– pour sélectionner la station de votre choix. English Écoute du DAB+ (X-HM26D uniquement) Lorsqu'il est mis en marche pour la première fois, l'appareil effectue automatiquement un balayage des stations radio pour créer une liste de stations. Les stations seront mémorisées par ordre alphanumérique, la première station de la liste sera choisie et vous pourrez l'entendre par les enceintes. 23 Fr X-HM16_26_26D_Fr.book 07 24 ページ 2016年7月22日 金曜日 午後5時11分 Utilisation du tuner Changement de l’écran d’informations Vous pouvez changer les informations DAB+ affichées. Appuyez sur le bouton DISPLAY. Chaque fois que vous appuyez sur le bouton, l’écran d’informations change dans l’ordre suivant. Lorsque « NO SIGNAL » s’affiche, le bouton DISPLAY ne vous permet pas de changer l’affichage. [Nom du programme] Le nom de la station s’affiche. (réglé par défaut) [Défilement du texte] Tableau de fréquence DAB (BANDE III) Fréquence Intitulé Fréquence Intitulé Les informations, envoyées par la station, défilent à l’écran. 5A 208.064 MHz 9D [Type de programme] 176.640 MHz 5B 209.936 MHz 10A Une description du type de contenu diffusé par la station. 178.352 MHz 5C 211.648 MHz 10B [Nom de multiplex] 180.064 MHz 5D 213.360 MHz 10C 181.936 MHz 6A 215.072 MHz 10D La fréquence DAB+ de la station. 183.648 MHz 6B 216.928 MHz 11A [Mode stéréo] 185.360 MHz 6C 218.640 MHz 11B 187.072 MHz 6D 220.352 MHz 11C 188.928 MHz 7A 222.064 MHz 11D [Qualité du signal] 190.640 MHz 7B 223.936 MHz 12A La qualité du signal s’affiche sous la forme d’un nombre (0 à 100). [85-100 : bonne, 70-84 : juste, 0-69 : faible] 192.352 MHz 7C 225.648 MHz 12B 194.064 MHz 7D 227.360 MHz 12C Mémorisation d’une station 195.936 MHz 8A 229.072 MHz 12D Vous pouvez stocker 10 stations DAB en mémoire et les rappeler d’une simple pression sur un bouton. (Accord sur présélection) 197.648 MHz 8B 230.784 MHz 13A 199.360 MHz 8C 232.496 MHz 13B 1 Accordez la station DAB souhaitée. 201.072 MHz 8D 234.208 MHz 13C 2 Appuyez sur PGM/MEMORY. 202.928 MHz 9A 235.776 MHz 13D 204.640 MHz 9B 237.488 MHz 13E 206.352 MHz 9C 239.200 MHz 13F [Fréquence] Mode stéréo de l’écran. [Vitesse de transfert] La vitesse de transfert de données. Le numéro de présélection clignote. 3 Dans les 10 secondes qui suivent, appuyez sur PRESET +/– pour sélectionner le numéro de canal de présélection. Stockez les stations en mémoire, dans l’ordre, en commençant par le canal de présélection 1. 4 Dans les 10 secondes qui suivent, appuyez sur PGM/MEMORY pour stocker cette station en mémoire. Si les indicateurs de numéro de présélection disparaissent avant que la station n’ait été mémorisée, répétez l’opération à partir de l’étape 2. Fr Lorsqu’une nouvelle station est stockée en mémoire, la station précédemment mémorisée pour ce numéro de canal de présélection est effacée. 174.928 MHz Le nom du multiplex (ensemble) proposant le service actuel. 24 5 Répétez les étapes 1 à 4 pour régler d’autres stations ou pour modifier une station de présélection. X-HM16_26_26D_Fr.book 25 ページ 2016年7月22日 金曜日 午後5時11分 Autres raccordements 08 English Chapitre 8 : Autres raccordements Branchez à la mini-prise AUDIO IN du panneau arrière votre appareil de lecture auxiliaire. Cette fonction passe automatiquement sur “AUDIO IN” lorsque l’entrée du son s’effectue par la prise AUDIO IN. 1 Appuyez sur MENU puis appuyez sur / jusqu'à ce que “Audio In detect” apparaisse sur l'afficheur. 2 Appuyez sur ENTER puis appuyez sur / pour commuter Audio In detect sur ON/OFF. Español Connexion de composants auxiliaires Commutation automatique sur l’entrée Audio In (Pour les modèles nord-américains uniquement) Français ATTENTION • Avant d’effectuer ou de modifier les raccordements, mettez l’appareil hors tension et débranchez le cordon d’alimentation au niveau de la prise secteur. • Nous n'acceptons en aucun cas la responsabilité pour des dommages résultant d'une connexion à des équipements fabriqués par d'autres sociétés. • Le réglage d’usine est OFF. Lecteur audio portable, etc. Remarque • Si le jack à mini-fiche AUDIO IN est branché sur la prise auxiliaire de casque, le volume de l’appareil sera ajusté par la commande de volume du composant de lecture. Si la qualité du son est affectée lorsque vous baissez le volume sur l’appareil, essayez de baisser le volume sur l’équipement de lecture externe. Pyccкий Lorsque la source d’entrée AUDIO IN est sélectionnée, l’indication « Audio In » apparaît à l’affichage. Nederlands 1 Sélectionnez AUDIO comme source d’entrée. Deutsch Câble stéréo fiche mini de 3,5 mm (disponible dans le commerce) Italiano Remarque • Lorsque Audio In detect est sur ON, “Audio In Det ON” apparait sur l’afficheur principal. • Lorsque Audio In detect est sur OFF, “Audio In Det OFF” apparait sur l’afficheur principal. 25 Fr X-HM16_26_26D_Fr.book 09 26 ページ 2016年7月22日 金曜日 午後5時11分 Lecture audio Bluetooth® Chapitre 9 : Lecture audio Bluetooth® X-HM26/26D uniquement Lecture de musique par la technologie sans fil Bluetooth Fonctionnement par télécommande La télécommande fournie permet de lire et d’arrêter la lecture de contenus sur l’appareil, ainsi que d’effectuer d’autres opérations. Périphérique optimisé pour la technologie sans fil Bluetooth : Téléphone portable Périphérique optimisé pour la technologie sans fil Bluetooth : Lecteur de musique numérique Périphérique non équipé de la technologie sans fil Bluetooth : Lecteur de musique numérique + Émetteur audio Bluetooth® (disponible dans le commerce) Données musicales TIMER L’appareil peut lire de la musique stockée sur des périphériques équipés de la fonction sans fil Bluetooth (téléphones portables, lecteurs de musique numériques, etc.). Vous pouvez aussi utiliser un transmetteur audio Bluetooth (vendu séparément) pour lire de la musique à partir d’équipements non dotés de la fonction sans fil Bluetooth. Pour plus d’informations, veuillez consulter le Guide d’utilisation de votre équipement Bluetooth. Remarque • La marque de mot et les logos Bluetooth® sont des marques déposées appartenant à Bluetooth SIG, Inc. • Le périphérique adapté pour la technologie sans fil Bluetooth doit prendre en charge les profils A2DP. • La connexion n'est pas garantie avec tous les dispositifs compatibles Bluetooth. 26 Fr Remarque • Le périphérique adapté pour la technologie sans fil Bluetooth doit prendre en charge les profils AVRCP. • Le fonctionnement de la télécommande ne peut être garanti pour tous les périphériques optimisés pour la technologie sans fil Bluetooth. Association avec l’appareil (enregistrement initial) Pour pouvoir lire de la musique stockée sur un périphérique sans fil Bluetooth, il est tout d’abord nécessaire d’associer les deux équipements. L’association doit être effectuée lors de la première utilisation de l’appareil avec un périphérique sans fil Bluetooth, ou lorsque les données d’association ont été effacées pour une raison quelconque. L’association est une procédure nécessaire pour permettre les communications à l’aide de la technologie sans fil Bluetooth. • L’association est effectuée seulement lorsque vous utilisez l’appareil et le périphérique sans fil Bluetooth ensemble pour la première fois. • Afin d’autoriser les communications à l’aide de la technologie sans fil Bluetooth, l’association doit être effectuée à la fois sur l’appareil et sur le périphérique sans fil Bluetooth. • Après avoir appuyé sur la touche et être passé sur l’entrée Bluetooth, effectuez la procédure d’association sur le périphérique sans fil Bluetooth. Si cette procédure d’association s’est déroulée correctement, vous n’avez pas besoin d’effectuer la procédure d’association ci-dessous sur l’appareil. Pour plus d’informations, veuillez consulter le Guide d’utilisation de votre équipement Bluetooth. 1 Appuyez sur la touche Í pour mettre l’appareil sous tension. 2 Appuyez sur . L’appareil passe sur Bluetooth et l’indication « Pairing » s’affiche. X-HM16_26_26D_Fr.book 27 ページ 2016年7月22日 金曜日 午後5時11分 Lecture audio Bluetooth® BT STANDBY Remarque 4 Vérifiez que l’association a bien été effectuée sur le périphérique sans fil Bluetooth. 3 Appuyez sur ENTER puis appuyez sur / pour commuter BT STANDBY sur ON/OFF. Si l’association avec le périphérique sans fil Bluetooth a été réalisée correctement, le nom du périphérique s’affiche sur le panneau avant de l’appareil. (Seuls les caractères alphanumériques d’un seul octet peuvent être affichés. Les caractères qui ne peuvent pas être affichés normalement sont remplacés par le symbole « ∫ ».) • Elle est réglée sur OFF (désactivé) dans le valeur initiale d’usine. 1 Appuyez sur . 2 Une connexion Bluetooth est créée entre le périphérique sans fil Bluetooth et l’appareil. 3 Lecture de musique à partir du périphérique sans fil Bluetooth. Remarque • Lorsqu’un périphérique Bluetooth n’est pas connecté et qu’aucune opération n’a été effectuée depuis 20 minutes, l’appareil se met automatiquement à l’arrêt. Pour cela, il est nécessaire d’activer (ON) la fonction d’arrêt automatique la fonction de mise hors tension automatique. • La fonction de mise hors tension automatique peut être activée/désactivée (ON/OFF) (page 33). Remarque • Lorsque la fonction BT STANDBY est activée (ON), l’indication « BT STANDBY ON » apparaît sur l’affichage principal. • Lorsque la fonction BT STANDBY est désactivée (OFF), l’indication « BT STANDBY OFF » apparaît sur l’affichage principal. Connexion avec un périphérique sans fil Bluetooth lorsque l’appareil est en mode BT STANDBY Lorsqu’un historique de connexion avec un périphérique sans fil Bluetooth existe déjà sur cet appareil (l’association a déjà été effectuée), l’appareil peut recevoir une requête de connexion lorsqu’il est un mode BT STANDBY. L’appareil se met en marche avec la fonction Bluetooth et se connecte directement au périphérique sans fil Bluetooth. Même les équipements déjà associés avec cet appareil ne se connecteront pas en mode BT STANDBY dans les cas suivants. Si cela se produit, effacez l’historique d’association au niveau du périphérique sans fil Bluetooth et exécutez de nouveau la procédure d’association. • Cet appareil peut mémoriser jusqu’à 8 appareils dans l’historique d'appairage. • Tous les historiques d’association sont supprimés en cas de réinitialisation des paramètres à leur valeur initiale d’usine. Pyccкий La procédure de connexion vers l’appareil doit être effectuée sur le périphérique sans fil Bluetooth. • Pour plus d’informations sur la procédure de connexion, veuillez consulter le Guide d’utilisation de votre périphérique sans fil Bluetooth. . Nederlands L’appareil passe sur l’entrée Bluetooth. Appuyez sur Deutsch Écouter de la musique sur l’appareil à partir d’un périphérique sans fil Bluetooth 1 Italiano 2 Appuyez sur MENU puis appuyez sur / jusqu'à ce que « BT STANDBY » apparaisse sur l'afficheur. Configuration de la fonction BT STANDBY Español • Cet appareil s'affichera comme « Pioneer X-HM26 » sur tous les appareils Bluetooth que vous possédez. La procédure d’association commence. • Placez le périphérique sans fil Bluetooth près de l’appareil. • Pour plus d’informations sur la procédure d’association de votre périphérique sans fil Bluetooth, veuillez consulter le Guide d’utilisation de votre périphérique. • Lorsque le code PIN est demandé, entrez « 0000 ». (Cet appareil ne prend pas en charge d’autre code PIN que « 0000 ».) Français • Les opérations suivantes peuvent être effectuées lorsque l’appareil est en veille avec la fonction BT STANDBY activée (ON). • En sélectionnant un périphérique sans fil Bluetooth pour lequel un historique de connexion avec cet appareil existe déjà (l’association a déjà été effectuée), l’appareil se met automatiquement en marche avec la fonction Bluetooth activée. English 3 Mettez le périphérique sans fil Bluetooth que vous souhaitez associer sous tension et effectuez la procédure d’association sur le périphérique. 09 27 Fr X-HM16_26_26D_Fr.book 09 28 ページ 2016年7月22日 金曜日 午後5時11分 Lecture audio Bluetooth® Précaution concernant les ondes radio Cet appareil utilise une fréquence d’ondes radio de 2,4 GHz, cette bande étant également utilisée par d’autres systèmes sans fil (consultez la liste ci-dessous). Pour éviter le brouillage ou les interruptions de communication, n’utilisez pas cet appareil à proximité de dispositifs fonctionnant sur la même bande, ou veillez à éteindre ces dispositifs lorsque vous utilisez l’adaptateur. • Téléphones sans fil • Télécopieurs filaires • Fours à micro-ondes • Périphériques réseau sans fil (IEEE802.11b/g) • Appareil AV sans fil • Télécommandes sans fil pour jeux vidéo • Appareils paramédicaux à micro-ondes • Certains écrans de surveillance des bébés D’autres appareils, moins courants, peuvent fonctionner sur la même fréquence : • Systèmes antivol • Stations radio amateur (HAM) • Systèmes logistiques des grands magasins • Systèmes discriminatoires des véhicules ferroviaires ou de secours Remarque • Si des parasites apparaissent sur l’image du téléviseur, il se peut que le périphérique sans fil Bluetooth ou cet appareil (y compris des produits pris en charge par cet appareil) crée des interférences avec le connecteur d’antenne de votre téléviseur, ou avec votre équipement vidéo, radio satellite, etc. Dans ce cas, éloignez le connecteur d’entrée d’antenne par rapport au périphérique sans fil Bluetooth ou à cet appareil (y compris des éléments pris en charge par cet appareil). • Si lun objet (tel qu’une porte métallique, un mur en béton ou une isolation à feuille d’étain) se trouve entre cet appareil (y compris des périphériques pris en compte par cet appareil) et le périphérique équipé de la technologie sans fil Bluetooth, il se peut que vous deviez déplacer le système pour éviter que le signal soit parasité ou interrompu. Limite de fonctionnement L’utilisation de cet équipement est limitée à un usage privé. (Selon l’environnement, les distances de transmission peuvent être réduites.) Dans les situations suivantes, le son peut être coupé ou arrêté pour cause de mauvaise réception ou de non réception des ondes radio : • Dans des immeubles en béton armé ou à structure métallique. • Près d’un grand meuble métallique. • Dans la foule ou près d’un bâtiment ou d’un obstacle. 28 Fr • Dans un emplacement exposé au champ magnétique, à de l’électricité statique ou des parasites provenant d’équipements de communication radio, utilisant la même bande de fréquence (2,4 GHz) que cet appareil, tel qu’un périphérique LAN sans fil de 2,4 GHz (IEEE802.11b/g) ou un four à micro-ondes. • Si vous vivez dans une zone résidentielle très peuplée (appartement, maison en ville, etc.) et si le four à microondes de votre voisin se trouve à proximité de votre système, des interférences peuvent se produire. Si tel est le cas, installez votre appareil à un autre endroit. Lorsque le four à micro-ondes n’est pas utilisé, les interférences disparaissent. Réflexions des ondes radio Les ondes radio reçues par cet appareil comprennent celles qui proviennent directement du périphérique doté de la technologie sans fil Bluetooth (onde directe) et les ondes provenant de différentes directions en raison de leur réflexion sur les murs, le mobilier et le bâtiment (ondes réfléchies). Les ondes réfléchies (dues aux obstacles et objets réfléchissants) produisent à leur tour un certain nombre d’ondes réfléchies et modifient les conditions de réception selon l’endroit. En cas de mauvaise réception audio liée à ce phénomène, essayez de déplacer légèrement le périphérique à technologie sans fil Bluetooth. Notez également que les ondes réfléchies peuvent interrompre la réception audio lorsqu’une personne traverse ou s’approche de l’espace entre cet appareil et le périphérique à technologie sans fil Bluetooth. Précautions relatives aux connexions à des produits pris en compte par cet appareil • Achevez les connexions pour tous les périphériques pris en compte par cet appareil, y compris tous les cordons audio et les câbles d’alimentation, avant de les brancher sur cet appareil. • Après avoir achevé les connexions sur cet appareil, vérifiez les câbles audio et d’alimentation pour vous assurer qu’ils ne sont pas emmêlés. • Avant de déconnecter cet appareil, vérifiez que vous disposez d’assez d’espace libre autour de celui-ci. • Lorsque vous rebranchez les cordons audio et d’autres câble des produits pris en charge par cet appareil, assurez-vous que l’espace environnant est suffisant pour le faire. X-HM16_26_26D_Fr.book 29 ページ 2016年7月22日 金曜日 午後5時11分 Informations supplémentaires 10 Informations supplémentaires English Guide de dépannage Français Chapitre 10 : Souvent, les opérations incorrectes sont interprétées comme des problèmes ou des dysfonctionnements. Si vous estimez que cet appareil ne fonctionne pas correctement, vérifiez les points ci-dessous. Parfois, le problème peut provenir d’un autre composant. Examinez les autres composants et les appareils électriques utilisés. Si le problème ne peut pas être résolu en dépit des vérifications ci-dessous, consultez le service après-vente Pioneer le plus proche pour faire réparer l’appareil. • Si l’appareil ne fonctionne pas normalement en raison d’effets extérieurs comme l’électricité statique, débranchez la fiche d’alimentation de la prise de courant et rebranchez-la pour revenir aux conditions normales de fonctionnement. Solution Les paramètres que vous avez réglés sont effacés. Le cordon d’alimentation a-t-il été débranché ? Lorsque le cordon d’alimentation est débranché, les réglages que vous avez effectués sont effacés. Réglez l’horloge à nouveau. Si vous ne voulez pas perdre les réglages, ne débranchez pas le cordon d’alimentation. Différence de volume entre CD, MP3, Tuner et AUDIO IN. Ce problème ne provient pas de cet appareil. Le volume peut varier selon les sources d’entrée et selon les formats de contenus audio. La commande de cet appareil à l’aide de la télécommande n’est pas possible. Essayez-vous d’utiliser la Utilisez à moins de 7 m, 30º du capteur de télécommande du télécommande en étant placé loin de panneau avant (page 5). l’appareil ? Lorsque vous utilisez un lecteur analogique avec cet appareil, connectez un périphérique équipé d’un égaliseur phono. Les signaux de la télécommande peuvent ne pas être reçus correctement si la télécommande est exposée directement à la lumière du soleil ou à un puissant éclairage artificiel, tel qu’un tube fluorescent, etc. Les piles sont mortes ? Remplacez les piles (page 5). Le disque ne peut pas être lu Le disque est-il rayé ? ou le disque est éjecté Le disque est-il sale ? automatiquement. Cet appareil se trouve-t-il dans un endroit humide ? Les disques rayés risquent de ne pas pouvoir être lus. Nettoyez le disque (page 33). De la condensation a pu se former à l’intérieur. Attendez que la condensation s’évapore. N’installez pas cet appareil près d’un climatiseur, etc. (page 32). Un maximum de 255 dossiers peuvent être reconnus sur un disque. Un maximum de 999 fichiers peuvent être reconnus à l’intérieur d’un dossier. Toutefois, selon la structure du dossier, cet appareil peut ne pas être capable de reconnaître certains dossiers ou fichiers. L’appareil se met automatiquement hors tension. Si aucune opération n’est effectuée pendant 20 minutes, l’appareil se met automatiquement hors tension. Pour cela, il est nécessaire d’activer (ON) la fonction d’arrêt automatique la fonction de mise hors tension automatique (page 33). Pyccкий Les noms de dossiers ou de Avez-vous dépassé le nombre fichiers ne sont pas maximal de noms de dossiers ou de reconnus. fichiers pouvant être reconnus par cet appareil ? Nederlands Le capteur de la télécommande estil exposé directement à la lumière du soleil ou à un puissant éclairage artificiel, tel qu’un tube fluorescent ? Deutsch Vérification Italiano Problème éventuel Español Problèmes d’ordre général 29 Fr X-HM16_26_26D_Fr.book 10 30 ページ 2016年7月22日 金曜日 午後5時11分 Informations supplémentaires Lorsqu’un périphérique de stockage USB est connecté Problème éventuel Vérification Le périphérique de stockage Le périphérique de stockage USB USB n’est pas reconnu. est-il connecté correctement ? Le périphérique de stockage USB est-il connecté via un concentrateur USB ? Solution Connectez le périphérique correctement (en l’engageant à fond). L’appareil ne prend pas en charge les concentrateurs USB. Connectez directement le périphérique de stockage USB à l’appareil. Cet appareil prend en charge seulement les clés de mémoire auxiliaire USB. Cet appareil prend en charge les clés à mémoire flash et audio numériques portables. Seuls les systèmes de fichiers FAT16 et FAT32 sont pris en charge. Les autres systèmes de fichiers (exFAT, NTFS, HFS etc.) ne sont pas pris en charge. Cet appareil ne prend pas en charge l’utilisation de disques durs externes. Ce problème ne provient pas de cet appareil. Le fichier ne peut pas être lu. Le fichier est-il protégé contre la copie (par DRM) ? Ce problème ne provient pas de cet appareil. 30 Fr Mettez l’appareil hors tension puis remettez-le sous tension. Certains périphériques de stockage USB peuvent ne pas être reconnus correctement. Les fichiers protégés contre la copie ne peuvent pas être lus. Les fichiers stockés sur un ordinateur ne peuvent pas être lus. Il se peut que l’appareil ne lise pas certains fichiers. Les noms de dossiers ou de Les noms de dossiers ou de fichiers fichiers ne sont pas affichés, contiennent-ils plus de 30 ou bien ils sont mal affichés. caractères ? Le nombre maximum de caractères affichables pour les noms de dossier et de fichier est de 30. Les noms de dossiers ou de Ce problème ne provient pas de cet fichiers ne sont pas affichés appareil. dans l’ordre alphabétique. L’ordre d’affichage des noms de dossier et de fichier dépend de l’ordre dans lequel les dossiers et les fichiers ont été enregistrés sur le périphérique de stockage USB. Le lecteur prend beaucoup de temps à reconnaître le périphérique de stockage USB. Un certain temps est nécessaire pour charger les données lorsqu’un périphérique de stockage USB de grande capacité est connecté (cela peut prendre plusieurs minutes). Quelle est la capacité du périphérique de stockage USB ? X-HM16_26_26D_Fr.book 31 ページ 2016年7月22日 金曜日 午後5時11分 Informations supplémentaires 10 X-HM26/26D uniquement Solution Le périphérique à technologie sans fil Bluetooth ne peut pas être raccordé ou utilisé. Le son en provenance du périphérique à technologie sans fil Bluetooth n’est pas émis ou le son est interrompu. Vérifiez qu’aucun objet émettant des ondes électromagnétiques dans la bande 2,4 GHz (four à micro-ondes, périphérique LAN sans fil ou appareil à technologie sans fil Bluetooth) ne se trouve à proximité de l’appareil. Le cas échéant, éloignez-le de cet appareil. Ou bien, n’utilisez pas l’objet émettant les ondes électromagnétiques. * Cette distance est indicative. La portée réelle peut varier selon les conditions propres à l’environnement d’utilisation. Il se peut que le périphérique à technologie sans fil Bluetooth ne soit pas réglé au mode de communication prenant en charge la technologie sans fil Bluetooth. Vérifiez le réglage du dispositif sans fil Bluetooth. CD audio MP3 • CD Audio en vente dans le commerce • Disques CD-R/ -RW/ -ROM contenant de la musique enregistrée en format CD-DA Fichiers MP3 enregistrés sur des disques CD-R/ -RW/ -ROM ou sur des périphériques de stockage USB MP3 est un format de compression. Il s’agit de l’acronyme de MPEG Audio Layer 3. MP3 est un code audio qui permet de compresser des données audio de façon significative sans altérer la qualité sonore. • Ce système prend en charge les fichiers de type MPEG-1/2 Audio Layer 3 (Taux d’échantillonnage : 32 kHz à 48 kHz; Débit binaire : 8 kbps à 320 kbps). Remarque • Cet appareil ne prend pas en charge les disques multisession ni l’enregistrement multiborder. • L’enregistrement multisession/ multiborder est une technique permettant d’enregistrer un disque en plusieurs sessions / bords. Une « session » ou « bord » est une unité d’enregistrement, consistant en un jeu complet de données de la zone d’entrée à la zone de sortie. Pyccкий MP3 : • Pendant la lecture d’un fichier VBR, le compteur sur l’afficher peut différer du temps de lecture en cours. • L'ordre des informations des dossiers et fichiers qui sont enregistrés sur le support dépend du logiciel d'écriture. Il peut arriver que cet appareil lise les fichiers dans un ordre inattendu. • Il est possible de lire les fichiers MP3 d'un support possédant jusqu'à 255 dossiers et 999 fichiers (fichiers non lisibles inclus). Nederlands • Seuls les disques qui ont été finalisés peuvent être reproduits. • Les disques enregistrés en mode d’écriture par paquet (format UDF) ne sont pas compatibles avec cet appareil. • Les noms de sociétés et de produits mentionnés dans le présent mode d’emploi sont des marques commerciales ou des marques déposées des sociétés respectives. • Seuls les disques enregistrés en format ISO9660 Niveau 1, Niveau 2 et Joliet peuvent être lus. • Les fichiers protégés par le DRM (Gestion des droits numériques) ne peuvent pas être lus. Deutsch Types de disque et formats de fichier lisibles Italiano Vérifiez si cet appareil est connecté à un périphérique équipé de la technologie sans fil Bluetooth avec une source d’entrée autre que Bluetooth sélectionnée. Effectuez la procédure d’association après avoir sélectionné Bluetooth comme source d’entrée. Español Vérifiez que le périphérique à technologie sans fil Bluetooth n’est pas trop éloigné de l’appareil et qu’il n’y a pas d’obstructions entre le périphérique à technologie sans fil Bluetooth et l’appareil. Placez le périphérique à technologie sans fil Bluetooth et l’appareil de façon à ce que la distance entre eux soit inférieure à 10 m* et qu’il n’y ait pas d'obstructions entre eux. Français Problème éventuel English Lorsqu’un périphérique sans fil Bluetooth est connecté ou utilisé : 31 Fr X-HM16_26_26D_Fr.book 10 32 ページ 2016年7月22日 金曜日 午後5時11分 Informations supplémentaires À propos des CD protégés contre la copie Ce lecteur se conforme aux spécifications du format CD Audio. Il ne prend pas en charge la lecture ou les fonctions des disques non conformes à ces spécifications. Formats de fichiers audio pris en charge Cet appareil ne prend pas en charge le codage sans perte. Précautions d’utilisation Lors d’un déplacement de l’appareil Avant de déplacer cet appareil, assurez-vous d'abord qu'il n'y a aucun disque à l'intérieur et que le périphérique de stockage USB est débranché. Puis appuyez sur Í, attendez que « STAND BY » disparaisse de l'afficheur principal avant de l'éteindre, puis débranchez le cordon d'alimentation. Des dommages peuvent survenir si l'appareil est transporté ou déplacé en ayant un disque à l'intérieur, ou lorsqu'un autre appareil est branché à la prise USB ou à la mini-prise AUDIO IN. Emplacement d’installation • Choisissez un endroit stable près du téléviseur ou de la chaîne stéréo, utilisés avec cet appareil. • N’installez pas cet appareil sur un téléviseur ou un moniteur couleur. En outre, installez-le à l’écart des platines à cassettes et autres équipements pouvant être facilement affectés par les champs magnétiques. Évitez d’installer l’appareil dans les endroits suivants : • • • • • Endroits exposés à la lumière directe du soleil Endroits humides ou insuffisamment aérés Endroits extrêmement chauds Endroits exposés aux vibrations Endroits dans lesquels il y a beaucoup de poussière ou de fumée de cigarette • Endroits exposés à la suie, à la vapeur ou à la chaleur (cuisines, etc.) Ne posez pas d’objets sur cet appareil Ne posez pas d’objets sur le dessus de cet appareil. N’obstruez pas les orifices de ventilation. N’utilisez pas cet appareil sur une couverture, un lit, un sofa, etc. pelucheux, et ne l’enveloppez pas dans un tissu, etc. La chaleur ne pourra pas se dégager et causera des dommages. N’exposez pas l’appareil à la chaleur. N’installez pas cet appareil sur un amplificateur ou un autre appareil produisant de la chaleur. En cas d’installation sur un rack, pour éviter que l’appareil ne soit exposé à la chaleur dégagée par l’amplificateur ou d’autres équipements audio, placez-le sur un rayon en-dessous de l’amplificateur, etc. 32 Fr • Mettez l’appareil hors tension lorsque vous ne l’utilisez pas. • Des rayures peuvent apparaître sur l’écran de télévision et du bruit peut parasiter le son des émissions de radio, selon l’état des signaux, lorsque l’appareil est en service. Dans ce cas, mettez l’appareil hors tension. À propos de la condensation Si vous transportez l’appareil sans transition d’un endroit froid vers une pièce chaude (par exemple, en hiver), ou si la température de la pièce où se trouve cet appareil augmente rapidement, des gouttelettes d’eau (condensation) peuvent se former à l’intérieur (sur des pièces et la lentille). En cas de condensation, cet appareil ne fonctionne pas correctement et la lecture n’est pas possible. Laissez l’appareil sous tension pendant 1 ou 2 heures à la température ambiante (pour que l’humidité ait le temps de s’évaporer). Les gouttelettes d’eau se dissiperont et la lecture sera de nouveau possible. De la condensation peut aussi se former en été si l’appareil est exposé à l’air d’un climatiseur. Si tel est le cas, déplacez votre appareil. Nettoyage de l’appareil • Débranchez le cordon d’alimentation de la prise secteur avant de nettoyer cet appareil. • Nettoyez l’appareil avec un chiffon doux. En cas de salissure importante, mouillez un chiffon doux dans une solution de détergent neutre dilué dans 5 à 6 volumes d’eau, essorez le chiffon complètement, nettoyez la saleté, puis essuyez l’appareil à l’aide d’un chiffon doux et sec. • L’utilisation d’alcool, de diluent, de benzène, de produits insecticides, etc. risque d’effacer les inscriptions et d’abimer la peinture. Évitez aussi de laisser des produits en caoutchouc ou en vinyle très longtemps au contact de cet appareil pour ne pas endommager le coffret. • En cas d’utilisation de chiffons/lingettes imprégnés avec des produits chimiques, etc., lisez les précautions d’emploi fournies par le fabricant. Nettoyage de la lentille La lentille de cet appareil ne devrait pas se salir lors d’une utilisation normale, mais si, pour une raison quelconque, des poussières ou saletés perturbent son fonctionnement, consultez un centre d’entretien agréé par Pioneer. Bien que divers produits de nettoyage pour lentille de lecteur soient en vente dans le commerce, nous déconseillons leur utilisation, car certains d’entre eux risquent, en fait, d’endommager la lentille. X-HM16_26_26D_Fr.book 33 ページ 2016年7月22日 金曜日 午後5時11分 Informations supplémentaires Rangement Les disques à formes spéciales (en cœur, hexagonaux, etc.) ne peuvent pas être lus sur cet appareil. N’essayez pas de lire de tels disques car ils pourraient endommager cet appareil. Français • Remettez toujours les disques dans leur boîtier et rangez-les verticalement, en évitant les endroits chauds, humides, exposés directement à la lumière du soleil ou extrêmement froids. • Veuillez lire les recommandations fournies avec le disque. À propos des disques de forme particulière Nettoyage des disques Configuration de la fonction de mise hors tension automatique 1 Appuyez sur la touche MENU de la télécommande. Español • Des empreintes de doigts ou de la poussière sur un disque peuvent empêcher sa lecture. Dans ce cas, utilisez un chiffon de nettoyage, etc. pour essuyer délicatement le disque en allant du centre vers l’extérieur. N’utilisez pas un tissu de nettoyage sale. English Manipulation d’un disque 10 « Auto Power Down » apparaitra sur l'afficheur principal. 3 Appuyez sur / pour commuter le paramètre de l'extinction automatique sur ON/OFF. • Le réglage par défaut est ON (activé). Remarque • Lorsque la fonction de mise hors tension automatique est activée (ON), l’indication « APD ON » apparaît sur l’affichage principal. • Lorsque la fonction de mise hors tension automatique est activée (OFF), l’indication « APD OFF » apparaît sur l’affichage principal. Suivez les étapes ci-dessous pour restaurer tous les paramètres de l’appareil à leur valeur d’origine par défaut. 2 Appuyez sur MENU puis appuyez sur / jusqu'à ce que « Factory Reset » apparaisse sur l'afficheur. 3 Pyccкий 1 Appuyez sur Í pour la mise sous tension. Nederlands Rétablissement de tous les réglages à leur valeur par défaut Deutsch • N’utilisez pas de benzène, de diluant ou d’autres produits chimiques volatils. En outre, n’utilisez pas de vaporisateur de produits de nettoyage ni d’agents antistatiques. • En cas de salissure importante, mouillez un chiffon doux, essorez-le chiffon, nettoyez la saleté, puis essuyez l’appareil à l’aide d’un chiffon sec. • N’utilisez pas de disques endommagés (fissurés ou déformés). • Ne laissez pas la face des disques sur laquelle sont gravées les informations devenir rayée ou sale. • N’attachez pas de morceaux de papier ou d’autocollants sur les disques. Cela pourrait déformer les disques et les rendre illisibles. Notez aussi que souvent, une étiquette est collée sur les disques de location, et que la colle de l’étiquette peut avoir débordé. Vérifiez que la colle n’a pas débordé des bords de l’étiquette avant d’utiliser un disque de location. Italiano 2 Appuyez sur la touche ENTER de la télécommande. Appuyez sur ENTER. « OK? » apparait. 4 Appuyez sur ENTER. • « Resetting » apparaît pendant que les paramètres sont rétablis aux valeurs par défaut. L’appareil est mis hors tension. 33 Fr X-HM16_26_26D_Fr.book 10 34 ページ 2016年7月22日 金曜日 午後5時11分 Informations supplémentaires Spécifications • Section Amplificateur Puissance de sortie RMS : . . . . . . . . . . . . . . 15 W + 15 W (1 kHz, 10 %, T.H.D., 8 Ω) • Section tuner Gamme de fréquences (FM) . . . . . 87,5 MHz à 108,0 MHz Entrée antenne (FM) . . . . . . . . . . . . . . . 75 Ω asymétrique Gamme de fréquences (AM) (Pour les modèles nord-américains) . . . . . . . . . . . . . . . . . . . . . . . . . . . . . . 530 kHz à 1710 kHz Antenne (AM) . . . . . . . . . . . . . . . . . . . . . . . . Antenne cadre • Bluetooth (X-HM26/26D uniquement) Version . . . . . . . . . . . . . . .Bluetooth Spécifications Ver. 4.1 Sortie . . . . . . . . . . . . . . . Bluetooth Spécifications Classe 2 Distance estimée de transmission en visibilité directe* . . . . . . . . . . . . . . . . . . . . . . . . . . . . . . . . . . . . Environ 10 m Gamme de fréquences . . . . . . . . . . . . . . . . . . . . . . 2,4 GHz Modulation . . . . FH-SS (Étalement de spectre par évasion) Profils Bluetooth pris en charge . . . . . . . . . . A2DP, AVRCP Codec prise en charge . . . . . .SBC (Codec de sous-bande) Protection de contenus pris en charge . . . . . . . . . . SCMS-T Code PIN . . . . . . . . . . . . . . . . . . . . . . . . . . . . . . . . . . .0000 * La distance de transmission en visibilité directe est une estimation. La distance de transmission dans la pratique peut être différente selon l’environnement. • Divers Prise USB . . . . . . . . . . . . . . . . . . . . . . . . . . . . . 5 V, 500 mA Alimentation . . . . . . . . . . . . . . . . . . . . . . . . . . . . . . . . . . . . . (Pour les modèles européens) . . . . . . . . . . . . . . . . . CA de 220 V à 240 V, 50 Hz/60 Hz (Pour les modèles nord-américains) . . . . . . . . . . . . . . . . . . . . . . . . . . . . CA de 120 V, 60 Hz Consommation En marche . . . . . . . . . . . . . . . . . . . . . . . . . . . . . . . 20 W En veille . . . . . . . . . . . . . . . . . . . . . . . . . . . . .0,5 W max. Veille (fonction BT STANDBY activée) . . . . .0,5 W max. Dimensions externes . . . . . . . . . . . . . . . . . . . . . . . . . . . 215 mm (L) x 95 mm (H) x 315 mm (P) Poids (sans emballage) . . . . . . . . . . . . . . . . . . . . . . . 2,0 kg • Enceintes Boîtier . . . . . . . . . . . . . . . . . . Bass-reflex, type bibliothèque (blindage magnétique) Configuration . . . . . . . . . . . . . . . . . . . . . . . . . . . . 2 voies Aigus . . . . . . . . . . . . . . . . . . . . . . . . . . . . dôme de 2 cm Graves . . . . . . . . . . . . . . . . . . . . . . . . . . . cône de 10 cm Puissance d’entrée max. . . . . . . . . . . . . . . . . . . . . . . 15 W Impédance . . . . . . . . . . . . . . . . . . . . . . . . . . . . . . . . . . . 8 Ω Dimensions externes . . . . . . . . . . . . . 130 mm (L) x 212 mm (H) x 228,5 mm (P) Poids. . . . . . . . . . . . . . . . . . . . . . . . . . . . . 2,0 kg (chacune) 34 Fr • Accessoires Télécommande . . . . . . . . . . . . . . . . . . . . . . . . . . . . . . . . . Piles AAA (R03). . . . . . . . . . . . . . . . . . . . . . . . . . . . . . . . . Câble d’antenne AM*1. . . . . . . . . . . . . . . . . . . . . . . . . . . . Antenne FM à fil*2 . . . . . . . . . . . . . . . . . . . . . . . . . . . . . . . Antenne filaire DAB/FM*3 . . . . . . . . . . . . . . . . . . . . . . . . . Cordon d’alimentation . . . . . . . . . . . . . . . . . . . . . . . . . . . . Carte de garantie*4 . . . . . . . . . . . . . . . . . . . . . . . . . . . . . . Mode d’emploi (ce document) . . . . . . . . . . . . . . . . . . . . . . *1 Modèles nord-américains uniquement *2 X-HM16/HM26 uniquement *3 X-HM26D uniquement *4 Modèles européens uniquement 1 2 1 1 1 1 1 1 Remarque • Les spécifications sont valables pour une alimentation de 230 V. • Les spécifications et la conception sont susceptibles d’être modifiées sans préavis, en raison d’améliorations apportées à l’appareil. « Pioneer » est une marque de commerce de Pioneer Corporation et est utilisée sous licence. © 2016 Onkyo & Pioneer Corporation. Tous droits de reproduction et de traduction réservés. SN29402699_X-HM16_26_26D_En_European.book 39 ページ 2016年7月21日 木曜日 午前10時20分 X-HM16_26_26D_Es.book 2 ページ 2016年7月22日 金曜日 午前10時23分 PRECAUCIÓN PARA PREVENIR EL PELIGRO DE CHOQUE ELÉCTRICO NO REMOVER LA TAPA NI LAS PARTES DENTRO NO UTILIZADAS, LLAMAR UNA PERSONA CUALIFICADA. D3-4-2-1-1_B2_Es ADVERTENCIA Este aparato no es impermeable. Para evitar el riesgo de incendio y de descargas eléctricas, no ponga ningún recipiente lleno de líquido (como pueda ser un vaso o un florero) cerca del aparato ni lo exponga a goteo, salpicaduras, lluvia o humedad. D3-4-2-1-3_A1_Es ADVERTENCIA Para evitar el peligro de incendio, no ponga nada con fuego encendido (como pueda ser una vela) encima del aparato. PRECAUCIÓN El interruptor de la alimentación STANDBY/ON de este aparato no corta por completo toda la alimentación de la toma de corriente de CA. Puesto que el cable de alimentación hace las funciones de dispositivo de desconexión de la corriente para el aparato, para desconectar toda la alimentación del aparato deberá desenchufar el cable de la toma de corriente de CA. Por lo tanto, asegúrese de instalar el aparato de modo que el cable de alimentación pueda desenchufarse con facilidad de la toma de corriente de CA en caso de un accidente. Para evitar correr el peligro de incendio, el cable de alimentación también deberá desenchufarse de la toma de corriente de CA cuando no se tenga la intención de utilizarlo durante mucho tiempo seguido (por ejemplo, antes de irse de vacaciones). D3-4-2-2-2a*_A1_Es D3-4-2-1-7a_A1_Es PRECAUCIÓN PARA LA VENTILACIÓN Cuando instale este aparato, asegúrese de dejar espacio en torno al mismo para la ventilación con el fin de mejorar la disipación de calor (por lo menos 25 cm encima, 10 cm detrás, y 5 cm en cada lado). ADVERTENCIA Las ranuras y aberturas de la caja del aparato sirven para su ventilación para poder asegurar un funcionamiento fiable del aparato y para protegerlo contra sobrecalentamiento. Para evitar el peligro de incendio, las aberturas nunca deberán taparse ni cubrirse con nada (como por ejemplo, periódicos, manteles, cortinas) ni ponerse en funcionamiento el aparato sobre una alfombra gruesas o una cama. D3-4-2-1-7b*_A1_Es PRECAUCIÓN Este aparato es un producto de láser de clase 1 clasificado como tal en Seguridad de productos de láser, IEC 60825-1:2007. PRODUCTO LASER CLASE 1 D58-5-2-2a_A1_Es Este producto es para tareas domésticas generales. Cualquiera avería debida a otra utilización que tareas domésticas (tales como el uso a largo plazo para motivos de negocios en un restaurante o el uso en un coche o un barco) y que necesita una reparación hará que cobrarla incluso durante el período de garantía. K041_A1_Es PRECAUCIONES CONCERNIENTES A LA MANIPULACIÓN DEL CABLE DE ALIMENTACIÓN Entorno de funcionamiento Temperatura y humedad del entorno de funcionamiento +5 °C a +35 °C; menos del 85 % de humedad relativa (rejillas de refrigeración no obstruidas) No instale este aparato en un lugar mal ventilado, ni en lugares expuestos a alta humedad o a la luz directa del sol (o de otra luz artificial potente). D3-4-2-1-7c*_A1_Es Tome el cable de alimentación por la clavija. No extraiga la clavija tirando del cable. Nunca toque el cable de alimentación cuando sus manos estén mojadas, ya que esto podría causar cortocircuitos o descargas eléctricas. No coloque la unidad, algún mueble, etc., sobre el cable de alimentación. Asegúrese de no hacer nudos en el cable ni de unirlo a otros cables. Los cables de alimentación deberán ser dispuestos de tal forma que la probabilidad de que sean pisados sea mínima. Una cable de alimentación dañado podrá causar incendios o descargas eléctricas. Revise el cable de alimentación está dañado, solicite el reemplazo del mismo al centro de servicio autorizado PIONEER más cercano, o a su distribuidor. S002*_A1_Es X-HM16_26_26D_Es.book 3 ページ 2016年7月22日 金曜日 午前10時23分 Información para los usuarios en la recogida y tratamiento de los equipos al final de su vida y de las pilas y baterías usadas. Símbolo para equipos Estos símbolos en los productos, embalaje, y/o en los documentos que los acompañan significa que los productos eléctricos y electrónicos al final de su vida, las pilas y baterías no deben mezclarse con los residuos generales de su hogar. Para el tratamiento adecuado, recuperación y reciclado de los productos viejos y las pilas usadas, por favor deposítelos en los puntos de recogida de acuerdo con su legislación nacional. Símbolo para pilas y baterías Mediante el tratamiento correctamente de estos productos y pilas, ayudará a preservar los recursos y prevenir cualquier efecto negativo en la salud humana y el medioambiente que podría surgir por una inadecuada manipulación de los desperdicios. Para más información sobre recogida y reciclado de los productos viejos, pilas y baterías, por favor contacte con su municipio, sobre localización de los puntos limpios o diríjase al punto de venta donde compró los productos. Estos símbolos sólo son válidos en la Unión Europea. Para países fuera de la Unión europea: Si desea eliminar estos artículos, por favor contactar con las autoridades locales o el distribuidor y pida por el método correcto de tratamiento. Pb K058a_A1_Es Advertencia para las ondas de radio ADVERTENCIA Esta unidad utiliza una frecuencia de ondas de radio de 2,4 GHz, la cual es una banda utilizada por otros sistemas inalámbricos (hornos microondas, teléfonos inalámbricos, etc.). En caso de que aparezca ruido en la imagen del televisor, existirá la posibilidad de que esta unidad (incluyendo los productos compatibles con esta unidad) esté causando interferencias de la señal con el conector de entrada de antena de su televisor, vídeo, sintonizador vía satélite, etc. En este caso, aumente la distancia entre el conector de entrada de antena y esta unidad (incluyendo los productos compatibles con esta unidad). • Pioneer no se hace responsable de ningún fallo del producto Pioneer compatible debido a un error de comunicación/fallos de funcionamiento asociados con su conexión a la red y/o su equipo conectado. Póngase en contacto con su proveedor de servicios de Internet o con el fabricante del equipo de la red. • Para usar Internet se necesita un contrato diferente con un proveedor de servicios de Internet y abonar esos servicios. Guarde las partes pequeñas fuera del alcance de los niños pequeños y bebés. En caso de que alguien se trague una por accidente, póngase inmediatamente en contacto con un médico. X-HM16_26_26D_Es.book 4 ページ 2016年7月22日 金曜日 午前10時23分 Gracias por comprar un producto Pioneer. Le sugerimos que lea atentamente estas manual de instrucciones a fin de que aprenda a utilizar su equipo de manera adecuada. Después de leer las instrucciones, guárdelas en un lugar seguro para futuras referencias. Índice 01 Antes de comenzar Contenido de la caja . . . . . . . . . . . . . . . . . . . . . . . . . . . . .5 Colocación de las pilas en el mando a distancia . . . . . . . .5 Utilización del mando a distancia. . . . . . . . . . . . . . . . . 5 02 Nombres y funciones de los controles Mando a distancia . . . . . . . . . . . . . . . . . . . . . . . . . . . . . . .6 Panel frontal . . . . . . . . . . . . . . . . . . . . . . . . . . . . . . . . . . .7 Indicadores . . . . . . . . . . . . . . . . . . . . . . . . . . . . . . . . . . . .8 Sistema de altavoces . . . . . . . . . . . . . . . . . . . . . . . . . . . .8 03 Conexiones Conexión de los altavoces . . . . . . . . . . . . . . . . . . . . . . . . .9 Conexión de antenas . . . . . . . . . . . . . . . . . . . . . . . . . . . .10 Uso de antenas exteriores . . . . . . . . . . . . . . . . . . . . . 10 Conexión a la corriente . . . . . . . . . . . . . . . . . . . . . . . . . .11 04 Primeros pasos Para encender la unidad . . . . . . . . . . . . . . . . . . . . . . . . .12 Ajuste del reloj . . . . . . . . . . . . . . . . . . . . . . . . . . . . . . . . .12 Control general . . . . . . . . . . . . . . . . . . . . . . . . . . . . . . . .12 Función de entrada . . . . . . . . . . . . . . . . . . . . . . . . . . 12 Control de brillo del display . . . . . . . . . . . . . . . . . . . . 12 Establecimiento automático del volumen. . . . . . . . . . 12 Control del volumen . . . . . . . . . . . . . . . . . . . . . . . . . . 12 Muting . . . . . . . . . . . . . . . . . . . . . . . . . . . . . . . . . . . . 12 Controles de sonido . . . . . . . . . . . . . . . . . . . . . . . . . . . . .13 Equalizer . . . . . . . . . . . . . . . . . . . . . . . . . . . . . . . . . . 13 Control P.bass . . . . . . . . . . . . . . . . . . . . . . . . . . . . . . 13 Control de bajos/agudos . . . . . . . . . . . . . . . . . . . . . . 13 Configuración del despertador . . . . . . . . . . . . . . . . . . . .13 Cómo restablecer el despertador. . . . . . . . . . . . . . . . 14 Cómo cancelar el despertador. . . . . . . . . . . . . . . . . . 14 Empleo del temporizador de conexión automática . . 14 Empleo del temporizador de desconexión automática . .14 Uso de auriculares . . . . . . . . . . . . . . . . . . . . . . . . . . . . . .14 05 Reproducción de discos Reproducción de discos o archivos . . . . . . . . . . . . . . . . .15 Cargue el disco . . . . . . . . . . . . . . . . . . . . . . . . . . . . . 15 Reproducción de pistas en un CD . . . . . . . . . . . . . . . 15 Reproduzca archivos de música MP3 . . . . . . . . . . . . 15 Reproducción avanzada de CD o disco de MP3 . . . . . . .16 Repetición de la reproducción . . . . . . . . . . . . . . . . . . 16 Reproducción aleatoria . . . . . . . . . . . . . . . . . . . . . . . 16 Reproducción programada (CD) . . . . . . . . . . . . . . . . 17 Sobre la descarga de archivos MP3 . . . . . . . . . . . . . 17 Cómo cambiar el contenido visualizado . . . . . . . . . . 17 06 Reproducción USB Reproducción de dispositivos de almacenamiento USB . . . . . . . . . . . . . . . . . . . . . . . . . . . . . . . . . . . . . . . . .18 Repetición de la reproducción . . . . . . . . . . . . . . . . . . 19 Reproducción aleatoria . . . . . . . . . . . . . . . . . . . . . . . 19 Cómo cambiar el contenido visualizado . . . . . . . . . . 19 4 Es 07 Uso del sintonizador Audición de FM (Para modelos europeos)/Audición de FM o AM (Solo para los modelos norteamericanos) . . . . . . . . 20 Sintonización. . . . . . . . . . . . . . . . . . . . . . . . . . . . . . . . 20 Presintonización de emisoras . . . . . . . . . . . . . . . . . . . 20 Uso del Radio Data System o RDS (sistema de datos de radio) (solamente modelos europeos) . . . . . . . . . . . . . . . . . 21 Audición de DAB+ (solamente X-HM26D) . . . . . . . . . . . 23 Acerca de DAB+ (Digital Audio Broadcasting) . . . . . . 23 Sintonización. . . . . . . . . . . . . . . . . . . . . . . . . . . . . . . . 23 Cambio de visualización de información. . . . . . . . . . . 24 Memorización de una emisora . . . . . . . . . . . . . . . . . . 24 Tabla de frecuencias de DAB (BANDA III) . . . . . . . . . 24 08 Otras conexiones Conexión de componentes auxiliares . . . . . . . . . . . . . . . 25 Cambio automático a entrada Audio In (Solo para modelos norteamericanos) . . . . . . . . . . . . . . 25 09 Reproducción de audio con Bluetooth® Reproducción de música empleando la tecnología inalámbrica Bluetooth . . . . . . . . . . . . . . . . . . . . . . . . . . . 26 Funcionamiento con mando a distancia . . . . . . . . . . . . . 26 Sincronización con la unidad (registro inicial) . . . . . . . . 26 Cómo escuchar música en la unidad desde un dispositivo habilitado para Bluetooth . . . . . . . . . . . . . . . . . . . . . . . . 27 BT STANDBY . . . . . . . . . . . . . . . . . . . . . . . . . . . . . . . . . 27 Precaución con las ondas radioeléctricas . . . . . . . . . . . 28 Alcance de operación . . . . . . . . . . . . . . . . . . . . . . . . . 28 Reflejos de ondas radioeléctricas . . . . . . . . . . . . . . . . 28 Precauciones relacionadas con los productos compatibles con esta unidad . . . . . . . . . . . . . . . . . . . 28 10 Información adicional Detección y solución de problemas . . . . . . . . . . . . . . . . Discos y formatos que pueden reproducirse . . . . . . . . . Acerca de los CD protegidos contra la copia . . . . . . . Formatos de archivos de audio compatibles . . . . . . . Observaciones sobre el uso de este receptor . . . . . . . . Cuando traslade esta unidad . . . . . . . . . . . . . . . . . . . Dónde instalar el receptor. . . . . . . . . . . . . . . . . . . . . . No ponga objetos sobre esta unidad . . . . . . . . . . . . . Acerca de la condensación. . . . . . . . . . . . . . . . . . . . . Cómo limpiar el receptor. . . . . . . . . . . . . . . . . . . . . . . Limpieza de la lente . . . . . . . . . . . . . . . . . . . . . . . . . . Manipulación de discos . . . . . . . . . . . . . . . . . . . . . . . . . Almacenaje de los discos . . . . . . . . . . . . . . . . . . . . . . Cómo limpiar los discos . . . . . . . . . . . . . . . . . . . . . . . Sobre los discos con formas especiales. . . . . . . . . . . Configuración del apagado automático . . . . . . . . . . . . . Restauración de todos los ajustes a los ajustes predeterminados . . . . . . . . . . . . . . . . . . . . . . . . . . . . . . . Especificaciones . . . . . . . . . . . . . . . . . . . . . . . . . . . . . . . 29 31 32 32 32 32 32 32 32 32 32 33 33 33 33 33 33 34 X-HM16_26_26D_Es.book 5 ページ 2016年7月22日 金曜日 午前10時23分 Antes de comenzar 01 English Capítulo 1: Antes de comenzar Utilización del mando a distancia El mando a distancia tiene un alcance de unos 7 metros en un ángulo de 30º desde el sensor remoto. T Cierre la tapa trasera. 30° Nederlands INPU 2 Deutsch 1 Abra la tapa trasera e introduzca las pilas como se muestra a continuación. Italiano Colocación de las pilas en el mando a distancia ADVERTENCIA • No use ni guarde pilas en lugares expuestos a la luz solar directa o en lugares con un calor excesivo, como el interior de un coche o cerca de un calefactor. Esto puede ocasionar fugas en las pilas, que se sobrecalienten, exploten o se incendien. También puede reducir su duración o rendimiento. Español Al abrir la caja, confirme que la misma contiene los siguientes accesorios: • Mando a distancia • Pilas AAA (R03) x 2 • Cable de alimentación • Cable de antena de AM*1 • Antena de hilo de FM*2 • Cable de antena DAB/FM*3 • Tarjeta de garantía*4 • Manual de instrucciones (este manual) *1 Solo modelos norteamericanos *2 X-HM16/X-HM26 solamente *3 X-HM26D solamente *4 Solamente modelos europeos • Cuando instale las pilas en el mando a distancia, colóquelas en el sentido correcto, según indican las marcas de polaridad (+ y -). • No caliente las pilas ni las desmonte, y no las tire al fuego ni al agua. • Las pilas pueden tener diferente tensión, a pesar de ser del mismo tamaño y forma. No use juntas pilas de tipos diferentes. • Para impedir la fuga del líquido de las pilas, retírelas si no piensa usar el mando a distancia durante mucho tiempo (1 mes o más). Si advirtiera la presencia de fugas en las pilas, limpie cuidadosamente el interior del compartimiento e introduzca pilas nuevas. Si el electrolito de una pila entrara en contacto con su piel, lave la parte afectada con mucha agua. • Al desechar pilas gastadas, deberá cumplir las regulaciones gubernamentales o las normas de las instituciones medioambientales públicas que se apliquen en su país/área. Français Contenido de la caja 30° PRECAUCIÓN • No utilice ninguna otra pila distinta de las especificadas. Tampoco use una pila nueva junto con otra usada. • Cuando introduzca las pilas, asegúrese de no causar daños en los muelles de los terminales - de las pilas. Podría provocar que las baterías experimenten alguna fuga o que se calienten en exceso. Pyccкий 7m Cuando utilice el mando a distancia, recuerde lo siguiente: • Asegúrese de que no haya obstáculos entre el mando a distancia y el sensor remoto de la unidad. • El funcionamiento del mando a distancia puede no ser fiable si la luz solar o una iluminación incandescente están incidiendo en el sensor remoto de la unidad. • Los mandos a distancia de dispositivos diferentes pueden interferir entre sí. Evite el uso de otros mandos a distancia situados cerca de esta unidad. • Cambie las pilas si observa una disminución en el alcance de funcionamiento del mando a distancia. 5 Es X-HM16_26_26D_Es.book 02 6 ページ 2016年7月22日 金曜日 午前10時23分 Nombres y funciones de los controles Capítulo 2: Nombres y funciones de los controles 4 Mando a distancia / // , ENTER Permiten seleccionar/cambiar los modos y la configuración del sistema, así como confirmar acciones. 5 1 2 10 11 3 PGM/MEMORY • Utilícelo para memorizar o programar el CD (página 17). • Utilícelo para memorizar emisoras FM/AM (página 20) o DAB (página 24). 6 TUNE +/– Se utiliza para encontrar frecuencias de radio (página 20). 12 PRESET +/– 4 5 Botones para el control de reproducción Permiten controlar cada función después de haberla seleccionado usando los botones de función de entrada (página 16). 13 Utilícelos para seleccionar presintonías (página 20). 7 Botones de control del sonido Permiten ajustar la calidad del sonido (página 13). 8 6 14 9 7 8 9 15 16 SLEEP Consulte Empleo del temporizador de desconexión automática en la página 14. TIMER Se utiliza para ajustar la hora, así como para ajustar y verificar los temporizadores (página 12). 10 Pulsar para cambiar el ajuste de reproducción repetida de un CD (página 16) o un USB (página 19). 11 RANDOM Pulsar para activar la reproducción aleatoria de un CD (página 16) o un USB (página 19). 1 Í Alterna el receptor entre encendido y modo de espera (página 12). 2 Botones de función de entrada Utilícelos para seleccionar la fuente de entrada para este receptor (página 12). 12 DISPLAY Pulsar para cambiar la pantalla para información de MP3 (página 17), RDS (página 21) o DAB (página 24). 13 Pulse para volver a la pantalla anterior. 14 Botones de control Volume Úselo para ajustar el volumen de audición (página 12). Permite configurar o reproducir un archivo de audio mediante la red Bluetooth (página 26). 3 MENU Permite acceder al menú. 6 Es 15 Silencia/restablece el sonido (página 12). 16 DIMMER Oscurece o ilumina la pantalla. Se pueden seleccionar cuatro niveles de luminosidad (página 12). X-HM16_26_26D_Es.book 7 ページ 2016年7月22日 金曜日 午前10時23分 Nombres y funciones de los controles 02 1 2 3 4 5 English Panel frontal Français TIMER Español 1 7 8 Í STANDBY/ON Alterna el receptor entre encendido y modo de espera (página 12). 2 Sensor del mando a distancia 9 10 7 11 Toma de auriculares Utilícela para conectar un par de auriculares. Cuando se conecta un par de auriculares, los altavoces no emiten ningún sonido. 8 3 Se utiliza para conectar un dispositivo de almacenamiento USB como fuente de audio (página 18). Indicador TIMER Se ilumina cuando el receptor está apagado y el temporizador está activado. 4 Display principal Consulte Indicadores en la página 8. Control de volumen Úselo para ajustar el volumen de audición (página 12). 6 INPUT Permite seleccionar la fuente de entrada. Bandeja del disco Coloque el disco con la etiqueta mirando hacia arriba (página 15). 10 Botones para el control de reproducción Permiten seleccionar la pista o archivo que se desea reproducir. Permiten detener la reproducción. Detienen la reproducción o reanudan la reproducción desde el punto en el que se ha detenido. 11 Botón de apertura/cierre de la bandeja del disco Pyccкий Permite abrir o cerrar la bandeja del disco (página 15). Nederlands 5 9 Terminal USB Deutsch Recibe las señales del mando a distancia. Italiano 6 7 Es X-HM16_26_26D_Es.book 02 8 ページ 2016年7月22日 金曜日 午前10時23分 Nombres y funciones de los controles Indicadores 1 2 3 4 1 3 ; Se ilumina cuando se silencia el sonido. Efectuar una pausa en la reproducción. 5 4 Nota La función del temporizador está activada. • El icono de silencio se mostrará en rojo. 2 5 1 Sistema de altavoces 1 3 2 1 Altavoz de agudos 2 Altavoz de graves 3 Terminales de altavoz Importante • No se puede extraer la rejilla del altavoz. • Ambos altavoces se pueden utilizar independientemente en el lado derecho o izquierdo. 8 Es Pantalla de visualización de caracteres Muestra diversos datos del sistema. Para iniciar la reproducción. X-HM16_26_26D_Es.book 9 ページ 2016年7月22日 金曜日 午前10時23分 Conexiones 03 English Capítulo 3: Conexiones • Empuje para abrir las pestañas e introduzca los hilos expuestos del cable. • Conecte el cable negro al terminal (s) y el cable rojo al terminal (r). Altavoz izquierdo Deutsch Panel posterior de este receptor Italiano Altavoz derecho Español Conexión de los altavoces PRECAUCIÓN • Por estos terminales de altavoz circula voltaje ACTIVO que es PELIGROSO. Para evitar el riesgo de descargas eléctricas al conectar o desconectar los cables de altavoz, desenchufe el cable de alimentación antes de tocar las partes de los cables que no están aisladas. • No conecte ningún altavoz que no haya sido suministrado con este sistema. • No conecte los altavoces suministrados a ningún amplificador que no sea el que se suministra con este sistema. La conexión a cualquier otro amplificador puede ocasionar un funcionamiento defectuoso o un incendio. • No instale estos altavoces en la pared ni en el techo. Podrían caerse y provocar lesiones. • Estos altavoces están protegidos magnéticamente. Sin embargo, dependiendo de la ubicación de la instalación, puede producirse una distorsión cromática si el sistema de altavoces está situado muy cerca de la pantalla de un televisor. Si esto sucediera, apague el televisor y vuélvalo a encender cuando hayan transcurrido de 15 a 30 minutos. Si el problema persistiera, aleje el sistema de altavoces del televisor. • Asegúrese de que el núcleo del cable de altavoz no queda expuesto y no hace contacto con los núcleos de otros cables. Ello podría provocar que el producto funcionara incorrectamente. • No permita que el núcleo del cale del altavoz entre en contacto con el cuerpo del receptor. Français PRECAUCIÓN • Siempre que realice o modifique conexiones deberá apagar la unidad y desenchufar el cable de alimentación de la toma de corriente. • Conecte el cable de alimentación después de que haya llevado a cabo todas las conexiones entre los distintos dispositivos. Nederlands Pyccкий • Si el núcleo del cable del altavoz entra en contacto con cualquier parte metálica del cuerpo del receptor, puede dañar los altavoces y provocar fuego y humos. Inserte los cables del altavoz de manera segura en los terminales y compruebe que el cable no se sale con facilidad. Nota • No existe ninguna diferencia entre los altavoces I y D. 9 Es X-HM16_26_26D_Es.book 03 10 ページ 2016年7月22日 金曜日 午前10時23分 Conexiones 2 Coloque la antena de cuadro de AM en el soporte fijado. Conexión de antenas • Conecte la antena de cuadro de AM y la antena de hilo de FM (DAB/FM) como se indica a continuación. • Para mejorar la recepción y la calidad de sonido, conecte antenas exteriores (consulte más abajo Uso de antenas exteriores). Solo para modelos norteamericanos 3 2 3 Coloque la antena de AM en una superficie plana y en una dirección que ofrezca la mejor recepción. • Coloque la antena cerca de una ventana, etc. para obtener la mejor recepción. • No coloque la antena cerca de un ordenador o un televisor. Se puede provocar ruido. 2 1 Realice la instalación de acuerdo con la ilustración de más arriba. 4 Conecte el cable de antena de FM (DAB/FM) en la toma de antena de FM. Para obtener mejores resultados, extienda la antena de FM (DAB/FM) por completo y fíjela en una pared o en el marco de una puerta. No la cubra ni la deje enrollada. Uso de antenas exteriores Para mejorar la recepción en FM 4 Utilice un conector PAL (no suministrado) para conectar una antena de FM (DAB/FM) externa. 3 X-HM16/ X-HM26 1 Para modelos europeos Conector PAL de una toma X-HM26D X-HM16/X-HM26 4 X-HM26D 1 Conecte los cables de la antena de AM. Para realizar la conexión, sujete el conector. 10 Es Cable coaxial 75 Ω X-HM16_26_26D_Es.book 11 ページ 2016年7月22日 金曜日 午前10時23分 Conexiones 03 Conexión a la corriente English Antes de realizar o cambiar las conexiones, apague el sistema y desenchufe el cable de alimentación de la toma de CA. Después de haber terminado todas las conexiones, enchufe la unidad a una toma de corriente de CA. Français Panel posterior de este receptor Español Deutsch PRECAUCIÓN • No utilice ningún cable de alimentación que no sea el suministrado con esta unidad. • No utilice el cable de alimentación suministrado con la unidad para ningún propósito excepto el descrito más arriba. Italiano Cable de A una toma de alimentación corriente de CA Nederlands Pyccкий 11 Es X-HM16_26_26D_Es.book 04 12 ページ 2016年7月22日 金曜日 午前10時23分 Primeros pasos Capítulo 4: Primeros pasos Para encender la unidad Pulse Í para conectar la alimentación. Control general Después del uso: Función de entrada Para colocar la unidad en el modo de espera, pulse Í. Al pulsar INPUT en la unidad principal, la función en curso cambiará a otro modo. Pulse INPUT varias veces para seleccionar la función deseada. Ajuste del reloj CD Audio In *1 *2 DAB*1 Bluetooth USB AM*2 FM X-HM26D solamente Solo modelos norteamericanos Control de brillo del display Pulse DIMMER para atenuar el brillo del display. Se pueden seleccionar cuatro niveles de luminosidad. 1 Pulse Í para conectar la alimentación. 2 Pulse TIMER en el mando a distancia. Se mostrará “CLOCK” en el display principal. 3 Pulse ENTER. 4 Pulse / para ajustar el día; a continuación, pulse ENTER. 5 Pulse / para ajustar la hora; a continuación, pulse ENTER. 6 Pulse / para ajustar los minutos; a continuación, pulse ENTER para confirmar. 7 Pulse ENTER. Para comprobar la visualización de la hora: Pulse TIMER. Aparecerá la visualización de la hora durante unos 10 segundos. Para reajustar el reloj: Lleve a cabo “Configuración del reloj” desde el paso 1. Nota • Cuando se restablece la alimentación eléctrica después de volver a conectar la unidad o después de un fallo eléctrico, configure el reloj. 12 Es Establecimiento automático del volumen Si apaga la unidad principal y el volumen está ajustado a 31 o a un valor superior, al encenderla de nuevo estará ajustado a 30 y se establecerá en el último nivel ajustado. Control del volumen Gire el botón del volumen hacia VOLUME (en la unidad principal) o presione VOL +/– (en el mando a distancia) para aumentar o disminuir el volumen. PRECAUCIÓN • El nivel de sonido como una función del volumen depende de la eficiencia del altavoz, de la localización, y de otros factores. Es recomendable evitar la exposición a altos niveles de volumen. No ponga el volumen al máximo al encender la unidad. Escuche música a niveles moderados. La presión acústica excesiva de los auriculares y los cascos puede causar la pérdida del sentido auditivo. Muting Al pulsar en el mando a distancia, el volumen se silenciará temporalmente. Púlselo otra vez para restablecer el volumen. X-HM16_26_26D_Es.book 13 ページ 2016年7月22日 金曜日 午前10時23分 Primeros pasos 04 Configuración del despertador Equalizer Para cambiar la configuración actual del despertador o realizar una nueva configuración: FLAT ACTIVE Un sonido básico, plano Un sonido potente que realza los tonos bajos y altos NIGHT Un sonido que puede escucharse de noche, incluso a un volumen más bajo Cuando se activa la alimentación por primera vez, la unidad entrará en el modo P.bass, que enfatiza las frecuencias de bajos. Para cancelar el modo P.bass, pulse P.BASS en el mando a distancia. Control de bajos/agudos Nota Cuando se haya seleccionado una de las dos funciones anteriores, la que no haya sido seleccionada se mostrará del siguiente modo. • EQ : FLAT 2 Si se han cambiado los ajustes de EQ. • P.BASS : OFF 4 Pulse / para seleccionar “TIMER SET”; a continuación, pulse ENTER. 5 Pulse / para seleccionar la fuente de reproducción con despertador; a continuación, pulse ENTER. CD, DAB (X-HM26D solamente), FM, AM (Solo modelos norteamericanos), y USB pueden seleccionarse como la fuente de reproducción. 6 Pulse / para seleccionar un día para la reproducción con temporizador; a continuación, pulse ENTER. 7 Pulse / para ajustar la hora; a continuación, pulse ENTER. 8 Pulse / para ajustar los minutos; a continuación, pulse ENTER. Ajuste el tiempo de finalización como en los pasos 7 y 8 de arriba. 9 Para ajustar el volumen, pulse VOL +/–; a continuación, pulse ENTER. Aparece “ ” en la pantalla. 10 Pulse Í para activar el modo de espera. El indicador TIMER se iluminará. Pyccкий 1 Si se han cambiado los ajustes de P.BASS (ON/OFF). ONCE – El despertador funciona una vez solamente, a la hora memorizada. DAILY – La reproducción con el despertador diario se activará a la hora y los días de la semana preestablecidos. Nederlands • No es posible utilizar simultáneamente EQ y P.BASS. De estas dos funciones, se utilizará la que se haya seleccionado en último lugar. • SOUND se puede utilizar junto con EQ o P.BASS. 3 Presione / para seleccionar “ONCE” o “DAILY”; a continuación, pulse ENTER. Deutsch Pulse SOUND para seleccionar “BASS” o “TREBLE”, después pulse / para ajustar los graves o los agudos. 2 Mantenga pulsado TIMER en el mando a distancia. Italiano Control P.bass Pulse Í para conectar la alimentación. Español Un sonido que permite escuchar DIALOGUE la radio o voces con mayor facilidad 1 Français Al pulsar EQ, se mostrará el ajuste del modo en curso. Para cambiar a otro modo, pulse EQ varias veces hasta que se muestre el modo de sonido deseado. English Controles de sonido 13 Es X-HM16_26_26D_Es.book 04 14 ページ 2016年7月22日 金曜日 午前10時23分 Primeros pasos Cómo restablecer el despertador Permite volver a utilizar una configuración de despertador existente. 1 Siga los pasos 1 a 3 indicados en “Configuración del despertador”. 2 Pulse / para seleccionar “TIMER ON” y, a continuación, pulse ENTER. Uso de auriculares Conecte los auriculares a la toma de auriculares. Cuando se conecta un par de auriculares, los altavoces no emiten ningún sonido. TIMER Cómo cancelar el despertador Permite desactivar la configuración del despertador. 1 Siga los pasos 1 a 3 indicados en “Configuración del despertador”. 2 Pulse / para seleccionar “TIMER OFF” y, a continuación, pulse ENTER. Empleo del temporizador de conexión automática 1 Pulse Í para desconectar la alimentación. 2 A la hora de conexión automática, esta unidad se encenderá automáticamente y activará la función de entrada seleccionada. Nota • Si a la hora del despertador el dispositivo de almacenamiento USB no está conectado a la unidad o no se ha introducido un disco, la unidad se encenderá y no reproducirá la pista. • Es posible que algunos discos no se reproduzcan automáticamente a la hora de conexión automática. • Si ajusta el temporizador, deberá dejar un minuto o más entre la hora de inicio y la de finalización. Empleo del temporizador de desconexión automática El temporizador de desconexión automática apaga la unidad después de un tiempo especificado para poder irse a dormir sin tener que preocuparse del mismo. 1 Pulse repetidamente SLEEP para seleccionar un tiempo hasta la desconexión. Seleccione uno de los ajustes siguientes: 10 min, 20 min, 30 min, 60 min, 90 min, 120 min, 150 min, 180 min u OFF. El nuevo valor ajustado se visualizará durante 3 segundos y luego se completará el ajuste. Nota • El temporizador de desconexión automática puede ajustarse presionando SLEEP mientras se visualiza el tiempo restante. 14 Es • No gire el botón del volumen al máximo y escuche la música a niveles moderados. La presión acústica excesiva de los auriculares y los cascos puede causar la pérdida del sentido auditivo. • Antes de enchufar o desenchufar los auriculares, baje el volumen. • Asegúrese de que sus auriculares tengan una clavija de 3,5 mm de diámetro y una impedancia de 16 ohmios a 50 ohmios. La impedancia recomendada es de 32 ohmios. X-HM16_26_26D_Es.book 15 ページ 2016年7月22日 金曜日 午前10時23分 Reproducción de discos 05 Reproducción de discos Reproduzca archivos de música MP3 En este documento, los datos de la pista MP3 se denominan “music file” y la ubicación en la que se guardan se denomina “folder”. por ejemplo, Français Este sistema puede reproducir un CD, CD-R/RW estándar en formato CD y CD-R/RW con archivos MP3, pero no puede grabar en ellos. Cabe la posibilidad de que algunos discos CD-R y CD-RW de audio no puedan reproducirse como consecuencia de su estado o del dispositivo empleado para la grabación. • Si desea información sobre MP3, consulte la página 31. English Capítulo 5: Reproducción de discos o archivos 1 Pulse Í para conectar la alimentación. 3 Pulse < en la unidad principal para abrir la bandeja del disco. 4 Coloque el disco en la bandeja del disco, con la etiqueta mirando hacia arriba. • Repita este paso si hay otras carpetas dentro de la carpeta seleccionada. . • Para volver a la carpeta anterior, pulse o • Una vez iniciada la reproducción, únicamente podrán reproducirse de forma continua los archivos de música que estén dentro de la misma carpeta. Reproducción de pistas en un CD Después de la última pista del disco, la unidad parará automáticamente. Nota • Debido a la estructura de la información del disco, se tarda más en leer un disco MP3 que un disco CD normal (aproximadamente de 20 a 90 segundos). • Cuando se alcance el principio de la primera pista en retroceso rápido, la unidad accederá al modo de reproducción (sólo para CD). • Si hay interferencias de televisión o radio durante el funcionamiento del reproductor de CD, coloque el aparato alejado del televisor o de la radio. Pyccкий 1 Una vez completado el proceso de reconocimiento, pulse 1; . Nederlands 5 Pulse < en la unidad principal para cerrar la bandeja del disco. PRECAUCIÓN • No ponga dos discos a la vez en la bandeja del disco. • No reproduzca discos de formas especiales (en forma de corazón, octagonales. etc.). Podría provocar un funcionamiento defectuoso. • No empuje la bandeja del disco mientras la misma está en movimiento. • Si hay un corte de alimentación eléctrica mientras la bandeja está abierta, espere a que se restablezca la alimentación. • Asegúrese de poner el disco de 8 cm en el centro de la bandeja del disco. Deutsch 2 Pulse / para seleccionar el archivo de música ([ ]) y a continuación pulse 1; o ENTER. Italiano 2 Pulse CD en el mando a distancia o INPUT varias veces en la unidad principal para seleccionar la entrada de CD. 1 Una vez completado el proceso de reconocimiento, pulse / para seleccionar la carpeta donde se haya guardado el archivo de música ([ ]) y a continuación pulse o ENTER. Español Cargue el disco 15 Es X-HM16_26_26D_Es.book 05 16 ページ 2016年7月22日 金曜日 午前10時23分 Reproducción de discos Sugerencia • Si no se ha llevado a cabo ninguna operación en el modo de CD y no se ha reproducido ningún archivo de audio durante más de 20 minutos, la unidad se apagará automáticamente. En este caso es necesario que apagado automático esté ajustado a ON. • El apagado automático se puede ajustar a ON/OFF (página 33). Reproducción avanzada de CD o disco de MP3 Operaciones básicas Función Unidad principal Mando a distancia Funcionamiento Reproducción Pulse el modo de parada. Parada Pulse el modo de reproducción. (durante la reproducción de un CD) Aparecerá “RESUME” y se memorizará el punto donde se detuvo la reproducción. Pulse de nuevo y se eliminará el punto memorizado. Pausa Pista siguiente/ anterior Pulse el modo de reproducción. Pulse 1; para reanudar la reproducción desde el punto en el que la haya interrumpido. Púlselo en el modo de reproducción o parada. Si pulsa el botón en el modo de parada, pulse 1; para que empiece a reproducirse la pista deseada. (durante la reproducción MP3) Únicamente podrá avanzar o retroceder hasta archivos de música que estén dentro de la misma carpeta. Avance rápido/ Retroceso rápido Pulse y mantenga pulsado el modo de reproducción. Suéltelo para volver a la reproducción. Repetición de la reproducción La repetición de lectura de una pista se puede realizar de forma que afecte a todas las pistas o a una secuencia programada de forma continua. Para escuchar nuevamente una pista: Pulse varias veces hasta que se muestre “REPEAT ONE”. Pulse ENTER. Para repetir todas las pistas: Pulse varias veces hasta que se muestre “REPEAT ALL”. Pulse ENTER. Para repetir las pistas deseadas: Siga los pasos del 1 al 5 de la sección “Reproducción programada (CD)” (página 17) y pulse repetidamente hasta que aparezca “REPEAT ALL”. Pulse ENTER. Para cancelar la repetición de la reproducción: Pulse varias veces hasta que se muestre “REPEAT OFF”. Pulse ENTER. Nota • Después de haber llevado a cabo una reproducción repetida, recuerde pulsar ∫. De lo contrario, el disco se reproducirá continuamente. • Durante la reproducción repetida, la reproducción aleatoria no estará disponible. Reproducción aleatoria Las pistas del disco se pueden reproducir en orden aleatorio automáticamente. Para reproducir aleatoriamente todas las pistas: Pulse RANDOM varias veces hasta que se muestre “RANDOM ON”. Pulse ENTER. Para cancelar la reproducción aleatoria: Pulse RANDOM varias veces hasta que se muestre “RANDOM OFF”. Pulse ENTER. 16 Es X-HM16_26_26D_Es.book 17 ページ 2016年7月22日 金曜日 午前10時23分 Reproducción de discos 05 Podrá seleccionar hasta 24 selecciones para la reproducción en el orden que usted prefiera. 1 Pulse DISPLAY durante la reproducción. Si el archivo contiene el título, el nombre del artista y el nombre del álbum, esta información se mostrará. (En esta unidad solo podrá visualizar caracteres alfanuméricos. Los caracteres que no sean alfanuméricos se mostrarán como “∫”.) Visualización del título 2 Pulse : 9 para seleccionar las pistas deseadas. Número de pista en una carpeta, visualización del tiempo restante Visualización del artista Número de pista en una carpeta, visualización del tiempo de reproducción Visualización del álbum 3 Pulse ENTER para guardar la carpeta y el número de pista. 4 Repita los pasos 2 - 3 para otras pistas. Se pueden programar hasta 24 pistas. 5 Pulse 1; para iniciar la reproducción. Para cancelar el modo de reproducción programada: Cómo añadir pistas a la programación: Pulse PGM/MEMORY. Después, para añadir pistas, siga los pasos 2 – 3. Nederlands Para cancelar la reproducción programada, pulse dos veces ∫ en el mando a distancia. La pantalla mostrará “PRG CLEAR” y todos los contenidos programados se borrarán. Nota • “Not supported playback file” no se puede reproducir. En este caso, se saltará automáticamente. • Puede haber casos en que no resulte posible mostrar ninguna información. • La visualización del título, el artista y los álbumes únicamente es posible con ID3 Versión 1 (1.0 o 1.1). Deutsch • Si desea comprobar las pistas programadas, pulse PGM/MEMORY. • Si comete un error, podrá cancelar las últimas pistas programadas pulsando . Italiano Número de pista, visualización del título Español 1 En el modo de parada, pulse PGM/MEMORY en el mando a distancia para entrar en el modo de guardar las pistas programadas. Français Reproducción programada (CD) Cómo cambiar el contenido visualizado English • Las canciones/ficheros descargados son solamente para uso personal. Cualquier otro uso de la canción sin la autorización del propietario es ilegal. Nota • Si pulsa el botón 9 durante la reproducción aleatoria, podrá pasar a la siguiente pista seleccionada en el modo de reproducción aleatoria. • En la reproducción aleatoria, la unidad seleccionará y reproducirá las pistas automáticamente. (No se puede seleccionar el orden de las pistas.) • Durante la reproducción aleatoria, la reproducción repetida no estará disponible. Nota Pyccкий • Al expulsar un disco, la programación se cancelará automáticamente. • Si pulsa Í para entrar en el modo de espera o para cambiar a una función distinta de CD, las selecciones programadas se eliminarán. • Durante el funcionamiento programado, la reproducción aleatoria no estará disponible. Sobre la descarga de archivos MP3 Existen muchas páginas web que permiten descargar ficheros de música MP3. Siga las instrucciones de la página web acerca de cómo descargar los archivos de música. Podrá reproducir estos archivos de música descargados grabándolos en un disco CD-R/RW. 17 Es X-HM16_26_26D_Es.book 06 18 ページ 2016年7月22日 金曜日 午前10時23分 Reproducción USB Capítulo 6: Reproducción USB Reproducción de dispositivos de almacenamiento USB Se puede escuchar audio de dos canales a través de la interfaz USB con archivos MP3 en el frontal del receptor. • Pioneer no garantiza que todos los ficheros grabados en un dispositivo de almacenamiento USB puedan reproducirse, ni que se suministrará alimentación a un dispositivo de almacenamiento USB. Tenga también presente que Pioneer no aceptará ninguna responsabilidad por la pérdida de archivos de dispositivos de almacenamiento USB causada por la conexión a esta unidad. • Si desea información sobre MP3, consulte la página 31. 1 Pulse USB como fuente de entrada. Se mostrará “USB” en el display principal. 2 Conecte el dispositivo de almacenamiento USB. • Este receptor no es compatible con un concentrador USB. TIMER Dispositivo de almacenamiento USB (de venta en establecimientos especializados) 3 Una vez completado el proceso de reconocimiento, pulse / para seleccionar la carpeta donde se haya guardado el archivo de música ([ ]) y a continuación pulse o ENTER. • En este documento, los datos de la pista MP3 se denominan “music file” y la ubicación en la que se guardan se denomina “folder”. • Repita este paso si hay otras carpetas dentro de la carpeta seleccionada. • Para volver a la carpeta anterior, pulse o . 4 Pulse / para seleccionar el archivo de música ([ ]) y a continuación pulse 1; o ENTER. • Una vez iniciada la reproducción, únicamente podrán reproducirse de forma continua los archivos de música que estén dentro de la misma carpeta. 18 Es • Si desea información sobre las operaciones básicas, consulte la página 16. • Si desea cambiar a otra fuente de entrada, antes deberá detener la reproducción del dispositivo de memoria USB. • Antes de retirar el dispositivo de almacenamiento USB, apáguelo. Nota • Es posible que esta unidad no reconozca el dispositivo de almacenamiento USB, que no reproduzca archivos o que no suministre alimentación al dispositivo de almacenamiento USB. Para obtener más detalles, consulte Cuando se ha conectado un dispositivo de almacenamiento USB en la página 30. • Cuando no haya ningún dispositivo de almacenamiento USB en funcionamiento y la unidad display durante 20 o más minutos, la alimentación se desconectará automáticamente. En este caso es necesario que apagado automático esté ajustado a ON (página 33). X-HM16_26_26D_Es.book 19 ページ 2016年7月22日 金曜日 午前10時23分 Reproducción USB La repetición de lectura de una pista se puede realizar de forma que afecte a todas las pistas o a una secuencia programada de forma continua. Para escuchar nuevamente una pista: Para repetir todas las pistas: Pulse varias veces hasta que se muestre “REPEAT ALL”. Pulse ENTER. Para cancelar la repetición de la reproducción: Nota Reproducción aleatoria El archivo del dispositivo de almacenamiento USB se puede reproducir en orden aleatorio automáticamente. Pulse RANDOM varias veces hasta que se muestre “RANDOM ON”. Pulse ENTER. Para cancelar la reproducción aleatoria: Pulse RANDOM varias veces hasta que se muestre “RANDOM OFF”. Pulse ENTER. Esta unidad puede reproducir repetidamente carpetas guardadas en el dispositivo de almacenamiento USB. Para obtener más detalles, consulte Cómo cambiar el contenido visualizado en la página 17. Pyccкий Cómo cambiar el contenido visualizado Nederlands Nota • Si pulsa el botón 9 durante la reproducción aleatoria, podrá pasar a la siguiente pista seleccionada en el modo de reproducción aleatoria. • En la reproducción aleatoria, la unidad seleccionará y reproducirá las pistas automáticamente. (No se puede seleccionar el orden de las pistas.) • Durante la reproducción aleatoria, la reproducción repetida no estará disponible. Deutsch Para reproducir aleatoriamente todas las pistas: Italiano • Después de haber llevado a cabo una reproducción repetida, recuerde pulsar ∫. De lo contrario, el archivo del dispositivo de almacenamiento USB se reproducirá de forma continua. • Durante la reproducción repetida, la reproducción aleatoria no estará disponible. Español Pulse varias veces hasta que se muestre “REPEAT OFF”. Pulse ENTER. Français Pulse varias veces hasta que se muestre “REPEAT ONE”. Pulse ENTER. English Repetición de la reproducción 06 19 Es X-HM16_26_26D_Es.book 07 20 ページ 2016年7月22日 金曜日 午前10時23分 Uso del sintonizador Capítulo 7: Uso del sintonizador • La sintonización automática omitirá las emisoras que presenten una señal débil. • Para detener la sintonización automática, pulse ∫. • Si ha sintonizado una emisora RDS (sistema de radiodifusión de datos), la frecuencia se mostrará en primer lugar. Finalmente, aparecerá el nombre de la emisora. • Las emisoras RDS se pueden sintonizar de forma totalmente automática utilizando la Memoria Automática de Estaciones Programadas (ASPM). Consulte página 22. Audición de FM (Para modelos europeos)/Audición de FM o AM (Solo para los modelos norteamericanos) El siguiente procedimiento describe cómo sintonizar emisoras de radio de FM o AM utilizando las funciones de sintonización automática (búsqueda) y sintonización manual (por pasos). Cuando haya sintonizado una emisora, puede memorizar la frecuencia para recuperarla más tarde. Para saber cómo llevar a cabo esta operación, consulte más abajo Presintonización de emisoras. Para recibir una transmisión de FM en estéreo: 1 Pulse TUNER hasta que “FM” aparezca en la pantalla. 2 Pulse MENU y después pulse / hasta que “FM STEREO/MONO” aparezca en la pantalla. 3 Pulse ENTER y después pulse / hasta que “AUTO” aparezca en la pantalla. Mejora de una mala recepción de FM: Tras realizar los pasos anteriores 1 - 2, pulse ENTER y después pulse / hasta que “MONO” aparezca en la pantalla. El sintonizador cambiará de estéreo a mono y por lo general mejorará la recepción. Sintonización 1 Pulse Í para conectar la alimentación. 2 Pulse TUNER varias veces para seleccionar la banda de frecuencia deseada (FM o AM). • (X-HM26D) Puede seleccionar “FM” y “DAB”. Si desea información sobre “DAB”, consulte la página 23. Presintonización de emisoras Si escucha una emisora de radio en particular a menudo, puede ser conveniente almacenar la frecuencia de la emisora en el receptor para luego recuperarla fácilmente cada vez que desee escuchar dicha emisora (Ajuste de presintonías). Esto le evitará tener que sintonizar manualmente la emisora cada vez que desee escucharla. Esta unidad puede memorizar hasta 45 emisoras. (30 estaciones de FM/15 estaciones de AM) 3 Para sintonizar la emisora deseada, pulse TUNE +/– en el mando a distancia. Sintonización automática: Pulse y mantenga pulsado TUNE +/–; la búsqueda dará comienzo automáticamente y el sintonizador se detendrá en la primera emisora de radiodifusión disponible. Sintonización manual: Pulse varias veces TUNE +/– para sintonizar la emisora deseada. Nota • Cuando se produzca una interferencia de radio, es posible que la sintonización automática se detenga automáticamente en ese punto. 20 Es 1 Sintonice la emisora que desea memorizar. Para más detalles, consulte Sintonización más arriba. 2 Pulse PGM/MEMORY. El número de presintonía parpadeará. X-HM16_26_26D_Es.book 21 ページ 2016年7月22日 金曜日 午前10時23分 Uso del sintonizador 4 Pulse PGM/MEMORY para guardar la emisora en la memoria. 1 Pulse TUNER hasta que “FM” aparezca en la pantalla. 2 Pulse DISPLAY repetidamente. Cada vez que pulse DISPLAY, el display cambiará del siguiente modo: Station name (PS) Frequency Programme type (PTY) Radio text (RT) • Cuando sintonice una emisora que no sea una emisora RDS, o una emisora RDS que emita señales débiles, la visualización cambiará en el orden siguiente: Français Si el número de presintonía deja de parpadear y se ilumina de forma continua antes de que la emisora se haya memorizado, repita esta operación desde el paso 2. • Repita los pasos 1 a 4 para configurar otras emisoras o para cambiar una emisora preconfigurada. Cuando una nueva estación es almacenada en la memoria, la estación memorizada previamente para ese número de canal será borrada. Información proporcionada por RDS English 3 Pulse PRESET +/– para seleccionar el número de emisora presintonizada. 07 Nota NO RDS FM 98.80 MHz Las emisoras almacenadas en la memoria pueden explorarse automáticamente. (Exploración de memoria preconfigurada.) 1 Pulse y mantenga pulsado PRESET +/–. Se mostrará el número de la emisora presintonizada y las emisoras programadas se podrán sintonizar de forma secuencial, durante 5 segundos cada una de ellas. 2 Cuando haya encontrado la emisora deseada, pulse PRESET +/– de nuevo. Para borrar toda la memoria preconfigurada 1 Pulse TUNER en el mando a distancia. 2 Pulse hasta que se muestre “MEMORY CLEAR”. Nota • Se borrarán todas las emisoras. Uso del Radio Data System o RDS (sistema de datos de radio) (solamente modelos europeos) Pyccкий El Radio Data System (Sistema de datos de radio), o RDS como se le conoce comúnmente, es un sistema utilizado por la mayoría de emisoras de radio FM para proporcionar a los oyentes informaciones de diversos tipos, como el nombre de la emisora y el tipo de programa que están emitiendo, por ejemplo. Una de las funciones del RDS consiste en la posibilidad de buscar por tipo de programa. Por ejemplo, puede buscar una emisora que esté emitiendo un programa de tipo Jazz Music. Nederlands 1 Pulse TUNER hasta que “FM” aparezca en la pantalla. 2 Pulse MENU y después pulse / hasta que “FM RDS” aparezca en la pantalla. 3 Pulse ENTER y después pulse / hasta que “PTY” aparezca en la pantalla. 4 Pulse ENTER. “SELECT” aparecerá durante unos 5 segundos. 5 Pulse / para seleccionar el tipo de programa que desea escuchar. Cada vez que pulse el botón, se mostrará el tipo de programa. Si mantiene el botón pulsado, el tipo de programa se mostrará de forma continua. 6 Mientras se visualiza el tipo de programa seleccionado (dentro de un lapso de 5 segundos), pulse ENTER. Después de que el tipo de programa seleccionado haya estado encendido durante 2 segundos, se mostrará “SEARCH” y dará comienzo la operación de búsqueda. Para explorar las emisoras preajustadas Deutsch Búsqueda de emisoras por tipo de programa Pulse PRESET +/– para seleccionar la emisora deseada. Italiano Para recuperar una emisora memorizada Español • La función de backup protegerá las emisoras memorizadas durante algunas horas en el caso de que se produzca una interrupción en el suministro eléctrico o se desenchufe el cable de alimentación de CA. 21 Es X-HM16_26_26D_Es.book 07 22 ページ 2016年7月22日 金曜日 午前10時23分 Uso del sintonizador Los tipos de programa se mostrarán de este modo: News – Noticias Current Affairs – Temas de actualidad Information – Información general Sport – Deportes Education – Material educativo Drama – Radionovelas, etc. Cultures – Cultura nacional o regional, teatro, etc. Science – Ciencia y tecnología Varied Speech – Material basado normalmente en charlas, tales como concursos o entrevistas. Pop Music – Música pop Rock Music – Música rock Easy Listening – Música ligera Light Classics M – Música clásica ‘ligera’ Serious Classics – Música clásica ‘no ligera’ Other Music – Música no perteneciente a ninguna de las categorías anteriores Weather & Metr – Informes meteorológicos Finance – Informes de la Bolsa de Valores, comercio, temas financieros, etc. Children’s Progs – Programas infantiles Social Affairs – Asuntos sociales Religion – Programas relacionados con religión Phone In – Público en general expresando sus opiniones por teléfono Travel & Touring – Programas de viajes, más que información sobre el tráfico Leisure & Hobby – Ocio y hobbies Jazz Music – Música jazz Country Music – Música country National Music – Música popular en varios idiomas, salvo inglés Oldies Music – Música popular de los años 50 y 60 Folk Music – Música folklórica Documentary – Documentales Alarm Test – Permite probar equipos o receptores de radiodifusión de emergencia. Alarm - Alarm! – Anuncios de emergencia hechos en circunstancias excepcionales o avisos de acontecimientos que causan peligro en general. • Si la pantalla ha dejado de parpadear, empiece de nuevo desde el paso 2. Si la unidad encuentra un tipo de programa deseado, el número de canal correspondiente se encenderá durante unos 8 segundos; luego, el nombre de la emisora permanecerá encendido. • Si quiere escuchar el mismo tipo de programa de otra emisora, repita los pasos 2 - 6. La unidad buscará la siguiente emisora. • Si no se encuentra ninguna emisora, aparecerá “NOT FOUND” durante 4 segundos. Cómo utilizar la Memoria Automática de Estaciones Programadas (ASPM) Mientras esté en el modo de operación del ASPM, el sintonizador buscará automáticamente las nuevas emisoras RDS. Podrán memorizarse hasta 30 emisoras. Si usted ya ha almacenado algunas emisoras en la memoria, el número de emisoras nuevas que podrán almacenarse será inferior. 1 Pulse TUNER hasta que “FM” aparezca en la pantalla. 2 Pulse MENU y después pulse / hasta que “FM RDS” aparezca en la pantalla. 3 Pulse ENTER y después pulse / hasta que “ASPM” aparezca en la pantalla. 4 Pulse ENTER. Después de que “ASPM” se haya mostrado de forma intermitente durante unos 4 segundos, se iniciará la exploración (87,5 - 108 MHz). 22 Es Después de la exploración, se visualizará el número de emisoras almacenadas en la memoria durante 4 segundos, y luego aparecerá “END” durante 4 segundos. • Para detener el funcionamiento ASPM antes de que se complete: Pulse ∫ mientras esté buscando emisoras. Las emisoras que ya se hayan memorizado se conservarán. • Si se está difundiendo la misma emisora en distintas frecuencias, la frecuencia más potente se almacenará en la memoria. • No se almacenarán las emisoras que tengan la misma frecuencia que la que está almacenada en la memoria. • Si ya se han almacenado 30 emisoras en la memoria, se interrumpirá la exploración. Si desea volver a realizar la operación de ASPM, borre la memoria de preajustes. • Si no se encuentra ninguna emisora, aparecerá “NOT FOUND” durante 5 segundos. • Si las señales RDS son muy débiles, es posible que los nombres de emisora no se almacenen en la memoria. • El mismo nombre de emisora puede almacenarse en distintos canales. • Es posible que en ciertas áreas o durante ciertos períodos de tiempo, los nombres de emisora sean momentáneamente distintos. Nota • Si ocurre algo de lo que se menciona a continuación, no significa que el aparato esté averiado: - Se muestran de forma alterna “PS”, “NO PS” y un nombre de emisora. - Si una emisora en particular no está difundiendo correctamente o una emisora está realizando pruebas, la función de recepción RDS no funcionará de forma adecuada. - Cuando reciba una emisora RDS cuya señal sea demasiado débil, es posible que no se visualice cierta información, como el nombre de la emisora. - “NO PS”, “NO PYT” o “NO RT” parpadearán durante unos 5 segundos, y entonces se visualizará la frecuencia. • Notas para el texto de radio: - Se mostrarán los 8 primeros caracteres del texto de radio y luego se desplazarán por el display. - Si sintoniza una emisora RDS que no está difundiendo texto de radio, se visualizará “NO RT” cuando usted cambie a la posición del texto de radio. - Mientras se están recibiendo datos de texto radiofónico o cuando cambia el contenido del texto, se visualiza “RT”. X-HM16_26_26D_Es.book 23 ページ 2016年7月22日 金曜日 午前10時23分 Uso del sintonizador 07 DAB + SIGNAL MULTIPLEX (CONJUNTO) Exploración automática Puede iniciar la búsqueda automática de nuevo si desplaza la unidad a otras zonas o añade canales multiplex a la lista de emisoras. 1 Pulse TUNER hasta que aparezca “DAB” en la pantalla. 2 Pulse MENU y después pulse / hasta que “DAB SCAN” aparezca en la pantalla. 3 Pulse ENTER y después pulse / hasta que “AUTO” aparezca en la pantalla. 4 Pulse ENTER. Se inicia la exploración automática. Una vez concluido el proceso de búsqueda, se seleccionará la primera emisora que se haya detectado. SERVICIOS Sintonización Pyccкий Cuando la encienda por primera vez, la unidad buscará emisoras de radio automáticamente para crear una lista. Las emisoras se guardarán por orden alfanumérico; se seleccionará la primera emisora de la lista y la escuchará a través de los altavoces. Nederlands 1 Pulse TUNER hasta que aparezca “DAB” en la pantalla. Deutsch COMPONENTES DE SERVICIOS (EMISORAS) Puede almacenar manualmente emisoras que la exploración automática no puede encontrar. Si la recepción es deficiente, ajuste la sensibilidad. La sintonización manual solo está disponible después de la sintonización automática. Realice la exploración automática primero. 1 Pulse TUNER hasta que “DAB” aparezca en la pantalla. 2 Pulse MENU y después pulse / hasta que “DAB SCAN” aparezca en la pantalla. 3 Pulse ENTER y después pulse / hasta que “MANUAL” aparezca en la pantalla. 4 Pulse ENTER. 5 En un lapso de 10 segundos, pulse TUNE +/– para seleccionar la frecuencia DAB+. 6 En un lapso de 10 segundos, pulse ENTER. • Si el nivel es demasiado bajo, mueva la antena o la unidad para mejorar la recepción. Italiano Sintonización manual Español Digital Audio Broadcasting es un sistema de transmisión digital en el que las señales de audio se convierten a señales digitales para su emisión. DAB+ se emite como un grupo de datos denominado multiplex (conjunto) que puede contener una o más emisoras (servicios). Cada emisora contiene un servicio principal y puede haber uno o más servicios secundarios. Esto permite transmitir varios programas o servicios en una sola frecuencia. • Si no se encuentra ninguna emisora, aparece “NO SIGNAL”. • Aparece hasta 100 para el total de emisoras recibidas. Français Acerca de DAB+ (Digital Audio Broadcasting) 3 En los siguientes 10 segundos, pulse ENTER en el mando a distancia para sintonizar la emisora que desee. English Audición de DAB+ (solamente XHM26D) 2 Pulse TUNE +/– para seleccionar la emisora deseada. 23 Es X-HM16_26_26D_Es.book 07 24 ページ 2016年7月22日 金曜日 午前10時23分 Uso del sintonizador Cambio de visualización de información Puede cambiar la visualización de información de DAB+. Pulse el botón DISPLAY. Cada vez que se pulsa el botón la visualización de información cambia en el siguiente orden. Cuando aparece “NO SIGNAL”, el botón DISPLAY no permite cambiar la visualización. [Programme Name] Tabla de frecuencias de DAB (BANDA III) Frecuencia Etiqueta Frecuencia 5A 208.064 MHz 9D 176.640 MHz 5B 209.936 MHz 10A 178.352 MHz 5C 211.648 MHz 10B [Tipo de programa] 180.064 MHz 5D 213.360 MHz 10C Una descripción del tipo de contenido que la emisora está emitiendo. 181.936 MHz 6A 215.072 MHz 10D [Nombre del multiplex] 183.648 MHz 6B 216.928 MHz 11A El nombre del multiplex (conjunto) que proporciona el servicio actual. 185.360 MHz 6C 218.640 MHz 11B 187.072 MHz 6D 220.352 MHz 11C 188.928 MHz 7A 222.064 MHz 11D 190.640 MHz 7B 223.936 MHz 12A Muestra el modo estéreo. 192.352 MHz 7C 225.648 MHz 12B [Velocidad de transferencia] 194.064 MHz 7D 227.360 MHz 12C La velocidad de transferencia de datos. 195.936 MHz 8A 229.072 MHz 12D [Calidad de la señal] 197.648 MHz 8B 230.784 MHz 13A 199.360 MHz 8C 232.496 MHz 13B 201.072 MHz 8D 234.208 MHz 13C 202.928 MHz 9A 235.776 MHz 13D 204.640 MHz 9B 237.488 MHz 13E 206.352 MHz 9C 239.200 MHz 13F [Texto deslizante] La información se desplaza por la pantalla cuando se envía desde la emisora. [Frecuencia] La frecuencia DAB+ para la emisora. [Modo estéreo] La calidad de la señal se muestra como un número (0 - 100). [85-100: Buena, 70-84: Regular, 0-69: Deficiente] Memorización de una emisora Puede almacenar 10 emisoras DAB en memoria y recuperarlas pulsando un botón. (Ajuste de presintonías) 1 Sintonice la emisora DAB que desee. 2 Pulse PGM/MEMORY. El número de preajuste parpadeará. 3 En los siguientes 10 segundos, pulse PRESET +/– para seleccionar el número de canal de presintonía. Almacene las emisoras en memoria, en orden, empezando con el canal presintonizado 1. 4 En los siguientes 10 segundos, pulse PGM/MEMORY para almacenar esa emisora en memoria. Si los indicadores de número de presintonía desaparecen antes de que se memorice la emisora, repita la operación del paso 2. Es Cuando se almacena una nueva emisora en memoria, la emisora memorizada previamente para ese número de canal de presintonía se borrará. 174.928 MHz Se muestra el nombre de la emisora. (Establecido de forma predeterminada) 24 5 Repita los pasos 1 - 4 para establecer otras emisoras o para cambiar una emisora presintonizada. Etiqueta X-HM16_26_26D_Es.book 25 ページ 2016年7月22日 金曜日 午前10時23分 Otras conexiones 08 English Capítulo 8: Otras conexiones Conecte su componente de reproducción auxiliar usando la entrada AUDIO IN del panel trasero. Esta función cambia automáticamente a “AUDIO IN” cuando hay entrada de audio al conector AUDIO IN. 1 Pulse MENU y después pulse / hasta que “Audio In detect” aparezca en la pantalla. 2 Pulse ENTER y después pulse alternar Audio In detect ON/OFF. / para • Está establecido en OFF en el ajuste de fábrica. Nota Pulse AUDIO IN como fuente de entrada. Si ha seleccionado AUDIO IN, se mostrará “Audio In” en el display principal. Pyccкий Nota • Si la toma de miniclavija AUDIO IN está conectada a la toma auxiliar de auriculares, el volumen de esta unidad se ajustará con arreglo al volumen del componente de reproducción. Si después de bajar el volumen de la unidad, el sonido se escucha distorsionado, intente bajarlo a través del componente de reproducción auxiliar. Nederlands 1 Reproductor de audio portátil, etc. Deutsch Cable de miniconector estéreo de 3,5 mm (de venta en establecimientos especializados) Italiano • Cuando Audio In detect está ON, en la pantalla principal aparece “Audio In Det ON”. • Cuando Audio In detect está OFF, en la pantalla principal aparece “Audio In Det OFF”. Español Conexión de componentes auxiliares Cambio automático a entrada Audio In (Solo para modelos norteamericanos) Français PRECAUCIÓN • Antes de realizar o cambiar las conexiones, apague el sistema y desenchufe el cable de alimentación de la toma de CA. • Nous n'acceptons en aucun cas la responsabilité pour des dommages résultant d'une connexion à des équipements fabriqués par d'autres sociétés. 25 Es X-HM16_26_26D_Es.book 09 26 ページ 2016年7月22日 金曜日 午前10時23分 Reproducción de audio con Bluetooth® Capítulo 9: Reproducción de audio con Bluetooth® Solamente X-HM26/26D Reproducción de música empleando la tecnología inalámbrica Bluetooth Dispositivo habilitado con tecnología Bluetooth inalámbrica: teléfono móvil Funcionamiento con mando a distancia El mando a distancia suministrado con este equipo le permite reproducir y parar diversos medios, además de realizar otras operaciones. Nota Dispositivo habilitado con tecnología Bluetooth inalámbrica: Reproductor de música digital • Es necesario que el dispositivo con tecnología inalámbrica Bluetooth sea compatible con perfiles AVRCP. • No pueden garantizarse las operaciones con mando a distancia para todos los dispositivos con tecnología inalámbrica Bluetooth. Dispositivo no equipado con tecnología Bluetooth inalámbrica: Reproductor de música digital + Transmisor de audio Bluetooth® (de venta en los establecimientos del ramo) Datos de música TIMER Esta unidad permite reproducir inalámbricamente música almacenada en dispositivos habilitados para Bluetooth (teléfonos móviles, reproductores de música digitales, etc.). También puede utilizar un transmisor de audio Bluetooth (de venta en establecimientos especializados) para oír música desde dispositivos que no estén equipados con la funcionalidad Bluetooth. Para más información, consulte el manual del usuario de su dispositivo habilitado para Bluetooth. Nota • La marca literal y los logotipos Bluetooth® son marcas registradas propiedad de Bluetooth SIG, Inc. • Es necesario que el dispositivo con tecnología inalámbrica Bluetooth sea compatible con perfiles A2DP. • La conexión no siempre está garantizada con todos los dispositivos con tecnología Bluetooth. 26 Es Sincronización con la unidad (registro inicial) Para que la unidad pueda reproducir música almacenada en un dispositivo habilitado para Bluetooth, antes deberá sincronizarlos. La sincronización deberá llevarse a cabo la primera vez que utilice el dispositivo habilitado para Bluetooth, o cuando los datos de sincronización del dispositivo se hayan borrado por cualquier motivo. La sincronización es un paso necesario para permitir que se lleve a cabo la comunicación mediante tecnología inalámbrica Bluetooth. • La sincronización solo deberá llevarla a cabo la primera vez que utilice de forma conjunta la unidad y el dispositivo habilitado para Bluetooth. • Para permitir que se lleve a cabo la comunicación mediante tecnología inalámbrica Bluetooth, deberá sincronizar tanto la unidad como el dispositivo habilitado para Bluetooth. • Después de pulsar y cambiar a la entrada de Bluetooth, realice el procedimiento de sincronización en el dispositivo habilitado para Bluetooth. Si la sincronización se ha efectuado correctamente, no será necesario que lleve a cabo los procedimientos de sincronización para la unidad indicados más abajo. Para más información, consulte el manual del usuario de su dispositivo habilitado para Bluetooth. 1 Pulse Í y encienda la unidad. 2 Pulse . La unidad cambiará a Bluetooth y se mostrará “Pairing”. X-HM16_26_26D_Es.book 27 ページ 2016年7月22日 金曜日 午前10時23分 Reproducción de audio con Bluetooth® 3 Cómo reproducir música desde un dispositivo habilitado para Bluetooth. Nota Nota 1 Pulse . La unidad cambiará a la entrada de Bluetooth. 2 Se creará una conexión Bluetooth entre el dispositivo habilitado para Bluetooth y la unidad. Pulse . 2 Pulse MENU y después pulse / hasta que “BT STANDBY” aparezca en la pantalla. 3 Pulse ENTER y después pulse alternar BT STANDBY ON/OFF. / para • Se ajusta en OFF en el ajuste de fábrica. Nota • Cuando BT STANDBY esté ajustado a ON, en el display principal se mostrará “BT STANDBY ON”. • Cuando BT STANDBY esté ajustado a OFF, en el display principal se mostrará “BT STANDBY OFF”. Conexión en el modo BT STANDBY con un dispositivo habilitado para Bluetooth Cuando exista un historial de conexiones (la sincronización ya se ha llevado a cabo) con un dispositivo habilitado para Bluetooth para la unidad durante BT STANDBY, la unidad podrá recibir una solicitud de conexión directamente a partir del historial de conexiones. La unidad comenzará a utilizar la función Bluetooth y se conectará con un dispositivo habilitado para Bluetooth. Aunque un dispositivo ya haya sido sincronizado con esta unidad, el mismo no se conectará durante BT STANDBY en los siguientes casos. En tales casos, elimine el historial de sincronización del dispositivo con tecnología inalámbrica Bluetooth y lleve a cabo la sincronización de nuevo. • Esta unidad puede almacenar un máximo de 8 unidades en el historial de emparejamiento. Pyccкий Los procedimientos para efectuar la conexión con la unidad deberán llevarse a cabo desde el dispositivo habilitado para Bluetooth. • Para una información detallada acerca de los procedimientos de conexión, consulte el manual del usuario de su dispositivo habilitado para Bluetooth. 1 Nederlands Cómo escuchar música en la unidad desde un dispositivo habilitado para Bluetooth Configuración de BT STANDBY Deutsch Si la sincronización con el dispositivo habilitado para Bluetooth se ha completado correctamente, el nombre del dispositivo habilitado para Bluetooth se mostrará en el panel frontal de la unidad. (Solo se pueden mostrar caracteres alfanuméricos de un byte. Todo carácter que no pueda mostrarse se indicará mediante un “∫”.) • Cuando la unidad esté en el modo de espera, con BT STANDBY ajustado a ON, podrá hacer lo siguiente. • Si selecciona un dispositivo habilitado para Bluetooth que ya tenga un historial de conexiones (la sincronización ya se ha llevado a cabo) con esta unidad, la misma se encenderá automáticamente con la función Bluetooth. Italiano 4 Confirme en el dispositivo habilitado para Bluetooth que la sincronización se ha llevado a cabo. BT STANDBY Español • Esta unidad se visualizará como “Pioneer X-HM26” en todos los dispositivos habilitados con Bluetooth que tenga. La sincronización dará comienzo. • Coloque el dispositivo habilitado para Bluetooth cerca de la unidad. • Para obtener información sobre cuándo se puede llevar a cabo la sincronización y el procedimiento que deberá seguir, consulte el manual del usuario de su dispositivo habilitado para Bluetooth. • Cuando se le solicite que introduzca el código PIN, deberá introducir “0000”. (Esta unidad únicamente aceptará el código PIN “0000”.) Français • Cuando no haya conectado ningún dispositivo habilitado para Bluetooth y no se haya llevado a cabo ninguna operación durante más de 20 minutos, la unidad se apagará automáticamente. En este caso es necesario que apagado automático esté ajustado a ON. • El apagado automático se puede ajustar a ON/OFF (página 33). English 3 Encienda el dispositivo habilitado para Bluetooth con el que desea sincronizar la unidad y lleve a cabo el procedimiento de sincronización. 09 27 Es X-HM16_26_26D_Es.book 09 28 ページ 2016年7月22日 金曜日 午前10時23分 Reproducción de audio con Bluetooth® • Si los ajustes se restablecen a los valores de fábrica, todos los historiales de sincronización se eliminarán. Precaución con las ondas radioeléctricas Esta unidad emplea una frecuencia de onda de radio de 2,4 GHz, que es una banda utilizada por otros sistemas inalámbricos (consulte la lista siguiente). Para impedir ruidos o interrupciones en la comunicación no use esta unidad cerca de tales aparatos, o apague esos aparatos mientras usa esta unidad. • Teléfono inalámbricos • Faxes inalámbricos • Hornos microondas • Dispositivos de LAN inalámbrica (IEEE802.11b/g) • Equipos AV inalámbricos • Controladores inalámbricos para sistemas de juegos • Audífonos basados en microondas • Algunos monitores para bebés Otros equipos menos comunes que pueden funcionar en la misma frecuencia: • Sistemas antirrobo • Emisoras de radio de aficionados (HAM) • Sistemas de administración logística de almacenes • Sistemas de discriminación para trenes o vehículos de emergencia Nota • Si aparece ruido en la imagen del televisor, existirá la posibilidad de que un dispositivo habilitado con tecnología inalámbrica Bluetooth o esta unidad (incluyendo los productos compatibles con esta unidad) estén causando interferencias de la señal en el conector de entrada de antena de su televisor, vídeo, sintonizador vía satélite, etc. En este caso, incremente la distancia entre el conector de entrada de la antena y el dispositivo habilitado con tecnología inalámbrica Bluetooth o esta unidad (incluyendo los productos compatibles con esta unidad). • Si hay algo que obstruya el paso entre esta unidad (incluyendo los productos compatibles con esta unidad) y el dispositivo habilitado con tecnología inalámbrica Bluetooth (como pueda ser una puerta metálica, un muro de hormigón o papel de aluminio aislante), es posible que tenga que cambiar la ubicación del sistema para evitar ruidos en la señal e interrupciones. Alcance de operación Esta unidad está diseñada para un uso doméstico. (Las distancias de transmisión pueden reducirse dependiendo del ambiente de comunicación). En los lugares siguientes, las malas condiciones o la inhabilidad de recibir ondas radioeléctricas puede ser la causa de que el sonido se interrumpa o se pare: • En edificios de hormigón reforzado o en edificios de estructura de metal o hierro. • Cerca de muebles metálicos grandes. 28 Es • Donde hay una multitud de personas o cerca de un edificio u obstáculo. • En un lugar expuesto a un campo magnético, electricidad estática o interferencias de ondas de radio por parte de equipos de radiocomunicaciones que usen la misma banda de frecuencia (2,4 GHz) que esta unidad, tales como dispositivos LAN inalámbricos de 2,4 GHz (IEEE802.11b/g) u hornos de microondas. • Si vive en un área residencial muy poblada (apartamento, casa unifamiliar construida junto a muchas otras casas, etc.) y el microondas de su vecino está próximo a su sistema, es posible que le afecten las interferencias de las ondas radioeléctricas. Si ocurre esto, traslade la unidad a un lugar diferente. Cuando no se use el microondas no habrá interferencia de ondas radioeléctricas. Reflejos de ondas radioeléctricas Las ondas de radio que recibe esta unidad incluyen la onda de radio que proviene directamente del dispositivo equipado con tecnología inalámbrica Bluetooth (onda directa) y las ondas procedentes de varias direcciones por los reflejos en paredes, muebles y edificios (ondas reflejadas). Las ondas reflejadas (debido a obstáculos y objetos reflejantes) producen además una variedad de ondas reflejadas y también una variación de condiciones de recepción que dependen de los lugares. Ni no se puede recibir el sonido correctamente debido a este fenómeno, trate de cambiar un poco la ubicación del dispositivo equipado con tecnología inalámbrica Bluetooth. Asimismo, observe que el sonido podría interrumpirse debido a las ondas reflejadas cuando una persona cruza o se acerca al espacio que hay entre esta unidad y el dispositivo equipado con tecnología inalámbrica Bluetooth. Precauciones relacionadas con los productos compatibles con esta unidad • Complete las conexiones de todos los dispositivos compatibles con esta unidad, incluyendo todos los cables de audio y cables de alimentación antes de conectarlos a esta unidad. • Después de haber completado las conexiones con esta unidad, compruebe los cables de audio y de alimentación y confirme que no estén enredados entre sí. • Cuando desconecte esta unidad, confirme que dispone de suficiente espacio para trabajar en el área circundante. • Cuando cambie conexiones de audio o de otros cables para productos compatibles con esta unidad, confirme que tenga espacio de trabajo suficiente en el área circundante. X-HM16_26_26D_Es.book 29 ページ 2016年7月22日 金曜日 午前10時23分 Información adicional 10 Información adicional English Detección y solución de problemas Français Capítulo 10: Problemas generales Verificación Solución Los ajustes realizados han sido eliminados. ¿Ha desenchufado el cable de alimentación? Cuando el cable de alimentación se ha desenchufado, los ajustes realizados se borran. Ajuste de nuevo el reloj. Si no desea que los ajustes se borren, no desenchufe el cable de alimentación. Diferencia de volumen entre Éste no es un problema de esta CDs, MP3, sintonizador y unidad. AUDIO IN. El volumen puede sonar de forma distinta según la fuente de entrada y el formato de grabación. Esta unidad no se puede controlar con el mando a distancia. ¿Lo está utilizando a una gran distancia? Colóquese a una distancia de 7 m, a 30º del sensor remoto del panel frontal (página 5). El sensor del mando a distancia, ¿está expuesto a la luz directa del sol o a una intensa luz artificial, como un tubo fluorescente, etc.? Las señales del mando a distancia no se pueden recibir correctamente si el sensor del mando a distancia está expuesto a la luz directa del sol o a una luz artificial muy intensa, como la de un tubo fluorescente, etc. ¿Están gastadas las pilas? Reemplace las pilas (página 5). Cuando use un reproductor analógico con esta unidad, conecte un dispositivo que cuente con un ecualizador phono. Es posible que los discos rayados no se puedan reproducir. ¿Está sucio el disco? Limpie la suciedad del disco (página 33). ¿Está colocada la unidad en un lugar húmedo? Podría haber condensación en el interior. Espere un rato para que la condensación se evapore. No ponga la unidad cerca de un acondicionador de aire, etc. (página 32). La unidad puede reconocer hasta 999 archivos en un único disco o dispositivo de memoria USB. El número máximo de carpetas es 255. En función de la estructura de carpetas, puede que la unidad no reconozca algunas carpetas o archivos. La unidad se apaga automáticamente. Si no se ha efectuado ninguna reproducción ni ninguna operación durante 20 minutos o más, la unidad se apagará automáticamente. En este caso es necesario que apagado automático esté ajustado a ON (página 33). Pyccкий Los nombres de carpeta o ¿Ha sobrepasado el número de archivo no se reconocen. máximo de nombres de carpetas o archivos que puede reconocer esta unidad? Nederlands ¿Está rayado el disco? Deutsch El disco no se puede reproducir o es expulsado automáticamente. Italiano Problema Español A menudo, un manejo incorrecto se confunde con problemas o un mal funcionamiento. Si cree que este componente tiene algún problema, compruebe los puntos siguientes. A veces el problema puede estar en otro componente. Examine los demás componentes y aparatos eléctricos que esté utilizando. Si el problema no se puede solucionar después de comprobar los puntos indicados abajo, solicite al centro de servicio técnico autorizado de Pioneer o a su distribuidor que le haga los trabajos de reparación necesarios. • Si el equipo no funciona de forma normal debido a interferencias externas, tales como electricidad estática, desconecte la clavija de alimentación de la toma de corriente y luego vuelva a conectarla para restablecer las condiciones normales de funcionamiento. 29 Es X-HM16_26_26D_Es.book 10 30 ページ 2016年7月22日 金曜日 午前10時23分 Información adicional Cuando se ha conectado un dispositivo de almacenamiento USB Problema Verificación Solución El dispositivo de almacenamiento USB no se reconoce. ¿Ha conectado correctamente el dispositivo de almacenamiento USB? Conecte el dispositivo adecuadamente (introdúzcalo hasta el fondo). ¿Ha conectado el dispositivo de Esta unidad no es compatible con concentradores USB. Conecte almacenamiento USB a través de un el dispositivo de almacenamiento USB directamente. concentrador USB? Esta unidad sólo es compatible con dispositivos de almacenamiento masivo USB. Esta unidad es compatible con memorias flash portátiles y aparatos de reproducción de audio digital. Solo los sistemas de archivos FAT16 y FAT32 son compatibles. No se soportan otros sistemas de archivos (exFAT, NTFS, HFS etc.). Este dispositivo no es compatible con el uso de unidades de disco duro externas. El archivo no se puede reproducir. Éste no es un problema de esta unidad. Apáguelo y enciéndalo de nuevo. ¿El archivo está protegido por copyright (por DRM)? Los archivos protegidos por copyright no se pueden reproducir. Éste no es un problema de esta unidad. Los archivos guardados en un ordenador no se pueden reproducir. Es posible que algunos dispositivos de almacenamiento USB no se reconozcan correctamente. Es posible que algunos archivos no se puedan reproducir. Los nombres de carpetas o ¿Contienen los nombres de de archivos no se visualizan carpetas o archivos más de 30 o no se visualizan caracteres? correctamente. El número máximo de caracteres que se pueden visualizar para los nombres de carpetas y de archivos es de 30. Los nombres de carpetas o de archivos no se muestran en orden alfabético. El orden de los nombres de carpetas y de archivos visualizados dependerá del orden en el que las carpetas o los archivos se hayan registrado en el dispositivo de almacenamiento USB. Éste no es un problema de esta unidad. Los dispositivos de ¿Cuál es la capacidad de los almacenamiento USB tardan dispositivos de almacenamiento mucho tiempo en ser USB? reconocidos. 30 Es Cuando se ha conectado un dispositivo de almacenamiento USB de gran capacidad, se precisa cierto tiempo para cargar los datos (varios minutos). X-HM16_26_26D_Es.book 31 ページ 2016年7月22日 金曜日 午前10時23分 Información adicional 10 Solamente X-HM26/26D Solución El dispositivo de tecnología inalámbrica Bluetooth no puede conectarse ni manejarse. El dispositivo de tecnología inalámbrica Bluetooth no emite sonido o el sonido se interrumpe. Compruebe que no haya ningún objeto que emita ondas electromagnéticas en la banda de 2,4 GHz (horno microondas, dispositivo inalámbrico LAN o un aparato de tecnología inalámbrica Bluetooth) cerca de la unidad. Si hay tal objeto cerca de la unidad, separe la unidad del objeto. O deje de usar el objeto que emite las ondas electromagnéticas. * La distancia indicada solo se facilita con fines orientativos. La distancia admisible real entre los dispositivos podrá variar según las condiciones del entorno circundante. Puede que el dispositivo de tecnología inalámbrica Bluetooth no esté ajustado en el modo de comunicación compatible con la tecnología inalámbrica Bluetooth. Compruebe el ajuste del aparato con tecnología inalámbrica Bluetooth. Audio CD MP3 • CD de audio de venta en establecimientos comerciales • Discos CD-R /-RW /-ROM con música grabada en el formato CD-DA Archivos MP3 grabados en discos CD-R /-RW /-ROM o en dispositivos de almacenamiento USB MP3 es una forma de compresión. Es un acrónimo que significa MPEG Audio Layer 3. MP3 es un tipo de código de audio que se procesa mediante una significativa compresión desde la fuente de audio original con muy poca pérdida en la calidad del sonido. • Este sistema es compatible con MPEG-1/2 Audio Layer 3 (frecuencias de muestreo: de 32 kHz a 48 kHz; tasas de bits: de 8 kbps a 320 kbps). Nota Pyccкий MP3: • Durante la reproducción de archivos VBR, el contador de tiempo del display podría diferir del tiempo real de reproducción. • La información sobre la carpeta y el orden de los archivos grabada en el medio dependerá del software de escritura. Puede que la unidad no reproduzca los archivos en el orden esperado. • Desde un medio con archivos MP3 se pueden leer hasta 255 carpetas y 999 archivos (incluidos los archivos que no se pueden reproducir). Nederlands • Sólo pueden reproducirse los discos que han sido finalizados. • Los discos grabados en el modo de escritura de paquetes (formato UDF) no son compatibles con esta unidad. • Corporation y los nombres de productos mencionados aquí son marcas comerciales o marcas registradas de sus respectivas corporaciones. • Sólo se pueden reproducir los discos grabaos en ISO9660 Level 1, Level 2 y Joliet. • Los archivos protegidos por DRM (Digital Rights Management) no se pueden reproducir. Deutsch Discos y formatos que pueden reproducirse Italiano Compruebe si esta unidad se ha conectado con un dispositivo con tecnología inalámbrica Bluetooth con una fuente de entrada seleccionada diferente de Bluetooth. Realice el procedimiento de emparejado tras seleccionar Bluetooth como fuente de entrada. Español Compruebe que el dispositivo de tecnología inalámbrica Bluetooth no está demasiado lejos de la unidad y que no hay obstáculos entre el dispositivo de tecnología inalámbrica Bluetooth y la unidad. Ajuste el dispositivo de tecnología inalámbrica Bluetooth y la unidad de modo que la distancia entre ambos sea inferior a 10 m* y no exista ningún obstáculo entre ellos. Français Problema English Cuando el dispositivo de tecnología inalámbrica Bluetooth esté conectado o se esté utilizando • Esta unidad no es compatible con discos con grabación multisesión ni grabación multiborde. • La grabación multisesión/multiborder es un método en el que los datos se graban en un solo disco en dos o más sesiones/borders. Una “sesión” o “border” es una unidad de grabación consistente en un juego completo de datos desde el principio hasta el final. 31 Es X-HM16_26_26D_Es.book 10 32 ページ 2016年7月22日 金曜日 午前10時23分 Información adicional Acerca de los CD protegidos contra la copia Esta unidad ha sido diseñada para cumplir con las especificaciones del formato CD de audio. Esta unidad no es compatible con la reproducción ni las funciones de los discos que no satisfacen estas especificaciones. Formatos de archivos de audio compatibles Esta unidad no es compatible con la codificación sin pérdidas. Observaciones sobre el uso de este receptor Cuando traslade esta unidad Cuando mueva la unidad, asegúrese de comprobar que no hay ningún disco cargado y desconecte el dispositivo de almacenamiento USB. Luego pulse Í, espere a que “STAND BY” desaparezca de la pantalla principal para apagar la unidad y a continuación desenchufe el cable de alimentación. Podrían producirse daños si la unidad se transporta o mueve con un disco dentro, o cuando otro dispositivo está conectado al terminal USB o al miniconector AUDIO IN. Dónde instalar el receptor • Elija un lugar estable cerca del televisor o sistema estéreo que esté utilizándose con la unidad. • No coloque el receptor encima de un televisor o monitor de color. Tampoco deberá colocarlo cerca de una platina ni de otros dispositivos que puedan verse fácilmente afectados por fuerzas magnéticas. Evite colocarlo en los siguientes lugares: • • • • • Lugares expuestos a la luz directa del sol Lugares húmedos o mal ventilados Lugares extremadamente calurosos Lugares expuestos a vibraciones Lugares en los que haya mucho polvo o humo de cigarrillos • Lugares expuestos a hollín, vapor o calor (cocinas, etc.) No ponga objetos sobre esta unidad No ponga ningún objeto encima de esta unidad. No obstruya los orificios de ventilación. No utilice la unidad encima de alfombras, camas, sofás, etc., ni tampoco envuelta en un paño, etc. En tal caso, el calor no se disipará y podrían producirse daños. 32 Es No la exponga a ninguna fuente de calor. No ponga la unidad encima de un amplificador u otro componente que genere calor. Si la instala en un sistema de estantes, colóquela debajo del amplificador para evitar que se vea afectada por el calor emitido por este u otros componentes de audio. • Desconecte la alimentación de la unidad cuando no la utilice. • Dependiendo de las condiciones de las señales, cuando se conecte la alimentación de la unidad pueden aparecer rayas en la pantalla del televisor y producirse ruido en las emisiones de radio. En tal caso, desconecte la alimentación de la unidad. Acerca de la condensación Si la unidad se traslada repentinamente de un lugar frío a una habitación caliente (en invierno, por ejemplo) o si la temperatura de la habitación donde está instalada esta unidad sube repentinamente debido al funcionamiento de la calefacción, etc., pueden formarse gotas de agua (condensación) en el interior de la unidad (en las piezas de funcionamiento y en la lente). Cuando haya condensación, la unidad no funcionará bien y la reproducción no será posible. Deje la unidad a temperatura ambiente, sin funcionar, durante 1 o 2 horas con la alimentación conectada (el tiempo depende de la cantidad de condensación). Las gotas de agua se disiparán y será posible reproducir. La condensación se puede producir también en verano si la unidad se expone directamente a la salida de aire de un acondicionador de aire. Si esto sucede, cambie de sitio la unidad. Cómo limpiar el receptor • Desenchufe el cable de alimentación de la toma de corriente cuando limpie la unidad. • Limpie la unidad con un paño blando. Para la suciedad persistente, humedezca un paño suave con un poco de detergente neutro, diluido en 5 a 6 partes de agua; escúrralo bien, retire la suciedad y, a continuación, pásele un paño suave y seco. • El uso de alcohol, diluyente, benceno, insecticidas, etc. podría provocar que la impresión o pintura se desprendieran. Evite también dejar productos de goma o vinilo en contacto con la unidad durante mucho tiempo porque podría dañarse la caja. • Si utiliza toallitas impregnadas con productos químicos, etc., lea cuidadosamente las advertencias que acompañen a las mismas. Limpieza de la lente La lente de la unidad no debería ensuciarse durante el uso normal pero, si por alguna razón, hay un fallo en su funcionamiento debido a polvo o suciedad, póngase en contacto con el centro de servicio técnico autorizado de Pioneer más cercano. Aunque se encuentran a la venta limpiadores de lentes para reproductores, no recomendamos utilizarlos porque podrían dañarlas. X-HM16_26_26D_Es.book 33 ページ 2016年7月22日 金曜日 午前10時23分 Información adicional Almacenaje de los discos Cómo limpiar los discos Configuración del apagado automático 1 Pulse MENU en el mando a distancia. Se visualizará “Auto Power Down” en la pantalla principal. 2 Pulse ENTER en el mando a distancia. • La configuración inicial está ajustada ON. Nota • Cuando el apagado automático esté ajustado a ON, en el display principal se mostrará “APD ON”. • Cuando el apagado automático esté ajustado a OFF, en el display principal se mostrará “APD OFF”. Restauración de todos los ajustes a los ajustes predeterminados 1 Pulse Í para conectar la alimentación. 2 Pulse MENU y después pulse / hasta que “Factory Reset” aparezca en la pantalla. Pulse ENTER. 4 Pulse ENTER. • Mientras los ajustes son restaurados, se visualiza “Resetting”. La unidad se apaga. Pyccкий 3 “OK?” aparecerá. Nederlands Para restaurar todos los ajustes a sus valores por defecto, siga los pasos que se indican a continuación. Deutsch • No utilice benceno, disolvente ni otros productos químicos volátiles. Tampoco deberá utilizar aerosoles para discos ni agentes antiestáticos. • Para la suciedad persistente, humedezca un paño suave con agua, escúrralo bien, retire la suciedad y, a continuación, elimine la humedad con un paño seco. • No utilice discos dañados (rotos o deformados). • No deje que la cara brillante de los discos (sin etiqueta) se raye ni ensucie. • No adhiera trozos de papel ni pegatinas en los discos. Si lo hace, podrían deformarse y quedar inservibles. Recuerde también que los discos alquilados suelen contener una etiqueta adherida, y que a su alrededor pueden haber restos de cola. Antes de utilizar discos alquilados, compruebe que no haya restos de cola alrededor de la etiqueta. Italiano 3 Pulse / para desactivar el ajuste de encendido automático ON/OFF. Español • Si los discos contienen huellas dactilares o polvo es posible que no pueda reproducirlos. En tal caso, utilice una gamuza, etc., para limpiar suavemente el disco desde el interior hacia el exterior. No utilice paños que estén sucios. Los discos con formas especiales (en forma de corazón, hexagonales, etc.) no se pueden reproducir en esta unidad. No intente reproducir tales discos porque podrían dañar la unidad. Français • Siempre deberá guardar los discos en sus cajas y en posición vertical, evitando los lugares cálidos y húmedos, los lugares expuestos a la luz directa del sol y los lugares extremadamente fríos. • Recuerde leer las advertencias que acompañen al disco. Sobre los discos con formas especiales English Manipulación de discos 10 33 Es X-HM16_26_26D_Es.book 10 34 ページ 2016年7月22日 金曜日 午前10時23分 Información adicional Especificaciones • Sección del amplificador Potencia de salida RMS: . . . . . . . . . . . . . . . . 15 W + 15 W (1 kHz, 10 %, T.H.D., 8 Ω) • Sección del sintonizador Intervalo de frecuencia (FM). . . De 87,5 MHz a 108,0 MHz Entrada de antena (FM) . . . . . . . . . . . . 75 Ω no equilibrada Intervalo de frecuencia (AM) (Solo para los modelos norteamericanos) . . . . . . . . . . . . . . . . . . . . . . . . . . . . . . 530 kHz a 1710 kHz Antena (AM) . . . . . . . . . . . . . . . . . . . . . . Antena de cuadro • Bluetooth (Solamente X-HM26/26D) Versión . . . . . . . . . . . . . . . .Bluetooth Specification Ver. 4.1 Salida . . . . . . . . . . . . . . . . . Bluetooth Specification Class 2 Distancia estimada de transmisión rectilínea libre de obstáculos* . . . . . . . . . . . . . . . . . . . . . . . . . . . . . Unos 10 m Banda de frecuencias . . . . . . . . . . . . . . . . . . . . . . . 2,4 GHz Modulación . . . . . . . . . FH-SS (Frequency Hopping Spread Spectrum) Perfiles compatibles con Bluetooth . . . . . . . A2DP, AVRCP Codec compatible . . . . . . . . . . . . . . SBC (Subband Codec) Protección de contenido compatible. . . . . . . . . . . . SCMS-T Código PIN . . . . . . . . . . . . . . . . . . . . . . . . . . . . . . . . . .0000 * La distancia de transmisión rectilínea libre de obstáculos es una estimación. Las distancias de transmisión reales pueden cambiar según las condiciones ambientales. • Varios Terminal USB . . . . . . . . . . . . . . . . . . . . . . . . . . 5 V, 500 mA Fuente de alimentación (Para los modelos europeos) . . . . . . . . . . . . . . . . . CA de 220 V a 240 V, 50 Hz/60 Hz (Solo para los modelos norteamericanos) . . . . . . . . . . . . . . . . . . . . . . . . . . . . . . . CA 120 V, 60 Hz Consumo eléctrico Encendido . . . . . . . . . . . . . . . . . . . . . . . . . . . . . . . 20 W Reserva de alimentación . . . . . . . . . . . . .0,5 W o menos Energía en modo de espera (BT STANDBY ON) . . . . . . . . . . . . . . . . . . . . . . . . . . . . . . . . .0,5 W o menos Dimensiones . . . . . . . . . . . . 215 mm (An) x 95 mm (Al) x 315 mm (Prof) Peso (sin el embalaje) . . . . . . . . . . . . . . . . . . . . . . . . 2,0 kg • Altavoz Alojamiento . . . . . . . . . . . . . . . . Bass-reflex, tipo estantería (con blindaje antimagnético) Configuración. . . . . . . . . . . . . . . . . . . Sistema de 2 vías Altavoz de agudos . . . . . . . . . . . . . . . . . Cúpula de 2 cm Altavoz de subgraves. . . . . . . . . . . . . . . Cono de 10 cm Potencia máxima de entrada . . . . . . . . . . . . . . . . . . . 15 W Impedancia . . . . . . . . . . . . . . . . . . . . . . . . . . . . . . . . . . 8 Ω Dimensiones . . . . . . . . . .130 mm (An) x 212 mm (Al) x 228,5 mm (Prof) Peso . . . . . . . . . . . . . . . . . . . . . . . . . . . . . . 2,0 kg/cada uno 34 Es • Accesorios Mando a distancia . . . . . . . . . . . . . . . . . . . . . . . . . . . . . . . Pilas AAA (R03). . . . . . . . . . . . . . . . . . . . . . . . . . . . . . . . . Cable de antena de AM*1 . . . . . . . . . . . . . . . . . . . . . . . . . Antena de hilo de FM*2 . . . . . . . . . . . . . . . . . . . . . . . . . . . Cable de antena DAB/FM*3 . . . . . . . . . . . . . . . . . . . . . . . Cable de alimentación . . . . . . . . . . . . . . . . . . . . . . . . . . . . Tarjeta de garantía*4. . . . . . . . . . . . . . . . . . . . . . . . . . . . . Manual de instrucciones (este manual). . . . . . . . . . . . . . . *1 Solo modelos norteamericanos *2 X-HM16/HM26 solamente *3 X-HM26D solamente *4 Solamente modelos europeos Nota • Las especificaciones son aplicables cuando la alimentación es de 230 V. • Las especificaciones y el diseño están sujetos a posibles modificaciones sin previo aviso, debido a mejoras. “Pioneer” es una marca comercial de Pioneer Corporation, y se usa bajo licencia. © 2016 Onkyo & Pioneer Corporation. Todos los derechos reservados. 1 2 1 1 1 1 1 1 SN29402699_X-HM16_26_26D_En_European.book 39 ページ 2016年7月21日 木曜日 午前10時20分 X-HM16_26_26D_It.book 2 ページ 2016年7月22日 金曜日 午前10時38分 ATTENZIONE PER EVITARE IL RISCHIO DI SCOSSE ELETTRICHE, NON RIMUOVERE IL COPERCHIO (O IL RETRO). NON CI SONO PARTI INTERNE LA CUI MANUTENZIONE POSSA ESSERE EFFETTUATA DALL’UTENTE. IN CASO DI NECESSITÀ, RIVOLGERSI ESCLUSIVAMENTE A PERSONALE DI SERVIZIO QUALIFICATO. D3-4-2-1-1_B2_It ATTENZIONE Questo apparecchio non è impermeabile. Per prevenire pericoli di incendi o folgorazioni, non posizionare nelle vicinanze di questo apparecchio contenitori pieni di liquidi (quali vasi da fiori, o simili), e non esporre l’apparecchio a sgocciolii, schizzi, pioggia o umidità. D3-4-2-1-3_A1_It ATTENZIONE Per evitare il pericolo di incendi, non posizionare sull’apparecchio dispositivi con fiamme vive (ad esempio una candela accesa, o simili). AVVERTENZA L’interruttore principale (STANDBY/ON) dell’apparecchio non stacca completamente il flusso di corrente elettrica dalla presa di corrente alternata di rete. Dal momento che il cavo di alimentazione costituisce l’unico dispositivo di distacco dell’apparecchio dalla sorgente di alimentazione, il cavo stesso deve essere staccato dalla presa di corrente alternata di rete per sospendere completamente qualsiasi flusso di corrente. Verificare quindi che l’apparecchio sia stato installato in modo da poter procedere con facilità al distacco del cavo di alimentazione dalla presa di corrente, in caso di necessità. Per prevenire pericoli di incendi, inoltre, il cavo di alimentazione deve essere staccato dalla presa di corrente alternata di rete se si pensa di non utilizzare l’apparecchio per periodi di tempo relativamente lunghi (ad esempio, durante una vacanza). D3-4-2-2-2a*_A1_It D3-4-2-1-7a_A1_It AVVERTENZA PER LA VENTILAZIONE Installare l’apparecchio avendo cura di lasciare un certo spazio all’intorno dello stesso per consentire una adeguata circolazione dell’aria e migliorare la dispersione del calore (almeno 25 cm sulla parte superiore, 10 cm sul retro, e 5 cm su ciascuno dei lati). ATTENZIONE AVVERTENZA Questo apparecchio è un prodotto al laser di Classe 1 secondo le norme di sicurezza dei prodotti al laser IEC 60825-1:2007. PRODOTTO LASER DI CLASSE 1 D58-5-2-2a_A1_It L’apparecchio è dotato di un certo numero di fessure e di aperture per la ventilazione, allo scopo di garantirne un funzionamento affidabile, e per proteggerlo dal surriscaldamento. Per prevenire possibili pericoli di incendi le aperture non devono mai venire bloccate o coperte con oggetti vari (quali giornali, tovaglie, tende o tendaggi, ecc.), e l’apparecchio non deve essere utilizzato appoggiandolo su tappeti spessi o sul letto. D3-4-2-1-7b*_A1_It Questo prodotto è destinato esclusivamente all'uso domestico. Eventuali disfunzioni dovute ad usi diversi (quali uso prolungato a scopi commerciali, in ristoranti, o uso in auto o su navi) e che richiedano particolari riparazioni, saranno a carico dell'utente, anche se nel corso del periodo di garanzia. K041_A1_It AVVERTIMENTO RIGUARDANTE IL FILO DI ALIMENTAZIONE Condizioni ambientali di funzionamento Gamma ideale della temperatura ed umidità dell’ambiente di funzionamento: da +5 °C a +35 °C, umidità relativa inferiore all‘85 % (fessure di ventilazione non bloccate) Non installare l’apparecchio in luoghi poco ventilati, o in luoghi esposti ad alte umidità o alla diretta luce del sole (o a sorgenti di luce artificiale molto forti). D3-4-2-1-7c*_A1_It Prendete sempre il filo di alimentazione per la spina. Non tiratelo mai agendo per il filo stesso e non toccate mai il filo con le mani bagnati, perchè questo potrebbe causare cortocircuiti o scosse elettriche. Non collocate l’unità, oppure dei mobili sopra il filo di alimentazione e controllate che lo stesso non sia premuto. Non annodate mai il filo di alimentazione nè collegatelo con altri fili. I fili di alimentazione devono essere collocati in tal modo che non saranno calpestati. Un filo di alimentazione danneggiato potrebbe causare incendi o scosse elettriche. Controllate il filo di alimentazione regolarmente. Quando localizzate un eventuale danno, rivolgetevi al più vicino centro assistenza autorizzato della PIONEER oppure al vostro rivenditore per la sostituzione del filo di alimentazione. S002*_A1_It X-HM16_26_26D_It.book 3 ページ 2016年7月22日 金曜日 午前10時38分 Informazioni per gli utilizzatori finali sulla raccolta e lo smaltimento di vecchi dispositivi e batterie esauste Simbolo per il prodotto Questi simboli sui prodotti, confezioni, e/o documenti allegati significano che vecchi prodotti elettrici ed elettronici e batterie esauste non devono essere mischiati ai rifiuti urbani indifferenziati. Per l’appropriato trattamento, recupero e riciclaggio di vecchi prodotti e batterie esauste, fate riferimento ai punti di raccolta autorizzati in conformità alla vostra legislazione nazionale. Esempi di simboli per le batterie Con il corretto smaltimento di questi prodotti e delle batterie, aiuterai a salvaguardare preziose risorse e prevenire i potenziali effetti negativi sull’ambiente e sulla salute umana che altrimenti potrebbero sorgere da una inappropriata gestione dei rifiuti. Per maggiori informazioni sulla raccolta e il riciclaggio di vecchi prodotti e batterie esauste, contattate il vostro Comune, il Servizio di raccolta o il punto vendita dove avete acquistato l’articolo. Questi simboli sono validi solo nell’Unione Europea. Per i paesi al di fuori dell’unione Europea: Se volete liberarvi questi oggetti, contattate le vostre autorità locali o il punto vendita per il corretto metodo di smaltimento. Pb K058a_A1_It Avvertenza sulle onde radio ATTENZIONE Questa unità usa frequenze radio da 2,4 GHz di frequenza, una banda usata anche da altri sistemi wireless (ad esempio forni a microonde e telefoni senza fili). Se sullo schermo del televisore appare del rumore, è possibile che questa unità (o unità da essa supportate) stia causando interferenze con i segnali provenienti dal connettore di ingresso dell’antenna del televisore, apparecchio video, sintonizzatore satellitare, ecc. In tal caso, aumentare la distanza fra il connettore di ingresso dell’antenna e questa unità (compresi i prodotti da essa supportati). • Pioneer non è responsabile di malfunzionamenti del prodotto Pioneer compatibile dovuti ad errori / malfunzionamenti associati alla propria connessione di rete e / o alle attrezzature cui si è collegati. Entrare in contatto con il proprio provider Internet o fabbricante di prodotti per rete. • Per poter usare Internet è anche necessario avere un contratto con un Internet service provider (ISP). Conservare piccole parti fuori della portata di bambini e lattanti. Se inghiottite accidentalmente, entrare immediatamente in contatto con un medico. X-HM16_26_26D_It.book 4 ページ 2016年7月22日 金曜日 午前10時38分 Vi ringraziamo per avere acquistato questo prodotto Pioneer. Prima di usare il prodotto, leggere questo manuale d’istruzioni in modo da saperlo utilizzare correttamente. Finito di leggerle, conservarle in un luogo sicuro per poterle riutilizzare in futuro. Indice 01 Prima di cominciare Contenuto della confezione . . . . . . . . . . . . . . . . . . . . . . . .5 Inserimento delle batterie nel telecomando . . . . . . . . . . . .5 Utilizzo del telecomando . . . . . . . . . . . . . . . . . . . . . . . 5 02 Nome delle parti e loro funzione Telecomando . . . . . . . . . . . . . . . . . . . . . . . . . . . . . . . . . . .6 Pannello anteriore . . . . . . . . . . . . . . . . . . . . . . . . . . . . . . .7 Display . . . . . . . . . . . . . . . . . . . . . . . . . . . . . . . . . . . . . . . .8 Diffusori . . . . . . . . . . . . . . . . . . . . . . . . . . . . . . . . . . . . . . .8 03 Collegamenti Collegamento dei diffusori . . . . . . . . . . . . . . . . . . . . . . . . .9 Collegamento delle antenne . . . . . . . . . . . . . . . . . . . . . .10 Uso delle antenne esterne . . . . . . . . . . . . . . . . . . . . . 10 Inserire la spina . . . . . . . . . . . . . . . . . . . . . . . . . . . . . . . .11 04 Come iniziare Per accendere l’apparecchio . . . . . . . . . . . . . . . . . . . . . .12 Impostazione dell’orologio . . . . . . . . . . . . . . . . . . . . . . . .12 Comando generale . . . . . . . . . . . . . . . . . . . . . . . . . . . . .12 Entrata . . . . . . . . . . . . . . . . . . . . . . . . . . . . . . . . . . . . 12 Visualizzazione del comando luminosità . . . . . . . . . . 12 Auto-impostazione volume. . . . . . . . . . . . . . . . . . . . . 12 Controllo di volume . . . . . . . . . . . . . . . . . . . . . . . . . . 12 Muting . . . . . . . . . . . . . . . . . . . . . . . . . . . . . . . . . . . . 12 Comandi audio . . . . . . . . . . . . . . . . . . . . . . . . . . . . . . . .13 Equalizer . . . . . . . . . . . . . . . . . . . . . . . . . . . . . . . . . . 13 P.bass control . . . . . . . . . . . . . . . . . . . . . . . . . . . . . . 13 Pulsante bass/treble . . . . . . . . . . . . . . . . . . . . . . . . . 13 Impostazione della sveglia . . . . . . . . . . . . . . . . . . . . . . .13 Regolare la sveglia . . . . . . . . . . . . . . . . . . . . . . . . . . 14 Annullare la sveglia . . . . . . . . . . . . . . . . . . . . . . . . . . 14 Uso della sveglia . . . . . . . . . . . . . . . . . . . . . . . . . . . . 14 Come utilizzare il timer di spegnimento . . . . . . . . . . . . . .14 Usare le cuffie . . . . . . . . . . . . . . . . . . . . . . . . . . . . . . . . .14 05 Riproduzione di dischi Riproduzione di dischi o file . . . . . . . . . . . . . . . . . . . . . . .15 Caricare il disco . . . . . . . . . . . . . . . . . . . . . . . . . . . . . 15 Riprodurre i brani su un CD . . . . . . . . . . . . . . . . . . . . 15 Riproduzione di file musicali MP3 . . . . . . . . . . . . . . . 15 Riproduzione d’avanguardia di un CD o disco MP3 . . . .16 Ripetizione di lettura . . . . . . . . . . . . . . . . . . . . . . . . . 16 Riproduzione ad accesso casuale . . . . . . . . . . . . . . . 16 Riproduzione programmabile (CD) . . . . . . . . . . . . . . 17 Scaricare MP3 . . . . . . . . . . . . . . . . . . . . . . . . . . . . . . 17 Commutare i contenuti della schermata . . . . . . . . . . 17 06 Riproduzione USB Riprodurre dispositivi di memoria USB . . . . . . . . . . . . . .18 Ripetizione di lettura . . . . . . . . . . . . . . . . . . . . . . . . . 19 Riproduzione ad accesso casuale . . . . . . . . . . . . . . . 19 Commutare i contenuti della schermata . . . . . . . . . . 19 4 It 07 Come usare il sintonizzatore Ascolto di FM (Per i modelli per l’Europa)/Ascolto di FM o AM (Per i modelli per il Nord America) . . . . . . . . . . . . . . . . . 20 Sintonizzazione. . . . . . . . . . . . . . . . . . . . . . . . . . . . . . 20 Come salvare le stazioni di preselezione . . . . . . . . . . 20 Uso di Radio Data System (RDS) (solo per modelli per l'Europa) . . . . . . . . . . . . . . . . . . 21 Ascolto di DAB+ (solo X-HM26D) . . . . . . . . . . . . . . . . . . 23 Informazioni su DAB+ (Digital Audio Broadcasting, Trasmissione audio digitale) . . . . . . . . . . . . . . . . . . . . 23 Sintonizzazione. . . . . . . . . . . . . . . . . . . . . . . . . . . . . . 23 Modifica del display delle informazioni . . . . . . . . . . . . 24 Memorizzazione di una stazione. . . . . . . . . . . . . . . . . 24 Tabella delle frequenze DAB (BANDA III) . . . . . . . . . 24 08 Altri collegamenti Connessione di componenti ausiliari . . . . . . . . . . . . . . . 25 Passaggio automatico all'ingresso Audio In (Solo per i modelli per il Nord America) . . . . . . . . . . . . . 25 09 Riproduzione Bluetooth® Audio Riproduzione con tecnologia wireless Bluetooth . . . . . . 26 Funzionamento del telecomando . . . . . . . . . . . . . . . . . . 26 Accoppiare all’unità (Registrazione iniziale) . . . . . . . . . . 26 Ascoltare la musica sull’unità con l’apparecchio abilitato a tecnologia Bluetooth . . . . . . . . . . . . . . . . . . . . . . . . . . . . 27 BT STANDBY . . . . . . . . . . . . . . . . . . . . . . . . . . . . . . . . . 27 Avvertenza sulle onde radio . . . . . . . . . . . . . . . . . . . . . . 28 Campo di funzionamento . . . . . . . . . . . . . . . . . . . . . . 28 Onde radio riflesse . . . . . . . . . . . . . . . . . . . . . . . . . . . 28 Precauzioni riguardanti i collegamenti fra prodotti supportati da questa unità. . . . . . . . . . . . . . . . . . . . . . 28 10 Informazioni aggiuntive Risoluzione dei problemi . . . . . . . . . . . . . . . . . . . . . . . . Dischi e formati riproducibili . . . . . . . . . . . . . . . . . . . . . . I CD protetti dalla copia. . . . . . . . . . . . . . . . . . . . . . . . Formati dei file audio supportati . . . . . . . . . . . . . . . . . Precauzioni d’uso . . . . . . . . . . . . . . . . . . . . . . . . . . . . . . Quando si sposta questa unità . . . . . . . . . . . . . . . . . . Luogo di installazione . . . . . . . . . . . . . . . . . . . . . . . . . Non appoggiare oggetti su questa unità . . . . . . . . . . . La condensa . . . . . . . . . . . . . . . . . . . . . . . . . . . . . . . . Pulizia del prodotto . . . . . . . . . . . . . . . . . . . . . . . . . . . Pulizia della lente . . . . . . . . . . . . . . . . . . . . . . . . . . . . Come maneggiare i dischi . . . . . . . . . . . . . . . . . . . . . . . Archiviazione. . . . . . . . . . . . . . . . . . . . . . . . . . . . . . . . Pulire i dischi. . . . . . . . . . . . . . . . . . . . . . . . . . . . . . . . Dischi con forma particolare . . . . . . . . . . . . . . . . . . . . Impostazioni di spegnimento automatico . . . . . . . . . . . . Ritorno di tutte le impostazioni ai valori predefiniti . . . . . Specifiche . . . . . . . . . . . . . . . . . . . . . . . . . . . . . . . . . . . . 29 31 32 32 32 32 32 32 32 32 32 33 33 33 33 33 33 34 X-HM16_26_26D_It.book 5 ページ 2016年7月22日 金曜日 午前10時38分 Prima di cominciare 01 English Capitolo 1: Prima di cominciare Utilizzo del telecomando Il telecomando dispone di un raggio di circa 7 m con un angolo di circa 30º dal sensore remoto. T 2 Chiudere il coperchio posteriore. 30° ATTENZIONE • Non usare batterie diverse da quelle specificate. Inoltre, non usare insieme batterie vecchie e nuove. • Caricare le batteria facendo attenzione a non danneggiare le molle dei terminali - della batteria. Questo potrebbe causare una perdita delle pile o surriscaldamento. • Nel caricare le batterie nel telecomando, fare attenzione ad orientarle correttamente seguendo le indicazioni di polarità (indicazioni + e -). Pyccкий 7m Usando il telecomando, tenere presente quanto segue: • Verificare che tra il telecomando e il sensore per il controllo a distanza dell’unità non siano presenti ostacoli. • Il funzionamento del telecomando può risultare scarsamente affidabile se la luce del sole o di una lampada fluorescente si riflette sul sensore del telecomando situato sull’unità. • I telecomandi di dispositivi diversi possono interferire reciprocamente. Evitare l’utilizzo del telecomando per un’altra apparecchiatura posizionata vicino a quest’unità. • Sostituire le batterie quando si nota una riduzione del raggio di azione del telecomando. Nederlands INPU 30° Deutsch 1 Aprire il coperchio posteriore e caricare le batterie come qui di seguito. Italiano Inserimento delle batterie nel telecomando ATTENZIONE • Non usare né conservare le pile alla luce diretta del sole o in luoghi eccessivamente caldi, come all’interno di un’automobile o in prossimità di un calorifero. Le pile potrebbero perdere liquido, surriscaldarsi, esplodere o prendere fuoco. Anche la durata o le prestazioni delle pile potrebbero risultare ridotte. Español Assicurarsi che i seguenti accessori siano nella scatola al momento dell’apertura. • Telecomando • Batterie AAA (R03) x 2 • Cavo di alimentazione • Cavo antenna AM*1 • Antenna FM a filo*2 • Antenna cavo DAB/FM*3 • Documento di garanzia*4 • Istruzioni per l’uso (questo documento) *1 Solo modelli per il Nord America *2 Solo X-HM16/X-HM26 *3 Solo X-HM26D *4 Solo modelli per l'Europa • Non riscaldare le batterie, non smontarle e non gettarle in acqua o nel fuoco. • Le batterie possono avere voltaggio diverso anche se hanno la stessa dimensione e forma. Non usare insieme batterie di tipo differente. • Per evitare che perdano fluido, togliere le batterie se si pensa di non dover usare il telecomando per qualche tempo (un mese o più). Se il fluido dovesse fuoriuscire, pulire bene il vano delle batterie prima di inserire quelle nuove. Se una batteria dovesse perdere il fluido che contiene ed entrare in contatto con la pelle, lavarlo via bene con acqua abbondante. • Se dovete smaltire vecchie pile, attenetevi alle leggi governative o ambientali e alle regole pubbliche in vigore nel vostro paese. Français Contenuto della confezione 5 It X-HM16_26_26D_It.book 02 6 ページ 2016年7月22日 金曜日 午前10時38分 Nome delle parti e loro funzione Capitolo 2: Nome delle parti e loro funzione 4 Telecomando / // 5 PGM/MEMORY • Usato per memorizzare o programmare il CD (pagina 17). • Utilizzato per memorizzare stazioni FM/AM (pagina 20) o DAB (pagina 24). 1 2 10 11 3 6 TUNE +/– Utilizzato per la ricerca delle frequenze radio (pagina 20). 12 PRESET +/– Utilizzare per scegliere le stazioni radio preselezionate (pagina 20). 13 7 Tasti di comando del suono. Regolare la qualità del suono (pagina 13). 6 14 8 15 16 SLEEP Vedi Come utilizzare il timer di spegnimento a pagina 14. 9 7 8 9 Tasti di comando del playback Usare per regolare qualsiasi funzione dopo averla selezionata tramite i tasti di entrata in funzione (pagina 16). 4 5 , ENTER Usare per selezionare/commutare tra le impostazioni e le modalità di sistema e per confermare le azioni. TIMER Da usare per impostare l’ora esatta e per impostare o controllare i timer (pagina 12). 10 Premere per cambiare l'impostazione di ripetizione riproduzione da CD (pagina 16) o USB (pagina 19). 11 RANDOM Premere per impostare la riproduzione casuale da CD (pagina 16) o USB (pagina 19). 1 Í Commuta il ricevitore tra standby e on (pagina 12). 2 Selettori di entrata Usarlo per selezionare la sorgente di entrata a questo ricevitore (pagina 12). 12 DISPLAY Premere per cambiare la visualizzazione delle informazioni per MP3 (pagina 17), RDS (pagina 21) o DAB (pagina 24). 13 Premere per tornare alla schermata precedente. 14 Tasti di comando Volume Usare per impostare o leggere un file audio usando la rete Bluetooth (pagina 26). 3 MENU Usare per accedere all’Home Menu. Usati per impostare il volume d’ascolto (pagina 12). 15 Silenzia/ripristina l’audio (pagina 12). 16 DIMMER Rende oscuro o luminoso il display. Esistono quattro livelli di luminosità (pagina 12). 6 It X-HM16_26_26D_It.book 7 ページ 2016年7月22日 金曜日 午前10時38分 Nome delle parti e loro funzione 02 1 2 3 4 5 English Pannello anteriore Français TIMER Español 1 7 8 Í STANDBY/ON Commuta il ricevitore tra standby e on (pagina 12). 2 Sensore remoto 9 10 7 11 Spinotto Auricolari Utilizzare per collegare le cuffie. Se le cuffie sono collegate, non viene emesso alcun suono dagli altoparlanti. 8 3 Viene utilizzato per collegare un dispositivo di archiviazione USB come sorgente audio (pagina 18). Indicatore TIMER Si illumina quando il ricevitore ha la corrente spenta ma il timer è stato impostato. 4 Display principale 9 Terminale USB Carrellino disco Collocare il disco con l’etichetta verso l’alto (pagina 15). 10 Tasti di comando del playback 5 Selezionare la pista o il file desiderato per la riproduzione. Usare per arrestare il playback. Arresta o ripristina il playback dal punto di pausa. Controllo di volume Usati per impostare il volume d’ascolto (pagina 12). 6 INPUT Seleziona la sorgente di entrata. 11 Tasto di apertura/chiusura del vassoio del disco Usare per aprire e chiudere il vassoio del disco (pagina 15) Nederlands Vedi Display a pagina 8. Deutsch Riceve i segnali dal telecomando. Italiano 6 Pyccкий 7 It X-HM16_26_26D_It.book 02 8 ページ 2016年7月22日 金曜日 午前10時38分 Nome delle parti e loro funzione Display 1 2 3 1 3 ; Si illumina quando il suono viene silenziato. Pausa playback. 4 5 4 Nota La funzione orologio è stata impostata. • L’icona mute verrà visualizzata in rosso. 2 5 1 Diffusori 1 3 2 1 Tweeter 2 Woofer 3 Terminali altoparlanti Importante • Non è possibile rimuovere la griglia dell’altoparlante. • Entrambi gli altoparlanti possono essere usati sia dalla parte destra sia da quella sinistra. 8 It Display dei caratteri Visualizza varie informazioni sul sistema. Avviare la riproduzione. X-HM16_26_26D_It.book 9 ページ 2016年7月22日 金曜日 午前10時38分 Collegamenti 03 English Capitolo 3: Collegamenti • Premere le linguette per aprirle e inserire la parte scoperta del cavo. • Collegare il filo nero al terminale (s), e il filo rosso al terminale (r). Diffusore sinistro Deutsch Il pannello posteriore di questa unità Italiano Diffusore destro Español Collegamento dei diffusori ATTENZIONE • I terminali degli altoparlanti sono sotto tensione, la stessa PERICOLOSA tensione della corrente di rete. Per prevenire rischi di folgorazioni nel corso delle operazioni di collegamento o di distacco dei cavi degli altoparlanti, staccare il cavo di alimentazione principale prima di toccare qualsiasi parte non isolata. • Non collegare alcun altoparlante che non sia uno di quelli in dotazione a questo sistema. • Non collegare gli altoparlanti in dotazione a un amplificatore che non sia quello in dotazione a questo sistema. Il collegamento ad un amplificatore diverso può causare guasti o incendi. • Non montare questi altoparlanti sulla parete o sul soffitto. Altrimenti potrebbetro cadere e causare ferimenti. • Questi altoparlanti sono dotati di schermatura magnetica. Tuttavia, secondo il luogo di installazione, si potrebbero verificare delle distorsioni dei colori, specie se il sistema di altoparlanti è stato installato molto vicino allo schermo di un apparecchio televisivo. Se ciò dovesse accadere, spegnere l’apparecchio televisivo e riaccenderlo dopo 15 o 30 minuti. Se il problema dovesse persistere, spostare il sistema di altoparlanti lontano dall’apparecchio televisivo. • Controllare che la parte centrale del cavo degli altoparlanti non rimanga esposta facendo contatto con altre parti centrali di cavi. Questo potrebbe essere causa di guasti al prodotto. • Evitate il contatto tra la parte centrale del cavo dell’altoparlante e il corpo del ricevitore. Français ATTENZIONE • Assicurarsi di spegnere la corrente e togliere la spina del cavo di corrente dalla presa mentre si eseguono o modificano le connessioni. • Connettere il cavo di corrente solo dopo aver completato tutte le connessioni tra gli apparecchi. Nederlands Pyccкий • Se la parte centrale del cavo dell’altoparlante entra in contatto con qualsiasi parte metallica del corpo del ricevitore potrebbe danneggiare gli altoparlanti e causare fumo o incendiarsi. Inserite i cavi dell’altoparlante in modo sicuro nei terminali e controllate che il cavo non possa fuoriuscire facilmente. Nota • Non vi è alcuna differenza tra altoparlante S e D. 9 It X-HM16_26_26D_It.book 03 10 ページ 2016年7月22日 金曜日 午前10時38分 Collegamenti Collegamento delle antenne • Collegare l’antenna AM a telaio e l’antenna FM (DAB/ FM) a filo come segue. • Per migliorare la ricezione e la qualità sonora, collegare le antenne esterne (vedi Uso delle antenne esterne sotto). 3 Collocare l’antenna AM su una superficie piana e in una direzione che consenta di ottenere la ricezione migliore. • Posizionare l’antenna vicino a una finestra per migliorare la ricezione. • Non porla nei pressi di un computer o di un televisore, in quanto potrebbero prodursi dei rumori. 4 Connettete il cavo dell’antenna FM (DAB/ FM) alla presa dell’antenna FM. Solo per i modelli per il Nord America Per i migliori risultati, srotolare completamente il filo dell’antenna FM (DAB/FM) e fissarlo a una parete o al telaio di una porta. Non lasciare il filo allentato né arrotolato. 2 3 1 Uso delle antenne esterne Per migliorare la ricezione FM Utilizzare un connettore PAL (non fornito) per collegare un’antenna FM (DAB/FM) esterna. 2 X-HM16/ X-HM26 4 Connettore PALone-touch 3 1 Per i modelli per l’Europa X-HM16/X-HM26 4 X-HM26D 1 Connettere i cavi dell’antenna AM. Tenere il connettore per connetterlo. 2 Fissare l’antenna AM a telaio al supporto. Configurare come illustrato. 10 It Cavo coassiale 75 Ω X-HM26D X-HM16_26_26D_It.book 11 ページ 2016年7月22日 金曜日 午前10時38分 Collegamenti 03 Prima di eseguire o cambiare i collegamenti, spegnete l’apparecchio e scollegate la spina dalla presa AC. Finiti i collegamenti, collegare questa unità ad una presa AC. Cavo di alimentazione Italiano ATTENZIONE • Utilizzare solo ed esclusivamente il cavo di alimentazione fornito con questo apparecchio. • Non usate il filo di corrente in dotazione per scopi diversi da quelli descritti sopra. Español Ad una presa AC Français Il pannello posteriore di questa unità English Inserire la spina Deutsch Nederlands Pyccкий 11 It X-HM16_26_26D_It.book 04 12 ページ 2016年7月22日 金曜日 午前10時38分 Come iniziare Capitolo 4: Come iniziare Per accendere l’apparecchio Premere Í per attivare l’alimentazione. Comando generale Dopo l’uso: Entrata Premere Í per inserire la modalità di corrente stand-by. Se si preme INPUT sull’unità principale, la funzione attuale si commuterà in una modalità diversa. Premere INPUT ripetutamente per selezionare la funzione desiderata. Impostazione dell’orologio CD Audio In *1 *2 DAB*1 Bluetooth USB AM*2 FM Solo X-HM26D Solo modelli per il Nord America Visualizzazione del comando luminosità Premere DIMMER per scurire la luminosità dello schermo. Esistono quattro livelli di luminosità. 1 Premere Í per attivare l’alimentazione. 2 Premere TIMER sul telecomando. Sul display principale appare “CLOCK”. 3 Premere ENTER. 4 Usare / per selezionare il giorno, poi premere ENTER. 5 Usare / per selezionare l’ora, poi premere ENTER. 6 Usare / per selezionare il minuto, poi premere ENTER. 7 Premere ENTER. Per controllare il display dell’ora: Premere TIMER. Il display dell’ora appare per circa 10 secondi. Per regolare di nuovo l’orologio: Eseguire l’“Impostazione dell’orologio” dal passaggio 1. Nota • Quando viene ripristinata l’alimentazione dopo che l’unità è ricollegata alla corrente o dopo un black-out, eseguire il ripristino dell’orologio. 12 It Auto-impostazione volume Se si spegne quando il volume dell’unità principale è impostato su 31 o di più, il volume parte da 30 e si imposta sull’ultimo livello selezionato. Controllo di volume Ruotare la manopola del volume verso VOLUME (sull’unità principale) oppure premere VOL +/– (sul telecomando) per aumentare o diminuire il volume. ATTENZIONE • Il livello audio di una data impostazione del volume dipende dall’efficienza dei diffusori, dalla loro posizione e da svariati altri fattori. Si consiglia di evitare l’esposizione a livelli di volume elevati. Non alzare al massimo il volume all’accensione. Ascoltare la musica a livelli moderati. Una pressione sonora eccessiva proveniente dalle cuffie o dagli auricolari può causare la perdita dell’udito. Muting Il volume viene momentaneamente silenziato se si preme, e si tiene premuto, il tasto sul telecomando. Premerlo di nuovo per ripristinare il volume. X-HM16_26_26D_It.book 13 ページ 2016年7月22日 金曜日 午前10時38分 Come iniziare 04 Impostazione della sveglia Equalizer Usato per cambiare le impostazioni esistenti dell’orologio o per impostarne di nuove. FLAT ACTIVE Un sono piatto e basico. Un suono potente che enfatizza i toni alti e bassi. Premere Í per attivare l’alimentazione. 2 Tenere premuto TIMER sul telecomando. 3 Usare / per selezionare “ONCE” o “DAILY”, poi premere ENTER. Un suono che permette di sentire più facilmente la radio e i suoni vocali. 4 Usare / per selezionare “TIMER SET”, poi premere ENTER. NIGHT Un suono che può essere apprezzato di notte, anche con un volume basso. 5 Premere / per selezionare la sorgente di playback del timer, poi premere ENTER. Premere SOUND per selezionare “BASS” o “TREBLE”, quindi premere / per regolare i bassi o gli alti. Nota Se si seleziona una delle due funzioni qui sopra, quella che non è stata selezionata verrà visualizzata come segue. • EQ : FLAT Se l’impostazione di EQ viene cambiata Impostare l’orario finale come ai precedenti punti 7 e 8. 9 Regolare il volume premendo VOL +/–, e poi premere ENTER. Sul display appare “ ”. 10 Premere Í per inserire la modalità di corrente stand-by. L’indicatore del TIMER si illumina. Pyccкий 1 Se l’impostazione di P.BASS (ON/OFF) viene cambiata 8 Usare / per selezionare il minuto, poi premete ENTER. Nederlands • EQ e P.BASS non possono funzionare simultaneamente. Tra le due funzioni, quella selezionata per ultima sarà quella funzionante. • SOUND può funzionare contemporaneamente a EQ o P.BASS. 7 Usare / per selezionare l’ora, poi premere ENTER. Deutsch Pulsante bass/treble 6 Usare / per selezionare il giorno del timer, poi premere ENTER. Italiano Quando la corrente viene accesa la prima volta, l’unità si attiva in modalità P.bass che pone in rilievo le frequenze basse. Per annullare la modalità P.bass, premere P.BASS sul telecomando. CD, DAB (solo X-HM26D), FM, AM (Solo modelli per il Nord America), e USB possono essere selezionati come sorgente per la riproduzione. Español ONCE – La riproduzione con la funzione di timer può essere attivata solo per una volta all’ora stabilita. DAILY – Il timer giornaliero funziona con lo stesso orario e giorni della settimana preimpostati. DIALOGUE P.bass control 2 1 Français Se si preme EQ, si visualizzeranno le impostazioni della modalità corrente. Per selezionare una modalità diversa, premere EQ ripetutamente finché non appare la modalità di suono desiderata. English Comandi audio • P.BASS : OFF 13 It X-HM16_26_26D_It.book 04 14 ページ 2016年7月22日 金曜日 午前10時38分 Come iniziare Regolare la sveglia Può essere usato per riutilizzare un’impostazione esistente del timer. 1 Gli stessi passaggi da 1 a 3 in “Impostare la sveglia”. 2 Premere / per selezionare “TIMER ON”, quindi premere ENTER. Usare le cuffie Connettersi allo spinotto jack delle cuffie. Se le cuffie sono collegate, non viene emesso alcun suono dagli altoparlanti. TIMER Annullare la sveglia Può essere usato per disattivare le impostazioni dell’orologio. 1 Gli stessi passaggi da 1 a 3 in “Impostare la sveglia”. 2 Premere / per selezionare “TIMER OFF”, quindi premere ENTER. Uso della sveglia 1 Premere Í per disattivare l’alimentazione. 2 All’ora di sveglia, questa unità si accende automaticamente e riproduce il segnale dell’ingresso scelto. Nota • Se al momento della riattivazione, il dispositivo di memorizzazione USB non è collegato a questa unità o non è inserito un disco, questa unità si accenderà e non riprodurrà il brano. • Alcuni dischi potrebbero non essere riprodotti automaticamente all’ora della sveglia. • Per impostare l’orologio, prendersi un minuto di più tra l’avvio e il termine del tempo. Come utilizzare il timer di spegnimento Il timer di spegnimento spegne l’unità dopo un periodo determinato, in modo che ci si possa addormentare senza preoccupazioni. 1 Premere SLEEP più volte per scegliere un’ora di spegnimento. Scegliere tra 10 min, 20 min, 30 min, 60 min, 90 min, 120 min, 150 min, 180 min o OFF. Il nuovo valore impostato viene visualizzato per 3 secondi e quindi l’impostazione è completa. Nota • Il timer di spegnimento può essere impostato premendo SLEEP mentre viene visualizzato il tempo rimanente. 14 It • Non mettere il volume al massimo durante l’accensione ed ascoltare la musica a livelli moderati. Una pressione sonora eccessiva proveniente dalle cuffie o dagli auricolari può causare la perdita dell’udito. • Prima di inserire o disinserire la cuffia, diminuire il volume. • Usare una cuffia con una spina da 3,5 mm di diametro e con un’impedenza da 16 a 50 ohm. L’impedenza raccomandata è di 32 ohm. X-HM16_26_26D_It.book 15 ページ 2016年7月22日 金曜日 午前10時38分 Riproduzione di dischi 05 English Capitolo 5: Riproduzione di dischi Riproduzione di file musicali MP3 In questo documento, i dati relativi ai brani MP3 sono chiamati “file musicali” e la posizione in cui sono memorizzati è chiamata “cartella”. ad esempio, Riproduzione di dischi o file Español Caricare il disco 1 Premere Í per attivare l’alimentazione. 2 Premere CD sul telecomando o INPUT ripetutamente sull’unità principale per selezionare l’entrata CD. 4 Mettere il disco sul vassoio con l’etichetta verso l’alto. Dopo che l’ultima traccia è stata riprodotta, l’unità si arresterà automaticamente. 2 Premere / per selezionare il file musicale ([ ]), e quindi premere 1; o ENTER. • Una volta avviata la riproduzione, è possibile riprodurre di seguito solo i file musicali all'interno della stessa cartella. ATTENZIONE • Non collocare due dischi su un unico piatto. • Non riprodurre dischi di forma speciale (cuore, ottagono, ecc.). Potrebbe causare guasti. • Non spingere il cassetto del disco mentre è in movimento. • Se la corrente viene a mancare mentre il cassetto è aperto, aspettare fino a quando la corrente viene ripristinata. • Assicurarsi di collocare i dischi da 8 cm al centro del piatto disco. Nota • A causa della struttura delle informazioni del disco, la lettura di un disco MP3 richiede più tempo di quella di un normale CD (da 20 a 90 secondi circa). • Quando si raggiunge l’inizio della prima pista durante l’indietro veloce, l’unità entra in modalità playback (solo per CD). • Se durante il funzionamento del lettore CD si verificano interferenze con la ricezione TV o radio, allontanare l’apparecchio dal televisore o dalla radio. Pyccкий 1 Quando il riconoscimento è completato, premere 1; . . Nederlands Riprodurre i brani su un CD • Ripetere questo passaggio se sono presenti altre cartelle all'interno della cartella selezionata. • Per tornare alla cartella precedente, premere o Deutsch 5 Premere < sull’unità principale per chiudere il piatto portadisco. 1 Quando il riconoscimento è completato, premere / per selezionare la cartella dove è memorizzato il file musicale ([ ]), quindi premere o ENTER. Italiano 3 Premere < sull’unità principale per aprire il piatto portadisco. Français Questo sistema può riprodurre un CD standard, CD-R/RW in formato CD e CD-R/RW con file MP3, ma non è in grado di registrare su di essi. Potrebbe non essere possibile riprodurre alcuni dischi audio CD-R e CD-RW a causa dello stato del disco o del dispositivo usato per la registrazione. • Per informazioni su MP3, vedere pagina 31. Suggerimento • Se non si eseguono operazioni in modalità CD e il file audio non viene riprodotto per più di 20 minuti, la corrente si spegnerà automaticamente. In questo caso, si richiede che spegnimento automatico sia commutato su ON. 15 It X-HM16_26_26D_It.book 05 16 ページ 2016年7月22日 金曜日 午前10時38分 Riproduzione di dischi • Lo spegnimento automatico può essere commutato su ON/OFF (pagina 33). Operazioni base Funzione Apparecchio principale Telecomando Funzionamento Riproduzione Premere mentre l’apparecchio è in modalità di arresto. Arresto Premere la modalità playback. (quando si riproduce un CD) viene visualizzato “RESUME” e viene memorizzato il punto in cui è stata arrestata la riproduzione. Premere nuovamente per cancellare la posizione memorizzata. Pausa Brano successivo/ precedente Premere la modalità playback. Premere 1; per ripristinare il playback dal punto di pausa. Premere mentre l’apparecchio èin modalità di riproduzione o di arresto. Se si preme il tasto in modalità stop, poi si deve premere il tasto 1; per avviare la pista desiderata. (quando si riproducono MP3) È possibile saltare in avanti o indietro solo verso file musicali all'interno della stessa cartella. Avanzamento riavvolgimento /rapido Premere e tenere premuto mentre l’apparecchio è in modalità di riproduzione. Rilasciare il pulsante per riprendere la riproduzione. Riproduzione d’avanguardia di un CD o disco MP3 Ripetizione di lettura La funzione di ripetizione della riproduzione permette di eseguire la lettura continua di un brano, di tutti i brani o di una sequenza programmata. Per ripetere un brano: Premere ripetutamente finché non appare “REPEAT ONE”. Premere ENTER. Ripetizione di tutti i brani: Premere ripetutamente finché non appare “REPEAT ALL”. Premere ENTER. Per riascoltare i brani desiderati: Effettuare i passaggi da 1 a 5 nella sezione “Riproduzione programmabile (CD)” (pagina 17) e quindi premere ripetutamente sino a che appare “REPEAT ALL”. Premere ENTER. Per cancellare la ripetizione di lettura: Premere ripetutamente finché non appare “REPEAT OFF”. Premere ENTER. Nota • Dopo aver eseguito la lettura ripetuta, assicurarsi di premere ∫. Altrimenti il disco continuerebbe a riprodursi. • Durante la riproduzione ripetuta, non è possibile la usare la funzione casuale. Riproduzione ad accesso casuale È possibile riprodurre automaticamente i brani di un disco secondo un ordine casuale. Per la riproduzione ad accesso casuale di tutti i brani: Premere RANDOM ripetutamente finché non appare “RANDOM ON”. Premere ENTER. Per cancellare la lettura casuale: Premere RANDOM ripetutamente finché non appare “RANDOM OFF”. Premere ENTER. 16 It X-HM16_26_26D_It.book 17 ページ 2016年7月22日 金曜日 午前10時38分 Riproduzione di dischi Si possono scegliere fino a 24 selezioni da riprodurre nell’ordine preferito. 2 Premere : 9 per selezionare i brani desiderati. 4 Ripetere i passaggi 2 - 3 per altri brani. È possibile programmare fino a 24 brani. 5 Premere 1; per avviare la riproduzione. Per aggiungere brani al programma: Aggiungere piste al programma: Premere PGM/MEMORY. Poi seguire le fasi 2 - 3 per aggiungere piste. Nota Visualizzazione artista Visualizzazione del brano in una cartella, tempo di riproduzione Visualizzazione album Nota • “Un file la cui riproduzione non è supportata” non può essere riprodotto. In questo caso, verrà saltato automaticamente. • In alcuni casi non vengono visualizzate le informazioni. • La visualizzazione di titolo, artista, e album è supportata solo con ID3 Versione 1 (1.0 o 1.1). Pyccкий • Se un disco viene espulso, il programma viene automaticamente annullato. • Premendo Í per immettere la modalità di standby o per cambiare la funzione CD con un’altra, le selezioni programmate saranno cancellate. • Durante le operazioni di programmazione, la riproduzione casuale non è possibile. Visualizzazione del brano in una cartella, tempo rimanente Nederlands Per annullare la riproduzione programmata, premere ∫ due volte sul telecomando. Sul display verrà visualizzato “PRG CLEAR” e tutti i contenuti programmati verranno cancellati. Visualizzazione titolo Deutsch • Per controllare le piste programmate, premere PGM/ MEMORY. • Se si commette un errore, le piste programmate possono essere annullate premendo . Visualizzazione numero del brano, titolo Italiano 3 Premere ENTER per salvare il numero di cartella e di pista. Premere DISPLAY durante la riproduzione. Se i nomi di titolo, artista e album sono stati scritti sul file, questa informazione sarà visualizzata. (Su questa unità si possono visualizzare solo caratteri alfanumerici. I caratteri non- alfanumerici vengono visualizzati come “∫”.) Español 1 In modalità di arresto, premere PGM/ MEMORY sul telecomando per immettere la modalità di salvataggio programmazione. 1 Français Riproduzione programmabile (CD) Commutare i contenuti della schermata English Nota • Se si preme il tasto 9 durante la riproduzione casuale, ci si può spostare sulla prossima pista selezionata attraverso il funzionamento causale. • La funzione di lettura casuale permette la selezione e la lettura automatica dei brani. (Non sarà possibile selezionare l’ordine delle piste). • Durante la riproduzione casuale, non è possibile usare la riproduzione ripetuta. 05 Scaricare MP3 Su Internet vi sono vari siti dedicati alla musica da cui scaricare file musicali MP3. Seguire le istruzioni del sito web per scaricare i file musicali. In seguito, è possibile riprodurre i file musicali scaricati trasferendoli su un disco CD-R/RW. • I brani/file scaricati sono destinati solo ad uso personale. Qualsiasi altro uso del brano senza il permesso del proprietario è contrario alla legge. 17 It X-HM16_26_26D_It.book 06 18 ページ 2016年7月22日 金曜日 午前10時38分 Riproduzione USB Capitolo 6: Riproduzione USB Riprodurre dispositivi di memoria USB È possibile ascoltare audio a due canali con file MP3 usando l'interfaccia USB nella parte anteriore di questo ricevitore. • Pioneer non garantisce che tutti i file registrati su qualsiasi dispositivo di memoria USB vengano letti o che la corrente venga fornita al dispositivo di memoria USB. Tenere anche presente che Pioneer non si assumerà alcuna responsabilità per perdite di file da dispositivi di memoria di massa USB causate da questa unità. • Per informazioni su MP3, vedere pagina 31. 1 Premere USB come sorgente in entrata. Sul display principale appare “USB”. 2 Connettere il dispositivo di memoria USB. • Questo ricevitore non supporta hub USB. TIMER Dispositivo di memoria USB (disponibile in commercio) 3 Quando il riconoscimento è completato, premere / per selezionare la cartella dove è memorizzato il file musicale ([ ]), quindi premere o ENTER. • In questo documento, i dati relativi ai brani MP3 sono chiamati “file musicali” e la posizione in cui sono memorizzati è chiamata “cartella”. • Ripetere questo passaggio se sono presenti altre cartelle all'interno della cartella selezionata. • Per tornare alla cartella precedente, premere o . 4 Premere / per selezionare il file musicale ([ ]), e quindi premere 1; o ENTER. • Una volta avviata la riproduzione, è possibile riprodurre di seguito solo i file musicali all'interno della stessa cartella. • Per informazioni sulle operazioni base, vedere pagina 16. • Se si cambia con una diversa sorgente in entrata, prima di eseguire il cambiamento, arrestare il playback della memoria USB. 18 It • Spegnere la corrente prima di rimuovere il dispositivo di memoria USB. Nota • Questa unità può non riconoscere un dispositivo di memoria di massa USB, riprodurne i file ed alimentarlo. Per maggiori dettagli, vedi Quando si collega un dispositivo di memoria di massa USB a pagina 30. • Se un dispositivo di memoria di massa USB non sta riproducendo o lapparecchio non è stato usatoo lapparecchio non è stato usato per 20 minuti o più, questa unità si spegne da sola. In questo caso, si richiede che spegnimento automatico sia commutato su ON (pagina 33). X-HM16_26_26D_It.book 19 ページ 2016年7月22日 金曜日 午前10時38分 Riproduzione USB La funzione di ripetizione della riproduzione permette di eseguire la lettura continua di un brano, di tutti i brani o di una sequenza programmata. Per ripetere un brano: English Ripetizione di lettura 06 Premere ripetutamente finché non appare “REPEAT ONE”. Premere ENTER. Premere ripetutamente finché non appare “REPEAT ALL”. Premere ENTER. Per cancellare la ripetizione di lettura: Premere ripetutamente finché non appare “REPEAT OFF”. Premere ENTER. Il file sul dispositivo di memoria USB può essere riprodotto automaticamente in ordine casuale. Per la riproduzione ad accesso casuale di tutti i brani: Per cancellare la lettura casuale: Premere RANDOM ripetutamente finché non appare “RANDOM OFF”. Premere ENTER. Deutsch Premere RANDOM ripetutamente finché non appare “RANDOM ON”. Premere ENTER. Italiano Riproduzione ad accesso casuale Español Nota • Dopo aver eseguito la lettura ripetuta, assicurarsi di premere ∫. Altrimenti, il file del dispositivo di memoria USB si riprodurrà continuamente. • Durante la riproduzione ripetuta, non è possibile la usare la funzione casuale. Français Ripetizione di tutti i brani: Nota • Se si preme il tasto 9 durante la riproduzione casuale, ci si può spostare sulla prossima pista selezionata attraverso il funzionamento causale. • La funzione di lettura casuale permette la selezione e la lettura automatica dei brani. (Non sarà possibile selezionare l’ordine delle piste). • Durante la riproduzione casuale, non è possibile usare la riproduzione ripetuta. Nederlands Commutare i contenuti della schermata Pyccкий Questa unità può riprodurre ripetutamente le cartelle salvate sul dispositivo di memoria USB. Per maggiori dettagli, vedi Commutare i contenuti della schermata a pagina 17. 19 It X-HM16_26_26D_It.book 07 20 ページ 2016年7月22日 金曜日 午前10時38分 Come usare il sintonizzatore Capitolo 7: Come usare il sintonizzatore • Ascolto di FM (Per i modelli per l’Europa)/Ascolto di FM o AM (Per i modelli per il Nord America) I seguenti punti mostrano come sintonizzare le trasmissioni radio FM e AM usando le funzioni di sintonizzazione automatica (ricerca) e manuale (punti). Se si è sintonizzati su una stazione, è possibile memorizzarne la frequenza per tornarci in un secondo tempo. Vedi Come salvare le stazioni di preselezione sotto qui sotto per maggiori informazioni su come farlo. Si può ottenere una sintonizzazione completamente automatica per le stazioni RDS, usando la modalità Auto Station Program Memory (ASPM), vedi pagina 22. Per la ricezione di una trasmissione FM stereo: 1 Premere TUNER sino a che sul display appare “FM”. 2 Premere MENU e quindi premere / sino a che sul display appare “FM STEREO/MONO”. 3 Premere ENTER e quindi premere / sino a che sul display appare “AUTO”. Miglioramento di una cattiva ricezione FM: Dopo aver effettuato i precedenti passaggi 1 - 2, premere ENTER e quindi premere / sino a che sul display appare “MONO”. Questo commuterà il sintonizzatore da stereo a mono e generalmente la ricezione migliora. Come salvare le stazioni di preselezione Sintonizzazione 1 Se si ascolta spesso una particolare stazione radio, è comodo memorizzare la frequenza della stessa per un facile richiamo ogni qualvolta si desidera ascoltare la stazione in questione (Preimpostare la sintonizzazione). Questo serve per evitare ogni volta la sintonizzazione manuale. Questo apparecchio può memorizzare un massimo di 45 stazioni. (Stazioni FM 30/stazioni AM 15) Premere Í per attivare l’alimentazione. 2 Premere ripetutamente TUNER per selezionare la banda di frequenza desiderata (FM o AM). • (X-HM26D) È possibile selezionare “FM” e “DAB”. Per informazioni su “DAB”, vedere pagina 23. 3 Premere TUNE +/– sul telecomando per sintonizzare la stazione desiderata. Sintonizzazione automatica: Premendo e tenendo premuto TUNE +/–, la scansione si avvierà automaticamente e il sintonizzatore si fermerà sulla prima stazione di trasmissione ricevibile. Sintonizzazione manuale: Premere ripetutamente TUNE +/– per sintonizzarsi sulla stazione desiderata. 2 Nota It Sintonizzare la stazione da memorizzare. Vedi Sintonizzazione qui sopra per ulteriori informazioni al riguardo. • Quando si verifica un’interferenza radio, la sintonizzazione automatica si ferma in quel punto. • La sintonizzazione automatica salterà le stazioni con segnale debole. • Per fermare la sintonizzazione automatica, premere ∫. • Quando si sintonizza su una stazione RDS (Radio Data System), innanzitutto si visualizzerà la frequenza. Infine, il nome della stazione apparirà. 20 1 Premere PGM/MEMORY. Il numero preimpostato lampeggerà. 3 Premere PRESET +/– per selezionare il numero di canale preimpostato. 4 Premere PGM/MEMORY per salvare in memoria questa stazione. Se il numero preimpostato ha cambiato da lampeggiante a illuminato, prima che la stazione sia memorizzata, ripetere le operazioni dal passaggio 2. X-HM16_26_26D_It.book 21 ページ 2016年7月22日 金曜日 午前10時38分 Come usare il sintonizzatore • Quando l’apparecchio viene sintonizzato su una stazione che non è RDS oppure su una stazione RDS a segnale debole, lo schermo si commuta nel seguente ordine: NO RDS English • Ripetere il procedimento dei punti 1 - 4 per impostare altre stazioni, oppure per cambiare una stazione preselezionata. Quando viene memorizzata una nuova stazione, la stazione memorizzata precedentemente per quel numero di canale preselezionato sarà cancellata. 07 Nota Per richiamare una stazione memorizzata Premere PRESET +/– per selezionare la stazione desiderata. Per cancellare tutte le preselezioni memorizzate Premere TUNER sul telecomando. 2 Premere finché non appare “MEMORY CLEAR”. Nota • Tutte le stazioni saranno cancellate. Informazioni fornite da RDS 1 Premere TUNER sino a che sul display appare “FM”. 2 Premere ripetutamente DISPLAY. Tutte le volte che si preme DISPLAY, la schermata si commuta come segue: Station name (PS) Frequency Programme type (PTY) Radio text (RT) Pyccкий Radio Data System (RDS) è un sistema usato da gran parte delle stazioni radio FM per fornire agli ascoltatori vari tipi di informazioni: ad esempio il nome della stazione e il tipo di spettacolo che stanno trasmettendo. Una funzione di RDS è la possibilità di ricerca per tipo di programma. Ad esempio, è possibile cercare una stazione che sta trasmettendo uno spettacolo con il tipo di programma, Jazz Music. Social affairs – Affari sociali Religion – Programmi sulla religione Phone In – Il pubblico esprime la propria opinione per telefono Travel & Touring – Viaggi di tipo vacanziero o notizie sul traffico Leisure & Hobby – Tempo libero e hobby Jazz Music – Jazz Country Music – Musica country National Music – Musica popolare in lingua diversa dall’inglese Oldies Music – Musica popolare degli anni ’50 e ’60 Folk Music – Musica folk Documentary – Documentari Alarm Test – Trasmettere mentre si testa l’apparecchiatura di trasmissione di emergenza o i ricevitori. Alarm - Alarm! – Annunci di emergenza trasmessi in circostanze straordinarie per avvisare il pubblico di eventi che possono provocare danni di varia natura. Nederlands Uso di Radio Data System (RDS) (solo per modelli per l'Europa) News – Notizie Current Affairs – Attualità Information – Informazioni generali Sport – Sport Education – Programmi educativi Drama – Drammi radiofonici, ecc. Cultures – Cultura nazionale o regionale, teatro, ecc. Science – Scienze e tecnologia Varied Speech – Talk show, quali quiz o interviste. Pop Music – Musica pop Rock Music – Musica rock Easy Listening – Musica leggera Light Classics M – Musica classica ‘leggera’ Serious Classics – Musica classica ‘seria’ Other Music – Altri tipi di musica che non rientrano nelle categorie di cui sopra Weather & Metr – Previsioni del tempo Finance – Notizie di borsa, economia, commercio, ecc. Children’s Progs – Programmi per bambini Deutsch 1 1 Premere TUNER sino a che sul display appare “FM”. 2 Premere MENU e quindi premere / sino a che sul display appare “FM RDS”. 3 Premere ENTER e quindi premere / sino a che sul display appare “PTY”. 4 Premere ENTER. “SELECT” apparirà per circa 5 secondi. 5 Premere / per selezionare il tipo di programma che si desidera ascoltare. Tutte le volte che si preme il tasto, apparirà il tipo di programma. Se si mantiene il tasto premuto, il tipo di programma apparirà continuamente. 6 Mentre viene visualizzato il tipo di programma selezionato (entro 5 secondi), premere ENTER. Dopo che il tipo di programma selezionato è rimasto illuminato per 2 secondi, apparirà “SEARCH” e si avvierà l’operazione di ricerca. I tipi di programma visualizzati sono i seguenti: Italiano Le stazioni memorizzate possono essere ricercate automaticamente. (Scansione della memoria delle stazioni preselezionate) 1 Premere e tenere premuto PRESET +/–. Il numero preimpostato apparirà e le stazioni programmate verranno sintonizzate in sequenza, ciascuna per 5 secondi. 2 Premere PRESET +/– di nuovo, quando viene localizzata la stazione desiderata. Ricerca di stazioni per tipo di programma Español Scansione delle stazioni preselezionate FM 98.80 MHz Français • La funzione backup protegge le stazioni memorizzate per alcune ore in caso di caduta di corrente o disconnessione del AC. 21 It X-HM16_26_26D_It.book 07 22 ページ 2016年7月22日 金曜日 午前10時38分 Come usare il sintonizzatore • Se il display smette di lampeggiare, ricominciare dal punto 2. Se l’unità trova un tipo di programma desiderato, il numero di canale corrispondente si illuminerà per circa 8 secondi, e il nome della stazione rimarrà. • Se si desidera ascoltare lo stesso tipo di programma su un'altra stazione, ripetere i passaggi 2 - 6. L'unità cercherà la stazione successiva. • Se non può essere trovata nessuna stazione, “NOT FOUND” apparirà per 4 secondi. Usare il programma Auto Station Memory (ASPM) Mentre l’apparecchio è in modalità ASPM, il sintonizzatore ricercherà automaticamente altre stazioni RDS. È possibile immettere nella memoria fino a 30 stazioni. Se delle stazioni sono già state immesse nella memoria, il numero delle nuove stazioni che si possono immettere nella memoria sarà inferiore. 1 Premere TUNER sino a che sul display appare “FM”. 2 Premere MENU e quindi premere / sino a che sul display appare “FM RDS”. 3 Premere ENTER e quindi premere / sino a che sul display appare “ASPM”. 4 Premere ENTER. Dopo che “ASPM” ha lampeggiato per circa 4 secondi, verrà avviata la scansione (87,5 – 108 MHz). Dopo la scansione, il numero delle stazioni memorizzate sarà visualizzato per 4 secondi, e poi “END” appare per 4 secondi. • Per arrestare la funzione ASPM prima che sia terminata: Premere ∫ durante la scansione delle stazioni. Le stazioni già memorizzate verranno mantenute. • Se la stessa stazione viene trasmessa su frequenze diverse, la frequenza più forte sarà immessa nella memoria. • Ogni stazione che ha la stessa frequenza di una che è già stata memorizzata non sarà immessa nella memoria. • Se 30 stazioni sono già state immesse nella memoria, la scansione sarà cancellata. Se si vuole eseguire di nuovo l’operazione ASPM, cancellare le stazioni memorizzate. • Se non può essere trovata nessuna stazione, “NOT FOUND” apparirà per 5 secondi. • Se i segnali RDS sono molto deboli, i nomi delle stazioni potrebbero non essere memorizzati. • Lo stesso nome di stazione può essere memorizzato su canali diversi. • In alcune zone oppure in certi periodi, i nomi delle stazioni potrebbero essere temporaneamente diversi. 22 It Nota • Se si verifica uno dei seguenti problemi, questo non significa che l’apparecchio non funzioni correttamente: - Appariranno alternativamente e secondo il caso “PS”, “NO PS” e il nome della stazione. - Se una particolare stazione non trasmette bene o sta compiendo dei test, la funzione di ricezione RDS potrebbe non funzionare correttamente. - Quando si riceve una stazione RDS dal segnale molto debole, l’informazione relativa al nome potrebbe non essere visualizzata. - “NO PS”, “NO PYT” o “NO RT” lampeggeranno per circa 5 secondi, e poi la frequenza sarà visualizzata. • Note per il testo radio: - Appariranno i primi 8 caratteri del testo della radio e poi scorreranno sullo schermo. - Se si sintonizza l’apparecchio su una stazione radio RDS che non sta trasmettendo un testo radio, “NO RT” sarà visualizzato quando si passerà alla posizione testo radio. - Mentre i dati del testo radio sono ricevuti o quando i contenuti cambiano, “RT” sarà visualizzato. X-HM16_26_26D_It.book 23 ページ 2016年7月22日 金曜日 午前10時38分 Come usare il sintonizzatore Informazioni su DAB+ (Digital Audio Broadcasting, Trasmissione audio digitale) MULTIPLEX (GRUPPO DI DATI) Sintonizzazione É possibile effettuare nuovamente la scansione automatica quando si sposta l'unità in aree diverse o si aggiungono canali multiplex all'elenco delle stazioni. 1 Premere TUNER fino a quando sul display viene visualizzata l’indicazione “DAB”. 2 Premere MENU e quindi premere / sino a che sul display appare “DAB SCAN”. 3 Premere ENTER e quindi premere / sino a che sul display appare “AUTO”. 4 Premere ENTER. La scansione automatica viene avviata. Dopo aver completato il processo di scansione, viene selezionata la prima stazione rilevata. Sintonizzazione manuale 1 Premere TUNER fino a quando sul display viene visualizzata l’indicazione “DAB”. Pyccкий • Se il livello è troppo basso, spostare l’antenna o l’unità per migliorare la ricezione. Nederlands È possibile memorizzare manualmente le stazioni non trovate tramite la scansione automatica. Se la ricezione non è ottimale, regolarne la sensibilità. La scansione manuale è disponibile solo dopo aver eseguito una scansione automatica. Eseguire prima la scansione automatica. 1 Premere TUNER sino a che sul display appare “DAB”. 2 Premere MENU e quindi premere / sino a che sul display appare “DAB SCAN”. 3 Premere ENTER e quindi premere / sino a che sul display appare “MANUAL”. 4 Premere ENTER. 5 Entro 10 secondi, premere TUNE +/– per selezionare la frequenza DAB+. 6 Entro 10 secondi, premere ENTER. Deutsch COMPONENTI DEI SERVIZI (STAZIONI) Scansione automatica Italiano SERVIZI • Se non viene trovata nessuna stazione, viene visualizzata la scritta “NO SIGNAL” (Nessun segnale). • È possibile ricevere fino a 100 stazioni. Español SEGNALE DAB+ 3 Entro 10 secondi, premere ENTER sul telecomando per sintonizzarsi sulla stazione desiderata. Français Il Digital Audio Broadcasting è un sistema di trasmissione digitale in cui i segnali audio sono convertiti in segnali digitali durante la trasmissione. La trasmissione DAB+ avviene con un gruppo di dati definiti Multiplex, che possono contenere una o più stazioni (servizi). Ogni stazione contiene un servizio primario ed, eventualmente, uno o più servizi secondari. Ciò consente la trasmissione di diversi programmi o servizi su un’unica frequenza. 2 Premere TUNE +/– per selezionare la stazione desiderata. English Ascolto di DAB+ (solo X-HM26D) 07 Quando viene accesa per la prima volta, l'unità scandisce automaticamente le stazioni radio per creare un elenco di stazioni. Le stazioni verranno memorizzate in ordine alfanumerico e verrà selezionata la prima stazione nell'elenco, che è possibile ascoltare attraverso i diffusori. 23 It X-HM16_26_26D_It.book 07 24 ページ 2016年7月22日 金曜日 午前10時38分 Come usare il sintonizzatore Modifica del display delle informazioni È possibile passare alle informazioni del display DAB+. Premere il pulsante DISPLAY. Ogni volta che si preme questo pulsante, il display cambia nell’ordine seguente. Quando viene visualizzato “NO SIGNAL” (Nessun segnale), il pulsante DISPLAY non consente di modificare il display. [Nome del programma] Tabella delle frequenze DAB (BANDA III) Etichetta Frequenza 174.928 MHz 5A 208.064 MHz 9D 176.640 MHz 5B 209.936 MHz 10A 178.352 MHz 5C 211.648 MHz 10B 180.064 MHz 5D 213.360 MHz 10C 181.936 MHz 6A 215.072 MHz 10D Il nome del multiplex che trasmette il servizio attuale. 183.648 MHz 6B 216.928 MHz 11A [Frequenza] 185.360 MHz 6C 218.640 MHz 11B 187.072 MHz 6D 220.352 MHz 11C Visualizza la modalità stereo. 188.928 MHz 7A 222.064 MHz 11D [Velocità di trasferimento] 190.640 MHz 7B 223.936 MHz 12A 192.352 MHz 7C 225.648 MHz 12B La qualità del segnale visualizzata in formato numerico (0– 100). [85–100: buono, 70–84: discreto, 0–69: scadente] 194.064 MHz 7D 227.360 MHz 12C 195.936 MHz 8A 229.072 MHz 12D Memorizzazione di una stazione 197.648 MHz 8B 230.784 MHz 13A È possibile memorizzare sino a 10 frequenze DAB e quindi richiamarle in seguito con la semplice pressione di un tasto. (Preselezione sintonia) 199.360 MHz 8C 232.496 MHz 13B [Testo a scorrimento] Le informazioni scorrono sul display quando vengono inviate dalla stazione. [Tipo di programma] Una descrizione del tipo di contenuto trasmesso dalla stazione. [Nome multiplex] La frequenza DAB+ della stazione. [Modalità stereo] La velocità di trasferimento dati. [Qualità del segnale] Etichetta 201.072 MHz 8D 234.208 MHz 13C 1 Sintonizzarsi sulla stazione DAB desiderata. 202.928 MHz 9A 235.776 MHz 13D 2 Premere PGM/MEMORY. 204.640 MHz 9B 237.488 MHz 13E 206.352 MHz 9C 239.200 MHz 13F Il numero predefinito lampeggia. 3 Entro 10 secondi, premere PRESET +/- per selezionare il numero del canale predefinito. Salvare le stazioni in memoria in ordine, a partire dal canale predefinito 1. 4 Entro 10 secondi, premere PGM/MEMORY per salvare la stazione in memoria. Se gli indicatori del numero predefinito scompaiono prima della memorizzazione della stazione, ripetere l’operazione a partire dal passaggio 2. It Se una nuova stazione viene salvata in memoria, la stazione precedentemente memorizzata viene cancellata automaticamente. Frequenza Viene visualizzato il nome della stazione. (impostazione predefinita) 24 5 Ripetere i passaggi da 1 a 4 per preimpostare altre stazioni o per modificare una stazione predefinita. X-HM16_26_26D_It.book 25 ページ 2016年7月22日 金曜日 午前10時38分 Altri collegamenti 08 English Capitolo 8: Altri collegamenti Collegare il proprio componente di riproduzione ausiliario all'ingresso AUDIO IN sul pannello posteriore. Questa funzione passa automaticamente a “AUDIO IN” quando è presente audio in ingresso presso il terminale AUDIO IN. 1 Premere MENU e quindi premere / sino a che sul display appare “Audio In detect”. 2 Premere ENTER e quindi premere / per selezionare Audio In detect ON/OFF. • L'impostazione di fabbrica è OFF. Lettore audio portatile, ecc. Nota • Se il mini spinotto AUDIO IN viene collegato ad una cuffia, il volume di questa unità è regolabile col componente che riproduce. Se il suono è distorto dopo aver abbassato il volume dell’unità, cercare di abbassare anche quello sul componente ausiliario di playback. Pyccкий Selezionando AUDIO IN, si visualizzerà “Audio In” sulla schermata principale. Nederlands 1 Premere AUDIO IN come sorgente in entrata. Deutsch Cavo mini stereo 3,5 mm (disponibile in commercio) Italiano Nota • Quando Audio In detect è ON, sul display principale viene visualizzato “Audio In Det ON”. • Quando Audio In detect è OFF, sul display principale viene visualizzato “Audio In Det OFF”. Español Connessione di componenti ausiliari Passaggio automatico all'ingresso Audio In (Solo per i modelli per il Nord America) Français ATTENZIONE • Prima di eseguire o cambiare i collegamenti, spegnete l’apparecchio e scollegate la spina dalla presa AC. • Non accetteremo responsabilità per danni derivanti dal collegamento di apparecchiature prodotte da altre aziende. 25 It X-HM16_26_26D_It.book 09 26 ページ 2016年7月22日 金曜日 午前10時38分 Riproduzione Bluetooth® Audio Capitolo 9: Riproduzione Bluetooth® Audio Solo X-HM26/26D Riproduzione con tecnologia wireless Bluetooth Funzionamento del telecomando Il telecomando fornito insieme all’apparecchio vi permette di leggere e fermare media e di eseguire altre operazioni. Nota Dispositivo con tecnologia wireless Bluetooth: Telefono cellulare • I dispositivi dotati di tecnologia wireless Bluetooth devono supportare i profili AVRCP. • Le operazioni del telecomando non possono essere garantite per tutti i dispositivi dotati di tecnologia wireless Bluetooth. Dispositivo con tecnologia wireless Bluetooth: Lettore di musica digitale Dispositivo non dotato di tecnologia wireless Bluetooth: Lettore di musica digitale + Trasmettitore audio Bluetooth® (da acquistare separatamente) Dati musicali TIMER L’unità è in grado di riprodurre la musica salvata sugli apparecchi wireless abilitati a tecnologia Bluetooth (telefono cellulare, lettori musica digitale ecc.). Si può usare un trasmettitore audio Bluetooth (venduto separatamente) per ascoltare musica da apparecchi che non hanno la funzionalità Bluetooth. Per maggiori informazioni, riferirsi al manuale di istruzioni dell’apparecchio abilitato a tecnologia Bluetooth. Nota • Il marchio nominale e il logo Bluetooth® sono marchi registrati di proprietà di Bluetooth SIG, Inc. • I dispositivi dotati di tecnologia wireless Bluetooth devono supportare i profili A2DP. • La connessione non è sempre garantita con tutti i dispositivi abilitati Bluetooth. 26 It Accoppiare all’unità (Registrazione iniziale) Per riprodurre musica salvata su un apparecchio abilitato a tecnologia Bluetooth, bisogna innanzitutto eseguire l’accoppiamento. L’accoppiamento deve essere eseguito quando si usa per la prima volta l’apparecchio abilitato a tecnologia Bluetooth o quando i dati di accoppiamento sull’apparecchio sono stati cancellati per un qualsiasi motivo. L’accoppiamento è un passaggio richiesto per permettere che la comunicazione tramite tecnologia wireless Bluetooth venga attivata. • L’accoppiamento viene eseguito solo la prima volta che si usano insieme l’unità e l’apparecchio abilitato a tecnologia Bluetooth. • Per permettere la comunicazione tramite tecnologia Bluetooth wireless di attivarsi, l’accoppiamento deve essere eseguito sia sull’unità che sull’apparecchio abilitato a tecnologia Bluetooth. • Dopo aver premuto e commutato sull’entrata Bluetooth, eseguire la procedura di accoppiamento sull’apparecchio abilitato a tecnologia Bluetooth. Se l’accoppiamento è stato eseguito correttamente, non sarà necessario eseguire le procedure di accoppiamento per l’unità mostrate qui sotto. Per maggiori informazioni, riferirsi al manuale di istruzioni dell’apparecchio abilitato a tecnologia Bluetooth. 1 Premere Í e accendere la corrente dell’unità. 2 Premere . L’unità si commuta su Bluetooth e si visualizzerà “Pairing”. X-HM16_26_26D_It.book 27 ページ 2016年7月22日 金曜日 午前10時38分 Riproduzione Bluetooth® Audio • Lo spegnimento automatico può essere commutato su ON/OFF (pagina 33). BT STANDBY 1 Premere . L’unità si commuterà sull’entrata Bluetooth. 2 Sarà creata una connessione Bluetooth tra l’apparecchio abilitato a tecnologia Bluetooth e l’unità. 3 Riprodurre musica dall’apparecchio con capacità Bluetooth. 3 Premere ENTER e quindi premere / per selezionare BT STANDBY ON/OFF. • L’impostazione predefinita è OFF. Nota • Se BT STANDBY è attivato su ON, si visualizzerà “BT STANDBY ON” sulla schermata principale. • Se BT STANDBY è disattivato su OFF, si visualizzerà “BT STANDBY OFF” sulla schermata principale. Connessione in modalità BT STANDBY con un apparecchio abilitato a tecnologia Bluetooth Con la connessione dell’unità già eseguita in precedenza (l’accoppiamento è già stato eseguito) con un apparecchio abilitato a tecnologia Bluetooth, durante BT STANDBY, l’unità potrebbe ricevere una richiesta di connessione direttamente dalla connessione precedente. L’unità si avvierà usando la funzione Bluetooth e si connetterà a un apparecchio abilitato a tecnologia Bluetooth. Anche gli apparecchi che sono già stati accoppiati a questa unità non saranno connessi durante BT STANDBY nei casi seguenti. In questi casi, cancellare lo storico di accoppiamento dall’apparecchio Bluetooth a tecnologia wireless e rifare l’accoppiamento. • Questa unità è in grado di memorizzare fino a 8 unità nella memoria di abbinamento. • Se le impostazioni vengono ripristinate a quelle di fabbrica, tutti gli storici di accoppiamento verranno cancellati. Pyccкий Le procedure di connessione all’unità dovrebbero essere eseguite dall’apparecchio abilitato a tecnologia Bluetooth. • Vedi il manuale di istruzioni dell’apparecchio abilitato a tecnologia Bluetooth per maggiori informazioni sulle procedure di connessione. . Nederlands Ascoltare la musica sull’unità con l’apparecchio abilitato a tecnologia Bluetooth Premere 2 Premere MENU e quindi premere / sino a che sul display appare “BT STANDBY”. Deutsch Se l’accoppiamento sull’apparecchio abilitato a tecnologia Bluetooth è stato completato correttamente, il nome dell’apparecchio abilitato a tecnologia Bluetooth sarà visualizzato sul pannello frontale dell’unità. (Possono essere visualizzati solo caratteri alfanumerici a byte singolo. Tutti i caratteri che non possono essere visualizzati saranno indicati da “∫”.) 1 Italiano 4 Controllare che l’accoppiamento sull’apparecchio abilitato a tecnologia Bluetooth sia stato completato. Impostazioni BT STANDBY Español • Questa unità sarà visualizzata come “Pioneer X-HM26” su tutti gli apparecchi abilitati a tecnologia Bluetooth che possedete. L’accoppiamento si avvierà. • Posizionare l’apparecchio abilitato a tecnologia Bluetooth vicino all’unità. • Vedi il manuale di istruzioni dell’apparecchio abilitato a tecnologia Bluetooth per maggiori dettagli su come eseguire l’accoppiamento e sulle procedure richieste per completarlo. • Se viene richiesta l’immissione di un codice PIN, immettere “0000”. (Questa unità non accetta alcuna impostazione di codice PIN diversa da “0000”.) Français • Le seguenti operazioni possono essere eseguite con BT STANDBY acceso su ON. • Selezionando un apparecchio a tecnologia Bluetooth abilitato che è già stato connesso in precedenza (l’accoppiamento è già stato eseguito) a questa unità, quest’ultima si accenderà automaticamente con la funzione Bluetooth. Nota English 3 Accendere la corrente dell’apparecchio abilitato a tecnologia Bluetooth con il quale si desidera eseguire l’accoppiamento ed effettuare la procedura di accoppiamento su di esso. 09 Nota • Se un apparecchio abilitato a tecnologia Bluetooth non viene connesso e non vengono eseguite operazioni per più di 20 minuti, l’unità si spegne automaticamente. In questo caso, si richiede che spegnimento automatico sia commutato su ON. 27 It X-HM16_26_26D_It.book 09 28 ページ 2016年7月22日 金曜日 午前10時38分 Riproduzione Bluetooth® Audio Avvertenza sulle onde radio Questa unità utilizza una frequenza di onde radio da 2,4 GHz, che corrisponde alla banda usata da altri sistemi wireless (fare riferimento all’elenco che segue). Per evitare rumore ed interruzioni della comunicazione, non usare questa unità vicino a simili apparecchi o controllare che questi siamo spenti prima dell’uso. • Telefoni senza fili • Fax senza fili • Forni a microonde • Dispositivi wireless LAN (IEEE802.11b/g) • Componenti AV wireless • Controller wireless di giochi elettronici • Apparecchi sanitari a microonde • Certi dispositivi per il monitoraggio di lattanti Altri componenti meno comuni che possono usare la stessa frequenza: • Antifurto • Impianti per radioamatori • Sistemi di gestione logistica di magazzini • Sistemi di discriminazione per treni e dispositivi di emergenza. Nota • Se l’immagine del vostro televisore fosse disturbata, è possibile che un dispositivo con tecnologia wireless Bluetooth o questa unità (compresi apparecchi che essa supporta) causi interferenze con il connettore dell’ingresso dell’antenna del vostro televisore, video, sintonizzatore satellitare o altro. In tal caso, aumentare la distanza fra il dispositivo con tecnologia wireless Bluetooth o questa unità (e gli apparecchi che essa supporta). • Nel caso in cui siano presenti ostacoli nel percorso tra questa unità (inclusi i dispositivi che supporta) e il dispositivo con tecnologia wireless Bluetooth (ad esempio una porta metallica, una parete in cemento o un isolamento contenente lamiera di stagno), potrebbe essere necessario cambiare la posizione del sistema per evitare disturbi e interruzioni del segnale. 28 It Campo di funzionamento L’uso di questo apparecchio è limitato all’uso casalingo. (La distanza di trasmissione può ridursi a seconda dell’ambiente di comunicazione). Nelle seguenti locazioni, delle condizioni di ricezione difficile o impossibile possono fare interrompere l’audio temporaneamente o permanentemente: • In edifici in cemento armato oppure che presentano strutture in ferro o in acciaio. • Vicino a grandi mobili in metallo. • In luoghi affollati o vicino ad edifici o ostacoli. • In un luogo esposto a campi magnetici, elettricità statica o interferenze radio provenienti da apparecchiature radio che utilizzano la stessa banda di frequenze (2,4 GHz) di questa unità, ad esempio un dispositivo wireless LAN da 2,4 GHz (IEEE802.11b/g) o un forno a microonde. • Chi vive in aree densamente popolate (appartamenti, caseggiati, ecc.) può subire interferenze causate dal forno a microonde del vicino. Se questo accade, spostare questa unità. Se il forno a microonde non è in uso, non ci saranno interferenze. Onde radio riflesse Le onde radio ricevute da questa unità comprendono l’onda radio che proviene direttamente dal dispositivo dotato di tecnologia wireless Bluetooth (onda diretta) e le onde che provengono da varie direzioni e riflesse da pareti, mobili ed edifici (onde riflesse). Le onde riflesse (da ostacoli o oggetti riflettenti) producono altre onde riflesse e variazioni nelle condizioni di ricezione a seconda della posizione. Nel caso in cui la ricezione audio risulti inappropriata a causa di questo fenomeno, tentare di modificare leggermente la posizione del dispositivo dotato di tecnologia wireless Bluetooth. Si noti inoltre che l’audio potrebbe essere interrotto anche a causa delle onde riflesse a causa del passaggio di una persona nello spazio tra questa unità e il dispositivo dotato di tecnologia wireless Bluetooth. Precauzioni riguardanti i collegamenti fra prodotti supportati da questa unità • Prima di collegarli a questa unità, completare i collegamenti, compresi i cavi audio e di alimentazione, di tutti i dispositivi da essa supportati. • Completati i collegamenti di questa unità, controllare che i cavi audio e di alimentazione non siano attorcigliati l’uno all’altro. • Prima di scollegare questa unità, controllare di avere spazio sufficiente per lavorare. • Prima di cambiare i collegamenti audio o di altri cavi di prodotto supportati da questa unità, controllare di avere spazio sufficiente per il lavoro. X-HM16_26_26D_It.book 29 ページ 2016年7月22日 金曜日 午前10時38分 Informazioni aggiuntive 10 Informazioni aggiuntive English Risoluzione dei problemi Français Capitolo 10: Problema di carattere generale Problema Controllare Soluzione Se si scollega il cavo di corrente, le impostazioni eseguite vengono cancellate. Si prega di riprogrammare l’orologio. Se non si vogliono cancellare le impostazioni, non scollegare il cavo di corrente. Differenza di volume tra CD, Questo non è un un problema con MP3, Tuner, e AUDIO IN. questa unità. Il volume potrebbe avere un suono diverso secondo la sorgente di entrata e il formato di registrazione. Se si utilizza quest’unità con un lettore analogico, collegarvi un dispositivo dotato di fonoequalizzatore. Il telecomando è esposto a luce del sole diretta o a forte luce artificiale da lampadina fluorescente, ecc.? I segnali del telecomando potrebbero non essere ricevuti correttamente se il sensore del telecomando è esposto a luce solare diretta o alla forte luce artificiale da lampadina fluorescente, ecc. Le batterie sono scariche? Sostituire le batterie (pagina 5). Il disco non può essere letto o viene espulso automaticamente. Il disco è graffiato? I dischi graffiati potrebbero non funzionare. Il disco è sporco? Eliminare la sporcizia dal disco (pagina 33). L’unità è installata in un luogo umido? Potrebbe essersi creata della condensa al suo interno. Aspettare un attimo per lasciare che la condensa evapori. Non installare questa unità vicino ad un climatizzatore o simili (pagina 32). Si è superato il numero massimo di cartelle o file che questa unità è in grado di riconoscere? L'unità è in grado di riconoscere fino a 999 file su un solo disco o dispositivo di archiviazione USB. Il numero massimo di cartelle è 255. A seconda della struttura delle cartelle, potrebbero essere presenti file o intere cartelle che l'unità non è in grado di riconoscere. La cartella o il nome dei file non viene riconosciuto. L’unità si spegne da sola. Pyccкий Usarlo entro 7 m, 30º dal sensore remoto del pannello anteriore (pagina 5). Nederlands State operando da lontano? Deutsch Questa unità non è controllabile col telecomando. Italiano Le impostazioni che avevate Il cavo di corrente era scollegato? fatto sono state cancellate. Español Le operazioni non corrette sono spesso interpretate come problemi o guasti. Qualora si ritenga che questo componente non funzioni nel modo corretto, verificare quanto elencato di seguito. Il problema potrebbe essere causato da un altro componente. Esaminare gli altri componenti e le apparecchiature elettriche in uso. Se il problema non può essere risolto anche dopo aver effettuato i controlli sopra descritti, chiedere al centro di servizio Pioneer più vicino o al concessionario di svolgere i lavori di riparazione. • Se l’unità non funziona correttamente a causa di effetti esterni, quale l’elettricità statica, scollegare la spina di alimentazione dalla presa e reinserirla per ripristinare le normali condizioni operative. Se non vengono eseguite riproduzioni o operazioni per 20 o più minuti, l’unità si spegne automaticamente. In questo caso, si richiede che spegnimento automatico sia commutato su ON (pagina 33). 29 It X-HM16_26_26D_It.book 10 30 ページ 2016年7月22日 金曜日 午前10時38分 Informazioni aggiuntive Quando si collega un dispositivo di memoria di massa USB Problema Controllare Soluzione Il dispositivo di memoria I dispositivo di memoria USB è stato Connettere il dispositivo in sicurezza (bene, fino in fondo). USB non viene riconosciuto. connesso correttamente? Il dispositivo di memoria USB è connesso tramite un hub USB? Questa unità non supporta hub USB. Connettere direttamente il dispositivo di memoria USB. Questa unità supporta solo dispositivi di memoria di massa USB. Questa unità supporta le memorie mobili flash ed i dispositivi di riproduzione audio digitali. Sono supportati solo i sistemi di file FAT16 e FAT32. Gli altri file system (exFAT, NTFS, HFS ecc.) non sono supportati. Questo apparecchio non supporta l’uso di drive esterni per i disco rigido. Questo non è un un problema con questa unità. I file non possono essere letti. It Alcuni dispositivi di archiviazione USB potrebbero non essere riconosciuti correttamente. I file hanno un copyright protetto (da I file coperti da copyright non possono essere letti. DRM)? Questo non è un un problema con questa unità. 30 Spegnere la corrente e poi riaccenderla. I file salvati su un computer non possono essere letti. Potrebbe non essere in grado di leggere alcuni file. I nomi di cartella o di file non I nomi di cartella o file contengono vengono visualizzati o più di 30 caratteri? vengono visualizzati in modo anomalo. Il numero massimo di caratteri visualizzabili per la cartella o per i nomi dei file è di 30. I nomi della cartella o del file Questo non è un un problema con non sono visualizzati in questa unità. ordine alfabetico. L’ordine in cui si visualizzano i nomi delle cartelle e dei file dipende da quello in cui le cartelle o i file sono stati registrati sul dispositivo di memoria USB. Ci vuole molto tempo per il Qual è la capacità dei dispositivi di riconoscimento del memoria USB? dispositivo di memoria USB. A volte si richiede di caricare i dati quando sono connessi dispositivi di memoria USB di elevata capacità (questo potrebbe richiedere diversi minuti). X-HM16_26_26D_It.book 31 ページ 2016年7月22日 金曜日 午前10時38分 Informazioni aggiuntive 10 Solo X-HM26/26D Soluzione Il dispositivo dotato di tecnologia wireless Bluetooth non può essere collegato o messo in funzione. Non viene emesso l’audio dal dispositivo dotato di tecnologia wireless Bluetooth oppure l’audio viene interrotto. Verificare che nelle vicinanze dell’unità non vi siano oggetti che emettono onde elettromagnetiche nella banda a 2,4 GHz (forno a microonde, dispositivo LAN wireless o dispositivo dotato di tecnologia wireless Bluetooth). Se un simile oggetto fosse presente, allontanarlo. Oppure smettere di fare uso dell’oggetto che produce onde elettromagnetiche. * La distanza fornita deve essere intesa come puramente indicativa. La vera distanza permessa tra gli apparecchi può variare secondo le condizioni dell’ambiente circostante. Verificare che l’unità sia collegata a un dispositivo con tecnologia Bluetooth e che sia selezionata una sorgente di ingresso diversa da Bluetooth. Selezionare Bluetooth come sorgente di ingresso, quindi eseguire la procedura di collegamento. CD-Audio File MP3 registrati su dischi CD-R/ -RW/ -ROM o su dispositivi di memoria USB MP3: MP3 è una forma di compressione. È l’acronimo per MPEG Audio Layer 3. MP3 è un tipo di codice audio che è processato ad elevata compressione rispetto alla sorgente audio originale con un trascurabile deterioramento della qualità del suono. • Questo sistema supporta MPEG-1/2 Audio Layer 3 (Tassi di campionamento: da 32 kHz a 48 kHz; Tassi Bit: da 8 kbps a 320 kbps). • Durante la riproduzione di file VBR, il contatore del tempo nel display potrebbe essere diverso dal tempo di riproduzione reale. • Le informazioni sull'ordine delle cartelle e dei file registrate sul supporto dipendono dal software di masterizzazione. È possibile che questa unità riproduca i file in un ordine diverso da quello atteso. • Su un supporto con file MP3 è possibile leggere sino a 255 cartelle e 999 file (compresi file non riproducibili). Pyccкий • Si possono riprodurre solo dischi finalizzati. • I dischi registrati nella modalità di scrittura a pacchetti (formato UDF) non sono compatibili con questa unità. • I nomi aziendali o di prodotti menzionati in questo documento sono marchi commerciali o marchi commerciali registrati delle rispettive aziende. • Possono venire riprodotti solo i dischi registrati con i metodi ISO9660 Level 1, Level 2 e Joliet. • I file protetti col sistema DRM (Digital Rights Management) non possono venire riprodotti. Nederlands MP3 • CD audio disponibili in commercio • CD-R/ -RW/ -ROM contenenti musica e registrati in formato CD-DA Deutsch Dischi e formati riproducibili Italiano Il dispositivo dotato di tecnologia wireless Bluetooth potrebbe non essere impostato nella modalità di comunicazione che supporta tecnologia wireless Bluetooth. Controllare le impostazioni del dispositivo compatibile con la tecnologia wireless Bluetooth. Español Verificare che il dispositivo dotato di tecnologia wireless Bluetooth non sia troppo lontano dall’unità e che non vi siano ostacoli tra il dispositivo dotato di tecnologia wireless Bluetooth e l’unità. Impostare il dispositivo dotato di tecnologia wireless Bluetooth e l’unità in modo che la distanza tra essi sia inferiore a 10 m* e non vi siano ostacoli. Français Problema English Con un dispositivo Bluetooth a tecnologia wireless connesso e in funzione Nota • Questa unità non supporta i dischi multisessione o la registrazione multiborder. • La registrazione multisessione/multiborder consiste nel registrare i dati su di un singolo disco in due o più sessioni/border. Una “sessione” o un “border” è un’unità di registrazione consistente di un set completo di dati dall’inizio alla fine. 31 It X-HM16_26_26D_It.book 10 32 ページ 2016年7月22日 金曜日 午前10時38分 Informazioni aggiuntive I CD protetti dalla copia Questa unità è costruita in conformità alle caratteristiche del formato CD audio. Questa unità non supporta la riproduzione o le funzioni di dischi che non siano conformi a tali caratteristiche. Formati dei file audio supportati Questo lettore non supporta la compressione senza perdite lossless. Precauzioni d’uso Quando si sposta questa unità Quando si sposta l'unità, verificare che non ci siano dischi caricati e scollegare il dispositivo di memorizzazione USB. Quindi premere Í, attendere che scompaia “STAND BY” sul display principale prima di spegnere, quindi scollegare il cavo di alimentazione. Possono verificarsi dei danni se l'unità viene trasportata o spostata con un disco inserito, o quando un altro dispositivo è collegato al terminale USB, o all'ingresso AUDIO IN. Luogo di installazione • Scegliere una posizione stabile vicino ad un televisore o impianto stereo da usare con l’unità. • Non installare questa unità sopra un televisore o monitor a colori. Inoltre, installarlo lontano da copertine di cassette e altri dispositivi facilmente influenzabili da forze magnetiche. Evitare di metterlo nei seguenti luoghi: • • • • • • Luoghi esposti alla luce diretta del sole Luoghi umidi o poco ventilati Luoghi estremamente caldi Luoghi esposti alle vibrazioni Luoghi con molta polvere o fumo di sigarette Luoghi esposti a fuliggine, vapore o calore (cucine, etc.) Non appoggiare oggetti su questa unità Non appoggiare oggetti sopra a questa unità. Non ostruire i fori di ventilazione. Non usare questa unità su tappeti folti, letti, sofà ed altro, avvolgendoli in panni, ecc. Facendolo si impedisce al calore di disperdersi e si causano danni. Non esporlo al calore. Non posare il lettore su di un amplificatore o altro dispositivo che genera calore. Se si monta su uno scaffale, per evitare il calore emesso dall’amplificatore o da qualsiasi altro componente radio, appoggiarlo su un ripiano sotto l’amplificatore. • Spegnere questa unità quando non la si utilizza. 32 It • A seconda della qualità del segnale, sul televisore possono apparire delle righe e l’audio della radio può essere disturbato quando questa unità è accesa. Se questo accade, spegnere questa unità. La condensa Se questa unità viene improvvisamente portata da un luogo freddo ad uno caldo (ad esempio d’inverno) o se la temperatura ambiente aumenta rapidamente a causa di caloriferi o altro, all’interno di questa unità (parti mobili e le lenti) potrebbe formarsi condensa (gocce d’acqua). Se della condensa si forma, questa unità non funziona bene e la riproduzione non è possibile. Lasciare riposare questa unità accesa a temperatura ambiente per 1 o 2 ore (il tempo richiesto dipende dalla quantità di condensa). La condensa evaporerà e la riproduzione ritornerà possibile. La condensa può anche formarsi d’estate se questa unità viene investita dall’aria di un climatizzatore. In tal caso, spostare l’unità in un luogo differente. Pulizia del prodotto • Prima di pulire questa unità, scollegare il cavo di alimentazione dalla presa di corrente. • Pulire questa unità con un panno pulito. In caso di sporcizia tenace, applicare un detergente neutro diluito in 5 o 6 parti d’acqua su un panno morbido, strizzarlo a fondo, strofinare la parte sporca, poi asciugarla con un panno morbido e pulito. • Alcol, solventi, benzene, insetticidi ecc. potrebbero causare la spelatura della stampa o della vernice. Inoltre, evitare di lasciare oggetti in gomma o vinile a contatto con questa unità per lunghi periodi, dato che questo può danneggiare le finiture del cabinet. • Se si usano detergenti impregnati di agenti chimici ecc., leggere attentamente le precauzioni indicate con il prodotto. Pulizia della lente La lente di questa unità non dovrebbe sporcarsi se utilizzata normalmente, se dovesse però non funzionare correttamente a causa di polvere o sporcizia, consultare il centro di assistenza di zona Pioneer. Nonostante siano disponibili in commercio detergenti per lenti di lettori, se ne sconsiglia l’uso perché possono danneggiare la lente. X-HM16_26_26D_It.book 33 ページ 2016年7月22日 金曜日 午前10時38分 Informazioni aggiuntive Archiviazione Pulire i dischi • L’impostazione iniziale è su ON. Nota • Quando lo spegnimento automatico è impostato su ON, si visualizzerà “APD ON” sulla schermata principale. • Quando lo spegnimento automatico è impostato su OFF, si visualizzerà “APD OFF” sulla schermata principale. Ritorno di tutte le impostazioni ai valori predefiniti Usare i passaggi qui sotto per ripristinare tutte le impostazioni al default. 1 Premere Í per accendere la corrente. 2 Premere MENU e quindi premere / sino a che sul display appare “Factory Reset”. 3 Premere ENTER. “Apparirà “OK?”. 4 Premere ENTER. • “Resetting” appare quando le impostazioni vengono ripristinate. La corrente è spenta. Nederlands Pyccкий I dischi non circolari (a cuore, esagonali, ecc.) non possono venire riprodotti con questa unità. Non tentare di riprodurre simili dischi, dato che possono danneggiare questa unità. Premere ENTER sul telecomando. 3 Premere / per impostare lo spegnimento automatico su ON o OFF. Deutsch Dischi con forma particolare 2 Italiano • Non usare benzene, solventi o altri agenti chimici volatili. Non usare prodotti spray o altri agenti antistatici. • Quando lo sporco è resistente, inumidire un panno morbido, strizzarlo a fondo e strofinare via lo sporco, poi rimuovere l’umidità con un panno asciutto. • Non usare dischi danneggiati (rotti o piegati). • Non lasciate che la superficie del segnale dei dischi si graffi o si sporchi. • Non attaccare pezzi di carta o adesivi sui dischi. Farlo potrebbe far curvare i dischi, rendendo impossibile la loro lettura. Attenzione, i dischi a noleggio potrebbero avere delle etichette attaccate, e la colla delle etichette potrebbe essere colata. Controllare che non vi sia colla intorno ai bordi delle etichette prima di usare dischi a noleggio. Premere MENU sul telecomando. Sul display principale verrà visualizzato “Auto Power Down”. Español • I dischi possono non funzionare se vi sono impronte digitali o polvere su di essi. In tal caso, usare un panno di pulizia ecc. per spolverare dolcemente il disco dall’interno verso l’esterno. Non usare panni di pulizia sporchi. 1 Français • Riporre sempre i dischi nelle loro custodie e archiviarli verticalmente, evitando luoghi caldi, umidi, esposti alla luce solare o estremamente freddi. • Leggere attentamente le precauzioni indicate nel disco. Impostazioni di spegnimento automatico English Come maneggiare i dischi 10 33 It X-HM16_26_26D_It.book 10 34 ページ 2016年7月22日 金曜日 午前10時38分 Informazioni aggiuntive Specifiche • Sezione amplificatore Uscita alimentazione RMS: . . . . . . . . . . . . . . 15 W + 15 W (1 kHz, 10 %, T.H.D., 8 Ω) • Sezione sintonizzatore Gamma di frequenza (FM) . . . . . da 87,5 MHz a 108,0 MHz Ingresso di antenna (FM) . . . . . . . . . . . . .75 Ω asimmetrico Gamma di frequenza (AM) (Per i modelli per il Nord America) . . . . . . . . . . . . . . . . . . . . . . . . . . . . da 530 kHz a 1710 kHz Antenna (AM) . . . . . . . . . . . . . . . . . . . . . . .Antenna a telaio • Bluetooth (Solo X-HM26/26D) Versione . . . . . . . . . . . . . . . . Specifiche Bluetooth Ver. 4.1 Uscita . . . . . . . . . . . . . . . . . . Specifiche Bluetooth Classe 2 Distanza stimata di trasmissione in linea retta* . . . . . . . . . . . . . . . . . . . . . . . . . . . . . . . . . . . . . . Circa 10 m Gamma di frequenza . . . . . . . . . . . . . . . . . . . . . . . 2,4 GHz Modulazione . . . . . . . . . FH-SS (Frequency Hopping Spread Spectrum) Profili Bluetooth supportati . . . . . . . . . . . . . . A2DP, AVRCP Codec supportati . . . . . . . . . . . . . . SBC (Subband Codec) Sistema di protezione dei contenuti . . . . . . . . . . . . SCMS-T Codice PIN . . . . . . . . . . . . . . . . . . . . . . . . . . . . . . . . . .0000 * La distanza di trasmissione in linea retta è una stima. Le distanze di trasmissione effettive dipendono dalle condizioni di uso. • Generalità Terminale USB . . . . . . . . . . . . . . . . . . . . . . . . . 5 V, 500 mA Alimentazione (Per modelli per l'Europa) . . . . . . . . . . . . . . . . . da CA 220 V a 240 V, 50 Hz/60 Hz (Per i modelli per il Nord America) . . . . . . . . . . . . . . . . . . . . . . . . . . . . . . . CA 120 V, 60 Hz Consumo Corrente accesa. . . . . . . . . . . . . . . . . . . . . . . . . . . 20 W In modalità stand-by. . . . . . . . . . . . . . . . . 0,5 W o meno Corrente in stand-by (BT STANDBY ON) . . . . . . . . . . . . . . . . . . . . . . . . . . . . . . . . . 0,5 W o meno Dimensioni . . . . . 215 mm (L) x 95 mm (A) x 315 mm (P) Peso (senza imballaggio) . . . . . . . . . . . . . . . . . . . . . . 2,0 kg • Altoparlante In dotazione . . . . . . . . . . . . . . . Bass-reflex, tipo book-shelf (Protetto magneticamente) Configurazione. . . . . . . . . . . . . . . . . . . . . . . . . . . a 2 vie Tweeter . . . . . . . . . . . . . . . . . . . . . . . . . . Dome da 2 cm Woofer . . . . . . . . . . . . . . . . . . . . . . . . . . Cono da 10 cm Massimo ingresso di potenza . . . . . . . . . . . . . . . . . . . 15 W Impedenza . . . . . . . . . . . . . . . . . . . . . . . . . . . . . . . . . . . 8 Ω Dimensioni . . . . 130 mm (L) x 212 mm (A) x 228,5 mm (P) Peso . . . . . . . . . . . . . . . . . . . . . . . . . . . . . . . . . . 2,0 kg/cad. 34 It • Accessori Telecomando . . . . . . . . . . . . . . . . . . . . . . . . . . . . . . . . . . Batterie AAA (R03) . . . . . . . . . . . . . . . . . . . . . . . . . . . . . . Cavo antenna AM*1 . . . . . . . . . . . . . . . . . . . . . . . . . . . . . Antenna FM a filo*2 . . . . . . . . . . . . . . . . . . . . . . . . . . . . . . Antenna cavo DAB/FM*3. . . . . . . . . . . . . . . . . . . . . . . . . . Cavo di alimentazione . . . . . . . . . . . . . . . . . . . . . . . . . . . . Documento di garanzia*4 . . . . . . . . . . . . . . . . . . . . . . . . . Istruzioni per l’uso (questo documento). . . . . . . . . . . . . . . *1 Solo modelli per il Nord America *2 Solo X-HM16/HM26 *3 Solo X-HM26D *4 Solo modelli per l'Europa 1 2 1 1 1 1 1 1 Nota • Le specifiche si riferiscono ad un’alimentazione 230 V. • Le specifiche e il design sono soggetti a possibili modifiche senza preavviso, per eventuali migliorie del prodotto. “Pioneer” è un marchio di fabbrica di proprietà di Pioneer Corporation, ed è utilizzato su licenza. © 2016 Onkyo & Pioneer Corporation. Tutti i diritti riservati. SN29402699_X-HM16_26_26D_En_European.book 39 ページ 2016年7月21日 木曜日 午前10時20分 X-HM16_26_26D_De.book 2 ページ 2016年7月22日 金曜日 午前10時35分 ACHTUNG UM SICH NICHT DER GEFAHR EINES ELEKTRISCHEN SCHLAGES AUSZUSETZEN, DÜRFEN SIE NICHT DEN DECKEL (ODER DIE RÜCKSEITE) ENTFERNEN. IM GERÄTEINNEREN BEFINDEN SICH KEINE VOM BENUTZER REPARIERBAREN TEILE. ÜBERLASSEN SIE REPARATUREN DEM QUALIFIZIERTEN KUNDENDIENST. D3-4-2-1-1_B1_De WARNUNG Dieses Gerät ist nicht wasserdicht. Zur Vermeidung der Gefahr von Brand und Stromschlag keine Behälter mit Flüssigkeiten (z.B. Blumenvasen und -töpfe) in die Nähe des Gerätes bringen und dieses vor Tropfwasser, Spritzwasser, Regen und Nässe schützen. ACHTUNG Der STANDBY/ON-Schalter dieses Gerätes trennt das Gerät nicht vollständig vom Stromnetz. Um das Gerät vollständig vom Netz zu trennen, muss der Netzstecker aus der Netzsteckdose gezogen werden. Daher sollte das Gerät so aufgestellt werden, dass stets ein unbehinderter Zugang zur Netzsteckdose gewährleistet ist, damit der Netzstecker in einer Notsituation sofort abgezogen werden kann. Um Brandgefahr auszuschließen, sollte der Netzstecker vor einem längeren Nichtgebrauch des Gerätes, beispielsweise während des Urlaubs, grundsätzlich von der Netzsteckdose getrennt werden. D3-4-2-2-2a*_A1_De D3-4-2-1-3_A1_De WARNUNG Keine Quellen offener Flammen (z.B. eine brennende Kerze) auf dieses Gerät stellen. D3-4-2-1-7a_A1_De VORSICHTSHINWEIS ZUR BELÜFTUNG Bei der Aufstellung dieses Gerätes muss für einen ausreichenden Freiraum gesorgt werden, um eine einwandfreie Wärmeabfuhr zu gewährleisten (mindestens 25 cm oberhalb des Gerätes, 10 cm hinter dem Gerät und jeweils 5 cm an der Seite des Gerätes). WARNUNG Im Gerätegehäuse sind Ventilationsschlitze und andere Öffnungen vorgesehen, die dazu dienen, eine Überhitzung des Gerätes zu verhindern und einen zuverlässigen Betrieb zu gewährleisten. Um Brandgefahr auszuschließen, dürfen diese Öffnungen auf keinen Fall blockiert oder mit Gegenständen (z.B. Zeitungen, Tischdecken und Gardinen) abgedeckt werden, und das Gerät darf beim Betrieb nicht auf einem dicken Teppich oder Bett aufgestellt sein. ACHTUNG Bei diesem Gerät handelt es sich zwar um ein Laserprodukt der Klasse 1, das entsprechend dem Standard Sicherheit für Laserprodukte IEC 60825-1:2007 klassifiziert ist. LASER KLASSE 1 D58-5-2-2a_A1_De Dieses Gerät ist für den Heimgebrauch vorgesehen. Falls bei Einsatz zu einem anderem Zweck (z.B. Langzeitgebrauch zu gewerblichen Zwecken in einem Restaurant oder Betrieb in einem Fahrzeug bzw. Schiff) eine Funktionsstörung auftritt, die eine Reparatur des Gerätes erforderlich macht, werden die Reparaturkosten dem Kunden selbst dann in Rechnung gestellt, wenn die Garantiefrist noch nicht abgelaufen ist. K041_A1_De D3-4-2-1-7b*_A1_De VORSICHT MIT DEM NETZKABEL Betriebsumgebung Betriebstemperatur und Betriebsluftfeuchtigkeit: +5 °C bis +35 °C, 85 % rel. Feuchte max. (Ventilationsschlitze nicht blockiert) Eine Aufstellung dieses Gerät an einem unzureichend belüfteten, sehr feuchten oder heißen Ort ist zu vermeiden, und das Gerät darf weder direkter Sonneneinstrahlung noch starken Kunstlichtquellen ausgesetzt werden. D3-4-2-1-7c*_A1_De Fassen Sie das Netzkabel immer am Stecker. Ziehen Sie nicht am Kabel selbst, und fassen Sie das Netzkabel niemals mit nassen Händen an, da dies einen Kurzschluss oder elektrischen Schlag verursachen kann. Stellen Sie nicht das Gerät, Möbelstücke o.ä. auf das Netzkabel; sehen Sie auch zu, dass es nicht eingeklemmt wird. Machen Sie niemals einen Knoten in das Netzkabel, und binden Sie es nicht mit anderen Kabeln. Das Netzkabel sollte so gelegt werden, dass niemand darauf tritt. Ein beschädigtes Netzkabel kann einen Brand oder elektrischen Schlag verursachen. Prüfen Sie das Netzkabel von Zeit zu Zeit. Sollte es beschädigt sein, wenden Sie sich an Ihre nächste autorisierte PIONEER-Kundendienststelle oder Ihren Händler, um es zu ersetzen. S002*_A1_De X-HM16_26_26D_De.book 3 ページ 2016年7月22日 金曜日 午前10時35分 Informationen für Anwender zur Sammlung und Entsorgung von Altgeräten und gebrauchten Batterien Symbol für Geräte Diese Symbole auf den Produkten, der Verpackung und/oder Begleitdokumenten bedeuten, dass gebrauchte elektrische und elektronische Produkte und Batterien nicht über den Haushaltsmüll entsorgt werden dürfen. Zur richtigen Handhabung, Rückgewinnung und Wiederverwertung von Altprodukten und gebrauchten Batterien bringen Sie diese bitte zu den gemäß der nationalen Gesetzgebung dafür zuständigen Sammelstellen. Symbolbeispiele für Batterien Mit der korrekten Entsorgung dieser Produkte und Batterien helfen Sie dabei, wertvolle Ressourcen zu schonen und vermeiden mögliche negative Auswirkungen auf die Gesundheit und die Umwelt, die durch eine unsachgemäße Behandlung des Abfalls entstehen könnten. Weitere Informationen zur Sammlung und Wiederverwertung von Altprodukten und Batterien erhalten Sie von Ihrer örtlichen Gemeindeverwaltung, Ihrem Müllentsorger oder dem Verkaufsort, an dem Sie die Waren erworben haben. Diese Symbole gelten ausschließlich in der Europäischen Union. Pb Für Länder außerhalb der Europäischen Union: Wenn Sie diese Gegenstände entsorgen wollen, wenden Sie sich bitte an Ihre lokalen Behörden oder Händler und fragen Sie dort nach der korrekten Entsorungsweise. K058a_A1_De Warnhinweis Funkwellen WARNUNG Diese Einheit nutzt eine 2,4 GHz-Funkwellenfrequenz, ein Band, welches auch von anderen kabellosen Systemen genutzt wird (Mikrowellenherde und Schnurlostelefone usw.). Falls das Fernsehbild durch Rauschen gestört wird, besteht die Möglichkeit, dass dieses Gerät (einschließlich von Produkten, die von diesem Gerät unterstützt werden) Signalinterferenzen mit dem Antenneneingang des Fernsehgerätes, Videogerätes, Satellitentuners usw. verursacht. In diesem Fall vergrößern Sie den Abstand zwischen dem Antenneneingangsanschluss und dieser Einheit (einschließlich von dieser Einheit unterstützte Produkte). • Pioneer übernimmt keine Verantwortung für jegliche Fehlfunktionen am kompatiblen Pioneer-Produkt aufgrund von Fehlern/Fehlfunktionen, die mit der Netzwerkverbindung und/oder Ihren anderen angeschlossenen Geräten zusammenhängen. Bitte wenden Sie sich an Ihren Internetprovider oder den Hersteller des Netzwerkgeräts. • Ein separater Vertrag mit/Bezahlung für einen Internetanbieter ist zur Verwendung des Internets erforderlich. Bewahren Sie Kleinteile stets außerhalb der Reichweite von Kindern und Kleinkindern auf. Falls ein Kleinteil versehentlich verschluckt wurde, suchen Sie bitte unverzüglich ärztliche Behandlung auf. X-HM16_26_26D_De.book 4 ページ 2016年7月22日 金曜日 午前10時35分 Wir danken Ihnen dafür, dass Sie sich für dieses Produkt von Pioneer entschieden haben. Bitte lesen Sie diese Bedienungsanleitung vor der Inbetriebnahme aufmerksam durch, damit Sie Ihr neues Gerät richtig bedienen und stets seine optimale Leistung erzielen können. Bitte bewahren Sie diese Anleitung anschließend für spätere Bezugnahme griffbereit auf. Inhaltsverzeichnis 01 Vor der Inbetriebnahme Lieferumfang . . . . . . . . . . . . . . . . . . . . . . . . . . . . . . . . . . .5 Einlegen der Batterien in die Fernbedienung . . . . . . . . . .5 Verwendung der Fernbedienung . . . . . . . . . . . . . . . . . 5 02 Bezeichnungen und Funktionen der Teile Fernbedienung . . . . . . . . . . . . . . . . . . . . . . . . . . . . . . . . .6 Vorderes Bedienfeld . . . . . . . . . . . . . . . . . . . . . . . . . . . . .7 Display . . . . . . . . . . . . . . . . . . . . . . . . . . . . . . . . . . . . . . . .8 Lautsprecher . . . . . . . . . . . . . . . . . . . . . . . . . . . . . . . . . . .8 03 Anschlüsse Anschluß der Lautsprecher . . . . . . . . . . . . . . . . . . . . . . . .9 Anschluss der Antennen . . . . . . . . . . . . . . . . . . . . . . . . .10 Verwendung externer Antennen . . . . . . . . . . . . . . . . 10 Einstecken des Steckers . . . . . . . . . . . . . . . . . . . . . . . . .11 04 Die ersten Schritte Einschalten der Stromversorgung . . . . . . . . . . . . . . . . . .12 Einstellen der Uhr . . . . . . . . . . . . . . . . . . . . . . . . . . . . . .12 Generelle Bedienung . . . . . . . . . . . . . . . . . . . . . . . . . . . .12 Eingangsfunktion . . . . . . . . . . . . . . . . . . . . . . . . . . . . 12 Display-Helligkeitsregler . . . . . . . . . . . . . . . . . . . . . . 12 Automatische Einstellung der Lautstärke. . . . . . . . . . 12 Lautstärkeregelung . . . . . . . . . . . . . . . . . . . . . . . . . . 12 Muting . . . . . . . . . . . . . . . . . . . . . . . . . . . . . . . . . . . . 12 Lautstärkeregler . . . . . . . . . . . . . . . . . . . . . . . . . . . . . . . .13 Equalizer . . . . . . . . . . . . . . . . . . . . . . . . . . . . . . . . . . 13 P.bass-Regelung . . . . . . . . . . . . . . . . . . . . . . . . . . . . 13 Bass/Hochtöner-Regelung. . . . . . . . . . . . . . . . . . . . . 13 Einstellen des Weck-Timers . . . . . . . . . . . . . . . . . . . . . .13 Anwählen des Weck-Timers . . . . . . . . . . . . . . . . . . . 14 Abbrechen des Weck-Timers. . . . . . . . . . . . . . . . . . . 14 Verwendung der Weck-Zeitschaltuhr. . . . . . . . . . . . . 14 Verwendung des Sleep-Timers . . . . . . . . . . . . . . . . . . . .14 Verwenden von Kopfhörern . . . . . . . . . . . . . . . . . . . . . . .14 05 Disc-Wiedergabe Abspielen von Discs oder Dateien . . . . . . . . . . . . . . . . . .15 Einlegen einer Disc . . . . . . . . . . . . . . . . . . . . . . . . . . 15 Wiedergabe von Tracks auf CD. . . . . . . . . . . . . . . . . 15 Wiedergabe von MP3-Musikdateien . . . . . . . . . . . . . 15 Weitere Wiedergabe von CDs oder MP3-Discs . . . . . . .16 Wiederholte Wiedergabe . . . . . . . . . . . . . . . . . . . . . . 16 Zufallswiedergabe . . . . . . . . . . . . . . . . . . . . . . . . . . . 16 Programmierte Wiedergabe (CD) . . . . . . . . . . . . . . . 17 Herunterladen von MP3 . . . . . . . . . . . . . . . . . . . . . . . 17 Umschalten des Display-Inhalts. . . . . . . . . . . . . . . . . 17 06 USB-Wiedergabe Wiedergeben von USB-Speichern (USB-Geräten) . . . . .18 Wiederholte Wiedergabe . . . . . . . . . . . . . . . . . . . . . . 19 Zufallswiedergabe . . . . . . . . . . . . . . . . . . . . . . . . . . . 19 Umschalten des Display-Inhalts. . . . . . . . . . . . . . . . . 19 4 De 07 Verwendung des Tuners Wiedergabe von FM (Bei Modellen für Europa)/Wiedergabe von FM oder AM (Nur bei Modellen für Nordamerika) . . . . . . . . . . . . . . . . . . . . . . . . . . . . . . . . . 20 Abstimmung . . . . . . . . . . . . . . . . . . . . . . . . . . . . . . . . 20 Speichern voreingestellter Sender . . . . . . . . . . . . . . . 20 Verwenden von RDS (Radio Data System) (nur europäische Modelle) . . . . . . . . . . . . . . . . . . . . . 21 Wiedergabe von DAB+ (alleen X-HM26D) . . . . . . . . . . . 23 Über DAB+ (Digital Audio Broadcasting) . . . . . . . . . . 23 Sendersuche. . . . . . . . . . . . . . . . . . . . . . . . . . . . . . . . 23 Ändern der Informationsanzeige. . . . . . . . . . . . . . . . . 24 Speichern eines Senders . . . . . . . . . . . . . . . . . . . . . . 24 DAB-Frequenztabelle (BAND III) . . . . . . . . . . . . . . . . 24 08 Andere Anschlüsse Anschluss zusätzlicher Komponenten . . . . . . . . . . . . . . 25 Automatisches Wechseln zum Audio In-Eingang (nur bei Modellen für Nordamerika) . . . . . . . . . . . . . . . . 25 09 Bluetooth® Audio-Wiedergabe Musikwiedergabe unter Einsatz von Bluetooth drahtloser Technologie . . . . . . . . . . . . . . . . . . . . . . . . . . . . . . . . . . 26 Betrieb per Fernbedienung . . . . . . . . . . . . . . . . . . . . . . . 26 Pairing (Paarung) mit der Einheit (Erstregistrierung) . . . 26 Musik auf der Einheit von einem Bluetooth fähigen Gerät anhören . . . . . . . . . . . . . . . . . . . . . . . . . . . . . . . . . . . . . 27 BT STANDBY . . . . . . . . . . . . . . . . . . . . . . . . . . . . . . . . . 27 Warnhinweis Funkwellen . . . . . . . . . . . . . . . . . . . . . . . . 28 Einsatzbereich . . . . . . . . . . . . . . . . . . . . . . . . . . . . . . 28 Funkwellenreflektionen . . . . . . . . . . . . . . . . . . . . . . . . 28 Vorsichtshinweise zum Anschließen von Produkten, die von dieser Anlage unterstützt werden. . . . . . . . . . . . . 28 10 Zusätzliche Informationen Fehlersuche . . . . . . . . . . . . . . . . . . . . . . . . . . . . . . . . . . Abspielbare Discs und Formate . . . . . . . . . . . . . . . . . . . Hinweise zu CDs, die mit Kopierschutz versehen sind . . . . . . . . . . . . . . . . . . . . . . . . . . . . . . . . . . . . . . . Unterstützte Audiodateiformate . . . . . . . . . . . . . . . . . Vorsichtsmaßregeln bei der Verwendung . . . . . . . . . . . Transport dieses Gerätes . . . . . . . . . . . . . . . . . . . . . . Installationsort. . . . . . . . . . . . . . . . . . . . . . . . . . . . . . . Stellen Sie keine Gegenstände auf dieses Gerät . . . . Hinweise zu Kondensatbildung. . . . . . . . . . . . . . . . . . Reinigen des Produkts . . . . . . . . . . . . . . . . . . . . . . . . Reinigen der Abtasterlinse . . . . . . . . . . . . . . . . . . . . . Handhabung von Discs . . . . . . . . . . . . . . . . . . . . . . . . . Aufbewahren. . . . . . . . . . . . . . . . . . . . . . . . . . . . . . . . Reinigen der Discs . . . . . . . . . . . . . . . . . . . . . . . . . . . Speziell geformte Discs . . . . . . . . . . . . . . . . . . . . . . . Einstellen der automatischen Stromabschaltung . . . . . . Wiederherstellen aller Standardeinstellungen . . . . . . . . Technische Daten . . . . . . . . . . . . . . . . . . . . . . . . . . . . . . 29 31 32 32 32 32 32 32 32 32 32 33 33 33 33 33 33 34 X-HM16_26_26D_De.book 5 ページ 2016年7月22日 金曜日 午前10時35分 Vor der Inbetriebnahme 01 Vor der Inbetriebnahme Verwendung der Fernbedienung Die Reichweite der Fernbedienung beträgt ca. 7 m innerhalb eines Winkels von ca. 30º vor dem FernbedienungssignalSensor am Gerät. T 2 Schließen Sie den Batteriefachdeckel wieder. 30° Nederlands INPU 30° Deutsch 1 Öffnen Sie den Batteriefachdeckel an der Rückseite, und legen Sie die Batterien wie in der nachstehenden Abbildung gezeigt in das Batteriefach ein. Italiano Einlegen der Batterien in die Fernbedienung WARNUNG • Verwenden oder lagern Sie Batterien nicht bei direkter Sonneneinstrahlung oder in übermäßig warmen Umgebungen wie zum Beispiel in Fahrzeugen oder in der Nähe von Heizungen. Dies kann zu Leckage, Überhitzung, Explosion oder Brand der Batterien führen. Außerdem kann sich die Lebensdauer der Batterien verringern. Español Bitte überzeugen Sie sich, dass sich das folgende Zubehör in der Box befindet, wenn Sie sie öffnen. • Fernbedienung • Batterien (R03, Größe „AAA“) x 2 • Netzkabel • MW-Antennenkabel*1 • UKW-Drahtantenne*2 • DAB/FM-Drahtantenne*3 • Garantiekarte*4 • Bedienungsanleitung (vorliegendes Dokument) *1 Nur bei Modellen für Nordamerika *2 alleen X-HM16/X-HM26 *3 alleen X-HM26D *4 Nur europäische Modelle • Batterien können unterschiedliche Spannungen besitzen, selbst wenn sie die gleiche Größe und Form aufweisen. Verwenden Sie keine Batterien unterschiedlicher Sorten gemeinsam. • Um ein Auslaufen von Batterieelektrolyt zu vermeiden, entfernen Sie die Batterien aus dem Batteriefach, wenn die Fernbedienung längere Zeit (mindestens einen Monat) nicht verwendet werden soll. Falls Batterieelektrolyt ausgelaufen ist, reinigen Sie das Innere des Batteriefachs gründlich, und legen Sie dann neue Batterien ein. Falls ausgelaufener Batterieelektrolyt mit der Haut in Kontakt gekommen ist, spülen Sie die betroffenen Stellen unter laufendem Wasser ab. • Bitte beachten Sie bei der Entsorgung von gebrauchten Batterien die geltenden staatlichen Regelungen oder die in Ihrem Land/Gebiet geltenden Umweltvorschriften der Umweltbehörden. Français Lieferumfang English Kapitel 1: 7m Pyccкий ACHTUNG • Verwenden Sie keine anderen als die vorgeschriebenen Batterien. Verwenden Sie außerdem niemals eine neue Batterie gemeinsam mit einer alten. • Achten Sie beim Einlegen der Batterien sorgfältig darauf, die Federn der negativen (-) Pole nicht zu beschädigen. Dies kann dazu führen, dass Batterien auslaufen oder überhitzt werden. • Legen Sie die Batterien unter Bezugnahme auf die Polaritätsmarkierungen (+ und -) im Inneren des Batteriefachs polaritätsgerecht ein. • Batterien dürfen nicht erhitzt, zerlegt oder in ein Feuer oder in Wasser geworfen werden. Bitte beachten Sie bei der Verwendung der Fernbedienung Folgendes. • Sorgen Sie dafür, dass sich keine Hindernisse zwischen der Fernbedienung und dem Fernbedienungssignal-Sensor am Gerät befinden. • Wenn der Fernbedienungssignal-Sensor am Gerät starker Sonneneinstrahlung oder dem Licht einer Leuchtstofflampe ausgesetzt ist, arbeitet die Fernbedienung möglicherweise nicht zuverlässig. • Die Fernbedienungen verschiedener Geräte können eine gegenseitige Beeinflussung verursachen. Vermeiden Sie den Gebrauch anderer Fernbedienungen in der Nähe dieses Gerätes. • Wechseln Sie die Batterien aus, sobald die Reichweite der Fernbedienung merklich nachgelassen hat. 5 De X-HM16_26_26D_De.book 02 6 ページ 2016年7月22日 金曜日 午前10時35分 Bezeichnungen und Funktionen der Teile Kapitel 2: Bezeichnungen und Funktionen der Teile 4 Fernbedienung / // , ENTER Verwendung zur Auswahl/Umschaltung der Systemeinstellungen und -modi sowie zur Bestätigung von Aktionen. 5 PGM/MEMORY • Gebruik om de CD (Seite 17) op te slaan of te programmeren. • Speichern Sie hiermit FM/AM- (Seite 20) oder DABSender (Seite 24). 1 6 2 10 11 Wiedergabe-Steuertasten Verwendung zur Steuerung jeder Funktion, nachdem Sie sie unter Verwendung der Eingabefunktionstasten gewählt haben (Seite 16). TUNE +/– Gebruiken om radiofrequenties op te zoeken (Seite 20). 3 Zum Wählen voreingestellter Radiosender (Seite 20). 4 5 PRESET +/– 12 7 13 Stellen Sie die Klangqualität ein (Seite 13). 8 SLEEP Siehe Verwendung des Sleep-Timers au Seite 14. 6 14 7 8 9 Tasten zur Einstellung des Klangs 9 TIMER Diese Taste dient zur Einstellung der Uhr sowie zur Einstellung und Überprüfung der beiden Timer (Seite 12). 10 15 16 Op drukken om de instelling voor herhaald afspelen van een CD (Seite 16) of USB (Seite 19) te veranderen. 11 RANDOM Op drukken om de instelling voor het in willekeurige volgorde afspelen van een CD (Seite 16) of USB (Seite 19) te veranderen. 12 DISPLAY Op drukken om de weergave van informatie over MP3 (Seite 17), RDS (Seite 21) of DAB (Seite 24) te veranderen. 1 Í Schaltet den Receiver zwischen Eingeschaltet und Bereitschaftsmodus um (Seite 12). 2 Eingangsfunktion-Tasten Wird zur Wahl der Eingangsquelle für diesen Receiver verwendet (Seite 12). 13 Op drukken om naar de vorige weergave terug te keren. 14 Volume-Einstelltasten Verwenden Sie diese Taste, um die Hörlautstärke einzustellen (Seite 12). 15 Verwendung zur Einstellung der Audio-Datei unter Verwendung des Bluetooth -Network (Seite 26). 3 MENU Zum Zugriff auf das Menü verwenden. 6 De Schaltet den Ton stumm/Stellt den Ton wieder her (Seite 12). 16 DIMMER Dieser Eintrag dient zum Abdunkeln oder Aufhellen der Displayanzeige. Die Helligkeit kann in vier Stufen eingestellt werden (Seite 12). X-HM16_26_26D_De.book 7 ページ 2016年7月22日 金曜日 午前10時35分 Bezeichnungen und Funktionen der Teile 02 1 2 3 4 5 English Vorderes Bedienfeld Français TIMER Español 1 7 8 Í STANDBY/ON Schaltet den Receiver zwischen Eingeschaltet und Bereitschaftsmodus um (Seite 12). 2 Fernbedienungssignal-Sensor 9 10 7 11 Kopfhörer-Anschluss Hier kann ein Kopfhörer angeschlossen werden. Wenn die Kopfhörer angeschlossen sind, kommt aus den Lautsprechern kein Ton. 8 3 Gebruiken om uw USB-massaopslagapparaat als audiobron te verbinden (Seite 18). TIMER-Anzeige Leuchtet, wenn beim Receiver mit Timer- Einstellung der Strom ausgeschaltet ist. 4 Hauptdisplay Siehe Display au Seite 8. Lautstärkeregelung Verwenden Sie diese Taste, um die Hörlautstärke einzustellen (Seite 12). 6 INPUT Wählt die Eingabequelle aus. CD-Schubfach Legen Sie die Disc mit dem Etikett nach oben ein (Seite 15). 10 Wiedergabe-Steuertasten Wählt den gewünschten Track oder die gewünschte Datei, die wiedergegeben werden soll. Verwendung zum Stoppen der Wiedergabe. Stoppt die Wiedergabe oder nimmt sie vom Anhaltepunkt wieder auf. 11 Taste Öffnen/Schließen für das DiscSchubfach Pyccкий Verwendung zum Öffnen oder Schließen des DiscSchubfachs (Seite 15). Nederlands 5 9 USB-Anschluss Deutsch Empfängt die Signale der Fernbedienung. Italiano 6 7 De X-HM16_26_26D_De.book 02 8 ページ 2016年7月22日 金曜日 午前10時35分 Bezeichnungen und Funktionen der Teile Display 1 2 3 1 3 ; Leuchtet bei stummgeschaltetem Ton. Anhalten der Wiedergabe. 4 5 4 Hinweis • Das Stummschaltungs-Icon wird in Rot angezeigt. 2 1 Lautsprecher 3 2 1 Hochtöner 2 Tieftöner 3 Lautsprecher-Anschlüsse Wichtig • Der Lautsprechergrill kann nicht entfernt werden. • Beide Lautsprecher können sowohl auf der rechten Seite als auch auf der linken Seite verwendet werden. 8 De 5 Zeichenanzeige Zeigt verschiedene Systeminformationen an. Hiermit starten Sie die Wiedergabe. 1 Die Timer-Funktion ist eingestellt. X-HM16_26_26D_De.book 9 ページ 2016年7月22日 金曜日 午前10時35分 Anschlüsse 03 Anschlüsse • Öffnen Sie die Klemmen und schieben Sie den hervorstehenden Draht ein. • Schließen Sie das schwarze Kabel an die (s)-Klemme und das rote Kabel an die (r)-Klemme an. Linker Lautsprecher Nederlands Pyccкий ACHTUNG • An den Lautsprecherklemmen dieses Gerätes liegt eine potentiell GEFÄHRLICHE Spannung an. Zur Vermeidung von Stromschlaggefahr ist unbedingt darauf zu achten, den Netzstecker beim Anschließen und Abtrennen der Lautsprecherkabel von der Netzsteckdose zu trennen, bevor irgendwelche nicht isolierten Teile berührt werden. • Wenn der Draht eines Lautsprecherkabels in Kontakt mit einem Metallteil des Receiver- Gehäuses kommt, kann er den betreffenden Lautsprecher beschädigen oder kann die Entstehung von Rauch oder Feuer bewirken. Führen Sie die Lautsprecherkabel sicher in die Anschlüsse ein und überprüfen Sie, dass die betreffenden Kabel nicht leicht herausgezogen werden können. Deutsch Rückwand dieses Gerätes Italiano Rechter Lautsprecher Español Anschluß der Lautsprecher • Schließen Sie keine anderen Lautsprecherboxen als die im Lieferumfang enthaltenen Lautsprecher an diese Anlage an. • Schließen Sie die mitgelieferten Lautsprecher an keinen anderen Verstärker als den Verstärker im Lieferumfang dieser Anlage an. Der Anschluss an einen anderen Verstärker kann zu Fehlfunktionen und Brandausbruch führen. • Bringen Sie diese Lautsprecher nicht an der Wand oder an der Decke an. Anderenfalls besteht die Gefahr, dass er herunterfällt und Verletzungen verursacht. • Diese Lautsprecher sind magnetisch abgeschirmt. Wenn jedoch je nach Aufstellungsort das Lautsprechersystem sehr nahe am Bildschirm eines Fernsehers installiert ist, kann es zu Farbverzerrungen kommen. Schalten Sie, wenn dies geschieht, den Fernseher aus und schalten Sie ihn nach 15 – 30 Minuten wieder ein. Stellen Sie, wenn das Problem weiter besteht, das Lautsprechersystem weiter entfernt vom Fernseher auf. • Achten Sie darauf, dass die Lautsprecher-kabel-Drähte nicht freigelegt werden und dass sie nicht Kontakt mit anderen Kabeldrähten kommen. Dies kann zu einem Defekt des Produkts führen. • Ein blankes Lautsprecherkabel darf auf keinen Fall in Kontakt mit dem Receiver-Gehäuse kommen. Français ACHTUNG • Achten sie darauf, immer dann, wenn Sie Anschlüsse vornehmen oder ändern, vorher den Strom auszuschalten und das Netzkabel aus der Netzsteckdose zu ziehen. • Schließen Sie das Stromkabel erst an, nachdem alle Anschlüsse zwischen den Geräten vorgenommen worden sind. English Kapitel 3: Hinweis • Es gibt keinen Unterschied zwischen dem L- und dem R- Lautsprecher (links und rechts). 9 De X-HM16_26_26D_De.book 03 10 ページ 2016年7月22日 金曜日 午前10時35分 Anschlüsse Anschluss der Antennen • Schließen Sie die MW-Rahmenantenne und die FM (DAB/FM)-Drahtantenne wie unten dargestellt an. • Um den Empfang und die Klangqualität zu verbessern, schließen Sie bitte externe Antennen an (siehe Verwendung externer Antennen unten). Nur bei Modellen für Nordamerika 3 Platzieren Sie die MW-Antenne auf einer ebenen Fläche in der Richtung, die den besten Empfang bietet. • Setzen Sie die Antenne für den besten Empfang in die Nähe eines Fensters usw. • Stellen Sie die Antenne nicht in der Nähe eines Computers oder Fernsehgeräts auf. Daraus können sich Funkstörungen ergeben. 4 Eine UKW-Drahtantenne an die UKWAntennenbuchse anschließen. 2 3 1 Beste Ergebnisse erzielen Sie, wenn Sie die UKW-Antenne zur vollen Länge ausrollen und an einer Wand oder einem Türrahmen befestigen. Lassen Sie die Antenne nicht lose herunterhängen oder in aufgerolltem Zustand. Verwendung externer Antennen Zur Verbesserung des FM (DAB/FM)-Empfangs 2 Benutzen Sie eine PAL-Verbindung (nicht im Lieferumfang), um eine externe UKW-Antenne anzuschließen. 4 X-HM16/ X-HM26 3 1 One-Touch PAL Stecker Bei Modellen für Europa X-HM26D 75 Ω Koaxialkabel X-HM16/X-HM26 4 X-HM26D 1 Schließen Sie die MW-Antennendrähte an. Halten des Steckverbinders für den Anschluss. 2 Verbinden Sie die MW-Rahmenantenne mit dem beiliegenden Ständer. Wie oben abgebildet einrichten. 10 De X-HM16_26_26D_De.book 11 ページ 2016年7月22日 金曜日 午前10時35分 Anschlüsse Schalten Sie, ehe Sie die Anschlüsse vornehmen oder ändern, den Strom aus und ziehen Sie das Netzkabel aus der Netzsteckdose. Nachdem Sie alle übrigen Anschlüsse hergestellt haben, schließen Sie das Gerät an eine Netzsteckdose an. Français Rückwand dieses Gerätes English Einstecken des Steckers 03 Español Netzkabel an Steckdose Italiano ACHTUNG • Verwenden Sie kein anderes als das mit dem Gerät mitgelieferte Netzkabel. • Verwenden Sie das mitgelieferte Netzkabel für keinen anderen Zweck als oben beschrieben. Deutsch Nederlands Pyccкий 11 De X-HM16_26_26D_De.book 04 12 ページ 2016年7月22日 金曜日 午前10時35分 Die ersten Schritte Kapitel 4: Die ersten Schritte Einschalten der Stromversorgung Drücken Sie Í, um den Strom einzuschalten. Generelle Bedienung Nach Gebrauch: Eingangsfunktion Drücken Sie Í, um den Strom-Standby-Modus einzugeben. Wenn INPUT auf der Haupteinheit gedrückt wird, ändert sich die momentane Funktion auf einen anderen Modus. Drücken Sie INPUT wiederholt, um die gewünschte Funktion zu wählen. Einstellen der Uhr CD Audio In *1 *2 DAB*1 Bluetooth USB AM*2 FM alleen X-HM26D Nur bei Modellen für Nordamerika Display-Helligkeitsregler Drücken Sie DIMMER, um die Display-Helligkeit zu dimmen. Die Helligkeit kann in vier Stufen eingestellt werden. 1 Drücken Sie Í, um das Gerät einzuschalten. 2 Drücken Sie TIMER auf der Fernbedienung. „CLOCK“ erscheint im Hauptdisplay. 3 Drücken Sie ENTER. 4 Drücken Sie / , um den Tag einzustellen, und drücken Sie dann ENTER. 5 Drücken Sie / , um die Stunde einzustellen, und drücken Sie dann ENTER. 6 Drücken Sie / , um die Minute einzugeben, und drücken Sie dann ENTER zur Bestätigung. 7 Drücken Sie ENTER. Überprüfen der Zeitanzeige: Drücken Sie TIMER. Die Zeitanzeige erscheint ca. 10 Sekunden lang. Nachstellen der Uhr: Die Schritte im Abschnitt „Einstellen der Uhr“ ab 1 durchführen. Hinweis • Wenn die Stromzufuhr nach dem erneuten Anschließen des Gerätes oder nach einem Stromausfall wieder hergestellt ist, stellen Sie die Uhrzeit erneut ein. 12 De Automatische Einstellung der Lautstärke Wenn Sie die Haupteinheit bei einer eingestellten Lautstärke von 31 oder höher aus- und einschalten, startet die Lautstärke bei 30 und stellt sich auf das zuletzt eingestellte Niveau ein. Lautstärkeregelung Drehen Sie den Lautstärkeregler in Richtung VOLUME (am Hauptgerät) oder drücken Sie die Taste VOL +/– (auf der Fernbedienung), um die Lautstärke zu erhöhen zu vermindern. ACHTUNG • Bei einer gegebenen Lautstärkeeinstellung hängt der Schallpegel von der Effizienz und der Anordnung der Lautsprecher sowie von weiteren Faktoren ab. Es wird empfohlen, sich nicht hohen Schallpegeln auszusetzen. Schalten Sie das Gerät nicht bei voller Lautstärke ein. Hören Sie Musik bei angemessener Lautstärke. Überhöhter Schalldruck von den Kopfhörern kann zu einem Hörverlust führen. Muting Der Ton wird vorübergehend stummgeschaltet, wenn auf der Fernbedienung gedrückt wird. Drücken Sie nochmals die Taste, um die Lautstärke wieder herzustellen. X-HM16_26_26D_De.book 13 ページ 2016年7月22日 金曜日 午前10時35分 Die ersten Schritte 04 Einstellen des Weck-Timers Equalizer Zur Änderung der momentanen Timer-Einstellung oder für eine neue Timer-Einstellung verwendet. FLAT Ein kontrastgedämpfter, einfacher Klang ACTIVE Ein kraftvoller Klang, bei dem die hohen und die tiefen Töne hervorgehoben werden 1 Drücken Sie Í, um das Gerät einzuschalten. 2 Drücken und halten Sie TIMER auf der Fernbedienung gedrückt. 3 Drücken Sie / , um „ONCE“ oder „DAILY“ zu wählen, und drücken Sie dann ENTER. NIGHT Ein Klang, an dem Sie sich spätabends oder nachts auch bei geringerer Lautstärke erfreuen können Wenn der Strom erstmals eingeschaltet wird, gelangt die Einheit in den P.Bass- Modus, in dem die Bassfrequenzen betont werden. Drücken Sie, um den P.bass-Modus abzubrechen, P.BASS auf der Fernbedienung. Druk op SOUND om “BASS” of “TREBLE” te selecteren en druk vervolgens op / om de lage of hoge tonen af te stellen. Hinweis 1 Wenn die Einstellung P.BASS (ON/OFF) verändert wird. • EQ : FLAT 2 7 Drücken Sie / , um die Stunde einzustellen, und drücken Sie dann ENTER. 8 Drücken Sie / , um die Minute einzustellen, und drücken Sie dann ENTER. Nach den Schritten 7 und 8 die Endzeit einstellen. 9 Stellen Sie die Lautstärke ein, drücken Sie VOL +/– und drücken Sie dann ENTER. “ ” verschijnt op het display. 10 Drücken Sie Í, um den Strom-StandbyModus einzugeben. Die TIMER-Anzeige leuchtet auf. Pyccкий Wenn eine der oben genannten zwei Funktionen gewählt wird, wird die nicht gewählte Funktion wie folgt angezeigt. 6 Drücken Sie / , um den Timer-Tag zu wählen, und drücken Sie dann ENTER. Nederlands • Der EQ und P.BASS können nicht gleichzeitig betrieben werden. Die zuletzt gewählte von diesen zwei Funktionen ist diejenige, die verwendet wird. • SOUND (Höhen) kann neben entweder EQ oder P.BASS betrieben werden. CD, DAB (alleen X-HM26D), FM, AM (Nur bei Modellen für Nordamerika) en USB kunnen als afspeelbron geselecteerd worden. Deutsch Bass/Hochtöner-Regelung 5 Drücken Sie / , um die Quelle der TimerWiedergabe zu wählen, und drücken Sie dann ENTER. Italiano P.bass-Regelung 4 Drücken Sie / , um „TIMER SET“ zu wählen, und drücken Sie dann ENTER. Español ONCE – Die Once-Timer-Wiedergabe funktioniert nur einmal zu der voreingestellten Zeit. DAILY – Die tägliche Timer-Wiedergabe erfolgt zur gleichen voreingestellten Zeit an den Tagen der Woche. DIALOGUE Ein Klang, der erlaubt, dass Radio oder Gesang leichter zu hören sind Français Wenn der EQ gedrückt wird, wird die momentane ModusEinstellung angezeigt. Drücken Sie zur Änderung auf einen anderen Modus den EQ wiederholt, bis der gewünschte Klang-Modus erscheint. English Lautstärkeregler Wenn die Einstellung EQ verändert wird. • P.BASS : OFF 13 De X-HM16_26_26D_De.book 04 14 ページ 2016年7月22日 金曜日 午前10時35分 Die ersten Schritte Anwählen des Weck-Timers Kann für die Wiederverwendung einer existierenden TimerEinstellung verwendet werden. 1 Wie die Schritte 1 – 3 in „Einstellen des Weck-Timers“. 2 Drücken Sie / , um „TIMER ON“ zu wählen und drücken Sie dann ENTER. Abbrechen des Weck-Timers Hinweis • Die Einschlaf-Zeitschaltuhr kann erneut eingestellt werden, indem Sie SLEEP drücken, während die Restzeit angezeigt wird. Verwenden von Kopfhörern Verbinden mit dem Klinkenstecker der Kopfhörer. Wenn die Kopfhörer angeschlossen sind, kommt aus den Lautsprechern kein Ton. Kann für das Ausschalten der Timer-Einstellung verwendet werden. 1 Wie die Schritte 1 – 3 in „Einstellen des Weck-Timers“. TIMER 2 Drücken Sie / , um „TIMER OFF“ zu wählen und drücken Sie dann ENTER. Verwendung der Weck-Zeitschaltuhr 1 Drücken Sie Í, um das Gerät auszuschalten. 2 Zur voreingestellten Weckzeit schaltet sich das Gerät automatisch ein, und die Wiedergabe beginnt mit der gewählten Eingangsfunktion. Hinweis • Als het USB-opslagapparaat op de wektijd niet verbonden is met dit toestel of als geen disc geplaatst is, zal dit toestel niet ingeschakeld worden en het nummer niet afspelen. • Bestimmte Discs werden bei Erreichen der Weckzeit möglicherweise nicht automatisch abgespielt. • Lassen Sie bei der Einstellung des Timers mindestens eine Minute zwischen der Start- und der Endzeit. Verwendung des Sleep-Timers Die Einschlaf-Zeitschaltuhr schaltet das Gerät nach Verstreichen der voreingestellten Zeitdauer aus, so dass Sie sorglos einschlafen können. 1 Betätigen Sie SLEEP zur Wahl der Zeitdauer, nach deren Verstreichen sich das Gerät ausschalten soll. Die folgenden Einstellungen stehen zur Auswahl: 10 min, 20 min, 30 min, 60 min, 90 min, 120 min, 150 min, 180 min und OFF (Aus). Der neue Wert wird 3 Sekunden lang angezeigt, wonach die Einstellung abgeschlossen ist. 14 De • Schalten Sie das Gerät nicht bei hoher Lautstärkeeinstellung ein und hören Sie der Musik in angemessener Lautstärke zu. Überhöhter Schalldruck von den Kopfhörern kann zu einem Hörverlust führen. • Vermindern Sie vor dem Anschließen oder Trennen des Kopfhörers die Lautstärke. • Verwenden Sie einen Kopfhörer mit einem 3,5 mm Stecker und 16 Ω bis 50 Ω Impedanz. Die empfohlene Impedanz ist 32 Ω. X-HM16_26_26D_De.book 15 ページ 2016年7月22日 金曜日 午前10時35分 Disc-Wiedergabe 05 Disc-Wiedergabe Wiedergabe von MP3-Musikdateien MP3-Trackdaten werden in diesem Dokument als Musikdateien, ihr Speicherort als Ordner bezeichnet. Beispiel: Einlegen einer Disc 1 Drücken Sie Í, um das Gerät einzuschalten. 3 Druk op < op het hoofdtoestel om de disclade te openen. 1 Wenn die Erkennung abgeschossen ist, drücken Sie 1; . Ist der letzte Track abgespielt, stoppt das Gerät automatisch. ACHTUNG • Legen Sie nicht zwei Discs in eine Disc-Schublade. • Spielen Sie keine Discs mit speziellen Formen (Herz oder Achteck) ab. Dies kann zu Defekten führen. • Die Disc-Schublade nicht berühren, wenn sich diese bewegt. • Wenn bei offener Schublade ein Stromausfall eintritt, warten Sie, bis die Stromversorgung wieder hergestellt wird. • 8 cm-Discs unbedingt in die Mitte der Disc-Schublade legen. Hinweis • Aufgrund der Struktur seiner Disc-Information braucht es länger zum Lesen einer MP3-Disc als bei einer normalen CD (ungefähr 20 bis 90 Sekunden). • Wenn während des schnellen Rücklaufs der Beginn des ersten Tracks erreicht ist, gelangt die Einheit in den Wiedergabe- Modus (gilt nur für CD). • Wenn Radio- oder Fernsehempfang durch den CDBetrieb gestört wird, das Gerät weiter entfernt vom Radio oder Fernseher aufstellen. Pyccкий Wiedergabe von Tracks auf CD • Wenn die Wiedergabe beginnt, können nur Musikdateien im gleichen Ordner kontinuierlich wiedergegeben werden. Nederlands 5 Druk op < op het hoofdtoestel om de disclade te sluiten. 2 Drücken Sie / , um die Musikdatei auszuwählen ([ ]), und dann 1; oder ENTER. Deutsch 4 Legen Sie die Disc mit dem Etikett nach oben in das Disc-Fach ein. • Wiederholen Sie diesen Schritt, wenn sich im ausgewählten Ordner weitere Ordner befinden. , um zum vorigen Ordner • Drücken Sie oder zurückzukehren. Italiano 2 Drücken Sie CD auf der Fernbedienung oder wiederholt INPUT auf der Haupteinheit, um die CD-Eingabe zu wählen. 1 Wenn die Erkennung abgeschossen ist, drücken Sie / , um den Ordner mit den Musikdateien auszuwählen ([ ]), und dann oder ENTER. Español Abspielen von Discs oder Dateien Français Dit systeem kan een standaard CD, CD-R/RW in het CDformaat en CD-R/RW met MP3-bestanden afspelen, maar kan er niet op opnemen. Sommige audio CD-R- en CD-RWschijven zouden niet afspeelbaar kunnen zijn wegens de staat van de schijf of het apparaat dat gebruikt werd voor opname. • Details zu MP3 finden Sie auf Seite 31. English Kapitel 5: Tipp • Wenn mehr als 20 Minuten lang keine Operation im CDModus erfolgte und die Audio-Datei in diesem Zeitraum nicht abgespielt wurde, wird der Strom automatisch abgeschaltet. In diesem Fall ist es erforderlich, dass automatische Stromabschaltung auf ON umgeschaltet wird. 15 De X-HM16_26_26D_De.book 05 16 ページ 2016年7月22日 金曜日 午前10時35分 Disc-Wiedergabe • Die automatische Stromabschaltung kann ein- oder ausgeschaltet werden (ON/OFF) (Seite 33). Grundlegende Funktionen Funktion Hauptgerät Fernbedienung Betrieb Wiedergabe In der Stopp-Betriebsart drücken. Stopp Drücken Sie im Wiedergabemodus. (Bei Wiedergabe einer CD) "RESUME" wird angezeigt und die aktuelle Wiedergabeposition gespeichert. Drücken Sie noch einmal, und die gespeicherte Position wird gelöscht. Pause Nächste/ vorige Nummer Schneller Vorlauf/ Rücklauf Drücken Sie im Wiedergabemodus. Drücken Sie 1;, um die Wiedergabe vom Anhaltepunkt an wieder aufzunehmen. In der Wiedergabe- oder Stopp-Betriebsart drücken. Wenn Sie die Taste im Stopp-Modus drücken, dann drücken Sie 1;, um den gewünschten Track zu starten. (Bei Wiedergabe von MP3) Sie nur können innerhalb des Ordners zwischen den Musikdateien vor- und zurückspringen. In der WiedergabeBetriebsart gedrückt halten. Lösen Sie die Taste, um die Wiedergabe fortzusetzen. Weitere Wiedergabe von CDs oder MP3-Discs 16 De Wiederholte Wiedergabe Bei der wiederholten Wiedergabe können ein Titel, alle Titel oder eine programmierte Reihenfolge fortlaufend abgespielt werden. Wiederholen eines Titels: Drücken Sie wiederholt Drücken Sie ENTER. , bis „REPEAT ONE“ erscheint. Wiederholen aller Titel: Drücken Sie wiederholt Drücken Sie ENTER. , bis „REPEAT ALL“ erscheint. Wiederholen von gewünschten Titeln: Führen Sie die Schritte 1–5 unter "Programmierte Wiedergabe (CD)" (Seite 17) aus und drücken Sie dann mehrfach Sie ENTER. , bis "REPEAT ALL" angezeigt wird. Drücken Beenden der wiederholten Wiedergabe: Drücken Sie wiederholt Drücken Sie ENTER. , bis „REPEAT OFF“ erscheint. Hinweis • Achten Sie darauf, nach der Ausführung der Wiederholungs-Wiedergabe ∫ zu drücken. Sonst wird die Disc fortlaufend wiedergegeben. • Während der Wiederholungs-Wiedergabe ist die Wiedergabe in zufälliger Reihenfolge nicht möglich. Zufallswiedergabe Die Tracks einer Disc können automatisch in der Zufallswiedergabe abgespielt werden. Zufallswiedergabe aller Titel: Drücken Sie wiederholt RANDOM, bis „RANDOM ON“ erscheint. Drücken Sie ENTER. Beenden der Zufallswiedergabe: Drücken Sie wiederholt RANDOM, bis „RANDOM OFF“ erscheint. Drücken Sie ENTER. Hinweis • Wenn Sie während der Wiedergabe in zufälliger Reihenfolge 9 drücken, können Sie sich zu dem Track bewegen, der bei der Wiedergabe in zufälliger Reihenfolge als nächster gewählt wird. • Bei der Zufallswiedergabe wählt und spielt das Gerät automatisch Titel. (Sie können die Reihenfolge der Tracks nicht wählen.) • Während der Wiedergabe in zufälliger Reihenfolge ist die Wiederholungswiedergabe nicht möglich. X-HM16_26_26D_De.book 17 ページ 2016年7月22日 金曜日 午前10時35分 Disc-Wiedergabe 05 Im Internet gibt es zahlreiche Musik-Seiten, von denen man Musik-Dateien MP3 herunterladen kann. Befolgen Sie die Anweisungen auf der Website für das Herunterladen dieser Musikdateien. Sie können diese heruntergeladenen Musikdateien durch Brennen einer CD-R/RW Disc abspielen. • Die heruntergeladenen Songs/Dateien sind nur für den persönlichen Gebrauch bestimmt. Jedwede andere Nutzung der Songs ohne Zustimmung des Eigentümers ist rechtswidrig. 1 Drücken Sie im Stopp-Modus auf der Fernbedienung PGM/MEMORY, um den Programmierspeichermodus einzugeben. 2 Druk op : 9 om de gewenste nummers te selecteren. 3 Drücken Sie ENTER, um das Verzeichnis und die Tracknummer zu speichern. • Wenn Sie die programmierten Tracks überprüfen wollen, dann drücken Sie PGM/MEMORY. • Wenn Sie einen Fehler begehen, werden die letzten programmierten Tracks durch Drücken von gelöscht. Hinzufügen von Tracks zum Programm: Drücken Sie PGM/MEMORY. Dann folgen die Schritte 2 – 3, um Tracks hinzuzufügen. Hinweis Weergave artiest Anzeige von Tracknummer im Ordner und Weergave album Hinweis • Een "Niet ondersteund afspeelbestand" kan niet afgespeeld worden. In dit geval zal het automatisch overgeslagen worden. • Es gibt Fälle, in denen keine Informationen angezeigt werden können. • Anzeige von Titel, Interpret und Album wird nur mit ID3Version 1 (1.0 oder 1.1) unterstützt. Nederlands Pyccкий • Wenn eine Disc ausgeworfen wird, wird das Programm automatisch abgebrochen. • Wenn Sie Í drücken, um den Standby-Modus einzugeben oder die Funktion von CD auf eine andere Funktion zu ändern, werden die programmierten Auswahlen gelöscht. • Während der programmierten Operation ist die Wiedergabe in zufälliger Reihenfolge nicht möglich. Anzeige von Tracknummer im Ordner und verbleibender Dauer Deutsch Drücken Sie, um die programmierte Wiedergabe abzubrechen, zweimal ∫ auf der Fernbedienung. Auf der Anzeige erscheint „PRG CLEAR“ und alle programmierten Inhalte werden gelöscht. Druk tijdens het afspelen op DISPLAY. Wenn der Titel, der Name des Interpreten und der Name des Albums auf der Datei aufgezeichnet sind, werden diese Informationen angezeigt. (Was Sie auf dieser Einheit sehen können, sind nur alphanumerische Zeilen. Nichtalphanumerische Zeichen werden werden in “∫” angezeigt.) Weergave titel Nummer des Tracks, Titelanzeige Italiano 5 Drücken Sie 1;, um die Wiedergabe zu starten. Abbrechen der programmierten Wiedergabe: 1 Español 4 Wiederholen Sie die Schritte 2 und 3 bei den anderen Tracks. Es können bis zu 24 Tracks programmiert werden. Umschalten des Display-Inhalts Français Herunterladen von MP3 Zur Wiedergabe können Sie bis zu 24 Titel in der gewünschten Reihenfolge wählen. English Programmierte Wiedergabe (CD) 17 De X-HM16_26_26D_De.book 06 18 ページ 2016年7月22日 金曜日 午前10時35分 USB-Wiedergabe Kapitel 6: USB-Wiedergabe Wiedergeben von USB-Speichern (USB-Geräten) Mit der USB-Schnittstelle an der Vorderseite des Receivers ist eine Zwei-Kanal-Wiedergabe von MP3-Dateien möglich. • Pioneer garantiert nicht, dass jede Datei, die auf einem USB-Speicher gespeichert ist, wiedergegeben wird oder dass Strom an einen USB-Speicher geliefert wird. Bitte beachten Sie außerdem, dass Pioneer keinerlei Haftung für Verluste von Dateien auf USBSpeichergeräten übernimmt, die auf den Anschluss an dieses Gerät zurückzuführen sind. • Details zu MP3 finden Sie auf Seite 31. 1 Drücken Sie USB als die Eingabequelle. Auf dem Hauptdisplay erscheint „USB“. 2 Schließen Sie den USB-Speicher an. • Dieser Receiver unterstützt nicht einen USB-Hub. TIMER USB-Speicher (handelsüblich) 3 Wenn die Erkennung abgeschossen ist, drücken Sie / , um den Ordner mit den Musikdateien auszuwählen ([ ]), und dann oder ENTER. • MP3-Trackdaten werden in diesem Dokument als Musikdateien, ihr Speicherort als Ordner bezeichnet. • Wiederholen Sie diesen Schritt, wenn sich im ausgewählten Ordner weitere Ordner befinden. • Drücken Sie oder , um zum vorigen Ordner zurückzukehren. 4 Drücken Sie / , um die Musikdatei auszuwählen ([ ]), und dann 1; oder ENTER. • Wenn die Wiedergabe beginnt, können nur Musikdateien im gleichen Ordner kontinuierlich wiedergegeben werden. • Details zur Grundbedienung finden Sie auf Seite 16. • Wenn Sie zu einer anderen Eingangsquelle wechseln wollen, dann beenden Sie vor dem Wechsel zuerst die USB-Speicher-Wiedergabe. 18 De • Schalten Sie den Strom aus, ehe Sie den USBSpeicher entfernen. Hinweis • Unter bestimmten Bedingungen kann es vorkommen, dass dieses Gerät ein USB-Speichergerät nicht erkennt, Dateien nicht abspielt oder das USBSpeichergerät nicht mit Strom versorgt. Einzelheiten finden Sie im Abschnitt Wenn ein USB-Speichergerät angeschlossen ist auf Seite 30. • Wenn momentan keine Wiedergabe vom USBSpeichergerät stattfindet und 20 Minuten lang kein Bedienungsvorgang an diesem Gerät ausgeführt wurde, schaltet es sich automatisch aus. In diesem Fall ist es erforderlich, dass automatische Stromabschaltung auf ON umgeschaltet wird (Seite 33). X-HM16_26_26D_De.book 19 ページ 2016年7月22日 金曜日 午前10時35分 USB-Wiedergabe Bei der wiederholten Wiedergabe können ein Titel, alle Titel oder eine programmierte Reihenfolge fortlaufend abgespielt werden. Wiederholen eines Titels: Drücken Sie wiederholt Drücken Sie ENTER. , bis „REPEAT ONE“ erscheint. , bis „REPEAT ALL“ erscheint. Beenden der wiederholten Wiedergabe: Drücken Sie wiederholt Drücken Sie ENTER. , bis „REPEAT OFF“ erscheint. Die Dateien des USB-Speichers können in zufälliger Reihenfolge oder automatisch wiedergegeben werden. Zufallswiedergabe aller Titel: Beenden der Zufallswiedergabe: Drücken Sie wiederholt RANDOM, bis „RANDOM OFF“ erscheint. Drücken Sie ENTER. Die Einheit kann die auf dem USB-Speicher aufgezeichneten Informationen anzeigen. Einzelheiten finden Sie im Abschnitt Umschalten des Display-Inhalts auf Seite 17. Pyccкий Umschalten des Display-Inhalts Nederlands Hinweis • Wenn Sie während der Wiedergabe in zufälliger Reihenfolge 9 drücken, können Sie sich zu dem Track bewegen, der bei der Wiedergabe in zufälliger Reihenfolge als nächster gewählt wird. • Bei der Zufallswiedergabe wählt und spielt das Gerät automatisch Titel. (Sie können die Reihenfolge der Tracks nicht wählen.) • Während der Wiedergabe in zufälliger Reihenfolge ist die Wiederholungswiedergabe nicht möglich. Deutsch Drücken Sie wiederholt RANDOM, bis „RANDOM ON“ erscheint. Drücken Sie ENTER. Italiano Zufallswiedergabe Español Hinweis • Achten Sie darauf, nach der Ausführung der Wiederholungs-Wiedergabe ∫ zu drücken. Andernfalls werden die Dateien des USB-Speichers kontinuierlich abgespielt. • Während der Wiederholungs-Wiedergabe ist die Wiedergabe in zufälliger Reihenfolge nicht möglich. Français Wiederholen aller Titel: Drücken Sie wiederholt Drücken Sie ENTER. English Wiederholte Wiedergabe 06 19 De X-HM16_26_26D_De.book 07 20 ページ 2016年7月22日 金曜日 午前10時35分 Verwendung des Tuners Kapitel 7: Verwendung des Tuners Wiedergabe von FM (Bei Modellen für Europa)/Wiedergabe von FM oder AM (Nur bei Modellen für Nordamerika) Die folgenden Schritte beschreiben die Einstellung von UKW- und MW-Radiosendungen mittels der automatischen (Suchlauf) und der manuellen (Rasterschritt) Einstellfunktionen. Sobald Sie einen Sender eingestellt haben, können Sie die Frequenz speichern, um sie später wieder aufrufen zu können. Zur Verfahrensweise siehe unter Speichern voreingestellter Sender unten. Hinweis • Wenn eine Radio-Interferenz auftritt, kann es sein, dass die automatische Senderwahl an diesem Punkt automatisch gestoppt wird. • Die automatische Senderwahl überspringt Sender mit schwachem Signal. • Wenn Sie die automatische Senderwahl stoppen wollen, dann drücken Sie ∫. • Wenn ein RDS-Sender (Radio Data System) eingestellt wird, wird zuerst die Frequenz angezeigt. Danach erscheint der Sendername. • Mit dem Modus Auto Station Program Memory (ASPM) kann eine vollautomatische Einstellung von RDSSendern realisiert werden (siehe Seite 22). Empfangen einer UKW-Stereosendung: 1 Druk op TUNER tot “FM” op het display verschijnt. 2 Druk op MENU en druk vervolgens op / tot “FM STEREO/MONO” op het display verschijnt. 3 Druk op ENTER en druk vervolgens op / tot “AUTO” op het display verschijnt. Verbeteren van slechte FM-ontvangst: Abstimmung 1 Drücken Sie Í, um den Strom einzuschalten. 2 Drücken Sie wiederholt TUNER, um das gewünschte Frequenzband (FM oder AM) zu wählen. • (X-HM26D) Sie können "FM" und "DAB" auswählen. Details zu "DAB" finden Sie auf Seite 23. 3 Drücken Sie TUNE +/– auf der Fernbedienung, um den gewünschten Sender einzustellen. Automatische Sendereinstellung: Drücken Sie TUNE +/– und halten Sie die Taste gedrückt. Daraufhin beginnt automatisch das Scannen, und der Tuner stoppt am ersten Sender, der empfangen werden kann. Manuelle Abstimmung: Drücken Sie TUNE +/– wiederholt, um den gewünschten Sender einzustellen. 20 De Druk na het uitvoeren van bovenstaande stappen 1 - 2 op ENTER en druk vervolgens op / tot “MONO” op het display verschijnt. Dies ändert den Tuner von Stereo auf Mono, wodurch sich normalerweise der Empfang verbessert. Speichern voreingestellter Sender Wenn Sie oft einen bestimmten Radiosender hören, ist es praktisch, die Frequenz zu speichern, um den Sender später immer dann einfach aufrufen zu können, wenn Sie ihn hören möchten (Voreingestellte Senderwahl). Er muss dann nicht immer wieder manuell eingestellt werden. Dieses Gerät kann bis zu 45 Sender speichern. (UKW 30 Sender / MW 15 Sender) X-HM16_26_26D_De.book 21 ページ 2016年7月22日 金曜日 午前10時35分 Verwendung des Tuners Hinsichtlich weiterer Einzelheiten siehe den Abschnitt Abstimmung oben. 2 Betätigen Sie PGM/MEMORY. Die voreingestellte Zahl blinkt. Hinweis • Die Backup-Funktion schützt die gespeicherten Sender für den Fall eines Stromausfalls oder einer Entfernung des Stromkabels einige Stunden. Drücken Sie PRESET +/–, um den gewünschten Sender zu wählen. Festsender-Suchlauf 1 Drücken Sie TUNER auf der Fernbedienung. 2 Drücken Sie , bis „MEMORY CLEAR“ erscheint. Hinweis • Alle Sender werden gelöscht. Radio text (RT) • Wenn Sie einen anderen Sender als einen RDSSender oder einen RDS-Sender, dessen Signal schwach ist, einstellen, ändert sich das Display in folgender Reihenfolge: NO RDS FM 98.80 MHz Sendersuche nach Programmtyp 1 Druk op TUNER tot “FM” op het display verschijnt. 2 Druk op MENU en druk vervolgens op / tot “FM RDS” op het display verschijnt. 3 Druk op ENTER en druk vervolgens op / tot “PTY” op het display verschijnt. 4 Druk op ENTER. “SELECT” zal gedurende ongeveer 5 seconden verschijnen. 5 Drücken Sie / zur Auswahl des gewünschten Programmtyps. Bei jedem Drücken der Taste erscheint der Programmtyp. Wenn die Taste gedrückt gehalten wird, wird der Programmtyp kontinuierlich angezeigt. 6 Terwijl het geselecteerde type programma weergegeven wordt drukt u (binnen 5 seconden) op ENTER. Nachdem der gewählte Programmtyp etwa 2 Sekunden lang geleuchtet hat, erscheint „SEARCH“, woraufhin die Suchoperation beginnt. Pyccкий Löschen aller gespeicherten Sender Frequency Programme type (PTY) Nederlands Die abgespeicherten Sender können automatisch abgetastet werden. (Festsenderspeicher-Suchlauf) 1 Drücken Sie PRESET +/– und halten Sie die Taste gedrückt. Die voreingestellte Zahl erscheint, und die programmierten Sender werden nacheinander gewählt, jeder 5 Sekunden lang. 2 Drücken Sie PRESET +/– erneut, wenn der gewünschte Sender lokalisiert worden ist. Station name (PS) Deutsch Abrufen eines gespeicherten Senders 1 Drücken Sie TUNER, bis "FM" auf dem Display angezeigt wird. 2 Drücken Sie mehrfach DISPLAY. Bei jedem Drücken von DISPLAY wird das Display wie folgt umgeschaltet: Italiano Wenn die voreingestellte Zahl nicht mehr blinkt, sondern leuchtet, ehe der Sender gespeichert wird, dann wiederholen Sie die Operation von Schritt 2 an. • Die Schritte 1 - 4 wiederholen, um andere Sender zu speichern oder einen Festsender zu ändern. Wenn ein neuer Sender gespeichert wird, wird der Sender gelöscht, der vorher für diesen voreingestellten Kanal gespeichert wurde. RDS-INFORMATIONEN Español 4 Drücken Sie PGM/MEMORY, um den betreffenden Sender im Speicher zu speichern. Radio Data System (RDS) ist ein System, das von den meisten UKW-Sendern genutzt wird, um Zuhörern die verschiedensten Informationen – beispielsweise den Sendernamen und die Art der Sendung - zu liefern. Eine Funktion des RDS-Systems ist, dass Sie nach Art des Programms suchen können. Zum Beispiel können Sie nach einem Sender suchen, der gerade eine Sendung der Programmart Jazz Music. ausstrahlt. Français 3 Drücken Sie PRESET +/–, um die voreingestellte Nummer des Kanals zu wählen. Verwenden von RDS (Radio Data System) (nur europäische Modelle) English 1 Stellen Sie den Sender ein, den Sie speichern möchten. 07 21 De X-HM16_26_26D_De.book 07 22 ページ 2016年7月22日 金曜日 午前10時35分 Verwendung des Tuners Die Programmtypen werden wie folgt angezeigt: News – Nachrichten Current Affairs – Aktuelle Themen Information – Allgemeine Informationen Sport – Sport Education – Bildungssendungen Drama – Hörspiele usw. Cultures – Nationale oder regionale Kultur, Theater usw. Science – Wissenschaft und Technologie Varied Speech – Für gewöhnlich Gesprächssendungen wie beispielsweise Quizshows oder Interviews. Pop Music – Pop-Musik Rock Music – Rock-Musik Easy Listening – Leichte Unterhaltungsmusik Light Classics M – „Leichte“ klassische Musik Serious Classics – „Ernste“ klassische Musik Other Music – Musik, die in keine der oben aufgeführten Kategorien passt Weather & Metr – Wetterberichte Finance – Börsenberichte, Kommerz, Handel usw. Children’s Progs – Kindersendungen Social Affairs – Soziale Themen Religion – Programme über Religion Phone In – HörerAnrufsendungen zur Äußerung der eigenen Meinung Travel & Touring – Ferienspezifische Reisemeldungen, weniger Verkehrsmeldungen Leisure & Hobby – Freizeit und Hobby Jazz Music – Jazz Country Music – CountryMusik National Music – Pop-Musik in einer anderen Sprache als Englisch Oldies Music – Pop-Musik aus den 50ern und 60ern Folk Music – Folk-Musik Documentary – Dokumentationen Alarm Test – Rundfunksendung beim Testen von GefahrenmeldungsEinrichtungen oder -Receivern Alarm - Alarm! – Information über Naturkatastrophen. • Hat das Display zu blinken aufgehört, wiederholen Sie das Verfahren ab Schritt 2. Wenn die Einheit den gewünschten Programmtyp findet, leuchtet die zugehörige Kanalnummer etwa 8 Sekunden lang, und der Name des Senders verbleibt. • Als u naar hetzelfde type programma van een andere zender wilt luisteren, herhaal dan stappen 2 - 6. Het toestel zal de volgende zender opzoeken. • Wenn kein Sender gefunden werden kann, erscheint „NOT FOUND“ 4 Sekunden lang. Verwendung des Auto Station Program Memory (ASPM) (automatischer Senderprogramm-Speicher) In der ASPM-Betriebsart sucht der Tuner automatisch nach neuen RDS-Sendern. Bis zu 30 Sender können gespeichert werden. Wenn einige Sender bereits abgespeichert sind, verringert sich die Zahl der speicherbaren neuen Sender entsprechend. 1 Druk op TUNER tot “FM” op het display verschijnt. 2 Druk op MENU en druk vervolgens op / tot “FM RDS” op het display verschijnt. 3 Druk op ENTER en druk vervolgens op / tot “ASPM” op het display verschijnt. 4 Druk op ENTER. „ASPM“ blinkt etwa 4 Sekunden lang, dann beginnt der Suchlauf (87,5 - 108 MHz). 22 De Nach Abschluß des Suchlaufs wird die Zahl der abgespeicherten Sender 4 Sekunden lang angezeigt und dann erscheint „END“ 4 Sekunden lang. • So stoppen Sie ASPM, bevor der Vorgang abgeschlossen ist: Drücken Sie ∫, während nach Sendern gesucht wird. Die bereits gespeicherten Sender werden beibehalten. • Wenn derselbe Sender auf verschiedenen Frequenzen sendet, wird die stärkste Frequenz abgespeichert. • Jeder Sender, der die gleiche Frequenz hat wie ein bereits gespeicherter, wird nicht noch einmal gespeichert. • Sind bereits 30 Sender abgespeichert, wird der Suchlauf abgebrochen. Wenn Sie die ASPM-Operation noch einmal durchführen möchten, müssen Sie den Festsenderspeicher löschen. • Wenn keine Sender abgespeichert worden sind, erscheint „NOT FOUND“ etwa 5 Sekunden lang. • Bei sehr schwachen RDS-Signalen können keine Sendernamen abgespeichert werden. • Derselbe Sendername kann in verschiedenen Kanälen gespeichert werden. • In einem gewissen Gebiet oder in gewissen Zeiträumen können die Sendernamen vorübergehend verschieden sein. Hinweis • Wenn eines der folgenden Ereignisse eintritt, bedeutet dies nicht, daß das Gerät defekt ist: - „PS“, „NO PS“ und der Sendername erscheinen abwechselnd und vollständig. - Wenn ein spezifischer Sender nicht richtig sendet oder ein Sender Prüfungen durchführt, kann die RDSEmpfangsfunktion nicht richtig arbeiten. - Wenn ein RDS-Sender, dessen Signal zu schwach ist, empfangen wird, können Informationen wie z.B. der Sendername nicht angezeigt werden. - „NO PS“, „NO PYT“ oder „NO RT“ blinkt etwa 5 Sekunden lang, und dann wird die Frequenz angezeigt. • Hinweise zum Radiotext: - Die ersten 8 Zeichen des Radiotextes erscheinen und werden dann über das Display gerollt. - Wenn Sie einen RDS-Sender einstellen, der keinen Radiotext sendet, wird beim Schalten in die Radiotext-Position „NO RT“ angezeigt. - Während des Empfangs der Radiotext-Daten oder beim Ändern des Textinhalts wird „RT“ angezeigt. X-HM16_26_26D_De.book 23 ページ 2016年7月22日 金曜日 午前10時35分 Verwendung des Tuners Über DAB+ (Digital Audio Broadcasting) MULTIPLEX (ENSEMBLE) Sendersuche Sie können die automatische Sendersuche wiederholen, wenn Sie das Gerät in eine andere Region transportieren, und Sie können der Senderliste Multiplex-Kanäle hinzufügen. 1 Drücken Sie TUNER, bis „DAB“ im Display erscheint. 2 Druk op MENU en druk vervolgens op / tot “DAB SCAN” op het display verschijnt. 3 Druk op ENTER en druk vervolgens op / tot “AUTO” op het display verschijnt. 4 Druk op ENTER. Die automatische Sendersuche beginnt. Sobald die Sendersuche abgeschlossen wurde, wird der zuerst gefundene Sender ausgewählt. Manuelle Sendersuche Pyccкий Sie können Sender, die die automatische Suche nicht finden kann, manuell speichern. Bei einem schlechten Empfang können Sie die Empfindlichkeit anpassen. Die manuelle Sendersuche ist erst nach der automatischen Sendersuche verfügbar. Führen Sie zuerst eine automatische Sendersuche durch. 1 Druk op TUNER tot “DAB” op het display verschijnt. 2 Druk op MENU en druk vervolgens op / tot “DAB SCAN” op het display verschijnt. 3 Druk op ENTER en druk vervolgens op / tot “MANUAL” op het display verschijnt. 4 Druk op ENTER. 5 Druk binnen de 10 seconden op TUNE +/– om DAB+ frequentie te selecteren. 6 Druk binnen 10 seconden op ENTER. • Bewegen Sie bei einem zu schwachen Signalpegel die Antenne oder die Einheit, um den Empfang zu verbessern. Nederlands 1 Drücken Sie TUNER, bis „DAB“ im Display erscheint. Automatische Sendersuche Deutsch DIENSTKO MPONENTEN (SENDER) Wenn kein Sender gefunden wurde, wird „NO SIGNAL“ angezeigt. • Bis zu 100 wird für insgesamt gefundene Sender angezeigt. Italiano DIENSTE • Español DAB + SIGNAL 3 Drücken Sie innerhalb von 10 Sekunden ENTER an der Fernbedienung, um den gewünschten Sender einzustellen. Français Digital Audio Broadcasting ist ein digitales Rundfunksystem, bei dem Audiosignale zur Ausstrahlung in digitale Signale umgewandelt werden. DAB+ wird als eine Gruppe von Daten, die als Multiplex (Ensemble) bezeichnet wird, ausgestrahlt, die einen oder mehrere Sender (Dienste) enthalten kann. Jeder Sender enthält einen primären Dienst und es können ein oder mehrere sekundäre Dienste vorhanden sein. Dies ermöglicht die Übertragung von mehreren Programmen oder Diensten über eine einzige Frequenz. 2 Drücken Sie TUNE +/–, um den gewünschten Sender auszuwählen. English Wiedergabe von DAB+ (alleen XHM26D) 07 Wenn die Einheit zum ersten Mal eingeschaltet wird, sucht sie automatisch nach Radiosendern, um eine Senderliste zu erstellen. Die Sender werden in alphanumerischer Reihenfolge gespeichert. Der erste Sender auf der Liste wird ausgewählt und über die Lautsprecher wiedergegeben. 23 De X-HM16_26_26D_De.book 07 24 ページ 2016年7月22日 金曜日 午前10時35分 Verwendung des Tuners Ändern der Informationsanzeige Sie können die DAB+-Displayinformationen umschalten. Drücken Sie die Taste DISPLAY. Die Informationsanzeige ändert sich mit jedem Drücken der Taste in der folgenden Reihenfolge. Wenn „NO SIGNAL“ angezeigt wird, erlaubt Ihnen die Taste DISPLAY kein Umschalten der Anzeige. [Programmname] DAB-Frequenztabelle (BAND III) Bezeichnung Frequenz 174.928 MHz 5A 208.064 MHz 9D 176.640 MHz 5B 209.936 MHz 10A 178.352 MHz 5C 211.648 MHz 10B 180.064 MHz 5D 213.360 MHz 10C 181.936 MHz 6A 215.072 MHz 10D 183.648 MHz 6B 216.928 MHz 11A 185.360 MHz 6C 218.640 MHz 11B Die DAB+-Frequenz für den Sender. 187.072 MHz 6D 220.352 MHz 11C [Stereo-Modus] 188.928 MHz 7A 222.064 MHz 11D 190.640 MHz 7B 223.936 MHz 12A Die Geschwindigkeit der Datenübertragung. 192.352 MHz 7C 225.648 MHz 12B [Signalqualität] 194.064 MHz 7D 227.360 MHz 12C Die Signalqualität wird als eine Zahl (0 - 100) angezeigt. [85-100: Gut, 70-84: Mäßig, 0-69: Schlecht] 195.936 MHz 8A 229.072 MHz 12D Speichern eines Senders 197.648 MHz 8B 230.784 MHz 13A Sie können 10 DAB-Sender im Speicher ablegen und per Tastendruck abrufen. (Vorwahlabstimmung) 199.360 MHz 8C 232.496 MHz 13B 201.072 MHz 8D 234.208 MHz 13C 202.928 MHz 9A 235.776 MHz 13D 204.640 MHz 9B 237.488 MHz 13E 206.352 MHz 9C 239.200 MHz 13F [Lauftext] Die vom Sender übertragenen Informationen durchlaufen das Display. [Programmtyp] Eine Beschreibung der Art des vom Sender ausgestrahlten Inhalts. [Multiplex-Name] Der Name des Multiplex (Ensembles), der den aktuellen Dienst bereitstellt. [Frequenz] Zeigt den Stereo-Modus an. [Übertragungsgeschwindigkeit] 1 Stellen Sie den gewünschten DAB-Sender ein. 2 Drücken Sie PGM/MEMORY. Die Vorwahlnummer blinkt. 3 Drücken Sie innerhalb von 10 Sekunden PRESET +/–, um die Vorwahlkanalnummer zu wählen. Legen Sie die Sender, mit Vorwahlkanal 1 beginnend, der Reihe nach im Speicher ab. 4 Drücken Sie innerhalb von 10 Sekunden PGM/MEMORY, um diesen Sender im Speicher abzulegen. Falls die Vorwahlnummernanzeige erlischt, bevor der Sender im Speicher abgelegt wurde, wiederholen Sie den Bedienvorgang unter Schritt 2. De Wenn ein neuer Sender im Speicher abgelegt wird, wird der vorher gespeicherte Sender für diese Vorwahlkanalnummer gelöscht. Frequenz Der Name des Senders wird angezeigt. (Standardeinstellung) 24 5 Wiederholen Sie Schritt 1 - 4, um andere Sender einzustellen oder um einen vorgewählten Sender zu ändern. Bezeichnung X-HM16_26_26D_De.book 25 ページ 2016年7月22日 金曜日 午前10時35分 Andere Anschlüsse 08 English Kapitel 8: Andere Anschlüsse Verbind uw hulp-afspeelcomponent met de AUDIO IN ingang op het achterpaneel. Mit dieser Funktion wird automatisch zu "AUDIO IN" gewechselt, wenn Audiosignale über die AUDIO IN-Buchse eingehen. 1 Drücken Sie MENU und dann / , bis "Audio In detect" auf dem Display angezeigt wird. 2 Drücken Sie ENTER und dann / , um bei Audio In detect zwischen ON/OFF zu wechseln. Español Anschluss zusätzlicher Komponenten Automatisches Wechseln zum Audio In-Eingang (nur bei Modellen für Nordamerika) Français ACHTUNG • Schalten Sie, ehe Sie die Anschlüsse vornehmen oder ändern, den Strom aus und ziehen Sie das Netzkabel aus der Netzsteckdose. • Wir übernehmen keine Haftung für Schäden, die beim Anschließen von Drittanbietergeräten entstehen. • Die Einstellung weist werksseitig den Wert OFF auf. Drücken Sie AUDIO als die Eingabequelle. Wenn AUDIO IN gewählt wird, wird „Audio In“ auf dem Hauptdisplay angezeigt. Pyccкий Hinweis • Wenn die Minibuchse AUDIO IN mit der Kopfhörerbuchse eines Zusatzgerätes verbunden ist, wird die Lautstärke dieses Gerätes über das zur Wiedergabe verwendete Gerät geregelt. Wenn der Klang verzerrt ist, nachdem Sie die Lautstärke der Einheit vermindert haben, dann versuchen Sie, die Lautstärke auf dem zusätzlichen Wiedergabegerät zu vermindern. Nederlands 1 Portable Audiowiedergabegeräte, usw. Deutsch 3,5-mm-StereoMinisteckerkabel (im Fachhandel erhältlich) Italiano Hinweis • Wenn Audio In detect den Wert ON aufweist, wird "Audio In Det ON" auf dem Hauptdisplay angezeigt. • Wenn Audio In detect den Wert OFF aufweist, wird "Audio In Det OFF" auf dem Hauptdisplay angezeigt. 25 De X-HM16_26_26D_De.book 09 26 ページ 2016年7月22日 金曜日 午前10時35分 Bluetooth® Audio-Wiedergabe Kapitel 9: Bluetooth® Audio-Wiedergabe alleen X-HM26/26D Musikwiedergabe unter Einsatz von Bluetooth drahtloser Technologie Mit kabelloser Bluetooth Technologie ausgerüstetes Gerät: Mobiltelefon Mit kabelloser Bluetooth Technologie ausgerüstetes Gerät: Digitaler Musikplayer Nicht mit kabelloser Bluetooth Technologie ausgerüstetes Gerät: Digitaler Musikplayer + Bluetooth® Audiosender (im Fachhandel erhältlich) Musikdaten TIMER Die Einheit kann Musik, die auf Bluetooth fähigen Geräten (Handys, digitale Musikplayer usw.) gespeichert ist, drahtlos wiedergeben. Sie können auch einen Bluetooth Audiotransmitter (gesondert zu beziehen) verwenden, um sich an Musik von Geräten zu erfreuen, die nicht die Bluetooth Funktionsweise haben. Zu weiteren Einzelheiten siehe die Bedienungsanleitung für Ihr Bluetooth fähiges Gerät. Hinweis • Die Bluetooth® Wortmarke und -Logos sind eingetragene Marken der Bluetooth SIG, Inc. • Das mit Bluetooth drahtloser Technologie ausgestattete Gerät muss die A2DP-Profile unterstützen. • Verbinding is niet altijd is gegarandeerd met alle Bluetooth ingeschakelde apparaten. 26 De Betrieb per Fernbedienung Die mit dieser Einheit mitgelieferte Fernbedienung ermöglicht das Abspielen und das Stoppen von Medien und die Ausführung anderer Operationen. Hinweis • Das mit Bluetooth drahtloser Technologie ausgestattete Gerät muss die AVRCP-Profile unterstützen. • Der Fernbedienungsbetrieb kann nicht für alle für die kabellose Bluetooth Technologie aktivierten Geräte gewährleistet werden. Pairing (Paarung) mit der Einheit (Erstregistrierung) Um Musik, die auf einem Bluetooth fähigen Gerät gespeichert ist, von der Einheit wiedergeben zu können, muss zuerst das Pairing ausgeführt werden. Das Pairing muss erfolgen, wenn die Einheit zum ersten Mal mit dem Bluetooth fähigen Gerät zusammen verwendet wird oder wenn die Pairing-Daten auf dem Gerät aus irgendeinem Grund gelöscht worden sind. Das Pairing ist ein Schritt, der erforderlich ist, um die Kommunikation unter Verwendung der drahtlosen Bluetooth Technologie ausführen zu können. • Das Pairing wird nur ausgeführt, wenn Sie die Einheit und das Bluetooth fähige Gerät das erste Mal zusammen verwenden. • Um die Kommunikation unter Verwendung der drahtlosen Bluetooth Technologie zu ermöglichen, muss das Pairing sowohl an der Einheit als auch an dem Bluetooth fähigen Gerät vorgenommen werden. • Nach dem Drücken von und dem Umschalten auf den Eingang Bluetooth werden die PairingVerfahrensschritte am Bluetooth fähigen Gerät vorgenommen. Wenn das Pairing korrekt vorgenommen worden ist, brauchen die Pairing-Vorgänge für die Einheit, wie unten dargestellt, nicht vorgenommen zu werden. Zu weiteren Einzelheiten siehe die Bedienungsanleitung für Ihr Bluetooth fähiges Gerät. 1 Drücken Sie Í drücken und den Strom für die Einheit einschalten. X-HM16_26_26D_De.book 27 ページ 2016年7月22日 金曜日 午前10時35分 Bluetooth® Audio-Wiedergabe Drücken Sie automatische Stromabschaltung auf ON umgeschaltet wird. • Die automatische Stromabschaltung kann ein- oder ausgeschaltet werden (ON/OFF) (Seite 33). . Die Einheit schaltet auf Bluetooth um, und „Pairing“ wird angezeigt. BT STANDBY • Folgendes kann getan werden, wenn sich die Einheit mit dem BT STANDBY auf ON umgeschaltet im Standby befindet. • Durch Wahl eines Bluetooth fähigen Geräts, das bereits eine Anschluss-Geschichte (Pairing wurde bereits durchgeführt) mit dieser Einheit hat, wird diese Einheit mit der Funktion Bluetooth automatisch eingeschaltet. Hinweis Musik auf der Einheit von einem Bluetooth fähigen Gerät anhören Drücken Sie . Die Einheit wird auf den Eingang Bluetooth umgeschaltet. 2 Eine Bluetooth Verbindung wird zwischen dem Bluetooth fähigen Gerät und der Einheit realisiert. 3 Wiedergabe von Musik vom Bluetooth fähigen Gerät. 2 Druk op MENU en druk vervolgens op / tot “BT STANDBY” op het display verschijnt. 3 Druk op ENTER en druk vervolgens op / om naar BT STANDBY ON/OFF te schakelen. • Diese Option ist werkseitig auf OFF gesetzt. Hinweis • Wenn BT STANDBY auf ON steht, wird auf dem Hauptdisplay „BT STANDBY ON“ angezeigt. • Wenn BT STANDBY auf OFF steht, wird auf dem Hauptdisplay „BT STANDBY OFF“ angezeigt. Anschluss während des Modus BT STANDBY bei einem Bluetooth fähigen Gerät Wenn für die Einheit während BT STANDBY eine Anschluss-Geschichte (Pairing wurde bereits durchgeführt) mit einem Bluetooth fähigen Gerät existiert, kann die Einheit eine Anschluss-Anforderung direkt von der AnschlussGeschichte erhalten. Die Einheit startet unter Verwendung der Funktion Bluetooth und wird mit einem Bluetooth fähigen Gerät verbunden. Auch Geräte, bei denen bereits ein Pairing mit dieser Einheit durchgeführt worden ist, werden während BT STANDBY in den folgenden Fällen nicht verbunden. Löschen Sie in solchen Fällen den Pairing-Vorgang von dem mit der drahtlosen Bluetooth Technologie ausgestatteten Gerät und führen Sie das Pairing erneut durch. • In diesem Gerät können bis zu 8 Geräte im Kopplungsverlauf gespeichert werden. • Wenn die Einstellungen auf die Einstellungen ab Werk zurückgesetzt werden, werden alle Pairing-Vorgänge gelöscht. Pyccкий Verfahrensschritte für das Anschließen an die Einheit sind von dem Bluetooth fähigen Gerät aus auszuführen. • Zu Einzelheiten hinsichtlich der Verfahrensschritte für den Anschluss siehe die Bedienungsanleitung für Ihr Bluetooth fähiges Gerät. . Nederlands 1 Druk op Deutsch Wenn das Pairing mit dem Bluetooth fähigen Gerät korrekt abgeschlossen worden ist, wird auf dem vorderen Bedienfeld der Einheit die Bezeichnung des Bluetooth fähigen Geräts angezeigt. (Nur alphanumerische 1-ByteZeichen können angezeigt werden. Ein Zeichen, das nicht angezeigt werden kann, wird durch ein „∫“ wiedergegeben.) 1 Italiano 4 Auf dem Bluetooth fähigen Gerät bestätigen, dass das Pairing abgeschlossen ist. BT STANDBY-Einstellungen Español • Dieses Gerät wird als "Pioneer X-HM26" auf all Ihren Bluetooth fähigen Geräten angezeigt. Das Pairing beginnt. • Das Bluetooth fähige Gerät nahe an der Einheit platzieren. • Bitte ziehen Sie zu Einzelheiten die Bedienungsanleitung für Ihr Bluetooth fähiges Gerät zu Rate, wenn das Pairing ausgeführt werden kann, sowie zu den Vorgängen, die für das Pairing erforderlich sind. • Geben Sie, wenn die Eingabe eines PIN-Codes verlangt wird, „0000“ ein. (Diese Einheit akzeptiert keine andere PIN-Code-Einstellung als „0000“.) Français 3 Den Strom für das Bluetooth fähige Gerät einschalten, mit dem das Pairing erfolgen soll, und den Pairing-Vorgang am Gerät vornehmen. English 2 09 Hinweis • Wenn ein Bluetooth fähiges Gerät nicht angeschlossen ist und mehr als 20 Minuten lang keine Operationen ausgeführt wurden, schaltet die Einheit automatisch den Strom aus. In diesem Fall ist es erforderlich, dass 27 De X-HM16_26_26D_De.book 09 28 ページ 2016年7月22日 金曜日 午前10時35分 Bluetooth® Audio-Wiedergabe Warnhinweis Funkwellen Dieses Gerät arbeitet mit einer Funkwellenfrequenz von 2,4 GHz, einem Frequenzband, das auch von anderen drahtlosen Systemen genutzt wird (siehe Liste weiter unten). Nutzen Sie dieses Gerät nicht in der Nähe solcher Anlagen oder stellen Sie sicher, dass diese während der Nutzung abgeschaltet sind, damit es nicht zu Geräuschen oder Verbindungsunterbrechungen kommt. • Drahtlose Telefone • Drahtlose Faxgeräte • Mikrowellengeräte • WLAN-Geräte (IEEE802.11b/g) • Drahtlose AV-Geräte • Wireless Controller für Spielekonsolen • Medizingeräte, die mit Mikrowellen arbeiten • Einige Babyphone Andere, weniger verbreitete, Geräte, die auf der gleichen Frequenz arbeiten können: • Diebstahlsicherungssysteme • Amateurfunkanlagen (HAM) • Management-Systeme für Lagerlogistik • Identifizierungssysteme für Züge oder Rettungsfahrzeuge Hinweis • Wenn das Fernsehbild durch Rauschen beeinträchtigt wird, besteht die Möglichkeit, dass ein Gerät mit Bluetooth drahtloser Technologie oder dieses Gerät (einschließlich von Produkten, die von diesem Gerät unterstützt werden) Signalinterferenzen mit dem Antenneneingang des Fernsehgerätes, Videogerätes, Satellitentuners usw. verursacht. In einem solchen Fall erhöhen Sie den Abstand zwischen dem Antenneneingang und dem Gerät mit Bluetooth drahtloser Technologie bzw. dieser Anlage (einschließlich von Produkten, die von dieser Anlage unterstützt werden). • Wenn irgendein Gegenstand den Weg zwischen dieser Anlage (einschließlich von Geräten, die von dieser Anlage unterstützt werden) und dem Gerät mit Bluetooth drahtloser Technologie behindert (z. B. eine Metalltür, eine Betonwand oder eine Isolierung mit Aluminiumfolie), kann eine Veränderung des Aufstellungsortes dieser Anlage erforderlich sein, um Rauschen und Signalunterbrechungen zu verhindern. Einsatzbereich Dieses Gerät ist ausschließlich für den Heimgebrauch vorgesehen. (Die Sendeabstände können sich je nach Umgebungsbedingungen verringern.) An folgenden Standorten kann es aufgrund von schlechten Bedingungen oder der Unmöglichkeit, Funkwellen zu empfangen, zu Unterbrechungen oder dem Abbruch der Audio-Verbindung kommen: • In Stahlbetonbauten oder Häusern mit Stahl- oder Eisenträgern. 28 De • Neben großen Möbelstücken aus Metall. • In einer Menschenmenge oder in der Nähe eines Gebäudes oder Hindernisses. • An einem Standort, der einem Magnetfeld, statischer Elektrizität oder HF-Einstreuungen von Funkanlagen ausgesetzt ist, die das gleiche Frequenzband (2,4 GHz) wie diese Anlage nutzen, z. B. ein drahtloses 2,4-GHzLAN-Gerät (IEEE802.11b/g) oder ein Mikrowellenherd. • Wenn Sie in einem dichtbesiedelten Wohngebiet (Appartement, Stadthaus usw.) wohnen und das Mikrowellengerät Ihres Nachbarn sich in der Nähe Ihrer Anlage befindet, kann es sein, dass dies zu Funkwellenstörungen führt. Sollte dies eintreten, stellen Sie die Anlage an einem anderen Ort auf. Ist das Mikrowellengerät nicht in Betrieb, gibt es keine Funkwellenstörung geben. Funkwellenreflektionen Diese Anlage empfängt sowohl die direkt von einem Gerät mit Bluetooth drahtloser Technologie übermittelten Wellen (direkten Wellen) als auch Wellen, die aufgrund von Reflektionen an Wänden, Möbelstücken und Gebäudeteilen aus verschiedenen Richtungen eintreffenden Wellen (reflektierten Wellen). Die (aufgrund von Hindernissen und reflektierenden Objekten) reflektierten Wellen erzeugen wiederum verschiedene reflektierte Wellen und auch Veränderungen in den Empfangsverhältnissen, und zwar je nach Standort. Wenn die Audiosignale aufgrund dieses Phänomens nicht einwandfrei empfangen werden können, verändern Sie probeweise den Aufstellungsort des Gerätes mit Bluetooth drahtloser Technologie geringfügig. Bitte beachten Sie außerdem, dass der Empfang von Audiosignalen auch durch reflektierte Wellen unterbrochen werden kann, wenn sich eine Person dem Raum zwischen dieser Anlage und dem Gerät mit Bluetooth drahtloser Technologie nähert oder diesen kreuzt. Vorsichtshinweise zum Anschließen von Produkten, die von dieser Anlage unterstützt werden • Stellen Sie die erforderlichen Anschlüsse an allen von dieser Anlage unterstützten Geräten komplett her, einschließlich von Audio- und Netzkabeln, bevor Sie die Geräte an diese Anlage anschließen. • Nachdem Sie die Anschlüsse an diese Anlage hergestellt haben, prüfen Sie nach, dass Audiokabel nicht gebündelt mit Netzkabeln verlegt worden sind. • Stellen Sie vor dem Abtrennen dieser Anlage sicher, dass ausreichend freier Arbeitsplatz im Umfeld vorhanden ist. • Wenn Sie Anschlüsse von Audio- oder anderen Kabeln für Geräte ändern, die von diesem Gerät unterstützt werden, vergewissern Sie sich, dass Sie ausreichend Platz haben. X-HM16_26_26D_De.book 29 ページ 2016年7月22日 金曜日 午前10時35分 Zusätzliche Informationen 10 Zusätzliche Informationen English Fehlersuche Français Kapitel 10: Allgemeine Probleme Prüfpunkt Maßnahme zur Behebung Einstellungen, die Sie vorgenommen haben, sind gelöscht worden. War das Netzkabel nicht angeschlossen? Wenn das Netzkabel nicht angeschlossen ist, werden die Einstellungen, die Sie vorgenommen haben, gelöscht. Bitte stellen Sie die Uhr erneut ein. Wenn Sie die Einstellungen nicht löschen wollen, dann trennen Sie das Netzkabel nicht vom Netz. Das Gerät spricht nicht auf eine Betätigung der Fernbedienung an. Betätigen Sie die Fernbedienung aus zu großer Entfernung? Betätigen Sie die Fernbedienung innerhalb von 7 Metern und einem Winkel von 30º vor dem Fernbedienungssignal-Sensor (Seite 5). Ist der Fernsensor für die Fernbedienung direktem Sonnenlicht oder starkem künstlichen Licht eines FluoreszenzBeleuchtungskörpers usw. ausgesetzt? Die Fernbedienungssignale können nicht richtig empfangen werden, wenn der Fernsensor für die Fernbedienung direktem Sonnenlicht oder starkem künstlichen Licht eines FluoreszenzBeleuchtungskörpers usw. ausgesetzt ist. Sind die Batterien erschöpft? Wenn ein Analogplayer mit dieser Einheit verwendet wird, schließen Sie ein mit einem Phono-Equalizer ausgestattetes Gerät an. Wechseln Sie die Batterien aus (Seite 5). Zerkratzte Discs werden möglicherweise nicht abgespielt. Verzeichnis- oder Dateinamen werden nicht erkannt. Von diesem Gerät können bis zu 999 Dateien auf einer einzelnen Disc bzw. auf einem einzelnen USB-Speichergerät erkannt werden. Die maximale Anzahl der Ordner beträgt 255. Je nach Ordnerstruktur ist es möglich, dass manche Ordner oder Dateien vom Gerät nicht erkannt werden. Das Gerät schaltet sich automatisch aus. Haben Sie die maximale Anzahl von Ordner- oder Dateinamen überschritten, die dieses Gerät erkennen kann? Wischen Sie den Schmutz von der Disc (Seite 33). Innen könnte es zu Kondensation gekommen sein. Warten Sie eine Weile, um das kondensierte Wasser verdampfen zu lassen. Stellen Sie dieses Gerät nicht in der Nähe einer Klimaanlage usw. auf (Seite 32). Pyccкий Die Disc kann nicht Ist die Disc zerkratzt? wiedergegeben werden oder Ist die Disc verschmutzt? sie wird automatisch ausgeworfen. Befindet sich das Gerät an einem feuchten Ort? Nederlands Die Lautstärke kann in je nach der Eingangsquelle und dem Aufnahmeformat unterschiedlich sein. Deutsch Verschil in volume tussen Dabei handelt es sich nicht um eine CD's, MP3, Tuner en AUDIO Funktionsstörung dieses Gerätes. IN. Italiano Problem Español Häufig wird eine nicht ordnungsgemäße Bedienung mit Geräteproblemen und Fehlfunktionen verwechselt. Wenn Sie den Eindruck haben, dass diese Komponente nicht ordnungsgemäß funktioniert, überprüfen Sie bitte die unten aufgeführten Punkte. Manchmal liegt das Problem bei einer anderen Komponente. Überprüfen Sie die anderen verwendeten Komponenten und die elektrischen Anschlüsse. Falls das Problem selbst nach dem Durchgehen der unten aufgeführten Checkliste nicht behoben werden kann, wenden Sie sich bitte an Ihr von Pioneer autorisiertes Service-Center oder Ihren Händler und lassen Sie eine Reparatur durchführen. • Falls das Gerät aufgrund äußerer Auswirkungen wie beispielsweise statischer Elektrizität nicht normal funktioniert, entfernen Sie bitte den Netzstecker aus der Wandsteckdose, und stecken Sie ihn erneut ein, um normale Betriebsbedingungen wiederherzustellen. Wenn 20 Minuten lang keine Wiedergabe und keine Operation erfolgte, wird die Einheit automatisch abgeschaltet. In diesem Fall ist es erforderlich, dass automatische Stromabschaltung auf ON umgeschaltet wird (Seite 33). 29 De X-HM16_26_26D_De.book 10 30 ページ 2016年7月22日 金曜日 午前10時35分 Zusätzliche Informationen Wenn ein USB-Speichergerät angeschlossen ist Problem Prüfpunkt Der USB-Speicher wird nicht Ist der USB-Speicher richtig erkannt. angeschlossen? Ist der USB-Speicher (Speichergerät) über einen USBHub angeschlossen? Maßnahme zur Behebung Schließen Sie den Speicher richtig an (bis zum Anschlag). Diese Einheit unterstützt nicht USB-Hubs. Schließen Sie den USB-Speicher (Speichergerät) direkt an. Dieses Gerät unterstützt ausschließlich USB-Geräte der Massenspeicherklasse. Dieses Gerät unterstützt tragbare Flash-Speicher und digitale Audio-Wiedergabegeräte. Nur die Datei-Systeme FAT16 und FAT32 werden unterstützt. Andere Dateisysteme (exFAT, NTFS, HFS usw.) werden nicht unterstützt. Dieses Gerät unterstützt nicht die Verwendung externer Festplattenlaufwerke. Datei kann nicht wiedergegeben werden. Dabei handelt es sich nicht um eine Funktionsstörung dieses Gerätes. Schalten Sie den Strom aus und wieder an. Ist die Datei Copyright-geschützt (durch DRM)? Copyright-geschützte Dateien können nicht wiedergegeben werden. Dabei handelt es sich nicht um eine Funktionsstörung dieses Gerätes. Auf einem Computer gespeicherte Dateien können nicht wiedergegeben werden. Einige USB-Speicher (Speichergeräte) werden möglicherweise nicht richtig erkannt. Bei einigen Dateien ist es möglich, dass sie nicht wiedergegeben werden können. Ordner- oder Dateinamen Enthält der Ordner- bzw. Dateiname Die maximale Anzahl von anzeigbaren Zeichen für die werden überhaupt nicht oder mehr als 30 Zeichen? Verzeichnis- und die Dateinamen beträgt 30. nicht richtig angezeigt. 30 De Verzeichnis- oder Dateinamen werden nicht in alphabetischer Reihenfolge angezeigt. Dabei handelt es sich nicht um eine Funktionsstörung dieses Gerätes. Die Reihenfolge der angezeigten Verzeichnis- und Dateinamen hängt ab von der Reihenfolge, in der die Verzeichnisse oder Dateien auf dem USB-Speicher (USB-Gerät) aufgenommen wurden. Die Erkennung des USBSpeichers (Speichergeräts) dauert lange. Wie groß ist die Kapazität des USB- Das Laden der Daten kann einige Zeit erfordern, wenn USBSpeichers (Speichergeräts)? Speicher (Speichergeräte) mit großer Kapazität angeschlossen sind (dies könnte einige Minuten dauern). X-HM16_26_26D_De.book 31 ページ 2016年7月22日 金曜日 午前10時35分 Zusätzliche Informationen 10 alleen X-HM26/26D Maßnahme zur Behebung Ein Gerät mit Bluetooth drahtloser Technologie kann nicht angeschlossen oder betätigt werden. Das Gerät mit Bluetooth drahtloser Technologie gibt keinen Ton aus, oder Tonunterbrechungen treten auf. Prüfen Sie nach, dass sich kein Gerät in der Nähe dieser Anlage befindet, das elektromagnetische Wellen auf dem 2,4-GHz-Band abgibt (z. B. ein Mikrowellenherd, ein drahtloses LAN-Gerät oder ein Gerät mit Bluetooth drahtloser Technologie). Wenn ein solches Objekt sich neben dem Gerät befindet, stellen Sie das Gerät weiter entfernt davon auf. Oder schalten Sie das Gerät, das elektromagnetische Wellen aussendet, aus. Das Gerät mit Bluetooth drahtloser Technologie ist möglicherweise nicht auf einen Kommunikationsmodus eingestellt, der die Bluetooth drahtlose Technologie unterstützt. Prüfen Sie die Einstellungen des Geräts mit Bluetooth-Wireless-Technologie. Abspielbare Discs und Formate MP3 • Handelsübliche Audio-CDs • CD-R/-RW/-ROM-Discs, die im CD-DA-Format aufgezeichnete Musikdaten enthalten MP3- Dateien, die auf CD-R/CD-RW/CD-ROM-Discs oder USB-Speicher (USB-Gerät) aufgenommen wurden. MP3: MP3 ist ein Kompressionsformat. Es ist eine Abkürzung für MPEG Audio Layer 3. MP3 ist eine Art von Audiocode, der durch erheblicher Datenreduzierung von der ursprünglichen Tonquelle mit sehr geringem Tonqualitätsverlust verarbeitet wird. • Dieses System unterstützt MPEG-1/2 Audio Layer 3 (Abtastraten: 32 kHz bis 48 kHz; Bitraten 8 kbps bis 320 kbps). • Während der Wiedergabe einer VBR-Datei kann das Zeitzählwerk im Display von ihrer tatsächlichen Wiedergabezeit abweichen. • Die Reihenfolgedaten der Ordner und Dateien, welche auf dem Medium aufgezeichnet sind, variieren je nach Brennsoftware. Möglicherweise erfolgt die Wiedergabe über dieses Gerät nicht in der erwarteten Reihenfolge. • Von Medien mit MP3-Dateien können bis zu 255 Ordner und 999 Dateien (einschließlich nicht wiedergabefähiger Dateien) gelesen werden. Pyccкий • Mit diesem Gerät können ausschließlich finalisierte Discs abgespielt werden. • Discs, die im Paketschreib-Modus (UDF-Format) bespielt wurden, sind nicht mit diesem Gerät kompatibel. • Firmen- und Produktnamen, die in der vorliegenden Bedienungsanleitung verwendet werden, sind Warenzeichen oder eingetragene Warenzeichen der betreffenden Firmen. • Mit diesem Gerät können ausschließlich Discs abgespielt werden, die im Format ISO9660 Level 1, Level 2 und Joliet aufgezeichnet wurden. • Durch DRM (Digital Rights Management) geschützte Dateien können nicht abgespielt werden. Nederlands Audio CD Deutsch Prüfen Sie, ob die Einheit mit einem Bluetooth-fähigen Gerät verbunden ist, für das eine andere Eingangsquelle als Bluetooth ausgewählt ist. Wählen Sie Bluetooth als Eingangsquelle und nehmen Sie ein Pairing vor. Italiano * Die angegebene Entfernung ist als ein grober Richtwert zu betrachten. Die tatsächlich mögliche Entfernung zwischen den Geräten kann in Abhängigkeit von der Umgebung variieren. Español Prüfen Sie nach, dass sich das Gerät mit Bluetooth drahtloser Technologie nicht in einem zu großen Abstand von dieser Anlage befindet, und dass sich keine Hindernisse auf dem Übertragungsweg zwischen dem Gerät mit Bluetooth drahtloser Technologie und dieser Anlage befinden. Stellen Sie das Gerät mit Bluetooth drahtloser Technologie in einem Abstand von weniger 10 m* von dieser Anlage so auf, dass sich keine Hindernisse auf dem Übertragungsweg befinden. Français Problem English Wenn das mit der drahtlosen Bluetooth-Technologie ausgestattete Gerät angeschlossen ist oder betrieben wird. Hinweis • Dieses Gerät bietet keine Unterstützung von Discs, die im Multisession- oder Multiborder-Verfahren bespielt wurden. 31 De X-HM16_26_26D_De.book 10 32 ページ 2016年7月22日 金曜日 午前10時35分 Zusätzliche Informationen • Bei der Multisession/Multiborder-Aufzeichnung handelt es sich jeweils um ein Verfahren, bei dem Daten in zwei oder mehr sog. Sessions bzw. Borders auf einer einzigen Disc aufgezeichnet werden. Bei einer „session“ bzw. einem „border“ handelt es sich um eine Aufzeichnungseinheit, die aus einem kompletten Datensatz von Lead-in bis Lead-out besteht. Hinweise zu CDs, die mit Kopierschutz versehen sind Dieses Gerät ist auf Übereinstimmung mit den Spezifikationen des Audio-CD-Formats ausgelegt. Dieses Gerät unterstützt keine Wiedergabe oder Funktionen von Discs, die diesen Spezifikationen nicht entsprechen. Unterstützte Audiodateiformate Dieses Gerät unterstützt keine Lossless-Codierung. Vorsichtsmaßregeln bei der Verwendung Transport dieses Gerätes Wanneer u dit toestel verplaatst, controleer dan eerst of geen disc geladen is en sluit het USB-opslagapparaat af. Druk vervolgens op Í, wacht tot “STAND BY” op het hoofdtoestel verdwijnt om dit uit te schakelen en maak het netsnoer vervolgens los. Er kan schade berokkend worden als het toestel met een geplaatste disc vervoerd of verplaatst wordt of wanneer een ander apparaat met de USBaansluiting verbonden is om met de aansluiting voor de ministekker van AUDIO IN. Installationsort • Wählen Sie einen stabilen Ort in der Nähe des Fernsehgerätes oder der Hi-Fi-Anlage, das bzw. die gemeinsam mit diesem Gerät verwendet werden soll. • Stellen Sie dieses Gerät nicht auf einem Fernsehgerät oder Farbmonitor auf. Installieren Sie den Receiver auch in ausreichender Entfernung von Kassettenlaufwerken und anderen Geräten, die leicht von Magnetkräften beeinflusst werden. Vermeiden Sie die folgenden Örtlichkeiten: • • • • • Orte, die direktem Sonnenlicht ausgesetzt sind Feuchte oder schlecht belüftete Orte Sehr heiße Orte Orte, die Vibrationen ausgesetzt sind Orte, an denen sehr viel Staub und Zigarettenrauch vorhanden ist • Orte, die dem Auftreten von Ruß, Dampf oder Hitze ausgesetzt sind (Küche usw.) Stellen Sie keine Gegenstände auf dieses Gerät Stellen Sie keine Gegenstände oben auf dieses Gerät. Verstopfen Sie nicht die Lüftungsöffnungen. Verwenden Sie dieses Gerät nicht auf zotteligen Teppichen, einem Bett, Sofa usw., oder während es in ein Tuch, eine Decke usw. eingewickelt ist. Anderenfalls besteht die Gefahr einer Beschädigung durch Überhitzung. 32 De Setzen Sie den Receiver nicht der Hitze aus. Stellen Sie das Gerät nicht auf einen Verstärker oder eine andere Komponente, die Wärme erzeugt. Wenn Sie den Receiver in einem Regal montieren, dann platzieren Sie ihn in einem Fach unter dem Verstärker, um die Wärme zu vermeiden, die vom Verstärker oder einem anderen Audiogerät abgegeben wird. • Schalten Sie das Gerät stets aus, wenn es nicht betrieben wird. • Bei eingeschaltetem Gerät kann es abhängig von den Signalbedingungen vorkommen, dass Streifen im Fernsehbild erscheinen und Rundfunksendungen durch Rauschen gestört werden. Schalten Sie das Gerät in einem solchen Fall aus. Hinweise zu Kondensatbildung Wenn dieses Gerät plötzlich von einem kalten Ort in einen warmen Raum gebracht wird (z. B. im Winter) oder die Temperatur im Raum, in dem das Gerät aufgestellt ist, plötzlich aufgrund eines in Betrieb befindlichen Heizgerätes usw. ansteigt, können sich Wassertröpfchen (Kondensat) im Geräteinneren (auf Betriebsteilen und Abtasterlinse) bilden. Wenn es zu Kondensatbildung gekommen ist, arbeitet das Gerät nicht mehr ordnungsgemäß, und Wiedergabe ist nicht möglich. Lassen Sie das Gerät 1 bis 2 Stunden lang bei Raumtemperatur eingeschaltet (die erforderliche Dauer hängt vom Ausmaß der Kondensatbildung ab). Die Wassertropfen verdampfen und die Wiedergabe ist wieder möglich. Auch im Sommer kann es zu Kondensatbildung kommen, wenn das Gerät direkt dem Luftstrom einer Klimaanlage ausgesetzt ist. Stellen Sie das Gerät in einem solchen Fall an einem anderen Ort auf. Reinigen des Produkts • Trennen Sie vor einer Reinigung des Gerätes grundsätzlich den Netzstecker von der Netzsteckdose. • Reinigen Sie die Außenflächen mit einem weichen Tuch. Wenden Sie bei hartnäckigem Schmutz ein neutrales Spülmittel an, verdünnt mit 5 bis 6 Teilen Wasser, tränken Sie damit das weiche Tuch, wringen Sie es gründlich aus, wischen Sie damit den Schmutz weg und wischen Sie anschließend mit einem weichen, trockenen Tuch nach. • Alkohol, Verdünner, Benzin, Insektizide usw. könnten dazu führen, dass der Druck oder die Farbe abgehen. Vermeiden Sie außerdem einen längeren Kontakt von Gegenständen aus Gummi oder Vinyl mit dem Gerät, da diese Substanzen das Gehäuse beschädigen können. • Bei der Verwendung von mit Chemikalien imprägnierten Wischtüchern usw. lesen Sie bitte sorgfältig die den Wischtüchern beiliegenden Vorsichtsmaßregeln. Reinigen der Abtasterlinse Unter normalen Betriebsbedingungen kommt es zu keiner Verschmutzung der Abtasterlinse dieses Gerätes. Sollte es dennoch vorkommen, dass sich Staub oder Schmutz auf der Abtasterlinse angesammelt haben und eine Funktionsstörung verursachen, wenden Sie sich bitte zwecks Reinigung der Linse an eine PioneerKundendienststelle. Vom Gebrauch von handelsüblichen Linsenreinigern wird abgeraten, da derartige Reiniger die Abtasterlinse beschädigen können. X-HM16_26_26D_De.book 33 ページ 2016年7月22日 金曜日 午前10時35分 Zusätzliche Informationen Aufbewahren Speziell geformte Discs (herzförmig, sechseckig usw.) können nicht mit diesem Gerät abgespielt werden. Verwenden Sie keine derartigen Discs, da diese das Gerät beschädigen können. Reinigen der Discs Einstellen der automatischen Stromabschaltung 1 Druk op MENU op de afstandsbediening. “Auto Power Down” zal op het hoofddisplay weergegeven worden. 2 Druk op ENTER op de afstandsbediening. Español • Fingerabdrücke oder Staub auf den Discs können dazu führen, dass die Discs nicht abgespielt werden können. Verwenden Sie in diesem Falle zum Reinigen ein Tuch usw., mit dem Sie die Disc vorsichtig von der Innenseite zur Außenseite hin abwischen. Verwenden Sie zum Reinigen keine verschmutzten Tücher. Français • Platzieren Sie Discs stets in Ihren Hüllen und bewahren Sie sie vertikal auf. Vermeiden Sie für den Aufbewahrungsort Hitze, Feuchtigkeit, direktes Sonnenlicht und extreme Kälte. • Lesen Sie unbedingt die mit der Disc mitgelieferten Behandlungshinweise. Speziell geformte Discs English Handhabung von Discs 10 3 Druk op / om de auto power offinstelling ON/OFF om te schakelen. Hinweis • Wenn die automatische Stromabschaltung eingeschaltet ist (ON), wird auf dem Hauptdisplay „APD ON“ angezeigt. • Wenn die automatische Stromabschaltung eingeschaltet ist (OFF), wird auf dem Hauptdisplay „APD OFF“ angezeigt. Wiederherstellen aller Standardeinstellungen 1 Drücken Sie Í, um das Gerät einzuschalten. 3 Drücken Sie ENTER. “OK?” wird angezeigt. 4 Drücken Sie ENTER. Pyccкий 2 Drücken Sie MENU und dann / , bis "Factory Reset" auf dem Display angezeigt wird. Nederlands Führen Sie die unten angegebenen Schritte aus, um alle Einstellungen auf ihre Standard-Einstellungen zurückzusetzen. Deutsch • Verwenden Sie zum Reinigen kein Benzin, keinen Verdünner und keine anderen leicht flüchtigen Chemikalien. Verwenden Sie auch keine Sprays und keine antistatischen Mittel. • Verwenden Sie bei hartnäckigem Schmutz etwas Wasser auf einem weichen Tuch, wringen Sie dieses Tuch gründlich aus, wischen Sie den Schmutz weg und wischen Sie dann die Feuchtigkeit mit einem trockenen Tuch weg. • Verwenden Sie auf keinen Fall beschädigte Discs (Discs mit Rissen oder verzogene Discs). • Lassen Sie auf keinen Fall die Signal-Oberfläche der Disc zerkratzt oder schmutzig werden. • Bringen Sie kein Papier und keine Sticker auf der Oberfläche der Discs an. Wenn Sie dies tun, könnten sich die betreffenden Discs verziehen, so dass es unmöglich wird, sie abzuspielen. Bitte beachten Sie auch, dass geliehene Discs oft Etiketten haben, die auf ihnen angebracht sind, und dass der Klebstoff der Etiketten herausgequollen ist. Überzeugen Sie sich vor der Verwendung der geliehenen Discs, dass sich rund um die Kanten solcher Etiketten kein Klebstoff befindet. Italiano • Die Anfangseinstellung ist ON. • Während der Rückstellung wird „Resetting“ im Display angezeigt. Der Strom ist ausgeschaltet. 33 De X-HM16_26_26D_De.book 10 34 ページ 2016年7月22日 金曜日 午前10時35分 Zusätzliche Informationen Technische Daten • Verstärkerteil Effektive Ausgangsleistung: . . . . . . . . . . . . . . 15 W + 15 W (1 kHz, 10 %, THD, 8 Ω) • Tunerbereich Frequenzbereich (UKW) . . . . . . . . 87,5 MHz bis 108,0 MHz Antenneneingang (UKW) . . . . . . . . . . 75 Ω unsymmetrisch Frequenzbereich (MW) (Nur bei Modellen für Nordamerika) . . . . . . . . . . . . . . . . . . . . . . . . . . . . . 530 kHz bis 1710 kHz Antenne (MW) . . . . . . . . . . . . . . . . . . . . . Rahmenantenne • Bluetooth (alleen X-HM26/26D) Version . . . . . . . . . . . . . . . .Bluetooth Spezifikation Ver. 4.1 Ausgang . . . . . . . . . . . . . . Bluetooth Spezifikation Klasse 2 Geschätzter Sendeabstand (Sichtlinie)* . . . . . . . Etwa 10 m Frequenzbereich. . . . . . . . . . . . . . . . . . . . . . . . . . . 2,4 GHz Modulation . . . . . . . . . . . FH-SS (Frequency Hopping Spread Spectrum) Unterstützte Bluetooth Profile. . . . . . . . . . . . A2DP, AVRCP Unterstützter Codec . . . . . . . . . . . . SBC (Subband Codec) Unterstützter Kopierschutz . . . . . . . . . . . . . . . . . . . SCMS-T PIN-Code . . . . . . . . . . . . . . . . . . . . . . . . . . . . . . . . . . .0000 * Der Sendeabstand ist ein Schätzwert. Die tatsächlichen Sendeabstände können je nach Umgebungsbedingungen variieren. • Verschiedenes USB-Anschluss. . . . . . . . . . . . . . . . . . . . . . . . . 5 V, 500 mA Spannungsversorgung (Europäische Modelle) . . . . . . . . . . . . . . . . . . AC 220 V bis 240 V, 50 Hz/60 Hz (Nur bei Modellen für Nordamerika) . . . . . . . . . . . . . . . . . . . . . . . . . . . . . . . AC 120 V, 60 Hz Leistungsaufnahme Strom ein . . . . . . . . . . . . . . . . . . . . . . . . . . . . . . . . 20 W Strom-Standby . . . . . . . . . . . . . . . . . 0,5 W oder weniger Strom-Standby (BT STANDBY ON) . . . . . . . . . . . . . . . . . . . . . . . . . . . . . 0,5 W oder weniger Abmessungen . . . . . . . . . . . . . .215 mm (B) x 95 mm (H) x 315 mm (T) Gewicht (ohne die Verpackung) . . . . . . . . . . . . . . . . . 2,0 kg • Lautsprecher Gehäuse . . . . . . Bassreflex-Lautsprecher, Bücherregal-Typ (Magnetabschirmung) Konfiguration . . . . . . . . . . . . . . . . . . . . . . . . . .Zweiwege Hochtöner . . . . . . . . . . . . . . . . . . . . . . . . . . 2 cm-Dome Tieftöner. . . . . . . . . . . . . . . . . . . . . . . . . . . 10 cm-Konus Maximale Eingangsleistung . . . . . . . . . . . . . . . . . . . . 15 W Impedanz . . . . . . . . . . . . . . . . . . . . . . . . . . . . . . . . . . . . 8 Ω Abmessungen . . . . . . . . . . . . . 130 mm (B) x 212 mm (H) x 228,5 mm (T) Gewicht. . . . . . . . . . . . . . . . . . . . . . . . . . . . . . . jeder 2,0 kg 34 De • Mitgeliefertes Zubehör Fernbedienung . . . . . . . . . . . . . . . . . . . . . . . . . . . . . . . . . Batterien (R03, Größe „AAA“) . . . . . . . . . . . . . . . . . . . . . . MW-Antennenkabel*1 . . . . . . . . . . . . . . . . . . . . . . . . . . . . UKW-Drahtantenne*2 . . . . . . . . . . . . . . . . . . . . . . . . . . . . DAB/FM-Drahtantenne*3. . . . . . . . . . . . . . . . . . . . . . . . . . Netzkabel. . . . . . . . . . . . . . . . . . . . . . . . . . . . . . . . . . . . . . Garantiekarte*4 . . . . . . . . . . . . . . . . . . . . . . . . . . . . . . . . . Bedienungsanleitung (vorliegendes Dokument) . . . . . . . . *1 Nur bei Modellen für Nordamerika *2 alleen X-HM16/HM26 *3 alleen X-HM26D *4 Nur europäische Modelle 1 2 1 1 1 1 1 1 Hinweis • Diese Daten gelten für eine Stromversorgung von 230 V. • Die technischen Daten und das Design können für Verbesserungen ohne vorherige Ankündigung geändert werden. „Pioneer” ist eine Marke der Pioneer Corporation und wird unter Lizenz verwendet. © 2016 Onkyo & Pioneer Corporation. Alle Rechte vorbehalten. SN29402699_X-HM16_26_26D_En_European.book 39 ページ 2016年7月21日 木曜日 午前10時20分 X-HM16_26_26D_Nl.book 2 ページ 2016年7月22日 金曜日 午前10時42分 LET OP OM HET GEVAAR VOOR EEN ELEKTRISCHE SHOCK TE VOORKOMEN, DEKSEL (OF RUG) NIET VERWIJDEREN. AAN DE BINNENZIJDE BEVINDEN ZICH GEEN ELEMENTEN DIE DOOR DE GEBRUIKER KUNNEN BEDIEND WORDEN. ENKEL DOOR GEKWALIFICEERD PERSONEEL TE BEDIENEN. D3-4-2-1-1_B2_Nl WAARSCHUWING Dit apparaat is niet waterdicht. Om brand of een elektrische schok te voorkomen, mag u geen voorwerp dat vloeistof bevat in de buurt van het apparaat zetten (bijvoorbeeld een bloemenvaas) of het apparaat op andere wijze blootstellen aan waterdruppels, opspattend water, regen of vocht. D3-4-2-1-3_A1_Nl WAARSCHUWING Om brand te voorkomen, mag u geen open vuur (zoals een brandende kaars) op de apparatuur zetten. D3-4-2-1-7a_A1_Nl LET OP De STANDBY/ON schakelaar van dit apparaat koppelt het apparaat niet volledig los van het lichtnet. Aangezien er na het uitschakelen van het apparaat nog een kleine hoeveelheid stroom blijft lopen, moet u de stekker uit het stopcontact halen om het apparaat volledig van het lichtnet los te koppelen. Plaats het apparaat zodanig dat de stekker in een noodgeval gemakkelijk uit het stopcontact kan worden gehaald. Om brand te voorkomen, moet u de stekker uit het stopcontact halen wanneer u het apparaat langere tijd niet denkt te gebruiken (bijv. wanneer u op vakantie gaat). D3-4-2-2-2a*_A1_Nl LET OP Dit apparaat is geclassificeerd als een klasse 1 laserproduct onder de veiligheidsnormen voor laserproducten, IEC 60825-1:2007. KLASSE 1 LASERPRODUCT BELANGRIJKE INFORMATIE BETREFFENDE DE VENTILATIE D58-5-2-2a_A1_Nl Let er bij het installeren van het apparaat op dat er voldoende vrije ruimte rondom het apparaat is om een goede doorstroming van lucht te waarborgen (tenminste 25 cm boven, 10 cm achter en 5 cm aan de zijkanten van het apparaat). WAARSCHUWING De gleuven en openingen in de behuizing van het apparaat zijn aangebracht voor de ventilatie, zodat een betrouwbare werking van het apparaat wordt verkregen en oververhitting wordt voorkomen. Om brand te voorkomen, moet u ervoor zorgen dat deze openingen nooit geblokkeerd worden of dat ze afgedekt worden door voorwerpen (kranten, tafelkleed, gordijn e.d.) of door gebruik van het apparaat op een dik tapijt of een bed. D3-4-2-1-7b*_A1_Nl Dit apparaat is bestemd voor normaal huishoudelijk gebruik. Indien het apparaat voor andere doeleinden of op andere plaatsen wordt gebruikt (bijvoorbeeld langdurig gebruik in een restaurant voor zakelijke doeleinden, of gebruik in een auto of boot) en als gevolg hiervan defect zou raken, zullen de reparaties in rekening gebracht worden, ook als het apparaat nog in de garantieperiode is. K041_A1_Nl WAARSCHUWING NETSNOER Pak het netsnoer beet bij de stekker. Trek de stekker er niet uit door aan het snoer te trekken en trek nooit aan het netsnoer met natte handen aangezien dit kortsluiting of een elektrische schok tot gevolg kan hebben. Plaats geen toestel, meubelstuk o.i.d. op het netsnoer, en klem het niet vast. Maak er nooit een knoop in en en verbind het evenmin met andere snoeren. De netsnoeren dienen zo te worden geleid dat er niet per ongeluk iemand op gaat staan. Een beschadigd netsnoer kan brand of een elektrische schok veroorzaken. Kontroleer het netsnoer af en toe. Wanneer u de indruk krijgt dat het beschadigd is, dient u bij uw dichtstbijzijnde erkende PIONEER onderhoudscentrum of uw dealer een nieuw snoer te kopen. S002*_A1_Nl Gebruiksomgeving Temperatuur en vochtigheidsgraad op de plaats van gebruik: +5 °C tot +35 °C, minder dan 85 % RH (ventilatieopeningen niet afgedekt) Zet het apparaat niet op een slecht geventileerde plaats en stel het apparaat ook niet bloot aan hoge vochtigheid of direct zonlicht (of sterke kunstmatige verlichting). D3-4-2-1-7c*_A1_Nl X-HM16_26_26D_Nl.book 3 ページ 2016年7月22日 金曜日 午前10時42分 Gebruikersinformatie voor het verzamelen en verwijderen van oude producten en batterijen Symbool voor toestellen De symbolen op producten, verpakkingen en bijbehorende documenten geven aan dat de gebruikte elektronische producten en batterijen niet met het gewone huishoudelijk afval kunnen worden samengevoegd. Er bestaat een speciaal wettelijk voorgeschreven verzamelsysteem voor de juiste behandling, het opnieuw bruikbaar maken en de recyclage van gebruikte producten en batterijen. Symbolen voor batterijen Door een correcte verzamelhandeling zorgt u ervoor dat het verwijderde product en/of batterij op de juiste wijze wordt behandeld, opnieuw bruikbaar wordt gemaakt, wordt gerecycleerd en het niet schadelijk is voor de gezondheid en het milieu. Voor verdere informatie betreffende de juiste behandling, het opnieuw bruikbaar maken en de recyclage van gebruikte producten en batterijen kunt u contact opnemen met de plaatselijke overheid of een verkooppunt. Deze symbolen zijn enkel geldig in de landen van de europese unie. Pb Indien u zich in een ander dan bovengenoemde landen bevindt kunt u contact opnemen met de plaatselijke overheid voor meer informatie over de juiste verwijdering van het product. K058a_A1_Nl Waarschuwing radiogolven WAARSCHUWING Dit toestel maakt gebruik van radiogolven met een frequentie van 2,4 GHz, een band die ook gebruikt wordt door andere draadloze systemen (draadloze telefoons, magnetronovens enz.). In dit geval verschijnt er ruis in het televisiebeeld en is het mogelijk dat dit apparaat (en ook de producten die door die apparaat worden ondersteund) signaalinterferentie veroorzaakt in de antenne-ingangsaansluiting van uw televisie, video-apparaat, satelliettuner enz. Vergroot in een dergelijk geval de afstand tussen de ingangsaansluiting voor de antenne en dit toestel (inclusief door dit toestel ondersteunde apparatuur). • Pioneer kan niet aansprakelijk worden gesteld voor storingen of foutieve werking van het geschikte Pioneer product door communicatiefouten/storingen die samenhangen met uw netwerkverbinding en/of de aangesloten apparatuur. Raadpleeg uw Internet-provider of de fabrikant van uw netwerkapparatuur. • Er is een aparte overeenkomst/betaling vereist met/aan een internet service provider om gebruik te kunnen maken van het internet. Berg kleine onderdelen buiten het bereik van kinderen en baby’s op. Neem direct contact op met een dokter bij per ongeluk inslikken. X-HM16_26_26D_Nl.book 4 ページ 2016年7月22日 金曜日 午前10時42分 Hartelijk dank voor de aanschaf van dit Pioneer produkt. Lees de handleiding aandachtig door zodat u volledig op de hoogte bent van de bediening en werking. Bewaar de handleiding op een veilige plaats voor eventuele naslag in de toekomst. Inhoudsopgave 01 Voordat u begint Inhoud van de doos . . . . . . . . . . . . . . . . . . . . . . . . . . . . . .5 Aanbrengen van de batterijen in de afstandsbediening . . . . . . . . . . . . . . . . . . . . . . . . . . . . . . .5 Gebruik van de afstandsbediening . . . . . . . . . . . . . . . 5 02 Overzicht van de bedieningstoetsen Afstandsbediening . . . . . . . . . . . . . . . . . . . . . . . . . . . . . . .6 Voorpaneel . . . . . . . . . . . . . . . . . . . . . . . . . . . . . . . . . . . .7 Display . . . . . . . . . . . . . . . . . . . . . . . . . . . . . . . . . . . . . . . .8 Luidsprekersysteem . . . . . . . . . . . . . . . . . . . . . . . . . . . . .8 03 Aansluitingen Aansluiten van de luidsprekers . . . . . . . . . . . . . . . . . . . . .9 Antennes aansluiten . . . . . . . . . . . . . . . . . . . . . . . . . . . .10 Buitenantennes gebruiken . . . . . . . . . . . . . . . . . . . . . 10 Insteken . . . . . . . . . . . . . . . . . . . . . . . . . . . . . . . . . . . . . .11 04 Aan de slag Het apparaat inschakelen . . . . . . . . . . . . . . . . . . . . . . . .12 Instellen van de klok . . . . . . . . . . . . . . . . . . . . . . . . . . . .12 Algemene bediening . . . . . . . . . . . . . . . . . . . . . . . . . . . .12 Ingangsfunctie . . . . . . . . . . . . . . . . . . . . . . . . . . . . . . 12 Helderheid van de display regelen. . . . . . . . . . . . . . . 12 Automatische begininstelling van het volume . . . . . . 12 Volumeregeling . . . . . . . . . . . . . . . . . . . . . . . . . . . . . 12 Muting . . . . . . . . . . . . . . . . . . . . . . . . . . . . . . . . . . . . 12 Geluidsbediening . . . . . . . . . . . . . . . . . . . . . . . . . . . . . . .13 Equalizer . . . . . . . . . . . . . . . . . . . . . . . . . . . . . . . . . . 13 P.bass-bediening . . . . . . . . . . . . . . . . . . . . . . . . . . . . 13 Bass/treble-bediening . . . . . . . . . . . . . . . . . . . . . . . . 13 De wekkerfunctie instellen . . . . . . . . . . . . . . . . . . . . . . . .13 Activeren van de wekkerfunctie . . . . . . . . . . . . . . . . . 14 Uitschakelen van de wekkertimer . . . . . . . . . . . . . . . 14 Gebruik van de wekkerfunctie . . . . . . . . . . . . . . . . . . 14 De slaaptimer gebruiken . . . . . . . . . . . . . . . . . . . . . . . . .14 Gebruik van hoofdtelefoons . . . . . . . . . . . . . . . . . . . . . . .14 05 Disc-weergave Afspelen van discs of bestanden . . . . . . . . . . . . . . . . . . .15 Laad deze disc. . . . . . . . . . . . . . . . . . . . . . . . . . . . . . 15 Speel nummers op een CD . . . . . . . . . . . . . . . . . . . . 15 Speel MP3-muziekbestanden af . . . . . . . . . . . . . . . . 15 Geavanceerde weergave van een CD of MP3-disc . . . .16 Herhaalde weergave . . . . . . . . . . . . . . . . . . . . . . . . . 16 Willekeurige weergave. . . . . . . . . . . . . . . . . . . . . . . . 16 Geprogrammeerde weergave (CD) . . . . . . . . . . . . . . 17 Informatie over het downloaden van MP3 . . . . . . . . . 17 Wijzig de displayinhoud . . . . . . . . . . . . . . . . . . . . . . . 17 06 USB-weergave Afspelen van USB-opslagapparaten . . . . . . . . . . . . . . . .18 Herhaalde weergave . . . . . . . . . . . . . . . . . . . . . . . . . 19 Willekeurige weergave. . . . . . . . . . . . . . . . . . . . . . . . 19 Wijzig de displayinhoud . . . . . . . . . . . . . . . . . . . . . . . 19 4 Nl 07 Gebruik van de tuner Luisteren naar FM (Voor Europese modellen)/Luisteren naar FM of AM (Voor Noord-Amerikaanse modellen) . . . . . . 20 Afstemmen . . . . . . . . . . . . . . . . . . . . . . . . . . . . . . . . . 20 Voorkeurzenders opslaan . . . . . . . . . . . . . . . . . . . . . . 20 Gebruik van het Radio Data Systeem (RDS) (alleen voor Europese modellen) . . . . . . . . . . . . . . . . 21 Luisteren naar de DAB+ (alleen X-HM26D) . . . . . . . . . . 23 Informatie over DAB+ (digitale audio-uitzending) . . . . 23 Tuning . . . . . . . . . . . . . . . . . . . . . . . . . . . . . . . . . . . . . 23 De informatiedisplay wijzigen . . . . . . . . . . . . . . . . . . . 24 Een zender opslaan . . . . . . . . . . . . . . . . . . . . . . . . . . 24 DAB frequentietabel (BAND III) . . . . . . . . . . . . . . . . . 24 08 Overige aansluitingen Aansluiten van extra apparatuur . . . . . . . . . . . . . . . . . . . 25 Automatisch schakelen naar Audio In-ingang (Alleen voor Noord-Amerikaanse modellen) . . . . . . . . . . 25 09 Bluetooth® audioweergave Muziek weergeven met behulp van Bluetooth draadloze technologie . . . . . . . . . . . . . . . . . . . . . . . . . . . . . . . . . . . 26 Gebruik van de afstandsbediening . . . . . . . . . . . . . . . . . 26 Paren met het systeem (eerste vastlegging) . . . . . . . . . 26 Luister naar muziek op het systeem vanaf een met Bluetooth uitgerust apparaat . . . . . . . . . . . . . . . . . . . . . . . . . . . . . . 27 BT STANDBY . . . . . . . . . . . . . . . . . . . . . . . . . . . . . . . . . 27 Waarschuwing radiogolven . . . . . . . . . . . . . . . . . . . . . . 28 Omvang van de werking . . . . . . . . . . . . . . . . . . . . . . . 28 Weerkaatsingen van radiogolven . . . . . . . . . . . . . . . . 28 Voorzorgsmaatregelen betreffende de aansluiting op producten die door dit apparaat worden ondersteund . . . . . . . . . . . . . . . . . . . . . . . . . . . . . . . . 28 10 Aanvullende informatie Problemen oplossen . . . . . . . . . . . . . . . . . . . . . . . . . . . . Afspeelbare schijven en indelingen . . . . . . . . . . . . . . . . Omtrent kopieerbeveiligde CD’s . . . . . . . . . . . . . . . . . Geschikte audiobestandsformaten . . . . . . . . . . . . . . . Let op tijdens het gebruik . . . . . . . . . . . . . . . . . . . . . . . . Wanneer het apparaat wordt verplaatst . . . . . . . . . . . Plaats van installatie . . . . . . . . . . . . . . . . . . . . . . . . . . Plaats nooit een voorwerp bovenop het apparaat . . . Over condensvocht . . . . . . . . . . . . . . . . . . . . . . . . . . . Reiniging van het product . . . . . . . . . . . . . . . . . . . . . . Reinigen van het disc-lensje . . . . . . . . . . . . . . . . . . . . Behandeling van discs . . . . . . . . . . . . . . . . . . . . . . . . . . Bewaren . . . . . . . . . . . . . . . . . . . . . . . . . . . . . . . . . . . Reiniging van schijven . . . . . . . . . . . . . . . . . . . . . . . . Informatie over schijven met speciale vormen . . . . . . Auto Power Off-instelling . . . . . . . . . . . . . . . . . . . . . . . . Alle instellingen op de beginstand terugzetten . . . . . . . . Specificaties . . . . . . . . . . . . . . . . . . . . . . . . . . . . . . . . . . 29 31 32 32 32 32 32 32 32 32 32 33 33 33 33 33 33 34 X-HM16_26_26D_Nl.book 5 ページ 2016年7月22日 金曜日 午前10時42分 Voordat u begint 01 English Hoofdstuk 1: Voordat u begint Gebruik van de afstandsbediening De afstandsbediening heeft een bereik van ongeveer 7 m bij een hoek van ongeveer 30º vanaf de afstandsbedieningssensor. T Sluit het achterdekseltje. 30° 30° Wanneer u de afstandsbediening gebruikt, houd dan rekening met het volgende: • Zorg ervoor dat zich geen obstakels tussen de afstandsbediening en de sensor op het apparaat bevinden. • De afstandsbediening werkt mogelijk niet goed als sterk zonlicht of TL-licht op de afstandsbedieningssensor valt. • Afstandsbedieningen van andere apparatuur kunnen storing veroorzaken. Vermijd het gebruik van afstandsbedieningen voor apparatuur die in de buurt van dit apparaat is opgesteld. • Vervang de batterijen wanneer het bereik van de afstandsbediening aanzienlijk korter is geworden. Pyccкий 7m WAARSCHUWING • Gebruik geen andere dan de voorgeschreven batterijen. Gebruik ook nooit een oude en een nieuwe batterij tegelijk. • Wees bij het plaatsen van de batterijen voorzichtig zodat u de veren op de - aansluitingen voor de batterijen niet beschadigt. Hierdoor kunnen batterijen gaan lekken of oververhit raken. Nederlands INPU 2 Deutsch 1 Open het achterdekseltje en plaats de batterijen zoals hieronder is afgebeeld. Italiano Aanbrengen van de batterijen in de afstandsbediening WAARSCHUWING • Gebruik of bewaar batterijen niet in direct zonlicht of op een hete plaats, zoals in de auto of bij een kachel. Batterijen kunnen hierdoor gaan lekken, oververhitten, exploderen of in brand vliegen. Bovendien vermindert dit de levensduur of prestatie van de batterijen. Español Controleer of de volgende onderdelen zich bij opening in de doos bevinden. • Afstandsbediening • AAA-batterijen (R03) x 2 • Netsnoer • AM-antennekabel*1 • FM-draadantenne*2 • DAB/FM-draadantenne*3 • Garantiebewijs*4 • Handleiding (dit document) *1 Alleen Noord-Amerikaanse modellen *2 alleen X-HM16/X-HM26 *3 alleen X-HM26D *4 Alleen Europese modellen • Leg de batterijen in de juiste richting in de afstandsbediening, zoals aangegeven door de polariteitstekens (+ en -). • Probeer niet om de batterijen open te maken, verhit ze niet en gooi ze niet in open vuur of water. • Batterijen kunnen verschillende voltages hebben, ook als ze van hetzelfde formaat zijn. Gebruik geen verschillende soorten batterijen door elkaar. • Verwijder de batterijen als u de afstandsbediening voorlopig (een maand of langer) niet meer gebruikt, om schade door eventuele batterijlekkage te voorkomen. Als er batterijvloeistof is gelekt, veegt u de binnenkant van het batterijvak dan zorgvuldig schoon, voordat u nieuwe batterijen plaatst. Als een batterij lek is en de vloeistof komt op uw huid, wast u het er grondig af met volop water. • Gebruikte batterijen dienen met inachtneming van de regelgeving of milieuwetgeving van de overheid in uw land/zone van de hand te worden gedaan. Français Inhoud van de doos 5 Nl X-HM16_26_26D_Nl.book 02 6 ページ 2016年7月22日 金曜日 午前10時42分 Overzicht van de bedieningstoetsen Hoofdstuk 2: Overzicht van de bedieningstoetsen 4 Afstandsbediening / // , ENTER Gebruiken om de systeeminstellingen en modi te selecteren en daartussen te wisselen, en om acties te bevestigen. 5 1 2 10 11 3 PGM/MEMORY • Gebruik om de CD (bladzijde 17) op te slaan of te programmeren. • Gebruik om FM/AM (bladzijde 20) of DAB (bladzijde 24) stations in het geheugen op te slaan. 6 TUNE +/– Gebruiken om radiofrequenties op te zoeken (bladzijde 20). 12 PRESET +/– 4 5 Weergavebedieningstoetsen Gebruiken om elke functie te bedienen nadat u deze heeft geselecteerd via de invoerfunctietoetsen (bladzijde 16). 13 Use to select preset radio stations (bladzijde 20). 7 Bedieningstoetsen voor het geluid De geluidskwaliteit afstellen (bladzijde 13). 8 6 14 9 7 8 9 SLEEP Zie De slaaptimer gebruiken op bladzijde 14. TIMER Gebruik deze toets om de klok in te stellen en ook om de timers in te stellen en te controleren (bladzijde 12). 15 16 10 Op drukken om de instelling voor herhaald afspelen van een CD (bladzijde 16) of USB te veranderen (bladzijde 19). 11 RANDOM Op drukken om de instelling voor het in willekeurige volgorde afspelen van een CD (bladzijde 16) of USB te veranderen (bladzijde 19). 12 DISPLAY 1 Í Schakelen tussen ruststand en aan (bladzijde 12). 2 Ingangsfunctieknoppen Gebruik deze toets om de ingangsbron van deze receiver te selecteren (bladzijde 12). Op drukken om de weergave van informatie over MP3 (bladzijde 17), RDS (bladzijde 21) of DAB (bladzijde 24) te veranderen. 13 Op drukken om naar de vorige weergave terug te keren. 14 Volume-bedieningsfuncties Gebruiken om het audiobestand met gebruik van het Bluetooth netwerk op te stellen of af te spelen (bladzijde 26). 3 MENU Gebruiken voor toegang tot het menu. 6 Nl Gebruik deze toetsen om het volume in te stellen (bladzijde 12). 15 Hiermee zet u het geluid aan en uit (bladzijde 12). 16 DIMMER Dimt of maakt het display helderder. De helderheid kan in vier stappen worden geregeld (bladzijde 12). X-HM16_26_26D_Nl.book 7 ページ 2016年7月22日 金曜日 午前10時42分 Overzicht van de bedieningstoetsen 02 1 2 3 4 5 English Voorpaneel Français TIMER Español 1 7 8 Í STANDBY/ON Schakelen tussen ruststand en aan (bladzijde 12). 2 Afstandsbedieningssensor Hier komen de signalen van de afstandsbediening binnen. TIMER indicator Gaat branden als de receiver met de timerinstelling wordt uitgeschakeld. 4 Hoofddisplay 10 7 11 Hoofdtelefoonaansluiting Sluit hierop een hoofdtelefoon aan. Wanneer een hoofdtelefoon is aangesloten, wordt er geen geluid weergegeven via de luidsprekers. 8 USB-aansluitpunt Gebruiken om uw USB-massaopslagapparaat als audiobron te verbinden (bladzijde 18). 9 Schijven Plaats de schijf met de label aan de bovenzijde (bladzijde 15). 5 10 Weergavebedieningstoetsen Volumeregeling Gebruik deze toetsen om het volume in te stellen (bladzijde 12). 6 INPUT Selecteren van de ingangsbron. Via deze toetsen kan de gewenste track of het bestand dat moet worden afgespeeld worden geselecteerd. Gebruiken om de weergave stop te zetten. Hiermee wordt de weergave stopgezet of hervat vanaf het onderbroken punt. Nederlands Zie Display op bladzijde 8. Deutsch 3 9 Italiano 6 11 Schijflade OPEN/CLOSE-toets Pyccкий Gebruiken om de schijflade te openen of te sluiten (bladzijde 15). 7 Nl X-HM16_26_26D_Nl.book 02 8 ページ 2016年7月22日 金曜日 午前10時42分 Overzicht van de bedieningstoetsen Display 1 2 3 1 3 ; Brandt wanneer het geluid is gedempt. De weergave onderbreken. 4 5 4 Opmerking De Timerfunctie is ingesteld. • Het Mute-icoon verschijnt in rood. 2 5 1 Luidsprekersysteem 1 3 2 1 Tweeter 2 Woofer 3 Aansluitpunten luidspreker Belangrijk • De luidsprekergrill kan niet verwijderd worden. • Beide luidsprekers kunnen aan de rechter- of linkerzijde worden gebruikt. 8 Nl Lettertekendisplay Toont uiteenlopende systeeminformatie. Start de weergave. X-HM16_26_26D_Nl.book 9 ページ 2016年7月22日 金曜日 午前10時42分 Aansluitingen 03 English Hoofdstuk 3: Aansluitingen • Duw de klemaansluiting open en steek de ontblote draad naar binnen. • Verbind de zwarte draad met de (s)-aansluiting en de rode draad met de (r)-aansluiting. Linkerluidspreker Deutsch Het achterpaneel van dit apparaat Italiano Rechterluidspreker Español Aansluiten van de luidsprekers WAARSCHUWING • Op deze luidsprekeraansluitingen staat een GEVAARLIJKE spanning. Om een elektrische schok te voorkomen bij het aansluiten en losmaken van de luidsprekerkabels, moet u de stekker uit het stopcontact halen voordat u niet geïsoleerde onderdelen aanraakt. • Sluit geen andere luidsprekers aan dan die bij dit systeem worden geleverd. • Sluit de bijgeleverde luidsprekers niet op een andere versterker aan dan die bij dit systeem wordt geleverd. Aansluiten op een andere versterker kan resulteren in een defect of brand. • De speakers mogen niet aan de wand of aan het plafond worden bevestigd. Het apparaat kan vallen en letsel veroorzaken. • Deze speakers zijn magnetisch afgeschermd. Afhankelijk van de plaats van installatie, ontstaat er kleurvervorming als het speakersysteem dichtbij het scherm van een televisie wordt geplaatst. Als dit zich voordoet, moet de televisie worden uitgezet en weer na 15 tot 30 minuten aangezet. Als dit probleem zich blijft voordoen, moet het speakersysteem verder van de televisie af worden geplaatst. • Zorg ervoor dat de luidsprekerkabelkern niet bloot komt te liggen en niet met andere kabelkernen in aanraking komt. Hierdoor kan een storing in het systeem optreden. • Zorg ervoor dat de kabelkern van de speaker niet in contact komt met de behuizing van de receiver. Français WAARSCHUWING • Zorg er te allen tijde voor dat het apparaat is uitgeschakeld en verwijder het netsnoer van het stopcontact als u aansluitingen doet of wijzigt. • Sluit het netsnoer aan nadat alle aansluitingen tussen de diverse apparaten zijn voltooid. Nederlands Pyccкий • Als de kabelkern van de speaker in contact komt met een metalen gedeelte van de behuizing van de receiver, kan deze schade toebrengen aan de speakers, wat kan leiden tot rook en brand. Steek de speakerkabels stevig in de aansluitpunten en controleer dat de kabel er niet gemakkelijk uit kan komen. Opmerking • Er is geen verschil tussen de luidsprekers L en R. 9 Nl X-HM16_26_26D_Nl.book 03 10 ページ 2016年7月22日 金曜日 午前10時42分 Aansluitingen Antennes aansluiten • Sluit de AM-raamantenne en de FM (DAB/FM)draadantenne aan zoals hieronder getoond. • Om de ontvangst en de geluidskwaliteit te verbeteren, kunt u buitenantennes aansluiten (zie Buitenantennes gebruiken hieronder). • Plaats de antenne bij een venster e.d. voor de beste ontvangst. • Plaats de antenne niet in de buurt van een computer of tv. Dat kan ruis veroorzaken. 4 Sluit de FM (DAB/FM)-draadantenne aan op de FM-antenne-aansluiting. Alleen voor Noord-Amerikaanse modellen Voor optimale resultaten rolt u de FM (DAB/FM)-antenne volledig af en bevestigt u deze aan een wand of een deurkozijn. Niet los ophangen of opgerold laten. 2 3 1 3 Plaats de AM-antenne op een vlakke ondergrond en in een richting waarbij de ontvangst optimaal is. Buitenantennes gebruiken Om de FM-ontvangst te verbeteren Gebruik een PAL-connector (niet meegeleverd) om een externe FM (DAB/FM)-antenne aan te sluiten. 2 X-HM16/ X-HM26 4 Eenkliks PALsteker 3 1 Voor Europese modellen X-HM26D 75 Ω coaxiale kabel X-HM16/X-HM26 4 X-HM26D 1 Sluit de AM-antennebedrading aan. Houd de connector voor de aansluiting vast. 2 Bevestig de AM-raamantenne aan de bevestigde houder. Stel hem op zoals hierboven afgebeeld. 10 Nl X-HM16_26_26D_Nl.book 11 ページ 2016年7月22日 金曜日 午前10時42分 Aansluitingen 03 Het achterpaneel van dit apparaat Français Schakel het apparaat uit en verwijder het netsnoer van het wandcontact voordat u apparatuur aansluit of aansluitingen wijzigt. Nadat alle aansluitingen zijn voltooid, kunt u het apparaat op een stopcontact aansluiten. English Insteken Español Naar stopcontact Netsnoer Italiano WAARSCHUWING • Gebruik uitsluitend het netsnoer dat bij dit apparaat is meegeleverd. • Het netsnoer mag alleen voor het bovenomschreven doeleinde worden gebruikt. Deutsch Nederlands Pyccкий 11 Nl X-HM16_26_26D_Nl.book 04 12 ページ 2016年7月22日 金曜日 午前10時42分 Aan de slag Hoofdstuk 4: Aan de slag Het apparaat inschakelen Druk op de toets Í om het apparaat in te schakelen. Algemene bediening Na gebruik: Ingangsfunctie Druk op de toets Í om het apparaat op stand-by te zetten. Als INPUT op het hoofdsysteem wordt ingedrukt, gaat de huidige functie over op een andere modus. Druk herhaaldelijk op INPUT om de gewenste functie te kiezen. Instellen van de klok CD Audio In *1 *2 DAB*1 Bluetooth USB AM*2 FM alleen X-HM26D Alleen Noord-Amerikaanse modellen Helderheid van de display regelen Druk op DIMMER om de helderheid van de display te dimmen. De helderheid kan in vier stappen worden geregeld. 1 Druk op Í om het apparaat in te schakelen. 2 Druk op TIMER op de afstandsbediening. “CLOCK” wordt op het hoofddisplay aangegeven. 3 Druk op ENTER. 4 Druk op / om de dag in te stellen, en druk daarna op ENTER. 5 Druk op / om het uur in te stellen, en druk daarna op ENTER. 6 Druk op / om de minuut in te stellen, en druk daarna op ENTER om te bevestigen. 7 Druk op ENTER. Bevestigen van het tijddisplay: Druk op TIMER. De tijdsaanduiding zal circa 10 seconden worden getoond. Gelijk zetten van de klok: Voer “Instelling van de klok” uit vanaf stap 1. Opmerking • Wanneer stroomvoorziening is weergegeven nadat het apparaat weer is ingestoken of door vermogensuitval, stel de klok in opnieuw. 12 Nl Automatische begininstelling van het volume Als u het hoofdsysteem uit- en inschakelt terwijl het volume op 31 of hoger staat, dan begint het volume bij 30 en gaat over naar het laatste ingestelde niveau. Volumeregeling Draai de volumeknop naar VOLUME (op het hoofdapparaat) of druk op VOL +/– (op de afstandsbediening) als u het volume wilt laten toenemen of afnemen. WAARSCHUWING • Het geluidsniveau bij een bepaald ingesteld volume, hangt af van het prestatievermogen van de luidspreker, van de locatie en van verschillende andere factoren. Het dient aanbeveling om u niet aan een te hoog geluidsvolume bloot te stellen. Zet niet het volume voluit wanneer u het toestel aanzet. Luister naar muziek op een gematigde geluidssterkte. Excessieve geluidsdruk uit oor- en hoofdtelefoons kan gehoorverlies veroorzaken. Muting Het volume wordt tijdelijk gedempt als op de afstandsbediening wordt ingedrukt. Druk opnieuw op deze toets, om het geluidsvolume te herstellen. X-HM16_26_26D_Nl.book 13 ページ 2016年7月22日 金曜日 午前10時42分 Aan de slag 04 De wekkerfunctie instellen Equalizer Gebruiken om de bestaande timerinstelling te wijzigen of om een nieuwe timer in te stellen. FLAT ACTIVE Basisgeluid met weinig intonatie Krachtig geluid waarbij de lage en hoge tonen worden benadrukt 1 2 Druk TIMER op de afstandsbediening in en houd de toets vast. 3 Druk op / om “ONCE” of “DAILY” te selecteren, en druk daarna op ENTER. Geluid dat ook op laag volume goed beluisterbaar is in de avond en nacht Als het apparaat voor het eerst wordt ingeschakeld, wordt de P.Bass-modus weergegeven welke de basfrequenties versterkt. Druk op P.BASS van de afstandsbediening om de P bass-modus uit te schakelen. Bass/treble-bediening Opmerking Als een van bovengenoemde functies is gekozen wordt de niet gekozen functie als volgt weergegeven. • EQ : FLAT 2 Als de EQ-instelling wordt gewijzigd. • P.BASS : OFF 7 Druk op / om het uur in te stellen, en druk daarna op ENTER. 8 Druk op / om de minuut te selecteren, en druk daarna op ENTER. Stel de stoptijd in zoals in stappen 7 en 8 hierboven. 9 Druk voor instelling van het volume op VOL +/–, en druk daarna op ENTER. “ ” verschijnt op het display. 10 Druk op Í om op stand-by over te schakelen. De TIMER-indicator gaat branden. Pyccкий 1 Als de P.BASS-instelling (ON/OFF) wordt gewijzigd. 6 Druk op / om de timerdag te selecteren, en druk daarna op ENTER. Nederlands • De EQ en P.BASS kunnen niet tegelijkertijd functioneren. De laatst gekozen functie van deze twee is de functie die wordt gebruikt. • SOUND functioneert naast de EQ of P.BASS. CD, DAB (alleen X-HM26D), FM, AM (Alleen NoordAmerikaanse modellen) en USB kunnen als afspeelbron geselecteerd worden. Deutsch Druk op SOUND om “BASS” of “TREBLE” te selecteren en druk vervolgens op / om de lage of hoge tonen af te stellen. 5 Druk op / om de weergavebron voor de timer te selecteren, en druk daarna op ENTER. Italiano P.bass-bediening 4 Druk op / om “TIMER SET” te selecteren, en druk daarna op ENTER. Español ONCE – De éénmalige timerweergave werkt slechts één keer op de ingestelde tijd. DAILY – Daily Timer Play werkt op dezelfde vooraf ingestelde tijd en dagen van de week. Geluid waarbij de radio of zang DIALOGUE beter hoorbaar is NIGHT Druk op Í om het apparaat in te schakelen. Français Als de EQ wordt ingedrukt, wordt de huidige modusinstelling getoond. Om de modus te wijzigen, drukt u herhaaldelijk op EQ totdat de gewenste geluidsmodus verschijnt. English Geluidsbediening 13 Nl X-HM16_26_26D_Nl.book 04 14 ページ 2016年7月22日 金曜日 午前10時42分 Aan de slag Activeren van de wekkerfunctie Deze kan worden gebruikt om een bestaande timerinstelling opnieuw te gebruiken. 1 En ook stappen 1 tot 3 bij “De wekkerfunctie instellen”. 2 Druk op / om “TIMER ON” te selecteren en druk dan op ENTER. Gebruik van hoofdtelefoons Aansluiting op de stekerplug van de hoofdtelefoon. Wanneer een hoofdtelefoon is aangesloten, wordt er geen geluid weergegeven via de luidsprekers. TIMER Uitschakelen van de wekkertimer Deze kan worden gebruikt om de timerinstelling uit te schakelen. 1 En ook stappen 1 tot 3 bij “De wekkerfunctie instellen”. 2 Druk op / om “TIMER OFF” te selecteren en druk dan op ENTER. Gebruik van de wekkerfunctie 1 Druk op Í om het apparaat uit te schakelen. 2 Bij het bereiken van de wektijd wordt het apparaat automatisch ingeschakeld en begint de weergave van de geselecteerde ingangsbron. Opmerking • Als het USB-opslagapparaat op de wektijd niet verbonden is met dit toestel of als geen disc geplaatst is, zal dit toestel niet ingeschakeld worden en het nummer niet afspelen. • Het is mogelijk dat sommige discs niet automatisch worden afgespeeld wanneer de wektijd wordt bereikt. • Neem één minuut of meer tussen de begin- en eindtijd wanneer u de timer instelt. De slaaptimer gebruiken De inslaaptimer schakelt het apparaat uit zodat u zonder zorgen in slaap kunt vallen. 1 Druk enkele malen op SLEEP om de tijd te kiezen waarna het apparaat moet worden uitgeschakeld. U kunt 10 minuten, 20 minuten, 30 minuten, 60 minuten, 90 minuten, 120 minuten, 150 minuten, 180 minuten of Uit (inslaaptimer uitgeschakeld) instellen. De nieuw ingestelde waarde wordt voor 3 seconden aangegeven waarna de instelling is voltooid. Opmerking • De inslaaptimer kan worden ingesteld door op SLEEP te drukken terwijl de resterende tijd wordt aangegeven. 14 Nl • Draai het volume niet op volle sterkte, wanneer u het apparaat inschakelt en luister naar muziek bij matige geluidsniveaus. Excessieve geluidsdruk uit oor- en hoofdtelefoons kan gehoorverlies veroorzaken. • Zet het volume laag voor u de hoofdtelefoon aansluit of uit het toestel haalt. • Let er op dat de gebruikte hoofdtelefoon een 3,5 mm diameter stekker heeft en een impedantie tussen de 16 en 50 Ω. De aanbevolen impedantie is 32 Ω. X-HM16_26_26D_Nl.book 15 ページ 2016年7月22日 金曜日 午前10時42分 Disc-weergave 05 Disc-weergave Speel MP3-muziekbestanden af MP3-nummergegevens heten “music file” en de locatie waar deze zich bevinden heeft een “map” in dit document. bv., Laad deze disc 1 Druk op Í om het apparaat in te schakelen. 3 Druk op < op het hoofdtoestel om de disclade te openen. • Wanneer het spelen begint, kunnen er alleen muziekbestanden in dezelfde map continu gespeeld worden. WAARSCHUWING • Plaats niet twee discs in één disclade. • Speel geen discs af met speciale vormen (hart, achthoekig, enz.). Dit kan een storing veroorzaken. • Druk niet op de CD-lade terwijl deze beweegt. • Wanneer de spanning wordt onderbroken met de lade geopend moet u wachten totdat er weer spanning wordt geleverd. • Plaats 8 cm discs beslist in het midden van de disclade. Nederlands 5 Druk op < op het hoofdtoestel om de disclade te sluiten. 2 Druk op / om het muziekbestand ([ ]) te selecteren en druk dan op 1; of ENTER. Deutsch 4 Plaats de schijf in de lade met de label aan de bovenzijde. • Herhaal deze stap als er zich andere mappen in de geselecteerde map bevinden. • Om terug te keren naar de vorige map, druk op of . Italiano 2 Druk op CD van de afstandsbediening of druk herhaaldelijk op INPUT van het hoofdapparaat om de CD-ingang te selecteren. 1 Wanneer de herkenning compleet is, druk op / om de map te selecteren waar het muziekbestand opgeslagen is ([ ]), druk vervolgens op of ENTER. Español Afspelen van discs of bestanden Français Dit systeem kan een standaard CD, CD-R/RW in het CDformaat en CD-R/RW met MP3-bestanden afspelen, maar kan er niet op opnemen. Sommige audio CD-R- en CD-RWschijven zouden niet afspeelbaar kunnen zijn wegens de staat van de schijf of het apparaat dat gebruikt werd voor opname. • Voor details over MP3, zie bladzijde 31. English Hoofdstuk 5: Opmerking Speel nummers op een CD Nadat het laatste nummer op de disc is afgespeeld zal het toestel automatisch stoppen. Pyccкий 1 Wanneer de herkenning compleet is, druk op 1; . • Vanwege de structuur van de discinformatie, duurt het aflezen van een MP3 disc langer dan bij een normale CD (ongeveer 20 tot 90 seconden). • Als het begin van de eerste track tijdens versneld achteruit spelen is bereikt, gaat het apparaat over op de weergavemodus (alleen voor CD). • Indien een radio of TV de weergave van de CD stoort, dient u het toestel verder van de TV of radio te plaatsen. Tip • Als het systeem langer dan 20 minuten niet is bediend terwijl het op CD staat en het geluidsbestand niet is afgespeeld, wordt het apparaat automatisch uitgeschakeld. In dit geval moet Auto Power Off zijn ingeschakeld (ON). 15 Nl X-HM16_26_26D_Nl.book 05 16 ページ 2016年7月22日 金曜日 午前10時42分 Disc-weergave • Auto Power Off kan in en uit worden geschakeld (ON/ OFF) (bladzijde 33). Basisbediening Functie Hoofdtoestel Afstandsbediening Bediening Afspelen Indrukken tijdens de stopfunctie. Stoppen Indrukken voor de weergavemodus. (wanneer er een CD gespeeld wordt) “RESUME” wordt afgebeeld en de plaats waar het spelen gestopt is wordt opgeslagen. Druk opnieuw om de opgeslagen positie weg te halen. Pauzeren Hoger/ lager fragment Snel voorwaarts/ achterwaarts Indrukken voor de weergavemodus. Druk op 1; om de weergave vanaf het onderbroken punt te hervatten. Druk tijdens weergave op de stopfunctie. Als u de toets in de stopmodus indrukt, drukt u op 1; om de gewenste track te starten. (wanneer er een MP3 gespeeld wordt) U kunt alleen vooruit of achteruit springen naar muziekbestanden binnen dezelfde map. Tijdens weergave ingedrukt houden. Laat de toets los om de weergave te hervatten. Geavanceerde weergave van een CD of MP3-disc 16 Nl Herhaalde weergave In de herhalingsfunctie kan één fragment, alle fragmenten of een geprogrammeerde reeks herhaald worden afgespeeld. Herhalen van één fragment: Druk herhaaldelijk op Druk op ENTER. totdat “REPEAT ONE” verschijnt. Herhaling van alle fragmenten: Druk herhaaldelijk op Druk op ENTER. totdat “REPEAT ALL” verschijnt. Herhalen van gewenste fragmenten: Voer stappen 1 - 5 uit in “Geprogrammeerde weergave (CD)” sectie (bladzijde 17) en druk dan herhaaldelijk totdat “REPEAT ALL” verschijnt. Druk op ENTER. Annuleren van de herhaalde weergave: Druk herhaaldelijk op Druk op ENTER. totdat “REPEAT OFF” verschijnt. Opmerking • Druk op ∫ nadat Repeat Play is uitgevoerd. De disc zal anders doorlopend worden afgespeeld. • Random Play is niet mogelijk tijdens Repeat Play. Willekeurige weergave De tracks op de disc kunnen automatisch in willekeurige volgorde worden afgespeeld. Willekeurig weergave van alle nummers: Druk herhaaldelijk op RANDOM totdat “RANDOM ON” verschijnt. Druk op ENTER. Annuleren van de willekeurige weergavevolgorde: Druk herhaaldelijk op RANDOM totdat “RANDOM OFF” verschijnt. Druk op ENTER. Opmerking • Als u op 9 drukt tijdens Random Play, gaat u naar de volgende track die door Random Play wordt geselecteerd. • Bij willekeurige weergave worden de fragmenten automatisch kris-kras door elkaar weergegeven. (De volgorde van de tracks kunnen niet worden geselecteerd.) • Repeat Play is niet mogelijk tijdens Random Play. X-HM16_26_26D_Nl.book 17 ページ 2016年7月22日 金曜日 午前10時42分 Disc-weergave U kunt maximaal 24 fragmenten voor weergave in de gewenste volgorde kiezen. 2 Druk op : 9 of de nummertoetsen van de afstandsbediening om de gewenste tracks te selecteren. 4 Herhaal stappen 2 - 3 voor andere nummers. Er kunnen maximaal 24 nummers geprogrammeerd worden. 5 Druk op 1; om de weergave te starten. Annuleren van de geprogrammeerde weergavefunctie: Toevoegen van tracks aan het programma: Druk op PGM/MEMORY. Volg daarna stappen 2 - 3 om tracks toe te voegen. Tracknummer, weergave titel Weergave titel Nummer het nummer in een map, weergave resterende tijd Weergave artiest Nummer het nummer in een map, weergave afspeeltijd Weergave album Opmerking • Een "Niet ondersteund afspeelbestand" kan niet afgespeeld worden. In dit geval zal het automatisch overgeslagen worden. • In sommige gevallen kan er geen informatie worden weergegeven. • Afbeelden van titel, artiest en albums is alleen ondersteund met ID3 Versie 1 (1.0 of 1.1). Nederlands Opmerking Pyccкий • Wanneer de schijf wordt uitgeworpen, dan wordt het programma automatisch uitgeschakeld. • Als u op Í drukt om op stand-by over te gaan of de functie van CD in een andere functie te wijzigen, worden de geprogrammeerde selecties gewist. • Random Play is niet mogelijk tijdens de bediening van de programmering. Druk tijdens het afspelen op DISPLAY. Als de titel, artiest en albumnaam naar het bestand zijn geschreven, dan wordt die informatie getoond. (Dit apparaat heeft slechts alfanumerieke tekens. Niet alfanumerieke tekens worden in de “∫” getoond.) Deutsch Druk tweemaal op ∫ van de afstandsbediening om geprogrammeerde tracks afspelen uit te schakelen. In de display verschijnt: “PRG CLEAR” en de complete geprogrammeerde inhoud wordt gewist. 1 Italiano • Druk op PGM/MEMORY als u de geprogrammeerde tracks wilt controleren. • Indien u zich heeft vergist kunnen de laatst geprogrammeerde tracks worden geannuleerd door op te drukken. Wijzig de displayinhoud Español 3 Druk op ENTER om de map en het tracknummer te bewaren. Op het Internet bevinden zich veel muziek-websites, waar u MP3 kunt downloaden. Volg de instructies van de website, hoe u de muziekbestanden kunt downloaden. U kunt deze gedownloade muziekbestanden dan afspelen door ze op een CD-R/RW disc te branden. • Uw downgeloade liedjes/bestanden zijn alleen maar voor persoonlijk gebruik bestemd. Elk ander gebruik van de liedjes, zonder toestemming van de eigenaar, is illegaal. Français 1 Druk als het apparaat is stopgezet op PGM/ MEMORY van de afstandsbediening voor toegang tot het programmeringsgeheugen. Informatie over het downloaden van MP3 English Geprogrammeerde weergave (CD) 05 17 Nl X-HM16_26_26D_Nl.book 06 18 ページ 2016年7月22日 金曜日 午前10時42分 USB-weergave Hoofdstuk 6: USB-weergave Afspelen van USB-opslagapparaten Het is mogelijk om naar twee-kanaalsgeluid m.b.v. de USBinterface met MP3-bestanden op de voorkant van deze ontvanger. • Pioneer garandeert niet dat bestanden die op een USBopslagapparaat zijn opgenomen kunnen worden afgespeeld of dat stroom naar een USBopslagapparaat kan worden toegevoerd. Bovendien aanvaardt Pioneer geen enkele verantwoordelijkheid voor het verlies van bestanden op USBgeheugenapparaten dat optreedt na het aansluiten op dit apparaat. • Voor details over MP3, zie bladzijde 31. 1 Druk op USB als de ingangsbron. “USB” wordt op het hoofddisplay aangegeven. 2 Sluit het USB-opslagapparaat aan. • Een USB-hub wordt door deze receiver niet ondersteund. TIMER USB-opslagapparaat (in de handel verkrijgbaar) 3 Wanneer de herkenning compleet is, druk op / om de map te selecteren waar het muziekbestand opgeslagen is ([ ]), druk vervolgens op of ENTER. • MP3-nummergegevens heten “music file” en de locatie waar deze zich bevinden heeft een “map” in dit document. • Herhaal deze stap als er zich andere mappen in de geselecteerde map bevinden. • Om terug te keren naar de vorige map, druk op of . 4 Druk op / om het muziekbestand ([ ]) te selecteren en druk dan op 1; of ENTER. • Wanneer het spelen begint, kunnen er alleen muziekbestanden in dezelfde map continu gespeeld worden. • Voor details over de basishandelingen, zie bladzijde 16. 18 Nl • Als u overschakelt naar een andere ingangsbron, zorg er dan voor dat eerst de weergave van het USBgeheugen wordt stopgezet. • Schakel het apparaat uit voordat het USBopslagapparaat wordt verwijderd. Opmerking • Het is mogelijk dat dit apparaat een USBgeheugenapparaat niet herkent, de bestanden niet kan afspelen of geen stroom aan het USBgeheugenapparaat kan leveren. Zie Wanneer er een USB-geheugenapparaat is aangesloten op bladzijde 30 voor verdere informatie. • Wanneer er geen USB-geheugenapparaat wordt weergegeven en dit apparaat langer dan 20 minuten niet wordt bediend, zal de stroom automatisch worden uitgeschakeld. In dit geval moet Auto Power Off zijn ingeschakeld (ON) (bladzijde 33). X-HM16_26_26D_Nl.book 19 ページ 2016年7月22日 金曜日 午前10時42分 USB-weergave 06 Herhaalde weergave English In de herhalingsfunctie kan één fragment, alle fragmenten of een geprogrammeerde reeks herhaald worden afgespeeld. Herhalen van één fragment: Druk herhaaldelijk op Druk op ENTER. totdat “REPEAT ONE” verschijnt. Druk herhaaldelijk op Druk op ENTER. totdat “REPEAT ALL” verschijnt. Annuleren van de herhaalde weergave: Druk herhaaldelijk op Druk op ENTER. totdat “REPEAT OFF” verschijnt. Español Opmerking • Druk op ∫ nadat Repeat Play is uitgevoerd. Anders wordt het bestand van het USB-opslagapparaat voortdurend afgespeeld. • Random Play is niet mogelijk tijdens Repeat Play. Français Herhaling van alle fragmenten: Willekeurige weergave Willekeurig weergave van alle nummers: Druk herhaaldelijk op RANDOM totdat “RANDOM ON” verschijnt. Druk op ENTER. Druk herhaaldelijk op RANDOM totdat “RANDOM OFF” verschijnt. Druk op ENTER. Opmerking Nederlands • Als u op 9 drukt tijdens Random Play, gaat u naar de volgende track die door Random Play wordt geselecteerd. • Bij willekeurige weergave worden de fragmenten automatisch kris-kras door elkaar weergegeven. (De volgorde van de tracks kunnen niet worden geselecteerd.) • Repeat Play is niet mogelijk tijdens Random Play. Deutsch Annuleren van de willekeurige weergavevolgorde: Italiano Het bestand van het USB-opslagapparaat kan in willekeurige volgorde automatisch worden afgespeeld. Wijzig de displayinhoud Pyccкий Via dit systeem kunnen mappen die in het USBopslagapparaat zijn opgeslagen herhaald worden afgespeeld. Zie Wijzig de displayinhoud op bladzijde 17 voor verdere informatie. 19 Nl X-HM16_26_26D_Nl.book 07 20 ページ 2016年7月22日 金曜日 午前10時42分 Gebruik van de tuner Hoofdstuk 7: Gebruik van de tuner • Automatische tuning slaat stations met een zwak signaal over. • Druk op ∫ om automatische tuning te stoppen. • Als op een RDS-station (Radio Data System) wordt afgestemd, wordt eerst de frequentie getoond. Tenslotte zal de naam van het station getoond worden. • RDS-stations kunnen geheel automatisch worden afgestemd via de functie Auto Station Program Memory (ASPM), zie bladzijde 22. Luisteren naar FM (Voor Europese modellen)/Luisteren naar FM of AM (Voor Noord-Amerikaanse modellen) Hieronder wordt beschreven hoe u afstemt op FM- en AMradiozenders met de automatische (zoek) en handmatige (stap) afstemfuncties. Zodra u op een station heeft afgestemd kunt u de frequentie opslaan zodat deze later kan worden opgeroepen. Zie Voorkeurzenders opslaan hieronder voor meer gegevens over deze functie. Ontvangen van FM stereo uitzendingen: 1 Druk op TUNER tot “FM” op het display verschijnt. 2 Druk op MENU en druk vervolgens op / tot “FM STEREO/MONO” op het display verschijnt. 3 Druk op ENTER en druk vervolgens op / tot “AUTO” op het display verschijnt. Verbeteren van slechte FM-ontvangst: Druk na het uitvoeren van bovenstaande stappen 1 - 2 op ENTER en druk vervolgens op / tot “MONO” op het display verschijnt. Hiermee wordt de tuner gewijzigd van stereo naar mono en zorgt gewoonlijk tevens voor een betere ontvangst. Voorkeurzenders opslaan Afstemmen 1 Druk op de toets Í om het apparaat in te schakelen. 2 Druk herhaaldelijk op TUNER om de gewenste frequentieband (FM of AM) te selecteren. Als u vaak naar een bepaalde zender luistert, is het handig dat u de frequentie opslaat in het geheugen van de receiver om hem later makkelijk te kunnen oproepen (Preset-tuning). Zo hoeft u niet telkens handmatig af te stemmen op de zender. In dit apparaat kunt u maximaal 45 zenders in het geheugen opslaan. (FM 30 stations/AM 15 stations) • (X-HM26D) U kunt “FM” en “DAB” selecteren. Voor details over "DAB", zie bladzijde 23. 3 Druk op TUNE +/– van de afstandsbediening om op het gewenste station af te stemmen. Automatisch afstemmen: Houd TUNE +/– ingedrukt, het scannen start automatisch en de tuner stopt bij het zendstation dat als eerste wordt ontvangen. 1 Handmatig afstemmen: Zie Afstemmen hierboven voor meer informatie. Druk herhaaldelijk op TUNE +/– om op het gewenste station af te stemmen. 2 Opmerking • Ingeval van radiostoringen, wordt de automatische tuning automatisch bij dat punt gestopt. 20 Nl Stem af op de gewenste zender. Druk op PGM/MEMORY. Het presetnummer gaat knipperen. X-HM16_26_26D_Nl.book 21 ページ 2016年7月22日 金曜日 午前10時42分 Gebruik van de tuner 4 Druk op PGM/MEMORY om dat station in het geheugen op te slaan. Opmerking Instellen van een voorkeurzender Druk op PRESET +/– om het gewenste station te selecteren. Wissen van het gehele ingestelde geheugen 1 Druk op TUNER op de afstandsbediening. 2 Druk op totdat “MEMORY CLEAR” verschijnt. Frequency Programme type (PTY) Radio text (RT) • Wanneer u afstemt op een zender die geen RDS gegevens uitzendt, of op een zeer zwakke RDS zender, zal het display in deze volgorde veranderen: NO RDS FM 98.80 MHz Zoek zenders op aan de hand van het type programma Pyccкий 1 Druk op TUNER tot “FM” op het display verschijnt. 2 Druk op MENU en druk vervolgens op / tot “FM RDS” op het display verschijnt. 3 Druk op ENTER en druk vervolgens op / tot “PTY” op het display verschijnt. 4 Druk op ENTER. “SELECT” zal gedurende ongeveer 5 seconden verschijnen. 5 Druk op / om het programmatype te selecteren waarnaar u wilt luisteren. Elke keer dat de toets wordt ingedrukt, verschijnt het programmatype. Als de toets ingedrukt wordt gehouden, blijft het programmatype getoond worden. 6 Terwijl het geselecteerde type programma weergegeven wordt drukt u (binnen 5 seconden) op ENTER. Nadat het geselecteerde programmatype 2 seconden is opgelicht, verschijnt “SEARCH”, en begint de functie met zoeken. Nederlands Opmerking • Alle stations worden gewist. Station name (PS) Deutsch De in het geheugen opgeslagen zenders kunnen automatisch worden afgetast. (Aftasten voorkeuzegeheugen) 1 Houd PRESET +/– ingedrukt. Het presetnummer verschijnt en de geprogrammeerde stations worden elk 5 seconden lang één voor één ingesteld. 2 Druk nogmaals op PRESET +/– als het gewenste station is gevonden. 1 Druk op TUNER tot “FM” op het display verschijnt. 2 Druk herhaaldelijk op DISPLAY. Elke keer dat DISPLAY wordt ingedrukt, wordt de display als volgt gewijzigd: Italiano Aftasten van de voorkeuzezenders Via RDS verzorgde informatie Español • De back-upfunctie houdt de opgeslagen stations enkele uren lang vast ingeval van een stroomonderbreking of als het netsnoer losraakt. RDS (Radio Data System – radiogegevenssysteem) is een systeem dat de meeste FM-radiozenders gebruiken om luisteraars informatie te verschaffen – bijvoorbeeld de naam van de zender en het soort uitzending dat ze verzorgen. Met RDS kunt u zoeken naar typen programma’s. U kunt bijvoorbeeld een station zoeken dat het programmatype Jazz Music uitzendt op dit moment. Français Als het presetnummer van knipperen op branden is overgegaan, herhaal dan de procedure vanaf stap 2 voordat het station in het geheugen wordt opgeslagen. • Herhaal de stappen 1 - 4 om andere zenders in te stellen of om een voorkeurzender te wijzigen. Wanneer een nieuwe zender in het geheugen opgeslagen wordt, zal de eerder opgeslagen zender worden gewist. Gebruik van het Radio Data Systeem (RDS) (alleen voor Europese modellen) English 3 Druk op PRESET +/– om het in te stellen kanaal te selecteren. 07 21 Nl X-HM16_26_26D_Nl.book 07 22 ページ 2016年7月22日 金曜日 午前10時42分 Gebruik van de tuner De weergegeven programmatypes zijn de volgende: News – Nieuws Current Affairs – Actualiteiten Information – Algemene informatie Sport – Sport Education – Educatief Drama – Hoorspelen e.d. Cultures – Nationale of regionale cultuur, theater enz. Science – Wetenschap en technologie Varied Speech – Meestal praatprogramma’s, zoals quizzen of interviews. Pop Music – Popmuziek Rock Music – Rockmuziek Easy Listening – ‘Easy listenning’ rustige populaire muziek Light Classics M – ‘Lichte’ klassieke muziek Serious Classics – ‘Serieuze’ klassieke muziek Other Music – Muziek die niet in een van bovenstaande categorieën valt Weather & Metr – Weerberichten Finance – Beursberichten, financieel en zakelijk nieuws enz. Children’s Progs – Kinderprogramma’s Social affairs – ‘Human interest’, programma’s over sociale aangelegenheden Religion – Religieuze programma’s Phone In – Programma’s waarin mensen telefonisch hun mening kunnen geven Travel & Touring – Programma’s over reizen (maar geen verkeersinformatie) Leisure & Hobby – Hobby en vrije tijd Jazz Music – Jazz Country Music – Country&Western-muziek National Music – Populaire muziek in een andere taal dan Engels Oldies Music – Gouwe ouwen (muziek uit de jaren 50 en 60) Folk Music – Volksmuziek Documentary – Documentaires Alarm Test – Uitzenden wanneer apparatuur of receivers voor nooduitzending worden getest. Alarm - Alarm! – Noodbericht, uitgezonden onder uitzonderlijke omstandigheden om te waarschuwen voor gebeurtenissen die een publiek gevaar vertegenwoordigen. • Begin, zodra de display stopt met knipperen, weer bij stap 2. Als het systeem het gewenste programmatype heeft gevonden, dan licht het overeenkomstige kanaalnummer ongeveer 8 seconden lang op, en zal de stationnaam het vasthouden. • Als u naar hetzelfde type programma van een andere zender wilt luisteren, herhaal dan stappen 2 - 6. Het toestel zal de volgende zender opzoeken. • Als er geen zender gevonden kan worden, zal de aanduiding “NOT FOUND” 4 seconden lang getoond worden. Auto Station Program Memory (ASPM) gebruiken Tijdens de ASPM functie zoekt de tuner automatisch nieuwe RDS-zenders zoeken. Er kunnen maximaal 30 zenders worden vastgelegd. Als u al een paar zenders in het geheugen heeft gezet, zal het aantal nieuwe zenders dat u kunt opslaan minder zijn. 1 Druk op TUNER tot “FM” op het display verschijnt. 2 Druk op MENU en druk vervolgens op / tot “FM RDS” op het display verschijnt. 3 Druk op ENTER en druk vervolgens op / tot “ASPM” op het display verschijnt. 4 Druk op ENTER. Nadat “ASPM” ongeveer 4 seconden heeft geknipperd, zal het scannen beginnen (87,5 - 108 MHz). 22 Nl Na het scannen zal het aantal zenders dat in het geheugen is opgeslagen 4 seconden worden getoond, waarna 4 seconden lang de aanduiding “END” getoond zal worden. • Om de ASPM-handeling te stoppen voordat deze voltooid is: Druk op ∫ terwijl het aan stations aan het scannen is. De stations die reeds opgeslagen zijn in het geheugen zullen hier behouden worden. • Als dezelfde zender op verschillende frequenties uitzendt, zal de sterkst doorkomende frequentie in het geheugen worden opgeslagen. • Een zender met dezelfde frequentie als een reeds in het geheugen opgeslagen zender zal niet worden opgeslagen. • Als er reeds 30 zenders in het geheugen zijn opgeslagen, zal het scannen worden afgebroken. Wanneer u het ASPM-proces wilt herhalen, moet u het geprogrammeerde geheugen wissen. • “NOT FOUND” wordt ongeveer 5 seconden getoond indien er geen zender in het geheugen is vastgelegd. • Als de RDS signalen zeer zwak zijn, is het mogelijk dat de naam van de zender in kwestie niet in het geheugen kan worden opgeslagen. • U kunt dezelfde zendernaam opslaan in verschillende kanalen. • Het is mogelijk dat de zendernamen tijdelijk afwijken in bepaalde gebieden of gedurende bepaalde perioden. Opmerking • Mocht zich een van de volgende gevallen voordoen, dan betekent dit niet dat het toestel defect is: - “PS”, “NO PS” en de stationnaam verschijnen om de beurt en op de juiste wijze. - Indien een bepaalde zender niet de juiste signalen uitzendt of aan het testen is, zal de RDS ontvangstfunctie mogelijk niet juist functioneren. - Het is mogelijk dat gegevens zoals de zendernaam niet getoond worden wanneer u afstemt op een RDS zender waarvan het signaal te zwak is. - “NO PS”, “NO PYT” of “NO RT” zal ongeveer 5 seconden langknipperen, waarna de frequentie getoond zal worden. • Opmerkingen over radiotekst: - De eerste 8 tekens van de radiotekst verschijnen, en vervolgens worden deze over de display gescrold. - Als u afstemt op een RDS zender die geen radiotekst gegevens uitzendt, zal de aanduiding “NO RT” getoond worden wanneer u overschakelt naar de radiotekst. - Terwijl radiotekstgegevens ontvangen worden, of wanneer de inhoud van de tekst gewijzigd wordt, zal “RT” op het display verschijnen. X-HM16_26_26D_Nl.book 23 ページ 2016年7月22日 金曜日 午前10時42分 Gebruik van de tuner DAB + SIGNAL SERVICES Tuning Manual tune U kunt handmatig afstemmen op zenders die de functie Automatisch scannen niet kan vinden. Als de ontvangst slecht is, kunt u de gevoeligheid aanpassen. Handmatig afstemmen kan alleen gebruikt worden na automatisch afstemmen. Voor eerst een automatische scan uit. 1 Druk op TUNER tot “DAB” op het display verschijnt. 2 Druk op MENU en druk vervolgens op / tot “DAB SCAN” op het display verschijnt. 3 Druk op ENTER en druk vervolgens op / tot “MANUAL” op het display verschijnt. 4 Druk op ENTER. 5 Druk binnen de 10 seconden op TUNE +/– om DAB+ frequentie te selecteren. 6 Druk binnen 10 seconden op ENTER. • Als het niveau te laag is, verplaats dan de antenne of het toestel om de ontvangst te verbeteren. Nederlands Pyccкий 1 Druk op TUNER tot op de display “DAB” wordt weergegeven. U kunt de autoscan opnieuw uitvoeren wanneer u het toestel naar andere zones verplaatst of multiltiplex-kanalen aan de stationlijst toevoegt. 1 Druk op TUNER tot op de display “DAB” wordt weergegeven. 2 Druk op MENU en druk vervolgens op / tot “DAB SCAN” op het display verschijnt. 3 Druk op ENTER en druk vervolgens op / tot “AUTO” op het display verschijnt. 4 Druk op ENTER. De automatische scan begint. Nadat het scanproces voltooid is, dan wordt de eerste zender die gedetecteerd werd geselecteerd. Deutsch SERVICECOMP ONENTEN (ZENDERS) Automatisch scannen Italiano MULTIPLEX (ENSEMBLE) • Als er geen zender wordt gevonden, wordt “NO SIGNAL” weergegeven. • Er worden maximaal 100 ontvangen zenders weergegeven. Español Digital Audio Broadcasting (digitale audio-uitzending) is een digitaal uitzendsysteem waarbij audiosignalen worden geconverteerd naar digitale signalen. Bij DAB+ uitzendingen wordt een groep gegevens verstuurd die een multiplex (ensemble) wordt genoemd en een of meerdere zenders (services) bevat. Elke zender bevat een primaire service en er kunnen een of meer secundaire services zijn. Daardoor kunnen meerdere programma's of services op een enkele frequentie verzonden worden. 3 Druk binnen 10 seconden op de afstandsbediening op ENTER om op de gewenste zender af te stemmen. Français Informatie over DAB+ (digitale audiouitzending) 2 Druk op de TUNE +/– om de gewenste zender te selecteren. English Luisteren naar de DAB+ (alleen XHM26D) 07 Wanneer het toestel voor de eerste keer aangezet wordt, scant deze automatisch radiostations om een stationlijst te creëren. De stations zullen opgeslagen worden in alfanumerieke volgorde en het eerste station op de lijst zal geselecteerd worden en u zult het uit de luidsprekers horen. 23 Nl X-HM16_26_26D_Nl.book 07 24 ページ 2016年7月22日 金曜日 午前10時42分 Gebruik van de tuner De informatiedisplay wijzigen U kunt de informatie op de DAB+ display omschakelen. Druk op de toets DISPLAY. Telkens als u de toets indrukt, verandert de informatie op de display als volgt. Als “NO SIGNAL” verschijnt, kan de display niet gewijzigd worden met de toets DISPLAY. [Programmanaam] De naam van de zender. (standaardinstelling) [Schuivende tekst] DAB frequentietabel (BAND III) Frequentie Naam Frequentie Naam Als de zender informatie stuurt, schuift die over de display. 5A 208.064 MHz 9D [Programmatype] 176.640 MHz 5B 209.936 MHz 10A Een beschrijving van het soort inhoud dat de zender uitzendt. 178.352 MHz 5C 211.648 MHz 10B [Multiplexnaam] 180.064 MHz 5D 213.360 MHz 10C De naam van de multiplex (ensemble) die de huidige service levert. 181.936 MHz 6A 215.072 MHz 10D 183.648 MHz 6B 216.928 MHz 11A De DAB+ frequentie voor de zender. 185.360 MHz 6C 218.640 MHz 11B [Stereostand] 187.072 MHz 6D 220.352 MHz 11C 188.928 MHz 7A 222.064 MHz 11D 190.640 MHz 7B 223.936 MHz 12A [Signaalkwaliteit] 192.352 MHz 7C 225.648 MHz 12B De signaalkwaliteit wordt met een getal weergegeven (0 100). [85-100: goed, 70-84: redelijk, 0-69: zwak] 194.064 MHz 7D 227.360 MHz 12C 195.936 MHz 8A 229.072 MHz 12D Een zender opslaan 197.648 MHz 8B 230.784 MHz 13A U kunt 10 DAB-zenders in het geheugen opslaan en met een druk op de toets oproepen. (afstemmen op voorkeuzenummers) 199.360 MHz 8C 232.496 MHz 13B 201.072 MHz 8D 234.208 MHz 13C 1 Stem af op de gewenste DAB-zender. 202.928 MHz 9A 235.776 MHz 13D Druk op PGM/MEMORY. 204.640 MHz 9B 237.488 MHz 13E 206.352 MHz 9C 239.200 MHz 13F Geeft de stereostand weer. [Overdrachtssnelheid] De snelheid van de gegevensoverdracht. 2 Het voorkeuzenummer knippert. 3 Druk binnen 10 seconden op PRESET +/– om het voorkeuzekanaalnummer te selecteren. Sla de zenders in het geheugen op, in volgorde, te beginnen met voorkeuzekanaal 1. 4 Druk binnen 10 seconden op PGM/ MEMORY om die zender in het geheugen op te slaan. Als de voorkeuzenummerindicators verdwijnen voordat de zender is opgeslagen, herhaalt u de procedure vanaf stap 2. Nl Wanneer een nieuwe zender in het geheugen wordt opgeslagen, wordt de eerder op dat voorkeuzekanaal opgeslagen zender gewist. 174.928 MHz [Frequentie] 24 5 Herhaal stap 1 - 4 om andere zenders in te stellen of om een voorkeuzezender te wijzigen. X-HM16_26_26D_Nl.book 25 ページ 2016年7月25日 月曜日 午前11時34分 Overige aansluitingen 08 English Hoofdstuk 8: Overige aansluitingen Verbind uw hulp-afspeelcomponent met de AUDIO IN ingang op het achterpaneel. Deze functie schakelt automatisch naar “AUDIO IN” als audio naar de AUDIO IN-aansluiting ingevoerd wordt. 1 Druk op MENU en druk vervolgens op / tot “Audio In detect” op het display verschijnt. 2 Druk op ENTER en druk vervolgens op / om naar Audio In detect ON/OFF te schakelen. Español Aansluiten van extra apparatuur Automatisch schakelen naar Audio Iningang (Alleen voor Noord-Amerikaanse modellen) Français WAARSCHUWING • Schakel het apparaat uit en verwijder het netsnoer van het wandcontact voordat u apparatuur aansluit of aansluitingen wijzigt. • Wij zijn niet aansprakelijk voor enige schade als gevolg van de verbinding van apparatuur die door andere bedrijven geproduceerd is. • Het is in de fabrieksinstelling op OFF gezet. Italiano Opmerking • Als Audio In detect op ON staat, wordt “Audio In Det ON” op het hoofddisplay weergegeven. • Als Audio In detect op OFF staat, wordt “Audio In Det OFF” op het hoofddisplay weergegeven. Deutsch 1 Draagbaar audiosysteem, enz. Druk op AUDIO als de ingangsbron. Nederlands 3,5 mm stereoministekkerkab el (los verkrijgbaar) Als AUDIO IN is geselecteerd, wordt “Audio In” op de hoofddisplay weergegeven. Pyccкий Opmerking • Als de AUDIO IN ministekkeringang wordt verbonden met de hoofdtelefoonaansluiting van de extra apparatuur, wordt het volume van het apparaat ingesteld met de volumeregeling op de extra apparatuur. Als het geluid vervormd is nadat u het volume van het apparaat heeft verlaagd, probeer dan het volume op de aanvullende weergavecomponent te verlagen. 25 Nl X-HM16_26_26D_Nl.book 09 26 ページ 2016年7月22日 金曜日 午前10時42分 Bluetooth® audioweergave Hoofdstuk 9: Bluetooth® audioweergave alleen X-HM26/26D Muziek weergeven met behulp van Bluetooth draadloze technologie Gebruik van de afstandsbediening Met de afstandsbediening die bij dit systeem wordt geleverd kunt u media afspelen en stopzetten en andere bewerkingen uitvoeren. Apparaat met Bluetooth draadloze technologie: Mobiele telefoon Opmerking • Het apparaat dat is voorzien van Bluetooth draadloze technologie moet AVRCP-profielen ondersteunen. • Bewerkingen van afstandsbedieningen kunnen niet worden gegarandeerd voor alle apparaten die zijn voorzien van Bluetooth draadloze technologie. Apparaat met Bluetooth draadloze technologie: Digitale muziekspeler Apparaat zonder Bluetooth draadloze technologie: Digitale muziekspeler + Bluetooth® audiozender (los verkrijgbaar) Muziekgegevens TIMER Op het systeem kan muziek worden afgespeeld die draadloos op met Bluetooth uitgeruste apparatuur (mobiele telefoon, digitale muziekspelers, enz.) is opgeslagen. Tevens kan een Bluetooth audiotransmitter (afzonderlijk in de handel verkrijgbaar) worden gebruikt, zodat muziek van apparatuur kan worden afgespeeld die de Bluetooth functionaliteit niet heeft. Raadpleeg de gebruikershandleiding voor het met Bluetooth uitgeruste apparaat voor meer gegevens. Opmerking • Het merk Bluetooth® en de logo’s daarvan zijn gedeponeerde handelsmerken van Bluetooth SIG, Inc. • Het apparaat dat is voorzien van Bluetooth draadloze technologie moet A2DP-profielen ondersteunen. • Verbinding is niet altijd is gegarandeerd met alle Bluetooth ingeschakelde apparaten. 26 Nl Paren met het systeem (eerste vastlegging) De paring dient te worden uitgevoerd om muziek, die op een met Bluetooth uitgerust apparaat is opgeslagen, af te spelen. De paring moet worden uitgevoerd als het systeem voor het eerst met het met Bluetooth uitgeruste apparaat wordt gebruikt, of als de paringsgegevens van het apparaat om de een of andere reden zijn gewist. De paring moet worden uitgevoerd zodat er communicatie kan plaatsvinden via Bluetooth draadloze technologie. • De paring wordt alleen de eerste maal dat het systeem en het met Bluetooth uitgeruste apparaat samen worden gebruikt, uitgevoerd. • Om communicatie via de Bluetooth draadloze technologie te laten plaatsvinden dient de paring zowel op het systeem als het met Bluetooth uitgeruste apparaat te worden uitgevoerd. • Nadat de is ingedrukt en de Bluetooth ingang is ingeschakeld, moet de paringsprocedure van het met Bluetooth uitgeruste apparaat worden uitgevoerd. Als de paring op de juiste wijze is uitgevoerd, hoeven de paringsprocedures voor het systeem zoals hieronder aangegeven niet te worden uitgevoerd. Raadpleeg de gebruikershandleiding voor het met Bluetooth uitgeruste apparaat voor meer gegevens. 1 Druk op Í en schakel het apparaat in. 2 Druk op . Het systeem schakelt over op Bluetooth en “Pairing” verschijnt. 3 Schakel het met Bluetooth uitgeruste apparaat waarmee gepaard moet worden in en voer de paringsprocedure uit. X-HM16_26_26D_Nl.book 27 ページ 2016年7月22日 金曜日 午前10時42分 Bluetooth® audioweergave BT STANDBY BT STANDBY-instellingen 1 Druk op . 2 Druk op MENU en druk vervolgens op / tot “BT STANDBY” op het display verschijnt. Als de paring met het met Bluetooth uitgeruste apparaat op de juiste wijze is voltooid, wordt de naam van het met Bluetooth uitgeruste apparaat op het voorpaneel van het systeem weergegeven. (Alleen alfanumerieke tekens van één byte kunnen worden getoond. Elk teken dat niet kan worden getoond wordt met “∫” aangeduid.) 3 Druk op ENTER en druk vervolgens op / om naar BT STANDBY ON/OFF te schakelen. Druk op . Het systeem schakelt over op de Bluetooth ingang. De procedures voor de aansluiting op dit systeem moeten vanaf het met Bluetooth uitgeruste apparaat worden uitgevoerd. • Raadpleeg de gebruikershandleiding van het met Bluetooth uitgeruste apparaat voor gegevens over de aansluitingsprocedures. Opmerking Als het met Bluetooth uitgevoerde apparaat reeds eerder tijdens BT STANDBY op het systeem is aangesloten geweest (paring is reeds uitgevoerd), kan het apparaat rechtstreeks uit de eerder gedane aansluiting een aansluitverzoek ontvangen. Het apparaat gaat de Bluetooth functie gebruiken en zal aansluiten op een met Bluetooth uitgevoerd apparaat. Ook apparatuur waarvoor reeds paring met dit systeem heeft plaatsgevonden kan in de volgende gevallen niet tijdens BT STANDBY worden verbonden. Wis in die gevallen de paringsgebeurtenissen uit het apparaat dat is uitgevoerd met Bluetooth draadloze technologie en voer de paring opnieuw uit. • Dit toestel kan maximaal 8 toestellen in de pairinggeschiedenis opslaan. • Indien de instellingen weer op de fabrieksinstellingen worden teruggezet, worden alle paringsgebeurtenissen gewist. Pyccкий 3 Speel muziek af vanaf het met Bluetooth uitgeruste apparaat. Aansluiting tijdens BT STANDBY via het met Bluetooth uitgevoerde apparaat Nederlands 2 Een Bluetooth aansluiting wordt tot stand gebracht tussen het met Bluetooth uitgeruste apparaat en dit systeem. Opmerking • Als BT STANDBY is ingeschakeld (ON), wordt “BT STANDBY ON” op de hoofddisplay getoond. • Als BT STANDBY is uitgeschakeld (OFF), wordt “BT STANDBY OFF” op de hoofddisplay getoond. Deutsch 1 • De fabrieksinstelling is OFF. Italiano Luister naar muziek op het systeem vanaf een met Bluetooth uitgerust apparaat Español 4 Bevestig op het met Bluetooth uitgeruste apparaat dat de paring is voltooid. Français • Het volgende kan worden uitgevoerd als het systeem op stand-by staat terwijl BT STANDBY is ingeschakeld (ON). • Als een met Bluetooth uitgevoerd apparaat wordt geselecteerd dat reeds eerder op dit systeem is aangesloten geweest (de paring is reeds uitgevoerd), wordt het systeem automatisch met de Bluetooth functie ingeschakeld. English Opmerking • Dit toestel zal weergegeven worden als “Pioneer XHM26” op alle apparaten die u bezit die met Bluetooth kunnen werken. De paring gaat van start. • Plaats het met Bluetooth uitgeruste apparaat dichtbij het systeem. • Raadpleeg de gebruikershandleiding van het met Bluetooth uitgeruste apparaat voor gegevens over wanneer de paring kan worden uitgevoerd en de procedures die voor de paring vereist zijn. • Als de pincode-ingang wordt gevraagd, moet “0000” worden ingevoerd. (Dit apparaat kan uitsluitend met de pincode “0000” worden ingesteld.) 09 • Wanneer het met Bluetooth uitgevoerde apparaat niet is aangesloten, en er heeft meer dan 20 minuten lang geen bediening plaatsgevonden, wordt het systeem automatisch uitgeschakeld. In dit geval moet Auto Power Off zijn ingeschakeld (ON). • Auto Power Off kan in en uit worden geschakeld (ON/ OFF) (bladzijde 33). 27 Nl X-HM16_26_26D_Nl.book 09 28 ページ 2016年7月22日 金曜日 午前10時42分 Bluetooth® audioweergave Waarschuwing radiogolven Dit apparaat maakt gebruik van een radiogolffrequentie van 2,4 GHz, wat een band is die wordt gebruikt door andere draadloze systemen (zie lijst hieronder). Om ruis of onderbroken communicatie te voorkomen, dient u dit apparaat niet in de buurt van dergelijke apparaten te gebruiken, of dient u ervoor te zorgen dat die apparaten tijdens het gebruik uitgeschakeld zijn. • Draadloze telefoons • Draadloze faxmachines • Magnetrons • Draadloze LAN-apparaten (IEEE802.11b/g) • Draadloze AV-apparatuur • Draadloze regelaars voor spelsystemen • Gezondheidsapparaten op basis van microgolven • Bepaalde babyphones Andere, minder bekende apparatuur die op dezelfde frequentie werkzaam kan zijn: • Antidiefstalsystemen • Amateurradiostations (HAM) • Logistieke beheersystemen in magazijnen • Discriminatiesystemen voor trein- of noodhulpvoertuigen Opmerking • Als er ruis verschijnt in uw televisiebeeld, is het mogelijk dat apparatuur die is voorzien van Bluetooth draadloze technologie of dit apparaat (met inbegrip van producten die door dit apparaat worden ondersteund) signaalinterferentie veroorzaken met de antenneingangsaansluiting van uw televisie, videospeler, satelliettuner enz. Vergroot in dit geval de afstand tussen de antenne-ingangsaansluiting en de apparatuur die is voorzien van Bluetooth draadloze technologie of dit apparaat (met inbegrip van producten die door dit apparaat worden ondersteund). • Als er iets is dat de baan blokkeert tussen dit apparaat (met inbegrip van apparaten die door dit apparaat worden ondersteund) en de apparatuur die is voorzien van Bluetooth draadloze technologie (zoals een metalen deur, een betonwand of isolatie waarin aluminiumfolie is verwerkt), kan het zijn dat u de plaats van uw systeem moet veranderen om signaalruis en onderbrekingen te voorkomen. Omvang van de werking Gebruik van dit apparaat is beperkt tot thuisgebruik. (De zendafstand kan minder zijn als gevolg van de communicatieomgeving.) In de volgende locaties kan het geluid worden onderbroken of gestopt als gevolg van slechte omstandigheden of het niet kunnen ontvangen van radiogolven: • In gebouwen met gewapend beton of woningen gemaakt met stalen of ijzeren dragende delen. • In de buurt van metalen meubilair. 28 Nl • In een menigte mensen of in de buurt van een gebouw of een obstakel. • Op een locatie die is blootgesteld aan het magnetische veld, statische elektriciteit of radiogolfinterferentie van radiocommunicatieapparatuur die gebruik maakt van dezelfde frequentieband (2,4 GHz) als dit apparaat, zoals een 2,4 GHz draadloos LAN-apparaat (IEEE802.11b/g) of een magnetron. • Wanneer u in een dichtbevolkt woongebied woont (appartement, rijtjeshuis enz.) en de magnetron van uw buren in de buurt van uw systeem is geplaatst, kunt u last hebben van radiogolfinterferentie. Wanneer dit gebeurt, verplaatst u het apparaat naar een andere plek. Wanneer de magnetron niet wordt gebruikt, is er geen radiogolfinterferentie. Weerkaatsingen van radiogolven De radiogolven die door dit apparaat worden ontvangen zijn de radiogolven die rechtstreeks afkomstig zijn van het apparaat dat is voorzien van Bluetooth draadloze technologie (directe golven) en de golven die vanuit verschillende richtingen komen als gevolg van de weerkaatsingen tegen muren, meubilair en gebouw (weerkaatste golven). De weerkaatste golven (als gevolg van obstakels en reflecterende voorwerpen) produceren daarnaast opnieuw een verscheidenheid aan weerkaatste golven alsmede een variatie in ontvangstomstandigheden, afhankelijk van de locaties. Wanneer de audio als gevolg van dit verschijnsel niet meer correct kan worden ontvangen, kunt u proberen de locatie van het apparaat dat is voorzien van Bluetooth draadloze technologie iets te veranderen. Het geluid kan tevens worden onderbroken als gevolg van de weerkaatste golven wanneer een persoon door de ruimte tussen dit apparaat en het apparaat dat is voorzien van Bluetooth draadloze technologie loopt of deze nadert. Voorzorgsmaatregelen betreffende de aansluiting op producten die door dit apparaat worden ondersteund • Zorg dat de aansluitingen voor alle apparatuur die door dit apparaat wordt ondersteund, inclusief alle audiosnoeren en netsnoeren, is voltooid voordat u de verbinding met dit apparaat maakt. • Nadat de aansluitingen op dit apparaat zijn voltooid, moet u controleren of de audiosnoeren en netsnoeren niet samen zijn gebundeld. • Controleer bij het loskoppelen van het apparaat of er voldoende werkruimte rondom het apparaat is. • Wanneer u de aansluiting wijzigt van de audiosnoeren of andere snoeren voor producten die door dit apparaat worden ondersteund, moet u controleren of er voldoende werkruimte rondom het apparaat is. X-HM16_26_26D_Nl.book 29 ページ 2016年7月22日 金曜日 午前10時42分 Aanvullende informatie 10 Aanvullende informatie Algemeen probleem Controle Oplossing De instellingen die u hebt gedaan zijn gewist. Is het netsnoer uitgetrokken? Als het netsnoer is uitgetrokken, worden de gedane instellingen gewist. Stel de tijd nogmaals in. Verwijder het netsnoer niet als u niet wilt dat de instellingen worden gewist. Verschil in volume tussen Dit duidt niet op een storing in de CD's, MP3, Tuner en AUDIO werking van dit apparaat. IN. Als u met dit toestel een analoge speler gebruikt, sluit dan een apparaat met een phono-equalizer aan. Blijf binnen de 7 m, 30º van de afstandsbedieningssensor op het voorpaneel (bladzijde 5). Staat de sensor voor de afstandsbediening bloot aan direct zonlicht of scherp kunstlicht zoals bijv. TL-verlichting? De signalen van de afstandsbediening worden niet juist ontvangen als de sensor van de afstandsbediening blootstaat aan direct zonlicht of scherp kunstlicht zoals bijv. TL-verlichting. Zijn de batterijen leeg? Vervang de batterijen (bladzijde 5). De schijf kan niet worden Bevat de schijf krassen? afgespeeld of de schijf wordt Is de schijf vuil? automatisch uitgeworpen. Schijven met krassen kunnen mogelijk niet worden afgespeeld. Verwijder het vuil van de schijf (bladzijde 33). Staat het apparaat op een plaats met Er kan zich binnenin condensvorming hebben voorgedaan. Wacht veel vocht? even totdat de condens is verdampt. Plaats het apparaat niet te dicht bij een airconditioning enz. (bladzijde 32). Het apparaat wordt automatisch uitgeschakeld. Is het maximaal aantal mappen of bestandsnamen dat het apparaat kan herkennen niet overschreden? Het toestel kan maximaal 999 bestanden op een enkele disc of op een enkel USB-geheugenapparaat herkennen. Het aantal mappen is maximaal 255. Afhankelijk van de mapstructuur kunnen er mappen of bestanden zijn die het toestel niet kan herkennen. Pyccкий Map- of bestandsnamen worden niet herkend. Nederlands Voert u de bediening op grote afstand uit? Deutsch Het apparaat reageert niet op de afstandsbediening. Het volume kan verschillen afhankelijk van de ingangsbron en opmaak van de opname. Italiano Probleem Español Vaak worden onjuiste handelingen verward met problemen of storingen. Wanneer u denkt dat er iets mis is met dit apparaat, controleert u eerst de onderstaande punten. Soms ligt de oorzaak van het probleem bij een ander apparaat. Controleer de andere apparaten en de elektrische apparatuur die in gebruik is. Als u het probleem aan de hand van de gegeven maatregelen niet kunt verhelpen, dient u contact op te nemen met uw dichtstbijzijnde officiële Pioneer servicecentrum of met uw dealer om het apparaat te laten repareren. • Als het apparaat niet naar behoren functioneert vanwege externe effecten zoals statische elektriciteit, haalt u de stekker uit het stopcontact en steekt u deze weer in het stopcontact om het apparaat weer normaal te doen werken. Français Problemen oplossen English Hoofdstuk 10: Als er 20 minuten of langer geen weergave of bediening is geweest, wordt het apparaat automatisch uitgeschakeld. In dit geval moet Auto Power Off zijn ingeschakeld (ON) (bladzijde 33). 29 Nl X-HM16_26_26D_Nl.book 10 30 ページ 2016年7月22日 金曜日 午前10時42分 Aanvullende informatie Wanneer er een USB-geheugenapparaat is aangesloten Probleem Controle Oplossing Het USB-opslagapparaat wordt niet herkend. Is het USB-opslagapparaat op de juiste wijze aangesloten? Sluit het apparaat stevig aan (geheel ingestoken). Is het USB-opslagapparaat via een USB-hub aangesloten? Dit apparaat ondersteunt geen USB-hubs. Sluit het USBopslagapparaat rechtstreeks aan. Dit apparaat herkent alleen USB-apparaten die bedoeld zijn voor gegevensopslag. Dit apparaat is geschikt voor draagbare flash-geheugenapparaten en digitale muziekspelers. Alleen de bestandssystemen FAT16 en FAT32 worden ondersteund. Andere bestandssystemen (exFAT, NTFS, HFS enz.) worden niet ondersteund. Het gebruik van drivers voor harde schijven wordt niet door dit apparaat ondersteund. Dit duidt niet op een storing in de werking van dit apparaat. Het bestand kan niet worden Is het bestand auteursrechtelijk afgespeeld. beschermd (door DRM)? Dit duidt niet op een storing in de werking van dit apparaat. Schakel het apparaat uit en daarna weer in. Sommige USB-opslagapparaten worden niet op de juiste wijze herkend. Auteursrechtelijk beschermde bestanden kunnen niet worden afgespeeld. Bestanden die op een computer zijn opgeslagen kunnen niet worden afgespeeld. Het is mogelijk dat sommige bestanden niet kunnen worden afgespeeld. 30 Nl Mappen of bestandsnamen Bestaat de naam van de map of het worden niet juist of helemaal bestand uit meer dan 30 tekens? niet aangegeven. Het maximum aantal tekens dat voor de map en bestandsnamen kan worden weergegeven is 30. Map- of bestandsnamen worden niet in alfabetische volgorde weergegeven. Dit duidt niet op een storing in de werking van dit apparaat. De volgorde van de getoonde map- en bestandsnamen is afhankelijk van de volgorde waarin de mappen of bestanden op het USB-opslagapparaat zijn opgenomen. Herkenning van het USBopslagapparaat neemt veel tijd in beslag. Wat is de capaciteit van de USBopslagapparaten? Het duurt even voordat de gegevens zijn geladen als een USBopslagapparaat met grote capaciteit wordt aangesloten (dit kan enkele minuten in beslag nemen). X-HM16_26_26D_Nl.book 31 ページ 2016年7月22日 金曜日 午前10時42分 Aanvullende informatie 10 alleen X-HM26/26D Oplossing Het apparaat dat is voorzien van Bluetooth draadloze technologie kan niet worden aangesloten of bediend. Er komt geen geluid uit het apparaat dat is voorzien van Bluetooth draadloze technologie of het geluid is onderbroken. Controleer of er geen voorwerp dat elektromagnetische straling uitzendt in de 2,4 GHz band (magnetrons, draadloze LAN-apparatuur of draadloze apparatuur die is voorzien van Bluetooth draadloze technologie) in de buurt van dit apparaat staat. Als een dergelijk apparaat bij de receiver staat, moet u het verder weg zetten. U kunt het apparaat dat de elektromagnetische golven uitzendt ook uitzetten. * De vermelde afstand dient als globale richtlijn. De feitelijk toelaatbare afstand tussen apparaten kan afhankelijk van de omstandigheden in de omgeving variëren. Controleer of dit toestel verbonden is met een Bluetooth apparaat en een andere ingangsbron dan Bluetooth is geselecteerd. Stel de ingangsbron in op Bluetooth voordat u het koppelen uitvoert. Audio CD MP3-bestanden die op CD-R/-RW/-ROM-schijven of USB-opslagapparaten zijn opgenomen MP3: MP3 is een compressieformaat. De afkorting staat voor MPEG Audio Layer 3. MP3 is een soort audiocodering voortkomend uit een aanzienlijke compressie van de oorspronkelijke audiobron met zeer weinig verlies van de geluidskwaliteit. • Dit systeem ondersteunt MPEG-1/2 audiolaag 3 (samplingsnelheid: 32 kHz tot 48 kHz; bitsnelheid: 8 kbps tot 320 kbps). • Tijdens weergave van een VBR bestand verschilt de tijdteller op het display mogelijk van de werkelijke weergavetijd. • De map en bestandvolgorde-informatie die opgenomen is op de media hangt af van de schrijfsoftware. Er kan de mogelijkheid bestaan dat dit toestel de bestanden niet volgens onze verwachte afspeelvolgorde afspeelt. • Vanaf een media met MP3-bestanden kunnen er tot 255 mappen en 999 bestanden (inclusief niet afspeelbare bestanden) gelezen worden. Pyccкий • Alleen discs die gefinaliseerd zijn kunnen worden afgespeeld. • Discs die zijn opgenomen in de packet-write-modus (UDF-indeling) zijn niet compatibel met dit apparaat. • De hierin genoemde ondernemingen en productnamen zijn handelsmerken of geregistreerde handelsmerken van de betreffende ondernemingen. • Alleen discs die zijn opgenomen volgens de ISO9660 niveau 1, niveau 2 en Joliet-normen kunnen worden afgespeeld. • Bestanden met een DRM (Digital Rights Management) beveiliging kunnen niet worden afgespeeld. Nederlands MP3 • In de audiohandel verkrijgbare audio-CD’s • CD-R/-RW/-ROM discs met muziek die is opgenomen in het CD-DA formaat Deutsch Afspeelbare schijven en indelingen Italiano Het apparaat dat is voorzien van Bluetooth draadloze technologie is mogelijk niet ingesteld op de communicatiemodus die de Bluetooth draadloze technologie ondersteunt. Controleer de instelling van het apparaat voorzien van Bluetooth draadloze technologie. Español Controleer of het apparaat dat is voorzien van Bluetooth draadloze technologie niet te ver van dit apparaat staat en of er geen obstakels tussen het apparaat dat is voorzien van Bluetooth draadloze technologie en dit apparaat staan. Stel het apparaat dat is voorzien van Bluetooth draadloze technologie en dit apparaat zo in dat de onderlinge afstand kleiner is dan 10 m* en dat er geen voorwerpen tussen staan. Français Probleem English Wanneer het apparaat dat is uitgevoerd met Bluetooth draadloze technologie wordt aangesloten of bediend Opmerking • Dit apparaat is niet geschikt voor multisessie-discs of multiborder-opnamen. 31 Nl X-HM16_26_26D_Nl.book 10 32 ページ 2016年7月22日 金曜日 午前10時42分 Aanvullende informatie • Multisessie/multiborder-opname is een opnamemethode waarbij de gegevens op een enkele disc worden opgenomen in meerdere sessies of tussen twee of meer begrenzingen (“borders”). Een “sessie” of een “border” is een complete opnameeenheid, bestaande uit een volledig stel gegevens vanaf de intro tot en met het slotakkoord of de aftiteling. Omtrent kopieerbeveiligde CD’s Dit apparaat is ontworpen om te voldoen aan de specificaties van het audio-CD formaat. Dit apparaat is niet geschikt voor het afspelen of voor andere functies van discs die niet voldoen aan deze specificaties. Geschikte audiobestandsformaten Dit apparaat is niet geschikt voor verliesvrije codering. Let op tijdens het gebruik Wanneer het apparaat wordt verplaatst Wanneer u dit toestel verplaatst, controleer dan eerst of geen disc geladen is en sluit het USB-opslagapparaat af. Druk vervolgens op Í, wacht tot “STAND BY” op het hoofdtoestel verdwijnt om dit uit te schakelen en maak het netsnoer vervolgens los. Er kan schade berokkend worden als het toestel met een geplaatste disc vervoerd of verplaatst wordt of wanneer een ander apparaat met de USBaansluiting verbonden is om met de aansluiting voor de ministekker van AUDIO IN. Plaats van installatie • Kies een stabiele plaats in de buurt van de TV of de stereo-installatie waarmee u het apparaat gebruikt. • Plaats het apparaat niet bovenop een TV of kleurenmonitor. Installeer de receiver ook niet in de buurt van een cassettedeck en overige apparatuur die voor magnetische krachten gevoelig is. Vermijd de volgende locaties: • • • • • • Plaatsen die aan direct zonlicht zijn blootgesteld Vochtige of slecht geventileerde plaatsen Zeer warme plaatsen Plaatsen die aan trillingen onderhevig zijn Plaatsen met veel stof of tabaksrook Plaatsen die blootstaan aan roet, stoom of hitte (van bijv. keukens) Plaats nooit een voorwerp bovenop het apparaat Plaats nooit enig voorwerp bovenop het apparaat. 32 Nl Zorg ervoor dat de ventilatiegaten vrij zijn. Plaats het apparaat niet op een wollig kleedje of deken, op een bed of sofa, en leg er nooit een doek overheen. Bij onvoldoende ventilatie kunnen de inwendige onderdelen oververhit en beschadigd raken. Niet aan hitte blootstellen. Plaats het apparaat niet bovenop een versterker of ander apparaat dat warmte afgeeft. Als de receiver op een rek wordt gemonteerd, plaats hem dan op een schap onder de versterker om de warmte die door de versterker of ander audiocomponent wordt afgegeven te vermijden. • Schakel het apparaat uit wanneer u het apparaat niet gebruikt. • Afhankelijk van de ontvangstomstandigheden kunnen er strepen in het TV-beeld verschijnen of kan er storing in de radio-ontvangst klinken wanneer het apparaat aan staat. Als dit zich voordoet, schakelt u het apparaat uit. Over condensvocht Als het apparaat direct van een koude omgeving in een warme kamer wordt geplaatst (’s winters bijvoorbeeld), of als de kamer waarin het apparaat staat plotseling snel wordt verwarmd, kan er vocht uit de lucht in het inwendige van het apparaat condenseren (als druppeltjes op de lens enz.). Na dergelijke condensatie zal het apparaat niet goed werken, zodat u geen discs kunt afspelen. Laat het apparaat dan 1 tot 2 uur lang (afhankelijk van de hoeveelheid condensatie) ongebruikt aan staan, totdat het condensvocht verdampt is. Wanneer alle condens is verdampt, zal het apparaat weer normaal werken. Condensatie kan ook ’s zomers optreden, als het apparaat direct in de koude luchtstroom van een airconditioning staat. Wanneer dit gebeurt, verplaatst u het apparaat naar een andere plek. Reiniging van het product • Trek altijd eerst de stekker uit het stopcontact, voordat u het apparaat gaat reinigen. • Veeg het apparaat schoon met een zachte doek. Gebruik ingeval van hardnekkig vuil een zachte doek die in neutraal wasmiddel is gedompeld dat met 5 of 6 delen water is opgelost, wring hem goed uit, verwijder het vuil, en reinig dan nogmaals met een zachte en droge doek. • Door gebruik van alcoholverdunners, wasbenzine, insecticiden, enz. kan de bedrukking of de lak loskomen. Laat ook niet langdurig plastic of rubber voorwerpen tegen het apparaat aan liggen, want ook dat kan de afwerking aantasten. • Als een chemisch geïmpregneerde reinigingsdoek wordt gebruikt, lees dan zorgvuldig de waarschuwingen die bij de doek worden gegeven. Reinigen van het disc-lensje Bij normaal gebruik hoort het lensje van dit apparaat niet vuil te worden, maar als er mogelijk stof of vuil op is gekomen, raadpleegt u dan uw dichtstbijzijnde Pioneer servicecentrum. Lensreinigers voor spelers zijn in de handel verkrijgbaar, maar sommige kunnen schade aan het lensje veroorzaken, dus we raden het gebruik ervan af. X-HM16_26_26D_Nl.book 33 ページ 2016年7月22日 金曜日 午前10時42分 Aanvullende informatie Bewaren Gebruik in dit apparaat geen discs met afwijkende vormen (zeshoekig, hartvormig e.d.). Probeer niet om dergelijke discs af te spelen, want dat kan dit apparaat beschadigen. Français • Plaats schijven altijd in hun cover en bewaar ze rechtop, waarbij hitte, vocht, plaatsen die blootstaan aan direct zonlicht en zeer koude plaatsen dienen te worden vermeden. • Lees de waarschuwingen die bij de schijf worden gegeven. Informatie over schijven met speciale vormen Reiniging van schijven Auto Power Off-instelling 1 Druk op MENU op de afstandsbediening. “Auto Power Down” zal op het hoofddisplay weergegeven worden. 2 Druk op ENTER op de afstandsbediening. Italiano 3 Druk op / om de auto power offinstelling ON/OFF om te schakelen. • De aanvankelijke instelling is ON. Opmerking • Als Auto Power Off is ingeschakeld (ON), verschijnt “APD ON” op de hoofddisplay. • Als Auto Power Off is ingeschakeld (OFF), verschijnt “APD OFF” op de hoofddisplay. Deutsch Alle instellingen op de beginstand terugzetten Nederlands • Gebruik geen wasbenzine, verdunner of andere vluchtige chemische stoffen. Gebruik ook geen LPspray of antistatische middelen. • Gebruik ingeval van hardnekkig vuil een zachte doek die in water is gedompeld, wring hem goed uit, verwijder het vuil, en neem dan het vocht af met een droge doek. • Gebruik geen beschadigde (gebroken of verbogen) schijven. • Zorg ervoor dat het contactoppervlak van de schijven niet bekrast of vervuild raakt. • Bevestig geen papiertjes of stickers op de schijven. Daardoor kunnen de schijven verbuigen, waardoor ze niet meer kunnen worden afgespeeld. N.B. er bevinden zich meestal labels op gehuurde schijven, en de label kan zijn doortrokken van de lijm. Controleer of er zich geen lijm bevindt rondom de randen van de labels voordat gehuurde schijven worden gebruikt. Volg onderstaande stappen om alle instellingen terug te stellen op de standaardinstellingen. 1 Druk op Í om het apparaat in te schakelen. 2 3 / Druk op ENTER. “OK?” zal getoond worden. 4 Pyccкий Druk op MENU en druk vervolgens op tot “Factory Reset” op het display verschijnt. Español • De schijven kunnen mogelijk niet worden afgespeeld als ze vingerafdrukken of stof bevatten. Gebruik in dat geval bijv. een reinigingsdoek en reinig de schijf voorzichtig aan de binnen- en buitenzijde. Gebruik geen vervuilde reinigingsdoeken. English Behandeling van discs 10 Druk op ENTER. • “Resetting” wordt weergegeven en de instellingen worden op de beginstand teruggezet. Het apparaat is uitgeschakeld. 33 Nl X-HM16_26_26D_Nl.book 10 34 ページ 2016年7月22日 金曜日 午前10時42分 Aanvullende informatie Specificaties • Versterkergedeelte RMS-uitgangsvermogen: . . . . . . . . . . . . . . . . 15 W + 15 W (1 kHz, 10 %, T.H.D., 8 Ω) • Tunergedeelte Frequentiebereik (FM) . . . . . . . . . 87,5 MHz tot 108,0 MHz Antenne-ingang (FM) . . . . . . . . . . . . 75 Ω ongebalanceerd Frequentiebereik (AM) (Voor Noord-Amerikaanse modellen) . . . . . . . . . . . . . . . . . . . . . . . . . . . . . 530 kHz tot 1710 kHz Antenne (AM) . . . . . . . . . . . . . . . . . . . . . . . . Raamantenne • Bluetooth (alleen X-HM26/26D) Versie . . . . . . . . . . . . . . . . . . Bluetooth specificatie ver. 4.1 Uitgang . . . . . . . . . . . . . . . . .Bluetooth specificatie klasse 2 Geschatte directe transmissie-afstand* . . . Ongeveer 10 m Frequentiebereik. . . . . . . . . . . . . . . . . . . . . . . . . . . 2,4 GHz Modulatie . . . . . . . . . FH-SS (Frequency Hopping Spread Spectrum) Ondersteunde Bluetooth profielen . . . . . . . . A2DP, AVRCP Ondersteunde codec . . . . . . . . . . . SBC (Subband Codec) Ondersteunde inhoudbescherming . . . . . . . . . . . . SCMS-T PIN-code. . . . . . . . . . . . . . . . . . . . . . . . . . . . . . . . . . . .0000 * De directe transmissie-afstand is een geschatte waarde. De feitelijke transmissie-afstand kan verschillen afhankelijk van de omgevingsomstandigheden. • Diverse USB-aansluitpunt . . . . . . . . . . . . . . . . . . . . . . . 5 V, 500 mA Voedingsbron (Voor Europese modellen) . . . . . . . . . . 220 V t/m 240 V wisselstroom, 50 Hz/60 Hz (Voor Noord-Amerikaanse modellen) . . . . . . . . . . . . . . . . . . . . . . . 120 V wisselstroom, 60 Hz Stroomverbruik Power On . . . . . . . . . . . . . . . . . . . . . . . . . . . . . . . . 20 W Power stand-by . . . . . . . . . . . . . . . . . . . 0,5 W of minder Power stand-by (BT STANDBY ON) . . . 0,5 W of minder Afmetingen. . . . 215 mm (B) x 95 mm (H) x 315 mm (D) Gewicht (zonder verpakking) . . . . . . . . . . . . . . . . . . . 2,0 kg • Luidspreker Bijlage . . . . . . . . . . . . . . . . . . . Bassreflex, shelf-luidspreker (Magnetisch beschermd) Configuratie . . . . . . . . . . . . . . . . . . . . . . . . . . . Tweeweg Tweeter . . . . . . . . . . . . . . . . . . . . . . . . .2 cm koepeltype Woofer . . . . . . . . . . . . . . . . . . . . . . . . . . . . 10 cm conus Maximum invoervermogen . . . . . . . . . . . . . . . . . . . . . 15 W Impedantie . . . . . . . . . . . . . . . . . . . . . . . . . . . . . . . . . . . 8 Ω Afmetingen . . . . 130 mm (B) x 212 mm (H) x 228,5 mm (D) Gewicht. . . . . . . . . . . . . . . . . . . . . . . . . . . . . . . . . Elk 2,0 kg 34 Nl • Accessoires Afstandsbediening . . . . . . . . . . . . . . . . . . . . . . . . . . . . . . . AAA-batterijen (R03) . . . . . . . . . . . . . . . . . . . . . . . . . . . . . AM-antennekabel*1 . . . . . . . . . . . . . . . . . . . . . . . . . . . . . . FM-draadantenne*2. . . . . . . . . . . . . . . . . . . . . . . . . . . . . . DAB/FM-draadantenne*3 . . . . . . . . . . . . . . . . . . . . . . . . . Netsnoer . . . . . . . . . . . . . . . . . . . . . . . . . . . . . . . . . . . . . . Garantiebewijs*4 . . . . . . . . . . . . . . . . . . . . . . . . . . . . . . . . Handleiding (dit document) . . . . . . . . . . . . . . . . . . . . . . . . *1 Alleen Noord-Amerikaanse modellen *2 alleen X-HM16/HM26 *3 alleen X-HM26D *4 Alleen Europese modellen 1 2 1 1 1 1 1 1 Opmerking • De specificaties zijn van toepassing wanneer de voeding 230 V is. • De technische gegevens en het ontwerp kunnen met het oog op verbeteringen zonder voorafgaande kennisgeving worden gewijzigd. “Pioneer” is een handelsmerk van Pioneer Corporation en wordt gebruikt onder licentie. © 2016 Onkyo & Pioneer Corporation. Alle rechten voorbehouden. SN29402699_X-HM16_26_26D_En_European.book 39 ページ 2016年7月21日 木曜日 午前10時20分 X-HM16_26_26D_Ru.book 2 ページ 2016年7月22日 金曜日 午前11時2分 ВНИМАНИЕ ВО ИЗБЕЖАНИЕ ПОРАЖЕНИЯ ЭЛЕКТРИЧЕСКИМ ТОКОМ НЕ СНИМАЙТЕ КРЫШКУ (ИЛИ ЗАДНЮЮ СТЕНКУ). ВНУТРИ НЕ СОДЕРЖАТСЯ ДЕАТЛИ, ПРЕДНАЗНАЧЕННЫЕ ДЛЯ РЕМОНТА ПОЛЬЗОВАТЕЛЕМ. ДЛЯ ОБСЛУЖИВАНИЯ ОБРАТИТЕСЬ К КВАЛИФИЦИРОВАННОМУ СОТРУДНИКУ СЕРВИСНОЙ СЛУЖБЫ. D3-4-2-1-1_B1_Ru ПРЕДУПРЕЖДЕНИЕ Данное оборудование не является водонепроницаемым. Во избежание пожара или поражения электрическим током не помещайте рядом с оборудованием емкости с жидкостями (например, вазы, цветочные горшки) и не допускайте попадания на него капель, брызг, дождя или влаги. D3-4-2-1-3_A1_Ru ПРЕДУПРЕЖДЕНИЕ Во избежание пожара не приближайте к оборудованию источники открытого огня (например, зажженные свечи). D3-4-2-1-7a_A1_Ru ОБЯЗАТЕЛЬНАЯ ВЕНТИЛЯЦИЯ ВНИМАНИЕ Выключатель STANDBY/ON данного устройства не полностью отключает его от электросети. Чтобы полностью отключить питание устройства, вытащите вилку кабеля питания из электророзетки. Поэтому устройство следует устанавливать так, чтобы вилку кабеля питания можно было легко вытащить из розетки в чрезвычайных обстоятельствах. Во избежание пожара следует извлекать вилку кабеля питания из розетки, если устройство не будет использоваться в течение долгого времени (например, если вы уезжаете в отпуск). D3-4-2-2-2a*_A1_Ru ВНИМАНИЕ Данное изделие является лазерным изделием класса 1 согласно классификации по Безопасности лазерных изделий, IEC 60825-1:2007. ЛАЗЕРНЫЙ ПРОДУКТ КЛАСС 1 D58-5-2-2a_A1_Ru При установке устройства обеспечьте достаточное пространство для вентиляции во избежание повышения температуры внутри устройства (не менее 25 см сверху, 10 см сзади и по 5 см слева и справа). ПРЕДУПРЕЖДЕНИЕ В корпусе устройства имеются щели и отверстия для вентиляции, обеспечивающие надежную работу изделия и защищающие его от перегрева. Во избежание пожара эти отверстия ни в коем случае не следует закрывать или заслонять другими предметами (газетами, скатертями и шторами) или устанавливать оборудование на толстом ковре или постели. D3-4-2-1-7b*_A1_Ru Условия эксплуатации Изделие эксплуатируется при следующих температуре и влажности: +5 °C до +35 °C; влажность менее 85 % (не заслоняйте охлаждающие вентиляторы) Не устанавливайте изделие в плохо проветриваемом помещении или в месте с высокой влажностью, открытом для прямого солнечного света (или сильного искусственного света). D3-4-2-1-7c*_A1_Ru K041_A1_Ru МЕРЫ ПРЕДОСТОРОЖНОСТИ ПРИ ОБРАЩЕНИИ С СЕТЕВЫМ ШНУРОМ Держите сетевой шнур за вилку. Не вытаскивайте вилку, взявшись за шнур, и никогда не касайтесь сетевого шнура, если Ваши руки влажные, так как это может привести к короткому замыканию или поражению электрическим током. Не ставьте аппарат, предметы мебели и т.д. на сетевой шнур, не зажимайте его. Не завязывайте узлов на шнуре и не связывайте его с другими шнурами. Сетевые шнуры должны лежать так, чтобы на них нельзя было наступить. Поврежденный сетевой шнур может стать причиной возникновения пожара или поразить Вас электрическим током. Время от времени проверяйте сетевой шнур. В случае обнаружения повреждения обратитесь за заменой в ближайший официальный сервисный центр фирмы PIONEER или к Вашему дилеру. S002*_A1_Ru X-HM16_26_26D_Ru.book 3 ページ 2016年7月22日 金曜日 午前11時2分 Информация для пользователей по сбору и утилизации бывшего в эксплуатации оборудования и отработавших элементов питания Обозначение для оборудования Обозначения для элементов питания Эти обозначения на продукции, упаковке, и/или сопроводительных документах означают, что бывшая в эксплуатации электротехническая и электронная продукция и отработанные элементы питания не должны выбрасываться вместе с обычным бытовым мусором. Для того чтобы данная бывшая в употреблении продукция и отработанные элементы питания были соответствующим образом обработаны, утилизированы и переработаны, пожалуйста, передайте их в соответствующий пункт сбора использованных электронных изделий в соответствии с местным законодательством. Утилизируя данные устройства и элементы питания правильно, Вы помогаете сохранить ценные ресурсы и предотвратить возможные негативные последствия для здоровья людей и окружающей среды, которые могут возникнуть в результате несоответствующего удаления отходов. Для получения дополнительной информации о правильных способах сбора и утилизации отработавшего оборудования и использованных элементов питания обращайтесь в соответствующие местные органы самоуправления, в центры утилизации отходов или по месту покупки данного изделия. Pb Данные обозначения утверждены только для Европейского Союза. Для стран, которые не входят в состав Европейского Союза: Если Вы желаете утилизировать данные изделия, обратитесь в соответствующие местные учреждения или к дилерам для получения информации о правильных способах утилизации. K058a_A1_Ru Предупреждение по радиоволнам ПРЕДУПРЕЖДЕНИЕ Данный аппарат использует радиоволновую частоту 2,4 ГГц, являющуюся диапазоном, используемым другими беспроводными системами (микроволновыми печами и радиотелефонами, др.). В случае появления искажений на изображении на телевизоре, существует возможность того, что данное устройство (включая изделия, поддерживаемые данным устройством) создают интерференцию сигналов с входным разъемом антенны телевизора, видеодеки, спутникового тюнера и т. п. В таком случае увеличьте расстояние между входным гнездом антенны и данным аппаратом (включая изделия, поддерживаемые данным аппаратом). • Pioneer не несет ответственности за любые сбои на совместимых изделиях Pioneer по причине ошибок/сбоев связи, связанных с подключением к сети и/или подключенным оборудованием. Пожалуйста, свяжитесь с провайдером Интернет услуги или производителем сетевого устройства. • Для использования Интернет требуется составить отдельный контракт/произвести оплату провайдеру Интернет услуги. Храните маленькие детали в недоступном для детей месте. В случае случайного проглатывания немедленно обратитесь к врачу. X-HM16_26_26D_Ru.book 4 ページ 2016年7月22日 金曜日 午前11時2分 Благодарим за покупку этого изделия компании Pioneer. Для того чтобы правильно обращаться с приобретенной моделью устройства, прочтите, пожалуйста, внимательно данную инструкцию. После того как вы ознакомитесь с инструкцией, сохраните ее в надежном месте для обращения к ней в будущем. Содержание 01 Перед началом работы Комплект поставки . . . . . . . . . . . . . . . . . . . . . . . . . . . . . .5 Установка батареек в пульт дистанционного управления . . . . . . . . . . . . . . . . . . . . . . . . . . . . . . . . . . . .5 Использование пульта дистанционного управления . . . . . . . . . . . . . . . . . . . . . . . . . . . . . . . . . 5 02 Названия частей и функции Пульт ДУ . . . . . . . . . . . . . . . . . . . . . . . . . . . . . . . . . . . . . .6 Передняя панель . . . . . . . . . . . . . . . . . . . . . . . . . . . . . . .7 Дисплей . . . . . . . . . . . . . . . . . . . . . . . . . . . . . . . . . . . . . .8 Акустическая система . . . . . . . . . . . . . . . . . . . . . . . . . . .8 03 Подключения Подключение громкоговорителей . . . . . . . . . . . . . . . . .9 Подключение антенн . . . . . . . . . . . . . . . . . . . . . . . . . . .10 Использование внешних антенн. . . . . . . . . . . . . . . 10 Подключение . . . . . . . . . . . . . . . . . . . . . . . . . . . . . . . . .11 04 Начало работы Для включения питания . . . . . . . . . . . . . . . . . . . . . . . .12 Настройка часов . . . . . . . . . . . . . . . . . . . . . . . . . . . . . .12 Общее управление . . . . . . . . . . . . . . . . . . . . . . . . . . . .12 Функция ввода . . . . . . . . . . . . . . . . . . . . . . . . . . . . . 12 Регулирование яркости дисплея. . . . . . . . . . . . . . . 12 Автоматическая установка громкости . . . . . . . . . . 12 Регулирование громкости . . . . . . . . . . . . . . . . . . . . 12 Приглушение звука . . . . . . . . . . . . . . . . . . . . . . . . . 12 Управление звуком . . . . . . . . . . . . . . . . . . . . . . . . . . . .13 Эквалайзер . . . . . . . . . . . . . . . . . . . . . . . . . . . . . . . . 13 Регулирование низких частот (режим P.bass) . . . . 13 Регулировка тембра низких/высоких частот . . . . . 13 Настройка таймера включения . . . . . . . . . . . . . . . . . . .13 Вызов таймера включения . . . . . . . . . . . . . . . . . . . 14 Отмена таймера включения . . . . . . . . . . . . . . . . . . 14 Использование таймера включения. . . . . . . . . . . . 14 Использование таймера отключения . . . . . . . . . . . . . .14 Использование наушников . . . . . . . . . . . . . . . . . . . . . .14 05 Воспроизведение диска Воспроизведение дисков или файлов . . . . . . . . . . . . .15 Загрузка диска . . . . . . . . . . . . . . . . . . . . . . . . . . . . . 15 Воспроизведение композиций на компакт-диске . . . . . . . . . . . . . . . . . . . . . . . . . . . . . . 15 Воспроизводите музыкальные файлы MP3. . . . . . 15 Усовершенствованное воспроизведение дисков CD или MP3 . . . . . . . . . . . . . . . . . . . . . . . . . . . . . . . . . . . . . . . . .16 Повторное воспроизведение . . . . . . . . . . . . . . . . . 16 Воспроизведение в случайной последовательности . . . . . . . . . . . . . . . . . . . . . . . . 16 Запрограммированное воспроизведение (CD) . . . 17 О загрузке файлов MP3. . . . . . . . . . . . . . . . . . . . . . 17 Переключение содержимого дисплея . . . . . . . . . . 17 06 Воспроизведение с USB Воспроизведение запоминающих устройств USB . . .18 Повторное воспроизведение . . . . . . . . . . . . . . . . . 19 Воспроизведение в случайной последовательности . . . . . . . . . . . . . . . . . . . . . . . . 19 Переключение содержимого дисплея . . . . . . . . . . 19 4 Ru 07 Использование тюнера Прослушивание передач FM-диапазона (Только для европейских моделей)/Прослушивание передач FM- или AM-диапазона (Только для моделей для Северной Америки) . . . . . . . . . . . . . . . . . . . . . . . . . . . . . . . . . . . . 20 Настройка . . . . . . . . . . . . . . . . . . . . . . . . . . . . . . . . . 20 Сохранение запрограммированных радиостанций . . . . . . . . . . . . . . . . . . . . . . . . . . . . . . 20 Использование системы передачи данных по радио (RDS) (только для моделей для Европы). . . . . . . . . . . . . . 21 Прослушивание радиостанций DAB+ (только X-HM26D) . . . . . . . . . . . . . . . . . . . . . . . . . . . . . 23 О DAB+ (Digital Audio Broadcasting, цифровое аудиовещание) . . . . . . . . . . . . . . . . . . . . . . . . . . . . . 23 Настройка . . . . . . . . . . . . . . . . . . . . . . . . . . . . . . . . . 23 Переключение режимов информационного дисплея . . . . . . . . . . . . . . . . . . . . . . . . . . . . . . . . . . . 23 Запоминание станции. . . . . . . . . . . . . . . . . . . . . . . . 24 Таблица частот DAB (ДИАПАЗОН III) . . . . . . . . . . . 24 08 Другие подключения Подсоединение дополнительных компонентов . . . . . 25 Автоматическое переключение на вход Audio In (только для моделей для Северной Америки) . . . . . . 25 09 Воспроизведение Bluetooth® Audio Воспроизведение музыки с помощью беспроводной технологии Bluetooth . . . . . . . . . . . . . . . . . . . . . . . . . . . 26 Использование дистанционного управления . . . . . . . 26 Спаривание с аппаратом (Первичная регистрация) . . . . . . . . . . . . . . . . . . . . . . . . . . . . . . . . . 26 Прослушивание музыки на аппарате с устройством с поддержкой Bluetooth . . . . . . . . . . . . . . . . . . . . . . . . . . 27 BT STANDBY . . . . . . . . . . . . . . . . . . . . . . . . . . . . . . . . . 27 Предостережение по радиоволнам . . . . . . . . . . . . . . . 28 Рамки действия . . . . . . . . . . . . . . . . . . . . . . . . . . . . . 28 Отражения радиоволн . . . . . . . . . . . . . . . . . . . . . . . 28 Меры предосторожности, касающиеся соединений с аппаратами, поддерживаемыми данным устройством. . . . . . . . . . . . . . . . . . . . . . . . . . . . . . . . 28 10 Дополнительная информация Устранение неполадок . . . . . . . . . . . . . . . . . . . . . . . . . Воспроизводимые диски и форматы . . . . . . . . . . . . . . Относительно компакт-дисков с защитой от копирования. . . . . . . . . . . . . . . . . . . . . . . . . . . . . . . . Поддерживаемые форматы аудиофайлов . . . . . . . Меры предосторожности при эксплуатации . . . . . . . . При перемещении устройства . . . . . . . . . . . . . . . . . Место установки . . . . . . . . . . . . . . . . . . . . . . . . . . . . Не размещайте предметы на устройстве . . . . . . . . О конденсации. . . . . . . . . . . . . . . . . . . . . . . . . . . . . . Чистка изделия . . . . . . . . . . . . . . . . . . . . . . . . . . . . . Чистка линзы . . . . . . . . . . . . . . . . . . . . . . . . . . . . . . . Обращение с дисками . . . . . . . . . . . . . . . . . . . . . . . . . Хранение . . . . . . . . . . . . . . . . . . . . . . . . . . . . . . . . . . Чистка дисков . . . . . . . . . . . . . . . . . . . . . . . . . . . . . . О дисках специальной формы . . . . . . . . . . . . . . . . . Настройка автоматического отключения питания . . . Сброс всех настроек на значения по умолчанию . . . Технические характеристики . . . . . . . . . . . . . . . . . . . . 29 31 32 32 32 32 32 32 32 32 33 33 33 33 33 33 33 34 X-HM16_26_26D_Ru.book 5 ページ 2016年7月22日 金曜日 午前11時2分 Перед началом работы 01 Перед началом работы Использование пульта дистанционного управления Пульт дистанционного управления имеет дальность действия около 7 м при угле отклонения от датчика дистанционного управления 30°. Закройте заднюю крышку. INPU T 30° 30° • • • • ВНИМАНИЕ Не используйте любые другие типы батареек, кроме указанных батареек. Также не используйте новую батарейку вместе со старой. Вставляя батарейки, будьте внимательны, чтобы не повредить пружины на - контактах для батареек. Это может вызвать течь батареек или перегрев. При установке батареек в пульт дистанционного управления вставляйте их в правильной ориентации в соответствии с обозначениями полярности (+ и -). Не нагревайте батарейки, не разбирайте и не кидайте их в огонь или в воду. Не забывайте о следующих моментах при использовании пульта ДУ: • Следите за тем, чтобы между пультом дистанционного управления и находящимся на основном устройстве приемным датчиком не было никаких препятствий. • Дистанционное управление может работать неустойчиво, если на датчик дистанционного управления на устройстве падает сильный солнечный свет или свет от люминесцентного освещения. • Пульты ДУ для различных устройств могут создавать помехи друг для друга. Не используйте пульты дистанционного управления для другого оборудования, расположенного рядом с этим устройством. • Замените батарейки, если вы заметите уменьшение дальности действия пульта ДУ. Pyccкий 7м Nederlands 2 Deutsch 1 Откройте заднюю крышку и установите батарейки, как показано ниже. ПРЕДУПРЕЖДЕНИЕ Не используйте и не храните батарейки под воздействием прямых солнечных лучей или в помещении с высокой температурой, например, в автомобиле или рядом с обогревателем. Это может вызвать протекание, перегрев, микровзрыв или возгорание батареек. Кроме того, это может привести к сокращению срока службы или производительности батареек. Italiano Установка батареек в пульт дистанционного управления • Español При вскрытии коробки убедитесь, что в ней присутствуют следующие принадлежности. • Пульт дистанционного управления • Батарейки AAA (R03) x 2 • Кабель питания • Кабель антенны AM*1 • Проволочная антенна FM*2 • Проволочная антенна DAB/FM*3 • Гарантийный сертификат*4 • Инструкции по эксплуатации (данный документ) *1 Только модели для Северной Америки *2 Только X-HM16/X-HM26 *3 Только X-HM26D *4 Только модели для Европы • Батарейки могут иметь различное напряжение, даже если они одинаковы по размеру и форме. Не используйте одновременно батарейки различных типов. • Во избежание протекания электролита батареек извлеките батарейки, если не собираетесь использовать пульт дистанционного управления в течение продолжительного периода времени (1 месяц или более). В случае протекания электролита тщательно протрите с внутренней стороны отделение для батареек, затем установите новые батарейки. В случае протекания батарейки и попадания электролита на кожу, смойте его большим количеством воды. • Производите утилизацию использованных батареек в соответствии с действующими в вашей стране/ регионе государственными постановлениями или правилами по охране окружающей среды. Français Комплект поставки English Глава 1: 5 Ru X-HM16_26_26D_Ru.book 02 6 ページ 2016年7月22日 金曜日 午前11時2分 Названия частей и функции Глава 2: Названия частей и функции 4 Пульт ДУ / // 5 PGM/MEMORY • Используется для сохранения радиостанций или программирования компакт-диска (стр. 17). • Используется для сохранения в памяти станций FM/ AM (стр. 20) или DAB (стр. 24). 1 2 10 11 3 6 TUNE +/– Используется для поиска радиочастот (стр. 20). 12 13 Кнопки управления воспроизведением Используйте для управления каждой функцией после ее выбора с помощью кнопок функций входа (стр. 16). PRESET +/– 4 5 , ENTER Используйте для выбора/переключения настроек системы и режимов и для подтверждения действий. Используйте для выбора запрограммированных радиостанций (стр. 20). 7 Кнопки управления звуком Регулируют качество звука (стр. 13). 8 6 14 9 7 8 9 SLEEP См. Использование таймера отключения на стр. 14. TIMER Используется для установки часов, а также для установки и проверки установок таймера (стр. 12). 15 16 10 Нажмите для изменения настроек режима повторного воспроизведения с компакт-дисков (стр. 16) или USB (стр. 19). 11 RANDOM Нажмите для изменения настроек режима воспроизведения в случайном порядке с компакт-дисков (стр. 16) или USB (стр. 19). 1 Í Используется для включения ресивера или его переключения в режим ожидания (стр. 12). 2 Кнопки выбора входа Используется для выбора источника входа данного ресивера (стр. 12). 12 DISPLAY Нажмите для изменения отображения информации MP3 (стр. 17), RDS (стр. 21) или DAB (стр. 24). 13 Нажмите для возврата к предыдущему экрану. 14 Кнопки управления Volume Используйте для регулировки уровня громкости прослушивания (стр. 12). 3 Используется для настройки или воспроизведения аудиофайла с помощью сети Bluetooth (стр. 26). 15 MENU 16 DIMMER Используйте для доступа к меню. 6 Ru Отключение/включение звука (стр. 12). Регулировка яркости дисплея. Имеется четыре уровня изменения яркости (стр. 12). X-HM16_26_26D_Ru.book 7 ページ 2016年7月22日 金曜日 午前11時2分 Названия частей и функции 02 1 2 3 4 5 English Передняя панель Français TIMER Español 1 7 8 Í STANDBY/ON Используется для включения ресивера или его переключения в режим ожидания (стр. 12). 2 Датчик дистанционного управления 9 10 7 11 Гнездо для наушников Используйте для подключения наушников. При подключении наушников звук не будет воспроизводиться через громкоговорители. 8 3 Используется для подключения устройства памяти USB в качестве источника звука (стр. 18). Индикатор TIMER Загорается, когда отключается питание ресивера при установке таймера. 4 Главный дисплей См. Дисплей на стр. 8. Регулирование громкости Используйте для регулировки уровня громкости прослушивания (стр. 12). 6 INPUT Используется для выбора источника входа. Лоток для дисков Поместите диск, стороной с этикеткой вверх (стр. 15). 10 Кнопки управления воспроизведением Используется для выбора требуемой дорожки или файла для воспроизведения. Используется для остановки воспроизведения. Останавливает или возобновляет воспроизведение с точки паузы. 11 Кнопка открытия/закрытия лотка для дисков Pyccкий Используйте для открытия или закрытия лотка для дисков (стр. 15). Nederlands 5 9 Разъем USB Deutsch Принимает сигналы от пульта ДУ. Italiano 6 7 Ru X-HM16_26_26D_Ru.book 02 8 ページ 2016年7月22日 金曜日 午前11時2分 Названия частей и функции Дисплей 1 2 3 1 3 ; Высвечивается при приглушении звука. Пауза в воспроизведении. 4 5 4 Примечание • Значок приглушения звука будет отображаться красным цветом. 2 Акустическая система 1 3 2 1 Высокочастотный динамик 2 Низкочастотный динамик Терминалы громкоговорителя ВАЖНО • Решетка громкоговорителя не снимается. • Оба громкоговорителя можно использовать или с правой, или с левой стороны. 8 Ru 5 Символьный дисплей Отображает различную информацию о системе. 1 Запуск воспроизведения. 3 Функция таймера установлена. X-HM16_26_26D_Ru.book 9 ページ 2016年7月22日 金曜日 午前11時2分 Подключения 03 Подключения Подключение громкоговорителей Левый громкоговоритель Deutsch Задняя панель данного устройства Italiano Правый громкоговоритель Español • Откройте защитные выступы и вставьте оголенный провод. • Присоедините черный провод к гнезду (s), а красный провод — к гнезду (r). ВНИМАНИЕ • На контактах громкоговорителей имеется ОПАСНОЕ ДЛЯ ЖИЗНИ напряжение. Во избежание опасности поражения электрическим током при подключении или отключении кабелей громкоговорителей отсоединяйте кабель питания, прежде чем прикасаться к любым неизолированным деталям. • Не подключайте никаких динамиков, кроме тех, которые входят в комплект поставки. • Не подключайте входящие в комплект динамики к каким-либо усилителям, кроме того, что входит в комплект поставки. Подключение к любому другому усилителю может стать причиной неисправности или пожара. • Не крепите громкоговоритель к стене или потолку. Он может упасть и нанести травмы. • Эти громкоговорители имеют магнитное экранирование. Однако, в зависимости от места установки, на экране могут возникать искажения цвета, если акустическая система установлена очень близко к экрану телевизора. В таком случае, выключите телевизор и затем включите его через 15 - 30 минут. Если проблема сохраняется, отодвиньте акустическую систему от телевизора. • Убедитесь, что кабельные жилы громкоговорителя не оголены и не контактируют с другими кабельными жилами. Это может вызвать неисправность изделия. • Не допускайте контакта сердечника кабеля громкоговорителя с корпусом ресивера. Français ВНИМАНИЕ • Обязательно выключите питание и отсоедините кабель питания от розетки при выполнении подключений или изменении соединений. • Подключите кабель питания после выполнения всех соединений между устройствами. English Глава 3: Nederlands Pyccкий • Если произойдет контакт оголенного кабеля громкоговорителя с любой металлической частью корпуса ресивера, это может повредить громкоговоритель и стать причиной задымления и возгорания. Надежно вставьте кабели громкоговорителей в зажимы и убедитесь, что кабель не выпадает из зажима. Примечание • Между громкоговорителями L и R нет разницы. 9 Ru X-HM16_26_26D_Ru.book 03 10 ページ 2016年7月22日 金曜日 午前11時2分 Подключения 2 Прикрепите рамочную антенну AM к специальной стойке. Подключение антенн • Подключите рамочную антенну АМ и проволочную антенну FM (DAB/FM), как показано ниже. • Для улучшения приема и качества звука подключите внешние антенны (см. раздел Использование внешних антенн ниже). Только для моделей для Северной Америки 3 Установите антенну AM на плоскую поверхность в направлении наилучшего приема. • Для улучшения приема поставьте антенну возле окна или в другом аналогичном месте. • Не устанавливайте антенну возле компьютера или телевизора. Это может вызывать шум. 4 Подключите проволочную антенну FM (DAB/FM) к разъему антенны FM. 2 3 1 Установите, как показано на рисунке выше. Чтобы улучшить прием, полностью вытяните проволочную антенну FM (DAB/FM) и прикрепите ее к стене или дверной раме. Не допускайте, чтобы антенна свешивалась или спутывалась. Использование внешних антенн 2 Улучшение качества приема FM Для подключения внешней FM (DAB/FM)-антенны используйте PAL-соединитель (приобретается отдельно). 4 X-HM16/ X-HM26 3 1 Только для европейских моделей Одноконтактны й разьем PAL X-HM26D X-HM16/X-HM26 4 X-HM26D 1 Подсоедините провода антенны AM. Держитесь за разъем для подсоединения. 10 Ru Коаксиальный кабель с сопротивлением 75 Ом X-HM16_26_26D_Ru.book 11 ページ 2016年7月22日 金曜日 午前11時2分 Подключения Задняя панель данного устройства Français Перед выполнением или изменением соединений выключите питание и отсоедините кабель питания от сетевой розетки. Когда выполнение всех соединений будет завершено, вставьте вилку питания устройства в розетку сети переменного тока. English Подключение 03 Español Deutsch ВНИМАНИЕ • Используйте только кабель питания, входящий в комплект поставки данного устройства. • Используйте прилагаемый кабель питания только по его прямому назначению, как описано выше. Italiano Кабель питания К сетевой розетке Nederlands Pyccкий 11 Ru X-HM16_26_26D_Ru.book 04 12 ページ 2016年7月22日 金曜日 午前11時2分 Начало работы Глава 4: Начало работы Для включения питания Нажмите Í, чтобы включить питание. После использования: Нажмите кнопку Í, чтобы войти в режим ожидания. Настройка часов Примечание • При восстановлении электропитания после повторного подключения аппарата или после аварийного отключения питания, переустановите часы. Общее управление Функция ввода При нажатии кнопки INPUT на основном блоке текущая функция изменится на другой режим. Нажмите кнопку INPUT несколько раз, чтобы выбрать нужную функцию. CD Audio In 1 Нажмите Í, чтобы включить питание. 2 Нажмите TIMER на пульте дистанционного управления. На главном дисплее отображается «CLOCK». 3 Нажмите ENTER. 4 Нажмите кнопки / , чтобы установить день, затем нажмите ENTER. 5 Нажмите кнопки / , чтобы установить часы, затем нажмите ENTER. 6 Нажмите кнопки / , чтобы установить минуты, затем нажмите ENTER для подтверждения. 7 Нажмите ENTER. Для подтверждения отображаемого времени: Нажмите кнопку TIMER. Отображаемое время появится примерно на 10 секунд. Для переустановки часов: Выполните операции раздела «Настройка часов» с шага 1. *1 *2 DAB*1 Bluetooth USB AM*2 FM Только X-HM26D Только модели для Северной Америки Регулирование яркости дисплея Нажмите кнопку DIMMER для уменьшения яркости дисплея. Имеется четыре уровня изменения яркости. Автоматическая установка громкости При выключении и включении основного блока с уровнем громкости, установленным на значение 31 или выше, громкость начинается со значения 30 и устанавливается на последний настроенный уровень. Регулирование громкости Чтобы увеличить или уменьшить громкость, поверните регулятор громкости VOLUME (на основном блоке) или нажмите кнопку VOL +/– (на пульте ДУ). ВНИМАНИЕ • Уровень звука при заданной настройке громкости зависит от кпд громкоговорителей, расположения и других различных факторов. Рекомендуется избегать воздействия высоких уровней громкости. При включении устройства не включайте громкость на полную мощность. Слушайте музыку при средних уровнях громкости. Избыточное звуковое давление из наушников и головных телефонов может вызвать потерю слуха. Приглушение звука При нажатии кнопки на пульте ДУ звук временно приглушается. Повторно нажмите эту кнопку для восстановления громкости. 12 Ru X-HM16_26_26D_Ru.book 13 ページ 2016年7月22日 金曜日 午前11時2分 Начало работы 04 Настройка таймера включения Эквалайзер Используется для изменения текущей установки таймера или для установки нового таймера. FLAT ACTIVE Пониженный на полтока и базовый звук Мощный звук, который усиливает низкие и высокие тона NIGHT Звук, который можно слушать ночью даже при низкой громкости При первом включении питания аппарат входит в режим P.bass, при котором выделяются низкие частоты. Для отмены режима P.bass нажмите кнопку P.BASS на пульте ДУ. Нажмите SOUND для выбора «BASS» или «TREBLE», затем нажмите / для регулировки низких или высоких частот. 1 Когда изменена настройка P.BASS (ON/ OFF). 4 Нажмите кнопки / , чтобы выбрать параметр «TIMER SET», затем нажмите ENTER. 5 Нажмите кнопки / , чтобы выбрать источник воспроизведения с таймером, затем нажмите ENTER. CD, DAB (только X-HM26D), FM, AM (Только модели для Северной Америки) и USB можно выбрать в качестве источника воспроизведения. 6 Нажмите кнопки / , чтобы установить день на таймере, затем нажмите ENTER. 7 Нажмите кнопки / , чтобы установить часы, затем нажмите ENTER. 8 Нажмите кнопки / , чтобы установить минуты, затем нажмите ENTER. Установите окончательно время, как описано в шагах 7 и 8 выше. 9 Отрегулируйте громкость нажатием VOL +/–, затем нажмите ENTER. На экране отображается символ « ». 10 Нажмите кнопку Í, чтобы войти в режим ожидания. Загорается индикатор TIMER. Pyccкий При выборе одной из этих функций невыбранная функция будет отображаться следующим образом. ONCE – Одноразовый таймер срабатывает один раз только в заданное время. DAILY – Ежедневный таймер срабатывает в одно и то же заданное время и дни недели. Nederlands Примечание • Функции EQ и P.BASS не могут работать одновременно. Работать будет последняя выбранная из этих двух функций. • SOUND может работать параллельно с функцией EQ или P.BASS. 3 Нажмите кнопки / , чтобы выбрать параметр «ONCE» или «DAILY», затем нажмите ENTER. Deutsch Регулировка тембра низких/высоких частот 2 Нажмите и удерживайте TIMER на пульте дистанционного управления. Italiano Регулирование низких частот (режим P.bass) Нажмите Í, чтобы включить питание. Español Звук, который облегчает DIALOGUE прослушивание радио и вокальных произведений 1 Français При нажатии кнопки EQ на дисплее будет отображаться настройка текущего режима. Для переключения на другой режим нажмите несколько раз кнопку EQ, пока не отобразится желаемый режим звучания. English Управление звуком • EQ : FLAT 2 Когда изменена настройка EQ. • P.BASS : OFF 13 Ru X-HM16_26_26D_Ru.book 04 14 ページ 2016年7月22日 金曜日 午前11時2分 Начало работы Вызов таймера включения Может использоваться для повторного применения текущей установки таймера. 1 Также выполните шаги с 1 до 3 в разделе «Настройка таймера включения». 2 Нажмите кнопки / , чтобы выбрать параметр «TIMER ON», затем нажмите ENTER. Отмена таймера включения Примечание • Таймер отключения можно установить нажатием SLEEP во время отображения оставшегося времени. Использование наушников Подсоедините штекер наушников к гнезду. При подключении наушников звук не будет воспроизводиться через громкоговорители. Может использоваться для отключения установки таймера. 1 Также выполните шаги с 1 до 3 в разделе «Настройка таймера включения». TIMER 2 Нажмите кнопки / , чтобы выбрать параметр «TIMER OFF», затем нажмите ENTER. Использование таймера включения 1 Нажмите Í, чтобы выключить питание. 2 При наступлении времени включения данное устройство автоматически включится и начнет воспроизведение на выбранной функции входа. Примечание • Если на момент включения устройство памяти USB не будет подключено к аппарату или не будет вставлен диск, аппарат включится и не будет воспроизводить композицию. • Некоторые диски не могут воспроизводиться автоматически при наступлении времени включения. • При установке таймера задавайте не менее одной минуты между временем начала и окончания. Использование таймера отключения Таймер отключения отключает устройство через заданный период времени, позволяя спокойно засыпать, не беспокоясь о необходимости выключения устройства. 1 Нажмите SLEEP несколько раз, чтобы выбрать время отключения. Выберите между значениями в минутах 10 min, 20 min, 30 min, 60 min, 90 min, 120 min, 150 min, 180 min или OFF (Выкл). Вновь заданное значение отображается в течение 3 секунд, после чего выполнение настройки завершено. 14 Ru • Не включайте громкость на полную мощность при включении аппарата и слушайте музыку при средних уровнях громкости. Избыточное звуковое давление из наушников и головных телефонов может вызвать потерю слуха. • Перед подключением или отключением наушников уменьшите громкость. • Убедитесь, что ваши наушники имеют штекер диаметром 3,5 мм и импеданс от 16 до 50 Ом. Рекомендуемый импеданс составляет 32 Ом. X-HM16_26_26D_Ru.book 15 ページ 2016年7月22日 金曜日 午前11時2分 Воспроизведение диска 05 Воспроизведение диска Воспроизведение дисков или файлов 2 Нажмите / , чтобы выбрать музыкальный файл ([ ]), затем нажмите 1; или ENTER. • После запуска воспроизведения будут непрерывно воспроизводиться только музыкальные файлы, хранящиеся внутри одной и той же папки. Примечание Воспроизведение композиций на компакт-диске После воспроизведения последней дорожки устройство автоматически остановится. Воспроизводите музыкальные файлы MP3 В этом документе данные композиции в формате MP3 называются «музыкальным файлом», а место ее хранения — «папкой». Пример Совет • Если в режиме CD не выполнялось никакой операции, и аудиофайл не воспроизводится в течение более 20 минут, произойдет автоматическое отключение питания. В этом случае требуется переключить автоматическое отключение на ON. • Автоматическое отключение питания может быть настроено на ON/OFF (стр. 33). Pyccкий 1 После завершения распознавания нажмите 1; . Nederlands 5 Нажмите < на аппарате, чтобы закрыть лоток компакт-дисков. • Из-за структуры информации на диске, требуется больше времени для чтения диска MP3 по сравнению с обычным диском CD (приблизительно от 20 до 90 секунд). • Если начало первой дорожки достигается во время быстрой перемотки назад, устройство войдет в режим воспроизведения (только для CD). • Если при работе компакт-диска возникают телевизионные или радиопомехи, отодвиньте устройство подальше от телевизора или радио. Deutsch ВНИМАНИЕ • Не помещайте два диска в один лоток для дисков. • Не воспроизводите диски специальных профилей (в форме сердца, восьмигранника и т.п.). Это может вызвать неисправности. • Не давите на лоток для дисков при его движении. • Если при открытии лотка происходит аварийное отключение питания, подождите до возобновления питания. • Помещайте диск диаметром 8 см только по центру лотка для дисков. Italiano 1 Нажмите Í, чтобы включить питание. 2 Нажмите CD на пульте ДУ или несколько раз кнопку INPUT на основном блоке, чтобы выбрать функцию CD. 3 Нажмите < на аппарате, чтобы открыть лоток компакт-дисков. 4 Поместите диск в лоток для дисков, стороной с этикеткой вверх. • Если внутри выбранной папки имеются другие папки, повторите этот шаг. • Чтобы вернуться в предыдущую папку, нажмите или . Español Загрузка диска 1 После завершения распознавания нажмите / , чтобы выбрать папку хранения музыкального файла ([ ]), затем нажмите или ENTER. Français Эта система позволяет воспроизводить стандартные компакт-диски, CD-R/RW в формате CD и CD-R/RW с файлами MP3, запись на диски не предусмотрена. Некоторые музыкальные диски CD-R и CD-RW могут не воспроизводиться в случае их плохого состояния или использования при их записи несовместимого устройства. • Подробную информацию о MP3-файлах см. на стр. 31. English Глава 5: 15 Ru X-HM16_26_26D_Ru.book 05 16 ページ 2016年7月22日 金曜日 午前11時2分 Воспроизведение диска Основные операции Назначение Основной блок Пульт ДУ Операция Воспроизведение Нажмите в режиме остановки. Стоп Нажмите в режиме воспроизведения. (при воспроизведении компакт-диска) Отображается сообщение «RESUME», и место остановки воспроизведения запоминается. При повторном нажатии это место стирается из памяти. Пауза Дорожка вперед/ назад Быстрая перемотка вперед/ назад Нажмите в режиме воспроизведения. Нажмите кнопку 1;, чтобы возобновить воспроизведение с места остановки. Нажмите в режиме воспроизведения или режиме остановки. Если эта кнопка нажимается в режиме остановки, нажмите кнопку 1;, чтобы начать воспроизведение желаемой дорожки. (при воспроизведении файлов MP3) Перейти к следующему или предыдущему музыкальному файлу можно только внутри одной и той же папки. Нажмите и удерживайте в режиме воспроизведения. Отпустите кнопку для возобновления воспроизведения. Усовершенствованное воспроизведение дисков CD или MP3 Повторное воспроизведение При повторном воспроизведении можно непрерывно воспроизводить одну дорожку, все дорожки или дорожки в запрограммированной последовательности. Для повтора одной дорожки: Нажмите несколько раз , пока не появится индикация «REPEAT ONE». Нажмите ENTER. Для повтора всех дорожек: Нажмите несколько раз , пока не появится индикация «REPEAT ALL». Нажмите ENTER. Для повтора желаемых дорожек: Выполните шаги 1–5 из раздела «Запрограммированное воспроизведение (CD)» (стр. 17), затем нажимайте кнопку , пока не отобразится «REPEAT ALL». Нажмите ENTER. Для отмены повторного воспроизведения: Нажмите несколько раз , пока не появится индикация «REPEAT OFF». Нажмите ENTER. Примечание • После выполнения повторного воспроизведения обязательно нажмите ∫. Иначе, диск будет воспроизводиться непрервыно. • Во время режима повторного воспроизведения воспроизведение в случайной последовательности невозможно. Воспроизведение в случайной последовательности Дорожки на диске можно автоматически воспроизводить в случайной последовательности. Для воспроизведения всех дорожек в случайной последовательности: Нажмите несколько раз RANDOM, пока не появится индикация «RANDOM ON». Нажмите ENTER. Для отмены воспроизведения в случайной последовательности: Нажмите несколько раз RANDOM, пока не появится индикация «RANDOM OFF». Нажмите ENTER. 16 Ru X-HM16_26_26D_Ru.book 17 ページ 2016年7月22日 金曜日 午前11時2分 Воспроизведение диска О загрузке файлов MP3 В интернете имеется много музыкальных сайтов, где вы можете загрузить музыкальные файлы в формате MP3. Для загрузки музыкальных файлов следуйте инструкциям на веб-сайте. Затем вы сможете воспроизвести эти загруженные музыкальные файлы, записав их на диск CD-R/RW. • Загруженные композиции/файлы предназначены только для личного пользования. Любое иное использование композиции без разрешения владельца запрещено законом. 1 Нажмите DISPLAY в течение воспроизведения. 1 В режиме остановки нажмите кнопку PGM/MEMORY на пульте ДУ, чтобы войти в режим сохранения программы. Если в файл записана информация о названии песни, имени исполнителя и названии альбома, то эта информация будет отображаться на дисплее. (Вы можете видеть, что на этом аппарате отображаются только буквенно-цифровые символы. Символы, отличные от буквенно-цифровых, показываются в виде «∫».) 2 Нажмите : 9 для выбора композиций. 4 Повторите шаги 2–3 для других композиций. Можно запрограммировать не более 24 композиций. 5 Нажмите кнопку 1; для начала воспроизведения. Для отмены режима запрограммированного воспроизведения: Добавление дорожек к программе: Отображение номера композиции в папке и оставшегося времени Отображение имени исполнителя Отображение номера композиции в папке и времени воспроизведения Отображение названия альбома Примечание • Воспроизведение неподдерживаемых файлов невозможно. Такие файлы пропускаются автоматически. • Возможны случаи, когда не отображается никакой информации. • Отображение названия, исполнителя и альбомов поддерживается только в версии ID3 1 (1.0 или 1.1). Pyccкий Для отмены запрограммированного воспроизведения нажмите два раза ∫ на пульте ДУ. На дисплее появится индикация «PRG CLEAR», и все запрограммированное содержимое будет стерто. Отображение названия Nederlands • Если вы хотите проверить запрограммированные дорожки, нажмите кнопку PGM/MEMORY. • При ошибке можно отменить последние запрограммированные дорожки, нажав кнопку . Отображение номера и названия композиции Deutsch 3 Нажмите ENTER чтобы сохранить номер папки и дорожки. Italiano Можно сделать до 24 выборов для воспроизведения в желаемой последовательности. Español Переключение содержимого дисплея Français Запрограммированное воспроизведение (CD) • При работе программы воспроизведение в случайной последовательности невозможно. English Примечание • Если кнопка 9 нажимается во время воспроизведения в случайной последовательности, можно перейти на следующую выбранную дорожку в режиме воспроизведения в случайной последовательности. • При воспроизведении в случайной последовательности устройство будет выбирать и проигрывать дорожки автоматически. (Нельзя выбирать последовательность дорожек.) • Во время режима воспроизведения в случайной последовательности повторное воспроизведение невозможно. 05 Нажмите кнопку PGM/MEMORY. Затем выполните шаги 2 - 3, чтобы добавить дорожки. Примечание • При извлечении диска программа автоматически отменяется. • При нажатии кнопки Í для входа в режим ожидания или изменения функции с CD на другую функцию, выбранные программы будут стираться. 17 Ru X-HM16_26_26D_Ru.book 06 18 ページ 2016年7月22日 金曜日 午前11時2分 Воспроизведение с USB Глава 6: Воспроизведение с USB Воспроизведение запоминающих устройств USB Этот ресивер позволяет прослушивать файлы MP3 с двухканальным звуком через интерфейс USB на его передней панели. • Pioneer не гарантирует, что будет воспроизводиться любой файл, записанный на запоминающем устройстве USB, или что будет подаваться питание на запоминающее устройство USB. Также обратите внимание, что компания Pioneer не несет никакой ответственности за любую потерю файлов на запоминающих устройствах USB в связи с подключением к данному устройству. • Подробную информацию о MP3-файлах см. на стр. 31. 1 Нажмите USB для выбора в качестве входного источника. На основном дисплее показывается индикация «USB». 2 Подключите запоминающее устройство USB. • Данный ресивер не поддерживает USB концентратор. TIMER Запоминающее устройство USB (имеется в продаже) 3 После завершения распознавания нажмите / , чтобы выбрать папку хранения музыкального файла ([ ]), затем нажмите или ENTER. • В этом документе данные композиции в формате MP3 называются «музыкальным файлом», а место ее хранения — «папкой». • Если внутри выбранной папки имеются другие папки, повторите этот шаг. • Чтобы вернуться в предыдущую папку, нажмите или . 18 Ru 4 Нажмите / , чтобы выбрать музыкальный файл ([ ]), затем нажмите 1; или ENTER. • После запуска воспроизведения будут непрерывно воспроизводиться только музыкальные файлы, хранящиеся внутри одной и той же папки. • Подробную информацию об основных операциях см. на стр. 16. • При переключении на другой входной источник сначала остановите воспроизведение с устройства памяти USB. • Перед извлечением запоминающего устройства USB отключите питание. Примечание • Данное устройство может не распознавать запоминающее устройство USB, не воспроизводить файлы или не подавать питание на запоминающее устройство USB. Подробнее, см. Когда подключено запоминающее устройство USB на стр. 30. • Когда не идет воспроизведение с запоминающего устройства USB, если в течение 20 минут и дольше с устройством не выполняется никаких операций, питание автоматически отключается. В этом случае требуется переключить автоматическое отключение на ON (стр. 33). X-HM16_26_26D_Ru.book 19 ページ 2016年7月22日 金曜日 午前11時2分 Воспроизведение с USB 06 Переключение содержимого дисплея При повторном воспроизведении можно непрерывно воспроизводить одну дорожку, все дорожки или дорожки в запрограммированной последовательности. Данный аппарат может повторно воспроизводить папки, сохраненные на запоминающем устройстве USB. Подробнее, см. Переключение содержимого дисплея на стр. 17. Для повтора одной дорожки: English Повторное воспроизведение Нажмите несколько раз , пока не появится индикация «REPEAT ONE». Нажмите ENTER. Нажмите несколько раз , пока не появится индикация «REPEAT ALL». Нажмите ENTER. Для отмены повторного воспроизведения: Нажмите несколько раз , пока не появится индикация «REPEAT OFF». Нажмите ENTER. Для воспроизведения всех дорожек в случайной последовательности: Нажмите несколько раз RANDOM, пока не появится индикация «RANDOM ON». Нажмите ENTER. Нажмите несколько раз RANDOM, пока не появится индикация «RANDOM OFF». Нажмите ENTER. Примечание Pyccкий • Если кнопка 9 нажимается во время воспроизведения в случайной последовательности, можно перейти на следующую выбранную дорожку в режиме воспроизведения в случайной последовательности. • При воспроизведении в случайной последовательности устройство будет выбирать и проигрывать дорожки автоматически. (Нельзя выбирать последовательность дорожек.) • Во время режима воспроизведения в случайной последовательности повторное воспроизведение невозможно. Nederlands Для отмены воспроизведения в случайной последовательности: Deutsch Файл в запоминающем устройстве USB можно автоматически воспроизводить в случайной последовательности. Italiano Воспроизведение в случайной последовательности Español Примечание • После выполнения повторного воспроизведения обязательно нажмите ∫. Иначе файл запоминающего устройства USB будет воспроизводиться непрерывно. • Во время режима повторного воспроизведения воспроизведение в случайной последовательности невозможно. Français Для повтора всех дорожек: 19 Ru X-HM16_26_26D_Ru.book 07 20 ページ 2016年7月22日 金曜日 午前11時2分 Использование тюнера Глава 7: Использование тюнера Прослушивание передач FMдиапазона (Только для европейских моделей)/Прослушивание передач FM- или AM-диапазона (Только для моделей для Северной Америки) В приведенных ниже пунктах описывается процедура настройки на радиостанции диапазона FM и AM с использованием функций автоматической (поиск) или ручной (пошаговой) настройки. Выполнив настройку на радиостанцию, ее частоту можно сохранить в памяти для последующего вызова. Подробные инструкции об этом см. ниже в разделе Сохранение запрограммированных радиостанций ниже. Примечание • При появлении радиопомех автоматическая настройка может автоматически остановиться в этом месте. • Автоматическая настройка будет пропускать станции со слабым сигналом. • Для остановки автоматической настройки нажмите ∫. • При настройке на станцию RDS (Система радиоданных) сначала будет отображаться частота. Наконец, появится название станции. • Полной автоматической настройки можно достичь для станций RDS, используя режим автоматической настройки на предварительно запомненные программы (радиостанции) (ASPM), см. стр. 22. Для приема стереосигнала в диапазоне FM: 1 Нажимайте TUNER до тех пор, пока на дисплее не отобразится «FM». 2 Нажмите MENU и затем нажимайте / , пока на дисплее не отобразится «FM STEREO/MONO». 3 Нажмите ENTER и затем нажимайте / до тех пор, пока на дисплее не отобразится «AUTO». Улучшение слабого приема FM: Настройка 1 Нажмите Í, чтобы включить питание. 2 Нажмите кнопку TUNER несколько раз, чтобы выбрать желаемый частотный диапазон (FM или AM). • (X-HM26D) Можно выбрать «FM» и «DAB». Подробную информацию о режиме «DAB» см. на стр. 23. 3 Нажмите кнопку TUNE +/– на пульте ДУ, чтобы настроиться на желаемую станцию. Автоматическая настройка: Нажмите и удерживайте кнопку TUNE +/–, автоматически запустится сканирование, и тюнер остановится на первой принимаемой радиостанции. Ручная настройка: Нажмите кнопку TUNE +/– несколько раз, чтобы настроиться на желаемую станцию. 20 Ru После выполнения указанных выше шагов 1 - 2 нажмите ENTER и затем нажимайте / до тех пор, пока на дисплее не отобразится «MONO». При этом тюнер переключится со стереофонического на монофонический режим, и обычно улучшается прием. Сохранение запрограммированных радиостанций Если Вы хотите слушать конкретную радиостанцию, то удобно, чтобы ресивер сохранил частоту для быстрого поиска в любое необходимое время (Предварительная настройка). Это экономит усилия, устраняя необходимость периодической ручной настройки. Данное устройство может запоминать до 45 станций. (30 станций FM/15 станций AM) X-HM16_26_26D_Ru.book 21 ページ 2016年7月22日 金曜日 午前11時2分 Использование тюнера Подробнее об этом см. Настройка выше. 2 Нажмите PGM/MEMORY. Запрограммированный номер будет мигать. 4 Нажмите кнопку PGM/MEMORY, чтобы сохранить эту станцию в памяти. Station name (PS) Frequency • При аварийном отключении питания или отсоединении кабеля питания переменного тока функция резервирования защитит занесенные в память станции на несколько часов. Для вызова занесенной в память станции Для сканирования предустановленных станций 1 Нажмите TUNER на пульте дистанционного управления. , пока не появится индикация Примечание • Все станции будут стерты. NO RDS FM 98.80 MHz Поиск радиостанций по типу передач 1 Нажимайте TUNER до тех пор, пока на дисплее не отобразится «FM». 2 Нажмите MENU и затем нажимайте / до тех пор, пока на дисплее не отобразится «FM RDS». 3 Нажмите ENTER и затем нажимайте / до тех пор, пока на дисплее не отобразится «PTY». 4 Нажмите ENTER. «SELECT» будет отображаться в течение 5 секунд. 5 Нажмите / для выбора типа программы, которую хотите прослушать. При каждом нажатии кнопки будет показываться тип программы. Если кнопка удерживается, тип программы будет показываться непрерывно. 6 В момент, когда на дисплее отображается тип передачи (в течение 5 секунд), нажмите ENTER. После загорания в течение 2 секунд выбранного типа программы, появится индикация «SEARCH», и начнется операция поиска. Pyccкий Для полного стирания предустановленной памяти Radio text (RT) • При настройке на станцию, отличную от станции RDS, или на станцию RDS, которая передает слабый сигнал, дисплей будет изменяться в следующем порядке: Nederlands Станции, сохраненные в памяти, могут сканироваться автоматически. (Сканирование предустановленной памяти) 1 Нажмите и удерживайте кнопку PRESET +/–. Отобразится запрограммированный номер, и запрограммированные станции будут настраиваться последовательно, на 5 секунд каждая. 2 Повторно нажмите кнопку PRESET +/– при обнаружении желаемой станции. Programme type (PTY) Deutsch Нажмите кнопку PRESET +/–, чтобы выбрать желаемую станцию. 2 Нажмите кнопку «MEMORY CLEAR». 1 Нажимайте TUNER до тех пор, пока на дисплее не отобразится «FM». 2 Нажимайте кнопку DISPLAY несколько раз. Каждый раз, когда нажимается кнопка DISPLAY, дисплей будет переключаться следующим образом: Italiano Примечание Информация, предоставляемая системой RDS Español Если до запоминания станции запрограммированный номер изменился с мигания на свечение, повторите операцию с шага 2. • Повторите шаги 1 - 4, чтобы настроить другие станции или сменить предустановленную станцию. При сохранении новой станции в памяти будет стираться станция, предварительно занесенная в память для этого номера запрограммированного канала. Система радиоданных (RDS) – это система, которая используется большинством радиостанций в диапазоне FM для предоставления слушателям различной информации – например, названия радиостанции или транслируемой программы. Одной из функций системы RDS является возможность поиска станции, транслирующей требуемый тип программы. Например, можно осуществлять поиск станции, которая транслирует программы в жанре Jazz Music. Français 3 Нажмите кнопку PRESET +/–, чтобы выбрать номер запрограммированного канала. Использование системы передачи данных по радио (RDS) (только для моделей для Европы) English 1 Выполните настройку на радиостанцию, которую требуется занести в память. 07 21 Ru X-HM16_26_26D_Ru.book 07 22 ページ 2016年7月22日 金曜日 午前11時2分 Использование тюнера Отображаются следующие типы передач: News – новости Current Affairs – текущие события Information – информация Sport – спорт Education – oбразовательная информаци Drama – pадиоспектакли и т.д. Cultures – национальная и местная культурная жизнь, театр и т.д. Science – наука и техника Varied Speech – программы, построенные на беседе или общении, например викторины или интервью. Pop Music – поп-музыка Rock Music – рок-музыка Easy Listening – легкая музыка Light Classics M – легкая классическая музыка Serious Classics – cерьезная классическая музыка Other Music – музыка, не соответствующая перечисленным категориям Weather & Metr – сводки и прогнозы погоды Finance – биржевые сводки, коммерческая, торговая информация и т.д. Children’s Progs – программы для детей Social Affairs – общественная жизнь Religion – программы о религии Phone In – программы, предусматривающие обсуждение какой-либо темы и общение со слушателями по телефону Travel & Touring – путешествия и отдых Leisure & Hobby – свободное время, интересы и хобби Jazz Music – джазовая музыка Country Music – музыка «кантри» National Music – популярная музыка не на английском языке Oldies Music – популярная музыка 1950-х и 1960-х годов Folk Music – народная музыка Documentary – публицистические программы Alarm Test – трансляция при тестировании аварийного вещательного оборудования или приемных устройств. Alarm - Alarm! – тревожное оповещение, сделанное в исключительных обстоятельствах для предупреждения о событиях, представляющих опасность общего характера. • Если индикация на дисплее перестала мигать, запустите операцию снова с шага 2. Если устройство находит желаемый тип программы, то примерно на 8 секунд загорится соответствующий номер канала, и затем останется название станции. • Если вы желаете прослушать передачу такого же типа, транслируемую другой радиостанцией, повторите шаги 2 - 6. Аппарат выполнит поиск следующей радиостанции. • Если не найдено никакой станции, на 4 секунды появится индикация «NOT FOUND». Использование автоматической настройки на предварительно запомненные программы (радиостанции) (ASPM) Во время рабочего режима ASPM тюнер будет автоматически выполнять поиск новых станций RDS. Можно сохранить в памяти до 30 станций. Если некоторые станции уже сохранены в памяти, число новых станций, которые можно сохранить, будет меньше. 22 Ru 1 Нажимайте TUNER до тех пор, пока на дисплее не отобразится «FM». 2 Нажмите MENU и затем нажимайте / до тех пор, пока на дисплее не отобразится «FM RDS». 3 Нажмите ENTER и затем нажимайте / до тех пор, пока на дисплее не отобразится «ASPM». 4 Нажмите ENTER. После мигания индикации «ASPM» в течение примерно 4 секунд, запустится сканирование (87,5 - 108,00 МГц). После сканирования, на дисплее в течение 4 секунд будет отображаться число станций, сохраненных в памяти, и затем на 4 секунды появится индикация «END». • Чтобы выйти из функции ASPM до завершения ее работы: Нажмите кнопку ∫ в процессе поиска радиостанций. Сохраненные на этот момент радиостанции останутся в памяти. • Не будет сохраняться в памяти станция, имеющая такую же частоту, как уже сохраненная станция. • Не будет сохраняться в памяти станция, имеющая такую же частоту, как уже сохраненная станция. • Если уже сохранены в памяти 30 станций, сканирование будет прекращено. Если необходимо вернуться к режиму ASPM, сотрите предустановленную память. • Если никакой станции не сохранено в памяти, примерно на 5 секунды появится индикация «NOT FOUND». • Если сигналы RDS очень слабые, названия станций могут не сохраняться в памяти. • Название одной и той же станции может быть сохранено на разных каналах. • В определенной зоне или в определенные периоды времени названия станции могут временно отличаться. Примечание • Если происходит любое из следующих событий, это не означает, что устройство неисправно: - Поочередно появляются индикации «PS», «NO PS» и название станции, и в установленном порядке. - Если определенная станция не вещает должным образом или на станции проводятся испытания, функция приема RDS может работать неправильно. - Если принимается станция RDS со слишком слабым сигналом, может не отображаться такая информация, как название станции. - Индикации «NO PS», «NO PYT» или «NO RT» будут мигать в течение примерно 5 секунд, и затем будет отображаться частота. • Примечания по радиотексту: - Появятся первые 8 символов радиотекста и затем они будут прокручиваться по дисплею. - При настройке на станцию RDS, которая не передает радиотекст, будет отображаться индикация «NO RT» при переключении на позицию радиотекста. - Если принимаются данные радиотекста или изменяется содержание текста, на дисплее будет отображаться индикация «RT». X-HM16_26_26D_Ru.book 23 ページ 2016年7月22日 金曜日 午前11時2分 Использование тюнера СИГНАЛ DAB + СЛУЖБЫ Настройка Вручную можно настроить станции, не обнаруженные автоматическим поиском. В случае плохого приема можно настроить чувствительность. Ручная настройка доступна только после автоматической настройки. Сначала выполните автоматический поиск. 1 Нажимайте TUNER до тех пор, пока на дисплее не отобразится «DAB». 2 Нажмите MENU и затем нажимайте / до тех пор, пока на дисплее не отобразится «DAB SCAN». 3 Нажмите ENTER и затем нажимайте / до тех пор, пока на дисплее не отобразится «MANUAL». 4 Нажмите ENTER. 5 В течение 10 секунд нажмите TUNE +/–, чтобы выбрать частоту DAB+. 6 В течение 10 секунд нажмите ENTER. • В случае слишком низкого уровня приема перенесите антенну или устройство в другое место для улучшения приема. Переключение режимов информационного дисплея Pyccкий При первоначальной настройке аппарат автоматически сканирует радиостанции и создает их список. Радиостанции сохраняются в алфавитном порядке, при этом выбирается первая радиостанция в списке, которая начинает воспроизводиться через АС. Ручная настройка Nederlands 1 Нажимайте кнопку TUNER до появления на дисплее индикации «DAB». В случае перемещения аппарата в другой регион или добавления в список радиостанций с многоканальным звуком автоматическое сканирование можно повторить. 1 Нажимайте кнопку TUNER до появления на дисплее индикации «DAB». 2 Нажмите MENU и затем нажимайте / до тех пор, пока на дисплее не отобразится «DAB SCAN». 3 Нажмите ENTER и затем нажимайте / до тех пор, пока на дисплее не отобразится «AUTO». 4 Нажмите ENTER. Начнется автоматический поиск. После завершения процесса сканирования выбирается первая обнаруженная радиостанция. Deutsch КОМПОНЕНТЫ СЛУЖБЫ (СТАНЦИИ) Автоматический поиск Italiano МУЛЬТИПЛЕКС (ГРУППА) • Если станции не обнаружены, появится индикация «NO SIGNAL». • Для индикации количества принимаемых станций будет отображаться число до 100. Español Digital Audio Broadcasting — это система цифровой передачи данных, в которой аудиосигналы для передачи преобразовываются в цифровые сигналы. DAB+ транслируется в виде группы данных, которая называется «мультиплекс» (группы) и может содержать одну или несколько станций (служб). Каждая станция содержит основную службу и может содержать одну или несколько дополнительных служб. Это позволяет на одной частоте транслировать несколько программ или служб. 3 В течение 10 секунд нажмите кнопку ENTER на пульте дистанционного управления, чтобы настроиться на интересующую станцию. Français О DAB+ (Digital Audio Broadcasting, цифровое аудиовещание) 2 Нажмите кнопку TUNE +/–, чтобы выбрать желаемую станцию. English Прослушивание радиостанций DAB+ (только X-HM26D) 07 Отображаемую информацию DAB+ можно переключать. Нажмите кнопку DISPLAY. При каждом нажатии кнопки вид информационного дисплея будет меняться в следующем порядке. Если отображается индикация «NO SIGNAL», кнопка DISPLAY не позволяет менять режим отображения. [Programme Name] Отображается название станции. (установлено по умолчанию) 23 Ru X-HM16_26_26D_Ru.book 07 24 ページ 2016年7月22日 金曜日 午前11時2分 Использование тюнера [Scrolling text] Таблица частот DAB (ДИАПАЗОН III) Информация пролистывается по дисплею при ее получении со станции. [Programme type] Описание типа содержимого, транслируемого станцией. Частота Метка 208.064 МГц 9D 176.640 МГц 5B 209.936 МГц 10A 178.352 МГц 5C 211.648 МГц 10B Частота DAB+ станции. 180.064 МГц 5D 213.360 МГц 10C [Stereo mode] 181.936 МГц 6A 215.072 МГц 10D Название мультиплекса (группы), предоставляющего текущую службу. [Frequency] Отображение стереофонического режима. 183.648 МГц 6B 216.928 МГц 11A Скорость передачи данных. 185.360 МГц 6C 218.640 МГц 11B [Signal quality] 187.072 МГц 6D 220.352 МГц 11C 188.928 МГц 7A 222.064 МГц 11D 190.640 МГц 7B 223.936 МГц 12A 192.352 МГц 7C 225.648 МГц 12B В память можно записать до 10 станций DAB, которые затем можно вызывать нажатием кнопки (предварительная настройка). 194.064 МГц 7D 227.360 МГц 12C 1 Настройтесь на интересующую станцию DAB. 195.936 МГц 8A 229.072 МГц 12D 197.648 МГц 8B 230.784 МГц 13A 199.360 МГц 8C 232.496 МГц 13B 201.072 МГц 8D 234.208 МГц 13C 202.928 МГц 9A 235.776 МГц 13D 204.640 МГц 9B 237.488 МГц 13E 206.352 МГц 9C 239.200 МГц 13F [Transfer speed] Качество сигнала отображается в виде числа (0–100). [85–100: хорошее, 70–84: удовлетворительное, 0–69: плохое] Запоминание станции 2 Нажмите кнопку PGM/MEMORY. Номер предварительной настройки будет мигать. 3 В течение 10 секунд нажмите кнопку PRESET +/–, чтобы выбрать номер канала предустановленной настройки. Записывайте станции в память по порядку, начиная с канала с номером 1. 4 В течение 10 секунд нажмите кнопку PGM/ MEMORY, чтобы записать станцию в память. Если индикаторы номеров предварительной настройки погаснут до записи станции, повторите действия, начиная с шага 2. 5 Повторите шаги 1– 4 для установки других станций или изменения предварительно настроенной станции. При записи в память новой станции станция, ранее записанная в канале с этим номером, удаляется. Ru Метка 5A [Multiplex name] 24 Частота 174.928 МГц X-HM16_26_26D_Ru.book 25 ページ 2016年7月22日 金曜日 午前11時2分 Другие подключения 08 English Глава 8: Другие подключения Соедините гнездо AUDIO IN на задней панели с вашим вспомогательным устройством воспроизведения кабелем с миништекером. Эта функция используется для автоматического переключения на вход "AUDIO IN" при поступлении входного аудиосигнала через гнездо AUDIO IN. 1 Нажмите MENU и затем нажимайте / до тех пор, пока на дисплее не отобразится “Audio In detect”. • В заводских настройках она установлена в OFF. Примечание Портативный аудио плеер и т.п. Когда выбирается AUDIO IN, на основном дисплее показывается индикация «Audio In». Pyccкий 1 Нажмите AUDIO для выбора в качестве входного источника. Nederlands Кабель стерео миништекера 3,5 мм (продается отдельно) Deutsch • Когда режим Audio In detect включен (ON), на главном дисплее отображается «Audio In Det ON». • Когда режим Audio In detect выключен (OFF), на главном дисплее отображается «Audio In Det OFF». Italiano 2 Нажмите ENTER и затем нажимайте / для переключения между режимами Audio In detect ON/OFF. Español Подсоединение дополнительных компонентов Автоматическое переключение на вход Audio In (только для моделей для Северной Америки) Français ВНИМАНИЕ • Перед выполнением или изменением соединений выключите питание и отсоедините кабель питания от сетевой розетки. • Мы не несем ответственности за ущерб, возникший из-за подключения оборудования, изготовленного другими компаниями. Примечание • Если гнездо для мини-штекера AUDIO IN подсоединено к гнезду дополнительных наушников, уровень громкости данного устройства будет регулироваться в соответствии с уровнем громкости воспроизводящего компонента. Если звук нарушается после понижения громкости устройства, попробуйте снизить громкость на вспомогательном компоненте воспроизведения. 25 Ru X-HM16_26_26D_Ru.book 09 26 ページ 2016年7月22日 金曜日 午前11時2分 Воспроизведение Bluetooth® Audio Глава 9: Воспроизведение Bluetooth® Audio Только X-HM26/26D Воспроизведение музыки с помощью беспроводной технологии Bluetooth Устройство с беспроводным интерфейсом Bluetooth: Сотовый телефон Устройство с беспроводным интерфейсом Bluetooth: Цифровой музыкальный проигрыватель Устройство, не оснащенное беспроводным интерфейсом Bluetooth: Цифровой музыкальный проигрыватель + Аудиопередатчик Bluetooth® (приобретается отдельно) • Соединение со всеми устройствами с функцией Bluetooth не всегда гарантируется. Использование дистанционного управления Пульт дистанционного управления, поставляемый с этим устройством, позволяет запускать и останавливать воспроизведение носителя и выполнять другие операции. Примечание • Устройство, оснащенное беспроводной технологией Bluetooth, должно поддерживать профили AVRCP. • Работа дистанционного управления не гарантируется для всех устройств с беспроводным интерфейсом Bluetooth. Музыкальные данные Спаривание с аппаратом (Первичная регистрация) TIMER Аппарат может воспроизводить музыку на устройствах с поддержкой Bluetooth (сотовые телефоны, цифровые аудиоплееры и т.д.) в беспроводном режиме. Вы также можете использовать аудиопередатчик Bluetooth (продается отдельно), чтобы слушать музыку с устройств, которые не поддерживают Bluetooth. Ознакомиться с работой устройства с поддержкой Bluetooth можно в соответствующем руководстве пользователя. Примечание • Bluetooth® (слово и логотипы) является зарегистрированным товарным знаком и принадлежит компании Bluetooth SIG, Inc.; • Устройство, оснащенное беспроводной технологией Bluetooth, должно поддерживать профили A2DP. 26 Ru Для того чтобы аппарат мог воспроизводить музыку, сохраненную на устройстве с поддержкой Bluetooth, сначала следует выполнить спаривание. Спаривание должно быть выполнено при первом использовании устройства с поддержкой Bluetooth, или когда на аппарате по какой-либо причине стерты данные спаривания. Спаривание - это шаг, необходимый для обеспечения связи с помощью беспроводной технологии Bluetooth. • Спаривание выполняется только при первом совместном использовании аппарата и устройства с поддержкой Bluetooth. • Чтобы обеспечить связь по беспроводной технологии Bluetooth, спаривание следует выполнить как на аппарате, так и на устройстве с поддержкой Bluetooth. • После нажатия и переключения на вход Bluetooth, на устройстве с поддержкой Bluetooth следует выполнить процедуру спаривания. Если спаривание выполнено правильно, нет необходимости выполнять процедуры спаривания на аппарате, как показано ниже. Ознакомиться с работой устройства с поддержкой Bluetooth можно в соответствующем руководстве пользователя. X-HM16_26_26D_Ru.book 27 ページ 2016年7月22日 金曜日 午前11時2分 Воспроизведение Bluetooth® Audio 2 Нажмите кнопку 3 Воспроизведение музыки с устройства с поддержкой Bluetooth. . Примечание Устройство переключается на Bluetooth, и на дисплее появится индикация «Pairing». 3 Включите электропитание того устройства с поддержкой Bluetooth, с которым нужно выполнить спаривание, и выполните процедуру спаривания. Примечание 1 Нажмите кнопку . 2 Между устройством с поддержкой Bluetooth и аппаратом будет создано подключение Bluetooth. Процедуры для подключения к аппарату должны выполняться с устройства с поддержкой Bluetooth. • Подробности о процедурах подключения см. в руководстве пользователя устройства с поддержкой Bluetooth. Нажмите . 2 Нажмите MENU и затем нажимайте / до тех пор, пока на дисплее не отобразится «BT STANDBY». 3 Нажмите ENTER и затем нажимайте / для переключения между режимами BT STANDBY ON/OFF. • В заводских настройках она установлена в OFF. Примечание • Когда режим BT STANDBY включен (ON), на главном дисплее отображается «BT STANDBY ON». • Когда режим BT STANDBY выключен (OFF), на главном дисплее отображается «BT STANDBY OFF». Подключение устройства с поддержкой Bluetooth в режиме BT STANDBY Если ранее в режиме BT STANDBY выполнялось подключение (спаривание уже выполнено) устройства с поддержкой Bluetooth, микросистема может получить запрос на подключение непосредственно из истории подключений. Микросистема будет запускаться с помощью функции Bluetooth и подключаться к устройству с поддержкой Bluetooth. Даже устройства, которые уже были спарены с данной микросистемой, не будут подключаться во время режима BT STANDBY в следующих случаях. Pyccкий Аппарат переключится на вход Bluetooth. 1 Nederlands Прослушивание музыки на аппарате с устройством с поддержкой Bluetooth Настройки BT STANDBY Deutsch Если спаривание с устройством с поддержкой Bluetooth выполнено правильно, имя устройства с поддержкой Bluetooth отобразится на передней панели аппарата. (Могут отображаться только однобайтовые буквенноцифровые символы. Любой символ, который не может быть отображен, будет показываться с помощью «∫».) • Можно выполнить следующие действия, когда микросистема находится в режиме ожидания при переключении режима BT STANDBY в положение ON (ВКЛ). • При выборе устройства с поддержкой Bluetooth, которое уже ранее подключалось (спаривание уже выполнено) к данной микросистеме, эта микросистема будет автоматически включаться с функцией Bluetooth. Italiano 4 Подтвердите на устройстве с поддержкой Bluetooth, что спаривание выполнено. BT STANDBY Español • Этот аппарат будет отображаться как «Pioneer XHM26» на всех устройствах с функцией Bluetooth. Начнется спаривание. • Установите устройство с поддержкой Bluetooth рядом с аппаратом. • Как выполняется спаривание и какие процедуры требуются для спаривания, см. в руководстве пользователя для устройства с поддержкой Bluetooth. • При появлении запроса о вводе PIN-кода, введите «0000». (Это устройство не принимает никакой другой настройки PIN-кода, кроме «0000».) Français • Когда устройство с поддержкой Bluetooth не работает, и в течение более чем 20 минут не выполняется никаких действий, устройство автоматически выключится. В этом случае требуется переключить автоматическое отключение на ON. • Автоматическое отключение питания может быть настроено на ON/OFF (стр. 33). English 1 Нажмите Í и включите электропитание аппарата. 09 27 Ru X-HM16_26_26D_Ru.book 09 28 ページ 2016年7月22日 金曜日 午前11時2分 Воспроизведение Bluetooth® Audio В таких случаях удалите историю спаривания из устройства с беспроводным интерфейсом Bluetooth и снова выполните спаривание. • В истории установленных сопряжений аппарата может храниться информация не более чем о восьми устройствах. • При восстановлении заводских настроек будут удалены все настройки спаривания. Предостережение по радиоволнам Данное устройство работает на радиочастоте 2,4 ГГц, которая может использоваться другими беспроводными системами (см. список ниже). Во избежание шума или прерывания связи, не используйте уданный аппарат возле таких устройств, или убедитесь, что такие устройства отключены во время использования. • Беспроводные телефоны • Беспроводные факсимильные аппараты • Микроволновые печи • Беспроводные устройства (IEEE802.11b/g) • Беспроводное аудио-видео оборудование • Беспроводные контроллеры для игровых систем • Медикаментозные средства, основанные на микроволнах • Некоторые радионяни Другое малораспространенное оборудование, которое может работать на одинаковой частоте: • Противоугонные системы • Любительские радиостанции (HAM) • Системы управления складской логистикой • Отличительные системы для поездов или спецмашин Примечание • В случае появления помех на телевизионном изображении существует вероятность того, что устройство, оснащенное беспроводной технологией Bluetooth, или данное устройство (включая приборы, поддерживаемые данным устройством) создают интерференцию сигналов с входным разъемом антенны телевизора, видеодеки, спутникового тюнера и т. п. В этом случае увеличьте расстояние между входным разъемом антенны и устройством, оснащенным беспроводной технологией Bluetooth, или данным устройством (включая аппараты, поддерживаемые данным устройством). • Если между данным устройством (включая аппараты, поддерживаемые данным устройством) и устройством, оснащенным беспроводной технологией Bluetooth, имеются какие-либо препятствия (например, металлическая дверь, бетонная стена или изолятор из фольги), то, чтобы избежать появления помех и шумов, а также прерывания сигнала, может потребоваться изменить место установки системы. 28 Ru Рамки действия Данное устройство предназначено только для домашнего использования. (В зависимости от среды связи, расстояния передачи могут снижаться.) В следующих местах, плохой прием или невозможность приема радиоволн может вызывать прерывание или остановку звучания: • В зданиях из железобетона или армированных панелей. • Возле большой металлической мебели. • В толпе людей или возде здания или препятствия. • В условиях воздействия магнитного поля, статического электричества, высокочастотных радиопомех от устройств, работающих на той же частоте, что и данное устройство (2,4 ГГц), такие как устройства беспроводных локальных сетей 2,4 ГГц (IEEE802.11b/g) или микроволновые печи. • При проживании в густонаселенном жилом квартале (квартира, индивидуальный дом, др.) и если микроволновая печь соседа размещена рядом с вашей системой, могут иметь место радиопомехи. В таком случае, переместите ваш аппарат в другое место. Когда микроволновая печь не используется, тогда не будет и радиопомех. Отражения радиоволн На данное устройство воздействуют прямые волны, исходящие от устройства, оснащенного беспроводной технологией Bluetooth, а также волны, отраженные от стен, предметов мебели и стен помещения. Отраженные волны (из-за препятствий и отражающих предметов) далее создают различные виды отраженных волн, а также различия в условиях приема, в зависимости от месторасположения. Если это является причиной ухудшения качества звука, попробуйте немного изменить расположение устройства, оснащенного беспроводной технологией Bluetooth. Следует также помнить, что звук может прерываться под влиянием отраженных волн, возникающих от передвижения человека в пространстве между данным устройством и устройством, оснащенным беспроводной технологией Bluetooth. Меры предосторожности, касающиеся соединений с аппаратами, поддерживаемыми данным устройством • Выполните все соединения для всех аппаратов, поддерживаемых данным устройством, включая аудиокабели и кабели питания, перед тем как подсоединять их к данному устройству. • После завершения соединений к данному устройству проверьте аудиокабели и кабели питания, чтобы убедиться в том, что они не перекрутились между собой. • При отсоединении данного устройства убедитесь в том, что вокруг аппарата имеется достаточное пространство для выполнения работ. • При изменении подключений аудио или других кабелей для изделий, поддерживаемых данным аппаратом, убедитесь, что вокруг имеется достаточно свободного рабочего пространства. X-HM16_26_26D_Ru.book 29 ページ 2016年7月22日 金曜日 午前11時2分 Дополнительная информация 10 Дополнительная информация English Устранение неполадок Français Глава 10: Общие проблемы Проверьте Устранение Настройки, которые вы выполнили, удалены. Отсоединен кабель питания? Если отсоединяется кабель питания, выполненные настройки удаляются. Заново установите часы. Если вы не хотите удалять настройки, не отсоединяйте кабель питания. Невозможно управлять данным устройством с помощью пульта дистанционного управления. Пытаетесь ли вы управлять пультом издалека? Используйте пульт в пределах 7 м, под углом не более 30 относительно датчика дистанционного управления на передней панели (стр. 5). На датчик ДУ попадает прямой солнечный свет или сильное искусственное освещение от флуоресцентной лампы и т.д.? Пульт ДУ может не принимать сигналы правильно, если датчик ДУ подвергается воздействию прямого солнечного света или сильного искусственного освещения от флуоресцентной лампы и т.д. Диск невозможно воспроизвести, или диск автоматически извлекается. При использовании с данным устройством аналогового проигрывателя подключайте устройство, оборудованное фоноэквалайзером. Замените батареи (стр. 5). Диск поцарапан? Поцарапанные диски могут не воспроизводиться. Диск загрязнен? Сотрите с диска грязь (стр. 33). Устройство размещено в месте с повышенной влажности? Внутри ресивера мог образоваться конденсат. Подождите, пока не испарится конденсат. Не размещайте проигрыватель вблизи кондиционера воздуха и т. п. (стр. 32). Имена папки или файла не Превышено максимальное распознаются. количество имен папок или файлов, которое может распознать данное устройство? Этот аппарат способен распознавать до 999 файлов, сохраненных на одном диске или на одном устройстве памяти USB. Допускается использование до 255 папок. В зависимости от структуры папки, аппарат может не распознавать некоторые папки или файлы. Устройство автоматически отключается. Если не выполнялось никакого воспроизведения и никакой операции в течение 20 минут или более, аппарат автоматически отключается. В этом случае требуется переключить автоматическое отключение на ON (стр. 33). Pyccкий Разрядились батарейки? Nederlands Уровень громкости звука может отличаться в зависимости от входного источника и формата записи. Deutsch Различная громкость при Это не является неисправностью воспроизведении компакт- устройства. дисков, MP3-файлов, источников, подключенных через вход AUDIO IN, и прослушивании радиопередач через тюнер. Italiano Неполадка Español Зачастую неверные действия ошибочно принимаются за неполадки или неисправности. Если вам кажется, что этот компонент неисправен, пожалуйста, сначала ознакомьтесь с приведенными ниже пояснениями. Иногда проблема может быть связана с другим компонентом. Проверьте другие компоненты и используемые электрические приборы. Если неполадку не удается устранить даже после ознакомления с приведенными ниже рекомендациями, то обратитесь в ближайший авторизованный сервисный центр Pioneer или к вашему дилеру для выполнения ремонта. • Если устройство перестает нормально работать из-за внешнего воздействия, например из-за разрядов статического электричества, то отсоедините сетевую вилку от розетки, а затем подсоедините ее снова — это поможет вернуть нормальные рабочие условия. 29 Ru X-HM16_26_26D_Ru.book 10 30 ページ 2016年7月22日 金曜日 午前11時2分 Дополнительная информация Когда подключено запоминающее устройство USB Неполадка Проверьте Запоминающее устройство USB не распознается. Запоминающее устройство USB Подключите устройство надежно (до упора). подключено правильно? Подключено ли запоминающее устройство USB через концентратор USB? Устранение Данное устройство не поддерживает концентраторы USB. Подключите запоминающее устройство USB напрямую. Данное устройство поддерживает только запоминающие устройства USB большой емкости. Данное устройство поддерживает портативные устройства флэшпамяти и цифровые аудиовоспроизводящие устройства. Поддерживаются только файловые системы FAT16 и FAT32. Другие файловые системы (exFAT, NTFS, HFS др.) не поддерживаются. Данное устройство не поддерживает использование внешних жестких дисков. Это не является неисправностью устройства. Выключите питание, затем снова включите. Охраняется ли файл авторским правом (технологией DRM)? Файлы, охраняемые авторским правом, воспроизводить невозможно. Это не является неисправностью устройства. Файлы, сохраненные на компьютере, воспроизводить невозможно. Не отображаются или отображаются неправильно имена папок или файлов. Имена папок или файлов содержат более 30 знаков? Максимальное отображаемое число символов для имен папок и файлов равно 30. Имена папок или файлов не отображаются в алфавитном порядке. Это не является неисправностью устройства. Порядок отображения имен папок и файлов зависит от последовательности, в которой папки или файлы записывались на запоминающее устройство USB. Требуется много времени для распознавания запоминающего устройства USB. Какова емкость запоминающего Может потребоваться некоторое время для загрузки данных при устройства USB? подключении запоминающих устройств USB большой емкости (может занять несколько минут). Файл нельзя воспроизвести. 30 Ru Некоторые запоминающие устройства USB могут распознаваться неправильно. Может быть невозможным воспроизведение некоторых файлов. X-HM16_26_26D_Ru.book 31 ページ 2016年7月22日 金曜日 午前11時2分 Дополнительная информация 10 Только X-HM26/26D Устранение Устройство, оснащенное беспроводной технологией Bluetooth, не подключается или не работает. Не воспроизводится или прерывается звук с устройства, оснащенного беспроводной технологией Bluetooth. Проверьте, нет ли рядом с устройством источников электромагнитного излучения в диапазоне 2,4 ГГц (микроволновые печи, устройства беспроводной локальной сети или оснащенного беспроводной технологией Bluetooth). Если такой предмет имеется возле аппарата, передвиньте аппарат подальше от него. Или, прекратите использование предмета, издающего электромагнитные волны. * Данное расстояние используется в качестве ориентира. Фактическое допустимое расстояние между устройствами может варьироваться в зависимости от условий окружающей среды. Проверьте, подключено ли данное устройство к устройству, оборудованному беспроводной технологией Bluetooth, с выбранным входным источником, отличным от Bluetooth. Выберите Bluetooth в качестве входного источника и выполните процедуру связывания. Audio CD Файлы MP3, записанные на диски CD-R/ -RW/ -ROM или запоминающие устройства USB MP3: MP3 является форматом сжатия. Это аббревиатура, которая обозначает MPEG Audio Layer 3. MP3 представляет тип аудио кодека, который обрабатывается со значительным сжатием от первоначального аудиоисточника при очень малых потерях в качестве звучания. • Эта система поддерживает файлы MPEG-1/2 Audio Layer 3 (Частоты дискретизации: от 32 кГц до 48 кГц; скорости передачи данных: от 8 кб/сек до 320 кб/ сек). • Во время воспроизведения файла VBR счётчик времени на дисплее может отличаться от фактического времени воспроизведения. • Информация о папке и порядке файлов, записанная на носителе, зависит от программного обеспечения, использованного при записи. Порядок воспроизведения файлов аппаратом может отличаться от ожидаемого. • С носителя файлов MP3 можно считать до 255 папок и 999 файлов (включая невоспроизводимые файлы). Pyccкий • Могут воспроизводиться только финализированные диски. • Диски, записанные в режиме пакетной записи (формат UDF), несовместимы с данным устройством. • Названия корпораций и изделий, упомянутые в данном документе, являются торговыми марками или зарегистрированными торговыми марками соответствующих корпораций. • Могут воспроизводиться только диски, записанные в формате ISO9660 Level 1, Level 2 и Joliet. • Файлы, защищенные системой DRM (Digital Rights Management), воспроизводиться не могут. Nederlands MP3 • Имеющиеся в продаже звуковые компакт-диски (Audio CD) • Диски CD-R/ -RW/ -ROM с музыкой, записанной в формате CD-DA Deutsch Воспроизводимые диски и форматы Italiano Устройство, оснащенное беспроводной технологией Bluetooth, может быть не переключено в режим поддержки беспроводной технологии Bluetooth. Проверьте настройку устройства, оборудованного беспроводной технологией Bluetooth. Español Проверьте, не слишком ли далеко находится устройство, оснащенное беспроводной технологией Bluetooth, от данного устройства и нет ли между устройством, оснащенным беспроводной технологией Bluetooth, и данным устройством какихлибо препятствий. Расположите устройство, оснащенное беспроводной технологией Bluetooth, и данное устройство так, чтобы расстояние между ними не превышало 10 м*, и между ними не было препятствий. Français Неполадка English Когда подключено или работает устройство с беспроводным интерфейсом Bluetooth Примечание • Данное устройство не поддерживает многосеансовые диски или многократную последовательную (multi-border) запись. 31 Ru X-HM16_26_26D_Ru.book 10 32 ページ 2016年7月22日 金曜日 午前11時2分 Дополнительная информация • Многосеансовая/многократная последовательная запись — это метод, при котором данные записываются на один и тот же диск в два или более сеанса/сессии. «Сеанс» или «сессия» представляет собой единицу записи, состоящую из полного набора данных от начальной записи до конечной записи. Не подвергайте ресивер воздействию тепла. Данное устройство сконструировано в соответствии со спецификациями формата звуковых компакт-дисков (Audio CD). Данное устройство не поддерживает воспроизведение или работу дисков, не соответствующих этим спецификациям. Не размещайте устройство сверху на усилителе или другом компоненте, генерирующем тепло. При установке в стойку, чтобы избежать воздействия тепла, отводимого от усилителя или иного аудиокомпонента, устанавливайте ресивер на полку ниже усилителя. • Когда устройство не используется, отключайте его питание. • В зависимости от условий сигнала, на телевизионном экране могут отображаться полосы, и может попадать шум в звучание радиотрансляций, когда питание устройства включено. В таком случае отключите питание устройства. Данное устройство не поддерживает кодирование без потерь. Меры предосторожности при эксплуатации При перемещении устройства Перед перемещением аппарата необходимо сначала убедиться в отсутствии загруженного диска и отсоединить устройство памяти USB. Затем нажмите Í, дождитесь исчезновения слова “STAND BY” на главном дисплее и отсоедините шнур питания. Транспортировка или перемещение аппарата с загруженным диском или соединенного с другим устройством через USB или гнездо AUDIO IN под кабель миништекером может привести к его повреждению. Место установки • Выберите устойчивое место возле телевизора или стереофонической системы, которые используются совместно с данным устройством. • Не размещайте данное устройство сверху на телевизоре или цветном мониторе. Также устанавливайте ресивер дальше от кассетных магнитофонов и иных устройств, на которые может повлиять магнитное поле. Избегайте следующих мест: • • • • • Места, подвергаемые прямому солнечному свету Сырые или плохо вентилируемые места Места со слишком высокой температурой Места, подвергаемые вибрациям Места с большим содержанием пыли или сигаретного дыма • Места, подвергаемые воздействию сажи, пара или тепла (кухни и т.п.) Не размещайте предметы на устройстве Не размещайте какие-либо предметы на устройстве сверху. Ru Не используйте данное устройство на ворсистых коврах, кроватях, диванах и т. д. или завернутым в ткань и т. д. Это может помешать рассеиванию тепла, что может привести к поломке. Относительно компакт-дисков с защитой от копирования Поддерживаемые форматы аудиофайлов 32 Не закрывайте вентиляционные отверстия. О конденсации При быстром перемещении данного устройства из холодного места в теплое помещение (например, зимой) или при резком повышении под воздействием работы обогревателя и т. п. температуры в помещении, в котором установлено устройство, внутри устройства (на рабочих деталях и линзе) могут образовываться капли воды (конденсация). При наличии конденсации данное устройство не будет работать надлежащим образом, и воспроизведение будет невозможно. Оставьте устройство при комнатной температуре на 1 или 2 часа с включенным питанием (время зависит от степени конденсации). Капли воды испарятся, и воспроизведение станет возможным. Конденсация может также образовываться летом, если устройство открыто воздействию прямых потоков воздуха от кондиционера воздуха. Если это произойдет, переместите данное устройство в другое место. Чистка изделия • Перед тем как приступить к очистке данного устройства, отсоедините кабель питания от розетки. • Для чистки данного устройства используйте мягкую ткань. Для прилипшей пыли смочите мягкую ткань некоторым количеством нейтрального моющего средства, разбавленного 5 до 6 частями воды, тщательно выжмите ткань, сотрите пыль и затем вытрите поверхность мягкой, сухой тканью. • Спирт, растворитель, бензин, инсектициды и т.п. могут вызвать расслаивание печати или краски. Также избегайте длительного контакта резиновых или виниловых изделий с данным устройством, так как это может испортить корпус. • При использовании чистящих тканей, смоченных химреактивами и т.п., внимательно прочтите инструкции по их применению. X-HM16_26_26D_Ru.book 33 ページ 2016年7月22日 金曜日 午前11時2分 Дополнительная информация 10 Диски особой формы (в виде сердца, шестиугольника и т. п.) не могут воспроизводиться на данном устройстве. Не пытайтесь воспроизвести такие диски, так как они могут повредить данное устройство. Обращение с дисками Хранение Чистка дисков 1 Нажмите MENU на пульте ДУ. На главном дисплее отобразится сообщение «Auto Power Down» (Автоматическое выключение питания). 2 Нажмите ENTER на пульте ДУ. 3 Нажимайте / для переключения между режимами ON/OFF. • Начальная установка настроена на ON. Примечание Сброс всех настроек на значения по умолчанию Для восстановления всех настроек по умолчанию выполните действия, описанные ниже. 1 Нажмите Í, чтобы включить питание. 3 Нажмите ENTER. Отобразится запрос «OK?». 4 Pyccкий 2 Нажмите MENU и затем нажимайте / до тех пор, пока на дисплее не отобразится «Factory Reset». Nederlands • Не используйте бензин, растворитель или иные летучие химикаты. Также не используйте средства для чистки винила или антистатики. • Для прилипшей пыли смочите мягкую ткань водой, тщательно выжмите ее, сотрите пыль и затем вытрите влагу сухой тканью. • Не используйте поврежденные (треснувшие или покоробленные) диски. • Не допускайте царапания или загрязнения рабочей поверхности дисков. • Не прилепляйте кусочки бумаги или стикеры на диски. Это может повредить диски так, что их невозможно будет воспроизвести. Также учтите, что на взятых напрокат дисках часто клеят этикетки, а клей с этикетки может просачиваться наружу. Перед использованием взятых напрокат дисков проверьте, не выступает ли клей по краям таких этикеток. Deutsch • Если автоматическое отключение питания настроено на ON, на главном дисплее будет отображаться «APD ON». • Если автоматическое отключение питания настроено на OFF, на главном дисплее будет отображаться «APD OFF». Italiano • Диски могут не воспроизводиться, если на них остаются отпечатки пальцев или пыль. В этом случае, используйте чистящую ткань и т.п., чтобы осторожно вытереть диск от внутренней стороны к наружной. Не пользуйтесь грязными чистящими тканями. Настройка автоматического отключения питания Español • Всегда помещайте диски в их коробки и храните их в вертикальном положении, избегая горячих, сырых мест, подверженных воздействию прямых солнечных лучей и слишком низких температур. • Прочитайте меры предосторожности, вложенные вместе с диском. Français О дисках специальной формы При нормальных условиях эксплуатации линза обычно не загрязняется, но если она по какой-то причине начнет работать неправильно из-за грязи или пыли, обратитесь в ближайший авторизованный сервисный центр Pioneer. Хотя в продаже имеются средства очистки линз для проигрывателей, использовать их не рекомендуется, так как некоторые средства могут повредить линзу. English Чистка линзы Нажмите ENTER. • Пока идет процесс восстановления настроек, отображается «Resetting». Питание отключается. 33 Ru X-HM16_26_26D_Ru.book 10 34 ページ 2016年7月22日 金曜日 午前11時2分 Дополнительная информация Технические характеристики • Усилитель Выходная среднеквадратическая мощность: . . . . . . . . . . . . . . . . . . . . . . . . . . . . . . . . . . . .15 Вт + 15 Вт (1 кГц, 10 % коэффициент гармоник, 8 Ом) • Секция тюнера Частотый диапазон (FM) . . . . . . .87,5 МГц до 108,0 МГц Вход антенны (FM) . . . . . . . 75 Ом несбалансированный Частотный диапазон (AM) (Только для моделей для Северной Америки) . . . . . . . . . . . . . . . . . . . . . . . . . . . . . . . . . . . 530–1710 кГц Антенна (AM). . . . . . . . . . . . . . . . . . . . Рамочная антенна • Bluetooth (только X-HM26/26D) Версия . . . . . . . . . . . . . . . . Стандарт Bluetooth Вер. 4.1 Выход. . . . . . . . . . . . . . . . . . . Стандарт Bluetooth класс 2 Приблизительная дальность передачи по линии прямой видимости* . . . . . . . . . . . . . . . . . . . . . . . . Примерно 10 м Диапазон частот . . . . . . . . . . . . . . . . . . . . . . . . . . .2,4 ГГц Модуляция звучания . . . . . . . . . FH-SS (Frequency Hopping Spread Spectrum) Поддерживаемые конфигурации Bluetooth . . . . . . . . . . . . . . . . . . . . . . . . . . . . . . . . . . . A2DP, AVRCP Поддерживаемый кодек . . . . . . . . SBC (Subband Codec) Поддерживаемая защита материала . . . . . . . . . SCMS-T ПИН-код . . . . . . . . . . . . . . . . . . . . . . . . . . . . . . . . . . . .0000 * Дальность передачи по линии прямой видимости указана приблизительно. Реальные поддерживаемые расстояния передачи могут различаться в зависимости от условий окружающей среды. • Остальное Разъем USB . . . . . . . . . . . . . . . . . . . . . . . . . . 5 V, 500 mA Источник питания (Модели для Европы) . . . . от 220 В до 240 В переменного тока, 50 Гц/60 Гц (Только для моделей для Северной Америки) . . . . . . . . . . . . . . . . .от 120 В переменного тока, 60 Гц Потребляемая мощность Включение питания . . . . . . . . . . . . . . . . . . . . . . . 20 Вт Мощность в режиме ожидания . . . 0,5 Вт или меньше Режим ожидания (BT STANDBY ON) . . . . . . . . . . . . . . . . . . . . . . . . . . . . . 0,5 Вт или меньше Размеры. . . . . . . . . . 215 мм (Ш) x 95 мм (В) x 315 мм (Г) Вес (без упаковки). . . . . . . . . . . . . . . . . . . . . . . . . . . 2,0 кг • Громкоговоритель Корпус . . . . . Бас-отражающий, для установки на полке (Магнитно-экранированный) Конфигурация. . . . . . . . . . . . . . . . . . . . . . . 2-полосная Высокочастотный . . . . . . . . . . . . . . . . 2 см, Купольный Низкочастотный . . . . . . . . . . . . . . . . . . . . 10 см, конус Максимальная входная мощность . . . . . . . . . . . . . 15 Вт Сопротивление . . . . . . . . . . . . . . . . . . . . . . . . . . . . . 8 Ом Размеры. . . . . . . 130 мм (Ш) x 212 мм (В) x 228,5 мм (Г) Вес . . . . . . . . . . . . . . . . . . . . . . . . . . . . . . . . 2,0 кг/каждый 34 Ru • Принадлежности Пульт дистанционного управления . . . . . . . . . . . . . . . . Батарейки AAA (R03). . . . . . . . . . . . . . . . . . . . . . . . . . . . Кабель антенны AM*1 . . . . . . . . . . . . . . . . . . . . . . . . . . . Проволочная антенна FM*2 . . . . . . . . . . . . . . . . . . . . . . Проволочная антенна DAB/FM*3 . . . . . . . . . . . . . . . . . . Кабель питания . . . . . . . . . . . . . . . . . . . . . . . . . . . . . . . . Гарантийный сертификат*4 . . . . . . . . . . . . . . . . . . . . . . Инструкции по эксплуатации (данный документ) . . . . . *1 Только модели для Северной Америки *2 Только X-HM16/HM26 *3 Только X-HM26D *4 Только модели для Европы 1 2 1 1 1 1 1 1 Примечание • Технические характеристики указаны для напряжения 230 В. • В связи с постоянным совершенствованием изделия технические характеристики и конструкция могут быть изменены без предварительного уведомления. «Pioneer» — это товарный знак Pioneer Corporation, и он используется по лицензии. © 2016 Onkyo & Pioneer Corporation. Все права защищены. SN29402699_X-HM16_26_26D_En_European.book 35 ページ 2016年7月22日 金曜日 午後7時2分 Дату изготовления оборудования можно определить по серийному номеру, который содержит информацию о месяце и годе производства. Серийный номер 12 цифр 10 цифр 2 цифры P1 P2 Дата изготовления оборудования P1 - Год изготовления Год 2001 2002 2003 2004 2005 2006 2007 2008 2009 2010 Символ A B C D E F G H I J Год 2011 2012 2013 2014 2015 2016 2017 2018 2019 2020 Символ K L M N O P Q R S T P2 - Месяц изготовления Месяц 1 2 3 4 5 6 7 8 9 10 11 12 Символ A B C D E F G H I J K L SN29402699_X-HM16_26_26D_En_European.book 36 ページ 2016年7月22日 金曜日 午後7時2分 Примечание: Корпорация О энд Пи устанавливает следующую продолжительность срока службы официально поставляемых на Российский рынок товаров. Аудио и видеооборудование: 7 лет Переносное аудиооборудование: 6 лет Другое оборудование (наушники, микрофон и т.д.): 5 лет Информация для покупателей в ЕАЭС: Уполномоченной организацией в соответствии с требованиями ТР ТС 004/2011, 020/2011, является ООО “ПИОНЕР РУС”, Россия, 105064, г. Москва, Нижний Сусальный переулок, дом 5, строение 19, т. (495) 9568901 SN29402699_X-HM16_26_26D_En_European.book 37 ページ 2016年7月22日 金曜日 午後7時2分 Declaration of Conformity with regard to the R&TTE Directive 1999/5/EC 0 Manufacturer: O&P Corporation 2-3-12, Yaesu, Chuo-Ku, Tokyo 104-0028, Japan EU Representative’s: Pioneer Europe NV Haven 1087, Keetberglaan 1, 9120 Melsele, Belgium http://www.pioneer.eu [*] X-HM26/X-HM26D English: Hereby, O&P, declares that this [*] is in compliance with the essential requirements and other relevant provisions of Directive 1999/5/EC. Suomi: O&P vakuuttaa täten että [*] tyyppinen laite on direktiivin 1999/5/EY oleellisten vaatimusten ja sitä koskevien direktiivin muiden ehtojen mukainen. Nederlands: Hierbij verklaart O&P dat het toestel [*] in overeenstemming is met de essentiële eisen en de andere relevante bepalingen van richtlijn 1999/5/EG Français: Par la présente O&P déclare que l’appareil [*] est conforme aux exigences essentielles et aux autres dispositions pertinentes de la directive 1999/5/CE Svenska: Härmed intygar O&P att denna [*] står I överensstämmelse med de väsentliga egenskapskrav och övriga relevanta bestämmelser som framgår av direktiv 1999/5/EG. Dansk: Undertegnede O&P erklærer herved, at følgende udstyr [*] overholder de væsentlige krav og øvrige relevante krav i direktiv 1999/5/EF Deutsch: Hiermit erklärt O&P, dass sich dieses [*] in Übereinstimmung mit den grundlegenden Anforderungen und den anderen relevanten Vorschriften der Richtlinie 1999/5/EG befindet". (BMWi) Ελληνικά: ΜΕ ΤΗΝ ΠΑΡΟΥΣΑ O&P ΔΗΛΩΝΕΙ ΟΤΙ [*] ΣΥΜΜΟΡΦΩΝΕΤΑΙ ΠΡΟΣ ΤΙΣ ΟΥΣΙΩΔΕΙΣ ΑΠΑΙΤΗΣΕΙΣ ΚΑΙ ΤΙΣ ΛΟΙΠΕΣ ΣΧΕΤΙΚΕΣ ΔΙΑΤΑΞΕΙΣ ΤΗΣ ΟΔΗΓΙΑΣ 1999/5/ΕΚ Italiano: Con la presente O&P dichiara che questo [*] è conforme ai requisiti essenziali ed alle altre disposizioni pertinenti stabilite dalla direttiva 1999/5/CE. Español: Por medio de la presente O&P declara que el [*] cumple con los requisitos esenciales y cualesquiera otras disposiciones aplicables o exigibles de la Directiva 1999/5/CE SN29402699_X-HM16_26_26D_En_European.book 38 ページ Português: O&P declara que este [*] está conforme com os requisitos essenciais e outras disposições da Directiva 1999/5/CE. Čeština: O&P tímto prohlašuje, že tento [*] je ve shodě se základními požadavky a dalšími příslušnými ustanoveními směrnice 1999/5/ES Eesti: Käesolevaga kinnitab O&P seadme [*] vastavust direktiivi 1999/5/EÜ põhinõuetele ja nimetatud direktiivist tulenevatele teistele asjakohastele sätetele. Magyar: Alulírott, O&P nyilatkozom, hogy a [*] megfelel a vonatkozó alapvetõ követelményeknek és az 1999/5/EC irányelv egyéb elõírásainak. Latviešu valoda: Ar šo O&P deklarē, ka [*] atbilst Direktīvas 1999/5/EK būtiskajām prasībām un citiem ar to saistītajiem noteikumiem. Lietuvių kalba: Šiuo O&P deklaruoja, kad šis [*] atitinka esminius reikalavimus ir kitas 1999/5/EB Direktyvos nuostatas. Malti: Hawnhekk, O&P jiddikjara li dan [*] jikkonforma mal-ħtiġijiet essenzjali u ma provvedimenti oħrajn relevanti li hemm fid-Dirrettiva 1999/5/EC Slovenčina: 2016年7月22日 金曜日 午後7時2分 Slovenščina: O&P izjavlja, da je ta [*] v skladu z bistvenimi zahtevami in ostalimi relevantnimi določili direktive 1999/5/ES. Română: Prin prezenta, O&P declara ca acest [*] este in conformitate cu cerintele esentiale si alte prevederi ale Directivei 1999/5/EU. български: С настоящето, O&P декларира, че този [*] отговаря на основните изисквания и други съответни постановления на Директива 1999/5/EC. Polski: Niniejszym O&P oświadcza, że [*] jest zgodny z zasadniczymi wymogami oraz pozostałymi stosownymi postanowieniami Dyrektywy 1999/5/EC Norsk: O&P erklærer herved at utstyret [*] er i samsvar med de grunnleggende krav og øvrige relevante krav i direktiv 1999/5/EF. Íslenska: Hér með lýsir O&P yfir því að [*] er í samræmi við grunnkröfur og aðrar kröfur, sem gerðar eru í tilskipun 1999/5/EC Hrvatski: Ovime tvrtka O&P izjavljuje da je ovaj [*] u skladu osnovnim zahtjevima i ostalim odredbama Direktive 1999/5/EC. O&P týmto vyhlasuje, že [*] spĺňa základné požiadavky a všetky príslušné ustanovenia Smernice 1999/5/ES. R-TTE-24L_C1_En SN29402699_X-HM16_26_26D_En_European.book 39 ページ 2016年7月22日 金曜日 午後7時2分 X-HM16_26_26D_BackCover_Europe.fm 40 ページ 2016年7月23日 土曜日 午前11時20分 2-3-12 Yaesu, Chuo-ku, Tokyo 104-0028 JAPAN <U.S.A.> 18 PARK WAY, UPPER SADDLE RIVER, NEW JERSEY 07458, U.S.A. Tel: 1-201-785-2600 Tel: 1-844-679-5350 <Germany> Hanns-Martin-Schleyer-Straße. 35, 47877 Willich, Germany Tel: +49(0)2154 913222 <UK> Anteros Building, Odyssey Business Park, West End Road, South Ruislip, Middlesex, HA4 6QQ United Kingdom Tel: +44(0)208 836 3612 <France> 6, Avenue de Marais F - 95816 Argenteuil Cedex FRANCE Tel :+33(0)969 368 050 Корпорация О энд Пи 2-3-12, Яэсу, Чуо-ку, г. Токио, 104-0028, ЯПОНИЯ © 2016 Onkyo & Pioneer Corporation. All rights reserved. © 2016 Onkyo & Pioneer Corporation. Tous droits de reproduction et de traduction réservés. Printed in China / Imprimé en Chine / Напечатано в Китае SN 29402699 F1607-0
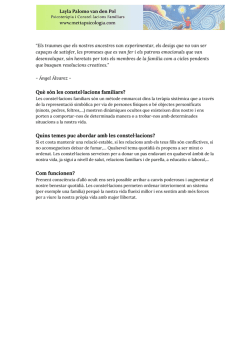
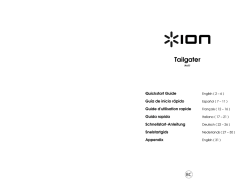
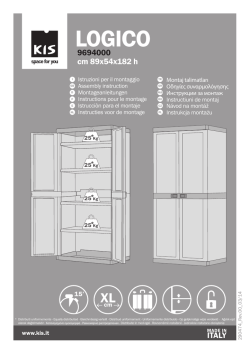

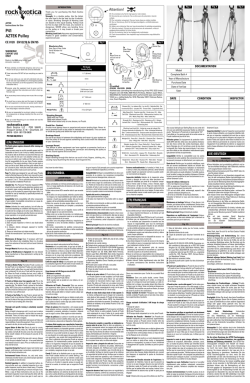
© Copyright 2026