
This product is for domestic use only Use & care
REFRIGERATOR
REFRIGERADOR
Model/Modelo: PRN10050MW
PRN10060MS
PRN12150MW
PRN12160MS
This product is for domestic use only
Use & care manual
Important safeguards
1
6
7
1
2
8
3
9
4
5
PS: If we change some small parts of the refrigerator ,it is for you to use it
more conveniently. Sorry for no giving notice.
2
Important Safety Instructions
To reduce the risk of fire, electrical shock, or injury follow
these basic precautions when using your refrigerator.
x
x
x
DANGER: Risk of child entrapment. To avoid the possibility of child entrapment,
please take the following precautions before you dispose of your refrigerator.
o Remove all doors.
o Leave shelves in place so children may not easily climb in.
o Never allow children to play with, operate, or crawl inside the refrigerator.
Do not store or use gasoline or any flammable vapors and liquids in the vicinity of
this refrigerator.
All refrigeration products contain refrigerants, which under the guidelines of federal
law must be removed before disposal. It is the consumer’s responsibility to comply
with federal and local regulations when disposing of this product.
Installation Instructions
Before Using Your Refrigerator
x Remove the exterior and interior packing.
x Before connecting the refrigerator to the power source, let it stand upright for
approximately 4 hours. This will reduce the possibility of a malfunction in the cooling
system from improper handling during transportation.
x Clean the interior surface with lukewarm water using a soft cloth. (Cleaning
instructions on page 7)
Location
x Do not recess or build-in. This appliance is designed to be free standing only.
x Allow 5 inches clearance space between the back and sides of the refrigerator,
which allows the proper air ventilation.
Installation:
x Avoid Installation
o On weak surfaces unable to support refrigerator when fully loaded.
o In direct sunlight and sources of heat (stove, heater, radiator, etc.). Ambient
temperature below 50°F or above 85°F will hinder the performance of this
appliance.
o In moist areas.
o In garage. This unit is not designed for any type of outside installation.
o In moving vehicle. This unit is not designed to be installed in an RV or
used with an inverter. This unit is intended for household use only.
Installing Your Refrigerator
x Adjust the leveling feet to keep the refrigerator level.
x Plug the refrigerator into dedicated, properly installed-grounded wall outlet. Do not
under any circumstances cut or remove the third (ground) prong from the power cord.
x After plugging the appliance into a wall outlet, turn the unit on and allow the unit to
cool down for 24 hours before placing food in the refrigerator or freezer compartment.
3
Electrical Connection
Improper use of the grounded plug can result in the risk
of electrical shock. If the power cord is damaged, have it
replaced by an authorized service center
center.
This refrigerator should be properly grounded for your safety. The power cord of this
refrigerator is equipped with a three-prong plug which mates with standard three prong
wall outlets to minimize the possibility of electrical shock.
Do not, under any circumstances, cut or remove the third ground prong from the power
cord supplied.
This refrigerator requires a standard 115/120 Volt A.C. ~/60Hz electrical outlet with
three-prong ground.
This refrigerator is not designed to be used with an inverter.
The cord should be secured behind the refrigerator and not left exposed or dangling to
prevent accidental injury.
Never unplug the refrigerator by pulling the power cord. Always grip the plug firmly and
pull straight out from the receptacle.
Do not use an extension cord with this appliance. If the power cord is too short, have a
qualified electrician or service technician install an outlet near the appliance. Use of an
extension cord can negatively affect the performance of the unit.
Operating Your Refrigerator
Temperature Control
The temperature control is located inside the refrigerator and in the freezer
compartment on some models. The temperature is factory preset to provide satisfactory
food storage temperatures. However, the temperature control is adjustable to provide a
range of temperatures for your personal satisfaction.
To adjust the temperature colder in the refrigerator compartment, press the SET button
on the control panel so that the display light shifts to a higher number. “1” is the warmest
setting and “5” is the coldest. To adjust the temperature colder in the freezer compartment,
move the Freezer Control knob towards the maximum setting. After each movement of
either control, allow 24 hours for the unit to adjust. If the unit is still not cold enough, repeat
until desired temperature is achieved.
To adjust the temperature warmer in the refrigerator compartment, press the SET button on
the control panel so that the display light shifts to a lower number. To adjust the temperature
warmer in the freezer compartment, move the Freezer Control knob towards the minimum
setting. After each movement of either control, allow 24 hours for the unit to adjust. If the
unit is still not warm enough, repeat until desired temperature is achieved.
4
NOTE
If the unit is unplugged or loses power; you must wait 3 to 5 minutes before
restarting the unit. If you attempt to restart before this time delay, the
refrigerator may not start.
Replacing the Interior Light
Before removing the light bulb, turn the refrigerator temperature control to the “1”
position. Then unplug the electrical cord from the wall outlet. Failure to do so may
result in electrical shock or personal injury. Replace the old bulb with a new bulb of
the same wattage and size.
Freezer Compartment Operation
Temperature Control
Your refrigerator has one control for regulating the
temperature in the freezer compartment. The freezer
temperature control is located on the freezer compartment’s
interior back panel. For the best performance, leave the
freezer control at the midpoint and adjust the refrigerator
compartment temperature control. Adjust the freezer control
one increment at a time until the desired temperature is
reached.
Ice Tray
To make ice, pour cool water into ice tray and place it in the freezer
for two hours. To release ice cubes, twist the ice tray and the ice
cubes will separate from the ice tray. To shorten the time of making
ice, you can set the temperature control knob at a colder position.
NOTE
Do not store canned foods or food stored in glass containers in the freezer
compartment.
The Freezer Compartment
This compartment is designed for the long-term storage of frozen food. The storage life
of frozen foods varies and the recommended storage time should not be exceeded.
Place frozen food into the freezer as quickly as possible after purchase. If there are
instructions on the packet, carefully follow these instructions regarding storage times.
5
Care and Maintenance
Cleaning Your Refrigerator
x
x
x
x
x
Disconnect the electrical unit from the wall outlet.
Clean interior and parts with a cloth soaked in lukewarm water and baking soda
solution. A solution of 2 tablespoons baking soda to a quart of water will clean and
neutralize odors. Rinse and wipe dry.
Be sure to keep the door gasket (seal) clean to keep the unit running efficiently.
The outside of the refrigerator should be cleaned with a warm damp cloth and mild
detergent. Do not use harsh or abrasive cleaners.
Never clean refrigerator parts with flammable fluids. The fumes can create a fire
hazard.
Vacation Time
x For long vacations, remove all food. Then, unplug the electrical cord from the wall
outlet.
x Clean the interior and leave doors open to avoid possible odor or mold formation.
x Use extreme caution in the case of children. The unit should not be accessible to
child’s play.
Moving Your Refrigerator
x Disconnect the electrical cord from the wall outlet.
x Remove all the food and securely tape down all loose items such as shelves,
drawers, and doors.
x Be sure the refrigerator stays in the upright position during transportation.
Energy Saving Tips
x The refrigerator should be located in the coolest area of the room, away from heat
producing appliances or heating ducts, and out of the direct sunlight.
x Let hot foods cool to room temperature before placing in the refrigerator.
x Be sure to wrap foods properly, and wipe containers dry before placing them in the
refrigerator. This cuts down on frost build-up inside the refrigerator.
x Organize and label food to reduce door openings and extended searches
6
Changing the Reversible Door
Before reversing the door swing, ensure the appliance is unplugged and empty. Provide
additional support for the doors while hinges are being removed. Do not depend on the door
magnets to hold the door in place. It is recommended that two people perform this task. DO
NOT lay the appliance completely flat as this may damage the coolant system.
Door parts
Top hinge
Top hinge washer
Included parts
Bottom right hinge
Left pin assembly (2)
Right pin assembly (2)
Middle hinge washer
Middle hinge
Bottom left hinge
Screw
Step 1
Step 2
Remove top hinge cover. Unscrew
and remove the top hinge and top
hinge washer. Reserve the screws.
Lift the freezer door up and away
from the appliance.
Step 3
Step 4
Unscrew and remove the middle
hinge and middle hinge washer.
Reserve the screws. Lift the
refrigerator door up and away
from the appliance.
Unscrew and remove the bottom right hinge.
Reserve the screws. Remove screw covers from
opposite corner (left) and cover exposed
holes (right). Attach bottom left hinge with the
reserved screws.
7
Step 5
Step 6
Remove right pin assemblies from the bottom
of the freezer and refrigerator doors. On the
opposite side, attach the replacement pin
assemblies (located in the plastic bag with the
Use and Care Manual) with a screwdriver.
Note: You must re-use the screws from the pin
assemblies that are removed in this step when
attaching the new assemblies.
Place the refrigerator door on the bottom left
hinge. Ensure the door is aligned horizontally
and vertically. Attach middle hinge to top (left)
of refrigerator door, attach washer to the back
of hinge, align with holes and affix to middle
beam with reserved screws. Fasten with
screwdriver (not included).
Step 7
Place the freezer door on the middle
hinge. Ensure that the door is aligned
horizontally and vertically, and that the
gasket seals on all sides before attaching
the top hinge. Attach the top hinge and
replace the hinge cover.
8
Troubleshooting Guide
You can solve many common refrigerator problems easily, saving you the cost of a
possible service call. Try the suggestions below to see if you can solve the problem
before calling for service.
Problem
Possible Causes
Refrigerator does not operate
x
x
Refrigerator is unplugged.
The circuit breaker is tripped/ fuse blown.
Compressor turns on and off
x
x
x
The room temperature is warmer than normal
Door is left open or is frequently opened.
The refrigerator does not have the correct
clearances.
The refrigerator has recently been disconnected for
a period of time.
x
Refrigerator compartments are too
warm
x
x
x
x
x
Vibrating or rattling (slight vibration
is normal)
x
x
x
Temperature of external refrigerator
surface is warm
x
x
Temperature control is not set correctly.
Door is left open or is frequently opened.
The door gasket does not seal properly.
A large amount of warm or hot food was stored
recently. Wait for the refrigerator to reach its
selected temperature.
The refrigerator has recently been disconnected for
a period of time.
Leveling legs need adjusting
Refrigerator is placed on an uneven or weak
surface.
The refrigerator is touching the wall. Re-level the
refrigerator and move it away from the wall.
The exterior refrigerator walls can be as much as
30°F warmer than room temperature.
This is normal while the compressor works to
transfer heat from inside the refrigerator cabinet.
Moisture collects inside the refrigerator
x
Door is left open or is frequently opened.
Moisture forms on outside of
refrigerator
x
Is normal in hot and humid weather. Air carries
moisture into the refrigerator when doors are
opened.
Bubbling or gurgling sounds (like
boiling water)
x
This is the normal sound of refrigerant (used to cool
refrigerator) circulating throughout the system.
Popping or cracking sounds when
compressor comes on
x
This is normal. Metal parts undergo expansion and
contraction, like hot water pipes. The sound will
level off or disappear as refrigerator runs.
The door will not close properly
x
x
x
The refrigerator is not on a level surface.
The gasket is dirty.
The storage basket is out of position.
9
2
3
3-4
5
5-6
6-7
7-9
10
Ilustración De La Estructura
6
7
1
2
8
3
9
4
5
1.
2.
3.
4.
5.
6.
7.
8.
9.
Perilla de control de temperatura del freezer
Control de temperatura del refrigerador
Estante de vidrio de refrigerador
Cajón vegetal
Patas regulables
Estante del compartimiento del freezer
Travesaño de la puerta del freezer
Interruptor de la lámpara
Botellero (grande)
PS: TODAS LAS ILUSTRACIONES DE ESTE MANUAL SON A MODO DE REFERENCIA,
EL PRODUCTO ACTUAL PUEDE TENER DIFERENTES IMAGENES.
2
3
4
Funcionamiento de su refrigerador
Ajuste de la temperatura
El control de temperatura se encuentra dentro del refrigerador y del congelador, en algunos
modelos. La temperatura está prefijada de fábrica para proporcionar temperaturas de
almacenamiento de alimentos satisfactorias. Sin embargo, el control de la temperatura es
ajustable para proporcionar un rango de temperaturas para su satisfacción personal.
Para ajustar la temperatura más fría en el refrigerador, presione el botón SET del panel de
control para que la luz de la pantalla cambie a un número más alto. "1" es el ajuste menos
frío y "5" es el más frío. Para ajustar la temperatura más fría en el congelador, mueva la
perilla del Control del congelador hacia el ajuste máximo. Después de cada movimiento de
cualquier control, deje transcurrir 24 horas para que la unidad se ajuste. Si la unidad aún no
está lo suficientemente fría, repita el proceso hasta alcanzar la temperatura deseada.
Para ajustar a la temperatura menos fría en el refrigerador, presione el botón SET del panel
de control para que la luz de la pantalla cambie a un número más bajo. Para ajustar la
temperatura menos fría en el congelador, mueva la perilla del Control del congelador hacia el
ajuste mínimo. Después de cada movimiento de cualquier control, deje transcurrir 24 horas
para que la unidad se ajuste. Si la unidad sigue estando demasiado fría, repita el proceso
hasta alcanzar la temperatura deseada.
NOTA
Si se desenchufa la unidad, pierde energía; usted debe esperar 3 a 5 minutos
antes de recomenzar la unidad. Si intenta volver a ponerla en funcionamiento
antes de transcurrido ese período, el Refrigerador no funcionará.
CAMBIAR LA BOMBILLA
Antes de quitar la bombilla, gire el control de temperatura del refrigerador al "1".
Después desenchufe la unidad del enchufe de pared. La falta de hacer tan podía dar
lugar a choque eléctrico o a daños corporales. Cuando reemplace la lamparita, utilice
una del mismo voltaje.
OPERAR COMPARTIMIENTO DEL CONGELADOR
CONTROL DE TEMPERATURA
La unidad cuenta con una perilla de control para
regular la temperatura del compartimiento del
freezer. El control de temperatura del congelador
esta ubicado en el panel interior detrás del
congelador. Para un mejor desempeño, deje el
control del congelador en el punto medio y ajuste
el control de temperatura del refrigerador. Ajuste
el control del congelador un incremento a la vez
hasta que la temperatura deseada sea
alcanzada.
5
Control de Temperatura
6
7
Puerta del
freezer
Puerta del
refrigerador
Inserte la
bisagra
del medio
Reemplace
puerta
8
9
10
Manual de uso y cuidado
Precauciones importantes
Éste producto es para uso doméstico únicamente

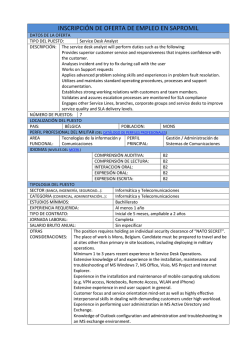
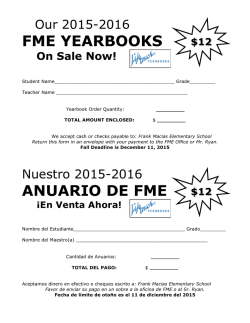

© Copyright 2026