
T-4RP - Tau S.r.l
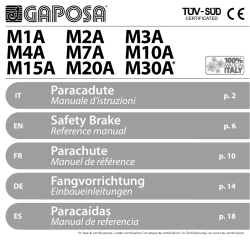
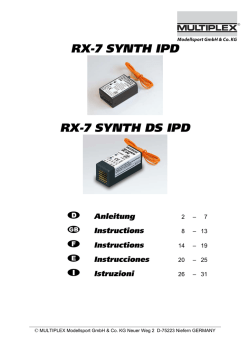
T-4RP
FUNZIONAMENTO E PROGRAMMAZIONE / OPERATION AND PROGRAMMING
FUNKTIONSWEISE UND PROGRAMMIERUNG
FONCTIONNEMENT ET PROGRAMMATION / FUNCIONAMIENTO Y PROGRAMACIÓN
* La portata dei trasmettitori e la capacità di ricezione dei ricevitori è fortemente
ITALIANO
influenzata da altri dispositivi (ad esempio: allarmi, radiocuffie, ecc.) che operano nella vostra zona alla stessa frequenza. In questi casi, TAU non può offrire CARATTERISTICHE TECNICHE DEL PRODOTTO
nessuna garanzia circa la reale portata dei propri dispositivi.
Alimentazione:
batteria al litio da 3V tipo CR2016
Smaltimento della batteria
Durata batteria:
stimata 2 anni, con 10 trasmissioni al giorno
Attenzione! La batteria scarica contiene sostanze inquinanti, quindi non deve essere
Frequenza:
433,92 MHz (± 100 kHz)
buttata nei rifiuti comuni. Occorre smaltirla utilizzando i metodi di raccolta “differenziata” previsti dalle normative vigenti nel vostro territorio.
Potenza irradiata:
stimata circa 1 mW e.r.p.
Codifica radio:
rolling code, dip-switch
NOTE
- Tutte le caratteristiche tecniche riportate sono riferite ad una temperatura Temperatura di funzionamento:
-20°C; + 55°C
ambientale di 20°C (± 5°C).
stimata 150 m (all’esterno); 35 m (se all’interno di edifici)
- Tau S.r.l. si riserva il diritto di apportare modifiche al prodotto in qualsiasi Portata*:
momento lo riterrà necessario, mantenendone comunque le stesse funziona- Grado di protezione:
IP 40 (utilizzo in casa o in ambienti protetti)
lità e destinazione d’uso.
Dimensioni:
L. 36,6 x P. 73,3 x H. 10 mm
Peso:
11 g.
Programmazione manuale del radiocomando
Vedi istruzioni della centrale di comando o della ricevente.
Programmazione remota su centrali con ricevente integrata abilitate, o su radio riceventi da esterno predisposte
Questa operazione permette di memorizzare nella centrale il codice del nuovo radiocomando, ma è necessario possederne uno già funzionante. Le successive operazioni si dovranno eseguire nelle vicinanze
della centrale dell’impianto.
Attivazione della modalità di autoapprendimento nella centrale e memorizzazione del nuovo radiocomando:
1 Nel radiocomando già funzionante, premere e tenere premuto il tasto (almeno 6 secondi) che normalmente si usa per comandare l’automazione fino a quando il led verde si accende, poi si spegne ed
infine inizia a lampeggiare. Rilasciare quindi il tasto.
2 Ora premere, sul radiocomando nuovo, il corrispondente tasto già usato con il radiocomando funzionante. Al termine eseguire una prova sull’automazione per verificarne il funzionamento, eventualmente
ripetere la procedura.
ATTENZIONE: quando un radiocomando viene memorizzato su più riceventi può accadere che l’automazione non risponda all’impulso di comando. Questo succede perchè radiocomando e ricevente
sono andati fuori sincronia. Per ripristinare il normale funzionamento, operare come segue:
1_ Premere il tasto del radiocomando;
2_ rilasciare il tasto ed attendere che il led si spenga;
3_ premere una seconda volta il tasto del radiocomando entro 5 sec dallo spegnimento del led.
Per i radiocomandi acquistati prima del mese di gennaio 2015, seguire la procedura riportata di seguito:
1 Nel radiocomando già in uso (vecchio) tenendo premuto il tasto P1, premere per 3 volte il tasto 4 Il led verde del radiocomando già in uso (vecchio) smette di lampeggiare e rimane acceso fisso
P2.
per 1÷2 sec.
2 Rilasciare i tasti. Il led verde del radiocomando inizierà a lampeggiare indicando l’abilitazione della 5 Ora premere, sul nuovo radiocomando, il tasto da memorizzare. Raccomandiamo di memorizzare
modalità di autoapprendimento.
sempre lo stesso tasto dei radiocomandi per l’apertura del cancello, per non perdere la possibilità
di abilitare la programmazione remota anche con il nuovo radiocomando. Al temine, eseguire una
3 Sempre nel radiocomando già in uso (vecchio), premere per almeno 3 secondi il tasto che apre il
prova per verificare l’avvenuta programmazione, eventualmente ripetere la procedura.
cancello e che si vuole memorizzare.
Il radiocomando T-4RP è personalizzabile solo tramite il programmatore TAUPROG. Può essere impostato in modalità rolling code o in modalità dip-switch.
In modalità Dip-switches (codice fisso) è compatibile, nella codifica e nel funzionamento, con i modelli T-4, T-4C, K-SLIM, K-SLIM-C, TXD2(4), BUG.
In modalità rolling code permette l’autoapprendimento nelle centrali con ricevitore integrato abilitate o nelle riceventi della serie RXDC.
Opzionale - Personalizzazione del radiocomando tramite programmatore TAUPROG
Premere contemporaneamente i tasti dei P1 e P2 (fig. 1) e, dopo qualche istante, il LED verde indicherà con una serie di 3 brevi lampeggi il passaggio in modalità di programmazione.
Seguire le istruzione del programmatore TAUPROG per effettuare la programmazione. Eventuali errori nella programmazione saranno segnalati da brevi lampeggi.
Importante: se il radiocomando non viene programmato entro 30 secondi, esce dalla modalità di programmazione emettendo una serie di brevi lampeggi, ripetuti x 3 volte.
* The range of the transmitters and the reception capacity of the receivers are
greatly affected by the presence of other devices (such as alarms, radio headsets, etc.) operating in your area at same frequency. In these cases, TAU cannot TECHNICAL CHARACTERISTICS OF THE PRODUCT
offer any warranty regarding the actual range of its devices.
Power supply:
3V CR2016 type lithium battery
Battery disposal
Estimated battery life:
2 years, with 10 transmissions a day
Warning! Exhausted batteries contain polluting substances; therefore they may not
433,92 MHz (± 100 kHz)
be disposed of together with unsorted household waste. They must be disposed of Frequency:
separately according to the regulations locally in force.
Estimated radiated power:
approx. 1 mW e.r.p.
Radio
codifing:
rolling code, dip-switch
NOTES
- All the technical characteristics specified above refer to an ambient tempera- Operating temperature:
-20°C; + 55°C
ture of 20°C (± 5°C).
150 m (outside); 35 m (insade buildings)
- Tau S.r.l. reserves the right to make modifications to the product at any time Estimated range*:
without prior notice, while maintaining the same functionality and intended Protection class:
IP 40 (for household use or in protected environments)
use.
Dimensions:
L. 36,6 x D. 73,3 x H. 10 mm
Weight:
11 g
Manual programming of remote control
See instructions that come with the control panel and receiver.
ENGLISH
Remote programming on enabled control panels with built-in receiver or on external radio receivers with this feature
If an already programmed RP-type transmitter is available, this feature allows to program quickly a new transmitter. Follow these steps (you must be close to the radio receiver/controller to perform successfully the remote programming).
1 In the already-working radio remote control, press and hold the button (for at least 6 seconds) that is normally used to control the automation till the green LED turns ON, then OFF, and finally starts
flashing. Then release the button.
2 Now, on the new radio remote control, press the same button used in the working radio remote control. At the end test the automation to check its operation and repeat the procedure as required.
WARNING: when a transmitter is programmed on more than one receiver, it can happen that the gate operator does not react to the command. This is due to a misalignment between receiver and
transmitter. To restore normal operation, proceed as follows:
1_ press the pushbutton in the transmitter;
2_ release the button and wait for the LED to turn OFF;
3_ within 5 seconds from the LED turning OFF, press again the pushbutton in the transmitter.
For transmitters purchased before january, 2015, follow the steps below:
1 On the old transmitter (already programmed): While keeping the 1. button pressed, press 3 times 4 The green LED now stops flashing, and remain ON for 1 - 2 seconds.
the 2. button.
2 Release both buttons. The green LED flashes to advise that remote programming procedure is 5 On the new transmitter: press the button you wish to perform the same operation as per point # 3. We
activated.
recommend to maintain the same button sequence on all transmitters, otherwise the new ones cannot be
used to program further new transmitters in the future.
3 Always on the old transmitter, press and keep pressed for at least 3 seconds the button you wish
Once the programming procedure is completed perform a test to check that it has been successfully. If
to copy into the new transmitter.
necessary repeat the procedure from point # 1.
The T-4RP remote control can be customized using the TAUPROG programmer only. It can be set in rolling code mode or dip switch mode.
In Dip-switch mode (fixed code) encoding and operating modes are compatible with the models T-4, T-4C, K-SLIM, K-SLIM-C, TXD2(4), and BUG.
In rolling code mode, self-learning is possible in enabled control panels with built-in receiver or in RXDC-series receivers.
Optional extra – transmitter customizing using the TAUPROG programmer
Press the push buttons P1 and P2 (fig. 1) simultaneously and after approx. 5 seconds, the green LED indicates entry to programming mode by emitting 3 short flashes.
Follow the instructions of the TAUPROG programmer to proceed with programming. Any programming errors are indicated by short flashes.
Important: If not programmed within 30 seconds the radio control exits the programming mode, emitting a series of short flashes repeated three times.
* Die Reichweite der Sender und das Empfangsvermögen der Empfänger wird
durch andere Vorrichtungen stark beeinflusst (wie z. B.: Alarme, Kopfhörer,
usw.), die in ihrer Zone auf derselben Frequenz funktionieren. In diesen Fällen TECHNISCHE MERKMALE DES PRODUKTS
kann die Firma TAU die effektive Reichweite der vorrichtungen nicht garantieren.
Versorgung:
Entsorgung der Batterie
Achtung! Die leere Batterie enthält Schadstoffe und darf daher nicht in den Haus- Dauer der batterie:
müll gegeben werden. Sie muss nach den örtlich gültigen Vorschriften differenziert Frequenz:
entsorgt werden.
Abgestrahlte Leistung:
Funkcodierung:
ANMERKUNG
- Alle angegebenen techischen Merkmale beziehen sich auf eine Temperatur Betriebstemperatur:
von 20°C (± 5°C).
- Tau S.r.l. behält sich das Recht vor, jederzeit als nötig betrachtete Ände- Reichweite*:
rungen am Produkt vorzunehmen, wobei Funktionalitäten und Einsatzzweck Schutzart:
beibehalten werden.
Abmessungen:
Manuelle Programmierung der Handsender
Gewicht:
Siehe Anweisungen des Steuergeräts oder des Empfängers.
DEUTSCH
3V Lithiumbatterie des Typs CR2016
ca. 2 Jahre bei 10 Sendungen pro Tag
433,92 MHz (± 100 kHz)
ca. 1 mW e.r.p.
rolling code, dip-switch
-20°C; + 55°C
ca. 150 m (außen); 35 m (in Gebäuden)
IP 40 (Innenanwendung oder Anwendung in geschützter Umgebung)
L. 36,6 x T. 73,3 x H. 10 mm
11 g
Fernprogrammierung von Steuergeräten mit aktiviertem integriertem Empfänger oder vorbereiteten externen Empfängern
Dieser Vorgang ermöglicht die Speicherung des Codes der neuen Fernsteuerung in die Steuerung, es ist jedoch notwendig, eine schon funktionierende Fernsteuerung zu besitzen. Die folgenden Vorgänge
müssen in der Nähe der Anlagensteuerung ausgeführt werden.
Aktivierung des Selbsterlernungsmodus in der Steuerung und Speicherung der neuen Fernsteuerung:
1 Auf dem bereits funktionierenden Handsender die Taste drücken und gedrückt halten (zumindest 6 Sekunden), die normalerweise für die Steuerung des Torantriebs verwendet wird, bis die grüne LED
leuchtet, dann ab, und schließlich zu blinken beginnt. Dann die Taste loslassen.
2 Jetzt auf der neuen Handsender die entsprechende Taste drücken, die bereits mit der funktionierenden Handsender verwendet wird. Anschließend einen Test mit der Automatisierung durchführen, um den
Betrieb zu überprüfen und das Verfahren gegebenenfalls wiederholen.
VORSICHTIG: sollten über einen Handsender mehrere Funkempfänger angesteuert ist es möglich, könnte den Torantrieb auf keinen Befehlsgeber mehr reagieren (Abweichung zwischen Handsender
und Funkempfänger). Rückstellung normaler Betrieb:
1_ auf die Taste des Handsenders drücken;
2_ Taste loslassen und warten, bis die LED ausgeht;
3_ innerhalb 5 Sekunden die Taste des Handsenders nochmals drücken.
Für Handsender, die vor Januar 2015 eingekauft wurden, die folgende Prozedur folgen:
1 In der schon verwendeten (früheren) Handsender wird die Taste P1 gedrückt gehalten, dann 3 4 Die grüne LED der bereits verwendeten Handsender (alt) hört auf zu blinken und bleibt dauerhaft
mal die Taste P2 gedrückt.
für 1÷2 Sekunden an.
2 Die Tasten loslassen. Die grün Led der Fernsteuerung beginnt zu blinken und zeigt so die Aktivie- 5 Drücken Sie nun auf der neuen Handsender die abzuspeichernde Taste. Wir empfehlen, immer die
rung des Selbsterlernungsmodus an.
gleiche Taste der Handsender für das Öffnen abzuspeichern, um nicht die Möglichkeit zu verlieren,
die Fernprogrammierung auch mit der neuen Handsender zu aktivieren. Nehmen Sie am Ende einen
3 Drücken Sie ebenfalls auf der bereits verwendeten Handsender (alt) für zumindest drei Sekunden
neuen Test vor, um die Programmierung zu überprüfen, und wiederholen Sie gegebenenfalls den
die Taste, die das Tor öffnet, das abgespeichert werden soll.
Vorgang.
Die Handsender T-4RP kann nur mit der Programmiereinheit TAUPROG personalisiert werden. Sie kann in Modalität Rolling Code oder in Modalität DIP-Switch eingestellt werden.
Im Modus Dip-Switches (Fixcode) ist sie bezüglich der Codierung und der Funktion mit den Modellen T-4, T-4C, K-SLIM, K-SLIM-C, TXD2(4), BUG kompatibel.
In der Modalität Rolling Code gestattet sie das Selbstlernen bei Steuergeräten mit aktiviertem integriertem Empfänger oder Empfängern der Serie RXDC.
Optional – Personalisierung der Handsender mit der Programmiereinheit TAUPROG
Gleichzeitig die Tasten P1 und P2 drücken (Abb. 1) und nach zirka 5 Sekunden gibt die grün LED mit einem 3fachen kurzen Blinken den Übergang in den Programmierungsmodus an.
Die Anleitung des Programmierers TAUPROG zur Programmierung befolgen. Eventuelle Fehler in der Programmierung werden durch ein kurzes Blinken angezeigt.
Wichtig: Wenn die Fernsteuerung nicht binnen 30 Sekunden programmiert wird, tritt sie aus dem Programmierungsmodus und blinkt 3 Mal kurz.
TAU srl via E. Fermi, 43 - 36066 Sandrigo (VI) Italia - Tel ++390444750190 - Fax ++390444750376
http://www.tauitalia.com - e-mail: [email protected]
rev. 08 del 18/06/2015
* La portée des émetteurs et la capacité de reception des récepteurs est fortement
FRANÇAIS
influencée par d’autres dispositifs (par example : alarmes, radio à écouteurs,
etc.) qui fonctionnent dans votre zone à la même fréquence. Dans ces cas, TAU CARACTÉRISTIQUES TECNIQUES DU PRODUIT
ne peut offrir aucune garantie quant à la portée réelle de ses dispositifs.
Alimentation :
pile au lithium de 3V type CR2016
Mise au rebut de la pile
2 ans environ, avec 10 transmissions par jour
Attention ! - La pile usagée contient des substances polluantes et ne doit donc Durée de la pile :
pas être jetée avec les ordures ménagères. Il faut la mettre au rebut en adoptant Fréquence :
433,92 MHz (± 100 kHz)
les méthodes de collecte sélective prévues par les normes en vigeur dans le pays
Puissance rayonnée :
environ 1 mW PAR
d’utilisation.
Codage radio :
rolling code, dip-switch.
NOTES
-20°C ; + 55°C.
- Toutes le caractéristiques techniques indiquées se réfèrent à une tempéra- Température de fonctionnement :
ture ambiante de 20 °C (± 5 °C).
Portée*
:
150 m environ ; 35 m (à l’intérieur).
- Tau S.r.l. se réserve le droit d’apporter des modifications au produit chaque
fois qu’ elle le jugera nécessaire à condition toutefois de garantir les même Indice de protection :
IP 40 (utilisation à l’intérieur ou dans des milieux protégés)
fonctions et la même application.
Dimensions :
L. 36,6 x P. 73,3 x H. 10 mm.
Programmation manuelle de la commande radio
Poids :
11 g.
Voir instructions de la centrale de commande ou du récepteur.
Programmation à distance sur des centrales avec récepteur intégré habilitées ou sur récepteurs de radio externes prédisposées
Cette opération permet de mémoriser dans la logique de commande le code de la nouvelle radiocommande, mais il est nécessaire de posséder une radiocommande fonctionnant déjà. Les opérations
successives devront être effectuées à proximité de la logique de commande de l’installation.
Activation de la modalité d’auto-apprentissage dans la logique de commande et mémorisation de la nouvelle radiocommande :
1 Sur la radiocommande, déjà en fonction, appuyez et maintenez le bouton (au moins 6 secondes) qui est normalement utilisé pour commander l’automatisme jusqu’à ce que le voyant vert est allumé, puis
éteint, et enfin commence à clignoter. Relâchez puis le bouton
2 Maintenant, appuyez sur la nouvelle radiocommande la touche correspondant à celle déjà utilisée avec la radiocommande en fonction. A la fin nous recommandons d’effectuer un test pour vérifier le
fonctionnement et si nécessaire répéter la procédure.
AVERTISSEMENT: lorsqu’un émetteur est mémorisé sur plusieurs récepteurs peut arriver que l’automatiste ne répond pas à l’impulsion de commande. Ceci parce que l’émetteur et le récepteur radio
sont sortit de synchronisation. Pour rétablir le fonctionnement normal, il faut faire comme suit:
1_ Appuyer sur la touche de l’émetteur;
2_ relâcher la touche et attendre que le voyant est éteint;
3_ appuyer une seconde fois sur la touche de l’émetteur dans les 5 secondes qui suivent la coupure de la led.
Pour les radiocommandes achetés avant janvier 2015, suivez la procédure ci-dessous:
1 Sur la radiocommande déjà utilisée (ancienne), en maintenant la touche P1 enfoncée, presser 4 Le led vert de la radio commande déjà utilisée (vieille) ne clignote plus et reste allumé fixe pendant
3 fois la touche P2.
1÷2 sec.
2 Relâcher les touches. La led vert de la radiocommande commencera à clignoter en indiquant 5 Appuyer maintenant, sur la nouvelle radio commande, sur la touche pour stocker. Nous vous
l’activation de la modalité d’auto-apprentissage.
conseillons de toujours utiliser la même touche des radio commandes pour stocker l’ouverture du
portail, pour ne pas perdre la possibilité d’autoriser la programmation à distance même avec une
3 Appuyer au moins 3 secondes, sur la radio commande déjà utilisée (vieille) sur la touche qui
nouvelle radio commande. A la fin, faire un essai pour vérifier que la programmation ait bien été
ouvre le portail et que vous voulez stocker.
faite éventuellement répéter la procédure.
La commande radio T-4RP peut être personnalisée seulement avec le programmateur TAUPROG. Elle peut être réglée en mode rolling code ou en mode dip-switch.
En modalité dip-switchs (code fixe) elle est compatible, du point de vue du codage et du fonctionnement, avec les modèles T-4, T-4C, K-SLIM, K-SLIM-C, TXD2(4), BUG.
En mode rolling code elle permet l’auto-apprentissage dans les centrales habilitées avec récepteur intégré ou dans les récepteurs de la série RXDC.
Facultatif - Personnalisation du radiocommande avec programmateur TAUPROG
Presser simultanément les touches P1 et P2 (fig. 1), au bout d’environ 5 secondes, la led vert indiquera par une série de 3 clignotements brefs le passage en modalité de programmation. Suivre les instructions
du programmateur TAUPROG pour effectuer la programmation. Les éventuelles erreurs dans la programmation seront réglés par de brefs clignotements.
Important : si elle n’est pas programmée dans les 30 secondes, la radiocommande sort de la modalité de programmation en émettant une série de clignotements brefs répétés 3 fois.
* El alcance de los transmisores y la capacidad de recepción de los receptores
ESPAÑOL
dependen de otros dipositivos (por ejemplo: alarmas, radioauricolares, etc.) que
funcionen en la zona con la misma fecuencia. En estos casos, TAU no puede CARACTERÍSTICAS TÉCNICAS DEL PRODUCTO
ofrecer ninguna garantía sobre el alcance efectivo de sus dispositivos.
Alimentación:
batería de litio de 3V tipo CR2016
Elimanción de la batería
estimada en 2 años, con 10 transmisiones por día
¡Atención! - La batería agotada contiene sustancias contaminantes y, por dicho Duración de la batería:
motivo, no debe arrojarse en los residuos normales. Hay que eliminarla utilizando Frecuencia:
433,92 MHz (± 100 kHz)
los métodos de recogida selectiva previstos por las normativas vigentes locales.
Potencia radiada:
estimada en alrededor de 1 mW ERP
NOTAS
Codificación radio:
rolling code, dip-switch
- Todas las características técnicas indicadas se refieren a una temperatura
Temperatura de funcionamiento:
-20°C; + 55°C
de 20°C (± 5°C).
- Tau S.r.l. se reserva el derecho de modificar los productos en cualquier mo- Alcance*:
estimada en 150 m (al aire libre); 35 m (en el interior de edificios)
mento en que lo considere necesario, manteniendo las mismas funcionalidades y el mismo uso previsto.
Grado de protección:
IP 40 (uso en interiores o en ambientes protegidos)
Dimensiones:
L. 36,6 x P. 73,3 x H. 10 mm
Programación manual del emisor
Véanse instrucciones de la central de mando o del receptor.
Peso:
11 g
Programación remota en centrales con receptor integrado habilitadas o en receptores radio de superficie predispuestas
Esta operación permite memorizar el código del nuevo emisor en la central, pero es necesario poseer un emisor que ya funcione. Las siguientes operación se deberán llevar a cabo cerca de la central de
la instalación.
Activación de la modalidad de autoaprendizaje en la central y memorización del nuevo emisor:
1 En el emisor que está ya funcionando, oprima y mantenga oprimido el botón (al menos durante 6 segundos) que normalmente se utiliza para el control del accionador hasta que el LED verde se encienda,
luego se apague, y por último comience a parpadear. Luego suelte el botón.
2 Ahora pulse en el emisor nuevo, la misma tecla que ya se utiliza con el emisor que está ya funcionando. Al final, realice una prueba en el automatismo para comprobar su funcionamiento. Repita el
procedimiento si es necesario.
ATENCIÓN: si el mismo emisor estuviera programado en varios receptores radio, puede ser que el accionador no responda al mando (falta de sincronismo entre emisor y receptor). Para restablecer
el funcionamiento normal:
1_ oprimir el botón del emisor;
2_ soltar el botón y esperar a que el LED se apague;
3_ dentro de 5 segundos volver a oprimir el botón del emisor.
Para los emisores comprados antes de marzo 2014, siga los siguientes pasos:
1 En el emisor ya que se está utilizando (viejo), manteniendo pulsado el botón P1, pulse 3 veces 4 El led verde del emisor utilizado (viejo) deja de destellar y queda encendido con luz fija durante
el botón P2.
1÷2 segundos.
2 Suelte los botones. El led verde del emisor comenzará a destellar indicando la habilitación de la 5 Ahora pulse el botón a memorizar en el nuevo emisor. Se recomienda memorizar siempre el mismo
modalidad de autoaprendizaje.
botón de los emisores para la apertura de la puerta para no perder la posibilidad de habilitar la
programación remota, incluso con el nuevo emisor. Al concluir, realice una prueba para comprobar la
3 Siempre en el emisor utilizado (viejo), pulse durante al menos 3 segundos el botón que abre la
programación y de ser necesario, repita el procedimiento.
puerta y que desea memorizar.
El emisor T-4RP es personalizable solo mediante el programador TAUPROG. Puede ser configurado en modo rolling code o en modo dip-switch.
En modalidad Dip-switches (código fijo) es compatible, en la codificación y en el funcionamiento, con los modelos T-4, T-4C, K-SLIM, K-SLIM-C, TXD2(4), BUG.
En modo rolling code permite el autoaprendizaje en las centrales con receptor integrado habilitadas o en los receptores de la serie RXDC.
Opcional – Personalización del emisor por medio de programador TAUPROG
Pulse simultáneamente los botones P1 y P2 (fig. 1); transcurridos 5 segundos aprox., el LED verde indicará, con una serie de 3 destellos, el paso a la modalidad de programación. Siga las instrucciones del
programador TAUPROG para realizar la programación. Los errores cometidos durante la programación serán señalados por destellos cortos.
Importante: si el emisor no fuera programado antes de 30 segundos, sale de la modalidad de programación emitiendo una serie de destellos breves repetidos 3 veces.
1
BATTERY
2
OPEN
P1
P2
P3
P4
3
ATTENZIONE!!
PERICOLO D’ESPLOSIONE SE LA BATTERIA È SOSTITUITA CON ALTRA DI TIPO ERRATO.
ATTENTION!
IN CASE THE BATTERY IS REPLACED USING NOT THE PROPER ONE IT MIGHT EXPLODE.
VORSICHT!
EXPLOSIONSGEFAHR, WENN DIE BATTERIE DURCH EINE BATTERIE FALSCHEN TYPS ERSETZT WIRD.
ATTENTION !!
DANGER D’EXPLOSION SI LA BATTERIE EST REMPLACÉE PAR UN AUTRE TYPE NON CONFORME.
¡ATENCIÓN!
HAY RIESGO DE EXPLOSIÓN SI LA BATERÍA SE SUSTITUYE POR OTRA DE UN TIPO INCORRECTO.
DICHIARAZIONE
DI CONFORMITA’
(ai sensi della Direttiva Europea 2006/42/CE AlI. II.A)
DECLARATlON
DECLARATION OF CONFORMITY
(European Directive 2006/42/CE All. Il.A)
DE CONFORMITY
(aux termes de la Directive européenne 2006/42/CE All. II.A)
Fabbricante / Manufacturer / Hersteller / Fabricant / Fabricante: Indirizzo / Address / Adresse / Adresse / Dirección: Fig. 1 / Abb. 1
D-MNL0T4RP
T-4RP
KONFORMITÄTSERKLÄRUNG
(gemäß der Europäischen Richtlinie 2006/42/CE Anl. Il.A)
DECLARACIÓN
DE CONFORMIDAD
(según la Directiva Europea 2006/42/CE Anex. Il.A)
TAU s.r.l.
Via E. Fermi, 43 - 36066 - Sandrigo - VICENZA - ITALY
Dichiara sotto la propria responsabilità che i prodotti: / Declares under its own responsibility that the following products: / Erklärt auf eigene Verantwortung, daß das
Produkte: / Déclare sous sa propre responsabilté que les produits: / Declara, bajo su propria responsabilidad, que los productos:
Radiocomando / Radio control / Handsender / Émetteur / Radiomando:
250T-4 series (250T-4, 250T-4C, 250T-4RP)
sono conformi ai requisiti essenziali di sicurezza della direttiva: / comply with the main safety requirements of the follwing Directive: / entsprechen den grundlegenden
Sicherheitsbedingungen der Direktiven: / ils sont conformes aux exigences essentielles de sécurité de la Directive: / cumple con los requisitos esenciales de seguridad
de la Directiva:
APPARECCHIATURE RADIO / RADIO SETS / RADIOAPPARATE / INSTALLATIONS RADIO / RADIOEQUIPOS
1999/5/CE
(ETSI EN 301 489-3 with ETSI EN 301 489-3 v1.4.1; ETSI EN 301 489-1 with ETSI EN 301 489-1 v1.8.1;
ETSI EN 300 220-2 with ETSI EN 300 220-2 v2.1.2; EN 60950-1:2006 + A11:2009 + A1:2010 + A12:2011)
SANDRIGO, 28/11/2014
Il Rappresentante Legale / The legal Representative
Der gesetzliche Vertreter / Le Représentant Légal
El Representante Legal
_________________________________________
Loris Virgilio Danieli
Nome e indirizzo della persona autorizzata a costituire la documentazione tecnica pertinente / Name and address of person authorised to draw up all pertinent technical documentation / Name und Adresse der beauftragten Person zur Vorlegung der zugehörigen technischen Unterlagen / Nom et adresse de la personne autorisée à
constituer la documentation technique pertinente / Nombre y dirección de la persona autorizada a entregar la documentación técnica pertinente:
Loris Virgilio Danieli - via E. Fermi, 43 - 36066 Sandrigo (Vi) Italia


© Copyright 2026