
Guía de inicio rápida - CNET Content Solutions
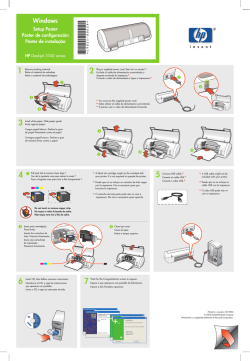
HP DeskJet Ink Advantage 3630 All-in-One series
Lea Esto
Introducción
1. Siga las ilustraciones del folleto para configurar la impresora.
Nota: Para los usuarios de Windows®, si el equipo no está conectado a Internet, inserte el CD de software de
la impresora HP en el equipo. Si el programa de instalación no se inicia, vaya a Equipo, haga doble clic en el
icono de la unidad CD/DVD con el logotipo de HP y haga doble clic en setup.exe.
Más información
Ayuda electrónica: Instale la Ayuda electrónica seleccionándola en el software recomendado durante la
instalación del software. Obtenga información sobre las funciones del producto, la impresión, la resolución de
problemas y el soporte. En la sección Información técnica, encontrará información sobre avisos, medio ambiente
y normativa, incluidos los avisos reglamentarios de la Unión Europea y las declaraciones de cumplimiento.
•• Windows® 8.1: Haga clic en la flecha hacia abajo en la esquina inferior izquierda de la pantalla Inicio,
seleccione el nombre de la impresora, haga clic en Ayuda y luego seleccione Buscar ayuda de HP.
•• Windows® 8: En la pantalla Inicio, haga clic con el botón derecho del ratón en una parte vacía de la
pantalla. A continuación, en la barra de aplicaciones, haga clic en Todas las aplicaciones. Haga clic en el
icono con el nombre de la impresora y, por último, haga clic en Ayuda.
•• Windows® 7, Windows Vista® y Windows® XP: Haga clic en Inicio, seleccione Todos los programas y,
luego, HP. Por último, seleccione el nombre de la impresora.
•• OS X: Haga clic en Ayuda > Centro de ayuda. En la ventana del Visor de ayuda, haga clic en Ayuda para
todas las aplicaciones y, luego, en Ayuda para su impresora.
Léame: Contiene información de soporte de HP, los requisitos del sistema operativo y las actualizaciones
recientes de la impresora.
•• Windows: Inserte el CD de software en el equipo y vaya al archivo ReadMe.chm. Haga doble clic en
ReadMe.chm para abrirlo y elija Léame en su idioma.
•• Mac: Abra la carpeta Documentos que se encuentra en el nivel superior del instalador de software. Haga
doble clic en Léame y seleccione Léame en su idioma.
En la Web: Información y ayuda adicionales: www.hp.com/go/support. Registro de la impresora:
www.register.hp.com. Declaración de conformidad: www.hp.eu/certificates. Uso de la tinta:
www.hp.com/go/inkusage.
¡Escanee para descubrir más!
Puede que tenga que pagar las tarifas estándar para datos. Puede que no esté disponible en todos los idiomas.
ES
EN
*F5S44-90006*
*F5S44-90006*
F5S44-90006
www.hp.com/lar/m/DJIA3635
La información
contenida en este
documento puede sufrir
modificaciones sin
previo aviso.
Printed in [English]
Printed in [Spanish]
© 2014 Hewlett-Packard Development Company, L.P.
Español
2. Visite 123.hp.com/dj3630 para instalar la aplicación móvil o el software de la impresora HP y conectar la
impresora a su red.
Panel de control
Español
1
Pantalla del panel de control: Indica el número de copias, errores de medios, estado e intensidad de
señal de la red inalámbrica, estado Wi-Fi Direct y niveles de tinta.
2
Botón Cancelar: Detiene la operación en curso.
Botón Conexiones inalámbricas: Activa y desactiva las funciones inalámbricas de la impresora.
3
Indicador luminoso Conexiones inalámbricas: Indica si la impresora está conectada a una red
inalámbrica o no. Si la luz parpadea significa que la conexión inalámbrica no está configurada
o que la impresora intenta conectarse.
Botón Wi-Fi Direct: Activa o desactiva Wi-Fi Direct.
4
Indicador luminoso Wi-Fi Direct: Indica si el estado de Wi-Fi Direct está activo o inactivo. Si la
luz parpadea significa que la impresora se está conectando a un dispositivo móvil en modo Wi-Fi
Protected Setup (WPS) o hay un problema con la conexión Wi-Fi Direct.
5
Botón Iniciar copia a color: Inicia un trabajo de copia a color. Para aumentar el número de copias
a color, pulse el botón varias veces. Se empezará a copiar dos segundos después de pulsar el botón.
6
Botón Encendido: Enciende o apaga la impresora.
7
Indicador luminoso Alerta de tinta: Indica poca tinta o un problema del cartucho de tinta.
8
Botón Reanudar: Reanuda un trabajo después de una interrupción (por ejemplo, después de cargar
papel o de eliminar un atasco de papel).
9
Botón información: Imprime la página de información de la impresora. Pulse este botón junto al
botón Conexiones inalámbricas, el botón Wi-Fi Direct o el botón HP ePrint para obtener páginas
de ayuda más específica sobre dichos botones.
10
11
2
Indicador luminoso Reanudar: Indica que puede pulsar el botón Reanudar para solucionar un problema.
Indicador luminoso información: Indica que puede pulsar el botón Información para obtener ayuda
sobre una advertencia o error.
Botón HP ePrint: Activa o desactiva HP ePrint.
Indicador luminoso HP ePrint: Indica si el estado de HP ePrint está activo o inactivo. Si la luz
parpadea significa que hay un problema con la conexión a Servicios Web.
Botón Iniciar copia en negro: Inicia un trabajo de copia en blanco y negro. Para aumentar el número
de copias en blanco y negro, pulse el botón varias veces. Se empezará a copiar dos segundos después
de pulsar el botón.
Solución de problemas básicos
1. Asegúrese de que el cable de alimentación esté bien conectado y la impresora está encendida. El botón
Encender estará encendido.
2. Si su ordenador está conectado a la impresora con un cable USB, asegúrese de que el cable esté bien conectado.
Si su ordenador está conectado a la impresora con una conexión inalámbrica, confirme que la conexión
inalámbrica funciona.
3. Visite el sitio web Herramientas de Diagnóstico de HP en www.hp.com/go/tools para descargar utilidades
(herramientas) gratuitas de diagnóstico que podrá usar para resolver los problemas habituales de la impresora.
Windows
Compruebe que la impresora esté definida como
dispositivo de impresión predeterminado:
•• Windows 8.1 y Windows 8: Señale o toque la
esquina derecha superior de la pantalla para abrir
la barra Accesos, haga clic en el icono Ajustes, haga
clic o toque el Panel de control y luego haga clic
o toque Ver dispositivos e impresoras.
•• Windows 7: Desde el menú Inicio de Windows, haga
clic en Dispositivos e impresoras.
•• Windows Vista: En la barra de tareas de Windows,
haga clic en Inicio, después en Panel de control y,
a continuación, haga clic en Impresora.
•• Windows XP: En la barra de tareas de Windows,
haga clic en Inicio, después en Panel de control y,
a continuación, haga clic en Impresoras y faxes.
Compruebe que junto a la impresora aparezca una marca
de verificación dentro de un círculo. Si la impresora
no está seleccionada como predeterminada, haga clic
con el botón derecho en el icono de la impresora y elija
Establecer como impresora predeterminada en el menú.
Si utiliza un cable USB y sigue sin poder imprimir o la
instalación del software falla:
1. Extraiga el CD de la unidad de CD/DVD y,
a continuación, desconecte el cable USB del equipo.
2. Reinicie el equipo.
3. Inserte el CD del software de la impresora en la
unidad de CD/DVD y siga las instrucciones que
aparecerán en la pantalla para instalar el software
de la impresora. No conecte el cable USB hasta que
se le indique.
4. Cuando se complete la instalación, reinicie el equipo.
Si utiliza la conexión inalámbrica y sigue sin poder
imprimir:
Vaya al apartado de “Redes inalámbricas” en la página
siguiente para obtener más información.
Mac
Compruebe la cola de impresión:
1. En Preferencias del sistema, haga clic en Impresoras
y escáneres (Impresoras y faxes en OS X v10.8
Mountain Lion).
2. Haga clic en Abrir cola de impresión.
3. Haga clic sobre un trabajo de impresión para
seleccionarlo.
4. Utilice los botones siguientes para administrar el
trabajo de impresión:
•• Icono Cancelar: Cancela el trabajo de impresión
seleccionado.
•• Reanudar: Continúa un trabajo de impresión que
se ha detenido.
5. Si ha hecho algún cambio, intente volver a imprimir.
Reiniciar y restablecer:
1. Reinicie el equipo.
2. Restablezca la impresora.
a. Apague la impresora y desconecte el cable de
alimentación.
b. Espere un minuto, vuelva a conectar el cable
y encienda la impresora.
Restablecer el sistema de impresión:
1. En Preferencias del sistema, haga clic en
Impresoras y escáneres (Impresoras y faxes en
OS X v10.8 Mountain Lion).
2. Mantenga pulsada la tecla Control mientras hace
clic en la lista de la izquierda y luego seleccione
Restablecer sistema de impresión.
3. Agregue la impresora que desea utilizar.
Desinstalar el software:
1. Si la impresora está conectada al equipo a través
de USB, desconecte la impresora del equipo.
2. Abra la carpeta Aplicaciones/Hewlett-Packard.
3. Haga doble clic en Desinstalador de HP y siga las
instrucciones que aparecen en pantalla.
Español
Si no puede imprimir:
Reconocimientos
Windows XP, Windows Vista, Windows 7, Windows 8 y Windows 8.1 son marcas comerciales registradas de
Microsoft Corporation en EE. UU.
Mac, OS X y AirPrint son marcas registradas de Apple Inc. en EE. UU. y otros países.
3
Redes inalámbricas
Puede conectar la impresora a una red inalámbrica durante la instalación del software de la impresora.
Nota: Durante la instalación del software, es posible que necesite un cable USB para conectar temporalmente la
impresora y el ordenador. No conecte el cable USB hasta que el software de la impresora se lo pida.
Consejo: Para imprimir una guía de inicio rápido a la conexión inalámbrica, pulse el botón Información (
)
durante tres segundos.
Español
¿Necesita ayuda con el trabajo en red?
www.hp.com/go/wirelessprinting
El Centro de Impresión Inalámbrica HP en www.hp.com/go/wirelessprinting le ayudará a preparar la red inalámbrica,
configurar o reconfigurar su impresora y solucionar problemas del trabajo en red.
Si la conexión de la impresora a la red falló
•• Confirme que esté activada la función inalámbrica en la impresora.
Desde el panel de control de la impresora, si el indicador luminoso Conexiones inalámbricas está apagado,
pulse el botón Conexiones inalámbricas (
) para activar la función inalámbrica de la impresora.
•• Compruebe que la impresora esté conectada a la red.
1. Desde el panel de control de la impresora, pulse el botón Conexiones inalámbricas (
) y el botón
Información (
) simultáneamente para imprimir el informe de prueba de la red inalámbrica y la página de
configuración de red.
2. Consulte la parte superior del informe de prueba de la red para ver si se produjo algún error durante la prueba.
–– Consulte el apartado RESULTADO DEL DIAGNÓSTICO para ver todas las pruebas realizadas y si la impresora
las ha pasado o no.
–– En el apartado CONFIGURACIÓN ACTUAL, busque el Nombre de red (SSID) al que está conectada actualmente
su impresora. Compruebe que la impresora esté conectada a la misma red que el equipo.
Nota: Si la impresora está conectada a una Red Privada Virtual (VPN), desconéctela de forma temporal antes
de continuar con la instalación. Luego de la instalación, debe desconectar la impresora de la VPN para acceder
a ella a través de la red doméstica.
•• Asegúrese de que ningún software de seguridad esté bloqueando la comunicación con la red.
El software de seguridad, como el cortafuegos, puede bloquear la comunicación entre su equipo y la impresora,
cuando se instala en una red. Si no se encuentra la impresora, desactive el cortafuegos de forma temporal y
verifique si el problema desaparece. Para obtener más ayuda y consejos sobre software de seguridad, visite:
www.hp.com/go/wpc-firewall.
•• Reinicie los componentes de la red inalámbrica.
Apague el enrutador y la impresora y, a continuación, vuelva a encenderlos en el siguiente orden: primero
el enrutador y después la impresora. A veces, si apaga y vuelve a encender los dispositivos, se resuelven
problemas de comunicación de red. Si aún no puede conectarse, apague el enrutador, la impresora y el equipo,
y vuelva a encenderlos en este orden: primero el enrutador, luego la impresora y, a continuación, el equipo.
Si los problemas persisten, visite el Centro de impresión inalámbrica HP (www.hp.com/go/wirelessprinting).
Esta página web contiene la información actual más completa sobre la impresión inalámbrica, así como
información para ayudarle a preparar su red inalámbrica; solucionar problemas cuando conecte la impresora
a la red inalámbrica; y resolver los problemas de software de seguridad.
Nota: Si está utilizando un equipo que ejecuta Windows, puede utilizar la herramienta Print and Scan Doctor, que
ayuda a resolver muchos problemas de la impresora. Para descargar esta herramienta, visite www.hp.com/go/tools.
Si desea compartir la impresora con varios equipos en la red
Primero, instale la impresora en la red doméstica. Después de que haya conectado correctamente la impresora
a la red doméstica, puede compartirla con otros equipos en la misma red. Por cada equipo adicional solo deberá
instalar el software de la impresora HP. Durante la instalación del software, seleccione Conexiones inalámbricas
en la pantalla Opciones de conexión y siga las instrucciones en pantalla.
4
Conexión inalámbrica en red (continuación)
Primero, asegúrese de que ya ha instalado el software de la impresora correctamente.
Windows
1. Haga doble clic en el icono de la impresora en el escritorio o siga los siguientes pasos para ejecutar el software
de la impresora:
•• Windows 8.1: Haga clic en la flecha hacia abajo en la esquina inferior izquierda de la pantalla Inicio y seleccione
el nombre de la impresora.
•• Windows 8: Haga clic con el botón derecho del ratón en la pantalla Inicio, luego en Todas las aplicaciones de
la barra de aplicaciones, y finalmente, seleccione el icono con el nombre de su impresora.
•• Windows 7, Windows Vista y Windows XP: En el escritorio del equipo, haga clic en Inicio, seleccione Todos
los programas o Programas, haga clic en HP, luego en la carpeta para la impresora y, a continuación,
seleccione el icono con el nombre de la impresora.
2. En el software de la impresora HP, haga clic en Utilidades.
3. Seleccione Configuración y software de impresora.
4. Seleccione Convertir una impresora conectada USB a inalámbrica. Siga las instrucciones que aparecen en la
pantalla.
Español
Si desea cambiar de una conexión USB a una conexión inalámbrica
Mac
Utilice la Utilidad HP en Aplicaciones/Hewlett-Packard para cambiar la conexión del software a inalámbrica para
esta impresora.
Si desea usar la impresora de forma inalámbrica sin un enrutador
Use Wi-Fi Direct para imprimir de forma inalámbrica sin un enrutador desde su equipo, teléfono inteligente
o dispositivo inalámbrico. Para utilizar Wi-Fi Direct en su equipo, debe instalar el software de la impresora.
1. Si el indicador luminoso Wi-Fi Direct en la impresora está apagado, pulse el botón Wi-Fi Direct (
) para
activar Wi-Fi Direct. El indicador luminoso Wi-Fi Direct está encendido cuando Wi-Fi Direct está activado.
) y el botón Información (
) simultáneamente para imprimir una guía de
2. Pulse el botón Wi-Fi Direct (
Wi-Fi Direct.
3. Siga las instrucciones en la guía de Wi-Fi Direct para conectar su ordenador o dispositivo móvil con la impresora.
4. Imprima de forma normal desde el ordenador o dispositivo móvil.
Nota: La conexión de Wi-Fi Direct no proporciona acceso a Internet.
Visite el Centro de impresión inalámbrica de HP en www.hp.com/go/wirelessprinting para obtener más
información acerca de Wi-Fi Direct.
Este producto está diseñado para su uso en entornos abiertos (p. ej., en hogares y sin conexión pública a Internet)
en el que cualquier persona pueda acceder y utilizar la impresora. Como resultado, el ajuste de Wi-Fi Direct es
en modo “Automático” de forma predeterminada, sin contraseña de administrador; esto permite que cualquier
persona que se encuentre en el campo inalámbrico pueda conectar y acceder a todas las funciones y ajustes de la
impresora. Si se desean niveles de seguridad más estrictos, HP recomienda cambiar el método de conexión Wi-Fi
Direct de “Automático” a “Manual” y establecer una contraseña de administrador.
Para imprimir con AirPrint
Esta impresora es compatible con Apple AirPrint™. Puede imprimir de forma inalámbrica desde su dispositivo iOS o Mac.
•• La impresora y el dispositivo iOS o Mac deben estar en la misma red inalámbrica.
•• Con Apple AirPrint™, puede escanear documentos desde la impresora al dispositivo iOS.
Nota: Verifique siempre que se haya cargado el papel deseado en la bandeja de entrada.
Información de seguridad
Use solo el cable y el adaptador de alimentación (si se incluyen) suministrados por HP.
5
Declaración de garantía limitada de la impresora HP
Español
Producto HP
Duración de la garantía limitada
Medio de almacenamiento del software
90 días
Impresora
1 año
Cartuchos de tinta o impresión
La garantía es válida hasta que se agote la tinta HP o hasta que se
alcance la fecha de “fin de garantía” indicada en el cartucho, cualquiera de
los hechos que se produzca en primer lugar. Esta garantía no cubrirá los
productos de tinta HP que se hayan rellenado o manipulado, se hayan
vuelto a limpiar, se hayan utilizado incorrectamente o se haya alterado su
composición.
Cabezales de impresión (sólo se aplica a productos
con cabezales de impresión que el cliente puede sustituir)
1 año
Accesorios
1 año, a no ser que se especifique otro dato
A. Alcance de la garantía limitada
1. Hewlett-Packard (HP) garantiza al usuario final que el producto de HP especificado no tendrá defectos de materiales ni mano de obra por el
periodo anteriormente indicado, cuya duración empieza el día de la compra por parte del cliente.
2. Para los productos de software, la garantía limitada de HP se aplica únicamente a la incapacidad del programa para ejecutar las instrucciones.
HP no garantiza que el funcionamiento de los productos se interrumpa o no contenga errores.
3. La garantía limitada de HP abarca sólo los defectos que se originen como consecuencia del uso normal del producto, y no cubre otros
problemas, incluyendo los originados como consecuencia de:
a. Mantenimiento o modificación indebidos;
b. Software, soportes de impresión, piezas o consumibles que HP no proporcione o no admita;
c. Uso que no se ajuste a las especificaciones del producto;
d. Modificación o uso incorrecto no autorizados.
4. Para los productos de impresoras de HP, el uso de un cartucho que no sea de HP o de un cartucho recargado no afecta ni a la garantía del
cliente ni a cualquier otro contrato de asistencia de HP con el cliente. No obstante, si el error o el desperfecto en la impresora se atribuye al uso
de un cartucho que no sea de HP, un cartucho recargado o un cartucho de tinta caducado, HP cobrará aparte el tiempo y los materiales de
servicio para dicho error o desperfecto.
5. Si durante la vigencia de la garantía aplicable, HP recibe un aviso de que cualquier producto presenta un defecto cubierto por la garantía, HP
reparará o sustituirá el producto defectuoso como considere conveniente.
6. Si HP no logra reparar o sustituir, según corresponda, un producto defectuoso que esté cubierto por la garantía, HP reembolsará al cliente el
precio de compra del producto, dentro de un plazo razonable tras recibir la notificación del defecto.
7. HP no tendrá obligación alguna de reparar, sustituir o reembolsar el precio del producto defectuoso hasta que el cliente lo haya devuelto a HP.
8. Los productos de sustitución pueden ser nuevos o seminuevos, siempre que sus prestaciones sean iguales o mayores que las del producto
sustituido.
9. Los productos HP podrían incluir piezas, componentes o materiales refabricados equivalentes a los nuevos en cuanto al rendimiento.
10. La Declaración de garantía limitada de HP es válida en cualquier país en que los productos HP cubiertos sean distribuidos por HP. Es posible
que existan contratos disponibles para servicios de garantía adicionales, como el servicio in situ, en cualquier suministrador de servicios
autorizado por HP, en aquellos países donde HP o un importador autorizado distribuyan el producto.
B. Limitaciones de la garantía
HASTA DONDE LO PERMITAN LAS LEYES LOCALES, NI HP NI SUS TERCEROS PROVEEDORES OTORGAN NINGUNA OTRA
GARANTÍA O CONDICIÓN DE NINGÚN TIPO, YA SEAN GARANTÍAS O CONDICIONES DE COMERCIABILIDAD EXPRESAS O
IMPLÍCITAS, CALIDAD SATISFACTORIA E IDONEIDAD PARA UN FIN DETERMINADO.
C. Limitaciones de responsabilidad
1. Hasta donde lo permitan las leyes locales, los recursos indicados en esta Declaración de garantía son los únicos y exclusivos recursos de los
que dispone el cliente.
2. HASTA EL PUNTO PERMITIDO POR LA LEY LOCAL, EXCEPTO PARA LAS OBLIGACIONES EXPUESTAS ESPECÍFICAMENTE EN ESTA
DECLARACIÓN DE GARANTÍA, EN NINGÚN CASO HP O SUS PROVEEDORES SERÁN RESPONSABLES DE LOS DAÑOS DIRECTOS,
INDIRECTOS, ESPECIALES, INCIDENTALES O CONSECUENCIALES, YA ESTÉ BASADO EN CONTRATO, RESPONSABILIDAD
EXTRACONTRACTUAL O CUALQUIER OTRA TEORÍA LEGAL, Y AUNQUE SE HAYA AVISADO DE LA POSIBILIDAD DE TALES DAÑOS.
D. Legislación local
1. Esta Declaración de garantía confiere derechos legales específicos al cliente. El cliente podría también gozar de otros derechos que varían
según el estado (en Estados Unidos), la provincia (en Canadá), o la entidad gubernamental en cualquier otro país del mundo.
2. Hasta donde se establezca que esta Declaración de garantía contraviene las leyes locales, dicha Declaración de garantía se considerará
modificada para acatar tales leyes locales. Bajo dichas leyes locales, puede que algunas de las declinaciones de responsabilidad y limitaciones
estipuladas en esta Declaración de garantía no se apliquen al cliente. Por ejemplo, algunos estados en Estados Unidos, así como ciertas
entidades gubernamentales en el exterior de Estados Unidos (incluidas las provincias de Canadá) pueden:
a. Evitar que las renuncias y limitaciones de esta Declaración de garantía limiten los derechos estatutarios del cliente (por ejemplo, en el Reino
Unido);
b. Restringir de otro modo la capacidad de un fabricante de aumentar dichas renuncias o limitaciones; u
c. Ofrecer al usuario derechos adicionales de garantía, especificar la duración de las garantías implícitas a las que no puede renunciar el
fabricante o permitir limitaciones en la duración de las garantías implícitas.
3. LOS TÉRMINOS ENUNCIADOS EN ESTA DECLARACIÓN DE GARANTÍA, SALVO HASTA DONDE LO PERMITA LA LEY, NO EXCLUYEN,
RESTRINGEN NI MODIFICAN LOS DERECHOS ESTATUTARIOS OBLIGATORIOS PERTINENTES A LA VENTA DE PRODUCTOS HP A
DICHOS CLIENTES, SINO QUE SON ADICIONALES A LOS MISMOS.
Información sobre la Garantía Limitada del Fabricante HP
Adjunto puede encontrar el nombre y dirección de las entidades HP que ofrecen la Garantía Limitada de HP (garantía comercial adicional del fabricante)
en su país.
España Hewlett-Packard Española S.L.U. C/Vicente Aleixandre 1 Parque Empresarial Madrid - Las Rozas, E-28232 Madrid
La garantía comercial adicional de HP (Garantía Limitada de HP) no afecta a los derechos que usted, como consumidor, pueda tener frente al vendedor
por la falta de conformidad del producto con el contrato de compraventa. Dichos derechos son independientes y compatibles con la garantía comercial
adicional de HP y no quedan afectados por ésta. De conformidad con los mismos, si durante un plazo de dos años desde la entrega del producto
aparece alguna falta de conformidad existente en el momento de la entrega, el consumidor y usuario tiene derecho a exigir al vendedor la reparación del
producto, su sustitución, la rebaja del precio o la resolución del contrato de acuerdo con lo previsto en el Título V del Real Decreto Legislativo 1/2007.
Salvo prueba que demuestre lo contrario, se presumirá que las faltas de conformidad que se manifiesten en los seis meses posteriores a la entrega del
producto ya existían cuando el producto se entregó.
Únicamente cuando al consumidor y usuario le resulte imposible o le suponga una carga excesiva dirigirse al vendedor por la falta de conformidad con
el contrato podrá reclamar directamente al fabricante con el fin de obtener la sustitución o reparación.
Información válida para México
La presente garantía cubre únicamente aquellos defectos que surgiesen como resultado del uso normal del producto y no por aquellos que resultasen:
Cuando el producto se hubiese utilizado en condiciones distintas a las normales; cuando el producto no hubiese sido operado de acuerdo con el instructivo de uso que se le
acompaña; cuando el producto hubiese sido alterado o reparado por personas no autorizadas por el fabricante nacional, importador o comercializador responsable respectivo. Los
gastos de transportación generados en lugares dentro de la red de servicios de HP en la República Mexicana para dar cumplimiento a esta garantía serán cubiertos por
Hewlett-Packard. Los gastos de transportación para llevar el producto al lugar donde se aplicará la garantía, serán cubiertos por el cliente.
Procedimiento:
Para hacer válida su garantía solo se deberá comunicar al Centro de Asistencia Telefónica de HP (Teléfonos: 1800-88-8588 o para la Ciudad de Mexico 55-5258-9922) y seguir las
instrucciones de un representante, quien le indicará el procedimiento a seguir.
Importador y venta de piezas, componentes, refacciones, consumibles y accesorios:
Hewlett-Packard de México, S. de R.L. de C.V.
Prolongación Reforma No. 700
Delegación Álvaro Obregón
Col. Lomas de Sta. Fé
México, D.F. CP 01210
Producto:_____________________________________________
Modelo:______________________________________________
Marca:_______________________________________________
Fecha de Compra:__________________________________________
Sello del establecimiento donde fue adquirido:
6
HP DeskJet Ink Advantage 3630 All-in-One series
Get started
1. Follow the illustrations on the setup flyer to set up your printer.
2. Visit 123.hp.com/dj3630 to install the mobile app or HP printer software and connect the printer to your
network.
Note: For Windows® users, If your computer is not connected to the Internet, insert the printer software CD
into your computer. If the installation program does not start, browse to Computer, double-click the CD/DVD
drive icon with the HP logo, and then double-click setup.exe.
Electronic Help: Install the electronic Help by selecting it from the recommended software during software
installation. Learn about product features, printing, troubleshooting, and support. Find notices, environmental,
and regulatory information, including the European Union Regulatory Notice and compliance statements, in the
Technical Information section.
•• Windows® 8.1: Click the down arrow in lower left corner of the Start screen, select the printer name, click
Help, and then select Search HP Help.
•• Windows® 8: On the Start screen, right-click an empty area on the screen, click All Apps on the app bar,
click the icon with the printer’s name, and then click Help.
•• Windows® 7, Windows Vista®, and Windows® XP: Click Start, select All Programs, select HP, and then
select the printer name.
•• OS X: Click Help > Help Center. In the Help Viewer window, click Help for all your apps, and then click the
Help for your printer.
Readme: Contains HP support information, operating system requirements, and recent printer updates.
•• Windows: Insert the software CD in your computer, and then browse to the ReadMe.chm file. Double-click
ReadMe.chm to open, and then select the ReadMe in your language.
•• Mac: Open the Documents folder located at the top-level of the software installer. Double-click ReadMe,
and then select the ReadMe in your language.
On the Web: Additional help and information: www.hp.com/go/support. Printer registration:
www.register.hp.com. Declaration of Conformity: www.hp.eu/certificates. Ink usage:
www.hp.com/go/inkusage.
Scan to find out more!
Standard data rates may apply. Might not be available in all languages.
www.hp.com/lar/m/DJIA3635
English
Learn more
Control Panel
English
1
Control panel display: Indicates number of copies, media errors, wireless status and signal strength,
Wi-Fi Direct status, and ink levels.
2
Cancel button: Stops the current operation.
3
Wireless button: Turns on or off the printer wireless capabilities.
Wireless light: Indicates whether the printer is connected to a wireless network or not. A blinking
light indicates that wireless has not been setup or that the printer is attempting to connect.
Wi-Fi Direct button: Turns on or off Wi-Fi Direct.
4
Wi-Fi Direct light: Indicates the on or off status of Wi-Fi Direct. A blinking light indicates that the
printer is connecting to a mobile device in the Wi-Fi Protected Setup (WPS) push mode or there is a
problem of the Wi-Fi Direct connection.
5
Start Copy Color button: Starts a color copy job. To increase the number of color copies, press the
button multiple times. Copying will start two seconds after the last button press.
6
Power button: Turns the printer on or off.
7
Ink Alert light: Indicates low ink or ink cartridge problems.
8
Resume button: Resumes a job after a disruption (for example, after loading paper or clearing a
paper jam).
9
Information button: Prints out a printer information page. Press the button in combination with the
Wireless button, the Wi-Fi Direct button, or the HP ePrint button to get more specific help pages
tied to each of those buttons.
10
11
8
Resume light: Indicates that you can press the Resume button to assist in solving a problem.
Information light: Indicates that you can press the Information button to get help for a warning or
error.
HP ePrint button: Turns HP ePrint on or off.
HP ePrint light: Indicates the on or off status of HP ePrint. A blinking light indicates a problem with
the connection to Web Services.
Start Copy Black button: Starts a black-and-white copy job. To increase the number of black-andwhite copies, press the button multiple times. Copying will start two seconds after the last button
press.
Basic Troubleshooting
If you are unable to print:
1. Make sure the power cord connections are secure and the printer is powered on. The Power button will be lit.
2. If your computer is connected to the printer with a USB cable, make sure the USB connections are secure. If your
computer is connected to the printer with a wireless connection, confirm that the wireless connection is working.
3. Visit the HP Diagnostic Tools website at www.hp.com/go/tools to download free diagnostic utilities (tools)
that you can use to fix common printer problems.
Windows
Mac
Make sure that the printer is set as your default
printing device:
Check your print queue:
1. In System Preferences, click Printers & Scanners
(Print & Scan in OS X v10.8 Mountain Lion).
2. Click Open Print Queue.
3. Click a print job to select it.
4. Use the following buttons to manage the print job:
•• Windows 7: From the Windows Start menu, click
Devices and Printers.
•• Cancel icon: Cancel the selected print job.
•• Windows Vista: On the Windows taskbar, click
Start, click Control Panel, and then click Printer.
5. If you made any changes, try to print again.
•• Windows XP: On the Windows taskbar, click Start,
click Control Panel, and then click Printers and
Faxes.
1. Restart the computer.
•• Resume: Continue a paused print job.
Restart and reset:
2. Reset the printer.
a. Turn off the printer and unplug the power cord.
Make sure that your printer has a check mark in the
circle next to it. If your printer is not selected as the
default printer, right-click the printer icon and choose
Set as Default Printer from the menu.
Reset the printing system:
If using a USB cable and you are still unable to print,
or the software installation fails:
1. In System Preferences, click Printers & Scanners
(Print & Scan in OS X v10.8 Mountain Lion).
1. Remove the CD from the CD/DVD drive, and then
disconnect the USB cable from the computer.
2. Press and hold the Control key as you click the list
at the left, and then choose Reset printing system.
2. Restart the computer.
3. Add the printer you want to use.
3. Insert the printer software CD in the CD/DVD drive,
and then follow the on-screen instructions to install
the printer software. Do not connect the USB cable
until you are told to do so.
Uninstall the software:
4. After the installation finishes, restart the computer.
If you are using wireless and you are still unable to
print:
English
•• Windows 8.1 and Windows 8: Point to or tap
the upper-right corner of the screen to open the
Charms bar, click the Settings icon, click or tap
Control Panel, and then click or tap View devices
and printers.
b. Wait a minute, then plug the power cord back in
and turn on the printer.
1. If the printer is connected to your computer through
USB, disconnect the printer from your computer.
2. Open the Applications/Hewlett-Packard folder.
3. Double-click HP Uninstaller, and then follow the
on-screen instructions.
Go to the “Wireless Networking” section on the next
page for more information.
Acknowledgements
Windows XP, Windows Vista, Windows 7, Windows 8, and Windows 8.1 are U.S. registered trademarks of Microsoft
Corporation.
Mac, OS X, and AirPrint are trademarks of Apple Inc., registered in the U.S. and other countries.
9
Wireless Networking
You can connect your printer to a wireless network during the printer software installation.
Note: During the software installation, a USB cable might be required for temporary connection between the
printer and the computer. Do not connect the USB cable until the printer software prompts to do so.
Tip: To print a wireless quick start guide, press the Information button (
) for three seconds.
Need networking help?
www.hp.com/go/wirelessprinting
The HP Wireless Printing Center at www.hp.com/go/wirelessprinting can help you prepare your wireless network,
set up or reconfigure your printer, and troubleshoot networking problems.
If connecting your printer to the network was unsuccessful
•• Confirm that wireless is enabled on your printer.
From the printer control panel, if the Wireless light is off, press the Wireless button (
wireless capabilities.
) to turn on the printer
English
•• Confirm that your printer is connected to your network.
) and the Information button (
1. From your printer control panel, press the Wireless button (
same time to print the wireless network test report and network configuration page.
) at the
2. Check the top of the wireless network test report to see if something failed during the test.
–– See the DIAGNOSTICS RESULTS section for all tests that were performed, to determine whether or not your
printer passed.
–– From the CURRENT CONFIGURATION section, find out the Network Name (SSID) to which your printer is
currently connected. Make sure that the printer is connected to the same network as your computer.
Note: If your computer is connected to a Virtual Private Network (VPN), temporarily disconnect from the VPN
before proceeding with the installation. After installation you will need to disconnect from the VPN to access
your printer over your home network.
•• Make sure security software is not blocking communication over your network.
Security software, such as firewalls, can block communication between your computer and printer when
installing over a network. If your printer cannot be found, temporarily disable your firewall and check if the
problem goes away. For more help and tips on security software, go to: www.hp.com/go/wpc-firewall.
•• Restart components of the wireless network.
Turn off the router and the printer, and then turn them back on in this order: router first and then printer.
Sometimes, turning off devices and then turning them back on helps resolve network communication issues.
If you still cannot connect, turn off the router, the printer, and the computer, and then turn them back on in this
order: router first, then printer, and then computer.
If you still have problems, visit the HP Wireless Printing Center (www.hp.com/go/wirelessprinting). This
website contains the most complete, up-to-date information about wireless printing, as well as information to
help you prepare your wireless network; solve problems when connecting the printer to the wireless network;
and resolve security software issues.
Note: If you are using a computer running Windows, you can use the Print and Scan Doctor tool, which can help
solve many problems you might have with the printer. To download this tool, visit www.hp.com/go/tools.
If you want to share your printer with multiple computers on your network
First install your printer on your home network. After you have successfully connected your printer to your home
network, you can share your printer with other computers on the same network. For each additional computer you
only need to install the HP printer software. During the software installation, select Wireless from the Connection
Options screen and then follow the on-screen instructions.
10
Wireless Networking (continued)
If you want to change from a USB connection to a wireless connection
First make sure that you have already successfully installed your printer software.
Windows
1. Double-click the printer icon on the desktop or do one of the following to open the printer software:
•• Windows 8.1: Click the down arrow in lower left corner of the Start screen, and then select the printer name.
•• Windows 8: Right-click an empty area on the Start screen, click All Apps on the app bar, and then select the
printer name.
•• Windows 7, Windows Vista, and Windows XP: From the computer desktop, click Start, select All Programs
or Programs, click HP, click the folder for the printer, and then select the icon with the printer’s name.
2. In the printer software, click Utilities.
3. Select Printer Setup & Software.
4. Select Convert a USB connected printer to wireless. Follow the on-screen instructions.
Mac
If you want to use the printer wirelessly without a router
Use Wi-Fi Direct to print wirelessly without a router, from your computer, smartphone, or other wireless enabled
device. To use Wi-Fi Direct from a computer, the printer software must be installed on the computer.
1. If the Wi-Fi Direct light on the printer is off, press the Wi-Fi Direct button (
The Wi-Fi Direct light is on when Wi-Fi Direct is turned on.
2. Press the Wi-Fi Direct button (
) and the Information button (
English
Use HP Utility in Applications/Hewlett-Packard to change the software connection to wireless for this printer.
) to turn on Wi-Fi Direct.
) together to print a Wi-Fi Direct guide.
3. Follow the instruction on the Wi-Fi Direct guide to connect your computer or mobile device to the printer.
4. Print as you normally do from your computer or mobile device.
Note: Wi-Fi Direct connection does not provide Internet access.
Visit the HP Wireless Printing Center at www.hp.com/go/wirelessprinting for more information about Wi-Fi
Direct.
This product is designed for use in open environments (e.g., in homes and not connected to the public Internet) in
which anyone may access and use the printer. As a result, the Wi-Fi Direct setting is in “Automatic” mode by default,
without an administrator password; this allows anyone in wireless range to connect and access all functions and
settings of the printer. If higher security levels are desired, HP recommends changing the Wi-Fi Direct Connection
Method from “Automatic” to “Manual” and establishing an administrator password.
If you want to print with AirPrint
This printer is Apple AirPrint™-enabled. You can print wirelessly from your iOS device or Mac.
•• Your printer and iOS device or Mac must be on the same wireless network.
•• With Apple AirPrint™, you cannot scan documents from the printer to your iOS device.
Note: Always make sure that the input tray is loaded with the desired paper.
Safety information
Use only with the power cord and power adapter (if provided) supplied by HP.
11
HP printer limited warranty statement
HP product
Duration of limited warranty
Software Media
90 days
Printer
1 year hardware warranty
Print or Ink cartridges
Until the HP ink is depleted or the “end of warranty” date
printed on the cartridge has been reached, whichever
occurs first. This warranty does not cover HP ink products
that have been refilled, remanufactured, refurbished,
misused, or tampered with.
Printheads (only applies to products with customer
replaceable printheads)
1 year
Accessories
1 year unless otherwise stated
English
A. Extent of limited warranty
1. Hewlett-Packard (HP) warrants to the end-user customer that the HP products specified above will be free from defects
in materials and workmanship for the duration specified above, which duration begins on the date of purchase by the
customer.
2. For software products, HP’s limited warranty applies only to a failure to execute programming instructions. HP does not
warrant that the operation of any product will be interrupted or error free.
3. HP's limited warranty covers only those defects that arise as a result of normal use of the product, and does not cover
any other problems, including those that arise as a result of:
a. Improper maintenance or modification;
b. Software, media, parts, or supplies not provided or supported by HP;
c. Operation outside the product's specifications;
d. Unauthorized modification or misuse.
4. For HP printer products, the use of a non-HP cartridge or a refilled cartridge does not affect either the warranty to the
customer or any HP support contract with the customer. However, if printer failure or damage is attributable to the use of
a non-HP or refilled cartridge or an expired ink cartridge, HP will charge its standard time and materials charges to
service the printer for the particular failure or damage.
5. If HP receives, during the applicable warranty period, notice of a defect in any product which is covered by HP's
warranty, HP shall either repair or replace the product, at HP's option.
6. If HP is unable to repair or replace, as applicable, a defective product which is covered by HP's warranty, HP shall,
within a reasonable time after being notified of the defect, refund the purchase price for the product.
7. HP shall have no obligation to repair, replace, or refund until the customer returns the defective product to HP.
8. Any replacement product may be either new or like-new, provided that it has functionality at least equal to that of the
product being replaced.
9. HP products may contain remanufactured parts, components, or materials equivalent to new in performance.
10. HP's Limited Warranty Statement is valid in any country where the covered HP product is distributed by HP. Contracts
for additional warranty services, such as on-site service, may be available from any authorized HP service facility in
countries where the product is distributed by HP or by an authorized importer.
B. Limitations of warranty
TO THE EXTENT ALLOWED BY LOCAL LAW, NEITHER HP NOR ITS THIRD PARTY SUPPLIERS MAKES ANY
OTHER WARRANTY OR CONDITION OF ANY KIND, WHETHER EXPRESS OR IMPLIED WARRANTIES OR
CONDITIONS OF MERCHANTABILITY, SATISFACTORY QUALITY, AND FITNESS FOR A PARTICULAR PURPOSE.
C. Limitations of liability
1. To the extent allowed by local law, the remedies provided in this Warranty Statement are the customer's sole and
exclusive remedies.
2. TO THE EXTENT ALLOWED BY LOCAL LAW, EXCEPT FOR THE OBLIGATIONS SPECIFICALLY SET FORTH IN
THIS WARRANTY STATEMENT, IN NO EVENT SHALL HP OR ITS THIRD PARTY SUPPLIERS BE LIABLE FOR
DIRECT, INDIRECT, SPECIAL, INCIDENTAL, OR CONSEQUENTIAL DAMAGES, WHETHER BASED ON
CONTRACT, TORT, OR ANY OTHER LEGAL THEORY AND WHETHER ADVISED OF THE POSSIBILITY OF
SUCH DAMAGES.
D. Local law
1. This Warranty Statement gives the customer specific legal rights. The customer may also have other rights which vary
from state to state in the United States, from province to province in Canada, and from country to country elsewhere in
the world.
2. To the extent that this Warranty Statement is inconsistent with local law, this Warranty Statement shall be deemed
modified to be consistent with such local law. Under such local law, certain disclaimers and limitations of this Warranty
Statement may not apply to the customer. For example, some states in the United States, as well as some governments
outside the United States (including provinces in Canada), may:
a. Preclude the disclaimers and limitations in this Warranty Statement from limiting the statutory rights of a consumer
(e.g., the United Kingdom);
b. Otherwise restrict the ability of a manufacturer to enforce such disclaimers or limitations; or
c. Grant the customer additional warranty rights, specify the duration of implied warranties which the manufacturer
cannot disclaim, or allow limitations on the duration of implied warranties.
3. THE TERMS IN THIS WARRANTY STATEMENT, EXCEPT TO THE EXTENT LAWFULLY PERMITTED, DO NOT
EXCLUDE, RESTRICT, OR MODIFY, AND ARE IN ADDITION TO, THE MANDATORY STATUTORY RIGHTS
APPLICABLE TO THE SALE OF THE HP PRODUCTS TO SUCH CUSTOMERS.
HP Limited Warranty
Complimentary Support: 365 days of online chat support and 90 days of phone support (both from date of purchase). In regions
outside of the US where chat support is not available, phone support will be provided for 365 days. Support includes general
troubleshooting related to setup, installation, assembly and connectivity. You may also refer to the HP Support Website
(www.hp.com/support) for additional information. During the term of HP’s limited warranty, you may contact your authorized HP
reseller or HP authorized service provided for additional information about support.
The name and address of the HP entity responsible for the performance of the HP Limited Warranty in your country is as follows:
United Kingdom: Hewlett-Packard Ltd Cain Road Bracknell GB-Berks RG12 1HN
Eire: Hewlett-Packard Ireland Limited, 63-74 Sir John Rogerson's Quay, Dublin 2
Malta: Hewlett-Packard International Trade B.V. Malta Branch, 48, Amery Street, Sliema SLM 1701, MALTA
You may have additional statutory rights against the seller based on your purchase agreement. Those rights are not in any way
affected by this HP Limited Warranty.
12
© Copyright 2026