
Compliance Guardian User Guide
Compliance Guardian 3 User Guide Service Pack 3 Revision A Issued January 2015 Table of Contents What's New in this Guide.............................................................................................................................. 4 About Compliance Guardian ......................................................................................................................... 5 Complementary Products ............................................................................................................................. 6 Submitting Documentation Feedback to AvePoint ...................................................................................... 7 Compliance Reports ...................................................................................................................................... 8 Navigation Bar........................................................................................................................................... 8 Getting Started.......................................................................................................................................... 8 Compliance Report Home Page .............................................................................................................. 10 Scan Results Overview ........................................................................................................................ 10 Risk Report Overview .......................................................................................................................... 11 Violation Report Overview .................................................................................................................. 12 Other Reports Overview ..................................................................................................................... 12 Types of Compliance Reports ................................................................................................................. 13 Scan Result .......................................................................................................................................... 14 Risk Report .......................................................................................................................................... 19 Data Table Report ............................................................................................................................... 24 File Errors Report ................................................................................................................................ 25 File Type Report .................................................................................................................................. 26 PDF Exception Report ......................................................................................................................... 27 Violation Report .................................................................................................................................. 28 Link Validation Report......................................................................................................................... 30 Page Title Report ................................................................................................................................. 32 Information Painter Report................................................................................................................. 33 Export Requests ...................................................................................................................................... 35 Human Auditor........................................................................................................................................ 36 Changing File's Initial Status................................................................................................................ 37 Auditing History .................................................................................................................................. 37 Export All Reports to HTML..................................................................................................................... 38 Configuring Export Report Settings..................................................................................................... 38 2 Compliance Guardian User Guide Using Profile Manager for Exporting Report to HTML ........................................................................ 40 Viewing the Exported HTML Report ................................................................................................... 41 Classification Report ................................................................................................................................... 42 Launching Classification Report .............................................................................................................. 42 Action Report .......................................................................................................................................... 43 Selecting Scope to Generate Action Report........................................................................................ 44 Viewing Action Reports ....................................................................................................................... 45 Configuring Settings for Action Report ............................................................................................... 47 Incident Manager .................................................................................................................................... 48 Managing Quarantined Files ............................................................................................................... 48 Managing Encrypted Files ................................................................................................................... 55 Managing Redacted Files .................................................................................................................... 61 Social Report ........................................................................................................................................... 69 Selecting Scope to Generate Social Report......................................................................................... 70 Viewing Social Reports ........................................................................................................................ 71 Configuring Settings for Social Report ................................................................................................ 75 Export Requests ...................................................................................................................................... 76 Notices and Copyright Information ............................................................................................................ 77 Compliance Guardian User Guide 3 What's New in this Guide 4 • Support scanning of social network. Social Report is used to view the scanning result of a social network’s posts affected by Classification Scanner mode actions. Currently Compliance Guardian only supports Yammer. • Support Adding Comments or attachments for items in Incident Manager. Compliance Guardian User Guide About Compliance Guardian Compliance Guardian is designed to ensure that information is available and accessible to the people who should have it and protected from the people who should not. Compliance Guardian helps Chief Privacy Officers, Chief Information Security Officers, Compliance Managers, Records Managers, SharePoint Administrators, and Company Executives proactively protect their IT environments from harmful information leaks, contamination, or misuse while simultaneously ensuring that all activities and content residing in their environments are compliant, accessible, and manageable. Compliance Guardian is designed to empower organizations to comply with regulatory, statutory, or organization specific requirements to manage and oversee access to sensitive data. Compliance Guardian works with AvePoint's extended Compliance Solutions to provide a "heat map" that provides additional actionable context about the document including: how old is the document, who authored it, how many times has it been accessed, who can access it, who has accessed it, and what have they done with it. In this way, organizations can take specific steps to protect and mitigate their risk. By identifying, classifying, and taking action on compliance risks, and presenting this information in easily digestible formats for various stakeholders, organizations can more effectively build and maintain a compliant framework. Compliance Guardian User Guide 5 Complementary Products Many products and product suites on the Compliance Guardian platform work in conjunction with one another. The DocAve Auditor Reports are recommended for use with Compliance Guardian. Auditor Reports are available in DocAve 6 Report Center under Compliance Reports. 6 Compliance Guardian User Guide Submitting Documentation Feedback to AvePoint AvePoint encourages customers to provide feedback regarding our product documentation. You can Submit Your Feedback on our website. Compliance Guardian User Guide 7 Compliance Reports To access the compliance reports, login to Compliance Guardian and select Compliance Report in the Compliance Manager section or on the navigation bar. You will be redirected to the Compliance Report page. For users who only have permissions to view the corresponding compliance reports, they will be redirected to the Compliance Report page directly after logging in. Navigation Bar If you select Report on the top-left corner of Compliance Report page, the navigation bar appears. This bar allows you to navigate to your desired report page by selecting the corresponding tab. Figure 1: Navigation bar. Getting Started To get started in Compliance Reports, complete the following steps: 1. Select Scan Policy Filter at the top-right corner of the page. A drop-down list appears. 2. Choose a scan policy from the drop-down list, select the plans containing the scan results you want to view, and then select OK under the drop-down list. The scan results of the latest job cycles will be displayed in the Compliance Report module. 8 Compliance Guardian User Guide 3. If you want to save your selection, after you select the desired plans, select Save As Default before selecting OK under the drop-down list. The next time you login to Compliance Report, the scan results of the desired plans will be displayed. You can change your selections, but after you select Default View, the scan results of the desired plans will also be displayed. *Note: After the Scan Policy Filter has been configured, Compliance Guardian will use the same configured scan policy filter when displaying the search results in the interfaces of different compliance reports. *Note: Only the users in the defined Report Group have permissions to view the compliance reports of the corresponding jobs. Compliance Guardian User Guide 9 Compliance Report Home Page The Compliance Report home page provides the users with an overall view of the scan results in four areas: • • • • Scan Results Overview Risk Report Overview Violation Report Overview Other Reports Overview Figure 2: Compliance Report page. Scan Results Overview The Scan Results overview area displays the histogram of the passed and failed files analyzed by the scan engine. • 10 Passed Files ─ The files that meet the defined scan policy. Select View All to go to the Passed Files tab in the Scan Result page to view more detailed information about the passed files. Compliance Guardian User Guide • Failed Files ─ The files that do not meet the defined scan policy. Select View All to go to the Failed Files tab in the Scan Result page to view more detailed information about the failed files. If you want to view the trend report of the scan results, select the Trend Report link and review it in the pop-up window. The passed and failed files of the selected scan policy will be displayed in a histogram. You can select a date range from This Month, Last Month, Last 3 Months, Last 6 Months, and Last 12 Months to view the files. If you want to export a PNG screenshot of the displayed trend chart, select Export to Screenshot at the top-right corner. The total number of passed, failed, unavailable, and exceptional PDF files is the number of the files that need to be scanned in the selected scope. Risk Report Overview The Risk Report overview feature allows users to define risk levels for each check. Those risk levels are used to represent the severity of the files that do not obey the selected check. A check is an XML file that defines the logic that Compliance Guardian uses to check files. Checks identify the purpose for the check (the type of check to run, such as a pattern of characters), the condition for the check (such as a social security number pattern), and the possible result of the check (true or false). Users can change the values in the checks to determine the check conditions, but the elements’ specific format defined by Compliance Guardian must stay the same. A test suite is a collection of checks. For each test suite, the risk of one file is calculated by the selected risk formula. The risk formula is a formula used for calculating a check’s risk level. It provides the user with a method to increase risk at a level proportional to the risk type, while at the same time providing a method to grow risk at a specified factor, allowing for a real look at risk by occurrence. • Raw risk of one file = (the first check’s raw risk level calculated by the raw risk Formula in the test suite) + (the second check’s raw risk level calculated by the raw risk formula in the test suite) + … + (the last check’s raw risk level calculated by the raw risk formula in the test suite) • Stepped risk of one file = (the first check’s stepped risk level calculated by the stepped risk formula in the test suite) + (the second check’s stepped risk level calculated by the stepped risk formula in the test suite) + … + (the last check’s stepped risk level calculated by the stepped risk formula in the test suite) • Weighted risk of one file = (the first check’s weighted risk level calculated by the weighted risk formula in the test suite) + (the second check’s weighted risk level calculated by the weighted risk formula in the test suite) + … + (the last check’s weighted risk level calculated by the weighted risk formula in the test suite) All the files analyzed by the scan engine will be grouped into the following three types according to their risk levels: • High Priority • Medium Priority Compliance Guardian User Guide 11 • Low Priority *Note: For more information on high, medium, and low priority files, refer to the Risk Report section. The Risk Report displays all three types of files. Select View All to go to the Risk Report page to view more detailed information about the grouped files. Violation Report Overview The Violation Report overview area displays the violation files of each check and the percentage of those violation files. When there are more than 10 checks used, the scan results of the top 9 checks will be displayed in different colors. Starting with the tenth check, all the results are displayed as Others in the pie chart. The Violation Type, Number of Violations, Number of Files, and Violation Percentage of those 10 areas will be displayed on the right pane. If you hover over a sector in the pie chart, you can also view the Violation Type, Number of Violations, Number of Files, and Violation Percentage of the selected check. If you select the sector in the pie chart, you can view all the violation files and their locations in the pop-up window. To export the detailed information to a CSV file for further use, select the Export to Datasheet link on the top-right corner of the pop-up window, and then enter a request name in the Export to window. Then select OK to export the file. To view the trend report of the violation files, select the Trend Report link and review it in the pop-up window. All the test suites of all the scan policies that have been involved in the scan jobs will be loaded and displayed in the Test Suite Filter drop-down menu. Select the checks containing the violation files you want to view from the Test Suite Filter drop-down menu, and then select OK to confirm the selection. The violation files of the selected checks will be displayed in the Violation Trend Report window. To view the violation files of the selected checks in a specified time range, choose from This Month, Last Month, Last 3 Months, Last 6 Months, or Last 12 Months. By selecting Export to Screenshot at the top-right corner, you can export a PNG screenshot of the displayed trend chart. To view more detailed information about the grouped files, select View All to go to the Violation Report page. Other Reports Overview The Other Reports overview area displays the other reports to view specific types of scanned results: 12 • Data Table Report ─ If the files analyzed by the scan engine contain one or several tables, the corresponding files will be displayed in the Data Table Report. Those files must be reviewed manually to confirm whether the data is accessible and compliant. • File Errors Report ─ If the files selected failed to be downloaded, or Compliance Guardian does not have permissions to access the specified files, or the files themselves are corrupted, those specified files will be considered unavailable and will be recorded in the File Errors Report. Compliance Guardian User Guide If the downloaded files cannot be analyzed by the scan engine (due to an invalid file type, for example), they will also be recorded in the File Errors Report. *Note: The total number of passed, failed, unavailable, and exceptional PDF files is the number of the files that need to be scanned in the selected scope. • File Type Report ─ Groups the files analyzed by the scan engine according to their file type and display the scan results according to the grouped file types. • PDF Exception Report ─ For the PDF files (generated using the Adobe Acrobat software), if the scan engine finds out that those PDF files include unstructured textual content during the analyzing process, the corresponding PDF files will be recorded in the PDF Exception Report. *Note: Unstructured textual content is content that cannot be recognized by the scan engine. For example, if someone created a PDF from an image file instead of a MS Word file, the scan engine may not be able to scan and recognize any of the text in the PDF file. Therefore, that PDF file would show up in the PDF Exception Report. • Link Validation Report – Groups the files that contain links and bookmarks that have been tested. The report is used to view the validity of the file’s links or bookmarks. • Page Title Report – The report is used to check the uniqueness of the webpage title (check the <title> node in the source code of the file). Only the titles of the files that are scanned by Compliance Guardian Website Scanner will be tested. The files that do not have unique titles will be displayed in this report. • Information Painter – This report is used to render the HTML page that Compliance Guardian tests with error and informational indicators in line with the content. Types of Compliance Reports From the navigation bar, you can access each of the following compliance report types. Refer to the following sections for details about each of these reports. • Scan Result • Risk Report • Data Table Report • File Errors Report • File Type Report • PDF Exception Report • Violation Report • Link Validation Report • Page Title Report Compliance Guardian User Guide 13 • Information Painter Report The following actions can be performed at the lower right-hand corner of any report page: • To change the number of the report result items displayed per page, select the desired number from 5, 8, 10, 15, 20, 25, 50, or 100 in the Show rows drop-down menu. • To go to the specified page, enter the page number in the Go to … of text box and press Enter on your keyboard. • To go to the next page, select the > button; to return to the previous page, select the < button. Scan Result To view details on all the files that have been analyzed by the scan engine, select Scan Result on the navigation bar to open the Scan Result page and review the Passed Files Tab and Failed Files Tab. Figure 3: Scan Result report page. To view a trend report in Compliance Report Home Page section, select the Trend Report link at the top of this page. To export the scan results, select the Export to Datasheet link on the top-right corner of this page, and then enter a request name in the Export to window. Then select OK. The request will start to run. You can go to the Export Requests interface to view the running process of the request. When the export is 14 Compliance Guardian User Guide complete, you can select one request and download the compressed report files to a specified location. You can export the report to a CSV file to view all the items. Passed Files Tab When a scanned file obeys all the checks in the selected test suite (meaning there is no failed items for this file), its status will be considered as passed, and the file is a passed file. The Passed Files tab of the Scan Result page displays the following information: • File Location ─ The full URL of the passed file. Selecting the URL in this column will redirect you to the file. • Test Suite ─ The name of the test suite used for scanning this file. • o After selecting the filter button ( ) in this column, selecting the desired test suites in the drop-down menu, and selecting OK, only the passed files of the selected test suites will be displayed in the table. o If you select All and select OK, the passed files of all the test suites will be displayed in the table. o If you select None, the selection status of the test suites will be cleared. o Select Cancel if you want to cancel the selection. Details ─ Select the detail report button ( ) in the Details column to view the detailed information in the View Detailed Report window. Here you can view the following information: o File Location ─ The full URL of the selected file. Selecting the URL in this area will direct you to the file. o Test Suite ─ The name of the test suite used for scanning this file. o Scan Time ─ The time when this file was scanned. o Status ─ The status of this file regarding the whole test suite. In this case, because the scanned file obeys all the checks in the specified check collection, which means there is no failed items for this file. The file is therefore a passed file and the status will indicate Passed. o Regulation ─ The name of a selected regulation (check) included in the corresponding test suite. Selecting the regulation will redirect you to the webpage of the check policy URL. o Description ─ The description of this selected regulation (check). o Status ─ The status of this file regarding this specified regulation (check). Passed ─ The file obeys the selected regulation (check). Failed ─ The file disobeys the selected regulation (check). Compliance Guardian User Guide 15 o User Review Required ─ The file needs the user to review it to decide its final status. Not Applicable ─ The file does not contain the elements defined in the selected regulation (check). Not Tested ─ The specified regulation (check) is not checked for the file. When a regulation (check) is included in the test suite of the scan policy used for scanning this file, but the specified regulation (check) is not enabled in the corresponding test suite, this status will be displayed. Change Status – Select the change status ( ) button in the Change Status column to change a file’s initial scan status. Configure the following settings after you select the change status ( ) button in the Change Status window. Select a status in the Change status to drop-down list. Add an optional comment for this change. If you select the Ignore this file until the file or policies change checkbox, the file will not be scanned until the action policy or scan policy is changed, or until the file is changed. Select OK to save the changes or select Cancel to exit the Change Status window. The changes made here are tracked in the Human Auditor feature. For more information, refer to Auditing History. You can search the files displayed by designating the keyword or file URL. The keyword must be contained in a column value. At the top of the Passed Files viewing pane, enter the keyword for the files you want to display. Failed Files Tab When a scanned file fails one or several checks in the selected test suite, its status will be considered as failed. The file will then be marked as a failed file. The Failed Files tab of the Scan Result page displays the following information: 16 • File Location ─ The full URL of the failed file. Selecting the URL in this column will redirect you to the file. • Test Suite ─ The name of the test suite used for scanning this file. o After selecting the filter button ( ) in this column, selecting the desired test suites in the drop-down menu and selecting OK, only the failed files of the selected test suites will be displayed in the table. o If you select All and select OK, the failed files of all the test suites will be displayed in the table. Compliance Guardian User Guide • o If you select None, the selection status of the test suites will be cleared. o Select Cancel if you want to cancel the selection. Details ─ Select the detail report button ( ) in the Details column to view the detailed information in the View Detailed Report window. Here you can view the following information: o File Location ─ The full URL of the selected file. Selecting the URL in this area will redirect you to the specified file. o Test Suite ─ The name of the test suite used for scanning this file. o Scan Time ─ The time when this file is scanned. o Status ─ The status of this file regarding the whole test suite. In this case, because the scanned file disobeyed one or several checks in the specified test suite, its status will be considered as failed. The file is therefore a Failed file and the status will indicate Failed. o Regulation ─ The name of a selected regulation (check) included in the corresponding test suite. Selecting the regulation will be redirected you to the webpage of the check policy URL. o Description ─ The description of this selected regulation (check). o Status ─ The status of this file regarding this specified regulation (check). o Passed ─ The file obeys the selected regulation (check). Failed ─ The file disobeys the selected regulation (check). User Review Required ─ The file needs the user to review it to decide its final status. Not Applicable ─ The file does not contain the elements defined in the specified regulation (check). Not Tested ─ The specified regulation (check) is not checked for the selected file. When a regulation (check) is included in the test suite of the scan policy used for scanning this file, but the specified regulation (check) is not enabled in the corresponding test suite, this status will be displayed. Change Status – Select the change status ( ) button in the Change Status column to change a file’s initial scan status. Configure the following settings after you select the change status ( ) button in the Change Status window. Select a status in the Change status to drop-down list. Add an optional comment for this change. If you select the Ignore this file until the file or policies change checkbox, the file will not be scanned until the action policy or scan policy is changed, or until the file is changed. Compliance Guardian User Guide 17 Select OK to save the changes or select Cancel to exit the Change Status window. The changes made here are tracked in in Human Auditor feature. For more information, refer to Auditing History. • Error Highlight Report ─ Select the error highlight report button ( ) in the Details column to view the source of the selected file in the Error Highlight Report window. The contents that are not compliant will be highlighted in yellow so the users can locate those parts quickly and fix any compliance issues. In the pop-up window, you can also view the following information: o File Location ─ The full URL of the file. Selecting the URL in this area will redirect you to the specified file. o Test Suite ─ The name of the test suite used for scanning this file. o Scan Time ─ The time when this file is scanned. o Status ─ The status of this file regarding the whole test suite. In this case, because the scanned file disobeyed one or several checks in the test suite, its status will be considered as failed. The file is therefore a failed file and the status will indicate Failed. If a file has been modified or deleted after it was scanned, after you view its Error Highlight Report, a message will appear in the report to warn you that the result of this report is not correct. You can search the files displayed by designating the keyword. The keyword must be contained in a column value. At the top of the Failed Files viewing pane, enter the keyword for the files you want to display. 18 Compliance Guardian User Guide Risk Report To view the risk levels of each failed file, select Risk Report on the navigation bar to open the Risk Report page. Figure 4: Risk Report page. To define the number of the high, medium, and low priority files, enter the desired number in the corresponding High Priority and Medium Priority text boxes above the table. The rest of the files will be designated as Low Priority files. The files in the downloaded report will be grouped according to the entered numbers. Files with higher risk levels require more attention and usually need to be dealt with immediately. Files with lower risk levels are relatively less threatening to the community. The three different kinds of risk priority files are marked with different colors. The following information is displayed on this page: • File Location ─ The full URL of the specified file. If you select the URL in this column, you will be redirected to the file. • Test Suite – The test suite which is used by the corresponding file. • Raw – The risk levels calculated by the Raw type Risk Formula are displayed in this column. If you have not selected any plans when you enter this Risk Report page, the Compliance Guardian User Guide 19 column name is Raw. When you have selected the plans, the column name will be the name of the Raw type Risk Formula that is specified in the corresponding test suite. • Stepped – The risk levels calculated by the Stepped type Risk Formula are displayed in this column. If you have not selected any plans when you enter this Risk Report page, the column name is Stepped. When you have selected the plans, the column name will be the name of the Stepped type Risk Formula that is specified in the corresponding test suite. • Weighted – The risk levels calculated by the Weighted type Risk Formula are displayed in this column. If you have not selected any plans when you enter this Risk Report page, the column name is Weighted. When you have selected the plans, the column name will be the name of the Weighted type Risk Formula that is specified in the corresponding test suite. To export the risk report results, select the Export to Datasheet link on the top-right corner of this page and then enter a request name in the Export To window. Then select OK, and the detailed information displayed on this page will be exported to a CSV file for further use. The number of the report result items displayed in Compliance Guardian is based on the Maximum Number of Files setting configured in Control Panel > Report Configuration. If the report contains results of Compliance Guardian Scanner for SharePoint, before selecting OK in the Export To window, you can also configure two advanced settings. Refer to DocAve Auditor Analysis Report and Security Information Reports for details on these advanced settings. Figure 5: Export To window. DocAve Auditor Analysis Report In the Export To window, select the DocAve Auditor Analysis Report checkbox to download the auditing information from the configured Auditor database in a separate Auditor Analysis Report. The following information is included in the Auditor Analysis Report: 20 Compliance Guardian User Guide • Full Path ─ The full URL of the list where this file resides. • Content Age (Day) ─ The time (counted by days) that the selected file exists in SharePoint after it has been created. • Last Access Time ─ The time when the file is last accessed. • Access Count ─ The times that this file has been accessed for. • Created At ─ The time when the file was created. • Created By ─ The user that created this file. • Last Modified Time ─ The time when the file was last modified. • Last Modified By ─ The user that modified this file for the last time. • Time of Unique User ─ Displays the number of the users that have accessed this file. Select a date range from This Month, Last Month, Last 3 Months, Last 6 Months, and Last 12 Months to specify the time period of the auditing data that you want to export. The user can use the auditing information to find out why the file is considered risky. The user can also adjust the file’s risk level according to the auditing information. For example, if the user finds out that one file with a high risk level has not been accessed for five years, the file may no longer be risky becauseit is not being accessed by users. *Note: The DocAve Auditor Analysis Report field will be greyed out if the Connect to DocAve Auditor Database settings are not configured in Control Panel > Report Configuration. Security Information Reports In the Export To window, select the Security Information Reports checkbox to download the following three separate reports: • Item Level Security Information Report ─ Displays the detailed security information for each failed file. For more detailed information about the related Security Scope, refer to the Detailed Security Settings Report bullet below. o File Location ─ The full URL of the file. o Versions Count ─ The number of the file’s versions. o Size (Byte) ─ The size of the file. o Security Level ─ Displays the level of the SharePoint object where the permission of the selected file is inherited from. File ─ If File is displayed in this column, it means that the file has its own permission and does not inherit the permission of any higher level node. List ─ If List is displayed in this column, it means that the file’s permission is inherited from its parent list, and the list has its own permission and does not inherit the permission of any higher level node. Compliance Guardian User Guide 21 • • Site ─ If Site is displayed in this column, it means that the file’s permission is inherited from its parent list, and the specified list inherits the permission of its parent site, but the corresponding site has its own permission and does not inherit the permission of the site collection level node. Site Collection ─ If Site Collection is displayed in this column, it means that the file’s permission is inherited from its parent list, and the specified list inherits the permission of its parent site, also the corresponding site inherit the permission of its parent site collection. o Security Scope ─ Displays the full URL of the SharePoint object where the permission of the selected file is inherited from. For more detailed information, refer to the description of Security Level column above. o Age (Day) ─ The time (counted by days) that the file exists in SharePoint after it has been created. o Created By – The user that created this file. o Last Modified Time ─ The time when the file was last modified. o Last Modified By – The user that modified this file for the last time. Detailed Security Settings Report ─ Displays the detailed security settings for each failed file. For more detailed information of the related AD Group, refer to the AD Group Information Report bullet below. o Scope ─ The full URL of the scope. o Scope Type ─ The level of the scope. Each scope has its own permission and does not inherit the permission of any higher level node. o SharePoint Identity Name ─ The display name of the corresponding user/group that has permission to the selected scope. o User/Group (Login Name) ─ The login name of the user/group described in the SharePoint Identity Name column. o Identity Type ─ Displays the type of the item described in the SharePoint Identity Name column. The type is AD Group/SharePoint User/SharePoint Group. o Permission Levels ─ Displays the permission levels of the specified user/group described in the SharePoint Identity Name column. o Detailed Permissions of the Permission Levels ─ Displays the detailed permissions of the permission level(s) displayed in the Permission Levels column. AD Group Information Report ─ Displays the detailed information about the users inside each group. o 22 AD Group Name ─ The name of the AD group. Compliance Guardian User Guide o User Login Name ─ The user or group’s login name that is configured in the specified domain. o User Display Name ─ The user or group’s display name that is configured in the specified domain. o Type – Indicate the type of the value in the User Login Name column. Its value can be User or Group. o Email Address ─ The user’s e-mail address that is configured in the specified domain. Exporting Risk Formulas Select Export Risk Formulas on the top of the Risk Report interface to export an XLSM file which is used as a risk calculator displaying and charting the risk results graphically. The risk calculator provides an open language allowing enterprises to define organization-specific risk models with more risk factors according to risk and compliance requirements, and then determine strengths, weaknesses, and when to take immediate action. Figure 6: The exported XLSM file. The risk formulas are: • Raw: R1*n • Stepped: R1+R2(n-1) • Weighted: R1+R2*R3(n-1) You can change the risk formulas according to your requirements. The risk scores will be calculated according to the defined risk formulas. By default, 10 instances are displayed. Users can add more instances to view trends. Compliance Guardian User Guide 23 Data Table Report Select Data Table Report on the navigation bar. You will be redirected to the Data Table Report page. You can also directly select Data Table Report under the Other Reports field in the Compliance Report Home Page. The Data Table Report page provides a view of all the files that contain tables. Those files must be manually reviewed to check whether they are compliant. Figure 7: Data Table Report page. The File Location table on this page displays full URLs of the files. Selecting a URL in this column will redirect you to the specified file. After selecting next to the file’s URL, the detailed locations of the tables will be displayed in the expanded Details area. The format is: Line 100, Column 100. Select the Export to Datasheet link on the top-right corner of this page, enter a request name in the Export To window, and then select OK. The detailed information displayed on this page will be exported to a CSV file for further use. The number of report result items displayed in Compliance Guardian is based on the Maximum Number of Files setting configured in Control Panel > Report Configuration. You can export the report to the CSV file to view all the items. 24 Compliance Guardian User Guide File Errors Report Select File Errors Report on the navigation bar. You will be redirected to the File Errors Report page. You can also directly select File Errors Report under the Other Reports field in the Compliance Report Home Page. You can view all the files that cannot be retrieved and downloaded on the File Errors Report page. Figure 8: File Errors Report page. The following information is displayed on this page: • Error Type ─ Displays the type of error. When you select the displayed error, a pop-up window appears and it displays the following information: o File Location ─ The full URL of the file. Selecting the URL in this column will redirect you to the selected file. o Detail ─ The detailed error information of this type of error. • Number of Errors ─ The number of times the error occurs. • Percentage of Errors ─ The percentage of this error compared to all the errors found in the selected file. If you add the value in this column for each kind of error, you will get 100%. Select the Export to Datasheet link on the top-right corner of this page, enter a request name in the Export to window, then select OK and the detailed information displayed on this page will be exported Compliance Guardian User Guide 25 to a CSV file for further use. The number of the report result items displayed in Compliance Guardian is based on the Maximum Number of Files setting configured in Control Panel > Report Configuration. You can export the report to the CSV file to view all the items. File Type Report Select File Type Report on the navigation bar. You will be redirected to the File Type Report page. You can also directly select File Type Report under the Other Reports field in the Compliance Report Home Page. You can view all the scanned files’ types on the File Type Report page. Figure 9: File Type Report page. The following information is displayed on this page: • File Type ─ One type of all the scanned files. • Number of Files ─ The number of the scanned files that are of the selected file type. • Percentage of Files ─ The percentage of the selected type of files compared to all the scanned files. If you add the value in this column for each file type, you will get 100%. Select the Export to Datasheet link on the top-right corner of this page, enter a request name in the Export to window, then select OK and the detailed information displayed on this page will be exported to a CSV file for further use. The number of the report result items displayed in Compliance Guardian is 26 Compliance Guardian User Guide based on the Maximum Number of Files setting configured in Control Panel > Report Configuration. You can export the report to the CSV file to view all the items. PDF Exception Report Select PDF Exception Report on the navigation bar. You will be redirected to the PDF Exception Report page. You can also directly select PDF Exception Report under the Other Reports field in the Compliance Report Home Page. The PDF Exception Report page provides a view of all the PDF files (generated using the Adobe Acrobat software) that contain unstructured textual content. Figure 10: PDF Exception Report page. The File Location table on this page displays full URLs of the files. Selecting a URL in this column will redirect you to the specified file. Select the Export to Datasheet link on the top-right corner of this page, enter a request name in the Export To window, then select OK and the detailed information displayed on this page will be exported to a CSV file for further use. The number of the report result items displayed in Compliance Guardian is based on the Maximum Number of Files setting configured in Control Panel > Report Configuration. You can export the report to the CSV file to view all the items. Compliance Guardian User Guide 27 Violation Report Select Violation Report on the navigation bar. You will be redirected to the Violation Report page. You can also directly select View All under the Violation Report field in the Compliance Report Home Page. The Violation Report page displays all the classified violation files of each check. Figure 11: Violation Report page. The following information is displayed on this page: • 28 Violation Type ─ The name of one check. After selecting the link in this column, the following information will be displayed in a pop-up window: o Check Name and Description ─ At the top-left corner of the pop-up window, it displays the name of the check and the brief introduction to this check. o File Location ─ The full URL of the selected violation file of this check. Selecting the URL in this column will redirect you to the file. • Number of Violations ─ The number of violations counted for this check. • Number of Files ─ The number of the violation files of the specified check. • Percentage of Violations ─ The percentage of the specified check’s violation files of all the violation files. If you add the value in this column for each check, you will get 100%. Compliance Guardian User Guide To view the Trend Report as described in the Compliance Report Home Page section, select the Trend Report link in the top-left corner of this page. Select the Export to Datasheet link on the top-right corner of this page, enter a request name in the Export To window, then select OK and the detailed information displayed on this page will be exported to a CSV file for further use. The number of the report result items displayed in Compliance Guardian is based on the Maximum Number of Files setting configured in Control Panel > Report Configuration. You can export the report to the CSV file to view all the items. Compliance Guardian User Guide 29 Link Validation Report Select Link Validation Report on the navigation bar. You will be redirected to the Link Validation Report page. You can also directly select Link Validation Report under the Other Reports field in the Compliance Report Home Page. The Link Validation Report page provides a view all the tested files that contain links. Figure 12: Link Validation Report page. The following information is displayed on this page: • File Location ─ The full URL of the file. Selecting the URL in this column will redirect you to the specified file. • Status ─ The status of this file regarding this selected regulation (check). • o Passed – The file obeys the regulation (check). o Failed – The file disobeys the regulation (check). Details – Select the detail report button ( ) in the Details column to view details in the View Detailed Report window. Here you can view the following information: o 30 Path ─ The corresponding file path. Selecting the URL in this area will direct you to the specified file. Compliance Guardian User Guide o Link Details Field – This field can list four conditions: 4XX Client Error, 5XX Server Error, Unknown Errors, and List of Redirects. 4XX Client Error – If there are some links in the file with a 4XX status code, they will be grouped in this field. This field also displays the link’s error type, the link location in the file, and the error description. 5XX Server Error – If there are some links in the file with a 5XX status code, they will be grouped in this field. This field also displays the link’s error type, the link location in the file, and the error description. Unknown Errors – If there are some links with status codes that cannot be obtained due to some unknown exceptions, the links will be listed in this field. The location of the link and the corresponding error message will also display in this field. List of Redirects – This field lists all the links that redirect to other URLs. The locations of these links will also display in this field. *Note: If the file does not contain the condition 4XX Client Error, 5XX Server Error, Unknown Errors, or List of Redirects, the corresponding field will not be displayed in the View Detailed Report window. o Anchors – This field displays all the anchors that are found in the file, as well as the invalid anchors. *Note: If there are no anchors found in the file, this field will not be displayed in the View Detailed Report window. Select the Export to Datasheet link on the top-right corner of this page, enter a request name in the Export To window, and then select OK. The detailed information displayed on this page will be exported to a CSV file for further use. The number of the report result items displayed in Compliance Guardian is based on the Maximum Number of Files setting configured in Control Panel > Report Configuration. You can export the report to the CSV file to view all the items. Compliance Guardian User Guide 31 Page Title Report Select Page Title on the navigation bar. You will be redirected to the Page Title Report page. You can also directly select Page Title Report under the Other Reports field in the Compliance Report Home Page. You can see all the files that do not have unique titles in the Page Title Report page. Figure 13: Page Title Report page. The Non-unique Page Title (Repetitions) table displays the repetitive titles grouped by domain. If you select the triangle button ( ) before a title, the files with this title that are in the same domain will be displayed. Select the file to open it. Select the Export to Datasheet link on the top-right corner of this page, enter a request name in the Export To window, then select OK and the detailed information displayed on this page will be exported to a CSV file for further use. The number of the report result items displayed in Compliance Guardian is based on the Maximum Number of Files setting configured in Control Panel > Report Configuration. You can export the report to the CSV file to view all the items. 32 Compliance Guardian User Guide Information Painter Report Select Information Painter on the navigation bar. You will be redirected to the Information Painter Report page. You can also directly select Information Painter Report under the Other Reports field on the Compliance Report Home Page. Figure 14: Information Painter Report page. Search the files displayed by designating the keyword or file URL. The keyword must be contained in a column value. At the top of the Files viewing pane, enter the keyword for the files you want to display. Painting Details Select the Painting Details ( ) button after a file to view the painting details. The corresponding Painting Details interface appears. Compliance Guardian User Guide 33 Figure 15: Painting Details interface. The left pane displays the check rules in the selected plan. Select each rule. The indicators display in the HTML file. Select the information ( ) button to view details about each rule. The right pane displays the HTML file. There are three tabs in the right pane: Code, Split, and Design. • Code – Select this tab to display the source code of the file and highlight all of the check rules’ related codes. Select the indicator in the left pane to display the related code highlighted in the right pane. • Split – Select this tab to display the webpage and corresponding code. The webpage includes the selected rule’s related indicators. All of the check rules’ related codes are highlighted. Select the button on the left pane to display the related location of the webpage. Select the button on the webpage to highlight the related code directly under the webpage. • Design – Select this tab to only display the webpage. Select the button on the left pane to display the related location of the webpage. Select Style or No Style on the upper-right corner to define whether or not to display the page style. 34 Compliance Guardian User Guide Export Requests Select Export Requests on the navigation bar. You will be redirected to the Export Requests page. You can view all your own downloading requests of the CSV report files on the Export Requests page. Figure 16: Export Requests page. The following information is displayed on this page: • Request ID – The ID of the request. • Request Name ─ The name of your report downloading request. • Category ─ The type of the downloaded CSV report. • Progress ─ The progress of the downloading process. • Status ─ The status of your report downloading request. • Start Time ─ The start time of the report downloading process. • Finish Time ─ The finish time of the report downloading process. The following actions can be performed in the Export Requests page: • Download ─ Select one request, and then select this button to download the compressed report files to your specified location. Compliance Guardian User Guide 35 • Delete ─ Select one or several requests, and then select this button to delete the requests from the requests’ list. • Stop ─ Select one request, and then select this button to stop the report generating process. • Restart ─ Select one request, and then select this button to restart the report generating process. Human Auditor Human Auditor allows you to change the initial status of a file, while tracking and auditing these changes. Select Human Auditor on the navigation bar. Figure 17: Human Auditor page. Select the checks in the Check drop-down list, and then select the check status in the Check Status dropdown list. Select Filter, you can filter by check or status. You can search the files displayed by designating the keyword or file URL. The keyword must be contained in a column value. Above the files viewing pane, enter keywords to search for the files you want to display. 36 Compliance Guardian User Guide Changing File's Initial Status To change a file’s initial status, complete the following steps: 1. Select the change status ( ) button in the Change Status column to change a file’s initial scan status. You can also select the checkbox before a file, and then select Change Status above the table. The Change Status window appears. 2. Configure the following settings: • Select a status in the Change status to drop-down list. • Add an optional comment for this change. • Select the Ignore this file until the file or policies change checkbox. The file will not be scanned until the action policy or scan policy is changed, or until the file is changed. 3. Select OK in the Change Status window to save the changes, or select Cancel to return to the Human Auditor interface without saving any changes. Auditing History Select Auditing History on the upper-right corner of the Human Auditor interface to view the history of status changes. In the Auditing History interface, you can view the file’s Updated Time (the time of changing the file’s initial status), the User who updated the file’s status, the File Location, the related Check, the Initial Status, the Updated Status, and the Comment. You also have the option to make the Whether to Ignore this File Until the File or Policies Change column display in the Auditing History interface. You can filter the files displayed by the keyword you designate. The keyword must be contained in a column value. At the top of the viewing pane, enter the keyword for the files you want to display. You can select to Search all pages or Search current page. Select the Export to Datasheet link on the top-right corner of this interface, enter a request name in the Export to window, and then select OK. The detailed information displayed on this interface will be exported to a CSV file for further use. Compliance Guardian User Guide 37 Export All Reports to HTML Select Export All Reports to HTML on the navigation bar. You will be redirected to the Export All Reports to HTML page. You can export the reports to an HTML file which is used to save and view. Figure 18: Export All Reports to HTML. Configuring Export Report Settings Configure the report related settings under the Export Report Settings tab. Under the Locations and Rules tab, the files in the selected plan are displayed in the Scanned files’ location pane. Select the files whose related report will be included in the exported HTML file. The plan’s related test suites are displayed in the right pane. Select the expand ( ) button before a test suite to expand the test suite for displaying all of the checks in the test suite. Select the test suites or checks. The related report will be exported to an HTML file. Under the Advanced Settings tab, configure the following settings: • Specify the file types that will be showed in the report – Select one of the following options: o 38 All types – All of the file types will be included in the report. Compliance Guardian User Guide o • Specify file types – Select this radio button to define the specified file types. Select the file types by selecting the checkboxes before the types. You can customize the file types by entering the customized file types in the Enter other file extensions field. Use a semicolon (;) as a separator. Specify the users. The files that are created or modified by these users will be displayed in the report – Select one of the following options: o Anyone – The files that are created or modified by anyone will be displayed in the report. o Specify users – Select this radio button to filter by selected users. The Filter Condition field appears under this radio button. Select Add a Filter Level Group to add a filter level. Then select a rule: Created By or Modified By. Select the condition (Contains, Does Not Contain, Equals, Does Not Equal, Matches, Does Not Match), and then enter a value. Select the delete ( ) button to delete a filter level group. *Note: Depending on the filters you enter, you can change the logical relationships between the filter rules. There are currently two logical relationships: And and Or. The logic is set to And. To change the logical relationship, select the logical relationship link. The And logical relationship means that the content which meets all of the rules will be filtered and included in the result. The Or logic means that the content which meets any one of the rules will be filtered and included in the result. For example, if the logical relationship is ((1 And 2) Or 3) in the Basic Filter Condition area, the contents that meet both the filter rule 1 and filter rule 2, or meet the filter rule 3, will be filtered out. You can view the logical relationship of the filter rules in the Basic Filter Condition area. • • • Specify the time range in which the scanned files will be displayed in the report – Select one of the following options: o All time – The files regardless of time range will be displayed in the report. o Specify scan time range – Select this radio button to define a specified time range. Select the calendar ( ) button, the time range calendar appears. Select the time range, and then select OK. Header Image – Select Browse to select a header image. Select Reset to clear your selected image and return to displaying the default image. Select the adjust buttons ( , ) to adjust the content size of the selected image in this interface. Alt Text for Header – Enter the alt text for the header image. Compliance Guardian User Guide 39 , • • Footer Image – Select Browse to select a footer image. Select Reset to clear your selected image and return to displaying the default image. Select the adjust buttons ( , ) to adjust the content size of the selected image in this interface. , Alt Text for Footer – Enter the alt text for the footer image. Using Profile Manager for Exporting Report to HTML After you finish configuring the export report settings, select Export. An Export To pop-up window appears. Enter a profile name, and then select OK. The Profile Manager tab appears and the profile displays under the Profile Manager tab. You can go to the Profile Manager tab by selecting Profile Manager in the Export All Reports to HTML interface. Under the Profile Manager tab, all of the Export Report to HTML profiles are displayed. You can customize how these profiles are displayed in the following ways: You may perform any of the following actions on a selected profile: 40 • View – Select View to see the detailed configuration information of the selected profile. • Edit – Select Edit to edit the detailed configuration information of the selected profile. • Delete – Select Delete to delete the selected profiles. • Run Now – Select Run Now to run the profile immediately. A pop-up message appears to prompt you to go to the Export Requests interface for details. In the Export Requests interface, you can view the job status. After the job finishes, select Download to download the exported report to the specified location. Compliance Guardian User Guide Viewing the Exported HTML Report After you download the exported report ZIP file, extract the ZIP file, and then locate the index.html file. Open the index.html file to view the report. Figure 19: The Exported HTML Report. Under the Reports tab: • Overview – This section contains the Scan Results overview, Violation overview and File Errors overview. The overview is displayed in the right pane. • Violation Details – Select each check rule to view the violation details of the files that violated the rule. The details of the files are displayed in the right pane. In the right pane, select Quick Search after a file under the Scanned Files Statistics field, the file URL will be displayed in the left pane. Select the file in the left pane, the detailed scan report of the file will be displayed. • Detailed Scan Report – Select a file URL, the detailed scan report of the selected file will be displayed in the right pane. Under the Search tab, in the left pane, enter the keyword, and then select Search. The corresponding check rules or files are displayed under the Search Results field. Select the rule or file to view the corresponding files in the right pane. Compliance Guardian User Guide 41 Classification Report Classification Report includes Action Report, Incident Report and Yammer Report. It is used to view the report results of the files affected by Classification Scanner actions, as well as provide operations to the quarantined files, redacted files and encrypted files. Launching Classification Report To launch Classification Report, complete the following steps: 1. Log in to Compliance Guardian. If you are already in the software, select the home page button ( ). From the home page, all of the products are displayed. 2. Select Classification Report to launch its interface. 3. Alternatively, you can select Administration on the top-left corner, and select the Classification Report tab on the appeared navigation bar to launch Classification Report. 42 Compliance Guardian User Guide Action Report Action Report is used to view the results of the files affected by Classification Scanner for SharePoint mode and File System mode actions. Select Action Report in Classification Report to access the Action Report interface. If you first access the Action Report interface, you must configure the following settings: • Specify a risk formula to calculate the risk scores – Select the down arrow ( ), a dropdown list appears. All of the risk formulas will be loaded in the drop-down list. Select a risk formula that will be used to calculate the risk scores of a file. • Specify the range of risk levels – Specify the risk level range. The files whose risk scores are lower than the value you entered to the left of Medium Priority are considered with the low risk priority. The files whose risk scores are greater than the value you entered to the right of Medium Priority are considered with the high priority. The files whose risk scores are between the two values are considered medium priority. Select Start Action Report to start the Action Report. Figure 20: The interface appeared when first accessing Action Report. Compliance Guardian User Guide 43 Selecting Scope to Generate Action Report The SharePoint farm and File System connections will be loaded on the left pane of the Action Report interface. To select scope for generating the action report, complete the following steps: 1. Select the SharePoint farm tree, the nodes that have performed the corresponding Scheduled Classification jobs and run the corresponding Real-Time Classification rules will be loaded. The File System connections that have performed the corresponding Scheduled Classification jobs are displayed under File System. Select the desired nodes under SharePoint and File System, the corresponding action report of the files related to the selected nodes will be generated. 2. You can select a time range, the file in the selected time range will be displayed in the action report. Select the down arrow ( ) under the Time Range field, and then configure the range. Select OK to save the settings, or select Cancel without saving any changes. 3. Select Show Report. The action report will be displayed on the right pane of the interface. Select Reset to erase any settings you configured in the left pane. 44 Compliance Guardian User Guide Viewing Action Reports The Action Report contains three sections: Action Overview, Classification File Risk Statistics and Reports. Figure 21: Action Report interface. Action Overview The Action Overview section displays the proportion of the files taken a particular action. If you hover over a sector in the pie chart, you can also view the file and action information. If you want to view the trend report of the action results, select the Trend Report link and review it in the pop-up window. The top five actions that have the most files taken are selected in the upper-left corner of the Trend Report interface. The files affected by the selected actions will be displayed in a histogram. You can change the selection according to your own requirements. Select a date range from This Month, Last Month, Last 3 Months, Last 6 Months, and Last 12 Months to view the files in the specified time range. If you want to export a PNG screenshot of the displayed trend chart, select Export to Screenshot at the upper-right corner. Compliance Guardian User Guide 45 Classification File Risk Statistics The Classification File Risk Statistics section displays the number of the files in each priority level. The files are classified according to their risk scores that are calculated by the selected risk formula. Classification means the files whose corresponding scan policy does not contain the test suite whose NoRisk attribute’s value is False, the specified test suite in the scan policy does not calculate the file’s risk scores. Reports The Reports section displays the report of the files that have taken a particular action. Select the action tab, the result report of the files have taken this action will be displayed. A pie chart is displayed at the lower-left corner of the field displaying the risk information of the files. Hover over a sector in the pie chart, you can also view the file and risk level information. Select View All to view the information on all of the files affected by the particular action. Then you can view the File Name, Classification Time, Risk Level and Details. Select the details ( ) button, the detailed information of the corresponding file is displayed in the View Detailed Report window. • File Name – The name of the corresponding file. • Original Location – The full URL of the specified file. Selecting the URL in this area will direct you to the file. • Action Information – The information of the actions taken to the file, as well as the risk level, the status of taking actions, and the time of taking actions. • Tagging Information – The tag information, including the tag name, tag value, the status of adding the tag, and the position of the tag. • Scan Policy Information – The scan policy name applied to the file, and the related test suite information. You can customize how these files are displayed in the following ways: 46 • Search – Filter the files and display them by the keyword you designate. The keyword must be contained in a column value. At the top right corner of the file viewing pane, enter the keyword for the files you want to display. You can select to Search all pages or Search current page. • Manage columns ( ) – Manage which columns are displayed in the list so that only the information you want to see will be shown. Select the manage columns button ( ), and then check the checkbox next to the column name to have that column shown in the list. • Hide the column ( ) – Hover over a column name, and then select the hide column button ( ) in the column name to hide the column. • To change the number of files displayed per page, select the desired number from 5, 8, 10, 15 , 20, 25, 50, 100 in the Show rows drop-down menu at the lower-right corner. Compliance Guardian User Guide • To go to the specified page, enter the page number in the Go to … of text box at the lower-right corner and press Enter. • To go to the next page, select the > button at the lower-right corner; to return to the previous page, select the < button at the lower-right corner. To export the results, select the Export to Datasheet link on the upper-right corner of this interface and then enter a request name in the Export To window. Then select OK, and the detailed information displayed on this page will be exported to a CSV file for further use. Select Back on the upper-right corner to return to the Action Report interface. Configuring Settings for Action Report The following settings can be configured in the Action Report interface: • Report Settings – If you want to change the risk formula and risk range selected when you first accessed Action Report, select Report Settings on the upper-right corner of the Action Report interface. A window appears. Change the risk formula and the range of risk levels, and then select Show Data. The files’ risk information will be shown in the report according to the settings you configured in the Report Settings window. • Export to Screenshot – If you want to export a PNG screenshot of the displayed report, select Export to Screenshot at the upper-right corner. • Save Displayed Action Report – If you want to save the currently displayed report, enter a profile name in the text box at the top of the left pane, and then select the Save ( ) button. The currently displayed report will be saved, the next time you access Action Report, you can select it from the drop-down list at the top of the left pane, and then the corresponding report will be displayed. You can also select the Save As ( ) button at the top of the left pane. Then, enter a profile name in the pop-up window and select OK. The profile will be saved. • Set Displayed Action Report as Default – If you want to set the displayed report as the default report which will be directly displayed the next time you access Action Report, select a profile in the drop-down list at the top of the left pane, and then select the Set as Default ( ) button. Compliance Guardian User Guide 47 Incident Manager Incident Manager allows you to manage and performed actions to the quarantined files, encrypted files, and redacted files. Select Incident Manager in Classification Report to access the Incident Manager interface. *Note: The files that are affected by the corresponding actions within the past seven days are automatically loaded into Incident Manager. You can change the filter condition to view more files. Managing Quarantined Files The Quarantine tab is selected when you go into the Incident Manager interface. All of the quarantined files are displayed in the interface. You can customize how these files are displayed in the following ways: • Sort ─ Select the header row of each column to sort all of the values in the selected column according to the ascending/descending order. • Search – Filter the files and display them by the keyword you designate; the keyword must be contained in a column value. At the top right corner of the file viewing pane, enter the keyword for the files you want to display. You can select to Search all pages or Search current page. • Manage columns ( ) – Manage which columns are displayed in the list so that only the information you want to see will be shown. Select the manage columns button ( ), and then check the checkbox next to the column name to have that column shown in the list. • Hide the column ( ) – Hover over a column name, and then select the hide column button ( ) in the column name to hide the column. • To change the number of files displayed per page, select the desired number from 5, 8, 10, 15, 20, 25, 50, 100 in the Show rows drop-down menu at the lower right corner. • To go to the specified page, enter the page number in the Go to … of text box at the lower right corner and press Enter. • To go to the next page, select the > button at the lower right corner; to return to the previous page, select the < button at the lower right corner. Filtering Files You can decide which files are displayed in the interface under the Quarantine tab by configuring the filter conditions. Select Filter above the table listing quarantined files, a window appears. Configure the filter conditions in the appeared window: • 48 Source – Select to display the files that are affected by the Quarantine action through Classification Scanner for SharePoint or Classification Scanner for File System. Compliance Guardian User Guide • Quarantined Location – Select the down arrow ( ) after the Quarantined Location box. Select the locations, and select OK. • Time Range – Select the time range. • Farm – If you have selected SharePoint as the source, all of the farms that contain quarantined files will be loaded. Select the down arrow ( ) after the Farm box. Select the farms from the drop-down list, and select OK. • Web Application – If you have selected the farms, under the selected farms, the Web applications that contain quarantined files will be loaded. Select the down arrow ( ) after the Web Application box. Select the Web applications from the drop-down list, and select OK. • Site Collection – If you have selected the Web applications, the site collections that contain quarantined files will be loaded. Select the down arrow ( ) after the Site Collection box. Select the site collections from the appeared drop-down list, and select OK. Select Show Data. All of the quarantined files that meet the above configured filter conditions will be displayed in the interface. Select Cancel to exit the window. Managing File Content To manage a file’s content, select the file, and then select Manage Content above the table listing quarantined files. You can also select the down arrow ( ) after a quarantined file. Find the following actions in the drop-down list: • Download – View the selected file’s content. o o o • For the SharePoint files or items that are affected by the In place quarantine method, after you select Download in the drop-down list: You can view the files on SharePoint site webpage. You can directly edit the content of the file. SharePoint items cannot be performed this action. For the SharePoint files or items that are affected by the Out of place quarantine method, after you select Download in the drop-down list: The file will be downloaded. SharePoint items cannot be performed this action since there is no content in an item. For the files that are quarantined from file system, after you select Download in the drop-down list: The files will be downloaded. Upload – Upload a file. o For the SharePoint files or items that are affected by the In place quarantine method, after you select Upload in the drop-down list: Since the files or Compliance Guardian User Guide 49 attachments of items that are affected by the In place quarantine method are edited in the webpage directly, this Upload function does not take effect on these files and items. o For the SharePoint files or items that are affected by the Out of place quarantine method, after you select Upload in the drop-down list: The downloaded and edited file will be uploaded and will replace the selected file. *Note: The uploaded file name must be same as that of the selected file. The downloaded and edited attachment of the SharePoint item can be uploaded and replace the original attachment of the item. *Note: The uploaded attachment name must be same as the original attachment name. o For the files that are quarantined from file system, after you select Upload in the drop-down list: The downloaded and edited file will be uploaded and replace the selected file. Note that the uploaded file name must be the same as the selected file. Users must first download the file for reviewing the violations in the file, and then edit the file according to their own requirement. Then, upload the edited file to Compliance Guardian > Incident Manager > Quarantine. Users can restore the edited file to the original place from the quarantined location. • View Version History – View the version history of a file or item. o For the SharePoint files or items that are affected by the In place quarantine method, after you select View Version History in the drop-down list, the corresponding SharePoint webpage appears displaying the file or item’s version history. o For the SharePoint files or items that are affected by the Out of place quarantine method, after you select View Version History in the drop-down list, all of the file or item versions are displayed in the View Version History page. You can perform the following actions to a selected version: Download – Select a version, and then select Download on the ribbon to download the file or item’s version for reference. Restore – Select the latest version of the selected file or item, then you can select Restore to restore the file or item. For detailed information, refer to Restoring Files. Delete – Select one or more file or item’s versions, and then select Delete on the ribbon to delete the selected versions. Select Close to exit the View Version History page. 50 Compliance Guardian User Guide o • For the files that are quarantined from file system, this action cannot be performed. View Properties – View the file or item’s properties. o o o For the SharePoint files or items that are affected by the In place quarantine method, after you select View Properties in the drop-down list: The corresponding SharePoint webpage appears displaying the file’s properties. The corresponding SharePoint webpage appears displaying the item’s properties. You can open the item attachment in the SharePoint webpage, and then edit the content of the attachment. For the SharePoint files or items that are affected by the Out of place quarantine method, after you select View Properties in the drop-down list: All of the selected file’s properties are displayed in the View Properties page. Select Close to exit the View Property page. All of the selected item’s properties are displayed in the View Properties page. You can select the attachment name to download the attachment of the item, and edit the content of the attachment, and then upload the edited item through the Upload function which is introduced above. Select Close to exit the View Property page. For the files that are quarantined from file system, this action cannot be performed. Restoring Files You can restore a quarantined file or item by selecting Restore above the table listing quarantined files. Restoring the SharePoint Files or Items that Are Affected by the In Place Quarantine Method After you select a SharePoint file or item that is affected by the In place quarantine method, configure the following settings in the appeared Restore interface: • Ignore this File Until the File or Policies Change – Select this checkbox, the file or item will not be scanned after it is restored until the action policy or scan policy is changed, or until the file or item is changed. If you do not select the checkbox, the last modified time is the time that the file was restored. If the restored file is scanned in another Classification Scanner job, and the test suites in the job has not changed, you must first change the OverrideUser value to No and change the OverrideCG value to False in the test suites. For more information on the test suite attributes, refer to Compliance Guardian Installation and Administration User Guide. If you select the checkbox, the last modified time of the file will not be changed although it is restored. Compliance Guardian User Guide 51 • Change Classification Result – Select to change the classification result by selecting the Change Classification Result checkbox. A table listing all the tags that have been added to the file or item appears. You can change the tags based on your own requirement. • Conflict Resolution – If there is a file (this function will not be taken effect on a SharePoint item) whose name is the same as the file that you want to restore, a conflict will be judged. Select a conflict resolution: o Replace – The conflicted destination file will be replaced with the selected file after the restore. o Skip – The file will be skipped to restore to the destination. Restoring the SharePoint Files or Items that Are Affected by the Out of Place Quarantine Method After you select a SharePoint file or item that is affected by the Out of place quarantine method, configure the following settings in the Restore interface: • Restore Type – Select In place restore to restore the selected file or item to its original place. Select Out of place restore to restore the selected file or item to another place in SharePoint. • Destination – If you have selected Out of place restore, all of the SharePoint farms appear. Browse the desired farm tree to a list level, library level, or folder level, the file or item will be restored to the selected SharePoint list, library or folder. • Agent Group – If you have selected Out of place restore, select an agent group for running the restore job, or select New Agent Group to create an agent group. • Ignore this File Until the File or Policies Change – Refer to Restoring the SharePoint Files or Items that Are Affected by the In Place Quarantine Method for details. • Change Classification Result – Refer to Restoring the SharePoint Files or Items that Are Affected by the In Place Quarantine Method for details. • Conflict Resolution – Refer to Restoring the SharePoint Files or Items that Are Affected by the In Place Quarantine Method for details. For the SharePoint files or items that are affected by the Out of place quarantine method, after they are restored to SharePoint, the following related objects or properties will be affected. For SharePoint On-premises: • Workflow – The original related workflows will no longer associate to the restored file or item. • ID – The file’s or item’s ID will be change. • Web part – Refer to the following scenarios for details: o 52 If the file’s Web part is not saved with the file or item (saved in the different tables in SharePoint database), the web part will not exist after the file or item is Compliance Guardian User Guide restored no matter you select In place restore or Out of place restore as the Restore Type. o If the file’s Web part is saved with the file or item (saved in the same tables in SharePoint database) and if you select In place restore as the Restore Type, the Web part can be restored normally along with the file or item. o If the file’s Web part is saved with the file or item (saved in the same tables in SharePoint database) and if you select Out of place restore as the Restore Type, the Web part may be affected after the restore. • Permissions – The restored file or item will inherit its parent’s permissions. • Rating, SharePoint Tags and Notes – The restored file or item’s rating and SharePoint tags and notes will no longer exist. • Versions – The file or item’s versions will not be kept after the file or item is restored to SharePoint. Only the version count can be kept. For SharePoint Online, the related objects or properties that will be affected are same as those in SharePoint on-premises. Restoring the Files Quarantined from File System After you select a file that is quarantined from file system, configure the following settings in the Restore interface: • Restore Type – Select In place restore to restore the selected file to its original place. Select Out of place restore to restore the selected file to another location. • Destination Location – If you have selected Out of place restore, select a location for storing the restored file. Select New Export Location to create an export location. • Agent Group – If you have selected Out of place restore, select an agent group for running the restore job, or select New Agent Group to create an agent group. • Ignore this File Until the File or Policies Change – Refer to Restoring the SharePoint Files or Items that Are Affected by the In Place Quarantine Method for details. • Change Classification Result – Refer to Restoring the SharePoint Files or Items that Are Affected by the In Place Quarantine Method for details. • Conflict Resolution – Refer to Restoring the SharePoint Files or Items that Are Affected by the In Place Quarantine Method for details. Select OK in the Restore interface to save the changes or select Cancel in the interface. In the Quarantine interface, the value of the Review Status column in the table will be changed from In Progress to Restored after the file is restored. Adding Comment Select a file and then select Add Comment above the table listing quarantined files. The Comments interface appears. Select Add Comment in the Comments window. Enter the comment content in the Compliance Guardian User Guide 53 textbox. You can add the attachment with the related content by selecting Add Attachment under the textbox. You can also select the file’s corresponding hyperlink in the Comment column of the table to add a comment. The number of comments will be displayed in the Comment column. Deleting Quarantined Files Select the quarantined files that you want to delete, and select Delete above the table displaying the quarantined files. The selected files will be permanently deleted. Exporting Files Select Export to Datasheet above the table displaying quarantined files to export the general information of all of the quarantined files. Refresh Files Select Refresh above the table displaying quarantined files to refresh the files in the table. 54 Compliance Guardian User Guide Managing Encrypted Files Select the Encryption tab to manage the encrypted files. Any encrypted or encrypted and quarantined file will display in this interface. You can customize how these files are displayed in the following ways: • Sort ─ Select the header row of each column to sort all of the values in the column according to the ascending/descending order. • Search – Filter the files and display them by the keyword you designate; the keyword must be contained in a column value. At the top right corner of the file viewing pane, enter the keyword for the files you want to display. You can select to Search all pages or Search current page. • Manage columns ( ) – Manage which columns are displayed in the list so that only the information you want to see will be shown. Select the manage columns button ( ), and then check the checkbox next to the column name to have that column shown in the list. • Hide the column ( ) – Hover over a column name, and then select the hide column button ( ) in the column name to hide the column. • To change the number of files displayed per page, select the desired number from 5, 8, 10, 15 , 20, 25, 50, 100 in the Show rows drop-down menu at the lower right corner. • To go to the specified page, enter the page number in the Go to … of text box at the lower right corner and press Enter. • To go to the next page, select the > button at the lower right corner; to return to the previous page, select the < button at the lower right corner. Filtering Files You can decide which files are displayed in the interface under the Encryption tab by configuring the filter conditions. Select Filter above the table listing encrypted files, a window appears. Configure the filter conditions in the appeared window: • Source – Select to display the files that are affected by the Encrypt action and Encrypt and Quarantine action through Classification Scanner for SharePoint or Classification Scanner for File System. • Time Range – Select the time range. • Farm – If you have selected SharePoint as the source, all of the farms that contain encrypted files will be loaded. Select the down arrow ( ) after the Farm box, and then select the farms from the appeared drop-down list, and select OK. • Web Application – If you have selected the farms, the Web applications that contain encrypted files will be loaded under the selected farms. Select the down arrow ( ) after Compliance Guardian User Guide 55 the Web Application box, and then select the Web applications from the appeared drop-down list, and select OK. • Site Collection – If you have selected the Web applications, under the selected Web applications, the site collections that contain encrypted files will be loaded. Select the down arrow ( ) after the Site Collection box, and then select the site collections from the appeared drop-down list, and select OK. Select Show Data. All of the encrypted files that meet the filter conditions will be displayed in the interface. Select Cancel to exit the window. Managing File Content To manage a file’s content, select the file, and then select Manage Content above the table listing encrypted files. You can also select the down arrow ( ) after a quarantined file. Find the following actions in the drop-down list: • • Download – View the selected file’s content. o SharePoint files will be downloaded. o SharePoint items cannot be viewed since there is no content in the item. o Files that are encrypted through the Classification Scanner for File System will be downloaded. Upload – Upload a file. o For SharePoint files, after you select Upload in the drop-down list, the downloaded and edited file will be uploaded and will replace the selected file. *Note: The uploaded file name must be same as the selected file. o For SharePoint items, after you select Upload in the drop-down list, the downloaded and edited attachment of the SharePoint item can be uploaded to replace the original attachment of the item. *Note: The uploaded attachment name must be same as the original attachment name. o For files that are encrypted through Classification Scanner for File System, after you select Upload in the drop-down list, the downloaded and edited file will be uploaded and replace the selected file. *Note: The uploaded file name must be same as the selected file. Users can download the file for reviewing the violations in the file, edit the file according to their own requirement, and then upload the edited file by navigating to Compliance Guardian > Incident Manager > Encryption. 56 Compliance Guardian User Guide • View Version History – View the version history of a file or an item. o For the SharePoint files or items that are affected by the In place quarantine method, after you select View Version History in the drop-down list, the corresponding SharePoint webpage appears displaying the file or item’s version history. o For the SharePoint files or items that are affected by the Out of place quarantine method, after you select View Version History in the drop-down list, all of the file or item versions are displayed in the View Version History page. You can perform the following actions to a selected version: Download – Select a version, and then select Download on the ribbon to download the file or item’s version for reference. Restore – Select the latest version of the selected file or item, then you can select Restore to restore the file or item. For detailed information, refer to Restoring Files. Delete – Select one or more file or item’s versions, and then select Delete on the ribbon to delete the selected versions. Select Close to exit the View Version History page. o • For the files that are quarantined from file system, this action cannot be performed. View Properties – View the file or item’s properties. o For SharePoint files that are affected by the Encrypt and Quarantine action, and the Quarantine Method for the files is In place quarantine, after you select View Properties, the corresponding SharePoint webpage appears displaying the file’s properties. o For SharePoint files that are affected by the Encrypt action, after you select View Properties, the corresponding SharePoint webpage appears displaying the file’s properties. o For SharePoint files that are affected by the Encrypt and Quarantine action, and the Quarantine Method for the files is Out of place quarantine, after you select View Properties in the drop-down list, all of the selected file’s properties are displayed in the appeared View Properties page. Select Close to exit the View Property page. o For SharePoint items, after you select View Properties in the drop-down list, all of the selected item’s properties are displayed in the appeared View Properties page. You can select the attachment name to download the attachment, edit the content of the attachment, and then upload the edited item through the Upload function. Select Close to exit the View Properties page. o For files that are quarantined from file system, this action cannot be performed. Compliance Guardian User Guide 57 Decrypting Files You can decrypt an encrypted file or item by selecting Decrypt above the table listing encrypted files, or select the file you want to decrypt, and then select the down arrow ( ) after the file. Decrypting the SharePoint Files or Items Affected by the Encrypt Action After you select a SharePoint file or item affected by the Encrypt action, configure the following settings in the appeared Decrypt interface: • Ignore this File Until the File or Policies Change – Select this checkbox. The file or item will not be scanned until the action policy or scan policy is changed, or until the file or item is changed. If you do not select the checkbox, the last modified time is the time that the file was decrypted. If the decrypted file is scanned in another Classification Scanner job, and the test suites in the job has not changed, you must first change the OverrideUser value to No and change the OverrideCG value to False in the test suites. For more information on the test suite attributes, refer to Compliance Guardian Installation and Administration User Guide. If you select the checkbox, the last modified time of the file will not be changed although it has been decrypted. • Change Classification Result – Select to change the classification result by selecting the Change classification result checkbox. A table listing all the tags that have been added to the file or item appears. You can change the tags based on your own requirement. Decrypting the SharePoint Files or Items Affected by the Encrypt and Quarantine Action (Quarantine Method is In Place Quarantine) After you select a SharePoint file or item that is affected by the Encrypt and Quarantine action and the Quarantine Method is In place quarantine, configure the following settings in the appeared Decrypt interface: • Ignore this File Until the File or Policies Change – Select this checkbox. The file or item will not be scanned until the action policy or scan policy is changed, or until the file or item is changed. If you do not select the checkbox, the last modified time is the time that the file was decrypted. If the decrypted file is scanned in another Classification Scanner job, and the test suites in the job has not changed, you must first change the OverrideUser value to No and change the OverrideCG value to False in the test suites. For more information on the test suite attributes, refer to Compliance Guardian Installation and Administration User Guide 58 Compliance Guardian User Guide If you select the checkbox, the last modified time of the file will not be changed although it has been decrypted. • Change Classification Result – Select to change the classification result by selecting the Change classification result checkbox. A table listing all the tags that have been added to the file or item appears. You can change the tags based on your own requirement. • Conflict Resolution – If there is a file (this function will not take effect on a SharePoint item) whose name is same as the file name that you want to restore, a conflict will be judged. Select a conflict resolution: o Replace – The conflicted destination file will be replaced with the selected file or item after the restore. o Skip – The file will be skipped to restore to the destination. Decrypting the SharePoint Files or Items Affected by the Encrypt and Quarantine Action (Quarantine Method is Out of Place Quarantine) After you select a SharePoint file or item that is affected by the Encrypt and Quarantine action and the Quarantine Method is Out of place quarantine, configure the following settings in the Decrypt interface: • Restore Type – Select In place restore to restore the selected file or item to its original place. Select Out of place restore to restore the selected file or item to another place in SharePoint. • Destination – If you have selected Out of place restore, all of the SharePoint farms appear. Browse the desired farm tree to a list level, library level or folder level, the file or item will be restored to the selected SharePoint list or library. • Agent Group – If you have selected Out of place restore, select an agent group for running the restore job, or select New Agent Group to create an agent group. • Conflict Resolution – If there is a file (this function will not take effect on a SharePoint item) whose name is same as the file name that you want to restore, a conflict will be judged. Select a conflict resolution: o Replace – The conflicted destination file will be replaced with the selected file or item after the restore. o Skip – The file will be skipped to restore to the destination. For the SharePoint files or items that are affected by the Out of place quarantine method, after they are restored to SharePoint, the following related objects or properties will be affected: For SharePoint On-premises: • Workflow – The original related workflows will no longer associate to the restored file or item. • ID – The file’s or item’s ID will be changed. • Web part – Refer to the following scenarios for details: Compliance Guardian User Guide 59 o If the file’s Web part is not saved together with the file or item (saved in the different tables in SharePoint database), the Web part will not exist after the file or item is restored no matter you select In place restore or Out of place restore as the Restore Type. o If the file’s Web part is saved together with the file or item (saved in the same tables in SharePoint database) and if you select In place restore as the Restore Type, the Web part can be restored normally along with the file or item. o If the file’s Web part is saved together with the file or item (saved in the same tables in SharePoint database) and if you select Out of place restore as the Restore Type, the Web part may be affected after the restore. • Permissions – The restored file or item will inherit its parent’s permissions. • Rating, SharePoint Tags and Notes – The restored file or item’s rating and SharePoint tags and notes will no longer exist. • Versions – The file or item’s versions will not be kept after the file or item is restored to SharePoint. Only the version count can be kept. For SharePoint Online, the related objects or properties that will be affected are same as those in SharePoint on-premises. Decrypting the File System Files that Are Affected by the Encrypt Action After you select a file system file that is affected by the Encrypt action, configure the following settings in the Decrypt interface: • Ignore this File Until the File or Policies Change – Select this checkbox, the file will not be scanned until the action policy or scan policy is changed, or until the file is changed. If you do not select the checkbox, the last modified time is the time that the file was decrypted. If the decrypted file is scanned in another Classification Scanner job, and the test suites in the job has not changed, you must first change the OverrideUser value to No and change the OverrideCG value to False in the test suites. For more information on the test suite attributes, refer to Compliance Guardian Installation and Administration User Guide. If you select the checkbox, the last modified time of the file will not be changed although it is decrypted. • Change Classification Result – Select to change the classification result by selecting the Change classification result checkbox. A table listing all the tags that have been added to the file appears. You can change the tags based on your own requirement. Decrypting the File System Files that Are Affected by the Encrypt and Quarantine Action After you select a file system file that is affected by the Encrypt and Quarantine action, configure the following settings in the Decrypt interface: 60 Compliance Guardian User Guide • Restore Type – Select In place restore to restore the selected file to its original place. Select Out of place restore to restore the selected file to another location. • Destination – If you have selected Out of place restore, select a location for storing the restored file. Select New Export Location to create an export location. • Agent Group – If you have selected Out of place restore, select an agent group for running the restore job, or select New Agent Group to create an agent group. • Conflict Resolution – If there is a file whose name is same as the file name that you want to restore, a conflict will be judged. Select a conflict resolution: o Replace – The conflicted destination file will be replaced with the selected file or item after the restore. o Skip – The file will be skipped to restore to the destination. Select OK in the Decrypt interface to save the changes or select Cancel to cancel the changes. In the Encryption interface, the value of the Review Status column in the table will be changed from In Progress to Restored after the file is decrypted. Adding Comment Select a file and then select Add Comment above the table listing encrypted files. The Comments interface appears. Select Add Comment in the Comments window. Enter the comment content in the textbox. You can add an attachment with the related content by selecting Add Attachment under the textbox. You can also select the file’s corresponding hyperlink in the Comment column of the table to add a comment. The number of added comments will be displayed in the Comment column. Deleting Encrypted Files Select the files that you want to delete, and select Delete above the table displaying the encrypted files. The selected files will be permanently deleted. Exporting Files Select Export to Datasheet above the table displaying encrypted files to export the general information of all of the encrypted files. Refresh Files Select Refresh above the table displaying encrypted files to refresh the files in the table. Managing Redacted Files Select the Redaction tab to manage the redacted files. All of the files that are affected by the Redact and Quarantine action are displayed in the interface. Compliance Guardian User Guide 61 You can customize how these files are displayed in the following ways: • Sort ─ Select the header row of each column to sort all of the values in the selected column according to the ascending/descending order. • Search – Filter the files and display them by the keyword you designate; the keyword must be contained in a column value. At the top right corner of the file viewing pane, enter the keyword for the files you want to display. You can select to Search all pages or Search current page. • Manage columns ( ) – Manage which columns are displayed in the list so that only the information you want to see will be shown. Select the manage columns button ( ), and then check the checkbox next to the column name to have that column shown in the list. • Hide the column ( ) – Hover over a column name, and then select the hide column button ( ) in the column name to hide the column. • To change the number of files displayed per page, select the desired number from 5, 8, 10, 15 , 20, 25, 50, 100 in the Show rows drop-down menu at the lower right corner. • To go to the specified page, enter the page number in the Go to … of text box at the lower right corner and press Enter. • To go to the next page, select the > button at the lower right corner; to return to the previous page, select the < button at the lower right corner. Filtering Files You can decide which files are displayed in the interface under the Redaction tab by configuring the filter conditions. Select Filter above the table listing redacted files, a window appears. Configure the filter conditions in the appeared window: 62 • Source – Select to display the files that are affected by the Redact and Quarantine action through Classification Scanner for SharePoint or Classification Scanner for File System. • Quarantined Location – Select the down arrow ( ) after the Quarantined Location box. Then, select the locations, and select OK. • Time Range – Select the time range. • Farm – If you have selected SharePoint as the source, all of the farms that contain redacted files will be loaded. Select the down arrow ( ) after the Farm box. Then, select the farms from the drop-down list, and select OK. • Web Application – If you have selected the farms, the Web applications that contain redacted files will be loaded. Select the down arrow ( ) after the Web Application box. Then, select the Web applications from the drop-down list, and select OK. Compliance Guardian User Guide • Site Collection – If you have selected the Web applications, the site collections that contain redacted files will be loaded. Select the down arrow ( ) after the Site Collection box. Then, select the site collections from the drop-down list, and select OK. Select Show Data. All of the quarantined files that meet the above configured filter conditions will be displayed in the interface. Select Cancel to exit the window without saving any changes. Managing File Content To manage a file’s content, select the file, and then select Manage Content above the table listing redacted files. You can also select the down arrow ( ) after a redacted file. Find the following actions in the drop-down list: • Download – View the selected file’s content. o o • For the SharePoint files or items, after you select Download in the drop-down list: The file will be downloaded. SharePoint items cannot be performed this action since there is no content in the item. For the file system files, after you select Download in the drop-down list, the files will be downloaded. Upload – Upload a file. o For the SharePoint files or items, after you select Upload in the drop-down list: The downloaded and edited file will be uploaded and will replace the selected file. *Note: The uploaded file name must be the same as that of the selected file. The downloaded and edited attachment of the SharePoint item can be uploaded and replace the original attachment of the item. *Note: The uploaded attachment name must be same as the original attachment name. o For the file system files, after you select Upload in the drop-down list: The downloaded and edited file will be uploaded and replace the selected file. Note that the uploaded file name must be the same as that of the selected file. Users must first download the file for reviewing, and then edit the file according to their own requirement. Upload the edited file to Compliance Guardian > Incident Manager > Redaction. Users can restore the original file that is not redacted from the quarantined location through Compliance Guardian. • View Version History – View the version history of a file or an item. Compliance Guardian User Guide 63 o For the SharePoint files or items, after you select View Version History in the drop-down list, all of the file or item versions are displayed in the View Version History page. You can perform the following actions to a selected version: Download – Select a version, and then select View on the ribbon to download the file or item’s version for reference. Restore – Select the latest version of the selected file or item, then you can select Restore to restore the file or item. For detailed information, refer to Restoring Files. Delete – Select one or more file or item’s versions, and then select Delete on the ribbon to delete the selected versions. Select Close to exit the View Version History page. o • For the file system files, this action cannot be performed. View Properties – View the file or item’s properties. o o For the SharePoint files or items, after you select View Properties in the dropdown list: All of the selected file’s properties are displayed in the View Properties page. Select Close to exit the View Property page. All of the selected item’s properties are displayed in the View Properties page. Select the attachment to download, and edit the content of the attachment, and then upload the edited item through the Upload function. Select Close to exit the View Properties page. For the file system files, this action cannot be performed. Restoring Files The files or items that are affected by the Redact and Quarantine action will be backed up first, the backed up files are quarantined, and then the original files are redacted. You can restore a redacted file or item to the original one by selecting Restore above the table listing the redacted files. Restoring the SharePoint Files or Items After you select a SharePoint file or item, configure the following settings in the Restore interface: 64 • Restore Type – Select In place restore to restore the original file or item that is not redacted to its original place. Select Out of place restore to restore the original file or item that is not redacted to another place in SharePoint. • Destination – If you have selected Out of place restore, all of the SharePoint farms appear. Browse the desired farm tree to a list level, library level or folder level, the file or item will be restored to the selected SharePoint list or library. • Agent Group – If you have selected Out of place restore, select an agent group for running the restore job, or select New Agent Group to create an agent group. Compliance Guardian User Guide • Ignore this File Until the File or Policies Change – Select this checkbox. The file or item will not be scanned after it is restored until the action policy or scan policy is changed, or until the file or item is changed. If you do not select the checkbox, the last modified time is the time that the file was restored. If the restored file is scanned in another Classification Scanner job, and the test suites in the job has not changed, you must first change the OverrideUser value to No and change the OverrideCG value to False in the test suites. For more information on the test suite attributes, refer to Compliance Guardian Installation and Administration User Guide. If you select the checkbox, the last modified time of the file will not be changed although it is restored. • Conflict Resolution – If there is a file (this function will not be taken effect on a SharePoint item) whose name is same as the file name that you want to restore, a conflict will be judged. Select a conflict resolution: o Replace – The conflicted destination file will be replaced with the selected file or item after the restore. o Skip – The file will be skipped to restore to the destination. For the SharePoint files or items that are affected by the Out of place quarantine method, after they are restored to SharePoint, the following related objects or properties will be affected: For SharePoint On-premises: • Workflow – The original related workflows will no longer associate to the restored file or item. • ID – The file’s or item’s ID will be changed. • Web part – Refer to the following scenarios for details: o If the file’s Web part is not saved together with the file or item (saved in the different tables in SharePoint database), the Web part will not exist after the file or item is restored no matter you select In place restore or Out of place restore as the Restore Type. o If the file’s Web part is saved together with the file or item (saved in the same tables in SharePoint database) and if you select In place restore as the Restore Type, the Web part can be restored normally along with the file or item. o If the file’s Web part is saved together with the file or item (saved in the same tables in SharePoint database) and if you select Out of place restore as the Restore Type, the Web part may be affected after the restore. • Permissions – The restored file or item will inherit its parent’s permissions. • Rating, SharePoint Tags and Notes – The restored file or item’s rating and SharePoint tags and notes will no longer exist. Compliance Guardian User Guide 65 • Versions – The file or item’s versions will not be kept after the file or item is restored to SharePoint. Only the version count can be kept. For SharePoint Online, the related objects or properties that will be affected are same as those in SharePoint on-premises. 66 Compliance Guardian User Guide Restoring the File System Files After you select a file system file, configure the following settings in the Restore interface: • Restore Type – Select In place restore to restore the original file that is not redacted to its original place. Select Out of place restore to restore the original file that is not redacted to another location. • Ignore this File Until the File or Policies Change – Select In place restore, the file or item will not be scanned until the action policy or scan policy is changed, or until the file or item is changed. If you do not select the checkbox, the last modified time is the time that the file was restored. If the restored file is scanned in another Classification Scanner job, and the test suites in the job has not changed, you must first change the OverrideUser value to No and change the OverrideCG value to False in the test suites. For more information on the test suite attributes, refer to Compliance Guardian Installation and Administration User Guide. If you select the checkbox, the last modified time of the file will not be changed although it is restored. • Destination Location – If you have selected Out of place restore, select a location for storing the restored file. Select New Export Location to create an export location. • Agent Group – If you have selected Out of place restore, select an agent group for running the restore job, or select New Agent Group to create an agent group. • Conflict Resolution – If there is a file whose name is the same as the file name that you want to restore, a conflict will be judged. Select a conflict resolution: o Replace – The conflicted destination file will be replaced with the selected file or item after the restore. o Skip – The file will be skipped to restore to the destination. Select OK in the Restore interface to save the changes or select Cancel in the interface to cancel the changes. In the Restore interface, the value of the Review Status column in the table will be changed from In Progress to Restored after the file is restored. Adding Comment Select a file and then select Add Comment above the table listing redacted files. The Comments interface appears, which displays the comments that you added before. Select Add Comment in the Comments window. Enter the comment content in the textbox. You can add the attachment with the related content by selecting Add Attachment under the textbox. Select Add Attachment again to add another attachment. You can also select the file’s corresponding hyperlink in the Comment column of the table to add a comment. The number of the added comments will be displayed in the Comment column. Compliance Guardian User Guide 67 Deleting Encrypted Files Select the files that you want to delete, and select Delete above the table displaying the redacted files. The selected files will be permanently deleted. Exporting Files Select Export to Datasheet above the table displaying redacted files to export the general information of all of the redacted files. Refresh Files Select Refresh above the table displaying redacted files to refresh the files in the table. 68 Compliance Guardian User Guide Social Report Social Report is used to view the scanning result of a social network’s posts affected by Classification Scanner mode actions. Currently Compliance Guardian only supports Yammer. Select Social Report in Classification Report to access the Social Report interface. When you first access the Action Report interface, you must configure the report settings: • Specify a risk formula to calculate the risk scores – Select the down arrow ( ), a dropdown list appears. All of the risk formulas will be loaded in the drop-down list. Select a risk formula that will be used to calculate the risk scores of a file. • Specify the range of risk levels – Select the risk level range by specify two values. The files whose risk scores are lower than the value you specified to the left of Medium Priority are considered low risk priority. The files whose risk scores are greater than the value you specified to the right of Medium Priority are considered high priority. The files whose risk scores are between the two selected values are considered with the medium priority. Select Start Action Report to start the Action Report. Figure 22: The interface appeared when first accessing Social Report. Compliance Guardian User Guide 69 Selecting Scope to Generate Social Report Select a Yammer connection, select a time range, and then select Show Report in the left pane. The scanned results based on the selected connection will be displayed on the right Dashboard pane of the Social Report interface. Compliance Guardian retrieves social report data from the report database and updates the social report every hour. If you want to view the up to date report, select Retrieve Data in the right pane before selecting Show Report. The interval of retrieving data can be customized, refer to Compliance Guardian Installation and Administration User Guide for more details. 70 Compliance Guardian User Guide Viewing Social Reports The Social Report contains three sections: Action Overview, Risk Report and Top Frequently Used Folksonomy. Figure 23: Social Report interface. Action Overview The Action Overview section displays all of the posts that have taken a particular action. If you hover over a sector in the pie chart, you can also view the post and action information. Select View All. The View All Blocked Posts that Are Affected by Actions interface appears. All of the posts affected by actions are displayed. You can also select a particular action in the pie chart, then only the posts affected by this particular action are displayed. You can view the Post Type, Post, Action, Post Time, Posted User, the Reason of each post, and the Risk Level. Select the Details ( ) button to view details of each post. The View Details window appears. Here you can view the following information: • Type – Displays the type of the post. • Post – Displays the post or post name. If the post is affected by the Redact or Alert Only actions, you can view the View whole conversation link. Select the link, and enter the account, then you can view the post in Yammer. Compliance Guardian User Guide 71 • Risk Level – Displays the risk level of the post. • Scanned Time – Displays the scanned time. • Posted Time – Displays the posted time, and the user who posted the message. • Action Information – Displays the information of the actions that was taken, the status of the actions, the reason for taking the action, and comment. • Tagging Information – Displays the tag information, including the tag name, tag value, the status of adding the tag, the position of the tag, and comment. • Scan Policy Information – Displays the scan policy name, test suite name and version. Select the Export To Datasheet link on the top-right corner of this page, enter a request name in the Export To window, then select OK and the detailed information displayed on this page will be exported to a CSV file for further use. Select Back to Dashboard to return to the Dashboard. 72 Compliance Guardian User Guide Risk Report The Risk Report section displays the risk condition of the scanned posts in the selected connection. Figure 24: Risk Report section. You can view three face marks ( ) in and two values in the graph. • The face mark on the left side – Marks minimum value of risk. • The face mark on the right side – Marks the maximum value of risk. • The value on the left side – The value is the first risk value selected in the report settings times the number of scanned posts that have risk values. You can select Report Settings on the upper-right corner of the Social Report interface to change the report settings, refer to Configuring Settings for Social Report. • The value in the right side – The value is the second risk value specified in the report settings times the number of scanned posts that have risk values. • The face mark displayed between the two marks described above – The value is the sum of all posts’ risk values calculated by the formula selected in the report settings. The face mark displays on the different zone of the histogram. If its value is less than the first value on the histogram, it will be displayed in the left of the first value. Then, the risk condition of the scan is considered low risk; if its value is greater than the first value but less than the second value, it will be displayed between the two values. Then, the risk condition of the scan is considered medium risk; if its value is greater than the second value, it will be displayed in the right of the second value. Then, the risk condition of the scan is considered high risk. If all of the scanned posts do not have risk scores, the face mark will not displayed on the graph. Compliance Guardian User Guide 73 Select View All to view all of the risk information of the posts. The View All Risk Posts interface appears. You can view the Risk Level, Post, Type, Posted User, and the Posted Time. Select the Details ( ) button to view details of each post. The View Details window appears. Here you can view the following information: • Type – Displays the type of the post. • Post – Displays the post content or name. If the post is affected by the Redact or Alert Only actions, you can view the View whole conversation link. Select the link, and enter the account, then you can view the post in Yammer. • Risk Level – Displays the risk level of the post. • Scanned Time – Displays the scanned time. • Posted Time – Displays the posted time, and the user who posted the message. • Action Information – Displays the information of the actions that was taken, the status of the actions, the reason for taking the action, and comment. • Tagging Information – Displays the tag information, including the tag name, tag value, the status of adding the tag, the position of the tag, and comment. • Scan Policy Information – Displays the scan policy name, test suite name and version. Select the Export To Datasheet link on the top-right corner of this page, enter a request name in the Export To window, then select OK and the detailed information displayed on this page will be exported to a CSV file for further use. Select Back to Dashboard to return to the Dashboard. Top Frequently Used Folksonomy This section displays the tagged post messages. They are classified by the tag values (topics). Only the five most frequently used tag values will be displayed. If you select a topic, the information of the posts that have been added this topic will appear in the View All Folksonomy Posts interface. Select View All. The View All Folksonomy Posts interface appears. All of the information of the posts that have added topics will be displayed in the interface. You can view the Topic, Post, Type, Posted User, Posted Time and Risk level. Select the Details ( ) button to view details of each post. The View Details window appears. Here you can view the following information: 74 • Type – Displays the type of the post. • Post – Displays the post content or post name. If the post is affected by the Redact or Alert Only actions, you can view the View whole conversation link. Select the link, and enter the account, then you can view the post in Yammer. • Risk Level – Displays the risk level of the post. Compliance Guardian User Guide • Scanned Time – Displays the scanned time. • Posted Time – Displays the posted time, and the user who posted the message. • Action Information – Displays the information of the actions that was taken, the status of the actions, the reason for taking the action, and comment. • Tagging Information – Displays the tag information, including the tag name, tag value, the status of adding the tag, the position of the tag, and comment. • Scan Policy Information – Displays the scan policy name, test suite name and version. Select the Export to Datasheet link on the top-right corner of this page, enter a request name in the Export To window, then select OK and the detailed information displayed on this page will be exported to a CSV file for further use. Select Back to Dashboard to return to the Dashboard. Configuring Settings for Social Report The following settings can be configured in the Social Report interface: • Retrieve Data – If you want to view the up to date report, select the here link in the message Please select here to view the latest reports appeared at the top of the Dashboard screen. Then select Show Report. You can view the report generation time at the upper-right corner of the Dashboard to judge if you are required to generate the up to date report. • Report Settings – If you want to change the risk formula and risk range selected when you first accessed Social Report, select Report Settings on the upper-right corner of the Social Report interface. A window appears. Change the risk formula and the range of risk levels, and then select Show Data. • Export to Screenshot – If you want to export a PNG screenshot of the displayed report, select Export to Screenshot at the upper-right corner. Compliance Guardian User Guide 75 Export Requests The Export Requests for Classification Report can be accessed through the navigation bar. To access Export Requests, complete the following steps: 1. Select Report on the top-left corner of the home page. The navigation bar appears. 2. Select Classification Report. 3. Select Export Requests. Figure 25: Accessing Classification Report > Export Requests through navigation bar. For more information on Export Requests, refer to Export Requests. 76 Compliance Guardian User Guide Notices and Copyright Information Notice The materials contained in this publication are owned or provided by AvePoint, Inc. and are the property of AvePoint or its licensors, and are protected by copyright, trademark and other intellectual property laws. No trademark or copyright notice in this publication may be removed or altered in any way. Copyright Copyright ©2013-2015 AvePoint, Inc. All rights reserved. All materials contained in this publication are protected by United States and international copyright laws and no part of this publication may be reproduced, modified, displayed, stored in a retrieval system, or transmitted in any form or by any means, electronic, mechanical, photocopying, recording or otherwise, without the prior written consent of AvePoint, 3 Second Street, Jersey City, NJ 07311, USA or, in the case of materials in this publication owned by third parties, without such third party’s consent. Notwithstanding the foregoing, to the extent any AvePoint material in this publication is reproduced or modified in any way (including derivative works and transformative works), by you or on your behalf, then such reproduced or modified materials shall be automatically assigned to AvePoint without any further act and you agree on behalf of yourself and your successors, assigns, heirs, beneficiaries, and executors, to promptly do all things and sign all documents to confirm the transfer of such reproduced or modified materials to AvePoint. Trademarks AvePoint®, DocAve®, the AvePoint logo, and the AvePoint Pyramid logo are registered trademarks of AvePoint, Inc. with the United States Patent and Trademark Office. These registered trademarks, along with all other trademarks of AvePoint used in this publication are the exclusive property of AvePoint and may not be used without prior written consent. Microsoft, MS-DOS, Internet Explorer, Office, Office 365, SharePoint, Windows PowerShell, SQL Server, Outlook, Windows Server, Active Directory, and Dynamics CRM 2013 are either registered trademarks or trademarks of Microsoft Corporation in the United States and/or other countries. Adobe Acrobat and Acrobat Reader are trademarks of Adobe Systems, Inc. All other trademarks contained in this publication are the property of their respective owners and may not be used without such party’s consent. Changes The material in this publication is for information purposes only and is subject to change without notice. While reasonable efforts have been made in the preparation of this publication to ensure its accuracy, AvePoint makes no representation or warranty, expressed or implied, as to its completeness, accuracy, or suitability, and assumes no liability resulting from errors or omissions in this publication or from the use of the information contained herein. AvePoint reserves the right to make changes in the Graphical User Interface of the AvePoint software without reservation and without notification to its users. AvePoint, Inc. Harborside Financial Center, Plaza 10 3 Second Street, 9th Floor Jersey City, New Jersey 07311 USA Compliance Guardian User Guide 77
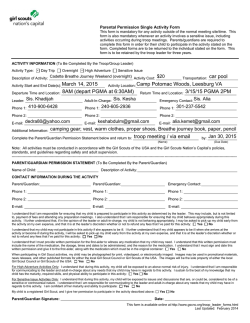
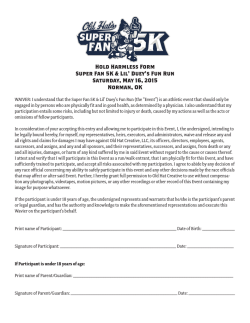
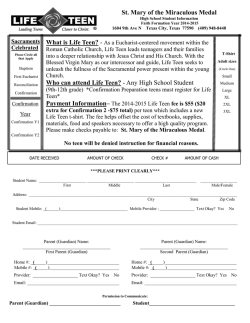
© Copyright 2026