
Manual - Evilution
Operating instructions
smart forfour
>>Good news.
You've chosen the smart forfour. We're sure you can hardly wait to start driving your car.
We'll show you what it's all about, give you a few important pieces of advice and some tips.
Please read these operating instructions carefully to ensure that you have more enjoyment with your smart and can recognise and avoid
any potential dangers to yourself or others.
The Operating Instructions, Quick Guide, Service Booklet and list of smart centers constitute part of the car itself. You should always
keep these documents in the car and make sure that you pass them on to the next owner if and when you come to sell your smart.
Inhalt
>>Good news.
>>Illuminating.
>>Adjustments.
Introduction . . . . . . . . . . . . . . . . . . . . 04
Light . . . . . . . . . . . . . . . . . . . . . . . . . .22
Interior lights . . . . . . . . . . . . . . . . . . .27
Fog lamps . . . . . . . . . . . . . . . . . . . . . . .28
Turn signal lights. . . . . . . . . . . . . . . .210
Warning sounds and indicator lights .211
Sun visors . . . . . . . . . . . . . . . . . . . . . . 42
Sunroof visor . . . . . . . . . . . . . . . . . . . . 43
Power glass sliding roof* . . . . . . . . . . 44
Heater/ventilation . . . . . . . . . . . . . . . . 46
Air conditioning system*. . . . . . . . . . 412
Windscreen wipers . . . . . . . . . . . . . . 415
Rear window heater . . . . . . . . . . . . . . 417
Outside mirror heaters* . . . . . . . . . . 418
Seat heaters*. . . . . . . . . . . . . . . . . . . 419
>>Getting acquainted.
Unlocking and locking. . . . . . . . . . . . . 12
Adjusting the seats. . . . . . . . . . . . . . . 19
Adjusting the steering wheel . . . . . . 115
Adjusting the mirrors. . . . . . . . . . . . 117
Power windows . . . . . . . . . . . . . . . . . 118
Seat belts . . . . . . . . . . . . . . . . . . . . . 121
Belt tensioners and
belt force limiters . . . . . . . . . . . . . . 125
Cockpit, lefthand drive model . . . . 127
Cockpit, righthand drive model . . . 128
Cover levers . . . . . . . . . . . . . . . . . . . 129
Multifunction steering wheel* . . . . . 130
Onboard instruments . . . . . . . . . . . 131
Overhead control panel . . . . . . . . . . 146
Centre console . . . . . . . . . . . . . . . . . 147
Lower centre console . . . . . . . . . . . . 148
Auxiliary instruments* . . . . . . . . . . . 149
>>Audio.
Multifunction steering wheel* . . . . . . .32
Onboard computer* . . . . . . . . . . . . . .34
Audio/telematics devices* . . . . . . . . . .39
smart CD changer*. . . . . . . . . . . . . . .314
Telephone console* . . . . . . . . . . . . . .315
Telephone preinstallation ex factory
(UHI)* . . . . . . . . . . . . . . . . . . . . . . . . .316
Universal handsfree system*. . . . . .317
All texts marked with an "*" refer either to special equipment ex works or original smart accessories.
02 Good news
>>Child friendly.
Child restraint systems . . . . . . . . . . . . 52
Disabling airbag . . . . . . . . . . . . . . . . . 55
Positions for child restraint systems . 57
Recommended child restraint
systems* . . . . . . . . . . . . . . . . . . . . . . . 58
Inhalt
>>On the move.
>>Routines.
>>Reference.
Before driving off. . . . . . . . . . . . . . . . 62
Driving . . . . . . . . . . . . . . . . . . . . . . . . 65
Alarm system*. . . . . . . . . . . . . . . . . . 615
Driving in the winter . . . . . . . . . . . . 618
Driving with the catalytic converter 619
Driving with a trailer . . . . . . . . . . . . 620
Driving tips. . . . . . . . . . . . . . . . . . . . 621
Brakes. . . . . . . . . . . . . . . . . . . . . . . . 622
Electronic Stability Program (esp). . 626
Airbags . . . . . . . . . . . . . . . . . . . . . . . 627
Refuelling . . . . . . . . . . . . . . . . . . . . . . .82
Engine compartment . . . . . . . . . . . . . .85
Tyre inflation pressure . . . . . . . . . . .815
Wiper blades. . . . . . . . . . . . . . . . . . . .818
Care instructions . . . . . . . . . . . . . . . .820
Information signs . . . . . . . . . . . . . . . 102
Model plate . . . . . . . . . . . . . . . . . . . . 103
Technical data . . . . . . . . . . . . . . . . . . 104
Homologation numbers . . . . . . . . . . 1016
>>Loading up.
Storage compartments and trays . . . . 73
Glove box . . . . . . . . . . . . . . . . . . . . . . 74
Holders for drinks . . . . . . . . . . . . . . . 75
cockpit bag* and luggage net for front
passenger footwell* . . . . . . . . . . . . . . 77
Storage compartment under the front
passenger seat* . . . . . . . . . . . . . . . . . 78
Luggage compartment . . . . . . . . . . . 710
Folding down bench seat . . . . . . . . . 716
Trailer hitch* . . . . . . . . . . . . . . . . . . 718
Loading guidelines . . . . . . . . . . . . . . 721
>>Key word index.
>>Helpful hints.
Faults in the power glass
sliding roof* . . . . . . . . . . . . . . . . . . . . .92
Onboard diagnosis socket (OBD) . . . .93
Fuses . . . . . . . . . . . . . . . . . . . . . . . . . .94
Replacing the bulbs . . . . . . . . . . . . . . .99
Battery . . . . . . . . . . . . . . . . . . . . . . . .914
Breakdown set . . . . . . . . . . . . . . . . . .921
Wheel theft protection* . . . . . . . . . . .927
Wheels and tyres . . . . . . . . . . . . . . . .928
Rolling start . . . . . . . . . . . . . . . . . . . .936
Towing . . . . . . . . . . . . . . . . . . . . . . . .937
Fire extinguisher* . . . . . . . . . . . . . . .939
All texts marked with an "*" refer either to special equipment ex works or original smart accessories.
Good news 03
Introduction
Introduction
The concept of these operating
instructions
Driving a vehicle is just one of its fac
ets; discovering a vehicle in detail is
all about gaining an insight into its in
credibly broad scope.
At the start of every chapter we tell you
precisely what awaits you, and perhaps a
little more too.
To help you find your way around with
even greater ease, each chapter is col
ourcoded.
Here is a brief overview:
04 Good news
>>Getting acquainted.
> For an initial impression.
>>Illuminating.
> All about the lights.
>>Audio.
> Radios, telephones and all other en
tertainment features.
>>Adjustments.
> Preparing you for all types of weath
er.
>>Child friendly.
> Carrying children safely and cor
rectly.
>>On the move.
> Driving and everything that it in
volves.
>>Loading up.
> How best to load the car and stow
items.
>>Routines.
> Refuelling, checking and topping
up.
>>Helpful hints.
> Performing minor repairs swiftly
and effectively.
>>Reference.
> The technical data.
Introduction
Clarity is our aim
Fewer words can often say more. To help
you enjoy reading these texts and concen
trate on what really matters, we have in
corporated a variety of design elements
that we'd like to outline here:
Lists
Items in lists are always preceded by a
dash:
to keep the list clearer,
for ease of recognition and under
standing.
Notes
Safety instructions
>Note!
Notes provide supplementary informa
tion on a topic.
Safety instructions draw your attention
to potential hazards that could damage
your health or even have fatal conse
quences.
Material damage
>Important!
Anything that could result in material
damage is classified as important.
Danger of injury!
We want to protect you, other oc
cupants and other road users as effec
tively as possible.
For this reason, it is essential to read
and observe the sections marked with
this symbol.
When you need to act
In this instance, first of all we inform
you what you need to do, then provide any
supplementary information that is nec
essary.
In other words:
쮿 Ensure that you read through these de
tailed operating instructions,
> Only then will you be able to handle
your vehicle expertly and recognise
and avoid hazards both to yourself
and to others.
Good news 05
Introduction
Environmental protection
About these operating instructions
Safety
The environmental policy of smart gmbh
is based on the environmental guidelines
of DaimlerChrysler, which are imple
mented in every phase of the product's
life. Protecting the environment, saving
energy and preserving natural resources
are essential components of all princi
ples. This starts with vehicle develop
ment, encompasses the production
process and ends with the recycling of
many different components.
As the scope of delivery of your vehicle
depends on the order placed, the equip
ment in it may deviate from that shown in
some of the descriptions and illustra
tions. In order to adapt our vehicles to
the everadvancing technologies availa
ble, we must reserve the right to make
changes to design, equipment and tech
nology.
Therefore no claims can be derived from
any of the specifications, illustrations
or descriptions in these operating in
structions.
Be sure to read the following sections in
particular:
"Airbags" in chapter >>On the move.
"Belt tensioners" and "Seat belts" in
chapter >>Getting acquainted.
Environment!
We want to protect our environ
ment.
For this reason, it is essential to read
the sections marked with this symbol.
Accessories and optional extras
All texts marked with an asterisk * refer
either to factoryfitted optional extras
or to original smart accessories that can
be fitted by a smart center. Please also
observe country and vehiclespecific
regulations for smart original parts.
Proper use
Please observe the following information
when using the vehicle:
The warning signs in these instruc
tions
the chapter >>Reference. (Technical
data) in these instructions
Road traffic regulations
Road traffic licencing regulations
Children
Be sure that you also study the chapter on
>>child suitability.
Resale
Should you sell your car, please be sure to
pass on these operating instructions.
smart a brand of DaimlerChrysler
06 Good news
Contents
>Opening and closing
>Adjusting the seats
>Steering wheel adjustment
>Mirrors adjustment
>Power windows
>Seat belts
>Belt tensioners and belt
force limiters
>Cockpit, lefthand drive
model
>Cockpit, righthand drive
model
>Control levers
>Multifunction steering
wheel*
>Onboard instruments
>Overhead control panel
>Centre console
>Lower centre console
>Auxiliary instruments*
>>Getting acquainted.
Open up your smart forfour. Have a good look round, and try things out for the first time.
Unlock your car, get in, adjust the seats and mirrors to your preferred settings and make yourself comfortable.
You'll be amazed at how much space there is, creating a truly comfortable travelling environment.
Unlocking and locking
>Note!
You will also be handed a spare key to
gether with the vehicle.
Lost your car key?
A duplicate key is available from a smart
center.
Unlocking and locking
The smart forfour's keys
There is one key with radio remote
control (A) for your vehicle.
>Note!
Should you have problems with your radio
remote control in certain areas, please
get in touch with a local smart center!
12 Getting acquainted
>Note!
The remote control has an operating
range of up to 15 metres (approx. 50 ft).
Depending on the nature of the surround
ings (objects reflecting or absorbing its
signals) and interference from other ra
diooperated systems, the range of the
remote control may fluctuate considera
bly. Similarly, the operating range fluc
tuates in line with the direction from
which the remote control is activated.
Unlocking and locking
Unlocking the car with the car key
쮿 Press the button for unlocking
once.
> The turn signal lights flash once.
> All doors, the tailgate and the filler
cap can be opened.
or
쮿 Unlock the car mechanically with the
key.
> All doors, the tailgate and the filler
cap can be opened.
Unlocking and locking the car from
the outside
Locking the car with the remote control
Danger of injury!
Never leave children unsuper
vised in the car, even if they are wear
ing a child restraint system*. They
could, for example, open a locked door
from the inside and endanger them
selves and others as a result.
Children could sustain serious or even
fatal injuries if left inside a hot car
for extended periods of time.
Accident risk!
When opening the doors, take care
not to endanger other road users or ne
cessitate other vehicles to swerve and
potentially cause an accident.
Make sure that nobody is endangered
when opening the doors.
Unlock and lock the car in the following
manner:
Getting acquainted 13
Unlocking and locking
쮿
쮿
쮿
쮿
쮿
Switch off the ignition.
Open the driver door.
Press the central locking switch.
Exit the vehicle.
Close the driver door.
> The vehicle locks automatically.
>Note!
Never leave your key in the ignition
switch.
You could lock yourself out!
쮿 Press the button
once to lock.
> The turn signal lights flash three
times.
> All doors are locked.
>Note!
It is not possible to lock all doors me
chanically1.
If the driver's door is open unlocking
automatically takes place immediate
ly.
>Important!
Please make sure that you do not inad
vertently activate the remote control on
the car key. You could unlock the vehicle.
1 Deviations are possible in certain countries.
14 Getting acquainted
Emergency locking
You can also lock the vehicle without the
remote control.
Danger of injury!
Never leave children unsuper
vised in the car, even if they are wear
ing a child restraint system*. They
could, for example, open a locked door
from the inside and endanger them
selves and others as a result.
Children could sustain serious or even
fatal injuries if left inside a hot car
for longer.
Unlocking and locking
autorelock function
If you do not open the driver or passenger
door or the tailgate after unlocking the
car with the remote control, the doors
will be locked again automatically after
one minute.
>Note!
Never leave your keys lying in the car.
You could lock yourself out!
Locking and unlocking the car from
inside
How to lock the car from the inside
쮿 Press the central locking switch.
> The central locking mechanism is
distinctly heard.
> The car is locked and will protect
you against any unwanted persons
entering the car when waiting,
such as at traffic lights.
> The door lock display on the switch
will light up red (if ignition ON).
Unlocking the car from inside
쮿 Press the central locking switch.
> The central unlocking mechanism is
distinctly heard.
> The vehicle is unlocked and can be
opened from the inside and outside.
Getting acquainted 15
Unlocking and locking
Switching off the drive lock function
Child safety lock
쮿 Switch off the ignition.
쮿 Press the central unlocking switch (B)
You can separately lock the rear doors to
prevent occupants (e.g. children) sitting
on the rear seats from opening the doors
on the inside.
When a door is locked, you
cannot open it from the inside.
can open it from the outside if the ve
hicle is not locked.
and the unlocking button on the remote
control device at the same time.
> You will hear an acoustic signal. The
drive lock function is switched off.
drive lock funktion
The vehicle doors are centrally locked
from a speed of approximately 20 km/h.
The drive lock function is switched off at
delivery.
Switching on the drive lock function
쮿 Switch off the ignition.
쮿 Press the central locking switch (A)
and the locking button on the remote
control device at the same time.
> You will hear an acoustic signal. The
drive lock function is switched on.
16 Getting acquainted
Accident risk!
Do not leave children unsuper
vised in the car. Children can open one
of the front doors even if it is locked and thereby endanger themselves or
other persons.
Unlocking and locking
Locking the rear doors
쮿 Insert the vehicle key into the opening
(A) on the desired side of the vehicle.
쮿 Turn the vehicle key to the vertical po
sition.
> The doors are now locked from the in
side.
Unlocking the rear doors
쮿 Turn the vehicle key all the way to the
right (on the left side of the vehicle)
or all the way to the left (on the right
side of the vehicle).
> The doors now can be opened from the
inside.
쮿 Open the doors by pulling on the door
handle (A).
If the driver's door is open a warning
signal will be sounded:
if the lights are switched on and the
ignition is switched off.
if a gear of the automated manual
transmission (softouch plus)* is en
gaged while the engine is running and
there is no pressure being applied to
either the footbrake or the accelerator
pedal.
How to recognise when the battery in the
key will soon be spent:
The turn signal lights flash nine times in
quick succession when you lock the car.
Cause:
> The remote control battery is almost
spent. You will be able to use the re
mote control approx. 100 more times.
Remedy:
> Replace the battery yourself or
> have the battery replaced by a smart
center.
>Note!
If you fail to replace the transmitter
battery after approx. 100 more presses of
the remote control:
you will not be able to lock or unlock
the car with the remote control.
> You will, however, be able to unlock
the car mechanically with the car
key.
you will still be able to start the car.
Getting acquainted 17
Unlocking and locking
>Note!
Replace the remote control's transmitter
battery every 2 years at the latest.
Otherwise there is a danger of leakage!
The remote control could be destroyed.
Environment!
Dispose of empty batteries in an
environmentally compatible manner.
Locking the car without the remote
control
쮿 Turn the ignition to position 2.
쮿 Open the driver door.
쮿 Press the central locking switch.
> The LED on the switches strip will
flash at double the normal frequen
cy.
쮿 Within 5 seconds, turn the ignition key
to position 0 and remove it.
> The central locking mechanism is
distinctly heard.
쮿 Lock the driver door from the outside.
> The car is now locked.
>Note!
Take care not to leave your keys inside
the car.
18 Getting acquainted
Replacing the transmitter battery
Danger of poisoning!
Batteries contain toxic and cor
rosive substances. Keep batteries out
of reach of children.
Go to a doctor immediately if a battery
has been swallowed.
Swallowing a battery can cause serious
health problems.
쮿 Use a coin to prise open the top half of
the key casing (A) with a suitable coin.
>Note!
Check the polarity when inserting the
new battery.
Otherwise damage may occur to parts in
the electrical system.
Unlocking and locking
쮿 Take the battery (B) out of the battery
holder.
쮿 Insert the new battery, checking that
the polarity is correct.
> Type of battery: lithium cell CR 2016
쮿 Press both sides of the key casing back
together again.
Getting acquainted 19
Adjusting the seats
Adjusting the seats
Adjust the driver's seat to the correct po
sition relative to the pedals and the
steering wheel before starting a journey.
Accident risk!
Only adjust the driver's seat
while the vehicle is stationary. You
will otherwise be distracted from the
traffic situation and the movement of
the seat could cause you to lose control
of the vehicle and result in an acci
dent.
Danger of injury!
When adjusting the seat, make
sure that no one is trapped.
Danger of injury!
To reduce the risk of serious or
fatal injuries in an accident or as a
result of rapid deceleration, such as
with an airbag inflating within a mat
ter of milliseconds, please note the
following:
Occupants should always be wearing
a seat belt correctly and recline
against a backrest that is more or
less upright. The head restraint
should support the back of the head
at approximately eye level.
All occupants must choose a seated
position in which they are able to
fasten the seat belt correctly and
that is as far as possible from the
front airbags.
The driver's seated position must be
such that he is able to control the ve
hicle safely. The driver must main
tain sufficient distance from the
pedals to be able to depress them
fully. The driver's arms should be
angled slightly when holding the
steering wheel.
Danger of injury!
Take the car to a qualified spe
cialist workshop, e.g. a smart center if
the seats have become damaged.
The seat is an integral part of the car's
safety system in the same way as
e.g. seat belts and airbags. Its safety
function can only be upheld if the seats
are free of damage.
Position the passenger's seat as far
back as possible, especially if child
restraint systems* were attached to
it and children were wearing these
child restraint systems or are sit
ting directly on the seat.
110 Getting acquainted
Adjusting the seats
Longitudinal seat adjustment
Accident risk!
Whenever the seat has been moved
forward or back, ensure that it engages
properly in position, as unexpected
movement or adjustment of the seat
while the car is being driven could
cause the driver to lose control and re
sult in an accident.
쮿 Pull the handle (A) up (example shows
front seat).
쮿 Reposition the seat or bench seat.
쮿 Release the handle.
> The locking mechanism must audibly
engage on both sides.
>Note!
There is likewise a lever in the luggage
compartment for adjustment of the rear
bench seat1 (see page 710).
Danger of injury!
Do not insert your hands into the
seat rail when adjusting the seat's lon
gitudinal position. This represents a
considerable risk of injury.
The front seats and the rear bench seat
can be adjusted forward or back.
The adjustment lever on the rear bench
seat is located beneath the centre rear
seat.
1 Not in pure.
Getting acquainted 111
Adjusting the seats
Seat height adjustment*
쮿 Pull the lever for seat height adjust
ment (A) up.
> The seat's height is raised in steps.
쮿 Press the lever for seat height adjust
ment (A) down.
> The seat's height is lowered in
steps.
쮿 Repeat the entire process until you
have obtained the correct seat height.
112 Getting acquainted
Adjusting the seats
Adjusting the backrest inclination
쮿 Lean against the backrest.
쮿 Pull up the adjustment lever (A).
쮿 Move your upper body to the correct
seated position.
쮿 Release the adjustment lever (A) and
allow it to engage.
Getting acquainted 113
Adjusting the seats
Adjusting upwards
쮿 Pull the head restraint upwards.
Adjusting downwards
쮿 Press the adjustment catch (A) on the
seat and hold it tight.
> The head restraint can be pushed
down.
Removing head restraints
쮿 Pull the head restraint upwards.
Lumbar support*
Adjusting head restraints
The driver's seat in addition has a lum
bar support that can be adjusted by turn
ing the adjusting wheel.
The height of the head restraints on all
seats can be adjusted.
114 Getting acquainted
Danger of injury!
If the occupant's head is not or
incorrectly supported by a head re
straint in the event of an accident, the
head or neck could sustain serious in
juries.
For this reason, never drive without the
head restraints engaged in position
and adjusted to the correct height on
all seats that are occupied.
Ensure that the back of the head is sup
ported at eye level.
> The head restraint can be pulled up
wards and removed.
Fitting head restraints
쮿 Insert the head restraint in the guides.
쮿 Press the adjustment catch (A).
> You can now insert the head re
straint.
Adjusting the seats
Rear bench seat head restraints
The rear bench seat head restraints can
be pressed all the way down (A), e.g. if
something is being transported or if you
want to improve the rear view.
If people occupy the rear bench seat, the
head restraints must be pulled up and
properly engaged (B).
Danger of injury!
If the occupant's head is not or
incorrectly supported by a head re
straint in the event of an accident, the
head or neck could sustain serious in
juries.
For this reason, never drive without the
head restraints engaged in position
and adjusted to the correct height on
all seats that are occupied.
Ensure that the back of the head is sup
ported at eye level.
The lounge concept*
To enable you to spend e.g. breaks in your
journey in comfort, the driver's and front
passenger's seats can be folded down.
You can then take sit on the rear bench
seat and use the foldeddown backrests as
tables.
Getting acquainted 115
Adjusting the seats
Folding over the twinface armrest*
쮿 Fold the armrest back in the direction
indicated by arrow B.
> You can engage the twinface armrest
in an upright position between the
backrests or fold it completely over.
Rotating the twinface armrest*
쮿 Pull the twinface armrest in the direc
tion indicated by arrow A.
쮿 Rotate the armrest 180° about its own
Folding down driver's and front
passenger's seats*
쮿 Pull the adjustment lever (A) all the way
up (example shows front passenger's
seat).
쮿 Fold the backrest down.
twinface armrest*
The twinface armrest serves
as an armrest,
as a storage compartment and can hold
er,
(see page 75).
To fold back:
쮿 Pull the adjustment lever (A) all the way
up.
쮿 Fold the seat backrest up and allow it
to engage audibly into position.
The twinface armrest can be rotated about
its own axis as well as folded over. This
allows the driver, front passenger and
rear seat passengers to use the armrest.
116 Getting acquainted
axis.
> The twinface armrest engages.
Adjusting the seats
Steering wheel adjustment
쮿 Press the lever for steering wheel
The steering wheel's height can be ad
justed to suit the driver's individual
preferences.
height adjustment down.
> The steering wheel can be pivoted up
and down.
쮿 Adjust the steering wheel to your pre
ferred height setting.
쮿 Pull the lever for steering wheel
height adjustment up.
> The steering wheel is now secured in
that position.
>Note!
Only adjust the steering wheel while the
car is stationary, and do not set off until
the steering wheel has been locked in po
sition again. If you drive with the steer
ing wheel adjustment device not locked,
unexpected repositioning of the steering
wheel could distract you temporarily.
The steerability of the vehicle is never
theless maintained at all times.
Getting acquainted 117
Mirrors adjustment
Mirrors adjustment
Ensure that the inside and outside mir
rors are correctly set before starting a
journey. Only then can the driver be sure
of a clear view to the rear.
Accident risk!
The outside mirrors show objects
reduced in size. The objects are closer
than they appear.
Manually adjusting the outside mirrors
쮿 Adjust the outside mirrors by turning
lever (A).
118 Getting acquainted
Electrically adjusting* the outside
mirrors
The electric outside mirror adjustment
will only function when the ignition is
switched on.
Setting the adjustment side
쮿 Press the rocker switch.
Driver side (A)
Passenger side (B)
Adjusting outside mirrors
쮿 The outside mirrors can be infinitely
adjusted by tilting the control knob (C).
Adjusting the inside rearview mirror
쮿 Set the inside rearview mirror to the
desired position by hand.
To avoid being dazzled by oncoming traf
fic when driving at night:
쮿 Deflect the inside rearview mirror by
pressing lever (A).
> The view to the rear is retained.
Power windows
>Note!
The front power windows are operated
electrically as standard, but do not have
touch control.
Power windows
In the standard specification, the front
side windows are opened and closed elec
trically, and the rear windows mechani
cally.
Opening and closing rear side windows
manually
The window crank is positioned below the
window, near the door handle.
쮿 Turn the crank clockwise to open the
window.
쮿 Turn the crank anticlockwise to close
the window.
Opening and closing all side windows
automatically*
The switches for the door windows are lo
cated on the right and left of the hand
brake lever:
Switch for power window, front passen
ger side (A).
Switch for power window, rear right (B).
Switch for power window, rear left (C).
Switch for power window, driver
side (D).
Getting acquainted 119
Power windows
Power closing of side windows
쮿 Pull the power window switch up.
> The side windows close for as long as
the switch is pulled.
The four side windows can be opened and
closed by the electric power windows*
when the ignition is on.
Power opening of side windows
쮿 Press the power window switch.
> The side window opens fully (touch
control).
쮿 To halt the side window's opening
movement, press the switch a further
time or pull it up.
120 Getting acquainted
>Note!
The side window in the driver's door
closes automatically at a press of the
switch (touch control).
The closing movement can be halted as
follows:
쮿 Pull the switch again, or press the
switch.
> The window halts and does not close
any further.
>Note!
The windows do not close automatically
when the car is locked.
Locking the rear power windows*
You can prevent the rear side windows
from being opened.
쮿 Press the switch on the switches strip.
> The power windows are blocked.
> The indicator light on the switch re
mains on while the power windows
are blocked.
Power windows
>Note!
To unblock the power windows, press the
switch again.
Danger of injury!
When closing the side windows,
make sure that no one is trapped. If
there is a risk of trapping, press the
switch to open the windows.
Do not leave children unsupervised in
the car. They could e.g. injure them
selves by opening and closing the win
dows!
Getting acquainted 121
Seat belts
Seat belts
The seat belts with integrated belt ten
sioners and belt limiters combine with
the airbags to form a restraint system
that offers maximum scope for protection
in the event of an accident.
Danger of injury!
Airbags represent an additional
form of protection but are no substitute
for wearing a seat belt. To reduce the
risk of serious or fatal injuries, make
sure that all occupants, particularly
pregnant women, always fasten their
seat belt correctly, are sitting in a
normal position and have their seat
more or less in the upright position.
122 Getting acquainted
Danger of injury!
If you do not fit the seat belt cor
rectly or do not engage it properly in
the catch, it will be unable to protect
you in the manner intended. In certain
circumstances this could result in se
rious or even fatal injuries. You should
therefore make sure that all occupants
particularly pregnant women are al
ways wearing their seat belt correctly.
Make sure that the belt
runs over the hip bone as low down as
possible, i.e. across the hip joint
and not across the stomach.
is taut.
is not twisted.
runs centrally over the shoulder.
does not run across the neck or is un
derneath the arm.
is sufficiently taut across the pel
vis; pull up the belt running across
the chest to tauten it.
Always use a seat belt for one person
only.
Never use a seat belt for an object and a
person at one and the same time.
Avoid wearing bulky clothing, e.g. a
winter coat.
Do not allow the belt to run across sharp
or fragile objects, particularly on or
inside your clothes, such as glasses,
pens, keys, etc. The belt could other
wise tear and expose you or other occu
pants to a risk of injury.
Never carry children travelling on the
lap of an occupant. In the event of an
accident, abrupt braking or sudden
changes of direction, it would no long
er be possible to hold the child secure
ly, and both the child and other
occupants could sustain potentially fa
tal injuries as a result.
Seat belts
Danger of injury!
Persons less than 150 centimetres
tall and children under 12 years of age
will be unable to fit the seat belts cor
rectly. They consequently require ad
ditional restraint systems* mounted on
suitable car seats (e.g. child seats or
child booster seats) for added protec
tion in the event of an accident. Please
also always observe the fitting in
structions supplied by the manufactur
er of the child restraint systems*.
Danger of injury!
The seat belt only provides the
intended degree of occupant restraint
if the backrest is almost vertical and
the occupant is sitting upright. Avoid
seated positions that prevent the seat
belt from lying correctly across the
wearer's body. For this reason, posi
tion the backrest as vertically as pos
sible. Never drive with a backrest
reclined well back. You otherwise risk
sustaining serious injury in the event
of an accident or abrupt braking, with
potentially fatal consequences in the
case of accidents.
Danger of injury!
The seat belt may no longer func
tion correctly if the belt or catch is
dirty or damaged. For this reason, keep
the belt and catch clean, as the buckle
may otherwise not engage properly.
Check the seat belts regularly to ensure
that
they are not damaged,
they are not running across sharp
edges,
they are not trapped.
The belt could otherwise tear in the
event of an accident. You or others
could sustain serious or fatal injuries
as a result.
If seat belts have been damaged or sub
jected to high loads in an accident,
have them replaced and have the belt
anchorages checked.
For safety reasons, smart gmbh recom
mends using only seat belts that smart
gmbh has specifically approved for
your vehicle.
Getting acquainted 123
Seat belts
Danger of injury!
Modifications or work performed
inexpertly to a restraint system (seat
belt and anchorages, belt tensioners,
belt force limiters or airbag) or its
wiring and any alterations made to oth
er networked electronic systems could
result in the restraint systems no long
er functioning in the manner intended.
Airbags or belt tensioners could
e.g. fail to operate in accidents where
the rate of deceleration exceeds the
tripping threshold, or be activated un
intentionally. For this reason, never
make modifications to the occupant re
straint systems. Do not perform any
work on electronic components and
their software without the necessary
expertise.
124 Getting acquainted
Adjusting the belt mounting downwards
쮿 Press the release button on the belt
mounting.
쮿 Pull the belt mounting (A) down as far
as the desired position.
쮿 Let go of the release button when in the
desired position.
> The belt mounting engages.
.
Adjusting seat belt height
To obtain optimum belt run, proceed as
follows:
Adjusting the belt mounting upwards
쮿 Pull the belt mounting (A) up as far as
the desired position.
Seat belts
Putting on the seat belts
쮿 Take a seat.
쮿 Pull the seat belt without jerking it
from the roller.
쮿 Pull the belt across your shoulder.
> Your back must be leaning against
the backrest.
쮿 Click the seat belt audibly into the
buckle.
Taking off the seat belts
쮿 Press the red button on the belt buckle.
쮿 Let the belt run back into the belt
guide.
> The belt is automatically reeled
back into the roller.
Getting acquainted 125
Belt tensioners and belt force limiters
Belt tensioners and belt force
limiters
The front seat belts have:
belt tensioners,
belt force limiters.
Belt tensioners
tension the seat belts when activated,
so that they lie tightly across the body.
are only triggered off in collisions
with high vehicle deceleration/accel
eration in the longitudinal direction,
e.g. a headon collision.
> If the airbag indicator light comes
on, your belt tensioner has been ac
tivated.
126 Getting acquainted
Belt force limiters
reduce the force exerted by the belt on
the occupants when activated in the
event of an accident.
>Note!
Belt tensioners cannot compensate for:
incorrect seated positions,
seat belts worn incorrectly.
Belt tensioners do not actively pull the
occupants back against the seat back
rests.
The belt force limiter is designed to op
erate in unison with the front airbag,
which absorbs a portion of the seat belt's
decelerating forces, distributing the
load over a larger area.
If the ignition is switched on, the belt
tensioner is activated:
if the restraint systems are operation
al.
in the event of a headon or rearend
collision if the vehicle is decelerated
or accelerated sufficiently in the lon
gitudinal direction at the start of im
pact.
Belt tensioners and belt force limiters
If the belt tensioners are triggered off,
you will hear an explosion that funda
mentally represents no risk to your hear
ing, but some dust may be generated.
Danger of injury!
If the belt tensioners have been
triggered, have them replaced in a
qualified specialist workshop. It is
particularly important to have safety
relevant work and work on safetyrele
vant systems performed by a qualified
specialist workshop.
Observe the safety regulations when
disposing of belt tensioners. These
regulations can be viewed in every
qualified specialist workshop such as
a smart center.
Getting acquainted 127
Cockpit, lefthand drive model
Cockpit, lefthand drive model
a Steering wheel or multifunction steer
ing wheel*
b Control lever
c Onboard instruments
128 Getting acquainted
d Overhead control panel
e Audio/telematics devices
f Heater/ventilation/air conditioning
system*
g Tunnel console
Cockpit, righthand drive model
Cockpit, righthand drive model
a Steering wheel or multifunction steer
ing wheel*
b Control lever
c Onboard instruments
d Overhead control panel
e Audio/telematics devices
f Heater/ventilation/air conditioning
system*
g Tunnel console
Getting acquainted 129
Control levers
1
2
Control levers
Control lever
left
A Wash front lights*
right
A Wipe windscreen
1 = touchkey wipe, 0 = off, 1 = interval
wipe, 2 = wiper speed 1, 3 = wiper
speed 2
B Rear window wipe and wash
1 = rear window wipe and wash, 0 = off,
1 = interval wipe, 2 = rear window wipe
and wash
C Windscreen wash
1 = windscreen washer system on
B Lights
0 = off, 1 = light on*, 2 = parking lights,
3 = low beam
C Headlight range adjustment
Range of four settings
D Turn signal lights
Indicating a right or left turn
E High beam lights
0 = off, 1 = headlight flashers, 2 = high
beams
130 Getting acquainted
Multifunction steering wheel*
AU
TO
Multifunction steering wheel*
Menu guidance
a Scroll down main menu
b Scroll up main menu
c Scroll down submenu
d Scroll up submenu
e Onboard computer display
Volume control for
audio/telematics devices*
f Reduce volume
g Increase volume
Telephone function
h Answer call
i End call
Shift paddles*
j Shifting up
k Shifting down
Getting acquainted 131
Onboard instruments
Onboard instruments
A Speedometer
B Tachometer
C Displays
Indicator lights
Airbag (a)
Brake system (d)
High beams (j)
abs (e)
Seat belt (k)
esp (f)
Battery (l)
Preglow indicator light* (g)
Coolant temperature (m)
Rear fog lamp (b)
Trailer indicator light* (h)
Oil pressure (n)
Fog lamps* (c)
Turn signal lights (i)
Engine check (o)
132 Getting acquainted
Onboard instruments
a) Airbag indicator light
The airbag indicator light signals to you
that there is a fault in the safety systems
of the:
airbags,
belt tensioners.
>Note!
The operating principle of the airbags
and additional information to this re
gard can be found starting on page 628.
Airbag indicator light
It lights up:
with the ignition switched on.
The subsequent selfdiagnosis of the
safety systems yields the following re
sults:
1. Airbag indicator light goes out after a
maximum of 7 seconds:
> No fault detected.
> The airbag system is OK.
2. Airbag indicator light does not go out
within 7 seconds and remains perma
nently on, or flashes:
> A fault has been detected.
쮿 Do not sit on the front passenger's
seat; this applies in particular to
children.
쮿 Take the car to a qualified
specialist workshop, e.g. a smart
center, without delay.
Danger of injury!
If the indicator light does not
come on when you switch the ignition
on, or does not go out again after a few
seconds once the engine is running or
comes on again, there is a fault. There
is the possibility of individual sys
tems being activated unintentionally
or not being triggered off in an acci
dent involving a high rate of decelera
tion. In this instance, have the safety
system checked and repaired immedi
ately by a qualified specialist work
shop. smart gmbh recommends that you
visit a smart center for this. It is par
ticularly important to have safetyrel
evant work and work on safetyrelevant
systems performed by a qualified spe
cialist workshop.
Getting acquainted 133
Onboard instruments
b) Rear fog lamp indicatorlight
It lights up:
when the rear fog lamp is switched on
while the ignition is on.
134 Getting acquainted
c) Fog lamp* indicator light
It lights up:
when the fog lamps are switched on
while the ignition is on.
d) Brake system indicator light
It lights up:
with the ignition switched on.
> The light goes out after the engine
starts or
> goes out after no more than
10 seconds.
with handbrake applied.
when brake circuit fails or brake fluid
level is too low.
쮿 Immediately park your car away from
moving traffic.
쮿 Secure your car against rolling away
if you have to leave it.
쮿 Do not drive any further.
쮿 Call a breakdown recovery service,
e.g. smartmove Assistance or a smart
center.
Onboard instruments
쮿 Take the car to a qualified
specialist workshop, e.g. a smart
center, without delay. The car's abs
and esp functions have failed!
Brake system indicator light
It lights up:
when the abs system malfunctions, to
gether with abs indicator light.
쮿 Immediately park your car away from
moving traffic.
쮿 Secure your car against rolling away
if you have to leave it.
쮿 Do not drive any further.
쮿 Call a breakdown recovery service,
e.g. smartmove Assistance or a smart
center.
e) abs indicator light
It lights up:
with the ignition switched on (self
diagnosis).
> The light goes out after engine is
started or
> goes out after no more than
10 seconds.
if there is a fault in the abs system.
when the abs system fails, together
with the brake system indicator light.
쮿 Immediately park your car away from
moving traffic.
쮿 Secure your car against rolling away
if you have to leave it.
쮿 Do not drive any further.
쮿 Call a breakdown recovery service,
e.g. smartmove Assistance or a smart
center.
Accident risk!
If the abs system is faulty, the
wheels could lock when the brakes are
applied. If this happens, the car's
steerability will deteriorate and the
braking distance may increase. esp
also will not function if the abs system
is having problems. There will then be
an increased risk of the vehicle skid
ding in certain driving situations. Al
ways therefore adapt your driving style
to the prevailing road, traffic and
weather conditions.
Getting acquainted 135
Onboard instruments
f) esp indicator light1
It lights up:
with the ignition switched on (self
diagnosis).
> The light goes out after engine is
started or
> goes out after no more than
10 seconds.
It flashes:
> when esp is working.
Light stays on permanently:
> for system failure,
> when esp is not responding.
It may be possible to clear a system mal
function by restarting the car.
쮿 If the indicator light still does not go
out, take the car to a qualified spe
cialist workshop, e.g. a smart center,
without delay.
1 Only for 47 kW, if equipped with esp.
136 Getting acquainted
esp indicator light1
>Note!
The esp operating principle and further
instructions on this are given on
page 627.
>Note!
If esp fails, abs will still function. How
ever, if abs has failed, esp will not func
tion!
Accident risk!
If esp is no longer functioning,
there is a greater risk that your car
could skid in certain driving situa
tions. Always therefore adapt your
driving style to the prevailing road,
traffic and weather conditions.
g) Preglow indicator light
It lights up:
with the ignition switched on.
> When the indicator light extin
guishes, the engine is ready to be
started.
>Note!
If the engine is already at operating
temperature you can start it without the
preheater.
Onboard instruments
h) Trailer indicator light*
It flashes:
when the ignition is switched on, the
control lever for the turn signals is
operated and a trailer is wired up to
the car.
i) Turn signal indicator light
It flashes:
when ignition is switched on, if
> the indicator lever is activated.
> the hazard warning lights are
switched on.
j) High beam indicator light
Comes on when the ignition is switched
on if you
switch on the high beams.
operate the headlight flashers.
>Note!
If a turn signal light malfunctions, the
flashing frequency is doubled.
쮿 Change the bulb (see page 912) or
쮿 Take the car to a qualified specialist
workshop, e.g. a smart center.
Getting acquainted 137
Onboard instruments
k) Seat belt indicator light
It lights up:
with the ignition switched on.
> if your seat belt is not fastened.
쮿 Fasten your seat belt.
l) Battery indicator light
It lights up:
with the ignition switched on.
> The indicator light goes out if the
engine is running.
If it comes on during a journey or fails to
go out after the engine has been started,
the battery is not being charged.
쮿 Immediately park your car away from
moving traffic.
쮿 Secure your car against rolling away
if you have to leave it.
쮿 Do not drive any further.
쮿 Call a breakdown recovery service,
e.g. smartmove Assistance or a smart
center.
>Important!
The drive belt may have broken.
If this occurs, the engine may suffer dam
age if driven any further.
138 Getting acquainted
m) Coolant temperature indicator light
It lights up:
if the engine has overheated.
쮿 Immediately park your car away from
moving traffic.
쮿 Secure your car against rolling away
if you have to leave it.
쮿 Do not drive any further.
쮿 Call a breakdown recovery service,
e.g. smartmove Assistance or a smart
center.
>Important!
The engine could be damaged if you con
tinue to drive.
Onboard instruments
n) Oil pressure indicator light
It lights up:
with the ignition switched on.
> Indicator light goes out if the en
gine is started and oil pressure is
sufficient.
Beware of the following!
If the indicator light goes out before
the engine is started, it is not func
tioning.
쮿 Check the oil level.
쮿 Take the car to a qualified
specialist workshop, e.g. a smart
center.
Oil pressure indicator light
If it comes on during a journey:
쮿 Immediately park your car away from
moving traffic.
쮿 Secure your car against rolling away
if you have to leave it.
쮿 Do not drive any further.
쮿 Call a breakdown recovery service,
e.g. smartmove Assistance or a smart
center.
o) Engine check indicator light
It lights up:
with the ignition switched on.
> The indicator light goes out if the
engine is running.
If it comes on during a journey:
쮿 Take the car to a qualified specialist
workshop, e.g. a smart center.
>Important!
Continuing to drive the car or keeping
the engine running even though the indi
cator light has come on may lead to ir
reparable engine damage.
Getting acquainted 139
Onboard instruments
Tachometer
The tachometer displays the engine
speed in units of 1000 rpm.
Driving in the optimum engine speed
range helps you to
save fuel.
take good care of the engine.
>Important!
Change gear in good time and always pay
attention to the gear shift recommenda
tions indicated in your car's gear indi
cator.
The optimum engine speed ranges (rpm) are:
Driving off
Petrol engines
1000 2000
Diesel engines
1000 2000
Normal operation at constant speed
Brief periods of acceleration, e.g. when passing
2000 3000
3000 6300
1800 3000
3000 4400
140 Getting acquainted
Onboard instruments
Display illumination
The display illumination lights up:
when the lights are switched on.
when the ignition is switched on.
Speedometer display
You can see the following in the display:
A Multifunction display
B Gear indicator1 and recommendation
to change gear
C Clock
D Frost warning display
E Service interval display
F Fuel tank gauge
The functions are described below.
The display illumination goes out
after the lights are switched off,
after the ignition is switched off,
30 seconds after the multifunction
display changeover button has been
pressed an additional time
(see page 142).
The display illumination is dimmed:
if the lights are switched on.
Adjusting brightness of display
쮿 Press the button (A).
> The brightness of the display in the
speedometer and tachometer is
increased in fixed steps, then
decreased again.
1 The gear indicator is only present on versions with automated manual transmission (softouch plus)*.
Getting acquainted 141
Onboard instruments
쮿 Press the button (A) twice in
succession.
> The distance remaining until the
next service scope is displayed.
> The previous display is called up
again after 10 seconds.
Multifunction display
쮿 Press the button (A).
> The following information appears
in succession in the multifunction
display:
Trip odometer
Daily trip recorder (when held down
for a few seconds it returns to zero)
Outside temperature display*
Residual litres display (when there
are fewer than 5 litres of fuel in the
fuel tank)
142 Getting acquainted
>Note on outside temperature display*
The temperature display will respond
sluggishly when temperatures rapidly
rise or fall.
This ensures that the temperature read
ing is not falsified by the heat of the en
gine e.g. when the car is at a standstill or
travelling relatively slowly.
Onboard instruments
Adjusting manually
쮿 Press the button (A).
> The time advances by 1 minute for
each press.
쮿 Release the button when the correct
time is shown in the display.
> The adjustment mode is ended after
5 seconds.
Adjusting automatically
쮿 Press button (A) for longer than
Only vehicles with automated manual
transmission (softouch plus)*
Gear engaged
Upshift (recommendation to change
gears)
Downshift (recommendation to change
gears)
Setting the time
The clock always runs forwards when the
time is adjusted.
쮿 Press the button (A) until the colon in
the time display starts to flash.
2 seconds.
> The time advances at the rate of
4 minutes per second.
> After 10 seconds, the rate of adjust
ment increases to 10 minutes per
second.
쮿 Release the button when the correct
time is shown in the display.
> The adjustment mode is ended after
5 seconds.
Neutral, no gear engaged
Reverse gear is engaged
No gear engaged
Automated gearshifts
Electronic immobiliser activated
Getting acquainted 143
Onboard instruments
Reserve range
You are in the reserve range if there are
5 litres of fuel or less in the tank.
If this occurs,
the fuel pump symbol starts to flash.
the fuel tank gauge is automatically
flashed up in the multifunctional
display.
쮿 Find a filling station.
Fuel tank gauge
The tank's fuel level is displayed with
the aid of eight bar segments.
The number of shaded segments indicates
the level of fuel in the tank. If all eight
segments are dark, the tank is full.
144 Getting acquainted
>Note!
The switchover function in the multi
function display (see page 142) remains
active even with the fuel pump symbol
flashing.
Onboard instruments
Accident risk!
Even if the temperature indicat
ed is slightly above freezing, there
could still be black ice on the road,
particularly where it passes through
trees or over bridges.
Always adjust your driving style and
speed to the weather, road and traffic
conditions to reduce the risk of acci
dents.
Frost warning
Service interval display
If the outside temperature falls below
3 °C, the display alerts you to the fact
that there could be ice on the road.
The outside temperature appears in the
display.
A snowflake symbol flashes for
60 seconds in the display. The snow
flake symbol stops flashing below 3 °C.
The service interval display informs you
of the point in time and scope of the next
service visit.
One spanner or two spanners is/are
shown in the display as well as the re
maining distance in kilometres (km), de
pending on if service scope A or B is due.
One spanner and the remaining distance
in kilometres (km) are displayed in the
onboard computer*.
Getting acquainted 145
Onboard instruments
If the deadline for a service scope is ex
ceeded, the following appears every time
the engine is started:
the number of kilometres with a nega
tive sign,
one or two flashing spanners.
Depending on whether service scope A or
B is due, one of the following messages
will appear in the onboard computer*:
"Carry out service"
or
"Carry out maintenance service"
146 Getting acquainted
Activate service interval display
쮿 Briefly press the button on the multi
function display twice.
Overhead control panel
Overhead control panel
a Rotary control for interior lighting
b Microphones*
c Switch for power glass sliding roof*
>Note!
For notes on how to operate the rear in
side light, see page 27.
Getting acquainted 147
Centre console
Centre console
A Switches and indicator lights
B Heater/ventilation/air conditioning
system*
a Driver's heated seat*
b Front fog lamps*
c Rear fog lamp
d Interlock for rear power windows*
148 Getting acquainted
e
f
g
h
Locking doors from inside
Hazard warning lights
Unlocking doors from inside
Switching off alarm function for alarms
triggered by interior motion*
i Switching off alarm function for trans
port
j Passenger's heated seat*
k Air distribution/recirculated air fresh air*
l Blower/rear window heater
m Air temperature/air conditioning sys
tem*
Lower centre console
Lower centre console
a Can holder with multifunctioninsert1 2
f Switch for power window, driver side
b Airbagoff indicator light, front pas
senger's side
g Handbrake
c Switch for power window, front passen h Gearshift lever
ger side
d Switch for power window, rear right*
e Switch for power window, rear left*
i Cigarette lighter* (only with smoker's
set*)
1. Not in pure.
2. Not in smoker's set*.
Getting acquainted 149
Auxiliary instruments*
Auxiliary instruments*
Above the centre console, there are two
auxiliary instruments for
the engine coolant level indicator (A)
the clock (B).
150 Getting acquainted
Contents
>Lights
>Interior lights
>Fog lamps
>Turn signal lights
>Warning sounds and indi
cator lights
>>Illuminating.
As your smart forfour is easy to operate because all control elements are located where you would expect them to be, even navigating in
the dark is a cinch. But go ahead and try it out in daylight first.
Lights
>Note!
When you switch the ignition off, the low
beam lights are also switched off. They
come on again automatically when the en
gine is restarted.
Lights
Switching on the lights
The control lever for the lights is located
on the steering column.
Turn the rotary switch to the following
positions for:
Off.
Parking lights on.
Low beam lights on.
22 Illuminating
>Note!
If you drive in countries in which the
side of the road driven on is opposite
that of the country in which the vehicle is
approved, oncoming traffic may be
blinded by the asymmetric low beam
lights. In this case, have the headlights
converted to the symmetric low beam
lights for these countries. This conver
sion can be carried out in a qualified
specialist workshop suchas a smart cent
er.
coming home function
The coming home function allows the
car's lights to be switched on when you
are exiting or approaching the vehicle.
12 seconds is the time the lights on your
vehicle will stay on to help you find your
way.
When leaving the car
쮿 Press the remote control twice to lock
the car.
> The exterior lights come on and then
go off again after 12 seconds.
Upon returning to the car
쮿 Press the remote control twice to un
lock the car.
> The car's exterior and interior
lights comes on and then go off again
after 12 seconds.
Lights
Daytime driving lights1
Switching off daytime driving lights
If your car is equipped with daytime
driving lights, the low beam and parking
lights come on automatically when you
start the engine.
쮿 Switch off the ignition.
쮿 Activate the headlight flashers while
>Note!
With the daytime driving lights active,
you can only switch on the high beam
lights if the low beams have been
switched on at the rotary switch.
pressing the button for unlocking the
car on the car key.
> A signal sounds by way of confirma
tion that the daytime driving lights
are switched off.
Switching on daytime driving lights
쮿 Switch off the ignition.
쮿 Activate the headlight flashers while
pressing the button for locking the car
on the car key.
> A signal sounds by way of confirma
tion that the daytime driving lights
are switched on.
lighton function*
The lighton function switches on the low
beam lights automatically at dusk or when
you drive into a tunnel.
lighton switched on*.
Switching on lighton function*
쮿 Turn the rotary switch to the (AUTO) po
sition.
> The lighton function is activated.
1 Standard specification in countries where daytime driving lights are required by law.
Illuminating 23
Lights
High beam lights
Accident risk!
Switch your lights on in good
The high beam lights can be switched on
if
the low beam lights are switched on or
the low beam lights have been switched
on by the rain/light sensor via the
lighton function.
time
when it is raining heavily,
when it starts to get dark.
Vehicles are detected easier in traffic
if they have their lights on.
Switching on the high beam lights
쮿 Pull the lever towards the steering
wheel until the high beam lights re
main switched on (2).
Switching off the high beam lights
쮿 Pull the lever towards the steering
wheel again (2).
> The high beam lights go out.
24 Illuminating
Lights
>Note!
Note that the headlight range adjustment
must be reset to position 0 after you have
unloaded the vehicle.
Headlight range adjustment
The headlight range adjustment enables
you to adapt the headlights to suit the
load status of your car.
Adjusting the headlight range
The basic setting, this means:
no payload,
driver's seat occupied,
headlight range adjustment position 0
ensures that you
obtain the best possible visibility
conditions for the driver (A),
do not dazzle drivers of oncoming ve
hicles.
Switch
position
0
Load
1
2
Front and rear seats occu
pied
Front and rear seats occu
pied and
luggage compartment load,
up to the rear axle load
limit
3
4
Front seats occupied
If the light cone changes as a result of
the vehicle's load (B), you can turn the
wheel for headlight range adjustment to
restore the basic light setting.
Illuminating 25
Lights
Cleaning headlights*
If the headlights are dirty, you can clean
them conveniently during a journey.
쮿 Briefly press the end of the control le
ver for the lights.
26 Illuminating
> Cleaning nozzles pop up and clean the
headlights automatically.
Lights
Front inside light
The front light (A) is switched on and off
with dimming control.
The rotary control can be turned to eight
different positions.
Interior lights
The interior lights are located on the
on the overhead control panel at the
front,
above the bench seat at the rear, to il
luminate the luggage compartment and
rear bench seat.
Continuous operation
> The inside light is on permanently.
Reading light for driver's seat
> The reading light on the driver's
seat is lit.
Automatic mode
> The inside light comes on when a
door is opened.
Reading light for front passenger's
seat
> The reading light on the front pas
senger's seat is lit.
In each case there is an "Off" setting be
tween these positions.
>Note!
If the interior light is in automatic
mode, it goes on after the ignition has
been switched off if you open a door.
It goes off when you turn the ignition key
to the position 1.
Rear inside light
The rear inside light (B) can be operated
by tilting.
쮿 Tilt the inside light to the rear (to
wards luggage compartment).
> The inside light is permanently on.
쮿 Tilt the inside light to the front.
> The inside light is off.
쮿 Tilt the inside light to the middle po
sition.
> The inside light comes on when the
tailgate is opened.
Illuminating 27
Fog lamps
Switching off the front fog lamps*
쮿 Press the switch a further time.
>Note!
If you switch the lights off, the front fog
lamps are also switched off. Switching
the lights back on again does not auto
matically switch the front fog lamps on.
Fog lamps
Front fog lamps*
The front fog lamps (A) should only be
switched on
in fog,
where visibility is poor because of rain,
where visibility is poor because of
snow.
>Note!
Please observe the national statutory
regulations regarding the use of front
fog lamps.
28 Illuminating
Switching on the front fog lamps*
The front fog lamps can only be switched
on if the parking lights are already on.
쮿 Press the switch once.
> The front fog lamps come on.
> With the ignition switched on, the
indicator light in the onboard in
strument comes on.
Accident risk!
Adapt your speed and driving
style according to the visibility con
ditions. Other vehicles could be driv
ing only a short distance in front of you
without you being able to spot them in
good time and brake.
Fog lamps
Switching off the rear fog lamp
쮿 Press the switch a further time.
Accident risk!
The rear fog lamp should only be
switched on when visibility is down to
less than 50 metres. Vehicles following
behind may otherwise be dazzled.
Rear fog lamp
For the rear fog lamp to function,
at least the low beam lights or
the parking lights and front fog lamps
must be switched on.
Switching on the rear fog lamp
쮿 Press the switch once.
> The rear fog lamp comes on.
> With the ignition switched on, the
indicator light in the onboard in
strument comes on.
Illuminating 29
Turn signal lights
To signal turning right
쮿 Push the lever upwards until you feel it
lock into place.
To signal turning left
쮿 Push the lever downwards until you feel
it lock into place.
Turn signal lights
The turn signal light control lever is lo
cated to the left of the steering wheel.
210 Illuminating
>Note!
The lever which is locked in place is then
returned to the neutral position
after the turn, by the automatic turn
signal reset function
or by
cancelling manually.
Turn signal lights with convenience
touchshifting
If you briefly press the control lever up
or down, the turn signal lights flash
three times on the corresponding side of
the car.
Warning sounds and indicator lights
Warning sounds and indicator lights
Horn
쮿 Press anywhere on the steering wheel's
highlighted area.
> The horn sounds.
Headlight flashers
The control lever for the headlight flash
ers is located on the left of the steering
column.
쮿 Pull the lever towards the steering
wheel to activate the headlight flash
ers.
Hazard warning lights
쮿 To switch on the hazard warning lights,
press the red switch.
> This causes
all six turn signal lights to flash,
the turn signal indicator light to
start flashing when the ignition is
switched on,
the hazard warning light switch to
flash.
쮿 To switch the hazard warning lights
off, press the red switch again.
Illuminating 211
212 Illuminating
Contents
>Multifunction steering
wheel*
>Onboard computer*
>Audio/telematics devices*
>smart CD changer*
>Telephone console*
>Telephone preinstallation
ex factory (UHI)*
>Universal handsfree sys
tem*
>>Audio.
Your smart forfour is in itself a very entertaining car. And audio and telematics devices provide additional entertainment when travelling*.
These systems transform your smart forfour into an allround entertainer.
Multifunction steering wheel*
Multifunction steering wheel*
Accident risk!
Please acquaint yourself with the
various functions of your multifunction
steering wheel prior to starting out on
your journey to ensure that you are not
distracted in any way from events on the
road if you operate it while driving.
The multifunction steering wheel permits
reliable operation of the
radio*,
CD player*,
mobile phone*,
Onboard computer*
without having to take your hands from the
steering wheel.
32 Audio
Multifunction steering wheel*
AU
TO
Multifunction steering wheel*
Menu controls for onboard computer*
A Scroll down main menu
B Scroll up main menu
C Scroll down submenu
D Scroll up submenu
E Onboard computer display
Volume control for audio/telematics
devices*
F Reduce volume
G Increase volume
Telephone function
H Answer call
I End call
Shift paddles*
J Shifting up
K Shifting down
Audio 33
Onboard computer*
Onboard computer*
The onboard computer is a standard fea
ture of the multifunction steering wheel*
optional extra, with its display incorpo
rated into the speedometer.
The onboard computer is activated auto
matically when you turn on the ignition.
34 Audio
Main menu buttons
You can call up the following main menus
with the buttons on the multifunction
steering wheel*:
Trip information (see page 36 ff)
Audio*
Navigation*
Telephone*
Basic settings
Submenu buttons
You can use the submenu buttons to
call up the various submenus,
search for stations or tracks.
All information is displayed in succession
on the onboard computer display in the
speedometer.
The onboard computer also displays a
variety of warnings.
Onboard computer*
Adjustment buttons
You can use the adjustment buttons to
adjust the volume,
make the appropriate settings in the
"Basic settings" menu.
Telephone buttons
You can use these buttons to answer or
end calls (with handsfree system* fitted).
Audio 35
Onboard computer*
Structure of the menus
Trip information
The following information can be read off
in the "Trip information" menu:
1. Trip recorder
Distance driven
Average speed
Journey time
Average fuel consumption
36 Audio
2. Total trip recorder
Distance driven
Average speed
Journey time
Average fuel consumption
3. Range on fuel in tank
4. Coolant temperature
5. Display off
Audio
You can find important information on
1. Radio,
2. CD player*
can be read off.
Use the main menu buttons to switch be
tween the features.
Onboard computer*
Navigation
The onboard computer display displays
the navigation function actively or inac
tively. Voice information supports the vis
ual displays and also helps you to arrive at
your destination quickly and without any
problems.
You can choose between
1. active navigation
Road name
Distance
Progress bar
Schematic representations of junc
tions with direction arrows
2. inactive navigation
Compass needle pointing in direction
of travel
Telephone
Entries in the "Telephone" menu can be
selected via the submenu buttons.
The telephone is operated via the tele
phone buttons on the multifunction steer
ing wheel*.
Basic settings
In the "Basic settings" menu, the
date and time can be set,
clock can be synchronised,
German, English, French, Italian, Span
ish or Japanese language versions can
be selected.
Audio 37
Onboard computer*
Further information
The onboard computer in addition dis
plays a whole range of warnings:
1. Coolant temperature
Switch off engine
2. Engine oil level
Switch off engine
3. Brakes
Service the brakes, take car to work
shop
5. Handbrake
Releasing the handbrake
6. Error when starting
Engage N to start
7. Error when starting
Press brake to start
8. Tank
Fuel level down to reserve
9. Airbag
Airbag faulty, take car to workshop
10. Door
The door indicated is open
38 Audio
11. esp
esp faulty, take car to workshop
12. abs
abs faulty, take car to workshop
13. Black ice
Danger of black ice
14. Service scope A or B
Service scope in XXXX km
Audio/telematics devices*
Audio/telematics devices*
Accident risk!
Please acquaint yourself with the
various functions for your audio, navi
gation and telecommunications systems
prior to starting out on your journey to
ensure that you are not distracted in
any way from events on the road if you
operate them while driving.
Accident risk!
Always select a volume that al
lows you to still hear ambient sound in
your immediate vicinity (e.g. horns,
emergency rescue vehicles, police ve
hicles, etc.). You could otherwise cause
an accident.
The following pages contain a brief de
scription of the audio, navigation and tel
ecommunications systems available for
the smart forfour.
The devices are described with their full
complement of equipment, including radio
mode and CD changer* mode. The de
scription for your individual equipment
specification applies.
Please see the individual operating in
structions for detailed functions.
Audio 39
Audio/telematics devices*
Controls
A On/off switch, volume
B Radio control buttons
C CD eject button
D Multifunction button panel
E Station buttons, tone settings
smart radio five*
The smart radio five system contains the
following functions:
Radio (FM/AM)
CD player
Connection option for universal hands
free system* (retrofittable)
>Note!
Please be sure to read the operating in
structions for the smart radio five before
using the set. Familiarise yourself with the
various functions of the set so that you
are able to operate it easily, reliably and
correctly at any time.
310 Audio
Accident risk!
If you wish to have a radio other
than an original smart radio fitted in
your car, ensure that the necessary work
is performed by a specialist workshop
authorised by smart gmbh for such work,
e.g. a smart center.
This is particularly important if there
had already been fitted a smart radio
five or if your car has a radio prein
stallation.
Improper connection (note pin assign
ment!) can lead to the failure of impor
tant vehicle functions (such as those of
the multifunction steering wheel*, the
shift paddles*, the onboard computer*
or similar).
Audio/telematics devices*
>Note!
Please be sure to read the operating in
structions for the smart radio six before
using the set. Familiarise yourself with the
various functions of the set so that you
are able to operate it easily, reliably and
correctly at any time.
Controls
A On/off switch, volume
B Control panel for selecting func
tions
Radio, radio CD, CD changer, tone
settings
C Display with menu buttons
smart radio six*
The smart radio six system contains the
following functions:
Radio (FM/AM)
CD player
Connection option for CD changer*
Connection option for telephone prein
stallation ex factory (UHI)* or universal
handsfree system* (retrofittable).
D Station buttons
Number dialling in conjunction with
telephone preinstallation ex factory
E Multifunction button panel
F CD eject button
Audio 311
Audio/telematics devices*
>Note!
Please be sure to read the operating in
structions for the smart radio navigator
before using the set. Familiarise yourself
with the various functions of the set so
that you are able to operate it easily, re
liably and correctly at any time.
smart radio navigator*
The smart radio navigator system con
tains the following functions:
Radio (FM/AM)
CD player
Connection option for CD changer*
Connection option for telephone prein
stallation ex factory (UHI)*
Navigation system with arrow view
312 Audio
Controls
A On/off switch, volume
B Control panel for selecting func
tions
Radio, radio CD, CD changer,
navigation system, tone settings,
number dialling in conjunction with
telephone preinstallation ex factory
(UHI)*
C Display with menu buttons, radio CD
D Numbers panel
E Multifunction button panel
F Telephone functions in conjunction
with telephone preinstallation ex
factory (UHI)*
Audio/telematics devices*
>Note!
Please be sure to read the operating in
structions for the smart radio multimedia
navigator before using the set. Familiar
ise yourself with the various functions of
the set so that you are able to operate it
easily, reliably and correctly at any time.
smart radio multimedia navigator*
The smart radio multimedia navigator sys
tem contains the following functions:
Radio (FM/AM)
CD player, DVD (for navigation DVDs on
ly)
Connection option for CD changer*
Connection option for telephone prein
stallation ex factory (UHI)*
Navigation system with map view
Controls
A On/off switch, volume
B Control panel for selecting func
tions
Radio, radio CD, CD changer,
navigation system, tone settings,
telephone operation in conjunction
with telephone preinstallation ex
factory (UHI)*
C Display with menu buttons, radio CD
D Numbers panel
E Multifunction button panel
F Telephone functions in conjunction
with telephone preinstallation ex
factory (UHI)*
Audio 313
smart CD changer*
smart CD changer*
The smart CD changer is located below the
driver's or front passenger's seat.
>Note!
More detailed information on how to oper
ate it is given in your radio operating in
structions.
314 Audio
Telephone console*
Telephone console*
The telephone console is located beneath
the centre console.
Accident risk!
Using telephones and radio
transmitters whose aerials are located
within the passenger compartment can
cause interference with the vehicle's
electrical system, which in turn may
compromise the operating safety of the
vehicle.
For safety reasons, all telephones and
radio transmitters that do not have an
outside aerial must be switched off
during the journey.
Accident risk!
Only use the telephone in con
junction with the handsfree system*
while driving, provided the traffic
situation permits. You otherwise risk
being distracted from the traffic situ
ation and causing an accident. Tele
phoning without a handsfree system*
is prohibited in most countries.
>Note!
The telephone battery is recharged de
pending on its charge status and the posi
tion of the key in the ignition. The
charging process is displayed in the tele
phone display.
>Important!
Do not place any bank, credit or other
cards with magnetic strips in the vicinity
of the holder. Its builtin magnet could
otherwise erase or modify the data stored
on such cards.
Audio 315
Telephone preinstallation ex factory (UHI)*
Telephone preinstallation ex factory
(UHI)*
With the telephone preinstallation ex fac
tory (UHI), incoming or dialled phone num
bers can be shown on the radio and on
board computer* display. It is accessed
via the radio or multifunction steering
wheel*.
The telephone preinstallation ex factory
(UHI) is connected to the radio and loud
speaker system.
The audio signals are thus reproduced via
the car's loudspeakers, allowing the vol
ume to be adjusted via the radio. The mi
crophones are located on the overhead
control panel.
The telephone preinstallation ex factory
(UHI) can only be acquired together with
the smart radio six, the smart radio navi
gator or the smart radio multimedia navi
gator.
316 Audio
While you are using the phone
the system is automatically activated,
audio programs are automatically mut
ed.
>Note!
More detailed information on operation
can be found in the operating instructions
for the respective audio device.
Universal handsfree system*
Universal handsfree system*
The universal handsfree system is con
nected to the radio and loudspeaker sys
tem. The audio signals are thus
reproduced via the car's loudspeakers,
allowing the volume to be adjusted via the
radio.
The universal handsfree system can only
be acquired together with the smart radio
five or the smart radio six.
While you are using the phone
the system is automatically activated,
the word Phone appears in the display,
audio programs are automatically mut
ed.
>Note!
More detailed information on operation
can be found in the operating instructions
for the universal handsfree system.
Audio 317
318 Audio
Contents
>Sun visors
>Sunroof visor
>Power glass sliding roof*
>Heater/ventilation
>Air conditioning system*
>Wipers
>Rear window heater
>Outside mirror heaters*
>Seat heater*
>>Adjustments.
You can adjust to the weather by changing your clothes to suit. Your smart forfour similarly offers a range of luxurious solutions such
as CFCfree air conditioning.
Sun visors
Mirror in sun visor
There is a mirror in the sun visor behind
the folding cover.
Accident risk!
Leave the mirrors in the sun vi
sors covered while driving, otherwise
reflected light could dazzle you and
others.
Sun visors
Protection against light from the front
쮿 Swivel the sun visor downwards.
쮿 Swivel the sun visor back up when the
sun is no longer blinding you and you
don't need it any more.
Protection against light from the side
쮿 Detach the inner end of the sun visor
from its holder.
> You can swivel the sun visors side
ways towards the side windows.
42 Adjustments
>Note!
The edge of the mirror can be used as a
ticket holder.
Sunroof visor
Sunroof visor
The sunroof visor serves to protect
against solar radiation and the buildup
of heat through the panoramic glass
roof*.
With the power glass sliding roof open, it
also excludes draughts.
쮿 Take hold of the handle and slide the
sunroof visor to the desired position.
> The sunroof visor can be operated
with one hand.
Adjustments 43
Power glass sliding roof*
Power glass sliding roof*
Switch for the power glass sliding roof
Opening and closing of the power glass
sliding roof is controlled via a rocker
switch while the ignition is switched on.
It is located on the overhead control pan
el. This enables the power glass sliding
roof to be opened to any desired posi
tion.
44 Adjustments
Raising the power glass sliding roof*
Opening the power glass sliding roof
쮿 Press the rocker switch (when glass
쮿 Briefly press the rocker switch to po
sliding roof closed) briefly to posi
tion B.
> Pressing the rocker switch a further
time halts the opening movement in
any desired position.
sition B.
> The glass sliding roof opens auto
matically.
> Pressing the rocker switch a further
time halts the opening movement in
any desired position.
Power glass sliding roof*
Closing the power glass sliding roof
쮿 Press the rocker switch to position A.
> The roof automatically moves into
the raised position.
> This process can be halted at any
time with a further press of the but
ton.
쮿 Press and hold the rocker switch in po
sition A until the roof has fully closed.
>Note!
To avoid causing damage to the glass
roof, do not carry any objects protruding
through the roof cutout.
With the glass sliding roof open, reso
nance noise may occur as well as the cus
tomary pressure fluctuations inside the
car.
쮿 Adjust the position of the sliding roof
to reduce or eliminate such noise.
Danger of injury!
The power glass sliding roof has
an obstruction sensor feature. When
closing it, nevertheless make sure that
no one is trapped.
>Note!
It may be necessary to readjust the glass
sliding roof from time to time. For de
tails of when and how to readjust the
glass sliding roof, see page 92.
Adjustments 45
Heater/ventilation
Environment!
Deice and dry fogged windows
before starting the engine.
Allowing the engine to idle when the
car is at a standstill can damage the
engine and pollute the environment.
Heater/ventilation
Your heater and ventilation controls
Air temperature/heater (A)
Blower (B)
Air distribution (C)
Fresh air/recirculated air selector* (D)
46 Adjustments
Air temperature/heating
Raising temperature of heated air
쮿 Turn the switch to the right.
Lowering temperature of heated air
쮿 Turn the switch to the left.
Accident risk!
Never drive with icedover or
fogged windows. Visibility will be
significantly impaired. You could in
addition cause an accident as a result.
Heater/ventilation
Blower
You can set the blower to four different
stages:
Off (stage 0)
Middle settings (stages 1 3)
> Blower slow/medium/fast
Blower on maximum (stage 4),
> Efficient deicing of windows and
fast drying of fogged windows.
Adjusting air nozzles
You can adjust the direction and rate of
airflow or shut off the air supply by turn
ing the air nozzle.
Off (A),
Maximum flow rate (B).
Air distribution
You can adjust the direction of the air
emerging from the nozzles with the rotary
control:
towards the front occupants (A),
to the footwell (B),
to the windscreen (C).
Adjustments 47
Heater/ventilation
Air distribution
The air flows from the nozzles set to the
respective blower stages as follows:
to the windscreen and side windows (C),
to the front and side windows and into
the footwell (B), (C),
to the footwell (B),
48 Adjustments
from the centre air nozzle, from the
side air nozzles and into the footwell
(A), (B),
from the centre air nozzle and the side
air nozzles (A).
You can adjust all air nozzles continu
ously by hand.
Heater/ventilation
Adjusting the recirculated air or
fresh air supply*
If your car is equipped with air condi
tioning*, you can change over between
recirculated air and fresh air when the
ignition is switched on.
Accident risk!
Use the recirculatedair mode
only for brief periods. The windows
could otherwise fog over.
The oxygen content in the passenger
compartment will be depleted. This re
duces concentration and thus increases
the danger of fatigue.
Switching on recirculated air
Switching on fresh air supply
쮿 Press the rotary control once.
쮿 Press the rotary control a further time.
> The air circulates e.g. when driv
ing through a tunnel in the passen
ger compartment.
> The indicator light on the switch
comes on.
> The air is drawn in from outside the
car.
> The indicator light on the switch
goes out.
Adjustments 49
Heater/ventilation
Adjustment examples for your heat
ing/ventilation
Rapid cooling
쮿 Set the temperature to cold.
쮿 Adjust the blower (B) to suit your needs.
쮿 Adjust the direction of the air and side
Accident risk!
You are strongly recommended to
adhere to the heating system settings
described on the next few pages. The
windows could otherwise fog over. You
could otherwise cause an accident be
cause of the resulting reduced visibil
ity.
air nozzles to the occupants.
Convenient cooling
쮿 Switch heater (A) off.
쮿 Adjust the blower (B) to suit your needs.
쮿 Adjust the air distribution (C) to the
centre air nozzles and footwell.
쮿 Adjust the direction of the air and side
air nozzles to suit.
410 Adjustments
Rapid cooling with air conditioning
system*
쮿 Close the windows.
쮿 Set the air conditioning rotary control
to cold.
> The air conditioning automatically
switches to recirculated air.
Heater/ventilation
>Important!
Do not use an ice scraper to remove ice
from the quarter windows on the rear
doors. This could otherwise cause damage
to the surface of the windows.
Rapid heating
쮿 Turn the heater (A) to maximum.
쮿 Adjust the blower (B) to maximum.
쮿 Adjust the air distribution (C) to the
centre air nozzles and footwell.
쮿 Direct the air nozzles towards the occu
pants.
Deicing the windows
The most effective way to deice the win
dows is
to remove the ice and snow completely
from the windows manually with an ice
scraper before starting the engine.
to turn the heater (A) to maximum.
to turn the blower (B) to stage 4.
to set the air distribution (C) to the
front and side windows.
Adjustments 411
Air conditioning system*
Air conditioning system*
Accident risk!
You are strongly recommended to
adhere to the air conditioning system
settings described on the next few pag
es. The windows could otherwise fog
over. You could otherwise cause an ac
cident because of the resulting re
duced visibility.
Function of the air conditioning system
The air conditioning system improves
the level of comfort when driving at high
outside temperatures
by cooling down the air,
by dehumidifying the air.
It operates
only when the engine is running,
only when the blower is switched on,
most effectively when the windows are
closed.
412 Adjustments
>Note!
Dehumidification of the air by air con
ditioning means that the windows do not
fog when there is a high level of moisture
in the air.
This effect can also be used to deice the
windows if, in addition to the air condi
tioning, the heater is switched to maxi
mum.
>Note!
An integrated air filter cleans the fresh
and recirculated air. It continues to op
erate when the air conditioning system is
switched off and you have switched the
blower on.
Air conditioning system*
Outside temperature display*
쮿 Press the selector knob (A) several
times until the outside temperature
display is activated.
Accident risk!
Even if the temperature indicat
ed is slightly above freezing, there
could still be black ice on the road,
particularly where it passes through
trees or over bridges.
Always adjust your driving style and
speed to the weather, road and traffic
conditions, to reduce the risk of acci
dents.
Please observe the following notes
before switching on the air conditioning
system:
The car's interior will cool down faster
if you do the following:
Discharge the warm air. To do this,
open a window briefly.
turn the blower to its maximum set
ting, and
close the window once the warm air
has been discharged.
In recirculated air mode, switch on the
air conditioning system.
Switch to fresh air mode after briefly
operating the system in recirculated
air mode.
Adjustments 413
Air conditioning system*
>Note!
When the ignition or blower is switched
on again, the air conditioning system
likewise comes on.
22
17
27
Switching the air conditioning system
on/off
쮿 Press the rotary control once.
> The air conditioning system is
switched on.
You can adjust the temperature with the
rotary control for the heating.
Raising temperature
쮿 Turn the switch to the right.
Lowering temperature
쮿 Turn the switch to the left.
414 Adjustments
>Note!
If the air conditioning system is set to
maximum cooling, it automatically
switches to recirculated air for a limit
ed time.
The air conditioning system switches off
automatically
if the blower is switched off, and
at a coolant temperature of more than
115 °C.
Environment!
In order to save fuel, the air con
ditioning system is best used with all
the windows closed.
Wipers
Wipers
The wiper lever is located to the right of
the steering column.
The following wipe and wash functions
are possible.
1
2
Rain sensor*
The rain sensor automatically controls
the activation and speed of the wipers
when rain and humidity collect on the
windscreen.
쮿 Move the lever to position 1.
> The rain sensor is switched on.
Windscreen wipers
Push lever up
1 Touchkey wipe
Push lever down
1 Interval wipe
> Delay duration of approx.
5 seconds.
2 Slow wipe
3 Fast wipe
Adjustments 415
Wipers
1
1
2
2
Windscreen wipers and windscreen
washer system
Pull lever towards the steering wheel
1 Windscreen washer system for
windscreen on
> The windscreen washer system re
mains active as long as the wiper le
ver is pulled.
> The wipers then proceed to wipe for
three more wipe cycles.
>Note!
Briefly tipping the lever will initiate a
single wiping cycle (touchkey wipe).
416 Adjustments
Rear window wiper and windscreen
washer system
Turning rotary control to the rear
Wipe and wash rear window
Touchkey wipe
Turning rotary control to the front
Interval wipe
> Delay duration of approx.
6 seconds.
Rear window heater
Rear window heater
쮿 Press the rotary control for the rear
The rear window heater
serves to free the rear window of ice
quickly,
clears the window if it has been
fogged.
window heater once.
> The rear window heater is switched
on.
> The integrated indicator light
comes on.
쮿 Press the switch again.
> The rear window heater is switched
off.
> The integrated indicator light goes
out.
Accident risk!
Clear ice or snow from the rear
window before setting off. You could
otherwise cause an accident because of
the resulting reduced visibility.
Switching the rear window heater on/off
쮿 Switch on the ignition.
> You can help to prolong the life of
the battery by switching the rear
window heater on only when the en
gine is running.
>Note!
The rear window heater will switch itself
off automatically after 20 minutes.
Adjustments 417
Outside mirror heaters*
Outside mirror heaters*
Switching on outside mirror heaters
If your car is equipped with electrically
adjustable outside mirrors they will
likewise be heated.
The heated outside mirrors
serve to automatically deice the out
side mirrors.
give you a clear view when the outside
mirrors are fogged.
쮿 Switch on the ignition.
쮿 Switch on the rear window heater.
418 Adjustments
> The outside mirror heaters automat
ically come on at the same time.
Switching off outside mirror heaters
쮿 Switch off the rear window heater.
> The heated outside mirrors are
switched off automatically.
Seat heater*
쮿 Press the switch for the seat heater a
Seat heater*
third time.
> The heater for the appropriate seat
is switched off.
> No indicator lights on the switch are
lit.
The seat heater allows you to heat the
driver's seat and front passenger's seat
electrically when the ignition is
switched on.
The switches for switching the seat heat
ers on and off are located on the switches
strip on the centre console.
Switching the seat heater on/off
쮿 Press the switch for the seat heater
once.
> The heater for the appropriate seat
switches to fast heating.
> Both indicator lights on the switch
are on.
쮿 Press the switch for the seat heater
again.
> The heater for the appropriate seat
switches to normal heating.
> An indicator light on the switch
comes on.
>Note!
When the ignition is switched off the seat
heater is also switched off.
Malfunction
In the event of a seat heater malfunction
the indicator light on the switch lights
up briefly and goes out again after the
switch is released.
쮿 Take the car to a qualified specialist
workshop, e.g. a smart center.
Adjustments 419
420 Adjustments
Contents
>Child restraint systems
>Airbag disabling
>Positions for child re
straint systems
>Recommended child re
straint systems*
>>Child friendly.
The safety of your children is a matter close to our heart.
For this reason, we have developed child restraint systems* for your children that fulfil the most stringent safety criteria. To make
sure that your children are comfortable, the system has been designed using the latest ergonomic findings.
Child restraint systems
Child restraint systems
In order to ensure that you will be able to
safely transport children, your vehicle
is equipped with the following child
safety systems:
Child restraint by locking the rear
doors (see page 17)
Child restraint by locking the rear
power windows* (see page 120)
Child restraint systems*
Child restraint systems*
Without suitable child restraint systems
the seat belts cannot be fastened cor
rectly.
your children will be exposed to a
greater risk of injury, as children's
muscles and bones are not yet fully de
veloped.
To reduce this increased risk of injury,
children need suitable child restraint
systems if they are
smaller than 150 cm (approx. 5 ft) or
under 12 years of age.
Only use those child restraint systems
which are appropriate for your vehicle.
Details of these products are provided in
the operating instructions for the indi
vidual items. Please read them carefully.
52 Child friendly
>Note!
Current information on child restraint
systems is available from a qualified
specialist workshop, e. g. a smart center.
>Note!
Observe the respective national regula
tions in this regard.
Child restraint systems
ISOFIX child seat attachment*
ISOFIX is a standardised attachment sys
tem for special child seats. The mounting
brackets for two child seats are located
on the seat surface of the rear bench out
er seats.
A smart center can provide you with in
formation on the child restraint systems
with ISOFIX attachments approved for use
in your vehicle.
Child seat safety lock
The belts on the rear bench outer seats
are equipped with a child seat safety
lock. This allows you to secure a child
seat against sliding. The child seat
safety lock ensures that the belt remains
tensioned after the child seat has been
secured.
Activating the child seat safety lock
쮿 Pull the belt all the way out of the re
tractor.
> The child seat safety lock is
switched on.
When you release the belt, you will
hear a clicking sound. The belt now
cannot be pulled any further out of
the retractor.
쮿 Secure the child seat with the belt in
accordance with the instructions pro
vided by the child seat manufacturer.
쮿 Insert the latch plate into the catch.
쮿 Retract the belt until it firmly rests on
the child seat.
What you must note when transporting
children!
Danger of injury!
Never leave a child alone in the
car. It could for instance set the car
moving, injure itself on moving parts,
and open the doors in a manner that
could endanger both itself and others.
Please also observe the warnings given
elsewhere in these operating instruc
tions regarding children and the vehi
cle.
Deactivating the child seat safety lock
쮿 Press the release button on the belt
catch.
쮿 Coil the belt all the way into the re
tractor.
> The child seat safety lock is
switched off. You now can pull on and
retract the belt as usual.
Child friendly 53
Child restraint systems
Danger of injury!
It will not be possible to fit the
seat belts correctly on children under
150 centimetres (approx. 5 ft) tall or
under 12 years of age without suitable
support equipment. They therefore
need special child restraint systems*
for protection in the event of an acci
dent.
Never carry children travelling on the
lap of another occupant. Both you and
the child will otherwise be unprotected
in the event of an accident and could
sustain serious or even fatal injuries.
When fitting a child restraint system*,
observe the manufacturer's fitting in
structions.
Preferably secure the child restraint
system* on the rear bench outer seats.
The child will normally be better pro
tected there.
54 Child friendly
Airbag disabling
Airbag disabling
If you use rearwardfacing child re
straint systems* on the front passenger's
seat, the front passenger's front airbag
must be disabled. For the precise proce
dure, please refer to page 636.
Danger of injury!
If the airbag indicator light is
not lit in the off position, the front
passenger's front airbag may not be
disabled. Should the airbag inflate, a
child secured by a child restraint sys
tem* on the front passenger's seat will
be consequently exposed to the risk of
life threatening injuries. In this in
stance, proceed as follows:
Do not use a rearfacing child re
straint system* on the front passen
ger's seat. The child could sustain
serious or even fatal injuries as a
result of the airbag being inflated.
Fit the rearfacing child restraint
system* on a suitable rear seat.
Use a forwardfacing child seat on
the front passenger's seat, provided
it is suitable for your child. In this
instance, move the front passenger's
seat to its rearmost position.
Danger of injury!
An incorrectly installed child
seat could become dislodged in an ac
cident or by braking manoeuvres or an
abrupt change of direction and cause
serious or even fatal injuries to the
child and other occupants.
For this reason, never place other ob
jects (such as cushions) beneath the
child restraint system*. The entire
base area of the child restraint system
must always be in contact with the seat
surface.
Child friendly 55
Airbag disabling
Danger of injury!
To reduce the risk of serious or
even fatal injuries to the child in the
event of an accident, braking manoeu
vres or sudden changes of direction,
please note the following:
On child restraint systems* that do
not have their own belt system, the
shoulder belt of the car's builtin
threepoint seat belt must run ap
proximately across the middle of the
child's shoulder never across the
neck and lie firmly against the up
per body. The lap section of the seat
belt must run across the pelvis not
across the stomach and always lie
firmly in place. Tighten the belt if
necessary.
56 Child friendly
Only one child at a time should be se
cured by any child restraint system.
Make sure that the belt is not
trapped, twisted or rubbing against
sharp edges.
Also observe the operating instruc
tions for the child restraint system.
Danger of injury!
If the child restraint system* or
its fastenings have previously been
damaged or subjected to loads in an ac
cident, the child it is intended to pro
tect could sustain serious or even fatal
injuries as a result of another acci
dent, braking manoeuvres or abrupt
changes of direction.
You should therefore have restraint
systems and fastenings that have been
damaged or subjected to loads in an ac
cident checked without delay in a qual
ified specialist workshop, such as a
smart center, and have them replaced if
necessary.
Positions for child restraint systems
Positions for child restraint systems
The table below provides you with an
overview of the installation options for
child restraint systems in your car.
Seats
Weight categories and approximate age groups
up to 10 kg
(up to approx.
9 months)
up to 13 kg
(0 to 2 years)
9 to 18 kg
(from approx. 9 months to
4 years)
15 to 36 kg
(from approx. 4 months to
12 years)
Front passenger seat
U
U
U
U
Outer seat,
rear bench seat
B
B
B
B
Centre seat,
rear bench seat
U
U
U
U
U:Suitable for "universal" child restraint systems that have been approved for this age group.
B:Suitable for special child restraint systems included in the list on page 58. The child restraint systems in question may be "ve
hiclespecific", "restricted", "semiuniversal" child restraint systems.
Child friendly 57
Recommended child restraint systems*
Recommended child restraint
systems*
The following child restraint systems
have been specially checked for safe op
eration in your vehicle.
Weight group
A current list of additional child re
straint systems approved for use in your
smart forfour can be obtained in a quali
fied specialist workshop, e.g. a smart
center.
Manufacturer
smart article
number
Model
Comment
up to 10 kg
(up to 9 months)
up to 13 kg
(0 to 2 years)
Storchenmühle
Baby carrier
Maximum
A 000 920 09 21 1), 2), 4)
9 to 18 kg
(from 9 months to 4 years)
Britax Römer
Child seat
Duo Plus
A 000 920 10 21 1), 3), 5)
15 to 36 kg
(from 4 to 12 years)
Storchenmühle
Booster seat
for children
My Seat XL
A 000 920 11 21 1), 4)
1)When these child restraint systems are used, the front passenger's seat must be moved to the rearmost position.
2)Disabling of front passenger's front airbag essential if baby carrier used on front passenger's seat.
3)Rear seat must be moved to the rearmost position.
4)Rear seat should be moved to the rearmost position, front passenger's seat to the furthest forward position.
5)Attachment with threepoint belt (universally approved) or with ISOFIX child seat attachment* (specially approved).
58 Child friendly
Contents
>Before driving off
>Driving
>Alarm system*
>Driving in winter
>Driving with a catalytic
converter
>Driving with a trailer
>Driving notes
>Brakes
>Electronic Stability Pro
gram (esp)
>Airbags
>>On the move.
Your smart forfour offers you various ways of adapting to your individual driving habits.
You can either manually shift or take advantage of the automated six speed transmission, softouch plus*. With softouch plus, you can select
the gears yourself without having to operate a clutch pedal when set to softip mode. When softouch is selected, the transmission automat
ically shifts itself. abs and esp, as well as an array of extensive safety systems, are designed with one goal in mind: to protect you and your
passengers.
Before driving off
Before driving off
쮿 Acquaint yourself with the operating
controls in your car before starting
your first journey.
쮿 Please study this chapter very careful
ly.
쮿 Get to know the car and how to handle it.
Special technical features
You should study its special technical
features:
Display with gear indicator1,
Electronic immobiliser,
Gearshifts
Gearshifts from the steering wheel*.
Accident risk!
If you use floor mats*, make sure
that there is enough clearance between
them and the pedals, and that they are
secured in place. Never place any loose
objects in the driver's footwell.
Check that the floor mat is secure be
fore setting off, and adjust it if neces
sary. An insufficiently secured floor
mat could slip and obstruct pedal ac
tions.
Do not place floor mats on top of each
other, as it will then not be possible to
secure them.
Display with gear indicator1
Important information on gearshifts is
provided in the gear indicator in your
display:
Gear engaged
Upshift (recommendation to change
gears)
Downshift (recommendation to change
gears)
Neutral, no gear engaged
Reverse gear is engaged
No gear engaged
Automated gearshifts*
Electronic immobiliser activated
1 The gear indicator is only present on versions with automated manual transmission (softouch plus)*.
62 On the move
Before driving off
Electronic immobiliser
The electronic immobiliser prevents
your car from being started without the
original key.
How to activate the electronic
immobiliser
쮿 Take the key out of the ignition switch.
> The electronic immobiliser is acti
vated.
Deactivate electronic immobiliser
쮿 Turn on the ignition (move key in igni
tion switch to position 2).
> The electronic immobiliser is deac
tivated.
Gearshifts
You change gear in your car in various
ways, depending on its specification:
Gearshifts with manual gearbox.
> Your car has a clutch pedal, which
you must operate to change gear.
Gearshifts with automated manual
transmission (softouch plus)*.
> Your car does not have a clutch pedal.
Gearshifts take place automatically.
Accident risk!
Ensure that there is sufficient
clearance between floor mats or car
pets and the pedals.
Do not leave children unsupervised in
the car. They could take the car out of
gear.
Risk of skidding!
Do not shift down if the top speed
for the desired gear has been exceeded.
The driven wheels could block. This
could impair steerability.
Do not shift down to brake on slippery
surfaces. You could lose control over
the vehicle as a result and cause an ac
cident.
On the move 63
Before driving off
Starting and driving vehicles with
manual gearbox
The gearshift pattern shows you the posi
tion of the gearshift lever when in each
of the gears.
64 On the move
Changing gear and driving: cars with
automated manual transmission (softouch
plus)*
The automatically controlled gearbox
(softouch plus*) has two operating modes:
softip mode
> You actively determine the timing of
gearshifts by a onetouch action.
softouch mode
> The car will change gear automati
cally.
The gearshift pattern shows you the pos
sible positions of the gearshift lever.
Gearshifts from the steering wheel (shift
paddles)*
This function enables you to shift the
gears without needing to take your hand
off the steering wheel.
To change gear, briefly press the shift
paddles on the steering wheel with the
gearshift lever in the gearshift plane.
+ Upshift
Downshift
Driving
Driving
Breaking in
The first 1,500 km are of immense signif
icance for the service life and perform
ance of your car's engine.
During the breakin period:
Do not drive at full throttle.
Change gear early.
Avoid running at high engine speeds.
When the breakin period is over:
You can gradually start to drive your car
faster, progressing up to top speed and
maximum engine speed.
>Note!
Please study the driving notes contained
in these operating instructions.
On the move 65
Driving
The ignition key can be turned to the fol
lowing positions:
Position 0 (LOCK): Pull out the key
Position 1 (ACC): Power supply for cer
tain electrical consumers
Position 2 (ON): Power supply for all
electrical consumers and key position
while driving
Position 3 (START): Starting the engine
Starting the engine (petrol engine)
Manual gearbox
쮿
쮿
쮿
쮿
쮿
쮿
Fasten your seat belt.
Insert the key in the ignition switch.
Press the footbrake and the clutch pedal.
Move the gearshift lever to position N.
Turn the key to position 2.
Turn the key briefly to position 3.
> The engine will start.
66 On the move
Danger of poisoning!
Never run the engine in enclosed
spaces. The exhaust emissions contain
carbon monoxide. Breathing in exhaust
emissions can severely damage your
health, resulting in a loss of con
sciousness or even death.
Automated manual transmission (softouch plus)*
쮿
쮿
쮿
쮿
Fasten your seat belt.
Insert the key in the ignition switch.
Apply the footbrake.
Move the gearshift lever to position N.
> The engine only starts when the gearshift lever is in
position N.
> An N appears in the gear indicator.
쮿 Turn the key to position 2.
쮿 Turn the key briefly to position 3.
> The engine will start.
Driving
Starting the engine (diesel engine)
Manual gearbox
쮿
쮿
쮿
쮿
쮿
Fasten your seat belt.
Insert the key in the ignition switch.
Press the footbrake and the clutch pedal.
Move the gearshift lever to position N.
Turn the key to position 2.
> The preglow indicator light comes on.
When the preheat indicator light goes out, you can start the en
gine:
쮿 Turn the key briefly to position 3.
> The engine will start.
Automated manual transmission (softouch plus)*
쮿
쮿
쮿
쮿
Fasten your seat belt.
Insert the key in the ignition switch.
Apply the footbrake.
Move the gearshift lever to position N.
> The engine only starts when the gearshift lever is in
position N.
> An N appears in the gear indicator.
쮿 Turn the key to position 2.
> The preglow indicator light comes on.
When the preheat indicator light goes out, you can start the en
gine:
쮿 Turn the key briefly to position 3.
> The engine will start.
On the move 67
Driving
Engine will not start
Check whether
the gearshift lever is in position N,
the footbrake is applied,
the display in the gear indicator1
shows N.
1. Engine does not start within four
seconds:
쮿 Wait for a few moments.
쮿 Try to start the engine again.
2. Engine will not start:
쮿 Secure your car against rolling away
if you have to leave it.
쮿 Call a breakdown recovery service,
e.g. smartmove Assistance or a
smart center.
1 Only on vehicles with automated manual transmission (softouch plus)*
68 On the move
Driving
Driving off
Manual gearbox
쮿 Press the footbrake and the clutch
pedal.
쮿 Engage first gear.
쮿 Release the footbrake, and then the
clutch pedal slowly.
쮿 Press the accelerator pedal at the same
time.
> The car will move off.
softip*/softouch*
쮿 Apply the footbrake.
쮿 Pull the gearshift lever out of position N to the left into the centre position D.
> Gear changes will be performed automatically (softouch) on versions with 80 kW
engines. An A appears in the gear indicator.
> Gear changes are performed manually (softip) on all other versions. A 1 appears in
the gear indicator.
>Note!
To change between softip and softouch, move the gearshift lever briefly to the one
touch position A. To change over from softouch to softip, you can also move the gear
shift lever briefly towards + or .
쮿 Release the footbrake.
쮿 Apply pressure to the accelerator pedal gradually.
> The car will move off.
On the move 69
Driving
Crawl function*
The crawl function enables you to drive
slowly without pressing the accelerator.
This form of movement will make it easi
er for you to park the car and roll along in
heavy traffic.
Activating crawl function
쮿 Operate the footbrake with the vehicle
stationary.
If you wish to move forwards,
쮿 pull the gearshift lever out of
position N to the left into the
gearshift plane.
If you wish to move backwards,
쮿 shift the gearshift lever out of
position N and pull it back to
position R.
쮿 Release the footbrake.
> The vehicle will move along at a very
low speed.
610 On the move
>Note!
The crawl function is only available
with the handbrake released,
on a gradient of up to five percent,
with the footbrake depressed while the
gear is engaged.
The function is cancelled if you acceler
ate or brake.
>Note!
If there is a risk of the clutch being
overloaded as a result of using the crawl
function, the engine automatically cuts
out.
Accident risk!
If the engine cannot be started,
the servo brake will not work.
Considerably more effort will be need
ed to apply the brakes.
Driving
Reversing the car
Manual gearbox
쮿
쮿
쮿
쮿
Press the footbrake and the clutch pedal.
Engage reverse gear.
Release the footbrake, and then the clutch pedal slowly.
Press the accelerator pedal at the same time.
> The car will move off.
softip*/softouch*
쮿 Apply the footbrake.
쮿 Shift the gearshift lever out of position N and pull it back to
position R.
> An R appears in the gear indicator.
쮿 Release the footbrake.
쮿 Apply pressure to the accelerator pedal gradually.
> The car will move off.
>Note!
Engage the reverse gear only when the car is at a standstill.
On the move 611
Driving
Accelerating
Manual gearbox
쮿
쮿
쮿
쮿
Depress the clutch pedal.
Engage the next gear up.
Release the clutch pedal.
Press the accelerator pedal at the same
time.
612 On the move
softip*
softouch*
쮿 To continue to accelerate the car, press
쮿 Move the gearshift lever to the left, to
the accelerator pedal.
> The gear indicator displays the gear
currently engaged.
> An arrow will appear in the gear in
dicator display advising you to shift
up (앖) or down (앗).
쮿 Keep the pressure on the accelerator
pedal.
쮿 Briefly press the gearshift lever
towards + to shift up or towards to
shift down.
the onetouch position A.
> The car will perform automated gear
shifts.
> An A appears in the gear indicator.
>Note!
If you want to change back to softip:
쮿 move the gearshift lever to the left
again to the onetouch position A or
쮿 move the gearshift lever briefly
towards + or .
Driving
>Note!
When performing automated gearshifts,
observe the following:
Environment!
To save energy and protect the en
vironment, shift up in good time, as
soon as you are requested to do so in the
gear indicator in the display.
softip*
Kickdown function
When coming to a stop, e.g. at traffic lights, the car will au
tomatically select 1st gear.
The car will automatically shift up a gear once you reach the
engine speed limit.
Vehicles with softip and softouch:
Use the kickdown function when you want maximum accelera
tion.
쮿 Depress the accelerator past the pressure point.
> The transmission downshifts.
쮿 Take your foot slightly off the accelerator once you have
reached the desired speed.
If you press the accelerator beyond the kickdown point to make
a sports start, the clutch is not engaged until the engine has
reached a higher speed.
On the move 613
Driving
쮿
쮿
쮿
쮿
Parking
Accident risk!
When you stop the car on a hill or
park it, it must be secured additionally
by means of the handbrake.
The car could otherwise roll away even
if the gearshift lever has been moved to
position R, and could cause an accident
resulting in injury or even death.
Wait until the display R is shown1.
Switch off the engine.
Apply the handbrake.
Remove the ignition key.
Accident risk!
Do not leave children unsuper
vised in the car. They could
e.g. release the handbrake This could
result in an accident and cause serious
or even fatal injuries!
Accident risk!
Do not park the car with the en
gine running and a gear engaged. This
could allow the car to set itself in mo
tion and cause an accident.
쮿 Apply the footbrake.
쮿 Shift the gearshift lever to position R.
1 Only on vehicles with automated manual transmission (softouch plus)*
614 On the move
Alarm system*
Alarm system*
The alarm system protects your vehicle
against unauthorised access such as bur
glary or theft.
If an alarm is triggered,
the horn sounds periodically,
the turn signal lights start to flash.
An alarm is triggered
if one of the doors is opened without
the car first having been unlocked.
if the front lid or tailgate is opened
without the car first having been un
locked.
when the vehicle's passenger compart
ment is entered.
if there is motion inside the vehicle.
if the vehicle is placed at an angle.
when you unlock the driver door with
the key.
>Note!
You also can activate the alarm system by
locking the vehicle without using the re
mote control (see page 18).
Activating the alarm system
To ensure that the alarm system is in per
fect working order it is necessary that
all windows, the tailgate and the bon
net are fully closed prior to activa
tion.
no movable objects are located inside
the car's passenger compartment.
쮿 Close the doors of the car.
쮿 Press the button to lock the car.
> The car's doors are locked.
> The turn signal lights flash three
times.
> The indicator light in the switch be
gins to flash quickly.
If the alarm system is activated, the in
dicator light flashes approx. every
3 seconds.
Deactivating the alarm system
If you unlock the doors of the car with the
remote control, the alarm system is deac
tivated.
If an alarm was triggered, the indicator
lamp for the alarm system flashes peri
odically for approx. 1 minute after the
vehicle is unlocked.
>Note!
The alarm can be deactivated at any given
time by the remote control. You also can
deactivate the alarm system without us
ing the remote control by inserting the
key into the ignition switch and turning
to the "ON" position.
On the move 615
Alarm system*
Switching off towing sensor for transport
If you
are towing away your car or for example
loading it on an autorail train and
wish to lock the doors,
the towing sensor must be switched off
manually, as the vehicle's angle would
otherwise cause an alarm to be triggered
off.
Switching off towing sensor manually
Towing sensor
The activated alarm system triggers off
an alarm if one side of your vehicle is
raised.
If you lock your car with the remote con
trol, the towing sensor cuts in automati
cally after about 30 seconds, and cuts out
when the alarm system is deactivated.
616 On the move
쮿 Remove the car key.
쮿 Press the towing sensor switch.
> The indicator light in the switch
lights up.
쮿 Lock your car with the remote control.
Reactivating the towing sensor
The next time you lock the car with the
remote control, the towing sensor comes
on again.
Alarm system*
Switching off interior motion sensor
If persons or pets are to remain inside
the locked vehicle, the interior motion
sensor must be switched off manually, as
their motion inside the car would other
wise trigger off an alarm.
Interior motion
The activated alarm system triggers off
an alarm if motion is detected inside the
car.
If you lock your car with the remote con
trol, the interior motion sensor cuts in
automatically after about 30 seconds, and
cuts out when the alarm system is deacti
vated.
Switching off interior motion sensor
manually
쮿 Remove the car key.
쮿 Press the interior motion sensor
switch.
> The indicator light in the switch
lights up.
쮿 Lock your car with the remote control.
Switching on interior motion sensor
again
The next time you lock the car with the
remote control, the interior motion sen
sor comes on again.
On the move 617
Driving in winter
Things to do before the onset of
winter
Driving in winter
We recommend that you have your car
checked by a qualified specialist work
shop such as a smart center before the on
set of winter.
Electronic systems (such as esp) are not
able to overcome the laws of physics.
Adapt your driving style and speed to the
winter road conditions and exercise cau
tion when accelerating and braking.
Accident risk!
Failure to observe the notes on
gear shifting and driving in winter
conditions may result in diminished
operating stability, e.g. the rear end
could break away. lead you to cause an
accident.
Accident risk!
Electronic control systems such
as esp are only able to stabilise the ve
hicle subject to the laws of physics. Al
ways adapt your speed to the weather,
road and traffic conditions.
Accident risk!
On bends, even electronic sys
tems are only capable of providing a
limited degree of stabilisation. Al
ways adapt your driving style to the
weather, road and traffic conditions.
You should therefore reduce your speed
before entering a bend. You could oth
erwise cause an accident.
618 On the move
Please pay particular attention to the
following notes concerning winter
driving:
In the interests of safety, we recom
mend fitting the tyres specifically ap
proved for your vehicle by smart gmbh.
These tyres are chosen specifically to
suit control systems such as abs and
esp. If you use other tyres, smart gmbh
is unable to accept any responsibility
for damage resulting from their use.
Change over to winter tyres at an early
date, preferably in the autumn.
Drive at low engine speeds.
Avoid extreme load reversals.
Upshift in good time (lowspeed driv
ing) and take your foot off the acceler
ator pedal when shifting gears.
Avoid sudden, jerky movements of the
steering wheel.
Brake your car as early as possible be
fore entering a bend.
Driving with a catalytic converter
Driving with a catalytic converter
Things you need to know
The catalytic converter reduces ex
haust emissions.
The catalytic converter is located in
side the engine compartment, at the
front.
Fill up with leadfree petrol only.
Even small quantities of leaded petrol
can damage the catalytic converter.
It is essential to heed the following
points, as there is otherwise a danger of
overheating and the catalytic converter
may be damaged.
Make sure you adhere to the prescribed
service intervals.
Never run the fuel tank empty.
If the engine starts to misfire, bring
the car to an immediate standstill
without endangering traffic.
If the engine fails to start the first
time, you should not try to start it any
more than three times in succession.
Do not run the starter motor for periods
of more than 4 seconds at a time.
Fire hazard!
The catalytic converter can get
extremely hot. Coming into contact
with it could result in burns. For this
reason
never remove its protective guard.
do not apply underseal.
when parking the car make sure that
the catalytic converter cannot come
into contact with any flammable ma
terial (e.g. hay or grass). It could
otherwise ignite and cause fire dam
age or injury.
On the move 619
Driving with a trailer
Driving with a trailer
A trailer alters the handling of your ve
hicle.
The outfit
is heavier,
will be able to accelerate and climb
hills less easily
requires a longer braking distance,
will be more susceptible to gusty
crosswinds.
Fuel consumption is higher when a trail
er is being towed.
620 On the move
Tips on driving with a trailer:
We recommend using the maximum per
mitted nose weight.
The load inside the car must be reduced
in line with the nose weight, to avoid
exceeding the rear axle load limit.
You should not exceed a speed of
80 km/h (approx. 50 mph), including in
countries where higher speeds are
permitted.
Avoid braking abruptly; instead, apply
the brakes gently at first to allow the
trailer to run up first. Then increase
braking force rapidly.
If the trailer should start to snake, re
duce your speed; do not take corrective
steering action, and brake if neces
sary. Never try to straighten out the car
and trailer outfit by increasing your
speed.
The hillclimbing capacity from a
dead stop is quoted at sea level. When
driving in mountainous regions, bear
in mind that engine output deterio
rates at increasing altitude, and that
its hillclimbing ability will conse
quently also be reduced.
>Important!
Do not uncouple a trailer with an over
running brake when in a runup state. The
overrunning brake could rebound and
damage the bumper.
Driving notes
Driving notes
The following tricks will help you to save
a substantial amount of fuel with your
car.
Not only will you reduce your operating
costs; you also will be helping to protect
the environment.
1. Take five
The following holds true for traffic
lights, rail barriers and when sitting in
tailbacks: always switch the engine off,
as you only need to be stopped for ten
seconds to save money.
>Important for vehicles with automated
manual transmission (softouch plus)*!
Make sure when you are about to drive off
again that
the selector lever is set to position N.
the footbrake is applied.
the gear indicator is displaying an N.
2. Full speed ahead
Driving off expends considerably more
energy than driving at a constant speed.
So when starting off, drive for no more
than two vehicle lengths in 1st gear and
accelerate briskly with the throttle at
least three quarters of the way down.
3. Please shift
Shift gears in good time when the gear
indicator in the display advises you to do
so.
4. Keep on running, look ahead
Frequent braking followed by accelerat
ing will cause your car to use up dis
tinctly more fuel than otherwise. For this
reason you should keep your distance
from the vehicle in front and ease off the
accelerator in good time whenever possi
ble.
5. Letting go
It is always better to let the vehicle roll
with the transmission in gear and to ap
ply no gas than to roll in neutral. This
way, fuel consumption is zero (decelera
tion fuel shutoff).
6. Under pressure
Correct tyre pressures help save fuel, in
crease tyre service life and improve
braking safety. Tyre inflation pressures
are given on the inside of the fuel tank
flap for various tyre types and load con
ditions.
7. Travelling light
Unnecessary articles stored in the lug
gage compartment will also increase fuel
consumption. We would therefore advise
you to check the luggage compartment
from time to time and remove any unnec
essary articles.
8. The perfect setting
Have your car checked regularly by a
qualified specialist workshop, e.g. in a
smart center. Do not exceed the scheduled
service intervals.
Environment!
You will save energy and help to
protect the environment if you refrain
from warming up the engine before
driving off and switch the engine off
when stationary due to a trafficin
duced delay.
On the move 621
Brakes
Operating the handbrake
쮿 Pull the lever upwards.
> The lever engages automatically
when pulled up.
> The brake system indicator light in
the instrument cluster lights up un
til you switch off the ignition.
Releasing the handbrake
Brakes
Handbrake
The handbrake serves to secure the car
against rolling away when it is station
ary or parked.
Accident risk!
When you stop the car on a hill or
park it, it must be secured additionally
by means of the handbrake.
The vehicle could otherwise set itself
in motion even with the gearshift le
ver in position R and cause an acci
dent.
622 On the move
쮿 Lift the lever up slightly.
쮿 Push lock knob (A).
쮿 Push the lever down.
> The brake system indicator light
goes out.
Accident risk!
Do not leave children unsuper
vised in the car. They could
e.g. release the handbrake This could
result in an accident and cause serious
or even fatal injuries!
Brakes
Footbrake
The footbrake has two brake circuits that
are independent of each other. A brake
servo is used when braking to increase
pedal force.
Accident risk!
Never restrict the free movement
of the pedals in any way. Never place
any loose objects in the driver's foot
well. Ensure that there is sufficient
clearance from floor mats or carpets.
Do not leave children unsupervised in
the car. They could remove a gear that
has been engaged, or release the hand
brake.
This could allow the car to set itself in
motion and cause an accident.
If a brake circuit fails (see "Brake sys
tem faults", page 626),
you must press the brake pedal further
down to achieve the maximum possible
braking effect.
the braking distance is longer.
쮿 Immediately park your car away from
moving traffic.
쮿 Secure your car against rolling away if
you have to leave it.
쮿 Do not drive any further.
쮿 Call a breakdown recovery service, e.g.
smartmove Assistance or a
smart center.
On the move 623
Brakes
>Note!
The brake servo will function only with
the engine switched on.
Accident risk!
Considerably more effort will be
required to apply the brakes if
the brake servo has failed,
a brake circuit has failed,
the engine is switched off, e.g. for
towing away.
The braking distance is likewise
greater.
Make sure that the engine is running
whenever the vehicle is rolling. Have
the brake system repaired by a quali
fied specialist workshop, e.g. a smart
center, if there is a fault in the brake
system.
The mechanicalacoustic brake pad
display
The car is equipped with a mechanical
acoustic brake pad display. If you can
hear a continuous noise from the front
axle when braking, you should take the
car to a qualified specialist workshop,
e.g. a smart center.
624 On the move
Antilock braking system (abs) with
electronic brake force distribution
Accident risk!
The risk of accidents increases
if you drive too fast, particularly
into corners,
on wet and slippery surfaces,
if you drive too close to the vehicle
in front.
abs and esp can reduce this risk but not
exclude it entirely. Always adapt your
driving style to the prevailing road,
traffic and weather conditions.
The antilock braking system prevents
the wheels from locking when the brakes
are applied. This upholds the steerabil
ity of your car.
If the abs cuts in while you are braking,
you will feel a pulsating sensation of the
brake pedal.
Braking using abs
In emergency situations:
쮿 Press the footbrake down quickly and as
hard as you can.
쮿 Continue to apply the brakes even when
the pedal starts to pulsate. Increase
the braking force if possible. This way
you will achieve maximum decelera
tion.
Brakes
Brake system faults
Faults in the abs system
A brake system fault has occurred if the
brake system indicator light
does not go out after releasing the
handbrake.
comes on when the car is in motion.
comes on at the same time as the abs
and esp indicator light.
An abs malfunction has occurred if the
abs indicator light
does not go out when the engine has
started or within ten seconds of having
started (case 1).
comes on when the car is in motion
(electronic brake force distribution
emergency mode) (case 2).
comes on together with the brake sys
tem indicator light (electronic brake
force distribution failure) (case 3).
In all three cases
쮿 Immediately park your car away from
moving traffic.
쮿 Secure your car against rolling away if
you have to leave it.
쮿 Do not drive any further.
쮿 Call a breakdown recovery service, e.g.
smartmove Assistance or a
smart center.
In case 3
쮿 Immediately park your car away from
moving traffic.
쮿 Secure your car against rolling away
if you have to leave it.
쮿 Do not drive any further.
쮿 Call a breakdown recovery service,
e.g. smartmove Assistance or a
smart center.
In cases 1 and 2
쮿 Take the car to a qualified specialist
workshop, e.g. a smart center, without
delay.
On the move 625
Electronic Stability Program (esp)
Electronic Stability Program (esp)
How esp works
Your vehicle comes standardly1 equipped
with the Electronic Stability Program
(esp) with hydraulic brake assistant. esp
monitors driving stability and traction,
i.e. the transmission of power between
the tyres and the road.
esp actively intervenes in the following
driving situations:
Evasive action if you suddenly encoun
ter an obstruction,
Excessive cornering speeds,
Spinning of the driven wheels when
moving away (acceleration slip regu
lation),
Locking of the wheels while braking
(antilock brake system).
1 With the exception of 47 kW.
626 On the move
>Note!
The indicator light in the speedometer
flashes while esp is active.
Depending on the driving situation
esp reduces the engine output,
esp selectively brakes individual
wheels,
esp equalises the speed of the driven
wheels.
Accident risk!
In critical driving situations,
esp stabilises the car's response sub
ject to the laws of physics.
On no account can the system be expect
ed to help prevent accidents if the
car's speed is too high or the driver is
reckless.
>Important!
esp will only function properly if you fit
the recommended tyre sizes on the
wheels.
Accident risk!
If the esp warning light in the
speedometer flashes, proceed as fol
lows:
Only depress the accelerator as far
as necessary when driving off.
Ease off the accelerator when driv
ing.
Adapt your driving style to the road,
traffic and weather conditions.
The car could otherwise start to swerve.
esp is unable to reduce the risk of an
accident if you are driving too fast.
Airbags
Airbags
Airbags reduce the severity of injuries
in serious collisions, e.g. in a headon
collision or a side impact.
The airbag system consists of
airbag indicator light (A).
driver's airbag (B),
front passenger's airbag (C),
side airbags (D),
side headlevel airbags (windowbags)*
(E),
indicator light for front passenger's
airbag (F).
.
On the move 627
Airbags
Danger of injury!
In conjunction with a correctly
fastened seat belt, airbags afford ad
ditional protective potential. Howev
er, they are no substitute for the seat
belts.
To reduce the risk of serious or fatal
injuries in an accident involving rap
id deceleration, e.g. with an airbag
inflating, or if the brakes are applied
abruptly, please note the following:
All occupants must adopt a seated po
sition where they are able to fit the
seat belt correctly and are seated as
far as possible from the airbag. The
driver's seated position must never
theless allow the car to be driven
safely. The driver's arms should be
angled slightly when holding the
steering wheel. The driver must
maintain sufficient distance from
the pedals to be able to depress them
fully.
Choose a seat position that is as far
as possible from the front airbag but
nevertheless allows you to maintain
control of the car reliably.
628 On the move
The car's occupants should always be
wearing a seat belt correctly and re
cline against a backrest that is more
or less upright. The head restraint
should support the back of the head at
approximately eye level.
Position the front passenger's seat
as far back as possible, particularly
if children are secured to it by
means of a child restraint system*.
Do not secure rearwardfacing child
seats to the front passenger's seat if
the front passenger's front airbag
has not been disabled. In order to fit
a rearfacing child restraint system
on the front passenger's seat, disa
ble the front passenger's airbag
first. Forwardfacing child re
straint systems may only be fitted to
the front passenger's seat if it is
moved to its rearmost position.
Do not lean forward, e.g. over the
cushioned pad on the steering wheel,
particularly while driving.
Do not place your feet on the instru
ment panel.
Only grip the steering wheel by its
outer rim. These precautions ensure
that the airbag can inflate unimped
ed. If you hold the inside of the
steering wheel, you could be injured
in the event of the airbag being trig
gered off.
Do not lean or lie against the doors
while travelling.
Do not place any objects on the air
bags or between the airbags and the
occupants.
Do not hang any hard objects such as
coat hangers from the grab handles or
coat hooks.
In view of the unavoidably high infla
tion speed of the airbag, the possibil
ity of injuries when an airbag inflates
cannot be entirely ruled out.
Airbags
Airbag operating principle
The airbag is inflated in a matter of mil
liseconds. The indicator light comes on.
>Note!
If the airbags are activated, you will
hear a loud noise and some dust may be
generated. The explosion fundamentally
represents no risk to your hearing, and
the dust is harmless.
The inflated airbag slows and reduces
the movement of the occupant. When the
occupant makes contact with the airbag,
hot gas flows out of the inflated front
airbags and side airbags. This reduces
the load on the occupant's head and upper
body. These airbags are consequently de
flated after the accident.
Danger of injury!
After airbags have been inflated:
airbag components will be hot. Do not
touch them as you otherwise risk sus
taining burns.
the airbags must be changed by a
qualified specialist workshop,
which will have the necessary exper
tise and tools for performing the
work involved. smart gmbh recom
mends that you visit a smart center
for this. It is particularly important
to have safetyrelevant work and work
on safetyrelevant systems per
formed by a qualified specialist
workshop.
Danger of injury!
A small amount of fine powder is
released for a short period when an
airbag is inflated. This fine powder is
entirely harmless; its smoky appear
ance does not indicate a fire in the car.
The fine powder could provoke tempo
rary breathing difficulties in people
with asthma or respiratory problems.
To avoid these breathing difficulties,
such persons should either leave the
car provided it is safe to do so, or open
the windows to let fresh air in.
On the move 629
Airbags
Danger of injury!
In the interests of safety, smart
gmbh recommends that seat covers that
have been tested for cars built by smart
gmbh and have a designated tear seam
be used on cars with side airbags. A
side airbag could otherwise fail to de
ploy correctly and achieve its intended
protective potential in the event of an
accident.
Driver's airbag/front passenger's airbag
The front airbags are intended to in
crease the prospects of protecting the
driver and front passenger against inju
ries to the head or thorax. The front air
bags for the driver and front passenger
are activated:
at the start of an accident with high
vehicle deceleration or acceleration
in the longitudinal direction,
if there is the prospect of supplement
ing the protective potential of the seat
belt,
independently of other airbags in the
car being deployed,
the airbags are not activated in the
event of a rollover, unless high vehicle
deceleration in the longitudinal di
rection is detected.
The front passenger's front airbag will
only trigger if the airbag has not been
manually deactivated.
630 On the move
Danger of injury!
If the airbag indicator light
does not come on when a baby carrier is
fitted to the passenger's seat, the pas
senger's airbag has not been deactivat
ed. If the passenger's airbag has not
been deactivated, a child could sustain
serious or even fatal injuries in the
event of the airbag on the passenger's
side being triggered, particularly if
the child is in the immediate vicinity
of the passenger's airbag at the time of
its activation.
The passenger's airbag is only deacti
vated when you fit an original smart
baby carrier to the passenger's seat.
Airbags
Side airbags
The side airbags are integrated into the
driver's and front passenger's seat back
rests. If activated, they are intended to
increase the potential protection for the
thorax (but not the head, neck and arms) of
the occupants on the side of the car that
is struck.
Danger of injury!
To minimise the risk of injury if
a side airbag deploys, you should en
sure that
there are no other persons, pets or
objects between each occupant and
the range protected by a side airbag.
only lightweight garments are hung
from the clothes hooks in the car.
there are no heavy or sharpedged
objects in the pockets of such gar
ments.
Danger of injury!
Observe the following notes to
reduce the risk of serious or fatal in
juries if the side airbag deploys:
Occupants particularly children should never rest their head on the
area around the window from which
the side airbag could emerge if de
ployed.
The car's occupants must always be
wearing a seat belt correctly and re
cline against a backrest that is more
or less upright.
Always secure children under 150
centimetres (approx. 5 feet) tall and
under 12 years of age with suitable
child restraint systems*.
The side airbags are activated:
on the side of the car that is struck,
at the start of an accident with high
vehicle deceleration or acceleration
acting in a lateral direction, e.g. a
side impact,
if there is the prospect of supplement
ing the protective potential of the seat
belt,
independently of the front airbags be
ing deployed,
independently of the belt tensioner,
in situations excluding a rollover, Un
less high vehicle deceleration in the
transverse direction is detected.
On the move 631
Airbags
Side headlevel airbags (windowbags)*
The windowbags are integrated into the
roof frame. They run along the top edges
of the doors on the left and right, from
the windscreen to the rear seats. Only the
windowbags on the side that is struck are
activated in the event of an accident, and
are intended to increase the protective
potential for the head (but not the thorax
or arms) of any occupants on the side that
is struck.
632 On the move
Danger of injury!
So that the windowbag can realise
its protective potential if activated,
ensure that:
there are no other persons, pets or
objects between the occupants and
the range protected by the window
bags,
only lightweight garments are hung
from the clothes hooks in the car,
there are no heavy or sharpedged
objects in the pockets of such gar
ments.
Danger of injury!
Observe the following notes to
reduce the risk of serious or fatal in
juries if the windowbag deploys:
Occupants particularly children should never rest their head on the
area around the window from which
the windowbag could emerge if de
ployed.
Always secure children under 150
centimetres (approx. 5 feet) tall and
under twelve years of age with suita
ble child restraint systems*.
Airbags
The windowbags are activated:
on the side of the car that is struck,
at the start of an accident with high
vehicle deceleration or acceleration
in the transversal direction.
if there is the prospect of supplement
ing the protective potential of the seat
belt.
independently of the front airbags be
ing deployed.
Airbag indicator light
The airbag indicator light signals to you
that there is a fault in one or more of the
following safety systems:
airbag,
belt tensioners.
The airbag indicator light comes on after
switching the ignition on.
The subsequent selfdiagnosis of the
safety systems yields the following re
sults:
1. The airbag indicator light goes out
after a maximum of 7 seconds.
> No fault detected.
> The airbag system is OK.
2. The airbag indicator light does not
go out within 7 seconds and remains
permanently on or flashes.
> A fault was detected (airbag warn
ing).
or
3. It does not come on when the ignition
is switched on.
> A fault was detected (airbag warn
ing).
쮿 Do not sit on the front passenger's
seat; this applies in particular to
children.
쮿 Take the car to a qualified specialist
workshop, e.g. a smart center, without
delay.
>Important!
If the airbag indicator light comes on
during a journey, take the car to a quali
fied specialist workshop, e.g. a smart
center, without delay.
It is possible that the airbag and the belt
tensioner could be activated uninten
tionally or will not function in the event
of an accident.
On the move 633
Airbags
Danger of injury!
If the airbag indicator light
does not come on when a baby carrier is
fitted to the passenger's seat, the pas
senger's airbag has not been deactivat
ed. If the passenger's airbag has not
been deactivated, a child could sustain
serious or even fatal injuries in the
event of the airbag on the passenger's
side being triggered, particularly if
the child is in the immediate vicinity
of the passenger's airbag at the time of
its activation.
The passenger's airbag is only deacti
vated when you fit an original smart
baby carrier to the passenger's seat.
634 On the move
Danger of injury!
For this reason, you should never
carry a child on the passenger's seat in
a child restraint system that faces to
the rear if the passenger's airbag has
not been deactivated, i.e. if the airbag
indicator light is not lit.
Also observe the corresponding warn
ing sticker on the instrument panel.
If you have installed an original smart
baby carrier on the passenger's seat
and the airbag indicator light does not
come on (restraint system not identi
fied), have the automatic restraint sys
tem recognition function checked
without delay by a qualified specialist
workshop, such as a smart center.
Until this problem has been rectified,
do not carry children in the car, as they
could sustain serious or even fatal in
juries in the event of an accident.
Danger of injury!
If the indicator light does not
come on when you switch the ignition
on, or does not go out again after a few
seconds once the engine is running or
comes on again, there is a fault. There
is the possibility of individual sys
tems being activated unintentionally
or not being triggered off in an acci
dent involving a high rate of decelera
tion. In this instance, have the safety
system checked and repaired immedi
ately by a qualified specialist work
shop, e.g. a smart center. It is particu
larly important to have safetyrelevant
work and work on safetyrelevant sys
tems performed by a qualified special
ist workshop.
Airbags
쮿 Push the key a short way into the lock
and turn it anticlockwise (off posi
tion).
> The front passenger's front airbag is
disabled.
> The indicator light for the front
passenger's airbag comes on.
To switch the front passenger's front air
bag on, turn the key clockwise (on posi
tion).
Disabling front passenger's front airbag
You can disable the front passenger's
front airbag. This may for example be
necessary in order to fit a rearwardfac
ing child restraint system* on the front
passenger's seat. A lock is provided for
this purpose on the front passenger's
side of the instrument panel.
>Note!
If the front passenger's front airbag is
disabled, the indicator light for the
front passenger's airbag on the centre
console will be lit.
On the move 635
636 On the move
Contents
>Storage compartments and
trays
>Glove compartment
>Holders for drinks
>cockpit bag* and luggage
net for front passenger
footwell*
>Storage compartment un
der the front passenger
seat*
>Luggage compartment
>Folding down bench seat
>Trailer hitch*
>Loading guidelines
>>Loading up.
Your smart forfour is amazingly spacious, as well as goodlooking!
The next few pages tell you where and how you can load or stow various items. A truly enjoyable way to handle the week's shopping.
72 Loading up
Storage compartments and trays
FDS
FM/AM
ON
TEL
1
2
3
4
5
h
Storage compartments and trays
a Storage compartments in the door trims d Glove compartment
b Instrument panel stowage compartment, e Instrument panel stowage compartment,
left
right
c Instrument panel stowage compartment, f Stowage net*
centre
g Centre console with can holder
h Compartment for operating instruc
tions
Loading up 73
Glove compartment
Glove compartment
Opening the glove compartment
쮿 Pull handle (A).
> The glove compartment opens down
wards.
Closing the glove compartment
쮿 Lift the cover of the glove compartment
upwards until it engages.
74 Loading up
Holder for drinks
Inserting a bottle
쮿 Gently press the sliding retainer and
push it with slight pressure towards
the front passenger's seat to its limit
of travel.
> The rubber loop curves out.
Holder for drinks
Bottle holder*
The bottle holder set is located in the
front passenger's footwell. Bottles and
other suitable objects can be stood in it.
>Important!
For safety reasons, conversions and mod
ifications to the bottle holder are not al
lowed.
Danger of injury!
Make sure that any objects placed
in the bottle holder are always secure
while the car is moving. Unsecured ob
jects in the bottle holder could other
wise be thrown around and injure you
and others if you
brake sharply,
change direction suddenly,
are involved in an accident.
Insert only suitable, sealed containers
in the holder. Drinks could otherwise
spill out. Do not place hot drinks in the
holder. They could cause scalding if
spilled.
쮿 Place a bottle or another suitable ob
ject in the rubber loop.
쮿 Press the sliding retainer and slide it
as far as possible towards the front of
the car.
> The rubber loop is tightened.
>Important!
Do not pull on the rubber loop when you
wish to open or close the holder. The bot
tle holder could otherwise be damaged.
Loading up 75
Holder for drinks
Can holder
Stowage areas (A) for cans and other suit
able objects can be found
in front of the gearshift lever,
behind the handbrake,
in the twinface armrest*.
76 Loading up
Danger of injury!
Make sure that any objects placed
in the can holder are always secure
while the car is moving. Unsecured ob
jects in the can holder could otherwise
be thrown around and injure you and
others if you
brake sharply,
change direction suddenly,
are involved in an accident.
Insert only suitable, sealed containers
in the holder. Drinks could otherwise
spill out. Do not place hot drinks in the
holder. They could cause scalding if
spilled.
cockpit bag* and luggage net for front passenger footwell*
cockpit bag* and luggage net for
front passenger footwell*
cockpit bag*
When installed, the cockpit bag (A) can be
used as an additional storage facility. It
is located above the glove box.
You can also remove the cockpit bag from
the storage compartment and use it as a
bag with strap handles.
Luggage net in front passenger's
footwell*
You can store small objects in the lug
gage net in the front passenger's foot
well.
Danger of injury!
Do not transport unsecured heavy
or hard objects in the passenger com
partment. Unsecured objects in the
passenger compartment could other
wise be thrown around and injure you
and others if you
brake sharply,
change direction suddenly,
are involved in an accident.
Even if the loading guidelines are ob
served in full, the payload will ad
versely affect your car's braking and
handling characteristics. This will
increase the risk of injury in the event
of an accident.
Loading up 77
Storage compartment under the front passenger seat*
Storage compartment under the front
passenger seat*
You can store small objects in the storage
compartment.
The storage compartment is fitted under
the front passenger seat.
Danger of injury!
Do not store items weighing more
than 1,5 kg in the storage compartment.
In the event of a collision or sudden
braking manoeuvre, the storage com
partment could otherwise be destroyed
and items could fly out of the storage
compartment into the footwell. This
could cause you injury.
Accident risk!
Only open and close the storage
compartment when the vehicle is at a
standstill. You otherwise risk being
distracted from the traffic situation
and causing an accident.
78 Loading up
Danger of injury!
Always close the storage com
partment properly and engage it cor
rectly. In the event of a collision or
sudden braking manoeuvre, items could
fly out of the storage compartment and
into the footwell.
Danger of injury!
Keep the storage compartment
area under the seat free of objects.
Otherwise the storage compartment no
longer will properly engage. If the
storage compartment is not fully
closed, it may unexpectedly open and
cause injury en route.
Pulling out the storage compartment
쮿 Pull up the handle (A) in the centre of
the storage compartment.
쮿 Pull out the storage compartment to
wards the rear.
Opening the storage compartment
쮿 Press button (B).
> The cover of the storage compartment
goes up.
Storage compartment under the front passenger seat*
snapfix*
You can attach the seat bag, the coat
hanger or the throughloading fixture to
the snapfix* bracket system in a few sim
ple steps.
More detailed information on operation
is given in the operating instructions
for accessories.
Closing the storage compartment
쮿 Press down the cover of the storage
compartment.
쮿 Press the button on the cover so that the
cover in the lock (A) is engaged.
> The storage compartment is locked.
쮿 Slide the storage compartment under
the seat until it can be heard to lock
into place.
Loading up 79
Luggage compartment
Closing the tailgate
Luggage compartment
The next few pages contain information
on the various loading and storage op
tions in the luggage compartment.
Danger of injury!
Do not transport unsecured heavy
or hard objects in the passenger com
partment; the same applies if the bench
seat is folded down.
Unsecured objects in the luggage com
partment could otherwise be thrown
around and injure you and others if you
brake sharply,
change direction suddenly,
are involved in an accident.
Even if the loading guidelines are ob
served in full, the payload will ad
versely affect your car's braking and
handling characteristics. This will
increase the risk of injury in the event
of an accident.
710 Loading up
Danger of injury!
When closing the tailgate, make
sure that no one is trapped.
쮿 Pull down the tailgate and close it
firmly.
Opening the tailgate
Danger of poisoning!
The tailgate must be closed while
the car is being driven. Exhaust emis
sions could otherwise enter the car and
poison the occupants.
쮿 Unlock the car with the remote control.
쮿 Open the tailgate at the handle recess.
> You can now swing the tailgate up.
Luggage compartment
Enlarging the luggage compartment1
You can enlarge the luggage compartment
by pushing the rear bench seat forwards.
쮿 Swing the handle (A) up and to the
right.
쮿 Reposition the seat or bench seat.
쮿 Release the handle.
> The locking mechanism must audibly
engage on both sides.
Storage tray*
To protect the luggage compartment floor
from dirt or damage, you can secure the
storage tray to the luggage compartment
floor with the aid of velcro.
Warning triangle*, first aid kit* and
warning waistcoat*
The following are stored in the luggage
compartment:
the warning triangle (A),
the warning waistcoat (B).
>Note!
The first aid kit is beneath the rear
bench seat, at the front.
1. Not in pure.
Loading up 711
Luggage compartment
>Note!
If your car is equipped with a breakdown
kit*, the warning triangle (A) will be in a
box in the spare wheel recess, beneath
the luggage compartment floor. The
breakdown kit is also located there.
712 Loading up
Luggage compartment
Pockets and containers
Luggage net bags*
There are luggage net bags as additional
storage space for small objects on the
left (A) and right (B) inside the luggage
compartment.
>Important!
The luggage net bags are only suitable
for storing lightweight items.
Heavy, sharpedged or fragile objects
should not be transported in the luggage
net bags.
The luggage net bags are unable to retain
such items in the event of an accident.
Luggage wedge*
You can use the luggage wedge to stop
smaller objects from sliding around in
the luggage compartment while in tran
sit.
Positioning the luggage wedge
쮿 Secure the luggage wedge to the lug
gage compartment floor with the vel
cro.
Loading up 713
Luggage compartment
Multifunction box*
The multifunction box allows you to store
smaller objects safely in a thermally in
sulated container. You can take the mul
tifunction box out of the car and carry it
around easily. It is consequently ideal
for storing shopping. The lid can be com
pletely detached.
>Note!
You can also take the multifunction box
out of the car for use as a stool.
714 Loading up
Danger of injury!
Ensure that the multifunction box
is always installed securely when in the
luggage compartment. It could other
wise be thrown forward in the event of
an accident or abrupt braking manoeu
vres, and cause serious or even fatal
injuries to occupants.
Luggage compartment
Luggage compartment cover*
The luggage compartment cover
serves to protect objects that are
stored in the car's luggage compart
ment from prying eyes,
prevents smaller objects from pene
trating into the passenger compart
ment from the storage space area, how
ever it is not intended to act as a load
restraining device.
Danger of injury!
The luggage compartment cover
is not intended to secure heavy objects
in the event of an accident.
For this reason, heavy objects must be
tied down. Otherwise, unsecured ob
jects could be thrown around and cause
injury to you and others.
Danger of injury!
Do not transport any objects by
placing them on the mounted luggage
compartment cover. Objects on the cov
er could otherwise be thrown around
and injure you and others if you
brake sharply,
change direction suddenly,
are involved in an accident.
Fitting the luggage compartment cover
쮿 Place the rear rod in the left and right
sides of the side panelling mount (A).
쮿 Pull the front rod between mount (A) and
mount (B) upwards first and then for
wards.
쮿 Place the front rod in the left and right
sides of the side panelling mount (B).
쮿 Attach the rear end of the cover with
the velcro strip to the back of the rear
bench seat. The distance to the top
edge of the rear bench seat should be
approx. 8 cm.
쮿 Removal is done in the reverse order.
>Note!
If objects are placed on the luggage com
partment cover when mounted, the cover
may be damaged.
Loading up 715
Folding down bench seat
Folding down bench seat
Danger of injury!
Stow the load in such a way that it
does not hinder you when driving.
Do not obstruct your view. With the
front passenger's seat or the bench seat
folded down, do not load above the level
of the upper edge of the door trims.
Place padding over any sharp edges. to
reduce the risk of cuts and abraded tie
downs.
Before folding down the bench seat, en
sure that
the head restraints are in the lower
position.
the bench seat is in the furthest for
ward position.
1 Preparations
쮿 Open the tailgate.
쮿 Slide the front seats to the furthest
forward position to create sufficient
room for manoeuvre.
716 Loading up
2 Folding down backrests
쮿 Press down the release lever for the
lefthand rear seat.
쮿 Fold the backrest of the lefthand rear
seat down forwards.
쮿 Proceed likewise with the righthand
backrest.
>Note!
Steps 3, 4 and 5 are not possible for pure.
3 Releasing bench seat
쮿 Move the bench seat to the furthest for
ward position and pull the release le
ver up.
4 Uprighting bench seat
쮿 Once released, the bench seat will piv
ot upwards largely of its own accord.
5 Locking bench seat
쮿 Lock the bench seat in the vertical po
sition by engaging the retaining strap
on one of the head restraint posts, and
tighten the belt.
쮿 You can now move the front seats back
into the desired position.
>Note!
It is converted back into the bench seat
in the reverse order.
Danger of injury!
When folding back the bench seat,
ensure that the bench seat and the back
rests are locked in position.
The occupants of the rear bench seat
could otherwise be injured when the car
is braked.
>Important!
To prevent damage to the seats, never op
erate the longitudinal adjustment lever
and the release lever simultaneously.
Folding down bench seat
>Note! Steps 3, 4 and 5 are not possible for pure.
Loading up 717
Trailer hitch*
Setting up ball head
The ball head is in the luggage compart
ment box beneath the cover in the luggage
compartment.
쮿 Remove the ball head from the luggage
compartment box.
쮿 Check that the red mark on the hand
wheel is aligned with the green mark on
the ball head.
> You can fit the ball head.
Trailer hitch*
The trailer hitch consists of the mounting
fitted permanently to the car and the ball
head in the luggage compartment box.
Your car is prepared for towing a trailer
by fitting the ball head to the permanent
mounting1.
1.Does not apply to BRABUS vehicles.
718 Loading up
>Note!
If the red mark on the hand wheel and the
green mark on the ball head are not
aligned, you will not be able to fit the trail
er hitch. You must first adjust the fitting
position (see page 718).
Fitting ball head
쮿 Pull the stopper out of the permanent
mounting on the car.
쮿 Guide the ball head into the mounting
until it locks automatically.
> During locking, the handwheel turns
until the green mark on the handwheel
is aligned with the green mark on the
ball head.
쮿 Remove the key and lock the facility with
it.
Trailer hitch*
쮿 Press the protective cap over the lock.
Removing ball head
쮿 Remove the protective cap from the
> The ball head is protected against
unauthorised removal.
> Only with the key removed is it as
sured that the ball head is correctly
locked.
lock on the handwheel.
쮿 Insert the key in the lock and turn it in
the opposite direction to the arrow.
쮿 Release the handwheel by pulling it out
>Note!
Make a note of the key number. If the key
is ever lost, you can order a new one from
a smart center by quoting this number.
Adjusting fitting position
쮿 Insert the key in the lock on the ball
head.
쮿 Turn the key in the opposite direction
to the arrow.
> The lock is released.
쮿 Lift the handwheel off the ball head and
turn it in the direction of the arrow
until it engages.
> The red mark on the hand wheel is
aligned with the green mark on the
ball head.
> You can fit the ball head.
sideways and turning it clockwise un
til it engages.
> The red mark on the hand wheel is
aligned with the green mark on the
ball head.
쮿 Pull off the ball head to the rear.
쮿 Press the stopper into the permanent
mounting on the car.
쮿 Place the ball head back in the luggage
compartment box beneath the cover in
the luggage compartment.
>Important!
The ball head can easily be fitted and re
moved by hand. Do not use any tools, as
this would damage the mechanism.
Loading up 719
Trailer hitch*
Electrical connection
If your trailer has a 7pin plug, you can
establish the electrical connection with
an adapter lead. The adapter lead is
available at a smart center.
As soon as you connect up a trailer to the
car's electrical system, the appropriate
indicator light in the instrument cluster
will come on when you make a turn.
Accident risk!
The ball head is only securely
fitted if the green mark on the hand
wheel is aligned with the green mark on
the ball head and the key can be re
moved. A ball head that is not securely
fitted could work loose and allow the
trailer to become detached, potential
ly causing an accident.
While a trailer is being towed, the ball
head must be closed and the key re
moved. Only then is it assured that the
ball head is locked and unable to work
loose during a journey.
If the ball head cannot be locked and
the key cannot be removed, take off the
ball head and clean it (see also page 7
18). If it is still not possible to lock the
ball head after cleaning, have the entire
trailer hitch checked by a qualified spe
cialist workshop, such as a smart cent
er.
In this case, do not use the trailer
hitch for towing a trailer, as its safe
functioning cannot be assured.
720 Loading up
Danger of injury!
Never leave the ball head lying
loose inside the car. It could otherwise
be thrown around in the event of sharp
braking, an abrupt change of direction
or an accident and cause serious or
even fatal injuries to occupants.
Loading guidelines
Loading guidelines
Load your car as follows:
Transport loads in the luggage com
partment as far as possible, with the
backrests folded up and locked in po
sition.
Place heavy loads towards the front of
the luggage compartment, low down.
Place light items on top.
Always place the load up against the
backrest or the foldedup seat base.
Do not stack loads higher than the top
edge of the seat backrest.
If possible, always transport the load
behind seats that are not occupied.
Do not obstruct your view.
Place padding over any sharp edges to
reduce the risk of cuts and abraded
tiedowns.
Use sufficiently tearresistant, abra
sionresistant tiedowns to secure the
load. Tiedowns are available from a
qualified specialist workshop, e.g. a
smart center.
Make sure that loaded articles are po
sitioned safely and secured.
Loading up 721
Loading guidelines
Stow the load in such a way that it does
not hinder you when driving.
Do not exceed the permissible gross
vehicle weight and permissible axle
load by loading too much into or onto
the car (take occupants into account).
Danger of injury!
Stow the load in such a way that it
does not hinder you when driving.
Shifting loads could otherwise distract
your attention from the traffic situa
tion and prompt an accident.
Trailer load limits for all models
kg
Trailer, braked
750
Trailer, unbraked
500
722 Loading up
If the rear seats are not occupied:
쮿 Insert the seat belt buckles in the di
agonally opposed catches.
Loading guidelines
While en route
Your car's handling characteristics are
dependent upon the load distribution.
Danger of poisoning!
Close the tailgate before driv
ing. Exhaust emissions could otherwise
enter the car and poison the occupants.
Danger of injury!
Loaded objects always must be
properly tied down. In the event of an
emergency braking manoeuvre or an ac
cident, they could enter the passenger
compartment.
Danger of injury!
Transport heavy or hard objects
in the luggage compartment, not the
passenger compartment. Such objects
could otherwise be thrown around and
injure you and others if you
brake sharply,
change direction suddenly,
are involved in an accident.
The bench seat alone is unable to pre
vent objects from being thrown around.
Accident risk!
The permissible gross vehicle
weight and the permissible axle load
must not be exceeded by the payload
(interior, roof rack and rear rack) in
cluding the occupants and trailer load.
Overloading or incorrectly loading the
vehicle impairs driving stability, and
the altered road behaviour could result
in tyre damage! This poses the risk of
accidents.
Danger of injury!
Objects on the passenger's seat
should always be secured in such a way
that they will not obstruct the driver
when driving.
Loading up 723
Loading guidelines
Reduced payload
Optional extras and accessories increase
the curb weight, which in turn reduce
payload.
Fitting a roof rack reduces the potential
payload. Please also read the accessories
operating instructions for the individu
al components.
Attaching a trailer reduces the potential
payload by up to 50 kilograms (approx.
110 lb).
Environment!
Unnecessary ballast increases
vehicle weight and fuel consumption.
724 Loading up
>Note!
When calculating the roof load (maximum
of 50 kilograms/110 lb), bear in mind that
the weight of the roof rack itself should
also be included.
>Note!
More information on "Dimensions and
weights" is available from page 1012.
After your trip
Remove loads from the vehicle if you no
longer need to transport them.
Contents
>Refuelling
>Engine compartment
>Tyre inflation pressure
>Wiper blades
>Care notes
>>Routines.
The small activities to do with your smart forfour are a useful and necessary side job. This helps to maintain the traffic and operating
safety of your smart forfour, as well as its value. Most of it can be done while at the petrol station.
Refuelling
Refuelling
Petrol engines
Fuel tank
Capacity (ltrs.)
of which reserve
capacity (ltrs.)
Fuel
47 kW
47
5
82 Routines
55 kW
47
5
Premium unleaded,
EN 228,
at least 95RON/85MON
Diesel engines
70 kW
47
5
80 kW
47
5
90 kW
47
5
130 kW
47
5
50 kW
47
5
Unleaded
premium plus,
EN 228
at least
95RON/
88MON
Diesel fuel,
EN 590
70 kW
47
5
Refuelling
>Note!
The petrol engines (except 130 kW) are
designed to run on unleaded petrol with a
minimum grade of 95RON/85MON.
In countries where a minimum grade of
95RON is not available, you can refuel with
91RON unleaded petrol. This should only
be done in exceptional cases, however.
This, however, can reduce engine output
and increase fuel consumption. When
subjected to heavy loads while burning
grade 91RON fuel, engine damage could
result.
As such, smart recommends that you al
ways run your petrol engine on unleaded
petrol with a minimum grade of 95RON/
85MON.
>Note!
The 130 kW petrol engine is designed to
run on unleaded fuel with a minimum
grade of 98RON/88MON.
In countries where unleaded petrol with a
minimum grade of 98RON is not available,
you can refuel with 95RON petrol in an
emergency.
This, however, can reduce engine output
and increase fuel consumption. When
subjected to heavy loads while burning
grade 95RON fuel, engine damage could
result.
As such, smart recommends that you al
ways run your petrol engine on unleaded
petrol with a minimum grade of 98RON/
88MON.
Routines 83
Refuelling
Before adding fuel
All petrol engines:
Never refuel with leaded petrol!
If this occurs,
immediately call a qualified special
ist workshop, e.g. a smart center or a
breakdown recovery service,
e.g. smartmove Assistance.
have the vehicle towed away.
Do not start the engine.
Otherwise the catalytic converter will be
damaged.
The following applies to all diesel en
gines:
Never refuel with petrol!
84 Routines
쮿 Switch both the engine and ignition
쮿
쮿
쮿
Refuelling properly
Danger of injury!
Fuel is a very flammable liquid.
Fire, naked flames and smoking are
therefore prohibited when handling
fuel.
Avoid allowing fuel to come into con
tact with your skin or clothes. You will
damage your health if
your skin comes directly into contact
with fuel.
you inhale fuel vapours.
쮿
쮿
쮿
off.
> The fuel tank flap is located on the
lefthand side of the car and is
locked and unlocked via the central
locking system.
Open the fuel filler flap.
Turn the filler cap anticlockwise.
Hang the filler cap from the inside of
the fuel filler flap.
You should fill up with fuel until the
nozzle cuts out.
Turn the filler cap clockwise until it
is tight and the handle grip overturns.
Close the fuel filler flap.
Refuelling
>Note!
If you wish to fill the fuel tank to its
maximum level,
wait for a period of five seconds after
the first switch off,
then start filling the tank with the fuel
pump nozzle again until it switches
off.
Environment!
Never allow fuel to spill over.
Never overfill the fuel tank.
Fuel that has spilled over onto the
ground pollutes the environment.
Routines 85
Engine compartment
Engine compartment
Before checking the fluid levels
쮿 Park the car on a level surface.
쮿 Switch both the engine and ignition
off.
쮿 Apply the handbrake.
Releasing the front lid
Accident risk!
Do not pull the release lever
while the car is moving. The front lid
could otherwise open.
쮿 Pull the lever (A) in the footwell on the
left side of the car.
> The front lid is released and pops up
a short way.
86 Routines
Engine compartment
The cooling fan may start of its own ac
cord even with the key removed. For this
reason, do not reach into the fan
wheel's range of rotation or allow
clothes to drape into it.
Opening the front lid
Danger of injury!
There is a risk of injury when the
front lid is open, even if the engine is
not running.
Various parts of the engine or operat
ing fluids can become very hot. To
avoid burns, only touch the components
described in the operating instruc
tions and always observe the relevant
hazard warnings.
Danger of injury!
Models with petrol engine:
The engine has an electronic ignition
system that operates at high voltage.
For this reason, do not touch any parts
of the ignition system (ignition coil,
ignition lead, spark plug connectors,
testing socket) if:
the engine is running,
the engine is started,
the ignition is switched on (key in
position 2 in ignition switch) and
the engine is turned over by hand.
You could otherwise suffer an electric
shock.
쮿 Pull up the lid release catch (A).
쮿 Swing up the front lid (B).
쮿 Secure the front lid with the prop (C) on
the righthand side.
Routines 87
Engine compartment
Oil level
Checking engine oil level
Check the engine oil level at regular in
tervals when the engine is warm.
쮿 Park the car on a level surface.
쮿 Switch both the engine and ignition
off.
쮿 Apply the handbrake.
Engine compartment for petrol engines
Engine compartment for BRABUS engines
In the engine compartment, check:
(A) washer fluid (see page 815)
(B) oil level (see page 88)
(C) brake fluid (see page 816)
(D) battery (see page 914)
(E) coolant (see page 813)
Check the fill levels at regular intervals.
You will find precise information about
the fluid capacities from page 1013.
Engine compartment for diesel engines
1 The service interval indicator is not available in all countries.
88 Routines
>Important!
Observe the specified service inter
vals.
The engine could otherwise be irrepa
rably damaged.
Observe the service interval indica
tor1 on your display.
An oil level above the MAX mark may re
sult in engine or catalytic converter
damage. Oil quantities above the MAX
mark have to be siphoned off.
An oil level below the MIN mark may re
sult in your engine being damaged.
Engine compartment
Danger of poisoning!
Keep oil out of reach of children.
If oil has been swallowed, consult a
doctor immediately.
Fire hazard!
When topping up the engine oil,
take care to ensure that no oil is spilt
on any hot parts such as the exhaust sys
tem or catalytic converter.
If this should however happen, the en
gine must be thoroughly cleaned off be
fore you continue your journey. The oil
could otherwise ignite.
Dipstick for BRABUS engines
The engine compartment houses
the dipstick (A),
the oil filler neck with cap (B).
Dipstick for petrol engines
Dipstick for diesel engines
Routines 89
Engine compartment
쮿 Pull the dipstick out again.
> The oil level must lie between the
markings MIN and MAX on both sides
of the dipstick (the markings can
look different, depending on the en
gine).
쮿 Reinsert the dipstick.
Checking the engine oil level
쮿 Wait a few minutes until the oil has
settled.
쮿 Open the front lid.
쮿 Pull the dipstick out and wipe it with a
clean cloth.
쮿 Reinsert the dipstick.
쮿 Wait for at least one minute.
810 Routines
Engine compartment
Environment!
One drop of oil will contaminate
1,000 litres of water.
Take care not to spill oil when topping
up. Spilled oil could seep into the
groundwater and cause considerable
damage to the environment.
Oil filler hole, petrol engine
Oil filler hole, diesel engine
Oil filler hole, BRABUS engine
If your car has too little engine oil
You must top up the engine oil!
쮿 Unscrew the cap (A).
쮿 Add oil.
쮿 Top up with no more than 1,0 litres (0.9
Imp. pint) of engine oil.
쮿 Wait a minute until the oil has run into
the oil pan.
쮿 Check the engine oil level again.
> The oil level must lie between the
markings MIN and MAX on both sides
of the dipstick.
쮿 Screw the cap on again tightly.
쮿 Close the tailgate.
Routines 811
Engine compartment
Choosing the right type of oil
Use only engine oils which have been ap
proved by smart gmbh. The MB sheet
number is marked on the oil containers
(petrol engines: sheet 229.1, 229.3 or
229.5, diesel engines: sheet 229.3 or
229.5). A list of the approved engine oils
can be obtained from any smart center or
smart service.
812 Routines
>Important!
Do not use special additives. They may
lead to increased wear or engine damage.
A qualified specialist workshop such as a
smart center will be able to provide fur
ther details.
Engine oil viscosity
The SAE class (viscosity) has to be chosen
in accordance with the average outside
air temperature for each current season.
Exact adherence to the SAE classes ac
cording to the outside temperatures
would, however, necessitate frequent oil
changes. The temperature limits for the
SAE classes therefore should be viewed as
guidelines which can be temporarily ex
ceeded or undercut.
Engine compartment
Determining the coolant level
쮿 Open the front lid.
Coolant level, checking
It is necessary to check the coolant level
to ensure that the engine does not over
heat.
Danger of injury!
The coolant reservoir is pressu
rised for the diesel engine. Allow the
engine to cool down again before un
screwing the cap. Allow it to cool down
for at least 30 minutes. You could oth
erwise be scalded by hot coolant when
the cap is released.
For petrol engine:
쮿 Check the level in the reservoir by
looking at it sideon.
> The fluid level must lie between the
MIN and MAX marks.
For diesel engine:
쮿 Check the level in the reservoir by
Oil filler hole for petrol and BRABUS en
gines
looking at it sideon.
> The fluid level must lie between the
MIN and MAX marks.
>Important!
The cooling system is maintenance free
under normal operating conditions. A
drop in the coolant level indicates leak
age.
Oil filler hole for diesel engine
Routines 813
Engine compartment
For BRABUS engine:
쮿 Pull up the cap by the tab.
쮿 Read the coolant level on the dipstick
that is attached to the cap.
> The fluid level must lie between the
markings L (min) and F (max).
If the coolant level has fallen
쮿 top up the coolant.
쮿 Have the reason for the loss of coolant
investigated by a qualified specialist
workshop, e.g. a smart center.
>Note!
Warm coolant expands, which is why it
may extend beyond the maximum filling
level.
814 Routines
Topping up coolant
For diesel engine:
쮿 Switch off the engine and wait for
about 30 minutes to allow the engine to
cool down.
쮿 Cover the cap for the coolant expansion
reservoir (A) with a cloth before
touching it.
쮿 Turn the cap one complete revolution
in order to allow the excess pressure to
escape.
쮿 Unscrew the cap and remove it.
쮿 Only fill the coolant to a filling level
between the markings for MIN and MAX.
쮿 Replace the cap and tighten when fin
ished.
For petrol and BRABUS engines:
쮿 Pull up the cap by the tab.
쮿 Only fill the coolant to a filling level
between the markings for MIN and MAX.
쮿 Firmly press the cap back on.
Engine compartment
Topping up windscreen washer system
Fire hazard!
Windscreen wash concentrate is
highly inflammable. When handling the
concentrate, avoid smoking, fire or na
ked flames.
>Note!
In order to clean the windscreen opti
mally, use smartcare windscreen cleanser
concentrate for summer or winter.
쮿 Open the front lid.
쮿 Pull the lug on the tank cap (A) to pull
it upwards.
Checking the windscreen washer
fluid
쮿 Add the windscreen wash concentrate.
쮿 Press the cap back on the tank.
In this way, your windscreen washer sys
tem is kept free of ice and fully function
al.
Dosage for total filling quantity of 3 litres
depending on the outside temperature
Above 0 °C
smartcare windscreen cleanser concentrate, summer: water
1:100
smartcare windscreen cleanser concentrate, winter: water
10 °C
20 °C
1:2
1:1
Routines 815
Engine compartment
Check brake fluid level
쮿 Open the front lid.
쮿 Perform a visual check on
reservoir (A).
> The fluid level must lie between the
MIN and MAX marks.
Checking the brake fluid
A constant fluid level is necessary to en
sure that the car's brake system remains
in perfect working order.
Accident risk!
If the boiling point of the brake
fluid is too low, vapour bubbles could
form in the brake system when the
brakes are subjected to high loads
(e.g. when driving down mountain pass
es). This will impair the effectiveness
of the brakes.
Have the brake fluid changed every two
years!
816 Routines
>Important!
Have the brake fluid topped up only by a
qualified specialist workshop, e.g. a
smart center.
쮿 If the level is slightly below the MIN
mark, take your car to a qualified spe
cialist workshop, e.g. a smart center.
쮿 If the level is significantly below the
MIN mark, call a breakdown recovery
service, e.g. smartmove Assistance or a
qualified specialist workshop, such as
a smart center.
Tyre inflation pressure
Tyre inflation pressure
Tyres are a particularly important aspect
of the car's operating safety and road
worthiness. For this reason, you must
check the tyre inflation pressure, tyre
tread and tyre condition on a regular ba
sis.
Accident risk!
If the inflation pressure of a tyre
falls repeatedly,
investigate the tyre for foreign ob
jects.
check whether there is a leak at the
rim or valve.
Accident risk!
Insufficient tyre pressure leads
to
excessive tyre heat buildup,
increased tyre wear and an increased
risk of causing an accident due to
tyre pressure loss and changes to
driving stability,
increased fuel consumption.
High tyre pressure leads to
a longer brake distance,
poorer traction from all tyres and
increased, uneven wear.
Tyres that are inflated too high are
moreover more susceptible to damage
and therefore increase the general risk
of accidents.
Accident risk!
Always inflate your car's tyres to
the specified pressures. The tempera
ture and pressure of the tyres rise dur
ing operation. For this reason, never
reduce the tyre pressure of tyres while
warm. The pressure of the tyres would
then be too low once they had cooled
down. If tyre inflation pressure is too
low, tyres could be damaged, particu
larly if the car is carrying a high load
and is travelling at high speed.
Tyre damage could e.g. result in a tyre
bursting, causing you to lose control
over your car; you or others could be
injured as a result.
You should therefore check the tyre in
flation pressure regularly, but at least
every 14 days.
Routines 817
Tyre inflation pressure
Check the tyre pressures before the start
of your journey. There is a table showing
the tyre pressures for various load sta
tuses on your car's fuel filler flap.
818 Routines
>Note!
The tyre inflation pressures quoted for
low car loads are minimum values which
will assure a high standard of ride com
fort. You may also use the values for the
higher load. These are permissible and
technically appropriate. The standard of
ride comfort will, however, be slightly
lower.
Tyre inflation pressures change by about
0.1 bar per 10 °C change in the air tem
perature. Always adjust the tyre infla
tion pressure when you have loaded up the
car. Observe the maximum tyre pressure
for the tyres.
Tyre inflation pressure
쮿 Check the tyre pressure (B).
> The tyre inflation pressure values
are printed on the inside of the fill
er cap and in the table below.
쮿 Screw the protective cap back onto the
valve.
>Important!
The protective cap protects the valve
against dirt and leakage.
Checking the tyre inflation pressure
쮿 Allow the tyres to cool down.
쮿 Unscrew the valve protective cap (A).
Tyre inflation pressure
Petrol engines
Engines
47 kW
Diesel engines
55 kW
70 kW
80 kW
90 kW
130 kW
50 kW
70 kW
2,2/2,5
2,2/2,5
2,2/2,5
2,2/2,5
2,2/2,5
2,2/2,5
2,2/2,5
2,2/2,5
2,2/2,5
2,2/2,5
2,2/2,5
2,2/2,5
2,2/2,5
2,2/2,5
Tyre inflation pressure (summer and winter)
Front wheels, unladen/fully laden (bar)
Rear wheels, unladen/fully laden (bar)
2,2/2,5
2,2/2,5
Routines 819
Wiper blades
쮿 Take the keys out of the ignition
Wiper blades
switch.
To have a clear view of things,
wiper blades that are in perfect shape
are absolutely indispensable,
clean the wiper blades regularly with a
cleaner and
remove any tough dirt stains with a
sponge or brush.
>Note!
Original wiper blades for your car are
available from a qualified specialist
workshop, e.g. a smart center.
820 Routines
쮿 Fold the wiper blade arm up and turn
the wiper blade until it is horizontal.
쮿 Press the retaining spring (A).
쮿 Slide the wiper blade off the end of the
wiper arm (B).
쮿 Remove the used wiper blade.
쮿 Slide the new wiper blade onto the wip
Changing the wiper blades
Danger of injury!
Before changing the wiper
blades, remove the key from the igni
tion switch. The windscreen wipers
could otherwise be set in motion and
injure you.
er blade arm (C).
> The retaining spring must audibly
engage in the wiper arm.
Wiper blades
Adjusting the wiper nozzles
Use a needle to adjust the spraying range
of the wiper nozzles.
The wiper nozzles are located
below the windscreen (A),
in front of the third brake light (B).
>Note!
The spray nozzles are correctly adjusted
if the jet of water strikes approximately
the centre of the windscreen.
Routines 821
Care notes
Care notes
Regular care will protect your car from
external influences both on the outside
and in the inside and will help it to re
tain its value.
>Important!
Please observe the instructions for use
printed on the packaging of the cleaning
agents.
We recommend that you use smartcare
products, as
they exhibit excellent cleaning capa
bility and provide an optimum level of
protection,
the products have been specifically
designed with the smart's materials in
mind and
all smartcare products are free of dyes
and fragrances.
>Note!
All smartcare products are available
from a smart center.
822 Routines
The following types of dirt should be
removed immediately:
Bird droppings,
Tree resins,
Dead insects etc.
>Note!
Failure to remove such dirt immediately
can cause damage to the paint. These fac
tors are environmental influences that
are not covered by warranty.
Care notes
Washing the car's exterior
Things you should watch out for before
washing your car!
쮿 Remove cakedon grime such as
dead insects, bird droppings and
tree resins,
oils, grease, fuel and tar.
쮿 Do not aim the highpressure cleaning
jet directly on the vehicle's seals.
Accident risk!
After washing the car, the brakes
may still be wet and thus their func
tionality impaired. Therefore, when
you start off, brake lightly several
times without endangering traffic.
Removing insects
Remove insects before you start to wash
the car.
쮿 Use the smartcare insect remover
spray.
쮿 After this, allow the insect remover to
work itself in for a few minutes.
쮿 Rub it in lightly with a damp cloth or
sponge.
쮿 Rinse off thoroughly with a generous
supply of water.
쮿 Apply hard wax to the cleansed surface.
Removing tar
Remove any tar marks before washing the
car.
쮿 Apply the tar remover with a damp
cloth.
쮿 After this, allow the tar remover to
work itself in for a few minutes.
쮿 Rub it in lightly.
쮿 Rinse off thoroughly with a generous
supply of water.
쮿 Apply hard wax to the cleansed surface.
Routines 823
Care notes
Washing your car by hand
쮿 Wash your car using car shampoo con
centrate and a sponge.
쮿 Rinse the car with clear water after
wards.
쮿 Rub your car down with a leather cloth.
Headlight cleaning
쮿 Wipe the lenses of the headlights with
a wet sponge.
>Important!
Do not wash the car in direct sunlight.
The body panel surfaces and paint finish
may be damaged.
Environment!
It is preferable to wash your car
at a dedicated car wash area or at a car
wash facility, because by washing the
car in the street it is possible that
grease and oil can find their way into
the sewage system. This puts an addi
tional burden on the environment.
824 Routines
Washing your car in the car wash
We recommend that you lower your car's
antenna or unscrew it before driving into
the car wash.
>Note!
Only use a windscreen wash that is suita
ble for plastic lenses. Unsuitable window
washes can damage the plastic lenses of
the headlights.
Do not use a
dry towel,
abrasive cleansers,
solvents,
cleaning agents containing solvents.
You could scratch or damage the surface
of the lenses.
Care notes
Frequency of paintwork care
The frequency with which you care for
your paintwork is dependent on
the car's degree of usage,
where you normally park the car (e.g. in
a garage or under a tree),
the season and
weather and environmental influences.
Rectifying paintwork damage
You can use a touchup paint stick to re
pair minimal stonechip damage and
scratches.
The smartcare touchup paint sticks can
be obtained in a qualified specialist
workshop, e.g. a smart center.
>Note!
For any major paintwork damage, please
contact a qualified specialist workshop,
e.g. a smart center.
Exterior
Repair options
Plastic parts (body panels) with clearcoat paint
Touchup paint stick clear lacquer
Body panels with base coat and clearcoat
smartcare twolayer touchup paint stick set in the appropriate
colour, e.g. star blue metallic
smartcare twolayer touchup paint stick set in the appropriate
colour, e.g. titanium, silver
tridion safety cell
Routines 825
Care notes
All care products can be purchased at a
smart center as smartcare products.
Interior
Special
considerations
Lightly soiled
Manual/automatic
car washes
Heavily soiled,
manual/automatic
car washes
Never do the
following
Cloth upholstery in the
car
Use a clean, nonfluffy
cloth
Light soap suds
Stain remover
Rub roughly, use
cleaning spirits
Plastic parts inside the
car
Use a colourfast cloth
Damp, clean cloth,
cockpit spray
Damp, clean cloth,
cockpit spray
Scour, use solvent
Leather upholstery in
the car
Use a clean, colourfast
cloth
Clean cloth with
lukewarm water, leather
care product
Leather care product
Use strong agents, stain
remover etc.
Damp, clean cloth,
microfibre cloth, glass
cleaner
Microfibre cloth, glass
cleaner
Strong and aggressive
agents
Car windows
826 Routines
Care notes
All care products can be purchased at
your smart center as smartcare products.
Exterior
Special
considerations
Lightly soiled
Manual/automatic
car washes
Heavily soiled,
manual/automatic
car washes
Never do the
following
tridion safety cell,
titanium, black
tridion safety cell,
silver
High gloss plastic parts
(body panels)
Wet paint
Car shampoo
concentrate, insect
remover for insect
remains, polish
Car shampoo
concentrate, hard wax,
insect remover for
insect remains, polish
Car shampoo
concentrate, rim care
Car shampoo
concentrate, soft top
cleaner, impregnation
spray
Use polish on titanium
tridion safety cell,
aggressive paint
cleaner, machine
polish, abrasive
cleanser, acidic/highly
alkaline agents,
abrasive sponges, high
pressure or hot water
cleaning equipment
Wet paint and clearcoat
paint
Body panels with base
coat and clearcoat or
clearcoat only
Wheels and wheel covers Twolayer metallic
paint (highgloss)
Routines 827
Care notes
Trailer hitch
Reason for care measure
Type of care measure
Aftercare
Ball head and ball head mount
ing
Dirt
Clean, nonfluffy cloth
Oil or grease lightly
Lock
Rust
Dirt, stiffness
Wire brush
Graphite
Guide pins, guide surfaces
Locking balls
Dirt
Dirt
Clean, nonfluffy cloth
Clean, nonfluffy cloth
Oil or grease lightly
Oil or grease lightly
Release lever
Dirt
Clean, nonfluffy cloth
Oil or grease lightly
>Important!
If you clean the vehicle with a steam jet,
you must remove the ball bar first and fit
the stopper.
Do not use solvents.
828 Routines
Contents
>Faults in the power glass
sliding roof*
>Onboard diagnosis socket
(OBD)
>Fuses
>Replacing the bulbs
>Battery
>Breakdown set
>Wheel theft protection*
>Tyres and wheels
>Roll starting
>Towing
>Fire extinguisher*
>>Helpful hints.
If you should need a helping hand with your smart forfour, for instance for changing bulbs or the battery, we won't leave you to fend for
yourself. We'll show you how you can quickly help your smart forfour and yourself get out of trouble. It goes without saying that qualified
specialist workshops such as a smart center or smartmove Assistance are always ready to lend you a helping hand at any given time.
Faults in the power glass sliding roof*
Faults in the power glass sliding
roof*
It may become necessary to readjust the
glass sliding roof from time to time.
This may be the case if
the sliding roof can no longer be
closed properly because the automatic
mode is not active in the "closing
roof" direction (case 1).
the sliding roof opens itself again af
ter it has been closed (case 2).
92 Helpful hints
Adjusting in case 1
The vehicle engine must be running dur
ing the adjustment process.
쮿 Move the sliding roof to the closed po
sition as soon as it stops.
쮿 Release the switch.
쮿 Press the switch again in the "closing
roof" direction and hold it in posi
tion.
> The roof opens completely again af
ter about ten seconds, then closes
completely.
쮿 Release the switch.
Adjusting in case 2
The vehicle engine must be running dur
ing the adjustment process.
쮿 Move the roof to the fully open position
until it stops.
쮿 Release the switch.
쮿 Press the switch again in the "opening
roof" direction and hold it in posi
tion.
> The roof closes completely after
about ten seconds, then opens com
pletely and closes completely again.
쮿 Release the switch.
Onboard diagnosis socket (OBD)
Onboard diagnosis socket (OBD)
The onboard diagnosis socket is in the
driver's footwell beneath the cover flap
(A). This information is important for
your service mechanic.
Helpful hints 93
Fuses
Fuses
The fuse box is located on the lefthand
side below the cockpit, in the driver's
footwell.
Fire hazard!
Never use fuses with a higher am
perage and do not repair or bypass de
fective fuses. This could lead to dam
age to the electrical system and
ultimately cause a fire.
94 Helpful hints
>Important!
Blown fuses must be replaced with equiv
alent fuses (recognisable by colour and
amperage) that have the amperages which
are recommended in the fuse assignment.
Only change fuses when the vehicle is
parked. Also switch off all consumers as
well as the ignition.
If a newly replaced fuse blows again, have
the cause of the problem determined and
rectified in a qualified specialist work
shop, e.g. a smart center.
Changing a fuse
쮿 Shut down all electrical consumers and
switch the ignition off before chang
ing a fuse.
쮿 Use the fuse table (see page 96 ff) to
ascertain which fuse is assigned to the
failed consumer.
쮿 Remove the corresponding fuse from
its holder.
쮿 Replace the defective fuse with a new
one of identical amperage.
Fuses
Fuse box, front
Helpful hints 95
Fuses
Fuse assignment
No.
Consumers
Amperage
Colour
1
Interior lighting
10 A
Red
2
ETACS
10 A
Red
3
Left rear lights + parking lights
7.5 A
Brown
4
Right rear light + parking light
7.5 A
Brown
5
Windscreen wipers
20 A
Yellow
6
7
Outside mirror heaters*
7.5 A
Brown
8
Right high beam
10 A
Red
9
Left high beam
10 A
Red
10
Horn
10 A
Red
11
Fuel pump
15 A
Blue
12
Engine control unit (petrol only)
20 A
Yellow
13
Trailer hitch* (Kl. 30)
15 A
Blue
14
Power glass sliding roof*
20 A
Yellow
15
Rear window wiper
15 A
Blue
16
Cigarette lighter
15 A
Blue
17
Rear fog lamp
7.5 A
Brown
96 Helpful hints
Fuses
No.
Consumers
Amperage
Colour
18
Outside mirror adjustment*
7.5 A
Brown
19
Engine control unit (diesel only)
15 A
Blue
20
Engine control unit (diesel only)
7.5 A
Brown
21
Right low beam
10 A
Red
22
Left low beam, headlight range adjustment
10 A
Red
23
Front fog lamps*
10 A
Red
24
25
Trailer hitch* (Kl. 15R)*
15 A
Blue
26
Flashers
10 A
Red
27
Audio/subwoofer
15 A
Blue
28
Antitheft alarm system*
10 A
Red
29
30
Onboard diagnosis socket, central locking
15 A
Blue
31
Brake lights, brake light switch
15 A
Blue
32
Control unit for air conditioning system, 12 volt
7.5 A
Brown
33
Control units: airbag, electric power steering
7.5 A
Brown
34
Ignition coils
10 A
Red
Helpful hints 97
Fuses
No.
Consumers
Amperage
Colour
35
Engine control unit
7.5 A
Brown
36
Reversing light
7.5 A
Brown
37
Rear window heater
30 A
Green
38
Seat heater*
30 A
Green
39
Engine control unit (diesel only)
30 A
Green
40
Heater blower
40 A
Orange
41
Ignition/starter switch
40 A
Green1
42
Power windows
40 A
Green1
43
Cooling blower (coolant fan in engine compartment)
40 A
Green1
44
ECU AMT control unit, automated manual transmission*
40 A
Green1
1
Fusible link
98 Helpful hints
Replacing the bulbs
Replacing the bulbs
Things you need to know
Before changing bulbs in your car, you
should make sure of the following points:
Switch the lights and the ignition off
in order to prevent any short circuits.
Handle the new bulbs only with a clean
cloth that is free of grease.
Do not hold the bulbs by the glass.
Do not handle the bulbs with wet or
greasy fingers.
Replace the bulbs only with bulbs of
the same type and wattage.
>Note!
You should have your headlight beam set
ting checked regularly, or at least once a
year.
Changing bulbs
Danger of burns!
Bulbs can become very hot. Com
ing into contact with them could result
in burns. Let the bulb fixture cool down
before replacing the bulb.
Rear and brake lights (E),
Turn signal indicators (F),
Reversing light (G),
Rear fog lamp (H).
This is where you will find the bulbs in
the event of needing to change them:
Turn signal indicators in mirror (A),
Low beams (B),
High beams/parking lights (C),
Front fog lamps* and turn signal indi
cators (D),
Helpful hints 99
Replacing the bulbs
Changing the low beams
쮿 Turn the wheels at the steering.
쮿 Open the service flap on the inside of
the wheel arch.
쮿 Remove the cover cap that is beneath
the service flap.
쮿 Disconnect the plug from the bulb
holder.
쮿 Release the retaining springs on the
bulb.
쮿 Remove the bulb from the housing.
쮿 Insert the new bulb.
>Note!
Installation occurs in reverse order.
910 Helpful hints
Replacing the bulbs
Changing high beams and parking lights
The high beams and parking lights can be
accessed from the engine compartment.
쮿 Open the front lid.
쮿 Remove the cover cap on the headlight
housing.
> The high beams (A) and parking
lights (B) are inside the headlight
housing.
Changing high beams
쮿 Take hold of the H7 bulb at the plug and
tilt it downwards.
쮿 Remove the bulb from the reflector.
쮿 Release the connector.
쮿 Fit the new H7 bulb. The lug on the side
shield must be pointing upwards.
쮿 Take hold of the bulb at the plug and
tilt it back into the horizontal posi
tion.
Changing parking lights
The parking lights are located in the re
flector, below the high beams.
쮿 Take hold of the bulb at its holder with
flatnosed pliers.
> The bulb is merely slotted into the
holder.
쮿 Remove the bulb from the housing.
> You can slot the new bulb into the
holder.
Helpful hints 911
Replacing the bulbs
Changing turn signal indicators (A)
쮿 Simply pull the plug off the turn signal
indicator.
쮿 Insert the new turn signal indicator in
the same way.
쮿 Place the lights unit back into the nose
end of the car. Ensure that the guide
lug at the top and the guide pin at the
side are correctly located.
쮿 Screw the unit in securely.
Changing turn signal indicators and
front fog lamps*
The turn signal indicators and front fog
lamps share the same housing. If your car
is not equipped with front fog lamps,
there will be only the turn signal indica
tors in the housing.
쮿 Release the two retaining screws on the
lower edge of the cover.
쮿 Pull the cover off to the front.
912 Helpful hints
>Note!
Have the turn signal indicators in the
outside mirrors checked regularly by a
qualified specialist workshop, e.g. a
smart center.
Changing front fog lamps* (B)
쮿 Remove the plug. Push the retaining
tongue upwards.
쮿 Twist the bulb holder to the left to re
move.
쮿 Insert the new H8 bulb.
> The H8 bulb is always supplied as a
component with a holder.
쮿 Place the lights unit back into the nose
end of the car. Ensure that the guide
lug is at the top and that the guide pin
at the side is correctly located.
쮿 Screw the unit in securely.
Replacing the bulbs
Changing rear lights
쮿 Open the tailgate.
쮿 Release the two Phillipshead screws
on either side of the bulb housing.
쮿 Fold the housing to one side and pull it
쮿
쮿
쮿
쮿
off to the rear.
Pull off the central plug (A).
The bulb holder is secured by eight
tongues. Unclip these.
Press and turn the faulty bulb to the
left to remove.
Twist in the new bulb.
쮿 Reconnect the central plug.
쮿 Press the two ball guides (A) back into
the plastic holders, taking note of the
upper guide pin (B).
쮿 Insert the bulb housing.
쮿 Tighten the Phillipshead screws
again.
Helpful hints 913
Battery
Battery
Safety notes and protective measures
when handling the battery
Always observe the following safety notes
and protective measures when handling
the battery.
Use original smart batteries to assure a
reliable fit and the correct functioning
of electrical systems.
Danger of explosion!
Highly explosive oxyhydrogen
gas can form when batteries are
being charged.
Fire, naked flame and smoking
are forbidden!
Avoid causing sparks!
Danger of acid poisoning!
Battery acid is corrosive. Do
not allow it to come into con
tact with your skin, eyes or clothing!
Immediately rinse any acid splashes
with clean water for several minutes!
In the event of contact with the eyes or
if swallowed, consult a doctor immedi
ately!
914 Helpful hints
Wear eye protection!
Keep acid away from the eyes or
skin.
Keep children away!
Keep children away from bat
teries, acid or charging devic
es.
Observe the operating instruc
tions!
Always observe the notes pro
vided in the operating instruc
tions.
>Important!
Danger of short circuiting!
Do not place any metal objects on the
battery!
Do not disconnect the battery when the
engine is running!
Do not operate the vehicle without a
battery fitted, otherwise its electri
cal equipment could be damaged.
Never open a battery forcibly! Danger
of burns and explosions!
Battery
Danger of injury!
If the positive terminal of the
connected battery is allowed to make
contact with vehicle components, there
could be a short circuit which could
ignite the highly explosive gas mix
ture generated by the battery. You and
others could sustain serious injuries
as a result.
Do not place any metal objects or
tools on the battery.
When disconnecting the battery, al
ways disconnect first the negative
terminal, then the positive terminal.
When connecting the battery, always
connect first the positive terminal,
then the negative terminal.
Do not loosen or disconnect the bat
tery terminal clips while the engine
is running.
Environment!
Batteries contain lead and sul
phuric acid, and should not be
disposed of as domestic waste!
Hand any spent, faulty or damaged bat
teries in to a qualified specialist
workshop, e.g. a smart center, or to a
collection point for spent batteries.
>Note!
Deactivate your alarm system before dis
connecting the battery, otherwise the
alarm will be triggered off.
Your car's battery
Models with a petrol engine:
12 volt and 42 ampere hours.
Model with petrol engine (cold zone):
12 volts and 61 ampere hours.
Models with a diesel engine:
12 volt and 74 ampere hours.
Helpful hints 915
Battery
Installing and removing the battery
>Important!
Make sure that
> you do not mix up the terminal clips.
The battery could otherwise be
destroyed.
> you never allow a wrench or other metal
parts to come into contact with both
battery terminals or with the positive
terminal and the car body at the same
time. There could otherwise be a short
circuit.
916 Helpful hints
Removing the battery
>Note!
Deactivate your alarm system before dis
connecting the battery, otherwise the
alarm will be triggered off.
쮿 Switch off the engine.
쮿 Switch off all electrical consumers.
쮿 Open the front lid.
쮿 First, unscrew the negative terminal,
then the positive terminal.
쮿 Unscrew the battery mounting at the
point shown.
쮿 Remove the battery.
Installing the battery
쮿 Switch off all electrical consumers.
쮿 Place the battery in the battery tray at
the front of the engine compartment.
쮿 Secure the battery with the battery
mounting.
쮿 First fasten the positive terminal,
then the negative terminal.
쮿 Mount the positive terminal cover.
쮿 After fitting the battery, the following
devices must be reset:
Clock,
Radio (PIN).
Battery
Tips on battery care
Your car's battery requires no mainte
nance in normal vehicle operation
(DIN 43539/T2).
However, have the battery's charge sta
tus and acid level checked at the start
of the cold season by a qualified spe
cialist workshop, e.g. a smart center.
The battery stoppers on the top must be
opened to check the acid level. Acid
must come up to MAX mark.
If the car is used almost exclusively
for short trips, recharge the battery
approximately every three months.
This will preserve your vehicle's
startability and prolong the battery's
operating life.
Disconnect the car's battery for ex
tended periods of nonuse and re
charge approximately every six
months.
If the car is left for extended periods
of time (three to four weeks) with the
battery still connected, it must be re
charged.
Helpful hints 917
Battery
Danger of explosion!
Avoid causing sparks. Do not use
any naked flames or smoke within the
vicinity of the battery.
Observe the safety notes and protective
measures when handling the battery!
쮿 Open the front lid.
쮿 Switch off the engine of the second ve
hicle.
Jump starting
If your battery is flat and the car will not
start, another vehicle may be able to help
you start.
Start your car's engine with the aid of
jumper cables and
another vehicle's battery.
Observe the following instructions when
doing this:
Danger of acid poisoning!
Do not lean over the battery while
jump starting the car or recharging the
battery.
918 Helpful hints
쮿 Remove the positive terminal covers.
쮿 First, connect the positive terminal
(A) with the red jumper cable.
쮿 Then connect the negative terminal (B)
of the second car's battery to the en
gine block (ground point/unpainted) of
the car to be started.
쮿 Start your car's engine.
쮿 If the engine does not start straight
away, leave about 30 seconds between
starting attempts.
> If the engine will not start, call a
breakdown recovery service,
e.g. smartmove Assistance or a qual
ified specialist workshop, such as a
smart center.
Battery
Removing the jumper cables
쮿 Do not switch on electrical consumers
such as the blower or the rear window
heater until the engine is running.
Do not switch the lights on!
> This helps reduce the danger of any
sparking when removing the jumper
cables.
쮿 Start by removing the jumper cable
connected to the negative terminal,
then remove the cable connected to the
positive terminal.
Things you need to know
Only use batteries with identically
rated voltages (12 volt).
Use jumper cables of a suitable cross
section and insulated cable clamps;
these are available from a qualified
workshop, such as a smart center.
The vehicles must not touch each other
during starting attempts.
Switch off electrical consumers in
both vehicles.
Switch off the engine of the second ve
hicle.
Helpful hints 919
Battery
Charging the battery
Danger of explosion!
While the battery is being
charged, the oxyhydrogen gas generat
ed by the battery represents an explo
sion risk. Avoid causing sparks. Do not
use any naked flames or smoke within
the vicinity of the battery. Do not touch
the battery terminal with metal objects
and do not remove the battery charger's
terminal clamps until the battery
charger has been switched off and no
further gas is being discharged by the
batteries. Charge the battery in a well
ventilated area. Do not lean over the
battery during charging, and do not
breathe in the gases. You are otherwise
at risk of injury.
920 Helpful hints
Only use chargers of a correct or suit
able voltage.
Never attempt to recharge a frozen bat
tery. Have the battery checked by a
qualified specialist workshop, e.g. a
smart center. The housing could be
damaged.
>Note!
Disconnect the battery for rapid charg
ing prior to using the charger.
Breakdown set
The breakdown set can be used to seal cuts
of up to approx. 4 millimetres in diame
ter on the tyre tread.
Use the tyre sealant only at ambient tem
peratures of 20 °C to +60 °C.
Breakdown set
The breakdown set (A) is located in the
luggage compartment beneath the cover.
The breakdown set comprises:
Tyre sealant bottle
Filler tube
Valve extractor with valve insert
Electricallyoperated pump with con
nector tube
"80 km/h" and "50 mph" label
>Notes!
Only use the tyre sealant in outside
temperatures ranging from 20 °C to
+60 °C.
Do not remove any foreign objects
such as nails or screws that have pene
trated the tyre.
Do not use the tyre sealant if the tyre
has been damaged by being driven when
insufficiently inflated (e.g. bumps,
cuts, cracks etc. on the tyre).
Allow escaped tyre sealant to dry, then
peel it off.
Immediately wash all painted surfaces
that came into contact with the tyre
sealant using a damp cloth.
Do not allow the tyre sealant to get into
your eyes!
Do not swallow the tyre sealant!
Allow the tyre sealant that is inside
the damaged tyre to dry and dispose of
together with the tyre.
Do not use the tyre sealant after the
"use by" date (see reverse of bottle)!
Helpful hints 921
Breakdown set
Danger of injury!
The tyre sealant can damage your
health and should not be allowed to
come into contact with the skin, eyes or
clothing.
If the tyre sealant comes into contact
with the eyes, thoroughly rinse them
immediately with clean water.
If your skin comes into contact with
the tyre sealant, thoroughly rinse the
affected area immediately with clean
water.
Immediately change out of any
clothes contaminated with the tyre
sealant.
Consult a doctor immediately if any
allergic reactions occur.
Keep the tyre sealant away from chil
dren.
If the tyre sealant has been swal
lowed, thoroughly rinse mouth imme
diately and drink plenty of water.
Do not induce vomiting! Consult a
doctor immediately!
Do not breathe in the vapours.
922 Helpful hints
Accident risk!
Your safety is particularly at
risk in the following cases, where the
tyre sealant will be unable to repair
the tyre:
Cuts or perforations of the tyre that
are larger than 4 millimetres (3/16
in),
Cuts in the tyre's sidewall,
Damage to the rim,
If you have been driving on tyres with
very little or no air.
Do not drive any further! Air could oth
erwise escape from the tyre. You could
cause an accident as a result. Notify a
qualified specialist workshop, e.g. a
smart center.
Breakdown set
쮿 Remove the dust cap from the valve.
쮿 Unscrew the valve insert using the en
Repairing tyres with the aid of the
breakdown kit
쮿 Shake the tyre sealant bottle before
use.
closed valve remover.
>Note!
Take care to protect the valve insert
against contamination. If the insert is
damaged, there is a spare valve beneath
the screw cap on the valve remover.
쮿 Screw the filler hose onto the bottle.
> This punctures the aluminium seal.
Helpful hints 923
Breakdown set
쮿 Remove the stopper from the filler hose
and push the end of the hose onto the
tyre valve.
쮿 Hold the bottle with the filler hose
pointing downwards and squeeze it.
쮿 Press the entire contents of the bottle
into the tyre.
쮿 Pull the hose off the valve and remove
any residual sealant from the valve,
rim and/or tyre.
924 Helpful hints
쮿 Screw the original valve insert (or the
replacement one if necessary) back
into the valve with the valve remover.
쮿 Fit the compressor's air hose accu
rately onto the valve.
쮿 Plug the power connection into the 12
volt power socket.
쮿 Inflate the tyre to at least 1.8 bar (max
imum 2.5 bar).
>Note!
Do not run the electric compressor for
more than six minutes. If you do so, there
is a risk of overheating!
Breakdown set
>Note!
If a pressure of 1.8 bar cannot be gener
ated, disconnect the compressor from the
wheel. Carefully drive the car 10 meters
forward or backward to distribute the
tyre sealant in the tyre.
Inflate the tyre again.
Accident risk!
If the tyre pressure of 1.8 bar
cannot be achieved after five minutes,
the tyre is damaged too severely.
Do not drive any further! Air could oth
erwise escape from the tyre. You could
cause an accident as a result. Notify a
qualified specialist workshop, e.g. a
smart center.
Accident risk!
Do not exceed a speed of 80 km/h
or 50 mph when you have repaired a tyre
with the tyre sealant.
The "max. 80 km/h" must be displayed
on the instrument panel within the
driver's field of view.
Your car's handling characteristics
may be impaired by the damaged tyre
even if it has been repaired using the
tyre sealant.
Accident risk!
If the tyre pressure has fallen
below 1.3 bar, the tyre is too badly dam
aged.
Do not drive any further! Air could oth
erwise escape from the tyre. You could
cause an accident as a result. Notify a
qualified specialist workshop, e.g. a
smart center.
쮿 Continue your journey immediately af
ter removing the compressor, so that
the tyre sealant is distributed evenly
around the tyre's interior and can seal
the damaged point.
쮿 After driving for about ten minutes,
check the pressure with the gauge on
the compressor.
Helpful hints 925
Breakdown set
>Note!
If the pressure has fallen below 1.3 bar,
do not continue your journey. If the pres
sure exceeds 1.3 bar, increase the tyre
pressure to the level indicated in the
car's operating instructions using the
compressor. Carefully drive to the next
qualified specialist workshop, e.g. a
smart center.
926 Helpful hints
>Note!
The manufacturer is unable to guarantee
that all tyre punctures can be repaired
with the breakdown set, in particular
cuts or perforations with a diameter of
more than 4 mm (1/8 in) or away from the
tyre's tread. The manufacturer is not lia
ble for damage sustained through im
proper use of the breakdown kit.
Wheel theft protection*
Wheel theft protection*
Do not use impact wrenches. Store the
security key in a suitable place in the
car.
For safety reasons, do not fit any hub
caps or covers when fitting antitheft
devices to steel wheels.
In the event of the security key being
lost, please contact a smart center,
presenting the code card for your key.
Keep the code card for your key in a
safe place.
Accident risk!
The antitheft wheel studs must
be retightened with a torque spanner
between 100 and 500 kilometres (see
Tightening torque). Otherwise the
studs could become loose and endanger
yourself and other road users.
Fitting the antitheft devices
쮿 Remove one wheel nut from each wheel.
쮿 Insert the antitheft nut (A) with secu
rity key (B) and tighten with a torque
wrench.
> Tightening torque: 120 Nm
Helpful hints 927
Tyres and wheels
Tyres and wheels
General information
In the interests of safety, smart gmbh
recommends that you use tyres that it has
specially approved for your car. These
tyres have been chosen to suit control
systems such as abs and esp. If you use
other tyres, smart gmbh is unable to ac
cept any responsibility for damage re
sulting from their use. Information on
tyres is available from any smart center.
If you use tyres other than those
tested and recommended by smart gmbh,
their characteristics such as road be
haviour, noise and wear rate etc. could be
poorer.
Dimensional deviations and a change in
the way the tyres are compressed under
load during operation could in addition
cause them to rub against the body or axle
components. This could result in damage
to the tyre or vehicle.
928 Helpful hints
smart gmbh neither tests nor recommends
the use of retreaded tyres. The prelimi
nary stages of damage cannot always be
detected on tyres that are being retreat
ed. smart gmbh is therefore unable to
guarantee driving safety with retreaded
tyres.
Accident risk!
Use only the tyre types, tyre sizes
and wheel sizes that are approved for
your type of vehicle.
If you fit different wheels:
the wheel brakes or suspension com
ponents could be damaged.
clearance between the wheels and
tyres is no longer assured.
Modifications to the brake system and
wheels and the use of spacer and brake
dust rings are not permissible. In both
cases the vehicle's operating approval
will be nullified.
Tyres and wheels
Please note in particular:
Use only tyres and wheels of the same
type and make.
Fit only the correct type of tyre on each
wheel.
Where a car has the same size of wheel
at the front and rear, only switch tyres
between the front and rear axles (RF to
RR; LF to LR).
Fit new tyres on the rear wheels.
Break in new tyres at moderate speeds
for the first 100 kilometres.
Check tyres and wheels regularly for
damage. Damaged wheels could result
in a loss of pressure from and damage
to the tyres.
Do not use tyres with an excessively low
tread. Below a tread depth of
3 millimetres, grip will deteriorate
sharply on wet roads. Summer tyres
with a tread depth of 3 millimetres and
winter tyres with a tread depth of less
than 4 millimetres should therefore be
replaced without fail.
Change the tyres after no later than six
years, irrespective of the level of
wear. The same applies to the spare
wheel.
>Note!
Store tyres in a cool, dry and preferably
dark place when not fitted to the car. Pro
tect the tyres against oil, grease and fu
el. Never clean the tyres with high
pressure equipment. Your tyres could
otherwise be damaged.
Operating safety and roadworthiness
Tyres are a particularly important aspect
of the car's operating safety and road
worthiness. For this reason, check the
tyre inflation pressure, tyre tread and
tyre condition at regular intervals.
A tyre specialist shop or a qualified spe
cialist workshop, such as a smart center,
will be able to supply further informa
tion on
tyre load capacity (LI, load index),
speed index (maximum permitted oper
ating speed of a tyre),
tyre age,
the causes and consequences of tyre
wear,
measures to take in the event of tyre
damage,
tyre types for particular regions, op
erating areas or operating conditions
of the vehicle.
scope for converting tyres, etc.
Helpful hints 929
Tyres and wheels
Tyre condition
Check tyres at regular intervals, e.g. for:
external damage,
ageing,
foreign bodies in the tread,
cracks, bulges,
onesided or irregular tread wear.
Tyre tread
Do not undercut the minimum tread depth
of 3 millimetres (1/8 in) for summer tyres
and 4 millimetres (3/16 in) for winter
tyres.
Along with increasing tyre wear, the
tyres' grip and car's handling character
istics deteriorate, particularly on wet or
snowcovered roads. You should therefore
change tyres before they undercut the
minimum tread depth.
You should measure the tread depth with a
tread depth gauge, available from a qual
ified specialist workshop such as a smart
center.
930 Helpful hints
Wear indicators integrated into the edge
of the tread provide an additional visual
sign as to whether the tyres need to be
changed or not. These indicators, howev
er, do not form narrow, continuous pat
terns until the depth of the remaining
tread to the base of the tread groove has
reached 1.6 millimetres (1/16 in). If you
can see this indicator, the tyre must be
replaced without delay.
Danger of injury!
Always make sure the tyre tread is
adequate. Too shallow a tyre tread will
reduce the tyres' grip considerably and
increase the risk of aquaplaning on wet
or slushy roads and at high speeds. The
tyre's tread will then no longer be able
to cut through the water. You could lose
control over your vehicle, cause an ac
cident and injure yourself or others.
Accident risk!
Note that cracks, bulges or exter
nal damage could cause the tyre to
burst. You could lose control over your
vehicle as a result, cause an accident
and injure yourself or others. All tyres
exhibiting such defects should be re
placed without delay.
Tyres continue to age even if they are
used little or not at all. The operating
safety and roadworthiness of all tyres
gradually decreases. You should there
fore replace tyres that were manufac
tured more than six years ago.
The date of production is indicated in
the DOT number, which is displayed on
the side of every tyre. Since 2000, the
last two digits denote the tyre's year of
production, preceded by two digits indi
cating the tyre's week of production
(WWYY).
Tyres and wheels
Tyre damage
Tyre damage may be caused e.g. by:
the vehicle's operating conditions,
curbs,
foreign bodies,
inadequate tyre pressure,
weather and environmental factors,
contact with oils, greases, fuels, etc.
Accident risk!
Driving over curbs or sharp
edged objects can cause damage to the
tyre's carcass that is not externally
visible. Damage to the tyre's carcass
will only become evident much later
and may result in tyre damage. You
could lose control over your vehicle as
a result and cause an accident which
could injure yourself or others.
Accident risk!
Never clean tyres with high
pressure equipment. This could lead to
tyre damage and failure. You could con
sequently cause an accident or injure
other persons.
Interchanging wheels
Accident risk!
Only interchange the front and
rear wheels if they are of the same di
mensions, e.g. rim size, wheel offset.
On cars with the same size of wheels all
round, depending on the level of wear you
can interchange the wheels every 5,000 to
10,000 kilometres (approx. 3,000 to 6,000
miles). Always keep a wheel's direction
of rotation the same.
The front and rear wheels will wear at
different rates, depending on the oper
ating conditions. Interchange the wheels
before a characteristic wear pattern has
become established on the tyres.
Clean the contact surface of the wheels
and brake disc/inner side of the wheel
each time the wheels are changed. Check
the tyre pressure.
Helpful hints 931
Tyres and wheels
Changing a wheel
Accident risk!
Exceeding the quoted tyre load
capacity and the permissible speed limit
can result in tyre damage or tyre fail
ure. You could lose control over your
vehicle and cause an accident, injuring
yourself or others as a result.
For this reason, use only the tyre types,
tyre sizes and wheel sizes that are ap
proved for your type of vehicle. Please
note in particular the customerspe
cific approval regulations for tyres.
These regulations may specify the use
of a particular tyre type for your car, or
prohibit the use of certain tyre types
that are permitted in other countries.
932 Helpful hints
The use of a particular type of tyre may
moreover be recommended for certain
regions and areas of use.
Information on tyres is available from
a qualified specialist workshop, e.g. a
smart center.
Accident risk!
After changing a wheel, have the
tightening torque checked by a quali
fied specialist workshop, e.g. a smart
center. Particularly for safetyrele
vant work and work on safetyrelevant
systems, it is vitally important to use a
qualified specialist workshop such as
a smart center. The wheels could other
wise work loose if they are not tight
ened to a torque of 120 Nm. For safety
reasons, use only the correct wheel nuts
approved by smart gmbh.
>Note!
Have the tyres replaced only in a qualified
specialist workshop, such as a smart
center.
Tyres and wheels
Installed position of the compact spare
wheel*
The compact spare wheel is located in the
luggage compartment beneath the cover.
It is concealed by the toolkit*.
Danger of injury!
The jack is intended to lift the
car off the ground for short spells only,
when changing a wheel.
Trestles must be used when conducting
work underneath the car.
Prepare the car as described.
Ensure that the jack is resting on a
firm, level surface. On loose surfaces,
place the jack on a stable support that
cannot slip.
Do not start the engine throughout the
entire wheelchanging process. Do not
crawl under the vehicle while it is
raised with the jack. If you raise the
car in a manner other than that de
scribed, it could topple off the jack
(e.g. as a result of starting the engine,
opening or closing a door or the tail
gate).
Helpful hints 933
Tyres and wheels
쮿 Park the car on a level surface.
쮿 Apply the handbrake.
쮿 Engage a gear.
Removing a wheel
Accident risk!
Position the car jack only at the
designated jacking points.
If you do not position the jack correct
ly, the car could topple off the jack and
injure you or others.
934 Helpful hints
> With the automated manual transmis
sion (softouch plus)*, press the foot
brake and move the gearshift lever to
position R.
쮿 Switch off the ignition.
쮿 With the wheel nut wrench, turn the
wheel nuts approximately one revolu
tion anticlockwise. Do not unscrew
them completely, however, otherwise
the thread could be damaged.
쮿 Position a suitable car jack at one of
the designated jacking points (A).
These can be identified by impres
sions in the door sill area.
> The contact surface of the jack sup
port (B) must be positioned vertical
ly below the jacking point (A).
쮿 Lever the car up using the jack until
the wheel is off of the ground.
쮿 Completely unscrew the wheel studs and
remove the wheel.
Tyres and wheels
Fitting a new wheel
Accident risk!
Use exclusively the wheel nuts
supplied.
Accident risk!
Replace any wheel nuts that are
damaged or corroded.
Never oil or grease wheel nuts. If the
thread of a wheel nut is damaged, never
continue to drive on it. Notify a quali
fied specialist workshop, e.g. a smart
center.
쮿 Fit the wheel in place and tighten the
nuts handtight using the wheel wrench.
쮿 Lower the car and remove the jack from
under it.
쮿 Tighten the wheel nuts firmly using the
wheel wrench (tightening torque:
120 Nm).
>Note!
If the newly mounted wheels exhibit any
imbalance, have this checked and recti
fied by a qualified specialist workshop,
e.g. a smart center.
Accident risk!
Have the tightening torque
checked immediately after changing a
wheel. The wheels could otherwise work
loose if they are not tightened to a
torque of 120 Nm.
Use only the designated wheel nuts for
the wheel and car.
For safety reasons, smart gmbh recom
mends using only the wheel nuts ap
proved by smart gmbh. Other studs
could work loose.
Helpful hints 935
Roll starting
Roll starting
If the starter is faulty, you can try to
start the car by letting it run down a
steep hill.
Roll starting cars with manual
transmission
쮿 Apply the handbrake.
쮿 Switch on the ignition.
쮿 Depress the clutch pedal.
쮿 Engage second gear.
쮿 Push the accelerator pedal to the floor.
쮿 Release the handbrake.
쮿 Carefully release the clutch.
> As the speed of the car increases, the
engine starts.
쮿 Apply pressure to the accelerator ped
al.
Roll starting vehicles with automated
manual transmission (softouch plus)*
쮿 Apply the handbrake.
쮿 Apply the footbrake.
쮿 Switch on the ignition.
쮿 Move the gearshift lever to position +
and hold it there.
쮿 Release the footbrake.
쮿 Push the accelerator pedal to the floor.
쮿 Release the handbrake.
> As the speed of the car increases the
clutch is automatically engaged and
the engine starts.
쮿 Release the gearshift lever.
쮿 Apply pressure to the accelerator ped
al.
>Note!
Roll starting with a warm engine could
damage the catalytic converter.
936 Helpful hints
Towing
Towing
The towing lug (A) is in the luggage com
partment box beneath the luggage com
partment floor.
Fixing points for the towing lug
The front fixing point is for towing the
vehicle.
The rear fixing points are for towing
other vehicles.
Helpful hints 937
Towing
Towing
Attaching the towing lug
쮿 Lift up the luggage compartment base
to do this.
쮿 Take the towing lug from the luggage
compartment box.
쮿 Remove the cover on the vehicle.
쮿 Screw in the towing lug to the stop and
then tighten it.
쮿 Attach the tow rope or the tow bar to the
towing lug.
938 Helpful hints
Accident risk!
Have the car towed away with a
tow bar if the engine cannot be started.
If the engine cannot be started, the
power assistance will not be available.
You will then need to use considerably
more effort to steer and brake the car.
If you are towstarting or towing away
another car, its weight must not exceed
the permissible gross vehicle weight
of your car.
>Note!
Only people with a certain amount of
experience should tow.
The ignition must be switched on.
If the car is being towed, the gearshift
lever must be set to position N.
Ideally have the car towed away by a
qualified specialist workshop or a
qualified breakdown recovery service.
Observe the national statutory regula
tions concerning the towing of vehi
cles.
The maximum towing speed should not
exceed 50 km/h (approx. 30 mph).
The maximum towing distance should
not exceed 50 kilometres (approx. 30
miles).
When towing the car it is preferable to
use a tow bar.
The towing lugs on both vehicles in
volved in the towing process must be on
the same side.
The car should only be towed or tow an
other vehicle by means of the towing
lug.
The towed vehicle may not be heavier
than the towing vehicle.
The vehicle may not be hauled by its
towing fittings.
The towing fitting may be used for
lashing down the vehicle.
Fire extinguisher*
You should be aware of the following:
쮿 Please read the safety and operating
instructions on the fire extinguisher.
쮿 Have your fire extinguisher inspected
every two years.
Fire extinguisher*
The fire extinguisher is located in the
front passenger footwell of your car.
Danger of injury!
The fire extinguisher must al
ways be locked firmly in place. Loose
objects could cause serious injury if
propelled around the passenger com
partment when the brakes are applied.
Helpful hints 939
940 Helpful hints
Contents
>Information signs
>Model plate
>Technical data
>Homologation number
>>Reference.
Now to finish off, you should take another few minutes and go through the smart forfour's technical data once more in peace and quiet.
Have fun in doing so.
Information signs
Information signs
a Airbag information sign
b smartmove Assistance
(in glove box)
c Refuelling sign
d Airbag sticker, round
e Model plate
f Antitheft wheel studs information
sign
102 Reference
Model plate
Model plate
Reference 103
Technical data
Technical data
The technical data are valid for all
standard equipped vehicles. We recom
mend that you use smart original parts
and original accessories.
Engine specifications
Petrol engines
Rated output (kW/bhp)
At engine speed (rpm)
Nominal torque (Nm)
At engine speed (rpm)
Number of cylinders
47/64
5,500
92
2,500
3
55/75
6,000
100
3,500
3
70/95
6,000
125
4,000
4
80/109
6,000
145
4,000
4
90/122
6,250
160
3,800
4
130/177
6,000
230
3,500
4
50/68
4,000
160
1,600
3
70/95
4,000
210
1,800
3
Valves per cylinder
Bore x stroke (mm)
4
75 x 84.8
4
75 x 84.8
4
75 x 75.4
4
75 x 84.8
4
75 x 84.8
4
75.5 x 82
4
83 x 92
4
83 x 92
Total displacement (cm³)
1,124
1,124
1,332
1,499
1,499
1,468
1,493
1,493
104 Reference
Diesel engines
Technical data
Fuel consumption in
accordance with EC Directive 1999/
100/EC
The following data were evaluated in ac
cordance with the EC Directive (1999/100/
EC). All data are valid for basic version
vehicles with catalytic converter.
In practice, fuel consumption may be
higher than the values determined and
cited in the EC guidelines (1999/100/EC),
as in everyday use different operating
conditions may prevail, such as individ
ual driving styles, additional equip
ment, different road surfaces and
weather conditions.
The fuel consumption values given by the
EC Directive (1999/100/EC) serve solely as
a means of comparison in certain given
conditions.
Any qualified specialist workshop
such as a smart center will be able to
provide further details.
Refer to the COC papers (ECCERTIFICATE
OF CONFORMITY) for the currently appli
cable fuel consumption ratings. These
papers are handed to you at the point of
vehicle delivery.
Reference 105
Technical data
Fuel consumption in
accordance with
1999/100/EU1
Diesel engines4
Petrol engines
47 kW
55 kW
70 kW
80 kW
90 kW
130 kW4
50 kW
70 kW
MT2
6.9
MT2
7.0
AMT3
6.8
MT2
7.4
AMT3
7.3
MT2
7.6
AMT3
7.6
MT2
8.2
AMT3
8.3
MT5
8.9
MT2
5.9
AMT3
5.5
MT2
5.9
AMT3
5.5
Extra urban
(ltrs./100 km)
4.5
4.6
4.4
4.8
4.6
4.9
4.9
5.2
5.2
5.6
3.9
3.8
3.9
3.8
Combined
(ltrs./100 km)
5.4
5.5
5.3
5.8
5.6
5.9
5.9
6.3
6.4
6.8
4.6
4.4
4.6
4.4
Maximum range (km)
Emissions standard
850
EU4
850
EU4
890
EU4
810
EU4
840
EU4
770
EU4
810
EU4
750
EU4
730
EU4
690
EU4
1,020 1,070 1,020 1,070
EU4
EU4
EU4
EU4
CO2 emissions
(g/km)
128
130
125
138
133
140
139
149
151
163
121
Urban (ltrs./100 km)
1 The values quoted depend on the tyre size.
2 MT = manual transmission
3 AMT = automated manual transmission (softouch plus)*
4 Provisional, calculated values
5 Only available with MT.
106 Reference
116
121
116
Technical data
Acceleration/maximum speed
0 to 100 km/h (s)
Maximum speed, km/h (mph)
Petrol engines
Diesel engines
47 kW
55 kW
70 kW
80 kW
90 kW
130 kW
50 kW
70 kW
15.3
158
13.4
165
10.8
180
9.8
190
9.5
195
7.6
221
13.9
160
10.5
180
Reference 107
Technical data
Wheels and tyres
>Notes!
Use only tyres and wheels approved by
smart gmbh.
> This way you ensure that your car
handles perfectly and is entirely
safe.
Change over to winter tyres at an early
date, preferably in the autumn.
The vehicle operating approval status
is rendered null and void if other
wheel/tyre combinations are used.
Replace worn tyres in good time.
Every smart center will be more than
willing to provide you with details and
information concerning the tyres and
wheels recommended for your smart.
108 Reference
Technical data
Tyres and wheels
Petrol engines
Pure tyres
47 kW
55 kW
175/65 R14 Pure wheels
pulse tyres
5.5 x 14
175/65 R14 175/65 R14 195/50 R15 175/65 R14 175/65 R14
pulse wheels
passion tyres
5.5 x 14
5.5 x 14
6 x 15
195/50 R15 195/50 R15 195/50 R15 5.5 x 14
5.5 x 14
195/50 R15 195/50 R15
passion wheels
Tyres available as
optional extras
Wheels available as
optional extras
6 x 15
6 x 15
6 x 15
205/45 R16 205/45 R16 205/45 R16 205/45 R16 205/45 R16 6 x 15
6 x 15
205/45 R16 205/45 R16
6.5 x 16
6.5 x 16
6.5 x 16
6.5 x 16
6.5 x 16
6.5 x 16
6.5 x 16
BRABUS tyres1
Front:
205/40
ZR 17 on 7 x
17 rims
Rear:
225/35
ZR 17 on 8 x
17 rims
Front:
205/40
ZR 17 on 7 x
17 rims
Rear:
225/35
ZR 17 on 8 x
17 rims
Front:
205/40
ZR 17 on 7 x
17 rims
Rear:
225/35
ZR 17 on 8 x
17 rims
Front:
205/40
ZR 17 on 7 x
17 rims
Rear:
235/35
ZR 17 on 8 x
17 rims
Front:
205/40
R 17 on 7 x
17 rims
Rear:
225/35
ZR 17 on 8 x
17 rims
Front:
205/40
ZR 17 on 7 x
17 rims
Rear:
225/25
ZR 17 on 8 x
17 rims
Front:
205/40
ZR 17 on 7 x
17 rims
Rear:
225/25
ZR 17 on 8 x
17 rims
Diesel engines
70 kW
80 kW
90 kW
130 kW
50 kW
70 kW
1 Only possible in conjunction with steering angle restriction. When retrofitting the vehicle, this must be additionally fitted with this tyre size.
>Note!
Adequate clearance can only be guaranteed if the manufacturer's recommended tyres and wheels are used. Other rim and tyre sizes
may moreover damage the braking system.
Reference 109
Technical data
Snow chains*
Use only snow chains approved by smart
gmbh.
>Note!
Read the detailed operating instructions
for the snow chains before starting to fit
them.
>Important!
Snow chains are only permissible for the
following tyre sizes:
all vehicles except 130 kW:
175/65 R14
Vehicles with 130 kW:
185/55 R15 front 205/45 R15 rear
1010 Reference
Accident risk!
When fitting or removing snow
chains, always park your car on a level
surface and switch the engine off. The
vehicle could otherwise slide and in
jure yourself or other road users.
Accident risk!
The car's handling changes when
driving with snow chains on any kind of
road surface.
Accident risk!
Do not forget to retighten the
snow chains. Otherwise they may work
their way loose from the tyres.
Accident risk!
Only use original smart snow
chains. Otherwise, there is a risk of an
accident as a result of changed han
dling characteristics!
>Notes on the use of nonoriginal smart
snow chains
If othermake snow chains are used:
the vehicle operating approval status is
rendered null and void,
the car could sustain damage,
handling can be greatly impaired.
Technical data
Weights
Petrol engines
47 kW
MT1
Diesel engines
55 kW
MT1
965
485
70 kW
80 kW
90 kW
130 kW
50 kW
AMT2
MT1
AMT2
MT1
AMT2
MT1
AMT2
MT1
MT1
970
485
970
485
975
485
975
485
980
480
975
485
980
480
70 kW
AMT2
MT1
AMT2
Curb weight (kg)
Load capacity (kg)
965
485
1,090
480
1,085 1,090 1,085 1,090
485
480
485
480
Permissible
gross vehicle
weight (kg)
1,450 1,450 1,455 1,455 1,460 1,460 1,460 1,460 1,460 1,570
1,570 1,570 1,570 1,570
Maximum
permitted tongue
weight (kg)
50
50
50
50
50
50
50
50
50
50
50
50
50
50
1 MT = manual transmission
2 AMT = automated manual transmission (softouch plus)*
Loads
Petrol engines
Maximum permissible axle weight, front axle (kg)
47 kW
850
55 kW
850
70 kW
850
80 kW
850
90 kW
850
130 kW
850
50 kW
850
70 kW
850
Maximum permissible axle weight, rear axle (kg)
Maximum permissible roof load (kg)1
750
50
750
50
750
50
750
50
750
50
750
50
750
50
750
50
Trailer load limit with trailer unbraked (kg)
Trailer load limit with trailer braked (kg)
500
750
500
750
500
750
500
750
500
750
500
750
Diesel engines
1 Including roof rack (preparation)
Reference 1011
Technical data
Vehicle dimensions
Petrol engines
Length (mm)
47 kW
3,752
55 kW
3,752
70 kW
3,752
80 kW
3,752
90 kW
3,752
130 kW
3,752
50 kW
3,752
70 kW
3,752
Width (mm)
Height (mm)
1,684
1,450
1,684
1,450
1,684
1,450
1,684
1,450
1,684
1,450
1,684
1,450
1,684
1,450
1,684
1,450
Wheelbase (mm)
Tread width, front/rear (mm)
2,500
1,460/
1,445
268 330
2,500
1,460/
1,445
268 330
2,500
1,460/
1,445
268 330
2,500
1,460/
1,445
268 330
2,500
1,456/
1,441
268 330
2,500
1,456/
1,441
268 330
2,500
1,460/
1,445
268 330
2,500
1,460/
1,445
268 330
620
620
620
620
620
620
620
620
Luggage compartment with rear bench seat fold 910
ed down (ltrs.)
910
910
910
910
910
910
910
Turning circle, m (ft/in)
10.5
10.5
10.5
11.0
11.0
10.5
10.5
Luggage compartment, l (cu.ft)
Luggage compartment with backrests of rear
bench seat folded down (ltrs.)
1012 Reference
10.5
Diesel engines
Technical data
Refuelling
Petrol engines
Diesel engines
47 kW
55 kW
70 kW
80 kW
90 kW
130 kW
50 kW
70 kW
Capacity
(ltrs.)
47
47
47
47
47
47
47
47
of which re
serve ca
pacity
(ltrs.)
Fuel
5
5
5
5
5
5
5
5
Fuel tank
Premium unleaded petrol, EN 228,
at least 95RON1/85MON
Unleaded
premium plus,
EN 228, at least
98RON1/88MON
Diesel fuel, EN590
1 The petrol engines are designed to run on unleaded petrol of at least 95RON/85MON (130 kW: 98RON/88MON). In countries in which unleaded fuel with at least 95RON/
85MON (130 kW: 98RON/88MON) is not available, you can use unleaded fuel with 91RON (130 kW: 95RON) in emergencies. This, however, can reduce engine output and in
crease fuel consumption. When subjected to heavy loads while burning grade 91RON fuel (130 kW: 95RON), engine damage could result. smart recommends that you always
run your petrol engine on unleaded petrol with a minimum grade of 95RON/85MON (130 kW: 95RON/88MON).
Fluid capacities
Petrol engines
Diesel engines
47 kW
55 kW
70 kW
80 kW
90 kW
130 kW
50 kW
70 kW
Coolant capacity, l (Imp. pints)
Anticorrosion agent/antifreeze (ltrs.)
4.2
50:50
4.2
50:50
4.6
50:50
4.6
50:50
4.6
50:50
4.6
50:50
6.6
50:50
6.6
50:50
Windscreen washer system
Total fluid capacity (ltrs.)
5
5
5
5
5
5
5
5
Coolant system
Reference 1013
Technical data
Tyre inflation pressure
(summer and winter)
Petrol engines
Diesel engines
47 kW
55 kW
70 kW
80 kW
90 kW
130 kW
50 kW
70 kW
Front wheels, unladen/fully laden (bar)
Rear wheels, unladen/fully laden (bar)
2.2/2.5
2.2/2.5
2.2/2.5
2.2/2.5
2.2/2.5
2.2/2.5
2.2/2.5
2.2/2.5
2.2/2.5
2.2/2.5
2.2/2.5
2.2/2.5
2.2/2.5
2.2/2.5
2.2/2.5
2.2/2.5
Engine oil
Petrol engines
Oil quantity (ltrs.)
Oil grade (recommended)
1014 Reference
Diesel engines
47 kW
55 kW
70 kW
80 kW
90 kW
130 kW
50 kW
70 kW
3.5
SAE
10W30
3.5
SAE
10W30
4.5
SAE
10W30
4.5
SAE
10W30
4.5
SAE
10W30
4.5
SAE
10W30
5.4
SAE
10W40
SAE
5W30
5.4
SAE
10W40
SAE
5W30
Technical data
Retrofitted electrical or electronic
equipment
Retrofitted electrical or electronic
equipment which may influence the driv
er's control over the vehicle require a
type approval certificate and must be
designated by means of an esymbol.
The installation of mobile phones and data
transmission devices which comply with
the maximum transmitting power listed
below will receive the approval of the
smart gmbh company if the installation is
done by skilled technician and a nonre
flectance aerial is used.
Frequency range (band)
Maximum
transmission power (watts)
Short wave (<50 MHz)
100
Wavelength 2 m
Wavelength 0.7 m
50
35
Wavelength 0.25 m = D + E networks
10
>Note!
If electrical/electronic devices that do
not comply with the aforementioned in
stallation specifications are fitted, the
vehicle's operating approval may be ren
dered null and void (EC Directive 95/54/
EC).
Reference 1015
Homologation numbers
Homologation numbers
(for radio wavebased remote control)
Electronic immobiliser
Remote control (car key)
5WK4 5107
5WK4 5109
5WK4 5107
5WK4 5109
Slovakia
Croatia
5WK4 5107
5WK4 5107
5WK4 5109
5WK4 5109
Hong Kong
Lebanon
5WK4 5107
5WK4 5107
5WK4 5109
5WK4 5109
Poland
South Africa
5WK4 5107
5WK4 5107
5WK4 5109
5WK4 5109
Germany, Austria, Belgium, Denmark, Finland,
France, Great Britain, Italy, Greece, Ireland,
Luxembourg, Spain, Netherlands, Portugal,
Sweden
Czech Republic
1016 Reference
Key word index >>
Key word index
A
abs ..................................................... 625
abs indicator light ................... 135, 626
Accelerating ...................................... 613
Acceleration ...................................... 107
Adjusting the backrest inclination.... 113
Adjusting the inside
rearview mirror ................................. 118
Adjusting the outside mirrors* ......... 118
Adjusting the seats............................ 110
Adjusting the wiper nozzles .............. 821
Air conditioning system* ................... 412
Air distribution.................................... 47
Air nozzle adjustment.......................... 47
Air temperature................................... 46
Airbag indicator light.............. 133, 634
Alarm system*.................................... 616
Armrest, folding over ........................ 116
Audio/telematics devices* .................. 39
Automated manual transmission,
softouch plus*...................................... 64
Auxiliary instruments* ...................... 150
B
Battery ............................................... 914
Battery in key ...................................... 17
Battery indicator light....................... 138
Belt force limiters ............................. 126
Belt guide........................................... 125
Belt tensioners .................................. 126
Bench seat adjustment ...................... 710
Bottle holder*.......................................74
Brake pad display ..............................625
Brake system indicator light ... 135, 626
Breakdown set....................................921
Breaking in...........................................66
Bulbs, replacing ...................................99
C
Can holder ............................................75
Care notes..........................................822
Catalytic converter............................620
CD changer* .......................................314
Central locking system ........................15
Changing a fuse....................................94
Changing a wheel ...............................932
Charging the battery .........................920
Checking the brake fluid....................816
Checking the tyre inflation pressure 819
Checking the windscreen
washer fluid........................................815
Child restraint systems .......................52
Child restraint systems*......................52
Child safety lock...................................16
Child seat safety lock...........................53
COC papers
(EC CERTIFICATE OF CONFORMITY) ..105
cockpit bag*.........................................76
Cockpit, lefthand drive model..........128
Cockpit, righthand drive model .......129
Coming home function* ........................22
Compact spare wheel .........................933
Control lever ......................................130
All texts marked with an "*" refer either to special equipment ex works or original smart accessories.
112 Key word index
Coolant temperature indicator light . 138
Crawl function* .................................. 611
D
Daily trip odometer ........................... 142
Daytime driving lights*........................ 23
Deactivating the alarm system* ........ 616
Deicing the windows ........................ 411
Dimensions and weights .................. 1012
Disabling airbag .................................. 55
Display illumination ........................... 141
Display of door locking system ........... 15
Door handle ......................................... 17
drive lock function .............................. 16
Driver's airbag .................................. 627
Driving in winter................................ 619
Driving notes ..................................... 622
Driving off.......................................... 610
E
Electronic immobiliser ........................ 63
Emergency locking .............................. 14
Engine check indicator light ............. 139
Engine oil ......................................... 1016
Engine specifications ........................ 104
esp ........................................... 136, 627
esp indicator light............................. 136
Key word index
F
Faults in the abs system .................... 626
Faults in the power glass
sliding roof* ........................................ 92
Fire extinguisher* ............................. 939
First aid kit* ...................................... 710
Floor mats* .......................................... 62
Fluid capacities ............................... 1014
Fog lamp* indicator light................... 134
Footbrake .......................................... 624
Fresh air .............................................. 49
Fresh air/recirculated air selector* .. 46
Front fog lamps*.................................. 28
Front passenger's front airbag,
disabling ............................................ 636
Frost warning .................................... 145
Fuel consumption..................... 105, 106
Fuel tank gauge ................................. 144
Fuse assignment .................................. 96
Fuse box............................................... 94
G
Gear indicator ................................... 143
Gearshifts from the steering wheel*... 65
Headlight flashers..............................211
Headlight range adjustment ................25
Heater ..................................................46
Height adjustment of the seat belt ....124
High beam indicator light ..................137
High beam lights...................................24
Horn....................................................211
I
Indicator lights ..................................132
Information signs...............................102
Insects, removing ..............................823
Installing and removing the battery..916
Interchanging wheels.........................931
Interior lights ......................................27
Interior motion sensor*.....................618
Interlock* for rear power windows ...120
J
Jump starting .....................................918
K
Keys ......................................................12
Kickdown function*...........................615
H
Handbrake.......................................... 623
Hazard warning lights........................ 211
Hazard warning triangle* .................. 710
Head restraint adjustment ................ 114
Headlight cleaning* ............................. 26
L
lighton function*................................ 23
Loads ............................................... 1012
Lock vehicle......................................... 13
Locking the rear doors ....................... 17
Longitudinal seat adjustment............ 111
lounge concept* ................................ 115
Low beam ............................................. 22
Luggage compartment cover*........... 714
Luggage net* ....................................... 76
Lumbar support* ............................... 114
M
Manual gearbox ................................... 64
Maximum speed.................................. 107
Mirror adjustment ............................. 118
Model plate ........................................ 103
Multifunction display ....................... 142
Multifunction steering wheel* ... 131, 32
O
Oil pressure indicator light .............. 139
Oil types............................................. 812
Onboard computer* ........................... 34
Onboard diagnosis socket................. 93
Onboard instruments....................... 132
Outside mirror heaters* ................... 418
Outside temperature display*. 142, 413
Overhead control panel..................... 147
All texts marked with an "*" refer either to special equipment ex works or original smart accessories.
Key word index 113
Key word index
P
Paintwork damage, rectifying............ 825
Panaromic glass roof* ......................... 43
Parking............................................... 615
Parking lights ...................................... 22
Passenger's airbag ........................... 631
Power glass sliding roof* .................... 44
Power windows ................................... 119
R
Radio remote control........................... 12
Rain sensor* ...................................... 415
Rear fog lamp....................................... 29
Rear fog lamp indicator light ............ 134
Rear window heater ........................... 417
Rear window wiper............................. 416
Recirculated air*................................. 49
Refuelling......................................... 1014
Reversing the car.............................. 612
Roll starting....................................... 936
S
Seat belt indicator light .................... 138
Seat belts ........................................... 122
Seat heater*....................................... 419
Seat height adjustment* .................... 112
Seats, folding down............................ 115
Service interval display .................... 145
Side airbags....................................... 628
snapfix* ............................................... 78
Snow chains* .................................... 1011
softouch plus* ......................................64
Speedometer display..........................141
Starting the engine ..............................67
Steering wheel adjustment ................116
Storage compartment under the
front passenger seat* .........................77
Storage compartments.........................72
Storage tray* .....................................710
Sun visors.............................................42
Sunroof visor........................................43
Switching on the lights.........................22
Switching the blower on .......................47
twinface armrest*.............................. 116
Tyre condition ................................... 930
Tyre damage ...................................... 931
Tyre inflation pressure ......... 817, 1016
Tyre tread.......................................... 930
Tyres.................................................. 108
Tyres and wheels ............................... 928
T
Tachometer ........................................140
Tailgate, opening .................................79
Tar, removing.....................................823
Time, setting ......................................143
Topping up engine oil ........................811
Topping up the coolant ......................814
Towing lug ..........................................937
Towing sensor ....................................617
Trailer hitch* .....................................717
Trailer indicator light........................137
Trailer, towing ...................................621
Transporting children .........................53
Trays ....................................................72
Trip odometer ....................................142
Turn signal indicator light.................137
Turn signal lights...............................210
Turn signal lights with
convenience touchshifting...............210
V
Vehicle dimensions .......................... 1013
Ventilation ........................................... 46
All texts marked with an "*" refer either to special equipment ex works or original smart accessories.
114 Key word index
U
Unlock vehicle...................................... 13
Using child restraint systems* ........... 57
W
Warning waistcoat* ............................ 710
Washer system ................................... 824
Washing the car ................................. 823
Wheel theft protection* ..................... 927
Wheels ................................................ 108
Which bulbs should you have
changed at your local smart center? .. 99
Windscreen washer system ............... 416
Windscreen wipers .................. 415, 416
Wipe and wash functions.................... 415
Wiper blades ...................................... 820
Wipers ................................................ 415
Masthead
Publisher and copyright
smart gmbh
Concept and execution
cognitas. GmbH
Layout and typesetting
cognitas. GmbH
Translation
indubo
translation solutions GmbH & Co. KG
Print
Sommer Corporate Media
Printed on paper bleached without chlorine
www.smart.com
smart a brand of DaimlerChrysler
Order number: 6515 0604 02
Part number: MN902244
or: A 454 584 35 82
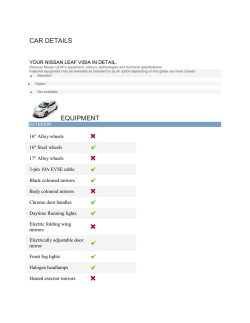
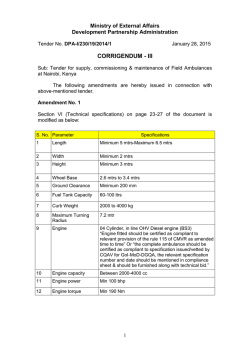
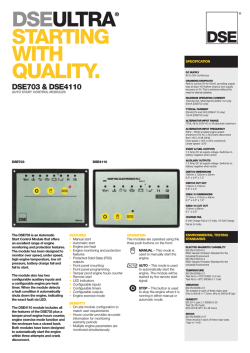

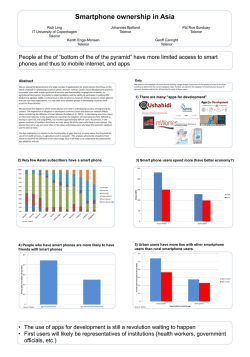

© Copyright 2026