
GEMS Installation and Configuration Guide
GEMS Installation and
Configuration Guide
for Administrators
Product Version: 1.2
Doc Rev 3.1.3
Last Updated: 5-Feb-15
Good Enterprise Mobility ServerTM
Table of Contents
Introducing Good Integrated Mobile Services
1
GEMS Prerequisites
4
Upgrade Notes
4
Supported Upgrades
4
Upgrade Steps
4
Additional Considerations
5
Core Requirements
5
System and Network Requirements
5
Good Dynamics Requirements
7
Configuring the Java Runtime Environment
8
Setting Up a Windows Service Account for GEMS
8
Push Notification Service (PNS) Prerequisites
Supported Exchange Versions
9
9
EWS Proxy Support
10
Create an Exchange Mailbox for the Service Account
11
Grant Application Impersonation Permission to the Service Account
11
Set Authentication for the EWS Protocol
11
Set Up Exchange Autodiscover
11
Database Requirements
12
Connect Prerequisites
Microsoft Lync Server Requirements
Presence Prerequisites
12
12
29
Installing GEMS
29
Upgrading
29
Downloading and Running the GEMS Installer
30
Configuring GEMS Core
33
Changing the GEMS Dashboard Admin Password
33
Replacing the Auto-Generated Self-Signed SSL Certificate
34
Good Enterprise Mobility Server™
ii
Enabling GEMS HTTP (Optional)
Configuring GEMS Services
Configuring the Push Notification (Mail) Service
34
35
36
Enabling Exchange ActiveSync (EAS)
36
Preparing the Database for GEMS-PNS
36
Configuring PNS (Mail) in the GEMS Dashboard
37
Configuring Good Control
43
Configuring GEMS-PNS for HA
45
Device Verification and Testing
46
PNS Logging and Diagnostics
46
Configuring the Connect Service
51
Preparing the Database for Connect
52
Configuring Connect in the GEMS Dashboard
52
Configuring Good Control for Connect
62
Using Friendly Names for Certificates in Connect
70
Enabling SSL Support Via Good Proxy
72
Configuring Support for the Global Catalog
81
Configuring Windows Services
82
Connect Service Logging and Diagnostics
83
Configuring the Presence Service
85
Configuring Presence in the GEMS Dashboard
85
Configuring Good Control for Presence
86
Using Friendly Names for Certificates in Presence
89
Logging and Diagnostics
91
Updating the Connect and Presence Services Using Lync Director
91
Maintaining GEMS Cluster Identification in Good Control
92
Device Provisioning and Activation
93
Appendix A – GEMS with Push Notifications ServicePre-Installation Checklist
95
Appendix B – GEMS with Connect and Presence Pre-Installation Checklist
98
Appendix C – Importing Certificates into the GEMS Java Keystore
102
Default Location
102
Default Password
102
Good Enterprise Mobility Server™
iii
Keystore File Reference
102
Certificate Format
102
Importing the Certificate
103
Other Useful Keystore Commands
103
Appendix D – Understanding the GEMS-Connect Configuration File
105
Appendix E – Fine-Tuning Your Java Memory Settings
108
Appendix F – IIS SSL Offloading
109
Appendix G – GEMS Windows Event Log Messages
115
Good Enterprise Mobility Server™
iv
Introducing Good Integrated Mobile Services
Introducing Good Integrated Mobile Services
Leveraging a services-based approach to integrated enterprise mobility, Good Enterprise Mobility Server (GEMS)
consolidates the Good Connect and Good Mobile Messaging servers as mobiles on a standardized architecture.
The integrated services offered by GEMS currently comprise Connect, Presence, Push Notifications, Docs, and
Analytics.
The Push Notifications Service (PNS) accepts push registration requests from hand-held mobile devices—iOS,
Android etc.—and then communicates with Microsoft Exchange via its Exchange Web Services (EWS) protocol to
monitor the user's enterprise mailbox for changes.
The Connect service boosts user communication and collaboration with secure instant messaging, corporate
directory lookup, and user presence from an easy-to-use interface on IT-provisioned mobile devices.
The Presence service furnishes real-time presence status to third-party Good Dynamics applications—giving
them a powerful add-in for mobile collaboration.
The Docs service, in this 1.2 release, is a developer preview not yet supporting any apps. Subsequently, however,
it will let your mobile workers access, sync, and share their enterprise file server and SharePoint documents
natively, without the need for VPN software, firewall reconfiguration, or duplicate data stores.
The Analytics service, also a developer preview in this 1.2 release and initially comprising an App Usage module,
provides traffic and usage metrics for evaluating the effectiveness and impact of the mobile app deployments
comprising your GD-GEMS ecosystem—which apps are being used, by whom, for what, how frequently, and for
how long.
A browser-based administration console—called the GEMS Dashboard—gives you the flexibility to configure all
server components and services after installation completes. GEMS Web Console, also browser-based, provides
real-time monitoring and logging of device connectivity, traffic load and throughput in real time.
"Services," in the context of Good Dynamics (GD), refer to concrete atomic business-level functionality that can
be consumed by a plurality of GD Applications. Examples of this are "Look up this contact in the directory",
"Subscribe to Presence for these contacts", "Save this file to SharePoint", and so forth. The Good Dynamics
Services Framework allows client applications on an authenticated device to discover and utilize services by
providing API publication, as well as life cycle and visibility management of services via the Good Developer
Network (GDN).
At a high level, the GEMS architecture looks like this:
Good Enterprise Mobility Server™
1
Introducing Good Integrated Mobile Services
A slightly different view, limited to the Connect and Presence architecture , looks like this—again at a high level:
The PNS architecture, leveraging Microsoft's Exchange Web Services (EWS) with Exchange ActiveSync (EAS) can be
viewed from a slightly different perspective, like this:
Good Enterprise Mobility Server™
2
Introducing Good Integrated Mobile Services
Note: While it is possible to consolidate Good Control/Good Proxy and GEMS on the same server, such a
configuration will require more memory and CPU on the single server. A single server approach is feasible in a
proof-of-concept (POC) environment only. Moreover, if using a single server, you are likely to encounter a port
conflict between Good Dynamics and the Lync Presence Provider (LPP). To rectify this conflict on a single
machine, start Good Control and Good Proxy after Good Presence.
Another important point to note in the diagram above is that the GEMS-PNS service is utilizing the same
database server as Good Control. The database server can be local to Good Control, as depicted, or remote.
These diagrams and the balance of this document assume that necessary supporting infrastructure components
like Microsoft Exchange, Microsoft Lync, Active Directory, and Good Control/Good Proxy are present and
configured to support existing enterprise network operations.
This guide, therefore, restricts itself to step-by-step instructions and guidance for installing GEMS and its Connect,
Presence and Push Notification services. The overall process comprises:
l Preparing the Service Environment
l Setting Up a Windows Service Account
l Installing GEMS
l Configuring GEMS Services
l Device Provisioning and Activation
Before attempting installation, be sure to carefully read and confirm that you meet all of the listed requirements.
Good Enterprise Mobility Server™
3
GEMS Prerequisites
GEMS Prerequisites
Successful GEMS installation and configuration requires that a supporting infrastructure comprising necessary
hardware and software components is already in place. These prerequisites include:
l Core Requirements
l Push Notifications Service (PNS) Requirements
l Connect Requirements
l Presence Requirements
Note to Admins: Non-developers do not need to install the Docs Configuration Console. The Docs and Analytics
Services included with GEMS 1.2 are a developer's preview and do not currently support Good apps. A
subsequent release of GEMS will support Good Work and other apps specifically designed to use these service
APIs. At present, admins can skip configuration of both the Docs and Analytics Services.
Based on the services you have chosen to deploy, only after verifying that each of the respective prerequisites
are in place and operating properly should you begin the GEMS service installation and configuration procedures
prescribed.
Important: If you don’t install the required software or fail to configure the requirements correctly prior to
beginning installation of GEMS, the server may fail or behave in an unexpected manner.
Upgrade Notes
If you are upgrading from an earlier version of GEMS, please review the following information and then complete
the steps below. If this is your first GEMS installation, skip the upgrade steps.
Supported Upgrades
• GEMS 1.1.29.57 ð GEMS 1.2.16.32
• GEMS 1.1.38.70 ð GEMS 1.2.16.32
Upgrade Steps
If you are upgrading from a previous version of GEMS:
1. Extract the database scripts from the installer zip file (GoodEnterpriseMobilityServerSetup.1.2.16.32.zip) . Scripts are
located in: \GoodEnterpriseMobilityServerSetup.1.2.16.32.zip\GoodEnterpriseMobilityServer\EWS\pushnotify-dbmanager0.2.16-sqlserver.zip\pushnotify-dbmanager-0.2.16\gcsmail-db-sqlserver\
2. Run the SQL script sqlserver_upgrade_from_0.0.1_to_0.1.1.sql against the current database to which GEMS EWS is
connected.
3. Run the GEMS executable.
4. Restart the Presence service (i.e., Lync Presence Provider [LPP]).
Good Enterprise Mobility Server™
4
GEMS Prerequisites
Note: The installer will detect previously installed versions of GEMS and offer an upgrade option. Please select
Upgrade, then follow the on-screen instructions in accordance with Installing GEMS below.
Additional Considerations
When upgrading instances in a cluster you should first upgrade the database using the upgrade script provided
(see Step 2 above), before upgrading any of the instances in the cluster. Once the database has been successfully
upgraded, use the GEMS installer to upgrade each GEMS instance in turn.
For upgrade situations in which there are multiple GEMS instances pointing to a shared (common) database,
upon upgrading the database, new features will not be available until all GEMS instances have been upgraded. In
a mixed-version environment, each GEMS instance will continue to function with the earlier version’s features.
Running in a mixed-version environment for an extended period of time is not recommended.
Core Requirements
Certain basic requirements must be satisfied, in place, and correctly functioning regardless of the service
modules—PNS, Connect, or Presence—you are deploying.
The core requirements include:
l System and Network Requirements
l Good Dynamics Requirements
l Configuring the Java Runtime Environment (JRE)
l Setting Up a Windows Service Account for GEMS
System and Network Requirements
Verify that the designated GEMS machine and its associated environment meet the following (minimum) system
and network requirements, bearing in mind that different services and combinations of services—Connect,
Presence, and/or Mail—and their respective traffic and use patterns will strongly influence your actual
requirements. Refer to the GEMS Deployment Planning Guide for additional scalability and sizing guidance, as well
as high availability and disaster recovery recommendations.
Hardware1
l 4-core / 2.4 GHz CPU or higher
l 16 GB RAM
l 50 GB disk space
l 100 / 1000 Ethernet Card
1See GEMS Deployment Planning and Upgrade Guide for scalability and sizing guidelines for your specific enterprise traffic and use profile.
Good Enterprise Mobility Server™
5
GEMS Prerequisites
Software
l Java Runtime Environment (JRE) 7 Update 67 (7up67) for Microsoft Windows (64-bit), available for download
directly from Oracle.
Operating System
Because GEMS uses Microsoft's Unified Communications Managed API (UCMA) to integrate Microsoft Lync with
the GEMS Connect and Presence services, the latter also used by the Mail component of Good Work, the OS
version required to run GEMS is dependent upon the version of Microsoft Lync deployed. Per guidance from
Microsoft, use the following criteria to determine the version of MS Windows Server supported by GEMS:
l For MS Lync 2010 Deployments use Windows Server in one of these 64-bit versions:
o 2008 R2
o 2008 R2 SP1
l For MS Lync 2013 Deployments use Windows Server in one of these 64-bit versions:
o 2008 R2 SP1
o 2012 R2
If Lync is not utilized in your environment, the above OS requirements are still required from an installation
standpoint. Due to a limitation in the installer, you will need to choose a version of Lync during the installation
process, even though Lync may not be used in your environment.
Supported Microsoft Exchange versions include:
l Exchange 2010 (SP2 RU4 +)
l Exchange 2013 (CU1, CU2, CU3, SP1 [CU4])
Supported Microsoft Lync versions include
l Lync 2010
l Lync 2013
Administration Rights
l User performing the installation must have local administrative privileges on the host machine
l GEMS must be able to connect with Microsoft Exchange for PNS
l GEMS must be in the same domain as the Microsoft Lync Server for Connect
l GEMS must be able to communicate with the enterprise’s Microsoft Active Directory
l GEMS must have "logon as a service" right
l Local antivirus software must be disabled during installation
l Local Windows firewall must be disabled
Good Enterprise Mobility Server™
6
GEMS Prerequisites
Important: A Group Firewall Policy will cause the installer to fail its prerequisite checks, even if the local firewall
is disabled.
Inbound TCP Ports (open and ready for GEMS; not blocked by any firewall)
l 8080 from the Good Proxy (GP) server; or 8082, if SSL is required for inbound GP communications
l 8181 from the Good Proxy server (required for Presence);
l 8443 from the Good Proxy server for Push Notifications
l Optional: 49555 from the Lync Server for the Connect Service
l Optional: 49777 from the Lync Server for the Presence Service
Outbound TCP Ports (not blocked by any firewall)
l 443 to Good NOC/APNS
l 443 to Exchange
l 5061 to the Lync Server
l 17080 to the Good Proxy server
l 17433 to the Good Proxy server
Internal Ports (used by GEMS):
l 8080, 8082 by the Connect Server
l 8101 for SSH connectivity to GEMS
l 8443
l 8099 by the .NET Component Manager
l 8060 by the Lync Presence Provider (LPP)
TCP/IP Port Access to the Database
l 1433 to the Microsoft SQL Server default
Good Dynamics Requirements
The following minimum GD Server versions should be appropriately installed and configured according to the
instructions in the GD Servers Installation Guide.
l Good Control (GC) Server 1.7.38.19
l Good Proxy (GP) Server 1.7.38.14
For best performance results, the most current software version available is strongly recommended and is
available from the Good Developer Network.
Important: Your Good Dynamics Server(s) must be operating prior to installation of GEMS.
Good Enterprise Mobility Server™
7
GEMS Prerequisites
Configuring the Java Runtime Environment
JRE 7 Update 67 for Windows x64 is integral to GEMS support of intranet applications and other e-business
solutions that are the foundation of corporate computing. After installing the JRE, the JAVA_HOME system
environment variable must be set.
To set the JAVA_HOME system environment variable for GEMS:
1. First, edit the system environment variables:
a. Select Computer from the Start menu, then click on System Properties.
b. Click on the Advanced tab, then click the Environment Variables... button.
2. If the JAVA_HOME variable does not exist under PATH, create it and set it to the Java install folder; e.g.,
C:\Program Files\Java\jre7. Make sure the path is set to the 64-bit JRE.
3. Click OK and you're done.
Setting Up a Windows Service Account for GEMS
For the required service account, "GoodAdmin" is recommended. In fact, you can use the same Windows Service
Account to install all GEMS service modules; e.g., [email protected]. Of utmost importance here
is to make sure the service account ([email protected]) has the appropriate administrative
privileges for all the GEMS service modules you plan to configure and deploy. Permissions for individual service
modules may not require the same privilege level as others. Consequently, as you add services to GEMS, you will
want to adjust the permissions accordingly.
Important: If you use this same account for GEMS Connect and Presence, you will need to give "GoodAdmin"
the RTCUniversalReadOnlyAdmins privilege.
Create an Active Directory Account for GEMS Services
Set the following attributes for the Good-GEMS AD Account:
Good Enterprise Mobility Server™
8
GEMS Prerequisites
l The preferred UID is "GoodAdmin"
l Account Password must not contain these characters: ';', '@', '/'.
l Password Expires option must be set to Never for this account.
l This account (GoodAdmin) should be a member of local administrator group on the GEMS host machine.
Push Notification Service (PNS) Prerequisites
GEMS-PNS requires a database, and that you set up a Windows Service Account for GEMS in support of your
Exchange environment.
Supported Exchange Versions
In general, EWS push notifications are sent (or pushed) by the server to a client-side web service via a callback
address. Push notifications are ideally suited for tightly coupled clients like Good Work and other GEMSsupported apps to which the server has reliable access and the client is IP addressable. When GEMS-PNS is
configured, EWS events are sent asynchronously from the mailbox server to the client.
The GEMS version(s) listed in the following table are compatible with the Microsoft Exchange versions indicated.
GEMS Version
Exchange Version
Supported
1.2 (on-cloud and on-premise)
Exchange 2007
No
Exchange 2010 SP 1+
Yes
Exchange 2013
Yes
Microsoft O365
Yes
Hosted Exchange* (Exchange 2010 SP 1+)
Yes
* Certified Rackspace
If you are deploying GEMS in a mixed environment, wherein GEMS and Exchange are not co-located, there are
additional requirements/prerequisites which may apply. These scenarios include:
l Cloud-based GEMS ð On-Premise Exchange
a. You must expose EWS and Autodiscover from your on-premise Exchange to the Internet on port 443.
b. Both Basic Authentication and Windows Authentication are supported for EWS and Autodiscover.
l On-Premise GEMS ð Cloud-based Exchange
a. You must expose EWS and Autodiscover from Cloud-based Exchange to On-Premise GEMS on port 443.
b. Although both Basic Authentication and Windows Authentication are supported by GEMS, be advised that
certain cloud vendors—for instance, O365 and Rackspace—only support Basic Authentication. Please
check with your specific cloud vendor for details.
For additional information on configuring EWS and Autodiscover for external access, refer to the pertinent
Microsoft articles on TechNet:
Good Enterprise Mobility Server™
9
GEMS Prerequisites
l Configuring the Autodiscover Service for Internet Access
l Configuring EWS for External Access
EWS Proxy Support
Simply put, Exchange Web Services (EWS) lets client applications communicate with the Exchange server using
SOAP messages sent by HTTP. Proxying occurs when a client access server (CAS) role sends traffic to another CAS
role—two common situations being:
l CAS to CAS communication between two AD sites
l CAS to CAS communication between Exchange 2010 and 2007 or 2003
More to the point, the following CAS protocols/services are proxy enabled:
l Exchange Web Services (EWS) and the availability service (part of EWS)
l Exchange ActiveSync (EAS)
l Outlook Web App (OWA) and Exchange Control Panel (ECP)
l POP3 / IMAP
Proxy support is available for the GEMS version indicated in the following implementations as defined below:
Proxy Support
GEMS Version
Remote Endpoint
Transparent
Anonymous
Basic
NTLM
1.1
NOC
Yes
Yes
Yes
No
1.2
NOC
Yes
Yes
Yes
Yes
1.1, 1.2
Remote O365
Yes
No
No
No
1.1, 1.2
On-prem Exchange
n/a
n/a
n/a
n/a
l Transparent – also known as an intercepting proxy, inline proxy, or forced proxy, it intercepts normal
communication at the network layer without requiring any special client configuration. GEMS doesn't need to
be aware of the existence of a transparent proxy, which is normally located between the client and the
Internet, with the proxy performing some of the functions of a gateway or router.
l Anonymous – also known as an anonymizer, attempts to make activity on the Internet untraceable by acting
as an intermediary and privacy shield between the client and the rest of the Internet. It accesses the Internet
on the user's behalf, protecting personal information by hiding the client computer's identifying information.
l Basic – is based on the model that a client must authenticate itself with a user name and password for each
realm. The server services the request if it is resent with an Authorization header that includes a valid user
name and password.
l NTLM – challenges users who request content for proof of their credentials. The proxy then sends the proof
of the user's credentials directly to the Windows domain controller to be validated. If the credentials are valid,
Good Enterprise Mobility Server™
10
GEMS Prerequisites
the proxy serves the requested content and stores the credentials in the NTLM cache for future use. If the
credentials are not valid, the proxy sends an authentication failed message to the user.
Create an Exchange Mailbox for the Service Account
Using the Exchange Management Console or Exchange shell, create a mailbox for the GoodAdmin service
account. If you are not familiar with how to create a mailbox on Exchange, please refer to the respective
Microsoft Exchange resource for additional details and tutorials:
l Exchange Server 2010
l Exchange Server 2013
Grant Application Impersonation Permission to the Service Account
In order for the GEMS Push Notification service to monitor mailboxes for updates, the GEMS Push Notification
service account (GoodAdmin), must have impersonation permissions.
Execute the following Exchange Shell command to apply Application Impersonation permissions to the
GoodAdmin service account:
New-ManagementRoleAssignment -Name:GoodAppImpersonation -Role:ApplicationImpersonation
-User:GoodAdmin
Important: Do not omit this step.
Set Authentication for the EWS Protocol
The GEMS Push Notification service supports Basic, NTLM and Windows Authentication when connecting with
Exchange via EWS. Basic authentication is turned off by default on the Exchange server.
Optionally, if Basic authentication is in fact desired, the command that follows can be used to update Exchange
to use Basic authentication for EWS connectivity. Regardless of authentication method used on Exchange for
EWS, however, no extra configuration is necessary for GEMS.
Execute the following Exchange Shell command to configure Basic authentication for the EWS protocol
on Exchange:
Set-WebServicesVirtualDirectory -Identity "Contoso\EWS(Default Web Site)"
-BasicAuthentication $true
Note: Replace "Contoso\EWS (Default Web Site)" highlighted above in yellow with the proper identity for the
EWS virtual directory. Be sure to enclose the string in quotes.
Set Up Exchange Autodiscover
Ensure that your Exchange Autodiscover is setup correctly. This is very important!
The Autodiscover feature in Exchange is often overlooked during setup but is an important factor in ensuring
smooth day to day running of your Exchange environment. Its main function is to provide the mail client with all
the configuration options it needs, sharing only the user's email address and password. This is particularly useful
Good Enterprise Mobility Server™
11
GEMS Prerequisites
for remote users and smartphone users, who no longer have to enter advanced settings like server names and
domains. It is also vital for the correct functioning of features such as Out Of Office and the Offline Address Book
in Outlook.
Use EWSEditor to test if there are any doubts.
Note: Please reference KB3496 for additional details on using EWSEditor.
Please see also "Exchange Autodiscover" by Jaap Wesselius (2010) for more helpful information on Exchange
Autodiscover.
Database Requirements
A relational database is required for the GEMS Push Notifications Service. The database can be part of your
existing environment or newly installed. GEMS currently supports Microsoft SQL Server. In all cases, the database
must be installed and prepared before starting GEMS installation. This means the necessary SQL scripts included
in the GEMS installation zip file must be executed before beginning GEMS installation proper.
Microsoft has visual and command line tools to assist with database and schema creation; i.e., Microsoft
Management Studio or sqlcmd.
The following versions of MS SQL Server are supported:
l SQL Server 2008 and 2008 R2 (Standard/Enterprise)
l SQL Server 2012 and 2012 SP1 (Standard/Enterprise)
l SQL Express 2008 R2 with Management Tools
If you do not have an existing supported database available, you can obtain one from the Microsoft Download
Center. MS SQL Server 2008 R2 is recommended.
Connect Prerequisites
Among the most important prerequisites for the Connect IM service is the availability of an established Microsoft
Lync environment. These requirements comprise:
l MS Lync 2010 Requirements
l MS Lync 2013 Requirements
l Database Requirements
l Preparing the Lync Topology for GEMS-Connect
l SSL Certificate Requirements for Lync
Microsoft Lync Server Requirements
Antivirus software should be OFF for computers running GEMS with Connect-Presence.
The respective GEMS prerequisites for Lync 2010 and Lync 2013 are included in the following topics:
Good Enterprise Mobility Server™
12
GEMS Prerequisites
l Microsoft Lync 2010 Requirements
l Microsoft Lync 2013 Requirements
Note: Even if you're not using Lync, however, for planned deployments of GEMS-PNS running on Windows
2008 R2, you will need to install .NET Framework 4.5.
Microsoft Lync 2010 Requirements
If you have deployed or are deploying Microsoft Lync 2010, the following components are required on the GEMS
machine to properly support Lync connectivity and operations.
Important: For GEMS support of Lync 2010, .NET Framework 3.5 SP1 and .NET Framework 4.5 must both be
installed.
Windows Management Framework 3.0/PowerShell 3.0
Built on the Microsoft .NET Framework, Windows PowerShell 3.0 is a command-line shell and scripting language
designed for system admin and automation. Windows Server 2012 comes with PowerShell 3.0 already installed.
Enable the Windows PowerShell 3.0 feature using Windows Server Manager.
If you are using Windows 2008 R2 SP1, however, you must install Windows Management Framework 3.0, which
includes Windows PowerShell 3.0.
To install Windows Management Framework 3.0:
1. Go to Windows Management Framework 3.0.
2. Review the information on the web page, then click Download.
3. Select Windows6.1-KB2506143-x86.msu and click Next.
4. Close all Windows PowerShell windows.
5. Uninstall any other version of Windows Management Framework 3.0.
6. Run the Windows6.1-KB2506143-x86.msu executable.
7. Open Windows PowerShell (x86) and run the following command to enable execution of remote-signed
scripts:
Set-ExecutionPolicy -Scope CurrentUser RemoteSigned
If you need to troubleshoot the installation, refer to the WMF 3.0 Release Notes.
For more complete information about Windows Management Framework 3.0 and Windows PowerShell 3.0, visit
the following Microsoft resources:
l Windows PowerShell Web site
l Windows PowerShell Online Help
l Windows PowerShell Blog
Good Enterprise Mobility Server™
13
GEMS Prerequisites
l Windows PowerShell Software Development Kit (SDK)
l Windows Management Framework 3.0 Compatibility Update
.NET Framework 3.5 SP1
Microsoft .NET Framework 3.5 SP1 is a cumulative update containing many new features that incrementally build
upon .NET Framework 2.0, 3.0, 3.5, and includes .NET Framework 2.0 service pack 2 and .NET Framework 3.0
service pack 2 cumulative updates.
Windows Server 2008 R2 comes with .NET Framework 3.5 SP1 already installed. Enable the .NET 3.5 Framework
feature using Windows Server Manager.
If you are using Windows Server 2008 SP2, however, you must install .NET Framework 3.5 SP1. Always make sure
you have the latest service pack and critical updates for the version of Windows Server running on your machine.
To look for recent Windows Server 2008 updates:
Click the Start button, click All Programs, and then click Windows Update.
To install Microsoft .NET Framework 3.5 SP1:
1. Go to Microsoft .NET Framework 3.5 Service Pack 1 (Full Package).
2. Review the information on the web page, then click Download near the top of the page.
3. When the download is complete, click Finish.
If you prefer to download the bootstrapper, rather than the full package, go to .NET Framework 3.5 Service Pack
1 (Bootstrapper).
For additional information about .NET Framework 3.5 SP1, visit the following Microsoft resources:
l .NET Framework 3.0 SP1 KB Article
l .NET Framework 3.5 SP1 Update
.NET Framework 4.5
Microsoft .NET Framework 4.5 is a highly compatible, in-place update to .NET Framework 4. It includes significant
language and framework enhancements, the blending of control flow in synchronous code, a responsive UI, and
web app scalability. .NET Framework 4.5 adds substantial improvements to other functional areas such as
ASP.NET, Managed Extensibility Framework, Windows Communication Foundation, Windows Workflow
Good Enterprise Mobility Server™
14
GEMS Prerequisites
Foundation, and Windows Identity Foundation, in addition to delivering better performance, reliability, and
security.
Windows Server 2012 comes with .NET Framework 4.5 already installed. Enable the .NET 4.5 Framework feature
using Windows Server Manager.
If you are using Windows Server 2008 R2, however, you must install .NET Framework 4.5. Always make sure you
have the latest service pack and critical updates for the version of Windows Server running on your machine.
To look for recent Windows Server 2008 R2 updates:
Click the Start button, click All Programs, and then click Windows Update.
To install Microsoft .NET Framework 4.5:
1. Go to the Microsoft .NET Framework 4.5.
2. Review the information on the web page, then click Download near the top of the page.
3. To install the software immediately, click Run.
4. To install the software later, click Save. Then, when you actually do the install, make sure the server machine is
connected to the Internet.
For additional information about .NET Framework 4.5, visit the following Microsoft resources:
l .NET Framework Developer Center
l .NET Framework 4.5 Language Pack
64-bit UCMA 3.0 Runtime
Microsoft’s Unified Communications Managed API (UCMA) 3.0 is a managed-code platform which developers use
to build applications that provide access to and control over Microsoft Enhanced Presence information, instant
messaging, telephone and video calls, and audio/video conferencing.
Note: You must have elevated permissions to install UCMA 3.0 Runtime. A reboot is required to install and
enable Windows Media Format after UCMA 3.0 Runtime setup is finished.
To install the UCMA 3.0 Runtime:
1. Go to Unified Communications Managed API 3.0 Runtime in the Microsoft Download .NET Framework 3.5
SP1 Center and click Download.
Good Enterprise Mobility Server™
15
GEMS Prerequisites
2. Launch UcmaRuntimeSetup.exe and accept the End-User License Agreement (EULA). The setup wizard will
install all the necessary components.
3. Follow the onscreen instructions to complete the installation.
The setup program installs English versions of the Speech Recognition and Text-to-Speech engines. The final
screen of the installer provides a link that can be used to download additional engines for other languages.
Included in the setup is an additional installer called OCSCore.msi that is also required for GEMS. Find
OCSCore.msi by navigating to the following directory:
C:\ProgramData\Microsoft\Lync Server\Deployment\cache\4.0.7577.0\Setup\OCSCore.msi
By default, the ProgramData folder is hidden, so it might not appear in Windows Explorer. You can change
this (unhide it) in folder settings.
4. Launch OCSCore.msi and use the default settings in the wizard.
To ensure that you have the latest cumulative update from Microsoft and thereby avoid performance
issues:
1. Open Windows Update in Control Panel.
2. In addition to installing any listed updates for Windows, click Find out more next to Get updates for other
Microsoft products.
3. Shortly, you'll receive the cumulative list of update patches.
4. Be sure to select Lync Server 2010 Core Components along with any UCMA 3.0 updates.
Good Enterprise Mobility Server™
16
GEMS Prerequisites
5. Verify that the latest update is now installed in Programs and Features. The required Lync Server 2010,
Core Components version is 4.0.7577.230.
Microsoft Lync 2013 Requirements
If you have deployed or are deploying Microsoft Lync 2013, the following components are required on the GEMS
machine to properly support Lync connectivity and operations:
Windows Management Framework 3.0/PowerShell 3.0
Built on the Microsoft .NET Framework, Windows PowerShell 3.0 is a command-line shell and scripting language
designed for system admin and automation. Windows Server 2012 comes with PowerShell 3.0 already installed.
Enable the Windows PowerShell 3.0 feature using Windows Server Manager.
If you are using Windows 2008 R2 SP1, however, you must install Windows Management Framework 3.0, which
includes Windows PowerShell 3.0.
To install Windows Management Framework 3.0:
1. Go to Windows Management Framework 3.0.
2. Review the information on the web page, then click Download.
3. Select Windows6.1-KB2506143-x86.msu and click Next.
4. Close all Windows PowerShell windows.
5. Uninstall any other version of Windows Management Framework 3.0.
6. Run the Windows6.1-KB2506143-x86.msu executable.
7. Open Windows PowerShell (x86) and run the following command to enable execution of remote-signed
scripts:
Set-ExecutionPolicy -Scope CurrentUser RemoteSigned
If you need to troubleshoot the installation, refer to the WMF 3.0 Release Notes.
Good Enterprise Mobility Server™
17
GEMS Prerequisites
For more complete information about Windows Management Framework 3.0 and Windows PowerShell 3.0, visit
the following Microsoft resources:
l Windows PowerShell Web site
l Windows PowerShell Online Help
l Windows PowerShell Blog
l Windows PowerShell Software Development Kit (SDK)
l Windows Management Framework 3.0 Compatibility Update
.NET Framework 4.5
Microsoft .NET Framework 4.5 is a highly compatible, in-place update to .NET Framework 4. It includes significant
language and framework enhancements, the blending of control flow in synchronous code, a responsive UI, and
web app scalability. .NET Framework 4.5 adds substantial improvements to other functional areas such as
ASP.NET, Managed Extensibility Framework, Windows Communication Foundation, Windows Workflow
Foundation, and Windows Identity Foundation, in addition to delivering better performance, reliability, and
security.
Windows Server 2012 comes with .NET Framework 4.5 already installed. Enable the .NET 4.5 Framework feature
using Windows Server Manager.
If you are using Windows Server 2008 R2, however, you must install .NET Framework 4.5. Always make sure you
have the latest service pack and critical updates for the version of Windows Server running on your machine.
To look for recent Windows Server 2008 R2 updates:
Click the Start button, click All Programs, and then click Windows Update.
To install Microsoft .NET Framework 4.5:
1. Go to the Microsoft .NET Framework 4.5.
2. Review the information on the web page, then click Download near the top of the page.
3. To install the software immediately, click Run.
4. To install the software later, click Save. Then, when you actually do the install, make sure the server machine is
connected to the Internet.
For additional information about .NET Framework 4.5, visit the following Microsoft resources:
Good Enterprise Mobility Server™
18
GEMS Prerequisites
l .NET Framework Developer Center
l .NET Framework 4.5 Language Pack
64-bit UCMA 4.0 Runtime
Microsoft’s Unified Communications Managed API (UCMA) 4.0 is a managed-code platform which developers use
to build applications that provide access to and control over Microsoft Enhanced Presence information, instant
messaging, telephone and video calls, and audio/video conferencing.
Note: You must have elevated permissions to install UCMA 4.0 Runtime. A reboot is required to install and
enable Windows Media Format after UCMA 4.0 Runtime setup is finished.
UCMA 4.0 requires Desktop Experience on Windows Server 2008 R2 SP1. Enable this feature using Windows
Server Manager.
UCMA 4.0 requires Media Foundation on Windows Server 2012. Enable this feature using Windows Server
Manager.
To install the UCMA 4.0 Runtime:
1. Go to Unified Communications Managed API 4.0 Runtime in the Microsoft Download Center and click
Download.
2. Launch UcmaRuntimeSetup.exe and accept the End-User License Agreement (EULA). The setup wizard will
install all the necessary components.
3. Follow the onscreen instructions to complete the installation.
The setup program installs English versions of the Speech Recognition and Text-to-Speech engines. The final
screen of the installer provides a link that can be used to download additional engines for other languages.
Included in the setup is an additional installer called OCSCore.msi that is also required for GEMS. Find
OCSCore.msi by navigating to the following directory:
C:\ProgramData\Microsoft\Lync Server\Deployment\cache\5.0.8308.0\Setup\OCSCore.msi
By default, the ProgramData folder is hidden, so it might not appear in Windows Explorer. You can change
this (unhide it) in folder settings.
4. Launch OCSCore.msi and use the default settings in the wizard.
Preparing the Lync Topology for GEMS
The Connect service and Lync Presence Provider (LPP) are Microsoft Lync trusted-UCMA applications. In order to
establish trust with Microsoft Lync, you must first use the Lync Management Shell to complete the following:
l Create a trusted application pool.
l Designate trusted applications for the use of the GEMS computer.
l Create a trusted-computer entry for every GEMS in the environment.
Good Enterprise Mobility Server™
19
GEMS Prerequisites
l Publish these changes to the Lync Topology.
l Create a Trusted Endpoint for the GEMS-Presence Service.
Important: You must be a member of the RTCUniversalServerAdmins and Domain Admins security groups
to provision and publish new applications in the Microsoft Lync Topology. If you have a designated Lync
administrator within your organization, that person should perform all subsequent preparation steps for this
procedure.
You must complete the application provisioning process described in the following instructions:
l Preparing to install GEMS for the first time
l Preparing subsequent GEMS machines
After updating the Lync topology, the Lync administrator must delegate RTCUniversalReadOnlyAdmins
permission to the GEMS service account in order for the GEMS Dashboard to access the provisioning information
during the GEMS configuration process.
Preparing the Initial GEMS Machine
Preparations vary if the Lync Topology has already been set up for GEMS. Hence, the preparation instructions
included here apply only if you are installing GEMS for the first time. If GEMS is already installed in your
environment, see Preparing Additional GEMS Machines.
Otherwise, when you create a trusted application pool for the installation of GEMS, you also create the trustedcomputer entry. Subsequent installations of GEMS machines do not require a new trusted application pool or
designated trusted applications. Because these are merely added to the existing trusted application pool, you
only need to create trusted application computers.
To prepare your topology, you must:
1. Create a Trusted Application Pool.
2. Create a Trusted Application for GEMS Connect.
3. Publish changes to the Lync Topology.
To accomplish these tasks, first launch the Lync Management Shell by selecting: Start > All Programs >
Microsoft Lync Server [2010 or 2013] > Lync Management Shell.
Next, enter the following commands (highlighted areas represent recommended values):
PS> Get-CsSite
If your organization has more than one site in its topology, look up the appropriate siteId number and the
corresponding registrar value and jot them down. You will need this information to create the application
pool.
PS> New-CsTrustedApplicationPool -Force -Identity "pool_gems.mycompany.com" -Registrar
-RequiresReplication $false -Site <siteId number> -ComputerFqdn "FQDN of GEMS machine"
Good Enterprise Mobility Server™
<registrar>
20
GEMS Prerequisites
PS> New-CsTrustedApplication -Force -ApplicationId "appid_connect.mycompany.com" -TrustedApplicationPoolFqdn
"pool_gems.mycompany.com" -Port 49555
PS> New-CsTrustedApplication -Force -ApplicationId "appid_presence.mycompany.com" -TrustedApplicationPoolFqdn
"pool_gems.mycompany.com" -Port 49777
Create the second application (appid_presence.mycompany.com) only if you are deploying the GEMS Presence
service.
PS> New-CsTrustedApplicationEndpoint -ApplicationId "appid_presence.mycompany.com" -TrustedApplicationPoolFqdn
"pool_gems.mycompany.com" -SipAddress "sip:presence_<GEMS hostname>@mycompany.com"
Create an application endpoint only if you are deploying the GEMS Presence service.
PS> Enable-CsTopology
This completes topology preparations for your initial GEMS machine. If you are deploying additional GEMS
machines, see Prepping Additional GEMS Machines.
If you are installing only one GEMS machine, proceed to Installing GEMS.
Preparing Additional GEMS Machines
The instructions presented here apply only if you have already installed at least one GEMS. If you are installing
GEMS for the first time, refer to the instructions in Preparing the Initial GEMS Machine
Prepare your Lync Topology for additional GEMS machines by launching the Lync Management Shell via Start >
All Programs > Microsoft Lync Server [2010 or 2013] > Lync Management Shell.
Next, you need to create a trusted computer for the GEMS trusted application pool. To do so, enter the following
command line:
PS> New-CsTrustedApplicationComputer -Identity "<FQDN of GEMS machine>" -Pool "<name of GEMS pool previously
created>"
With the Lync topology now prepped for the new GEMS, you may proceed to Installing GEMS after reviewing the
next section on creating/acquiring a valid SSL certificate.
SSL Certificate Requirements for Lync
If your enterprise doesn’t already have one—or one designated for use by GEMS—you must obtain and install a
digital certificate.
Your enterprise can sign its own digital certificates, acting as its own certificate authority (CA), or you can submit a
certificate request to a well-known, third-party CA. Although you can preinstall the root authority for your own
CA on each user’s device, to forestall the continuous tedium and management, especially as new employees come
and go, it makes sense to get an independent CA-validated certificate.
Mutual TLS (MTLS) Certificates
Connect and LPP connections to Lync rely on mutual TLS (MTLS1) for mutual authentication. On an MTLS
connection, the server originating a message and the server receiving it exchange certificates from a mutually
1For more on TLS and MTLS for Lync Server 2010, see http://technet.microsoft.com/en-us/library/gg195752(v=ocs.14).aspx.
Good Enterprise Mobility Server™
21
GEMS Prerequisites
trusted CA. The certificates prove the identity of each server to the other. In Lync Server 2010 deployments,
certificates issued by the enterprise CA that are still in their validity period and not revoked by the issuing CA are
automatically considered valid by all internal clients and servers because all members of an Active Directory
domain trust the Enterprise CA in that domain. In federated scenarios, the issuing CA must be trusted by both
federated partners. Each partner can use a different CA, if desired, so long as that CA is also trusted by the other
partner. This trust is most easily accomplished by the Edge Servers having the partner’s root CA certificate in their
trusted root CAs, or by use of a third-party CA that is trusted by both parties.
Hence, GEMS must form a mutual trust relationship for MTLS communications supporting its network server
environment. Mutual trust requires a valid SSL certificate that meets the following criteria:
l The private certificate issued for GEMS by a trusted CA must be stored in the GEMS machine’s Console
Root\Certificates local_host_name\Personal\Certificate folder.
l The GEMS computer’s private certificate and the Lync Server’s internal computer certificate must both be
trusted by root certificates in GEMS’s Console Root\Certificate local_host_name\Trusted Root Certification
Authorities\Certificates folder.
l Intermediate certificates for both the GEMS private certificate and the Lync Server’s internal computer
certificate must be located in the GEMS Console Root\Certificates local_host_name\Trusted Root
Certification Authorities\Certificates folder (similar to the one pictured next).
Important: The account used to run GEMS must have read access to the certificate store and the private key.
You can assign read rights to the private key by right-clicking on the certificate.
l The Subject Name (SN) of the certificate must contain the Common Name (CN) for GEMS’s fully qualified
domain name (FQDN), such that CN=server.subdomain.domain.tld.
l The Subject Alternative Name (SAN) must contain the DNS for the trusted pool for the GEMS machine, as well
as the GEMS machine FQDN. SANs let you protect multiple host names with a single SSL certificate.
l The certificate must be signed by a CA that is mutually trusted by both the Lync Server and GEMS.
Good Enterprise Mobility Server™
22
GEMS Prerequisites
For more complete information regarding Microsoft Lync SSL certificate requirements, visit the MSDN Office Dev
Center’s Lync page. For instructions on creating a certificate for GEMS, see Creating and Adding the GEMS SSL
Certificate.
Creating and Adding the GEMS SSL Certificate for Lync
These certificate request procedures are based on a Windows Server 2012 certificate authority but will also work
for earlier versions of Windows Server. Please make sure to execute the steps that follow on the Certificate
Authority server.
If you are deploying the Connect Service only, skip to Requesting a GEMS Certificate from a Local AD Certificate
Authority. However, if you are deploying the GEMS Presence service, you will need a Subject Alternative Name
(SAN) certificate.
To create a SAN certificate template:
1. Open a CMD window and type MMC to open the MMC window.
2. Click File> Add/Remove Snap-in and then click Add > Certificate Templates.
3. In the center panel, right-click Computer, then Duplicate Template.
4. In the General tab, change the name to Computer – SAN Cert, or something like it. Just be sure to make
note of it for future reference.
Good Enterprise Mobility Server™
23
GEMS Prerequisites
5. In the Subject Name tab, select “Supply in the request”.
6. Click Apply, then click OK.
To add the SAN Certificate Template to the CA
In order for requesters to see the new template, it must first be added to the CA using the following steps:
1. Open the Certificate Authority utility and right-click on Certificate Templates.
2. Select New > Certificate Template to Issue.
3. Select the template that was created above in Creating a SAN Certificate Template.
Requesting a GEMS Certificate from a Local AD Certificate Authority
Use the following procedure if you are requesting a certificate for the GEMS machine from a local AD certificate
authority.
Good Enterprise Mobility Server™
24
GEMS Prerequisites
On the GEMS machine:
1. Open a CMD window and type mmc.
2. Click File > Add/Remove Snap-In.
3. Select Add Certificate > Computer Account > Local computer.
4. Right-click Personal, then select Certificate (or Personal) > All Tasks > Request New Certificate.
5. Click Certificate Enrollment, then click Next and Next again.
6. If you are only deploying the GEMS Connect Service, choose a Computer certificate request template.
Otherwise, choose the Computer-SAN Cert certificate request template.
If there is no Computer SAN certificate request template, refer to Creating a SAN Certificate Template above.
Good Enterprise Mobility Server™
25
GEMS Prerequisites
7. If you chose a regular Computer certificate request, click Enroll and you’re done. Otherwise, you will need to
supply both the Common Name (CN) and the Subject Alternative Name (SAN).
8. If you choose a Computer-SAN Cert, you will need to supply both the Common Name (CN) and the Subject
Alternative Name (SAN). Click on the More information is required... link to enter this information.
9. In the Certificate Properties popup:
a. Under the Subject tab, change the Subject name Type to Common Name.
b. For Value, enter the FQDN of the GEMS machine.
c. Click Add.
d. Change the Alternative name Type to DNS.
e. Add two Values, one with the FQDN of the GEMS machine and the other with the FQDN of the GEMS Lync
pool.
Good Enterprise Mobility Server™
26
GEMS Prerequisites
f. Click Apply, then click OK.
g. Click Enroll.
After creating the certificate, make sure the Subject Name and Subject Alternative Name are correct. To do
this, simply double-click on the certificate, then click the Details tab.
Correctly reflecting the name you gave it or chose, the Subject Name should look something like this:
Good Enterprise Mobility Server™
27
GEMS Prerequisites
And the Subject Alternative Name should look like this:
10. Right-click the certificate, then select All Tasks > Manage Private Keys.
11. Under rthe Security tab, add the service account and grant it read access to the certificate.
Database Requirements
A relational database is required for the Connect and the Push Notification components of GEMS. The Presence
service does not require a database. The GEMS database can be part of your existing environment or newly
Good Enterprise Mobility Server™
28
Installing GEMS
installed. GEMS currently supports Microsoft SQL Server. In all cases, the database must be installed and
prepared before starting GEMS installation. This means the necessary SQL scripts included in the GEMS
installation zip file must be executed before beginning GEMS installation proper.
Microsoft has visual and command line tools to assist with database and schema creation; i.e., Microsoft
Management Studio or sqlcmd.
The following versions of MS SQL Server are supported:
l SQL Server 2008 and 2008 R2 (Standard/Enterprise)
l SQL Server 2012 and 2012 SP1 (Standard/Enterprise)
l SQL Express 2008 R2 with Management Tools
If you do not have an existing supported database available, you can obtain one from the Microsoft Download
Center.
For MS SQL Server 2008 R2 setup guidance, see SQL Server Setup.
For test lab guidance on setting up SQL Server 2012 Enterprise Edition, click here.
Presence Prerequisites
The Presence service has the same predeployment requirements as the Connect service. Please refer to the
complete list of Connect Prerequisites.
Installing GEMS
A successful GEMS installation hinges on all prerequisites for each service you are deploying being in place. These
include, respectively:
l Core Prerequisites
l PNS Prerequisites
l Connect Prerequisites
l Presence Prerequisites
It is strongly recommended that installation be done with the GEMS service account.
Upon verifying that all prerequisites have been satisfied, download and unzip the GEMS installer package, then
continue with the steps below.
Upgrading
If you are upgrading from a previous version of GEMS:
1. Extract the database scripts from the installer zip file (GoodEnterpriseMobilityServerSetup.1.2.16.32.zip) .
Scripts are located in:
Good Enterprise Mobility Server™
29
Installing GEMS
\GoodEnterpriseMobilityServerSetup.1.2.16.32.zip\GoodEnterpriseMobilityServer\EWS\pushnotifydbmanager-0.2.16-sqlserver.zip\pushnotify-dbmanager-0.2.16\gcsmail-db-sqlserver\
2. Run the SQL script sqlserver_upgrade_from_0.0.1_to_0.1.1.sql against the current database to which GEMS
EWS is connected.
3. Run the GEMS executable.
Note: The installer will detect previously installed versions of GEMS and offer an upgrade option. Please select
Upgrade, then follow the on-screen instructions in accordance with the instructions below.
Note to Admins: Non-developers do not need to install the Docs Configuration Console. The Docs and Analytics
Services included with GEMS 1.2 are a developer's preview and do not currently support Good apps. A
subsequent release of GEMS will support Good Work and other apps specifically designed to use these service
APIs. At present, admins can skip configuration of both the Docs and Analytics Services.
Downloading and Running the GEMS Installer
To download and run GEMS Setup:
1. Download the installation zip package from the GEMS product page.
2. Unpack the contents of the zip and run GoodEnterpriseMobilityServerSetup.exe.
3. Choose either Lync Server 2010 or Lync Server 2013, then click Next.
Note: If you have a Lync environment, select the appropriate version. Otherwise, accept the default, even if
you don't use Lync.
Good Enterprise Mobility Server™
30
Installing GEMS
The installer now runs a check of required components.
4. If all Prerequisites indicate Pass, click Next. If not, make a note of the failed components so that any issues
can be resolved during the configuration process, then click Next.
5. Accept the default installation path or click Browse to change it.
6. Accept the license agreement by clicking the checkbox, then click Install. The Install button becomes active
only upon your acceptance of the license agreement. Click the link to the License and Service Agreement to
read the terms and conditions.
7. It typically takes 3-5 minutes for the installer to finish. When complete, click Configure and when the
Dashboard launches, you'll see:
Good Enterprise Mobility Server™
31
Installing GEMS
If the GEMS Dashboard fails to launch automatically in your browser, open your browser and manually enter
http://localhost:8181/dashboard in the address bar.
Note: HTTP access is only allowed from the localhost.
Google's Chrome browser is recommended.
8. The default Username and Password are both "admin." Enter admin in each respective field, then click
Login.
This diplays the Good Services Configuration page, also called the GEMS Dashboard home page.
Note: Once again, please be aware that in version 1.2 of GEMS, the Analytics and Docs services are strictly
intended as a preview for developers. GEMS system administrators should skip configuration of these
services for v1.2 deployments.
Good Enterprise Mobility Server™
32
Configuring GEMS Core
You're now ready to select a service to configure. The Push Notifications Service is required to run the Good
Work mobile collaboration app. The Presence service furnishes the Lync Presence Provider (LPP) to Good Work
and other Good Dynamics applications, while the Connect service provides both presence and instant messaging
services on client devices provisioned with the Good Connect app.
Configuring GEMS Core
The first phase in the configuration process is to set up the server irrespective of the services you choose to put
in place. This includes:
l Changing the GEMS Dashboard administration password
l Installing the GEMS SSL Certificate
l Enabling GEMS HTTP (optional)
Changing the GEMS Dashboard Admin Password
It is a recommended practice to change the administrator's password for GEMS periodically, in accordance with
your IT policy.
Good Enterprise Mobility Server™
33
Configuring GEMS Core
Important: Entering an incorrect username and password combination more than ten (10) consecutive times
results in a dashboard lockout. The lockout can be removed by using the following procedure for changing the
administration password.
To change the administration password for the GEMS Dashboard:
1. In your favorite text editor, open <GEMS Machine Path>\Good Enterprise Mobility Server\Good Server
Distribution\gems-karaf-<version>\etc\users.properties.
2. Change the current password from admin (the SHA-1 Hash highlighted in yellow) to something else, after
which, this will be the password for the GEMS Dashboard.
admin={CRYPT}a0089182becd921781d5ba1e58fa4d129b24060f{CRYPT},
_g_:admingroup ð admin=<new_password>,_g_:admingroup
You can enter a plain text value. It will automatically be replaced with a salted SHA-256 Hash the next time an
admin user logs in.
3. Save your changes.
To confirm the change:
Restart Good Technology Common Services and login to the Dashboard by going to
http://localhost:8181/dashboard. You will be asked for the new password (username will still be admin).
The new admin password shall apply for the admin user of the GEMS Web Console.
Note: If not on localhost, use https://<gems_host_fqdn>:8443/dashboard for secure access. Please refer to
subsequent sections on how to enable HTTPS for GEMS.
Replacing the Auto-Generated Self-Signed SSL Certificate
By default, GEMS is remotely accessible using the HTTPS protocol only. Consequently, during installation, a
GEMS Java keystore is created named gems.jks and placed in <GEMS Machine Path>\Good Enterprise Mobility
Server\Good Server Distribution\gems-karaf-<version>\etc\keystores\. However, if you have a previously
created self-signed certificate, then your existing certificate and certificate password are retained.
The default password for the gems.jks keystore is "changeit."
For instructions on importing certificates into the GEMS Java keystore, please see Appendix C.
Note: Unless you import a signed certificate as primary, then, as expected, the browser will report that your
SSL certificate is untrusted because it is a self-signed.
Enabling GEMS HTTP (Optional)
Recognizing the inherent security vulnerability that comes with standard HTTP connections, when necessary or
desired, you can manually configure GEMS to use HTTP in test/POC environments using the following procedure.
Good Enterprise Mobility Server™
34
Configuring GEMS Services
To enable GEMS HTTP:
1. On the GEMS host, locate the org.ops4j.pax.web.cfg file and open it in a text editor. Its default location is
C:\Program Files\Good Technology\Good Enterprise Mobility Server\Good Server Distribution\gemskaraf-<version>\etc .
2. Comment out the “org.ops4j.pax.web.listening.addresses=127.0.0.1” line by prefixing it with a “#” sign.
It should look like this:
#org.ops4j.pax.web.listening.addresses=127.0.0.1
3. Save the file.
4. Locate the jetty.xml file. Its default location is C:\Program Files\Good Technology\Good Enterprise
Mobility Server\Good Server Distribution\gems-karaf-<version>\etc and open it in your text editor.
5. Find the following block of lines and delete the comment markers highlighted in yellow:
<!-<Call name="addConnector">
<Arg>
<New class="org.eclipse.jetty.server.nio.SelectChannelConnector">
<Set name="host">
<Property name="jetty.host" />
</Set>
<Set name="MaxIdleTime">300000</Set>
<Set name="Acceptors">2</Set>
<Set name="statsOn">false</Set>
<Set name="confidentialPort">8443</Set>
<Set name="lowResourcesConnections">20000</Set>
<Set name="lowResourcesMaxIdleTime">5000</Set>
</New>
</Arg>
</Call>
-->
6. Save the file.
7. Restart Good Technology Common Services.
Configuring GEMS Services
As previously indicated, you can configure one or more services at any time in any order desired according to
your organization's mobile user demand and deployment requirements. Once again, these services currently
comprise:
l Push Notifications (Email)
l Connect
l Presence
Note to Admins: The Analytics and Docs Services are currently included strictly as an app developer's preview.
In GEMS 1.2, you may safely omit configuration of these services.
Good Enterprise Mobility Server™
35
Configuring GEMS Services
Configuring the Push Notification (Mail) Service
Configuring GEMS for PNS support of the Good Work app, which includes Mail, Contacts, and Calendar, entails:
l Enabling Exchange ActiveSync (EAS)
l Preparing the SQL database
l Configuring Mail in the GEMS Dashboard
l Configuring Good Control
l Configuring GEMS-PNS for High Availability
Enabling Exchange ActiveSync (EAS)
EAS is a protocol designed for the synchronization of email, contacts, calendar, tasks, and notes from the
messaging server to the Good Work client. GEMS does not participate in EAS activity, but if EAS is not properly
enabled, then GEMS cannot support Good Work clients with PNS.
Consequently, if you plan to deploy the Good Work client to your users, please ensure that EAS is enabled on
port 443 and that connections are permitted to the Good Proxy server.
Note: By default, ActiveSync is enabled when you install the Client Access server role on the computer that's
running Microsoft Exchange Server 2010 or Exchange 2013.
For detailed guidance on Exchange EAS and how it works with Good apps, please refer to Good Work EAS Security
Information and Guidance.
For additional information on how to enable and manage EAS in your existing Exchange environment, see
Microsoft's Exchange and IIS documentation.
Preparing the Database for GEMS-PNS
If you are deploying the Push Notifications Service (PNS), you must configure a SQL Server database and create
the database tables that GEMS will use for push notification storage.
Included in the downloaded GEMS .zip distribution is the database schema setup files.
For the Push Notification Service (PNS), the schema setup scripts are in the EWS folder.
Good Enterprise Mobility Server™
36
Configuring GEMS Services
To prepare the new database:
1. Create a new SQL database. The preferred database name is “EWS”.
2. For database authentication, the GEMS-PNS supports both SQL and Windows Authentication. If Windows
Authentication is used, then the GEMS service account (GoodAdmin) can be used. If SQL authentication is
used, then a separate local SQL account must be created on the SQL server. Regardless of which
authentication type is used, the account will require DBO rights to the database created in Step 1.
3. From GoodEnterpriseMobilityServerSetup.<version>.zip, extract the file named pushnotify-dbmanager<version>-sql, located in the EWS folder.
4. Next, locate createMSSQLUTF8.sql in the EWS folder.
5. Open the createMSSQLUTF8.sql file in Microsoft SQL Server Management Studio and then execute the script
against the database that was created in step 1 (i.e., EWS).
Configuring PNS (Mail) in the GEMS Dashboard
Important: Before proceeding, it is important to emphasize that the configuration sequence presented next
be strictly followed to avoid connectivity issues. Chiefly, it is critical that database configuration be completed
prior to configuring Microsoft Exchange.
Upon clicking Mail, complete its service configuration in the following order:
Good Enterprise Mobility Server™
37
Configuring GEMS Services
Good Dynamics
Note: Your Good Dynamics Servers must be operating before the GEMS Push Notifications Service can be
configured for Good Dynamics.
1. On the Good Mail Service Configuration page, click Good Dynamics.
2. Enter the Good Proxy Hostname. If you have more than one Good Proxy server, pick any one you wish.
Autodiscover will correctly identify the others.
3. Enter the Good Proxy Port.
4. Select either HTTP or HTTPS, the latter being the more secure transport protocol.
Good Enterprise Mobility Server™
38
Configuring GEMS Services
5. Use the Test button to verify the connection.
6. Click Save to record the setting.
Database
In configuring your SQL database for GEMS-PNS, you have a choice of using either Windows Authentication or
SQL Authentication for granting access to the database by GEMS. Make sure you have already set the “Good
Technology Common” service to run as the service account in Windows Service Manager (SrvMan). After
restarting the Good Technology Common service, perform the steps below for either Windows Authentication
or SQL Authentication.
Note: For early adopters of GEMS, installation of the sql-auth.dll for database configuration was done
manually. Now, however, the sql-auth.dll is packaged with the GEMS deliverable and automatically configured
by the installer, eliminating the manual process.
To use Windows Authentication to access the database:
1. In the Good Mail Service Configuration page, click Database.
2. Enter the Server host name and instance name; i.e., <your_sqlserver_hostname>\<instance_name>.
3. Enter the Database name.
4. Select Windows Authentication for the Authentication Type.
Good Enterprise Mobility Server™
39
Configuring GEMS Services
5. Click the Test button to verify connectivity with the database.
6. Click Save to commit your changes.
7. Finally (and critical to the configuration process), restart the Good Technology Common service in Windows
Services Manager to allow these settings to take effect.
To use SQL Authentication to access the database:
1. Enter the database Server host name and instance; i.e., <your_sqlserver_hostname>\<instance_name>.
2. Enter the Database name.
3. Select SQL Authentication as the Authentication Type.
4. Click the Test button to verify connectivity with the database.
5. Click Save to commit your changes.
6. Use the Windows Services Manager to locate the service named Good Technology Common Services, then
select Restart to allow these settings to take effect.
Tip: After restart, check the table dbo.KeyValueRecord to verify that your SQL Server database is now being
used by GEMS.
Microsoft Exchange
1. Returning to the Good Mail Service Configuration page, click Microsoft Exchange. Then, as pictured
below...
Good Enterprise Mobility Server™
40
Configuring GEMS Services
2. Enter the Domain, Username ("GoodAdmin" is recommended), and Password of the Windows Service
Account. This account should have impersonation rights on Exchange.
3. Enter a valid end-user email address to test connectivity using the Service Account and click Test.
Note: If the service account is correctly configured and the test fails, it is generally the case that GEMS is
attempting to communicate with an Exchange Server that is not using a trusted SSL Certificate. If your
Exchange server is not set up to use a trusted SSL certificate, you will need to turn off certificate verification
in accordance with the instructions found below under Problems Connecting to Exchange.
4. Click Save to commit your changes.
Database Connectivity Issues
If GEMS is unable to connect to its Push Notification database, this usually means that the Mail > Microsoft
Exchange configuration information was applied in the GEMS Dashboard before configuring the Mail >
Database information. If you encounter this problem, use the following procedure to resolve the issue.
From the GEMS Dashboard:
1. Clear out the Mail > Exchange Server configuration and click Save.
2. Make sure the information in Mail > Database is correct.
3. Restart the Good Technology Common service.
4. Repopulate the Mail > Exchange Server configuration and save your changes.
Good Enterprise Mobility Server™
41
Configuring GEMS Services
Web Proxy
Because APNS pushes are sent via the Good Network Operations Center (NOC), which resides outside of your
enterprise network, a proxy may be needed to access the NOC.
To configure a Web Proxy for GEMS-PNS:
1. Returning to the Good Mail Service Configuration page, click Web Proxy. Then, as pictured...
2. Enable the Use Web Proxy checkbox.
3. For Proxy Address, enter the FQDN of the web proxy.
4. Enter a Proxy Port.
5. Select a Proxy Server Authentication Type (or None) from the drop-list.
If you choose Basic or NTLM authentication, enter recognized credentials (Username, Password) and,
optionally, the Domain.
Good Enterprise Mobility Server™
42
Configuring GEMS Services
6. Click Test to confirm connection to the proxy server.
7. Click Save to commit your changes.
Configuring Good Control
A few basic configuration settings are necessary so that Good Control can properly support Good Work
application users. These include:
l Configuring EAS for the Good Work app
l Adding Applications and Users
l Device Provisioning and Activation
Note: The Good Work application must be published in Good Control. For prerequisite details on setting up
Good Control, see Good Dynamics Requirements. To learn how to add the application in Good Control, see
"Registering a New Application" in the GC console's online help.
With respect to GEMS, to complete configuration of PNS, please login to Good Control with full admin rights.
Configuring Exchange ActiveSync (EAS) for Good Work™
To allow your users to easily enroll in EAS when they activate their Good Work app, the app must be configured in
Good Control to connect to EAS. This is accomplished from your Good Control console.
Important: Before the Good Work app can be configured to use PNS, it must first be configured for EAS.
There are two parts to this procedure:
l Whitelisting the EAS server(s) in Good Control
l Adding the correct JSON configuration
If this has not already been accomplished, please see the Good Work Product Guide for the correct setup
instructions.
Adding Applications and Users in Good Control
By default, every user is assigned to the “Everyone” group. If you plan to use the default, simply add the Good
Work app to the Everyone Application Group.
Refer to your Good Control online help utility for complete instructions on adding applications like Good Work,
Good Connect, Good Presence, along with adding new user accounts, as well as modifying policies and
permissions.
Whitelisting Your GEMS Host(s) in Good Control
The GEMS host must be whitelisted in Good Control to enable proper communication between the Good Proxy
server and GEMS.
Good Enterprise Mobility Server™
43
Configuring GEMS Services
To whitelist GEMS in Good Control:
1. Open the Good Control console, then under Server Configuration, click Client Connections.
2. Scroll down to Additional Servers and click
.
3. In the Server field, add the FQDN of the GEMS machine and enter 8443 for the Port. Choose a primary GP
cluster and a secondary GP cluster (if available).
Caution: At this stage, you are adding a configuration that will cause devices to connect to GEMS over its
secure HTTPS port 8443, which is the only port that is open for remote access, by default. Therefore, you
should ensure that you have already followed the steps to configure GEMS Core for HTTPS. Otherwise, your
devices will not be able to connect to GEMS.
4. Whitelist additional GEMS hosts with GP Clusters by repeating from Step 2.
5. Click Submit to save your changes.
Adding GEMS to the Good Work Application Server List
Note: If you haven't yet registered the Good Work app in Good Control, do so now.
The Good Work client checks the Good Work server list for available GEMS instances hosting the Presence
service. Hence, the list must be populated with at least one GEMS machine with the Presence service enabled. If
Good Enterprise Mobility Server™
44
Configuring GEMS Services
multiple GEMS hosts are listed, you can use the Preferred Presence Server Configuration parameter to set up
an affinity association (see Configuring Presence Affinity for Good Work).
To add GEMS to the Good Work application server list:
1. From the Good Control console navigator (left-hand panel) under Applications, click Manage Applications.
2. Scroll or search for Good Work and click it.
3. Click the Servers tab.
4. Enter the GEMS host FQDN in the Host Name field, then enter 8443 under Port.
Caution: At this stage, you are adding a configuration that will cause devices to connect to GEMS over its
secure HTTPS port 8443, which is the only port that is open for remote access by default. Therefore, you
should ensure that you have not removed the auto-generated self-signed certificate created during GEMS
installation unless you replaced it with a CA-signed certificate. Otherwise, devices will not be able to connect to
GEMS.
5. If you have additional GEMS hosts, configure them for the application in the same way, after clicking
to
add a new row.
6. Click Submit to save your changes.
Configuring GEMS-PNS for HA
High Availability for GEMS-PNS is based upon multiple active instances with no instances in a passive/standby
mode.
When adding a new GEMS instance, you will need to:
1. Configure your new GEMS instance to use the existing database.
2. Configure your new GEMS instance to point to the same Good Proxy server.
3. Configure your new server host and port in the Good Control server list.
Good Enterprise Mobility Server™
45
Configuring GEMS Services
The GEMS Push Notifications Service (PNS) supports high availability (HA) by adding additional GEM servers
running PNS. The GEMS instances hosting PNS that you designate to participate in HA must share the same
database.
To setup a HA GEMS PNS host, simply provision an additional server and install GEMS-PNS. Use of the same
service account ("GoodAdmin") for all HA servers is strongly recommended. In the GEMS dashboard
configuration on the HA server, be sure to point the HA server to the same database.
From the Good Control console, add each HA server to the Good Work application server list in accordance with
the instructions above for configuring the Good Work App with EAS.
Device Verification and Testing
The Good Work app is publicly available from the Apple App Store or the Google Play store. By default the app
will only use HTTPS to communicate with GEMS when it registers for push notifications. If you would like to do
device verification and testing in a test environment, you can configure communications to use HTTP instead of
HTTPS.
This is a matter of making additional changes to the Good Control configuration (JSON) we set up when
configuring the Good Work app with Active Sync earlier.
If you haven’t already done so, download the Good Work app to your device.
Upon launching the Good Work app for the first time, you will be prompted for an email address and a
provisioning PIN. If you don’t have this information, refer to the previous section on device activation keys.
Good Work will continue the provisioning process once the email address and PIN is entered correctly.
Depending on the Good Control policy for the device, you may be prompted to create a password for the app.
After the app password is set, you will be prompted for your enterprise email address and Active Directory
password. If the system is not able to correlate your email address to an Exchange Active Sync (EAS) server, you
will be prompted for a different EAS server and domain credentials.
When everything is setup correctly, Good Work will automatically start synchronizing with Exchange and you will
start to see mail, calendar and contact information in the app. If Good Presence is configured, you will also see
presence information for each contact.
To test from GEMS as to whether a device is actually connected, go to Push Channels and query GEMS. You can
also query users by going to EWS Listener. If these tests fail or are inconclusive, investigate Autodiscover
troubleshooting.
Refer to Logging and Diagnostics for any additional issues encountered.
PNS Logging and Diagnostics
Helpful performance logs and diagnostic information for GEMS and the Push Notification Service can be found in
the GEMS Web Console. To set/change the administrator's password see Changing the GEMS Web Console
Password.
Good Enterprise Mobility Server™
46
Configuring GEMS Services
GEMS Web Console
The GEMS Web Console provides advanced configuration and tuning options for GEMS. It should be used with
care as it offers advanced maintenance capabilities intended for expert users of the system.
To see the relevant logs in your browser:
1. Go to https://<fqdn_of_your_gems_host>.com:8443/system/console/configMgr
2. Login as an administrator (the default uid/pwd is "admin"/"admin").
3. Click on OSGi, then select Log Service.
4. Scroll the log activity. It's listed in chronological order.
Note: A more robust and complete administration guide covering how to use the advanced features of the
GEMS Web Console is scheduled for publication later this year.
Log File Location
The actual log files are stored in the GEMS installation directory. Its default location is:
C:\Program Files\Good Technology\Good Enterprise Mobility Server
All log directories are relative to this path.
The GEM Server Log can be found in:
\Good Server Distribution\gems_karaf-<version>\data\log\
Good Enterprise Mobility Server™
47
Configuring GEMS Services
Problems Connecting to Exchange
Some environments may need to configure GEMS to communicate with an Exchange Server that does not have a
trusted SSL Certificate. Although this is not recommended for production deployments, if your Exchange server
is currently not using a publicly verifiable certificate, you can turn off SSL certificate verification using the
procedure enumerated below.
Caution: Do not modify the DisableSSLv2Hello property unless you know what you are doing. Contact Good
Technical Support for additional details.
To disable SSL certificate checking:
1. Login to the GEMS Web Console as an administrator (uid/pwd = "admin" / "admin").
2. Select OSGi > Configuration.
3. Scroll down to Good Technology Async HTTP Client Configuration and click it.
Caution: Editing this configuration will affect all your SSL clients, not just EWS Clients, as well as APNS and
GNP.
4. Check Disable SSL certificate checking.
Good Enterprise Mobility Server™
48
Configuring GEMS Services
5. Click Save.
Autodiscover Override
In certain environments, the system may not be able to dynamically retrieve the autodiscover endpoint URL. If
this happens, the autodiscover endpoint URL will need to be set manually. Push notification failure and EWS
Listener queries returning NULL are common symptoms.
To set the override from the GEMS machine:
1. Login to the GEMS Web Console as an administrator.
2. Select OSGi > Configuration.
3. Scroll down to GEMS Autodiscover Configuration and click it.Configuring Good Control
6. Enter an Autodiscover override URL in the field provided. This typically takes the form
https://mycas.mydomain/autodiscover/autodiscover.svc.
Good Enterprise Mobility Server™
49
Configuring GEMS Services
7. Click Save.
8. Restart the “Good Technology Common Services” service.
To remove the override, return to the GEMS Autodiscover Configuration in the GEMS Web Console and remove
the override URL, then save the configuration.
Checking EWS Listener and Push Channels
GEMS provides diagnostic URLs to help you determine whether GEMS-PNS is working properly. However, these
diagnostic URLs are not remotely accessible. They can only be accessed on the same machine on which GEMSPNS is running. Therefore, you must use "127.0.0.1" as the hostname in each of the URLs below.
A quick way to check whether or not the Push Channels and EWS Listener are working is to query GEMS with the
following URLs:
Push Channels
http://127.0.0.1:8181/pushnotify/pushchannels
Sample Output:
[{"registrationId":"[email protected]#3EFED82C-BE27-4A71-BF647F68424122B4","account":"[email protected]","pushToken":"8FAE82462C794005BFC90C7A4B654B523CDB2FCC59A922BDAFBAFD
30D2460614","bundleId":
"com.good.gcs.g3.enterprise","ewsProfileId":"51","deviceType":"ios"}]
If the outputs are NULL ([]), check the log for the reasons why. If outputs are not found, then refer to the SSH
console for additional detail.
EWS Listener
http://127.0.0.1:8181/ewslistener/user
Sample Output:
[{"connectionId":45946713,"email":"[email protected]","stage":"Streaming",
"lastErrorTime":null,"status ":null}]
Good Enterprise Mobility Server™
50
Configuring GEMS Services
Using the first check, you will see a push channel registration if the device successfully connected to GEMS. Then,
if your Exchange Configuration is set up properly you will see a streaming EWS Listener subscription.
Note that in the diagnostic URLs above, the HTTP protocol is used. This is permissible for connections made to
GEMS from same machine on which GEMS is running but not from remote clients. Occasionally, for evaluation
or demonstration purposes, you may not yet have configured SSL for GEMS Core. In this situation, you can
permit remote connections to GEMS via HTTP. Even when doing so, please note that traffic between the device
and the Good Proxy remains protected over a secure channel.
To do so, add the following line to the JSON configuration for Good Work in Good Control:
"serverProtocol":"http",
For example:
{
"serverProtocol":"http",
"disableSSLCertificateChecking":"true",
"<email domain for end users>": {
"EASDomain":"<EAS Windows domain for end users>",
"EASServer":"<EAS server fully qualified DNS name>",
"AutodiscoverURL":"https://autodiscover.mydomain.com/autodiscover/autodiscover.xml",
"EASServerPort":"<EAS server port number>",
"EASUseSSL":"true"
}
}
If using Autodiscover, replace the EASServer parameter above with AutodiscoverURL so that
"EASServer":"<EAS server fully qualified DNS name>"
becomes
"AutodiscoverURL":"https://autodiscover.good.com/autodiscover/autodiscover.xml"
See Enabling GEMS HTTP above; see also "Adding the JSON Configuration for EAS" in the Good Work Product
Guide.
Configuring the Connect Service
The Connect service governs IM and presence capabilities of the Good Connect app. Configuring the GEMS
Dashboard and Good Control are critical phases in the deployment of Good Connect. This entails:
l Setting up the SQL database
l Configuring Connect in the GEMS Dashboard
l Configuring Good Control for Connect
Good Enterprise Mobility Server™
51
Configuring GEMS Services
l Enabling SSL via Good Proxy
l Configuring support for the Global Catalog
Preparing the Database for Connect
If you are deploying the Connect Service, you must configure a SQL Server database and create the database
tables that GEMS will use for data storage.
Included in the downloaded GEMS .zip distribution is the database schema setup files.
For the Connect Service, the schema setup scripts are found in the Connectfolder.
To prepare the new database:
1. Create a new SQL database. The preferred database name is “GoodConnect”.
2. For database authentication, Connect supports both SQL and Windows Authentication. If Windows
Authentication is used, then the GEMS service account (GoodAdmin) can be used. If SQL authentication is
used, then a separate local SQL account must be created on the SQL server. Regardless of which
authentication type is used, the account will require DBO rights to the database created in Step 1.
3. From GoodEnterpriseMobilityServerSetup.<version>.zip, extract the folder named SQL\SQLServer, located
in the Connect folder.
4. Open Microsoft SQL Server Management Studio and run the following SQL script files against the database
you created in step 1 (i.e., GoodConnect):
1_Balboa_Schema.sql
1_Balboa_StoredProcedures.sql
2_Cardiff_Schema.sql
Important: It is critical that the above script files are ran in the listed order.
When all scripts have been executed, the database is preconfigured and ready for Connect service installation
and connectivity.
Configuring Connect in the GEMS Dashboard
Using Good Connect, employees can track coworker availability, initiate or receive an instant message, make a
phone call, share and open file links in Good Share or send an email securely via Good for Enterprise™. Best of all,
Good Enterprise Mobility Server™
52
Configuring GEMS Services
Good Connect lets you efficiently embrace BYOD programs without compromising corporate security or
employee privacy.
To set up the Good Connect service for GEMS, complete the configuration steps for each of the following
components:
l Service Account
l Database
l Good Dynamics
l Lync 2010 or Lync 2013
l Microsoft Exchange (optional)
l Web Proxy (optional)
Configuring the Service Account
1. Be sure to stop the "Good Technology Connect" service before making any of the changes that follow. This is
very important.
2. In the Good Connect Server Configuration page, click Connect to configure the Good Connect service.
Good Enterprise Mobility Server™
53
Configuring GEMS Services
As you'll see, the necessary components are grayed-out until you provide the correct GEMS Windows Service
Account credentials.
2. Click Service Account to provide the GEMS Domain Service Account credentials.
3. Login with the proper authentication credentials—Username and Password—then click Save. GEMS uses
this information to securely connect to Microsoft Services like Active Directory, Lync, Exchange, and SQL
Server.
Make sure this service account has RTCUniversalReadOnlyAdmins rights.
As stated on the Dashboard page, your Service Account credentials are not stored after the current browser
session ends.
If an account has not yet been created, contact your Windows domain administrator to request an account.
If the credentials are valid, the service is connected and the links to the other components on the page are
activated.
Configuring the Database
1. In the Good Connect Service Configuration page click Database.
2. Enter the Server and Database name, then select the appropriate Authentication Type
Good Enterprise Mobility Server™
54
Configuring GEMS Services
When you choose Windows Authentication, the credentials for the Windows Service Account configured for
the Good Connect Service are used. If you select SQL Server Login, you will then need to enter a valid
Username and Password for the SQL Server Database prescribed in the Prerequisites section of this guide.
4. Click Test to verify that a connection with the database can be made.
If the test is successful, a confirmation is displayed at the top of the page in blue. If testing fails, check that
System and Network Requirements, plus all Database Requirements, have been met. Correct as needed, then
return to Step 1 above.
5. Click Save when done.
Configuring Good Dynamics
Before continuing with this setup phase, make sure that your Good Dynamics servers—Good Connect and Good
Proxy—are installed and operating. For details, see the Good Dynamics Server Installation Guide available on
GDN.
Good Enterprise Mobility Server™
55
Configuring GEMS Services
To configure GEMS connectivity with Good Dynamics:
1. In the Good Connect Service Configuration page (breadcrumb: Services > Connect), click Good Dynamics.
2. Next, in the Good Dynamics Server Configuration page, enter the Hostname and Port number of the
Good Proxy server, then choose communication via HTTP or HTTPS.
Important: An HTTPS connection requires a well-known 3rd Party CA-signed SSL certificate. See
Enabling SSL Support Via Good Proxy for details. See also your GD Server Installation Guide.
3. Click Test to verify that a connection to the Good Proxy server can be made. If the test is successful, a
confirmation is displayed at the top of the page in blue. If testing fails, check that all System and Network
Requirements, plus all Good Dynamics Requirements have been met. Correct as needed, then return to Step
1 above.
4. Click Save to record these settings.
Next, use the respective instructions for the Lync Server version you have deployed: Lync 2010 or Lync 2013.
Configuring Lync 2010
1. From the Good Connect Service Configuration page, click Lync 2010. The system will query the Lync server
to verify that the appropriate GEMS Lync topology has been added. Allow a few moments for the query to
complete.
Good Enterprise Mobility Server™
56
Configuring GEMS Services
2. From the Application ID drop-down list, select the pool_gems.<mycompany.com> application id. If the list is
empty, this means that either the GEMS Lync topology was not setup correctly or the service account does
not have the proper permissions to query for these settings. Refer to Microsoft Lync 2010 Requirements and
correct your topology or permissions as needed.
3. Click Test to verify that a connection to the Lync 2010 Server can be made. If the test is successful, a
confirmation is displayed at the top of the page in blue. It testing fails, check that all System and Network
Requirements, plus all Microsoft Lync 2010 Requirements, have been met. Correct as needed, then return to
Step 1 above.
4. Click Save to record these settings.
Configuring Lync 2013
1. From the Good Connect Service Configuration page, click Lync 2013. The system will query the Lync server
to verify that the appropriate GEMS Lync topology has been added. Allow a few moments for the query to
complete.
Good Enterprise Mobility Server™
57
Configuring GEMS Services
2. From the Application ID drop-down list, select the pool_gems.<mycompany.com> application id. If the list is
empty, this means that either the GEMS Lync topology was not setup correctly or the service account does
not have the proper permissions to query for these settings. Refer to Microsoft Lync 2013 Requirements and
correct your topology or permissions as needed.
3. Click Test to verify that a connection to the Lync 2010 Server can be made. If the test is successful, a
confirmation is displayed at the top of the page in blue. It testing fails, check that all System and Network
Requirements, plus all Microsoft Lync 2013 Requirements, have been met. Correct as needed, then return to
Step 1 above.
4. Click Save to record these settings.
Configuring Microsoft Exchange Conversation History
Enable this component connection only if you wish to access saved conversations from Microsoft Exchange. Bear
in mind that before configuring conversation history for the Good Connect Service, you must first make sure that
it is enabled on the enterprise Lync Server for which you are configuring Good Connect. As indicated on the
Dashboard, consult your Microsoft Lync 2010 Administration Guide and Windows PowerShell Supplement.
Good Enterprise Mobility Server™
58
Configuring GEMS Services
To configure GEMS to access Exchange conversation histories:
1. From the Good Connect Service Configuration page, click on Microsoft Exchange.
2. Check Enable Conversation History.
3. Enter the URL for your Microsoft Exchange Server in the field provided.
4. Select the supported Exchange Server Type (version) from the drop-down list.
5. Enter the desired Server Write Interval in minutes. This determines the frequency with which each unique
conversation will be sent to Exchange.
6. Click Test to verify that a connection to the Exchange Server can be made. If the test is successful, a
confirmation is displayed at the top of the page in blue. If testing fails, check that System and Network
Requirements, plus all Microsoft Lync Server Requirements, have been met. Correct as needed, then return to
Good Enterprise Mobility Server™
59
Configuring GEMS Services
Step 1.
7. Click Save to record these settings.
Configuring a Web Proxy
If your company uses a web proxy server to connect to the Internet, you must enter the required information
necessary to enable a connection with the Good Connect Service. Skip this setup phase if your enterprise does
not use a web proxy.
To configure the GEMS Internet connection using a web proxy:
1. From the Good Connect Service Configuration page, click on Web Proxy.
2. Check Use Web Proxy.
Good Enterprise Mobility Server™
60
Configuring GEMS Services
3. Enter Proxy Address and Proxy Port number. Both of these value should be exclusive to your organization.
4. Select a Proxy Authentication Type.
Basic authentication requires that a user name and password be supplied by the GEMS-Connect Service to
authenticate a request. Digest authentication is more secure because it applies a hash function to the
password before sending it over the network.
If no authentication is required or desired, select None.
If you choose an authentication type, the Connect Service Username and Password are automatically
populated based on the Windows Domain Service Account you assigned to the Connect Service under
Configuring Windows Services.
5. Next, you can specify the Domain, although this is not required.
6. Click Test to verify that connection to the Web Proxy can be made. If the test is successful, a confirmation is
displayed at the top of the page in blue. If testing fails, check that you entered the correct Proxy Address in
Step 3 above, and that all System and Network Requirements have been met. Correct as needed, then retry
by clicking Test again.
Good Enterprise Mobility Server™
61
Configuring GEMS Services
7. Click Save to record these settings.
Restart the Good Technology Connect Service
Now that GEMS is configured, you must restart the Connect service for your changes to take effect.
Configuring Good Control for Connect
Next, it’s important to associate deployed GEMS and the Good Connect Client within Good Control’s application
management handler. This is required for each GEMS machine, individually and clustered. This configuration
information dictates the available servers to which a Good Connect client may connect.
Important: The Good Connect application must be published in Good Control. For prerequisite details on
setting up Good Control, see Good Dynamics Requirements. To learn how to add the Good Control app, see
"Registering a New Application" in the GC console's online help.
To add server pool and IM platform information, you must launch the Good Control management console in
your browser.
Then, with the Good Control management console loaded in your browser, complete the following steps (as
pictured):
1. In the navigator on the left side of the display, click Manage Applications, then select Good Connect.
2. Click the Servers tab.
Good Enterprise Mobility Server™
62
Configuring GEMS Services
3. For each GEMS machine deployed:
a. Click the Add icon
.
b. In the new Host Name field, enter the FQDN of the Connect service host.
c. In the Port field, enter the corresponding port (typically 8080).
d. For each GEMS machine, enter the following information in the Configuration field:
PLATFORM=LYNC
SERVERS=<comma-separated list of available GEMS hosts using the format FQDN:port>
Consult the Good Control online help utility for additional information.
Next, you’re ready to list the approved GEMS hostnames and ports for client connections.
Defining Allowed Domains and Servers
Allowed domains and servers within your enterprise network to which the Good Collaboration client apps can
connect are defined in Good Control’s Client Connections option under Settings in the Server Configuration
navigator. It is strongly recommended that you whitelist each individual GEMS.
Here, the domain you are trying to configure is the one that allows GD connections to your Microsoft Exchange
server and your host and port(s) for Connect IM.
Whitelisting means that domains and servers on the list will be accepted, approved or recognized. It is the reverse
of blacklisting—the practice of identifying those that are denied or unrecognized.
First, locate Additional Servers under Client Connections.
This is a list of specific servers with which all GD applications can connect. Add servers to this list instead of using
the Allowed Domains list if you want to restrict access so that GD applications can only connect to certain
servers—like GEMS and Exchange—and not to every machine in a domain.
Good Enterprise Mobility Server™
63
Configuring GEMS Services
To add an allowed server:
1. Click
to add a blank row to the list.
2. Enter the Server fully qualified hostname and Port in the respective fields.
3. Assign a primary and secondary GP cluster for the server, if applicable. Connections through GP servers in the
primary cluster are attempted first, and if no responses are received, connections are attempted through GP
servers in the secondary cluster.
4. Click Submit.
As indicated at the beginning of this topic, you can also whitelist or block domains.
To edit information for an allowed server:
1. Click the
Edit icon for the server.
2. Modify the server name or GP cluster configuration.
Good Enterprise Mobility Server™
64
Configuring GEMS Services
3. Click Submit to commit the change.
To remove a server from the list:
1. Click the
Delete icon for the server.
2. Click Submit .
To whitelist GEMS:
1. Click the Edit
icon.
2. Under Additional Servers, add an entry for the GEMS Connect service that will use port 8080. Reflecting
your specific machine information, the entry should look something like this:
goodconnect<n>.<mycomany.com>:8080
3. Make sure to save your changes.
Setting Policy Governing Disclaimer Text
Via Good Control, you can choose the option to display a Corporate Policy disclaimer at the top over every new
conversation (IM) within each Connect Service client; for example: “Use of this service, a company IT asset, is
subject to the proper conduct, secure use and handling policies found in the XYZ Employee Handbook.”
To set or add a disclaimer via Good Control:
1. In the navigator, click Policy Sets, then select the policy set governing Good Connect.
2. Click the Application Policies tab, then expand the Good Connect application listing.
3. Click the Disclaimer tab.
4. Enable (check) the Display Disclaimer option.
5. Type or paste in your approved Disclaimer Text (250 characters max).
Good Enterprise Mobility Server™
65
Configuring GEMS Services
6. Click Update to display this disclaimer at the top of each new client conversation window.
Establishing User Affinity
In clustered environments, client affinity can be used to map a client to a GEMS machine for Adding GEMS to the
Good Work Application Server List the duration of the client session. This makes it possible for a GEMS
administrator to pin a user to a cluster of GEMS machines, instead of letting the system randomly assign this
particular user to a server from a master list.
To better understand how to use affinity assignments, consider the following example.
XYZ Inc. has two Lync pools—a West Coast pool hosting users in XYZ’s West Coast offices, and an East Coast pool,
which hosts users in the firm’s East Coast offices—so IT deploys a Connect server for each pool, while only setting
up one Good Control and Good Proxy cluster, as pictured.
Good Enterprise Mobility Server™
66
Configuring GEMS Services
Unless affinity is configured, when Aaron Beard launches his Good Works client, Good Control sends a list of
servers that includes both East Coast and West Coast servers and Aaron’s client randomly chooses which one
with which to connect. Even though Aaron is a West Coast user, there’s a strong chance he’ll actually be served by
the East Coast server. By contrast, when user affinity is enabled, it means Aaron will always connect to the West
Coast server.
Note: User Affinity is not currently supported for the Presence Service.
To enable User Affinity for Connect:
1. In the navigator, click Policy Sets, then select the policy set corresponding to user affinity assignments for
Good Connect; e.g., “West Coast Connect Users.”
2. Click the Application Policies tab, then expand the Good Connect application listing.
3. Click the Server Configuration tab.
4. Enter (type or paste) your Connect Server Hosts separated by commas in the following format:
<server_1_fqdn>:<port>,<server_2_fqdn>:<port>,<server_n_fqdn>:<port>
Example:
westcoast1.xyzcorp.com:8080,westcoast2.xyzcorp.com:8080,eastcoast1.xyzcorp.com:8080
Good Enterprise Mobility Server™
67
Configuring GEMS Services
5. In the navigator on the left, select Manage Users under User Accounts.
6. Select the User for whom you want to establish an affinity policy.
7. From the Policy Set dropdown, assign the user to an appropriate policy set.
8. Click Refresh to confirm the change and update the user account.
Enabling/Disabling Conversation History
Saving conversation histories on respective user devices in enabled by default in Good Control. The GEMS
Connect Service supports the option to limit storing conversation histories of more than 40 messages on client
devices. The decision to do so could be in support of standard enterprise security policy, to conserve physical
storage availability on devices, or for any other reason.
Good Enterprise Mobility Server™
68
Configuring GEMS Services
To disable/enable the conversation history option:
1. In the Good Control navigator, click Policy Sets, then select the policy set governing collaboration suite apps;
i.e., Good Connect.
2. Click the Application Policies tab, then expand the Good Connect application listing.
3. Click the Conversation History tab, then check/uncheck Save more than 40 messages in a conversation
history on the device.
4. Click Update.
Controlling Browser and Map Behavior
GEMS supports the option to control whether or not the local device browser application is invoked when
tapping on a Web page URL within a Good Work or Good Connect contact, conversation, or email, and if the
device’s map application can be used when tapping an address. Both browser and map access are allowed by
default in Good Control.
To disable either browser or map access or both from Good Work or Good Connect in Good Control (see
screenshot below):
1. In the navigator, click Policy Sets, then select the policy set governing the application you want to set; i.e.,
Good Connect or Good Work.
2. Click the Application Policies tab, then expand the Good Connect or Good Work application listing.
3. Click the App Settings tab.
4. Disable (uncheck) either option or both, then click Update.
Good Enterprise Mobility Server™
69
Configuring GEMS Services
Here, it's important to remember that Good Control Policy Sets are assigned to provisioned devices running the
application governed by the policy's permissions. When the app is activated by the user, a policy's permissions
and restrictions are applied immediately.
Using Friendly Names for Certificates in Connect
The friendly name of a certificate can be helpful when multiple certificates with a similar subject exist in a
certificate store. Friendly names are properties in the X.509 certificate store that associate aliases with certificates
so they can be easily identified.
You can restrict certificates used for GEMS-Connect to a Friendly Name by:
a. Creating and enrolling a certificate, if you don't already have one
b. Changing the certificate Friendly Name and Description, and
c. Setting the new certificate friendly name string value in the Good Connect Server configuration file
(GoodConnectServer.exe.config).
If you do not already have a certificate, you can create and verify a GEMS SSL Certificate for Lync by following the
guidance under GEMS Prerequisites, above, for creating and adding the GEMS SSL certificate for Lync.
To change the certificate Friendly Name and Description:
1. Open a command prompt and run mmc.
2. Select File > Add/Remove Snap-in.
3. Click Certificates, click Add, click Computer Account, then click Next.
4. Click Local Computer, click Finish, and then clickOK.
5. Select Certificates (Local Computer) > Personal > Certificates.
6. Locate the certificate you want to change and double-click it.
Good Enterprise Mobility Server™
70
Configuring GEMS Services
7. Open the Details tab and select Show: <All>.
8. Click Edit Properties...
9. Enter a Friendly Name.
10. Enter a Description.
11. Click Apply, then OK to save your changes.
12. Click OK again, to exit the Certificate popup.
You're now ready to set the certificate's new Friendly Name in the configuration file for the GEMS-Connect
service.
To update the Good Connect Server configuration file:
1. Open GoodConnectServer.exe.config in your favorite text editor.
You can find the file in <install path>\Good Technology\Good Server\Good Connect
Server\GoodConnectServer.exe.config..
2. Add the following line (or change its value if it has already been added):
<add key="RESTRICT_CERT_BY_FRIENDLY_NAME" value="<cert_friendly_name>"/>
Good Enterprise Mobility Server™
71
Configuring GEMS Services
3. Save your changes.
4. Restart the Good Technology Connect service in the Windows Service Manager for this change to take effect.
Enabling SSL Support Via Good Proxy
In the diagram below, the blue lines indicate the path to the GEMS machine from each Good Work client.
Although SSL is disabled by default, GEMS can be configured to run securely using SSL/TLS (HTTPS) to
communicate with clients through Good Proxy.
As discussed under prerequisites, GEMS requires a signed server SSL certificate from a third-party Certificate
Authority (CA).
The following step-by-step details will guide you in enabling SSL support via Good Proxy:
l Importing the CA-signed certificate to the GEMS machine
l Binding the SSL certificate to the Connect SSL port
l Adding the certificate to the GEMS-Connect configuration file
l Configuring Good Control to send requests over SSL
l Troubleshooting SSL certificate exceptions
Submitting the CSR to a Certificate Authority (CA)
If you need to send the new CSR to a well-known third-party CA and purchase a certificate for your server, the
third-party CA may also send you a file that contains the full certificate chain, including possible intermediate
certificates.
Well-known third-party CAs include:
Good Enterprise Mobility Server™
72
Configuring GEMS Services
l Symantec
l Thawte
l GeoTrust
l GlobalSign
l DigiCert
When the issued certificate is received, it is important that it be installed on the same server that generated the
CSR. To do so, after the new certificate is issued, you must:
l Import the CA-signed SSL certificate to the GEMS machine
l Bind the issued certificate to the GEMS machine's SSL port
l Add the new certificate information to the GEMS configuration file
l Configure Good Control to send requests over SSL
Importing the Signed Certificate
Installing the signed certificate is done on the GEMS machine with the GEMS service account.
Thus, to install a well-known third-party CA-signed SSL certificate for GEMS, login with the Submitting the CSR to a
Certificate Authority (CA) GEMS service account, and then:
1. Click Start > Run, enter mmc, and click OK.
Good Enterprise Mobility Server™
73
Configuring GEMS Services
2. After the MMC launches, click File > Add/Remove Snap-in…
3. Select Certificates in the left panel and click Add to move it into the right panel, then click OK.
Good Enterprise Mobility Server™
74
Configuring GEMS Services
4. Select the Computer account option and click Next.
5. Confirm that Local computer is selected and click Finish.
6. Click OK to confirm Certificates in the Console Root.
Good Enterprise Mobility Server™
75
Configuring GEMS Services
7. Launch import of the trusted root certificate by expanding Certificates (Local Computer) in the panel on the
left, then right-clicking Personal > All Tasks > Import.
8. Once the Certificate Import Wizard opens, click Next.
9. Specify the file you want to import; e.g., the certificate received after submitting a CSR to a well-known, thirdparty CA; and click Next.
10. Click Next to confirm placing the certificate in the Personal store, then click Finish to import the certificate.
11. Click OK when informed that the import was successful.
Next, you’re ready to bind the certificate to the server.
Binding the SSL Certificate to the Connect SSL Port
Before binding the certificate to the GEMS machine’s SSL port, you must first import the third-party CA-signed
certificate to the GEMS machine. If import was successful, complete the binding exercise that follows here.
Binding must be completed prior to configuring Good Control to use the new certificate.
To bind the new certificate to the GEMS machine's SSL port:
1. Login to the GEMS machine with the correct service account.
2. In the MMC’s Certificate Snap-in, double-click the certificate, then click on Details to switch to that tab.
3. Change the Show value to Properties Only.
Good Enterprise Mobility Server™
76
Configuring GEMS Services
4. Click Thumbprint.
5. Copy the thumbprint value in the lower textbox.
6. Paste the copied thumbprint into a text editor and remove all the spaces, so that “80 82 41 2f …” becomes
“0882412f…”
7. Copy this edited version of the thumbnail to the clipboard.
8. Open a command prompt as an administrator and enter the following command string:
> netsh http add sslcert ipport+0.0.0.0:<port> certhash=<thumbprint> appid={AD67330E-7F41-4722-83E2F6DF9687BC71}
replacing <port> with the port number you want to use (e.g., 8082) and <thumbprint> with the contents of the
clipboard.
9. Confirm the certificate binding by executing the following command:
> netsh http show sslcert
If the certificate is properly bound, you’re ready to:
l Add the new certificate information to the GEMS configuration file
l Configure Good Control to send requests over SSL
If binding fails, see Troubleshooting SSL Certificate Exceptions.
Modifying the GEMS-Connect Configuration File with the New Certificate
Some important configuration file changes are necessary to allow Good Connect to use the new SSL certificate.
Before continuing, however, it is recommended that you make a backup copy of the current Good Connect
server configuration file.
Next, for discussion purposes here, it is assumed that you have installed GEMS in the default directory location
on the server. Adjust the drive:\path\ for your deployment as necessary.
Good Enterprise Mobility Server™
77
Configuring GEMS Services
To modify the server configuration to use the correct SSL certificate, open C:\Program Files\Good
Technology\Good Server\Good Connect\GoodConnectServer.exe.config and make the following change:
<addkey="USE_SSL" value="false" />
Note: Save your changes, then restart the Good Technology Connect service in the Windows Service Manager
for these changes to take effect.
Configuring Good Control to Send Requests over SSL
There are only a couple of changes needed in the Good Control console to enable client SSL connections with
GEMS. These configuration settings involve making sure that:
l Any server previously installed without SSL, including prior implementations of Good Connect and Connect
Server, has its FQDN added and associated with the new SSL port. Previously installed non-SSL Good Connect
servers and Connect Service servers must be removed from Good Control.
l The format and port information for servers listed in the configuration must be prepended with https:// and
assigned to the new SSL port.
To change the necessary application server settings in Good Control (pictured below):
1. Open your Good Control console.
2. In the navigator under Applications, click Manage Applications.
3. Select the Good Connect app, then click the Servers tab.
4. Click the Add icon
.
5. Under Host Name, enter the fully qualified domain name (FQDN) of each GEMS-Connect Server.
6. Under Port, enter the SSL port.
7. In the Configuration textbox, prepend each listed FQDN with https:// and change its port assignment to the
Connect SSL port; e.g., 8082.
Good Enterprise Mobility Server™
78
Configuring GEMS Services
To change user affinity-clustering:
1. Click on Policy Sets in the navigator, then select the Application Policies tab.
2. Expand the Good Connect policy set, then click the Server Configuration tab.
3. Change the port numbers in Connect Server Hosts to the new SSL port for GEMS.
Good Enterprise Mobility Server™
79
Configuring GEMS Services
Troubleshooting SSL Certificate Exceptions
Despite meeting all of the SSL certificate requirements defined under Enabling SSL Support via Good Proxy, you
may continue to get the following error:
Description: The process was terminated due to an unhandled exception.
Exception Info: Microsoft.Rtc.Internal.Sip.TLSException
If so, the most likely explanation is that the SSL certificate was not created with the correct CSP and key spec. The
KeySpec property sets or retrieves the type of key generated. Valid values are determined by the cryptographic
service provider (CSP) in use, typically Microsoft RSA.
To check the certificate’s CSP and KeySpec:
1. Open cmd/powershell on the GEMS machine and execute the following command:
certutil.exe –v –store “my”
<name of ssl cert>” > c:\temp\ssl.txt
2. Open c:\temp\ssl.txt in a text editor and search for “CERT_KEY_PROV_INFO_PROP_ID.”
The search should return the following:
CERT_KEY_PROV_INFO_PROP_ID(2):
Key Container = 9ad85141c0b791ad17f0687d00358b70_dd7675d5-867d-479c-90b0-cd24435fe903
Provider = Microsoft RSA SChannel Cryptographic Provider
ProviderType = c
Flags = 20
Good Enterprise Mobility Server™
80
Configuring GEMS Services
KeySpec = 1 -- AT_KEYEXCHANGE
If the values for Provider, ProviderType, and KeySpec are not exactly the same as those shown above, you will
need to have the CA reissue a new SSL with appropriate provider and key spec values.
Configuring Support for the Global Catalog
In a multi-domain Active Directory Domain Services (AD DS) forest, the global catalog provides a central
repository of domain information for the forest by storing partial replicas of all domain directory partitions.
These partial replicas are distributed by multimaster replication to all global catalog servers in a forest. In this way,
the global catalog makes the directory structure within a forest transparent to users who perform a search.
Without a global catalog server, this query would require a search of every domain in the forest.
During an interactive domain logon, the domain controller authenticates the user by verifying the user’s identity,
and also provides authorization data for the user’s access token by determining all groups of which the user is a
member. Because the global catalog is the forest-wide location of the membership of all universal groups, access
to a global catalog server is a requirement for authentication in a multidomain forest. A global catalog server is
also required for Microsoft Exchange Server.
To support Good collaboration suite users from multiple domains within the same forest, the following
modifications using the Active Directory Schema MMC Snap-In will enable users to be accessed from the Global
Catalog:
1. Click the Attributes folder in the snap-in.
2. In the right panel, scroll down to the desired attribute, right-click it, and then click Properties.
3. Click to select the Replicate this attribute to the Global Catalog check box.
4. Click OK.
5. Verify that the following attributes are published to the Global Catalog:
l msrt-primaryuseraddress
l mail
l telephoneNumber
l displayname
l title
l mobile
l givenName
l sn
l sAMAccountName
6. Edit the following configuration parameters in the GoodConnectServer.exe.config file installed by default in
the C:\Program Files\Good Technology\Good Enterprise Mobility Server\Good Connect folder:
<addkey = "AD_USERS_SOURCE" value = "GC"/>
<addkey = "AD_USERS_SOURCE_DOMAIN" value="<root GC domain; LDAP format>"/>
Good Enterprise Mobility Server™
81
Configuring GEMS Services
Note: You must restart Good Technology Connect Service in the Windows Service Manager after updating
the parameters.
Configuring Windows Services
Good Connect Server is now listed in the Microsoft Windows Services UI. By opening it, you can review its current
status.
If you select the Log On tab, you should see the Service Account user you entered for the Connect service the
GEMS Dashboard.
Good Enterprise Mobility Server™
82
Configuring GEMS Services
In order for Connect to run as another domain user, the following must be true:
l The alternate domain user must have access to the private key of the computer certificate. See
Identifying/Acquiring a Valid SSL Certificate for details.
l The alternate domain user must be enabled to “Log on as service” through the Local Security Policy tool.
To give your GEMS account Log on as service privileges:
1. Run the Local Security Policy admin tool on the Good Connect host.
2. Expand the Local Policies folder in the navigator on the left.
3. Select the User Rights Assignments folder to see a list of policies.
4. Double-click Log on as a service to add this policy to the Good Connect account.
Connect Service Logging and Diagnostics
Server logs and performance information for the Connect Service can be found in the GEMS installation direction
directory.
Log File Location
The default GEM server installation directory is:
C:\Program Files\Good Technology\Good Enterprise Mobility Server
All log directories are relative to this path.
Good Enterprise Mobility Server™
83
Configuring GEMS Services
GEMS Connect Service Log
\Good Connect\logs\Application-log_<data>.txt
Common Good Connect Issues
The most common issues can be diagnosed by properly analyzing the appropriate log file when encountering IM
or preference issues.
For troubleshooting, entries like the following examples are generally the most revealing:
Example 1
Log Entry:
Failed to start GoodConnectServer: Microsoft.Rtc.Signaling.ConnectionFailureException: Unable to establish a
connection. ---> System.Net.Sockets.SocketException: No such host is known.
Issue: The hostname value in the configuration file for the key OCS_SERVER does not exist or is not recognized as
a valid server.
Resolution: Correct the OCS_SERVER value in the configuration file.
Example 2
Log Entry:
DeregisterReason=None
ResponseCode=480
ResponseText=Temporarily Unavailable
Microsoft.Rtc.Signaling.RegisterException: The endpoint was unable to register. See the ErrorCode for specific
reason.
Issue: The port number specified in OCS_PORT_TLS is not valid.
Resolution: Correct OCS_PORT_TLS value in the configuration file.
Example 3
Log Entry:
ErrorCode=-2146233088
FailureReason=RemoteDisconnected
LocalEndpoint=10.120.165.137:5060
RemoteEndpoint=10.120.167.109:55118
RemoteCertificate=<null>
Microsoft.Rtc.Signaling.TlsFailureException: Unknown error (0x80131500) -->
Microsoft.Rtc.Internal.Sip.RemoteDisconnectedException: Remote disconnected while outgoing tls negotiation was
in progress --> System.Net.Sockets.SocketException: An existing connection was forcibly closed by the remote
host.
Issue: OCS_TRANSPORT was specified as TLS, however the port number provided was TCP.
Resolution: Change the OCS_PORT_TLS to 5061.
Example 4
Log Entry:
Good Enterprise Mobility Server™
84
Configuring GEMS Services
Failed to start GoodConnectServer: Microsoft.Rtc.Signaling.ConnectionFailureException: Failed to listen on any
address and port supplied.
Issue: Port number specified for UCMA_APPLICATION_PORT in the configuration file is either blocked by a
firewall or used by another application.
Resolution: Unblock port if it is a firewall issue or choose another port number.
Example 5
Log Entry:
Failed to start GoodConnectServer: WCFGaslampServiceLibrary.OCSCertificateNotFoundException: Certificate not
found.
Issue: The certificate's subjectName must contain the local host's FQDN and the private key for the cert must
be enabled for the user which executes the GEMS software.
Resolution: Enable private keys for this cert for the user running the GEMS machine.
Configuring the Presence Service
Configuring the GEMS-Presence to support both Good Work and other third-party apps running on the Good
Dynamics platform entails a few steps. These include:
l Configuring Presence in the GEMS Dashboard
l Configuring Good Control for Presence
Configuring Presence in the GEMS Dashboard
The Presence service exposes the Lync Presence Provider (LPP) to third-party Good Dynamics applications.
Setting up the Presence service is similar to configuring the Connect service, and can be reduced to the following
four steps:
1. Service Account: Enter the GEMS Service Account, but only after making sure this service account has
RTCUniversalReadOnlyAdmins rights. Click Save to record these settings.
2. Good Dynamics: Enter the Good Proxy Hostname. Use the Test button to test the connection. Click Save to
record these settings.
3. Settings: Default settings are typically sufficient.
4. Lync 2010/2013 – After clicking on this setting, the system will dynamically query the Lync Server to see if the
appropriate GEMS Lync topology has been added. It will typically take a few moments for the query to
complete, so please be patient.
For Application ID, select the Lync Presence Provider application ID, then select the corresponding
Application Endpoint. If the listboxes are empty, this means that either the GEMS Lync topology was not
setup correctly or the service account does not have the proper permissions to query these settings.
Use the Test button to test connectivity. Click Save when done.
Good Enterprise Mobility Server™
85
Configuring GEMS Services
Additional resources for Good Presence Developers
If you are a Good Presence developer, the following will be useful links:
l Good Presence Service API
l Good Presence Sample app
Configuring Good Control for Presence
Depending on how you plan to implement and use the Presence service, setting it up in Good Control involves a
number of considerations:
l Configuring Presence for Good Work
l Configuring Presence Affinity for the Good Work app
l Configuring Presence for Third-Party apps
Note: If you were an early adopter of the Presence service for Good Work, you were instructed to use a Good
Control application policy to run Presence over HTTP while ActiveSync ran over HTTPS. The updated Good
Work client now automatically adheres to the server list widget and JSON configuration. Hence, setting the
Preferred Presence Service Configuration now merely controls Presence Affinity.
Adding GEMS to the Good Work Application Server List
Note: If you haven't yet registered the Good Work app in Good Control, do so now.
The Good Work client checks the Good Work server list for available GEMS instances hosting the Presence
service. Hence, the list must be populated with at least one GEMS machine with the Presence service enabled. If
multiple GEMS hosts are listed, you can use the Preferred Presence Server Configuration parameter to set up
an affinity association (see Configuring Presence Affinity for Good Work).
To add GEMS to the Good Work application server list:
1. From the Good Control console navigator (left-hand panel) under Applications, click Manage Applications.
2. Scroll or search for Good Work and click it.
3. Click the Servers tab.
Good Enterprise Mobility Server™
86
Configuring GEMS Services
4. Enter the GEMS host FQDN in the Host Name field, then enter 8443 under Port.
Caution: At this stage, you are adding a configuration that will cause devices to connect to GEMS over its
secure HTTPS port 8443, which is the only port that is open for remote access by default. Therefore, you
should ensure that you have not removed the auto-generated self-signed certificate created during GEMS
installation unless you replaced it with a CA-signed certificate. Otherwise, devices will not be able to connect to
GEMS.
5. If you have additional GEMS hosts, configure them for the application in the same way, after clicking
to
add a new row.
6. Click Submit to save your changes.
Configuring Presence Affinity for Good Work
Presence affinity for Good Work is configured in Good Control's Application Policies. Presence affinity is
optional. Be aware, however, that once you set affinity, it takes precedence.
Caution: When a distributed computer system is truly load balanced, each request is routed to a different
server. This load balancing approach is diminished when server affinity techniques are applied.
To enable Presence Affinity for Good Work:
1. In the Good Control console navigator click Policy Sets, then locate the policy you want to apply and click it.
2. Click the Application Policies tab.
3. Scroll down to Good Work and click it, then click the App Settings tab.
Good Enterprise Mobility Server™
87
Configuring GEMS Services
4. In the Server Hosts field, enter in the FQDN of your GEMS host, followed by port 8443.
5. Click Update.
6. Now, repeat Steps 1 through 5 for every policy that will use Good Work Presence.
Configuring Presence for Third-Party Apps
If you're making the Presence service available to third-party GD apps, the Presence app/service must be
configured in Good Connect's management handler. This is required for each GEMS machine, individually and
clustered.
Again, for prerequisite details on setting up Good Control, see Good Dynamics Requirements.
Important: The Good Presence application is not published to Good Control by default. You must request this
app and then add it to Good Control.
To learn how to add the Good Presence app, see "Registering a New Application" in the GC console's online help.
Then, with the Good Control management console loaded in your browser, complete the following steps:
1. Under Applications, click Manage Applications, and select Good Presence.
2. Click the Servers tab.
3. In the new Host Name field, enter the FQDN of the GEMS-Presence Service host.
Good Enterprise Mobility Server™
88
Configuring GEMS Services
4. In the Port field, enter the corresponding port (typically 8443).
5. For each GEMS machine entered, click
in the Actions column, then repeat Steps 3 thru 5.
6. Click Submit to save the configuration.
Consult the Good Control online help utility for additional information on Managing Applications.
Using Friendly Names for Certificates in Presence
The friendly name of a certificate can be helpful when multiple certificates with a similar subject exist in a
certificate store. Friendly names are properties in the X.509 certificate store that associate aliases with certificates
so they can be easily identified.
You can restrict certificates used for GEMS-Presence to a Friendly Name by:
a. Creating and enrolling a certificate, if you don't already have one
b. Changing the certificate Friendly Name and Description, and
c. Setting the new certificate friendly name string value in the GEMS Lync Presence Provider (LPP) Service
configuration file.
If you do not already have a certificate, you can create and verify a certificate for the Lync Presence Provider
(LPP) by following the guidance under GEMS Prerequisites, above, for requesting a GEMS certificate from a local
AD certificate authority.
To change the certificate Friendly Name and Description:
1. Open a command prompt and run mmc.
2. Select File > Add/Remove Snap-in.
3. Click Certificates, click Add, click Computer Account, then click Next.
Good Enterprise Mobility Server™
89
Configuring GEMS Services
4. Click Local Computer, click Finish, and then clickOK.
5. Select Certificates (Local Computer) > Personal > Certificates.
6. Locate the certificate you want to change and double-click it.
Good Enterprise Mobility Server™
90
Configuring GEMS Services
7. Open the Details tab and select Show: <All>.
8. Click Edit Properties...
9. Enter a Friendly Name.
10. Enter a Description.
11. Click Apply, then OK to save your changes.
12. Click OK again, to exit the Certificate popup.
You're now ready to set the certificate's new Friendly Name in the configuration file for the GEMS Presence
service.
To update the LPP configuration file:
1. Open LyncPresenceProviderService.exe.config in your favorite text editor.
You can find the file in <install path>\Technology\Good Enterprise Mobility Server\Good
Presence\LyncPresenceProviderService.exe.config.
2. Add the following line (or change its value if it has already been added):
<add key="RESTRICT_CERT_BY_FRIENDLY_NAME" value="<cert_friendly_name>"/>
3. Save your changes.
4. Restart the Good Technology Presence service in the Windows Service Manager for this change to take effect.
Logging and Diagnostics
The default GEM server installation directory is:
C:\Program Files\Good Technology\Good Enterprise Mobility Server
All log directories are relative to this path.
GEM Server Log
\Good Server Distribution\assembly-<version>\data\log\<gems_server_name+timestamp>.log
Note: At 23:59 the timestamp resets to 0:00. It is also reset by a service restart or when the file
size reaches 100 MB.
GEMS Presence Service
\Good Presence\Logs\LPP-log.txt
Updating the Connect and Presence Services Using Lync Director
The Lync Director role provides functionality for users accessing Lync, internally and externally1.
1From http://social.technet.microsoft.com/wiki/contents/articles/3933.lync-director.aspx. ©2014 Microsoft Corporation. Used with permission.
Good Enterprise Mobility Server™
91
Configuring GEMS Services
To support this capability, Lync Server is deployed as one or more pools, based on Standard Edition or Enterprise
Edition Lync Server. Users can be homed on only a single pool. Clients can be configured to find their Lync pool
automatically. However, the DNS records that support this functionality can point to only a single pool. In a
multi-pool environment, this "primary" pool will have to redirect users to their correct home pool. This is an
overhead on the primary pool. The Lync Director is used to offload this redirection functionality. The Director
does not home any users itself but instead redirects the user to their correct pool home. The requirement for the
Lync Director is therefore for multi-pool environments with high user numbers.
Once the user has been redirected to their correct pool, the Director plays no further role in communications
between the client and the pool server.
To update the Connect and Presence services to use a Director:
1. From the GEMS host, stop the following services:
l Good Technology Connect
l Good Technology Presence
2. Locate the Good Connect configuration file. Its default location is:
C:\Program Files\Good Technology\Good Enterprise Mobility Server\Good
Connect\GoodConnectServer.exe.config
3. Open the file in notepad, locate the LYNC_SERVER key, then update its value with the FQDN of the Director
pool you want to use.
4. Locate the Good Presence configuration file. Its default location is:
C:\Program Files\Good Technology\Good Enterprise Mobility Server\Good
Presence\LyncPresenceProviderService.exe.config
As with Connect, open the file in notepad and locate the LYNC_SERVER key. Update this value with the FQDN
of the Director pool you want to use.
5. Start the two services that you stopped in Step 1.
Maintaining GEMS Cluster Identification in Good Control
Always ensure that Connect servers listed in the Good Control application configuration for Good Connect
identifies installed GEMS machines in that cluster.
If you add a server to the cluster, please correlate the timing of both the server’s installation with updating the
Good Control application configuration for Good People, to include that additional server after it has been
installed and is up and running.
If you temporarily remove a server from the cluster for maintenance, it is not necessary to change the Good
Control application configuration for GEMS. The Good People client will detect that the server is offline and will
automatically connect to another GEMS machine in the cluster.
Good Enterprise Mobility Server™
92
Device Provisioning and Activation
If you permanently remove a server from the cluster, first shut down the GEMS machine, then remove it from
the Good Control application configuration.
Device Provisioning and Activation
Users invited to install and activate Good Connect on their device(s), require an access key. The access key must
be entered when the user opens Good Connect for the first time on a given device.
The access key is a 15-character alphanumeric code sent to the user’s (registered) company email address and has
the following properties:
l It can be used only once and is consumed immediately upon the activation of an application.
l It is not application-exclusive. In other words, a user who has been sent four access keys can use them to
activate any four applications to which s/he is entitled.
l It does not support reactivation. Hence, if the client software is uninstalled, then reinstalled on the same
device, a new access key is required. This is also true if a new or factory-reset device is in use, or if a device
emulator is in use and its state is not persisted. However, a user who has been issued multiple access keys
could use them to activate the same application multiple times.
l It can be configured to expire after a specified period of time. This is done in Provisioning Policies by
enabling the Access Keys expire option, and then selecting the number of days after which access keys
expire if not consumed.
To grant access to all your enterprise users complete the following steps:
1. Assign the default policy set or create a new policy set in accordance with your enterprise’s user access
protocols. The default policy set is automatically applied to all new users.
For each user, the policy currently applied is located at the top of the user’s account page. To apply a different
policy set, hover your cursor over it and select from the available policy sets in the listbox. It should be noted
that the user must be granted access to the app in order to activate it. This is done by assigning the user to an
Application Group that includes the app (Good Connect) for which the user is being permitted access.
2. Go to User Accounts > Manage Users in the navigation panel, locate the user you want to provision, and
click Edit. You can also click anywhere on the user’s row to view account information.
Good Enterprise Mobility Server™
93
Device Provisioning and Activation
3. Click on the Access Keys tab to set the number of keys to send to the user.
4. Click Provision.
The appropriate number of access keys will then be sent to the user’s registered enterprise email address—one
email message per key. Hashes of the access keys are also copied to the GD NOC for validation.
Assuming the user has received the email message containing the access key and downloaded and installed the
GD client application from the pertinent online marketplace—App Store or Google Play—on the device, they can
now activate the application until its GC-specified expiration date. At application start-up, the Good Dynamics
user activation interface opens, whereupon the user must enter the access key and his/her enterprise email
address in the input fields provided on the client so that the GD Client Library can promptly transmit the access
key to the NOC.
Additional provisioning and activation options are also available in Good Control. For more on these features see:
l Easy Activation
Good Enterprise Mobility Server™
94
Appendix A – GEMS with Push Notifications ServicePre-Installation Checklist
Appendix A – GEMS with Push Notifications Service
Pre-Installation Checklist
It is highly recommended that this checklist be completed prior to implementation of your Good Enterprise
Mobility Server (GEMS) with Push Notifications and Presence Services.
#
Task
Check
Registration
1.1
Register with the GDN Portal (click here)
c
1.2
Download the latest GEMS software
c
1.3
Request the Good Work App (click here — very important!)
c
Network
2.1
Ensure the following ports are open for GEMS:
c
Inbound TCP ports:
l 8443 from the Good Proxy server (required for Presence and Push
notifications); add port 8181 if SSL is not going to be used
Outbound TCP ports:
l 443 to Good NOC/APNS
l 443 to Exchange
l 17080 to the Good Proxy server (17433 for SSL)
Active Directory and Exchange
3.1
Verify Exchange version support; either:
c
l Exchange 2010 (SP2 RU4 +)
l Exchange 2013 (CU1, CU2, CU3, SP1 [CU4])
3.2
Create an AD account for Good.Preferred UID is "GoodAdmin" with the following attributes:
Good Enterprise Mobility Server™
c
95
Appendix A – GEMS with Push Notifications ServicePre-Installation Checklist
#
Task
Check
l Password must not contain ':', '@', or '/'
l Password Expired option must be set to Never for this account
l GoodAdmin should be a member of the local administrator group on the GEMS host machine
3.3
Create an Exchange mailbox for the GoodAdmin account.
3.4
Grant Application Impersonation Permissions to the GoodAdmin account in Exchange (very
important!). For your convenience, the Exchange Shell command to apply Application
Impersonation is included here.
c
Command Format:
New-ManagementRoleAssignment -Name:impersonationAssignmentName
-Role:ApplicationImpersonation -User:serviceAccount
Example:
New-ManagementRoleAssignment -Name:GoodAppImpersonation
-Role:ApplicationImpersonation -User:GoodAdmin
For additional details, see Configuring Exchange Impersonation, in addition to Grant
Application Impersonation Permission to the Service Account under Setting Up a Windows
Service Account for GEMS above.
3.6
Ensure that your Exchange Autodiscover is set up correctly (very important!).
c
Use EWSEditor to test. Please reference KB3496 for more information on how to use
EWSEditor.
3.7
Ensure that Exchange EAS is enabled on port 443 and that connections are permitted for the
Good Proxy server.
c
GEMS
4.1
Verify OS support. The following are supported by GEMS:
c
l Windows Server 2008 R2
l Windows Server 2008 R2 SP1
l Windows Server 2012 R2
4.2
Verify minimum hardware requirements.
c
POC:
l Dual Core / 2.4 GHz CPU or higher
l 4 GB RAM / 50 GB HDD
l 100 / 1000 Ethernet Card
Production:
Good Enterprise Mobility Server™
96
Appendix A – GEMS with Push Notifications ServicePre-Installation Checklist
#
Task
Check
l Pentium 4 Quadcore / 2.4 GHz CPU or higher
l 16 GB RAM / 50 GB HDD
l 100 / 1000 Ethernet Card
4.3
Verify Good Dynamics support. GEMS requires Good Dynamics 1.7.38.x or newer. Good
Dynamics must already be installed and operational before installing GEMS.
c
4.4
Ensure that the GoodAdmin Service account is a local administrator on the server
c
4.5
Ensure that the GC Service account hasLogon As a Service rights
c
4.6
Ensure that the server's date/time is correctly set
c
4.7
Ensure that the server has been joined to the domain
c
4.8
Ensure that Windows Firewall is OFF.
c
4.9
Ensure that all antivirus/backup and backup software is stopped during the installation.
c
4.16
Install JRE 7 Update 67 or higher (click here to download)
c
4.11
Set JAVA_HOME environment variable to the Java install folder; e.g., C:\Progam Files\Java\jre7
c
4.12
Ensure connectivity to SQL Server (typically TCP port 1433)
4.13
Ensure connectivity to Exchange (EWS).
Database
5.1
Verify Database server support.The following database servers are supported:
c
l All editions of MS SQL Server 2008 and 2008 R2
l All editions of MS SQL Server 2012 and 2012 SP1
l MS SQL Express 2008 R2 with Management Tools
To download MS SQL Express, click here.
5.2
Create a database for the PNS service. The recommended DB name is “EWS”. Extend the DB
scheme with the schema file provided with the GEMS binary zip file.
c
5.3
Ensure that the SQL account or the GEMS Windows Service Account has db_owner privileges
to the GEMS PNS database.
Good Enterprise Mobility Server™
97
Appendix B – GEMS with Connect and Presence Pre-Installation Checklist
Appendix B – GEMS with Connect and Presence
Pre-Installation Checklist
It is highly recommended that this checklist be completed prior to implementation of your Good Enterprise
Mobility Server (GEMS) with Connect and Presence Services.
#
Task
Check
Registration
1.1
Register with the GDN Portal (click here)
c
1.2
Download the latest GEMS software
c
1.3
Request the Good Connect App (click here — very important!)
c
1.4
Request the Good Presence App ONLY if you are using third-party GD apps that require
presence. The Good Presence app can be requested from Mobile App Sales
([email protected])
c
Network
2.1
Ensure the following ports are open for GEMS:
c
Inbound TCP ports:
l 8080/8082 from the Good Proxy Server
l 8181 from the Good Proxy Server (for Presence)
l 49555 from the Lync Server (for Connect)
l 49777 from the Lync Server (for Presence)
Outbound TCP ports:
l 443 to the Good Technology NOC
o 206.124.114.0/24
o 206.124.121.0/24
o 206.124.122.0/24
Good Enterprise Mobility Server™
98
Appendix B – GEMS with Connect and Presence Pre-Installation Checklist
#
Task
Check
l 5061 to the Lync server
l 17080 to the Good Proxy server
l 17433 to the Good Proxy server
l 1433 to the MS SQL server (default)
2.2
If GEMS requires a Proxy server for external access, please note it here:
c
Proxy Server Make/Model: __________________________
Authentication Method: _____________________________
Active Directory and Lync
3.1
Create an AD service account for the GEMS software (can be the same account used for
Good Dynamics)
c
3.2
Ensure that the GEMS service account has RTCUniversalReadOnlyAdmins permission
during the GEMS install. This permission is granted via AD.
c
3.3
Create a Trusted Application Pool, trusted application, and trusted application
endpoint for GEMS via the Lync Shell Console (very important!)
c
Note: The user creating the Tusted Application Pool must have RTCUniversalServerAdmins
and Domain Admins persmissions.
GEMS
4.1
Verify OS support. The following are supported by GEMS:
c
l For MS Lync 2010 Deployments use Windows Server in one of these 64-bit versions:
o 2008 R2
o 2008 R2 SP1
l For MS Lync 2013 Deployments use Windows Server in one of these 64-bit versions:
o 2008 R2 SP1
o 2012 R2
4.2
Verify minimum hardware requirements:
c
l Pentium 4 Quadcore / 2.4 GHz CPU or higher
l 16 GB RAM / 50 GB HDD
l 100 / 1000 Ethernet Card
4.3
Verify Good Dynamics support. GEMS requires Good Dynamics 1.7.38.x or newer. Good
Dynamics must already be installed and operational before installing GEMS.
Good Enterprise Mobility Server™
c
99
Appendix B – GEMS with Connect and Presence Pre-Installation Checklist
#
Task
Check
4.4
Verify Lync Support. Lync 2010 and Lync 2013 are supported.
c
4.5
Ensure that the GC Service account is a local administrator on the server
c
4.6
Ensure that the GC Service account has Logon As a Service rights
c
4.7
Ensure that the server's date/time is correctly set
c
4.8
Ensure that the server has been joined to the domain
c
4.9
Ensure that .NET 3.5 SP1 or later is enabled (Server manager > Add Features)
c
4.10
Ensure that either .NET Framework 4.5 or 4.5.1 is installed. Click here to download.
c
4.11
Ensure that MS Windows PowerShell is installed:
c
l For both Lync 2010 and Lync 2013, install PowerShell 3.0 RTM (click here to download)
l Open “Windows PowerShell (x86)” and run the following command to enable execution of
remote signed scripts:
Set-ExecutionPolicy -Scope CurrentUser RemoteSigned
4.12
Ensure that the Microsoft Unified Communications Managed API is installed:
c
l For Lync 2010, install UCMA 3.0 (click here to download)
l For Lync 2013, install UCMA 4.0 (click here to download)
After installing UcmaRuntimeSetup.exe, you must also run the OCSCore.msi file. By default,
this file is located at:
C:\Program Data\Microsoft\Lync Server\Deployment\cache\5.0.8308.0\Setup\OCSCore.msi
Note: The version number in the path will vary.
4.13
Request and install a SSL certificate on GEMS (very important!). See SSL Certificate
Requirement for Lync.
c
4.14
Ensure that all antivirus/backup and backup software is stopped during the
installation.
c
4.15
Ensure that all GEMS software is installed with the GEMS service account
c
4.16
Install JRE 7 Update 67 or higher (click here to download)
c
4.17
Set JAVA_HOME environment variable to the Java install folder; e.g., C:\Progam
Files\Java\jre7
c
Database
5.1
Verify Database server support. The following database servers are supported:
Good Enterprise Mobility Server™
c
100
Appendix B – GEMS with Connect and Presence Pre-Installation Checklist
#
Task
Check
l All editions of MS SQL Server 2008 and 2008 R2
l All editions of MS SQL Server 2012 and 2012 SP1
l MS SQL Express 2008 R2 with Management Tools
To download MS SQL Express, click here.
5.2
Create a DB for the GEMS Connect Service and extend its scheme (very important!). This
must be done prior to installing GEMS. For more information, see Database Requirements.
c
5.3
Ensure that the GEMS service account has db_owner permission on the GEMS Connect
database.
c
Good Enterprise Mobility Server™
101
Appendix C – Importing Certificates into the GEMS Java Keystore
Appendix C – Importing Certificates into the GEMS Java Keystore
A briefly covered under Replacing the Auto-Generated Self-Signed SSL Certificate above, a Java keyStore file,
called gems.jks, containing a SSL self-signed certificate is generated by the GEMS installer.
Note: The browser will report that your SSL certificate is untrusted because it is a self-signed certificate.
Default Location
The default location is:
<GEMS Machine Path>\Good Enterprise Mobility\Server\Good Server Distribution\gems-karaf<version>\etc\keystores\gems.jks
Default Password
The default password is changeit.
Keystore File Reference
The keystore file is referenced in jetty.xml. Its default location is:
<GEMS Machine Path>\Good Enterprise Mobility\Server\Good Server Distribution\gems-karaf-<version>\etc\jetty.xml
The relevant snippet from jetty.xml referencing the location of the keystore file and its associated password
would look like the following:
<Call name="addConnector">
<Arg>
<New class="org.eclipse.jetty.server.ssl.SslSelectChannelConnector">
<Arg>
<New class="org.eclipse.jetty.http.ssl.SslContextFactory">
<Set name="keyStore"><SystemProperty default="." name="jetty.home"/>/etc/keystores/gems.jks</Set>
<Set name="trustStore"><SystemProperty default="." name="jetty.home"/>/etc/keystores/gems.jks</Set>
<Set name="keyStorePassword">OBF:1vn21ugu1saj1v9i1v941sar1ugw1vo0</Set>
<Set name="keyManagerPassword">OBF:1uh01xmu1k8k1juc1k5m1wg21kmk1w</Set>
<Set name="trustStorePassword">OBF:1vn21ugu1saj1v9i1v941sar1ugw1vo0</Set>
</New>
</Arg>
<Set name="port">8443</Set>
<Set name="maxIdleTime">30000</Set>
</New>
</Arg>
</Call>
The passwords are obfuscated. The keyStorePassword and the trustStorePassword are typically the identical
and represent the Java keystore password. The keyManagerPassword is the challenge password for the
certificate.
Certificate Format
Any certificate used should be PKCS #12 and the private key must contain a challenge password. In addition,
please also make sure that the certificate has the appropriate key chain; i.e., root and intermediate certificate.
Good Enterprise Mobility Server™
102
Appendix C – Importing Certificates into the GEMS Java Keystore
Importing the Certificate
The Java keytool is used to import the certificate into the java keystore. The default location of this tool on the
GEMS host is C:\Program Files\Java\jre7\bin.
To import a certificate:
1. Make a backup copy of the gems.jks file.
2. Open a command prompt and import the certificate using the following command:
keytool -importkeystore -destkeystore <path to gems.jks file> -srckeystore <path to your certficiate> srcstoretype pkcs12 -alias <alias of your certficate> -storepass changeit
For example:
keytool -importkeystore -destkeystore gems.jks -srckeystore mycert.p12 -srcstoretype pkcs12 -alias
myserver.com -storepass changeit
3. Delete the old self-signed certificate from the keystore using the following command:
keytool -delete -alias serverkey -keystore gems.jks -storepass changeit
4. Copy the new gems.jks file back to its original location.
5. Generate the obfuscated challenge password for your private key.
In order for the GEM server to access your certificate private key, you must include the challenge password in
the jetty.xml file. The password must be obfuscated. This can be done with the GEMS SSL Tech Tool. See
KB16041 for details.
Caution: When you run the GEMS SSL Tech Tool to obfuscate the password, it will generate a new gems.jks
file. You can then delete the gems.jks file generated under Step 2 above because you are really only
interested in the obfuscated password.
GEMS SSL Tech Tool output will look similar this:
6. Update keyManagerPassword in the jetty.xml file with the obfuscated password.
7. Restart Good Technology Common Services from the Windows Service Manager.
8. Test the new certificate by accessing the GEMS Dashboard in a browser. Its certificate information should now
reflect the newly imported certificated.
Other Useful Keystore Commands
The following keystore commands are available at the command line:
Good Enterprise Mobility Server™
103
Appendix C – Importing Certificates into the GEMS Java Keystore
To check which certificates are currently in the keystore, use:
keytool -list -v -keystore gems.jks
To export a certificate from the keystore, use:
keytool -export -alias serverkey -file gems.crt -keystore gems.jks
To check a standalone certificate, use:
keytool -printcert -v -file gems.crt
To delete a cert from the keystore, use:
keytool -delete -alias serverkey -keystore gems.jks
To import a signed primary certificate to an existing GEMS Java keystore, use:
keytool -import -trustcacerts -alias serverkey -file gems.crt -keystore gems.jks
Good Enterprise Mobility Server™
104
Appendix D – Understanding the GEMS-Connect Configuration File
Appendix D – Understanding the GEMS-Connect Configuration
File
Configuration settings can be manually updated directly in the GEMS configuration file located in <install
path>\Good Technology\Good Server\Good Connect Server\GoodConnectServer.exe.config. After updating
any of the configuration parameters, you must restart the GEMS machine for the changes to take effect.
Parameter Name
Required
(Y/N)
Description
Default Setting
Generated during application
provisioning
UCMA_
APPLICATION_NAME
Yes
Name of application as defined through the installation
provisioning process
UCMA_GRUU
Yes
GRUU = Globally Routable User-Agent URI that uniquely defines Generated during application
the Session Initiation Protocol (SIP) URI for the application
provisioning
UCMA_
APPLICATION_PORT
Yes
The fixed port used by the Good Connect Server to receive
messages from the enterprise IM server
49555
OCS_SERVER
Yes
FQDN (Full Qualified Domain Name) of the Microsoft Lync
Front-End server or Front-End server pool
GD_HOST
Yes
Good Dynamics Proxy host
GD_PORT
Yes
Good Dynamics Proxy port
17080
BASE_ADDRESS
Yes
URL for the Good Connect Server which takes the form
http://goodconnect.mycompany.com:8080/
BUILD_VERSION
Yes
The version number of the Good Connect Server build
Auto-populated
SESSION_TIMEOUT_
SECS
Yes
The number of seconds a client is allowed to remain idle
86,400 (24 hours)
ACTIVE_DIRECTORY_
CACHE_REFRESH_
SECS
Yes
The number of seconds the Good Connect Server waits before
synchronizing with the Active Directory (any value smaller than
7200 is ignored in favor of 7200 seconds)
86,400 (24 hours)
GD_USE_SSL
Yes
Determines whether or not the Good Connect Server uses the
Good Dynamics secure port (17433) or unsecured port (17080).
False
APN_SOUND
Yes
Play sound when an Apple device receives a push notification
APN_BADGE
Yes
Determines whether or not to use the badge graphic for Apple
push notifications
True
APN_ALERT
Yes
Apple push notification message string that notifies a user that
there are unread messages
“You have <number> unread
messages.”
APN_SLEEP_TIME
Yes
The number of milliseconds the Good Connect Server waits in
100
Good Enterprise Mobility Server™
105
Appendix D – Understanding the GEMS-Connect Configuration File
Parameter Name
Required
(Y/N)
Description
Default Setting
between queued Apple push notifications
ACTIVE_DIRECTORY_
SEARCH_RESULT_
MAX
Yes
The upper limit on the number of hits from a search of the
Global Address List (GAL)
150
GD_APN_PROXY_
TYPE
No
Web Proxy Authentication Mechanisms. Acceptable values are:
""
GD_APN_HTTP_URL
Yes
Web Service URL for Good Dynamics Apple Push Notification
Service (APNS)
GD_APN_PROXY_
AUTH_DOMAIN
No
Web Proxy Domain
Deprecated
GD_APN_PROXY_
AUTH_USERNAME
No
Web Proxy Username
Deprecated
GD_APN_PROXY_
AUTH_PASSWORD
No
Web Proxy Password
Deprecated
GD_APN_PROXY_
HTTP_HOST
No
Web Proxy Host
GD_APN_PROXY_
HTTP_PORT
No
Web Proxy Port
GD_APNS_
BLACKLIST_RETRY_
NO
Yes
Specifies # of retries after the server receives APNS response
where the token has been blacklisted
3
DB_TYPE
Yes
SQLSERVER or ORACLE depending on what database is used
DB_AUTHTYPE
Yes
USE_INTEGRATEDAUTH when the specifying windows integrated
authentication, otherwise SQL Server authentication will be
used
GASLAMP_
USERNAME
Yes
Window Service account
DB_INIT_CATALOG
No
SQL Server database name; only valid if DB_TYPE=SQLSERVER
Caution:This value is set by the installer, so do not change
GoodConnect
LYNC_DB_
CONNECTIONSTRING
No
SQL Server connection string for the Lync/OCS database
DB_SESSION_
Yes
Time limit for search Lync/OCS database as defined by LYNC_DB_ 300
"" (empty string for no proxy)
"Basic No Auth"
"Basic"
"Digest"
Good Enterprise Mobility Server™
106
Appendix D – Understanding the GEMS-Connect Configuration File
Parameter Name
Required
(Y/N)
Description
Default Setting
CONNECTIONSTRING
TIMEOUT_SECS
EWS_HOST
No
FQDN of the Exchange server to which the Good Connect Server
will write conversation history
EWS_HISTORY_
INTERVAL_MINUTES
No
Defines the number of interval in minutes Good Connect server
will wait before writing to Conversation history. 0 means that
conversation history is written only after conversation has been
terminated
5
EWS_VERSION
No
Version of Exchange server:
2
0 = Exchange 2007 SP1
1 = Exchange 2010
2 = Exchange 2010 SP1
3 = Exchange 2010 SP2 or SP3
4 = Exchange 2013
300
DB_RECONNECT_
WAITTIME_SEC
Yes
# of seconds to wait before reconnecting attempt to database
DB_RECONNECT_
TRY_NUM
Yes
# of times Connect server to retry reconnecting to database after 3
a failure to connect to database
AD_USERS_SOURCE
No
Parameter indicates if Good Connect server should read AD or
GC for SIP-enabled users; value can be “GC” or “LDAP” (default is
LDAP, if empty)
AD_USERS_SOURCE_
DOMAIN
Yes, if
users
source is
GC
Domain for the for AD or GC to query. This value should be in
LDAP format; i.e., DC=GOOD,DC=COM
RESTRICT_CERT_BY_
FRIENDLY_NAME
No
Allows naming of certificate so that Connect server can load
correct certificate; the certificate friendly name must match the
name specified here
DISABLE_
MESSAGEUPDATE
No
Disable message not delivered errors which may potentially be
due client/network latencies
False
LONG_INVITATION_
TIME_DELAY
No
Time (in milliseconds) that a Connect client will wait for
invitation received to confirm/ignore a request to a conversation
60 000
ACK_TIME_WAIT
No
Time (in milliseconds) that the Connect server waits for
acknowledgment from client for a message received before
sending message failed to deliver
90 000
SEND_TIME_WAIT
No
Time (in milliseconds) the Connect server waits after sending
message before reporting message failed to deliver
120 000
Good Enterprise Mobility Server™
107
Appendix E – Fine-Tuning Your Java Memory Settings
Appendix E – Fine-Tuning Your Java Memory Settings
Java settings for GEMS are found in the configuration file Good Server Distribution\gems-karaf<version>\etc\GoodServerDistribution-wrapper.conf.
You may wish to review or modify the default Java settings used by GEMS. However, as a general rule, you won't
need to make changes to these settings.
In particular, the default memory settings for GEMS can be viewed at:
Initial memory allocation:
# Initial Java Heap Size (in MB)
wrapper.java.initmemory=2048
# Maximum Java Heap Size (in MB)
wrapper.java.maxmemory=2048
Java memory settings:
wrapper.java.additional.14=-XX:PermSize=512m
wrapper.java.additional.15=-XX:MaxPermSize=1024m
By default, this means that the Java process used by GEMS will always need approximately 3 GB of memory free
for its use on the machine hosting it.
Good Enterprise Mobility Server™
108
Appendix F – IIS SSL Offloading
Appendix F – IIS SSL Offloading
SSL offloading takes all the processing of SSL encryption and decryption off the main Web server and moves it to
the GEMS host.
To set up IIS on the GEMS host:
1. Download and install the IIS Application Request Routing extension and install it.
2. When installation completes, select Start > IIS Manager.
3. Under Connections, select Server > Server Certificates, then double-click Import to import a trusted thirdparty certificate (the .PFX file received from your CA).
Good Enterprise Mobility Server™
109
Appendix F – IIS SSL Offloading
4. After the certificate is added, click Server under Connections, double-click Application Request Routing,
andclick Server Proxy Settings... under Actions.
5. Check Enable proxy, then click Apply.
6. Next, click Server under Connection, double-click URL Rewrite, then click Add Rule(s)... under Actions.
7. Select Blank Rule and click OK.
8. On the Edit Inbound Rule screen, enter a Name for the rule—e.g., "gems"—in the field provided.
9. With Requested URL: Matches the Pattern Using: Regular Expressions displayed, enter
"pushnotify/pushchannels" in the Pattern field.
10. Scroll down and expand the Conditions section, then click Add...
Good Enterprise Mobility Server™
110
Appendix F – IIS SSL Offloading
11. For Condition input enter {REQUEST_METHOD}.
12. For Pattern enter POST, then click OK.
13. Scroll down and expand the Action section.
14. For Rewrite URL enter http://localhost:8181/{R:0}.
Good Enterprise Mobility Server™
111
Appendix F – IIS SSL Offloading
15. In the Actions panel on the far left, click Apply.
Finally, verify that you can now access GEMS under its secure HTTPS port by opening the GEMS Dashboard in
your browser using https://localhost:8443/dashboard.
16. After the certificate is added, click Server under Connections, double-click Application Request Routing,
andclick Server Proxy Settings... under Actions.
17. Check Enable proxy, then click Apply.
18. Next, click Server under Connection, double-click URL Rewrite, then click Add Rule(s)... under Actions.
19. Select Blank Rule and click OK.
20. On the Edit Inbound Rule screen, enter a Name for the rule—e.g., "gems"—in the field provided.
21. With Requested URL: Matches the Pattern Using: Regular Expressions displayed, enter
"pushnotify/pushchannels" in the Pattern field.
Good Enterprise Mobility Server™
112
Appendix F – IIS SSL Offloading
22. Scroll down and expand the Conditions section, then click Add...
23. For Condition input enter {REQUEST_METHOD}.
24. For Pattern enter POST, then click OK.
25. Scroll down and expand the Action section.
26. For Rewrite URL enter http://localhost:8181/{R:0}.
Good Enterprise Mobility Server™
113
Appendix F – IIS SSL Offloading
27. In the Actions panel on the far left, click Apply.
Finally, verify that you can now access GEMS under its secure HTTPS port by opening the GEMS Dashboard in
your browser using https://localhost:8443/dashboard.
Good Enterprise Mobility Server™
114
Appendix G – GEMS Windows Event Log Messages
Appendix G – GEMS Windows Event Log Messages
Message
Level
Context
Error communicating with Good
server-core/gd-core
Proxy Server - HTTP code {}, Message
{}
error
Could not connect to Good Proxy Server while
verifying auth token (during Push Registration from
G3 Mail context)
Failed to retrieve the list of Good
Proxy servers - code {} - Reason {}
server-core/gd-core
error
Used for HA and load balancing of requests to
Good Proxy server. The list of known GP servers are
maintained in memory and requests are loadbalanced through this list.
Failed to retrieve the list of Good
Proxy servers
server-core/gd-core
error
Used for HA and load balancing of requests to
Good Proxy server. The list of known GP servers are
maintained in memory and requests are loadbalanced through this list.
Incorrect Good Proxy Server
configuration
server-core/gd-spring
error
Communicate with Good Proxy server to verify
Authorization token using HTTP(s) protocol. If URL
is syntactically wrong or configuration error then
error is logged in event log.
Autodiscover failed for {} users with
exception {}
servernotifications/autodiscover
warn
Failed to retrieve user’s settings through
autodiscover. Needs administrator attention to fix
the issue. The user will not receive notifications
until issue is resolved. This is a batch request and
the log only prints the number of users that failed
auto discover.
Invalid syntax for property {}, must
be a valid URL
servernotifications/autodiscover
error
Server is configured with an invalid URL used for
bypassing the steps to find the autodiscover end
point. GEMS server would ignore this URL and
follow the regular steps to perform autodiscover.
User {} being quarantined after {}
attempts to perform autodiscover
servernotifications/autodiscover
warn
GEMS server could not autodiscover user’s settings
for configured number of attempts. The user
mentioned will be marked as ‘QUARANTINED’ and
will not receive notifications. The status can be
reset through karaf command (user:reset).
No response from server while
performing autodiscover for user {}
servernotifications/autodiscover
warn
Autodiscover failed for the user mentioned.
Autodiscover failed for user {}, error
code: {}, Detail: {}
servernotifications/autodiscover
warn
Autodiscover failed for the user mentioned.
Failed to retrieve user settings while serverperforming autodiscover for user {} notifications/autodiscover
warn
Autodiscover failed for the user mentioned.
No valid EWS URL setting
warn
Autodiscover failed for the user mentioned.
Good Enterprise Mobility Server™
Component
server-
115
Appendix G – GEMS Windows Event Log Messages
Message
Component
Level
Context
configured for the user {}
notifications/autodiscover
Error communicating with Database serverserver - {error msg}
notifications/autodiscover
error
GEMS failed to connect to SQL database. Needs
immediate attention.
Database Error - {error msg}
servernotifications/autodiscover
error
GEMS failed to connect to SQL database. Needs
immediate attention.
Lost connection with exchange
server. Last known error {}
servernotifications/ewslistener
error
EWSListener: Lost connection with exchange server.
This might be due to Exchange server\Autodiscover
service down.
Error subscribing user {} with
exchange server {}
servernotifications/ewslistener
error
Subscribe to the user email address with exchange
server to track modifications of user mailbox.
User {} marked for re-autodiscover
servernotifications/ewslistener
info
Does a DB call to mark the user for reautodiscovery. This task is done every n interval of
time.
Error communicating with Database serverserver - {error details}
notifications/pushnotifydbmanager
error
Bootstrap database connection.
{} is no longer the master (producer) serversince database server time {}
notifications/pushnotify-hadbwatcher
error
HA System: Check whether the node itself is
Producer or not. Prints the error in event log when
the server has lost ownership of the HA system (not
master any more).
{} is the master (producer) since
database server time {}
info
HA System: Check whether the node itself is
Producer or not. If it was not master before; the failover is happening.
Detected Server {} is inactive. Users serverwill be load balanced to other active notifications/pushnotify-haservers
dbwatcher
error
HA System: If server is detected as
inactive\heartbeat fails, the users of the bad server
are reassigned to other active servers.
Error communicating with Database serverserver - {error details}
notifications/pushnotifyprefs
error
Database error due to server down\login error, etc.
{ Good Dynamic Proxy Server
connection error details }
server-console/config
error
Connect GD Module – Test from dashboard with GP
down, connection failure error.
Connection to Good Dynamic Proxy
Server is successful
server-console/config
info
Connect GD – Test from dashboard when GP is up
and running, successful test.
Connection Successful, Server: - {}:
Database : {}
server-console/config
info
Mail – DB – Test database configurations from
dashboard. Connection successful.
Exception during connection test {}
server-console/config
error
Mail – DB – Test database configurations from
dashboard. Connection issues due to bad
Good Enterprise Mobility Server™
servernotifications/pushnotify-hadbwatcher
116
Appendix G – GEMS Windows Event Log Messages
Message
Component
Level
Context
password or user or host info.
Invalid configuration properties - {}
server-console/config
error
Mail – DB – Test database configurations from
dashboard. Validation of database configuration
values.
{ Good Dynamic Proxy Server
connection error details }
server-console/config
error
Presence GD – Test from dashboard with GP down,
connection failure error.
Connection to Good Dynamic Proxy
Server is successful
server-console/config
info
Presence GD – Test from dashboard when GP is up
and running, successful test.
Lync Presence Provider Ping failed
with error status {} and reason - {}
server-presence/presencebundle
error
Connection to Presence server. If response received,
log the reason for failure.
Lync Presence Provider Ping failed
with exception {}: {} - set status {}
server-presence/presencebundle
error
Connection to Presence server. Most likely
connection refused because down
Lync Presence Provider Ping failed,
cause unknown
server-presence/presencebundle
error
Connection to Presence server.
Presence Service failed to reset LPP,
interrupted with error: {}
server-presence/presencebundle
error
Reset all contacts presence status.
Presence Service failed to reset LPP,
timed out with error: {}
server-presence/presencebundle
error
Reset all contacts presence status. Timeout error.
Failed to reset LPP, {} with error: {}
server-presence/presencebundle
error
Reset all contacts presence status.
Presence Service started.
server-presence/presencebundle
info
Presence service started.
Presence Service stopped.
server-presence/presencebundle
info
Presence service stopped.
Bad Lync Presence Provider
Subscription URI: {}
server-presence/presencebundle
error
Presence service provider subscription URI.
Bad Lync Presence Provider Ping
URI: {} Ping
server-presence/presencebundle
error
Presence service provider subscription URI.
Redis Cache & Queue services are
not available at the moment.
server-presence/presencebundle
error
When cache provider is set to Redis and Redis
service is unavilable.
GNP Relay Service not available
server-presence/presencebundle
warn
GNP service which sends GNP notification is not
available or down.
Good Enterprise Mobility Server™
117
Legal Notice
This document, as well as all accompanying documents for this product, is published by Good Technology Corporation
(“Good”). Good may have patents or pending patent applications, trademarks, copyrights, and other intellectual property
rights covering the subject matter in these documents. The furnishing of this, or any other document, does not in any way
imply any license to these or other intellectual properties, except as expressly provided in written license agreements with
Good. This document is for the use of licensed or authorized users only. No part of this document may be used, sold,
reproduced, stored in a database or retrieval system or transmitted in any form or by any means, electronic or physical, for
any purpose, other than the purchaser’s authorized use without the express written permission of Good. Any unauthorized
copying, distribution or disclosure of information is a violation of copyright laws.
While every effort has been made to ensure technical accuracy, information in this document is subject to change without
notice and does not represent a commitment on the part of Good. The software described in this document is furnished
under a license agreement or nondisclosure agreement. The software may be used or copied only in accordance with the
terms of those written agreements.
The documentation provided is subject to change at Good’s sole discretion without notice. It is your responsibility to utilize
the most current documentation available. Good assumes no duty to update you, and therefore Good recommends that
you check frequently for new versions. This documentation is provided “as is” and Good assumes no liability for the
accuracy or completeness of the content. The content of this document may contain information regarding Good’s future
plans, including roadmaps and feature sets not yet available. It is stressed that this information is non-binding and Good
creates no contractual obligation to deliver the features and functionality described herein, and expressly disclaims all
theories of contract, detrimental reliance and/or promissory estoppel or similar theories.
Legal Information
© Copyright 2015. All rights reserved. All use is subject to license terms posted at www.good.com/legal. GOOD, GOOD
TECHNOLOGY, the GOOD logo, GOOD FOR ENTERPRISE, GOOD FOR GOVERNMENT, GOOD FOR YOU, GOOD APPCENTRAL,
GOOD DYNAMICS, SECURED BY GOOD, GOOD MOBILE MANAGER, GOOD CONNECT, GOOD SHARE, GOOD TRUST, GOOD
VAULT, and GOOD DYNAMICS APPKINETICS are trademarks of Good Technology Corporation and its related entities. All
third-party technology products are protected by issued and pending U.S. and foreign patents.
Good Enterprise Mobility Server™
118


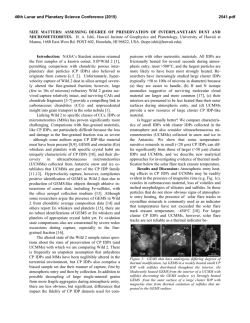


© Copyright 2026