ac1-5 instruction for use
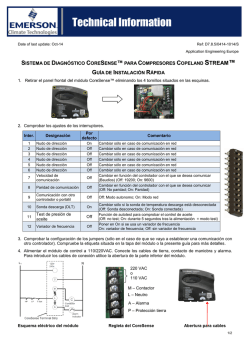
Channel 2 output
L1
Channel 1 setpoint modification
L2
Channel 2 setpoint modification
PAR
SCL
RANGE
SPL
SPH
1SP
-50°...SPH
SPL...150°
Maximum limit for 1SP setting.
SPL... SPH
Setpoint (value to be maintained in the room).
1CM
HY; PID
Alarm
Fig.1 - Front panel
Info / Enter button
Increase / Modify Setpoint 2 button
Modify Setpoint 1 / Decrease button
Exit / Stand-by button.
INSTALLATION
■■ Insert the controller through a hole measuring 71x29 mm;
■■ Make sure that electrical connections comply with the paragraph “wiring diagrams”. To reduce the effects of electromagnetic
disturbance, keep the sensor and signal cables well separate from the power wires.
■■ Fix the controller to the panel by means of the suitable clips, by pressingly gently; if fitted, check that the rubber gasket adheres
to the panel perfectly, in order to prevent debris and moisture infiltration to the back of the instrument.
■■ Place the probe T1 inside the room in a point that truly represents the temperature of the stored product.
1CH
1HY
1°C;
2°C;
°F
REF; HEA
0...19.9°
DISPLAY
Controller in stand-by
Probe T1 overrange or failure
Room high temperature alarm
Room low temperature alarm
TUN/xx.x
E1
E2
E3
Controller in autotuning
In tuning: timeout1 error
In tuning: timeout2 error
In tuning: overrange error
MENU INFO
1T1
The information available in this menu is:
THI Maximum temperature recorded
TLO Minimum temperature recorded
LOC
Keypad state lock
1PB
Access to menu and information displayed.
■■ Press and immediately release button .
■■ With button
or
select the data to be displayed.
■■ Press button
to display value.
or wait for 10 seconds.
■■ To exit from the menu, press button
Reset of THI, TLO recordings
■■ With button
or
select the data to be reset.
■■ Display the value with button .
■■ While keeping button
pressed, use button .
CHANNEL 1 SETPOINT (display and modification of desired temperature value)
■■ Press and release button
: the LED L1 blinks, the display shows 1SP for 1 second and then the setpoint associated value.
■■ Press buttons
or
to set the desired value (adjustment is within the minimum SPL and maximum SPH limit).
■■ To store the new value press button
, or wait for 10 seconds.
■■ To go back to normal mode without saving the new value, press .
0...30min
0...19.9°
1IT
0...999s
1SP+1HY
1CM=PID
0...999s
The keypad lock avoids undesired, potentially dangerous operations, which might be attempted when the controllers is operating
in a public place. In the INFO menu, set parameter LOC=YES to inhibit all functions of the buttons. To resume normal operation
of keypad, adjust setting so that LOC=NO.
Minimum off time.
After output 1 has been turned off, it
temperature value measured.
T[°]
1SP
Minimum on time. (the following parameter will be 1PF).
After output 1 has been turned on, it remains active for 1T1 minutes regardless of the temperature
value measured.
Proportional bandwidth.
Overshoot
Steady-state error
1PB
Process
temperature
Time
Integral action time.
1SP
Alarm threshold management.
NON: all temperature alarms are inhibited (the following parameter will be SB).
ABS: the values programmed in ALA and AHA represent the real alarm thresholds.
REL: the values programmed in ALR and AHR are alarm differentials referred to 1SP and 1SP+1HY.
ON
T[°]
1PBx1AR% 1PB
integral control
action area
Process
temperature
Derivative action time.
1SP 1SP+1HY+AHR
1SP-1HY-ALR
1SP+AHR
1SP
Temperature alarm with relative thresholds,
heating control (ATM=REL, 1CH=HEA).
Relay outputs (AC1-5..R..)
OUT1
OUT2
12(4)A
7(2)A
SSR drive (AC1-5..M..)
OUT1
15mA 12Vdc
Inputs
see table of input specifications
Measurement range
see table of input specifications
Measurement accuracy
see table of input specifications
ALA
-50°...AHA
Low temperature alarm threshold.
Operating conditions
AHA
ALA...150°
High temperature alarm threshold.
CE (Reference Norms)
ALR
-12.0...0°
Low temperature alarm differential.
With ALR=0 the low temperature alarm is excluded
AHR
0...12.0°
High temperature alarm differential.
With AHR=0 the high temperature alarm is excluded
0...120min
SB
INP
NO/YES
-10 … +50°C; 15%...80% U.R.
EN60730-1; EN60730-2-9;
EN55022 (Class B); EN50082-1
Front protection
IP55
Delay before alarm temperature warning.
Stand-by button enabling.
0mA/4mA,
T1/T2
ST1/SN4
Sensor input selection (see table of input specifications).
RLO
-19.9...RHI
Minimum range value (in the models AC1-5A…, AC1-5I… only)
RLO takes the minimum value measured by the transmitter (i.e. the value matching 0V, 0/4mA).
RHI
RLO...99.9
Maximum range value (in the models AC1-5A…, AC1-5I… only)
RHI takes the maximum value measured by the transmitter (i.e. the value matching 1V, 20mA)
In the models AC1-5A..., AC1-5J..., AC1-5T... only.
-12.5...12.5° Probe T1 offset.
TLD
1...30min
SIM
0...100
Display slowdown
ADR
1...255
AC1-5 address for PC communication
Delay for minimum temperature (TLO) and maximum temperature (THI) logging.
1PF
NON;
THR;
AL0;
AL1
AUX output operation.
NON : output disabled (always off). (the next parameter will be ATM)
THR: output programmed for second thermostat control (the next parameter will be 2SM).
AL0: contacts open when an alarm condition occurs (the next parameter will be ATM).
AL1: contacts make when an alarm condition occurs (the next parameter will be ATM).
ABS;
REL
Setpoint 2 mode.
Channel 2 setpoint may be absolute (2SM=ABS), or a differential relative to setpoint 1 (2SM=REL)
RLO÷RHI [< ± 0.2mA]
---
4÷20mA
INP=T1
TC “J”
---
-50÷750°C [ < ±3°C ]
INP=T2
TC “K”
---
-50÷999°C [ < ±3°C ]
-50/-19.9÷99.9/150°C
[ < ±0.3°C ]
-100÷850°C
[ <±1°C(-50÷850°), ±2°C ]
-150÷999°F
[ <±2°F(-60÷999°), ±4°F]
PT100
-60÷999°F [ < ±5°F ]
INP=ST1
PTC 1000 Ω
(LAE ST1..)
-50/-19.9 ÷ 99.9/150°C
[<±0.3°C(-30÷130°),±1°C]
-50 ÷ 150°C
[<±0.3°C(-30÷130°), ±1°C]
-60 ÷ 300°F
[< ±0.6°F(-20÷260°),±2°F]
INP=SN4
NTC 10K Ω
(LAE SN4..)
-40/-19.9 ÷ 99.9/125°C
[<±0.3°C(-40÷100°),±1°C]
-40 ÷ 125°C
[<±0.3°C(-40÷100°),±1°C]
-40 ÷ 260°F
[<±0.6°F(-40÷210°), ±2°F]
AC1-5T...
OAU
---
INP = 4mA
1PB
ON/OFF
SCL=°F
0÷20mA
AC1-5P...
Cycle time.
It’s the period in which the output ON time changes. The quicker the system to be controlled
reacts to temperature variations, the smaller the cycle time must be, in order to obtain higher
temperature stability and less sensitivity to load variations.
SCL=2°C
RLO÷RHI [< ± 3mV]
INP = 0mA
AC1-5J...
1...255s
SCL=1°C
0÷1V
AC1-5I...
1SP
RANGE [MEASUREMENT ACCURACY]
INPUT
Overshoot
Process
temperature
T[°]
OFF
Temperature alarm with relative thresholds,
refrigerating control (ATM=REL, 1CH=REF)
AC1-5A...
1CT
2SM=ABS
Auxiliary output state in case of probe failure.
NON;
ABS;
REL
1SP-ALR
WIRING DIAGRAMS
V
RS485
TTL
rH
9 10 11
V+ VIN V-
data I/O
OUT1
12(4)A
Output state in case of probe failure.
1
2
OUT2
7(2)A
3
4
5
OUT1
12(4)A
6
7
115...230V~
1
AC1-5AS2RW-B
10
+
data I/O
2
11
-
OUT2
7(2)A
3
4
5
6
7
115...230V~
AC1-5JS2RW-A
Auxiliary output switchover temperature (the next parameter will be 2CH)
ON
RS485
ON
OFF
2SP
2SP+2HY T[°]
OFF
ON/OFF control in refrigeration
(2SM=ABS, 2CH=REF)
T[°]
ON/OFF control in heating
(2SM=ABS, 2CH=HEA)
2DF -19.9...19.9° Temperature differential relative to 1SP. The auxiliary output setpoint is equal to 1SP+2DF
ON
ON
TTL
9 10 11
W R W
data I/O
2SP-2HY 2SP
OUT1
15mA
OAU=THR
ON/OFF
MODEL
Time
2SM=REL
2PF
ATM
AC1-5…D 12Vac/dc ±10%, 2W
AC1-5...W 110 - 230Vac±10%, 50/60Hz, 2W
INPUT SPECIFICATIONS
Reset of integral action time referred to 1PB
Decreasing the parameter 1AR reduces the integral control action zone, and consequently the
overshoot (see figure on paragraph 1IT).
SPL...SPH
Minimum on time.
After output 2 has been turned on, it remains active for 2T1 minutes regardless of the temperature
value measured.
Overshoot
0...100%
2SP
Power supply
Minimum off time.
After output 2 has been turned off, it remains inactive for 2T0 minutes regardless of the temperature
value measured.
0...30min
OS1
1SP
1AR
2SM
Differential of thermostat 2. With 2HY=0 the auxiliary output always remains off.
2T1
ATD
remains inactive for 1T0 minutes regardless of the
CONTROLLER AUTOTUNING IN PID MODE
■■ Have a precision reference thermometer or a calibrator to hand. Ensure that OS1=0 and SIM=0.
■■ Switch the controller off then on again.
■■ During the auto-test phase, press buttons
+
and keep them pressed till the controller shows 0AD.
■■ With buttons
and
select 0AD or SAD: 0AD allows a calibration of 0, inserting a constant correction over the whole scale
of measurement. SAD allows a calibration of the top part of the measurement scale with a proportional correction between the
calibration point and 0.
■■ Press
to display the value and then use
+
or
to make the read value coincide with the value measured by the
reference instrument.
■■ Exit from calibration by pressing button .
1SP-1HY
ON/OFF heating control
(1CM=HY, 1CH=HEA)
Response overshoot may be reduced by inserting
a derivative Action. A high derivative action (1DT
high) makes the system very sensitive to small
temperature variations and causes instability. With
1DT=0 the derivative control is disabled.
KEYPAD LOCK
RECALIBRATION
OFF
T[°]
Time
, when pressed for 3 seconds, allows the controller to be put on a standby or output control to be resumed (with SB=YES only).
Before starting
In the setup mode (see configuration parameters): set 1CM=PID; make sure that 1CH matches the desired operation mode
(1CH=REF for refrigerating control, 1CH=HEA for heating control); then adjust setpoint 1SP at the desired value.
Start autotuning
During normal operation, keep buttons
+
pressed for 3 seconds. 1CT blinks on the display. With
+
or
set the cycle
time in order to define the dynamic of the process to be controlled. To abort the autotuning function, press ; to start autotuning
press
+
or wait for 30 seconds.
During autotuning
During the entire autotuning phase, the display alternates TUN with the actual temperature measured. In case of power failure,
when power is resumed, after the initial autotest phase, the controller resumes the autotuning function. To abort the autotuning,
without modifying the previous control parameters, keep button
pressed for 3 seconds. After the autotuning has taken place
successfully, the controller updates the control parameters and start to control.
Errors
If the autotuning function failed, the display shows an error code:
■■ E1 timeout1 error: the controller could not bring the temperature within the proportional band. Increase 1SP in case of heating
control, vice versa, decrease 1SP in case of refrigerating control and re-start the process.
■■ E2 timeout2 error: the autotuning has not ended within the maximum time allowed (1000 cycle times). Re-start the autotuning
process and set a longer cycle time 1CT.
■■ E3 temperature overrange: check that the error was not caused by a probe malfunction, then decrease 1SP in case of heating
control, vice versa increase 1SP in case of refrigerating control and then re-start the process.
■■ To eliminate the error indication and return to the normal mode, press button .
Control improvement
■■ To reduce overshoot, reduce the integral action reset 1AR
■■ To increase the response speed of the system, reduce the proportional band 1PB. Caution: doing this makes the system less stable.
■■ To reduce swings in steady-state temperature, increase the integral action time 1IT; system stability is thus increased, although
its response speed is decreased.
■■ To increase the speed of response to the variations in temperature, increase the derivative action time 1DT. Caution: a high
value makes the system sensitive to small variations and it may be a source of instability.
OAU=THR
ON
The steady-state error is cancelled by inserting an
integral action. The integral action time, determines
the speed with which the steady-state temperature
is achieved, but a high speed (1IT low) may be the
cause of overshoot and instability in the response.
With 1IT=0 the integral control is disabled.
1DT
STAND-BY
Button
OFF/ON thermostat differential. With 1HY=0 the output is always off.
Temperature control takes place by changing the
ON time of the output: the closer the temperature
to the setpoint, the less time of activation. A small
proportional band increases the promptness of
response of the system to temperature variations,
but tends to make it less stable. A purely
proportional control stabilises the temperature
within the proportional band but does not cancel
the deviation from setpoint.
With 1PB=0 the output is always off.
CHANNEL 2 SETPOINT
■■ With the auxiliary output set as thermostat control (OAU=THR), it’s possible to modify setpoint 2 during the normal operation
of the controller.
■■ Press and release button
: the LED L2 blinks, the display shows 2SP for 1 second if setpoint 2 is an absolute threshold
(2SM=ABS), alternatively the display shows 2DF, if setpoint 2 is a threshold relative to setpoint 1 (2SM=REL), then the value
associated to the parameter appears.
■■ Press buttons
or
to set the desired value.
■■ To store the new value press button
or wait for 10 seconds.
■■ To go back to normal mode without saving the new value, press .
Refrigerating (REF) or Heating (HEA) control mode.
ON/OFF refrigerating control
(1CM=HY, 1CH=REF)
0...30min
0...19.9°
0...30min
2HY
2T0
OFF
Control mode.
With 1CM=HY you select control with hysteresis: parameters 1HY, 1T0 and 1T1 are used.
With 1CM=PID you select a Proportional-Integral-Derivative control mode: parameters 1PB, 1IT,
1DT, 1AR, 1CT will be used
1SP
1T0
TECHNICAL DATA
REF; HEA
ON
OFF
1CM=HY
OFF
OR
HI
LO
Refrigerating control (REF) or heating control mode (HEA) for the auxiliary output.
2CH
Minimum limit for 1SP setting
ON
OPERATION
During normal operation, the display shows either the temperature measured or one of the following indications:
DESCRIPTION
Readout scale (see table of input specifications)
Caution: upon changing the SCL value, it is then absolutely necessary to reconfigure the parameters relevant to the absolute and relative temperatures (SPL, SPH, 1SP, 1HY etc..)
ATM=ABS
OUT2
ATM=REL
OUT1 Channel 1 output
Temperature
INDICATION
DESCRIPTION
■■ To get access to the parameter configuration menu, press button
+
for 5 seconds.
■■ With button
or
select the parameter to be modified.
■■ Press button
to display the value.
■■ By keeping button
pressed, use button
or
to set the desired value.
■■ When button
is released, the newly programmed value is stored and the following parameter is displayed.
■■ To exit from the setup, press button
or wait for 30 seconds.
Temperature
Thank you for having chosen a LAE electronic product. Before installing the instrument, please read these instructions carefully
to ensure maximum performance and safety.
CONFIGURATION PARAMETERS
Temperature
AC1-5 INSTRUCTION FOR USE
1
-
12V
2
SSR
OUT2
7(2)A
4
5
OUT1
12(4)A
6
7
10
data I/O
1
2
11
OUT2
7(2)A
3
4
5
6
7
+
OFF
OFF
1SP+2DF+2HY
2DF>0
1SP
1SP+2DF
T[°]
ON/OFF control in refrigeration. Setpoint 2
relative to setpoint 1 (OAU=THR, 2CH=REF)
1SP+2DF-2HY
2DF<0
1SP+2DF
1SP
T[°]
ON/OFF control in heating. Setpoint 2
relative to setpoint 1 (OAU=THR, 2CH=HEA)
115...230V~
AC1-5PS2MW-B
115...230V~
AC1-5TS2RW-A
VIA PADOVA, 25
31046 ODERZO /TV /ITALY
TEL. +39 - 0422 815320
FAX +39 - 0422 814073
www.lae-electronic.com
E-mail: [email protected]
OUT1 Salida canal 1
OUT2
Salida canal 2
L1
Modificación setpoint canal 1
L2
Modificación setpoint canal 2
Alarma
Fig.1 — Panel frontal
Botón Info / Enter.
Botón aumento / modificación setpoint 2
Botón modificación setpoint 1 / disminución.
Botón salida / Stand-by.
INSTALACIÓN
■■ Introduzca el instrumento en un agujero de 71x29 mm;
■■ Realice las conexiones eléctricas tomando como referencia el párrafo “esquemas de conexión”. Para reducir los efectos de las
perturbaciones electromagnéticas, aleje los cables de las sondas y de señal de los conductores de potencia
■■ Fije el instrumento al panel con las abrazaderas específicas, presionando correctamente; de estar incluida, la junta de caucho se
debe colocar entre el marco del instrumento y el panel, comprobando que quede perfectamente adherida para evitar infiltraciones
hacia la parte trasera del instrumento.
■■ Coloque la sonda T1 en un punto de la cámara que tenga perfectamente la temperatura del producto que se ha de conservar.
1°C;
2°C;
°F
Límite mínimo para la regulación de 1SP.
Límite máximo para la regulación de 1SP.
SPL... SPH
Temperatura de conmutación (valor que se desea mantener en la cámara).
1CM
HY; PID
1CH
REF; HEA
0...19.9°
Instrumento en autocalibración
En calibración: error de timeout1
En calibración: error de timeout2
En calibración: error de tolerancia
1CM=HY
TUN/xx.x
E1
E2
E3
MENÚ INFO
Las informaciones disponibles en el menú Info son:
THI Temperatura máxima medida sonda 1
TLO Temperatura mínima medida sonda 1
LOC
Estado del teclado (bloqueo)
Pulsando durante 3 segundos el botón
(sólo con SB=YES).
T[°]
1SP-1HY
1SP
Control ON/OFF en calefacción
(1CM=HY, 1CH=HEA)
T[°]
0...30min
Tiempo mínimo de activación. (El parámetro succesivo será 1PF).
Después de una activación la salida 1 se queda activada para 1T1 minudos, con cualquiera temperatura.
1PB
0...19.9°
Banda proporcional.
0...999s
Temperatura
de proceso
Tiempo de la acción integral.
Sobreelongación
Temperatura
Temperatura
de proceso
REF; HEA
2HY
2T0
0...19.9°
Diferencial del termóstato 2. Con 2HY=0 la salida auxiliar siempre se queda apagada.
0...30min
Tiempo mínimo de apagamiento.
Después de un apagamiento, la salida 2 se queda disactivada para 2T0 minudos, a cualquiera
temperatura.
2T1
0...30min
Tiempo mínimo de activación.
Después de una activación la salida 2 se queda activada para 2T1 minutos, a cualquiera
temperatura.
2PF
ATM
ON/OFF
1PBx1AR% 1PB
Zona de acción
control integral
1PF
ON/OFF
OAU
NON;
THR;
AL0;
AL1
2SM
2SP
2SM=ABS
OAU=THR
1...255s
ABS;
REL
SPL...SPH
T[°]
OFF
1SP 1SP+1HY+AHR
1SP-1HY-ALR
1SP+AHR
1SP
Alarma de temperatura con umbrales relativos,
en calentamiento (ATM=REL, 1CH=HEA)
-50°...AHA
Umbral de alarma de baja temperatura.
AHA
ALA...150°
Umbral de alarma de alta temperatura.
ALR
-12.0...0°
Diferencial de alarma de baja temperatura.
Con ALR=0 se desactiva la alarma de baja temperatura.
AHR
0...12.0°
Diferencial de alarma de alta temperatura.
Con AHR=0 se desactiva la alarma de alta temperatura.
ATD
0...120min
Retardo en la señalización de la alarma de temperatura.
SB
INP
NO/YES
stand-by.
Habilitación del botón
0mA/4mA,
T1/T2
ST1/SN4
Selección del sensor en entrada. (ver tablilla características de entrada)
RLO
-19.9...RHI
Alcance mínimo de la escala (solamente en los modeles AC1-5 A..., AC1-5I...).
Se asigna a RLO el valor mínimo mesurado con el transmisor (correspondiente a 0V, 0/4mA)
RHI
RLO...99.9
Alcance máximo de la escala (solamente en los modeles AC1-5A ..., AC1-5I...).
Se asigna a RLO el valor máximo mesurado con el transmisor (correspondiente a 1V, 20 mA).
solamente en lo modeles AC1-5A..., AC1-5J..., AC1-5T...
INSTRUCTIONS FOR USE
INSTRUCCIONES DE USO
VIA PADOVA, 25
31046 ODERZO /TV /ITALY
TEL. +39 - 0422 815320
FAX +39 - 0422 814073
www.lae-electronic.com
E-mail: [email protected]
-12.5...12.5° Corrección medición sonda T1.
TLD
1...30min
SIM
0...100
Deceleración pantalla.
ADR
1...255
Dirección de AC1-5 para la comunicación con el PC.
MODELO
Retardo en la memorización de las temperaturas mínimas (TLO) y máximas (THI) alcanzadas.
Temperatura
de proceso
INP = 0mA
0÷20mA
INP = 4mA
4÷20mA
INP=T1
TC “J”
INP=T2
TC “K”
AC1-5J...
Tiempo de ciclo.
Es el período al interior del cual el tiempo de ON de la salida varia. Cuanto más prontamente el
sistema que tiene que ser controlado responde a las variaciones de la temperatura, tanto menor
tiene que ser el tiempo de ciclo, para obtener más de estabilidad de la temperatura, y menor
sensibilidad a las variaciones de cargo.
Estado de la salida con sonda defectuosa.
Funcionamiento de la salida auxiliar AUX.
NON: salida inhabilitada (siempre apagada). (El próximo parámetro será ATM).
THR: salida programada como segundo termóstato. (El próximo parámetro será 2SM).
AL0: abertura de los contactos cuando se presenta una condición de alarma. (El próximo
parámetro será ATM).
AL1: Cerrazón de los contactos cuando se presenta una condición de alarma. (El próximo
parámetro será ATM).
Modalidad setpoint 2
El setpoint 2 puede ser absoluto (2SM=ABS),o un diferencial relativo al setpoint 1(2SM=REL).
Temperatura de conmutación de la salida auxiliar (El próximo parámetro será 2CH).
SCL=1°C
0÷1V
AC1-5I...
1PB
RANGO DE MEDICIÓN [PRECISIÓN DE MEDICIÓN]
ENTRADA
AC1-5A...
Reset de la acción integral referido a 1PB.
Disminuyendo el parámetro 1AR disminuye la zona de acción del control integral y, por
consiguiente, la sobreelongación (véase la figura en el párrafo 1IT).
ON
ON
T[°]
CARACTERÍSTICAS ENTRADA
Sobreelongación
Temperatura
1CT
0...100%
Gestión de los umbrales de la alarma.
NON: todas las alarmas de temperatura están suspendidas. (El parámetro sucesivo será SB)
ABS: Los valores programados en ALA y AHA representan los umbrales reales de alarma
REL: Los valores programados en ALR y AHR son los diferenciales de alarma respecto a 1SP y 1SP+1HY
ALA
SCL=2°C
SCL=°F
RLO÷RHI [< ± 3mV]
---
RLO÷RHI [< ± 0.2mA]
---
---
-50÷750°C [ < ±3°C ]
-60÷999°F [ < ±5°F ]
AC1-5…D 12Vac/dc ±10%, 2W
AC1-5...W 110 - 230Vac±10%, 50/60Hz, 2W
Salida Relé (AC1-5..R..)
OUT1
OUT2
12(4)A
7(2)A
-50÷999°C [ < ±3°C ]
-100÷850°C
[ <±1°C(-50÷850°), ±2°C ]
-150÷999°F
[ <±2°F(-60÷999°), ±4°F]
INP=ST1
PTC 1000 Ω
(LAE ST1..)
-50/-19.9 ÷ 99.9/150°C
[<±0.3°C(-30÷130°),±1°C]
-50 ÷ 150°C
[<±0.3°C (-30÷130°),±1°C]
-60 ÷ 300°F
[<±0.6°F (-20÷260°),±2°F]
Entradas
INP=SN4
NTC 10K Ω
(LAE SN4..)
-40/-19.9 ÷ 99.9/125°C
[<±0.3°C(-40÷100°), ±1°C]
-40 ÷ 125°C
[<±0.3°C (-40÷100°),±1°C]
-40 ÷ 260°F
[<±0.6°F (-40÷210°),±2°F]
Rango de medición
PT100
AC1-5T...
ESQUEMAS DE CONEXIÓN
OUT1
12(4)A
4
5
7
10
+
data I/O
OUT1
12(4)A
6
15mA 12Vdc
ver la tablilla características entrada
ver la tablilla características entrada
Condiciones de funcionamiento
9 10 11
V+ VIN VOUT2
7(2)A
3
OUT1
ver la tablilla características entrada
TTL
rH
data I/O
Pilotaje SSR (AC1-5..M..)
Precisión de medición
V
RS485
2
Alimentación
---
AC1-5P...
1
DATOS TÉCNICOS
-50/-19.9÷99.9/150°C
[ < ±0.3°C ]
Tiempo
1AR
Estado de la salida 2 con sonda defectuosa.
NON;
ABS;
REL
OS1
Tiempo
Tiempo de la acción derivada.
La inserción de una acción derivada en un control 1SP
proporcional-integral, disminuye la sobreelongación
en la respuesta. Una acción derivada alta (1DT
alto) hace que el sistema sea muy sensible a las
pequeñas variaciones de temperatura y puede
conducir a la inestabilidad.
Con 1DT=0 el control derivado se desactiva.
AUTOCALIBRACIÓN DEL REGULADOR EN MODALIDAD PID
1PB
Tiempo
La inserción de una acción integral en un control
1SP
proporcional anula el error en régimen de
funcionamiento. El tiempo de la acción integral
determina la velocidad con la que se alcanza
la temperatura de régimen de funcionamiento,
pero una velocidad alta (1IT bajo) puede causar
sobreelongación e inestabilidad en la respuesta.
Con 1IT=0 el control integral se desactiva.
0...999s
Error en régimen
de funcionamiento
Sobreelongación
El control de la temperatura se realiza variando
el tiempo de ON de la salida: más la temperatura 1SP
está cerca del setpoint, menor será el tiempo de
activación. Una banda proporcional pequeña
augmenta la rapidez del sistema en relación a las
variaciones de temperatura, pero lo hace menos
estable. Un control simplemente proporcional
estabiliza la temperatura al interior de la banda
proporcional, pero no anula el alejamiento con
respecto al setpoint.
Con 1PB=0 la salida siempre se queda apagada.
T[°]
2CH
Alarma de temperatura con umbrales relativos
en refrigeración (ATM=REL, 1CH=REF)
1T1
El bloqueo de los botones impide la ejecución de operaciones indeseables, potencialmente perjudiciales, que podrían activarse si
el regulador funcionara en lugares abiertos al público. Para inhibir todos los mandos del teclado, configure LOC=YES en el menú
INFO; para restablecer la función normal, programe nuevamente LOC=NO.
■■ Procúrese un termómetro de referencia de precisión o un calibrador; Controle que OS1=0 y SIM=0.;
■■ Apague y encienda el instrumento;
■■ Durante la etapa de autotest, pulse los botones
+
y manténgalos pulsados hasta que el instrumento muestre 0AD;
■■ Con los botones
y
seleccione 0AD o SAD: 0AD permite regular el 0 insertando una corrección constante en toda la
escala de medida. SAD permite regular la parte alta de la escala de medida con una corrección proporcional entre el punto de
regulación y el 0.
■■ Pulse
para visualizar el valor y utilice
+
o
para hacer coincidir el valor leído con aquel medido por el instrumento
de referencia;
1SP+1HY
2DF<0
1SP+2DF
1SP
Control ON/OFF en refrigeración. Setpoint 2
relativo al setpoint 1 (OAU=THR, 2CH=REF)
Modo de regulación en refrigeración (REF) o calentamiento (HEA) de la salida auxiliar.
1SP-ALR
Tiempo mínimo de apagamiento
Después de un apagamiento, la salida 1 se queda disactivada para 1T0 minudos, a cualquiera temperatura.
BLOQUEO DEL TECLADO
RECALIBRACIÓN
OFF
1SP+2DF-2HY
Control ON/OFF en calefacción. Setpoint 2
relativo al setpoint 1 (OAU=THR, 2CH=HEA)
OFF
0...30min
1DT
, es posible conmutar el estado del regulador entre las funciones de las salidas y standby
Antes de empezar
En modalidad setup (ver los parárametros de configuración): asentar 1CM=PID; asegurarse de que 1CH corresponda a la modalidad
de funcionamiento deseada (1CH=REF para la refrigeración, 1CH=HEA para la calefacción); fijar el setpoint 1SP al valor deseado.
Empezar la función
Durante el funcionamento normal, tener pulsadas las teclas
+
para 3 segundos. En la pantalla relampaguea 1CT, con
+
o
asentar el tiempo de ciclo para poder caracterizar la dinámica del proceso que tiene que ser controlado. Para abandonar
la función de autotuning pulsar ; para empezar el autotuning pulsar
+
o esperar para 30 segundos.
Durante la autocalibración
Durante toda la etapa de autocalibración la pantalla muestra alternativamente TUN y el valor de la temperatura medida. Si se
cortara la alimentación, al volverlo a encender, después de la etapa de autotest inicial, el instrumento reanudará la función de
autocalibración. Para abandonar la función de autocalibración sin modificar los parámetros de control, mantenga pulsado durante
3 segundos el botón . Una vez concluida correctamente la autocalibración, el controlador actualizará el valor de los parámetros
de control y comenzará a controlar.
Errores
Si la función de autocalibración no obtuviera resultados positivos, en la pantalla destellará un código de error:
■■ E1 error de timeout1: el controlador no pudo llevar la temperatura dentro de la banda proporcional. Aumente 1SP en el caso de
control en calentamiento, viceversa, disminuya 1SP en refrigeración y reactive el procedimiento.
■■ E2 error de timeout2: la autocalibración no ha concluido dentro del tiempo máximo establecido (1000 tiempos de ciclo). Reactive
el procedimiento de autocalibración y configure un tiempo de ciclo 1CT mayor.
■■ E3 temperatura fuera del rango: controle que el error no haya sido causado por un desperfecto de la sonda, disminuya 1SP en
el caso de control en calentamiento, viceversa, aumente 1SP en refrigeración y reactive el procedimiento.
■■ Para eliminar la indicación de error y volver al modo normal, pulse el botón .
Mejoramiento del control
■■ Para reducir la sobreelongación, disminuya el reset de la acción integral 1AR;
■■ Para aumentar la celeridad del sistema, disminuya la banda proporcional 1PB; atención: de esta manera el sistema será menos estable;
■■ Para reducir las oscilaciones de la temperatura en régimen de funcionamiento, aumente el tiempo de la acción integral 1IT; así
se aumenta la estabilidad del sistema, pero disminuye su celeridad;
■■ Para aumentar la velocidad de respuesta a las variaciones de temperatura, aumente el tiempo de la acción derivada 1DT;
atención: un valor alto hace que el sistema sea sensible a las pequeñas variaciones y puede ser fuente de inestabilidad.
OFF
T[°]
ON
1T0
1CM=PID
STAND-BY
ON
1SP
1IT
1SP+2DF+2HY
2DF>0
1SP
1SP+2DF
Diferencial del termóstato. Con 1HY=0 la salida siempre se queda apagada.
ON
OFF
OFF
Modo de regulación en refrigeración (REF) o calentamiento (HEA) de la salida 1.
Control ON/OFF en refrigeración
(1CM=HY, 1CH=REF)
SETPOINT CANAL 2
■■ Con la salida auxiliar asentada como termóstato (OAU=THR), es posible modificar el setpoint 2 durante el funcionamento
normal del regulador.
■■ Pulsar y dejar la tecla : el led L2 relampaguea, la pantalla visualiza para un segundo 2SP, si el setpoint 2 está asentado en modalidad
absoluta (2SM=ABS), o visualiza 2DF si el setpoint 2 es relativo al setpoint 1 (2SM=REL), y enseguida el valor asociado al parámetro.
o
para impostar el valor deseado.
■■ Utilizar las teclas
■■ Para memorizar el nuevo valor pulsar la tecla
, o atender 10 segundos.
■■ Para volver a la modalidad normal sin salvaguardar el nuevo valor pulsar .
Modalidad de control.
Con 1CM=HY se selecciona la regulación con histéresis: en el control se utilizan los parámetros
1HY ,1T0 y 1T1.
Con 1CM=PID se selecciona la regulación Proporcional-Integral-Derivada: en el control se
utilizan los parámetros 1PB, 1IT, 1DT, 1AR, 1CT.
Temperatura
Acceso al menú y visualización de las informaciones.
.
■■ Pulse y suelte inmediatamente el botón
■■ Con los botones
o
seleccione el dato que debe visualizar.
■■ Pulse el botón
para visualizar el valor.
■■ Para salir del menú, pulse el botón
o espere 10 segundos.
Reajuste de las memorizaciones THI, TLO
■■ Con los botones
o
seleccione el dato que debe reajustar.
■■ Visualice el valor con el botón .
■■ Manteniendo pulsado el botón
pulse el botón .
SETPOINT CANAL 1 (visualización y modificación del valor de temperatura deseado)
■■ Pulsar y dejar la tecla : el led L1 relampaguea, la pantalla visualiza para 1 segundo 1SP y después el valor asociado al setpoint
■■ Utilizar las teclas o para asentar el valor deseado (la regulación está comprendida entre el límite mínimo SPL y máximo SPH).
■■ Para memorizar el nuevo valor pulsar la tecla
, o attendere 10s.
■■ Para volver a la modalidad normal sin salvaguardar el nuevo valor pulsar .
Escala de lectura (ver la tablilla características entrada)
Atención: cambiando el valor de SCL, deberán ser configurados obligatoriamente los parámetros
de las temperaturas absolutas y relativas (SPL, SPH, 1SP, 1HY etc..)
-50°...SPH
Durante el funcionamiento normal, en la pantalla se visualiza la temperatura medida, o bien una de las siguientes indicaciones:
Regulador en standby
Fuera de tolerancia o rotura T1
Alarma de alta temperatura en cámara
Alarma de baja temperatura en cámara
DESCRIPCIÓN
SPL...150°
VISUALIZACIONES
OFF
OR
HI
LO
.
SPL
SPH
1SP
1HY
FUNCIONAMIENTO
RANGO
+
ON
ON
2SM=REL
■■ Para acceder al menú de configuración de los parámetros, pulse durante 5 segundos los botones
■■ Con los botones
o
seleccione el parámetro que deba modificar.
■■ Pulse el botón
para visualizar el valor.
■■ Manteniendo pulsado el botón , utilice los botones
o
para configurar el valor deseado.
■■ Al soltar el botón
el nuevo valor será memorizado y se visualizará el parámetro siguiente.
■■ Para salir del setup, pulse el botón
o espere 30 segundos.
PAR
SCL
AC1-5
2DF -19.9...19.9° Diferencial de temperatura con respecto a 1SP. El setpoint de la salida auxiliar corresponde a 1SP+2DF
OAU=THR
INDICACIONES
DESCRIPCIÓN
.
ATM=ABS
Les agradecemos por la preferencia demostrada eligiendo un producto LAE electronic. Antes de comenzar con la instalación del
instrumento, lea detenidamente estas instrucciones para así obtener el mejor rendimiento y seguridad.
■■ Para salir de la calibración, pulse el botón
PARÁMETROS DE CONFIGURACIÓN
ATM=REL
AC1-5 INSTRUCCIONES DE USO
1
2
-10 … +50°C; 15%...80% H.R.
11
-
CE (Normativas de referencia)
OUT2
7(2)A
3
4
5
EN60730-1; EN60730-2-9;
EN55022 (Clase B); EN50082-1
6
Protección frontal
7
IP55
ON
OFF
2SP
2SP+2HY T[°]
Control ON/OFF en refrigeración
(2SM=ABS, 2CH=REF)
OFF
115...230V~
2SP-2HY 2SP
T[°]
Control ON/OFF en calefacción
(2SM=ABS, 2CH=HEA)
AC1-5AS2RW-B
115...230V~
AC1-5JS2RW-A
AC1-5
INSTRUCTIONS FOR USE
EN
INSTRUCCIONES DE USO
ES
0LAC1001-02
© Copyright 2026
