
Air Conditioner Features
Use & Care Guide
Manual de Uso y Cuidado
®
Smart Room Air Conditioner
Aire Acondicionado Inteligente Para Habitación
Model/Modelo: 253.77082
P/N 16120300A05923
Sears Brands Management Corporation
Ho man Estates, IL 60179 U.S.A.
www.kenmore.com
www.sears.com
www.kmart.com
®
TABLE OF CONTENTS
Warranty ................................................................ 2
Master Protection Agreements ............................ 3
Important Safety Instructions ................................ 4
Air conditioner Features ......................................... 5-7
Additional Things ................................................... 8
Care and Cleaning ................................................. 9
Energy Saving Ideas .............................................. 9
Troubleshooting Guide ........................................... 10-11
Normal Sounds ........................................................ 11
Call for Service ....................................................... Back Cover
KENMORE ELITE LIMITED WARRANTY
WITH PROOF OF SALE, the following warranty coverage applies when this appliance is correctly installed, operated
and maintained according to all supplied instructions.
FOR ONE YEAR from the date of sale this appliance is warranted against defects in material or workmanship. A defective
appliance will receive free repair or replacement at option of seller.
FOR FIVE YEARS from the date of sale, the sealed refrigerant system of this appliance is warranted against defects in
material or workmanship. If a system part is defective within the first year, a new one will be supplied and installed at no
charge. If a system part is defective after the first year, a new one will be supplied but not installed at no charge. You are
responsible for the labor cost of part installation after the first year from the date of sale.
For warranty coverage details to obtain free repair or replacement, visit the web page: www.kenmore.com/warranty.
All warranty coverage applies for only 90 days from the date of sale if this appliance is ever used for other than
private household purposes.
This warranty covers ONLY defects in material and workmanship, and will NOT pay for:
1. Expendable items that can wear out from normal use, including but not limited to filters, belts, bags or screw-in base
light bulbs.
2. A service technician to clean or maintain this appliance, or to instruct the user in correct appliance installation,
operation and maintenance.
3. Service calls to correct appliance installation not performed by Sears authorized service agents, or to repair problems
with house fuses, circuit breakers, house wiring, and plumbing or gas supply systems resulting from such installation.
4. Damage to or failure of this appliance resulting from installation not performed by Sears authorized service agents,
including installation that was not in accord with electrical, gas or plumbing codes.
5. Damage to or failure of this appliance, including discoloration or surface rust, if it is not correctly operated and
maintained according to all supplied instructions.
6. Damage to or failure of this appliance, including discoloration or surface rust, resulting from accident, alteration,
abuse, misuse or use for other than its intended purpose.
7. Damage to or failure of this appliance, including discoloration or surface rust, caused by the use of detergents,
cleaners, chemicals or utensils other than those recommended in all instructions supplied with the product.
8. Damage to or failure of parts or systems resulting from unauthorized modifications made to this appliance.
9. Service to an appliance if the model and serial plate is missing, altered, or cannot easily be determined to have the
appropriate certification logo.
Disclaimer of implied warranties; limitation of remedies
Customer’s sole and exclusive remedy under this limited warranty shall be product repair or replacement as provided
herein. Implied warranties, including warranties of merchantability or fitness for a particular purpose, are limited to one
year on the appliance and five years on the sealed system, or the shortest period allowed by law. Seller shall not be
liable for incidental or consequential damages. Some states and provinces do not allow the exclusion or limitation of
incidental or consequential damages, or limitation on the duration of implied warranties of merchantability or fitness, so
these exclusions or limitations may not apply to you.
This warranty applies only while this appliance is used in the United States.
This warranty gives you specific legal rights, and you may also have other rights which vary from state to state.
Sears Brands Management Corporation, Hoffman Estates, IL 60179
2
Master Protection Agreements
Congratulations on making a smart purchase. Your new Kenmore Elite® product is designed and manufactured for years of
dependable operation. But like all products, it may require preventive maintenance or repair from time to time. That’s
when having a Master Protection Agreement can save you money and aggravation.
The Master Protection Agreement also helps extend the life of your new product. Here’s what the Agreement* includes:
Parts and labor not just for repairing defects, but to help keep products operating properly under normal use. Our
coverage goes well beyond the product warranty. No deductibles, no functional failure excluded from coverage
— real protection.
Expert service by a force of more than 10,000 authorized Sears service technicians, which means someone you can
trust will be working on your product.
Unlimited service calls and nationwide service, as often as you want us, whenever you want us.
“No-lemon” guarantee – replacement of your covered product if four or more product failures occur within twelve
months.
Product replacement if your covered product can’t be fixed.
Annual Preventive Maintenance Check at your request – no extra charge.
Fast help by phone – we call it Rapid Resolution – phone support from a Sears representative on all products.
Think of us as a “talking owner’s manual.”
Power surge protection against electrical damage due to power fluctuations.
$250 Food Loss Protection annually for any food spoilage that is the result of mechanical failure of any covered
refrigerator or freezer.
Rental reimbursement if repair of your covered product takes longer than promised.
25% discount off the regular price of any non-covered repair service and related installed parts.
Once you purchase the Agreement, a simple phone call is all that it takes for you to schedule service. You can call anytime day
or night, or schedule a service appointment online.
The Master Protection Agreement is a risk free purchase. If you cancel for any reason during the product warranty period, we
will provide a full refund. Or, a prorated refund anytime after the product warranty period expires. Purchase your Master
Protection Agreement today!
Some limitations and exclusions apply. For prices and additional information in the U.S.A. call 1-800-827-6655.
* Coverage in Canada varies on some items. For full details call Sears Canada at 1-800-361-6665.
Sears Installation Service
For Sears professional installation of home appliances, garage door openers, water heaters, and other major home items, in the
U.S.A. call 1-844-553-6667, and in Canada call 1-800-469-4663.
Read an d Save Th ese In stru ction s
This Use & Care Guide provides specific operating instructions for your model. Use the air conditioner only as
instructed in this guide. These instructions are not meant to cover every possible condition and situation that may
occur. Common sense and caution must be practiced when installing, operating, and maintaining any appliance.
Record Your Model and Serial Numbers
Record in the space provided below the model and serial numbers. The serial plate is located on the outside of the
cabinet, or behind filter at the bottom of unit. Reading the numbers may be easier by using a flashlight or by
removing the cabinet front as instructed under “ Care and Cleaning. ”
Model Number : ___________________________________________________________
Serial Number : ____________________________________________________________
Purchase Date : ____________________________________________________________
Remove package materials from unit prior to installation.
Note: Keep the insulation panel.
Package materials
3
Important Safety
Instructions
NOTE The power supply cord with
this air conditioner contains a current
detection device designed to reduce the risk of
fire.
Please refer to the section ‘Operation of
Current Device’ for details.
In the event that the power supply cord is
damaged, it cannot be repaired, and it must
be replaced with a cord from the Product
manufacturer.
Read all instructions before using this air conditioner.
WARNING For Your Safety
Do not store or use gasoline or other flammable vapors and liquids in the vicinity of this
or any other appliance. Read product labels for flammability and other warnings.
WARNING
Prevent Accidents
To reduce the risk of fire, electrical shock, or injury to persons when using your air
conditioner, follow basic precautions, including the following:
Be sure the electrical service is adequate for the model you have chosen. This
information can be found on the nameplate, which is located on the side of the
cabinet.
If the air conditioner is to be installed in a window, you will probably want to
clean both sides of the glass first. If the window is a triple-track type with a
screen panel included,remove the screen completely before installation.
Be sure the air conditioner has been securely and correctly installed according
to the separate installation instructions provided with this manual. Save this
WARNING Avoid fire hazard or electric
manual and the installation instructions for possible future use in removing or
shock. Do not use an extension cord or an
reinstalling this unit.
adaptor plug. Do not remove any prong from
When handling the air conditioner, be careful to avoid cuts from sharp metal
the power cord.
fins on front and rear coils.
Grounding type wall
receptacle
Do not, under any
circumstances, cut,
remove, or bypass the
grounding prong.
Power supply cord
with 3-prong grounding
plug and current
detection device
WARNING Electrical Information
The complete electrical rating of your new room air conditioner is stated on the serial
plate. Refer to the rating when checking the electrical requirements.
Be sure the air conditioner is properly grounded. To minimize shock and fire
hazards, proper grounding is important. The power cord is equipped with a
three-prong grounding plug for protection against shock hazards.
Your air conditioner must be used in a properly grounded wall receptacle. If the
wall receptacle you intend to use is not adequately grounded or protected by a
time delay fuse or circuit breaker, have a qualified electrician install the proper
receptacle.
Do not run air conditioner without outside protective cover in place. This could
result in mechanical damage within the air conditioner.
Do not use an extension cord or an adapter plug.
READ THIS SECTION BEFORE ATTEMPTING TO OPERATE AIR CONDITIONER.
Unit must be up right for one hour prior to operating.
Operation of Current
Device
Plug in &
press RESET
The power supply cord contains a current device that senses damage to the
power cord.
To test your power supply cord do the following:
1. Plug in the Air Conditioner.
2. The power supply cord will have TWO buttons on the plug head. Press the
TEST button. You will notice a click as the RESET button pops out.
3. Press the RESET button. Again you will notice a click as the button engages.
4. The power supply cord is now supplying electricity to the unit. (On some
products this is also indicated by a light on the plug head).
NOTES:
Do not use this device to turn the unit on or off.
Always make sure the RESET button is pushed in for correct operation.
The power supply cord must be replaced if it fails to reset when either the
TEST button is pushed, or it cannot be reset. A new one can be obtained by
contacting Sears at 1-844-553-6667.
If power supply cord is damaged, it CANNOT be repaired. It MUST be
replaced by one obtained by contacting Sears at 1-844-553-6667.
4
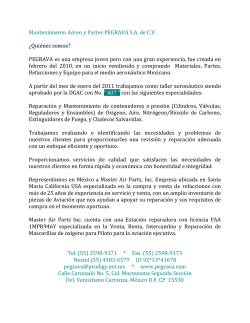
Air Conditioner Features
ELECTRONIC CONTROL
Before you begin, thoroughly familiarize yourself with the control panel and remote as shown below and all its functions, then
touch the symbol pads for the functions you desire. The unit can be controlled by the panel touch pads, the remote control,
or with the Kenmore ACTM App*.
SMART CONTROL
BUTTON*
SETS MODE
DISPLAYS
TEMPERATURE
TURNS UNIT
ON OR OFF
ADJUSTS
TEMPERATURE
INFRARED
REMOTE WINDOW
FILTER RESET
BUTTON
SLEEP MODE
SETS FAN SPEEDS
*Refer to the Quick Start Guides that came with your Smart Air Conditioner for detailed instructions on creating a
Kenmore account and setting up your air conditioner for connected operation from your smart phone. This
Use & Care Guide contains information and instructions for operating the air conditioner from the front panel touch
pads. For additional assistance, visit www.kenmore.com/smart.
T OUCH PAD
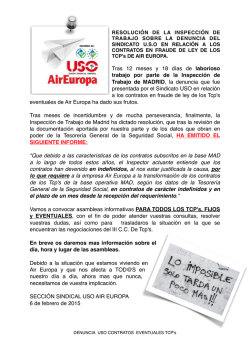
REMOTE CONTROL
TO REPLACE BATTERY
TAB
ON/OFF
SETS FAN
SPEEDS
AUTO FAN
ADJUSTS
TEMP
Battery Size: CR2025
SLEEP
MODE
Turn Remote Control upside down. Squeeze tab and pull
to remove battery tray. Place battery in tray with
POSITIVE(“+”) side facing UP, according to diagram.
Re-insert battery tray.
Note: Pull off the protecting film to activate the remote
control, when use for the first time.
5
Air Conditioner Features
(continued)
Note: The following instructions describe the Control Panel Touch Pads.
To turn unit on or oç press the ON/OFF
button:
The unit is programmed to start in the energy saver mode, with auto fan speed
and a temperature setting of 72 °F.
These settings are required by ENERGY STAR for maximum energy eèciency. We
recommend just using the temperature buttons for controlling room comfort.
To change the Temperature Setting use the UP and Down arrows as required:
Remote Control: Use TEMP arrows
to change Temperature setting.
To use Cool, press the MODE button to select:
Note: In this mode, the fan remains on all the time with the compressor cycling on and
oç when room temperature is reached.
Remote Control: Press Cool button to activate Cool function.
To adjust Fan Speeds press the Fan Speed button and select:
Remote Control: Use
FAN SPEED arrows to
adjust fan speed.
LOW
MED
HIGH
To use the Auto Fan Feature press the Fan Speed button and select AUTO:
Note: Fan speed starts at high and adjusts to a slower speed as the room temperature
dictates. For example, if the room doesn’t get too warm it will stay at the slowest speed.
If the room temperature rises quickly, such as when a door is opened, it will
automatically go to the highest speed. The fan speed will re-adjust back to the slowest
speed as the room returns to the original set temperature.
Remote Control: Press Auto Fan button to activate Auto Fan feature.
To operate on Fan Only, press the MODE button to select:
Use Fan Only function to circulate room air without air conditioner cooling. You can use
any fan speed you prefer and the actual room temperature will be displayed in the
DISPLAY.
Remote Control: Press Fan Only button. Use Fan Speed arrows to adjust fan speed.
6
Air Conditioner Features
(continued)
To use Energy Saver press the MODE button to select:
You will save energy usage in this mode. The compressor and motor will turn o once
the room is at the desired temperature. The air will be sampled for 20 seconds every
10 minutes until the room is above the set temperature, at which point the compressor
turns back on and the fan runs. The entire process is now repeated.
Remote Control: Press Energy Saver button to activate Energy Saver mode.
To use the Sleep feature press the SLEEP button and the LED will illuminate:
The set temperature will increase 2 °F 30 minutes after this mode is selected. It will
increase again after 30 minutes by another 2 °F. It will stay at this set point for 7 hours,
and then return to the original setting.
Remote Control: Press Sleep button to activate Sleep feature.
Check Filter Feature:
After 250 hours of operation, the Filter Reset LED will light. This is a reminder to clean
iently. Pressing the
the ter housed behind the front panel to keep the unit operati
FILTER RESET button for 3 seconds will reset this reminder and turn o he LED.
To remove the air conditioner from the customer Kenmore account and reset all internal
setting to factory defaults:
Press the "assurelink" pad on the front panel 5 times within 5 seconds. This will remove the
air conditioner from the Kenmore account and reset all settings to the factory default settings.
7
ADDITIONAL THINGS YOU SHOULD KNOW
Now that you understand the basic operation functions, here are more control features with which you should become
familiar.
The “cool” circuit has an automatic 3 minute time delayed start if the unit is turned off and on quickly. This prevents
overheating of the compressor and possible circuit breaker tripping. The fan will continue to run during this time.
There is a 2-Second delay for the compressor shutting down when selecting FAN ONLY. This is to cover the possibility
of having to roll through to select another mode.
The control will maintain the set temperature within 2 degrees Fahrenheit, between 60F and 90F degrees.
If the unit is turned off in heat mode (if applicable) or fan only mode, it will return to the same setting when it is turned
on again.
When the unit is turned off in cool or energy saver mode, it will run in energy saver mode when it is turned on again, but
the setting of temperature and fan speed will remain.
Models with a key hole overflow drain hole can use drain kit 5304481680 to connect a 1/2 inch drain hose for safe
disposal of excess system water. This part can be ordered at www.SearsPartsDirect.com.
The control is capable of displaying temperature in degrees Fahrenheit or degrees Celsius. To convert from one to the
other and back, press and hold both the “TEMP” Up( ) and Down ( ) buttons for 3 seconds.
FAULT CODES :
If the display reads “ES” or “AS”, a sensor has failed. Contact 1-844-553-6667 for repair.
Evaporator coil sensor
Air temperature sensor
AUTO RE-START :
After a power outage, the unit will remember the last temperature and mode settings, and will return to these same settings
once power is restored.
8
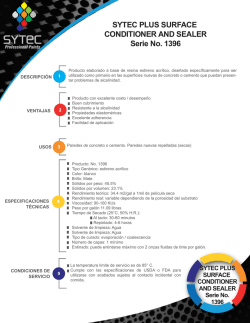
LOUVERS
AUGER WHEELS
Care and Cleaning
Tab
Air Filter
Air Directional Louvers
Air directional louvers control air flow direction. Your air conditioner has the
8-way directional system described below.
The louvers will allow you to direct the air flow Up or Down and Left or Right
throughout the room as needed. Rotate the Auger Wheels until the desired
Left or Right direction is obtained. Pivot horizontal louvers with your fingertips
until the desired Up/Down direction is obtained. There are a total of 8 possible
air directional orientations available with this system.
Clean your air conditioner occasionally to keep it looking new. Be sure to
unplug the unit before cleaning to prevent shock or fire hazards.
Air Filter Cleaning
The air filter should be checked at least once a month to see if cleaning is
necessary.
Trapped particles in the filter can build up and block air from flowing to
cooling coils and cause an accumulation of frost on the cooling coils.
On models with Fresh Air Vent Control, push in control to vent closed position.
Open the front panel.
Grasp the filter by the center and pull up and out.
Wash the filter using liquid dishwashing detergent and warm water. Rinse
filter thoroughly. Gently shake excess water from the filter. Be sure filter is
thoroughly dry before replacing.
Or instead of washing, you may vacuum the filter clean.
NOTE: When replacing the air filter after cleaning, make sure the tabs on
the air filter are on the upper part of filter, and placed outward as shown in
the drawing on the left side.
Cabinet Cleaning
Be sure to unplug the air conditioner to prevent shock or fire hazard. The
cabinet and front may be dusted with an oil-free cloth or washed with a
cloth dampened in a solution of warm water and mild liquid dishwashing
detergent. Rinse thoroughly and wipe dry.
Never use harsh cleaners, wax or polish on the cabinet front.
Be sure to wring excess water from the cloth before wiping around the
controls. Excess water in or around the controls may cause damage to the
air conditioner.
Plug in air conditioner.
Winter Storage
If you plan to store the air conditioner during the winter, remove it carefully
from the window according to the installation instructions. Cover it with cloth
or return it to the original carton.
NOTE: Store air conditioner in a dry place in upright position (horizontal with base down).
Energy Saving Ideas
The capacity of the room air conditioner must fit the room size for efficient
and satisfactory operation.
Install the room air conditioner on the shady side of your home. A window
that faces north is best because it is shaded most of the day.
Do not block inside airflow around air conditioner with blinds, curtains or
furniture; or outside with shrubs, enclosures, or other buildings.
Close the fireplace damper, floor and wall registers so cool air does not
escape up the chimney and into the duct work.
Keep blinds and drapes in other windows closed during the sunniest part of
the day.
Clean the air filter as recommended in the section “Care and Cleaning.”
Proper insulation and weather stripping in your home will help keep warm air
out and cool air in.
External house shading with trees, plants or awnings will help reduce the
air conditioner’s work load.
Operate heat producing appliances such as ranges, washers, dryers and
dishwashers during the coolest part of the day.
9
Room Air Conditioner Troubleshooting Guide
®
THE AIR CONDITIONER WILL NOT OPERATE
Check if …
Then …
Power supply cord is disconnected
Firmly push the cord into a live wall outlet having proper voltage. (Page 4)
Power Cord has tripped
Press the RESET button on the plug head. (Page 4)
House fuse has blown or circuit breaker tripped
Replace the fuse with a time delay type or reset the circuit breaker. (Page 4)
Power is OFF.
Push ON/OFF Button to turn ON. (Page 6)
Temperature setting is warmer than room temperature.
Set temperature to a lower setting. (Page 6)
Unit was turned OFF and ON too quickly.
Built-in delay will prevent compressor from turning on for 3 minutes.
Timer shut unit OFF.
Push ON/OFF Button to turn unit ON. (Page 6)
Unit is in a locked mode. Unplug unit for 10 seconds, and then plug in again and
the controls will reset. (Page 4)
Touch Pad and Remote not responding.
THE AIR CONDITIONER BLOWS FUSES OR TRIPS CIRCUIT BREAKER
Check if …
Then …
House fuse has blown or circuit breaker tripped.
Replace the fuse with a time delay type or reset the circuit breaker. (Page 4)
Too many electrical devices are being used on the same circuit.
Unplug or relocate electrical devices being shared on same circuit.
Unit is rated over 7.5 amps.
Unit should be plugged into a single circuit outlet.
Unit is plugged into an extension cord.
Do not use an extension cord to run the unit. (Page 4)
Unit was turned OFF and ON too quickly.
Turn unit OFF and wait 3 minutes before restarting. (Page 6)
THE AIR CONDITIONER TURNS ON AND OFF BY ITSELF
Check if …
Then …
Outside temperature is extremely hot.
Set fan speed at the fastest setting for maximum cooling. (Page 6)
ENERGY SAVER feature does not circulate air continually. Set mode to COOL for
constant air circulation. (Page 5)
Push ON/OFF Button to turn unit ON or OFF. (Page 6)
ENERGY SAVER feature is on.
Timer turned unit ON or shut unit OFF.
THE AIR CONDITIONER DOES NOT COOL THE ROOM - ICE BEHIND FRONT PANEL
Check if …
Then …
Outside temperature is below 60°F.
Set mode to FAN ONLY and fan speed to fastest setting to defrost coil. (Page 6)
Filter is dirty.
Open front panel. Remove filter. Rinse or vacuum filter. Replace filter. Close
Panel (Page 9)
A lower capacity unit may be required depending on the size of the room being
cooled. (Page 9)
BTU size is too large.
THE AIR CONDITIONER DOES NOT COOL THE ROOM - NO ICE BEHIND FRONT PANEL
Check if …
Then …
Filter is dirty.
Temperature setting is warmer than room temperature.
Open front panel. Remove filter. Rinse or vacuum filter. Replace filter. Close
Panel (Page 9)
Set temperature to a lower setting. (Page 6)
Room temperature is below 60°F.
Unit is not designed to cool below 60°F. (Page 8)
Front of unit is blocked by furniture, drapes, blinds, etc.
Clear away area in front of unit.
Back of unit is blocked by leaves, dirt, branches, etc.
Clear away back of unit.
Doors, windows, registers, etc. are open.
Close doors, windows, registers, etc.
Unit recently turned on.
Temperature sensor is touching the coil.
Allow time to cool a larger room.
Open front panel. Remove filter. Turn end of temperature sensor away from coil.
Replace filter. Close panel.
Use exhaust vents while cooking or bathing. Limit use of heat producing appliances
during the hottest part of the day. (Page 9)
Excessive heat in the room being cooled.
Vent control (on some models) is pulled open.
Push in vent control for maximum cooling. (Page 8) (CLOSED POSITION)
10
Room Air Conditioner Troubleshooting Guide
(Continued)
THE AIR CONDITIONER RUNS TOO MUCH
Check if…
Then …
Energy Saver is chosen.
Inside blower continues operating for one minute to use as much cooling that is
available in the evaporator.
Newer, higher efficiency Air Conditioner may run longer to cool the room. Total
energy consumption is less due to higher efficiency.
Current Unit replaced an older unit.
A higher capacity unit may be required depending on the size of the room being
cooled. (Page 9)
BTU size is too small.
WATER DRIPPING FROM AIR CONDITIONER - INSIDE ROOM
Check if…
Then …
Unit is not properly installed.
Unit should be mounted on a 1/4" downward slope to the outside (1/2 bubble on
a carpenter’s level) to provide proper drainage. Reposition or shim cabinet as
necessary. DO NOT drill drain pan.
WATER DRIPPING FROM AIR CONDITIONER - OUTSIDE ROOM
Check if…
Then …
Room is hot and humid.
Normal operation during hot and humid days.
THE REMOTE WILL NOT OPERATE AIR CONDITIONER
Check if…
Then …
Verify batteries are installed properly. (Page 5)
Batteries are not installed properly.
The remote is pointed at the unit.
The remote may not work properly when used at extreme angles to the front of
the unit.
TYPICAL AIR CONDITIONER SOUNDS YOU MAY HEAR
Check if…
Then …
High pitched whine or pulsating noise that cycles on and off.
Compressor - Normal noise due to modern high efficiency compressors. (Page 11)
Fan/Motor - Normal noise of higher efficiency fans pushing air further into the
room. (Page 11)
Condenser - Normal noise of water hitting the condenser to increase energy
efficiency. (Page 11)
Rushing air sound.
Pinging or swishing sounds.
Gurgling or hissing sounds.
Beeping.
Evaporator - Normal noise of refrigerant passing through evaporation. (Page 11)
Vibration.
Unit Vibration - Due to poor wall or window construction or incorrect installation.
(Page 11)
Electronic Control - Normal noise when electronic control settings are changed.
WIRELESS TROUBLESHOOTING
Wireless troubleshooting
Normal Sounds
Sound of Rushing Air
At the front of the unit,
you may hear the sound
of rushing air being moved
by the fan.
For Frequently Asked Questions on the Assurelink system and app, refer to the
FAQs that are online in the app or visit www.kenmore.com/smart.
High Pitched Whine
Today’s high efficiency
compressors may have a
high pitched whine during
the cooling cycle.
Vibration
Unit may vibrate and make
noise because of poor wall
or window construction or
incorrect installation.
Pinging or Swishing
Droplets of water hitting
condenser during normal
operation may cause
“pinging or swishing”
sounds.
Note: Don’t try to drill any holes
on the base pan to eliminate the
normal sounds, otherwise it will
void the warranty.
Gurgle/Hiss
“Gurgling or hissing” noise may
be heard due to refrigerant passing
through evaporator during normal
operation.
11
FCC STATEMENTS
FCC Interference Statement
This equipment has been tested and found to comply with the limits for a Class B digital device, pursuant to part 15 of
the FCC Rules. These limits are designed to provide reasonable protection against harmful interference in a residential
environment. This equipment generates, uses, and can radiate radio frequency energy and, if not installed and used in
accordance with the instructions, may cause harmful interference to radio communications. However, there is no
guarantee that interference will not occur in a particular installation. If this equipment does cause harmful interference to
radio or television reception, which can be determined by tuning the device oç and on, the user is encouraged to try to
correct the interference by one or more of the following measures:
Reorient or relocate the receiving antenna.
Increase the separation between the device and receiver.
Connect the equipment into an outlet other than the one used for the receiver.
Consult the dealer or an experienced radio/TV technician for assistance.
This device complies with Part 15 of the FCC Rules. Operation is subject to the following two conditions: (1) This device
may not cause harmful interference, and (2) This device must accept any interference received, including interference
that may cause undesired operation.
FCC CAUTION: Any changes or modifi cations not expressly approved by the party responsible for compliance could
void the user’s authority to operate the equipment.
Host device Labeling
This device includes the following module.
Contains FCC ID: 2ABHC-5430042
RF exposure statement
This equipment complies with FCC radiation exposure limits set forth for an uncontrolled environment. This equipment
should be installed and operated with minimum 20 cm between the radiator and your body. This transmitter must not be
collocated or operating in conjunction with any other antenna or transmitter unless authorized to do so by the FCC.
INDUSTRY CANADA (IC) STATEMENT
This Class B digital apparatus complies with Canadian ICES-003.
This device complies with Industry Canada license-exempt RSS standard(s). Operation is subject to the following two
conditions: (1) this device may not cause interference, and (2) this device must accept any interference, including
interference that may cause undesired operation of the device.
Le présent appareil est conforme aux CNR d'Industrie Canada applicables aux appareils radio exempts de licence.
L'exploitation est autorisée aux deux conditions suivantes : (1) l'appareil ne doit pas produire de brouillage, et (2)
l'utilisateur de l'appareil doit accepter tout brouillage radioélectrique subi, même si le brouillage est susceptible d'en
compromettre le fonctionnement.
RF Exposure
The antenna (or antennas) must be installed so as to maintain at all times a distance minimum of at least 20 cm between
the radiation source (antenna) and any individual. This device may not be installed or used in conjunction with any other
antenna or transmitter.
l'exposition aux RF
L’antenne (ou les antennes) doit être installé e de façon à maintenir à tout instant une distance minimum de au moins 20
cm entre la source de radiation (l’antenne) et toute personne physique.
Host device Labeling
This device includes the following module.
Contains IC: 12012A-5430042
Host dispositif d'étiquetage
Ce dispositif inclut le module suivant.
Contient module émetteur IC: 12012A-5430042
Note: This appliance contains a Wi-Fi module inside the panel,
as shown in the picture, allowing the unit to connect to the internet.
12
This is the location
of the module.
ÍNDICE DE CONTENIDOS
Garantía ................................................................. 1 3
Acuerdo de Protección Experta ......................... 14
Instrucciones importantes sobre seguridad ........ 15
Funcionalidades del acondicionador de aire... 16-18
Información adicional ........................................... 19
Cuidados y limpieza ............................................. 20
Consejos de ahorro energético ........................... 20
Guía de solución de problemas .......................... 21-22
Sonidos normales ................................................... 22
Llame al servicio técnico ...................................... La cubierta posterior
GARANTÍA LIMITADA DE KENMORE ELITE
CON PRUEBA DE VENTA, la siguiente cobertura de garantía se aplica cuando este aparato se instala, opera y mantiene
correctamente de acuerdo con todas las instrucciones proporcionadas.
DURANTE UN AÑO a partir de la fecha de compra, este aparato está garantizado contra defectos en materiales o
mano de obra. El aparato defectuoso recibirá reparación gratuita o reemplazo a discreción del vendedor.
DURANTE CINCO AÑOS a partir de la fecha de venta, el sistema refrigerante sellado de este electrodoméstico está
garantizado contra defectos en cuanto a material y mano de obra. Si alguna pieza del sistema se pone defectuosa
durante el primer año, se suministrará una nueva y se instalará sin costo alguno. Si alguna pieza del sistema se pone
defectuosa después del primer año, se suministrará una nueva pero no se instalará sin costo. Usted será responsable de
los costos de mano de obra para la instalación de piezas después del primer año a partir de la fecha de venta.
Para detalles de la cobertura de garantía sobre cómo obtener reparación o reemplazos gratis, visite la página
web: www.kenmore.com/warranty.
Toda la cobertura de garantía se aplica durante 90 días a partir de la fecha de venta si este electrodoméstico se le
da un uso diferente al hogar privado.
Esta garantía cubre ÚNICAMENTE los defectos en materiales y la mano de obra y NO cubrirá:
1. Artículos reemplazables que pueden sufrir desgaste derivado del uso normal, incluyendo pero no limitado a filtros,
correas, bolsas o lámparas con base de rosca.
2. Un técnico de servicio para limpiar o mantener este aparato, o para instruir al usuario en la correcta instalación,
operación y mantenimiento.
3. Llamadas de servicio para corregir la instalación del aparato si esta no fue realizada por agentes de servicio
autorizados por Sears, o para reparar problemas con los fusibles de la casa, disyuntores, cableado o sistemas de
plomería o gas derivados de esta instalación.
4. Daños o fallos del aparato derivados de una instalación no realizada por agentes de servicio autorizados por Sears,
incluyendo la instalación que no se ajustó a los códigos de electricidad, gas o plomería.
5. Daños o fallos del aparato, incluyendo la decoloración o el óxido en la superficie, si no se opera y mantiene
correctamente de acuerdo con todas las instrucciones proporcionadas.
6. Daños o fallos del aparato, incluyendo la decoloración o el óxido en la superficie, derivados de accidentes,
alteraciones, abuso, uso indebido o con otros fines de aquellos para los que está diseñado.
7. Daños o fallos del aparato, incluyendo la decoloración o el óxido en la superficie, provocado por el empleo de
detergentes, limpiadores, químicos o utensilios distintos de los recomendados en las instrucciones proporcionadas con
el mismo.
8. Daños o fallos en piezas o sistemas derivados de las modificaciones no autorizadas realizadas a este aparato.
9. Servicio a un aparato si la placa del modelo y serie está perdida, alterada o no se puede determinar fácilmente
que tiene el logotipo de certificación adecuado.
Renuncia de garantías implícitas; limitación de recursos.
El único y exclusivo recurso del cliente bajo esta garantía limitada será la reparación del producto o el remplazo como
aquí se indica. Las garantías implícitas, incluyendo garantías de comerciabilidad o aptitud para un propósito particular,
están limitadas a un año para el aparato y cinco años para el sistema sellado, o el periodo más corto establecido por la
ley. El vendedor no será responsable por daños accidentales o consecuentes. Algunos estados y provincias no permiten la
exclusión o limitación de daños accidentales o consecuentes, o la limitación en la duración de las garantías implícitas de
comerciabilidad o aptitud, por lo que estas exclusiones o limitaciones podrían no ser aplicables en su caso.
Esta garantía se aplica sólo cuando este aparato es utilizado en los Estados Unidos .
Esta garantía le otorga derechos legales específicos, aunque usted podría tener otros derechos que varían de un estado
a otro.
Sears Brands Management Corporation, Hoffman Estates, IL 60179
13
Acuerdo de Protección Experta
Felicidades por su inteligente compra. Su nuevo producto Kenmore Elite® está diseñado y manufacturado para
proporcionarle años de funcionamiento de confianza. Pero como cualquier producto, puede requerir mantenimiento
preventivo o reparaciones de vez en cuando. Es en estas circunstancias en las que tener un Acuerdo de Protección
Experta puede ahorrarle costes y molestias.
El Acuerdo de Protección Experta también le ayuda a prolongar la vida útil de su nuevo producto. A continuación se
detalla lo que el Acuerdo* incluye:
Partes y trabajo no solo para reparar los defectos, sino también para mantener el buen funcionamiento de los
productos en condiciones de uso normales. Nuestra cobertura va aún más allá de la garantía del producto.
Ningún consumible ni fallo funcional queda excluido de la cobertura: protección real.
Servicio técnico experto por parte de un equipo de más de 10.000 técnicos autorizados por Sears, es decir,
que son gente en la que puede confiar que conoce su producto.
Llamadas de atención técnica sin límite en el ámbito nacional, tantas veces como nos necesite, donde sea
que nos necesite.
Garantía "anti-limón": cambio total de su producto bajo cobertura si sufre 4 o más fallos durante doce meses
consecutivos.
Cambio total de su producto si este no puede ser arreglado.
Revisión preventiva de mantenimiento anual a su conveniencia — sin cargos extra.
Ayuda telefónica rápida — lo llamamos solución rápida — soporte telefónico por parte de un representante de
Sears para todos los productos. Puede considerarnos un "manual de usuario parlante".
Protección contra sobretensiones para los daños eléctricos causados por fluctuaciones en la corriente eléctrica.
Protección contra pérdida de alimentos por valor de 250$ anualmente por cualquier alimento que se estropee
como resultado de un fallo mecánico de cualquier refrigerador o congelador bajo cobertura.
Reembolso del alquiler si la reparación de su producto bajo cobertura requiere más tiempo del comprometido.
25% de descuento sobre el precio normal de cualquier reparación o servicio técnico no incluido en la cobertura
que tenga relación con los componentes instalados.
Una vez que contrata el Acuerdo, una sencilla llamada telefónica es todo lo que necesita para concertar una asistencia
técnica. Puede llamar a cualquier hora del día o de la noche, o concertar una cita a través de la web.
El Acuerdo de Protección Experta es una compra sin riesgo. Si lo cancela por cualquier razón durante el periodo de
garantía del producto, le proporcionaremos un reembolso completo. O un reembolso prorrateado en cualquier
momento una vez el periodo de garantía expira. Adquiera hoy su Acuerdo de Protección Experta!
Algunas limitaciones y exclusiones pueden aplicarse. Para más información y precios en USA llame al 1-800-827-6655.
* La cobertura en Canadá varía en algunos artículos. Para más detalles llame a Sears Canada al 1-800-361-6665
Servicio de instalación de Sears
Para la instalación profesional de Sears de electrodomésticos, abridores de puertas de garaje, calentadores de agua, y otros
objetos de hogar grandes, llame en EUA a 1-844-553-6667, y llame en Canadá a 1-800-469-4663.
Lea y guarde estas instrucciones
Esta Guía de Usos y Cuidados proporciona instrucciones de funcionamiento específicas para su modelo. Use el
acondicionador de aire sólo como se indica en esta guía. Estas instrucciones no pretenden reflejar todas las posibles
situaciones que puedan presentarse. Debe proceder con precaución y sentido común durante la instalación,
operación y mantenimiento de cualquier aparato.
Guarde los números de Modelo y de Serie de su aparato
Anote en el espacio abajo provisto los números de modelo y de serie. La placa de serie está localizada en el
exterior de la carcasa, o detrás del filtro en la parte inferior del equipo. Le resultará más fácil leer estos números
si usa una linterna o si extrae el frontal de la carcasa tal como se indica en "Cuidados y limpieza".
___________________________________________________________
Nº de Modelo:
Nº de Serie:
____________________________________________________________
Fecha de compra: ____________________________________________________________
Quite los materiales de empaque de la unidad antes de la instalación.
Nota: Mantenga el panel aislante.
materiales de empaque
14
Instrucciones importantes
sobre seguridad
ATENCIÓN
El cable de corriente provisto
con este aparato contiene un dispositivo
cortacorriente diseñado para reducir el
riesgo de incendio.
Por favor, consulte la sección 'Operación
del dispositivo cortacorriente' para obtener
más detalles.
En caso de que el cable provisto resulte
dañado, no podrá ser reparado. Deberá ser
reemplazado por un cable del fabricante.
PRECAUCIÓN
Evite el riesgo de incendio
o choque eléctrico. No use un alargador ni
un adaptador de tomacorrientes.
No remueva ninguna clavija del enchufe.
Tomacorrientes polarizado
Bajo ninguna circunstancia
corte, remueva o evite el
uso de la clavija de
conexión a tierra.
Cable de corriente
con enchufe polarizado
de 3 clavijas y dispositivo
cortacorriente.
Lea todas las instrucciones antes de usar este acondicionador de aire.
PRECAUCIÓN
Por su seguridad
No almacene gasolina ni otros líquidos o vapores inflamables alrededor de este u
otro aparato eléctrico. Lea las etiquetas del producto sobre inflamabilidad y otras
advertencias.
Prevenga accidentes
PRECAUCIÓN
Para reducir el riesgo de incendio, choque eléctrico o lesiones al operar su aparato de
aire acondicionado, siga unas instrucciones básicas entre las que se encuentran:
Asegúrese de que la instalación eléctrica es adecuada para el modelo que ha elegido.
Esta información puede encontrarse en la placa de serie, que está localizada en el
lateral de la carcasa.
Si el aparato de aire acondicionado va a ser instalado en una ventana, probablemente
necesitará limpiar antes ambas caras del cristal. Si la ventana es de triple raíl con un
panel apantallado, remueva éste completamente antes de realizar la instalación.
Asegúrese de que el aparato de aire acondicionado ha sido instalado firme y
correctamente de acuerdo a las instrucciones de montaje provistas con este manual.
Guarde este manual y las instrucciones de montaje para un posible uso en el futuro a
la hora de remover o reinstalar el equipo.
Cuando manipule el aparato de aire acondicionado, tenga cuidado para evitar
producirse cortes con las aletas metálicas afiladas de la parte delantera y trasera.
PRECAUCIÓN
Información eléctrica
Las especificaciones eléctricas completas de su nuevo aparato de aire acondicionado
están expresadas en la placa de serie. Consulte estas especificaciones cuando chequee
los requisitos eléctricos.
Asegúrese de que el aparato de aire acondicionado queda adecuadamente
conectado a tierra. Para minimizar el riesgo de choque eléctrico e incendio es
importante una polarización adecuada. El cable de corriente está equipado con
un enchufe polarizado de tres clavijas para protección contra choques eléctricos.
Su aparato de aire acondicionado debe conectarse a un tomacorrientes
adecuadamente polarizado. Si el tomacorrientes que pretende utilizar no está
adecuadamente polarizado o protegido por un fusible retardante o cortacorrientes,
consiga que un electricista cualificado le instale un tomacorrientes adecuado.
No ponga en marcha el aparato de aire acondicionado sin la cubierta protectora
exterior en su sitio. Esto podría provocar daños mecánicos en el interior del
aparato.
No utilice un cable alargador o adaptador de tomacorrientes.
LEA ESTA SECCIÓN ANTES DE INTENTAR PONER EN FUNCIONAMIENTO EL
APARATO DE AIRE ACONDICIONADO.
La unidad debe quedar instalada una hora antes de operarla.
Operación del dispositivo
cortacorriente
Conéctelo al
tomacorrientes
y presione
RESET
El cable de corriente contiene un dispositivo cortacorriente que detecta daños en el
cable. Para comprobar su cable de corriente haga lo siguiente:
1. Enchufe el aparato de aire acondicionado.
2. El cable de corriente tiene DOS botones en el enchufe. Presione el botón TEST.
Percibirá un sonido al tiempo que el botón RESET sale hacia fuera.
3. Presione el botón RESET. De nuevo percibirá un sonido al encajar el botón en su
lugar.
4. El cable de corriente estará en este momento suministrando electricidad a la unidad.
(En algunos productos esto se indica además con un piloto en el enchufe)
ATENCIÓN:
No use este dispositivo para encender y apagar la unidad.
Asegúrese siempre de que el botón RESET está presionado antes de operar el
aparato.
El cable de alimentación debe ser reemplazado si no se puede resetear pulsando el
botón RESETEO, o si no puede resetearse en absoluto. Puede obtener un cable
nuevo contactando con Sears en el número 1-844-553-6667.
Si el cable de alimentación resulta dañado, NO PODRÁ ser reparado. DEBE ser
reemplazado por uno nuevo proporcionado por Sears en el número
1-844-553-6667.
15
Funcionalidades del acondicionador
CONTROL ELECTRÓNICO
Antes de comenzar, familiarícese completamente con el panel de control y el control remoto que se muestran a continuación
y con todas sus funciones, y después toque los símbolos en el panel táctil para usar las funciones deseadas. La unidad se
(TM)
puede controlar usando las almohadillas del panel táctil, el control remoto, o la aplicación Kenmore AC .
MUESTRA LA
TEMPERATURA
BOTÓN DE
ASSURELINK
RECEPTOR DE
INFRARROJOS DEL
CONTROL REMOTO
MODO DORMIR
ENCIENDE O
APAGA LA UNIDAD
ESTABLECE
EL MODO
AJUSTA LA
TEMPERATURA
BOTÓN DE R
ESETEO DEL
FILTRO
SELECCIONA LA VELOCIDAD
DEL VENTILADOR
* Consulte las Guías de inicio rápido que vienen con su Aire acondicionado inteligente para instrucciones detalladas sobre cómo crear una
cuenta Kenmore y configurar su aire acondicionado para funcionamiento conectado desde su teléfono inteligente. Esta Guía de uso y
cuidados contiene información e instrucciones para el funcionamiento del aire acondicionado desde la pantalla táctil del panel frontal.
Para obtener más ayuda, visite www.Kenmore.com/connected.
PANEL TÁCTIL
CONTROL REMOTO
PARA CAMBIAR LA BATERÍA
PESTAÑA
ENCENDIDO/
APAGADO
SELECCIONA
LA VELOCIDAD
DEL VENTILADOR
AJUSTA LA
TEMPERATURA
Tipo de batería : CR2025
VENTILADOR
AUTOMÁTICO
MODO DORMIR
Voltee el control remoto. Apriete la pestaña y tire para extraer
la bandeja de la batería. Coloque la batería en la bandeja
con el lado POSITIVO ("+") hacia ARRIBA, de acuerdo al
diagrama. Reinserte la bandeja de la batería.
Nota: Extraiga la cinta protectora para activar el control remoto,
cuando lo use por primera vez.
16
Funcionalidades del acondicionador
(continuación)
Nota: Las siguientes instrucciones describen el panel de control táctil.
Para encender o apagar la unidad presione el botón ENCENDIDO/APAGADO
:
La unidad está programada para que encienda en modo de ahorro de energía, con la
velocidad automática del ventilador y una temperatura establecida en 72 °F.
ENERGY STAR exige estos valores por cuestiones de máxima eficiencia energética.
Recomendamos solo utilizar los botones de temperatura para controlar la comodidad de la
habitación.
Para cambiar la configuración de temperatura, use las flechas Arriba y Abajo como sea necesario:
Control remoto: Use las flechas de TEMP para cambiar la
configuración de la temperatura.
Para establecer el modo "Cool" (frío), presione el botón MODE (modo) para seleccionarlo:
Nota: En este modelo, el ventilador permanece encendido todo el tiempo y el compresor se
enciende y se apaga, según si se alcanza o no la temperatura de la habitación.
Control remoto: Presione el botón de enfriamiento para activar la función de enfriamiento.
Para ajustar la velocidad del ventilador presione el botón " Velocidad del Ventilador " y seleccione:
Control remoto: Use las flechas de VELOCIDAD
DEL VENTILADOR para ajustar la velocidad del
ventilador.
BAJO
MEDIO
ALTO
Para usar la función de ventilador automático presione el botón " Velocidad del Ventilador "
y seleccione AUTO:
Nota: El ventilador comienza en alta velocidad y se va ajustando a velocidades
inferiores según vaya siendo necesario para mantener la temperatura de la habitación.
Por ejemplo, si la habitación no se calienta lo suficiente, permanecerá a la velocidad
más baja. Si la temperatura sube rápidamente, por ejemplo al abrir una puerta,
automáticamente cambiará a la máxima velocidad. La velocidad del ventilador se
irá reajustando después hasta la más baja según la temperatura de la habitación
vaya retornando al valor establecido.
Control remoto: Presione el botón de ventilador automático para activar la función de
ventilador inteligente.
Para operar en modo " Sólo Ventilador", presione el botón MODO para seleccionarlo:
Use la función sólo ventilador para circular el aire de la habitación sin acondicionar la
temperatura. Puede usar la velocidad que prefiera para ello y la temperatura real de la
habitación se mostrará en la pantalla.
Control remoto: Presione el botón de solo ventilador. Use las flechas de velocidad del
ventilador para ajustar la velocidad del ventilador.
17
Funcionalidades del acondicionador
(continuación)
Para usar el modo " Ahorro de Energía " presione el botón MODO para seleccionarlo:
Ahorrará energía usando el aparato en este modo. El compresor y el motor se apagarán
una vez que la habitación esté a la temperatura seleccionada. Después la temperatura
del aire será comprobada durante 20 segundos cada 10 minutos hasta que se eleve por
encima de la selección, momento en el cual el compresor y el ventilador volverán a
funcionar. El proceso completo se repetirá entonces.
Control remoto: Presione el botón de ahorro de energía para activar el modo de ahorro de
energía.
Para usar la función "Dormir " presione el botón DORMIR y el testigo LED se iluminará:
La temperatura seleccionada se incrementará en 2º F 30 minutos después de seleccionar
esta función. Se volverá a incrementar de nuevo otros 2º F pasados otros 30 minutos.
Permanecerá en este estado durante 7 horas, y después volverá a la configuración
original.
Control remoto: Presione el botón de reposo para activar la función de reposo
Función de comprobación del filtro:
Tras 250 horas de funcionamiento, el indicador LED de " Reseteo del Filtro" se encenderá.
Es un recordatorio para limpiar el filtro alojado tras el panel frontal y así mantener la
unidad funcionando eficientemente. Al presionar el botón RESETEO DEL FILTRO durante
3 segundos este recordatorio se reseteará y el LED se apagará.
Para eliminar el aire acondicionado de la cuenta Kenmore del cliente y restablecer
todos los ajustes internos a los predeterminados de fábrica:
Presione la almohadilla "assurelink" en el panel frontal 5 veces en 5 segundos. Estto
eliminará el aire acondicionado de la cuenta Kenmore y restablecerá todos los ajustes
a los predeterminados de fábrica.
18
INFORMACIÓN ADICIONAL QUE DEBE CONOCER
Ahora que entiende las funciones de básicas de funcionamiento, le presentamos más capacidades de control con las que
debería familiarizarse.
El circuito de frío tiene un retardo automático de inicio por 3 minutos si la unidad se apaga y vuelve a encender
rápidamente. Esto evita el sobrecalentamiento del compresor y el posible salto del diferencial/cortacorrientes.
El ventilador continuará funcionando durante este tiempo.
Existe un retardo de 2 segundos antes del apagado del compresor cuando se selecciona el modo SÓLO VENTILADOR.
Esto cubre el posible caso de que sólo se haya seleccionado de paso hacia otro modo.
El control mantendrá la temperatura seleccionada en un rango de 2 grados Fahrenheit, entre 60º F y 90º F.
Si la unidad está apagada en modo calor (si corresponde) o en modo ventilación, volverá a los mismos valores cuando se
vuelva a encender.
Cuando se apaga la unidad en modo frío o en modo de ahorro de energía, funcionará en este último modo cuando se vuelva
a encender, pero los valores con respecto a la temperatura y a la velocidad del ventilador seguirán siendo los mismos.
Los modelos con orificio de drenaje pueden usar el kit de drenaje 5304481680 para conectar una manguera de 1/2 pulgada
para la eliminación segura del exceso de agua del sistema. Esta pieza se puede ordenar en www.SearsPartsDirect.com.
El panel control es capaz de mostrar la información de temperatura en grados Fahrenheit o Celsius. Para cambiar de
una medida a otra, mantenga presionados los botones de las flechas Arriba ( ) y Abajo ( ) simultáneamente
durante 3 segundos.
CÓDIGOS DE ERROR:
Si la pantalla muestra "ES" o "AS", hay un fallo en un sensor. Contacte con el número1-844-553-6667 para solicitar
la reparación.
Sensor de la bobina de evaporación
Sensor de temperatura del aire
REINICIO AUTOMÁTICO:
Después de un corte de energía, la unidad recordará el último ajuste de temperatura y modo, y volverá a la misma configuración
una vez que se restablezca la alimentación de energía.
19
PALAS
RUEDECILLAS SIN FIN
Cuidados y limpieza
Palas de direccionamiento del aire
Las palas de direccionamiento del aire controlan la dirección del flujo de aire.
Su acondicionador tiene el sistema direccional de 8 vías descrito a continuación.
Las palas permiten dirigir el flujo de aire a la habitación hacia arriba o abajo y
hacia la izquierda o la derecha según sea necesario. Gire las ruedecillas
hasta conseguir la dirección deseada hacia la izquierda o la derecha. Pivote
las palas horizontales con los dedos hasta conseguir la dirección deseada
hacia arriba o abajo. Puede configurar un total de 8 orientaciones diferentes
para el flujo de aire con este sistema.
Limpie de tanto en tanto su aparato de aire acondicionado de forma que se
mantenga como nuevo. Asegúrese de desconectar el equipo de la
corriente antes de limpiarlo para evitar incendios y choques eléctricos.
Limpieza del filtro de aire
El filtro de aire debe ser revisado al menos una vez al mes por si acaso es
necesario limpiarlo.
Las partículas atrapadas en el filtro pueden apilarse y bloquear el flujo normal
del aire en el circuito refrigerante, causando una acumulación de escarcha en
el mismo.
En los modelos con control de respiradero, mantenga éste presionado en
la posición de respiradero cerrado.
Abra el panel frontal.
Sujete el filtro por el centro y tire de él hacia arriba y hacia fuera.
Lave el filtro usando jabón líquido y agua tibia. Aclárelo minuciosamente.
Sacuda con cuidado el exceso de agua del filtro. Asegúrese de que el filtro
está completamente seco antes de volverlo a colocar.
Como alternativa a lavarlo, puede limpiar el filtro con una aspiradora.
NOTA: Cuando vuelva a colocar el filtro después de limpiarlo, asegúrese de
que las pestañas del filtro de aire quedan en la parte superior del mismo, y
colocadas hacia fuera tal como se muestra en el dibujo de la izquierda.
Pestaña
Limpieza de la carcasa
Filtro del aire
Asegúrese de desconectar el equipo de la corriente antes de limpiarlo para
evitar incendios y choques eléctricos. La carcasa y el frontal pueden
sacudirse con un paño sin aceites o lavarse con un paño humedecido en una
solución de agua tibia y jabón líquido suave. Aclare cuidadosamente y seque.
Nunca utilice limpiadores duros, ni cera o pulidores en el frontal de la carcasa.
Asegúrese de escurrir el exceso de agua del paño antes de limpiar
alrededor de los controles. El exceso de agua en los controles o su
alrededor puede causar daños al aparato.
Conecte el aparato de aire acondicionado a la corriente.
Almacenamiento en invierno
Si tiene pensado guardar el acondicionador de aire durante el invierno,
quítelo con cuidado de la ventana de acuerdo a las instrucciones de
instalación. Cúbralo con una tela o devuélvalo a su embalaje original.
NOTA: Almacene el acondicionador de aire en un lugar seco y en la
posición normal hacia arriba (horizontal con la base hacia abajo).
Consejos de ahorro
energético
La capacidad del aparato de aire acondicionado debe ser adecuada para la
estancia para conseguir una operación eficiente y satisfactoria.
Instale el aparato de aire acondicionado en el lado de su casa donde no
pegue el sol. Una ventana que encare al norte es mejor ya que queda a la
sombra la mayor parte del día.
No bloquee el flujo interior de aire alrededor del acondicionador con persianas,
cortinas o muebles; ni en el exterior con setos, cercas ni otros edificios.
Cierre la compuerta de la chimenea, así como las rejillas de ventilación de
suelos y paredes de modo que el aire frío no se escape por los conductos
de ventilación ni por la chimenea.
Mantenga las cortinas y persianas de las demás ventanas cerradas durante
la hora más soleada del día.
Limpie el filtro del aire como se recomienda en la sección "Cuidados y
limpieza".
Un aislamiento adecuado y burletes en puertas y ventanas de su hogar
ayudarán a mantener el aire cálido fuera y el frío dentro.
Tener la casa a la sombra de árboles, plantas o toldos contribuye a reducir
la carga de trabajo del aparato de aire acondicionado.
Use los aparatos eléctricos que produzcan calor tales como estufas,
lavaplatos, secadoras y lavadoras durante la hora más fresca del día.
20
Guía de resolución de problemas del acondicionador
de aire para habitaciones
EL ACONDICIONADOR NO FUNCIONA
Compruebe si …
En ese caso …
El cable de alimentación está desconectado.
Conecte firmemente el enchufe en un tomacorriente del voltaje adecuado. (Página 15)
El cortacorriente del cable de alimentación ha saltado.
Presione el botón RESETEO del cabezal del cable de alimentación. (Página 15)
Los fusibles se han fundido o el diferencial/cortacorriente de la instalación
doméstica ha saltado.
Reemplace el fusible fundido por uno de retardo o reestablezca el diferencial/cortacorriente.
(Página 15)
El equipo está apagado.
Pulse el botón ENCENDIDO/APAGADO para encenderlo. (Página 17)
La temperatura establecida es más cálida que la de la habitación.
Establezca la temperatura a un valor menor. (Página 17)
La unidad se apagó y encendió demasiado deprisa.
El retardo integrado evita que el compresor se encienda durante 3 minutos.
El temporizador apagó la unidad.
Pulse el botón ENCENDIDO/APAGADO para encenderlo. (Página 17)
No responden ni el panel táctil ni el control remoto.
La unidad está bloqueada. Desconéctela de la red eléctrica durante 10 segundos, enchúfela de
nuevo y los controles se resetearán. (Página 15)
EL ACONDICIONADOR DE AIRE PROVOCA QUE LOS FUSIBLES SE FUNDAN O EL DIFERENCIALES/CORTACORRIENTES SALTEN
Compruebe si …
En ese caso …
Los fusibles se han fundido o el diferencial/cortacorriente de la instalación
doméstica ha saltado.
Reemplace el fusible fundido por uno de retardo o reestablezca el diferencial/cortacorriente.
(Página 15)
Se están usando demasiados dispositivos eléctricos en el mismo circuito.
Desenchufe o recoloque algunos dispositivos que compartan el mismo circuito.
El equipo está tasado por encima de 7,5 amperios.
El equipo debería estar conectado a un enchufe de circuito único.
La unidad está enchufada con un alargador.
No use un alargador para conectar la unidad. (Página 15)
La unidad se apagó y encendió demasiado deprisa.
Apáguela y espere 3 minutos antes de volver a encenderla. (Página 17)
EL ACONDICIONADOR SE ENCIENDE Y APAGA SÓLO
Compruebe si …
En ese caso …
La temperatura exterior es extremadamente caliente.
Establezca la velocidad del ventilador al máximo para conseguir la máxima refrigeración.
(Página 17)
La función AHORRO DE ENERGÍA está activada.
La función ENERGY SAVER no hace circular el aire continuamente. Seleccione el modo FRÍO para
conseguir una circulación de aire constante. (Página 16)
El temporizador encendió o apagó la unidad.
Presione el botón ENCENDIDO/APAGADO para encender o apagar la unidad. (Página 17)
EL ACONDICIONADOR DE AIRE NO ENFRÍA LA HABITACIÓN - HAY HIELO TRAS EL PANEL FRONTAL
Compruebe si …
En ese caso …
La temperatura exterior está por debajo de 60º F.
Establezca el modo SÓLO VENTILADOR y la velocidad del ventilador al máximo para
descongelar el circuito. (Página 17)
Abra el panel frontal. Saque el filtro. Aclare el filtro o límpielo con una aspiradora. Recoloque el
filtro. Cierre el panel. (Página 20)
Podría ser necesaria una unidad de menor capacidad dependiendo del tamaño de la habitación
a enfriar. (Página 20)
El filtro está sucio.
La capacidad de BTU es demasiado grande.
EL ACONDICIONADOR DE AIRE NO ENFRÍA LA HABITACIÓN - NO HAY HIELO TRAS EL PANEL FRONTAL
Compruebe si …
En ese caso …
El filtro está sucio.
La temperatura establecida es más cálida que la de la habitación.
Abra el panel frontal. Saque el filtro. Aclare el filtro o límpielo con una aspiradora. Recoloque el
filtro. Cierre el panel. (Página 20)
Establezca la temperatura a un valor menor. (Página 17)
La temperatura exterior está por debajo de 60º F.
La unidad no está diseñada para enfriar por debajo de 60º F. (Página 19)
El frontal de la unidad queda bloqueado por muebles, cortinas,
persianas... etc.
La parte trasera de la unidad queda bloqueada por hojas, polvo,
ramas... etc.
Hay alguna puerta, ventana, ventilación... etc abierta.
Despeje el área de delante del frontal de la unidad.
Despeje la parte trasera de la unidad.
Cierre puertas, ventanas, ventilaciones... etc.
La unidad acaba de encenderse.
Permita un cierto tiempo para enfriar una habitación grande.
El sensor de temperatura está en contacto con el circuito de refrigeración.
Abra el panel frontal. Saque el filtro. Quite el extremo del sensor de temperatura del circuito de
refrigeración. Recoloque el filtro. Cierre el panel.
Abra los respiraderos si está cocinando o tomando un baño. Limite el uso aparatos domésticos que
generen calor durante el tiempo más caluroso del día. (Página 20)
Presione el control del respiradero a LA POSICIÓN DE CERRADO para conseguir un enfriamiento
máximo. (Página 19)
Hay demasiado calor en la habitación a enfriar.
El control del respiradero (en algunos modelos) está en posición abierta
hacia fuera.
21
Guía de resolución de problemas del acondicionador de aire para habitaciones
(Continuación)
EL ACONDICIONADOR DE AIRE FUNCIONA DEMASIADO
Compruebe si …
En ese caso …
El modo de Ahorro de Energía está seleccionado.
El ventilador interno continúa funcionando durante un minuto para aprovechar al máximo el frío
acumulado en el evaporador.
Ha reemplazado un equipo más viejo.
Los acondicionadores de aire nuevos de alta eficiencia pueden funcionar más para enfriar la
habitación. El consumo total de energía es menor debido a su alta eficiencia.
La capacidad de BTU es demasiado pequeña.
Podría ser necesaria una unidad de mayor capacidad dependiendo del tamaño de la habitación
a enfriar. (Página 20)
GOTEA AGUA DEL ACONDICIONADOR DE AIRE - DENTRO DE LA HABITACIÓN
Compruebe si …
En ese caso …
La unidad no ha sido adecuadamente instalada.
La unidad debe montarse con una inclinación de 1/4" hacia abajo y hacia el exterior (1/2 burbuja
en un nivel de carpintero) para proporcionar el drenaje adecuado. Reposicione o calce la carcasa
como sea necesario. NUNCA taladre un agujero de drenaje.
GOTEA AGUA DEL ACONDICIONADOR DE AIRE - EN EL EXTERIOR DE LA HABITACIÓN
Compruebe si …
En ese caso …
La habitación está caliente y húmeda.
Es un funcionamiento normal durante los días más cálidos y húmedos.
EL CONTROL REMOTO NO OPERA EL ACONDICIONADOR DE AIRE
Compruebe si …
En ese caso …
La batería no está instalada adecuadamente.
Verifique que la batería está correctamente instalada. (Página 16)
El control remoto apunta a la unidad.
El control remoto podría no funcionar adecuadamente cuando se usa en ángulos muy amplios con
respecto al frontal de la unidad.
SONIDOS TÍPICOS QUE PUEDE OIR EN SU ACONDICIONADOR DE AIRE
Compruebe si …
En ese caso …
Silbidos agudos y ruidos de vibración que van y vienen.
Compresor - Ruido normal en los compresores de alta eficiencia modernos. (Página 22)
Sonido de ráfagas de aire.
Ventilador/Motor - Ruido normal en los ventiladores de alta eficiencia cuando inyectan aire a
fondo en la habitación. (Página 22)
Condensador - Ruido normal de agua entrando en el condensador para aumentar la eficiencia
energética. (Página 22)
Sonido de goteo o chapoteo.
Sonido de borboteo o pitido.
Evaporador - Ruido normal del refrigerante pasando por la fase de evaporación. (Página 22)
Pitidos.
Control electrónico - Ruido normal cuando se cambian configuraciones en el control electrónico.
Vibración.
Vibración de la unidad - Debido a una pobre construcción de la ventana o una instalación
incorrecta. (Página 22)
RESOLUCIÓN DE PROBLEMAS DE ASSURELINK
RESOLUCIÓN DE PROBLEMAS DE ASSURELINK
Sonidos normales
Para las Preguntas más frecuentes sobre el sistema y la aplicación de Assurelink, consulte las respuestas
a Preguntas más frecuentes que se encuentran en línea en la aplicación o visite www.Kenmore.com/connected
Chirridos agudos
Los compresores de alta
efectividad de hoy en día
pueden producir un chirrido
agudo durante el ciclo de enfriado.
Sonido de ráfagas de aire
Delante de la unidad, puede
oír el sonido de ráfagas de
aire que son movidas por
el ventilador.
Borboteo/Siseo
Un sonido parecido a
un "borboteo o siseo" puede
escucharse debido al refrigerante
pasando a través del evaporador
durante una normal operación.
22
Vibración
La unidad puede vibrar y
hacer ruido debido a una
estructura débil de la pared
o la ventana, o a una instalación
incorrecta.
Goteo o chapoteo
Las gotas de agua que
caen sobre el condensador
durante la normal operación
del producto pueden producir
sonidos de "goteo o chapoteo".
Nota: No intente hacer perforaciones
en la base para eliminar los sonidos
normales, de lo contrario se anulará
la garantía.
DECLARACIÓN DE FCC
Declaración de interferencia de FCC
Se ha comprobado que este equipo cumple los límites para dispositivos digitales de clase B, de acuerdo con el apartado 15 de
las normas de la FCC. Estos límites están diseñados para ofrecer una protección razonable contra las interferencias perjudiciales
en una instalación doméstica. Este equipo genera, utiliza y puede irradiar energía de radiofrecuencia y, si no se instala y se
utiliza de acuerdo con las instrucciones, podría ocasionar interferencias perjudiciales para las comunicaciones de radio. No
obstante, no se puede garantizar que no se vaya a producir este tipo de interferencias en una instalación en particular. Si
este equipo ocasiona interferencias perjudiciales en la recepción de radio o televisión, que puede comprobarse encendiendo y
apagando el dispositivo, se recomienda que intente corregir la interferencia mediante una de las siguientes acciones:
Reoriente o reubique la antena receptora.
Aumente la separación entre el dispositivo y el receptor.
No conecte el equipo en la toma del mismo circuito que el receptor.
Consulte con su distribuidor o con un técnico de radio y televisión.
Este dispositivo cumple con el apartado 15 de las normas de la FCC. Su funcionamiento está sujeto a las siguientes dos condiciones:
(1) Este dispositivo no debe provocar interferencias perjudiciales, y (2) Este dispositivo debe aceptar cualquier interferencia que
reciba, incluidas las interferencias que puedan provocar un funcionamiento no deseado.
PRECAUCIONES DE FCC: Cualquier cambio o modificación que no haya sido aprobada explícitamente por la parte responsable
del cumplimiento, puede conllevar la extinción del permiso operativo de este equipo.
Etiquetado del dispositivo
Este dispositivo incluye el siguiente módulo.
Contiene el identificador de FCC: 2ABHC-5430042
Declaración de exposición de RF
Este equipo cumple los límites FCC de exposición a la radiación establecidos para un entorno no controlado. Este equipo se debe
instalar y utilizar a un mínimo de 20 cm de distancia entre el radiador y su cuerpo. Este transmisor no se debe colocar o utilizar junto
con ninguna otra antena o transmisor a menos que sea autorizado por la FCC.
DECLARACIÓN DE INDUSTRY CANADA (IC)
Este aparato digital de Clase B cumple con las normas canadienses ICES-003.
Este dispositivo cumple con las normas RSS exentas de la licencia de Industry Canada. Su funcionamiento está sujeto a las siguientes
dos condiciones: (1) este dispositivo no debe provocar interferencias, y (2) este dispositivo debe aceptar cualquier interferencia que
reciba, incluidas las interferencias que puedan provocar un funcionamiento no deseado del dispositivo.
Le présent appareil est conforme aux CNR d'Industrie Canada applicables aux appareils radio exempts de licence.
L'exploitation est autorisée aux deux conditions suivantes : (1) l'appareil ne doit pas produire de brouillage, et (2)
l'utilisateur de l'appareil doit accepter tout brouillage radioélectrique subi, même si le brouillage est susceptible d'en
compromettre le fonctionnement.
Exposición de RF
La antena (o antenas) se debe instalar de forma tal que mantenga a todo momento una distancia mínima de al menos 20 cm
entre la fuente de radiación (antena) y cualquier persona. Este dispositivo no se debe instalar o utilizar junto con ninguna otra
antena o transmisor.
l'exposition aux RF
L’antenne (ou les antennes) doit être installé e de façon à maintenir à tout instant une distance minimum de au moins 20
cm entre la source de radiation (l’antenne) et toute personne physique.
Etiquetado del dispositivo
Este dispositivo incluye el siguiente módulo.
Contiene el IC: 12012A-5430042
Host dispositif d'étiquetage
Ce dispositif inclut le module suivant.
Contient module émetteur IC: 12012A-5430042
Nota: Este electrodoméstico contiene un modulo Wi-Fi dentro
del panel, como se muestra in la imagen, lo que le permite a
la unidad conectarse a Internet.
23
Esta es la ubicación
del módulo.


© Copyright 2026