
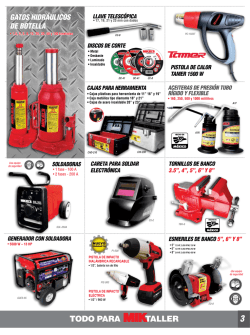
Untitled - Česká zbrojovka
Before handling the pistol read this manual carefully and observe the
following safety instructions.
Improper and careless handling of the pistol could result in unintentional discharge
and could cause injury, death or damage to property. The same consequences can be
caused by unauthorized modifications or adjustments, corrosion, or use of non-standard
or damaged ammunition. In these cases the manufacturer shall not be responsible in any
manner whatsoever for the resultant consequences. Before leaving the factory this pistol
was tested, carefully inspected, and packed. CZ cannot accept responsibility for product
handling while in transit, or upon leaving the factory. Therefore, please examine this pistol
carefully at the time of purchase to ensure that it is unloaded and undamaged.
This instruction manual should always accompany this pistol and that even in the
case of the loan or sale of this pistol.
CONTENTS
SAFETY INSTRUCTIONS
PISTOL DESCRIPTION AND TERMINOLOGY
Safety Features
OPERATING INSTRUCTIONS
Ammunition
Removal of the Magazine
Magazine Loading
Pistol Loading
Reloading During Shooting
Unloading the Pistol
Engaging the Safety Mode
Decocking
Sight Adjustment
Changing the Back Strap Inserts
MAINTENANCE INSTRUCTIONS
Stripping for Cleaning - Disassembly
Magazine Disassembly
Exchange of Control Elements
Cleaning the Pistol
Cleaning the Barrel Bore and the Cartridge Chamber
Cleaning of Other Pistol Parts
Preserving
Waste Management
LIST OF PARTS
TROUBLESHOOTING, CAUSES AND REMEDIES
TECHNICAL SPECIFICATIONS
LIST OF ILLUSTRATIONS
2
3
6
7
7
7
7
8
8
8
8
8
9
9
9
10
10
10
11
11
11
12
12
12
13
14
15
15
SAFETY INSTRUCTIONS
Always follow the safety instructions for your safety and the safety of others.
1. Always handle your pistol as if it were loaded.
2. Never point your pistol at anything you do not intend to shoot.
3. Never take anyone's word that a gun is unloaded.
4. Always make sure that your pistol is not loaded before laying it down, or handing it to
another person.
5. Always keep and carry your pistol empty, with the hammer forward except when you
intend to shoot.
6. Never abuse your pistol by using it for any purpose other than shooting.
7. Never leave the pistol cocked and ready to fire unattended.
8. Before loading your pistol be sure that the barrel bore, chamber, and action are clean
and clear of obstructions. After shooting, clean the dirtied pistol as soon as possible.
9. Always use only clean, dry, original high quality commercially manufactured
ammunition, which is appropriate to the caliber of your pistol.
10. Never drink alcoholic beverages or take drugs before or during shooting.
11. Always wear safety glasses and ear protection when shooting.
12. Always keep the safety on when the pistol is loaded and cocked, until you are ready to
fire. Keep your pistol pointed in a safe direction when disengaging the manual safety.
13. Always keep clear and keep others clear of the ejection port.
14. Never squeeze the trigger or put your finger in the trigger guard until you are aiming at
a target and ready to shoot.
15. Always be absolutely sure of your target, and the area behind it, before you squeeze
the trigger. A bullet could travel through or past your target up to several hundred
meters.
16. Never shoot at a hard surface such as rock, or a liquid surface such as water.
17. Never fire your pistol near an animal unless it is trained to accept the noise.
18. Never indulge in "horseplay" while holding your pistol.
19. Failure to fire: In case of failure to fire hold the firearm keeping it pointed towards the
target, or a safe open area and wait 30 seconds. If a hangfire (slow ignition) has
occurred, the cartridge will fire within 30 seconds. If the cartridge does not fire, eject
the cartridge and examine it. If the firing pin indent on the cartridge is light, or nonexistent, have the firearm examined by a competent gunsmith.
20. Always make sure your pistol is not loaded before cleaning, storing or travelling.
21. Always keep and store your pistol and ammunition in separate locked receptacles out
of reach and sight of children and untrained people.
3
22. Never alter any parts of your pistol as the safety and proper function of your pistol
could be seriously compromised.
23. Always be aware that corrosion, use of damaged ammunition, dropping the pistol on
hard surfaces or other "coarse treatment" could cause damage you may not see. If
something like this happens allow the pistol to be examined and tested by a
competent gunsmith.
RULES OF THE SAFE HANDLING TRITIUM SIGHTS
The tritium sights MEPROLIGHT type ML-17777 for CZ pistols involve a luminous front
sight (tritium radiator of 0,565 GBq activity) and a luminous rear sight (2 tritium radiators of
0,444 GBq activity) that is installed at the pistol by means of precision dovetails. Tritium in
the gaseous state (99% HT and 1% HTO) is enclosed in borosilicate glass ampoules with a
luminescent element and these ampoules are fixed by glue into the metallic cap of the sight
so that the manipulation and storage of the sights is not exposed to any risks.
The third generation of the sights retains all the advantageous features of the preceding
generation of MEPROLIGHT sights and several improvements are added:
-
-
built-in shock absorber
solid protective bushing providing less sensitivity against rough manipulation
immovable crystal window for a better light output with additional protection
against a damage
tolerance against longer immersion in currently used solvents and cleaning agents
guaranteed continuous available light intensity for the period of 12 years
MV sealing design (the only design tested and approved by Israel armed forces)
protects the sights against an accidental damage, avoids the unwanted
manipulation with the light source, inhibits to penetrate the dirt into the visual
system and to hide the light
provided a finer transition between the aiming during the day and the night
simple installation (no modification of the arm is necessary)
no added weight nor size
no maintenance
no battery needed (no losses of the energy at the cold weather)
Safety instructions in case of the sights damage
In regular conditions of the storage, use and maintenance there is no risk to the user
caused by emitted ionizing radiation, because it doesn't penetrate metallic caps, in which the
ampoules with radiators are fixed. In case of a nearly unreal incidental damage of all
ampoules in one set at the moment, when the arm is in shooting position (position of the
sights closer to the shooter), the single effective radiation dose wouldn't exceed the value of
0,26 mSv. What does this value present? It is for example:
4
-
1/12 of the dose which is received by an ordinary inhabitant in course of a year
-
due to the natural radioactive background (3,5 mSv / year)
less than 1/4 of the general effective dose limit to an ordinary inhabitant
Recommended first aid at the inspiration of the gaseous tritium
The gaseous tritium state is practically inactive and causes a slight internal
contamination. In case of its inspiration it is recommended to increase the intake of liquids
and eventually to take some diuretic (beer with low content of alcohol) for acceleration of the
body water exchange.
DUTIES OF THE TRITIUM SIGHTS OWNER
1. The sights are a radioactive radiator in the period of 6,5 years since their purchase
according to the Czech Republic legislation.
2. At the purchase the owner obtains a guide with rules of the safe handling and a
document on the on the impermeability of the radionuclidic radiators in the set
(certificate of the encased radionuclidic radiator), which must be preserved and
presented on request of the competent authority.
3. When handling a type approved product, which is the source of the ionizing radiation,
it is necessary to respect national regulations for protection against he ionizing
radiation (the appropriate national legislation).
4. In case of the ownership of more than 9 sets of sights (the total activity exceeding 10
GBq) the owner is obliged to consult the duties resulting from the appropriate national
legislation at the competent authority.
5. To avoid such manipulation, when a rough mechanical damage of the sights may happen.
6. It is not allowed to carry out any changes, relating to the properties of the protection
against the radiation.
7. In case of the destruction or the damage, the sights mustn't be further used. The
owner is obliged to secure safely the device changed in such a way and to pass it to
the distributor or the manufacturer for the safe liquidation. The same procedure to be
applied for liquidation of no more used sights.
8. The manipulation with sights is governed by general principles of the protection
against the ionizing radiation. At the current use there are no requested tests of
impermeability during the service life of the sights.
The sights were type approved by the decision of the competent authority Ref. No.
25169/2005, index A1.
Company, eventually the responsible company representative:
Ing. Ladislav Britaňák
5
PISTOL DESCRIPTION AND TERMINOLOGY
The names of basic pistol parts used in this Instruction Manual are presented in Fig. 1
on the inner side of the left-hand cover. Nomenclature of all CZ P-09 parts are presented in
the section List of Parts.
The CZ P-09 pistol is a semi-automatic handgun incorporating short recoil, designed for
aimed shooting up to 50 m distances. The CZ P-09 utilizes the locked breech principle. It is
fitted with a trigger mechanism adapted to operate both in SA and DA modes of fire, a firing
pin safety, safety stop on the hammer and manual safety which can be easily disassembled
and substituted by a hammer decocking element. The frame is made from plastic material.
Characteristic features of the CZ P-09 are:
-
Comfortable grip and balance in either hand
Good results at instinctive shooting (without aiming)
Low trigger pull weight
High accuracy of fire
Long service life
High reliability, even with various types of cartridges
Sights adapted also for aiming under reduced visibility conditions
The slide stays open after the last cartridge has been fired
Suitable for everyday service gun toting
The standard pistol version provided with ambidextrous safety or ambidextrous
decocking element
Mutual interchangeability of the safety and hammer decocking element
The front part of the frame provided with grooves for applying special accessories
Each pistol is supplied with these items:
-
-
2 pieces of magazines (the number of magazines can differ for particular versions
of the pistol)
set of interchangeable back strap inserts
interchangeable control elements (safety/hammer decocking lever controller)
maintenance and cleaning instruments (cleaning brush, cleaning rod, key for
sights adjustment, polymer case)
documents related to the pistol (instruction manual, CD containing promotion files
and instruction manuals in various languages, warranty certificate/card, grouping
paper)
padlock (only in selected versions)
6
Comments:
SA (Single Action)
The trigger mechanism operates in a single action mode of fire. The hammer is cocked
manually and then after pressing the trigger the pistol is fired. The trigger travel is short, and
pull weight is low. After each discharge the hammer remains cocked.
DA (Double Action)
The trigger mechanism operates in a double action mode of fire. The hammer is
cocked, released and the pistol fired by one pull of the trigger. The trigger travel is longer,
and trigger pull weight is higher than at SA mode of fire.
Safety Features
Trigger Guard
Prevents unintentional pressing of the trigger, for example when the pistol is dropped.
Inertia Firing Pin
The design of the firing pin prevents the firing pin from protruding through the face of
the slide when the hammer is in its rest position. This eliminates the possibility of a discharge
when a loaded pistol is dropped on the hammer.
Firing Pin Safety
The firing pin safety keeps the firing pin blocked until the trigger is pulled. This safety
device minimizes the risk of accidental discharge through mishandling such as when a
loaded pistol is dropped.
Safety Stop on the Hammer
A half-cock safety notch is on the hammer so as to prevent it from striking the firing pin
when the hammer is manually cocked, and a thumb could slip. When the hammer is on the
safety stop, it is not leaning against the firing pin stop, but its position is further back.
OPERATING INSTRUCTIONS
Ammunition
Use only factory-manufactured ammunition of appropriate caliber, which are in
compliance with CIP regulations (International Proof Commission for Firearms) or SAAMI
(Sporting Arms and Ammunition Manufacturers' Institute Inc. of the United States). The use
of other cartridges could damage the handgun or cause injury to the shooter.
Removal of the Magazine
Grip the pistol in your right (left) hand and by the thumb (middle finger) depress the
magazine catch (Fig. 2). The magazine disengages and falls out of the frame. This pistol
model is equipped with the user type magazine catch which can be reversed by gunsmith for
the right or left hand operation.
7
Magazine Loading
With the open end uppermost, grasp the magazine in one hand. Place a cartridge on
the magazine follower. Press the cartridge down and back until it touches the rear flat edge
of the magazine. Place the next cartridge on top of the previous cartridge and press down
and back. We recommend that when some cartridges are already loaded in the magazine,
depress them slightly with the thumb of the hand which holds the magazine.
The number of cartridges can be checked through the inspection holes in the sides of
the magazine. Do not try to exceed the magazine capacity - doing so can cause a feeding
failure.
Pistol Loading
ALWAYS MAKE SURE THE PISTOL IS POINTED IN A SAFE DIRECTION WHEN LOADING!
Insert a loaded magazine and ensure that it has engaged the magazine catch.
Hold the pistol by the grip with one hand, and with the thumb and index finger grasp the
serrated finger grips on both sides of the slide. Retract the slide to the stop and allow it to
snap forward (Fig. 3). This procedure cocks the hammer and inserts a cartridge into the
chamber. The pistol is now ready to fire. If you do not intend to fire immediately, ensure the
pistol safety by some of the methods mentioned in the section: Engaging the Safety Mode or
as per section Decocking.
Reloading During Shooting
When the last cartridge has been fired the slide will stay to the rear. Remove the
emptied magazine and replace it with a loaded one. Thumb down the slide stop with the
shooting hand (Fig. 4), or with the other hand draw back the slide and allow it to snap
forward. The pistol is again loaded and ready to fire.
Unloading the Pistol
ALWAYS MAKE SURE THE PISTOL IS POINTED IN A SAFE DIRECTION!
-
Remove the magazine
Draw back the slide and verify the last cartridge has been extracted from the
chamber and ejected
Let the slide snap fully forward
Depress the trigger (dry fire)
Engaging the Safety Mode
The version equipped with a decocking device is not covered in this section!
Push the safety up to the Safety-On position (Fig. 5) until the red warning dot is
covered. The safety in this position blocks the trigger mechanism and slide, thus preventing
the pulling of the trigger and operating the slide. The safety lever can be set to the "Safe"
position even with the hammer on safety notch. However, it is not recommended that the
safety be engaged while in this state as any forced cocking of the hammer could damage the
8
trigger mechanism. The pistol safety shall be only engaged with the hammer in its rear
position, i.e. cocked. The use of safety is therefore convenient for short interruptions of firing
only.
Besides the method previously described it is possible to put the pistol into a safety
mode and still be ready to fire immediately:
Load the pistol. Grasp the grip, POINT IN A SAFE DIRECTION. With thumb press on
the grooved area (thumb piece) of the hammer, pull the trigger and release the hammer
slowly ahead (Fig. 6) until it rests on the action or safety thumb of the hammer. Release the
trigger. Practise this operation very carefully to avoid an accidental discharge! We strongly
recommend to practise this operation beforehand with the pistol unloaded!
In this state the pistol is safe for all normal handling and at the same time ready for
immediate use. Please remember that the safest way to secure a pistol is to unload it and
store it in a safe place!
Decocking
The version equipped with a manual safety is not covered in this section!
MAKE SURE THE PISTOL IS POINTED IN A SAFE DIRECTION and thumb down the
decocking control lever (Fig. 7).
Pressing down the decocking control lever actuates the lowering of the hammer from
the cocked position to the hammer safety notch position, without any need to pull the trigger.
Even if there is a cartridge in the chamber the pistol is (hammer decocked) safe for all
normal handling in this state, and ready for immediate use in a Double Action mode of fire.
Sight Adjustment
The pistol sights were sighted in at the manufacturing plant at a distance of 25 m so
that the mean point of impact approximately conforms to the point of aim.
Windage correction can be carried out by the drifting of the rear sight in the dovetail
and then secured in its position by an indentation.
Elevation correction is carried out by exchanging the front sight for higher or lower
sizes.
Changing the Back Strap Inserts
Each pistol is supplied with a set of changeable back strap inserts, which enables the
rear part of the grip to be adjusted according to the individual needs of the user. In order to
change the back strap inserts it is necessary to remove the main spring plug pin. To avoid
injuries be very careful when removing the pin as it secures the main spring plug as well as
the compressed main spring. Entrust the task to a gunsmith.
9
MAINTENANCE INSTRUCTIONS
Stripping for Cleaning - Disassembly
POINT YOUR PISTOL IN A SAFE DIRECTION!
1. Remove the magazine. The pistol must not be disassembled with the magazine
inserted!
2. Put the safety to "OFF" position, in order to release the movement of the slide.
3. MAKE SURE THAT THERE IS NO CARTRIDGE IN THE CHAMBER!
4. Retract the hammer slightly back and then release it, until it stops on half-cock (safety)
notch position. In this state the handling which follows will be easier.
5. Put your left thumb through the trigger guard and with the other fingers grasp the top
of the front part of the slide firmly.
6. Push the slide slightly rearwards until the rear of the slide is against the retracted
hammer and the guidelines on the frame and the slide are in line.
7. Push (tap) the slide stop from the right hand side of the weapon, i.e. using the
magazine base (Fig. 8). Remove the slide stop from the left.
8. Pull the slide and the barrel forward off the frame.
9. Remove the recoil spring and finally the barrel.
No further disassembly is needed for routine maintenance. When a great number of
cartridges has been fired, it is advisable to also disassemble magazine and to entrust the
pistol to a competent gunsmith for the firing pin cleaning.
Magazine Disassembly
To remove the magazine base, push on the base lock which sticks out through a hole
in the base and slide the base about 5 mm towards the front of the magazine. Cover the
base with your thumb to prevent losing the magazine spring and with the other hand take off
the base from its guiding rails. Be careful during the disassembly as the spring could fly out,
or even cause an injury.
10
Exchange of Control Elements
The pistol is designed in such a way that it enables an easy exchange of the safety by
the hammer decocking element and reversely. This operation can be done without using any
special tooling. The left safety or left decocking element can be removed first after
depressing the ejector downward. Before assembling the right safety or right decocking
element it is necessary to depress the trigger bar downward.
In the safety configuration only safeties are installed. In case of the decocking
configuration besides the control elements, it is necessary to install also the spring of the
control element so that its shorter end is supported by the nose of the control element body
and the opposite end is positioned in the pin hollow (Fig. 9).
It is recommended to pass the training of the control elements exchange under
supervision by an experienced gunsmith or to refer to the guidance on the website of Ceska
zbrojovka.
CAUTION:
No further disassembly of your pistol is recommended. Should your pistol require
adjustment or repair be sure the task is entrusted to a competent gunsmith!
Cleaning the Pistol
-
Clean the pistol
Each time you use it
If you get your pistol wet
As soon as possible after shooting
At least once a year in a temperate climate
As often as once a month in a tropical climate, or other demanding environment
Cleaning the Barrel Bore and the Cartridge Chamber
If the pistol has not been fired or if only a few cartridges have been fired, clean the
barrel bore and cartridge chamber by the clean patch attached to the cleaning rod. Repeat
the cleaning, changing patches, until the last patch comes out clean.
When the barrel bore is very dirty, apply a gun cleaning solution using a cleaning brush.
Let the solvent act for about 10 minutes (this time may vary depending on the solvent agent
being used). Then thoroughly scrub out the barrel bore. Subsequently, dry the barrel bore
and cartridge chamber with a clean patch and check that all powder residues or fouling have
been removed. If necessary repeat this procedure.
The cleaning rod and the brush must be inserted into the barrel bore from the chamber,
to prevent wear or damage to the muzzle. Pass the brush all the way through the barrel bore
before reversing the movement. If you try to change directions with the brush in the barrel,
the brush could stick.
11
Cleaning of Other Pistol Parts
Other parts of the pistol (including the external surfaces of the barrel) should be
cleaned with a dry cloth, old toothbrush, brass bristle brush or a wooden scraper. Preserving
oil or paraffin oil can be used for proper cleaning. Never use the agent designed for barrel
bore cleaning! These solutions could remain in the joints, and after some time could cause
corrosion.
Check that cloth particles or brush bristles have not become lodged in any part of the
pistol.
Preserving
When the barrel bore, cartridge chamber, and all accessible parts are clean and dry,
wipe these parts with a cloth soaked in gun oil or apply the oil in a spray. Remove all excess
oil.
Before shooting always wipe the barrel bore dry. At very low temperatures remove the
oil from all accessible parts or apply a lubricant prepared especially for these conditions.
Use thick preserving agents for example, preserving grease only for a long-term
storage in demanding climate environments, and before any use of the pistol it must be
thoroughly removed from all parts of the firearm.
Waste Management
When used properly, the materials used in the product and packaging have no adverse
effects on human health or the environment. When disposing of the product or its packaging,
metal parts (steel and non-ferrous metals), plastics, wood, paper and cardboard should be
stored separately in collecting containers intended specifically for that purpose.
The Company, reserves the right to make any changes it thinks necessary to improve its models or to
meet any requirements of manufacturing or commercial nature.
12
LIST OF PARTS
1 a) Frame
25 Front Sight
b) Changeable Back Strap
26 Main Spring Strut
Insert S/M/L
27 Main Spring Plug
2 Slide
28 Sear Pin
3 Barrel
29 Hammer Pin
4 Slide Stop
30 Trigger Pin
5 Magazine
31 Magazine Catch Plug
6 Insert - Front
32 Main Spring Plug Pin
7 Insert - Rear
33 Extractor Pin
8 Trigger
34 Magazine Catch Pin
9 Trigger Bar
35 Insert - Front Pin
10 Sear
36 Pin
11 Hammer
37 Firing Pin Plug
12 Disconnector
38 Recoil Spring Assembly
13 Firing Pin Block Lever
39 Securing Screw (2x)
14 Trigger Bar Disconnector
40 Extractor Spring
15 Ejector
41 Firing Pin Spring
16 Firing Pin
42 Firing Pin Block Stop Spring
17 Extractor
43 Spring (2x)
18 Firing Pin Block Stop
44 Slide Stop Spring Pin
19 Magazine Catch
45 Main Spring
20 Safety - Left *
46 Trigger Spring
21 Safety - Right *
47 Slide Stop Spring
22 Hammer Decocking Lever
48 Hammer Decocking Lever Spring *
Controller - Left *
49 Trigger Bar Spring
23 Hammer Decocking Lever
50 Sear Spring
Controller - Right *
51 Insert - Rear Pin
24 Rear Sight *
The parts marked * differ according to versions, or as case may be in some versions
are entirely missing.
13
TROUBLESHOOTING, CAUSES AND REMEDIES
If your pistol is properly used and maintained, malfunctions will rarely occur. However, if
such a situation does occur, please observe the following instructions.
CAUTION - If a malfunction occurs, the possibility of unintentional discharge is
substantially increased. For this reason, carefully observe the Safety Instructions already
mentioned above. Keep the pistol pointed in a safe direction, do not turn the pistol against
your body or anyone else’s! Do not place your hands in front of the barrel!
If you use your pistol for self-defense, or in law enforcement, please acquire so-called
“dummy cartridges” and practice fast clearing of malfunctions as described below.
Malfunction
Possible Cause
Remedy
Magazine is not fully
inserted or is damaged.
Insert magazine properly or change
magazine.
The pistol or cartridges are
fouled (dirty) or too heavily
greased.
Clean the pistol and cartridges and
wipe them dry or as case may be
slightly lubricate.
Defective cartridge.
Pull the trigger again. If a discharge is
not initiated, follow the Safety
Instructions according to point 19.
Misfire
Firing pin hole fouled
(dirty) or unproper
lubrication agent used
under low temperature
conditions.
Disassemble and clean the firing pin
or use a low temperature lubricant.
A shot sounds "weak"
combined with failure
to eject the cartridge
case
The cartridge has been
activated but no powder
load was inside the
cartridge case.
Unload the pistol and check that the
bullet is not lodged in the barrel. A
subsequent shot could cause
damage to the barrel.
The spent case has
not been ejected
Cartridge chamber,
extractor or ammunition
dirty, or unsuitable
lubricant in low
temperature environment.
Clean and wipe the pistol dry or
lubricate lightly with a suitable agent.
Use new and clean ammunition.
A cartridge has not
been fed into the
chamber or the slide
has not fully locked
with the barrel
If you cannot clear away any malfunction in the manner described above, entrust the
pistol to a competent gunsmith for inspection and repair.
14
TECHNICAL SPECIFICATIONS
9 x 19
9 x 21
Caliber
.40 S&W
Overall length
[mm]
205 -2
205 -2
Height
[mm]
148 ± 1,5
148 ± 1,5
Width *
[mm]
Frame
Weight with empty magazine
[g]
37 ± 1
37 ± 1
Polymer
Polymer
max. 860
max. 860
Barrel length (without glide ramp)
[mm]
115 -1
115 -1
Sight radius
[mm]
170 ± 2
170 ± 2
Magazine capacity **
19
15
Trigger pull (SA)
[N]
14,7 - 24,5
14,7 - 24,5
Trigger pull (DA)
[N]
max. 58,9
max. 58,9
*
**
[cartridges]
Measured with ambidextrous safety eventually with ambidextrous decocking element
To some countries, the CZ P-09 pistols are supplied with a reduced magazine capacity
in compliance with local laws
LIST OF ILLUSTRATIONS
1. The names of basic parts
2. Removal of the magazine
3. Pistol loading
4. Slide release from its "rear lock-up" position by depressing slide stop
5. Shifting the safety to the "SAFETY-ON" position
6. Release of the hammer in the version equipped with the manual safety
7. Release of the hammer in the version equipped with no manual safety
8. Slide stop removal using the magazine base
9. Detail of the hammer decocking element installed
15
Antes de manipular con la pistola, lea cuidadosamente este manual y observe
especialmente las siguientes instrucciones de seguridad.
Un manejo incorrecto y descuidado de la pistola podría producir un disparo no
intencionado causando lesiones corporales, muerte o daños a la propiedad. Las mismas
consecuencias pueden tener modificaciones no autorizadas, corrosión o uso de una
munición no prescrita o averiada. El fabricante no se hará responsable por las
consecuencias originadas en estos casos. Antes de abandonar la fábrica, la pistola fue
probada, revisada cuidadosamente y empaquetada. CZ no puede controlar la
manipulación del producto una vez que el mismo abandone la fábrica. Por esta razón, al
comprar esta pistola verifique que la misma esté descargada y sin averías.
Este Manual de Instrucciones deberá siempre acompañar la pistola, incluso cuando
el arma fuese prestada o vendida.
CONTENIDO
INSTRUCCIONES DE SEGURIDAD
TERMINOLOGÍA Y DESCRIPCIÓN DE LA PISTOLA
Elementos de seguridad de la pistola
INSTRUCCIONES DE USO
Munición
Retiro del cargador
Cargar el cargador
Cargar la pistola
Recarga durante el tiro
Descargar la pistola
Seguro de la pistola
Soltar el martillo (Decocking)
Ajuste de miras
Recambio de lomos de la empuñadura
INSTRUCCIONES DE MANTENIMIENTO
Desmontaje del arma para la limpieza
Desmontaje del cargador
Recambio de elementos de manejo
Limpieza de la pistola
Limpieza del ánima y la recámara
Limpieza de otras partes de la pistola
Conservación
Tratamiento de los residuos
LISTA DE COMPONENTES
ELIMINACIÓN DE FALLAS FUNCIONALES
DATOS TÉCNICOS
LISTA DE GRÁFICOS
16
17
21
22
23
23
23
23
23
24
24
24
25
25
25
26
26
26
27
27
27
28
28
28
29
30
31
31
INSTRUCCIONES DE SEGURIDAD
Mantenga siempre las instrucciones de seguridad para su seguridad personal y la de
los demás.
1. Manipule siempre con su pistola como si fuese cargada.
2. No apunte nunca a ningún objeto, si no tenga la intención de disparar.
3. No confíe a nadie que la pistola esté descargada.
4. Antes de dejar de utilizar la pistola o entregarla a otra persona, verifique siempre que
esté descargada.
5. Almacene la pistola descargada y con el martillo en la posición delantera.
6. No utilice nunca la pistola con otros fines que para disparar.
7. Nunca deje sin vigilancia una pistola cargada.
8. Antes de cargar el arma, asegúrese que el ánima del cañón, la recámara y la
corredera estén limpios y sin obstrucciones. Limpie la pistola después del disparo tan
pronto sea posible.
9. Utilice siempre una munición limpia, seca y de fabricación original, de alta calidad y
en un buen estado, correspondiente al calibre de su pistola.
10. Nunca tome bebidas alcohólicas o utilice estupefacientes antes o durante el disparo.
11. Utilice protectores de oídos y gafas de tiro protectoras durante el tiro.
12. Si la pistola está cargada y con el martillo montado, mantenga el seguro en la
posición de seguridad hasta el momento de estar preparado para el disparo. Al quitar
el seguro apunte en un espacio seguro.
13. Mantenga libre la ventanilla de expulsión e impida que alguien se coloque en la
dirección de la cartuchera expulsada.
14. No presionar el disparador y no introducir los dedos en el guardamonte del
disparador, a no ser, que esté apuntando al blanco y preparado para dispararar.
15. Antes de presionar el disparador, vuelva a controlar su objetivo y el espacio posterior
del mismo. La bala puede atravesar el objetivo o desviarse fuera del mismo y pasar
una distancia de varios cientos de metros.
16. Nunca dispare a una superficie dura, como una piedra, o la del agua por ejemplo.
17. No dispare nunca cerca de un animal que no esté entrenado para este tipo de ruido.
18. Al manipular con la pistola, evite todo tipo de "bromas".
17
19. Falla del disparo: En el caso de no producirse el disparo, mantenga el arma
apuntando hacia el blanco de disparar o hacia un espacio seguro y espere treinta
segundos. En el caso de producirse una ignición atrasada, el cartucho disparará en
treinta segundos. Si no se produciría el disparo, retire el cartucho del cañón y
revíselo. Si la huella del percutor en el cartucho es débil o falta, antes de realizar el
siguiente disparo deje revisar la pistola por un armero calificado.
20. Asegúrese siempre que la pistola no este cargada cuando vaya a limpiarla,
almacenarla o transportarla.
21. Guarde siempre la munición y la pistola en depósitos seguros y bajo llave, fuera del
alcance y la vista de los niños o gente no autorizada.
22. Nunca altere ninguna parte de la pistola, podría comprometer de una manera grave el
correcto funcionamiento de la pistola o su seguridad.
23. Tenga en cuenta que la corrosión, el uso de munición dañada, el roce del arma con
superficies duras u otros rudos movimientos podrían causar daños a la pistola, que no
necesariamente se puedan percibir a simple vista. Si algo como esto ocurriera,
entregue el arma a un especialista para ser examinada y probada.
REGLAMENTOS DE SEGURIDAD PARA EL USO DE MIRAS DE TRITIUM
Las miras de tritium MEPROLIGHT de tipo ML-17777 para pistolas CZ forman un juego
con un guión luminoso (emisor de tritium de una actividad de 0,565 GBq) y miras luminosas
posteriores - el alza (2 emisores de tritium de una actividad de 0,444 GBq), que se
ensamblan en el arma a colas de milano exactas. El tritium en su forma gaseosa (99% HT y
1% HTO) se encuentra cerrado en ampollas de vidrio de borosilicato con luminofor, las
mismas que se fijan con un pegante en una funda de metal de tal manera, que el uso y el
almacenamiento de las miras no representen ningunos riesgos.
En la tercera generación de las miras se mantienen todos los elementos de ventaja de
la generación anterior de miras MEPROLIGHT y se añaden algunas correcciones:
-
Un amortiguador de golpes incorporado
Un manguito de protección sólido que asegura la disminuída sensibilidad de las
miras en caso de una manipulación tosca
-
Una ventanilla fija de cristal para una mejor salida de luz y mejor protección
contra el el daño
Resistencia a la sumersión prolongada en disolventes y medios de limpieza de
uso corriente
Luminosidad garantizada utilizable e ininterrumpida durante el tiempo de 12 años
-
18
-
-
Molde de empaque MV (el único molde ensayado y aprobado por las fuerzas
armadas de Israel) protege las miras contra averías casuales, impide la
manipulación inadecuada con la fuente de luz, impide la penetración de suciedad
al sistema visual y el encubrimiento de la luz
Asegura un paso más suave entre el apuntamiento durante el día y en la noche
Un montaje sencillo (no requiere de ningunas modificaciones en el arma)
No aumenta el peso ni el volumen
Sin mantenimiento
No necesita batería (no hay pérdidas de energía durante el clima frío)
Instrucciones de seguridad en caso de un daño de las miras
Bajo condiciones regulares de almacenamiento, uso y mantenimiento de las miras la
radiación ionizante emitida no representa ningún riesgo para el usuario, ya que no se filtra a
través de las fundas de metal en las cuales se encuentran fijas las ampollas con los
emisores. En caso de producirse un daño casual casi irreal de todas las ampollas en un
juego de miras en el momento cuando el arma se encuentre en la posición de disparo (la
posición, cuando las miras se encuentran más cerca del tirador), la dosis única efectiva no
sobrepasaría el valor de 0,26 mSv. Que representa este valor? Por ejemplo, es igual a:
-
1/12 de la dosis que un habitante corriente obtiene durante el año del fondo de
radiación natural (3,5 mSv / año)
es menos que 1/4 del límite general de la dosis efectiva para un habitante
corriente
Primeros auxilios recomendados en caso de una inhalación del tritium en forma gaseosa
La forma gaseosa del tritium es practicamente inerte y causa una moderada
contaminación interior. En caso de una inhalación se recomienda aumentar la cantidad de
líquidos y también, eventualmente administrar diuréticos (cerveza con bajo contenido de
alcohol) para acelerar la vuelta del agua en el cuerpo.
OBLIGACIONES DEL PROPIETARIO DE MIRAS DE TRITIUM
1. De acuerdo a la legislación de la República Checa las miras son un emisor
radioactivo durante el plazo de 6,5 años desde su adquisición.
2. Al adquirir las miras el propietario del equipo obtendrá un manual con instrucciones
de uso seguro y un certificado sobre la hermeticidad de los emisores de radionúclido
en el juego (el certificado del emisor de radionúclido cerrado), que debe guardar y
presentarlo a las autoridades competentes en caso de ser requerido.
3. Durante la manipulación con el producto de tipo autorizado que es una fuente de
radiación ionizante hay que respetar los reglamentos nacionales sobre la protección
de la radiación ionizante (la legislación nacional correspondiente).
19
4. En caso de ser propietario de más de 9 juegos de miras (una actividad total que
sobrepasa los 10 GBq), el propietario está obligado a pedir a las autoridades
competentes la información sobre las obligaciones resultantes de la legislación
nacional correspondiente.
5. Evitar tal manipulación que podría causar un grave daño mecánico de las miras.
6. No está permitido realizar tales modificaciones en las miras que podrían alterar
propiedades importantes para la protección contra la radiación.
7. La miras no deben seguir utilizándose al ser destruidas o dañadas. El propietario
debe recoger con seguridad los equipos así alterados y entregarlos al distribuidor o
productor para su liquidación segura. El mismo procedimiento es válido en caso de la
liquidación de miras que ya no se utilizan.
8. Para la manipulación con las miras valen las reglas generales de protección contra la
radiación ionizante. Durante un uso corriente durante la vida útil de las miras no se
requieren pruebas de hermeticidad.
El tipo de miras fue aprobado en la República Checa mediante la decisión de la
autoridad competente bajo el no. 25169/2005, marca A1.
La empresa, eventualmente el representante responsable de la empresa:
Ing. Ladislav Britaňák
20
TERMINOLOGÍA Y DESCRIPCIÓN DE LA PISTOLA
La denominación de las partes principales de la pistola utilizada en este Manual está
indicada en el gráfico No. 1 en la parte interior de la tapa del libro. La denominación de
todos los componentes de la pistola está indicada en el capítulo Lista de componentes.
La pistola CZ P-09 es un arma de fuego de mano con un retroceso del cañón corto,
destinada para un disparo dirigido a la distancia de 50 metros. Tiene el sistema de cerradura
cerrado. Viene equipada con el mecanismo del disparador de doble acción SA/DA, bloqueo
del percutor, diente de seguridad en el martillo y seguro manual que puede desmontarse
con facilidad y reemplazarse con el manipulador para soltar el martillo (decocking). El
armazón de la pistola es de Polímero. Entre las características de la pistola destacan:
-
buen agarre en ambas manos
buenos resultados durante el tiro instintivo (sin apuntar)
baja resistencia del disparador
alta precisión del tiro
larga vida útil
alta confiabilidad también utilizando varios tipos de balas
miras adaptadas también para apuntar con baja visibilidad
después de disparar el último cartucho la cerradura queda abierta
apropIada para el porte diario como un arma de servicio
pistola equipada de manera standard con un seguro ambidiestro y un
manipulador ambidiestro del decocking
posible intercambio del seguro por el manipulador de decocking
marco en la parte delantera provisto con ranuras de sujeción, para sujetar
accesorios especiales
Cada pistola viene suministrada con estos equipos:
-
-
2 piezas de cargadores (el número de cargadores puede variar en las versiones
diferentes de la pistola)
set de lomos de la empuñadura intercambiables
manipuladores intercambiables (seguro/manipulador del decocking)
equipo de mantenimiento y limpieza del arma (cepillo, varilla de limpieza, llave
para ajustar las miras, casete polímero)
documentes del arma (manual de instrucciones, CD con materiales de promoción
y manuales de instrucción en varias lenguas, certificado/carta de garantía, papel
de agrupación)
la cerradura de seguridad para el arma (solamente en versiones seleccionadas)
21
Explicaciones:
SA (Single Action)
La función simple del mecanismo de disparo. El martillo se monta manualmente y el
disparo se efectua después de apretar el disparador. El recorrido del disparador es corto, la
resistencia es baja. El martillo permanece montado después de cada disparo.
DA (Double Action)
Función doble del mecanismo de disparo. Apretando el disparador, el martillo se monta
y suelta. El recorrido del disparador es más largo y la resistencia del disparador es más alta
que durante SA.
Elementos de seguridad de la pistola
Guardamonte
Impide un apretamiento accidental del disparador, por ejemplo durante una caída de la
pistola.
Percutor dinámico
La construcción del percutor está solucionada de tal manera que el mismo no pueda
sobresalir de la cerradura estando el martillo en la posición de reposo. Eso excluye la
posibilidad del disparo durante la caída de la pistola cargada en el martillo.
Bloqueo del percutor
Impide el movimiento del percutor mientras el disparador no se encuentre presionado.
Minimiza el riesgo de un disparo no intencionado durante un manipuleo inadecuado con el
arma, sobre todo durante la caída de una pistola cargada.
Diente de seguridad
El engrane en el martillo que impide un disparo no intencionado en el caso que al
montar el martillo manualmente éste se resbale. Cuando se encuentra el martillo en el
diente de seguridad, no se apoya en la cerradura, sino que se encuentra inclinado un poco
hacia atrás.
22
INSTRUCCIONES DE USO
Munición
Utilice exclusivamente una munición estándar de fabricación industrial y del calibre
correspondiente, que responde a las prescripciones de CIP (Una organización internacional
para pruebas de armas de fuego manuales y la munición) o SAAMI (una norma
norteamericana para armas y munición). El uso de otro tipo de cartuchos podría causar
fallas, daños en el arma o heridas al tirador.
Retiro del cargador
Sujete la pistola con la mano derecha (izquierda), presione con el dedo pulgar (dedo
medio) el retén del cargador (dib. 2). El cargador se afloja y sale del marco. La pistola viene
provista por un retenedor universal del cargador, el cual puede ser desplazado por un
armero con una pequeña vuelta para ser manipulado con la mano derecha o izquierda.
Cargar el cargador
Sujete el cargador en la mano con la boca hacia arriba. Coloque un cartucho a la parte
delantera del aportador y presiónelo hacia abajo y para atrás, hasta que tope el lado
posterior del cargador. Coloque el siguiente cartucho sobre el otro e introduzca de la misma
manera. En caso, que ya se encuentran varios cartuchos en el cargador, es conveniente
presionar un poco con el dedo pulgar la fila de cartuchos.
El número de cartuchos en el cargador puede constatar a través de los agujeros de
inspección ubicados a los lados del cargador. No intente a extender la capacidad del
cargador - ya que esto podría causar un acceso defectuoso del primer cartucho a la
recámara.
Cargar la pistola
AL CARGAR LA PISTOLA APUNTE SIEMPRE HACIA UN ESPACIO SEGURO!
Introduzca el cargador lleno a la pistola y verifique que permanezca retenido por el
retén del cargador.
Sujete la pistola con una mano por la empuñadura y con los dedos pulgar e índice de
la otra mano agarre la parte ranurada de la cerradura. Hale la corredera en la dirección
hacia atrás hasta el tope y suéltela (dib. 3). Durante este procedimiento se monta el martillo
y el cartucho se introduce en la recámara. Ahora, la pistola está lista para disparar. Si no va
a disparar de inmediato asegure el arma de cualquier forma indicada más adelante en la
parte Seguro de la pistola respectivamente en la parte Soltar el martillo (Decocking).
23
Recarga durante el tiro
Después de disparar el último cartucho, la corredera permanecerá en la posición
posterior. Saque el cargador vacío e introduzca uno lleno. Con la mano que dispara
presione el retén de la corredera en la dirección hacia abajo (dib. 4) o con la otra mano hale
la corredera hacia atrás y suéltela. La pistola está nuevamente cargada y lista para disparar.
Descargar la pistola
APUNTE HACIA UN ESPACIO SEGURO!
-
Retire el cargador
-
Tire hacia atrás la corredera y verifique que la recámara se encuentra vacía
Suelte la corredera hacia adelante
Presione el disparador (disparo en seco)
Seguro de la pistola
La parte Ajuste del seguro no vale para la versión con decocking!
Desplace el seguro en la dirección hacia arriba a la posición de seguridad (dib. 5),
hasta que cubra la marca roja. De esta manera el mecanismo disparador y la corredera
quedan bloqueados y consecuentemente no es posible apretar el disparador ni movilizar la
corredera. Es posible poner el seguro de la pistola también, cuando el martillo se encuentra
en el diente de seguridad. Sin embargo, en este caso no se recomienda poner el seguro, ya
que puede producirse un daño al mecanismo de disparo en caso de montar el martillo
bruscamente. Ponemos el seguro de la pistola tan solamente cuando el martillo se
encuentra en la posición posterior, entonces montado. Es adecuado utilizar el seguro sobre
todo durante una corta interrupción de tiro.
Aparte del método previamente descrito es posible mantener la pistola con el cartucho
en la recámara en un estado de seguridad, en el cual está preparada para el tiro inmediato:
Agarre la pistola cargada por la empuñadura, APUNTE HACIA UN ESPACIO
SEGURO. Con el dedo pulgar presione la superficie ranurada del martillo, presione el
diparador y traslade el martillo lentamente hacia adelante (dib. 6) hasta que se apoye de la
cerradura o del diente de seguridad del martillo. Afloje el disparador. ¡Lleve a cabo este
procedimiento con extrema cautela para impedir un disparo no intencionado!
¡Recomendamos practicar esta operación con la pistola descargada!
En este estado la pistola se encuentra segura para una manipulación de rutina y, a su
vez, queda preparada para el uso inmediato. Recuerde, que la mejor manera de asegurar la
pistola es tenerla descargada y guardada en un lugar seguro!
24
Soltar el martillo (Decocking)
La parte Soltar el martillo no vale para la versión con el seguro!
APUNTE HACIA UN ESPACIO SEGURO y presione el manipulador del decocking
(dib. 7).
Presionando el manipulador del decocking, el martillo se traslada de la posición
montada al diente de seguridad sin la necesidad de presionar el disparador. Si se encuentra
algún cartucho en la recámara, soltando el martillo, la pistola está segura para una
manipulación regular y lista para el tiro mediante la función DA.
Ajuste de miras
La mira de la pistola fue ajustada en la fábrica para una distancia de 25 m de tal
manera, que el punto central del impacto esté concordando aproximadamente con el punto
de mira.
Es posible realizar la corrección lateral desplazando el alza en la ranura de milano y
asegurándola con un centropunto.
La corrección de la elevación se realiza cambiando el guión por uno más alto o más
bajo.
Recambio de lomos de la empuñadura
Cada pistola viene provista de un set de lomos recambiables que facilitan la
adaptación del tamaño de la parte trasera de la empuñadura según las necesidades
individuales del usuario. Para cambiar un lomo de la empuñadura por el otro hay que extraer
el pasador del tapón del muelle de percusión. Mientras sacando el pasador tenga mucho
cuidado para evitar heridas ya que el pasador asegura tanto el tapón del muelle de
percusión como el muelle de percusión presionado. Encargue la tarea a un armero.
25
INSTRUCCIONES DE MANTENIMIENTO
Desmontaje del arma para la limpieza
APUNTAR HACIA UN ESPACIO SEGURO!
1. Retire el cargador. No es posible desmontar una pistola con el cargador adentro!
2. Desactive el seguro para poder movilizar la corredera.
3. ASEGÚRESE QUE NO HAYA NINGÚN CARTUCHO EN LA RECÁMARA!
4. Incline el martillo hacia atrás un poco y suéltelo, de manera que quede retenido en el
diente de seguridad. En este estado la manipulación es la más fácil.
5. Pase el dedo pulgar de la mano izquierda a través del guardamonte, con los dedos
restantes agarre la parte delantera de la cerradura.
6. Desplace un poco la cerradura hacia atrás hasta que la parte posterior de la cerradura
se apoye en el martillo inclinado y las marcas en el armazón y la cerradura se
encuentren en línea.
7. Desde el lado derecho presione (mediante un golpecito) el retenedor de la cerradura,
por ejemplo empleando el fondo del cargador (dib. 8). Retire el retenedor de la
cerradura desde el lado izquierdo.
8. Desplace la cerradura con el cañón para adelante.
9. Retire el muelle de avance con la guía y finalmente el cañón.
Este tipo de desmontaje es suficiente para un mantenimiento rutinario. Después de
disparar una mayor cantidad de cartuchos desmonte también el percutor y el cargador y
entregue la pistola a un armero para limpiar el percutor.
Desmontaje del cargador
Por el agujero en el fondo del cargador presione el pestillo del fondo del cargador y
desplácelo unos 5 mm para adelante. Después coloque el dedo pulgar sobre la base para
sostener el muelle y con la otra mano desplace el fondo de sus rieles de guía. Tenga mucho
cuidado, que durante este desmontaje no se produzcan heridas por el muelle lanzado.
26
Recambio de elementos de manejo
Esta pistola fue diseñada de tal manera que facilite un intercambio fácil del seguro por
el manipulador de decocking y viceversa. Esta operación se puede realizar aún sin utilizar
herramientas especiales. El seguro izquierdo o el manipulador de decocking izquierdo es
posible desmontar, solamente después de presionar el expulsor hacia abajo. Antes de
realizar el montaje del seguro derecho o el manipulador de decocking derecho, es necesario
bajar el tirante en la dirección hacia abajo.
La versión de seguro tiene montados solamente los seguros. En la versión de
decocking hay que montar, aparte de los manipuladores, también el resorte del manipulador
de tal manera que se apoye con su extremo más corto en la solapa del cuerpo del
manipulador introduciéndose el otro extremo en la cavidad del pasador (dib. 9).
Recomendamos participar en una formación del intercambio de elementos de manejo
supervisada por un armero calificado o ver los procedimientos instructivos en las páginas
web de Česká zbrojovka.
ATENCIÓN:
No desmonte ningunas otras partes de la pistola. Si está convencido que su pistola
necesita algún ajuste o reparación, asegúrese de encomendar esta tarea a un taller
especializado!
Limpieza de la pistola
Limpie la pistola
-
Después de cada uso
Siempre después que entre en contacto con humedad
Lo más antes posible después del disparo
Por lo menos una vez al año en climas templados
En condiciones climáticas exigentes por lo menos una vez al mes
Limpieza del ánima y la recámara
En caso que no se haya disparado de la pistola o si solamente se han disparado pocos
cartuchos, limpie el ánima y la recámara con un pedazo de tela seca colocado en un extremo
de una baqueta. Cambie los trapitos tantas veces, hasta que el último pedazo sea limpio.
Cuando el ánima se encuentre muy sucia, aplique en ella y en la recámara una
solución limpiadora, deje actuar aproximadamente 10 minutos (el tiempo de actuación
puede variar de acuerdo con el tipo del producto de limpieza) y limpie con un cepillo. Seque
el ánima y la recámara con un pedazo de tela limpio y verifique, si se eliminaron todos los
residuos. Repita el procedimiento en caso de necesidad.
Introduzca la baqueta y el cepillo en el cañón a través de la recámara para evitar que
la boca del cañón se desgaste o daňe. Pase el cepillo por todo el largo del cañón antes de
invertir el movimiento. Si trata de cambiar de dirección con el cepillo dentro del cañón, el
cepillo podría atascarse.
27
Limpieza de otras partes de la pistola
Las otras partes del arma (incluyendo las superficies externas del cañón) deben
limpiarse con una tela seca, un cepillo de dientes viejo, un cepillo de cerdas de bronce o un
raspador de madera. Durante la limpieza se puede utilizar también un aceite de
preservación o querosene. Sin embargo, no emplee nunca la solución determinada para la
limpieza del ánima del cañón! Estas soluciones podrían permanecer en las hendiduras de
los componentes y con el tiempo causar corrosión.
Comprobar que ningún trozo de tela o alguna cerda de cepillo hayan quedado alojados
en alguna parte de la pistola.
Conservación
Una vez que el ánima del cañón, la recámara y todas las partes accesibles estén
limpias y secas, frótelas con un paño remojado en aceite de preservación o aplique dicho
aceite mediante un rociador. Retire luego el exceso de aceite.
Antes de disparar, seque completamente el ánima del cañón. Si utiliza la pistola en
temperaturas muy bajas, retire el aceite de todas las partes accesibles y aplique un
lubricante especial determinado para estas condiciones climáticas.
La grasa preservante utilice únicamente en el caso de un almacenaje de larga duración
en condiciones climáticas extremas. Antes de usar la pistola, retíre dicha grasa por
completo.
Tratamiento de los residuos
Si son manejados de manera correcta, el material, los envases y los embalajes del
producto no tienen ninguna incidencia negativa ni sobre la salud humana ni sobre el medio
ambiente. Si necesita deshacerse del producto o su embalaje, los componentes metálicos
(acero, metales de color), los plásticos, la madera y el papel-cartón tienen que ser
depositados selectivamente en los contenedores destinados para estos materiales.
El productor se reserva el derecho de realizar cambios que podría considerar indispensables para
mejorar sus modelos o para satisfacer los requerimientos de la producción o del comercio.
28
LISTA DE COMPONENTES
1 a) Armazón
27 Tapón del muelle de percusión
28 Perno del retén del martillo
b) Lomo recambiable S/M/L
2 Cerradura
29 Perno del martillo
3 Cañón
30 Perno del disparador
4 Retén de la corredera
31 Perno del retén del cargador
5 Cargador
32 Pasador del tapón del muelle de
percusión
6 Bloque delantero
7 Bloque trasero
33 Pasador del extractor
8 Disparador
34 Pasador del retén del cargador
9 Tirante del disparador
35 Pasador del bloque delantero
10 Retén del martillo
36 Perno
11 Martillo
37 Pasador del percutor
12 Interruptor
38 Muelle de avance (completo)
13 Palanca del bloqueo
39 Tornillo de aseguración (2x)
14 Desconector del tirante
40 Muelle del extractor
15 Eyector
41 Muelle del percutor
16 Percutor
42 Muelle del tope del bloqueo
17 Extractor
43 Muelle (2x)
18 Tope del bloqueo del percutor
44 Pasador del muelle del retén de la
19 Retén del cargador
corredera
20 Seguro izquierdo *
45 Muelle de percusión
21 Seguro derecho *
46 Muelle del disparador
22 Manipulador del decocking
47 Muelle del retén de la corredera
izquierdo *
48 Resorte del manipulador de
23 Manipulador del decocking
decocking *
derecho *
49 Resorte del tirante
24 Alza *
50 Muelle del retén del martillo
25 Guión
51 Pasador del bloque trasero
26 Varilla del muelle de percusión
* Los componentes marcados así varían en cada versión, eventualmente en algunas
faltan por completo.
29
ELIMINACIÓN DE FALLAS FUNCIONALES
Con un uso y mantenimiento correcto hay muy poca probabilidad que se produzca una
avería. En caso de producirse tal situación, diríjase con las siguientes instrucciones.
ATENCIÓN - En caso que se produzca una falla durante el disparo, aumenta
notablemente la probabilidad de un disparo no intencionado. Por esta razón, durante la
eliminación de la falla mantenga al pie de letra las instrucciones de seguridad indicadas más
arriba. Apunte siempre hacia un espacio seguro, no dé la vuelta a la pistola enfrente suyo ni
frente a otras personas, no coloque las manos delante de la boca del cañón!
Si utiliza la pistola solamente para su protección personal o con fines de servicio,
consiga tan llamados cartuchos de escuela y entrene una eliminación rápida de fallas abajo
descritas.
Falla
Causa probable
Forma de eliminarla
El cartucho no
entra en la
recámara o no
ajusta la cerradura
El cargador no está encajado
suficientemente o se
encuentra averiado.
El arma o los cartuchos están
sucios o excesivamente
lubricados.
Introduzca correctamente el cargador
o utilice uno nuevo.
Cartucho defectuoso.
Vuelva a apretar el disparador. Si no
se produzca el disparo prosiga según
el punto 19 de las Instrucciones de
seguridad.
Desmonte y limpie el percutor,
eventualmente utilice un lubricante
para temperaturas bajas.
Fallos al disparar
El disparo suena
"débil", la
cartuchera no fue
expulsada
El agujero del percutor se
encuentra sucio o se utilizó
un lubricante inadecuado
bajo temperaturas
ambientales bajas.
El fulminante se activó, pero
no hubo pólvora en la
cartuchera.
La recámara, el extractor o la
munición sucios,
La vaina no ha sido eventualmente el uso de un
expulsada
lubricante inadecuado para
temperaturas bajas.
Limpie el arma y los cartuchos,
eventualmente lubrique suavemente.
Descargue el arma y compruebe que
la bala no ha quedado atascada en el
cañón. Un siguiente disparo eventual
podría ocasionar serios daños al
cañón!
Limpie y seque la pistola,
eventualmente lubríquela con un
lubricante adecuado.Utilice munición
nueva y limpia.
Si no es posible, reparar la fallas según las instrucciones arriba descritas, entregue la
pistola para una revisión y reparación en un taller especializado.
30
DATOS TÉCNICOS
9 x 19
9 x 21
Calibre
.40 S&W
Longitud total
[mm]
205 -2
205 -2
Altura total
[mm]
148 ± 1,5
148 ± 1,5
Ancho *
[mm]
37 ± 1
37 ± 1
polímero
polímero
max. 860
max. 860
Material del armazón
Peso con el cargador vacío
[g]
Longitud del cañón (sin la rampa)
[mm]
115 -1
115 -1
Distancia entre miras
[mm]
170 ± 2
170 ± 2
Capacidad del cargador **
19
15
Resistencia del disparador en SA
[N]
14,7 - 24,5
14,7 - 24,5
Resistencia del disparador en DA
[N]
max. 58,9
max. 58,9
*
**
[cartuchos]
Medido con el seguro ambidiestro, respectivamente con el manipulador ambidiestro de
decocking
A algunos países se suministran pistolas con una capacidad del cargador menor
conforme a las leyes locales
LISTA DE GRÁFICOS
1. Denominación de los componentes básicos
2. Retiro del cargador
3. Carga la pistola
4. Liberación de la corredera de su "posición de alerta" (de la "posición de caza")
presionando el retén de la corredera
5. Desplazamiento del seguro a la posición de seguridad
6. Liberación del martillo en la versión con el seguro
7. Liberación del martillo en la versión sin el seguro
8. Presionando el retenedor de la cerradura utilizando el fondo del cargador
9. Vista detallada de manipuladores de decocking montados
31
© Copyright 2026