
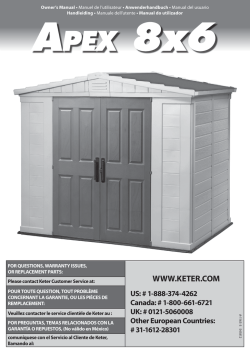
APEX 8X6 - Sheds For Less Direct
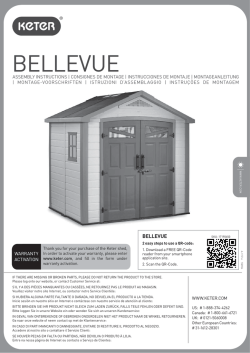
APEX 8X6
ASSEMBLY INSTRUCTIONS | CONSIGNES DE MONTAGE | INSTRUCCIONES DE MONTAJE | MONTAGEANLEITUNG
| MONTAGE-VOORSCHRIF TEN | ISTRUZIONI D’ASSEMBL AGGIO | INSTRUÇÕES DE MONTAGEM
WWW.KETER.COM
APEX 8X6
SKU: 17187140
2 easy steps to use a QR-code:
1. Download a FREE QR-Code
reader from your smartphone
application site.
2. Scan the QR-Code.
IF THERE ARE MISSING OR BROKEN PARTS, PLEASE DO NOT RETURN THE PRODUCT TO THE STORE.
Please log onto our website, or contact Customer Service at:
S’IL Y A DES PIÈCES MANQUANTES OU CASSÉES, NE RETOURNEZ PAS LE PRODUIT AU MAGASIN.
Veuillez visiter notre site Internet, ou contacter notre Service Clientèle:
SI HUBIERA ALGUNA PARTE FALTANTE O DAÑADA, NO DEVUELVA EL PRODUCTO A LA TIENDA.
Inicie sesión en nuestro sitio en Internet o contáctese con nuestro servicio de atención al cliente:
WWW.KETER.COM
BITTE BRINGEN SIE IHR PRODUKT NICHT GLEICH ZUM LADEN ZURÜCK, FALLS TEILE FEHLEN ODER DEFEKT SIND.
Bitte loggen Sie in unsere Website ein oder wenden Sie sich an unseren Kundenservice:
US: # 1-888-374-4262
Canada: # 1-800-661-6721
UK: # 0121-5060008
Other European Countries:
# 31-1612-28301
IN GEVAL VAN ONTBREKENDE OF GEBROKEN ONDERDELEN NIET HET PRODUCT NAAR DE WINKEL RETOURNEREN.
Ga naar onze website of neem contact op met de Klantenservice:
IN CASO DI PARTI MANCANTI O DANNEGGIATE, EVITARE DI RESTITUIRE IL PRODOTTO AL NEGOZIO.
Accedere al nostro sito o contattare il Servizio Clienti:
SE HOUVER PEÇAS EM FALTA OU PARTIDAS, NÃO DEVOLVA O PRODUTO À LOJA.
Entre na nossa página de Internet ou contacte o Serviço de Clientes:
A-1165-5 555324
WARRANTY
ACTIVATION
Thank you for your purchase of the Keter shed,
In order to activate your warranty, please enter
www.keter.com, and fill in the form under
warranty activation.
CUSTOMER SERVICE | SERVICE CLIENTÈLE | KUNDENSERVICE | SERVICIO AL CLIENTE |
KLANTENSERVICE | SERVIZIO CLIENTI | ASSISTÊNCIA AO CLIENTE
IMPORTANT: For assistance with assembly or to request missing parts, please log onto our web site at www.www.keter.com or contact Customer Service.
IMPORTANT: Pour toute assistance lors du montage ou pour obtenir des pièces manquantes, veuillez visiter notre site Internet: www.keter.com
ou contacter notre Service Clientèle.
IMPORTANTE: Para asistencia con el armado o para solicitar partes que puedan faltar,por favor, entre a nuestro sitio en Internet: www.keter.com,
o contáctese con nuestro servicio al cliente.
WICHTIG:
Sollten Sie bei der Montage Hilfe benötigen oder fehlende Teile anfordern müssen,besuchen Sie bitte unsere Internet-Seite www.keter.com
oder wenden Sie sich an unseren Kundenservice.
BELANGRIJK: Voor hulp bij het monteren of het aanvragen van missende onderdelen, kunt u op onze website inloggen: www.keter.com
of contactopnemen met de klantenservice.
IMPORTANTE: Per ricevere assistenza sul montaggio o per richiedere parti mancanti, accedere al nostro sito web all›indirizzo www.keter.com
oppure contattare il Servizio clienti.
IMPORTANTE: Para obter assistência ou pedir peças que estejam em falta, aceda ao nosso site www.keter.com ou contacte a assistência a clientes.
US: Call Toll Free Number: 1-(888)-374-4262
Fax: 317-575-4502 11495 North Pennsylvania Suite 110,
Carmel, Indiana 46032, U.S.A
Canada:
Appel gratuit: 1-(800)-661-6721
Call Toll Free Number: 1-(800)-661-6721
United Kingdom: Keter (UK) Ltd.
Unit 4, Woodgate Business Park, Clapgate Lane,
Birmingham, B32 - 3DB, United Kingdom.
Tel: 0121-5060008, Fax: 0121-4220808
Other European Countries:
Keter Europe Gardening
Ericssonstraat 17, Postbus 224, 5120 AE Rijen,
the Netherlands. Tel: 31-1612-28301,
Fax: 31-1612-28322
• USAGE DOMESTIQUE UNIQUEMENT | A CONSERVER POUR CONSULTATION ULTÉRIEURE
REQUIRED TOOLS | OUTILS NÉCESSAIRES (non fournis) | HERRAMIENTAS NECESARIAS | BENÖTIGTE
WERKZEUGE | BENODIGD GEREEDSCHAP | ATTREZZATURA OCCORRENTE | FERRAMENTAS NECESSÁRIAS
The following tools are required for shed assembly | Pour construire votre Abri, vous aurez besoin des outils suivants | Las siguientes
herramientas son necesarias para armar el cobertizo | Für die Montage des Gartenschuppens benötigen Sie folgende Werkzeuge | De
volgende gereedschappen worden vereist voor het monteren van het schuurtje | Il montaggio richiede i seguenti utensili | São necessárias
as seguintes ferramentas para a montagem do abrigo de jardim
LEVEL THE GROUND | NIVELLEMENT DU SOL | NIVELE EL SUELO | SORGEN SIE FÜR EINE EBENE |
GRUNDFLÄCHE MAAK DE GROND WATERPAS | METTERE IL TERRENO A LIVELLO | NIVELAR O SOLO
Please select your construction site carefully | The ground surface must be level | it is highly recommended that you construct a wooden or
concrete | base to use as a foundation.
Veuillez sélectionner le site de votre construction avec précaution. La surface du sol doit être plane | il est fortement recommandé de construire
une base en bois ou solide afin de l'utiliser comme fondation.
Seleccione con cuidado el lugar donde colocará su cobertizo | la superficie del suelo debe ser pareja | le recomendamos especialmenteque
construya una base de madera o cemento para usar como cimiento.
Bitte wählen sie ihren montagestandort sorgfältig aus | die bodenfläche muss eben sein. Es wird empfohlen, dass sie eine holz-oder
betonunterlageals fundament anlegen.
Selecteer met zorg uw bouwplaats | het oppervlak van de grond moet vlak zijn | het wordt ten zeerste aangeraden dat u een houten
ofbetonnen basis maakt om als fundament te gebruiken.
Scegliere con cura la posizione ove montare la casetta | la superficie del terreno deve essere ben livellata | si raccomanda vivamente dicostruire
un basamento in legno o in calcestruzzo, da utilizzare come fondamenta.
Por favor, escolha o local de construção cuidadosamente | a superfície do solo deve ser nivelada | recomenda-se vivamente que
construauma base de madeira ou de cimento para usar como fundações.
2
LEVEL THE GROUND | NIVELLEMENT DU SOL | NIVELE EL SUELO | SORGEN SIE FÜR EINE EBENE |
GRUNDFLÄCHE MAAK DE GROND WATERPAS | METTERE IL TERRENO A LIVELLO | NIVELAR O SOLO
Clear area of stones | Remove all plants, roots and other obstacles | Rake the ground | Make ground level using a long, flat object (e.g. wood
beam)
Retirez toutes les pierres | Arrachez toutes les plantes, racines et autres obstacles | Ratissez le sol | Aplanissez le sol à l’aide d’un objet long
et plat (une planche en bois par exemple)
Saque las piedras del área | Retire todas las plantas, raíces y otros obstáculos | Rastrille la tierra | Nivele el suelo usando un objeto largo y
plano (por ejemplo, una viga de madera).
Beseitigen Sie Steine | Entfernen Sie alle Pflanzen, Wurzeln und andere Hindernisse | Pflügen Sie den Boden durch | Ebenen Sie den Boden mit
Hilfe eines langen, flachen Objektes (wie z.B. eines Holzbalken) aus.
Verwijder stenen | Verwijder alle planten, wortels en andere obstakels | Hark de grond | Maak de grond met een lang, vlak onderwerp (bijv.
een houten balk) waterpas
Eliminare le pietre | Rimuovere piante, radici e altri ostacoli | Livellare il terreno | Mettere a livello il terreno utilizzando un oggetto lungo e
piatto (ad es. un asse di legno)
Retire as pedras do local | Retire todas as plantas, raízes e outros obstáculos | Alise o local | Nivele o solo utilizando um objecto comprido e
plano (por exemplo, uma trave de madeira)
For easy identification of the parts, code letters are imprinted on them | Pour une identification plus aisée, des lettres sont imprimées au
dos de chaque pièce | Para una fácil identificación de las piezas, éstas llevan letras de código impresas | Für einfaches Identifizieren der
Teile haben wir die Kennbuchstaben auf diesen eingeprägt | Voor het makkelijk identificeren van de onderdelen zijn er codeletters op afgedrukt
| Per un’identificazione più semplice, le lettere del codice sono state stampate su ciascuna parte | Para uma fácil identificação das peças,
foram impressas letras nas mesmas.
Packaging may contain some additional small parts to be kept for use as spare parts | L'emballage peut contenir des petites pièces
supplémentaires à conserver comme pièce de rechange | El embalaje puede contener algunas partes pequeñas adicionales que se deben
guardar para ser usadas como repuestos | Die Verpackung kann eventuell zusätzliche Kleinteile enthalten, die in Zukunft als Ersatzteile
verwendet werden können | De verpakking kan enkele extra kleine onderdelen houden die als reserveonderdelen kunnen worden gebruikt
| A embalagem poderá conter algumas peças pequenas adicionais que servem para ser usadas como peças sobresselentes | La confezione
potrebbe contenere piccole parti supplementari da utilizzare come parti di ricambio.
3
CAUTION | AVERTISSEMENT | ADVERTENCIA | WICHTIG | WAARSCHUWING | ATTENZIONE | ATENÇÃO
Some parts have steel edges | Please be careful when handling components | Always wear work gloves, eye protection and long sleeveswhen
assembling or performing any maintenance on your shed | Do not attempt assembly on days with strong winds or low temperatures.
Certaines pièces ont des bords en acier | Soyez prudent en les manipulant | Portez toujours des gants de travail, des lunettes de protection et
des vêtements à manches longues lors de l’assemblage ou de l’accomplissement d’activités de maintenance sur votre abri | N’essayez pas de
réaliser le montage les jours de grand vent ou de grand froid | Veuillez vérifier régulièrement que les vis sont bien serrées.
Algunas partes tienen bordes de acero | Tenga cuidado al manejar estos componentes | Use siempre guantes de trabajo, anteojos protectores y mangas largas para armar el cobertizo o realizar cualquier tarea de mantenimiento en el mismo | No intente armar el cobertizo en días
de viento fuerte o de baja temperatura.
Manche Teile haben Stahlkanten, bitte seien Sie vorsichtig beim Umgang mit diesen | Tragen Sie bei der Montage des Gartenschuppens oder
Wartungsarbeiten stets Arbeitshandschuhe, eine Schutzbrille und Kleidungsstücke mit langen Ärmeln | Versuchen Sie nicht, den Gartenschuppenbei starkem Wind oder niedrigen Temperaturen zu montieren.
Sommige onderdelen hebben stalen randen | Wees voorzichtig met het omgaan met deze onderdelen | Draag altijd werkhandschoenen,
oogbescherming en lange mouwen als u uw schuurtje monteert of onderhoud | Probeer niet te monteren op dagen met sterke wind of
lagetemperaturen.
Alcune parti presentano bordi in acciaio | Fare attenzione nel maneggiare i componenti | Indossare sempre guanti da lavoro, protezioni per gli
occhi e maniche lunghe durante il montaggio o durante la manutenzione | Evitare di effettuare il montaggio in presenza di forte vento o bassetemperature.
Algumas peças têm extremidades de aço | Tenha cuidado ao manusear este componentes | Utilize sempre luvas e óculos de protecção,assim
como vestuário comprido ao montar ou efectuar qualquer procedimento de manutenção no seu abrigo de jardim | Não monte o abrigo de
jardim em dias de vento forte ou de baixas temperaturas.
BEFORE STARTING ASSEMBLY | AVANT DE COMMENCER LE MONTAGE | ANTES DE EMPEZAR EL
ARMADO | VOR MONTAGEBEGINN | VOORDAT U BEGINT TE MONTEREN | PRIMA DI INIZIARE IL
MONTAGGIO | ANTES DE INICIAR A MONTAGEM
Remove all of the pieces from the 2 packages and spread them out on the ground | It is recommended to use a clean work surface to spread
the parts out and for pre-assembly steps | Review all instructions before you begin, continue to refer to instructions duringassembly | Be
sure to follow all steps thoroughly | Parts are color coded in instructions to indicate which parts shall be used during a given stage | Please
prepare these components in advance at the beginning of each stage.
Videz les 2 paquets et étalez toutes les pièces sur le sol | Il est recommandé d’utiliser une surface de travail propre pour répartir les pièces à
l’extérieur et pour les étapes de ré-montage | Lisez bien toutes les instructions avant de commencer et continuez à vous y référer pendant le
montage | Assurez-vous de suivre scrupuleusement toutes les étapes | Les pièces sont présentées suivant un code de couleurs dans les instructions pour indiquer clairement celles à utiliser à chaque étape | Veuillez les préparer à l’avance au fur et à mesure des étapes.
Saque de los 2 embalajes todas las piezas y extiéndalas en el suelo | Se recomienda usar una superficie de trabajo limpia para diseminar las
partes y para realizar los pasos de prearmado | Lea todas las instrucciones antes de empezar, y siga remitiéndose a ellas durante el armado
| Asegúrese de seguir todos los pasos con atención | Observe que las partes están codificadas con colores diferentes en las instrucciones
para indicar qué parte se debe usar en cada etapa | Se recomienda preparar las partes antes de empezar cada etapa.
Alle Teile den 2 Packungen entnehmen und auf dem Boden bereitlegen | Es wird empfohlen, die Einzelteile auf einer sauberen, glatten
Unterfläche auszubreiten und Vorbereitungen für den Zusammenbau zu treffen | Lesen Sie die Anleitung vor Beginn der Montage gründlich
durch und richten Sie sich dann nach dieser | Vergewissern Sie sich, dass Sie allen Montageschritten genau folgen | Inder Anleitung sind die
Teile farblich gekennzeichnet, um so anzuzeigen, welches Teil in welcher Aufbauphase benötigt wird | Bitte sortieren Sie die Teile zu Beginn
jeder dieser Phasen.
Verwijder alle onderdelen uit de 2 pakketten en spreid ze uit op de grond | U wordt aanbevolen een schoon werkoppervlak te gebruiken om
de onderdelen op uit te spreiden en voor de voorbereiding op de montage | Bekijk alle instructies voordat u begint en raadpleeg tijdens de
montage de instructies | Zorg dat u alle stappen uitvoerig opvolgt | In de instructies zijn de onderdelen met kleurengecodeerd om aan te
geven welke onderdelen u tijdens een gegeven fase dient te gebruiken. Voordat u met elke fase begint, dient u de onderdelen klaar te leggen.
Rimuovere tutti i pezzi dai 2 imballaggi e disporli a terra | Si raccomanda l’uso di un piano da lavoro sgombro per la sistemazione dei componenti e lo svolgimento delle fasi di preassemblaggio | Rileggere tutte le istruzioni prima di iniziare e continuare a fare riferimento alle istruzioni
anche durante il montaggio | Accertarsi di seguire attentamente tutte le procedure | Nelle istruzioni le parti sono contraddistinte da codici
colorati che servono a indicare quelle da utilizzare nel corso di una particolare procedura | Preparare questicomponenti all›inizio di ogni fase.
4
BEFORE STARTING ASSEMBLY | AVANT DE COMMENCER LE MONTAGE | ANTES DE EMPEZAR EL
ARMADO | VOR MONTAGEBEGINN | VOORDAT U BEGINT TE MONTEREN | PRIMA DI INIZIARE IL
MONTAGGIO | ANTES DE INICIAR A MONTAGEM
Retire todas as peças dos 2 pacotes e espalhe-as no chão | Recomenda-se o uso de uma superfície de trabalho limpa para distribuir as peças
e para os passos de pré-montagem | Leia todas as instruções antes de iniciar e consulte-as durante a montagem. Siga atentamente os
seguintes passos | As peças estão marcadas com cores nas instruções para indicar quais deverão ser montadas numa determinada fase de
montagem | Prepare antecipadamente estes componentes no início de cada fase.
ASSEMBLY REQUIRES TWO PEOPLE | LE MONTAGE DOIT ÊTRE EFFECTUÉ PAR DEUX PERSONNES | SE NECESITAN DOS
PERSONAS PARA ARMARLO | ZWEI PERSONEN ZUR MONTAGE NOTWENDIG | MONTAGE VEREIST TWEE PERSONEN |
MONTAGGIO RICHIEDE DUE PERSONE | A MONTAGEM EXIGE DUAS PESSOAS
5
ASSEMBLY PARTS | PIÈCES À ASSEMBLER | PIEZAS DE ENSAMBLE | MONTAGETEILE | MONTAGESTUKKEN | PARTI DA MONTARE | PEÇAS DE MONTAGEM
For easy identification of the parts, code letters are imprinted on them | Pour une identification plus aisée, des lettres sont imprimées au
dos de chaque pièce | Para una fácil identificación de las piezas, éstas llevan letras de código impresas | Für einfaches Identifizieren der
Teile haben wir die Kennbuchstaben auf diesen eingeprägt | Voor het makkelijk identificeren van de onderdelen zijn er codeletters op afgedrukt
| Per un’identificazione più semplice, le lettere del codice sono state stampate su ciascuna parte | Para uma fácil identificação das peças,
foram impressas letras nas mesmas.
ROOF PARTS | PIÈCES DU TOIT | PARTES DEL TECHO | DACHELEMENTE
| DAKONDERDELEN | PARTI DEL TETTO | PEÇAS DO TELHADO
A3,A4(X2)
SMALL ROOF PARTS | PETITES PARTIES DU TOIT |
KLEINE DACHTEILE | PEQUEÑAS PARTES PARA EL
TECHO | PICCOLE PARTI DEL TETTO | KLEINE DAKONDERDELEN | PEÇAS DO TELHADO PEQUENAS
A1,A2(X2)
CA(X1)
TD2(X2)
NB(X2)
RS(X12)
BC(X2)
BM(X1)
AP(X1)
MT2(X2)
DUC(X2)
WALL PARTS | PIÈCES DU CONTOUR | PARTES DE LAS PAREDES | WANDELEMENTE | MUURONDERDELEN | PARTI DELLA
PARETE | PAINÉIS LATERAIS
CO(X24)
SP(X4)
SPK(X2)
O(X4)
CS(X3)
WA(X24)
WINDOW PARTS | PIÈCES DE LA FENÊTRE | PARTES DE LA VENTANA | FENSTERELEMENTE | VENSTERONDERDELEN | PARTI
DELLA FINESTRA | PEÇAS DA JANELA
F-IN(X2)
SC15(X14)
F-OUT(X2)
WT(X2)
SCREWS | VIS | SCHRAUBEN | TORNILLOS | SCHROEVEN | VITI | PARAFUSOS
SC6(X16)
SC1(X12)
SC12(X8)
6
SC5(X10)
SC9(X20)
FLOOR PANELS | PANNEAUX DU SOL | PANELES DEL PISO | BODENELEMENTE | VLOERPANELEN | PANNELLI DEL PAVIMENTO
| PAINÉIS DO PISO
FS(X2)
FG(X2)
DOOR PARTS | PIÈCES DE LA PORTE | PARTES DE LA PUERTA | TÜRELEMENTE | DEURONDERDELEN | PARTI DELLA PORTA |
PEÇAS DAS PORTAS
DOOR TYPE 1 | PORTE DE TYPE 1 | TÜRTYP 1 | TIPO DE
PUERTA 1 | PORTA DI TIPO 1 | DEURTYPE 1 | PORTA TIPO 1
DP2(X2)
GSA(X4)
DOOR TYPE 2 | PORTE DE TYPE 2 | TÜRTYP 2 | TIPO DE
PUERTA 2 | PORTA DI TIPO 2 | DEURTYPE 2 | PORTA TIPO 2
DS(X2)
DH2(X1)
DP1(X2)
HG(X4)
DH1(X1)
DS(X2)
DX(X2)
DX(X2)
GLR(X1)
GLL(X1)
DB(X2)
DH2(X1)
DH1(X1)
ND(X1)
2ND(X1)
DD(X2)
DNS(X1)
GM(X2)
HG(X4)
DLA(X2)
SHELVES | ÉTAGÈRES | REGALE | ESTANTES | PLANKEN | MENSOLE | PRATELEIRAS
SN(X2)
SC6(X2)
SA(X2)
SL(X2)
7
GEMS(X2)
FLOOR ASSEMBLY • MONTAGE DU SOL • MONTAGE DER BODENPLATTE • ARMADO DEL PISO • VLOERMONTAGE • MONTAGGIO DEL PAVIMENTO • MONTAGEM DO PISO
1
FG x 2
FS x 2
FS
FG
2
FS
FG
FG
FS
8
3
SC1 x 12
/
cm
175
69"
249
cm
/
98"
SHELL ASSEMBLY • MONTAGE DE LA STRUCTURE • GERÜSTMONTAGE • MONTAJE DEL ARMAZÓN
MONTAGGIO DELLA STRUTTURA • GERAAMTESAMENSTELLING • MONTAGEM DA ESTRUTURA
4
CO x 3
CO
WA x 3
Ox1
O
WA
!
Ox1
9
OVER DE LOCATIE VAN RAMEN BESLISSEN
• Let op dat deze panelen (SPK) in elk van de zes-murige panelen
kunnen worden gemonteerd.
• U kunt het raampaneel in de achter- of één van de zijmuren
installeren.
• Beslis over de samenstelling voordat u begint met het monteren.
DECIDING ON THE LOCATION OF WINDOWS
• Note that these panels (SPK) can be installed in any of the six wall panels.
• The window panel can be installed in the back or either of the side walls.
• Decide on configuration before beginning assembly.
EMPLACEMENT DES FENÊTRES
• Notez que ces panneaux (SPK) peuvent être installés sur n'importe lequel
des six pans de mur.
• Le panneau portant la fenêtre peut être installé à l'arrière ou sur l'un des
murs latéraux.
• Décidez de la configuration avant de commencer le montage.
SCEGLIERE LA POSIZIONE DELLE FINESTRE
• Notare che questi pannelli (SPK) possono essere installati in uno
qualunque dei sei pannelli a parete.
• Il pannello della finestra può essere installato nella parte posteriore o
anche sulle pareti laterali.
• Stabilire la configurazione prima di iniziare il montaggio.
BESTIMMUNG DER POSITION VON FENSTERN
• Beachten Sie, dass diese Elemente (SPK) in jedes der sechs
Wandelemente eingesetzt werden können.
• Die Fensterelemente können entweder an der Rückwand oder an
den Seitenwänden angebracht werden.
• Entscheiden Sie sich vor Montagebeginn für eine bestimmte
Positionierung der Fenster.
LOCALIZAÇÃO DAS JANELAS
• Tenha em atenção que estes painéis (SPK) podem ser montados em
quaisquer um dos seis painéis laterais.
• O painel da janela pode ser montado na traseira ou nas laterais.
• Escolha uma determinada configuração antes de iniciar a montagem.
DECIDIR LA UBICACIÓN DE LAS VENTANAS
• Observe que estos paneles (SPK) pueden ser colocados en cualquiera de
los seis paneles de pared.
• El panel de la ventana puede ser instalado en la pared posterior o en las
paredes las laterales.
• Decida la configuración antes de empezar el armado.
10
5
SP/SPK x 1
SP/SPK
6
CS x 1
CS
11
•
•
•
•
•
•
•
This side out
Côté extérieur
Cara exterior
Diese seite nach Aussen
Deze kant buiten
Lato rivolto verso L'esterno
Este lado para fora
7
SP/SPK x 1
SP/SPK
8
CO x 3
WA x 3
Ox1
O
CO
WA
CO
12
9
CO x 2
WA x 2
TD2 x 1
CO
WA
10
CO x 3
WA x 3
Ox1
CS x 1
SP/SPK
CS
CO
O
WA
13
SP/SPK x 2
11
CO x 3
WA x 3
Ox1
CS x 1
CO
WA
12
CO x 2
WA x 2
TD2 x 1
14
SP/SPK x 2
Follow the appropriate assembly instructions for your type of door.
Suivez les instructions d’assemblage appropriées à votre type de porte.
Befolgen Sie die entsprechende Montageanleitung für Ihren Türtyp.
Siga las instrucciones de armado apropiadas para su tipo de puerta.
Seguire le istruzioni di assemblaggio inerenti il vostro tipo di porta
Volg de passende montage-instructies voor uw type deur.
Siga as instruções de montagem adequadas para o seu tipo de porta.
Door Type 1 • Porte de type 1 • Türtyp 1 • Tipo de Puerta 1 • Porta di tipo 1 • Deurtype 1 • Porta Tipo 1
13
DP2 x 2
DP1 x 2
DX x 2
HG x 4
DD x 2
HG
DP2
HG
DP1
DP2
HG
DP1
HG
15
Door Type 2 • Porte de type 2 • Türtyp 2 • Tipo de Puerta 2 • Porta di tipo 2 • Deurtype 2 • Porta Tipo 2
14
2ND x 1
ND x 1
DB x 2
DX x 2
HG x 4
HG
DB
HG
DX
DX
HG
DB
HG
16
15
DD/ND x 2
90
900
17
ROOF ASSEMBLY • MONTAGE DU TOIT • DACHMONTAGE • ARMADO DEL TECHO
DAKMONTAGE • MONTAGGIO DEL TETTO • MONTAGEM DO TELHADO
16
A3, A4 x 1
•
•
•
•
•
•
•
•
•
•
•
•
•
•
Back
Arrière
Trasero
Hinterseite
Achterkant
Indietro
Traseiro
Front
Avant
Delante
Vorderseite
Voorkant
Anteriore
Frente
A1, A2 x 1
BC x 2
A4
A3
A2
A1
x2
•
•
•
•
•
•
•
This stage must be repeated twice
Cette étape doit être répétée deux fois
Dieser Schritt muss zweimal wiederholt werden
Esta etapa debe repetirse dos veces.
Dit stadium moet tweemaal worden herhaald
Questa fase deve essere ripetuta due volte
Esta parte deve ser executada duas vezes
18
17
CO x 8
WA x 8
AP x 1
Logo
18
DUC x 2
CA x 1
19
19
BM x 1
SC9 x 4
SC9
20
MT2 x 2
20
AP x 1
21
NB x 2
22
RS x 12
SC9 x 12
DS x 2
21
23
SC6 x 16
24
SC9 x 4
22
Follow the appropriate assembly instructions for your type of door.
Suivez les instructions d’assemblage appropriées à votre type de porte.
Befolgen Sie die entsprechende Montageanleitung für Ihren Türtyp.
Siga las instrucciones de armado apropiadas para su tipo de puerta.
Seguire le istruzioni di assemblaggio inerenti il vostro tipo di porta
Volg de passende montage-instructies voor uw type deur.
Siga as instruções de montagem adequadas para o seu tipo de porta.
DOOR TYPE 1 • PORTE DE TYPE 1 • TÜRTYP 1 • TIPO DE PUERTA 1 PORTA
DI TIPO 1 • DEURTYPE 1 • PORTA TIPO 1
DOOR TYPE 2 • PORTE DE TYPE 2 • TÜRTYP 2 • TIPO DE PUERTA 2 PORTA
DI TIPO 2 • DEURTYPE 2 • PORTA TIPO 2
STEPS 25-29
STEPS 30
Door Type 1 • Porte de type 1 • Türtyp 1 • Tipo de Puerta 1 • Porta di tipo 1 • Deurtype 1 • Porta Tipo 1
25
GLL x 1
GLL
GLR x 1
GM x 2
SC12 x 4
GSA x 4
GLR
26
DH1 x 1
• Left
• Gauche
• Izquierdo
• Verließ
• Links
• Sinistra
• Esquerdo
24
27
DNS x 1
SC5 x 8
• Left
• Gauche
• Izquierdo
• Verließ
• Links
• Sinistra
• Esquerdo
28
DLA x 2
• Left
• Gauche
• Izquierdo
• Verließ
• Links
• Sinistra
• Esquerdo
DLA
25
29
DH2 x 1
SC5 x 2
• Right
• Droit
• Derecho
• Richtig
• Rechts
• Destra
• Direito
Door Type 2 • Porte de type 2 • Türtyp 2 • Tipo de Puerta 2 • Porta di tipo 2 • Deurtype 2 • Porta Tipo 2
30
DH1 x 1
DH2 x 1
SC5 x 4
26
31
SC12 x 4
•
•
•
•
•
•
•
SC12 x 2
• Right side
• Côté droit
• Lado derecho
• Rechte Seite
• Rechterzijde
• Lato destro
• lado direito
Left side
Côté gauche
Lado izquierdo
Linke Seite
Linkerzijde
Lato sinistro
Lado esquerdo
SC12 x 2
SC12
WINDOW ASSEMBLY • MONTAGE DE LA FENÊTRE • VENTANA DEL TECHO • FENSTERHMONTAGE
RAAMMONTAGE • MONTAGGIO DE LA FINESTRA • MONTAGEM DO JANELA
32
F-OUT x 1
• Repeat steps 32-34 for the second window
• Répétez les étapes 32-34 pour la deuxième fenêtre
• Repita los pasos 32 a 34 para la segunda ventana
• Wiederholen Sie Schritte 32-34 beim zweiten Fenster.
• Herhaal stappen 32-34 voor het tweede venster
• Ripetere i passi 32-34 per la seconda finestra
• Repita os passos 32-34 relativamente à segunda janela
27
Please remember to remove the UV sticker from the window before assembly.
N'oubliez pas de retirer I'adhésif UV de la fenêtre avant I'assemblage.
Bitte vergessen Sie nicht, den UV Aufkleber vor dar Montage vem Fenster zu
entfernen.
Por favor, recuerde ratirar la calcomanía UU dela ventana antes de armar.
Denk voor de montage eraan de UV-sticker van hat ream te verwijderen.
Si prega di non tralasciare di togliere I'adesivo UV dalla finestra prima del
montaggio.
Não se esqueça de retirar o autocolante UV da janela antes da montagem.
33
WT x 1
• Assembly requires two people
• Le montage doit être effectué
par deux personnes
• Zwei Personen zur Montage
notwendig
• Se necesitan dos personas
para armarlo.
• Montage vereist
twee personen
• Il montaggio richiede
due persone
• A montagem exige
duas pessoas
34
F-IN x 1
SC15 x 7
28
OPTIONAL • OPCIÓN • OPTIE • OPZION • OPÇÃOE
Option
Opción
Optie
Opzion
Opçãoe
Option
Opción
Optie
Opzion
Opçãoe
A
B
• Shelves can only be installed in the side walls.
• Supports a maximum weight of 20 kg / 44 lbs.
• De planken kunnen alleen aan de zijmuur worden geïnstalleerd.
• Voor het ondersteunen van een maximaal gewicht van 20 kg / 44lbs.
• Les étagères ne peuvent être installées que sur les murs latéraux.
• Poids maximum supporté : 20 kg / 44 livres.
• Le mensole possono essere fissate solo sulla parete laterale.
• Il peso massimo dei supporti non deve superare i 20 kg / 44lb.
• Die Regale können nur an den Seitenwänden installiert werden.
• Die Regale tragen ein Maximalgewicht von 20kg / 44lb.
• As prateleiras só podem ser montadas nos painéis laterais.
• As prateleiras suportam um peso máximo de 20 kg / 44lbs.
• Los estantes sólo pueden ser instalados en las paredes laterales.
• Soportan un peso máximo de 20 kg / 44 libras.
SHELVES • ÉTAGÈRES • REGALE • ESTANTES • PLANKEN • MENSOLE • PRATELEIRAS
SN x 2
SC6 x 2
SA x 2
GEMS x 2
SL
GEMS
SA
SC6
29
SL x 2
LIMITED 2-YEAR WARRANTY
KETER’s renowned reputation for fine products is a result of its dedication and commitment to quality, design and innovation. The entire range of sheds and boxes is manufactured
from high quality materials under rigorous control and supervision. Please note that the products are produced from the finest raw materials, which are “clear”: non-toxic and
completely recyclable. In case a problem should occur, please address your claim to customer service either by phone or through our web site: www.keter.com. The limited
warranty is valid from the date of purchase and with a dated proof of purchase. Receipt should be presented upon request. KETER continuously tests its products for durability &
stability and will replace, at its discretion, any product or part which fails due to structural defect or faulty workmanship, or which fails due to fading of color, for an 2 year period
from the initial date of purchase.
Exclusions to the limited warranty: The limited warranty does not apply to products that have been stored or assembled incorrectly, used inappropriately, abused, misused, altered,
or cleaned with wrong cleaning methods or wrong cleaning products. The limited warranty does not cover normal wear and tear, cuts or scratches, or damage caused by impacts
or accidents. The limited warranty does not cover consequential or incidental damages. The limited warranty does not apply to damage resulting from “acts of nature” such as: hail,
storm, tornado, hurricane, flood, fire effects etc. The limited warranty is to the benefit of the original purchaser of the product, and is not transferable. The usage of KETER products
is defined for private use and not for any commercial or public use. Any such use will cause this limited warranty to become void. After a claim has been settled the guarantee period
will continue to be counted and shall terminate upon its original expiry date. Please keep your receipt and this instruction manual for future customer service purposes.
GARANTIE LIMITÉE DE 2 ANS
Renommé pour l’excellence de ses produits, KETER a bâti sa réputation sur son engagement sans faille pour la qualité, le design et l’innovation. L’ensemble de la gamme d’abris
et de rangements est fabriqué à partir de matériaux de grande qualité selon des processus de contrôle et de surveillance rigoureux. Veuillez noter que nos articles sont produits à
partir des meilleures matières premières, elles sont exemptes de substances toxiques et entièrement recyclables. Dans le cas où vous rencontreriez un problème, veuillez le
signaler à notre service clients par téléphone ou à travers notre site web : www.keter.com. La garantie limitée est valable à compter de la date d’achat et avec un document daté
attestant de l’achat. Un reçu doit être présenté sur demande. KETER effectue régulièrement des tests de résistance et de stabilité sur ses produits et remplacera, à sa seule
discrétion, toute pièce ou produit défectueux en raison d’un défaut de structure, de fabrication ou d’altération de couleur pendant une période de 2 ans à compter de la date d’achat.
Exclusions de la garantie limitée : La garantie limitée n’est pas applicable en cas de stockage ou d’assemblage incorrect, d’utilisation inappropriée, d’erreurs de manipulation,
d’altération ou de nettoyage avec des méthodes ou des détergents inadaptés. La garantie limitée ne couvre pas l’usure normale, les coupures ou éraflures, ni les dommages causés
par les chocs ou les accidents. La garantie limitée ne couvre pas les dommages indirects ou secondaires. La garantie limitée ne s’applique pas aux dommages résultant des “forces
de la nature“ telles que grêle, tempête, tornade, ouragan, inondation, incendie, etc. La garantie limitée est au bénéfice du premier acheteur du produit et n’est pas transférable.
L’utilisation des produits KETER s’entend pour un usage privé et non pas commercial ou publique quel qu’il soit. Toute utilisation de ce type entraînera l’annulation de la garantie
limitée. Après dépôt d’une réclamation, la période de garantie continue à courir et prend fin à la date d’expiration prévue à l’origine. Veuillez conserver votre reçu et ce manuel
d’instructions pour de futures demandes auprès de notre service clients.
GARANTÍA LIMITADA - 2 AÑOS
La reconocida reputación como fabricante de productos de calidad que posee KETER es fruto de su dedicación y su compromiso con la calidad, el diseño y la innovación. Toda la
gama de cobertizos y baúles se fabrican a partir de materiales de alta calidad bajo un control y una supervisión rigurosos. Tenga en cuenta que los productos se fabrican a partir
de materias primsa de la mejor calidad y que son ”limpios”: no son tóxicos y sí totalmente reciclables. Si se diera el caso de que surgiese algún problema, dirija su reclamación a
atención al cliente ya sea por teléfono o a través de nuestra web www.keter.com. La garantía limitada tiene validez desde la fecha de la compra y siempre que se presente una
prueba fechada de la misma. Se deberá presentar el comprobante de compra al solicitarla. KETER prueba continuamente la durabilidad y estabilidad de sus productos y
reemplazará, a su sola discreción, cualquier producto o pieza que falle debido a un defecto estructural o un problema de fabricación o que se deteriore perdiendo color durante un
periodo de 2 años desde su fecha de la compra.
Excepciones a la garantía limitada: La garantía limitada no se aplica a los productos que se hayan almacenado o montado incorrectamente, se hayan usado de forma inadecuada,
se hayan maltratado, se hayan usado incorrectamente, se hayan modificado o se hayan limpiado con productos o métodos de limpieza no apropiados La garantía limitada no cubre
el desgaste o deterioro natural, los cortes o arañazos o los daños causados por golpes o accidentes. La garantía limitada no cubre los daños resultantes o fortuitos. La garantía
limitada no es aplicable a aquellos daños resultantes de “elementos de la naturaleza” como granizo, tormentas, tornados, huracanes, inundaciones, incendios, etc. La garantía
limitada se ofrece al comprador original del producto y no es transferible. Los productos KETER están destinados al uso particular y no a usos comerciales o públicos. El uso con
tales fines anulará la presente garantía limitada. Una vez resuelta cualquier reclamación, el periodo de garantía conservará su duración hasta la fecha de caducidad original.
Conserve este manual y su comprobante de compra con el fin de utilizarlo si fuese preciso ante el departamento de atención al cliente.
BEGRENZTE 2-JAHRESGARANTIE
KETERs renommierter Ruf für ausgezeichnete Produkte ist ein Ergebnis seines Engagements und seiner Selbstverpflichtung für Qualität, Design und Innovation. Das gesamte
Sortiment von Schuppen und Boxen wird aus hochwertigen Materialen unter strenger Kontrolle und Überwachung hergestellt. Bitte beachten Sie, dass die Produkte aus den besten
Rohstoffen hergestellt werden, die rein, ungiftig und vollständig recyclefähig sind. Falls ein Problem auftreten sollte, wenden Sie sich bitte mit Ihrer Reklamation an den
Kundenservice, entweder telefonisch oder über unsere Webseite: www.keter.com. Die begrenzte Garantie gilt ab dem Kaufdatum und nur mit einem Kaufnachweis, mit Datum
versehen. Die Rechnung muss auf Anforderung vorgelegt werden. KETER testet kontinuierlich seine Produkte auf Haltbarkeit und Stabilität und wird, nach eigenem Ermessen,
Produkte oder Teile ersetzen, die aufgrund einer defekten Bauform, mangelhaften Verarbeitung oder einer Farbveränderung fehlerhaft sind - innerhalb eines 2-Jahreszeitraums
ab Kaufdatum.
Garantieausschlüsse: Die begrenzte Garantie gilt nicht für Produkte, die auf falsche Weise gelagert oder zusammengebaut, unsachgemäß verwendet, falsch oder schlecht
behandelt, verändert oder mit falschen Reinigungsmethoden oder falschen Reinigungsprodukten gereinigt wurden. Die begrenzte Garantie deckt nicht die normale Abnutzung,
Schnitte oder Kratzer, oder Schäden, die durch Schläge oder Unfälle entstanden sind. Die begrenzte Garantie deckt keine Folge - oder Nebenschäden. Die begrenzte Garantie gilt
nicht für Schäden, die aufgrund höherer Gewalt wie Hagel, Sturm, Tornado, Hurrikan, Hochwasser, Feuerauswirkungen usw. entstanden sind. Die begrenzte Garantie gilt
zugunsten des ursprünglichen Käufers des Produkts und kann nicht übertragen werden. Die Nutzung der KETER-Produkte ist für den privaten Gebrauch und nicht für
kommerzielle oder öffentliche Nutzung bestimmt. Jegliche solche Nutzung führt dazu, dass diese begrenzte Garantie ungültig wird. Wenn die Garantie in Anspruch genommen
wurde, läuft die Garantiezeit weiter und endet zum ursprünglichen Ablaufdatum. Bitte bewahren Sie Ihre Rechnung und diese Anleitung für zukünftige Kundendienst-Zwecke auf.
BEPERKTE 2-JARIGE GARANTIE
De alom bekende reputatie van KETER voor uitstekende producten is het resultaat van toewijding en inzet voor kwaliteit, ontwerp en innovatie. Het volledige assortiment hokken en
cabines is vervaardigd uit materialen van hoge kwaliteit onder regelmatige controle en streng toezicht. Wij wijzen u erop dat de producten vervaardigd worden van de beste en de
“zuiverste” grondstoffen: niet toxisch en volledig herbruikbaar. Mocht u toch een probleem tegenkomen, dan rzoeken wij u om uw klacht aan de klantendienst te adresseren, per
telefoon of via onze website: www.keter.com. De beperkte garantie is geldig vanaf het moment van aanschaf op basis van een gedateerd bewijs van aankoop. Het ontvangstbewijs
dient op aanvraag getoond te worden. De producten worden door KETER regelmatig getest op duurzaamheid & stabiliteit, en KETER zal, naar eigen goeddunken, voor een 2-jarige
periode vanaf de aanvankelijke aankoopdatum, producten of onderdelen vervangen, als deze structurele defecten of gebrekkig vakmanschap vertonen, of als het defect te wijten is
aan verkleuring.
Uitsluitingen voor de beperkte garantie: De beperkte garantie geldt niet voor producten die op verkeerde wijze zijn opgeslagen of gemonteerd, die op een onjuiste manier zijn
gebruikt, die met de verkeerde schoonmaakmethoden, of de verkeerde schoonmaakproducten zijn schoongemaakt. De beperkte garantie geldt niet voor normale slijtage, sneden,
krassen of schade veroorzaakt door stoten of ongelukken. De beperkte garantie dekt geen gevolgschade of incidentele schade. De beperkte garantie is niet van toepassing op
schade die voorvloeit uit “natuurevenementen”, zoals hagel, storm, wervelwind, orkaan, overstroming, brandgevolgen, enz. De beperkte garantie geldt uitsluitend voor de
daadwerkelijke koper dan het product, en is niet overdraagbaar. Het gebruik van KETER-producten is bestemd voor eigen gebruik, en niet voor de handel of publiek gebruik.
Dergelijk gebruik zal de annulering van deze beperkte garantie tot gevolg hebben. Na afhandeling van een klacht zal de garantieperiode doorlopen en eindigen op de aanvankelijk
bepaalde einddatum. Wij verzoeken u uw ontvangstbewijs en deze gebruikersgids te bewaren voor toekomstige klantendienstdoeleinden.
GARANZIA LIMITATA DI 2 ANNI
La buona reputazione di cui gode KETER in merito ai suoi raffinati prodotti è il risultato della dedizione e dell’impegno dimostrati verso valori quali la qualità, il design e
l’innovazione. L’intera gamma di annessi e box è prodotta usando materiali di alta qualità, sotto il rigoroso controllo di un attento sistema di supervisione. I prodotti in oggetto sono
stati realizzati usando le migliori materie prime, un insieme di materiali assolutamente “puliti”, in quanto atossici e completamente riciclabili. Nel caso in cui si dovesse verificare
30
un problema, si prega di presentare il proprio reclamo al servizio clienti tramite telefono o direttamente sul nostro sito (www.keter.com). La garanzia limitata è valida a partire
dalla data di acquisto e solo in presenza di un›adeguata prova di acquisto su cui sia chiaramente visibile la data. La ricevuta dovrà essere presentata su richiesta. KETER sottopone
continuamente i propri prodotti a test di durata e stabilità e sostituirà, a sua discrezione, qualsiasi prodotto o parte di esso che si dovesse rompere a causa di difetti strutturali o
di realizzazione, oppure per via di eventuali effetti legati allo sbiadimento/al viraggio del colore dopo un periodo pari a 2 anni dalla data di acquisto.
Esclusioni alla garanzia limitata: La presente garanzia limitata non si applica a prodotti che siano stati montati o conservati in modo errato, o che siano stati utilizzati
impropriamente, eccessivamente o in modo non adeguato, che siano stati alterati, oppure che siano stati puliti seguendo metodi errati o con prodotti non adatti allo scopo. La
garanzia limitata non copre eventuali danni dovuti alla normale usura, a tagli, a graffi o a danni causati da urti o incidenti. La garanzia limitata non copre eventuali danni accidentali
o conseguenti. La garanzia limitata non si applica ad eventuali danni derivanti da “eventi naturali”, come, ad esempio, grandine, temporali, tornado, uragani, alluvioni, incendi e
simili fenomeni. La garanzia limitata è a solo beneficio dell›acquirente originale del prodotto e non è trasferibile. I prodotti KETER possono essere utilizzati solo in ambito privato:
non è previsto l’uso per qualsiasi fine commerciale o pubblico. Qualsiasi uso improprio (determinabile in base a quanto indicato in precedenza) sarà motivo di immediata
invalidazione della presente garanzia limitata. L’eventuale risoluzione di un reclamo non modifica la durata del periodo di validità della garanzia, che cesserà alla data di scadenza
originalmente stabilita in base alla data di acquisto. Si prega di conservare lo scontrino originale ed il presente manuale d’istruzioni per eventuali richieste future da parte del
servizio clienti.
GARANTIA LIMITADA DE 2 - ANOS
A famosa reputação da KETER pelos bons produtos é o resultado da sua dedicação e compromisso com a qualidade, design e inovação. A gama completa de alpendres e caixas
é produzida com materiais de alta qualidade sob um controlo e supervisão rigorosos. Por favor, note que os produtos são produzidos a partir das melhores matérias-primas, que
são “limpas”: não tóxicas e completamente recicláveis. Se ocorrer algum problema, por favor, envie a sua reclamação para o serviço de atendimento ao cliente por telefone ou
através do nosso web site: www.keter.com. A garantia limitada é válida a partir da data da compra e com uma prova de compra com data. O recibo deve ser apresentado mediante
solicitação. A KETER testa continuamente os seus produtos em termos de durabilidade e estabilidade e irá substituir, com inteira discricionariedade, qualquer produto ou peça
que se avariar devido a defeitos estruturais ou defeitos de fabrico, ou que se avariar devido à descoloração do produto, por um período de 2 - anos a contar da data inicial da
compra.
Exclusões à garantia limitada: A garantia limitada não se aplica aos produtos que tenham sido armazenados ou montados de forma incorreta, utilizados de forma inadequada,
abusiva ou indevida, alterados ou limpos com os métodos ou produtos de limpeza errados. A garantia limitada não cobre o desgaste normal, cortes ou riscos ou danos causados
por impactos ou acidentes. A garantia limitada não cobre danos diretos ou indiretos. A garantia limitada não se aplica aos danos resultantes de “atos da natureza”, como: granizo,
tempestades, tornados, furacões, inundações, efeitos de incêndios, etc. A garantia limitada é vantajosa para o comprador original do produto e não é transferível. A utilização dos
produtos KETER é definida para uso privado e não para qualquer uso comercial ou público. Qualquer uso desta natureza tornará esta garantia nula. Após a resolução de uma
reclamação, o período de garantia continuará a contar e deverá terminar após o seu prazo de validade original. Por favor, guarde o seu recibo e este manual de instruções para
efeitos de assistência ao cliente no futuro.
CARE & SAFETY
• In case of fire, do not attempt to extinguish any burning polypropylene with water | Unsuitable for storage of flammable or corrosive substances
• It is of utmost importance to assemble all of the parts according to the directions. Do not skip any step.
• Please consult your local authorities if any permits are required to erect shed.
• Periodically check shed to assure that it remains stable and that the site remains level.
• It is highly recommended to secure the shed to an immovable object or to the ground by drilling holes in the floor at the pre-marked locations and
inserting proper screws into the ground (size: 1.9’’-3’’ ,screws are not included).
• Wear safety-goggles and always follow the manufacturer’s instructions when using power tools.
• Wash shed with garden hose or a mild detergent solution. Using a stiff brush or abrasive cleaner could damage shed.
• Hot items such as recently used grills, blowtorches, etc. must not be stored in the shed.
• Heavy articles should not be leaned against the walls, as this may cause distortion.
• Keep roof clean of snow and leaves. Heavy amounts of snow on roof can damage the shed making it unsafe to enter.
• Although wind direction varies, it is an important factor when taking into account where to place your shed. Therefore, it is recommended to reduce
wind exposure of the shed in general, and the door side in particular.
• Keep doors closed and locked to prevent wind damage.
• Do not stand on the roof.
• Shed not designed for habitation.
PRÉCAUTIONS ET SÉCURITÉ
• En cas d’incendie, ne pas tenter d’éteindre le POL Ypropylène brûlé avec de l’eau | Ne convient pas pour le stockage de substances inflammables ou caustiques
• Il est impératif de monter toutes les parties selon les instructions. Ne pas omettre une quelconque étape.
• Veuillez consulter les autorités locales de votre commune pour savoir si un permis est nécessaire à la construction de votre Abri.
• Vérifiez régulièrement la stabilité de votre Abri et l’horizontalité de son site de construction.
• Il est fortement recommandé de fixer l'abri à un objet fixe (déjà fixer au sol ou au mur) ou directement au sol à travers les perçages du plancher.
Fixez bien les vis au sol (Taille 1,9'-3', les vis ne sont pas incluses).
• Portez des lunettes de protection et suivez toujours les instructions du fabricant lorsque vous utilisez des outils électriques.
• Lavez la Abri au tuyau d’arrosage ou avec un détergent doux. Utiliser une brosse dure ou un produit d’entretien abrasif risquerait de l’endommager.
• Des objets chauds tels que des grils non refroidis, des chalumeaux, etc. ne doivent pas être entreposés dans la Abri.
• Ne pas déposer d’objets lourds contre les parois afin d’éviter tout risque de déformation.
• Maintenez le toit propre et dégagé de neige et de feuilles. De lourdes quantités de neige sur le toit peuvent abîmer la Abri et rendre dangereux
l’accès à l’intérieur.
• Bien que la direction du vent change, il est important de prendre en compte où l’abri est posé. Cependant, il est recommandé de réduire l’exposition
de l’abri au vent en général, et de la porte latérale en particulier.
• Veillez à fermer les portes à clef pour éviter tout dégât provoqué par le vent.
• Ne montez jamais sur le toit.
• Abri non conçu pour habitation.
PFLEGE - UND SICHERHEITSHINWEISE
• Im Brandfall sollten Sie nicht versuchen, brennendes Polypropylen mit Wasser zulöschen | Nicht zur Aufbewahrung von entzündbaren oder ät zenden
Mitt elnvorgesehen
• Es ist äußerst wichtig, dass alle Teil der Anleitung zufolge montiert werden. Bitte lassen Sie keine Schritte aus.
• Falls Sie eine Baugenehmigung für den Gartenschuppen benötigen, wenden Sie sich bitte an die örtlichen Behörden.
• Überprüfen Sie den Gartenschuppen in regelmäßigen Abständen, um sosicherzustellen, dass seine Stabilität sowie die Ebenheit seines Standortes
noch gewährleistet sind.
• Es wird strengstens empfohlen, den Schuppen an ein unbewegliches Objekt oder am Boden zu verankern. Dies geschieht durch Bohren von Löchern
an den markierten Stellen und das Verankern am Boden durch die richtigen Schrauben (Größe 1.9”-3”, die Schrauben sind nicht im Lieferumfang).
• Tragen Sie beim Gebrauch von Elektrowerkzeugen eine Schutzbrille und folgen Sie stets der Anleitung des Herstellers.
• Bitte verwenden Sie zur Reinigung des Schuppens einen Gartenschlauch oder ein mildes Putzmittel. Die Verwendung von harten Bürsten oder
anderen ungeeigneten Putzgeräten kann das Material beschädigen.
31
• Noch heiße Gegenstände wie Grillgeräte, Fackeln usw. dürfen nicht im Schuppen aufbewahrt werden.
• Schwere Gegenstände dürfen nicht an die Wände angelehnt werden, da dies zu einer Verformung des Materials führen kann.
• Halten Sie das Dach frei von Schnee und Laub. Große S chneemengen auf dem Dach können den Gartenschuppen beschädigen und sein Betreten
zur Gefahr werden lassen.
• Obwohl Windrichtungen wechseln, können diese bei der Wahl des Standpunkts I hres Schuppens ausschlaggebend sein. Daher ist es empfohlen,
die Windbelastung des Schuppen im Allgemeinen und der Türseite im Besonderen zu verringern.
• Zum Schutz vor Windschäden halten Sie die Türen geschlossen und verriegelt.
• Bitte das Dach nicht betreten.
• Schuppen nicht zum Bewohnen geeignet.
CUIDADO Y SEGURIDAD
• En caso de incendio, no intente extinguir polipropileno en llamas con agua | No es apropiado para el almacenamiento de sustancias inflamables o causticas.
• Es de suma importancia armar todas las partes de acuerdo con las instrucciones. N o omita ninguno de los pasos.
• Consulte a las autoridades locales si se requiere algún permiso para instalar el cobertizo.
• Verifique el cobertizo periódicamente para corroborar que esté estable y que el suelo esté nivelado.
• Se recomienda especialmente afirmar el cobertizo a un objeto inmóvil o al suelo, haciendo perforaciones en el piso, en los lugares previamente
marcados, e insertando los tornillos apropiados en el suelo (tamaño: 1,9’’-3’’. L os tornillos no vienen incluidos.).
• Use anteojos protectores; al usar herramientas eléctricas, siga siempre las instrucciones del fabricante.
• Lave el cobertizo con una manguera para jardín o una solución que contenga un detergente suave. L a utilización de un cepillo duro o de un producto
de limpieza abrasivo podría dañar el cobertizo.
• Los objetos calientes -como por ejemplo, las parrillas recién usadas, sopletes, etc.- no deben guardarse en el cobertizo.
• Se recomienda no apoyar artículos pesados contra las paredes, pues esto podrá ocasionar deformaciones.
• Mantenga el techo libre de nieve y hojas. G randes cantidades de nieve sobre el techo pueden dañar el cobertizo y hacer peligrosa la entrada al mismo.
• Aunque su dirección varíe, el viento es un factor importante a tomar en cuenta cuando decida dónde ubicar su cobertizo. P or lo tanto, se recomienda
reducir la exposición al viento del cobertizo en general y del lado de la puerta en particular.
• Mantenga las puertas cerradas y trabadas para evitar los daños producidos por el viento.
• No se pare sobre el techo.
• El cobertizo no es apropiado para vivienda.
ZORG EN VEILIGHEID
• In geval van brand NIET proberen om brandend polypropyleen met water te blussen | Ongeschikt voor het opslaan van brandbare of gevaarlijke materialen
• Het is uitermate belangrijk alle onderdelen volgens de richtlijnen te monteren. Sla geen van de stappen over.
• Raadpleeg uw plaatselijke autoriteiten of er bepaalde vergunningen worden vereist om het schuurtje te plaatsen.
• Controleer het schuurtje regelmatig om er zeker van te zijn dat het stabiel blijft en dat de locatie waterpas blijft.
• Het wordt ten zeerste aangeraden het schuurtje aan een onverplaatsbaar object of aan de grond te bevestigen door op de voorgemarkeerde locaties
gaten in de grond te boren en de geschikte schroeven in de grond te plaatsen (afmeting: 1.9’’-3’’, schroeven zijn niet inbegrepen).
• Draag een veiligheidsbril en volg altijd de instructies van de fabrikant als u elektrisch gereedschap gebruikt.
• Was het schuurtje met een tuinslang of een zacht wasmiddel af. Het gebruik van een harde borstel of oplosmiddelen kan het schuurtje beschadigen.
• Warme voorwerpen zoals een pas gebruikte grill, branders, enz. mogen niet in het schuurtje worden geplaatst.
• Laat geen zware voorwerpen tegen de muren leunen. D it kan misvorming veroorzaken.
• Houdt het dak vrij van sneeuw en bladeren. G rote hoeveelheden sneeuw op het dak kunnen het schuurtje beschadigen en de toegang ertoe gevaarlijk maken.
• Ofschoon windrichtingen variëren, is het belangrijk dat u rekening houdt met de plaats waar u uw schuurtje opstelt. Het wordt daarom aangeraden
over het algemeen het schuurtje en vooral de deurzijde, zo min mogelijk aan wind bloot te stellen.
• Houdt de deuren dicht en op slot om windschade te voorkomen.
• S ta niet op het dak.
• Het schuurtje is niet voor woondoeleinden ontworpen.
MANUTENZIONE E SICUREZZA
• In caso di incendio, non usare l’acqua per spegnere il fuoco sugli oggett i in polipropilene | Non adatt o per la conservazione di sostanze infiammabili o corrosive
• È della massima importanza assemblare tutte le parti seguendo accuratamente le istruzioni. N on saltare nessuno dei passaggi descritti.
• Consultare l’ente di controllo locale nel caso in cui per il montaggio del magazzino siano richieste delle autorizzazioni .
• Controllare la struttura periodicamente per assicurarsi che sia stabile e che il sito sia a livello.
• Si consiglia vivamente di fissare il capanno su un oggetto immobile o sul terreno effettuando dei fori sul pavimento nelle posizioni precedentemente
contrassegnate e inserendo le viti adeguate nel terreno (dimensioni: 1.9’’-3’’, le viti non sono incluse).
• Indossare occhiali di sicurezza e seguire sempre le istruzioni del produttore durante l’utilizzo di strumenti elettrici.
• Lavare il magazzino con un tubo da giardino o una soluzione detergente delicata. P er non provocare danni non utilizzare una spazzola dura o un
pulitore abrasivo.
• Non conservare nel magazzino prodotti caldi come grill usati da poco, lampade per saldature ecc.
• Evitare di appoggiare oggetti pesanti alle pareti per non deformarle.
• Rimuovere la neve e le foglie che si accumulano sulla copertura. T roppa neve potrebbe danneggiare il magazzino rendendone precaria la struttura.
• Sebbene la direzione del vento vari continuamente, è un fattore importante quando si prende in considerazione dove collocare il capanno. Quindi, si
consiglia in generale di ridurre l’esposizione del capanno al vento, in particolare il lato della porta.
• Chiudere e bloccare le porte per evitare eventuali danni provocati dal vento.
• E vitare di rimanere in piedi sul tetto.
• Il magazzino non è stato progettato per fungere da abitazione.
MANUTENZIONE E SICUREZZA
• Em caso de incêndio, não t ente apagar material de polipropileno em combustão com água | Não deve ser utilizado para guardar
substâncias inflamáveis ou corrosivas
• Éde extrema importância que monte todas as partes de acordo com as instruções. N ão omita nenhum passo.
• Contacte as autoridades locais se for necessária alguma licença para montar o abrigo de jardim.
• Verifique periodicamente o abrigo de jardim para certificar-se que o mesmo se encontra estável e nivelado no local.
• Recomenda-se vivamente que fixe o abrigo a um objecto inamovível ou ao chão, efectuando orifícios no fundo do mesmo, nos locais previamente
marcados e inserindo os parafusos adequados no chão (tamanho: 1.9-3 polegadas, parafusos não incluídos).
• Utilize sempre óculos de protecção e siga as instruções do fabricante quando utilizar ferramentas eléctricas.
• Lave o abrigo de jardim com água ou com um detergente suave. S e utilizar uma escova dura ou um detergente abrasivo poderá danificar o abrigo de jardim.
• Elementos quentes, tais como grelhas acabadas de utilizar, maçaricos, etc. não devem ser guardados no abrigo de jardim.
• Artigos pesados não devem ser encostados ao abrigo de jardim, na medida em que podem provocar empenos da estrutura.
• Não deixe acumular neve ou folhas sobre o telhado do abrigo de jardim. G randes quantidades de neve sobre o telhado podem danificar o abrigo de
jardim e impedir uma utilização segura do mesmo.
• Embora a direcção do vento varie, é um factor importante que deve ter conta no momento de posicionar o abrigo. P ortanto, recomenda-se que
reduza a exposição do abrigo ao vento em geral e em particular do lado da porta.
• Mantenha as portas fechadas e trancadas para evitar danos provocados pelo vento.
• Não se coloque em cima do telhado do abrigo de jardim.
• Oabrigo de jardim não foi concebido para ser uma habitação.
32


© Copyright 2026