
2005 - 2014 Toyota Hilux, Tiger, & Vigo 4WD 1"- 3
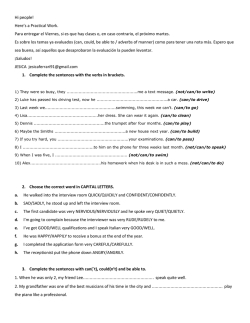
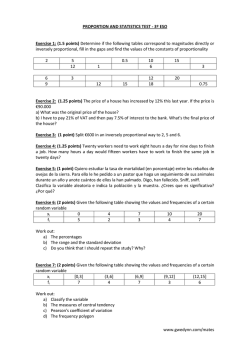
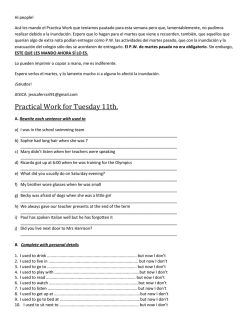
www.skyjacker.com
2005 - 2014 Toyota Hilux,
Tiger, & Vigo 4WD
1"- 3” Performance Strut
Installation Instructions
Required Tool List:
•
•
•
•
•
•
Safety Glasses
Metric / Standard Wrenches & Sockets
Floor Jack / Jack Stands
Measuring Tape
Strut Spring Compressor
Torque Wrench
Before beginning the installation, thoroughly & completely read these instructions & the enclosed
driver’s WARNING NOTICE. Affix the WARNING decal in the passenger compartment in clear view
of all occupants. Please refer to the Parts List to insure that all parts & hardware are received prior
to the disassembly of the vehicle. If any parts are found to be missing, contact SKYJACKER®
Customer Service at 318-388-0816 to obtain the needed items. If you have any questions or
reservations about installing this lift kit, contact SKYJACKER® Technical Assistance at 318-3880816.
Make sure you park the vehicle on a level concrete or asphalt surface. Many times a vehicle is not
level (side-to-side) from the factory & is usually not noticed until a lift kit has been installed, which
makes the difference more visible. Using a measuring tape, measure the front & rear (both sides)
from the ground up to the center of the fender opening above the axle. Record this information
below for future reference.
Driver Side Front:
Passenger Side Front:
Driver Side Rear:
Passenger Side Rear:
Important Notes:
• If larger tires (10% more than the OEM diameter) are installed, speedometer recalibration will be
necessary. Contact your local Toyota dealer or an authorized dealer for details.
• After installation, a qualified alignment facility is required to align the vehicle to the OEM
specifications.
I-HL130ST 7-14
Pg 1
Component Box Breakdown:
Part #: HL13ST / HL30ST
Item #
613STS
RBF125
Description
TOYOTA 1"-3" ADJ PERF STRUT
1.25" FLAT REAR BLOCK
(Included With HL30ST Box)
916X212X834U 9/16" X 2 1/2" X 8 3/4" U-BOLT
(Included With HL30ST Box)
Qty
2
2
Item #
HB-916
I-HL13ST
Description
HDWR BAG: 9/16" LOCK NUTS
(Included With HL30ST Box)
INST SHEET: HL13ST / HL30ST
Qty
1
1
4
Hardware Bag Breakdown:
Part # HB-916
Item #
916FTN
Description
9/16" FINE TREAD LOCK NUT
Qty
8
Front Installation:
1. With the vehicle on flat level ground, set the emergency brake &
block the rear tires / wheels.
2. Place a floor jack under the lower control arm’s front cross member
& raise the front of the vehicle. Place jack stands under the frame
rails, behind the front wheel wells & lower the frame of the vehicle
onto the jack stands.
3. Remove the front tires / wheels & remove the OEM brake line
brackets from the frame. (See Photo # 1)
Photo # 1
4. Disconnect the OEM sway bar end links from the OEM steering
knuckles. (See Photo # 2)
5. Disconnect the OEM outer tie rod ends from the OEM steering
knuckles using a tie rod remover or other suitable tool. (See Photo
# 3)
6. Disconnect the OEM struts from the OEM lower A-arms. (See Photo Photo # 2
# 4)
Photo # 4
I-HL130ST
Photo # 3
Pg 2
7. Disconnect the OEM upper ball joints from the OEM steering
knuckles using a ball joint remover or other suitable tool. (See Photo
# 5)
8. Remove the upper strut mount retaining nuts from the OEM upper
frame mounts & remove the OEM strut assemblies. (See Photo # 6)
9. Using a spring compressor, unload the tension on the upper mounts
of the OEM strut assemblies. Remove the upper strut retaining nuts
& seperate the OEM struts from the OEM coil springs. (See Photo
Photo # 5
# 7)
Note: There are multiple snap ring grooves located on the new
Skyjacker strut bodies for 1" to 3" lift heights. The ring is installed in
the second groove from the top when shipped. This will yield 2.5" 3" of lift. The upper groove is only to be used when 2.5" - 3" of lift is
desired, after aftermarket accessories have been added that weigh
the front of the vehicle down (ie. winch, after market bumper, & etc).
The lower grooves can be used if you would like to keep the OEM
rake of the vehicle (front of the vehicle lower than the rear). Once
the coil spring seat retaining ring has been installed, check all Photo # 6
suspension components for any contact or interference. If
suspension component contact or interference is present,
lower the coil spring seat by lowering the coil spring seat
retaining ring until no contact or interference is present.
10. Assemble the new Skyjacker strut assemblies using the new
Skyjacker struts. (See Photo # 8) Note: The OEM upper stem
bushings & hardware will be reused.
11. Connect the new Skyjacker strut assemblies to the OEM lower
A-arms using the OEM hardware. (See Photo # 9)
Photo # 7
12. Attach the upper strut mounts to the frame using the OEM hardware.
13. Connect the OEM upper ball joints to the OEM steering knuckles
using the OEM hardware. Note: It may be necessary to use a pry
bar to pull the OEM A-arms down far enough to connect.
14. Connect the OEM outer tie rod ends to
the OEM steering knuckles using the
OEM hardware. (See Photo # 3)
Photo # 8
15. Connect the OEM sway bar end links to
the OEM steering knuckles using the
OEM hardware. (See Photo # 2)
Photo # 9
I-HL130ST
Pg 3
16. Connect the OEM brake line brackets to the frame using the OEM
hardware. (See Photo # 1)
17. Install the front tires / wheels & lower the front of the vehicle to the
ground.
Rear Installation:
18. Block the front tires / wheels & raise the rear of the vehicle using a
floor jack. Properly support the frame rails using jack stands &
remove the rear tires / wheels.
Photo # 10
19. Disconnect the OEM brake proportioning valve linkage from the
rear differential. (See Photo # 10)
20. Support the rear differential & remove the OEM rear shocks. (See
Photo # 11)
21. Remove the OEM rear u-bolts & lower the rear differential enough to
allow for the installation of the new Skyjacker rear lift blocks. (See
Photo # 11
Photo # 12)
22. Install the new Skyjacker rear lift blocks, raise the rear differential, &
install the new Skyjacker u-bolts using the supplied 9/16" nuts. (See
Photo # 13)
23. Install the new Skyjacker rear shocks (Sold Seperately), using the
supplied & OEM hardware.
24. Connect the OEM brake proportioning valve linkage to the rear
differential using the OEM hardware. (See Photo # 10)
Photo # 12
25. Install rear tires / wheels & lower the rear of the vehicle to the
ground.
Final Notes:
• After the installation is complete, double check that all nuts & bolts are
tight. Refer to the following chart for the proper torque specifications.
(Do not retighten the nuts & bolts where thread lock compound was
Photo # 13
used.)
• With the vehicle placed on the ground, cycle the steering lock to lock & inspect the steering,
suspension, brake lines, front & rear drivelines, fuel lines, & wiring harnesses for proper operation,
tightness, & adequate clearance.
• Have the headlights readjusted to the proper settings.
I-HL130ST
Pg 4
• Have a qualified alignment center align the vehicle to the OEM specifications.
• After the first 100 miles, check all hardware for the proper torque & periodically thereafter.
Torque specificAtions
Inch System
Bolt Size
5/16
3/8
7/16
1/2
9/16
5/8
3/4
Grade 5
15 FT LB
30 FT LB
45 FT LB
65 FT LB
95 FT LB
135 FT LB
185 FT LB
Metric system
Grade 8
20 FT LB
35 FT LB
60 FT LB
90 FT LB
130 FTLB
175 FT LB
280 FT LB
Bolt Size
6MM
8MM
10MM
12MM
14MM
16MM
18MM
Class 8.8
5 FT LB
18 FT LB
32 FT LB
55 FT LB
85 FT LB
130 FT LB
170 FT LB
Class 10.9
9 FT LB
23 FT LB
45 FT LB
75 FT LB
120 FT LB
165 FT LB
240 FT LB
• The above specifications are not to be used when the bolt is being installed with a bushing.
Seat Belts Save Lives, Please Wear Your Seat Belt.
I-HL130ST
Pg 5
Jesus Forgives,
Rocks Don’t
www.skyjacker.com
Jesus Christ Died For You.
Jesús murió por ti.
For God so loved the world that He gave His only Son, so that everyone who
believes in Him should not perish, but have everlasting life.
Romans 3:23
“Porque tanto amó Dios al mundo, que dio a su Hijo unigénito, para que todo
el que cree en él no se pierda, sino que tenga vida eterna.”
Romanos 3:23
For all have sinned; all fall short of God’s glorious standard.
Ephesians 2:8
“Pues todos han pecado y están privados de la gloria de Dios.”
Efesios 2:8
God saved you by his special favor when you believed. And you can’t take
credit for this; it is a gift from God.
Psalms 18:2
“Porque por gracia ustedes han sido salvados mediante la fe; esto no procede
de ustedes, sino que es el regalo de Dios.”
Salmos 18:2
The Lord is my Rock, my fortress, and my savior; my God is my Rock, in
whom I find protection. He is my shield, the strength of my salvation, and
my stronghold.
Romans 10:9-10
“El Señor es mi roca, mi amparo, mi libertador; es mi Dios, el peñasco
en que me refugio. Es mi escudo, el poder que me salva, ¡mi más alto
escondite!”
Romanos 10:9-10
That if you shall confess with thy mouth the Lord Jesus, and shall believe in
your heart that God hath raised him from the dead, you shall be saved.
For with the heart man believeth unto righteousness; and with the mouth
confession is made unto salvation.
“9 Que si confi esas con tu boca que Jesús es el Señor, y crees en tu corazón
que Dios lo levantó de entre los muertos, serás salvo. 10 Porque con el
corazón se cree para ser justifi cado, pero con la boca se confi esa para ser
salvo.”
Pray This Simple Prayer:
God, I come to You admitting I have sinned against You and I need you to
take control of my life. The Bible says anyone who calls on the name of the
Lord will be saved. I am calling on You, Jesus. I ask that You come live in
my heart and be the Lord over my life today. I do believe You died on the
cross for me and came back to life to give me life! Thank You, Lord Jesus
for a new life in You!
Ahora dí esta simple oración:
Dios, vengo a Ti y admito que he pecado contra Ti, necesito que tomes el
control de mi vida. La Biblia dice que todo aquel que invoca el nombre del
Señor escapará con vida. En este momento yo clamo ante Ti, Jesús; te pido
que vengas a vivir en mi corazón y que tomes el control de mi vida. ¡Yo creo
que tu moriste en la cruz y resucitaste para darme vida! ¡Gracias Señor Jesús,
por una nueva vida que tengo en Ti! Amen.
Now, go and tell somebody about your new life in Jesus, get a Bible, begin
to read it, and go to a Bible believing church.
Ahora ve y dile a alguien sobre la nueva vida que tienes en Cristo. Compra
una Biblia y empieza a leerla. Busca una Iglesia que cree en la Biblia y hazte
parte de esa Iglesia.
John 3:16
If you would like someone to pray with you, call Kenneth Copeland
Ministries anytime at 800-600-7395.
To listen to commercial free Christian radio on the web, go to
www.887fm.org
Juan 3:16
Si te gustaría orar con alguien, puedes llamar a este número 800-600-7395
Puedes ir a este sitio de Internet para escuchar música Cristiana sin anuncios,
www.887fm.org
Check out our favorite ministries at:
www.innministries.org
www.familychurch.org
www.kcm.org

© Copyright 2026