
Istruzioni per il montaggio Assembly instructions Instructions
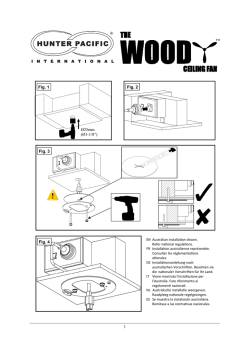
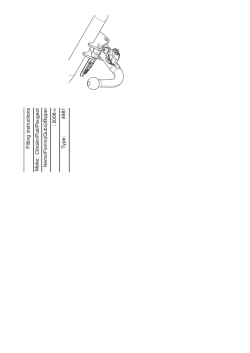
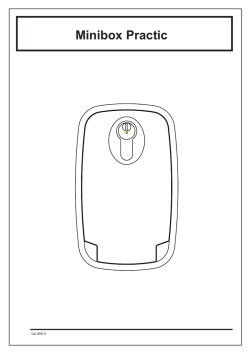
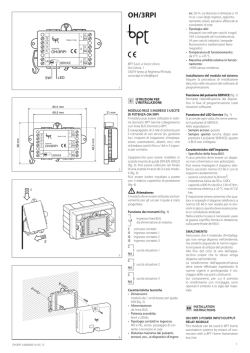
Raccomandazione importante:
Important note:
Avis important:
Wichtigehinweise:
Advertencias importantes:
Lampadina:
Bulb:
Ampoule:
Lampe:
Bombilla:
La sicurezza elettrica dell’apparecchio dipende dal corretto uso delle istruzioni.
Disinserire la corrente prima di intervenire sulla lampada. Per pulire l’apparecchio non usare detergenti abrasivi.
The electrical safety of the product depends on the correct use of instructions.
Turn power off before carrying out any operation on the lamp. To clean the lamp, never use abrasive detergents.
Pour le sécurité électrique de votre appareil, suivre strictement les instructions.
Débrancher le courant avant de remplacer l’ampoule. Ne pas utiliser des détergents abrasifs pour le nettoyage de l’appareil.
Die elektrische Sicherheit des Gerätes hängt von der vorschriftsmäßigen Befolgung der Anleitung ab.
Vor dem Auswechseln der Lampe ist diese vom Versogungsnetz zu trennen. Bitte verwenden Sie zur Reinigung kein Scheuermittel.
La seguridad del aparato depende del correcto uso de las instrucciones.
Desenchufar el aparato antes de intervenir en el mismo. Para limpiar el aparato no hay que usar detergentes abrasivos.
Alogena
max 1 x 300W R7s
Halogene
max 1 x 300W R7s
Halogéne
max 1 x 300W R7s
Leuchtstofflampe
max 1 x 300W R7s
Halogena
max 1 x 300W R7s
GARANZIA - QUESTO PRODOTTO È GARANTITO PER 24 MESI DALLA DATA DI ACQUISTO CONTRO DIFETTI DI MATERIALE O FABBRICAZIONE. NEL
PERIODO DI GARANZIA VERRANNO ELIMINATI TALI DIFETTI SIA RIPARANDO IL PRODOTTO SIA SOSTITUENDOLO. LA GARANZIA NON COPRE ALTRI
TIPI DI DANNO. EVENTUALI RIPARAZIONI IN GARANZIA NON MODIFICHERANNO LA DURA
TA DELLA STESSA. LA GARANZIA SARA’ VALIDA SOLO SE
RITORNATACI DATATA E TIMBRA TA DAL VOSTRO RIVENDITORE NEMO INSIEME AL PRODOTTO. PER RIPARAZIONI IN GARANZIA E NO, SPEDITECI IL
PRODOTTO ESCLUSIVAMENTE TRAMITE IL VOSTRO RIVENDITORE NEMO.
WARRANTY - FOR A PERIOD OF 24 MONTHS FROM THE PURCHASE DATE THE PRODUCT IS WARRANTED FOR DAMAGE RESULTING FROM DEFECTIVE
WORKMANSHIP AND MATERIAL. DURING THE WARRANTY PERIOD DEFECTS WILL BE ELIMINATED BOTH BY REPAIRING THE PRODUCT OR BY
REPLACING IT. WARRANTY DOES NOT COVER ANY OTHER KIND OF DAMAGE. REPARATIONS DURING THE WARRANTY PERIOD DO NOT CHANGE THE
WARRANTY DURATION. WARRANTY IS VALID ONLY IF SENT BACK WITH DATE AND STAMP OF YOUR NEMO DEALER TOGETHER WITH THE PRODUCT.
FOR REPARATIONS WITHIN AND OUTSIDE THE WARRANTY PERIOD ALWAYS SEND US THE PRODUCT ONLY THROUGH YOUR NEMO DEALER.
GARANTIE - LE PRODUIT EST GARANTI CONTRE LES DÉFAUTS DES MATERIAUX OU DE FABRICATION PENDANT UN DÉLAI DE 24 MOIS DÈS LE DATE DE
L’ ACHAT. AU COURS DE CETTE PÉRIODE, LES DÉFAUTS SERONT ÉLIMINÉS EN RÉPARANT OU EN REMPLAÇANT LE PRODUIT. NOTRE GARANTIE, AINSI
QUE NOTRE RESPONSABILITÉ, SONT LIMITÉES AUX PIÈCES RECONNUES DÉFECTUEUSES ET LES RÉP ARATIONS ÉVENTUELLES DONNÉES EN
GARANTIE NE POURRONT PAS CHANGER LE DÉLAI DE LA MÊME. LA GARANTIE JOUE LORSQU’ELLE VIENT RETOURNÉE AVEC LA DATE ET LE TIMBRE
DU REVENDEUR NEMO. LE PRODUIT DOIT ÊTRE ENVOYÉ EXCLUSIVEMENT PAR L’ENTREMISE DE VOTRE REVENDEUR NEMO.
GARANTIE - DIE GARANTIE ENTSPRICHT 24 MONATE AB DEM KAUFDATUM UND DECKT ALLE AUSFÜHRUNGS-ODER MATERIALMÄNGEL. IN DER
GARANTIEFRIST WERDEN SOLCHE MÄNGEL DURCH REPARATUR ODER AUSTAUSCH DES PRODUKTES BESEITIGT. DIE GARANTIE DECKT KEINE
ANDERE MÄNGEL. IN DER GARANTIEFRIST DURCHGEFÜHRTE REPARATUREN WERDEN DIE GARANTIEDAUER NICHT ÄNDERN. DIE GARANTIE IST
GÜLTIG, NUR WENN SIE UNS MIT DATUM UND STEMPEL IHRES NEMO-HÄNDLERS ZUSAMMEN MIT DEM PRODUKT ZURÜCKGESCHICKT WIRD.
REPARATURARBEITEN JEGLICHER ART BITTE NUR, ÜBER IHREN NEMO-HÄNDLER ABWICKELN.
GARANTÍA - ESTE PRODUCTO ESTÁ GARANTIZADO POR 24 MESES A PARTIR DE LA FECHA DE COMPRA CONTRA DEFECTOS DE MATERIAL O BIEN DE
FABRICACIÓN. DURANTE EL PERIODO DE GARANTÍA SE ELIMINARÁN DICHOS DEFECTOS BIEN REPARANDO EL PRODUCTO BIEN SUBSTITUYÉNDOLO.
LA GARANTÍA NO CUBRE OTROS TIPOS DE DAÑOS. EVENTUALES REPARACIONES DURANTE LA GARANTÍA NO MODIFICARÁN LA DURACIÒN DE LA
MISMA. LA GARANTÍA SERÁ VÁLIDA SÓLO SI SE NOS LE REMITE FECHADA Y SELLADA POR EL DISTRIBUIDOR NEMO JUNTO CON EL PRODUCTO.
PARA REPARACIÓNES DURANTE LA GARANTÍA Y NO, ENVIAR EL PRODUCTO EXCLUSIVAMENTE POR MEDIO DEL DISTRIBUIDOR NEMO.
Tutti i prodotti NEMO che rientrano nell’ambito di applicazione della
direttiva europea compatibilità elettromagnetica E.M.C. 89/336 e
successive modifiche 92/31 e 93/68, e/o della direttiva europea bassa
tensione B.T. 73/23 e successiva modifica 93/68, soddisfano i requisiti
richiesti e recano la marcatura “CE”.
All NEMO products fall within the range of application of the european
electromagnetic compatibility E.M.C.directive 89/336 and subsequent amendment
92/31 and 93/68, and/or the european low voltage directive B.T. 73/23 and
subsequent 93/68, meet the required specifications and bear “CE” labelling.
Tous les produits NEMO appartenant au champ d’application de la directive
européenne compatibilité électromagnétique E.M.C.89/336 et modifications
successives 92/31 et 93/68, et/ou de la directive européenne basse tension B.T.
73/23 et modification sucessive 93/68, remplissent les conditions prévues et portent
le marquage “CE”.
Alle Produkte von NEMO, die unter das Anwendungsgebiet der europäischen
Richtlinien der elektromagnetischen Kompatibilität E.M.C.89/336 und nachfolgende
Änderungen 92/31 und 93/68 und/oder der europäischen Richtlinie der
Niederspannung B.T. 73/23 und nachfolgende Änderung 93/68 fallen, entsprechen
den erforderlichen Eigenschaften und tragen das “CE” -Kennzeichen.
Todos los productos NEMO que pertenencen al ámbito de aplicación de la directiva
europea sobre compatibilidad electromagnética E.M.C. 89/336 y modificaciones
sucesivas 92/31 y 93/68, y/o de la directiva europea baja tensión B.T. 73/23 y
modificación 93/68, cumplen los requisitos correspondientes y llevan el marcado
“CE”.
Il
simbolo
indica
l’idoneità
degli
apparecchi al montaggio
diretto su superfici
n o r m a l m e n t e
infiammabili.
The symbol indicates the suitabily of
fixtures to be mounted directly on
normaly inflammable surfaces.
Le symbole indique que les appareils
sont indiqués pour être montés
directement sur des surfaces
normalement inflammables.
Das Symbol zeigt an, ob die Geräte
dazu geeignet sind, auf normal
entflammbaren
Oberflächen
angebracht zu werden.
El símbolo indica que los aparatos
son aptos para ser montados
directamente sobre superficies
normalmente inflamables.
....m
Sostituire
gli
schermi
di
protezi one
danneggiati.
Replace damaged
p r o t e c t i o n
screens.
Remplacer les
écrans
à
p r o t e c t i o n
endommagés.
Auswechseln die
beschädigten
Schirmen.
Substituir la caja
de
protección
oxidada.
Il simbolo indica la distanza
minima a cui va posto
l’oggetto da illuminare.
The symbol indicates the
minimum distance from
which the object to be
illuminated should be
placed.
Ce symbole i n d i q u e l a
distance minimum où l’objet
à éclairer doit être placé.
Das Symbol gibt den
Mindestabstand zwischen
Leuchte
und
zu
beleuchtender Fläche an.
El símbolo indica la
distancia minima de los
objetos iluminados.
Nemo S.r.L. Viale Brianza, 30 | 20823 Lentate sul Seveso (MB), Italy | Tel. +39 0362 166 05 00 | Fax +39 0362 372 996
[email protected] | nemolighting.com
Istruzioni per il montaggio
Assembly instructions
Instructions pour le montage
Montageanleitung
Instrucciones para el montaje
MONTAGGIO
Rimuovere il fondello svitando le due viti ed utilizzando il cacciavite come una leva (fig. 1). Estrarre il morsetto
dal corpo della lampada (fig. 2). Collegare il conduttore giallo-verde al morsetto di terra contrassegnato dal
simbolo
e i restanti conduttori negli altri morsetti. (fig. 3). Fissare il fondello a muro tramite le apposite viti
(fig. 4). Inserire la lampadina senza toccarla con le mani nude (fig. 5). Inserire il vetrino di protezione in
maniera simmetrica in modo tale che la lampadina non sia visibile in maniera diretta (fig. 6).Orientare la
lampada nella direzione desiderata, facendo attenzione a non eccedere l’angolo di apertura massimo indicato
(fig. 7-8). Se il braccio lampada non mantiene la posizione desiderata e cade verso il basso, è necessario agire
sulla frizione.Quindi, staccare il corpo lampada dal rosone A e con la brugola in dotazione intervenire sui due
grani che si trovano in fondo alla sede delle viti (fig. 9).
ATTENZIONE: Non utilizzare l’apparecchio senza gli schermi di protezione.Sostituire gli schermi danneggiati
esclusivamente con il vetro NEMO cod: 063 NAO 000 000 (L=144mm).
ASSEMBLY
Remove the base by undoing the two screws, using the screwdriver as a lever (fig. 1). Remove the terminal from
the lamp body (fig. 2). Connect the green and yellow wire to the earth terminal marked with the earth symbol
and the remaining wires to the other terminals (fig. 3). Fix the base to the wall using the screws provided
(fig. 4). Insert the bulb without touching it with the bare hands (fig. 5). Insert the protective glass screen
symmetrically, to ensure that the bulb is not directly visible (fig. 6). Point the lamp in the direction required,
taking care not to exceed the maximum opening indicated (fig. 7-8). If the arm of the lamp does not stay in the
position required and falls downwards, the friction device will have to be adjusted. Remove the lamp body from
rose A with the key supplied by adjusting the two nuts at the bottom of the screw housings (fig. 9).
IMPORTANT: Do not use the appliance without the protective screen. Replace damaged screens only with the
NEMO glass screen code 063 NAO 000 000 (L=144mm).
1
0,4m
MONTAJE
Quitar el fondo destornillando los dos tornillos y utilizando el destornillador como una palanca (Fig. 1). Extraer
el borne del cuerpo de la lámpara (Fig. 2). Conectar el conductor amarillo-verde al borne de tierra marcado con
el símbolo
y los conductores restantes en los otros bornes (Fig. 3). Fijar el fondo a la pared con los
tornillos específicos (Fig. 4). Insertar la bombilla sin tocarla con las manos desnudas (Fig. 5). Colocar el cristal
de protección en modo simétrico de modo que no se vea la bombilla directamente (Fig. 6). Orientar la lámpara
en la dirección deseada, prestando atención a no superar el ángulo de apertura máximo indicado (Fig. 7-8). Si
el brazo de la lámpara no mantiene la posición deseada y cae hacia abajo, es necesario intervenir sobre el
embrague. Luego, extraer el cuerpo de la lámpara del rosetón A y con la llave hexagonal intervenir sobre los
dos tornillos sin cabeza que se encuentran en el fondo del alojamiento de los tornillos (Fig. 9).
AT E N C I Ó N ! ! No utilizar el aparato sin las pantallas de protección. Sustituir las pantallas dañadas
exclusivamente con el cristal NEMO cod: 063 NAO 000 000 (L=144mm).
3
Click
2
1
MONTAGE
Oter la plaquette en dévissant les deux vis et en utilisant le tournevis comme un levier (fig. 1). Sortir
la borne du corps de la lampe (fig. 2). Connecter le conducteur jaune-vert à la borne de terre marquée par le
symbole
et les conducteurs restants dans les autres bornes (fig. 3). Fixer la plaquette au mur au moyen
des vis appropriées (fig. 4). Introduire l’ampoule sans la toucher avec les mains nues (fig. 5). Introduire le verre
de protection de manière symétrique afin que l’ampoule ne soit pas visible de manière directe (fig. 6). Orienter
la lampe dans la direction désirée, en prenant garde de ne pas excéder l’angle d’ouverture maximale indiqué
(fig. 7-8). Si le bras de la lampe ne maintient pas la position désirée et tombe vers le bas, il faut agir sur la
friction. Par conséquent, détacher le corps lampe de la rosace A et avec la clef creuse hexagonale fournie
intervenir sur les deux grains qui se trouvent au fond du siège des vis (fig. 9).
ATTENTION: Ne pas utiliser l’appareil sans les écrans de protection. Remplacer les écrans endommagés
exclusivement avec le verre NEMO code 063NAO 000 000 (L=144mm).
MONTAGE:
Montieren Sie den Bodenteller ab, indem Sie die beiden Schrauben lösen und einen Schraubenzieher als Hebel
ansetzen (Abb. 1). Ziehen Sie die Klemme vom Körper der Leuchte ab (Abb. 2). Schließen Sie den gelb-grün
gestreiften Leiter an die mit dem Symbol
gekennzeichnete Erdklemme und die übrigen Leiter an die
anderen Klemmen an (Abb. 3). Befestigen Sie den Boden mit geeigneten Schrauben an der Wand (Abb. 4). Die
Lampe einsetzen, ohne sie mit den nackten Fingern zu berühren (Abb. 5). Setzen Sie das Schutzglas
symmetrisch so ein, daß die Lampe nicht direkt sichtbar ist (Abb. 6). Richten Sie die Leuchte in die gewünschte
Richtung; achten Sie dabei darauf, daß der angegebene max. Öffnungswinkel nicht überschritten wird (Abb. 7-8).
Sollte der Leuchtenarm die gewünschte Position nicht beibehalten und nach unten neigen, müssen Sie die
Kupplung entsprechend einstellen. Anschließend den Leuchtenkörper von der Rosette A abnehmen und mit dem
mitgelieferten Inbusschlüssel die beiden Dübelschrauben unten am Sitz der Schrauben anziehen (Abb. 9).
ZU BEACHTEN: Das Gerät darf nicht ohne die Schutzabdeckungen betrieben werden! Tauschen
Sie b eschädigte Schutzabdeckungen nur geg en das Glas N EMO, Best.-Nr. 063 NAO 00 0 0 00
aus (L=144mm).
2
4
5
6
45°
7
8
A
9


© Copyright 2026