
90345 istruzioni
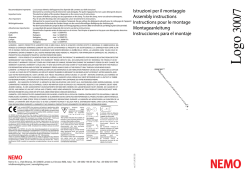
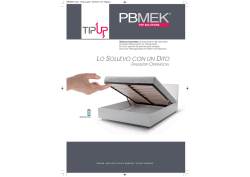
• MACCHINA PER LA PASTA - MANUALE DI ISTRUZIONI • PASTA MACHINE - USE INSTRUCTIONS • MACHINE À PÂTES - MANUEL D’INSTRUCTIONS • NUDELMASCHINE - BETRIEBSANLEITUNG • MÁQUINA PASTA - MANUAL DE INSTRUCCIONES Cod.: 90.345 ITALIANO pag. 3 ENGLISH pag. 7 FRANÇAIS pag. 10 DEUTSCH pag. 13 ESPAÑOL pag. 15 For further information and/or for instructions for use in other languages, please visit: beper.com Fig. 1 Fig. 2 Macchina per la pasta Manuale di istruzioni Mulinella Beper è destinata ad un utilizzo casalingo e prodotta sulla base di standard qualitativi molto elevati, Vi garantirà affidabilità e sicurezza nel tempo, permettendovi di preparare in casa vostra, in modo veloce e sicuro la migliore pasta fresca con gli ingredienti naturali scelti da Voi. Il presente libretto è parte integrante della macchina. Prima di compiere qualsiasi operazione, leggere attentamente tutte le norme di sicurezza, le istruzioni e le condizioni di garanzia. Conservate con cura e a portata di mano questo manuale e consultatelo a ogni eventuale necessità. Per qualsiasi dubbio o impiego non previsto, interpellate il rivenditore prima dell’installazione, citando il MODELLO. ATTENZIONE! Qualsiasi utilizzo della macchina non previsto dal presente libretto di istruzioni deve considerarsi scorretto o improprio. La macchina è destinata solo ed esclusivamente a impasto, riduzione in sfoglia o taglia sfoglia della pasta e non può essere utilizzata per scopi diversi. Il Fabbricante si ritiene sollevato da eventuali responsabilità in caso di: - uso improprio; - non corretta installazione; - modifiche o interventi non autorizzati dal Fabbricante; - utilizzo di ricambi non originali o non specifici per il modello DESCRIZIONE DELLA MACCHINA A - Corpo macchina B - Manovella C - Morsetto D - Foro d’innesto rulli tagliasfoglia E - Vano sede morsetto V - Vite morsetto F - Foro d’innesto rulli tirasfoglia G - Pomello regolatore H - Rullo tirasfoglia I - Rulli tagliasfoglia L - Leva pomello IMPIEGO DELLA MACCHINA Prima di ogni utilizzo: seguire le istruzioni descritte nel paragrafo “Pulizia e manutenzione” 1 - Sistemare la macchina per pasta (A) in prossimità del bordo di un piano stabile ed in grado di sopportarne il peso, inserire il morsetto (C) nel vano sede morsetto (E), avvitare la vite del morsetto (V) sino ad ottenere un bloccaggio stabile della macchina con il piano di appoggio. 2 - Tenendo premuta la leva (L) ruotare il pomello regolatore (G) fino alla posizione 9 (max apertura rulli), inserire la manovella (B) nel foro d’innesto (F) della macchina, appoggiare sui rulli tirasfoglia una parte dell’impasto precedentemente prepararato e ruotare la manovella in senso orario (facendo girare i rulli tirasfoglia). Si otterrà così una prima formatura della sfoglia. Piegare la stessa in due e ripassarla tra i rulli fino a renderla omogenea. 3 - Per diminuire lo spessore della sfoglia, ruotare in senso orario il pomello regolatore (G) in modo da ridurre la distanza tra i rulli tirasfoglia (H). Ripassare la sfoglia ripetendo l’operazione sino ad ottenere lo spessore desiderato. 3 Macchina per la pasta Manuale di istruzioni N.B. Per un risultato ottimale si consiglia di infarinare la sfoglia su entrambe i lati ad ogni passaggio tra i rulli tira-sfoglia. L’impasto deve essere ben solido e non friabile, altrimenti si disferebbe dutante passaggio nella macchina. 4 - Per tagliare la sfoglia con i rulli tagliasfoglia (I), dopo aver scelto la misura del taglio desiderato (tagliatelle o fettuccine) sfilare la manovella (B) dal foro d’innesto (F) ed inserire la stessa in uno dei fori d’innesto (D) appoggiare un’estremità della sfoglia sui rulli tagliasfoglia (I) e ruotare la manovella in senso orario. 5 - L’impasto deve essere tenuto a temperatura ambiente. Al termine di ogni utilizzo: seguire le istruzioni descritte nel paragrafo “Pulizia e manutenzione”. ACCESSORI 1 – Rulli tirasfoglia 2 – Rulli taglia sfoglia per fettuccine 3 – Rulli taglia sfoglia per tagliatelle MONTAGGIO DEGLI ACCESSORI (Fig. 2) Prima di ogni utilizzo: seguire le istruzioni descritte nel paragrafo “Pulizia e manutenzione”. 1 - Sistemare la macchina per pasta in prossimità del bordo di un piano stabile ed in grado di sopportarne il peso, inserire il morsetto nel vano sede morsetto, avvitare la vite sino ad ottenere un bloccaggio stabile della macchina con il piano d’ appoggio. 2 - Agganciare sulle apposite alette di ritegno della macchina l’accessorio desiderato. 3 - Inserire la manovella in dotazione nell’innesto presente su tutti gli accessori. La procedura di montaggio degli accessori è valida per tutti gli apparecchi manuali indicati in questa pagina. UTILIZZO MANUALE DEGLI ACCESSORI TAGLIA SFOGLIA Prima di ogni utilizzo: seguire le istruzioni descritte nella pagina “Avvertenze” al paragrafo “Pulizia”. Appoggiare un’estremità della sfoglia precedentemente ottenuta sui rulli tagliatori, inserire la manovella nell’innesto dell’apparecchio e ruotare in senso orario, ottenendo così il taglio della sfoglia. PULIZIA E MANUTENZIONE La pulizia e la sola manutenzione normalmente richiesta Prima di ogni utilizzo: Pulire accuratamente la macchina con un panno asciutto oppure con un pennello morbido. Dopo aver fissato la macchina su di un piano idoneo si può completare l’operazione di pulizia facendo passare tra i rulli tirasfoglia e tra i rulli tagliatori un pezzetto di impasto (in modo da rimuovere eventuali residui di polvere). L’impasto impiegato per questa operazione dovrà essere ovviamente eliminato. Non lavare MAI in lavastoviglie o comunque con getti d’acqua o detersivi nessuna delle parti della sfogliatrice e degli accessori. Non usare oggetti contundenti per rimuovere eventuali residui. Evitare assolutamente l’uso di coltelli o altri utensili per iniziare la presa dell’impasto tra i rulli della macchina. 4 Macchina per la pasta Manuale di istruzioni Al termine di ogni utilizzo: Non rimuovere MAI eventuali residui di impasto con corpi contundenti. Non lavare MAI in lavastoviglie o comunque con getti d’acqua o detersivi nessuna delle parti della macchina e degli accessori. Assicurarsi che tutti i componenti siano perfettamente asciutti da ogni eventuale residuo di umidità, prima di riporli. ATTENZIONE! QUESTE MACCHINE NON SONO DEI GIOCATTOLI. DURANTE L’USO QUINDI, TENERLE SEMPRE SOTTO CONTROLLO E FUORI DALLA PORTATA DEI BAMBINI COME PREPARARE L’IMPASTO BASE L’impasto fresco è un ingrediente essenziale per la pasta fatta in casa. Per ottenere circa 1/2 kg di pasta occorrono 350 gr di farina 00 (2 tazze) e 2 uova intere grandi. Questi sono gli unici due ingredienti che servono per preparare un ottimo impasto. Per preparare, invece, l’impasto a mano, bisogna disporre la farina su un piano e fare un buco al centro, dove mettere le uova. Poi con una forchetta, sbattere le uova con dolcezza ed incorporare la farina dai lati. Iniziare a lavorare gli ingredienti insieme fino a che l’impasto diventa omogeneo. A questo punto, si inizia ad impastare la pasta su un piano leggermente infarinato aiutandosi con il palmo della mano. IMPORTANTE: se la consistenza dell’impasto è troppo asciutta o troppo friabile lo si deve spruzzare con un po’ di acqua tiepida. Quando la consistenza desiderata è raggiunta, formare una palla e lasciare riposare in un recipiente. Ricoprire l’impasto preparato (questo evita che si asciughi) e continuare. In un’ottica di miglioramento continuo Beper si riserva la facoltà di apportare modifiche e migliorie al prodotto in oggetto senza previo preavviso. 5 CERTIFICATO DI GARANZIA Questo apparecchio è stato controllato in fabbrica. La garanzia di applicazione è valida 24 mesi dalla data di acquisto per difetti di materiale o di fabbricazione. La garanzia è valida unicamente presentando il certificato di garanzia e il documento di acquisto (scontrino fiscale) che certifichi la data di acquisto e il nome del modello dell’apparecchio acquistato. Se l’apparecchio dovesse richiedere assistenza tecnica rivolgersi al venditore o presso la nostra sede. Questo per conservare inalterata l’efficienza del vostro apparecchio e per NON invalidare la garanzia. Eventuali manomissioni dell’apparecchio da parte di personale non autorizzato invalideranno automaticamente la garanzia. Condizioni di garanzia Se ci sono guasti a causa di difetti di materiale e/o fabbricazione durante il periodo di garanzia, garantiamo la riparazione del prodotto gratuitamente, a patto che: - l’apparecchio sia stato usato in modo corretto ed ai fini per cui è stato costruito; - l’apparecchio non sia stato manomesso: il prodotto non è manutenzionabile. - venga presentato lo scontrino; - non rientrano in garanzia le parti che dimostrano un normale logoramento. Sono quindi escluse tutte le parti che hanno subito rotture accidentali o che sono soggette ad usura (tra le quali lampade, batterie, resistenze) le parti estetiche e difetti derivanti da un utilizzo non domestico dell’apparecchio, negligenza nell’uso, incuria, istallazione errata o impropria o nella manutenzione, danni da trasporto e tutti quei danni non imputabili direttamente al produttore. Se entro il periodo di garanzia emerge un difetto che non può essere riparato, l’apparecchio viene cambiato gratuitamente. In ogni caso, se la parte da sostituire per difetto, rottura o malfunzionamento è un accessorio e/o una parte staccabile del prodotto, Beper si riserva la facoltà di sostituire solo il pezzo interessato e non l’intero prodotto. Assistenza tecnica Anche dopo il periodo di garanzia prestiamo molta attenzione alle riparazioni. Per l’assistenza tecnica e/o riparazioni fuori dal periodo di garanzia ci si può rivolgere direttamente all’indirizzo sottostante. BEPER SRL Via Salieri, 30 37050 - Vallese di Oppeano - Verona Tel. 045/7134674 – Fax 045/9817905 e-mail: [email protected] 6 Mulinella Beper is intended for household use and is made to very high quality standards. It will offer you reliability and safety over time allowing you to make the best fresh pasta with natural ingredients chosen by you, quickly and safely in your own home. This handbook is an integrating part of the machine. Please carefully read through all the rules of safety, instructions and warranty conditions before using the machine. Keep this handbook carefully and near at hand to be able to refer to it for any need. For any doubts or unforeseen use, inquire with your dealer before installation, quoting the MODEL. ENGLISH Pasta Machine Use instructions WARNING! Any use of the machine not provided for herein shall be considered incorrect or improper. The machine is intended only and exclusively for mixing, rolling or cutting pasta and may not be used for other purposes. The Manufacturer disclaims any liability in the event of: - improper use; - incorrect installation; - alterations or operations not authorised by the Manufacturer; - use of non genuine spares or not specific to the model. DESCRIPTION OF THE MACHINE A - Machine body B - Handle C - Clamp D - Cutter roller attachment slot E - Clamp housing slot V - Clamp screw F - Stretching roller attachment slot G - Adjustment knob H - Stretching rollers I - Cutter rollers L - Knob lever USE OF THE MACHINE Before each time of use: follow the instructions given in the “Cleaning and maintenance” paragraph. 1 - Set the pasta machine (A) near the edge of firm surface able to bear its weight, insert the clamp (C) in the clamp housing slot (E), tighten the clamp screw (V) until the machine is firmly clamped to the resting surface. 2 - Keeping the lever (L) pressed, turn the adjustment knob (G) to position 9 (max roller opening), insert the handle (B) in the attachment slot (F) of the machine, lay part of the previously prepared dough on the stretching rollers and turn the handle clockwise (making the stretching rollers turn). This will obtain a first shaping of the sheet. Fold it in two and pass it through the rollers again to make it homogeneous. 3 - To reduce the thickness, turn the adjustment knob (G) clockwise to reduce the distance between the stretching rollers (H). Pass the dough through again repeating the operation until obtaining the required thickness. 4 - To cut the sheet with the cutter rollers (I), after choosing the required cutting size, remove the handle (B) from the attachment slot (F) and insert it in one of the attachment slots (D). Rest one end of the sheet on the cutter rollers (I) and turn the handle counter-clockwise. 7 Pasta Machine Use instructions 5 - The dough must be kept at room temperature. After each time of use: Follow the instructions given in the “Cleaning and maintenance” paragraph. MANUAL ACCESSORIES 1 – Stretching rollers 2 – Cutter rollers for fettuccine 3 – Cutter rollers for tagliatelle FITTING ACCESSORIES (Fig.2) Before each time of use: follow the instructions given in the “Warnings” page of the “Cleaning” paragraph. Set the pasta machine near the edge of firm surface able to bear its weight, insert the clamp in the clamp housing slot, tighten screw until the machine is firmly clamped to the resting surface. 2 - Connect the required accessory to the retainer fins provided on the machine. 3 - Insert the handle provided in the slot present on all accessories. This procedure is the same for all the manual devices shown on this page MANUAL USE OF CUTTERS Before each time of use: follow the instructions given in the “Warnings” page of the “Cleaning” paragraph. Rest one end of the sheet obtained previously on the cutter rollers, insert the handle in the slot of the device and turn clockwise to obtain the cutting action. CLEANING AND MAINTENANCE Cleaning is the only type of maintenance normally required. BEFORE EACH TIME OF USE: Thoroughly clean the machine with a dry cloth or soft brush. AFTER FASTENING THE MACHINE TO A SUITABLE SURFACE cleaning can be completed passing a piece of dough through the stretching rollers and cutter rollers (to remove any remaining dust). Of course, the dough used for this purpose is to be eliminated. NEVER wash any part of the machine and its accessories in a dishwasher or with water and detersives. Do not use sharp objects to remove any remainders. Absolutely avoid using knives or other utensils to put the dough between the machine rollers. AFTER EACH TIME OF USE: NEVER use sharp objects to remove any remaining dough. NEVER wash any part of the machine and its accessories in a dishwasher or with water and detersives. Make sure that all the components are perfectly dry before stowing them. WARNING! THESE MACHINES ARE NOT TOYS. THEREFORE DURING USE KEEP THEM UNDER CONTROL AND OUT OF THE REACH OF CHILDREN. For any improvement reasons, Beper reserves the right to modify or improve the product without any notice. 8 GUARANTEE CERTIFICATE This appliance has been checked in the factory. From the date of original purchase a 24 month guarantee applies to material and production defects. The purchase receipt and the guarantee certificate must be submitted together in case of claim to guarantee. The guarantee is valid only with a guaranty certificate and proof of purchase (fiscal receipt) indicating the date of purchase and the model of the appliance For any technical assistance, please contact directly the seller or our head office in order to preserve the appliance’s efficiency and NOT TO void the guarantee. Any intervention on this appliance by non-authorized persons will automatically void the guarantee. Guarantee conditions If the appliance shows defects as a result of faulty material and/or production during the period of guarantee, we guarantee repair free of charge on condition that: - The appliance has been used properly and for the purpose for which it has been intended. - The appliance has not been tampered with, otherwise it is not maintainable. - The purchase receipt shall be presented. - The appliance showing a fair wear and tear shall not be covered by this guarantee. Therefore, any part that could be accidentally broken or having visible signs of use in consumable products (such as lamps, batteries, heating elements…) the aesthetic parts are excluded from the guarantee, and any defect whatsoever resulting from non-respect of the rules for use, negligence in usage and/or maintenance of the appliance, carelessness, wrong or improper installation, damage during transport and any other damage not attributable the supplier. For every defect that could not be repaired within the guarantee period, the appliance will be replaced free of charge. In any case, if the part to be replaced for defect, breakage or malfunction is an accessory and/or a detachable part of the product, Beper reserves the right to replace only the very part in question and not the entire product Technical assistance Even after the guarantee period we will always pay attention to repairs for defected appliances. For technical assistance and/or repairs after the guarantee period you can directly contact the below address: CONTACT YOUR DISTRIBUTOR IN YOUR COUNTRY OR AFTER SALES DEPARTMENT BEPER. E-MAIL [email protected] WHICH WILL FORWARD YOUR ENQUIRIES TO YOUR DISTRIBUTOR. 9 Machine à pâtes Manuel d’instructions Mulinella Beper est destinée à être utilisée à la maison et est fabriquée sur la base de standards de qualité très élevés. Elle vous garantira fiabilité et sécurité dans le temps en vous permettant de préparer chez vous, rapidement et en toute sécurité, les meilleures pâtes fraîches avec les ingrédients naturels de votre choix. Ce livret fait partie intégrante de la machine. Avant d’effectuer toute opération, lisez avec attention toutes les normes de sécurité, le mode d’emploi et les conditions de garantie. Gardez avec soin et à portée de la main ce manuel et consultez-le s’il le faut. Pour n’importe quel doute ou emploi non prévu, demandez au vendeur avant l’installation, en mentionnant le MODELE. ATTENTION! Tout emploi de la machine non prévu par le présent livret est considéré comme incorrect ou inapproprié. La machine n’est destinée qu’à pétrir, préparer ou couper l’abaisse de la pâte et ne peut pas être utilisée pour d’autres finalités. Le Fabricant est exonéré de toute responsabilité éventuelle dans les cas suivants: - usage impropre; - installation incorrecte; - changements ou interventions non autorisés par le Fabricant; - utilisation de pièces de rechange non originales ou non spécifiques pour le modèle. DESCRIPTION DE LA MACHINE A - Corps de la machine B - Manivelle C - Etau à main D - Trou embrayage rouleaux qui coupent l’abaisse E - Emplacement étau à main V - Vis étau à main F - Trou embrayage rouleaux qui étendent l’abaisse G - Poignée régulatrice H - Rouleaux qui étendent l’abaisse I - Rouleaux qui coupent l’abaisse L - Levier poignée UTILISATION DE LA MACHINE Avant chaque utilisation: suivez le mode d’emploi décrit au paragraphe “Nettoyage et entretien” 1 - Placez la machine à pâtes (A) à proximité du bord d’un plan stable et à même d’en supporter le poids. Introduisez l’étau à main (C) dans l’emplacement étau à main (E), vissez le vis de l’étau (V) jusqu’à bloquer de manière stable la machine au plan d’appui. 2 - Tenez le levier (L) pressé et tournez la poignée régulatrice (G) jusqu’à la position 9 ( ouverture maximum rouleaux). Introduisez la manivelle (B) dans le trou embrayage (F) de la machine, posez sur les rouleaux qui étendent l’abaisse une partie de la pâte que vous avez préparée auparavant et t o u rnez la manivelle dans le sens horaire (en faisant tourner les rouleaux qui étendent l’abaisse). Vous obtiendrez ainsi un premier façonnage de l’abaisse. Pliez cette dern i è re en deux et repassez-laentre les rouleaux jusqu’à ce qu’elle devienne homogène. 3 - Pour réduire l’épaisseur de l’abaisse, tournez la poignée régulatrice (G) dans le sens horaire de façon à réduire la distance entre les rouleaux (H). Passez encore une fois l’abaisse en répétant l’opération jusqu’à obtenir l’épaisseur souhaitée. 10 Machine à pâtes Manuel d’instructions 4 - Pour couper l’abaisse à l’aide des rouleaux (I), après avoir choisi la mesure de la coupe souhaitée, enlevez la manivelle (B) du trous embrayage (F) et introduisez cette dernière dans un des trous embrayage (D). Posez une extrémité de l’abaisse sur les rouleaux qui étendent l’abaisse (I) et tournez la manivelle dans le sens horaire. 5 - La pâte doit être tenue à température ambiante. A la fin de chaque utilisation: suivez le mode d’emploi décrit dans le paragraphe “Nettoyage et entretien”. FRANÇAIS ACCESSOIRES 1 - Rouleaux qui étendent l’abaisse 2 - Appareil à couper l’abaisse pour fettuccine 3 - Appareil à couper l’abaisse pour tagliatelle ASSEMBLAGE DES ACCESSOIRES (Fig. 2) Avant chaque utilisation: suivez le mode d’emploi décrit dans le paragraphe “Nettoyage et entretien”. 1 - Placez la machine à pâtes à proximité du bord d’un plan stable et à même d’en supporter le poids. Introduisez l’étau à main dans l’emplacement prévu, vissez la vis jusqu’à bloquer de façon stable la machine au plan d’appui. 2 - Attelez l’accessoire souhaité sur les spéciales ailettes de retenue de la machine. 3 - Introduisez la manivelle en dotation dans l’embrayage présent sur tous les accessoires. La procédure d’assemblage des accessoires est valable pour tous les appareils manuels indiqués dans cette page UTILISATION DES APPAREILS A COUPER L’ABAISSE Avant chaque utilisation: suivez le mode d’emploi décrit à la page “Notice” au paragraphe “Nettoyage”. Appuyez sur les rouleaux coupeurs une extrémité de l’abaisse obtenue auparavant, introduisez la manivelle dans l’embrayage de l’appareil et tournez dans le sens horaire en coupant ainsi l’abaisse. NETTOYAGE ET ENTRETIEN Le nettoyage est le seul entretien demandé normalement. AVANT CHAQUE UTILISATION: Nettoyez soigneusement la machine avec un chiffon sec ou bien avec un pinceau souple. APRES AVOIR FIXE LA MACHINE SUR UN PLAN APPROPRIE vous pouvez achever le nettoyage en faisant passer entre les rouleaux qui étendent l’abaisse et entre les rouleaux coupeurs un morceau de pâte (de façon à enlever d’éventuels résidus de poudre). La pâte utilisée pour cette opération devra être éliminée. Ne lavez JAMAIS dans le lave-vaisselle ou, en tout cas, à l’aide de jets d’eau ou détergents aucune des parties de la machine à préparer l’abaisse et des accessoires. N’ utilisez pas d’ objet contondant pour enlever des résidus éventuels. Evitez absolument d’utiliser des couteaux ou d’autres ustensiles pour faire prendre l’abaisse par les rouleaux. A LA FIN DE CHAQUE UTILISATION: N’enlevez JAMAIS des résidus de pâte éventuels à l’aide d’objets contondants. Ne lavez JAMAIS dans le lave-vaisselle ou, en tout cas, à l’aide de jets d’eau ou détergents aucune des parties de la machine et des accessoires. Avant de les ranger, assurez-vous que tous les éléments soient parfaitement secs sans résidu d’humidité. ATTENTION ! CES MACHINES NE SONT PAS DE JOUETS. LORSQUE VOUS LES UTILISEZ, GARDEZ-LES 11 Machine à pâtes Manuel d’instructions TOUJOURS SOUS CONTROLE ET HORS DE LA PORTEE DES ENFANTS. Dans une optique d’amélioration constante Beper se réserve le droit de modifier ou améliorer cet appareil sans préavis. CERTIFICAT DE GARANTIE Cet appareil a été contrôlé en usine. La garantie est valable 24 mois à partir de la date d’achat pour tout défaut de matériel ou de fabrication. En cas de réclamation, le ticket de caisse et la garantie devront être présentés ensemble. La garantie est valide seulement si vous montrez le certificat de garantie et la récépissé d’achat qui doit demontrer la date de l’achat et le nom du model acheté. En cas de besoin et pour toute assistance technique, veuillez contacter votre revendeur ou vous adresser à notre siège. Cela vous permettra de conserver votre appareil dans de meilleures conditions et de NE PAS invalider la garantie. Toute manipulation de l’appareil par une personne non autorisée ou non qualifiée annulera automatiquement la garantie. Conditions de garantie Pendant la durée de garantie, si des pannes provenant d’un défaut de materiel et/ou de fabrication apparaissent, nous assurons gratuitement la réparation aux conditions énoncées ci-dessous : - l’appareil a été correctement utilisé et ce uniquement à l’usage pour lequel il a été fabriqué ; - L’appareil ne doit pas être etait altéré: on ne peux pas remédier l’appareil. - la présentation du ticket de caisse est obligatoire; - les pièces présentant les signes évidents d’usure ne sont pas pris en compte dans la garantie. En conséquence, sont exclus de la garantie toutes les pièces qui auraient subi des dommages accidentels ou présentant des signes d’usure normale (parmi lesquelles, ampoules, batteries, piles, résistances), les accessoires esthétiques, toutes les pièces comportant des défauts dus à la non utilisation domestique, la négligence dans la manipulation, insouciance, incorrecte ou impropre installation et l’entretien, les dommages lors du transport et tous les dommages non imputables directement au producteur. Si un défaut survient lors de la période de garantie et ne peut être réparé, l’appareil sera remplacé gratuitement. Si la partie qui doit être remplacer parce que ne marche pas bien ou puor défaut ou rupture est une pièce détachée ou un accessoire, Beper remplacera seulement l’accessoire/la pièce mais non l’appareil entier. Assistance technique Même après la fin de la garantie, nous accordons toujours une grande importance à la reparation. Pour toute assistance technique et/ou reparations en dehors de la garantie, veuillez vous adresser directement à l’adresse ci-desous : LE SERVICE APRÈS-VENTE EST EFFECTUÉ PAR VOTRE REVENDEUR OU PAR L’IMPORTATEUR/DISTRIBUTEUR DES PRODUITS BEPER. ÉCRIVEZ UN E-MAIL AU [email protected] POUR CONNAITRE LE CENTRE SERVICE AGRÉE BEPER LE PLUS PROCHE DE CHEZ VOUS. Nudelmaschine Betriebsanleitung Mulinella Beper wurde für den Hausgebrauch konzipiert und auf Grund sehr hoher Qualitätsstandards hergestellt. Sie garantiert Zuverlässigkeit und Sicherheit auf die Zeit und erlaubt Ihnen, bei sich zu Hause in schneller und sicherer Weise die besten Frischnudeln mit den von Ihnen ausgesuchten natürlichen Zutaten herzustellen. Vorliegende Gebrauchsanweisung ist ein fester Bestandteil der Maschine. Vor Ausführung eines jeglichen Vorganges lesen Sie sorgfältig die Sicherheitsnormen, die Anweisungen und die Garantiebedingungen durch. Bewahren Sie diese Gebrauchsanweisung sorgfältig und immer griffbereit auf, damit Sie bei Bedarf darin nachschlagen können. Für jegliche Zweifel oder nicht vorgesehene Gebrauchsarten wenden Sie sich bitte vor der Installation an den Wiederverkäufer mit Angabe des MODELLS. ACHTUNG! Jede Benutzung der Maschine in einer in vorliegender Gebrauchsanleitung nicht vorgesehener Weise ist als unkorrekt oder unsachgemäß zu betrachten. Die ausgelegte Maschine kann nur für das Kneten und Ausrollen oder Schnitt des Teigs benutzt werden, sie darf keineswegs für andere Anwendungen verwendet werden. Der Hersteller haftet nicht bei - unsachgemäßem Gebrauch - unkorrekter Installation - vom Hersteller nicht genehmigten Einschritten oder Veränderungen. Benutzung von Nicht-Originalersatzteilen oder von Ersatzteilen, die nicht für das Modell vorgesehen sind. DEUTSCH BESCHREIBUNG DER MASCHINE A - Maschinenkörper B - Handkurbel C - Klemme D - Aufnahmeloch der Teigschneiderollen E - Klemmensitz V - Klemmenschraube F - Aufnahmeloch der Teigausroller G - Einstellknopf H - Teigausroller I - Teigschneiderollen L - Einstellknopf-Hebel BENUTZUNG DER MASCHINE Vor jeglicher Benutzung: beachten Sie bitte die Anweisungen im Abschnitt „Reinigung und Wartung“. 1 - Stellen Sie die Nudelmaschine (A) nahe dem Rand auf eine geeignete Fläche, die in der Lage ist, ihr Gewicht zu tragen. Führen Sie die Klemme (C) in den Klemmensitz (E) ein, und ziehen Sie die Klemmenschraube (V) bis zur Blockierung der Maschine auf der Aufstellfläche fest. 2 - Bei heruntergedrücktem Hebel (L) drehen Sie den Einstellknopf (G) auf Stellung 9 (größte Rollenöffnung), stecken die Handkurbel (B) in ihren Sitz (F) auf der Maschine und f ü h ren ein Teil des zuvor zubereiteten Teigs in die Teigausroller ein und drehen die Handkurbel im Uhrzeigersinn (wodurch die Teig aus roller zu rotieren beginnen). Es wird so eine erste Teigplatte erhalten, die zusammengelegt solange wieder in die Rollen eingeführt wird, bis sie homogen ist. 13 Nudelmaschine Betriebsanleitung 3 - Zur Reduzierung der Teigstärke drehen Sie den Einstellknopf (G), wodurch sich der Abstand zwischen den Teigausrollern (H) verkleinert. Die Teigplatte bis zum Erhalt der gewünschten Stärke durch die Teigausroller laufen lassen. 4 - Für das Schneiden der Teigplatte mit der Teigplattenschneiderolle (I) ziehen Sie – nach Auswahl des gewünschten Formats – die Handkurbel (B) aus ihrer Aufnahme (F) und führen sie in eines der Aufnahmelöcher (D) ein, geben ein Teigstück in die Teigschneiderollen (I) unddrehen die Handkurbel im Uhrzeigersinn. 5 - Der Teig muss bei Umgebungstemperatur aufbewahrt werden. Nach jeder Benutzung: Der Teig muss bei Umgebungstemperatur aufbewahrt werden. MANUELLE ZUBEHÖRTEILE 1 -Teigausroller 2 – Teigschneiderollen für fettuccine 3 – Teigschneiderollen für tagliatelle MONTAGE DER ZUBEHÖRTEILE (Abb.2) Vor jeglicher Benutzung: beachten Sie bitte die Anweisungen im Abschnitt „Reinigung und Wartung“. 1 - Stellen Sie die Nudelmaschine nahe dem Rand auf eine geeignete Fläche, die in der Lage ist, ihr Gewicht zu tragen. Führen Sie die Klemme in den Klemmensitz ein, und ziehen Sie die Schraube bis zur Blockierung der Maschine auf der Aufstellfläche fest 2 - Haken Sie das gewünschte Zubehörteil in die Rückhaltezungen auf der Maschine ein. 3 - Stecken Sie die mitgelieferte Handkurbel in die Aufnahme, die an allen Zubehörteilen vorhanden ist. Der Montagevorgang der Zubehörteile ist für alle manuellen Vorrichtungen gleich, die in dieser Seite bezeichnet werden. MANUELLE BENUTZUNG DER TEIGPLATTENSCHNEIDER Vor jeglicher Benutzung: beachten Sie bitte die Anweisungen der Seite „Hinweise“ im Abschnitt „Reinigung“. Legen Sie ein Ende der zuvor ausgerollten Teigplatte auf die Schneiderollen, führen Sie die Handkurbel in die Aufnahme des Gerätes ein und drehen Sie die Kurbel im Uhrzeigersinn, wodurch die Teigplatte geschnitten wird. REINIGUNG UND WARTUNG Die Reinigung ist die normalerweise allein notwendige Wartung VOR JEDEM GEBRAUCH Reinigen Sie die Maschine sorgfältig mit einem trockenen Tuch oder einem weichen Pinsel. NACHDEM DIE MASCHINE AUF EINER GEEIGNETEN AUFSTELLFLÄCHE BEFESTIGT WURDE kann die Reinigung (zur Entfernung eventueller Staubreste) mit einem Teigstückchen vervollständigt werden, das nach Durchlauf durch die Rollen wegzuwerfen ist. Reinigen Sie NIE den Teigausroller und seine Zubehörteile im Geschirrspüler oder durch Wasserstrahl oder mit Spülmitteln. Verwenden Sie keine spitzen Gegenstände, um eventuelle Reste zu entfernen. Die Verwendung von Messern oder anderen Geräten für die Mitnahme der Teigplatte durch die Rollen der Maschine ist absolut zu vermeiden. NACH JEDEM GEBRAUCH Verwenden Sie NIE spitze Gegenstände, um eventuelle Teigreste zu entfernen. 14 Nudelmaschine Betriebsanleitung Reinigen Sie NIE die Maschine und ihre Zubehörteile im Geschirrspüler oder durch Wasserstrahl oder mit Spülmitteln. Bevor Sie die Maschine wegstellen, vergewissern Sie sich bitte, dass jedes Element perfekt trocken ist. ACHTUNG DIESE MASCHINE IST KEIN SPIELZEUG. WÄHREND DES BETRIEBS MUSS SIE STETS ÜBERWACHT UND AUSSERHALB DER REICHWEITE VON KINDERN GEHALTEN WERDEN. In Hinblick auf eine Verbesserungsperspektive behält sich Beper das Recht vor, das betreffende Produkt ohne Voranmeldung zu ändern bzw. umzubauen. GARANTIE Garantie-Anwendung gilt für 24 Monate ab Kaufdatum gegen Material- und Herstellungsfehler Kaufbeleg und Garantieschein sind wesentlich für die Gültigkeit der Garantie. Die Garantie ist gültig nur bei Darstellung des Garantieschein und Kaufbeleg (Rechnung), die das Kaufdatum und den Modellnamen des gekauften Gerätes beweist. Ohne diesen Nachweis kann ein kostenloser Austausch oder eine kostenlose Reparatur nicht erfolgen. Im Garantiefall geben Sie bitte das komplette Gerät in der Originalverpackung zusammen mit dem Kassenbon an Ihren Händler. Die Garantie erlischt bei Fremdeingriff. Garantiebedingungen Wenn es Mängel während der Garantiezeit aufgrund von Material- und / oder Herstellung, garantieren wir die Reparatur des Produkts kostenlos, sofern: - das Gerät ist richtig für die Zwecke, für die sie gebaut wurde, verwendet ist - das Gerät wurde nicht manipuliert/verändert Garantieleistungen bewirken weder eine Verlängerung der Garantiefrist, noch beginnt dadurch ein Anspruch auf eine neue Garantie! Kaufbeleg und Garantieschein sind wesentlich für die Gültigkeit der Garantie. Ohne diesen Nachweis kann ein kostenloser Austausch oder eine kostenlose Reparatur nicht erfolgen, sowie auch bei einer normalen Verschlechterung des Gerät. Alle Teile sind daher ausgeschlossen wenn die versehentliche Beschädigungen unterzogen wurden oder die einem Verschleiß unterliegen (einschließlich Lampen, Batterien, Widerstände), als auch ästhetischen Teile, und Mängel, die durch unsachgemäßen Gebrauch von Haushaltsgeräten, Fahrlässigkeit, Unachtsamkeit, Nachlässigkeit oder unsachgemäße Installation und Wartung, Transportschäden und alle Schäden, für den der Hersteller nicht schuldig ist, fallen nicht unter die Garantie und sind deshalb kostenpflichtig! Wenn innerhalb der Garantiezeit eine Mängel aufweist, die nicht repariert werden kann, wird das Gerät kostenlos gewechselt. In jedem Fall, wenn der Ersatzteil, ein Zubehör ist, der wegen Brechen, Mängel oder Fehlfunktion umgetauscht werden soll, behält Beper sich das Recht vor, nur das Stück in Frage und nicht das gesamte Produkt zu ersetzten. Nach der Garantie Auch nach Ablauf der Garantiezeitraums zahlen wir viel Aufmerksamkeit auf Reparaturen. Für technische Unterstützung und / oder Reparaturen außerhalb der Garantiezeit, wenden Sie bitte direkt an der folgenden E-Mail Anschrift: TRETEN SIE BITTE IN VERBINDUNG MIT IHREN HÄNDLER IN IHREM LAND ODER POST SALES ABTEILUNG VON FA. BEPER. E-MAIL [email protected] DIE IHREN HÄNDLER NENNEN WIRD Máquina Pasta Manual de instrucciones Mulinella Beper está destinada para uso doméstico y ha sido producida siguiendo estándares de calidad muy altos. Le garantizará fiabilidad y seguridad en el tiempo, permitiéndole preparar en su misma casa, y de manera rápida y segura, la mejor pasta fresca con los ingredientes naturales que Usted elija. El presente manual forma parte de la máquina. Antes de efectuar cualquier operación, lea atentamente todas las normas de seguridad, las instrucciones y las condiciones de garantía. Conserve bien este manual, teniéndolo al alcance de la mano para poder consultarlo en caso de necesidad. Para cualquier duda o uso no previsto, llame al vendedor antes de la instalación, indicando el MODELO. ¡ATENCIÓN! Cualquier utilización de la máquina no prevista en el presente manual de instrucciones debe considerarse incorrecta o impropia. La máquina está destinada sólo y exclusivamente para amasar, preparar hojaldre y cortar la pasta y no puede ser utilizada para otras funciones diferentes. El Fabricante se considera libre de toda responsabilidad en caso de: - uso impropio - instalación no correcta - modificaciones o intervenciones no autorizadas por el Fabricante - utilización de repuestos no originales o no específicos para el modelo. DESCRIPCIÓN DE LA MÁQUINA A - Cuerpo de la máquina B - Manivela C - Abrazadera D - Foro de acoplamiento rodillos corta-hojaldre E - Hueco sede de la abrazadera V - Tornillo de la abrazadera F - Foro de acoplamiento rodillos estira-hojaldre G - Pomo de ajuste H - Rodillos estira-hojaldre I - Rodillos corta-hojaldre L - Palanca del pomo USO DE LA MÁQUINA Antes del uso: siga las instrucciones descritas en el apartado “Limpieza y mantenimiento” 1 - Coloque la máquina para pasta (A) cerca del borde de una superficie de apoyo estable capaz de soportar el peso, introduzca la abrazadera (C) en el hueco de la sede de la abrazadera (E), enrosque el tornillo de la abrazadera (V) hasta que se obtenga un bloqueo estable de la máquina con la superficie de apoyo. 2 - Manteniendo apretada la palanca (L) gire el pomo de ajuste (G) hasta la posición 9 (máx apertura de rodillos), introduzca la manivela (B) en el foro de acoplamiento (F) de la máquina, apoye sobre los rodillos estira-hojaldre una parte de la masa precedentemente preparada y gire la manivela en el sentido de las agujas del reloj (haciendo girar los rodillos estira-hojaldre). De este modo se obtendrá un primer modelado del hojaldre. Dóblelo en dos y vuélvalo a pasar entre los rodillos hasta que se vuelva homogéneo. 3 - Para disminuir el grosor del hojaldre, gire en el sentido de las agujas del reloj el pomo de ajuste (G) de manera que se reduzca la distancia entre los rodillos estira-hojaldre (H). Vuelva a pasar el hojaldre repitiendo la operación hasta obtener el grosor deseado. 16 Máquina Pasta Manual de instrucciones 4 - Para cortar el hojaldre con los rodillos corta-hojaldre (I), después de haber elegido la medida de corte deseada, saque la manivela (B) del foro de acoplamiento (F) e introdúzcala en uno de los foros de acoplamiento (D), apoye un extremo del hojaldre sobre los rodillos corta-hojaldre (I) y gire la manivela en el sentido de las agujas del reloj. 5 - La masa se ha de mantener a temperatura ambiente. Después del uso: siga las instrucciones descritas en el apartado “Limpieza y mantenimiento”. ACCESORIOS MANUALES 1 - Rodillos estira-hojaldre 2 - Rodillos corta-hojaldre para fettuccine 2 - Rodillos corta-hojaldre para tagliatelle MONTAJE DE LOS ACCESORIOS (Fig.2) Antes del uso: siga las instrucciones descritas en el apartado “Limpieza y mantenimiento”. 1 - Coloque la máquina para pasta cerca del borde de una superficie de apoyo estable capaz de soportar el peso, introduzca la abrazadera en el hueco de la abrazadera, enro s q u e el tornillo hasta que se obtenga un bloqueo estable de la máquina con la superficie de apoyo. 2 - Enganche en las específicas aletas de sujeción de la máquina el accesorio que quiera utilizar. 3 - Introduzca la manivela en el foro de acoplamiento presente en todos los accesorios. El procedimiento de montaje de los accesorios vale para todos los utensilios manuales indicados en esta página. UTILIZACIÓN MANUAL DE LOS ACCESORIOS CORTA-HOJALDRE Antes del uso: siga las instrucciones descritas en la página “Advertencias” del apartado “Limpieza”. Apoye un extremo del hojaldre precedentemente obtenido sobre los rodillos cortadores, introduzca la manivela en el foro de acoplamiento del utensilio y gire en el sentido de las agujas del reloj, obteniendo de esta manera el corte del hojaldre. ESPAÑOL LIMPIEZA Y MANTENIMIENTO La limpieza es el único mantenimiento que se requiere ANTES DEL USO: Limpie cuidadosamente la máquina con un paño seco o bien con un pincel suave. TRAS HABER FIJADO LA MÁQUINA SOBRE UNA SUPERFICIE IDÓNEA se puede completar la operación de limpieza haciendo pasar entre los rodillos estira-hojaldre y entre los rodillos cortadores un trozo de masa (para quitar eventuales residuos de polvo). Obviamente, la masa usada para esta operación deberá ser eliminada. No lave NUNCA en lavavajillas o con chorros de agua o detergentes ninguna de las partes de la máquina moldeadora de pasta o de los accesorios. No use objetos contundentes para quitar eventuales residuos. Evite absolutamente el uso de cuchillos u otros utensilios para facilitar el inicio de la toma de la masa entre los rodillos de la máquina. DESPUÉS DEL USO: No quite NUNCA eventuales residuos de masa con cuerpos contundentes. No lave NUNCA en lavavajillas o con chorros de agua o detergentes ninguna de las partes de la máquina o de los accesorios. Asegúrese de que todos los componentes estén perfectamente secos sin residuos de humedad, antes de recogerlos. Ti siano perfettamente asciutti da ogni eventuale residuo di umidità, prima di riporli. 17 Máquina Pasta Manual de instrucciones ¡ATENCIÓN! ESTAS MÁQUINAS NO SON JUGUETES. DURANTE EL USO, MANTÉNGANSE SIEMPRE BAJO CONTROL Y FUERA DEL ALCANCE DE LOS NIÑOS. En una visión de continuo mejoramiento, Beper podrá efectuar cambios y mejoramientos sobre el producto actual sin avisar con anterioridad. 18 CERTIFICADO DE GARANTĺA Este aparato ha sido controlado en fábrica. La garantía es valida 24 meses a partir de la fecha de compra para todos los defectos de material o de fabricación. En caso de reclamación, tiene que presentar juntos el recibo fiscal y la garantía. La garantía es válida sólo se presenta la tarjeta de garantía y el documento de compra (recibo) que demuestra la fecha de compra y el nombre del modelo de la unidad adquirida. Para la asistencia técnica, es necesario contactar su revendedor o nuestra empresa. Eso le permitirá conservar su aparato en mejores condiciones y no invalidar la garantía. Toda manipulación del aparato por una persona no autorizada o no cualificada cancelará automáticamente la garantía. Condiciones de garantía Durante la garantía, si algunas averías aparecen a causa de un defecto de material y/o fabricación, garantizamos gratuitamente la reparación a las condiciones siguientes : - El aparato ha sido utilizado correctamente y esto solamente al uso para el cual ha sido fabricado ; - El dispositivo no ha sido manipulado: el producto no es mantenible. - Es obligatorio de presentar el recibo fiscal; - Las partes que presentan señales evidentes de desgaste no se tienen en cuenta en la garantía. En consecuencia, todas las partes que habrían sufrido daños accidentales o que presentaban señales de uso normal se excluyen de la garantía (entre las cuales, bombillas, baterías, pilas, resistencias), las partes estéticas, todas las partes implicando defectos debidos a la no utilización doméstica, negligencia, instalación incorrecta o inadecuada, la negligencia en la manipulación y el mantenimiento, los daños en el transporte y todos los daños no imputables directamente al fabricante. Si un defecto aparece durante la garantía y no puede estar reparado, el aparato se sustituirá gratuitamente. En cualquier caso, si la parte que necesita ser sustituida por defecto, rotura o mal funcionamiento es un accesorio y / o una parte desmontable del producto, beper se reserva el derecho de reemplazar sólo la pieza en cuestión y no todo el producto. Asistencia técnica Después del final de la garantía, concedemos siempre una gran importancia a la reparación. Para la asistencia técnica y/o reparaciones fuera de la garantía, es necesario contactar directamente la dirección siguiente : CONTACTE CON EL DISTRIBUIDOR DE SU PAIS O EL DEPARTAMENTO DE POST VENTA DE BEPER . ENVIE UN E-MAIL [email protected] Y LE ENVIAREMOS DATOS DE SU SERVICIO TECNICO EN SU PAIS. BEPER SRL Via Salieri, 30 37050 - Vallese di Oppeano - Verona Tel. 045/7134674 – Fax 045/9817905 e-mail: [email protected] beper.com


© Copyright 2026