
Review Manager Guide
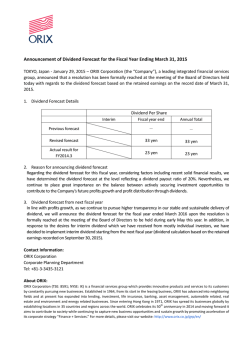
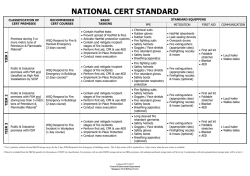
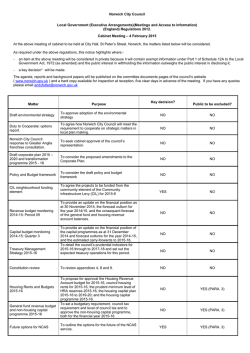
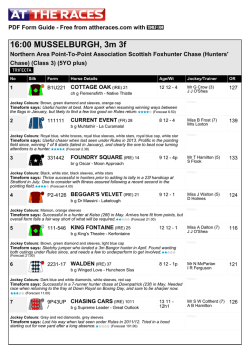
Review Manager Guide
Version 8.2 | 2/5/2015
For the most recent version of this document, visit our documentation website.
Relativity | Review Manager Guide - 1
Table of Contents
1 Review Manager
4
Using Review Manager
4
1.1 Review Manager life cycle
4
1.2 Installation and upgrade
5
1.2.1 Selecting from the Application Library
5
1.2.2 Importing from file
5
1.2.3 Configuring Review Manager
5
1.2.4 Security configuration
6
1.2.5 Adding the Review Manager Agent
7
1.2.6 Upgrading
7
1.3 Accessing Review Manager
7
1.4 Forecasts
8
1.4.1 Adding and editing a forecast
8
1.5 Forecast fields
8
1.6 Tiers
9
1.6.1 Adding and editing a tier
1.7 Tier fields
1.7.1 Adding saved searches to a tier
9
10
11
1.8 Best Practices
12
1.9 Roles
12
1.9.1 Adding or editing a role
1.10 Role fields
1.10.1 Linking roles and reviewer user or groups
13
13
14
1.11 The Review Manager console
14
1.12 Review Manager console options
14
Relativity | Review Manager Guide - 2
1.13 Reports
1.13.1 Forecast summary report
15
15
1.14 Detail report input fields
24
1.15 Resources
25
1.15.1 Prior installations of Review Manager
Relativity | Review Manager Guide - 3
25
1 Review Manager
The Review Manager generates forecasts, insights, and optimizations to help track the time and cost
of review. Review Manager’s graphical reports of key review metrics help streamline workflow and
implement best practices.
Using Review Manager
Imagine that your law firm is representing a corporation intending to merge with another
corporation. Due to growing concern over how the merger might affect competition in your client's
market, the government issued a second request, meaning you now have 30 days to produce the
applicable documents in order to move forward with the case.
You start by hiring a team of 15 contract attorneys to help review all the documents involved.
You're under time and budget constraints, so you use Review Manager to help streamline and
optimize your review process.
First, you create a Forecast in Review Manager so that you can begin entering details about the
review. Here you enter how many documents you anticipate your team needs to review, how the
review is structured, how fast the attorneys can review, any budget restrictions, and a target
completion date.
Once you create the Forecast, you enter details in objects called Tiers, which track the work that
needs to be done, and Roles, which track who will be doing the work. You enter your first Tier, the
first pass review, then you enter the Role of contract attorney. Your associates then enter the rest
of the review information in Review Manager.
Shortly after the first pass review begins, you generate a Forecast report to see if your preliminary
assessment is viable. Using this report, you determine if you're off to a good start. Later in the
review process, you generate an Insight Summary report. This report tells you how the actual work
is progressing. You may notice that while your first pass review is meeting the deadline, you realize
that your senior attorneys aren't reviewing at the rate you estimated in order to meet the privilege
review deadline. Based on Review Manager's Show Optimization suggestions, you decide to hire
three more senior attorneys to make the deadline.
As the review progresses, you continue to monitor the Insight Summary report and run other
individual reports that allow you to track each attorney's review progress and additional document
review trends. You adjust your resources as needed and are able to produce the applicable
documents within the judge's time line.
1.1 Review Manager life cycle
Review Manager generates forecasts to predict and measure the time, cost, and efforts required for
a document review project. It then displays these metrics in graphical reports for trend recognition
and other analysis. The following are examples of how Review Manager can assist with review
workflow.
Relativity | Review Manager Guide - 4
n
Forecasts
n
Calculate time and cost estimates for document review projects
Provide graphical timelines of forecasted data to enhance early project assessment
Insights
n
Provide real-time review metrics for trend identification analysis
Display information graphically for quick comprehension of project status, distribution and
decision-making assistance
Optimizations
o
o
o
o
o
o
Present suggestions for increasing review efficiency and deadline integrity
Offer course corrections prior to or during a review
1.2 Installation and upgrade
Note: Only a user that is a Relativity Administrator and Script Administrator can import application schema.
1.2.1 Selecting from the Application Library
Follow the steps below to import Review Manager using the Application Library.
1. Select the Relativity Applications tab.
2. Click New Relativity Application.
3. Click Select from Application Library for Application Type.
4. Click the
and select Review Manager, then click OK.
5. Click Import. If the install is successful, the Review Manager tab is visible and Review Manager is listed
on the All Relativity Applications view.
1.2.2 Importing from file
Follow the steps below to import Review Manager using the Applications tab.
1. Select the Relativity Applications tab.
2. Click New Relativity Application.
3. Select Import from File for Application Type.
4. Click
, navigate to the place of your Review Manager Schema and select it. The following categories
on the form should appear in gray: Application Information, Application Artifacts, and Map Fields.
5. Click Import. If the install is successful, the Review Manager tab is visible and Relativity Manager is listed on the All Relativity Applications view.
1.2.3 Configuring Review Manager
Note: A Relativity System Administrator must configure the application.
To configure Review Manager:
Relativity | Review Manager Guide - 5
Note: Steps 3 and 4 are only necessary the first time you install Review Manager to an instance of Relativity.
1.
2.
3.
4.
Enter the workspace to which you have installed Review Manager.
Select the Configuration sub-tab under the Review Manager tab.
Click New Review Manager Configuration.
Enter the Relativity Services API user name, password, domain name, and protocol (http or https). Use
a Relativity system admin account for the application access since all report activity is logged against
this account.
For example, the Services API domain should follow this format as noted below:
<Your Machine Name>
Contact [email protected] with any questions.
1.2.4 Security configuration
You must configure certain permissions for proper functionality of Review Manager. Restrict two
layouts to the System Administrator.
To configure these security settings:
1.
2.
3.
4.
Add the Security field to the Layout tab view.
Click the padlock icon on each of the configuration layouts to secure.
Select Overwrite Inherited Security.
Add Admin groups to the Review Manager Configuration layout only.
Note: Make sure the non-Admin groups are not present.
5.
6.
7.
8.
9.
10.
Create users and add them to a group for configuration with non-Admin permissions.
Navigate to the Administration tab > Workspace Details.
Click Edit Permissions.
Click Add Group to add the group to which your non-Admin users belong to in this workspace.
Select the desired group and click Set Permissions.
Select the following tabs:
Review Manager
n Forecast
n Configuration
11. Select the following Mass Actions:
n
n
Mass Copy
Relativity | Review Manager Guide - 6
12. Select the following Security Permissions with Delete and Add status:
Forecast
ReviewManagerConfiguration
n ReviewerGroup
n ReviewerUser
n ForecastReport
n Role
n ForcastJob
n ForecastJobItem
n Tier
n ReviewManagerNativeType
n DetailReportRole
n RelativityTimeZone
13. Save group permissions and close.
n
n
All other Relativity permissions behave in standard fashion within Review Manager.
1.2.5 Adding the Review Manager Agent
After you install Review Manager, add the AuditParserAgent and RefreshDataAgent by going to the
Agents tab and clicking New Agent. Add at one agent per environment. See Application-specific
agents in the Agents guide for more information.
Verify the Enable column displays Yes for both agents. See Adding and editing agents in the Agents
guide.
1.2.6 Upgrading
Review Manager patches release concurrently with Relativity patches. You can find information
about Review Manager patches in the Relativity patch release notes.
To upgrade the application use one of the following methods:
1. Upgrade to the latest Relativity patch - Upgrading to the latest Relativity path will automatically
upgrade Review Manager to the latest patched version.
2. Upgrade Review Manager only - Download the newly released schema from the Relativity Customer
Portal and import it into the application library.
1.3 Accessing Review Manager
To access Review Manager, log in to Relativity and select a case workspace. A Review Manager tab
is available if Review Manager is installed on that specific workspace.
Note: Review Manager must be installed on each workspace and users must have rights to see Review
Manager tab.
Relativity | Review Manager Guide - 7
1.4 Forecasts
Forecasts are the starting point and the most important component in managing your review.
Through Review Manager you can update your forecast throughout the review process. Enter as
much information up front as you can to define your forecast to keep it complete. Your forecast is
only as valuable as the information you include in it.
Note: There can be only one active forecast per workspace at a time. You can quickly see which forecasts
are active by clicking on Review Manager > Forecast and noting whether the Active field is set to Yes or No.
1.4.1 Adding and editing a forecast
To create or edit a new forecast:
1.
2.
3.
4.
Click New Forecast.
Edit an existing forecast by clicking the edit link next to the forecast name.
Add or edit information pertaining to the forecast on the Forecast screen.
Click Save.
See Forecast fields below for details.
1.5 Forecast fields
The Forecast layout contains the following fields:
Relativity | Review Manager Guide - 8
n
n
n
n
n
n
Name - displays the name of the forecast.
Review Start Date - the date when the review began or is expected to begin.
Deadline Date - the targeted completion date of a review (manually entered).
Calculated Review End Date - system calculated end date base on forecasted number or documents,
number of reviewers, and review rates.
Total Documents - total number of documents or expected number of documents for review
Billable Unit - the unit for what billing method is to be employed. This gives you the flexibility to keep
track of cost from different perspectives. For example, you may calculate cost by Reviewer Hour or by
Document e.g. $100 per hour. The available Billable Units are:
Document
Gigabyte
o Page (documents must be imaged)
o Reviewer Hour
Description - a field describing Forecast in greater detail.
Case - case title or case number.
Active Forecast - denotes an active Forecast when checked and enables Data Refresh functionality for
current forecast. Only one forecast in a workspace can be active.
Data Last Refreshed On - the date and time the forecast data was last modified.
Comments - additional information, mental impressions, or messages to colleagues related to the forecast or review.
o
o
n
n
n
n
n
1.6 Tiers
A tier describes a sub-set of work to be done as part of the overall review process. During tier
creation, enter details about the work to be done, the number of documents affected, and the time
anticipated to complete the specified work.
1.6.1 Adding and editing a tier
Once you create a forecast, you can add or edit a new tier.
Relativity | Review Manager Guide - 9
To add or edit a new tier:
1.
2.
3.
4.
Click New Tier.
Edit an existing tier by clicking the edit link next to the tier name.
Add or edit information to the tier on the Tier Forecast screen.
Click Save.
See Tier fields below for details.
1.7 Tier fields
The Tier Forecast layout contains the following fields:
n
n
n
Forecast Name - the name of the forecast. This value is auto-populated with the forecast name.
Tier Name - the descriptive name of the tier. For example, First Pass, QC Pass, Privilege Pass.
Projected Total Documents - estimated number of documents that a given tier is anticipated to review
Relativity | Review Manager Guide - 10
n
n
n
n
n
n
n
n
n
n
n
n
Data Volume (GB or Pages) - the volume of your data set, either in GB or pages
Tier Order - the logical sequence in time of a given tier. Tier Order is important because this controls
how the tiers are sequenced and displayed graphically.
Start Date Method - calculation technique for estimating the start date of a tier. You can select a specific start date or use a % overlap calculation.
Set Calendar Date - date selected by the user for the forecasted start of a tier. This is used when Set Specific Calendar Date is chosen in the Start Date Method drop-down menu.
% Overlap with Previous Tier - overlap in start times of tiers for a forecast. This is used to estimate
start dates of tiers when the % Overlap with Previous Tier is selected in the Start Date Method field.
Working Days - days of the week in which review activity is conducted
Working Hours Per Shift - number of hours in a shift. Shifts cannot exceed 24 hours.
Actual Begin Date - actual date on which activity for a tier begins. This is determined by the user. From
this point forward, actual audit data appears in the application.
Available Document Saved Search - a saved search of the total documents to be reviewed in this tier.
This is set up by the user on the Documents tab that holds the criteria for a document to be included in
a given tier of review. For example, "designation is responsive" could be the criteria for a first level
review tier.
Completed Document Saved Search - a saved search of the total documents where the review is complete in this tier. This is set up by the user on the Documents tab that holds the criteria for a document
to be included in a given tier of review and considered. For example, "designation is not set" could be
the criteria for a first level review tier.
Available Document Total - the resulting document total from the Available Document saved search
Completed Document Total - the resulting document total from the Completed Document saved
search
1.7.1 Adding saved searches to a tier
Review Manager gives an Administrator insight into how a document review is progressing. Using
Saved Searches, Review Manager tracks the progress of a review compared to the active forecast.
See Creating saved searches for more information.
In order to ensure accurate calculations, set up your saved searches correctly.
Make your saved searches public when you create them. The two searches should reflect the
universe of documents the tier reviews. In a given tier, the first saved search reflects the documents
available for review in the tier and the second saved search captures the documents that have been
reviewed in the tier. The saved searches conditions need to be setup in a way that documents move
from the available saved search and funnel to the completed saved search.
For example, the available saved search could have a condition of “designation not set” and the
completed saved search could have a condition of “designation is set”. With this setup, any time a
reviewer makes a coding decision on the designation field, the document will leave the available
saved search and will move to the completed saved search.
Relativity | Review Manager Guide - 11
n
n
n
n
n
Actual Begin Date - the date the review starts.
Available Document Saved Search - this should be a saved search of the total documents to be
reviewed in this Tier.
Completed Document Saved Search - this should be a saved search of the total documents where the
review is completed in this Tier.
Available Document Total - this is the number of documents to review.
Completed Document Total - this is the number of documents completed.
1.8 Best Practices
The total number of documents to be reviewed in an individual tier should match the total of both
searched. Documents should move from the Available Document Saved Search to the Completed
Document Saved Search as they are reviewed. As the Available Document Saved Search decreases,
the Completed Document Saved Search increases by an equal number, keeping the total of both
searches the same. To ensure this behavior, set up the conditions for the searches correctly.
For example, a simple saved search condition uses a Single Choice field to indicate that a document
has been reviewed. When you use this field, documents in the Available Document Saved Search
have the condition of the field: Is Not Set and the Completed Document Saved Search has the
condition of the field: Is Set. Since Review Manager handles complex conditions, saved searches do
not always need to be simple.
Set the Available Document Saved Search as all the documents for review. However, without setting
a track-able condition, documents will not move between searches, regardless of what choices are
applied to the documents. Progress isn't tracked or recorded for the Insight Report.
1.9 Roles
Once you create a forecast, apply at least one role to each tier. A role is a designation for the type
of reviewer that actually works on a given tier. Remember that a tier is a description of the work to
be done, whereas the role is a description of the worker performing the work. There can be more
than one role per tier.
Relativity | Review Manager Guide - 12
Reviewers link to the tiers via roles. You must link a reviewer to a role, and then a role to a tier.
Clicking the Click Refresh Data button on the console in the Role layout updates your user list with
the most recent Relativity case workspace user data.
1.9.1 Adding or editing a role
1. Click New next to the Role heading on the main Forecast layout.
2. Add or edit information pertaining to the role on the Role layout screen. See Role fields below
3. Click Save.
1.10 Role fields
The Role layout contains the following fields:
n
n
n
n
n
n
n
Forecast Name - the name of the current forecast in which the user is operating
Role - the descriptive name of the role as determined by the user
# of Reviewers - the number of reviewers to be included in a role as estimated by the user
Billable Unit - the unit by which cost is being calculated. This field should already be auto-populated
with the option selected on the forecast. For example, cost per document where document is the billable unit. This is chosen on the forecast home layout and persists to all roles.
Billable Rate - the amount in terms of currency to be applied to the billable unit. For example, $2.00 per
document (for document billable unit) or $150.00 per hour (for review hours billable unit).
Review Rate - the speed of review in documents per hour as estimated by the user
Tier - the role to tier association. Note that there can be multiple roles associated with one tier, therefore, as you define your second or third roles, you can select the same tier if you desire.
Relativity | Review Manager Guide - 13
1.10.1 Linking roles and reviewer user or groups
After saving your new role, you can now link users (reviewers) and/or user groups to your role.
To link a reviewer or review group to a role:
1. Click Link.
2. Select the user(s) or group(s) you want to link to the role from the pop-up window.
Note: Only Relativity users that have access to the current workspace via their existing Relativity group
permissions display in the pop-up window. Warning, after clicking Refresh Groups/User, any user that has
access to Review Manager can see all users and groups for that workspace.
3. Click Add, then click Set.
The reviewers populate as shown below:
The reviewer groups populate as shown below:
1.11 The Review Manager console
Similar to other consoles in Relativity, the Review Manager console appears on the right side of the
layout once you've created a forecast. The Review Manager console contains Review Manager's
reporting abilities.
1.12 Review Manager console options
The Review Manager console contains the following options in the review forecast process:
Relativity | Review Manager Guide - 14
n
n
n
Forecast Home - displays forecast, tier, and role information. Use to navigate back to main layout of
the forecast.
Reports - navigate to the Review Manager reports.
Refresh Data - on-demand refresh. Before running Refresh Data, understand that this option can be
system intensive and may take a few hours. We recommend running a Refresh Data during off-peak
hours:
o
o
o
To avoid negatively impacting system performance if you're working in an existing case
If criteria have changed in your saved searches
If you're running the option to perform an incremental data refresh
If you encounter a "Failed" message in the status field, contact your system admin.
1.13 Reports
Review Manager generates key metric reports to track your review progress. These reports provide
detailed and summary metrics for both forecasted and actual data. You can access reports via the
Review Manager console, and can be export the reports via the export menu. The following formats
are available: .pdf, .xls, .xlsx, .rtf, .csv, .image.
A completed forecast must be present in order to generate a Forecast summary report. An easy way
to assess whether a forecast is complete is to verify that the Projected Total Documents field is
populated.
1.13.1 Forecast summary report
The Forecast Summary report provides a graphic representation of your forecast inputs and
calculations. The graphs show aggregations of all tiers and roles for Review Rate, Time, and Cost. In
addition to graphically representing data, tables display numeric representations of aggregate data
by tier.
This report shows a quick comparison of review structure to budget and deadlines. To generate the
report, select Forecast Summary Report and click Generate Report. Your report appears to the
right of the Report Criteria console.
Relativity | Review Manager Guide - 15
1.13.1.1 Optimizing a forecast summary report
After you review your forecast, adjustments might be necessary. In such situations, Review Manager
provides suggested optimizations by means of the Show Optimizations button, activated through
the Report Criteria console. In such situations, Review Manager provides suggested optimizations by
showing some options. The optimizations display by default, on the left side of the Forecast
Summary report.
Relativity | Review Manager Guide - 16
This option breaks each tier down by number of reviewers, number of hours, and review rate.
Review Manager displays the differences between the forecasted data and what is recommended in
order to bring your project back within its desired parameters.
These suggestions could mean adding additional resources or possibly leveraging different
technologies to increase your review rates, such as mass tagging or Assisted Review.
If you elect to employ one or more of Review Manager’s optimization suggestions, you may also
elect to go back and revise your forecast (or create a new one) to reflect the adjustments.
1.13.1.2 Insight summary report
Once the review begins, the Insight Summary Report compares forecasted data to your actual
progress. You can see the status of your review as compared to your forecasted information with
the Insight Summary report.
Like the Forecast Summary report, this information appears graphically and in tables. Optimization
suggestions are available for aligning your actual data with your Forecasted data.
Relativity | Review Manager Guide - 17
1.13.1.3 Detail reports: reviewers, roles, and document
Review Manager reports and gets insights from Reviewers, Roles, and Document types during a
review. Using this information, you can identify the behavior trends in the observed review. These
trends might reveal weaknesses you can improve upon to influence the outcome of your review.
Alternatively, you may notice a trend that seems to be speeding up the review, and wish to apply the
trend to other tiers. The Detail reports provide quick insight into where deviations are occurring
from your original forecast. You can monitor this information in real time and become more
proactive in your review management decisions.
1.13.1.4 Reviewers detail report
The Reviewers Detail Report shows trends by reviewer for specific metrics. All of the detail reports
can show data over an hourly or daily interval for various date ranges. For example, you can view
the Average Total Edits per Hour over the course of a week. You can also track and analyze Distinct
Edits, Total Views, Distinct Views, and Active Time.
Note: Users must be associated with Roles for their data to reflect in these reports.
The reports always display the first 10 selections alphabetically on the graph, but all selection
display in the example. Additionally, the graph shows two standard deviations above the average
value for any chosen metric (a horizontal dashed line denotes the average and gray banding denotes
Relativity | Review Manager Guide - 18
one standard deviation).
Relativity | Review Manager Guide - 19
1.13.1.5 Roles detail report
The Role Detail Report compares trends among the different Roles that have been created in
Review Manager. All of the roles created workspace wide are available in this report. Only activity
from reviewers associated with roles displays in this report.
Relativity | Review Manager Guide - 20
Relativity | Review Manager Guide - 21
1.13.1.6 Document detail report
The Document detail report is similar to the Reviewer Insight detail report and the Role Insight
detail report. You can view information for the different document native types loaded into
Relativity with the Document detail report.
Relativity | Review Manager Guide - 22
Relativity | Review Manager Guide - 23
1.14 Detail report input fields
View a description of the Detail report input fields
Below are the descriptions of the Detail report input fields:
n
n
n
n
n
n
Detail Report Native Types - native file types to be displayed on the detail report. Choices determined
by load file.
Detail Report Reviewers - reviewers to be displayed on the detail report. Only reviewers that have
been added to the application are available.
Detail Report Roles - roles to be displayed on the detail report. All Roles from the workspace are available, but only Roles in current Forecast should be selected.
Name - descriptive name to be given to the report.
Report End Date - ending date selection to be displayed on the report. (Report scales to include first
and last data point within the selected range only.)
Report Interval - the interval for the x-axis of the detail report. Average hourly units or a standard
daily/weekly/monthly interval can be chosen.
Relativity | Review Manager Guide - 24
n
Report Start Date - starting date selection to be displayed on the report. (Report scales to include first
and last data point within the selected range only.)
1.15 Resources
Additional Review Manager resources are available on kcura.com.
1.15.1 Prior installations of Review Manager
For installations of Review Manager on Relativity 7.4 and earlier, locate the following resources on
the Customer Portal:
n
Installation Guide
n
Provided in the Installation Package .zip file
Reference Guide
o
o
Provided in the Installation Package .zip file
Relativity | Review Manager Guide - 25
Proprietary Rights
This documentation (“Documentation”) and the software to which it relates (“Software”) belongs
to kCura Corporation and/or kCura’s third party software vendors. kCura grants written license
agreements which contain restrictions. All parties accessing the Documentation or Software must:
respect proprietary rights of kCura and third parties; comply with your organization’s license
agreement, including but not limited to license restrictions on use, copying, modifications, reverse
engineering, and derivative products; and refrain from any misuse or misappropriation of this
Documentation or Software in whole or in part. The Software and Documentation is protected by
the Copyright Act of 1976, as amended, and the Software code is protected by the Illinois Trade
Secrets Act. Violations can involve substantial civil liabilities, exemplary damages, and criminal
penalties, including fines and possible imprisonment.
© 2014. kCura Corporation. All rights reserved. Relativity® and kCura® are registered
trademarks of kCura Corporation.
Relativity | Review Manager Guide - 26

© Copyright 2026