
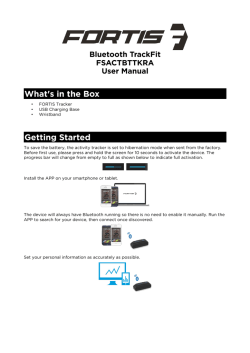
set snooze dimmer down up alm 1-2 on-off alm 1 on alm 2
Page 1 of booklet (Paper Size A6) H 148 x W106mm
15003 SIERRA LED ALARM CLOCK OPERATING INSTRUCTIONS
Thank you for purchasing this quality clock.
Please read these instructions carefully and save them for future reference.
DOWN SET
SNOOZE
DIMMER
ALM 1-2
ON-OFF
UP
TOP VIEW
ALM 1 ON
ALM 2 ON
FRONT VIEW
PM
BACK VIEW
INSERT 1 X CR2032
LITHIUM BATTERY
(NOT INCLUDED)
INSTALLATION
Connect the DC plug of the adaptor to the DC jack of the clock and plug the adaptor in to an AC
household outlet. Your clock is ready to work for you.
OPTIONAL BACKUP BATTERY INSTALLATION
Your clock requires one CR2032 lithium battery (not included) to provide backup power to the clock in
the event of a temporary power interruption.
1. Remove the AC/DC adaptor from the AC household outlet.
2. Place your unit face down on a flat surface.
3. Slide and remove the battery cover at the bottom of your unit.
4. Insert one new CR2032 lithium battery into the battery compartment with the “+” side facing up
as indicated.
5. Replace the battery cover.
6. Connect the DC plug of the adaptor to the DC jack of the clock and plug the adaptor in to a
household outlet. Your clock is ready to work for you.
If AC power is interrupted, the LED display will go off and the alarm will not function. The backup battery
will keep the time and all settings of your unit. Make sure a new CR2032 lithium battery is used. A new
CR2032 battery could backup your clock continuously for around 3 days.
SET TIME AND THE SNOOZE DURATION
1. Press SET once, the hour digits will flash. Press the up or down arrow button to set the hour (hold
to advance rapidly).
2. Press SET again, the minute digits will flash. Press the up or down arrow button to set minutes
(hold to advance rapidly).
3. Press SET again, the display shows “05” and flashes. Press the up or down arrow button to select
the snooze time from 5 to 60 minutes.
4. Press SET again or if no key is pressed in approx.10 seconds to exit the setting mode.
Note: The PM LED will appear on the lower middle time display to indicate the afternoon time; there
is no AM indicator.
SET THE ALARMS (A1 & A2)
1. Press AL 1.2 once, the A1 LED and the hour digits flash. Press the up or down arrow button to set
the alarm 1 hour. (hold to advance rapidly).
2. Press AL 1.2 again to adjust minutes. Press the up or down arrow button to set the alarm 1
minutes. (hold to advance rapidly).
3. Press AL 1.2 again, LED displays “OFF” (alarm off). To turn on the alarm, press up or down arrow
button to select “ON”
4. Press AL 1.2 again, LED displays “HI”. To select lower buzzer sound level, press up or down to
select “LO”.
5. Press AL 1.2 again, the A2 LED and the hour digits flash. Press up or down arrow button to set the
alarm 2.
hour. Repeat step 2 to 4 to set alarm 2.
6. Press AL1.2 again or no key is pressed in approx. 10 seconds to exit alarm setting mode.
Note: When the related alarm is turned on, it will be indicated by the appearance of the A1 and/or
the A2 LED on the right side of the display.
STOP AND RESET THE ALARM TO COME ON THE NEXT DAY
SNOOZE OPERATION (default snooze duration is 5 minutes)
When alarm is sounding, press Zz/Dimmer button once, the alarm will be silenced and will sound
again after the set snooze duration.
Note: If your second alarm activates while the first alarm is sounding or it is in the snooze mode, the
second alarm overrides the first alarm (the first alarm is reset to come on the next day).
USE THE HI-LO-OFF DIMMER
Press Zz/Dimmer button to adjust the brightness (HI/ LO or OFF) of the LED display. This can only
be done when the unit is not sounding.
TROUBLE SHOOTING
If your clock displays irrelevant time or does not function properly, which maybe caused by
electro-static discharge or other interference, unplug the DC jack to disconnect the AC power (and
remove the backup battery). The clock will be reset to default settings and you need to set it again.
CARE OF YOUR PRODUCT
1. Place your clock on a stable surface, away from sources of direct sunlight or excessive heat or
moisture.
2. Protect your furniture when placing your units on a natural wood and lacquered finish by using a
cloth or protective material between it and the furniture.
3. Clean your unit with a soft dry cloth. Make sure the unit is unplugged before cleaning.
4. If the unit is not to be used for a prolonged period, such as a month or longer, remove the batteries
to prevent possible corrosion. Should the battery compartment become corroded or dirty, clean the
compartment thoroughly and replace the batteries.
SPECIFICATIONS
Alarm duration
Snooze duration
Default settings:Time format
Time
Alarm 1 and 2
Volume
2 minutes
5 to 60 minutes
12 hour
12:00
6:00
HI
YOUR GUARANTEE
Your clock is guaranteed for 12 months from the date of purchase against any faults arising from
defective materials or manufacture. Damage caused through careless handling, misuse or in transit
is expressly excluded. Should this clock fail within 12 months please return it in the first instance
to your retailer.
If you have any queries, problems or do not understand any part of these instructions
please contact:
Customer Help Line Locall 0845 1207208 or (01908) 449208 Mon - Fri 9.00am - 4.30pm
email for service: [email protected] or visit www.acctim.com
ENVIRONMENTAL PROTECTION
Disposal of electrical and electronic equipment
Do not dispose of this product with household waste. For the proper
treatment, recovery and recycling please take this product to the
appropriate collection point. If you are unsure of where this is contact
your local authority. Improper disposal may be harmful to the environment.
When alarm 1 or 2 is sounding, the related A1 or A2 LED flashes. Press the AL 1.2 once to stop the
alarm and reset it to come on the following day. The A1 or A2 LED indicator light will stay on the
display.
Page 2 of booklet (Paper Size A6) H 148 x W106mm
V.1
Page 3 of booklet (Paper Size A6) H 148 x W106mm


© Copyright 2026