
Palermo™ - Gazebo 3600 - Poly
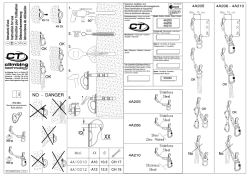
Assembly Instructions
Palermo™ - Gazebo 3600
Approx. Dim.
360L x 360W x 280H cm / 11’9”L x 11’9”W x 9’4”H
5mm
3/16”
SILICON \
CAULK
10mm
25/64”
After Sale Service
Email: [email protected]
USA Canada 877-627-8476
1 800-866-5749 England 01302-380775
Germany 0180-522-8778
www.palramapplications.com
France 0169-791-094
International +972 4-848-6942
14.01_EN_DE_FR_ES_76638
13mm
x2
EN
IMPORTANT
Please read these instructions carefully before you start to assemble this product.
Please carry out the steps in the order set out in these instructions.
Keep these instructions in a safe place for future reference.
» Care and Safety advice
• Please follow the instructions as listed in this manual.
• Sort the parts and check against the list of contents.
• For safety purposes we strongly recommend that the product will be assembled
by at least two people.
• Some parts have metal edges. Please be careful when handling components.
Always wear gloves, shoes and safety goggles during assembly.
• Do not attempt to assemble the Gazebo in windy or wet conditions.
• Dispose of all plastic bags safely – keep them away from children’s reach.
• Keep children away from the assembly area.
• Do not attempt to assemble the Gazebo if you are tired, have taken drugs,
medications or alcohol, or if you are prone to dizzy spells.
• When using a stepladder or power tools, ensure that you are following the
manufacturer’s safety advice.
• Do not climb or stand on the roof.
• Heavy articles should not be leaned against the poles.
• Keep roof and gutters clean of snow, dirt & leaves.
• Heavy load of snow on roof can damage the Gazebo making it unsafe to
stand below or nearby.
• This product was designed and produced for it’s aimed purpose only.
If color was scratched during assembly it can be fixed with the following tints:
Grey – RAL 7012
» Cleaning instructions
In order to clean the Gazebo, use a mild detergent solution and rinse with
cold clean water.
Do not use acetone, abrasive cleaners, or other special detergents to clean the panels.
» During Assembly
During assembly use a soft surface below the parts
to avoid scratches and damages.
» You will need
(Supplied)
13mm
5mm
3/16”
10mm
25/64”
SILICON \
CAULK
(These items are
not supplied)
When encountering the information icon, please refer to the relevant
assembly step for additional comments and assistance.
Step 7:
It is recommended to use a carton or other soft material under the lowered
corner in order to avoid scratches and peeling of paint.
*This note also refers to steps 8,9,10
Steps 10a+12a:
Please note that threading of the screws should be done from the outside
Steps 11b+13a:
Please note that threading of the screws should be made from the bottom up.
Afterwards please use a screwdriver for easy screwing
Step 14b:
Please add silicone on the inner area of part # 7661 as illustrated
Step 20a:
Please drill holes in the panels to be located precisely parallel to the holes in
profiles # 7744 + # 7743
Step 21:
Please level the profiles’ legs and adapt screws and plugs to your specific ground
type.
•
•
•
•
•
•
Please note: Screws and plugs are not supplied*
• Please Fasten all screws at the end of assembly
ES
IMPORTANTE
Por favor, lea estas instrucciones detenidamente antes de empezar a montar este
producto. Por favor, siga los pasos en el orden establecido en estas instrucciones.
Guarde estas instrucciones en un lugar seguro para futuras consultas.
» Consejos de mantenimiento y seguridad
» Durante el montaje
Durante el montaje utilice una superficie suave por debajo de las piezas para evitar
arañazos y otros daños.
» Necesitará
• Por favor, siga las instrucciones tal como se enumeran en este manual.
• Clasifique las piezas y compárelas con la lista de contenidos.
• Por razones de seguridad, recomendamos encarecidamente que este producto se
monte entre al menos dos personas.
• Algunas piezas tienen bordes metálicos. Por favor, tenga cuidado al manejar los
componentes. Póngase siempre guantes, zapatos y gafas de seguridad durante el
montaje.
No intente montar el Cenador cuando hace viento o bajo la lluvia.
Deshágase de todas las bolsas de plástico con seguridad. Manténgalas fuera del
alcance de los niños.
Aleje a los niños de la zona de montaje.
No intente montar el Cenador si está cansado o ha tomado drogas, medicinas o alcohol,
o bien si es propenso a sufrir desvanecimientos.
Cuando utilice una escalera de mano o herramientas eléctricas, asegúrese de seguir los
consejos de seguridad del fabricante.
No se suba al tejado ni se ponga de pie sobre este.
Los objetos pesados no deben apoyarse sobre los postes.
Mantenga el tejado y los canalones libres de nieve, lodo y hojas.
Una carga pesada de nieve en el tejado puede dañar el Cenador, por lo cual sería
peligroso quedarse debajo o cerca de este.
Este producto ha sido diseñado y producido exclusivamente para utilizarse con el fin
para el que se ha creado.
If Si se produce algún arañazo en el color durante el montaje, puede repararse con el tono
siguiente: Gris – RAL 7012
•
•
•
•
•
•
•
•
•
•
» Instrucciones de limpieza
Para limpiar el Cenador, utilice una solución de detergente suave y enjuáguelo con agua
limpia fría.
No use acetona, productos de limpieza abrasivos u otros detergentes especiales para
limpiar los paneles.
(Suministrado(s))
13mm
5mm
3/16”
10mm
25/64”
SILICON \
CAULK
(Estos elementos
están no suministrado(s))
Cuando vea el icono de información, por favor consulte el paso de montaje
pertinente para disponer de más comentarios y ayuda.
paso 7:
Se recomienda usar cartón u otro material blando bajo la esquina situada en una
posición más baja para evitar arañazos y peladuras en la pintura.
* Esta nota también se refiere a los pasos 8, 9 y 10.
pasos 10a+12a: Pasos Por favor, tenga en cuenta que debe enroscar los tornillos
desde el exterior.
pasos 11b+13b: Por favor, tenga en cuenta que debe enroscar los tornillos de abajo
arriba. Después, utilice un destornillador para atornillar con facilidad.
Paso 14b: Por favor, añada silicona a la zona interior de la pieza # 7661 tal como se
ilustra.
Paso 20a: Por favor, taladre orificios en los paneles para que se sitúen de forma precisa
en paralelo a los orificios de los perfiles # 7744 + # 7743.
Paso 21: Por favor, nivele las patas de los perfiles y adapte los tornillos y tacos a su tipo
de suelo específico.
*Tenga en cuenta que no se suministran los tornillos ni los tacos.
•
• Apriete todas las tuercas al final del montaje.
FR
IMPORTANT
Lire attentivement ces instructions avant de commencer l’assemblage de cette tonnelle. Merci de suivre les étapes en respectant l’ordre mentionné sur cette notice.
Conserver cette notice dans un endroit sûr pour toute référence ultérieure.
» Pendant l’assemblage
Positionnez les pièces sur une surface souple pour éviter toute rayure ou dégât.
» Vous aurez besoin de
» Conseils d’entretien et de sécurité
• Suivez les instructions telles qu’elles sont mentionnées sur cette notice.
• Vérifiez que le paquet contient bien toutes les pièces.
• Pour des raisons de sécurité, il est fortement recommandé qu’au moins 2 personnes
participent au montage.
• Certaines pièces peuvent être coupantes. Merci de manipuler les pièces avec
précaution.
• Toujours porter des gants, des chaussures et des lunettes de protection durant tout
l’assemblage.
• Ne pas essayer de monter cette tonnelle par temps venteux ou pluvieux.
• Assurez-vous d’avoir bien jeté tous les emballages en plastique - Les mettre hors de la
portée des enfants.
• Eloignez les enfants du site de montage.
• N’essayez pas de monter la tonnelle si vous êtes fatigué, si vous avez pris des
médicaments ayant un effet sur votre état d’éveil, des drogues si vous avez consommé
de l’alcool, ou si vous êtes sujet aux vertiges.
Assurez-vous de bien suivre les conseils de sécurité du fabricant lorsque vous utilisez
une échelle ou des outils électriques.
Ne pas grimper ni s’accrocher au toit.
Les articles lourds ne doivent pas être posés sur les poteaux.
Veillez à ce que le toit et les gouttières soient toujours propres en retirant la neige, les
feuilles mortes et la poussière.
Le produit pourrait subir des dommages en cas de grosses chutes de neige sur le toit, il
serait alors dangereux de vous tenir sous le toit ou à proximité.
Ce produit a été conçu afin de servir de tonnelle exclusivement.
•
•
•
•
•
•
Si la peinture a été raillée pendant l’assemblage, elle peut être réparée en utilisant le Gris
RAL 7012
» Instructions de nettoyage
Pour nettoyer votre tonnelle, utilisez un détergent doux et rincez avec de l’eau propre et
froide.
Ne pas utiliser d’acétone, de produits abrasifs ni tout autre détergent spécial pour nettoyer
les panneaux.
(Fourni)
13mm
5mm
3/16”
SILICON \
CAULK
(Non fourni)
10mm
25/64”
Lorsque vous rencontrez l’icône information, merci de vous référez à l’étape
d’assemblage appropriée pour toute remarque et assistance additionnelle.
Etape 7:
Afin d’éviter toute égratignure ou écaillement de la peinture, Il est
recommandé d’utiliser un carton ou un autre matériel souple sous l’angle
inférieur.
*Cette note se réfère également aux étapes 8,9,10
Etape 10a+12a:
Noter s’il vous plaît que l’enfilage des vis doit être fait de l’etérieur.
Etape 11b+13b:
Noter s’il vous plaît que l’enfilage des vis doit être de bas en haut. Ensuite
utilisez s’il vous plaît un tournevis pour vissage facile.
Etape 14b:
Ajoutez s’il vous plaît du silicone à l’intérieure de la pièce #7661 comme illustré.
Etape 20b:
Percez s’il vous plaît des trous dans les panneaux situé exactement parallèles
aux trous qui se trouve dans les profiles #7744+#7743.
Etape 21:
Nivellez les poteaux et adaptez les vis et chevilles au type de sol
*Notez s’il vous plaît: les vis et chevilles ne sont pas fournis
•
•
•
•
•
•
DE
WICHTIG
Bitte lesen Sie diese Anweisungen sorgfältig durch, bevor Sie mit dem Aufbau des
Gewächshauses beginnen. Führen Sie den Aufbau in der in den Gebrauchsanweisungen
aufgeführten Reihenfolge Schritt per Schritt aus.Heben Sie diese Anweisungen an einem
sicheren Ort auf, um später auf sie zurückgreifen zu können.
» Bei der Montage
Bei der Montage nehmen Sie eine weiche Plattform und stellen Sie diese unterhalb
der Teile, um Kratzer und Beschädigungen zu vermeiden.
» Sie werden brauchen
» Pflege und Sicherheitshinweise
• Please follow the instructions as listed in this manual.
• Bitte folgen Sie die in diesem Handbuch aufgeführten Anweisungen.
• Sortieren Sie die Teile und überprüfen Sie die Inhaltsliste.
• Aus Sicherheitsgründen empfehlen wir dringend, dass das Produkt von mindestens
zwei Menschen zusammengebaut wird.
• Einige Teile haben Metallkanten. Bitte seien Sie vorsichtig beim Umgang mit den
Komponenten.
• Tragen Sie immer Handschuhe, Schuhe und Schutzbrille bei der Montage.
• Versuchen Sie nicht, das Produkt bei windigen oder nassen Bedingungen zu montieren.
• Entsorgen Sie alle Plastiktüten sicherheitsgemäß – bewahren Sie sie außerhalb der
Reichweite von kleinen Kindern auf.
• Halten Sie Kinder vom Montagebereich fern.
• Versuchen Sie nicht ein Produkt zusammen zu bauen, wenn Sie müde sind, Drogen,
Medikamente oder Alkohol genommen haben, oder wenn Sie zu Schwindelanfällen
neigen.
Bei Verwendung einer Stehleiter oder Elektrowerkzeugen, stellen Sie sicher, dass Sie die
Sicherheitshinweise und Anweisungen des Herstellers befolgen.
Steigen oder stehen Sie nicht auf dem Dach.
Schwere Gegenstände dürfen nicht an den Pfosten angelehnt werden.
Halten Sie Dach und Dachrinne frei von Schnee, Schmutz und Blättern.
Extreme Mengen von Schnee auf dem Dach können das Gazebo schädigenund zu
unsicheren Bedingungen in der Umgebung führen
Dieses Produkt wurde entwickelt und hergestellt nur um seinen vorgesehenen Zweck
zu dienen und darf nur dafrür benutzt werden.If color was scratched during assembly.
•
•
•
•
•
•
Sollte die Farbe bei der Montage verkratzten, kann es mit den folgenden Farben
nachlackiert werden: Grau - RAL 7012
» Pflegeanleitung
Um das Produkt zu reinigen, verwenden Sie ein mildes Reinigungsmittel und reinigen
Sie mit kaltem Wasser. Verwenden Sie kein Aceton, Scheuermittel oder andere spezielle
Reinigungsmittel um das Paneel zu reinigen.
(Sind inbegriffen)
13mm
5mm
3/16”
10mm
25/64”
SILICON \
CAULK
(Diese Werkzeuge
sind nicht inbegriffen)
Beim Aufbau wird Ihnen das Informationssymbol begegnen.
Für zusätzliche Kommentare und Unterstützung beziehen Sie sich bitte auf
die entsprechende Aufbaustufe.
Schritt 7:
Es wird empfohlen, einen Karton oder ein anderes weiches Material unter
der abgesenkten Ecke zu stellen, um Kratzer und Abblättern der Farbe zu
vermeiden.
* Dieser Hinweis bezieht sich auch auf die Schritte 8,9,10
Schritte 10a +12 a:
Bitte beachten Sie, dass das Einschrauben der Schrauben von außen
durchgeführt werden sollte.
Schritte 11b +13 b:
Bitte beachten Sie, dass das Einschrauben der Schrauben von unten nach oben
erfolgen sollte. Verwenden Sie bitte danach einen Schraubendreher um das
Einschrauben zu erleichtern.
Schritt 14b:
Bitte fügen Sie Silikon auf dem Innenbereich des Teils # 7661 hinzu, wie
dargestellt.
Schritt 20a:
Bitte bohren Sie die Löcher in den Platten genau parallel zu den Löchern in
Profilen # 7744 + # 7743
Schritt 21:
Bitte ebenen Sie die Beine der Profile und passen Sie die Schrauben und Dübeln
an Ihren spezifischen Boden-Typ an.
* Bitte beachten Sie: Schrauben und Dübel sind nicht im Lieferumfang enthalten.
•
•
•
•
•
•
• Bitte befestigen Sie alle Schrauben nach Abschluss der Montage.
Contents
Item
Qty.
7743
4
7744
4
Item
7750
7751
7745
7759
7664
Qty.
4
Item
Qty.
7756
4
7757
4
7754
4
7755
4
7752
4
7753
4
4
4
7673
2
7672
2
4
4
7746
4
7747
4
7748
4
7749
4
7670
4
7669
4
Contents
Item
Qty.
Item
7662
1
4000
4010
7661
4
5000
7681
Qty.
Item
16
411
16
466
56
421
(+1)
(+1)
(+4)
4
7680
17
7682
212
8
7679
7567
16
(+1)
8
(+1)
8
433
4
1
16
(+2)
10
(+1)
4024
1
(+4)
(+1)
7024
7671
40
(+3)
102
1
T001
17
(+3)
426
427
7674
16
(+2)
(+1)
447
7119
Qty.
1
413
414
40
(+3)
40
(+3)
1
49
(+3)
1
7672
2
7673
a
2
b
7673
7673
7673
7672
c
7672
7672
2
7682
1
466
1
426
1
7680
1
414
1
433
2
13mm
7674
a
1
466
426
7674
7674
7674
7682
b
414
433
433
7680
3
7759
4
7680
414
4
426
8
4
13mm
a
7759
7759
7759
a
7759
b
7759
7680
426
426
414
4
7680
414
13mm
4
4
433
8
466
411
4
7671
a
7671
4
4
b
7671
7671
414
433
7671
7671
7671
7680
c
433
7671
411
466
5
7670
4
7680
8
7669
4
414
8
16
426
13mm
a
a
7669
7670
7669
7670
b
a
a
7670
7669
7670
7669
b
a
7670
b
b
414
414
7669
b
7680
426
6
7743
4
7750
7744
4
447
4
7751
4
16
a
b
15 cm / 6”
7750
7743
7744
7743
7750
c
7743
7743
7744
7750
7751
x4
7744
447
7751
7
7119
8
414
8
426
13mm
a
b
b
7743
7743
16
+ 7744
+ 7744
b
7743
7744
b
b
b
7743
7743
b
426
+ 7744
+ 7744
b
426
b
7119
414
8
466
4
1
4024
7662
4
411
1
1
413
a
413
4024
a
b
b
7662
7662
b
411
b
b
466
9
4
7664
8
411
414
8
212
426
16
7567
13mm
x4
a
8
8
414
a
426
212
212
426
212
7567
7664
b
212
b
7664
411
10
4
7679
414
4
8
426
13mm
a
414
426
x2
426
7679
Carton
/
Karton
11
466
4
a
466
x2
466
411
b
466
466
411
12
4
7679
414
4
8
426
13mm
a
414
426
x2
426
7679
13
466
4
a
466
x2
466
411
b
466
466
411
14
7661
4
7681
4
8
7119
c
13mm
414
8
426
16
a
b
7661
c
SILICON \
CAULK
c
c
7681
7661
ac
414
414
426
426
7661
7119
7119
15
7756
4
7757
7757
4
a
7756
7757
7756
7756
7757
7756
7757
7756
7757
16
7748
4
7749
4
7748
7749
a
7748
7749
7748
7748
7749
7748
7749
7749
7748
7749
17
7755
4
7754
4
7746
4
7747
4
a
7746
7754
7755
7747
7746
7747
18
7752
4
7753
4
a
7753
7752
7752
7753
19
7745
4
a
a
+
a
c
+
b
7745
c
7745
b
a
+
c
a
+
c
c
7745
20
427
40
5mm
3/16”
421
40
7024
40
a
b
421
427
7024
21
4000
16
16
4010
426
16
13mm
a
4000
426
4010
10mm
25/64”
a
a
a
a
22
5000
5000
a
56
5000
b
5000
5000
a
b
b
b
5000
5000
5000
b
c
c
c
5000
5000
5000
master_PALERMO_3.6_V1-4
c


© Copyright 2026