
Clear and Simple Quick Start Guide - ZTE USA
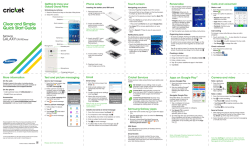
Getting to know your
ZTE Grand™ X Max+
Volume keys
Proximity and
light sensor
Phone setup
Touch screen
Personalize
Calls and voicemail
1.Insert the tray eject tool
(or end of a paper clip)
into the hole on the
micro-SIM card tray and
pull the tray out.
Navigating your phone
Set wallpaper
Make a call
• Use your fingertip to lightly touch the screen.
• Use quick flicks of your finger on the touch screen
to swipe up, down, left, and right.
• To return to the previous screen, tap the Back
key
.
• Tap the Home key
at any time to return to the
main home screen.
• Tap the Recent Apps key
to access recently
viewed apps.
• Tap Apps
to access applications on your phone.
• To change your home or lock
1.From the home screen,
tap Phone .
Headset port
Earpiece
Clear and Simple
Quick Start Guide
Camera lens
Indicator light
Status and
notification bar
microSDHC™
card slot
2.Place the micro-SIM
card in the tray with the
gold-colored contacts
facing down. Carefully
slide the tray back
in place.
micro-SIM
card slot
ZTE Grand™ X Max+
Power key
Touch screen
Place most used keys where you
need them for easy access and
one-handed operation.
1.From the home screen, tap
Apps
and then tap
Settings .
2.Tap Display and then scroll
down and tap Mi-POP. Tap
Mi-POP to check the box and
turn on. Once open, swipe right
to expand Mi-POP and access
all four key options.
Home key
Notifications panel
Recent
apps key
Access alerts, including new
messages, emails and
software updates.
• Tap the top of the home screen
and drag your finger down to
see the Notifications panel.
• Tap
to access the settings
menu.
• Swipe right to clear individual
notifications or tap Remove
to clear all.
Charging/data port
Back key
3.Insert the tray eject tool
(or end of a paper clip)
into the hole on the
microSDHC card tray
and pull the tray out.
Mi-POP
Microphone
4.Place a microSDHC card
(not included) in the tray
with the gold-colored
contacts facing down.
Carefully slide the tray
back in place.
screen wallpaper, press and
hold a blank part of the home
screen and tap Wallpaper.
• Tap
or
and follow
on-screen instructions.
Add to home screen
• Press and hold a blank part
of the home screen and tap
Widgets or Apps.
• Press and hold an icon and
drag it to a home screen
thumbnail at the bottom of
the screen.
• To move an icon, press and
hold it and drag it to a new
location. To delete it, drag it
to Delete
.
Organize home screens
• Press and hold an icon and
drag it to Folder
. To keep
your stuff together just how
you like, drag additional icons
to add them to an existing folder.
• To rename a folder, tap it and then tap the name
to bring up the keyboard.
Create new home screens
• From the home screen, spread two fingers quickly
apart. Tap Plus
on the blank screen.
2.Tap to call, or select an option:
• Dialer
• History
• All Contacts
: Manually enter
a phone number.
a call.
: Return or retry
: Call from
your contacts list.
Check voicemail
1.From the home screen, tap
Phone , then tap .
2.Press and hold the 1 key
.
Use call waiting
Call waiting helps you answer
or hold a call while you are on
an existing call.
1.While on a call, you will hear a
tone if another call comes in.
Tap Hold current and answer.
2.Tap , then tap
to merge
calls or tap
to switch
between active calls.
Use one-hand operation
1.From the home screen, tap
Phone , then tap , then
tap , then tap One-hand
operation on.
2. Tap
or
to change the
dial pad’s position.
More information
Text and picture messaging
Email
Cricket services
Apps on Google Play™
Camera and video
On the web
Send a text message
1.From the home screen,
tap Messaging .
These services make using Cricket even better
and easier!
The Grand X Max+ is preloaded with great apps
like Amazon Kindle™
to take your experience
to the next level. To find additional apps to make
your phone experience even better, check out
Google Play.
Take a picture
Detailed support information, including device
specifications and troubleshooting, is available at
www.cricketwireless.com/support/devices.
Email setup (Gmail™,
Yahoo!®, etc.)
On the phone
• Call Customer Care at 1-855-246-2461 or
• Dial 611 from your cell phone.
Accessories
For more information concerning accessories,
please visit your local Cricket store location or go to
www.cricketwireless.com/shop/accessories.
2.Tap Compose
to start
a new text message.
3.In the To field, enter a
number or a contact
name or tap Contacts
to access your contacts.
4.Tap the Type message
field and enter your
message.
5.Tap Send
message.
to send the
Send a picture message
1.Follow steps 1-4 above.
2.Tap the Paperclip
Note: Store and online inventories may vary.
.
3.Tap Pictures
and select
desired picture.
4.Tap Send
to send
the message.
Printed in China
2.Enter email address and
password and then tap Next.
3.Confirm email account
settings and tap Next.
4.Name the account, enter
your name as it will appear
on outgoing messages,
and tap Next. Your email
will begin to synchronize
with your phone.
Note: To set up corporate email,
contact your IT administrator.
Create and send an
email message
1.From the home screen,
tap Email .
2.To compose a new message,
tap Compose
.
3.
Tap the To field and enter email address or name
or tap Contacts
to access your contacts.
Product meets FCC Radio Frequency Exposure Guidelines—FCC ID
SRQ-Z987. This device complies with Part 15 of the FCC Rules. Operation
is subject to the following two conditions: (1) this device may not cause
harmful interference, and (2) this device must accept any interference
received, including interference that may cause undesired operation.
© 2014 Cricket Wireless LLC. All rights reserved. Cricket is
a trademark of Cricket Wireless LLC. Other marks are the
property of their respective owners. microSDHC logo is a
trademark of SD-3C, LLC. Manufactured under license from
Dolby Laboratories. Dolby and the double-D symbol are
trademarks of Dolby Laboratories.
© 2014 ZTE CORPORATION. All rights reserved. No part of this publication
may be excerpted, reproduced, translated or utilized in any form or by
any means, electronic or mechanical, including photocopying and
microfilm, without the prior written permission of ZTE Corporation. The
manual is published by ZTE Corporation. We reserve the right to make
modifications on print errors or update specifications without prior notice.
079584506900 1.From the home screen,
tap Email
.
4.Enter a subject and email message.
5.To attach files to the email message, tap
Settings , then tap Attach file and make
your selection.
6.Tap Send to send message.
Please don’t text and drive.
My Cricket: Access billing, make a quick
payment, view usage and access support
from the palm of your hand.
Cricket Wi-Fi: Automatically connect to
free and open Wi-Fi ® hotspots, helping you
to maximize data usage and enhance
coverage.
Cricket Voicemail: Quickly view, access and
play back your voicemail messages. Easily
save important numbers to your Favorites list
and respond to messages by calling back
or texting.
To update and use apps
1.Swipe right on the main home screen and
tap a Cricket app.
2.Tap UPDATE.
3.Tap ACCEPT/Continue.
4.Once installed, you will see a notification in
the Notifications panel. Open the app from
this notification or by locating the app in
Apps
.
Access Google Play
1.From the home screen,
tap Play Store
.
2.Enter your existing Google
account or create one
following the steps on
the screen.
Navigate Google Play
From Play Store, you will have
multiple ways to search for
apps, games, and more.
1.Tap a category to browse
popular apps, games,
movies, and music
organized by popularity
or category.
2.Tap Search
to search
the Play Store for a specific
game or app.
3.To install, tap the app and
follow instructions. Once
installed, you will see a
notification in the Notifications
panel. Open the app from this
notification or by locating the
app in Apps
.
Note: A Google Wallet™ payment method is
required to purchase apps.
1.From the home screen,
tap Camera .
Note: You have a choice of 3
different modes (Auto, Pro, and
Fun) that offers options for every
type of photographer – see user
manual for additional details.
2.Zoom in and out by pinching
with your fingers or by using
the Volume Keys.
3.Tap the Shutter button
to take a photo.
View pictures
1.From the home screen,
tap Apps
.
2.Tap Gallery
.
Take a video
1.In camera mode, tap Start
recording
to start and
tap Stop recording
to
stop recording video.
Send a picture
1.After taking a picture, tap
the thumbnail in the corner
of the screen and then
tap Share
.
2.Scroll through options to send
via text messaging or email,
Evernote®, and more.
Cambio de idioma
Conoce tu ZTE Grand™ X Max+
1.Desde la pantalla principal,
toca la Bandeja de
aplicaciones .
Botones de volumen
Sensor de proximidad
y de luz
2. Toca Settings (Configuración)
y después toca Language &
input (Teclado e idioma).
Puerto para los auriculares
3. Toca Language (Idioma).
Audífono
Lentes de la
cámara
Luz del indicador
Barra de estado
y notificaciones
4. Toca el idioma que
desearías usar.
Ranura para
tarjeta
microSDHC™
Ranura para
tarjeta micro-SIM
Botón de
encendido
Pantalla táctil
Botón de inicio
Botón de
aplicaciones
recientes
En Internet
Puedes ver información detallada de
ayuda, incluyendo las especificaciones
y la solución de problemas del teléfono en
www.cricketwireless.com/support/devices.
En el teléfono
• Llama al servicio al cliente al 1-855-246-2461 o
• Marca 611 desde tu teléfono móvil.
Accesorios
Para más información con respecto a los
accesorios, visita la tienda local de Cricket o
www.cricketwireless.com/shop/accessories.
Micrófono
Mensajes de texto
y con fotos
Para enviar un mensaje
de texto
1.Desde la pantalla principal,
toca Mensajería .
2.Toca Redactar
para
comenzar un nuevo
mensaje de texto.
3.En el campo Para, ingresa
un número o el nombre
de un contacto, o toca
Todos
para tener
acceso a tus contactos.
4.Toca el campo Escribir
mensaje e ingresa
tu mensaje.
Importante: los inventarios de la tienda y por
Internet pueden variar.
El producto cumple con los Lineamientos sobre la Exposición a
Radiofrecuencia de FCC ID SRQ-Z987. Este teléfono cumple con la
Parte 15 de las Reglas de FCC. La operación está sujeta a las siguientes
dos condiciones: (1) este teléfono no puede ocasionar interferencia
perjudicial, y (2) este teléfono debe aceptar cualquier interferencia
recibida, incluyendo interferencia que pueda causar una operación
no deseada.
© 2014 Cricket Wireless LLC.Todos los derechos reservados.
Cricket es una marca de Cricket Wireless LLC. Las demás
marcas son propiedad de sus respectivos propietarios.
El logotipo de microSDHC es una marca de SD-3C, LLC.
Fabricado con la licencia de Dolby Laboratories. Dolby
y el símbolo de la doble D son marcas comerciales de
Dolby Laboratories.
© 2014 ZTE CORPORATION. Todos los derechos reservados. No se
puede extraer, reproducir, traducir ni utilizar ninguna parte de esta
publicación de ninguna forma ni por ningún medio, electrónico ni
mecánico, incluyendo las fotocopias y el microfilm, sin el permiso previo
de ZTE Corporation. El manual es publicado por ZTE Corporation. Nos
reservamos el derecho de hacer modificaciones en los errores impresos
o actualizar especificaciones sin aviso previo.
079584506900 Impreso en China
5.Toca Enviar
el mensaje.
para enviar
Para enviar una imagen
1.Sigue los pasos del
1 al 4 descritos arriba.
2.Toca el Clip
.
3.Toca Imágenes
deseada.
4.Toca Enviar
Pantalla táctil
Personalización
Llamadas y correo de voz
1.Inserta la herramienta
para la expulsión de la
bandeja (o el extremo
de un clip) en el orificio
de la bandeja de la
tarjeta SIM y sácala.
Para navegar tu teléfono
Para establecer el fondo
de pantalla
• Para cambiar el fondo de
Para hacer una llamada
• Usa la punta de tus dedos para tocar ligeramente
la pantalla.
• Da golpecitos rápidos con tus dedos en la pantalla
táctil para deslizarte hacia arriba, abajo, izquierda
y derecha.
• Para regresar a la pantalla anterior, toca el Botón
para volver
.
• Toca el Botón de inicio
en cualquier momento
para regresar a la pantalla principal.
• Toca el Botón de aplicaciones recientes
para
volver a las aplicaciones vistos recientemente.
• Toca Apps
para tener acceso a las aplicaciones
en tu téléfono.
2.Coloca la tarjeta microSIM en la bandeja con
los contactos de metal
dorados hacia abajo.
Desliza con cuidado la
bandeja de regreso a
su lugar.
Mi-POP
Guarda los botones más usados
donde los necesitas para un
acceso fácil y la operación con
una sola mano.
1.Desde la pantalla principal,
toca Apps
y luego toca
Configuración .
2.
Toca Pantalla y luego desplázate
hacia abajo y toca Mi-POP. Toca
Mi-POP para marcar la casilla y
encender. Una vez abierto, desliza
hacia la derecha para expandir
Mi-POP y acceder a las cuatro
opciones de botones.
3.Inserta la herramienta
para la expulsión de la
bandeja (o el extremo
de un clip) en el orificio
de la bandeja de la
tarjeta microSDHC y
sácala.
Panel de notificaciones
y selecciona la fotografía
para enviar el mensaje.
Para añadir a la pantalla
principal
• Oprime por unos segundos
una parte en blanco de la
pantalla principal y toca
Miniaplicaciones
o Aplicaciones.
• Oprime un ícono por unos
segundos y arrástralo a una
miniatura de la pantalla
principal en la parte de abajo
de la pantalla.
• Para mover un ícono, oprímelo por unos segundos
y arrástralo a un lugar nuevo. Para borrarlo,
arrástralo hacia Eliminar .
Para revisar el correo de voz
1.Desde la pantalla principal, toca
Teléfono , después toca .
2.Oprime por unos segundos el
Botón de 1
.
Para usar la llamada en espera
La llamada en espera te ayuda
a contestar o poner una llamada
en espera mientras estás en
otra llamada.
1.Cuando estés en una llamada,
escucharás un tono en caso
de que entre otra llamada.
Toca Pon. act. esper. y resp..
2.Toca , después toca para
unir las llamadas o toca
para
alternar entre llamadas activas.
Para organizar las pantallas principales
Correo electrónico
Servicios de Cricket
Aplicaciones en Google Play™
Cámara y video
Configuración de correo
electrónico (Gmail™,
Yahoo!®, etc.)
¡Estos servicios hacen que el uso de Cricket sea
mejor y más sencillo!
La aplicación Grand X Max+ está precargada con
grandes aplicaciones como Amazon Kindle™
para llevar tu experiencia al siguiente nivel. Para
encontrar aplicaciones adicionales y mejorar aún
más la experiencia de tu teléfono, echa un vistazo
a Google Play.
Para tomar una fotografía
4.Coloca la tarjeta
microSDHC (no incluida)
en la bandeja con los
contactos de metal
dorados hacia abajo.
Desliza con cuidado la
bandeja de regreso a
su lugar.
My Cricket: ten acceso a la facturación, haz
pagos rápidos, ve el uso y ten acceso a la
ayuda desde la palma de tu mano.
1.Desde la pantalla principal,
toca Correo .
2.Ingresa la dirección de correo
electrónico y la contraseña
y luego toca Siguiente.
3.Confirma la configuración
de la cuenta de correo
electrónico y toca Siguiente.
4.Nombra la cuenta, escribe tu
nombre como aparecerá en
tus mensajes de salida y luego
toca Siguiente. Tu correo
electrónico empezará a
sincronizarse con tu teléfono.
Nota: para establecer un
correo electrónico corporativo,
comunícate con tu administrador
de informática.
1.Desde la pantalla principal, toca Correo
3.Toca el campo Para para ingresar una dirección
de correo electrónico, o toca Contactos
para
tener acceso a tus contactos.
5.Para agregar archivos al mensaje de correo
electrónico, toca Configuración de la cuenta ,
después toca Adjuntar un archivo y realiza tu
selección.
6.Toca Enviar para enviar el mensaje.
2.Ingresa tu cuenta actual de
Google o crea una siguiendo
los pasos que se indican en
la pantalla.
3.Toca ACEPTAR/Continuar.
2.Para escribir un mensaje nuevo, toca Redactar
.
• Desde la pantalla principal, separa rápidamente
dos dedos. Toca Más
en la pantalla en blanco.
Correo de voz de Cricket: mira rápidamente
tus mensajes de correo de voz, ten acceso
a ellos y escúchalos. Guarda fácilmente
números importantes en tu lista de Favoritos
y responde a los mensajes llamando o
enviando un mensaje de texto.
2.Toca ACTUALIZAR.
.
Para crear nuevas pantallas principales
Para tener acceso a
Google Play
1.Desplázate hacia la derecha en la pantalla
principal y toca una aplicación de Cricket.
Para crear y enviar un mensaje
de correo electrónico
• Oprime por unos segundos un ícono y arrástralo a
una Carpeta
. Para mantener tus cosas juntas
como quieres, arrastra íconos y agrégalos a una
carpeta existente.
• Para cambiar el nombre a una carpeta, tócala y
luego toca el nombre para que aparezca el teclado.
Cricket Wi-Fi: conéctate automáticamente
a zonas de conexión gratis de Wi-Fi®, que
te ayudan a maximizar el uso de datos y
mejorar la cobertura.
Para actualizar y usar las aplicaciones
4.Ingresa un asunto y el mensaje de correo
electrónico.
No envíes mensajes de texto al momento
de conducir.
pantalla de la pantalla principal
o la de bloqueo, oprime por
unos segundos una parte en
blanco de la pantalla principal
y toca Papel tapiz.
• Toca
o
y sigue las
instrucciones que aparecen en
la pantalla.
1.Desde la pantalla principal,
toca Teléfono .
2.
Toca para llamar o seleccionar
una opción:
• Marcador : ingresa
manualmente un número
de teléfono.
• Historial : devuelve o vuelve
a intentar una llamada.
• Todos los contactos : para
llamar desde tus contactos.
Ten acceso a alertas, incluyendo
mensajes nuevos, correos
electrónicos y actualizaciones de
software.
• Toca la parte superior de la
pantalla principal y arrastra tu
dedo hacia abajo para ver el
panel de notificaciones.
• Toca
para tener acceso al
menú de configuración.
• Desliza a la derecha para eliminar
notificaciones individuales o toca
Eliminar
para eliminarlas todas.
Puerto de carga/datos
Botón para
volver
Más información
Ajuste del teléfono
4. U
na vez instalada, verás una notificación en
el panel de notificaciones. Abre la aplicación
desde esta notificación o localízala en
Apps .
1.Desde la pantalla principal,
toca Play Store
.
Para navegar Google Play
Desde Play Store, tendrás
muchas maneras de buscar las
aplicaciones, los juegos y más.
1.Toca una categoría para
recorrer aplicaciones
populares, juegos, películas
y música organizadas por su
popularidad o por categoría.
2.Toca Buscar
para buscar
en Play Store un juego o
aplicación específica.
3.
Para instalar, toca la aplicación
y sigue las instrucciones. Una
vez instalada, verás una
notificación en el panel de notificaciones.
Abre la aplicación desde esta notificación o
ubicando la aplicación en Apps .
Nota: se requiere un método de pago Google
Wallet™ para comprar aplicaciones.
Para usar la operación con una mano
1.
Desde la página principal, toca Teléfono ,
después toca , después , luego Activar
operación con una mano.
2. Toca
o
para cambiar la posición
del marcador.
1.Desde la pantalla principal,
toca Cámara .
Nota: tienes una opción de 3
diferentes modos (Auto, Pro,
y Diversión) que ofrece opciones
para todos los tipo de fotógrafo.
Consulta el manual de usuario
para obtener detalles adicionales.
2.Aumenta y disminuye al
acercar con tus dedos o
con los Botones de volumen.
3.Toca el Botón obturador
para tomar una foto.
Para ver las imágenes
1.Desde la pantalla principal,
toca Apps
.
2.Toca Galería
.
Para tomar un video
1.En el modo de cámara,
toca Empezar grabación
para empezar, y toca
Parar grabación
para
detener la grabación.
Para enviar una fotografía
1.Después de tomar una
fotografía, toca la vista en
miniatura en la esquina de
la pantalla, y luego toca
Compartir .
2.Desplázate por las opciones
para enviarla por mensaje
de texto o correo electrónico,
Evernote®, y más.
© Copyright 2026