
itelecomandi.com itelecomandi.com itelecomandi.com itelecomandi
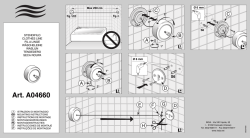
d
I
n
BFT MITTO TRC
a
433,92 Mhz rolling code
m
o
c
le
Istruzioni d’uso
om
m
o
.c
ite
.c
i
d
i
d
n
Programmazione telecomando
Il telecomando può essere programmato in due modi, via radio nelle vicinanze della centralina, senza aprirla, oppure direttamente sulla scheda. Se in fase di montaggio la procedura via radio non è stata abilitata non funzionerà. In questo caso sarà obbligatoria agire sulla scheda.
an
m
.i co
a
m
o
c
Tasto nascosto
Nei vecchi modelli il tasto nascosto si trova sul retro del telecomando, nei modelli più recenti (dopo il 2009) la funzione tasto nascosto si ottiene premendo contemporaneamente i tasti T1 e T2
om
le
e
it
m
o
.c
PROCEDURA A DISTANZA
Memorizzazione trasmettitori in modalitá autoapprendimento vía radio
Questo modalitá serve per esegulre una copla del tastl di un trasmettitore già memorizzato nella rlcevente senza accedere alla
ricevente. II primo trasmettitore deve essere memorizzato in modo manuale.
a) Premere il tasto nascosto (Fig.4) del trasmettitore giá memorizzato.
b) Premere iI tasto T del trasmettitore giá memorizzato che si desidera attribuire anche al nuovo trasmettitore.
c) Premere entro 10s. iI tasto nascosto del nuovo trasmettitore da memorizzare.
d) Premere iI tasto T che si desidera attribuire al nuovo trasmettitore.
e) Per memorizzare un’altro trasmettitore, ripetere dal passo (c) entro un tempo massimo di 10 secondi, altrlmenti la ricevente
esce dal modo programmazione.
f) Per copiare un altro tasto, ripetere dal passo (a) attendendo l’uscita dal modo programmazione (o togliendo alimentazione
alla ricevente).
.c
i
d
i
d
n
a
an
m
m
o
o
c
c
e
le
m
l
m
e
o
e
t
it
.c
.co
i
i
d
d
n
an
a
m
m
o
o
c
c
e
e
l
l
m
e
e
o
t
i
it
c
i.
d
an
m
o
c
e
l
m
ite
.co
i
d
n
a
m
o
c
e
l
e
PROCEDURA MANUALE SUL RICEVITORE SERIE CLONIX (SENZA DISPLAY):
Nel caso di installazioni standard nelle quali non siano richieste le funzionalità avanzate è possibile procedere alla memorizzazione
manuale dei trasmettitori.
1) Se si desidera che il trasmettitore attivi l’uscita 1 premere il pulsante SW1, oppure se si desidera che il trasmettitore attivi
l’uscita 2 premere il pulsante SW2.
2) Al lampeggio del led DL1 premere il tasto nascosto del tra¬smettitore, il led DL1 resterà acceso fisso.
Nota: Il tasto nascosto ha un aspetto diverso a seconda del modello di trasmettitore.
3) Premere il tasto da memorizzare del trasmettitore, il led DL1 lampeggerà velocemente indicando l’avvenuta memorizzazione.
In seguito riprenderà il lampeggio normale.
4) Per memorizzare un ulteriore trasmettitore ripetere i passi 3) e 4).
5) Per uscire dal modo di memorizzazione attendere fino al completo spegnimento del led oppure premere il tasto di un
telecomando appena memorizzato.
A questo indirizzo web potete vedere un video con le istruzioni di programmazione:
http://www.youtube.com/watch?v=KS92JoDYHx4
o
.c
i
d
PROCEDURA MANUALE SU CENTRALI CON DISPLAY (RIGEL, LYBRA, HYDRA ETC.):
1- premi il tasto ok per entrare nel menu
2- con i tasti +/- scegli il menù radio
3- entra nel menù premendo ok e seguire le indicazioni dell’immagine
an
m
o
c
A questo indirizzo web potete vedere un video con le istruzioni di programmazione:
http://www.youtube.com/watch?v=EOIowObFrp0
le
e
it
om
.c
i
d
an
m
o
.c
i
d
n
a
m
.c
i
d
om
le
e
it
m
o
c
i
d
n
m
o
.c
a
an
m
m
o
o
c
c
e
e
l
m
l
m
e
o
e
o
t
it
.c
.c
i
i
d
d
n
n
a
a
m
m
o
o
c
c
e
e
l
l
m
e
o
t
ti e
i
.c
i
d
n
a
m
o
c
e
l
m
e
o
it
.c
i
d
n
a
m
o
c
ele
.i co
BFT MITTO TRC nd
a
433,92 Mhz rolling code
En
m
o
c
le
e
it
Manual remote control
om
.c
i
d
m
o
.c
an
m
i
d
n
Remote control programming
The remote control can be programmed in two ways, by radio, near of the control unit, without opening it, or directly on the control
board. If by radio procedure has not been enabled during system installation, it will not work. In this case it will have to store it on
the control unit.
a
m
o
c
Hidden button
In older models the hidden button is located on the back of the remote, the most recent models (after 2009) the hidden button function is obtained by simultaneously pressing the buttons T1 and T2
om
.c
i
d
it
e
l
e
m
o
.c
i
d
n
TRANSMITTER STORAGE VIA RADIO
Transmitter storage via radio in self-learning mode (DIP1 ON)
This mode is used to copy the keys of a transmitter already stored in the receiver memory, without accessing the receiver.
The first transmitter is to be memorised in manual mode (see paragraph 5).
a) Press hidden key P1 (fig.4) on the transmitter already memorised.
b) Press key T on the transmitter already memorised, which is also to be attributed to the new transmitter.
c) Within 10 sec., press key P1 on the new transmitter to be memorised.
d) Press key T to be attributed to the new transmitter.
e) To memorise another transmitter, repeat the procedure from step (c) within a maximum time of 10 seconds, otherwise
the receiver exits the programming mode.
f) To copy another key, repeat from step (a), having waited for the receiver to exit the programming mode (or after disconnecting
the receiver from the power supply).
a
an
m
m
o
o
c
c
e
e
l
m
l
m
e
o
e
o
t
it
.c
.c
i
i
d
d
n
n
a
a
m
m
o
o
c
c
e
e
l
l
m
e
e
o
t
i
it
c
i.
d
an
m
o
c
e
l
m
o
ite
c
i.
d
an
m
o
c
e
l
e
MANUAL PROGRAMMING ON THE CLONIX SERIES RECEIVER (WITHOUT DISPLAY):
In the case of standard installations where no advanced functions are required, it is possible to proceed to manual storage of the
transmitters.
1) If you wish the transmitter to activate output 1, press pushbutton SW1, otherwise if you wish the transmitter to activate output
2, press pushbutton SW2.
2) When LED DL1 starts blinking, press hidden key P1 on the transmitter, LED DL1 will remain continuously lit.
Note: Hidden key P1 appears differently depending on the transmitter model.
3) Press the key of the transmitter to be memorized, LED DL1 will flash quickly to indicate that it has been memorized successfully.
Flashing as normal will then be resumed.
4) To memorize another transmitter, repeat steps 2) and 3).
5) To exit memorizing mode, wait for the LED to go off completely or press the key of a remote control that has just been memorized.
At this web address you can see a video with the programming instructions:
http://www.youtube.com/watch?v=KS92JoDYHx4
o
.c
i
d
MANUAL PROGRAMMING ON DISPLAY CONTROL UNIT (RIGEL, LYBRA, HYDRA ETC.):
1- press the ok button to enter the menu
2- choose the radio menu with the +/- keys
3- press ok to enter the menu and then follow the instructions of this picture
an
m
o
c
At this web address you can see a video with the programming instructions:
http://www.youtube.com/watch?v=EOIowObFrp0
le
e
it
om
.c
i
d
an
m
o
.c
i
d
n
a
m
.c
i
d
om
le
e
it
m
o
c
i
d
n
m
o
.c
a
an
m
m
o
o
c
c
e
e
l
m
l
m
e
o
e
o
t
it
.c
.c
i
i
d
d
n
n
a
a
m
m
o
o
c
c
e
e
l
l
m
e
e
o
t
i
it
c
i.
d
an
m
o
c
e
l
m
o
ite
c
i.
d
an
m
o
c
e
l
e
o
.c
i
d
BFT MITTO TRC n
a
433,92 Mhz rolling code
De
m
o
c
le
e
it
om
Handsender
.c
i
d
m
o
.c
an
m
i
d
n
Fernprogrammierung
Die Fernsteuerung kann auf zwei Arten programmiert werden, über Funk in der Nähe der Steuereinheit , ohne sie zu öffnen, oder
direkt auf der Karte. Wenn während des Systeminstallationsprogramm nicht aktiviert wurde, wird das Radio Verfahren nicht funktionieren. In diesem Fall wird es haben, es zu speichern, auf dem Brett.
a
m
o
c
Versteckte Taste
Bei älteren Modellen die versteckte Taste auf der Rückseite der Fernbedienung befindet, die neuesten Modelle (nach 2009) die
versteckte Taste Funktion wird durch gleichzeitiges Drücken der Tasten T1 und T2 erhalten
om
.c
i
d
le
e
it
m
o
.c
i
d
n
AUTOMATISCHE SPEICHERUNG DER HANDSENDE VIA FUNK
Auf diese Art wird im Empfänger die Tastenkopie eines bereits gespeicherten Senders erstellt, ohne dabei auf das im Kasten abgeschlossene Empfangsteil zugreifen zu müssen. Der erste Handsender muß von Hand gespeichert werden (siehe Abschnitt 5).
a) Den Geheimcode des bereits gespeicherten Handsenders erneut übertragen (Fig.4).
b) Die gewünschte Taste T des bereits gespeicherten Handsenders drücken, die dem neuen Handsender zugeordnet werden soll.
c) Den Geheimcode des neuen zu speichernden Handsenders, übertragen.
d) Die gewünschte Sendetaste drücken, die dem neuen Hnadsender zugeordnet werden soll.
e) Die Speicherung weitere Handsender muss innerhalb von 10 Sekunden ab Schritt (c) erneut begonnen werden, andernfalls
verläßt der Empfänger die Programmierung.
f) Für das Speichern einer weiteren Taste des gleichen Handsen¬ders, muss zuerst der Programmiermodus Verlassen werden
(als alternative, kann man auch die Stromversorgung des Empfängers kurz unterbrechen) und nachfolgend ab Schritt (a)
verfahren.
a
an
m
m
o
o
c
c
e
e
l
m
l
m
e
o
e
o
t
it
.c
.c
i
i
d
d
n
n
a
a
m
m
o
o
c
c
e
e
l
l
m
e
o
t
ti e
i
.c
i
d
n
a
m
o
c
e
l
m
e
o
it
.c
i
d
n
a
m
o
c
ele
MANUELLE PROGRAMMIERUNG AUF DER EMPFÄNGER SERIE CLONIX (ohne Display):
Bei Standardanlagen, wo die fortgeschrittenen Funktionen nicht benötigt werden, können die Sender von Hand programmiert werden.
1) Wird gewünscht, daß der Sender Ausgang 1 anspricht, drücken Sie den Knopf SW1, soll der Sender Ausgang 2 ansprechen,
Knopf SW2.
2) Wenn die Led DL1 blinkt, drücken Sie die verborgene Sendertaste P1, die Led DL1 leuchtet nun durchgehend.
Anmerkung: Die verborgene Taste P1 hat je nach Sendermodell ein anderes Aussehen:
3) Drücken Sie die abzuspeichernde Taste des Senders: die LED DL1 blinkt schnell auf und zeigt die erfolgte Abspeicherung an.
Anschließend blinkt sie normal weiter.
4) Wiederholen Sie zum Abspeichern eines weiteren Senders die Schritte 2) und 3).
5) Warten Sie zum verlassen der Abspeicherung, bis die LED ausgeht oder drücken Sie die Taste der soeben abgespeicherten
Funksteuerung.
An dieser Web-Adresse können Sie ein Video mit der Programmieranleitung finden Sie unter:
http://www.youtube.com/watch?v=KS92JoDYHx4
o
.c
i
d
MANUELLE PROGRAMMIERUNG AUF ZENTRALE MIT DISPLAY (RIGEL, LYBRA, HYDRA ETC.):
1- drücken Sie die OK-Taste, um das Menü aufzurufen
2- das Radio-Menü mit den +/- Tasten wählen
3- drücken Sie OK um das Menü aufzurufen und die Anweisungen dieser folgen Bild
An dieser Web-Adresse können Sie ein Video mit der Programmieranleitung finden Sie unter:
http://www.youtube.com/watch?v=EOIowObFrp0
an
m
o
c
le
e
it
om
.c
i
d
an
m
o
.c
i
d
n
a
m
.c
i
d
om
le
e
it
m
o
c
i
d
n
m
o
.c
a
an
m
m
o
o
c
c
e
e
l
m
l
m
e
o
e
o
t
it
.c
.c
i
i
d
d
n
n
a
a
m
m
o
o
c
c
e
e
l
l
m
e
e
o
t
i
it
c
i.
d
an
m
o
c
e
l
m
o
ite
c
i.
d
an
m
o
c
e
l
e
o
.c
i
d
BFT MITTO TRCn
a
433,92 Mhz rolling code
Fr
m
o
c
le
e
it
om
Mode d’emploi
.c
i
d
m
o
.c
an
m
i
d
n
Programmation télécommande
La télécommande peut être programmée de deux manières, par radio, au voisinage de l’unité de commande, sans l’ouvrir, ou directement sur la carte. Si au cours de l’installation du système n’a pas été activé, la procédure de la radio ne fonctionne pas. Dans ce
cas, il devra stocker sur l’unité de commande.
a
m
o
c
Touche cachée
Dans les modèles plus anciens sur le bouton caché est situé à l’arrière de la télécommande, les modèles les plus récents (après
2009) la fonction touche cachée est obtenue en appuyant simultanément sur les touches T1 et T2
om
.c
i
d
le
e
it
m
o
.c
i
d
n
AUTOAPPRENTISAGE PAR RADIO
Mémorisation des émetteurs en modalité autoapprentissage par radio
Cette modalité sert à effectuer une copie des touches d’un émetteur déjà mémorisé dans le récepteur sans accéder au récepteur.
Le premier émetteur doit être mémorisé en mode manuel (voir paragraphe 5).
a) Appuyer sur la touche cachée P1 (Fig. 4) de l’émetteur déjà mémorisé.
b) Appuyer sur la touche T de l’émetteur déjà mémorisé que l’on souhaite attribuer aussi au nouvel émetteur.
c) Appuyer avant 10 s la touche P1 du nouvel émetteur à mémoriser.
d) Appuyer sur la touche T que l’on souhaite attribuer au nouvel émetteur.
e) Pour mémoriser un autre émetteur, répéter depuis le pas (c) avant un temps maximum de 10 secondes, sinon le récepteur sort
du mode programmation.
f) Pour copier une autre touche, répéter du pas (a) en attendant la sortie du mode programmation (ou en coupant l’alimentation au récepteur).
a
an
m
m
o
o
c
c
e
e
l
m
l
m
e
o
e
o
t
it
.c
.c
i
i
d
d
n
n
a
a
m
m
o
o
c
c
e
e
l
l
m
e
e
o
t
i
it
c
i.
d
an
m
o
c
e
l
m
o
ite
c
i.
d
an
m
o
c
e
l
e
PROGRAMMATION MANUELLE SUR LE RÉCEPTEUR SÉRIE CLONIX (SANS DISPLAY):
En cas d’installations standard qui n’exigent pas de fonctions avancées, il est possible d’effectuer la mémorisation manuelle des
émetteurs.
1) Si l’on désire que l’émetteur active la sortie 1, appuyer sur la touche SW1, ou bien, si l’on désire que l’émetteur active la sortie
2, appuyer sur la touche SW2.
2) Quand la led DL1 clignote, appuyer sur la touche cachée P1 de l’émetteur, la led DL1 restera allumée de manière fixe.
Note: La touche cachée P1 prend un aspect différent suivant le modèle d’émetteur.
3) Appuyez sur la touche de mémorisation de l’émetteur; la Del DL1 se met à clignoter rapidement pour signaler que la mémorisation est accomplie. Elle reprend ensuite son clignotement normal.
4) Pour mémoriser un auter trasmetteur répéter les étapes 2) et 3).
5) Pour quitter le mode de mémorisation attendre jusqu’à l’extinction totale de la led ou bien appuyer sur la touche d’une télècommande à peine mémorisée.
A cette adresse Web vous pouvez voir une vidéo avec les instructions de programmation:
http://www.youtube.com/watch?v=KS92JoDYHx4
.i co
d
n
a
PROGRAMMATION MANUELLE SUR L’UNITÉ DE COMMANDE AVEC AFFICHAGE (RIGEL, LYBRA, HYDRA ETC.):
1- appuyez sur le bouton OK pour entrer dans le menu
2- choisissez le menu radio avec les touches +/3- Appuyez sur OK pour entrer dans le menu et suivez les instructions de cette image
A cette adresse Web vous pouvez voir une vidéo avec les instructions de programmation:
http://www.youtube.com/watch?v=EOIowObFrp0
m
o
c
le
e
it
om
.c
i
d
an
m
o
.c
i
d
n
a
m
.c
i
d
om
m
o
c
it
e
l
e
i
d
n
m
o
.c
a
an
m
m
o
o
c
c
e
e
l
m
l
m
e
o
e
o
t
it
.c
.c
i
i
d
d
n
n
a
a
m
m
o
o
c
c
e
e
l
l
m
e
e
o
t
i
it
c
i.
d
an
m
o
c
e
l
m
ite
.co
i
d
n
a
m
o
c
e
l
e
o
.c
i
d
BFT MITTO TRC n
a
433,92 Mhz rolling code
Es
m
o
c
le
e
it
Instrucciones de uso
om
.c
i
d
m
o
.c
an
m
i
d
n
Programación remota
El mando a distancia se puede programar de dos maneras, por radio en las proximidades de la unidad de control, sin necesidad de
abrirlo, o directamente en la tarjeta. Si durante la instalación del sistema no se ha habilitado, el procedimiento de radio no funcionará. En este caso se tendrá que almacenarlo en el tablero.
a
m
o
c
Tecla escondida
En los modelos más antiguos el botón escondido está situado en la parte posterior del mando a distancia, los modelos más recientes
(después de 2009) la función tecla escondida se obtiene pulsando simultáneamente los botones T1 y T2.
om
.c
i
d
le
e
it
m
o
.c
i
d
n
AUTOAPRENDIZAJE POR RADIO
IEsta modalidad sirve para efectuar una copia de las teclas de un transmisor ya memorizado en el receptor sin acceder a éste
último.
El primer transmisor debe memonzarse de forma manual (véase el apartado 5). Hay que realizar lo siguiente:
a) Presionar la tecla escondida P1 (Fig. 4) del transmisor ya memorizado.
b) Presionar la tecla T del transmisor ya memorizado que se desea atribuir, también, al nuevo transmisor.
c) Presionar, antes de 10 s, la tecla P1 del nuevo transmisorque se desea memorizar.
d) Presionar la tecla T que se desea atribuir al nuevo transmisor.
e) Para memorizar otro transmisor, repetir desde el paso (c) dentro de un tiempo máximo de 10 segundos; en caso
contrario, el receptor sale de la modalidad de programación.
f) Para copiar otra tecla, repetir desde el paso (a), esperando a que se salga de la modalidad de programación
(o cortando el suministro de corriente al receptor).
a
an
m
m
o
o
c
c
e
e
l
m
l
m
e
o
e
o
t
it
.c
.c
i
i
d
d
n
n
a
a
m
m
o
o
c
c
e
e
l
l
m
e
e
o
t
i
it
c
i.
d
an
m
o
c
e
l
m
o
ite
c
i.
d
an
m
o
c
e
l
e
PROGRAMMACION MANUAL EN EL RECEPTOR DE LA SERIE CLONIX (SIN DISPLAY):
En el caso de instalaciones standard en lasque no se requieran funciones avanzadas, es posible proceder a la memorización
manual de los transmisores, teniendo en cuenta la tabla de programación A y el ejemplo de la Fig. 2 para la programación base.
1) Si sedesea que el transmisor active la salida 1, hay que pulsar el botón SW1; si se desea que el transmisor active
la salida 2, se tiene que pulsar el botón SW2.
2) Cuando el led DL1 empiece a parpadear, hay que presionar la tecla escondida P1 del transmisor; el led DL1
permanecerá encendido de manera fija.
Nota: La tecla escondida P1 asume un aspecto diferente según el modelo de transmisor.
3) Pulsar la tecla para memorizar el transmisor, el led DL1 parpadeará rápidamente indicando que la memorización
ha sido realizada. Luego volverá a parpadear normalmente.
4) Para memorizar otro transmisor, repetir los pasos 3) y 4).
5) Para salir del modo de memorización, esperar hasta que el led se apague por completo y pulsar la tecla de
un mando a distancia antes memorizado.
En esta dirección web se puede ver un video con las instrucciones de programación:
http://www.youtube.com/watch?v=KS92JoDYHx4
o
.c
i
d
PROGRAMMACION MANUAL EN CENTRAL CON DISPLAY (RIGEL, LYBRA, HYDRA, etc.):
1- pulse el botón OK para entrar en el menú
2- Puede mostrar el menú de radio con las teclas +/3- presione OK para abrir el menú y siga las indicaciones de la imagen
an
m
o
c
En esta dirección web se puede ver un video con las instrucciones de programación:
http://www.youtube.com/watch?v=EOIowObFrp0
le
e
it
om
.c
i
d
an
m
o
.c
i
d
n
a
m
.c
i
d
om
le
e
it
m
o
c
i
d
n
m
o
.c
a
an
m
m
o
o
c
c
e
e
l
m
l
m
e
o
e
o
t
it
.c
.c
i
i
d
d
n
n
a
a
m
m
o
o
c
c
e
e
l
l
m
e
e
o
t
i
it
.c
i
d
n
a
m
o
c
e
l
m
e
o
it
.c
i
d
n
a
m
o
c
ele
.i co
BFT MITTO TRC nd
a
433,92 Mhz rolling code
Pt
m
o
c
le
e
it
Instrucciones de uso
om
.c
i
d
m
o
.c
an
m
i
d
n
Memorização de transmissores
O controlo remoto pode ser programado de duas maneiras, por rádio, na vizinhança da unidade de controlo, sem o abrir, ou directamente no central. Se durante a montagem através do procedimento de rádio não foi ativado não vai funcionar. Neste caso irá agir
em unidade electrónica de controlo obrigatório.
a
m
o
c
Tecla escondida
Em modelos mais antigos da Tecla escondida está localizado na parte traseira do controle remoto, os modelos mais recentes (após
2009) a função chave escondida é obtido pressionando simultaneamente as teclas T1 e T2
om
.c
i
d
it
e
l
e
m
o
.c
i
d
n
AUTOAPRENDIZAGEM ATRAVÉS DE RÁDIO
Este modo, serve para executar urna copia das teclas de um transmissor já memorizado no receptor sem aceder ao mesmo. O
primeiro transmissor deve ser memorizado em modo manual
a) Pressionar a tecla escondida P1(Fig.4) do transmissor já memorizado.
b) Pressionar a tecla T do transmissor já memorizado que se deseja atribuir também ao novo transmissor.
c) Pressionar dentro de 10s, a tecla P1 do novo transmissor a memorizar.
d) Pressionar a tecla T que se pretende atribuir ao novo transmissor.
e) Para memorizar um outro transmissor, repetir desde o passo (c) dentro de um tempo máx. de 10 segundos, caso
contrario o receptor sai do modo programacáo.
f) Para copiar urna outra tecla, repetir desde o passo (a) aguardando a saída do modo de programagáo
(ou ¡nterrompendo a alimentacáo ao receptor).
a
an
m
m
o
o
c
c
e
e
l
m
l
m
e
o
e
o
t
it
.c
.c
i
i
d
d
n
n
a
a
m
m
o
o
c
c
e
e
l
l
m
e
e
o
t
i
it
c
i.
d
an
m
o
c
e
l
m
ite
.co
i
d
n
a
m
o
c
ele
PROGRAMAÇÃO MANUAL NO RECEPTOR SÉRIE CLONIX (sem display):
No caso de ¡nstalacóes standard em que nao sao requeridas funcionalidades ayancadas é possível executar o armazenamento
manual dos transmissores, tomando como referencia a tabela de programacáo A para a programacáo
base.
1) Pressionar o botáo SW1, se deseja-se que o transmissor active a salda 1; ou entáo, pressionar o botáo SW2.
se deseja-se que o transmissor active a saída 2.
2) Quando o led DL1 pisca, pressionar a tecla escondida P1 do transmissor, o led DL1 permanecerá aceso em modo fixo.
Nota: A tecla escondida P1 adquire um aspecto diverso, dependendo do modelo de transmissor.
3) Pressionar a tecla do transmissor que deve ser memorizada, o led DL1 irá piscar rápidamente indicando que
a memorizacáo foi bem sucedida. Sucessivamente recomecará o piscar normal.
4) Para memorizar outro transmissor repita os passos 3) e 4).
5) Para sair do modo de memorizacáo. deve-se aguardar que o led se apague completamente ou pressionar a tecla
de um telecomando que se acabou de memorizar.
Neste endereço da web que você pode ver um vídeo com as instruções de programação:
http://www.youtube.com/watch?v=KS92JoDYHx4
o
.c
i
d
PROGRAMAÇÃO MANUAL EM CENTRAL COM DISPLAY (RIGEL, LYBRA, HYDRA etc.):
1- Pressione o botão OK para entrar no menu
2- as teclas +/- para selecionar o menu Radio
3- entrar no menu pressionando ok e siga as instruções da imagem.
an
m
o
c
Neste endereço da web que você pode ver um vídeo com as instruções de programação:
http://www.youtube.com/watch?v=EOIowObFrp0
le
e
it
om
.c
i
d
an
m
o
.c
i
d
n
a
m
.c
i
d
om
le
e
it
m
o
c
i
d
n
m
o
.c
a
an
m
m
o
o
c
c
e
e
l
m
l
m
e
o
e
o
t
it
.c
.c
i
i
d
d
n
n
a
a
m
m
o
o
c
c
e
e
l
l
m
e
e
o
t
i
it
c
i.
d
an
m
o
c
e
l
m
o
ite
c
i.
d
an
m
o
c
e
l
e

© Copyright 2026