
Pelican 9490 User Manual
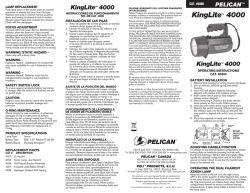
Chargement du bloc d’alimentation
Mode clignotement
E
Bloc d’alimentation
Le bloc d’alimentation 9490 est déposable. Cela permet,
si nécessaire, de continuer à utiliser le produit en
remplaçant le bloc d’alimentation par un autre
entièrement chargé. Pour déposer le bloc d’alimentation,
relâcher simplement les attaches et soulever par la poignée.
Niveau du bloc d’alimentation
F
Lorsque le produit est allumé, le nombre de segments allumés sur le moniteur de niveau
baisse progressivement au fil du temps. Le produit s’éteint rapidement après avoir
affiché d’un seul segment rouge clignotant. Une fois que le produit s’est éteint tout seul,
le segment rouge unique du moniteur de niveau continue de clignoter, pour indiquer
que la batterie doit être rechargée.
Battery Safety Information
WARNING: HANDLE AND STORE BATTERIES PROPERLY TO AVOID INJURY OR DAMAGE BATTERIES
CAN BE DANGEROUS!
Most battery issues arise from improper handling of batteries, and particularly from the use of damaged or counterfeit
batteries. Please review the information below to avoid serious injury and/or damage to your property.
Rechargeable Batteries
1. H
azardous location safety approvals for explosive environments are only valid for the Pelican battery pack that is
supplied with the light.
2. F
or replacement battery packs only use the approved Pelican battery pack for the model of the light that you are
using. The use of other battery packs will invalidate the safety approval.
3. Lights should only be charged in a non-hazardous location.
4. L
ights should only be charged using the Pelican charger base that is supplied with the light.
5. Lights
should be charged and operated between the temperatures shown: Charge Temperature: -20°C to 50°C
(-4°F to 122°F)
Operating Temperature: -20°C to 50°C (-4°F to 122°F)
6. D
o not charge with alkaline batteries installed in the light. Attempting this can cause internal gas or heat generation
resulting in venting, explosion or possibly fire.
7. D
eep discharge of the rechargeable battery may cause batteries to vent potentially dangerous gasses and
electrolytes.
Always dispose of all batteries properly at an approved battery recycling center.
PELICAN 1 YEAR LIMITED
Pelican Products, Inc. (“Pelican”) warrants to the original purchaser its Remote Area Lighting Systems (RALS) and all other
products manufactured by the Advanced Area Lighting Group (AALG) against defects in materials and workmanship under
normal use, service, and maintenance for a period of twelve months from the date of purchase. This warranty applies only to the
original purchaser and is not transferable.
TO THE EXTENT PERMITTED BY LAW: (A) THIS WARRANTY IS IN LIEU OF ALL WARRANTIES, EXPRESS OR IMPLIED,
INCLUDING, BUT NOT LIMITED TO, THE IMPLIED WARRANTIES OF MERCHANTABILITY AND FITNESS FOR A
PARTICULAR PURPOSE; AND (B) ALL OTHER IMPLIED WARRANTIES AND ANY LIABILITY NOT BASED UPON
CONTRACT ARE HEREBY DISCLAIMED AND EXCLUDED.
TO THE EXTENT PERMITTED BY LAW, IN NO EVENT SHALL PELICAN BE LIABLE FOR ANY INDIRECT, PUNITIVE,
INCIDENTAL OR CONSEQUENTIAL DAMAGES, OR SPECIAL DAMAGES, REGARDLESS OF WHETHER A CLAIM FOR
SUCH DAMAGES IS BASED ON WARRANTY, CONTRACT, NEGLIGENCE OR OTHERWISE. To the extent permitted by law,
in no event shall Pelican’s liability to the purchaser for damages hereunder exceed the purchase price of the product in respect of
which damages are claimed.
With valid dated proof of purchase, Pelican will either repair or replace ay defective part, at our sole option. TO THE EXTENT
PERMITTED BY LAW, THE REMEDIES HEREBY PROVIDED SHALL BE THE SOLE AND EXCLUSIVE REMEDIES OF
THE ORIGINAL PURCHASER. Any repaired or replacement part or unit is covered only for the unexpired portion of the warranty
on the original product purchased.
To make a warranty claim, the purchaser must contact Pelican Products, Inc. at 23215 Early Avenue, Torrance, CA 90505 or
[email protected], or by calling 1-800-473-5422, extension 5. Any warranty claims shall be made by the purchaser as
soon as practicable and in no event more than twelve months from the date of purchase. The purchaser must provide valid dated
proof of purchase and obtain a return authorization number from Pelican Customer Service prior to returning any product, and
is responsible for paying for all warranty freight costs. If Pelican determines that any returned product is not defective, within the
terms of this warranty, the purchaser shall pay Pelican all costs of handling, return freight and repairs at Pelican’s prevailing rates.
All warranty claims of any nature are barred if the product has been altered or in any way physically changed, or subjected to
abuse, misuse, negligence or accident.
Some states and countries do not allow limitations on how long an implied warranty lasts or the exclusion or limitation of incidental
or consequential damages, so the above limitation or exclusion may not apply to you. This warranty gives you specific legal rights,
and you may have other rights which vary from state to state and country to country.
In Australia: The benefits provided to you under this warranty are in addition to your rights and remedies as a consumer under
the Competition and Consumer Act 2010 (Cth). Nothing in this warranty limits the rights or obligations of a party under provisions
of the Competition and Consumer Act 2010 (Cth) in relation to the supply to consumers of goods which cannot be limited, modified or excluded. If applicable, our goods come with guarantees that cannot be excluded under the Australian Consumer Law. You
are entitled to a replacement or refund for a major failure and compensation for any other reasonably foreseeable loss or damage.
You are also entitled to have the goods repaired or replaced if the goods fail to be of acceptable quality and the failure does not
amount to a major failure. If you are not a consumer under the Competition and Consumer Act 2010 (Cth), then your rights may
be limited. To make a warranty claim, the purchaser must contact Pelican Products Australia, Suite 2.33, West Wing, Platinum
Bldg., Erina NSW 2250, Tel: +612 4367 7022. Any warranty claims shall be made by the purchaser as soon as practicable.
The purchaser must obtain a return authorization number from Pelican Customer Service prior to returning any product, and is
responsible for paying for all warranty freight costs. If Pelican determines that any returned product is not defective, within the
terms of this warranty, the purchaser shall pay Pelican all costs of handling, return freight and repairs at Pelican’s prevailing rates.
In the event that Pelican determines that any returned product is defective, within the terms of this warranty, Pelican shall pay the
purchaser all reasonable costs of the purchaser in making claim under this warranty.
© PELICAN PRODUCTS 2014
Pendant le chargement, l’écran du moniteur de niveau s’éclaire davantage et continue en cycle
jusqu’à affichage de tous les segments. Quand le cycle de l’affichage est terminé et tous les segments sont affichés, la batterie est entièrement chargée.
AVERTISSEMENT : UTILISER UNIQUEMENT UNE ALIMENTATION ÉLECTRIQUE
APPROUVÉE ET S’ASSURER QUE LE CHARGEMENT EST EFFECTUÉ DANS UNE PIÈCE
BIEN AÉRÉE. NE PAS RANGER UN BLOC-PILE S’IL EST DÉCHARGÉ.
SI UN BLOC-PILE N’EST PAS UTILISÉ PENDANT UNE PÉRIODE PROLONGÉE,
LE RECHARGER TOUS LES 3 MOIS. UNE FOIS LA CHARGE TERMINÉE, TOUJOURS DÉBRANCHER L’ALIMENTATION ÉLECTRIQUE.
Remplacement de la batterie / du fusible
1. Lift the light and pole to a selected position, then twist the red locking
collar clockwise to lock the pole in place.
2. To extend the mast, release the clamp on each section and raise.
Lock each clamp until you have reached your chosen height.
3. To collapse the mast, reverse the procedure.
Light Operation
Prior to light operation, locate the required fuse.
With a slot screwdriver, screw the fuse into the fuse receptacle on the side of the power pack (A).
A
B
u
Contactez votre distributeur pour toute batterie ou fusible de rechange.
Environnement
Au terme de sa durée de vie technique, la batterie au plomb scellée doit être envoyée
à un centre de recyclage approprié ou retournée au point d’achat.
Información sobre seguridad de las baterías
ADVERTENCIA: MANIPULAR Y GUARDAR LAS BATERÍAS CON PRECAUCIÓN PARA EVITAR DAÑOS. LAS
BATERÍAS PUEDEN RESULTAR PELIGROSAS.
La mayoría de los problemas relacionados con las baterías surgen al utilizarlas incorrectamente y, sobre todo, al
emplear baterías falsas o en mal estado. Consulta la información siguiente para evitar daños personales o en el
producto.
Baterías recargables
1. Los certificados de seguridad en zonas peligrosas para entornos explosivos solo se aplican a la batería Pelican
que se suministra con la linterna.
2. Para cambiar la batería utilice únicamente una batería Pelican homologada para el modelo de linterna correspondiente. El uso de otras baterías anulará el certificado de seguridad.
3. No cargar la linterna en zonas peligrosas.
4. Cargar la linterna únicamente en la base de cargador Pelican que se suministra con la linterna.
5. Las linternas deben cargarse y utilizarse respetando el rango de temperaturas que aparece a continuación:
Temperatura de carga: de -20 °C a 50 °C
Temperatura de funcionamiento: de -20 °C a 50 °C
6. No cargar con pilas alcalinas dentro de la linterna, ya que podría generarse gas o calor en el interior que podría
emanar y provocar una explosión o un incendio.
7. Si las pilas recargables se descargan demasiado rápido pueden originarse fugas de gases peligrosos y
electrolitos.
Desecha las baterías en un centro de reciclado homologado.
Informations relatives à la sécurité de la batterie
AVERTISSEMENT : MANIPULER ET RANGER CORRECTEMENT LES BATTERIES AFIN
D’ÉVITER TOUT RISQUE DE LÉSION CORPORELLE OU DE DOMMAGE MATÉRIEL. LES BATTERIES PEUVENT ÊTRE DANGEREUSES !
La plupart des problèmes liés aux batteries sont dus à une manipulation impropre de ces dernières,
notamment à l’utilisation de batteries endommagées ou contrefaites. Lire attentivement les informations ci-dessous, afin d’éviter tout risque de lésion corporelle et/ou de dommage matériel grave de vos
produits.
Batteries rechargeables
1. Les agréments de sécurité de site dangereux pour les environnements explosifs sont valables uniquement pour le
bloc-pile Pelican fourni avec le système d’éclairage.
2. Pour remplacer le bloc-pile, utiliser uniquement un bloc-batterie Pelican homologué pour le modèle du système
d’éclairage utilisé. L’utilisation d’autres blocs-piles annulera l’agrément de sécurité.
3. Le système d’éclairage doit être rechargé uniquement dans un site non dangereux.
4. Le système d’éclairage doit être rechargé uniquement à l’aide de la base-chargeur Pelican fournie avec le
système d’éclairage.
5. Le système d’éclairage doit être rechargé et ne doit fonctionner que dans les plages de température indiquées
ci-dessous : Température de charge : -20 °C à 50 °C (-4 °F à 122 °F)
Température de fonctionnement : -20 °C à 50 °C (-4 °F à 122 °F)
6. Ne pas recharger lorsque des piles alcalines sont installées dans le système d’éclairage. Dans le cas contraire,
cela pourrait entraîner une production interne de gaz ou de chaleur, provoquant un dégazage, une explosion ou
éventuellement un incendie.
7. Un déchargement important des piles rechargeables peut provoquer un dégazage potentiellement dangereux et
une fuite de l’électrolyte.
Toujours mettre au rebut toutes les piles correctement dans un centre de recyclage des piles agréé.
CON LA GARANTÍA LIMITADA DE EXCELENCIA DE POR VIDA DE PELICAN
Pelican Products, Inc., ofrece una garantía de por vida en sus linternas contra roturas o defectos de
fabricación. Esta garantía no cubre la lámpara ni las pilas. Las reclamaciones de garantía de
cualquier clase se considerarán nulas en caso de que el producto haya sufrido alteraciones, daños
o modificaciones físicas de cualquier tipo, se haya hecho un uso incorrecto, abusivo o negligente
o haya sufrido accidentes.
La garantía de por vida no cubre las maletas rotomoldeadas, los productos del AALG ni la parte de
tejido de las mochilas.
GARANTIE D’EXCELLENCE À VIE LIMITÉE DE PELICAN
Pelican Products, Inc. garantit à vie ses torches contre la casse et les défauts de fabrication. Cette
garantie ne couvre pas l’ampoule ou les piles. Toute demande de prise en charge sous garantie, de
quelque nature que ce soit, sera refusée si le produit a été transformé, endommagé ou physiquement
modifié d’une façon ou d’une autre, ou encore sujet à un traitement abusif, une mauvaise utilisation,
une négligence ou un accident. Pour une version complète et détaillée de la garantie, voir
http://www.pelican.com/warranty.
La garantie à vie ne couvre pas les valises rotomoulées, les produits AALG et la partie en tissu des
sacs à dos.
009493-3110-000 5-12448 REV A DE/14
All trademarks and logos displayed herein are registered and unregistered trademarks of Pelican Products, Inc. and others.
PELICAN PRODUCTS
Mast Operation
Indication du cycle de chargement :
Remarque : Le bloc d’alimentation peut rester fixé au chargeur pendant la maintenance sans que
cela n’endommage la batterie.
Chaque bloc d’alimentation est équipée d’un moniteur de
niveau d’alimentation qui reste allumé en permanence pour
indiquer à l’utilisateur l’autonomie de batterie restante. Le moniteur de
niveau brille fortement à l’allumage du produit et puis s’atténue lorsque le produit n’est pas utilisé.
REMOTE AREA LIGHTING SYSTEMS
WARRANTY FOR RALS PRODUCTS
Pelican 9490 User Manual
Le bloc d’alimentation peut être chargé à l’intérieur ou à l’extérieur du logement principal du 9490.
1. Retirer le cache anti-poussière de la prise de chargement et brancher le chargeur.
2. Brancher le chargeur à l’alimentation électrique CA réseau.
1. P
resser et maintenir le bouton d’alimentation
enfoncé pendant 3 secondes jusqu’à ce que la lampe
commence à clignoter, puis sélectionner le niveau
d’alimentation requis.
2. Pour arrêter le mode clignotement, presser à nouveau
le bouton d’alimentation.
RoHS
compliant
23215 Early Ave. • Torrance, CA 90505 USA • Tel (310) 326-4700 • FAX (310) 326-3311 • www.pelican.com
PELICAN PRODUCTS ULC 10221-184th Street • Edmonton, Alberta T5S 2J4 Canada • Tel (780) 481-6076 • FAX (780) 481-9586 • www.pelican.ca
1. Press power button
on keypad once to switch on. The default setting is the preset* high mode
(as indicated by the three symbols at the top of the screen). (B)
Your remaining run time is displayed in the center of the screen and your battery level at the bottom of the screen.
2. Press the bottom left button
on the keypad to change between high, medium and low power. Your remaining run time varies between these settings.
3. P
ress the up or down buttons on the keypad at any time to enter the Intelligent Control (IC) mode. The IC mode allows you to select any run time up to 24hrs. In this mode, your
power level is displayed at the top of the screen instead of the preset ‘sun’ symbols. You can go back to preset mode at any time by pressing the bottom left button on the keypad.
4. Press the power button on the keypad to switch off.
The 9490 IC features three preset modes which provide recommended lux levels over a certain distance. Please see table below:
*
Setting
Lux @ 1m
Lux @ 2m
Lux @ 3m
3 Suns
4,000
1,260
620
2 Suns
2,180
700
340
1 Sun
670
210
100
The 9490 features the ability to be used while charging. When the charger is connected to AC power and the product is switched on, the 9490 will automatically
select a light level to allow continuous operation. - automatic mode. (In this mode, the battery level will remain constant. The light will be at a 50% level.
In AC mode the display will show the battery level and power level but the time display will be replaced by
and the hourglass icon will be extinguished.
Manual adjustment of the brightness will still be possible. If the brightness is increased, then automatic mode will be exited, a new runtime will be computed
based upon the new operating conditions. The battery level and the display will revert to the normal IC mode, (or preset mode if the bottom left button has been used).
If the brightness is decreased, the unit will remain in continuous mode (and the battery will charge up slowly).
If the charger is removed, the unit will return to normal operation and the run-time display will show the remaining time for the selected setting.
--:--
Bluetooth Operation
The 9490 is equipped with Bluetooth capability and you are able to operate it via the
Pelican RALS (Remote Area Lighting Systems) app.
C
To download the RALS app, visit the app store and search for Pelican RALS
Once installed the app icon should appear on your screen. Please note that this app requires iOS 7.0 or later.
It is compatible with iPhone, iPad and iPod touch only.
The Bluetooth is active by default while the battery is connected to the 9490. Once you open the app your 9490 should appear
under the ‘Found’ heading as per the following example: (C) 9490 000001 (the last six digits are your unique serial number).
By selecting this serial number the app should connect to the 9490 RALS and the serial number should now appear under the
‘Connected’ heading in the app screen and the Bluetooth logo on the 9490 screen should turn from white to blue. (D)
You can connect to multiple 9480/9490 units but only operate one at a time.
Once connected, the default setting is always off. To switch on you can either press the ‘on/off’ toggle on the app screen
or slide the intensity slider towards the right until you reach your desired light intensity. The app works in conjunction
with the keypad screen on your 9490; as you adjust the slider on the app screen, the remaining
run time adjusts on the keypad screen.
The app will remain connected until you either close the app or go out of range*, at which point the Bluetooth logo on the
9490 keypad screen will turn from blue to white. You can override the app control by operating the 9490 keypad if desired.
D
The Bluetooth can be manually deactivated on the 9490 if required. To deactivate it, switch the 9490 on, then press and hold the bottom left button on the keypad until the
Bluetooth logo in the bottom left of the screen disappears. It can be reactivated again by pressing and holding the same button again until the logo reappears.
*Range varies depending upon the environment in which the unit is being used.
Flash Mode
1 Press and hold the power button for 3 seconds until flashing begins, then select the required power level.
2. To switch flashing mode off, press the power button again.
Power Pack
The 9490 power pack is removable. This allows for continuous use of the product by replacing it with
another fully charged power pack when required.
To remove the power pack simply release the clips and lift via the handle. (E, F)
Power Pack Level
E
F
The power pack is equipped with a power level monitor which remains permanently illuminated to tell the user
how much power the battery contains. The level monitor will glow brightly when the product is switched on and dim when not in use.
While the product is switched on, the number of segments illuminated in the level monitor will gradually reduce over time. The product will switch off soon after a single red
flashing segment is displayed. Once the product has switched itself off, the single red segment in the level monitor will continue to flash, indicating that a recharge is required.
Power Pack Charging
The power pack can be charged inside or outside of the main 9490 housing.
1. Remove the dust cap from the charging socket and plug in charger.
2. Connect the charger to the mains AC power supply.
Charge Cycle Indication:
During charging, the level monitor display will become brighter and continue to cycle until all segments of the display are shown. Once the display stops cycling and shows all segments, the battery
is fully charged.
Note: The power pack can be left attached to the charger without any harm to the battery.
WARNING: ONLY USE APPROVED POWER SUPPLY & ENSURE CHARGING IS CARRIED OUT IN A WELL VENTILATED ROOM.
DO NOT STORE BATTERY PACKS IN A DISCHARGED STATE. WHEN NOT IN USE, RECHARGE THE BATTERY PACK EVERY 3 MONTHS.
ONCE FULLY CHARGED ALWAYS REMOVE THE POWER SUPPLY.
La batería cuenta con un indicador de nivel de carga que permanece encendido para informar al usuario del estado de la batería. El indicador brilla con más intensidad cuando el producto
está encendido y la luz se atenúa cuando está apagado.
Cuando el producto está encendido, la cantidad de segmentos iluminados en el indicador va bajando con el tiempo. El producto se apagará poco después de que aparezca un segmento
rojo intermitente. Una vez apagado, el segmento rojo del indicador seguirá parpadeando para indicar que hay que cargar el producto.
Cargar la batería
Battery/Fuse ReplacementEnvironmental
Contact your dealer for a replacement battery or fuse.
Nivel de carga de la batería
La batería puede cargarse dentro o fuera de la carcasa del modelo 9490.
1. Sacar la cubierta protectora de la toma del cargador y enchufar el cargador.
2. Enchufar el cargador a la corriente.
At the end of its technical life, the sealed lead battery should be sent to
a suitable recycling center or returned to the point of purchase.
Indicación del ciclo de carga
Manual de usuario del sistema de iluminación 9490 de Pelican
Mientras se carga, la luz del indicador se hará más brillante y seguirá en movimiento hasta que aparezcan todos los segmentos. En ese punto, la batería estará totalmente cargada.
Observación: la batería puede seguir conectada al cargador sin sufrir daños.
1.
Levantar el cabezal del sistema a la posición deseada y a continuación girar la anilla roja para bloquearlo.
ADVERTENCIA: USAR ÚNICAMENTE UNA FUENTE DE ALIMENTACIÓN HOMOLOGADA Y CARGAR LA BATERÍA EN UNA ZONA BIEN VENTILADA.
NO ALMACENAR BATERÍAS DESCARGADAS. DE NO USAR EL PRODUCTO, CARGAR LA BATERÍA CADA 3 MESES.
UNA VEZ CARGADA, SACAR LA FUENTE DE ALIMENTACIÓN.
2.
Para extender el mástil, soltar la pestaña de cada lateral y levantar. Bloquear las pestañas una vez ajustada la altura.
Ponte en contacto con tu distribuidor para conseguir una batería o un fusible de repuesto.
3.
Para plegar el mástil, seguir el procedimiento inverso.
Funcionamiento del mástil
Cambiar la batería/el fusible
Reciclado
Al final de su vida técnica, la batería sellada de plomo debe llevarse a un centro de reciclaje o devolverse al punto de compra.
A
Funcionamiento de la linterna
Manuel d’utilisateur Pelican 9490
B
Fonctionnement du mât
u
Antes de ponerla en marcha localizar el fusible. Con ayuda de un destornillador plano,
introducir el fusible en el receptáculo situado en el lateral de la batería. (A)
1. P
ulsar el botón de encendido
del panel de control una vez para encender la linterna. Por defecto* se encenderá en modo
de alta intensidad (tal como indican los tres símbolos que aparecen la parte superior de la pantalla). (B)
En el centro de la pantalla aparece el tiempo de autonomía restante del sistema y en la parte inferior, el nivel de batería.
2. Pour étendre le mât, relâcher le dispositif de serrage de chaque section puis soulever.
Verrouiller chaque dispositif de serrage jusqu’à atteindre la hauteur désirée.
3. Pour rétracter le mât, procéder dans l’ordre inverse.
2. P
ulsar el botón de la parte inferior izquierda
del panel para alternar entre alta, media y baja potencia.
El nivel de intensidad afecta a la autonomía de la linterna.
3. P
ulsar la flecha hacia arriba o hacia abajo del teclado para acceder al modo de control inteligente. El modo de control inteligente permite seleccionar el tiempo de autonomía (hasta 24 h). Con esta función activada, el nivel de batería aparece en la parte superior de la pantalla en lugar de los soles que aparecen de fábrica. Para volver al modo normal en cualquier momento pulsar el botón de la parte inferior izquierda
del panel.
El control inteligente del modelo 9490 cuenta con tres ajustes que recomiendan distintos niveles de intensidad (lux) según la distancia. Consulta la tabla siguiente:
*
Ajuste
Lux a 1 m
Lux a 2 m
Lux a 3 m
3 soles 4.000
2 soles 2.180
1 sol
670
1.260
700
210
620
340
100
A
B
1. Presser une fois le bouton d’alimentation
sur le clavier pour mettre sous tension. Le réglage par défaut est le
mode élevé prédéfini* (comme indiqué par les trois symboles en haut de l’écran. (B) Le temps de fonctionnement
restant est affiché au centre de l’écran et le niveau de la batterie au bas de l’écran.
2. Presser le bouton inférieur gauche
sur le clavier pour commuter entre l’alimentation élevée, moyenne et basse.
Le temps de fonctionnement restant varie selon ces réglages.
3. A tout moment, presser les boutons de Hausse ou de Baisse sur le clavier pour passer en mode Contrôle Intelligent (IC) Le mode IC permet de sélectionner tout temps de fonctionnement jusqu’à 24h. Avec
ce mode, le niveau d’alimentation est affiché en haut de l’écran à la place des symboles « soleil » prédéfinis. Il est également possible de revenir en mode prédéfini à tout moment en pressant le bouton inférieur
gauche sur le clavier.
El modelo 9490 puede usarse mientras se está cargando. Si está enchufada a la corriente y encendida, el sistema de iluminación seleccionará automáticamente un nivel de bajo consumo
para que no se apague (modo automático). En este modo, el nivel de batería no variará. La intensidad de la luz estará al 50%.
En la pantalla veremos el nivel de batería y de potencia, pero el ajuste de la hora pasará a
Fonctionnement de la lampe
u
Avant toute utilisation de la lampe, localiser le fusible emballé requis avec les accessoires fournis.
À l’aide d’un tournevis plat, visser le fusible dans le compartiment à fusible sur le côté du bloc d’alimentation. (A)
4. Pulsar el botón de encendido del panel de control para apagar la linterna.
1. Soulever la torche et la tige à une position définie, puis tourner le collier de
fixation rouge vers la droite pour verrouiller la tige en place.
--:--
4. Presser le bouton d’alimentation sur le clavier pour éteindre.
Le
9490 IC présente trois modes prédéfinis qui fournissent les niveaux lux recommandés à une distance donnée. Merci de consulter le tableau suivant :
y el icono del reloj de arena desaparecerá.
No obstante, el brillo podrá ajustarse manualmente. Al aumentar el brillo, el modo automático se desactiva, y se calcula un nuevo tiempo de autonomía en función de las nuevas condiciones de funcionamiento.
El nivel de batería y la pantalla volverán al modo de control inteligente normal (o al modo de fábrica, si se activa el botón de la parte inferior izquierda). Al bajar el brillo, la linterna seguirá funcionado en modo
ininterrumpido (y la batería se irá cargando lentamente).
Al desconectar el cargador, la linterna volverá al funcionamiento normal y
aparecerá la autonomía prevista para el modo de funcionamiento seleccionado.
Bluetooth
D
El modelo 9490 puede controlarse por Bluetooth desde la aplicación RALS (Remote Area Lighting Systems) de Pelican
Para descargar la aplicación RALS, entra en la App Store y busca “Pelican RALS”. Una vez instalada la aplicación aparecerá
el icono en la pantalla. Para esta aplicación se necesita iOS 7.0 o superior. Solo es compatible con iPhone, iPad y iPod Touch.
El Bluetooth está activado por defecto mientras la batería está conectada. Con la aplicación abierta, la linterna 9490 debe
aparecer bajo el título “Found” (encontrados) tal como aparece aquí: (C) 9490 000001 (los seis últimos dígitos corresponden al
número de serie y son únicos). Al seleccionar este número de serie la aplicación se conecta a 9490 RALS y acto seguido el
mismo número aparece bajo el título “Connected” (conectado) y el icono del Bluetooth de la pantalla del 9490 pasa de
blanco a azul. (D) Se pueden sincronizar varias linternas 9480/9490, pero solo puede funcionar una a la vez.
Lux à 1 m
Lux à 2 m
Lux à 3 m
3 Soleils 4 000
2 Soleils 2 180
1 Soleil 670
1 260
620
700
340
210
100
Réglage
Le 9490 présente la possibilité de pouvoir être utilisé alors qu’il est en cours de chargement. Une fois le chargeur branché à l’alimentation CA et le produit mis sous tension, le 9490 sélectionne automatiquement
un niveau lumineux permettant un fonctionnement continu (mode automatique). (Dans ce mode, le niveau de batterie reste constant.) La torche aura un niveau de 50%.
En mode CA, l’afficheur indique le niveau de batterie et le niveau d’alimentation mais l’afficheur de temps est remplacé par
--:--
et l’icône Sablier disparaît.
L’ajustement manuel de la luminosité sera encore possible. Si la luminosité est augmentée, alors le mode automatique est quitté et un nouveau temps de fonctionnement est calculé sur la base des nouvelles
conditions de fonctionnement. Le niveau de batterie et l’afficheur reviendront en mode IC normal, (ou en mode prédéfini si le bouton inférieur gauche a été utilisé). Si la luminosité est réduite, l’unité restera en mode
continu (et la batterie se chargera lentement).
C
Si le chargeur est déposé, l’unité reviendra en fonctionnement normal et
l’afficheur de temps de fonctionnement indiquera le temps résiduel pour le réglage sélectionné.
Una vez conectado, la configuración de fábrica se desactiva. Para encender el sistema de iluminación puedes pulsar el botón de encendido/apagado de la aplicación o deslizar la barra de intensidad hacia la derecha hasta alcanzar el nivel deseado. La aplicación se sincroniza con el panel de control de la 9490; cuando regulas la barra de la aplicación, el tiempo de autonomía se ajusta en la pantalla del panel.
La aplicación seguirá conectada a menos que la cierres o te salgas del rango, y entonces el icono del Bluetooth de la pantalla del sistema de iluminación pasará de azul a blanco. Puedes desactivar el control desde
la aplicación activando el panel de control de la linterna.
El Bluetooth puede desactivarse manualmente. Para ello, enciende la linterna, mantén pulsado el botón de la parte inferior izquierda del panel de control hasta que el icono del Bluetooth desaparezca de la parte
inferior izquierda de la pantalla. Para volver a activarlo, mantén pulsado el mismo botón hasta que reaparezca el icono.
Fonctionnement Bluetooth
D
Le 9490 est équipé d’une fonctionnalité Bluetooth permettant de l’utiliser via l’App RALS Pelican
(Systèmes d’éclairage pour zones inaccessibles).
Pour télécharger l’App RALS, se rendre sur l’App store et rechercher Pelican RALS. Une fois installée,
l’icône de l’application doit apparaître à l’écran. Noter que cette application requiert iOS 7.0 ou ultérieure.
Elle est compatible uniquement avec iPhone, iPad et iPod Touch.
Modo intermitente
Le Bluetooth est actif par défaut quand la batterie est branchée au 9490. A l’ouverture de l’application, votre
9490 doit apparaitre sous l’intitulé « Found » (Trouvé) comme dans l’exemple suivant : (C) 9490 000001 (les dix derniers
chiffres sont votre numéro de série unique). En sélectionnant le numéro de série, l’application doit se connecter au
RALS 9490 et le numéro de série doit apparaître sous l’intitulé « Connected » (Connecté) sur l’écran de l’App.
Le logo Bluetooth sur l’écran du 9490 doit alors passer du blanc au bleu. (D) Il est possible de brancher plusieurs unités 9480/9490 mais elles ne fonctionne qu’une par une.
Batería
Une fois branchée, le réglage par défaut est toujours désactivé. Pour l’allumer, vous pouvez soit presser le commutateur « marche/arrêt » sur l’écran de l’application, soit coulisser le curseur d’intensité vers la droite
jusqu’à atteindre l’intensité lumineuse souhaitée. L’App fonctionne en association avec l’écran du clavier de votre 9490 ; en réglant le curseur sur l’écran de l’application, le temps de fonctionnement résiduel s’ajuste
à l’écran de clavier.
L’application reste connectée jusqu’à sa fermeture, ou être hors de portée* ; le logo Bluetooth sur l’écran du clavier de 9490 passe alors du bleu au blanc. Il est possible de contourner la commande d’application
au moyen du clavier du 9490, si souhaité.
* El rango varía según el entorno en el que se esté utilizando el sistema. 1. M
antener pulsado el botón de encendido durante 3 segundos hasta que parpadee. A continuación seleccionar el nivel de potencia deseado.
2. Para desactivar el modo intermitente, pulsar de nuevo el botón de encendido.
La batería del modelo 9490 es extraíble. De esta manera se puede sustituir por otra
totalmente cargada al momento cuando sea necesario.
Para sacar la batería solo hay que soltar las pestañas y levantarla por el asa. (E, F)
E
F
C
Le Bluetooth peut être désactivé manuellement sur le 9490 en cas de besoin. Pour le désactiver, allumer le 9490, puis presser et maintenir enfoncé le bouton inférieur gauche du clavier jusqu’à disparition du Logo
Bluetooth en bas à gauche de l’écran. Il peut être réactivé en pressant puis maintenant enfoncé encore le même bouton jusqu’à réapparition du logo.
*La portée varie selon l’environnement dans lequel l’unité est utilisée.

© Copyright 2026