
SECURITY® - LiftMaster
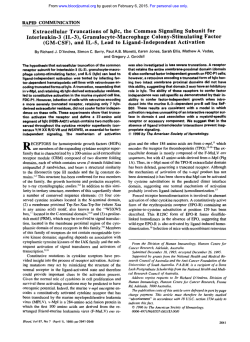
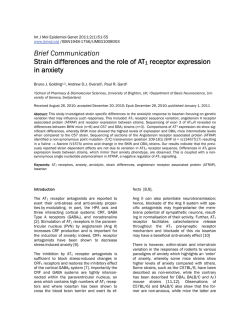
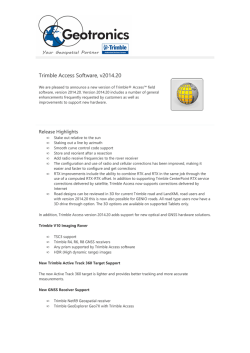
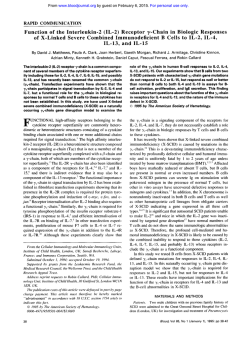
®
SECURITY✚
Universal Receiver
Model 139.53757
USER INSTRUCTIONS
INSTALLATION
1. Unplug the motor unit before proceeding.
2. OPEN RECEIVER: Insert a small screwdriver in slot on
receiver front panel as shown. Twist up actuator cover.
3. CONNECT RECEIVER AND MOTOR UNIT: Remove about
1/4" of insulation from each end of the 2-strand bell wire.
Connect one end to the receiver screw terminals (polarity is
NOT required). Route wire along the channels and out the
bottom as shown.
4. Connect the other end of the bell wire to the two motor unit
terminals labeled “2” (white) and “1” (red), “common” and
“command” or the terminals used for the push button control.
5. Use insulated staples to secure bell wire between receiver
and motor unit. Length of bell wire depends on where the
receiver will be installed. Replace actuator cover.
6. Choose a 120Vac polarized outlet for the receiver which is
OUT OF THE REACH OF CHILDREN. Plug receiver into
selected outlet. Return power to the motor unit.
PROGRAMMING THE REMOTE TO THE RECEIVER
With Security✚®, the code between the remote control and the
receiver changes with each use, accessing over 100 billion new
codes.
You can activate your motor unit with up to 8 Security✚® remote
controls and one Security✚® Keyless Entry.
1. Remove the front panel of receiver case. Re-connect power
to motor unit.
2. Press and release the “SMART” actuator on the receiver. The
learn indicator light will glow steadily for 30 seconds.
3. Within 30 seconds, press and hold the button on the
hand-held remote that you wish to operate your garage door.
The motor unit will now operate when either the receiver
actuator or the remote control push button is pressed.
Repeat Steps 2 and 3 for each remote control that will be used
to operate the garage door motor unit.
To prevent possible SERIOUS INJURY or DEATH from
electrocution:
• Be sure power is NOT connected BEFORE installing the
receiver.
To prevent possible SERIOUS INJURY or DEATH from a
moving gate or garage door:
• Install door control within sight of gate or garage door, out
of reach of children at a minimum height of 5 feet (1.5 m),
and away from all moving parts of gate or door.
• NEVER permit children to operate or play with door control
push buttons or remote control transmitters.
• Activate gate or door ONLY when it can be seen clearly, is
properly adjusted, and there are no obstructions to gate or
door travel.
• ALWAYS keep gate or garage door in sight until completely
closed. NEVER permit anyone to cross path of moving gate
or garage door.
NOTICE TO U. S. CONSUMERS:
Some states prohibit the service or repair of garage door motor units
which cannot be made to comply with the safety standards contained
in UL 325 (1988 revision). In order to comply with both the letter and
the spirit of these laws, this universal remote control converter kit
should not be used with any Sears Craftsman® garage door opener
manufactured prior to April 1, 1982.
Power Indicator Light
Actuator Cover
TO ERASE ALL REMOTE CONTROL CODES
Press and hold the “SMART” actuator on the receiver panel until
the indicator light turns off (about 6 seconds). All transmitter
codes are now erased. Then follow the steps above to
reprogram each remote control.
Bell Wire
Channels
"SMART"
Indicator
Light
PROGRAMMING THE FINGERPRINT KEYLESS ENTRY
TO THE RECEIVER
NOTE: The unit must have an enrolled user before it can be
programmed to the receiver. Due to the 30 second time interval,
a second person may be needed to press the “SMART”
actuator.
1. Remove the front panel of the receiver case. Press and
release the “SMART” actuator on the receiver. The “SMART”
indicator light will glow steady for 30 seconds.
2. Open the Fingerprint Keyless Entry cover and wait for Ready
LED to light.
3. Within 30 seconds of pressing the “SMART” actuator, slowly
and firmly swipe enrolled finger.
NOTE: The Retry LED will light if another swipe is needed.
4. After a passed swipe the Pass LED will light followed by a lit
Send LED. Programming is complete.
5. If the opener does not operate, press and release the
Resend button at 1 second intervals for up to 5 seconds until
the door moves. Programming is complete.
Terminals
Connect Bell Wire
To Garage Door
Opener Terminals
"SMART"
Actuator
Bell Wire
Fingerprint Keyless
Entry
3-Function
Remote Control
Universal Receiver
Select a
push button
ENROLL
SEND
ENROLL
PASS
FAIL
READY
RETRY
NOTICE: To comply with FCC and or Industry Canada (IC) rules, adjustment or modifications of
this receiver and/or transmitter are prohibited, except for changing the code setting or replacing
the battery. THERE ARE NO OTHER USER SERVICEABLE PARTS.
Tested to Comply with FCC Standards FOR HOME OR OFFICE USE. Operation is subject to the
following two conditions: (1) this device may not cause harmful interference, and (2) this device
must accept any interference received, including interference that may cause undesired
operation.
To order replacement parts call:
1-800-4-MY-HOME® (1-800-469-4663)
®
SECURITY✚
Receptor Universal
Modelo 139.53757
ADVERTENCIA
ADVERTENCIA
INSTRUCCIÓNES DEL USUARIO
INSTALACIÓN
1. Desenchufar el abridor antes de proceder.
2. ABRIR EL RECEPTOR: Inserto un destornillador entre el abertura en
el panal frontal de receptor como demostrar. Torcedura arriba el
cubierta de actuador.
3. CONECTAR EL RECEPTOR Y LA UNIDAD DEL MOTOR: Quitar 1/4
pulgadas de aislamindo de los extremos del alambre de timbre.
Conectar un extremo al los tornillos terminados de receptor (polaridad
NO es requerida). Recorrido el alambre entre los canals y fuera de
bajo como demonstrar.
4. Conectar los otros extremos en los dos terminales del abridor
marcado “2” (blanco) y “1” (rojo), “común” y “mando” o los terminales
usado para los controles de botones.
5. Broches aislados para asegurar el cable del timbre entre el receptor y
la unidad del motor. Longitud de alambra son dependiente de adonde
el receptor es instalada. Reconectar el cubierta de actuador.
6. Componer un tomacorriente de 120 tensión polarizadora el receptor
que es FUERA DEL ALCANCE DE LOS NIÑOS. Enchufar el
receptor al un tomacorriente. Reconectar la electricidad la
unidad del motor.
PROGRAMACIÓN DEL CONTROL REMOTO PARA EL
RECEPTOR
Con Security✚®, el código entre el control remoto y el receptor cambia
con cada uso, con acceso a más de 100 billiones de nuevos códigos.
Se puede activar la unidad del motor con hasta 8 controles remoto del
Security✚® y una entrada sin tecla de Security✚®.
1. Quite el panel delantro de la caja del receptor. Reconectar la
electricidad el unidad del motor.
2. Oprimir y soltar el actuador “SMART” en el receptor. La luz
indicadora “SMART” se ilumina continuamente por 30 segundos.
3. Para 30 segundos, oprimir y mantener oprimido el botón en el
remoto manual con el cual sedesea operar la puerta del garaje.
El la unidad del motor opera ahora cuando se oprime el botón en el
receptor o el control remoto.
Repetir los pasos 2 y 3 para cada control remoto que se usa para
operar la unidad del motor de la puerta del garaje.
ADVERTENCIA
Para evitar la posibilidad de sufrir LESIONES GRAVES o INCLUSO LA MUERTE
por electrocución:
• Asegúrese de que la corriente esté desconectada ANTES de instalar el
receptor.
Para evitar la posibilidad de sufrir LESIONES GRAVES o INCLUSO LA MUERTE
causada por una puerta de garaje o compuerta en movimiento:
• Instale el control de la puerta que quede a la vista desde la puerta del garaje,
fuera del alcance de los niños a una altura mínima de 1.5 m (5 pies) y lejos
de las partes móviles de la puerta.
• Mantenga SIEMPRE los controles remotos fuera del alcance de los niños.
NUNCA permita que un niño opere o juegue con los transmisores de control
remoto.
• Accione la puerta o compuerta SÓLO cuando pueda verla bien, esté ajustada
correctamente y no haya obstrucciones que impidan su movimiento.
• Mantenga SIEMPRE la compuerta o puerta del garaje a la vista hasta que
esté completamente cerrada. NUNCA permita que nadie cruce el recorrido de
una puerta o compuerta que está en movimiento.
PRECAUCIÓN
AVISO A LOS CONSUMIDORES ESTADOUNIDENSES:
Algunos estados prohiben el servicio o reparación de abridores de
puertas de cochera que no pueden cumplir las normas de seguridad
contenidas en UL 325 (revisión de 1988). A fin de cumplir con el texto
y la intención de estas leyes, este control remoto universal kit de
conversión no debe utilizarse con ningún abridor de puertas de
cochera Sears Craftsman® fabricado antes del 1 de abril de 1982.
Luz indicadora de encendido
Terminales
Tapa del accionador
del receptor
Canales del alambre
de timbre
Indicador
de luz
"SMART"
Conectar
el alambre de timbre
a los terminales
del abridor de puerta
PROGRAMACIÓN DE LLAVE DIGITAL DE HUELLA DIGITAL
PARA EL RECEPTOR
Actuador
"SMART"
(aprender)
NOTA: La unidad debe tener un usuario registrado antes de que pueda
programarse el receptor. Debido al intervalo de 30 segundos, tal vez
sea necesaria una segunda persona para oprimir el botón de “SMART”.
1. Quite el panel delantro de la caja del receptor. Oprimir y soltar el
actuador “SMART” en el receptor. La luz indicadora “SMART” se
ilumina continuamente por 30 segundos.
2. Abre la tapa de llave digital de huella digital y espere a que se
encienda el LED Ready.
3. Antes de que transcurran 30 segundos después de haber oprimido
el botón de “SMART”, pase lenta y firmemente el dedo registrado.
NOTA: El LED Retry se encenderá si se necesita otra pasada.
Alambre de timbre
Llave digital de huella digital
Control Remoto
3-Funciones
Receptor Universal
Seleccióne
un botón
ENROLL
SEND
4. Después de una pasada aceptada, se encenderá el LED Pass y
después se encender á el LED Send. La programación está
completa.
ENROLL
PASS
FAIL
READY
RETRY
5. Si el abridor no operer, oprima y suelte el botón Resend a intervalos
de 1 segundo hasta un máximo de 5 segundos, hasta que mueva la
puerta. La programación está completa.
AVISO: Para cumplir con las reglas de la FCC y/o de Canadá (IC), las reglas, ajustes o
modificaciones de este receptor y/o transmisor están prohibidos, excepto por el cambio de la
graduación del código o el reemplazo de la pila. NO HAY OTRAS PIEZAS REPARABLES DEL
USUARIO.
PARA BORRAR TODOS LOS CÓDIGOS DE CONTROL
REMOTOS
Se ha probado para cumplir con las normas de la FCC para USO DEL HOGAR O DE LA OFICINA.
La operación está sujeta a las dos condiciones siguientes:(1) este dispositivo no puede causar
interferencia perjudicial, y (2) este dispositivo debe aceptar cualquier interferencia recibida,
incluyendo la interferencia que puede causar una operación no deseable.
Oprimir y mantener oprimido el actuador “SMART” en el panel receptor
hasta que se apague la luz indicadora (6 segundos aproximadamente).
Todos los códigos del transmisor están ahora borrados. A continuación
seguir los pasos de arriba para reprogramar cada control remoto.
114A3477B
Para pedir repuestos, llame al:
1-800-4-MY-HOME® (1-800-469-4663)
© 2007, Sears, Roebuck and Co./ ® Registered Trademark / ™ Trademark / SM Service Mark of Sears, Roebuck and Co.
® Marca Registrada / ™Marca de Fábrica / SM Marca de Servicio de Sears, Roebuck and Co.

© Copyright 2026