
MUSIK-CENTER FÜR iPHONE/iPOD
D
NL
F
E
I
GB
Musik-Center für iPhone/iPod
Muziekcentrum voor iPhone/iPod
Station d‘accueil pour iPhone/iPod
Centro de música para iPhone/iPod
Centro musicale per iPhone/iPod
Music Center for iPhone/iPod
Bedienungsanleitung/Garantie
Gebruiksaanwijzing
Mode d’emploi
Instrucciones de servicio
Istruzioni per l’uso
Instruction Manual
MUSIK-CENTER
FÜR iPHONE/iPOD
MC 4456 iP
iPhone und iPod sind Schutzmarken der Apple Inc., registriert in den USA und anderen Ländern.
iPhone and iPod are trademarks of Apple Inc., registered in the USA and other countries.
05
16
25
34
43
52
2
Inhalt
Deutsch
Español
Inhalt
Übersicht der Bedienelemente......................................Seite
Wandmontage..................................................................Seite
Bedienungsanleitung.......................................................Seite
Technische Daten..............................................................Seite
Garantie...............................................................................Seite
Entsorgung.........................................................................Seite
Contenidos
3/4
4
5
13
14
15
Nederlands
3/4
4
34
42
42
Italiano
Inhoud
Overzicht van de bedieningselementen..........................Blz
Wandmontage......................................................................Blz
Gebruiksaanwijzing...............................................................Blz
Technische specificaties.......................................................Blz
Verwijdering............................................................................Blz
Indicación de los elementos demanejo....................Página
Montaje en pared..........................................................Página
Manual del usuario........................................................Página
Especificaciones técnicas.............................................Página
Eliminación......................................................................Página
Contenuto
3/4
4
16
24
24
Elementi di comando....................................................Pagina
Installazione a parete.....................................................Pagina
Manuale dell'utente.......................................................Pagina
Specifiche tecniche........................................................Pagina
Smaltimento....................................................................Pagina
Français
English
Sommaire
Contents
Liste des différents éléments de commande..............Page 3/4
Montage mural..................................................................Page 4
Mode d’emploi..................................................................Page 25
Données techniques........................................................Page 33
Élimination..........................................................................Page 33
Location of Controls.........................................................Page
Wall mounting...................................................................Page
User manual.......................................................................Page
Technical Specifications...................................................Page
Disposal...............................................................................Page
3/4
4
43
51
51
3/4
4
52
59
60
3
Übersicht der Bedienelemente
Overzicht van de bedieningselementen
Liste des différents éléments de commande
Indicación de los elementos demanejo
Abb. 1 / Fig. 1
Abb. 2 / Fig. 2
Elementi di comando
Location of Controls
4
Übersicht der Bedienelemente
Overzicht van de bedieningselementen
Liste des différents éléments de commande
Indicación de los elementos demanejo
Elementi di comando
Location of Controls
Abb. 3 / Fig. 3
Wandmontage
Wandmontage
Montage mural
Montaje en pared
Abb. 4 / Fig. 4
Installazione a parete
Wall mounting
Deutsch
Bedienungsanleitung
Vielen Dank, dass Sie sich für unser Produkt entschieden
haben. Wir wünschen Ihnen viel Freude mit dem Gerät.
Allgemeine Sicherheitshinweise
Lesen Sie vor Inbetriebnahme dieses Gerätes die Bedienungsanleitung sehr sorgfältig durch und bewahren Sie diese
inkl. Garantieschein, Kassenbon und nach Möglichkeit den
Karton mit Innenverpackung gut auf. Falls Sie das Gerät an
Dritte weitergeben, geben Sie auch die Bedienungsanleitung
mit.
• Um das Risiko von Feuer oder einem elektrischen Schlag
zu vermeiden, sollten Sie das Gerät nicht Regen oder
Feuchtigkeit aussetzen. Das Gerät nicht in unmittelbarer
Nähe von Wasser betreiben (z.B. Badezimmer, Schwimmbecken, feuchte Keller).
• Benutzen Sie das Gerät ausschließlich für den privaten
und den dafür vorgesehenen Zweck. Dieses Gerät ist
nicht für den gewerblichen Gebrauch bestimmt.
• Das Gerät ausschließlich an eine vorschriftsmäßig installierte Steckdose anschließen. Achten Sie darauf, dass die
angegebene Spannung mit der Spannung der Steckdose übereinstimmt.
• Bei Verwendung von externen Netzteilen auf die richtige
Polarität und Spannung achten, Batterien stets richtig
herum einlegen.
• Das Gerät so aufstellen, dass vorhandene Lüftungsöffnungen nicht verdeckt werden.
• Niemals das Gehäuse des Gerätes öffnen. Durch unsachgemäße Reparaturen können erhebliche Gefahren für
den Benutzer entstehen. Bei Beschädigung des Gerätes,
insbesondere des Netzkabels, das Gerät nicht mehr in
Betrieb nehmen, sondern von einem Fachmann reparieren lassen. Netzkabel regelmäßig auf Beschädigungen
prüfen.
• Ein defektes Netzkabel darf nur vom Hersteller, unserem
Kundendienst oder einer ähnlich qualifizierten Person
durch ein gleichwertiges Kabel ersetzt werden, um Gefährdungen zu vermeiden.
• Benutzen Sie das Gerät längere Zeit nicht, ziehen Sie den
Netzstecker aus der Steckdose, bzw. entnehmen Sie die
Batterien.
Diese Symbole können sich ggf. auf dem Gerät befinden
und sollen Sie auf folgendes hinweisen:
Das Blitz-Symbol soll den Benutzer auf Teile im Inneren des Gerätes hinweisen, die gefährlich hohe
Spannungen führen.
Das Symbol mit Ausrufezeichen soll den Benutzer
auf wichtige Bedienungs- oder Wartungs-Hinweise in den Begleitpapieren hinweisen.
5
Geräte mit diesem Symbol arbeiten mit einem
„Klasse 1-Laser“ zur Abtastung der CD. Die eingebauten Sicherheitsschalter sollen verhindern,
dass der Benutzer gefährlichem, für das menschliche Auge nicht sichtbarem Laserlicht ausgesetzt
wird, wenn das CD-Fach geöffnet ist.
Diese Sicherheitsschalter sollten auf keinen Fall überbrückt
oder manipuliert werden, sonst besteht die Gefahr, dass Sie
sich dem Laser-Licht aussetzen.
Symbole in dieser Bedienungsanleitung
Wichtige Hinweise für Ihre Sicherheit sind besonders gekennzeichnet. Beachten Sie diese Hinweise unbedingt, um Unfälle
und Schäden am Gerät zu vermeiden:
WARNUNG:
Warnt vor Gefahren für Ihre Gesundheit und zeigt mögliche
Verletzungsrisiken auf.
ACHTUNG:
Weist auf mögliche Gefährdungen für das Gerät oder
andere Gegenstände hin.
HINWEIS:
Hebt Tipps und Informationen für Sie hervor.
Kinder und gebrechliche Personen
• Zur Sicherheit Ihrer Kinder lassen Sie keine Verpackungsteile (Plastikbeutel, Karton, Styropor etc.) erreichbar
liegen.
WARNUNG!
Lassen Sie kleine Kinder nicht mit Folie spielen. Es
besteht Erstickungsgefahr!
• Dieses Gerät ist nicht dafür bestimmt, durch Personen
(einschließlich Kinder) mit eingeschränkten physischen,
sensorischen oder geistigen Fähigkeiten oder mangels
Erfahrung und/oder mangels Wissen benutzt zu werden,
es sei denn, sie werden durch eine für ihre Sicherheit
zuständige Person beaufsichtigt oder erhielten von ihr
Anweisungen, wie das Gerät zu benutzen ist.
• Kinder sollten beaufsichtigt werden, um sicherzustellen,
dass sie nicht mit dem Gerät spielen.
Spezielle Sicherheitshinweise
Dieses Gerät arbeitet
mit einem Laser der Klasse 1.
6
Deutsch
Übersicht der Bedienelemente
Inbetriebnahme des Gerätes/Einführung
Vorderseite (Abb. 1)
1
STANDBY/ON Taste (Standby/Betrieb)
CD OPEN/CLOSE (öffnen/schließen) CD-Fach
2
3 USB Anschluss
SD/MMC Kartenschlitz
4 VOLUME +/- (Lautstärke) Tasten
5 ID3/iPOD/MEM/C-ADJ. Taste (Speicher/Uhrzeit)
6
iPOD OPEN/CLOSE (öffnen/schließen) DockAnschluss-Fach
7 Lautsprecher
8 CD-Fach
9 LCD-Display
10 IR Sensor für die Fernbedienung
11 STANDBY Kontrollleuchte
12 DAB/FM/AUX Taste
13 CD/iPOD/USB/CARD Taste
14
SCAN/ENTER Taste
(Wiedergabe/Pause/Suchlauf/Bestätigen)
15 /MENU/INFO Taste
16 / SKIP/TUNE SEARCH Tasten
(Suchlauf vorwärts/rückwärts)
17 Dock-Anschluss aus-/einklappen
18 Dock-Anschluss-Fach
• Lesen Sie vor der Inbetriebnahme die Bedienungsanleitung sorgfältig durch!
• Wählen Sie einen geeigneten Standort für das Gerät.
Geeignet wäre eine trockene, ebene, rutschfeste Fläche,
auf der Sie das Gerät gut bedienen können.
• Achten Sie darauf, dass das Gerät ausreichend belüftet
wird!
• Entfernen Sie, falls vorhanden, die Schutzfolie vom
Display.
Rückseite (Abb. 2)
19 Netzschalter
20 Netzkabel
21 FM ANT. Wurfantenne
22 Kopfhöreranschluss
23 LINE IN Anschluss
Fernbedienung (Abb. 3)
1 CD/iPOD/USB/CARD Taste
2 DAB/FM/AUX Taste
3 SELECT/MONO/ST. Taste
4 / FOLDER Tasten (aufwärts/abwärts Album)
5 CLOCK DISP Taste
6 TIMER Taste
7 SLEEP Taste
8 VOLUME +/- (Lautstärke) Tasten
9 INTRO Taste
10 MUTE (Stumm) Taste
11 EQ Taste
12 ID3/iPOD/MEM/C-ADJ. Taste (Speicher/Uhrzeit)
13
/ SCAN/ENTER
(Wiedergabe/Pause / Suchlauf / Bestätigen) Taste
Taste (Radiospeicherplatz/Suchlauf vorwärts)
Taste (Radiospeicherplatz/Suchlauf rückwärts)
/ MENU/INFO (Stopp/Menü) Taste
14 REPEAT Taste (Wiederholen)
15 RANDOM Taste (Zufallswiedergabe)
16 STANDBY/ON Taste
Wandmontage
Sie können das Gerät auch wahlweise an die Wand montieren (Montagezubehör nicht im Lieferumfang enthalten).
ACHTUNG:
Vergewissern Sie sich vorher, ob sich Leitungen in der
Wand verbergen, die Sie beschädigen könnten!
HINWEIS: Kabelreichweite beachten!
Zur Montage des Gerätes muss sichergestellt sein, dass
eine gut zugängliche Steckdose in Reichweite der Zuleitung vorhanden ist.
Die Distanz zwischen den Vorrichtungen für die Wandmontage beträgt 140 mm.
• Bohren Sie in diesem Abstand waagerecht zwei Löcher.
• Versehen Sie die Löcher mit Dübel und Schrauben.
• Drehen Sie die Befestigungsschrauben so weit ein, dass
sie ca. 4 mm aus der Wand hervorstehen.
• Klappen Sie den Standfuß um 90° nach oben (siehe
Seite 4, Abb. 4).
• Hängen Sie das Gerät in die Schrauben ein. Kontrollieren
Sie den sicheren Halt.
Batterien der Fernbedienung einlegen/austauschen
HINWEIS:
Die Lithium-Zelle im Batteriefach der Fernbedienung
wurde für den Transport ggf. mit einer Folie gesichert.
Dies verlängert die Lebensdauer der Batterie. Vor der
ersten Anwendung entfernen Sie bitte diese Folie, um die
Fernbedienung betriebsbereit zu machen.
Bei der Batterie der Fernbedienung handelt es sich um eine
langlebige Lithium-Zelle. Sollte im Laufe der Anwendung die
Reichweite der Fernbedienung nachlassen, gehen Sie bitte
wie folgt vor:
• Öffnen Sie das Batteriefach an der Unterseite der Fernbedienung.
• Ersetzen Sie die Zelle durch eine Batterie der gleichen
Bauart (CR 2032). Achten Sie auf die richtige Polarität.
• Schließen Sie das Batteriefach.
Deutsch
Wird die Fernbedienung längere Zeit nicht benutzt, entnehmen Sie bitte die Batterie, um ein „Auslaufen“ von Batteriesäure zu vermeiden.
•
•
•
•
•
•
•
WARNUNG:
Setzen Sie Batterien keiner hohen Wärme oder dem
direkten Sonnenlicht aus. Werfen Sie Batterien niemals
ins Feuer. Es besteht Explosionsgefahr!
Halten Sie Batterien von Kindern fern. Sie sind kein
Spielzeug.
Öffnen Sie Batterien nicht gewaltsam.
Vermeiden Sie den Kontakt zu metallischen Gegenständen. (Ringe, Nägel, Schrauben usw.) Es besteht
Kurzschlussgefahr!
Durch einen Kurzschluss können sich Batterien stark
erhitzen oder evtl. sogar entzünden. Verbrennungen
können die Folge sein.
Zu Ihrer Sicherheit sollten die Batteriepole beim Transport mit Klebestreifen überdeckt werden.
Falls eine Batterie ausläuft, die Flüssigkeit nicht in die
Augen oder Schleimhäute reiben. Bei Berührung die
Hände waschen, die Augen mit klarem Wasser spülen,
und bei anhaltenden Beschwerden einen Arzt aufsuchen.
ACHTUNG:
Batterien gehören nicht in den Hausmüll. Bitte geben Sie
verbrauchte Batterien bei zuständigen Sammelstellen oder
beim Händler ab.
Stromversorgung
• Stecken Sie den Netzstecker in eine vorschriftsmäßig
installierte Schutzkontaktsteckdose, 230 V, 50 Hz.
• Achten Sie darauf, dass die Netzspannung mit den Angaben auf dem Typenschild übereinstimmt.
• Die Speicherung der Uhrzeit geht verloren, sobald die
Stromzufuhr unterbrochen wurde.
• Schalten Sie das Gerät mit dem Netzschalter (19) auf der
hinteren Unterseite des Gerätes ein.
Automatische Zeiteinstellung
Voraussetzung hierfür ist der Empfang von DAB Sendern.
Nachdem Sie das Gerät zum ersten Mal eingeschaltet
haben, sucht das Gerät automatisch die Uhrzeit. SCAN TIME
erscheint im Display. Empfängt das Gerät an Ihrem Standort
keine DAB Sender, stellen Sie die Uhrzeit manuell ein, wie im
Abschnitt „Manuelle Zeiteinstellung (im Standby)“ beschrieben.
Manuelle Zeiteinstellung (im Standby-Modus)
1. Halten Sie die ID3/iPOD/MEM/C-ADJ. Taste (5/12)
gedrückt. Im Display erscheint die Anzeige „24 HOUR“.
2. Wählen Sie mit den / SKIP/TUNE SEARCH Tasten
(16/13) zwischen der 24 Stunden und 12 Stunden Anzeige. Drücken Sie die ID3/iPOD/MEM/C-ADJ. Taste zum
Bestätigen.
7
HINWEIS: Bei der 12 Stunden Anzeige erscheint
AM = Vormittags, PM = Nachmittags.
3. Drücken Sie die / SKIP/TUNE SEARCH Tasten um die
Stunden einzustellen. Drücken Sie die ID3/iPOD/MEM/
C-ADJ. Taste zum Bestätigen.
4. Um die Minuten einzustellen, drücken Sie die / SKIP/
TUNE SEARCH Tasten.
5. Drücken Sie erneut auf die ID3/iPOD/MEM/C-ADJ. Taste
um die Uhrzeit abzuspeichern.
Transportsicherung CD Fach
• Schalten Sie das Gerät ein, betätigen Sie die
STANDBY/ON Taste (1/16).
• Öffnen Sie das CD Fach (8), indem Sie die CD OPEN/
CLOSE (öffnen/schließen) Taste (2 am Gerät) drücken.
Das CD Fach fährt nach rechts auf.
• Entfernen Sie vor der Inbetriebnahme, wenn vorhanden,
die Transportsicherung aus dem CD-Player.
• Drücken Sie erneut die CD OPEN/CLOSE Taste, um
das CD Fach wieder zu schließen.
HINWEIS:
Das CD Fach kann nicht im iPOD Modus geöffnet werden.
iPod/iPhone Kompatibilität
Aufgrund der vielen verschiedenen iPod- und iPhone Modelle und Generationen, die zurzeit auf dem Markt erhältlich
sind, kann eine volle Kompatibilität nicht gewährleistet werden. Vergewissern Sie sich vor Anschluss Ihres iPod/iPhone
davon, dass dieser eine kompatible Schnittstelle besitzt.
Des Weiteren kann eine volle Kompatibilität der Fernbedienfunktionen nicht garantiert werden. Bedienen Sie daher
ggf. Ihren iPod/iPhone wie gewohnt, während dieses in der
Docking Station steckt.
HINWEIS:
In Abhängigkeit vom Softwarestand Ihres iPhone kann im
Einzelfall die folgende Fehlermeldung im Display erscheinen:
„Dieses Zubehör wurde nicht für die Verwendung mit
dem iPhone entwickelt. Es ist möglich, dass Störgeräusche
auftreten und die Signalstärke reduziert wird.“
Drücken Sie in diesem Fall „OK“.
Allgemeine Bedienung
HINWEIS:
Einige Tasten finden Sie sowohl am Gerät als auch auf
der Fernbedienung. Gleichlautende Tasten bewirken
die gleiche Funktion.
8
Deutsch
STANDBY/ON (1/16)
Schalten Sie das Gerät mit der STANDBY/ON Taste in den
Standby-Betrieb (die Uhrzeitanzeige erscheint). Drücken Sie
diese Taste erneut, schaltet sich das Gerät wieder ein.
HINWEIS:
• Drücken Sie im Standby-Modus eine beliebige Taste,
um die Uhrzeit für 10 Sekunden anzuzeigen.
• Befindet sich das Gerät im CD/USB/SD/iPOD Modus,
aber wird nicht betrieben, schaltet sich das Gerät nach
15 Minuten automatisch in den Standby-Modus.
Lautstärke (4/8)
Zum Einstellen der individuellen Lautstärke. Im Display
erscheint „VOL SETTING“, „VOL“ und eine Ziffer. Dies
entspricht der eingestellten Lautstärke bis „VOL MAX“ bzw.
„VOL MIN“.
Kopfhörerbuchse (22)
Benutzen Sie für den Kopfhörerbetrieb einen Kopfhörer mit
einem 3,5 mm Stereo-Klinkenstecker, den Sie in den Kopfhöreranschluss stecken. Die Lautsprecher werden abgeschaltet.
Infrarot-Fernbedienung
Zur kabellosen Bedienung aus einer Entfernung von bis zu
5 Metern. Lässt diese Reichweite nach, müssen die Batterien
ausgetauscht werden. Achten Sie bei der Bedienung auf
freie Sicht zwischen Fernbedienung und dem Sensor (10) am
Gerät.
USB Anschluss
Dieses Gerät ist nach den letzten Stand der technischen
Entwicklungen im USB Bereich entwickelt worden. Die große
Anzahl von verschiedenen USB Speichermedien jeglicher
Art die heute angeboten werden, erlauben es leider nicht,
eine volle Kompatibilität mit allen USB Speichermedien zu
gewährleisten. Aus diesem Grund kann es in seltenen Fällen
zu Problemen bei der Wiedergabe von USB Speichermedien
kommen. Dies ist keine Fehlfunktion des Gerätes.
1. Öffnen Sie die Abdeckklappe (3) an der Oberseite des
Gerätes.
2. Wählen Sie nun mit der CD/iPOD/USB/CARD Taste (13/1)
den Modus USB aus. USB MODE erscheint im Display.
3. Stecken Sie ein USB Speichermedium direkt in die
Buchse ein. Es wird kurz USB READING und dann die
Gesamtanzahl der Ordner (F) und die Anzahl der Titel (T)
angezeigt.
4. Falls die Wiedergabe nicht automatisch startet: Drücken
Sie die Taste
SCAN/ENTER (14/13), um die Musikdaten wiederzugeben.
Für die Bedienung richten Sie sich bitte nach dem Abschnitt
„CDs/MP3 abspielen“.
ACHTUNG:
Bevor Sie das USB Speichermedium entfernen, schalten
Sie das Gerät mit der DAB/FM/AUX Taste in den RADIO
Betrieb.
SD/MMC-Kartenschlitz
1. Öffnen Sie die Abdeckklappe (3) an der Oberseite des
Gerätes.
2. Wollen Sie Daten auf einer SD/MMC-Card abspielen,
stecken Sie diese in die dafür vorgesehene Öffnung.
3. Wählen Sie nun mit der CD/iPOD/USB/CARD Taste
(13/1) den Modus CARD aus. CARD MODE erscheint
im Display. Es wird kurz CARD READING und dann die
Gesamtanzahl der Ordner (F) und die Anzahl der Titel (T)
angezeigt.
4. Falls die Wiedergabe nicht automatisch startet: Drücken
SCAN/ENTER (14/13), um die MusikSie die Taste
daten wiederzugeben.
Für die Bedienung richten Sie sich bitte nach dem Abschnitt
„CDs/MP3 abspielen“.
LINE IN Buchse
Zum Anschluss von analogen Wiedergabegeräte. Über diese
Buchse können Sie auch den Ton anderer Wiedergabegeräte
wie MP3-Player, CD-Player usw. über die Lautsprecher hören.
1. Schließen Sie bitte das externe Gerät, mit einem 3,5 mm
Stereo-Klinkenstecker, an die LINE IN Buchse (23) an.
2. Wählen Sie nun mit der DAB/FM/AUX Taste (12/2) den
Modus AUX aus. AUX MODE erscheint im Display.
3. Über die Lautsprecher hören Sie die Tonwiedergabe aus
dem externen Gerät, mit den VOLUME +/- Tasten (4/8)
können Sie die Lautstärke verändern. Die CD Tasten sind
nicht funktionsfähig.
4. Die weitere Vorgehensweise entnehmen Sie bitte der
Bedienungsanleitung der externen Tonquelle.
HINWEIS:
Stellen Sie die Lautstärke des externen Gerätes auf eine
hörgerechte Lautstärke.
Werkseinstellung wiederherstellen
Es werden alle gespeicherten Radiosender und die Uhrzeit
gelöscht.
1. Schalten Sie das Gerät in den Standby-Modus.
2. Halten Sie die /MENU/INFO Taste (15/13) ca. 3 Sekunden gedrückt. „SYSTEM RESET PLEASE WAIT“ erscheint
im Display. Wurde der Reset erfolgreich durchgeführt,
erscheint im Display „SYSTEM RESET OK“.
3. Anschließend sucht das Gerät nach der Uhrzeit. SCAN
TIME erscheint im Display.
Deutsch
Radio hören
FM Sender suchen
1. Drücken Sie die DAB/FM/AUX Taste (12/2) so oft, bis im
Display „RADIO INITIALIZE PLEASE WAIT“ erscheint.
2. Sie haben zwei Möglichkeiten einen Sender abzustimmen:
- Drücken Sie die / SKIP/TUNE SEARCH Tasten
(16/13).
- Drücken Sie die
SCAN/ENTER (14/13) Taste,
sucht das Gerät bis zum nächsten Radiosender.
Halten Sie diese Taste gedrückt, sucht das Gerät bis
zum vorherigen Radiosender.
3. Ist der Empfang zu schwach und rauscht der empfangene Sender, versuchen Sie durch Drehen und ab- bzw.
aufwickeln der Antenne den Empfang zu verbessern.
Bei FM-Sendern können Sie mit der SELECT/MONO/ST
Taste (3 an der FB) zwischen AUDIO MODE: MONO und
AUTO (Stereo) Empfang umschalten. Bei schlechtem
Empfang empfehlen wir auf MONO zu schalten.
DAB Sender suchen
Digital Audio Broadcasting (DAB) ist ein digitaler Übertragungsstandard für terrestrischen Empfang von Digital Radio.
Eine Liste der in Deutschland zu empfangenden Radiosender
ist im Internet unter www.digitalradio.de verfügbar.
1. Drücken Sie die DAB/FM/AUX Taste (12/2) so oft, bis im
Display „WELCOME TO DIGITAL RADIO“ erscheint.
2. Drücken Sie die
SCAN/ENTER (14/13) Taste, das
Gerät startet einen automatischen Sendersuchlauf.
„AUTOTUNE FULL SCAN“ erscheint kurz im Display.
Anschließend sucht das Gerät nach den zu empfangenden Radiosendern.
3. Mit den / SKIP/TUNE SEARCH Tasten (16/13) können
Sie den nächsten bzw. vorherigen Sender anwählen.
4. Ist der Empfang zu schwach und „blubbert“ der empfangene Sender, versuchen Sie durch Positionsänderung der
Antenne den Empfang zu verbessern.
HINWEIS:
• Für einen optimalen DAB Empfang empfehlen wir die
Wurfantenne vertikal auszurichten.
• Ein Umschalten zwischen Mono und Stereo ist bei DAB
nicht möglich.
• Um eine DAB Frequenz manuell einzustellen, halten
Sie die SELECT/MONO/ST Taste gedrückt. Im Display
erscheint kurz die Meldung MANUAL TUNE. Stellen
Sie mit den / SKIP/TUNE SEARCH die gewünschte
Frequenz ein. Bestätigen Sie anschließend mit der
SELECT/MONO/ST Taste.
9
DAB Zusatzinformationen anzeigen
Im DAB Modus können Sie sich die folgenden Zusatzinformationen anzeigen lassen, sofern vom Radiosender ausgestrahlt. Drücken Sie dazu die MENU/INFO Taste (15/13).
• <PROGRAMME TYP>
Hier wird Ihnen die Sparten-Zugehörigkeit des Senders
angezeigt (z.B. Pop-Musik, Nachrichten etc.).
• <DLS>
kurz für Dynamic Label Segment. Hierbei handelt es
sich um digitale Begleitdaten. Diese Inhalte können z.B.
Informationen zum Sender oder der gerade gespielte
Musiktitel und Interpret sein.
• <Ensemble Name>
Anzeige des Namens der Sendergruppen
(z.B. DR Deutschland).
• <Ensemble Freq.>
Frequenz des aktuellen Radiosenders.
• <Audio Bit Rate>
Anzeige der digitalen Audio Bit Rate.
• <Sig. Strenght>
Anzeige der empfangenen Signalstärke.
• <Time/Date>
Anzeige der Uhrzeit und des aktuellen Datums.
HINWEIS:
Wird hinter dem Sendernamen das Symbol „>“ angezeigt,
können Sie sich bei Anzeige einer anderen Information kurz
die Sparten-Zugehörigkeit anzeigen lassen. Drücken Sie
hierfür die SELECT/MONO/ST Taste.
Sender abspeichern
1. Haben Sie den gewünschten Sender gefunden, halten
Sie die ID3/iPOD/MEM/C-ADJ. Taste (5/12) gedrückt.
Bei FM Sendern: Im Display erscheint die aktuell abgespeicherte Radiofrequenz und die Speicherplatznummer
blinkt.
Bei DAB Sendern: Im Display erscheint bei noch leeren
Speicherplätzen „Preset empty“ und die Speicherplatznummer blinkt.
2. Zum Wählen des Programmplatzes, drücken Sie die
/ SKIP/TUNE SEARCH Tasten (16/13).
3. Zum Abspeichern, drücken Sie die ID3/iPOD/MEM/CADJ. Taste.
Gespeicherte Sender anwählen
1. Drücken Sie die ID3/iPOD/MEM/C-ADJ. Taste.
2. Wählen Sie mit den / SKIP/TUNE SEARCH Tasten
den gewünschten Speicherplatz aus.
3. Drücken Sie erneut die ID3/iPOD/MEM/C-ADJ. Taste,
um den gewählten Radiosender wiederzugeben.
10
Deutsch
Musik vom iPod/iPhone wiedergeben
iPod/iPhone Ladefunktion
(iPod/iPhone nicht im Lieferumfang enthalten)
Haben Sie einen iPod/iPhone auf dem Dock Anschluss aufgesteckt, so wird der Akku des iPod/iPhone geladen. Hierfür
muss das Gerät ans Stromnetz angeschlossen sein.
1. Drücken Sie die CD/iPOD/USB/CARD Taste (13/1) so oft,
bis im Display „NO iPOD“ erscheint.
2. Drücken Sie die iPOD OPEN/CLOSE (öffnen/schließen) Taste (6 am Gerät), um das Dock-Anschluss-Fach (18)
zu öffnen. Das CD Fach fährt nach links auf.
HINWEIS:
Das Dock-Anschluss-Fach kann nicht im CD Modus
geöffnet werden.
3. Drücken Sie die Taste (17), um den Dock-Anschluss
auszuklappen.
4. Sofern mit Ihrem iPod mitgeliefert, stecken Sie den
Adapter auf den Dock Anschluss. Nur mit aufgestecktem
Adapter kann einen korrekter Sitz des iPod gewährleisten
werden.
5. Stecken Sie einen iPod/iPhone auf den Dock Anschluss.
ACHTUNG:
Achten Sie darauf, dass Sie Ihren iPod/iPhone gerade
auf den Anschluss stecken. Verbiegen oder kippen Sie
den iPod/iPhone nicht während dieser auf dem iPod/
iPhone Anschluss steckt. Dies könnte zur Beschädigung
des Steckplatzes oder des iPod/iPhone führen.
6. Drücken Sie erneut auf die Taste (17), um den DockAnschluss einzuklappen.
HINWEIS:
Ist der Dock-Anschluss nicht eingeklappt, kann das
Dock-Anschluss-Fach nicht geschlossen werden. Die
Meldung DOOR KEY LOCK erscheint im Display.
7. In Abhängigkeit vom iPod/iPhone Modell entriegeln Sie
zuerst die Tastensperre und starten die Musikwiedergabe
SCAN/ENTER Taste (14/13).
ggf. mit der
8. Schließen Sie das Dock-Anschluss-Fach wieder. Drücken
Sie hierfür erneut auf die iPOD OPEN/CLOSE Taste.
9. Für die weitere Bedienung beachten Sie bitte die Bedienungsanleitung Ihres iPod/iPhone.
ACHTUNG:
Stoppen Sie die Wiedergabe, bevor Sie den iPod/iPhone
vom Anschluss abstecken, da der iPod/iPhone sonst Schaden nehmen könnte.
HINWEIS:
Geht bei der Musikwiedergabe eines aufgesteckten iPhone
ein Anruf ein, stoppt das Gerät mit der Wiedergabe und
der Klingelton ist hörbar.
HINWEIS:
• Sofern mit Ihrem iPod mitgeliefert, verwenden Sie den
Steckplatzadapter, um den korrekten Sitz des iPod zu
gewährleisten.
• Nicht alle iPod/iPhone Generationen unterstützen die
Ladefunktion.
• Die Dauer des Ladevorgangs ist abhängig vom verwendeten iPod/iPhone und dessen Betriebszustand.
CDs/MP3 abspielen
So geben Sie eine CD wieder
1. Drücken Sie die CD/iPOD/USB/CARD Taste (13/1) so oft,
bis im Display „CD MODE“ erscheint.
2. Drücken Sie die CD OPEN/CLOSE (öffnen/schließen)
Taste (2 am Gerät), um das CD-Fach (8) zu öffnen. Das CD
Fach fährt nach rechts auf.
HINWEIS:
Das CD Fach kann nicht im iPOD Modus geöffnet
werden.
3. Legen Sie eine Audio CD mit dem Aufdruck nach vorne
so auf den Zentrierkegel, dass die CD mechanisch einrastet. Schließen Sie dann den CD Fachdeckel, indem Sie
erneut die CD OPEN/CLOSE Taste drücken.
4. Bei einer AUDIO CD:
Auf dem Display erscheint „DISC CD“ die Anzahl der
Titel und die Gesamtlaufzeit. Falls die Wiedergabe nicht
SCAN/ENTER
automatisch startet: Drücken Sie die
Taste (14/13), um die CD wiederzugeben. Die CD wird
vom ersten Titel an abgespielt. Das aktuelle Lied und die
abgelaufene Spielzeit werden im Display angezeigt.
Bei MP3 oder einer CD im MP3 Format:
Auf dem Display erscheint „STOP“, die Anzahl der
Ordner z.B. F--04 und die Gesamtzahl der Titel
(z.B. T--126). Falls die Wiedergabe nicht automatisch
startet: Drücken Sie die
SCAN/ENTER Taste, um die
CD wiederzugeben. Die CD wird vom ersten Titel, und
dem ersten Ordner, an abgespielt. Das aktuelle Lied, der
aktuelle Ordner, die abgelaufene Spielzeit und „DISC
MP3“ werden im Display angezeigt. Mit den FOLDER
oder FOLDER Tasten (5 an der FB) können Sie die
einzelnen Ordner anwählen.
5. Um eine CD zu entnehmen, drücken Sie bitte die
MENU/INFO Taste (15) (13 an der Fernbedienung),
öffnen das CD-Fach mit der CD OPEN/CLOSE (öffnen/
schließen) Taste und heben die CD vorsichtig ab.
Deutsch
Halten Sie den CD-Deckel stets geschlossen.
HINWEIS:
• Bei CDs im MP3 Format, mit Ordner, erscheint beim
Wechsel in einen anderen Ordner 001 für das erste Lied
des neuen Ordners.
• Wenn eine Disk falsch herum eingelegt wird, bzw. keine
Disk eingelegt ist, leuchtet die Meldung
„CD--READING“, und „NO DISC“ (keine Disk) erscheint auf dem Display.
• Die Wiedergabe anwenderseitig erstellter CD kann
durch die Vielzahl der verfügbaren Software und CDMedien nicht garantiert werden.
Beschreibung der Bedientasten
SCAN/ENTER (9/14)
Sie können die Wiedergabe kurz unterbrechen und wieder
starten. Im Display blinkt die abgelaufene Spielzeit. Nochmaliges Drücken der Taste setzt die Wiedergabe an derselben Stelle fort.
Im iPOD Modus:
• Drücken Sie zuerst die ID3/iPOD/MEM/C-ADJ. Taste, um
das iPod-Menü zu aktivieren. iPOD MENU erscheint im
Display.
• Drücken Sie nun die
SCAN/ENTER Taste, um eine
Funktion zu aktivieren bzw. um das nächste Menü anzeigen zu lassen.
Im DAB Modus:
Startet den automatischen Sendersuchlauf (AUTOTUNE
FULL SCAN).
/ SKIP/TUNE SEARCH (16/14)
Bei laufender Audio-CD, MP3, einer CD im MP3 Format oder
im iPOD Modus:
Mit SKIP/TUNE SEARCH können Sie zum nächsten bzw.
übernächsten Titel springen usw. Halten Sie die Taste gedrückt, setzt ein Musiksuchlauf ein.
Die SKIP/TUNE SEARCH Taste können Sie wie folgt bedienen:
1 x drücken = Beginnt das aktuelle Lied wieder von vorne.
2 x drücken = Springt zum vorherigen Titel.
3 x drücken = Spielt ein Lied davor usw. Halten Sie die
Taste gedrückt, setzt ein Musiksuchlauf ein.
Im iPOD Modus:
• Drücken Sie zuerst die ID3/iPOD/MEM/C-ADJ. Taste, um
das iPod-Menü zu aktivieren. iPOD MENU erscheint im
Display.
• Drücken Sie nun die / SKIP/TUNE SEARCH Tasten,
um sich im iPod/iPhone Menü hoch-/bzw. runter zu
bewegen.
11
Im Radiobetrieb:
Zum Abstimmen des gewünschten Radiosenders. Und in
Verbindung mit der zuvor gedrückten ID3/iPOD/MEM/
C-ADJ. Taste zum Anwählen der gespeicherten Radiosender.
MENU/INFO (15/13)
Die CD bzw. das Musikstück wird angehalten.
Im iPOD Modus:
• Drücken Sie zuerst die ID3/iPOD/MEM/C-ADJ. Taste, um
das iPod-Menü zu aktivieren. iPOD MENU erscheint im
Display.
• Drücken Sie nun die MENU/INFO Taste, um das iPod/
iPhone Menü aufzurufen bzw. in das vorherige Menü
zurückzukehren.
HINWEIS:
Das Musik App muss hierfür bereits gestartet sein.
Im DAB Modus:
Zum Anzeigen von zusätzlichen Informationen. Siehe
Abschnitt „Radio hören“ „DAB Zusatzinformationen
anzeigen“.
MUTE (10 an der FB)
Dient zum schnellen Abstellen der Lautstärke. Die Anzeige
„MUTE ON“ blinkt im Display. Zum Beheben dieser Funktion, drücken Sie erneut die MUTE Taste.
EQ (11 an der FB)
(Voreingestellte Equalizer-Funktion). Es stehen verschiedene
Sound Modi zur Verfügung (FLAT, CLASSIC, ROCK, POP,
JAZZ).
HINWEIS: Bei iPod/iPhone Musikwiedergabe
Verändern Sie ggf. auch die EQ Einstellung in Ihrem iPod/
iPhone, um einen optimalen Klang zu erzeugen.
SELECT/MONO/ST (3 an der FB)
Im FM-Radiobetrieb:
Zum Umschalten zwischen STEREO und MONO.
Im DAB Modus:
Halten Sie die Taste gedrückt, um einen DAB Sender manuell
einzustellen.
REPEAT (14 an der FB)
1 x drücken:
(REP_1 leuchtet) Das aktuelle Lied wird
ständig wiederholt.
2 x drücken:
(REP_ALL leuchtet) Die komplette CD wird
ständig wiederholt.
3 x drücken:
Alle Funktionen sind aufgehoben. Der
normale Abspielbetrieb wird fortgesetzt.
12
Deutsch
Nur für MP3‘s und CD‘s im MP3-Format:
1 x drücken:
Das aktuelle Lied wird ständig wiederholt (im
Display erscheint REP_1).
2 x drücken:
Die komplette CD wird ständig wiederholt
(im Display erscheint REP_ALL).
3 x drücken:
Der angewählte Ordner der MP3 CD wird
ständig wiederholt (im Display erscheint
REP_ALBUM). Mit den FOLDER Tasten
(4 an der FB) können Sie die einzelnen
Ordner anwählen.
4 x drücken:
Die Funktion wird deaktiviert und die CD
wird im normalen Modus abgespielt.
RANDOM (15 an der FB)
Im Display erscheint die Anzeige „RANDOM“ und die erste
Titelnummer, welche als erste gespielt wird. Alle Titel werden
nacheinander in einer zufälligen Reihenfolge wiedergegeben.
FOLDER (4 an der FB)
Bei MP3 oder einer CD im MP3 Format:
Drücken Sie diese Tasten, während der Wiedergabe, um
einen Ordner nach oben bzw. nach unten zu wechseln. Die
Anzeige, z.B. ALBUM 02, wird kurz angezeigt. Anschließend
beginnt selbsttätig die Wiedergabe der MP3 CD. Wird die
Taste im Stopp-Modus gedrückt, erscheint ebenfalls kurz die
Anzeige im Display. Starten Sie danach die Wiedergabe mit
der
SCAN/ENTER Taste.
SLEEP (7 an der FB)
Hier wird bei eingeschaltetem Gerät in 10-Minuten-Schritten
von 90 bis 10 Minuten der Zeitraum eingestellt, nachdem sich
das Gerät in die Betriebsbereitschaft (Standby) schaltet. Die
Taste so oft drücken, bis die gewünschte Dauer im Display
angezeigt wird. Bei aktivierter Funktion wird die noch verbleibende Zeit ca. alle 10 Sekunden im Display eingeblendet.
Das Gerät schaltet nach der eingegebenen Zeit automatisch
ab.
Um die Funktion wieder abzuschalten, drücken Sie die SLEEP
Taste so oft, bis keine Anzeige mehr im Display angezeigt
wird.
TIMER (6 an der FB)
Sie können das Gerät so einstellen, das es sich zu einer
bestimmten Uhrzeit ein und wieder ausschaltet.
1. Schalten Sie das Gerät mit der STANDBY/ON Taste in
den Standby-Betrieb (die Uhrzeitanzeige erscheint).
2. Halten Sie die TIMER Taste gedrückt, bis die Anzeige
„ON TIME“ im Display erscheint.
• Sie können nun nacheinander mit den / SKIP/
TUNE SEARCH Tasten (16/13) die Einstellungen für
die Einschaltstunden, Einschaltminuten, Ausschaltstunden, Ausschaltminuten, den Einschaltmodus und
die Einschaltlautstärke vornehmen.
• Bestätigen Sie Ihre Eingabe jeweils mit der TIMER
Taste. Die aktuell einzustellende Anzeige blinkt im
Display.
HINWEIS:
Wird innerhalb von ca. 5 Sekunden keine Taste betätigt,
schaltet das Gerät in den Standby-Betrieb zurück ohne
die Eingaben zu speichern.
3. Nachdem Sie die Einschaltlautstärke ausgewählt haben,
drücken Sie abschließend erneut die TIMER Taste. Die
Einstellungen werden hintereinander im Display angezeigt. Das Gerät schaltet wieder in den Standby-Betrieb.
„ “ erscheint im Display und der Timer ist aktiviert.
Nach Erreichen der eingestellten Uhrzeit schaltet sich das Gerät im gewählten Modus ein. Die Lautstärke steigt langsam
auf die ausgewählte Lautstärke an.
Zum Deaktivieren des Timers drücken Sie die TIMER Taste.
Im Display wird kurz TIME OFF angezeigt. Die Anzeige „ “
im Display erlischt.
HINWEIS:
Drücken Sie bei deaktivierten Timer die TIMER Taste,
erscheint kurz TIME ON im Display. Es werden Ihnen die
aktuell eingestellten Einstellungen angezeigt. Anschließend erscheint das Symbol „ “ im Display und der Timer
ist aktiviert.
ID3/iPOD/MEM/C-ADJ. (5/12)
Dient zur Einstellung der Uhrzeit, Senderspeicherung und
programmierte Wiedergabe.
Bei MP3‘s oder einer CD im MP3 Format:
Bei gespeicherter ID-3 Tag Information erscheint diese im
Display als Laufband. Drücken Sie die Taste erneut, um die
Funktion zu deaktivieren.
CLOCK DISP (5 an der FB)
Drücken Sie diese Taste, um sich die Uhrzeit für 10 Sekunden
anzeigen zu lassen.
Programmierte Wiedergabe
Lässt die Programmierung einer beliebigen Titelfolge zu.
(Nur im CD/USB/CARD Modus)
1. Drücken Sie die MENU/INFO Taste (15/13).
2. Drücken Sie die ID3/iPOD/MEM/C-ADJ. Taste (5/12).
Die Anzeige MEMORY, P-01 (Speicherplatz) erscheint
und T-000 (Titel) blinkt im Display. Wählen Sie mit den
/ SKIP/TUNE SEARCH Tasten (16/13) den gewünschten Titel aus und drücken Sie erneut die ID3/iPOD/
MEM/C-ADJ. Taste. Die Anzeige im Display wechselt auf
Speicherplatz P-02.
Deutsch
3.
4.
5.
6.
7.
Bei MP3’s oder CD‘s im MP3 Format:
Die Ordner Anzeige „F-000“, neben der Anzeige
MEMORY, blinkt im Display. Wählen Sie mit den
FOLDER Tasten (4 an der FB) zuerst den gewünschten Ordner aus. Bestätigen Sie die Ordnerwahl mit der
ID3/iPOD/MEM/C-ADJ. Taste.
Wählen Sie mit den / SKIP/TUNE SEARCH Tasten
den nächsten Titel aus und drücken Sie erneut die ID3/
iPOD/MEM/C-ADJ. Taste. Wiederholen Sie den Vorgang, bis Sie alle Titel ausgewählt haben.
Drücken Sie die
SCAN/ENTER Taste (14/13). Die
Wiedergabe wird gestartet. Im Display wird die erste
gewählte Titelnummer angezeigt.
Drücken Sie einmal die MENU/INFO Taste, wird die
Wiedergabe gestoppt, das Programm bleibt jedoch
erhalten.
Zur erneuten Wiedergabe des Programms drücken Sie
die
SCAN/ENTER Taste.
Zum Löschen des Programms drücken Sie 2x die
MENU/INFO Taste. Die Anzeige MEM erlischt.
Das Gerät stoppt automatisch, nachdem alle programmierten Titel wiedergegeben wurden. Die programmierte
Reihenfolge bleibt im Speicher enthalten bis Sie in den
anderen Modus wechseln, oder die CD aus dem CD Fach
entnommen wird bzw. das Gerät ausgeschaltet wird.
Sie haben die Möglichkeit die programmierten Titel mit der
REPEAT-Funktion zu kombinieren. Nachdem Sie programmiert und das Gerät gestartet haben, drücken Sie bitte die
REPEAT Taste (14 an der FB) bis zu 3 x und die Funktionen
können, wie unter Abschnitt „REPEAT“ beschrieben, angewendet werden.
Wiedergabe von Musik im MP3 Format
Sie haben die Möglichkeit mit diesem Gerät Musikstücke im
MP3 Format wiederzugeben. Das Gerät unterstützt außerdem die gängigen CD Typen: CD, CD-RW, CD-R.
Sie können mit Ihrem Gerät MP3 CDs abspielen. Auf diesen
CDs können bis zu 200 Titel verdichtet abgespeichert
werden. Ihr Gerät erkennt eine MP3 CD automatisch (im
Display erscheint die Gesamtzahl der Titel und Ordner). Zum
Abspielen dieser CDs gehen Sie bitte vor, wie unter CDs/
MP3 abspielen beschrieben. Die Programmierung von Titeln
können Sie, wie bereits unter „Programmierte Wiedergabe“
beschrieben, durchführen.
Bitte beachten Sie:
Es gibt eine Vielzahl von Brenn- und Komprimierungsverfahren, sowie Qualitätsunterschiede bei CDs und gebrannten
CDs.
Des Weiteren hält die Musikindustrie keine festen Standards
ein (Kopierschutz).
Aus diesen Gründen kann es in seltenen Fällen zu Problemen
bei der Wiedergabe von CDs und MP3 CDs kommen. Dies
ist keine Fehlfunktion des Gerätes.
13
Reinigung und Pflege
• Ziehen Sie vor der Reinigung den Netzstecker.
• Äußere Flecken können Sie mit einem leicht feuchten
Tuch, ohne Zusatzmittel, abwischen.
Störungsbehebung
Fehler
Ursache
Gerät lässt sich Gerät blockiert
nicht bedienen „hängt fest“
Lösung
Ziehen Sie für ca.
5 Sek. den Netzstecker.
Schalten Sie das Gerät
anschließend wieder
ein
Kein DAB
Wurfantenne nicht Richten Sie die WurfanRadioempfang richtig ausgerichtet tenne vertikal aus
In Ihrem Gebiet
wird kein Digital
Radio empfangen
Technische Daten
Modell:.............................................................................MC 4456 iP
Spannungsversorgung:......................................230-240 V~ 50 Hz
Ausgangsleistung:.....................................................100 W PMPO
Leistungsaufnahme:..................................................................23 W
Schutzklasse:......................................................................................II
Nettogewicht:.........................................................................2,40 kg
Radioteil:
Frequenzbereiche:….................UKW/FM 87,5 ~ 108,0 MHz
....................DAB/DAB+ 174 ~ 240 MHz
Technische Änderungen vorbehalten!
Konformitätserklärung
Hiermit erklärt die Firma ETV – Elektro-Technische Vertriebsgesellschaft mbH, dass sich das Gerät MC 4456 iP in Übereinstimmung mit den grundlegenden Anforderungen, der
europäischen Richtlinie für elektromagnetische Verträglichkeit
(2004/108/EG) und der Niederspannungsrichtlinie (2006/95/
EG) befindet.
„Made for iPod“ und „Made for iPhone“ bedeutet, dass ein
elektronisches Zubehör konzipiert wurde, um eine Verbindung speziell mit einem iPod oder iPhone herzustellen und
wurde von dem Entwickler zertifiziert, um den Leistungsstandard der Apple Inc. zu erfüllen. Apple Inc. ist nicht verantwortlich für den Betrieb dieses Gerätes oder die Einhaltung
der Sicherheitsvorschriften und Normen. Bitte beachten Sie,
dass der Einsatz dieses Zubehörs mit iPod oder iPhone sich
auf die drahtlose Leistung auswirken kann.
14
Deutsch
Garantie
Garantiebedingungen
1. Gegenüber Verbrauchern gewähren wir bei privater
Nutzung des Geräts eine Garantie von 24 Monaten ab
Kaufdatum.
Ist das Gerät zur gewerblichen Nutzung geeignet, gewähren wir beim Kauf durch Unternehmer für das Gerät
eine Garantie von 12 Monaten.
Die Garantiezeit für Verbraucher reduziert sich auf 12 Monate, sofern sie ein zur gewerblichen Nutzung geeignetes
Gerät – auch teilweise – gewerblich nutzen.
2. Voraussetzung für unsere Garantieleistungen sind der
Kauf des Geräts in Deutschland bei einem unserer
Vertragshändler sowie die Übersendung einer Kopie des
Kaufbelegs und dieses Garantiescheins an uns.
Befindet sich das Gerät zum Zeitpunkt des Garantiefalls
im Ausland, muss es auf Kosten des Käufers uns zur
Erbringung der Garantieleistungen zur Verfügung gestellt
werden.
3. Mängel müssen innerhalb von 14 Tagen nach Erkennbarkeit uns gegenüber schriftlich angezeigt werden.
Besteht der Garantieanspruch zu Recht, entscheiden wir,
auf welche Art der Schaden/Mangel behoben werden
soll, ob durch Reparatur oder durch Austausch eines
gleichwertigen Geräts.
4. Garantieleistungen werden nicht für Mängel erbracht, die
auf der Nichtbeachtung der Gebrauchsanweisung, unsachgemäßer Behandlung oder normaler Abnutzung des
Geräts beruhen. Garantieansprüche sind ferner ausgeschlossen für leicht zerbrechliche Teile, wie zum Beispiel
Glas oder Kunststoff. Schließlich sind Garantieansprüche
ausgeschlossen, wenn nicht von uns autorisierte Stellen
Arbeiten an dem Gerät vornehmen.
5. Durch Garantieleistungen wird die Garantiezeit nicht
verlängert. Es besteht auch kein Anspruch auf neue
Garantieleistungen. Diese Garantieerklärung ist eine
freiwillige Leistung von uns als Hersteller des Geräts.
Die gesetzlichen Gewährleistungsrechte (Nacherfüllung,
Rücktritt, Schadensersatz und Minderung) werden durch
diese Garantie nicht berührt.
Stand 03 2008
Garantieabwicklung
Sollte Ihr Gerät innerhalb der Garantiezeit einen Mangel
aufweisen, bitten wir Sie, uns Ihren Garantieanspruch mitzuteilen.
Die schnellste und komfortabelste Möglichkeit ist die Anmeldung über unser SLI (Service Logistik International) InternetServiceportal.
www.sli24.de
Sie können sich dort direkt anmelden und erhalten alle Informationen zur weiteren Vorgehensweise Ihrer Reklamation.
Über einen persönlichen Zugangscode, der Ihnen direkt nach
Ihrer Anmeldung per E-Mail übermittelt wird, können Sie den
Bearbeitungsablauf Ihrer Reklamation auf unserem Serviceportal online verfolgen.
Alternativ können Sie uns den Servicefall per E-Mail
[email protected]
mitteilen.
Bitte teilen Sie uns Ihren Namen, Vornamen, Straße,
Hausnummer, PLZ und Wohnort, Telefon-Nummer, soweit
vorhanden, Fax-Nummer und E-Mail-Adresse mit. Im Weiteren benötigen wir die Typenbezeichnung des reklamierten
Gerätes, eine kurze Fehlerbeschreibung, das Kaufdatum
und den Händler, bei dem Sie das Neugerät erworben
haben.
Nach Prüfung Ihres Garantieanspruches erhalten Sie von
uns einen fertig ausgefüllten Versandaufkleber. Sie brauchen
diesen Aufkleber nur noch auf die Verpackung Ihres gut verpackten Gerätes zu kleben und das Paket bei der nächsten
Annahmestelle der Deutschen Post / DHL abzugeben. Der
Versand erfolgt für Sie kostenlos an unser Servicecenter bzw.
Servicepartner.
Bitte fügen Sie dem Paket eine Kopie Ihres Kaufbeleges
(Kassenbon, Rechnung, Lieferschein) sowie eine kurze Fehlerbeschreibung bei.
Ohne den Garantienachweis (Kaufbeleg) kann Ihre Reklamation nicht kostenfrei bearbeitet werden.
Bitte nehmen Sie in keinem Fall eine unfreie Einsendung Ihres Gerätes vor. Bei unfreien Lieferungen entfällt Ihr Anspruch
auf Garantieleistungen.
ETV
Elektro-technische Vertriebsgesellschaft mbH
Industriering Ost 40
D-47906 Kempen
Deutsch
Entsorgung
Bedeutung des Symbols „Mülltonne“
Schonen Sie unsere Umwelt, Elektrogeräte gehören nicht in
den Hausmüll.
Nutzen Sie die für die Entsorgung von Elektrogeräten vorgesehenen Sammelstellen und geben dort Ihre Elektrogeräte
ab, die Sie nicht mehr benutzen werden.
Sie helfen damit die potenziellen Auswirkungen, durch
falsche Entsorgung, auf die Umwelt und die menschliche
Gesundheit zu vermeiden.
Sie leisten damit Ihren Beitrag zur Wiederverwertung, zum
Recycling und zu anderen Formen der Verwertung von Elektro- und Elektronik-Altgeräten.
Informationen, wo die Geräte zu entsorgen sind, erhalten Sie
über Ihre Kommunen oder die Gemeindeverwaltungen.
15
16
Nederlands
Gebruiksaanwijzing
Dank u voor uw keuze van dit product. We hopen dat u er
veel plezier van beleeft.
Algemene veiligheidsrichtlijnen
Lees deze gebruiksaanwijzing zorgvuldig door voordat u dit
apparaat in gebruik neemt, en bewaar hem samen met het
Garantiecertificaat, het aankoopbewijs en, indien mogelijk,
de originele verpakking inclusief het materiaal in de doos. Als
u het apparaat doorgeeft aan een derde persoon, geef de
gebruiksaanwijzing dan ook door.
• Stel het apparaat niet bloot aan regen of vocht, om het
risico op elektrische schokken te vermijden. Gebruik het
apparaat niet in de buurt van water (bijv. in badkamers,
zwembaden en vochtige kelders).
• Gebruik dit apparaat uitsluitend privé and voor het
bestemde doeleinde. Dit apparaat is niet bestemd voor
commercieel gebruik.
• Sluit het apparaat alleen aan op een standaard stopcontact. Zorg dat de spanning die is aangegeven op
het apparaat overeenkomt met de spanning van het
stopcontact.
• Controleer bij het gebruik van externe adapters dat de
spanning en polariteit correct zijn. Plaats batterijen op de
juiste wijze.
• Dek bij de installatie van het apparaat geen van de ventilatieopeningen af.
• Open de behuizing van het apparaat nooit. Ondeskundige reparaties kunnen de gebruiker blootstellen aan
ernstige risico’s. Als het apparaat of het netsnoer zijn
beschadigd, gebruik dan het apparaat niet en zorg dat
het door een deskundige wordt gerepareerd. Controleer
het netsnoer regelmatig op beschadigingen.
• Om risico’s te vermijden, dient een beschadigd netsnoer
vervangen te worden door een gelijkwaardige kabel van
de fabrikant, onze klantenservice of een andere specialist.
• Als u het apparaat gedurende langere tijd niet gebruikt,
haal dan de stekker uit het stopcontact en verwijder de
batterijen.
Deze symbolen kunnen op het apparaat aangetroffen worden en zijn bedoeld als waarschuwingen:
De bliksemschicht dient ervoor om de gebruiker
te wijzen op de aanwezigheid van gevaarlijke
spanning in het apparaat.
Het uitroepteken dient ervoor om de gebruiker
te wijzen op belangrijke aanwijzingen over de
bediening of het onderhoud die horen bij dit
apparaat.
Producten die voorzien zijn van dit symbool zijn
voorzien van een “Klasse 1 Laser” voor het lezen
van de CD. De ingebouwde veiligheidschakelaars dienen ervoor om te voorkomen dat de
gebruiker wordt blootgesteld aan de gevaarlijke
laserstraal, die niet zichtbaar is voor het ook, wanneer het CD-compartiment wordt geopend.
Deze veiligheidschakelaars dienen niet overbrugd of gemodificeerd te worden, omdat anders het risico bestaat van
blootstelling aan de laserstraal.
Symbolen in deze gebruiksaanwijzing
Belangrijke opmerkingen voor uw veiligheid worden speciaal
aangeduid. Volg deze opmerkingen altijd op, om ongelukken en schade aan het apparaat te voorkomen:
WAARSCHUWING:
Waarschuwt voor gezondheidsrisico’s en duidt op potentiaal verwondingsgevaar.
LET OP:
Duidt op potentiaal gevaar voor het apparaat of voor
andere voorwerpen.
OPMERKING:
Duidt op tips en informatie voor u.
Kinderen en gehandicapten
• Houd voor de veiligheid van uw kinderen het verpakkingsmateriaal (plastic zakken, karton, piepschuim enz.)
buiten hun bereik.
WAARSCHUWING!
Laat kleine kinderen niet met verpakkingsmateriaal
spelen i.v.m. verstikkingsgevaar!
• Dit apparaat is niet bedoeld voor gebruik door personen
(inclusief kinderen) met verminderde lichamelijke, zintuiglijke of mentale capaciteiten, of gebrek aan ervaring en/of
kennis tenzij zij onder toezicht staan of instructies hebben
gekregen betreffende het gebruik van het apparaat door
een persoon verantwoordelijk voor hun veiligheid.
• Houd kinderen onder toezicht om er voor te zorgen dat
zij niet met het apparaat gaan spelen.
Speciale veiligheidsinstructies
Dit apparaat is uitgerust met een
Klasse 1 laser.
Nederlands
17
Overzicht van de bedieningsorganen
Installatie/Inleiding
Voorzijde (Fig. 1)
1
STANDBY/ON toets (slaapstand/aan)
CD OPEN/CLOSE (openen/sluiten) CD-compartiment
2
3 USB-poort
SD/MMC kaartsleuf
4 VOLUME +/- (volume) toetsen
5 ID3/iPOD/MEM/C-ADJ. toets (geheugen/klok)
6
iPOD OPEN/CLOSE (openen/sluiten) Docking poort
compartiment
7 Luidspreker
8 CD-compartiment
9 LCD-scherm
10 IR sensor voor de afstandsbediening
11 STANDBY Indicator
12 DAB/FM/AUX toets
13 CD/iPOD/USB/CARD toets
14
SCAN/ENTER toets (afspelen/pauze/Scan/Enter)
15 /MENU/INFO toets
16 / SKIP/TUNE SEARCH toetsen
(snel vooruit/achteruit zoeken)
17 Open/sluit docking poort
18 Docking poort compartiment
• Lees deze gebruiksaanwijzing aandachtig door voordat u
het apparaat in gebruik neemt!
• Bepaald een geschikte plek voor het apparaat. De ondergrond waarop u het apparaat plaatst dient droog, vlak en
niet glad te zijn, voor een gemakkelijke bediening.
• Zorg dat het apparaat voldoende geventileerd wordt!
• Verwijder indien nodig het beschermende plastic van het
scherm.
Achteraanzicht (Fig. 2)
19 Aan-/uitschakelaar
20 Voedingskabel
21 FM ANT. antenne
22 Hoofdtelefoonaansluiting
23 LINE IN aansluiting
Afstandsbediening (Fig. 3)
1 CD/iPOD/USB/CARD toets
2 DAB/FM/AUX toets
3 SELECT/MONO/ST. toets
4 / FOLDER toetsen (omhoog/omlaag Album)
5 CLOCK DISP toets
6 TIMER toets
7 SLEEP toets
8 VOLUME +/- (volume) toets
9 INTRO toets
10 MUTE (demp) toets
11 EQ toets
12 ID3/iPOD/MEM/C-ADJ. toets (geheugen/klok)
13
/ SCAN/ENTER
(afspelen/pauze / Scan / Enter) toets
Toets (Voorkeuze/snel vooruit)
Toets (Voorkeuze/snel achteruit)
/ MENU/INFO (Stop/Menu) toets
14 REPEAT toets (herhaal)
15 RANDOM toets (willekeurig afspelen)
16 STANDBY/ON toets
Muurmontage
U kunt het apparaat ook op de muur monteren (montagetoebehoren niet inbegrepen).
LET OP:
Controleer eerst of er geen kabels in de muur zitten die
beschadigd kunnen raken!
OPMERKING: Controleer het bereik van de kabel!
Zorg ervoor het apparaat te monteren op een plek waar de
voedingskabel eenvoudig een stopcontact kan bereiken.
De afstand tussen de bevestigingen voor muurmontage is
140 mm.
• Boor twee gaten, horizontaal 140 mm van elkaar verwijderd.
• Bevestig muurankers en schroeven in de gaten.
• Steek de montageschroeven aan totdat ze ca. 4 mm uit
de muur steken.
• Vouw de standaard op met 90° (zie pagina 4, fig. 4).
• Hang het apparaat op aan de schroeven en controleer of
het veilig is bevestigd.
Batterij in de Afstandsbediening Plaatsen/Vervangen
OPMERKING:
De lithumcel in het batterijvak van de afstandsbediening
wordt tijdens transport beschermd door een stukje folie.
Hierdoor wordt de levensduur van de batterij verlengd.
Verwijder dit stukje folie voordat u de afstandsbediening
voor de eerste keer gebruikt.
De batterij van de afstandsbediening is een lithumcelbatterij
met extra lange levensduur. Als het bereik van de afstandsbediening tijdens gebruik kleiner wordt, volg dan de volgende
stappen op:
• Open het batterijvakje aan de onderkant van de afstandsbediening.
• Vervang de cel door een batterij van hetzelfde type
(CR 2032). Let hierbij op de polariteitsaanduidingen.
• Sluit het batterijvakje weer.
Als de afstandsbediening lange tijd niet gebruikt wordt,
verwijder dan de batterij om lekkage van de batterijvloeistof
te voorkomen.
18
Nederlands
WAARSCHUWING:
• Stel batterijen niet bloot aan hoge temperaturen of
direct zonlicht. Gooi de batterijen nooit in het vuur.
Ontploffingsgevaar!
• Houd de batterijen buiten bereik van kinderen. Batterijen zijn geen speelgoed.
• Probeer de batterijen niet open te maken.
• Vermijd contact met metalen voorwerpen. (Ringen,
spijkers, schroeven, enz.) Kortsluitingsgevaar!
• Door kortsluiting kunnen de batterijen oververhitten of
zelfs in brand vliegen. Hierdoor kunnen de batterijen
ontploffen.
• Als u de batterijen vervoert, plak dan een stukje plakband op de batterijpolen, voor uw eigen veiligheid.
• Als er batterijlekkage optreedt, zorg er dan voor dat
de vloeistof niet in contact komt met ogen of huid. Als
de vloeistof toch in contact met de ogen komt, moet
u onmiddellijk spoelen met schoon water, en een arts
raadplegen als de klachten aanhouden.
LET OP:
Gooi de batterijen niet weg bij het huishoudafval. Breng
gebruikte batterijen naar erkende inzamelpunten of breng
ze terug naar de verkoper.
Stroomverzorging
• Steek de stekker in een standaard stopcontact, 230 V,
50 Hz.
• Zorg dat de spanning in overeenstemming is met die op
het indicatieplaatje.
• De tijdinstelling zal verloren raken zodra de voeding
wordt onderbroken.
• Gebruik de voedingsschakelaar (19) op de onderzijde van
het apparaat om het apparaat in te schakelen.
Automatische Tijdinstelling
Voor deze instelling is de ontvangst van DAB stations vereist.
Nadat u het apparaat voor de eerste keer heeft ingeschakeld,
zal het apparaat automatisch zoeken naar het tijdsignaal. Op
het scherm verschijnt SCAN TIME. Als het apparaat op uw
locatie geen DAB stations ontvangt, kunt u de tijd handmatig
instellen, zoals omschreven in “Handmatige Tijdinstelling
(tijdens Standby-modus)”.
Handmatige Tijdinstelling (in slaapstand)
1. Houd de ID3/iPOD/MEM/C-ADJ. toets ingedrukt (5/12).
Het scherm geeft aan “24 HOUR”. 2. Gebruik de / SKIP/TUNE SEARCH toetsen (16/13)
om te kiezen tussen 24 en 12-uursweergave. Bevestig
met ID3/iPOD/MEM/C-ADJ..
OPMERKING:
De 12-uursweergave resulteert in de volgende aanduiding op het scherm
AM = ochtend, PM = middag.
3. Gebruik de / SKIP/TUNE SEARCH toetsen om de
uren in te stellen. Bevestig met ID3/iPOD/MEM/C-ADJ..
4. Gebruik de / SKIP/TUNE SEARCH toetsen om de
minuten in te stellen.
5. Druk nogmaals ID3/iPOD/MEM/C-ADJ. om de tijdinstellingen op te slaan.
Transportbeveiliging van het CD-compartiment
• Schakel het apparaat in en druk op de STANDBY ON
toets (1/16).
• Open het CD-compartiment (8) door het drukken van
de CD OPEN/CLOSE (openen/sluiten) toets (2 op het
apparaat). De CD-sleuf opent naar rechts.
• Verwijder indien aanwezig de transportbeveiliging van de
CD speler voordat u deze in gebruik neemt.
• Druk nogmaals de toets om het CD-compartiment te
sluiten.
OPMERKING:
De CD houder kan niet worden geopend in iPOD modus.
iPod/iPhone compatibiliteit
Volledige compatibiliteit kann niet worden gegarandeerd
vanwege de grote verscheidenheid aan iPod en iPhone
modellen en generaties op de markt vandaag. Controleer
dat uw iPod/iPhone met dit apparaat gebruikt kan worden
voordat u de iPod/iPhone aansluit.
Er kan ook niet gegarandeerd worden dat alle functies op
afstand bediend kunnen worden. Bedien uw iPod/iPhone op
de gebruikelijke wijze, terwijl het in het dockingstation zit.
OPMERKING:
De volgende storingsmelding kan worden weergegeven,
afhankelijk van de softwareversie van uw iPhone:
“Dit accessoire was niet ontwikkeld voor iPhone gebruik.
Er kan eventueel ruis optreden en de signaalsterkte kan
gereduceerd zijn.”
Druk in dit geval op “OK”.
Algemene bediening
OPMERKING:
U zult sommige toetsen zowel op het apparaat als op
de afstandsbediening aantreffen. Toetsen met de zelfde
naam bedienen de zelfde functies.
Nederlands
STANDBY/ON (1/16)
Druk de STANDBY/ON toets om het apparaat in de slaapstand te schakelen (het scherm geeft de tijd aan). Druk deze
toets nogmaals om het apparaat in te schakelen.
OPMERKING:
• Druk in de standby-modus op een willekeurige toets
om de tijd voor 10 seconden weer te geven.
• Als het apparaat zich in de CD/USB/SD/iPOD modus
bevindt, zal het apparaat na 15 minuten automatisch
naar de standby-modus schakelen.
Volume (4/8)
Instellen van het gewenste volume. Het scherm geeft “VOL
SETTING”, “VOL” en een nummer weer. Dit nummer komt
overeen met een waarde tussen “VOL MAX” en “VOL MIN”.
Hoofdtelefoonaansluiting (22)
Gebruik voor het luisteren via een hoofdtelefoon, een hoofdtelefoon met een 3,5 mm stereo stekker, die u aansluit op de
hoofdtelefoonaansluiting. De luidsprekers worden uitgeschakeld.
Infrarood afstandsbediening
Voor draadloze bediening tot een afstand van 5 meter. Als dit
bereik kleiner wordt, vervang dan de batterijen. Zorg dat er
zich tijdens het gebruik geen obstakels bevinden tussen de
afstandsbediening en de sensor (10) op het apparaat.
USB poort
Dit apparaat is ontworpen in overeenstemming met de
meest recente stand der techniek voor USB-technologie.
Door de grote verscheidenheid aan verschillend USB
geheugenmiddelen op de markt, is het niet mogelijk om
volledige comptabiliteit te bieden voor alle USB opslagmiddelen. Daarom kunnen zich in sommige gevallen storingen
voordoen bij het afspelen van USB opslagmiddelen. Dat is
geen storing van dit apparaat.
1. Open het klepje (3) bovenop het apparaat.
2. Gebruik de CD/iPOD/USB/CARD toets (13/1) om de
USB-stand te selecteren. Het scherm toont USB MODE.
3. Steek een USB geheugenapparaat rechtstreeks in de
poort. Op het scherm wordt USB READING en vervolgens het totaal aantal folders (F) en het aantal nummers (T)
weergegeven.
4. Als het afspelen niet automatisch begint: Druk
SCAN/ENTER (14/13) om het weergeven van de muziekbestanden te starten.
Zie voor de bediening het hoofdstuk “Afspelen CD’s/MP3”.
LET OP:
Gebruik voor het verwijderen van het USB opslagmiddel
de DAB/FM/AUX toets om te wisselen naar de RADIO
stand.
19
SD/MMC kaartsleuf
1. Open het klepje (3) bovenop het apparaat.
2. Als u bestanden af wilt spelen van een SD/MMC kaart,
plaats de kaart dan in de overeenkomstige sleuf.
3. Gebruik nu de CD/iPOD/USB/CARD toets (13/1) om de
CARD stand te selecteren. Op het scherm wordt CARD
MODE weergegeven. Vervolgens wordt CARD READING, het totaal aantal folders (F) en het aantal nummers
(T) weergegeven.
4. Als het afspelen niet automatisch begint: Druk de
SCAN/ENTER (14/13) om het afspelen van de muziekbestanden te starten.
Zie voor de bediening het hoofdstuk “Afspelen CD’s/MP3”.
LINE IN aansluiting
Voor het aansluiten van analoge afspeelapparatuur. Als u
hier apparatuur op aansluit, kunt u ook via de luidsprekers
luisteren naar andere apparaten, zoals MP3 of CD-spelers.
1. Sluit het externe apparaat aan op de LINE IN aansluiting
(23) met een 3,5 mm plug.
2. Gebruik nu de DAB/FM/AUX toets (12/2) om de AUX
stand te kiezen. Op het scherm verschijnt AUX MODE.
3. U kunt via de luidsprekers luisteren naar het geluid van
het externe apparaat; gebruik de VOLUME +/- toetsen
(4/8) om het volume aan te passen. De CD toetsen werken niet.
4. Zie voor verdere functies het de gebruiksaanwijzing van
het externe audiotoestel.
OPMERKING:
Stel het volume van het externe apparaat in op een acceptabel niveau.
Fabrieksinstellingen herstellen
De tijd en alle vooringestelde radiostations worden verwijderd.
1. Schakel het apparaat naar de Standby-modus.
2. Houd de /MENU/INFO toets (15/13) voor ca. 3 seconden ingedrukt. Op het scherm verschijnt ”SYSTEM RESET PLEASE WAIT”. Als de reset succesvol is, verschijnt
er “SYSTEM RESET OK” op het scherm.
3. Het apparaat zoekt vervolgens naar de tijd. Op het
scherm verschijnt SCAN TIME.
Radio luisteren
FM stations scannen
1. Druk herhaaldelijk de DAB/FM/AUX toets (12/2) totdat
het scherm “RADIO INITIALIZE PLEASE WAIT” toont.
2. U heeft twee opties voor het afstemmen van een station:
- Druk op de / SKIP/TUNE SEARCH toetsen (16/13).
- Als u op de
SCAN/ENTER (14/13) toets drukt,
scant het apparaat tot aan het volgende station.
Houd deze toets ingedrukt om naar het vorige
station te scannen.
20
Nederlands
3. Als de ontvangst te zwak is en er zich storing bevindt
op het ontvangen station, kunt u de ontvangst proberen te verbeteren, door aan de antenne te draaien of
door deze in of uit te schuiven. Voor FM stations kunt u
tussen volgende AUDIO MODE schakelen: MONO en
AUTO (stereo) ontvangst. Maak hiervoor gebruik van de
SELECT/MONO/ST toets (3 op de afstandsbediening).
Bij slecht ontvangst raden wij aan om naar MONO te
schakelen.
DAB stations scannen
Digital Audio Broadcasting (DAB) is een digitale radioomroep standaard voor de digitale terrestrische radioontvangst. Er is een lijst van radiostations, die in Duitsland
kunnen worden ontvangen, beschikbaar op het internet op
www.digitalradio.de.
1. Druk herhaaldelijk op de DAB/FM/AUX toets (12/2) totdat er “WELCOME TO DIGITAL RADIO” op het scherm
verschijnt.
2. Druk op de
SCAN/ENTER (14/13) toets om het automatische scannen te starten. Op het scherm verschijnt
kort “AUTOTUNE FULL SCAN”. Het apparaat zoekt
vervolgens naar radiostations die ontvangen kunnen
worden.
3. U kunt het volgende of vorige station selecteren door gebruik te maken van de / SKIP/TUNE SEARCH toetsen
(16/13).
4. Als de ontvangst te zwak is en het ontvangen station
stoort, kunt u de ontvangst proberen te verbeteren door
de positie van de antenne te wijzigen.
OPMERKING:
• Voor een optimaal DAB ontvangst, raden wij u aan om
de draadantenne verticaal te plaatsen.
• U kunt tijdens de DAB ontvangst niet tussen Mono en
Stereo schakelen.
• Om een DAB frequentie handmatig in te stellen, dient
u de SELECT/MONO/ST toets ingedrukt te houden.
Het bericht MANUAL TUNE verschijnt kort op het
scherm. Gebruik de / SKIP/TUNE SEARCH toetsen,
om de gewenste frequentie in te stellen. Bevestig
vervolgens met de SELECT/MONO/ST toets.
Geef aanvullende DAB informatie weer
In de DAB modus kunt u de volgende aanvullende informatie
weergegeven, indien verzonden door het radiostation. Druk
hiervoor op de MENU/INFO toets (15/13).
• <PROGRAMME TYP>
Hiermee wordt de categorie van het station aangegeven
(bijv. Popmuziek, Nieuws, enz.).
• <DLS>
Afkorting voor Dynamic Label Segment. Dit betreft
aanvullende gegevens. Dit omvat bijv. informatie over
het station of de titel van het nummer en de naam van de
artiest.
• <Ensemble Name>
Geeft de naam van het station of de omroep weer
(bijv. DR Deutschland).
• <Ensemble Freq.>
Frequentie van het huidige radiostation.
• <Audio Bit Rate>
Geeft de digitale audio-bitsnelheid weer.
• <Sig. Strenght>
Geeft de sterkte aan van het ontvangen signaal.
• <Time/Date>
Geeft de actuele tijd en datum weer.
OPMERKING:
Als het “>” symbool wordt getoond achter de naam van
het station, kunt u kort de categorie weergeven terwijl er
andere informatie wordt weergegeven. Druk hiervoor op
de SELECT/MONO/ST toets.
Station opslaan
1. Houd de ID3/iPOD/MEM/C-ADJ. toets (5/12) ingedrukt,
als u het gewenste station heeft gevonden.
Voor FM stations: De actuele vooringestelde radiofrequentie verschijnt op het scherm en het nummer van de
voorkeuzelocatie knippert.
Voor DAB stations: Op het scherm verschijnt “Preset
empty”, als de voorkeuzelocatie leeg is en het nummer
van de voorkeuzelocatie knippert.
2. Gebruik de / SKIP/TUNE SEARCH toets (16/13) voor
het kiezen van de geheugenstand.
3. Druk ID3/iPOD/MEM/C-ADJ. om de instellingen op te
slaan.
Een voorkeuzestation selecteren
1. Druk op de ID3/iPOD/MEM/C-ADJ. toets.
2. Selecteer de gewenste voorkeuzelocatie met de /
SKIP/TUNE SEARCH toetsen.
3. Druk nogmaals op de ID3/iPOD/MEM/C-ADJ. toets om
af te stemmen op het gewenste radiostation.
Muziekweergave via de iPod/iPhone
(iPod/iPhone niet bijgeleverd)
1. Druk meerdere keren op de CD/iPOD/USB/CARD toets
(13/1) totdat “NO iPOD” op de display verschijnt.
2. Druk op de iPOD OPEN/CLOSE (openen/sluiten) toets
(6 op het apparaat) om het docking poort compartiment
(18) te openen. De CD-sleuf opent naar links.
OPMERKING:
Het docking poort compartiment kan niet worden
geopend in CD modus.
3. Druk op de toets (17), om de docking poort te openen.
4. Als een adapter met uw iPod is meegeleverd, verbind
deze dan met de docking aansluiting. Pas als de adapter
aangesloten is, kunt u controleren of de iPod goed in de
iPod-aansluiting past.
Nederlands
5. Plaats uw iPod/iPhone in het dock.
LET OP:
Zorg ervoor dat uw iPod/iPhone rechtop in de aansluiting gezet wordt. Zet de iPod/iPhone niet scheef in
de aansluiting. Dit kan het dock en/of de iPod/iPhone
beschadigen.
6. Druk op de toets (17) om de docking poort te sluiten.
OPMERKING:
Als de docking poort niet is ingetrokken, kan het docking poort compartiment niet worden gesloten. Het
bericht DOOR KEY LOCK verschijnt op het scherm.
7. Afhankelijk van het iPod/iPhone model moet eerst de
toetsenvergrendeling uitgeschakeld worden, en moet de
SCAN/
weergave gestart worden met behulp van de
ENTER toets (14/13).
8. Sluit het docking poort compartiment weer door nogmaals op de iPOD OPEN/CLOSE toets te drukken.
9. Raadpleeg de gebruiksaanwijzing van uw iPod/iPhone
voor meer informatie over de bediening.
LET OP:
Stop het afspelen voordat u de iPod/iPhone uit de poort
haalt, anders kan de iPod/iPhone beschadigd raken.
OPMERKING:
Indien er een inkomende oproep wordt ontvangen terwijl u
muziek afspeelt met de iPhone in het dock, zal het afspelen
stoppen zodat u de ringtoon kunt horen.
iPod/iPhone opladen
Uw iPod/iPhone batterij wordt opgeladen zodra de iPod/
iPhone is aangesloten. Om de batterij op te kunnen laden
moet het apparaat aangesloten zijn op de elektriciteit.
OPMERKING:
• Als een adapter is meegeleverd met uw iPod, gebruik
deze dan om ervoor te zorgen dat de iPod past op de
aansluiting.
• Niet alle iPod/iPhone-generaties ondersteunen de
oplaadstand.
• De duur van het oplaadproces hangt af van het iPod/
iPhone model en van de staat van de batterij.
Afspelen CD’s/MP3
Het afspelen van een CD
1. Druk herhaaldelijk de CD/iPOD/USB/CARD toets (13/1)
totdat het scherm “CD MODE” weergeeft.
2. Druk de CD OPEN/CLOSE (openen/sluiten) toets (2 op
het apparaat), om het CD-compartiment (8) te openen.
De CD-sleuf opent naar rechts.
21
OPMERKING:
De CD houder kan niet worden geopend in iPOD
modus.
3. Plaats een audio CD met het label naar voren op de spindel in het midden, zodat de CD vast klikt. Sluit dan de
CD deur door nogmaals de CD OPEN/CLOSE toets te
drukken.
4. AUDIO CD:
Het scherm geeft “DISC CD”, het aantal nummers en de
totale speeltijd weer. Als het afspelen niet automatisch
begint: Druk de
SCAN/ENTER toets (14/13) om het
afspelen van de CD te starten. Het afspelen begint vanaf
het eerste nummer op de CD. Het scherm toont het
huidige nummer en de verstreken afspeeltijd.
Voor MP3 of een CD in MP3 formaat:
Het scherm toont “STOP”, het nummer of de map, bijv.
F--04, en het totaal aantal nummers (bijv. T--126). Als het
afspelen niet automatisch begint: Druk de
SCAN/ENTER toets het afspelen van de CD te starten. Het afspelen
start vanaf het eerste nummer en vanaf de eerste map.
De huidige track, huidige folder, verstreken afspeeltijd
en “DISC MP3” worden op de display weergegeven.
Gebruik de FOLDER or FOLDER toetsen (5 op de
afstandsbediening) om de verschillende mappen te
selecteren.
5. Druk de MENU/INFO toets (15) (13 op de afstandsbediening) om een CD te verwijderen. Open het CDcompartiment met de CD OPEN/CLOSE (openen/
sluiten) toets en neem de CD voorzichtig uit.
Houd de CD door altijd gesloten.
OPMERKING:
• Voor CD’s in MP3 formaat met een folder, verschijnt
er 001 op het scherm voor het eerste nummer van de
nieuwe folder, wanneer er wordt overgeschakeld naar
een andere folder.
• Als een disc niet juist of geheel niet is geplaatst, zal
“CD--READING” oplichten en het scherm geeft “NO
DISC” (geen disc) weer.
• Het afspelen van CD’s die gecreëerd zijn door de
gebruiker kan niet gegarandeerd worden vanwege de
verscheidenheid in software en CD schrijfapparatuur.
Beschrijving van bedieningstoetsen
SCAN/ENTER (9/14)
U kunt het afspelen tijdelijk onderbreken en hervatten. De
verstreken weergavetijd in het scherm knippert. Door nogmaals op de toets te drukken wordt het afspelen vanaf het
zelfde punt hervat.
In iPOD modus:
• Druk eerst op de ID3/iPOD/MEM/C-ADJ. toets om het
iPod-Menu te activeren. iPOD MENU verschijnt op de
display.
22
Nederlands
• Druk nu op de
SCAN/ENTER toets om een functie te
activeren of het volgende menu te openen.
In DAB modus:
Start het automatisch scannen naar stations (AUTOTUNE
FULL SCAN).
/ SKIP/TUNE SEARCH (16/14)
Als een Audio CD, MP3, een CD MP3 Formaat of in iPOD
modus wordt afgespeeld:
U kunt met de SKIP/TUNE SEARCH toets naar volgende
nummers springen. Houd de toets ingedrukt om versneld
voorwaarts te gaan in het huidige nummer.
U kunt de SKIP/TUNE SEARCH toets als volgt gebruiken:
1 x drukken = Ga terug naar het begin van het huidige
nummer.
2 x drukken = Ga terug naar het vorige nummer.
3 x drukken = Ga terug naar het nummer daarvoor enz.
Houd de toets ingedrukt om versneld achterwaarts te gaan in het huidige nummer.
In iPOD modus:
• Druk eerst op de ID3/iPOD/MEM/C-ADJ. toets om het
iPod-Menu te activeren. iPOD MENU verschijnt op de
display.
• Druk nu op de / SKIP/TUNE SEARCH toetsen om het
iPod/iPhone menu omhoog of omlaag te scrollen.
In de radiostand:
Afstemmen van het gewenste radiostation. En in verbinding
met de vorige ingedrukte ID3/iPOD/MEM/C-ADJ. toets, af
op het gewenste radiostation, om het voorkeuzestation te
selecteren.
MENU/INFO (15/13)
Pauzeert de CD of muziekstuk.
In iPOD Modus:
• Druk eerst op de ID3/iPOD/MEM/C-ADJ. toets om het
iPod-Menu te activeren. iPOD MENU verschijnt op de
display.
• Druk nu op de MENU/INFO toets om het iPod/iPhone
menu op te roepen of terug te keren naar het vorige
menu.
OPMERKING:
De Muziektoepassing moet hiervoor al gestart zijn.
In DAB modus:
Geeft aanvullende informatie weer. Zie sectie “Luisteren naar
de radio” “Geef aanvullende DAB informatie weer”.
MUTE (10 op de afstandsbediening)
Om het geluid snel uit te schakelen. Het “MUTE ON” pictogram knippert op het scherm. Druk nogmaals op MUTE
om deze functie uit te schakelen.
EQ (11 op de afstandsbediening)
(Voorinstelling voor de toonregeling). Er zijn diverse standen
voor de toonregeling beschikbaar (FLAT, CLASSIC, ROCK,
POP, JAZZ).
OPMERKING: Tijdens Afspelen van iPod/iPhone
Muziek
Wijzig de EQ instelling op uw iPod/iPhone naar wens voor
een optimaal geluid.
SELECT/MONO/ST (3 op de afstandsbediening)
In de FM radiostand:
Voor het schakelen tussen STEREO en MONO.
In DAB modus:
Houd deze toets ingedrukt om het DAB station handmatig
aan te passen.
REPEAT (14 op de afstandsbediening)
1x drukken
(REP_1 licht op) Het huidige nummer wordt
volledig herhaald.
2x drukken:
(REP_ALL licht op) De CD wordt volledige
herhaald.
3x drukken:
Alle functies worden geannuleerd. Normaal
afspelen wordt hervat.
Alleen voor MP3’s en CD’s in MP3 formaat:
1x drukken:
Het huidige nummer wordt doorlopend
herhaald (Het scherm toont REP_1).
2x drukken:
De volledige CD wordt doorlopend herhaald (het scherm toont REP_ALL).
3x drukken:
De geselecteerde map van de MP3
CD wordt doorlopend herhaald (het
scherm toont REP_ALBUM). Gebruik de
FOLDER toetsen (4 op de afstandsbediening) om de verschillende mappen te
selecteren.
4x drukken:
De functie wordt uitgeschakeld en de CD
wordt in de normale stand afgespeeld.
RANDOM (15 op de afstandsbediening)
Het scherm toont “RANDOM” en het nummer dat als eerste
wordt afgespeeld wordt weergegeven. Alle nummers worden in willekeurige volgorde afgespeeld.
FOLDER (4 op de afstandsbediening)
Voor MP3’s oof een CD in MP3 Formaat:
Druk deze toetsen tijdens het afspelen om naar de vorige
of volgende map te springen. Het scherm geeft kort een
bericht weer, bijv. ALBUM 02. Daarna start het systeem
automatisch met het afspelen of the MP3 CD. Wanneer de
toetsen worden gedrukt in de stop stand, wordt het bericht
ook kort weergegeven op het scherm. Druk dan
SCAN/
ENTER om het afspelen te starten.
Nederlands
SLEEP (7 op de afstandsbediening)
Wanneer het apparaat is ingeschakeld, kunt u de tijd instellen waarna het apparaat naar de slaapstand zal schakelen.
De tijd kan ingesteld worden tussen 90 en 10 minuten in
stappen van 10 minuten. Druk deze toets herhaaldelijk totdat
het scherm de gewenste tijd weergeeft. Wanneer de functie
is geactiveerd, zal de resterende tijd ca. elke 10 seconden
worden weergegeven. Het apparaat schakelt automatisch af
als de ingestelde tijd is verstreken.
Druk, om de functie nogmaals uit te schakelen, herhaaldelijk
op de SLEEP toets, totdat er niets meer getoond wordt op
het scherm.
TIMER (6 op de afstandsbediening)
U kunt het apparaat programmeren zodat het na een vooraf
ingestelde tijd uit en weer aan gaat.
1. Gebruik de STAND/ON toets om naar de slaapstand
te schakelen (de tijd wordt weergegeven).
2. Houd de TIMER toets ingedrukt, totdat er “ON TIME”
verschijnt op het scherm.
• Gebruik de / SKIP/TUNE SEARCH toetsen (16/13)
om vervolgens de inschakeluren, de uitschakeluren,
de uitschakelminuten, de inschakelmodus en het
inschakelvolume in te stellen.
• Bevestig elke invoer met de TIMER toets. De huidig
in te stellen display knippert om de display.
OPMERKING:
Het apparaat schakelt terug op stand-by modus zonder
uw invoer op te slaan als u binnen ca. 5 seconden geen
toets indrukt.
3. Druk nadat u het inschakelvolume hebt geselecteerd
nogmaals op de TIMER toets. De instellingen worden
één voor één weergegeven op het scherm. Het apparaat
schakelt in. “ ” wordt weergegeven en de schakelklok
wordt geactiveerd.
Het apparaat schakelt op de geselecteerde modus zodra de
ingestelde tijd wordt bereikt. Het volume verhoogt geleidelijk aan tot het geselecteerde volume.
Druk TIMER om de schakelklok uit te schakelen. Op het
scherm wordt kort TIME OFF weergegeven. “ ” zal verdwijnen van het scherm.
OPMERKING:
Druk, als de timer gedeactiveerd is, op de TIMER toets,
waarna TIME ON kort op het scherm verschijnt. U zult nu
de actuele instellingen zien. Het “ ” symbool verschijnt
vervolgens op het scherm en de timer is nu geactiveerd.
ID3/iPOD/MEM/C-ADJ. (5/12)
Voor het instellen van de klok en het programmeren van
stations en afspelen.
23
Voor MP3 bestanden of een CD in MP3 formaat:
Als er ID-3 Tag informatie is opgeslagen, verschijnt deze
informatie op het scherm als een ticker. Druk nogmaals op de
toets om de functie te activeren.
CLOCK DISP (5 op de afstandsbediening)
Druk op deze toets om de tijd voor 10 seconden weer te geven.
Programmeren van het afspelen
Programmeren van het afspelen in een gewenste volgorde.
(Alleen in CD/USB/CARD modus)
1. Druk de MENU/INFO toets (15/13).
2. Druk de ID3/iPOD/MEM/C-ADJ. toets (5/12). MEMORY,
P-01 (Voorkeuzelocatie) verschijnt op het scherm en
T-000 (Nummer) knippert. Gebruik de / SKIP/TUNE
SEARCH toetsen (16/13) om het gewenste nummer te
selecteren en druk nogmaals de ID3/iPOD/MEM/C-ADJ.
toets. De aanduiding op het scherm wijzigt in geheugenpositie P- 02.
3.
4.
5.
6.
7.
Voor MP3’s of CD’s in MP3 formaat:
De folderweergave “F-000” knippert op de display naast
de MEMORY toets. Selecteer eerst de gewenste folder
met de FOLDER toetsen (4 op de afstandsbediening). Bevestig de folder met de ID3/iPOD/MEM/C-ADJ.
toets.
Gebruik de / SKIP/TUNE SEARCH toetsen om het
volgende nummer te selecteren en druk nogmaals op
ID3/iPOD/MEM/C-ADJ.. Herhaal de stappen totdat u
alle nummers hebt geselecteerd.
Druk de
SCAN/ENTER toets (14/13). Het afspelen
begint. Het scherm toont het volgnummer van het eerste
geselecteerde nummer.
Druk eenmaal de MENU/INFO toets om het afspelen
te stoppen. De positie wordt onthouden.
Druk op de
SCAN/ENTER toets om het programma
nogmaals af te spelen.
Druk tweemaal op de MENU/INFO toets om het
geheugen te wissen. De MEM display schakelt uit.
Het apparaat stopt automatisch nadat alle geprogrammeerde nummers zijn afgespeeld. De geprogrammeerde
volgorde wordt in het geheugen vastgehouden totdat u naar
een andere stand schakelt, de CD uit het compartiment haalt
of het apparaat uitschakelt.
Het is mogelijk om het geprogrammeerd afspelen te
combineren met de REPEAT functie. Druk na het programmeren en het starten van het afspelen de REPEAT toets (14
op de afstandsbediening) tot drie keer in. De functies kunnen
toegepast worden zoals beschreven onder “REPEAT”.
Het afspelen van muziekbestanden in MP3 formaat
Met dit apparaat kunnen muziekbestanden in MP3 formaat
afgespeeld worden. Het apparaat ondersteunt verder de
volgende soorten CD’s: CD, CD-RW, en CD-R.
24
Nederlands
Uw apparaat kan MP3 CD’s afspelen. Dit zijn gecomprimeerde CD’s die tot 200 nummers kunnen bevatten. Het apparaat
herkent automatisch MP3 discs (het scherm toont het totale
aantal nummers en mappen). Zie hoofdstuk “Afspelen van
CD/MP3” voor het afspelen van zulke CD’s. U kunt nummers
programmeren, zoals beschreven onder “Programmeren van
het afspelen”.
Opmerking:
Er zijn vele methoden voor het comprimeren en branden
van CD’s. Er zijn ook grote verschillen in kwaliteit van CD’s en
gebrande CD’s.
Verder past de muziekbranche geen vast standaards toe
(kopieerbeveiliging).
Dit apparaat voldoet aan alle huidige CE-richtlijnen, zoals de
richtlijn elektromagnetische compatibiliteit en de laagspanningsrichtlijn, en is gefabriceerd volgens de meest recente
veiligheidsvoorschriften.
“Made for iPod” en “Made for iPhone” betekent dat een apparaat specifiek is ontworpen voor een verbinding met een
iPod of iPhone en dat de ontwerper is gecertificeerd om aan
de Apple standaarden te voldoen. Apple is niet verantwoordelijk voor de functionering van dit apparaat, of in hoeverre
deze voldoet aan de veiligheids- en regulatiestandaarden.
Houd er rekening mee dat het gebruik van deze accessoire
met een iPod of iPhone mogelijk de draadloze prestatie kan
beïnvloeden.
Daarom kunnen zich soms problemen voordoen bij het
afspelen van CD’s en MP3 discs. Dat is geen storing van dit
apparaat.
Reiniging en onderhoud
• Haal de stekker uit het stopcontact voor het reinigen.
• U kunt vlekken op de buitenzijde afvegen met een vochtige doek zonder toevoegingen.
Probleemoplossing
Probleem
Het apparaat
kan niet worden gebruikt
Oorzaak
Het apparaat is
geblokeerd en
“hangt”
Oplossing
Trek de stekker uit het
stopcontact en wacht
minstends 5 seconden.
Zet daarna het apparaat weer aan
Geen DAB ra- Draadantenne niet Positioneer de draaddio ontvangst correct gepositio- antenne verticaal
neerd
Er kan geen Digitale Radio worden
ontvangen op uw
locatie
Technische specificaties
Model:..............................................................................MC 4456 iP
Voeding:................................................................230-240 V~ 50 Hz
Uitgangsvermogen:...................................................100 W PMPO
Opgenomen vermogen:..........................................................23 W
Beschermingsklasse:........................................................................II
Netto gewicht:........................................................................2,40 kg
Radio:
Frequentiebereiken:....................VHF/FM 87,5 ~ 108,0 MHz
.................DAB/DAB+ 174 ~ 240 MHz
Onderhevig aan verandering zonder voorafgaande kennisgeving!
Verwijdering
Betekenis van het “vuilnisbak”-symbool
Houd rekening met het milieu, gooi elektrische apparaten
niet weg bij het huishoudafval.
Breng overbodige of defecte elektrische apparaten naar
gemeentelijke inzamelpunten.
Help potentiële milieu- en gezondheidsgevaren door onverantwoordelijk wegwerpen te voorkomen.
Draag bij aan hergebruik en ander opnieuw gebruik van
oude elektrische en elektronische apparaten.
Uw gemeente kan u informatie geven over inzamelingspunten.
Français
Mode d’emploi
Merci d’avoir choisi notre produit. Nous espérons que vous
saurez profiter votre appareil.
Indications générales de sécurité
Avant d’utiliser cet appareil, lire attentivement ce manuel et le
conserver avec le Certificat de Garantie, la facture et, si possible, l’emballage d’origine, y compris l’emballage interne. Si
cet appareil est donné à une tierce personne, transmettre le
manuel avec.
• Pour éviter tout risque d‘incendie ou d‘électrocution,
n‘exposez pas cet appareil à la pluie ou à l‘humidité. Ne
le faites pas fonctionner à proximité de l‘eau (par ex. dans
une salle de bain, une piscine ou un sous-sol humide).
• Utilisez uniquement cet appareil pour un usage privé et
pour l’usage prévu. Cet appareil n’est pas conçu pour
une utilisation industrielle.
• Ne branchez l‘appareil que sur une prise de courant
murale standard. Assurez-vous que la tension indiquée
sur l‘appareil soit conforme à celle délivrée par la prise.
• Si vous utilisez des adaptateurs externes, veuillez respecter la polarité et la tension. Insérez les batteries correctement.
• Lorsque vous installez l‘appareil, prenez soin de ne pas
obstruer les orifices de ventilation.
• N‘ouvrez jamais l‘appareil. Des réparations inadaptées
peuvent créer des risques importants pour l‘utilisateur.
Si l‘appareil ou son cordon d‘alimentation sont endommagées, cesser de les utiliser et faites-les réparer par
un expert. Vérifiez régulièrement le bon état du cordon
d‘alimentation.
• Pour éviter les risques, un cordon endommagé doit être
remplacé par un cordon similaire fourni par le constructeur, notre service clientèle ou tout autre spécialiste.
• Si vous n‘utilisez pas l‘appareil durant une période prolongée, veuillez le débrancher et en retirer les batteries.
Ces symboles peuvent se trouver sur l‘appareil à titre d‘avertissements :
Le symbole en forme d‘éclaire est destiné à
prévenir l‘utilisateur de la présence d‘une tension
dangereuse à l‘intérieur de l‘appareil.
Le point d‘exclamation est destiné à prévenir l‘utilisateur de la présence d‘instructions d‘utilisation
importantes accompagnant l‘appareil.
Les équipements avec ce symbole utilisent un
“Rayon laser de Classe 1” pour lire le CD. Les
interrupteurs de sécurité intégrées sont destinés
à éviter que l‘utilisateur ne puisse être exposé à
au faisceau laser dangereux, bien qu‘invisible à
l‘œil nu, lorsqu‘ils ouvrent le compartiment CD.
25
Ces interrupteurs de sécurité ne doivent pas être contournés
ou modifiés sous peine de créer un risque d‘exposition au
faisceau laser.
Symboles utilisés dans ce manuel
Les notes importantes de sécurité sont marquées de façon
distincte. Y faire attention afin d’éviter les accidents et dommages sur l’appareil :
AVERTISSEMENT :
Avertit contre les dangers pour la santé et indique les
risques potentiels de blessure.
ATTENTION :
Indique de potentiels dangers pour l’appareil ou d’autres
objets.
NOTE :
Souligne les conseils et informations donnés à l’utilisateur.
Enfants et personnes invalides
• Pour la sécurité de vos enfants, garder hors de leur portée tous les emballages (sachets en plastique, pièces de
cloisonnement, polystyrène etc.).
AVERTISSEMENT !
Ne pas laisser de jeunes enfants jouer avec les emballages danger d’étouffement !
• Cet appareil n‘est pas destiné à être utilisé par des personnes (y compris des enfants) aux capacités physiques,
sensorielles ou mentales réduites ou ne disposant pas
de l‘expérience et/ou des connaissances nécessaires à
moins qu‘elles ne soient supervisées ou reçoivent d‘une
personne responsable de leur sécurité des instructions
concernant l‘utilisation de l‘appareil.
• Surveillez les enfants et assurez-vous qu‘ils ne jouent pas
avec l‘appareil.
Directives spéciales de sécurité
Cet appareil fonctionne avec un
laser de Classe 1.
Liste des différents éléments de commande
Vue avant (Fig. 1)
1 Touche STANDBY/ON (Veille/Marche)
2
CD OPEN/CLOSE Compartiment CD (Ouvrir/Fermer)
3 Port USB
Emplacement cartes SD/MMC
4 VOLUME +/- Touches (volume)
5 Touche ID3/iPOD/MEM/C-ADJ. (Mémoire/Horloge)
iPOD OPEN/CLOSE (ouvrir/fermer) Le compartiment
6
de port d‘accueil
26
7
8
9
10
11
12
13
14
15
16
17
18
Français
Haut-parleur
Compartiment CD
Ecran LCD
Capteur IR pour la télécommande
Voyant STANDBY
Bouton DAB/FM/AUX
Bouton CD/iPOD/USB/CARD
Touche
SCAN/ENTER
(lecture/pause/Scan/Entrer)
Touche /MENU/INFO
Touches / SKIP/TUNE SEARCH
(recherche en avant/en arrière)
Ouvrir/fermer le port d‘accueil
Compartiment de port d‘accueil
Vue Arrière (Fig. 2)
19 Interrupteur secteur
20 Câbles principaux
21 Antenne FM ANT
22 Prise casque
23 Connexion LINE IN
Télécommande (Fig. 3)
1 Touche CD/iPOD/USB/CARD
2 Touche DAB/FM/AUX
3 Touche SELECT/MONO/ST.
4 Touches / FOLDER
(Haut/Bas, position mémoire Album)
5 Touche CLOCK DISP
6 Touche TIMER
7 Touche SLEEP
8 Touches VOLUME +/- (volume)
9 Touche INTRO
10 Touche MUTE (silence)
11 Touche EQ
12 Touche ID3/iPOD/MEM/C-ADJ. (Mémoire/Horloge)
13 Touche
/ SCAN/ENTER (lecture/pause/Scan/Entrer)
Touche (Préréglage/recherche en avant)
Touche (Préréglage /recherche vers l‘arrière)
Touche / MENU/INFO (Arrêt /Menu)
14 Touche REPEAT (Répétition)
15 Touche RANDOM (lecture aléatoire)
16 Touche STANDBY/ON
Installation/Introduction
• Lisez l‘ensemble du manuel avec d‘utiliser l‘appareil !
• Choisissez un endroit qui convient à l‘appareil. Les
endroits adaptés sont secs et disposent de surfaces antidérapantes sur lesquelles vous pouvez utiliser l‘appareil
sans difficultés.
• Assurez-vous que l‘appareil dispose d‘une ventilation
adaptée !
• Retirez si nécessaire le film de protection qui recouvre
l‘écran.
Montage mural
Vous pouvez également installer l’appareil à un mur (accessoires de montage non-inclus).
ATTENTION :
Assurez-vous préalablement qu’il n’y a pas de câbles dans
le mur pouvant être endommagés !
NOTE : Vérifiez que les câbles sont assez longs !
Pour installer l’appareil, assurez-vous qu’il y a une prise
électrique à portée du câble d‘alimentation.
La distance entre les points de fixation pour un montage
mural est de 140 mm.
• Perçez deux trous horizontallement à 140 mm de distance l’un de l‘autre.
• Installez des chevilles et vissez dans les trous.
• Serrez les vis de montage jusqu’à ce qu’elles dépassent
d‘environ 4 mm du mur.
• Pliez le socle jusqu’à 90° (voir page 4, fig. 4).
• Installez l’appareil sur les vis. Vérifiez qu’il est bien fixé.
Installation / remplacement de la pile de la télécommande
NOTE :
Dans certaines conditions, la pile au lithium dans le boîtier
à pile de la télécommande a été fixée avec un film protecteur pour le transport. Ceci permet de prolonger sa durée
de vie. Retirer ce film pour préparer la télécommande
avant la première utilisation.
La pile dans la télécommande est une pile-bouton au lithium
à longue durée de vie. Si la portée d’opération de la télécommande vient à réduire, suivre les étapes suivantes :
• Ouvrir le boîtier à pile en dessous de la télécommande.
• Remplacer la pile par une autre du même type
(CR 2032). Vérifier que la polarité est correcte.
• Fermer le boîtier à pile.
Lorsque la télécommande ne doit pas être utilisée pendant
longtemps, retirer la pile afin que l’acide ne “coule” pas.
AVERTISSEMENT :
• Ne pas exposer les piles à une forte chaleur ni aux
rayons du soleil. Ne jamais jeter des piles au feu.
Danger d’explosion !
• Conserver les piles hors de portée des enfants. Ce ne
sont pas des jouets.
• Ne pas ouvrir des piles par la force.
• Eviter le contact avec des objets métalliques. (Anneaux,
clous, vis etc.) Danger de court-circuit !
• Les court-circuits peuvent surchauffer voire enflammer
les piles. Ceci peut être cause d’incendie.
• Lors du transport de piles, couvrir les bornes avec une
bande adhésive pour plus de sûreté.
• Lorsqu’une pile coule, ne pas mettre en contact le
liquide avec les yeux ou la peau. En cas de contact de
l’acide avec les yeux, rincer avec de l’eau distillée et
consulter un médecin en cas de problème.
Français
ATTENTION :
Les piles ne doivent pas être jetées avec les ordures
ménagères. Les déposer dans un centre de récupération
compétent ou les rendre au vendeur.
Alimentation
• Branchez la fiche d‘alimentation sur une prise standard
230 V, 50 Hz.
• Assurez-vous que la tension corresponde à celle indiquée
sur la plaque indicatrice.
• Le réglage de l’horloge sera perdu dès que l’alimentation
électrique est interrompue.
• Utilisez l’interrupteur principal (19) au dessous de l’appareil
pour allumer celui-ci.
Réglage automatique de l’heure
Pour cela, vous devez recevoir des stations DAB.
Après avoir allumé l’appareil pour la première fois, l’appareil
recherche automatiquement le signal horaire. SCAN TIME
apparaît à l’écran. Si l’appareil ne reçoit pas de stations DAB
dans votre région, réglez manuellement l’heure comme
décrit dans “Réglage manuel de l’heure (en mode veille)”.
Réglage manuel de l’heure (en mode de veille)
1. Maintenez le bouton ID3/iPOD/MEM/C-ADJ. enfoncé
(5/12). L‘écran va afficher “24 HOUR”.
2. Servez-vous des touches / SKIP/TUNE SEARCH
(16/13) pour sélectionner l‘affichage de l‘heure sur 12 ou
sur 24 h. Confirmez à l‘aide de iPOD/MEM/C-ADJ..
NOTE : L‘affichage sur 12h implique l‘affichage des
indications suivantes :
AM = matin, PM = après-midi.
3. Utilisez les touches / SKIP/TUNE SEARCH pour régler
les heures. Confirmez avec ID3/iPOD/MEM/C-ADJ..
4. Utilisez les touches / SKIP/TUNE SEARCH pour régler
les minutes.
5. Appuyez à nouveau sur ID3/iPOD/MEM/C-ADJ. pour
sauvegarder le réglage de l‘heure.
Dispositif de sécurisation du compartiment CD pour le
transport
• Mettez l‘appareil en marche, veuillez appuyer sur la
touche STANDBY/ON (1/16).
• Ouvrez le compartiment CD (8) en appuyant sur la touche
CD OPEN/CLOSE (Ouvrir/Fermer) (2 de l’appareil). Le
tiroir CD s’ouvre à droite.
• Retirez, s‘il est présent, le dispositif de sécurisation pour
le transport du lecteur de CD avant de commencer à
vous en servir.
• Appuyez à nouveau sur la touche CD OPEN/CLOSE
pour refermer le compartiment CD.
NOTE :
Le tiroir à CD ne peut pas être ouvert en mode iPOD.
27
Compatibilité iPod/iPhone
En raison de la variété importante de modèles et de générations d’iPod et d’iPhone sur le marché, la compatibilité
absolue ne peut pas être garantie. Avant de connecter un
iPod/iPhone, vérifier qu’il a une interface compatible.
Une entière compatibilité des fonctions de télécommande
ne peut pas non plus être garantie. Utilisez normalement
votre iPod/iPhone, quand il est dans sa station d’accueil.
NOTE :
Selon la version du logiciel de votre iPhone le message
d’erreur suivant peut s’afficher :
“Cet accessoire n’a pas été conçu pour une utilisation avec
iPhone. Il est possible qu’un bruit soit audible et que la
force du signal soit réduite.”
Dans ce cas, appuyez sur “OK”.
Fonctionnement général
NOTE :
Certaines touches se trouvent à la fois sur l‘appareil et
sur la télécommande. Les touches ayant le même nom
ont la même fonction.
STANDBY/ON (1/16)
Appuyez sur la touche STANDBY/ON pour mettre l‘appareil en mode de veille (l‘écran va se mettre à afficher l‘heure).
Appuyez à nouveau sur cette touche pour mettre l‘appareil
en marche.
NOTE :
• En mode veille, appuyez sur un bouton pour afficher
l’heure pendant 10 secondes.
• Si l’appareil est en mode CD/USB/SD/iPOD, mais ne
fonctionne pas, il se met automatiquement en mode
veille au bout de 15 minutes.
Volume (4/8)
Ajustez le volume au niveau de votre choix. L‘écran va afficher
“VOL SETTING” ainsi qu‘un chiffre correspondant à la valeur
réglée pour “VOL MAX” ou “VOL MIN”.
Prise de connexion (22)
Lorsque vous utilisez des écouteurs, veuillez utiliser des écouteurs disposant d‘une fiche stéréo de 3,5 mm en connectant
cette dernière sur la prise prévue à cet effet. Les enceintes
seront alors désactivées.
Télécommande à infrarouges
Fonctionnement sans fil jusqu‘à une distance de 5m. Si cette
portée diminue, veuillez remplacer les batteries. Lorsque
vous utilisez la télécommande, assurez-vous qu‘il n‘y ait pas
d‘obstacles entre la télécommande et le capteur (10) situé sur
l‘appareil.
28
Français
Port USB
Cet appareil a été conçu en conformité avec la technologie
USB la plus récente. Compte tenu de la grande variété de
supports de stockages USB existant sur le marché, il n‘est
pas possible de garantir une compatibilité totale avec tous
les supports de stockage USB existants. Il peut arriver qu‘à
certaines rares occasions des erreurs se produisent lors de
la lecture de supports de stockage USB. Il ne s‘agit pas d‘un
disfonctionnement de ce lecteur.
1. Ouvrez le couvercle (3) sur le dessus de l‘appareil.
2. Servez-vous de la touche CD/iPOD/USB/CARD (13/1)
pour sélectionner le mode USB. L‘affichage va alors
afficher USB MODE.
3. Branchez un stockage USB directement dans la prise.
USB READING, le nombre total de dossiers (F) et le
nombre de titres (T) s’affichent.
4. Si la lecture ne commence pas automatiquement :
Veuillez appuyer sur
SCAN/ENTER (14/13) pour
commencer la lecture des fichiers musicaux.
Veuillez consulter le chapitre “Lire des CD/MP3” sur la façon
de vous en servir.
CAUTION :
Avant de retirer un support de stockage USB, appuyez sur
la touche DAB/FM/AUX pour passer en mode RADIO.
Emplacement pour carte SD/MMC
1. Ouvrez le couvercle (3) sur le dessus de l‘appareil.
2. Si vous désirez lire des fichiers à partir d‘une carte SD/
MMC, veuillez insérer la carte dans le port correspondant.
3. Utilisez ensuite la touche CD/iPOD/USB/CARD (13/1)
pour sélectionner le mode CARD. CARD MODE apparaît
sur l’écran. CARD READING, le nombre total de dossiers
(F) et le nombre de titres (T) s’affichent.
4. Si la lecture ne commence pas automatiquement :
SCAN/ENTER (14/13) pour
Appuyez sur la touche
débuter la lecture des fichiers musicaux.
Veuillez consulter le chapitre “Lire des CD/MP3” sur la façon
de vous en servir.
Prise LINE IN
Connexion aux appareils de lecture analogiques. Lorsque
vous les connectez sur cette prise, vous pouvez également
écouter la radio ou d‘autres appareils comme des lecteurs
MP3 ou CD, etc. par les enceintes.
1. Veuillez connecter l‘appareil externe sur la prise LINE IN
(23) à l‘aide de la fiche 3,5mm.
2. Utilisez ensuite la touche DAB/FM/AUX (12/2) pour sélectionner le mode AUX. AUX MODE apparaît sur l’écran.
3. Vous écouterez le son de l‘appareil externe par les enceintes; utilisez les touches VOLUME +/- (4/8) pour régler
le volume. Les touches du CD ne sont plus actives.
4. Pour les autres fonctions, veuillez consulter le manuel de
l‘utilisateur de l‘appareil audio externe.
NOTE :
Réglez le volume de l‘appareil audio externe sur un niveau
audible.
Rétablir les paramètres d’usine par défaut
Toutes les stations de radio préréglées et l’heure sont supprimées.
1. Mettez l’appareil en mode Veille.
2. Maintenez le bouton /MENU/INFO (15/13) enfoncé
pendant environ 3 secondes. “SYSTEM RESET PLEASE
WAIT” apparaît sur l’écran. Une fois la réinitialisation
effectuée, “SYSTEM RESET OK” apparaît sur l’écran.
3. L’appareil recherche alors l’heure. SCAN TIME apparaît
sur l’écran.
Ecouter la radio
Balayer les stations FM
1. Appuyez plusieurs fois sur la touche DAB/FM/AUX
(12/2) jusqu‘à ce que l‘écran indique “RADIO INITIALIZE
PLEASE WAIT”.
2. Vous avez deux options pour régler une station :
- Appuyez sur les boutons / SKIP/TUNE SEARCH
(16/13).
- Si vous appuyez sur le bouton
SCAN/ENTER
(14/13), l’appareil balaie jusqu’à la prochaine station.
Maintenez ce bouton enfoncé pour balayer jusqu’à la
station précédente.
3. En cas de réception trop faible et de présence d’un parasite sur la station reçue, essayez d’améliorer la réception
en tournant et en roulant/déroulant l’antenne. Pour les
stations FM, vous pouvez basculer entre les réceptions
AUDIO MODE : MONO et AUTO (stéréo) à l’aide du
bouton SELECT/MONO/ST (3 de la télécommande). Si
la réception est insatisfaisante, nous vous conseillons de
passer en MONO.
Balayer les stations DAB
Digital Audio Broadcasting (DAB) est un système de radiodiffusion numérique standardisé pour la réception terrestre
de la radio numérique. Une liste répertoriant les stations de
radio qui peuvent être reçues en Allemagne est disponible
sur le site Internet : www.digitalradio.de.
1. Appuyez plusieurs fois sur le bouton DAB/FM/AUX
(12/2) jusqu’à ce que “WELCOME TO DIGITAL RADIO”
apparaisse sur l’écran.
2. Appuyez sur le bouton
SCAN/ENTER (14/13) pour
démarrer un balayage automatique. “AUTOTUNE FULL
SCAN” apparaît brièvement sur l’écran. L’appareil recherché alors les stations de radio qui peuvent être reçues.
Français
3. Vous pouvez sélectionner la station suivante ou précédente à l’aide des boutons / SKIP/TUNE SEARCH
(16/13).
4. Si la réception est trop faible et que la station reçue est
“fragile”, essayez d’améliorer la réception en modifiant la
position de l’antenne.
NOTE :
• Pour une reception DAB optimale, nous vous
conseillons de positionner l’antenne filaire de manière
verticale.
• Vous ne pouvez pas permuter entre Mono et Stéréo
pendant la réception DAB.
• Pour régler manuellement une fréquence DAB,
maintenez le bouton SELECT/MONO/ST enfoncé.
Le message MANUAL TUNE apparaît brièvement sur
l’écran. Utilisez les boutons / SKIP/TUNE SEARCH
pour régler la fréquence souhaitée. Puis, confirmez à
l’aide du bouton SELECT/MONO/ST.
Afficher des informations DAB supplémentaires
En mode DAB, vous pouvez afficher les informations supplémentaires suivantes si elles sont diffusées par la station
de radio. Pour cela, appuyez sur le bouton MENU/INFO
(15/13).
• <PROGRAMME TYP>
Indique la catégorie de la station (p.ex. Pop-Music, News
etc.).
• <DLS>
Abréviation de Dynamic Label Segment. Ce paramètre
affiche des données complémentaires. Il contient p.ex.
des informations sur la station ou le titre et l’artiste de la
chanson en cours de lecture.
• <Ensemble Name>
Affiche le nom du groupe de la station
(e.g. DR Deutschland).
• <Ensemble Freq.>
Fréquence de la station de radio en cours.
• <Audio Bit Rate>
Affiche le débit binaire audio numérique.
• <Sig. Strenght>
Affiche la puissance du signal reçue.
• <Time/Date>
Affiche l’heure et la date en cours.
NOTE :
Si le symbole “>” s’affiche derrière le nom de la station,
vous pouvez brièvement afficher la catégorie tout en
indiquant d’autres informations. Pour cela, appuyez sur le
bouton SELECT/MONO/ST.
Sauvegarder une station
1. Si vous avez trouvé la station souhaitée, maintenez le
bouton ID3/iPOD/MEM/C-ADJ. (5/12) enfoncé.
29
Pour les stations FM : La fréquence radio actuellement
préréglée s’affiche sur l’écran et le numéro de l’emplacement préréglé clignote.
Pour les stations DAB : “Préréglage vide” apparaît sur
l’écran si les emplacements préréglés sont vides et que le
numéro de l’emplacement préréglé clignote.
2. Pour choisir la position de la mémoire, veuillez appuyer
sur la touche / SKIP/TUNE SEARCH (16/13).
3. Appuyez sur ID3/iPOD/MEM/C-ADJ. pour sauvegarder
les réglages.
Sélectionner une station préréglée
1. Appuyez sur le bouton ID3/iPOD/MEM/C-ADJ..
2. Sélectionnez l’emplacement préréglé souhaité à l’aide
des boutons / SKIP/TUNE SEARCH.
3. Appuyez à nouveau sur le bouton ID3/iPOD/MEM/
C-ADJ. pour écouter la station de radio souhaitée.
Lecture de fichiers musicaux à partir de
l’iPod/iPhone
(iPod/iPhone non fourni)
1. Appuyez sur le bouton CD/iPOD/USB/CARD (13/1) plusieurs fois jusqu’à ce que “NO iPOD” s’affiche sur l‘écran.
2. Appuyez sur le bouton iPOD OPEN/CLOSE (Ouvrir/
Fermer) (6 de l’appareil), pour ouvrir le compartiment de
port d‘accueil (18). Le tiroir CD s’ouvre à gauche.
NOTE :
Le compartiment de port d’accueil ne peut pas être
ouvert en mode CD.
3. Appuyez sur le bouton (17), ouvrir le port d‘accueil.
4. En cas d’adaptateur fourni avec votre iPod, placez-le sur
le connecteur d’accueil. Le bon branchement de l’iPod
dans le port iPod ne peut être vérifié que si l’adaptateur
est branché.
5. Insérez votre iPod ou iPhone dans la station d’accueil.
ATTENTION :
Vérifier que l’iPod/iPhone est branché droit dans le
port. Ne pas renverser ni incliner l’iPod/iPhone lorsqu’il
est branché dans le port. Cela pourrait endommager la
station ou l’iPod/iPhone.
6. Appuyez sur le bouton (17), pour fermer le port d‘accueil.
NOTE :
Si le port d’accueil n’est pas rentré, vous ne pouvez pas
fermer son compartiment. Le message DOOR KEY
LOCK apparaît sur l‘écran.
7. Selon le modèle d’iPod/iPhone, relâcher d’abord le verrouillage des touches et démarrer la lecture si nécessaire
SCAN/ENTER (14/13).
avec la touche
30
Français
8. Refermez le compartiment de port d‘accueil. Pour ce
faire, appuyez à nouveau sur le bouton iPOD OPEN/
CLOSE.
9. Suivre les indications du manuel de votre iPod/iPhone
pour l’utilisation des commandes.
ATTENTION :
Arrêtez la lecture avant de débrancher l‘iPod/iPhone du
port, au cas contraire l‘iPod/iPhone pourrait être endommagé.
NOTE :
Si vous recevez un appel alors que l’iPhone posé sur la
station est en train de lire de la musique, alors la lecture
s’arrêtera et vous entendrez la sonnerie.
Chargement de l’iPod/iPhone
La batterie de votre iPod/iPhone se charge dès que l’iPod/
iPhone est branché à une station d’accueil. Pour cela, l’appareil doit être branché à l’alimentation.
NOTE :
• Si l’adaptateur de logement est fourni avec votre iPod,
utilisez-le pour garantir que votre iPod est bien adapté.
• Les différentes versions d’iPod/iPhone ne supportent
pas toutes le mode charge.
• La durée de chargement dépend de l’iPod/iPhone
utilisé et des ses conditions de fonctionnement.
Lire des CD/MP3
Comment lire un CD
1. Appuyez plusieurs fois sur la touche CD/iPOD/USB/
CARD (13/1) jusqu‘à ce que l‘écran affiche “CD MODE”.
2. Appuyez sur la touche CD OPEN/CLOSE (Ouvrir/Fermer) (2 de l’appareil) pour ouvrir le compartiment à CD (8).
Le tiroir CD s’ouvre à droite.
NOTE :
Le tiroir à CD ne peut être ouvert en mode iPOD.
3. Placez un CD audio avec l‘étiquette dirigée vers l‘avant
de l‘axe, au centre, afin que le CD soit bloqué en position. Fermez ensuite la porte en appuyant de nouveau
sur la touche CD OPEN/CLOSE.
4. CD AUDIO :
L‘écran va afficher “DISC CD”, le nombre de pistes et le
temps de lecture total. Si la lecture ne commence pas
automatiquement : Appuyez sur la touche
SCAN/
ENTER (14/13) pour commencer la lecture du CD. La lecture débute à partir de la première piste du CD. L‘écran
va afficher le numéro de la piste en cours ainsi que le
temps de lecture écoulé.
Pour un MP3 ou un CD au format MP3 :
L‘écran va afficher “STOP”, le numéro du répertoire, par
exemple F--04 et le nombre total de pistes (par ex. T--126).
Si la lecture ne commence pas automatiquement : Appuyez sur la touche
SCAN/ENTER pour commencer
la lecture du CD. La lecture débute à partir de la première
piste et du premier répertoire.La piste actuelle, le fichier
actuel, le temps de lecture expiré et “DISC MP3” s’affichent sur l‘écran. Servez-vous des touches FOLDER ou
FOLDER (5 sur la télécommande) pour sélectionner un
répertoire précis.
5. Pour retirer un CD, veuillez appuyer sur la touche
MENU/INFO (15) (13 sur la télécommande), ouvrir le
compartiment à CD à l‘aide de la touche CD OPEN/
CLOSE et retirer délicatement le CD.
Conservez toujours la porte du compartiment à CD refermée.
NOTE :
• Pour les CD au format MP3 contenant un dossier,
001 apparaît et désigne la première piste du nouveau
dossier lorsque vous passez à un autre dossier.
• Si un disque n‘est pas correctement inséré ou absent,
l‘indication “CD--READING” va apparaître, et l‘écran va
indiquer “NO DISC” (pas de disque).
• La lecture de CD crées par l‘utilisateur ne peut être
garantie compte tenu de la diversité des logiciels et
des équipements média CD disponibles.
Description des boutons de contrôle
SCAN/ENTER (9/14)
Vous pouvez interrompre la lecture de façon temporaire,
puis la reprendre. Le temps de lecture écoulé va clignoter sur
l‘écran. En appuyant à nouveau sur la touche, vous reprendrez la lecture à partir de la même position.
En mode iPOD :
• Appuyez d’abord sur le bouton ID3/iPOD/MEM/C-ADJ.
pour active le menu iPod. iPOD MENU apparait sur
l’écran.
• Appuyez à présent sur le bouton
SCAN/ENTER pour
activer une fonction ou pour afficher le menu suivant.
En mode DAB :
Démarre le balayage automatique de stations (AUTOTUNE
FULL SCAN).
/ SKIP/TUNE SEARCH (16/14)
Si un CD Audio, MP3, ou un CD fonctionne au format MP3
ou en mode iPOD :
La touche SKIP/TUNE SEARCH vous permet de passer à
la piste suivante ou bien à celle d‘après, etc. Maintenez cette
touche enfoncée pour parcourir rapidement les morceaux.
Français
Vous pouvez utiliser la touche SKIP/TUNE SEARCH de la
façon suivante :
Appuyez 1 fois = Reprend la lecture de la piste en cours,
depuis son commencement.
Appuyez 2 fois = Passe à la piste précédente.
Appuyez 3 fois = Lis la piste d‘avant, etc. Maintenez cette touche enfoncée pour parcourir rapidement les
fichiers musicaux.
En mode iPOD :
• Appuyez d’abord sur le bouton ID3/iPOD/MEM/C-ADJ.
pour activer le menu iPod. iPOD MENU s’affiche sur
l’écran.
• Appuyez à présent sur les boutons / SKIP/TUNE
SEARCH pour parcourir le menu de l’iPod/iPhone.
En mode radio :
Réglez la station radio de votre choix en relation avec le bouton sur lequel vous avez précédemment appuyé ID3/iPOD/
MEM/C-ADJ. pour sélectionner la station préréglée.
MENU/INFO (15/13)
Met le CD ou la piste en pause.
En mode iPOD :
• Appuyez d’abord sur le bouton ID3/iPOD/MEM/C-ADJ.
pour activer le menu iPod. iPOD MENU apparait sur
l’écran.
• Appuyez à présent sur le bouton MENU/INFO pour
atteindre le menu iPod/iPhone ou pour retourner au
menu précédent.
NOTE :
L’App Musique doit être démarrée pour pouvoir faire ceci.
En mode DAB :
Affiche des informations supplémentaires. Voir la section
“Écouter la radio” “Afficher des informations DAB supplémentaires”.
MUTE (10 sur la télécommande)
Coupe rapidement le son. “MUTE ON” apparaît sur l’écran.
Pour annuler cette fonction, appuyez à nouveau sur MUTE .
EQ (11 sur la télécommande)
(Fonction égaliseur préréglé). Il existe différents modes audio
disponibles (FLAT, CLASSIC, ROCK, POP, JAZZ).
NOTE :
Pendant la lecture de musique avec l’iPod/iPhone
Pour avoir un son optimal, changez le paramètre EQ sur
votre iPod/iPhone comme nécessaire.
SELECT/MONO/ST (3 sur la télécommande)
En mode radio FM :
Permute entre STEREO et MONO.
31
En mode DAB :
Maintenez le bouton enfoncé pour régler manuellement une
station DAB.
REPEAT (14 sur la télécommande)
Appuyez 1 fois : (REP_1 s‘allume) L‘intégralité de la piste en
cours sera répétée.
Appuyez 2 fois : (REP_ALL s‘allume) L‘ensemble du CD sera
lu en boucle.
Appuyez 3 fois : Toutes les fonctions seront annulées. La
lecture normale va reprendre.
Uniquement pour les MP3 et les CD au format MP3 :
Appuyez 1 fois : La piste en cours sera lue en boucle de
façon continue (l‘écran va afficher REP_1).
Appuyez 2 fois : L‘ensemble du CD sera lu en boucle (l‘écran
va afficher REP_ALL).
Appuyez 3 fois : Le répertoire sélectionner du CD MP3
sera lu en boucle (l‘écran va afficher REP_
ALBUM). Utilisez les touches FOLDER
(12/14) pour sélectionner un répertoire
donné.
Appuyez 4 fois : La fonction sera désactivée et le CD sera
joué en mode normal.
RANDOM (15 sur la télécommande)
L‘écran va afficher “RANDOM” et le numéro de la piste qui
sera jouée en premier. Toutes les pistes seront ensuite lues
dans un ordre aléatoire.
FOLDER (4 sur la télécommande)
Pour les MP3 et les CD au format MP3
Appuyez sur ces touches au cours de la lecture pour passer
au répertoire supérieur ou inférieur. L‘écran affiche brièvement un message, ex : ALBUM 02. Le système commence
alors automatiquement à lire le CD de MP3. Lorsque vous
appuyez sur les touches en mode arrêt, le message va également s‘afficher brièvement à l‘écran. Appuyez alors sur
SCAN/ENTER pour commencer la lecture.
SLEEP (7 sur la télécommande)
Lorsque l‘appareil est en marche, vous pouvez régler le
temps au bout duquel il passera automatiquement en mode
de veille; réglez le temps par intervalles de 10 minutes, entre
10 et 90 minutes. Appuyez plusieurs fois sur la touche jusqu‘à
ce que l‘écran indique le temps désiré. Une fois la fonction
activée, le temps restant s’affiche pendant environ 10 secondes. L‘appareil va automatiquement s‘éteindre au temps
indiqué.
Pour éteindre à nouveau la fonction, appuyez sur le bouton
SLEEP plusieurs fois jusqu’à ce que l’écran n’affiche plus rien.
TIMER (6 sur la télécommande)
Vous pouvez programmer l‘appareil pour qu‘il s‘éteigne et se
rallume à un moment prédéterminé.
32
Français
1. Utilisez la touche STANDBY/ON pour passer en mode
de veille (le heure va s‘afficher).
2. Maintenez le bouton TIMER enfoncé jusqu’à ce que
“ON TIME” apparaisse à l’écran.
• A l’aide des boutons / SKIP/TUNE SEARCH
(16/13), vous pouvez à présent régler l’heure de mise
en route, les minutes de mise en marche, l’heure d’arrêt, les minutes d’arrêt, le mode de mise en marche
et le volume de mise en marche.
• Confirmez à chaque fois votre entrée à l’aide du
bouton TIMER. L’affichage actuel devant être réglé
clignote sur l‘écran.
NOTE :
Si aucun bouton n’est enclenché après 5 secondes,
l’appareil retourne en mode de veille dans que l’entrée
soit sauvegardée.
votre choix, puis appuyez à nouveau sur ID3/iPOD/MEM/
C-ADJ.. L‘écran va afficher la position de mémoire P- 02.
3.
4.
5.
Pour les MP3 ou les CD au format MP3 :
L’affichage de fichier “F-000” clignotte sur l’écran ainsi
que le bouton MEMORY. Sélectionnez d’abord le fichier
voulu à l’aide des boutons FOLDER (12/5) (4 de la
télécommande). Confirmez la sélection du dossier à l’aide
du bouton ID3/iPOD/MEM/C-ADJ..
Utilisez les touches / SKIP/TUNE SEARCH pour sélectionner la piste suivante et appuyez à nouveau sur ID3/
iPOD/MEM/C-ADJ.. Répétez ces étapes jusqu‘à ce que
vous ayez sélectionné toutes les pistes.
Appuyez sur la touche
SCAN/ENTER (14/13). La lecture débute. L‘écran va afficher le numéro de la première
piste sélectionnée.
Appuyez une fois sur la touche MENU/INFO pour
arrêter la lecture. La mémoire sera conservée.
Pour relire le programme, appuyez sur le bouton
SCAN/ENTER.
Pour effacer la mémoire, veuillez appuyer deux fois sur
MENU/INFO. L‘affichage MEM s‘éteint.
3. Après avoir sélectionné le volume de mise en marche,
appuyez à nouveau sur le bouton TIMER. Les paramètres
s’affichent les uns après les autres. Le symbole “ ”va
s‘afficher et la minuterie sera activée.
6.
Une fois que l’heure souhaitée est atteinte, l’appareil passe
au mode sélectionné. Le volume augmente lentement
jusqu‘au volume sélectionné.
L‘appareil va s‘arrêter automatiquement une fois que toutes
les pistes enregistrées ont été lues. La séquence programmée sera conservée en mémoire jusqu‘à ce que vous
basculiez sur un autre mode, retiriez le CD du compartiment
ou éteignez l‘appareil.
Appuyez sur TIMER pour désactiver la fonction de minuterie.
TIME OFF apparaît brièvement sur l’écran. Le symbole “ ”
va disparaître de l‘écran.
NOTE :
Si le minuteur est désactivé, appuyez sur le bouton TIMER,
TIME ON apparaît brièvement sur l’écran. Vous apercevrez
alors les paramètres actuels. Le symbole “ ” apparaît alors
sur l’écran et le minuteur est activé.
ID3/iPOD/MEM/C-ADJ. (5/12)
Paramétrez l‘horloge, les stations préréglées et la lecture
programmée.
Pour les MP3 ou un CD au format MP3 :
Si des informations ID-3 Tag sont stockées, ils apparaissent
sur l’écran comme message défilant. Appuyez à nouveau sur
le bouton pour activer la fonction.
CLOCK DISP (5 sur la télécommande)
Appuyez sur le bouton pour afficher l’heure pendant
10 secondes.
Lecture programmée
Lecture programmée suivant la séquence de votre choix.
(Uniquement en mode CD/USB/CARD)
1. Appuyez sur la touch MENU/INFO (15/13).
2. Appuyez sur la touche ID3/iPOD/MEM/C-ADJ. (5/12).
MEMORY, P-01 (Emplacement préréglé) apparaît et T-000
(Titre) clignote sur l’écran. Utilisez les touches / SKIP/
TUNE SEARCH (16/13) pour sélectionner la piste de
7.
Il est possible de combiner la lecture programmée avec la
fonction REPEAT. Une fois la programmation effectuée et la
lecture débutée, appuyez jusqu‘à 3 fois sur la touche REPEAT
(14 sur la télécommande); Les fonctions peuvent s‘appliquer
comme décrites dans “REPEAT”.
Lecture de fichiers musicaux au format MP3
Cet appareil permet la lecture de fichiers musicaux au format
MP3. L‘appareil supporte également les types de CD communs : CD, CD-RW et CD-R.
Vous appareil peut lire les CD MP3. Il s‘agit de CD au format
compressé pouvant contenir jusqu‘à 200 pistes. Votre
appareil peut automatiquement reconnaître les disques MP3
(l‘écran va indiquer le nombre total de pistes et de répertoires). Veuillez consulter le chapitre “Lires des CD/MP3” pour
la lecture de tels CD. Vous pouvez programmer la lecture des
pistes comme cela est décrit dans le paragraphe “Lecture
programmée”.
Veuillez noter :
Il existe de nombreuses méthodes de gravure et de compressions ainsi que différentes qualités de CD et de CD
gravés.
De plus, l‘industrie musicale n‘applique pas les standards
fixés (protection contre les copies).
Il se peut donc qu‘en de rares occasions, des problèmes surviennent lors de la lecture de disques CD et MP3. Il ne s‘agit
pas d‘un disfonctionnement de l‘appareil.
Français
33
Nettoyage et entretien
• Débranchez la prise d‘alimentation sur secteur avant de
procéder au nettoyage.
• Vous pouvez nettoyer les salissures externes à l‘aide d‘un
chiffon légèrement humidifié, sans aucun additif.
Dépannage
Problème
Cause
L’appareil ne L’appareil est blofonctionne pas qué et “ne répond
plus”
Solution
Retirez la fiche
électrique pendant
5 secondes environ.
Puis, rebanchez l’appareil.
Aucune récep- L’antenne filaire
Positionnez l’antenne
tion radio DAB n’est pas correcte- filaire de manière
ment positionnée verticale
Aucune radio
numérique ne peut
être reçue dans
votre région
Données techniques
Modèle :...........................................................................MC 4456 iP
Tension d‘alimentation :.....................................230-240 V~ 50 Hz
Puissance de sortie :..................................................100 W PMPO
Consommation électrique :.....................................................23 W
Classe de protection :......................................................................II
Poids net :................................................................................2,40 kg
Radio :
Gamme de fréquences :.............VHF/FM 87,5 ~ 108,0 MHz
..........DAB/DAB+ 174 ~ 240 MHz
Sujet à changement sans avertissement préalable !
Cet appareil est conforme à toutes les directives CE en
vigueur, telles que les directives sur la compatibilité électromagnétique et les faibles tensions et a été fabriqué selon les
derniers règlements de sécurité.
“Made for iPod” et “Made for iPhone” signifient qu’un
accessoire électronique a été tout particulièrement conçu
pour être branché à un iPod ou iPhone et a été certifié par le
développeur pour répondre aux normes de performances
Apple. Apple n’est pas responsable du fonctionnement de
cet appareil ni de sa conformité aux normes de sécurité et
des régulateurs. Veuillez noter que l’utilisation de cet accessoire avec un iPod ou iPhone peut affecter les performances
de la connexion sans fil.
Élimination
Signification du symbole de “Poubelle à roulettes”
Prendre soin de l’environnement, ne pas jeter des appareils
électriques avec les ordures ménagères.
Porter les appareils électriques obsolètes ou défectueux dans
les centres de récupération municipaux.
Aider à éviter les impacts potentiels sur l’environnement et la
santé en luttant contre les déchets sauvages.
Vous contribuerez ainsi au recyclage et autres formes de
réutilisation des appareils électriques usagés.
Votre municipalité vous fournira les informations nécessaires
sur les centres de collecte.
34
Español
Manual del usuario
Le agradecemos la confianza depositada en este producto y
esperamos que disfrute de su uso.
Normas generales de seguridad
Antes de usar este dispositivo, lea cuidadosamente este
manual del usuario y consérvelo junto con el certificado de
garantía, el recibo de compra y, si es posible, el embalaje
original, incluyendo el embalaje interno. Si entrega el dispositivo a terceros, incluya también el manual del usuario.
• Para evitar riesgos de incendio o electrocución, no
exponga el aparato a la lluvia o la humedad. No lo use
cerca del agua (como en baños, piscinas ni sótanos
húmedos).
• Utilice el dispositivo únicamente para uso privado y para
el propósito por el que ha sido diseñado. Este dispositivo
no ha sido fabricado para uso comercial.
• Conéctelo exclusivamente a una toma de corriente
estándar. Asegúrese de que el voltaje indicado en el
dispositivo coincida con la tensión de la toma.
• Si usa adaptadores externos, observe la polaridad y
voltaje correctos. Introduzca correctamente las baterías.
• Cuando instale el dispositivo, no tape ninguna de las
aperturas de ventilación.
• No abra nunca el chasis del dispositivo. Las reparaciones
inadecuadas pueden provocar riesgos notables para el
usuario. Si el dispositivo o cable de corriente está dañado, no use el dispositivo y hágalo reparar por un experto.
Compruebe regularmente si hay daños en el cable de
alimentación.
• Para evitar riesgos, el cable de alimentación dañado
debe sustituitse por un cable equivalente por el fabricante, nuestro servicio de atención al cliente o cualquier otro
especialista.
• Si no usa el dispositivo durante un periodo de tiempo
prolongado, desenchúfelo y saque las baterías.
Estos símbolos pueden encontrarse en el dispositivo y están
pensados como advertencias:
El símbolo del rayo pretende avisar al usuario
de la presencia de tensión peligrosa dentro del
dispositivo.
El símbolo de exclamación pretende alertar al
usuario de la presencia de instrucciones importantes de uso y mantenimiento que acompañan
a este dispositivo.
Los productos con este símbolo funcionan con
un “Láser de Clase 1” para explorar el CD. Los
conmutadores de seguridad integrados están
pensados para evitar que el usuario se vea
expuesto al peligroso rayo láser invisible al ojo
cuando abra el compartimiento del CD.
Estos interruptores de seguridad no deben anularse ni alterarse, o se producirá riesgo de exposición al rayo láser.
Símbolos en este manual del usuario
Las notas importantes para su seguridad se indicant claramente. Preste mucha atención a las mismas para evitar
accidentes y daños al dispositivo.
AVISO:
Advierte de riesgos para su salud, e indica riesgo potencial
de heridas.
ATENCIÓN:
Indica peligros potenciales para el dispositivo u otros objetos.
NOTA:
Indica recomendaciones e información para usted.
Niños y personas discapacitadas
• Para la seguridad de sus hijos, mantenga las piezas de
embalaje (bolsas de plástico, cartones, porexpan, etc.)
fuera de su alcance.
¡AVISO!
¡No deje que los niños pequeños jueguen con los
plásticos, debido al riesgo de asfixia!
• Este dispositivo no está pensado para ser usado por
personas (incluyendo niños) con capacidades físicas, sensoriales o mentales reducidas, o con falta de experiencia
y/o conocimientos, a menos que tengan supervisión
o sean instruidas sobre el uso del dispositivo por una persona responsable por su seguridad.
• Vigile a los niños para garantizar que no jueguen con el
dispositivo.
Normas especiales de seguridad
Este dispositivo funciona con un
láser de Clase 1.
Indicación de los elementos demanejo
Front (Fig. 1)
1 Botón STANDBY/ON (Espera/Encendido)
2
CD OPEN/CLOSE (abrir/cerrar) compartimiento de CD
3 Puerto USB
Ranura de tarjeta SD/MMC
4 Botones VOLUME +/- (Volumen)
5 Botón ID3/iPOD/MEM/C-ADJ. (Memoria/Reloj)
6
iPOD OPEN/CLOSE (abrir/cerrar) Compartimento de
puerto de acoplamiento
7 Altavoz
8 Compartimiento de CD
Español
9
10
11
12
13
14
15
16
17
18
Pantalla LCD
Sensor IR para el mando a distancia
Indicador de STANDBY
Botón DAB/FM/AUX
Botón CD/iPOD/USB/CARD
Botón
SCAN/ENTER
(Reproducir/pausa/ Explorar/Entrar)
Botón /MENU/INFO (Detener)
Botones / SKIP/TUNE SEARCH
(buscar adelante/atrás)
Abrir/cerrar puerto de acoplamiento
Compartimento de puerto de acoplamiento
Vista trasera (Fig. 2)
19 Interruptor de red
20 Cable de alimentación
21 Antena FM ANT.
22 Toma de auriculares
23 Conexión LINE IN
Mando a distancia (Fig. 3)
1 Botón CD/iPOD/USB/CARD
2 Botón DAB/FM/AUX
3 Botón SELECT/MONO/ST.
4 Botones / FOLDER (arriba/abajo, Album)
5 Botón CLOCK DISP
6 Botón TIMER
7 Botón SLEEP
8 Botón VOLUME +/- (Volumen)
9 Botón INTRO
10 Botón MUTE (Silencio)
11 Botón EQ
12 Botón ID3/iPOD/MEM/C-ADJ. (Memoria/Reloj)
SCAN / ENTER
13 Botón
(Reproducir/pausa / Explorar/ Entrar)
Botón (Preset/Buscar adelante)
Botón (Preset/ Buscar atrás)
Botón / MENU/INFO (Detener/Menú)
14 Botón REPEAT (Repetir)
15 Botón RANDOM (Reproducción aleatoria)
16 Botón STANDBY/ON
Instalación/presentación
• Lea por completo el manual antes de usar el dispositivo.
• Seleccione una ubicación adecuada para el dispositivo. Las ubicaciones adecuadas son superficies secas,
uniformes y antideslizantes sobre las que pueda usar con
facilidad el dispositivo.
• Asegúrese de que exista una ventilación adecuada para
el dispositivo.
• Retire, si es necesario, la hoja protectora de la pantalla.
Montaje en pared
También puede montar el dispositivo en la pared (accesorios
de montaje no incluidos).
35
ATENCIÓN:
Antes de comenzar la instalación, cerciórese de que no
haya ningún cable en la pared para evitar dañarlos.
NOTA: ¡Compruebe el alcance del cable!
Para montar el dispositivo, asegúrese de contar con un
enchufe de pared cerca al que pueda llegar el cable de
alimentación.
La distancia entre los tornillos para el montaje en la pared es
de 140 mm.
• Taladre dos orificios de manera horizontal con una separación entre sí de 140 mm.
• Introduzca tacos y tornillos en los orificios.
• Apriete los tornillos de montaje hasta que sobresalgan
alrededor de 4 mm de la pared.
• Pliegue el soporte hasta 90° (ver página 4, fig. 4).
• Monte el dispositivo sobre los tornillos. Compruebe que
esté bien fijado.
Colocación y sustitución de las pilas del mando a distancia
NOTA:
En algunos casos, la celda de litio del compartimento de la
batería del control remoto se ha cubierto con una lámina
protectora para su transporte. Así se logra aumentar la
duración de la batería. Antes del primer uso del control
remoto, quite esta protección.
La batería del control remoto es una celda de litio de larga
duración. En el caso de que el alcance del control remoto
disminuya con el uso, siga estos pasos:
• Abra el compartimento de la batería, situado en la parte
inferior del control remoto.
• Sustituya la celda por una batería del mismo tipo
(CR 2032). Compruebe que la polaridad es la adecuada.
• Cierre el compartimento de la batería.
Si el control remoto va a estar en desuso durante un largo
periodo de tiempo, extraiga la batería para evitar que se
produzcan fugas de ácido de la misma.
AVISO:
• No exponga las baterías a fuentes de calor intenso o
a la acción directa de la luz del sol. No arroje nunca las
baterías al fuego. ¡Peligro de explosión!
• Mantenga las baterías fuera del alcance de los niños.
no son juguetes.
• No intente abrir las baterías.
• Evite el contacto con objetos metálicos (anillos, clavos,
tornillos, etc.). ¡Podría provocar un cortocircuito!
• Los cortocircuitos pueden provocar un sobrecalentamiento de las baterías, e incluso prenderles fuego.
Pueden derivar en la combustión de las baterías.
• Por motivos de seguridad, cubra los terminales de las
baterías con una cinta adhesiva para su transporte.
36
Español
AVISO:
• Si se producen fugas en una batería, no permita que el
fluido entre en contacto con los ojos o con la piel. Si el
ácido entra en contacto con los ojos, lávelos con agua
depurada y consulte con un médico si no desaparecen
los síntomas.
ATENCIÓN:
Las baterías no se deben desechar en la basura. Lleve las
baterías usadas a centros de recolección específicos o
devuélvalas al vendedor.
Alimentación
• Conecte el enchufe de corriente a una toma estándar,
230 V, 50 Hz.
• Asegúrese de que el voltaje coincida con la placa identificadora.
• Perderá la configuración de la hora si se interrumpe el
suministro eléctrico.
• Utilice el interruptor de alimentación (19) de la parte
inferior del dispositivo para encenderlo.
Configuración automática de hora
Es necesario para hacerlo recibir emisoras DAB.
Después de encender por primera vez el dispositivo, éste
buscará automáticamente la señal de hora. Aparecerá SCAN
TIME en pantalla. Si el dispositivo no recibe emisoras DAB en
su ubicación, establezca la hora manualmente como se describe en “Configuración manual de hora (en modo espera)”.
Configuración manual de hora (durante el modo espera)
1. Mantenga pulsado el botón ID3/iPOD/MEM/C-ADJ.
(5/12). La pantalla mostrará “24 HOUR”.
2. Use los botones / SKIP/TUNE SEARCH (16/13)
para seleccionar entre la configuración de indicación
de 24 horas y 12 horas. Confirme con ID3/iPOD/MEM/
C-ADJ..
NOTA:
La configuración de 12 horas producirá la indicación
siguiente
AM = mañana, PM = tarde.
• Abra el compartimiento de CD (8) pulsando el botón
CD OPEN/CLOSE (abrir/cerrar) (2 en el dispositivo).
La bandeja de CD se abre hacia la derecha.
• Saque, si está presente, el dispositivo de asegurado para
transporte del reproductor de CD antes de iniciar el uso.
• Pulse el botón CD OPEN/CLOSE de nuevo para cerrar
el compartimiento de CD.
NOTA:
La bandeja de CD no se puede abrir en el modo iPOD.
Compatibilidad con el iPod/iPhone
Debido a la gran variedad de modelos y generaciones de
iPod y iPhone disponibles en el mercado, no se puede
garantizar plena compatibilidad. Antes de conectar su iPod/
iPhone, compruebe que la interfaz es compatible.
Asimismo, tampoco podemos garantizar la compatibilidad
de todas las funciones del control remoto. Use el iPod/iPhone con normalidad mientras se encuentra colocado en la
base de carga.
NOTA:
En función de la versión del software de su iPhone, podría
aparecer en pantalla el siguiente mensaje de error:
“Este accesorio no ha sido diseñado para su uso con
iPhone. Es posible que se registre ruido y que la intensidad
de la señal sea reducida.”
En este caso, pulse “Aceptar”.
Funcionamiento general
NOTA:
Algunos botones se encuentran en el dispositivo y en el
mando a distancia. Los botones con el mismo nombre
producen las mismas funciones.
STANDBY/ON (1/16)
Pulse el botón STANDBY/ON para poner el dispositivo en
modo espera (la pantalla mostrará la hora). Pulse este botón
de nuevo para encender el dispositivo.
3. Use los botones / SKIP/TUNE SEARCH para establecer las horas. Confirme con ID3/iPOD/MEM/C-ADJ..
4. Use los botones / SKIP/TUNE SEARCH para establecer los minutos.
5. Pulse ID3/iPOD/MEM/C-ADJ. de nuevo para guardar la
configuración de hora.
NOTA:
• Pulse cualquier botón en modo espera para mostrar la
hora durante 10 segundos.
• Si el dispositivo está en modo CD/USB/SD/iPOD pero
no está funcionando, pasará a modo espera automáticamente pasados 15 minutos.
Dispositivo de asegurado del compartimiento de CD
para el transporte
• Encienda el dispositivo, pulse el botón STANDBY/ON
(1/16).
Volumen (4/8)
Ajústelo al nivel deseado de volumen. La pantalla mostrará
“VOL SETTING” “VOL” y un número. Equivaldrá al volumen
establecido entre “VOL MAX” o “VOL MIN”.
Español
37
Toma de auriculares (22)
Cuando escuche por auriculares, use auriculares con una
toma estéreo de 3,5 mm, que debe conectar a la toma de
auriculares. Se desactivarán los altavoces.
Toma LINE IN
Conexión de dispositivos de reproducción analógicos.
Cuando conecte con esta toma también puede escuchar el
sonido de otros dispositivos, como reproductores MP3 o CD,
etc. por los altavoces.
Mando a distancia por infrarrojos
Funcionamiento inalámbrido desde una distancia de hasta
5 metros. Si el alcance se reduce, cambie las baterías. Asegúrese de que no haya obstáculos entre el mando a distancia y
el sensor (10) del dispositivo durante el funcionamiento.
1. Conecte el dispositivo externo por la toma de 3,5 mm a
la toma LINE IN (23).
2. Use el botón DAB/FM/AUX (12/2) para seleccionar el
modo AUX. Aparecerá AUX MODE en pantalla.
3. Con los altavoces puede escuchar el sonido del dispositivo externo; use los botones VOLUME +/- (4/8) para
ajustar el volumen. Los botones de CD están desactivados.
4. Para otras funciones, consulte el manual del usuario del
dispositivo de audio externo.
Puerto USB
Este dispositivo se ha diseñado según las últimas características de la tecnología USB. Debido a la diversidad de las
herramientas de memoria USB del mercado, no resulta posible proporcionar una compatibilidad completa con todos
los dispositivos de almacenamiento USB. En algunos casos
pueden producirse, por este motivo, errorres al reproducir
dispositivos de almacenamiento USB. No es una avería del
dispositivo.
1. Abra la tapa (3) de la parte superior del dispositivo.
2. Use el botón CD/iPOD/USB/CARD (13/1) para seleccionar el modo USB. La pantalla mostrará MODE.
3. Introduzca un dispositivo de almacenamiento USB
directamente en el puerto. Se mostrará USB READING y
a continuación el número total de carpetas (F) y número
de títulos (T).
4. Si la reproducción no comienza automáticamente: Pulse
SCAN/ENTER (14/13) para iniciar la reproducción de
los archivos de música.
Consulte el capítulo “Reproducir CD/MP3” para saber el
funcionamiento.
ATENCIÓN:
Antes de extraer el dispositivo de almacenamiento USB,
use el botón DAB/FM/AUX para cambiar al modo RADIO.
Ranura de tarjeta SD/MMC
1. Abra la tapa (3) de la parte superior del dispositivo.
2. Si desea reproducir archivos de una tarjeta SD/MMC,
introduzca la tarjeta en la ranura correspondiente.
3. Use el botón CD/iPOD/USB/CARD (13/1) para seleccionar el modo CARD. Aparecerá CARD MODE en pantalla.
Se mostrará CARD READING y a continuación el número
total de carpetas (F) y número de títulos (T).
4. Si la reproducción no comienza automáticamente: Pulse
SCAN/ENTER (14/13) para iniciar la reproducción de
los archivos de música.
Consulte el capítulo “Reproducir CD/MP3” para saber el
funcionamiento.
NOTA:
Ponga el volumen del dispositivo externo a un nivel de
audición adecuado.
Retablecer valores de fábrica
Se borrarán las emisoras memorizadas y la hora.
1. Ponga el dispositivo en modo espera.
2. Mantenga pulsado el botón /MENU/INFO (15/13)
durante unos 3 segundos. Aparecerá “SYSTEM RESET
PLEASE WAIT” en pantalla. Si el reinicio ha tenido éxito,
aparecerá “SYSTEM RESET OK” en pantalla.
3. El dispositivo buscará la hora. Aparecerá SCAN TIME en
pantalla.
Escuchar la radio
Explorar emisoras FM
1. Pulse repetidamente el botón DAB/FM/AUX (12/2) hasta
que la pantalla muestre “RADIO INITIALIZE PLEASE
WAIT”.
2. Tiene dos opciones para sintonizar una emisora:
- Pulse los botones / SKIP/TUNE SEARCH (16/13).
- Si pulsa el botón
SCAN/ENTER (14/13), el dispositivo buscará hasta la siguiente emisora. Mantenga
pulsado este botón para buscar la emisora anterior.
3. Si la recepción es muy débil y tiene interferencias en la e
misora recibida, pruebe a mejorar la recepción orientando y enrollando/desenrollando la antena. Para las emisoras FM puede cambiar entre recepción AUDIO MODE:
MONO y AUTO (estéreo) usando el botón SELECT/
MONO/ST (3 en el mando a distancia). Si la recepción es
mala, recomendamos cambiar a MONO.
Explorar emisoras DAB
Digital Audio Broadcasting (DAB) es un estándar de emisión
digital para recepción terrestre de radio digital. Puede encontrar una lista de emisoras de radio que pueden recibirse
en Alemania en Internet, en www.digitalradio.de.
38
Español
1. Pulse el botón DAB/FM/AUX (12/2) repetidamente hasta
que se muestre “WELCOME TO DIGITAL RADIO” en
pantalla.
SCAN/ENTER (14/13) para iniciar la
2. Pulse el botón
exploración automática. Aparecerá brevemente “AUTOTUNE FULL SCAN” en pantalla. El dispositivo buscará las
emisoras de radio que puedan recibirse.
3. Puede seleccionar la emisora siguiente o anterior usando
los botones / SKIP/TUNE SEARCH (16/13).
4. Si la recepción es muy débil y la emisora tiene “saltos”,
pruebe a mejorar la recepción cambiando la posición de
la antena.
NOTA:
• Para una recepción DAB optima, recomendamos que
ponga la antena vertical.
• Durante la recepción DAB no puede cambiar entre
Mono y Estéreo.
• Para establecer manualmente una frecuencia DAB,
mantenga pulsado el botón SELECT/MONO/ST.
Aparecerá brevemente el mensaje MANUAL TUNE en
pantalla. Use los botones / SKIP/TUNE SEARCH
para establecer la frecuencia deseada. Confirme con el
botón SELECT/MONO/ST.
Mostrar información DAB adicional
En modo DAB puede mostrar la siguiente información
adicional si la emite la emisora. Para hacerlo, pulse el botón
MENU/INFO (15/13).
• <PROGRAMME TYP>
Indica la categoría de la emisora (como Música Pop,
Noticias, etc.).
• <DLS>
Abreviatura de Dynamic Label Segment. Incluye datos
complementarios. Este contenido puede ser, por ejemplo, información sobre la emisora o el título y artista de la
música que se escucha.
• <Ensemble Name>
Muestra el nombre del grupo de la emisora (por ejemplo,
DR Deutschland).
• <Ensemble Freq.>
Frecuencia de la emisora de radio actual.
• <Audio Bit Rate>
Muestra la tasa de bits de audio digital.
• <Sig. Strenght>
Muestra la potencia de señal recibida.
• <Time/Date>
Muestra la fecha y hora actuales.
NOTA:
Si se muestra el símbolo “>” tras el nombre de la emisora,
puede mostrar brevemente la categoría al mostrar otra
información. Para hacerlo, pulse el botón SELECT/MONO/
ST.
Guardar emisora
1. Si ha encontrado la emisora deseada, mantenga pulsado
el botón ID3/iPOD/MEM/C-ADJ. (5/12).
Para emisoras FM: La frecuencia de radio memorizada
actual aparecerá en pantalla y parpadeará el número de
ubicación preestablecida.
Para emisoras DAB: Aparecerá “Memoria vacía” en la
pantalla si las ubicaciones preestablecidas están vacías y
parpadeará el número de ubicación preestablecida.
2. Para elegir la posición de memoria, pulse el botón
/ SKIP/TUNE SEARCH (16/13).
3. Pulse ID3/iPOD/MEM/C-ADJ. para guardar la configuración.
Seleccionar una emisora preestablecida
1. Pulse el botón ID3/iPOD/MEM/C-ADJ..
2. Seleccione la ubicación preestablecida deseada con los
botones / SKIP/TUNE SEARCH.
3. Pulse de nuevo el botón ID3/iPOD/MEM/C-ADJ. para
reproducir la emisora de radio deseada.
Reproducción música del iPod/iPhone
(iPod/iPhone no incluido)
1. Pulse el botón CD/iPOD/USB/CARD (13/1) varias veces,
hasta que aparezca “NO iPOD” en la pantalla.
2. Pulse el botón iPOD OPEN/CLOSE (abrir/cerrar) (6 en
el dispositivo) para abrir el compartimento de puerto de
acoplamiento (18). La bandeja de CD se abre hacia la
izquierda.
NOTA:
El compartimento de puerto de acoplamiento no se
puede abrir en el modo de CD.
3. Pulse el botón (17) para abrir el puerto de acoplamiento.
4. Si se proporciona un adaptador con el iPod, póngalo
sobre el conector de la base de carga. Solamente podrá
comprobar que el iPod se ajusta correctamente al puerto
si el adaptador está conectado.
5. Coloque el iPod/iPhone en la base de carga.
ATENCIÓN:
Compruebe que el iPod/iPhone está conectado al
puerto en la posición correcta. No tuerza ni incline el
iPod/iPhone mientras esté conectado al puerto. Podría
provocar daños en la base de carga o en el iPod/iPhone.
6. Pulse el botón (17) para cerrar el puerto de acoplamiento.
NOTA:
Si el puerto de conexión no está retraído, no podrá
cerrar el compartimiento. Aparecerá el mensaje DOOR
KEY LOCK en pantalla.
7. En función del modelo de iPod/iPhone, es posible que
sea necesario desbloquear los botones y comenzar la
SCAN/ENTER (14/13).
reproducción con el botón
Español
8. Cierre de nuevo el compartimento de puerto de acoplamiento. Para ello, pulse de nuevo el botón iPOD
OPEN/CLOSE.
9. Siga el manual de su iPod/iPhone para saber el uso de
los controles.
ATENCIÓN:
Detenga la reproducción antes de desconectar el iPod/
iPhone del puerto, ya que su iPod/iPhone podría sufrir
daños.
NOTA:
Si recibe una llamada durante la reproducción de música
con el iPhone en la base de carga, la reproducción de
detendrá y podrá oír el tono de llamada.
Carga de iPod/iPhone
La batería de su iPod/iPhone se carga en cuanto se conecta
el iPod/iPhone. Para ello, la unidad debe estar conectada al
suministro eléctrico.
NOTA:
• Si se ha suministrado un adaptador de ranura con
su iPod, utilícelo para estar seguro de que el iPod se
acopla correctamente.
• No todas las generaciones de iPod/iPhone soportan el
modo de carga.
• La duración del proceso de carga dependerá del iPod/
iPhone utilizado y sus características de funcionamiento.
Reproducir CD/MP3
Cómo reproducir un CD
1. Pulse repetidamente el botón CD/iPOD/USB/CARD
(13/1) hasta que la pantalla muestre “CD MODE”.
2. Pulse el botón CD OPEN/CLOSE (abrir/cerrar) (2 en el
dispositivo) para abrir el compartimiento de CD (8). La
bandeja de CD se abre hacia la izquierda.
NOTA:
El compartimento de puerto de acoplamiento no se
puede abrir en el modo de iPOD.
3. Ponga un CD audio con el lado de la etiqueta hacia la
parte delantera del eje central, de modo que el CD encaje de forma mecánica. Cierre la tapa del CD pulsando el
botón CD OPEN/CLOSE de nuevo.
4. CD AUDIO:
La pantalla mostrará “DISC CD”, el número de pistas y
el tiempo de reproducción total. Si la reproducción no
comienza automáticamente: Pulse el botón
SCAN/
ENTER (14/13) para iniciar la reproducción del CD. La
reproducción comenzará en el primer título del CD. La
pantalla mostrará la pista actual y el tiempo de reproducción transcurrido.
39
Para MP3 o CD en formato MP3:
La pantalla mostrará “STOP”, el número de carpeta,
como F--04, y el número total de pistas (como T--126). Si
la reproducción no comienza automáticamente: Pulse
el botón
SCAN/ENTER para iniciar la reproducción
de CD. La reproducción comenzará por la primera
pista y la primera carpeta. En la pantalla se muestra la
canción actual, la carpeta actual, el tiempo que queda de
reproducción y DISC “MP3”. Use los botones FOLDER
o FOLDER (5 en el mando a distancia) para elegir las
carpetas independientes.
5. Para sacar un CD, pulse el botón MENU/INFO (15)
(13 en el mando), abra el compartimiento de CD con el
botón CD OPEN/CLOSE (abrir/cerrar) y levante cuidadosamente el CD.
Mantenga siempre cerrada la tapa del CD.
NOTA:
• Para CD en formato MP3 con una carpeta, aparecerá
001 para la primera pista de la nueva carpeta al cambiar
a otra carpeta.
• Si no se ha introducido un disco o no se ha introducido
correctamente, se encenderá “CD--READING” y la
pantalla mostrará “NO DISC (Sin disco)”.
• La reproducción de CD creados por el usuario no puede garantizarse por la diversidad de software y equios
de medios de CD.
Descripción de los botones de control
SCAN/ENTER (9/14)
Puede detener temporalmente la reproducción y comenzar
de nuevo. El tiempo de reproducción transcurrido parpadeará en la pantalla. Pulsando el botón de nuevo continuará la
reproducción desde la misma posición.
En modo iPOD:
• En primer lugar, pulse el botón ID3/iPOD/MEM/C-ADJ.
para activar el Menú iPod. iPOD MENU aparece en la
pantalla.
• A continuación, pulse el botón
SCAN/ENTER para
activar una función o para acceder al menú siguiente.
En modo DAB:
Inicia la exploración de emisoras automática (AUTOTUNE
FULL SCAN).
/ SKIP/TUNE SEARCH (16/14)
Si se está escuchando un CD de audio, MP3,o un CD en
formato MP3 o en el modo iPOD:
Con el botón SKIP/TUNE SEARCH puede saltar a la pista
siguiente o posterior, etc. Presione y mantenga este botón
para buscar música rápidamente.
40
Español
Puede usar el botón SKIP/TUNE SEARCH del modo
siguiente:
Pulsar x 1 =
Inicia de nuevo la pista actual desde el
principio.
Pulsar x 2 =
Salta a la pista anterior.
Pulsar x 3 =
Reproduce la pista anterior, etc. Presione
y mantenga el botón para buscar música
rápidamente.
En modo iPOD:
• En primer lugar, pulse el botón ID3/iPOD/MEM/C-ADJ.
para activar el Menú iPod. iPOD MENU aparece en la
pantalla.
• A continuación, pulse los botones / SKIP/TUNE
SEARCH para subir o bajar en el menú del iPod/iPhone.
En modo radio:
Sintoniza la emisora de radio deseada. Con el botón previamente pulsado ID3/iPOD/MEM/C-ADJ. para seleccionar la
emisora preestablecida.
MENU/INFO (15/13)
Para poner en pausa el CD o una pista de música.
En modo iPOD:
• En primer lugar, pulse el botón ID3/iPOD/MEM/C-ADJ.
para activar el Menú iPod. iPOD MENU aparece en la
pantalla.
• A continuación, pulse el botón MENU/INFO para
acceder al menú de iPod/iPhone o para volver al menú
anterior.
NOTA:
La aplicación de música debe estar activada para hacer
esto.
En modo DAB:
Muestra la información adicional. Consulte la sección “Escuchar la radio” “Mostrar información DAB adicional”.
MUTE (10 en el mando)
Apaga rápidamente el sonido. Parpadeará la indicación
“MUTE ON”. Para cancelar esta función, pulse MUTE de
nuevo.
EQ (11 en el mando)
(función de ecualizador preestablecida). Tiene distintos
modos de sonido disponibles (FLAT, CLASSIC, ROCK, POP,
JAZZ).
NOTA:
Durante la reproducción de música del iPod/iPhone.
Para mejorar el sonido, modifique el ajuste EQ en su iPod/
iPhone como sea necesario.
SELECT/MONO/ST (3 en el mando a distancia)
En modo radio FM:
Cambia entre STEREO y MONO.
En modo DAB:
Mantenga pulsado el botón para ajustar manualmente una
emisora DAB.
REPEAT (14 en el mando)
Pulsar x 1:
(REP_1 se enciende) La pista actual se repetirá por completo.
Pulsar x 2:
(REP_ALL se enciende) Se repetirá todo el
CD por completo.
Pulsar x 3:
Se cancelarán todas las funciones. Se continuará con la reproducción normal.
Sólo para MP3 y CD en formato MP3:
Pulsar x 1:
La pista actual se repetirá continuamente
(La pantalla mostrará REP_1).
Pulsar x 2:
El CD entero se repetirá continuamente
(La pantalla mostrará REP_ALL).
Pulsar x 3:
La carpeta actual del CD MP3 se repetirá
continuamente (La pantalla mostrará REP_
ALBUM). Use los botones FOLDER
(4 en el mando a distancia) para elegir las
carpetas independientemente.
Pulsar x 4:
Se desactivará la función y el CD se reproducirá de la forma normal.
RANDOM (15 en el mando)
La pantalla mostrará “RANDOM” y el número de pista que
se reproducirá en primer lugar. Se reproducirán todas las
pistas en orden aleatorio.
FOLDER (4 en el mando a distancia)
Para MP3 o un CD en formato MP3:
Pulse estos botones durante la reproducción para pasar a
una carpeta arriba o abajo. La pantalla mostrará brevemente
un mensaje, por ejemplo ALBUM 02. El sistema comenzará
automáticamente la reproducción del CD MP3. Cuando pulse los botones en modo detención, el mensaje se mostrará
brevemente en la pantalla. Pulse el botón
SCAN/ENTER
para iniciar la reproducción.
SLEEP (7 en el mando)
Cuando el dispositivo esté encendido, puede establecer el
tiempo pasado el cual el dispositivo pasará a modo espera;
establezca el tiempo en intervalos de 10 minutos, de 90 a
10 minutos. Pulse repetidamente este botón hasta que la
pantalla muestre el tiempo deseado. Cuando la función está
activada, se muestra el tiempo restante aproximadamente
cada 10 segundos. El dispositivo se apagará automáticamente pasado el tiempo preestablecido.
Español
Para apagar de nuevo la función, pulse el botón SLEEP repetidamente hasta que no se muestre nada en la pantalla.
TIMER (6 en el mando)
Puede programar el dispositivo para que se apague y encienda de nuevo pasado un tiempo preestablecido.
1. Pulse el botón STANDBY/ON para poner el dispositivo
en modo espera (la pantalla mostrará la hora).
2. Mantenga pulsado el botón TIMER hasta que aparezca
“ON TIME” en pantalla.
• Mediante los botones / SKIP/TUNE SEARCH
(16/13), ahora puede configurar la horas y los minutos
de encendido, así como las hora y los minutos de
apagado, el modo de encendido y el volumen de
encendido.
• Confirme su selección cada vez con el botón TIMER.
La opción a configurar parpadea en la pantalla.
NOTA:
Si no pulsa ningún botón en 5 segundos, el dispositivo
vuelve al modo de standby sin guardar ninguna selección.
3. Tras seleccionar el volumen de encendido, vuelva a
pulsar el botón TIMER. Las configuraciones se mostrarán
secuencialmente en pantalla. El dispositivo pasará a
modo espera. Se mostrará “ ” y se activará el temporizador.
Al llegar a la hora programada, el dispositivo se enciende
con el modo seleccionado. El volumen va aumentando lentamente hasta alcanzar el volumen seleccionado.
Pulse TIMER para desactivar la función de temporizador. Se
mostrará brevemente TIME OFF en pantalla. “ ” desaparecerá de la pantalla.
NOTA:
Si se desactiva el temporizador, pulse el botón TIMER; aparecerá brevemente TIME ON en la pantalla. A continuación
verá la configuración actual. El símbolo “ ” aparecerá en
pantalla y el temporizador estará activo.
ID3/iPOD/MEM/C-ADJ. (5/12)
Establecer el reloj, guardar emisoras y reproducción programada.
Para MP3 o un CD en formato MP3:
Si dispone de información de etiqueta ID-3 guardada, se
mostrará en pantalla como un mensaje. Pulse el botón de
nuevo para activar la función.
CLOCK DISP (5 en el mando a distancia)
Pulse el botón para mostrar la hora durante 10 segundos.
41
Reproducción programada
Reproducción programada en la secuencia deseada. (Sólo
en el modo CD/USB/CARD)
1. Pulse el botón MENU/INFO (15/13).
2. Pulse el botón ID3/iPOD/MEM/C-ADJ. (5/12). Parpadeará MEMORY, P-01 (ubicación preestablecida) y T-000
(título) en pantalla. Use los botones / SKIP/TUNE
SEARCH (16/13) para elegir la pista deseada y pulse el
botón ID3/iPOD/MEM/C-ADJ. de nuevo. La pantalla
cambiará a la posición de memoria P- 02.
3.
4.
5.
6.
7.
Para MP3 o CD en formato MP3:
La carpeta “F-000” parpadea en la pantalla junto al botón MEMORY. En primer lugar, seleccione la carpeta que
desee con los botones FOLDER (4 en el mando a
distanica). Confirme la selección de carpeta con el botón
ID3/iPOD/MEM/C-ADJ..
Use los botones / SKIP/TUNE SEARCH para elegir la
pista siguiente y pulse el botón ID3/iPOD/MEM/C-ADJ.
de nuevo. Repita los pasos hasta haber seleccionado
todas las pistas.
Pulse el botón
SCAN/ENTER (14/13). Comenzará la
reproducción. La pantalla mostrará el primer número de
pista seleccionado.
Pulse el botón MENU/INFO una vez para detener la
reproducción. Se conservará la memoria.
Para reproducir el programa de nuevo pulse el botón
SCAN/ENTER.
Para borrar la memoria, pulse el botón MENU/INFO
dos veces. La indicación MEM se apaga.
El dispositivo se detendrá automáticamente cuando se
hayan reproducido todas las pistas guardadas. La secuencia
de programa se conservará en memoria hasta que cambie
a otro modo, saque el CD del compartimiento o apague el
dispositivo.
Puede combinarse la reproducción programada con la
función REPEAT. Después de programar e iniciar la reproducción, pulse el botón REPEAT (14 en el mando) hasta tres
veces; las funciones pueden usarse como se describe en
“REPEAT”.
Reproducción de archivos de música en formato MP3
Este dispositivo permite la reproducción de archivos de música en formato MP3 El dispositivo, además soporta los tipos
de CD habituales: CD, CD-RW, y CD-R.
El dispositivo puede reproducir CD MP3. Son CD comprimidos que pueden guardar hasta 200 pistas. El dispositivo
reconoce automáticamente discos MP3 (la pantalla mostrará
el número total de pistas y carpetas). Consulte el capítulo
“Reproducir CD/MP3” para reproducir estos CD. Puede
programar pistas como se ha descrito en “Reproducción
programada”.
42
Español
Observe:
Existen muchos métodos de grabación y compresión, así
como diferencias de calidad de los CD y los CD grabados.
Además, la industria musical no aplica estándares fijos (protección de copia).
Por este motivo pueden, en algunos casos, producirse
problemas cuando reproduzca discos CD y MP3. No es una
avería del dispositivo.
“Made for iPod” y “Made for iPhone” indican que un
accesorio electrónico está diseñado para conectarse
específicamente con iPod o iPhone y ha sido certificado por
el desarrollador en el cumplimiento de los estándares de
rendimiento de Apple. Apple no se hace responsable del
funcionamiento de este dispositivo ni del cumplimiento de
las exigencias de seguridad y regulación. Observe que el
uso de este accesorio con iPod o iPhone puede afectar al
rendimiento inalámbrico.
Limpieza y mantenimiento
• Desconecte el enchufe de corriente antes de limpiar.
• Puede limpiar las manchas externas usando un trapo
ligeramente húmedo sin aditivos.
Eliminación
Resolución de problemas
Problema
La unidad no
funciona
No se recibe
radio DAB
Causa
La unidad está
bloqueada y “se
congela”
Antena de cable
mal colocada
No se puede
recibir radio digital
en su zona
Solución
Retire el enchufe de
la toma de corriente
durante aproximadamente 5 segundos y a
continuación vuelva a
enchufar
Coloque la antena de
cable vertical
Especificaciones técnicas
Modelo:............................................................................MC 4456 iP
Tensión de alimentación:...................................230-240 V~ 50 Hz
Potencia de salida:.....................................................100 W PMPO
Consumo:....................................................................................23 W
Clase de protección:.........................................................................II
Peso neto:................................................................................2,40 kg
Radio:
Rangos de frecuencia:.................VHF/FM 87,5 ~ 108,0 MHz
...............DAB/DAB+ 174 ~ 240 MHz
Sujeto a cambios sin previo aviso.
Este dispositivo cumple con todas las directrices CE actuales,
como la directriz de compatibilidad electromagnética y de
bajo voltaje, y está fabricada según las últimas normas de
seguridad.
Significado del símbolo “cubo de basura”
Cuide del medio ambiente, no deseche aparatos eléctricos
con los residuos domésticos.
Deseche los aparatos eléctricos obsoletos o defectuosos en
los puntos de recolección municipales.
Ayude a evitar potenciales impactos medioambientales y en
la salud por una eliminación de residuos inadecuada.
Contribuye al reciclaje y otros modos de uso de aparatos
eléctricos y electrónicos viejos.
Su municipalidad le proporcionará información sobre los
puntos de recolección.
Italiano
Manuale dell’utente
Grazie per aver scelto il nostro prodotto. Vi auguriamo un
buon utilizzo del dispositivo.
Linee guida generali sulla sicurezza
Prima di usare questo dispositivo, leggere attentamente
il manuale dell’utente e conservarlo con il Certificato di
Garanzia, lo scontrino e, se possibile, la confezione originale.
Se il dispositivo viene consegnato a terzi, consegnare anche il
manuale dell’utente.
• Per evitare il pericolo di incendi o scosse elettriche,
non esporre l’apparecchio a pioggia o umidità. Non far
funzionare l’apparecchio vicino all’acqua (per es. in stanze
da bagno, piscine o ambienti umidi).
• Utilizzare il dispositivo solo per uso privato e per lo scopo
previsto. Il dispositivo non è idoneo ad utilizzo commerciale.
• Effettuare il collegamento soltanto a una presa standard.
Controllare che la tensione indicata sull’apparecchio
corrisponda alla tensione della presa.
• Se si usano adattatori esterni, rispettare polarità e tensione. Inserire le batterie correttamente.
• Quando si installa l’apparecchio, non ostruire le aperture
di ventilazione.
• Non aprire mai il guscio dell’apparecchio. Riparazioni
improprie possono provocare pericoli per l’utente. Se
l’apparecchio o i cavi principali sono danneggiati, non
mettere in funzione l’apparecchio e farlo riparare da un
esperto. Controllare periodicamente che i cavi principali
non siano danneggiati.
• Per evitare pericoli, far sostituire I cavi principali danneggiati con un altro equivalente dal produttore, dall’assistenza clienti o da un altro specialista.
• E l’apparecchio non viene utilizzato per un periodo
prolungato, sfilare la spina ed estrarre le batterie.
I presenti simboli sono riportati sull’apparecchio e devono
essere considerati come avvertenze:
La spia intermittente ha lo scopo di avvertire
l’utente della presenza di tensione pericolosa
nell’apparecchio.
Il punto esclamativo ha lo scopo di avvertire
l’utente della presenza di importanti istruzioni
di funzionamento e manutenzione fornite con
l’apparecchio.
I prodotti con questo simbolo funzionano con
“laser di classe 1” per la scansione del CD. I commutatori di sicurezza integrati hanno lo scopo di
impedire che l’utente venga esposto al pericoloso fascio di luce laser invisibile a occhio nudo che
fuoriesce dall’apparecchio quando si apre il vano
CD.
43
I commutatori di sicurezza non devono essere bypassati o
manomessi; in caso contrario sussiste il rischio di esposizione
al raggio laser.
Simboli nel manuale dell’utente
Note importanti per la sicurezza sono segnate in modo
chiaro. Fare attenzione ad evitare incidenti o danneggiare il
dispositivo:
AVVISO:
Avvertimenti di pericoli alla salute e indica rischi potenziali
di lesioni.
ATTENZIONE:
Indica pericoli potenziali per il dispositivo e altri oggetti.
NOTA:
Sottolinea consigli e informazioni.
Bambini e persone disabili
• Per ragioni di sicurezza tenere qualsiasi parte dell’imballaggio (sacchetti di plastica, cartilagine, spugne ecc.) fuori
dalla portata dei bambini.
AVVISO!
Non lasciare che i bambini giochino con le pellicole in
quanto c’è pericolo di soffocamento!
• L’apparecchio non deve essere utilizzato da individui
(compresi bambini) con ridotte abilità fisiche, sensoriali
oppure mentali o con esperienza/conoscenza insufficiente dell’apparecchio, se non dietro supervisione oppure
istruzioni sull’uso dell’apparecchio da parte del personale
responsabile della loro sicurezza.
• Controllare che i bambini non giochino con l’apparecchio.
Linee guide speciali di sicurezza
Il presente apparecchio utilizza un
laser di classe 1.
Elementi di comando
Lato anteriore (Fig. 1)
1 Tasto STANDBY/ON (standby/alimentazione)
2 Vano CD OPEN/CLOSE (aperture/chiusura) CD
3 Porta USB
Slot SD/MMC
4 Tasti VOLUME +/- (volume)
5 Tasto ID3/iPOD/MEM/C-ADJ. (memoria/orologio)
6
iPOD OPEN/CLOSE (apri/chiudi) Vano porta docking
7 Altoparlante
8 Vano CD
9 Display LCD
44
10
11
12
13
14
15
16
17
18
Italiano
Sensore IR per il telecomando
Indicatore STANDBY
Tasto DAB/FM/AUX
Tasto CD/iPOD/USB/CARD
Tasto
SCAN/ENTER
(riproduzione/pausa/Scansione/invio)
Tasto /MENU/INFO
Tasti / SKIP/TUNE SEARCH
(ricerca in avanti/all’indietro)
Apri/chiudi porta docking
Vano porta docking
Vista posteriore (Fig. 2)
19 Interrulttore di linea
20 Cavo d’alimentazione
21 Antenna seriale FM ANT.
22 Spinotto cuffie
23 Collegamento LINE IN
Telecomando (Fig. 3)
1 Tasto CD/iPOD/USB/CARD
2 Tasto DAB/FM/AUX
3 Tasto SELECT/MONO/ST.
4 Tasti / FOLDER (su/giù, album)
5 Tasto CLOCK DISP
6 Tasto TIMER
7 Tasto SLEEP
8 Tasti VOLUME +/- (volume)
9 Tasto INTRO
10 Tasto MUTE (silenziamento)
11 Tasto EQ
12 Tasto ID3/iPOD/MEM/C-ADJ. (memoria/orologio)
13 Tasto
/ SCAN/ENTER
(riproduzione/pausa/Scansione/invio)
Tasto (Preselezione/ricerca in avanti)
Tasto (Preselezione/ricerca all’indietro)
Tasto / MENU/INFO (Arresto/Menu)
14 Tasto REPEAT (ripetizione)
15 Tasto RANDOM (riproduzione casuale)
16 Tasto STANDBY/ON
Installazione/Introduzione
• Leggere attentamente il manuale prima di mettere in
funzione l’apparecchio!
• Scegliere un luogo idoneo al dispositivo. I luoghi adatti
sono asciutti e non scivolosi, non ché facilmente accessibili per consentire di azionare l’apparecchio facilmente.
• Assicurare una ventilazione adeguata!
• All’occorrenza, rimuovere la pellicola protettiva dal
display.
Installazione a parete
È anche possibile montare il dispositivo alla parete (accessori
di montaggio non forniti).
ATTENZIONE:
Accertarsi prima se ci sono cavi nella parete che possono
essere danneggiati!
NOTA: Controllare la portata del cavo!
Per montare il dispositivo, accertarsi che sia disponibile una
presa a parete facilmente accessibile vicino al cavo.
La distanza tra i montaggi per il montaggio a parete è di
140 mm.
• Perforare due fori orizzontalmente a distanza di 140 mm.
• Montare i tasselli a espansione e le viti nei fori.
• Avvitare le viti di montaggio fino a farle fuoriuscire di circa
4 mm dalla parete.
• Piegare il sostegno in alto di 90° (vedi pagina 4, fig. 4).
• Montare il dispositivo sulle viti. Controllare che sia fermo.
Inserimento/Sostituzione della batteria nel telecomando
NOTA:
Ove necessario, la cella al litio nel vano batterie del telecomando è stata inserita con una pellicola protettiva per il
trasporto. Questa consente di prolungare la durata della
batteria. Al primo utilizzo rimuovere questa pellicola per
preparare il telecomando all’uso.
La batteria nel telecomando è una cella litio a lunga durata.
Se il raggio di azione del telecomando si riduce durante l’uso,
seguire i seguenti passaggi:
• Aprire lo scomparto della batteria sotto al telecomando.
• Sostituire la cella con una batteria dello stesso tipo
(CR 2032). Accertarsi che la polarità sia corretta.
• Chiudere lo scomparto della batteria.
Se il telecomando non è utilizzato per lungo tempo, rimuovere la batteria per evitare eventuali perdite dell’acido.
AVVISO:
• Non esporre le batteria a forte calore o luce solare
diretta. Non gettare le batterie nel fuoco. Pericolo di
esplosione!
• Tenere le batterie fuori portata dei bambini. Non sono
giocattoli.
• Non forzare l’apertura delle batterie.
• Evitare il contatto con oggetti metallici. (Anelli, chiodi,
viti, ecc.) Pericolo di corto circuito!
• Il corto circuito può surriscaldare o anche incendiare le
batterie. Questo potrebbe determinare combustione.
• Durante il trasporto di batterie, coprire i terminali per la
sicurezza con un nastro adesivo.
• Se una batteria perde, far attenzione a non far andare il
fluido negli occhi o sulla pelle. Se l’acido va in contatto
con gli occhi, pulire bene con acqua pulita e contattare
un medico se i sintomi persistono.
Italiano
ATTENZIONE:
Le pile non devono essere smaltite nei rifi uti. Consegnare
le pile usate presso centri di raccolta competenti o al rivenditore stesso.
Alimentazione
• Collegare la spina a una presa, 230 V, 50 Hz.
• Controllare che la tensione corrisponda alla tensione
nominale riportata sull’etichetta.
• L’impostazione dell’ora andrà persa non appena vi sarà
un’interruzione di corrente.
• Usare l’interruttore principale (19) presente sul lato inferiore del dispositivo per accendere quest’ultimo.
Impostazione automatica dell’ora
Il requisito è la ricezione di stazioni DAB.
Dopo aver acceso il dispositivo per la prima volta, il dispositivo cerca automaticamente il segnale dell’ora. SCAN TIME
compare sul display. Se il dispositivo non riceve stazioni DAB
nel luogo, impostare l’ora manualmente come descritto in
“Impostazione manuale dell’ora (durante la modalità standby)”.
Impostazione manuale dell’orario
(durante il modo standby)
1. Tenere premuto il tasto ID3/iPOD/MEM/C-ADJ. (5/12). Il
display mostra “24 HOUR“.
2. Usate I tasti / SKIP/TUNE SEARCH (16/13) per selezionare l’impostazione “24 ore” oppure “12 ore”. Confermare con ID3/iPOD/MEM/C-ADJ..
NOTA:
In caso di selezione dell’impostazione “12 ore”, il display
visualizza quando segue
AM = mattina, PM = pomeriggio.
3. Usare I tasti / SKIP/TUNE SEARCH per impostare le
ore. Confermare con ID3/iPOD/MEM/C-ADJ..
4. Usare I tasti / SKIP/TUNE SEARCH per impostare i
minuti.
5. Premere nuovamente ID3/iPOD/MEM/C-ADJ. per salvare le impostazioni dell’orario.
Dispositivo di sicurezza del vano CD
• Accendere l’apparecchio premendo il tasto STANDBY/
ON (1/16).
• Aprire il vano CD (8) by premendo il tasto CD OPEN/
CLOSE (aperture/chiusura) (2 sul dispositivo). L’unità CD si
apre a destra.
• Se presente, rimuovere il dispositivo di sicurezza del CD
prima di mettere in funzione l’apparecchio.
• Premere nuovamente il tasto CD OPEN/CLOSE per
chiudere il vano CD.
NOTA:
Il vano CD non può essere aperto in modalità iPOD.
45
Caricamento dell’iPod/iPhone
A causa della varietà di modelli e generazioni di iPod e iPhone sul mercato, non è possibile garantire una compatibilità
completa. Prima di collegare l’iPod/iPhone, assicurarsi che
disponga dell’interfaccia compatibile.
Non è possibile garantire nemmeno la completa compatibilità con le funzioni remote. Far funzionare l’iPod/iPhone
normalmente mentre è collocato nella stazione docking.
NOTA:
A seconda della versione del software del vostro iPhone
potrà essere visualizzato il seguente messaggio di errore:
“Questo accessorio non è stato sviluppato per l’uso su
iPhone. È possibile che vi sia del rumore e che la potenza
del segnale sia ridotta.”
In questo caso premere “OK”.
Funzionamento generale
NOTA:
Alcuni tasti sono presenti sia sull’apparecchio che sul
telecomando. I tasti con lo stesso nome hanno la stessa
funzione.
STANDBY/ON (1/16)
Premere il tasto STANDBY/ON per portare l’apparecchio
nel modo standby (il display mostra l’orario). Premere nuovamente il tasto per accendere l’apparecchio.
NOTA:
• Premere qualsiasi tasto in modalità standby per mostrare l’ora per 10 secondi.
• Se il dispositivo è in modalità CD/USB/SD/iPOD, ma
non è in funzione, il dispositivo automaticamente passa
alla modalità standby dopo 15 minuti.
Volume (4/8)
Impostare il livello di volume preferito. Il display mostra “VOL
SETTING”, “VOL” e un numero. Il volume può essere impostato tra I valori “VOL MAX” e “VOL MIN”.
Spinotto cuffie (22)
Quando si ascolta attraverso le cuffie, utilizzare una presa
stereo da 3,5 mm a cui collegare lo spinotto degli altoparlanti. Gli altoparlanti vengono disattivati.
Telecomando a infrarossi
Funzionamento senza fili da una distanza max di 5 m. Se
l’intervallo è minore, sostituire le batterie. Controllare che non
vi siano ostacoli tra telecomando e sensore (10) dell’apparecchio durante il funzionamento.
46
Italiano
Porta USB
L’apparecchio è stato progettato secondo la più moderna
tecnologia USB. In seguito alla presenza di un’ampia gamma
di strumenti di memoria sul mercato, non è possibile assicurare compatibilità assoluta con tutti i dispositivi di memorizzazione USB. In alcuni rari casi possono quindi verificarsi errori
durante le riproduzione con alcuni dispositivi di memorizzazione USB. Non si tratta di anomalie dell’apparecchio.
1. Aprire il coperchio (3) sopra il dispositivo.
2. Usare il tasto CD/iPOD/USB/CARD (13/1) per selezionare
il modo USB. Il display mostra MODE.
3. Collegare un’archiviazione di massa USB direttamente
nella porta. USB READING e poi il numero totale delle
cartelle (F) e il numero delle tracce (T) sono visualizzati.
4. Se la riproduzione non ha inizio in modo automatico:
Premere
SCAN/ENTER (14/13) per avviare le riproduzione dei file musicali.
Fare riferimento al capitolo “Riproduzione CD/MP3” per il
funzionamento.
ATTENZIONE:
Prima di rimuovere il dispositivo di memorizzazione USB,
utilizzare il tasto DAB/FM/AUX per passare al modo RADIO.
Slot SD/MMC
1. Aprire il coperchio (3) sopra il dispositivo.
2. Se si desidera riprodurre file da una SD/MMC card, inserire la card nel relative slot.
3. Utilizzare il tasto CD/iPOD/USB/CARD (13/1) per selezionare il modo CARD. CARD MODE compare sul display.
CARD READING e poi il numero totale delle cartelle (F) e
il numero delle tracce (T) sono visualizzati.
4. Se la riproduzione non ha inizio in modo automatico:
SCAN/ENTER (14/13) per avviare la
Premere il tasto
riproduzione dei file musicali.
Fare riferimento al capitolo “Riproduzione di CD/MP3” per il
funzionamento.
Spinotti LINE IN
Collegare I dispositive di riproduzione analogica. Quando si
effettua il collegamento a questo spinotto, è possible anche
ascoltare altri dispositive, come lettori MP3 o CD ecc. attraverso gli altoparlanti.
1. Collegare il dispositivo esterno per mezzo dello presa da
3,5 mm allo spinotto LINE IN (23).
2. Utilizzare il tasto DAB/FM/AUX (12/2) er selezionare il
modo AUX. AUX MODE compare sul display.
3. Per mezzo degli altoparlanti è possible ascoltare l’audio
dei dispositivi esterni; utilizzare I tasti VOLUME +/- (4/8)
per regolare il volume. I tasti CD non sono attivi.
4. Per ulteriori funzioni, fare riferimento al manuale utente
del dispositivo audio esterno.
NOTA:
Impostare il volume dl dispositivo esterno a un livello
corretto.
Ripristinare i valori predefiniti
Tutte le stazioni radio preimpostate e l’ora sono eliminati.
1. Passare alla modalità Standby.
2. Tenere premuto il tasto /MENU/INFO (15/13) per circa
3 secondi. ”SYSTEM RESET PLEASE WAIT” compare sul
display. Se il ripristino è riuscito con successo, “SYSTEM
RESET OK” compare sul display.
3. Il dispositivo cerca poi l’ora. SCAN TIME compare sul
display.
Ascolto radio
Scansione delle stazioni FM
1. Premere ripetutamente il tasto DAB/FM/AUX (12/2)
finché il display non mostra “RADIO INITIALIZE PLEASE
WAIT”.
2. Si hanno due opzioni per sintonizzare una stazione:
- Premere i tasti / SKIP/TUNE SEARCH (16/13).
SCAN/ENTER (14/13), il di- Se si preme il tasto
spositivo cerca la stazione successiva. Tenere premuto
questo tasto per passare alla stazione precedente.
3. Se la ricezione è troppo debole e c’è statico sulla stazione
ricevuta, cercare di migliorare la ricezione girando e
allungando/accorciando l’antenna. Per le stazioni FM,
è possibile scegliere tra la ricezione AUDIO MODE:
MONO e AUTO (stereo) reception usando il tasto
SELECT/MONO/ST (3 sul telecomando). Se la ricezione
è debole, si consiglia di passare a MONO.
Ricerca di stazioni DAB
Digital Audio Broadcasting (DAB) è uno standard di trasmissione digitale per la ricezione terrestre di radio digitale. Un
elenco delle stazioni radio che possono essere ricevute in
Germania è disponibile su Internet a www.digitalradio.de.
1. Premere il tasto DAB/FM/AUX (12/2) ripetutamente
finché “WELCOME TO DIGITAL RADIO” non compare
sul display.
2. Premere il tasto
SCAN/ENTER (14/13) per avviare la
scansione automatica. “AUTOTUNE FULL SCAN” compare sul display. Il dispositivo poi ricerca le stazioni radio
che possono essere ricevute.
3. È possibile selezionare la stazione successiva o precedente usando i tasti / SKIP/TUNE SEARCH (16/13).
4. Se la ricezione è troppo debole e la stazione ricevuta
“motorboats”, provare a migliorare la ricezione cambiando la posizione dell’antenna.
Italiano
NOTA:
• Per una migliore ricezione DAB, si consiglia di posizionare l’antenna cavo verticalmente.
• Non è possibile selezionare Mono e Stereo durante la
ricezione DAB.
• Per impostare manualmente una frequenza DAB, tenere premuto il tasto SELECT/MONO/ST. Il messaggio
MANUAL TUNE compare sul display. Usare i tasti /
SKIP/TUNE SEARCH per impostare la frequenza desiderata. Confermare poi con il tasto SELECT/MONO/
ST.
Visualizzazione di alte informazioni DAB
In modalità DAB, è possibile visualizzare le seguenti informazioni se la trasmissione avviene dalla stazione radio. Per
effettuare ciò, premere il tasto MENU/INFO (15/13).
• <PROGRAMME TYP>
Questo indica la categoria della stazione (ad es. musica
pop, notizie, ecc.).
• <DLS>
Abbreviazione per Dynamic Label Segment. Questo
comporta dati complementari. Questo contenuto può
essere ad esempio informazioni sulla stazione o sulla
traccia musicale e l’artista riprodotto.
• <Ensemble Name>
Visualizza il nome del gruppo di stazioni
(ad es. DR Deutschland).
• <Ensemble Freq.>
Frequenza della stazione radio corrente.
• <Audio Bit Rate>
Visualizza la velocità dei bit audio.
• <Sig. Strenght>
Visualizza la potenza del segnale ricevuto.
• <Time/Date>
Visualizza la data e l’ora correnti.
NOTA:
Se il simbolo “>” è visualizzato dietro il nome della stazione, è possibile visualizzare la categoria quando si visualizzano altre informazioni. Per effettuare ciò premere il tasto
SELECT/MONO/ST.
Salva stazione
1. Dopo aver trovato la stazione desiderata, tenere premuto
il tasto ID3/iPOD/MEM/C-ADJ. (5/12).
Per stazioni FM: La frequenza radio preimpostata attualmente compare sul display e il numero della posizione
preimpostata lampeggia.
Per stazioni DAB: “Preimpostata vuota” compare sul
display se le posizioni di preimpostazione sono vuote e il
numero della posizione preimpostata lampeggia.
2. Per selezionare la posizione della memoria, premere il
tasti / SKIP/TUNE SEARCH (16/13).
3. Premere ID3/iPOD/MEM/C-ADJ. per salvare le impostazioni.
47
Selezione di una stazione preimpostata
1. Premere il tasto ID3/iPOD/MEM/C-ADJ..
2. Selezionare la posizione preimpostata desiderata con i
tasti / SKIP/TUNE SEARCH.
3. Premere nuovamente il tasto ID3/iPOD/MEM/C-ADJ.
per riprodurre la stazione radio desiderata.
Riproduzione musicale dall’iPod/iPhone
(Riproduzione musicale dall’iPod/iPhone)
1. Premere il tasto CD/iPOD/USB/CARD (13/1) in modo
ripetuto finchè non compare “NO iPOD” sul display.
2. Premere il tasto iPOD OPEN/CLOSE (6 sul dispositivo)
per aprire il vano porta docking (18). L’unità CD si apre
sulla sinistra.
NOTA:
Il vano porta docking non può essere aperto in modalità CD.
3. Premere il tasto (17) per aprire la porta docking.
4. Se un adattatore è stato fornito con l’iPod, inserirlo nel
connettore dock. È anche possibile assicurare che l’iPod
entri correttamente nella porta iPod se l’adattatore è
collegato.
5. Inserire l’iPod/iPhone nel dock.
ATTENZIONE:
Assicurarsi che l’iPod/iPhone sia collegato nella porta
in modo diritto. Non piegare o inclinare l’iPod/iPhone
mentre è connesso nella porta. In caso contrario, il dock
o l’iPod/iPhone possono subire danni.
6. Premere il tasto (17) per chiudere la porta docking.
NOTA:
Se la porta dock non è rientrata, il vano della porta
dock non può essere chiuso. Il messaggio DOOR KEY
LOCK compare sul display.
7. In base al modello dell’iPod/iPhone, rilasciare il blocco
tasti e iniziare la riproduzione di musica se necessario con
SCAN/ENTER (14/13).
il tasto
8. Chiudere nuovamente il vano porta docking. Per farlo,
premere il tasto iPOD OPEN/CLOSE di nuovo.
9. Seguire manualmente l’iPod/iPhone per un ulteriore
utilizzo dei tasti del dispositivo.
ATTENZIONE:
Interrompere la riproduzione prima di scollegare l’iPod/
iPhone dalla porta in quanto l’iPod/iPhone potrebbe venir
danneggiato.
NOTA:
In caso di chiamata in arrivo con riproduzione di musica di
fondo con l’iPhone in dock, la riproduzione si interrompe e
si sente il suono di chiamata.
48
Italiano
Caricamento dell’iPod iPod/iPhone
La batteria dell’iPod/iPhone viene caricata non appena l’iPod/
iPhone viene collegato. Per effettuare ciò, l’unità deve essere
connessa all’alimentazione.
NOTA:
• Se l’adattatore dello slot è stato fornito con l’iPod,
usarlo per assicurarsi che l‘iPod sia posizionato correttamente.
• Non tutte le generazioni di iPod/iPhone supportano la
modalità di ricarica.
• La durata del processo di ricarica dipende dall’iPod/
iPhone che è utilizzato e dalla condizione di funzionamento.
Riproduzione CD/MP3
Come riprodurre un CD
1. Premere ripetutamente il tasto CD/iPOD/USB/CARD
(13/1) finché il display non mostra “CD MODE”.
2. Premere il tasto CD OPEN/CLOSE (aperture/chiusura)
(2 sul dispositivo) per aprire il vano CD (8). L’unità CD si
apre a destra.
NOTA:
Il vano CD non può essere aperto in modalità iPOD.
3. Collocare un CD audio con l’etichetta verso la parte anteriore sul supporto al centro, in modo che il CD si blocchi
meccanicamente. Chiudere quindi lo sportello del CD
premendo nuovamente il tasto CD OPEN/CLOSE.
4. CD AUDIO:
Il display mostra “DISC CD” il numero dei brano e il tempo totale di riproduzione.Se la riproduzione non ha inizio
in modo automatico: Premere il tasto
SCAN/ENTER
(14/13) per avviare la riproduzione del CD. La riproduzione ha inizio dal primo brano del CD. Il display mostra il
brano attuale e il tempo di riproduzione rimanente.
Per MP3 o un CD in formato MP3:
Il display mostra “STOP” il numero della cartella, per es.
F--04 e il numero totale di branil (ad esempio, T--126). Se
la riproduzione non ha inizio in modo automatico: Premere il tasto
SCAN/ENTER per avviare la riproduzione
del CD. La riproduzione ha inizio dal primo brano e dalla
prima cartella. La canzone corrente, la cartella corrente,
il tempo di riproduzione trascorso e “DISC MP3” sono
visualizzati sul display. Utilizzare I tasti FOLDER o
FOLDER (5 sul telecomando) per selezionare le single
cartelle.
5. Per rimuovere un CD, premere il tasto MENU/INFO (15)
(13 sul telecomando), aprire il vano CD con il tasto CD
OPEN/CLOSE (aperture/chiusura) ed estrarre il CD con
attenzione.
Tenere sempre chiuso lo sportello del CD.
NOTA:
• Per CD in formato MP3 con una cartella, 001 compare
per la prima traccia della nuova cartella quando si passa
ad un’altra cartella.
• Se il disco non è inserito completamente oppure non
è inserito correttamente, compare il testo “CD--READING” e il display mostra “NO DISC” (nessun disco).
• Non è possible garantire la riproduzione di CDs create
dall’utente per la varietà dei software disponibile e le
varie attrezzature media CD.
Descrizione dei controlli
SCAN/ENTER (9/14)
È possible interrompere momentaneamente la riproduzione
e riprenderla in seguito. Il tempo di riproduzione rimanente
lampeggia sul display. Premere nuovamente il tasto per
riprendere la riproduzione dal punto in cui era stata interrotta.
In modalità iPOD:
• Premere prima il tasto ID3/iPOD/MEM/C-ADJ. per attivare il menu iPod. iPOD MENU compare sul display.
• Premere ora il tasto
SCAN/ENTER per attivare una
funzione o per visualizzare il menu successivo.
In modalità DAB:
Si avvia la scansione automatica delle stazioni (AUTOTUNE
FULL SCAN).
/ SKIP/TUNE SEARCH (16/14)
Se un CD audio, MP3, un CD è in riproduzione in formato
MP3 o in modalità iPOD:
Con il tasto SKIP/TUNE SEARCH è possibile saltare al
brano successivo o a quello ancora successivo ecc. Tenere
premuto il tasto per effettuare la ricerca rapida della musica.
È possible azionare il tasto SKIP/TUNE SEARCH come
segue:
Premere 1 x = Riproduce nuovamente il brano attuale
dall’inizio.
Premere 2 x = Salta al brano precedente.
Premere 3 x = Riproduce il brano precedente ecc.Tenere
premuto questo tasto per effettuare la
ricerca rapida della musica.
In modalità iPOD:
• Premere prima il tasto ID3/iPOD/MEM/C-ADJ. per attivare il menu iPod. iPOD MENU compare sul display.
• Ora premere i tasti / SKIP/TUNE SEARCH per scorrere su o giù nel menu dell’iPod/iPhone.
Durante il modo radio:
Sintonizzare la stazione radio desiderata. E in connessione
con il tasto premuto precedentemente ID3/iPOD/MEM/
C-ADJ. per selezionare la stazione preimpostata.
Italiano
MENU/INFO (15/13)
Sospende il CD o brano musicale.
In modalità iPOD:
• Premere prima il tasto ID3/iPOD/MEM/C-ADJ. per attivare il menu iPod. iPOD MENU compare sul display.
• Ora premere il tasto MENU/INFO per accedere al
menu dell’iPod/iPhone o per ritornare al menu precedente.
NOTA:
L’applicazione musicale deve essere già aperta per effettuare ciò.
In modalità DAB:
Visualizza le informazioni addizionali. Vedere la sezione
“Ascolto della radio” “Visualizzazione di alte informazioni
DAB”.
MUTE (10 sul telecomando)
Silenzia rapidamente il suono. Il display di “MUTE ON” lampeggia. Per cancellare questa funzione, premere nuovamente MUTE.
EQ (11 sul telecomando)
(Preimpostare la funzione equalizzazione). Sono disponibili
diversi modi di suono (FLAT, CLASSIC, ROCK, POP, JAZZ).
NOTA: Durante la riproduzione musicale iPod/iPhone
Per un suono di ottima qualità, modificare l’impostazione
EQ dell’iPod/iPhone come richiesto.
SELECT/MONO/ST (3 sul telecomando)
Durante il modo radio FM:
Effettua la commutazione tra STEREO e MONO.
In modalità DAB:
Tenere premuto il tasto per regolare manualmente una
stazione DAB.
REPEAT (14 sul telecomando)
Premere 1 x: (REP_1 si accende) Viene ripetuto completamente il brano attuale.
Premere 2 x: (REP_ALL si accende) Viene ripetuto completamente l’intero CD.
Premere 3 x: Tutte le funzioni vengono cancellate. La
riproduzione normale continua.
Solo per MP3 e CD in formato MP3:
Premere 1 x: Viene ripetuto continuamente il brano
attuale (Il display mostra REP_1).
Premere 2 x: Viene ripetuto continuamente il CD complete (il display mostra REP_ALL).
Premere 3 x:
Premere 4 x:
49
Viene ripetuta continuamente la cartella
selezionata del CD in MP3 (il display mostra
REP_ALBUM). Utilizzare i tasti FOLDER
(4 sul telecomando) per selezionare le single
cartello.
La funzione viene disattivata e il CD viene
riprodotto nel modo normale.
RANDOM (15 sul telecomando)
Il display mostra “RANDOM”e il numero del brano che verrà
riprodotto per primo. Tutti I brani vengono riprodotti consecutivamente in ordine casuale.
FOLDER (4 sul telecomando)
Per MP3 o un CD in formato MP3:
Premere questi tasti durante la riproduzione per passare alla
cartella superiore oppure inferiore. Il display mostra brevemente un messaggio, per es. ALBUM 02. Il sistema inizia
quindi la riproduzione del Cd in formato MP3. Quando si
premono i tasti durante il modo di arresto, il messaggio viene
anche in questo caso mostrato brevemente sul display. Premere quindi
SCAN/ENTER per avviare la riproduzione.
SLEEP (7 sul telecomando)
Quando viene acceso l’apparecchio, è possible impostare l’ora in cui l’apparecchio di porterà nel modo standby;
impostare l’orario a intervalli di 10 minuti da 90 a 10 minuti.
Premere ripetutamente questo tasto finché il display non mostra l’orario desiderato. Quando la funzione è attiva, il tempo
rimanente viene visualizzato ogni 10 secondi. L’apparecchio si
spegne automaticamente dopo il tempo preimpostato.
Per disattivare nuovamente la funzione, premere ripetutamente il tasto SLEEP finché il display non mostra nulla.
TIMER (6 sul telecomando)
È possible programmare l’apparecchio in modo che si spenga e si riaccenda dopo un periodo di tempo preimpostato.
1. Utilizzare il tasto STANDBY/ON per passare al modo
standby (viene mostrato l’orario).
2. Tenere premuto il tasto TIMER finché “ON TIME” non
compare sul display.
• Utilizzando i tasti / SKIP/TUNE SEARCH (16/13), è
ora possibile impostare le ore di accensione, i minuti
di accensione, le ore di spegnimento, i minuti di
spegnimento, la modalità di accensione e il volume
di accensione.
• Confermare l’immissione ogni volta con il tasto
TIMER. La visualizzazione corrente da impostare
lampeggia sul display.
NOTA:
Se non viene premuto alcun tasto entro 5 secondi, il
dispositivo ritorna in modalit di standby senza salvare
l’immissione.
50
Italiano
3. Dopo aver selezionato il volume di accensione, premere
di nuovo il tasto TIMER.Le impostazioni sono visualizzate
una dopo un’altra sul display. L’apparecchio di porta nel
modo standby. Il display mostra “ ” e si attiva il timer.
Al raggiungimento dell’orario impostato, il dispositivo passa
alla modalità selezionata. Il volume aumenta lentamente al
volume selezionato.
Premere TIMER per disattivare la funzione Timer. TIME OFF
viene visualizzato sul display. Il display smette di mostrare “ ”.
NOTA:
Se il timer è disattivato, premere il tasto TIMER, TIME ON
compare sul display. Poi saranno visualizzate le impostazioni correnti. Il simbolo “ ” compare poi sul display e il timer
viene attivato.
ID3/iPOD/MEM/C-ADJ. (5/12)
Impostazione dell’orologio, memorizzazione delle stazioni e
riproduzione dei programmi.
Per MP3 o un CD in formato MP3:
Se sono salvate le informazioni ID-3 Tag, queste compaiono
sul display. Premere di nuovo il tasto per attivare la funzione.
CLOCK DISP (5 sul telecomando)
Premere il tasto per visualizzare il tempo per 10 secondi.
7. Per cancellare la memoria, premere due volte il tasto
MENU/INFO. Il display MEM si spegne.
L’apparecchio si spegne automaticamente dopo aver
riprodotto tutti i brani memorizzati. La sequenza programma
viene mantenuta in memoria finché non si effettua la commutazione a un altro modo; rimuovere il CD dal vano o spegnere l’apparecchio.
È possibile combinare la riproduzione programma con la
funzione REPEAT. Dopo la programmazione e l’avvio della
riproduzione, premere il tasto REPEAT Taste (14 sul telecomando) fino a 3 volte; le funzioni possono essere applicata
come descritto nella sezione “REPEAT“.
Riproduzione di file musicali in formato MP3
Questo apparecchio consente di riprodurre file musicali in
formato MP3. L’apparecchio supporta inoltre I tipi di CD più
comuni: CD, CD-RW, e CD-R.
Si tratta di CD compressi che possono memorizzare fino a
200 brani. L’apparecchio riconosce automaticamente dischi
MP3 (il display mostra il numero totale di brani e cartelle).
Fare riferimento al capitolo “Riproduzione di CD/MP3” per la
riproduzione di questo tipo di CD. È possibile programmare
brani come descritto in precedenza nella sezione “Riproduzione programma”.
Riproduzione programma
Nota:
VI sono metodi di masterizzazione e compressione diversi,
come diverse qualità di CD e CD masterizzati.
Riproduzione programma nella sequenza desiderata. (Solo in
modalità CD/USB/CARD)
Inoltre, il settore musicale non utilizza standard prefissati
(protezione copia).
1. Premere il tasto MENU/INFO (15/13).
2. Premere il tasto ID3/iPOD/MEM/C-ADJ. (5/12). MEMORY, P-01 (posizione preimpostata) compare e T-000 (titolo)
lampeggia sul display. Utilizzare I tasti / SKIP/TUNE
SEARCH (16/13) per selezionare il brano desiderato e
premere nuovamente il tasto ID3/iPOD/MEM/C-ADJ.. Il
display cambia a posizione memoria P- 02.
Per questo motivo è possible, in rari casi, che insorgano errori
durante la lettura di CD e MP3. Non si tratta di un’anomalia
dell’apparecchio.
3.
4.
5.
6.
Per MP3 o CD in formato MP3:
La cartella visualizza “F-000” che lampeggia sul display
assieme al tasto MEMORY. Selezionare prima la cartella
desiderata tramite i tasti FOLDER (4 sul telecomando). Confermare la selezione della cartella con il tasto
ID3/iPOD/MEM/C-ADJ..
Utilizzare I tasti / SKIP/TUNE SEARCH per selezionare
il brano successivo e premere nuovamente ID3/iPOD/
MEM/C-ADJ.. Ripetere questi punti finché non sono stati
selezionati tutti I brani.
Premere il tasto
SCAN/ENTER (14/13). La riproduzione ha inizio. Il display mostra il numero del primo brano
selezionato.
Premere una volta il tasto MENU/INFO per interrompere la riproduzione. La memoria viene mantenuta.
Per riprodurre nuovamente il programma premere il tasto
SCAN/ENTER.
Pulizia e manutenzione
• Scollegare l’alimentazione prima di pulire l’apparecchio.
• Rimuovere le macchie esterne con un panno leggermente umido, senza detergente.
Risoluzione di problemi
Problema
L'unità non
funziona
Causa
Soluzione
L'unità è bloccata Tirare la presa principae “resta sospesa” le per circa 5 secondi.
Poi collegare nuovamente l'unità
Nessuna
Antenna cavo non Posizionare l'antenna
ricezione radio posizionata corret- cavo verticalmente
DAB
tamente
Nessuna radio
digitale può essere
ricevuta nell’area
Italiano
Specifiche tecniche
Modello:...........................................................................MC 4456 iP
Tensione di alimentazione:................................230-240 V~ 50 Hz
Uscita di potenza:.......................................................100 W PMPO
Consumo di potenza:................................................................23 W
Classe di protezione:........................................................................II
Peso netto:...............................................................................2,40 kg
Radio:
Gamme di frequenza:...............UKW/FM 87,5 ~ 108,0 MHz
...............DAB/DAB+ 174 ~ 240 MHz
Con riserva di apportare mofifiche tecniche!
Questo dispositivo risponde a tutte le direttive della CE,
come la direttiva sulla compatibilità elettromagnetica e quella
sul basso voltaggio ed è prodotto secondo le più recenti
norme di sicurezza.
“Made for iPod” e “Made for iPhone” significa che un accessorio elettronico è stato progettato per essere connesso
all’iPod o iPhone ed è stato certificato dallo sviluppatore al
fine di rispettare gli standard di prestazione Apple. Apple non
è responsabile del funzionamento di questo dispositivo o del
suo rispetto degli standard di sicurezza e regolamentativi.
L’utilizzo di questo accessorio con l’iPod o iPhone potrebbe
influenzare la prestazione wireless.
Smaltimento
Significato del simbolo “Cassonetto con ruote”
Rispettare l’ambiente, non smaltire dispositivi elettrici nei
rifiuti domestici.
Lo smaltimento di dispositivi obsoleti o difettosi deve avvenire tramite consegna presso punti di raccolta locali.
Aiutate ad evitare pericoli potenziali per l’ambiente e la
nostra salute tramite uno smaltimento non corretto.
Voi contribuite al riciclaggio e altro forme di utilizzo di dispositivi elettrici e elettronici.
Vostro comune è in grado di fornirvi informazioni sui punti di
raccolta.
51
52
English
Instruction Manual
Thank you for choosing our product. We hope you will enjoy
using the appliance.
General Safety Guidelines
Before using this device, carefully read this user manual and
keep it together with the Warranty Certificate, cashier receipt
and if possible, the original package inclusive its interior packing. If you hand on the device to any third person, include the
user manual as well.
• To avoid the risk of fire or electric shock, do not expose
the device to rain or humidity. Do not operate near water
(e.g. in bathrooms, swimming pools and wet basements).
• Only use the device for private use and the intended
purpose. This device is not intended for commercial use.
• Only connect to a standard wall outlet. Make sure the
voltage indicated on the device is in conformity with the
voltage of the outlet.
• If using external adapters, please observe correct polarity
and voltage. Insert batteries properly.
• When installing the device, do not cover any of the ventilation openings.
• Never open the enclosure of the device. Improper repairs
may cause significant hazards to the user. In case the
device or the mains cable are damaged, do not operate
the device and have it repaired by an expert. Regularly
check the mains cable for damage.
• In order to avoid hazards, a damaged mains cable must
be replaced with an equivalent cable by the manufacturer, our customer service or any other specialist.
• If you do not use the device for a longer period of time,
please unplug the device and remove the batteries.
These symbols may be found on the device and are intended
as warnings:
The lightning flash is intended to alert the user
to the presence of dangerous voltage within the
device.
The exclamation mark is intended to alert the
user to the presence of important operating
and maintenance instruction accompanying this
device.
Products with this symbol operate with a
“Class 1 Laser” for scanning the CD. The builtin safety switches are intended to prevent the
user from being exposed to the dangerous laser
beam not visible to the eye when opening the
CD compartment.
These safety switches must not be bypassed or altered;
otherwise there is a risk of being exposed to the laser beam.
Symbols in this user manual
Important notes for your safety are marked distinctively. Pay
absolute attention to them to avoid accidents and damage
to the device.
WARNING:
Warns of dangers for your health and indicates potential
risks of injury.
CAUTION:
Indicates potential dangers for the device or other objects.
NOTE:
Highlights tips and information for you.
Children and disabled persons
• For the safety of your children, keep any packing parts
(plastic bags, cartilage, Styrofoam etc.) out of their reach.
WARNING!
Don’t let small children play with foils for danger of
suffocation!
• This device is not intended for use by persons (including children) with reduced physical, sensory or mental
capabilities, or lack of experience and/or knowledge
unless they have been given supervision or instructions
concerning the use of the device by a person responsible
for their safety.
• Supervise children to ensure they do not play with the
device.
Special safety guidelines
This device operates with
a Class 1 laser.
Overview of the components
Front (Fig. 1)
1
STANDBY/ON button (standby/power)
2
CD OPEN/CLOSE (open/close) CD compartment
3 USB port
SD/MMC card slot
4 VOLUME +/- (volume) buttons
5 ID3/iPOD/MEM/C-ADJ. button (memory/clock)
6
iPOD OPEN/CLOSE (open/close)
Docking port compartment
7 Speaker
8 CD compartment
9 LCD display
10 IR sensor for the remote control
English
11
12
13
14
15
16
STANDBY Indicator
DAB/FM/AUX button
CD/iPOD/USB/CARD button
SCAN/ENTER button (play/pause/Scan/Enter)
/MENU/INFO button
/ SKIP/TUNE SEARCH buttons
(search forward/backwards)
17 Open/close docking port
18 Docking port compartment
53
CAUTION:
Make sure beforehand whether there are cables in the wall
which could be damaged!
NOTE: Check the reach of the cable!
To mount the device, make sure that an easily accessible
plug outlet is available within reach of the power cable.
The distance between the mountings for wall mounting is
140 mm.
Rear view (Fig. 2)
19 Mains switch
20 Mains cable
21 FM ANT. aerial antenna
22 headphone jack
23 LINE IN connection
• Drill two holes horizontally 140 mm apart.
• Fit rawlplugs and screws into the holes.
• Tighten the mounting screws until they protrude around
4 mm from the wall.
• Fold the stand up through 90° (see page 4, fig. 4).
• Mount the device onto the screws. Check that it is secure.
Remote control (Fig. 3)
1 CD/iPOD/USB/CARD button
2 DAB/FM/AUX button
3 SELECT/MONO/ST. button
4 / FOLDER buttons (up/down, album)
5 CLOCK DISP button
6 TIMER button
7 SLEEP button
8 VOLUME +/- (volume) buttons
9 INTRO button
10 MUTE (mute) button
11 EQ button
12 ID3/iPOD/MEM/C-ADJ. button (memory/clock)
13
/ SCAN/ENTER
(play/pause/Scan/Enter) button
button (Preset/search forward)
button (Preset/search backwards)
/ MENU/INFO (Stop/Menu) button
14 REPEAT button (repeat)
15 RANDOM button (random play)
16 STANDBY/ON button
Insert/Replace Battery in Remote Control
Installation/Introduction
• Read the manual thoroughly before operating the device!
• Choose a suitable location for the device. Suitable locations are dry, even and anti-slip surfaces on which you
may operate the device easily.
• Make sure there is proper ventilation for the device!
• Remove, if necessary, the protection sheet from the
display.
Wall mounting
You can also mount the device to the wall (mounting accessories not supplied).
NOTE:
Where necessary, the lithium cell in the battery compartment of the remote has been fitted with a protective foil for
transport. This extends the lifetime of the battery. Before
initial use please remove this foil to prepare the remote for
use.
The battery in the remote is a long-life lithium cell. Should
the range of the remote shorten during use, follow the steps
below:
• Open the battery compartment on the underside of the
remote.
• Replace the cell with a battery of the same type
(CR 2032). Make sure the polarity is correct.
• Close the battery compartment.
If the remote is not in use for a lengthy period of time, please
remove the battery to prevent the battery acid from “leaking”.
WARNING:
• Do not expose batteries to intense heat or direct
sunlight. Never throw batteries onto a fire. Danger of
explosion!
• Keep batteries out of the reach of children. They are
not toys.
• Do not force batteries open.
• Avoid contact with metallic objects. (Rings, nails, screws
etc.) Danger of short circuits!
• Short circuits may overheat or even ignite batteries.
This may lead to combustion.
• When transporting the batteries, cover the terminals for
your safety with an adhesive strip.
• If a battery leaks, do not rub the fluid into the eyes or
the skin. If acid comes into contact with the eyes, rinse
with purified water and seek medical advice if symptoms persist.
54
English
CAUTION:
Batteries must not be disposed of in the garbage. Please
bring used batteries to competent collection centers or
back to the dealer.
Power supply
• Connect the mains plug to a standard outlet, 230 V,
50 Hz.
• Make sure the voltage is in conformity with the rating
plate.
• The time settings will be lost as soon as the power supply
has been interrupted.
• Use the mains switch (19) on the underside of the device
to switch the device on.
Automatic Time Setting
The requirement for this is the reception of DAB stations.
After switching on the device for the first time, the device automatically searches for the time signal. SCAN TIME appears
on the display. If the device does not receive DAB stations in
your location, set the time manually as described in “Manual
Time Setting (during standby mode)”.
Manual Time Setting (during standby mode)
1. Hold down the ID3/iPOD/MEM/C-ADJ. button (5/12).
The display will show “24 HOUR”.
2. Use the / SKIP/TUNE SEARCH buttons (16/13) to
select between 24-hour and 12-hour display setting.
Confirm with ID3/iPOD/MEM/C-ADJ..
NOTE:
The 12-hour setting will result in the following display
AM = morning, PM = afternoon.
3. Use / SKIP/TUNE SEARCH buttons to set the hours.
Confirm with ID3/iPOD/MEM/C-ADJ..
4. Use / SKIP/TUNE SEARCH buttons to set the minutes.
5. Press ID3/iPOD/MEM/C-ADJ. again in order to save the
time settings.
Transport securing device of CD compartment
• Turn on the device, please press the STANDBY ON
button (1/16).
• Open the CD compartment (8) by pressing the CD
OPEN/CLOSE (open/close) button (2 on the device). The
CD drawer opens to the right.
• Remove, if present, the transport securing device from
the CD player before starting operation.
• Press CD OPEN/CLOSE button again to close the CD
compartment.
NOTE:
The CD drawer cannot be opened in iPOD mode.
iPod/iPhone Compatibility
Due to the large variety of iPod and iPhone models and generations on the market, full compatibility cannot be guaranteed. Before connecting your iPod/iPhone, ensure that it has
a compatible interface.
Full compatibility of the remote functions also cannot be
guaranteed. Operate your iPod/iPhone as normal, while it sits
in the docking station.
NOTE:
Depending on the software version of your iPhone the following error message may be displayed:
“This accessory was not developed for iPhone use. It is
possible that noise occurs and signal strength is reduced.”
In this case press “OK”.
General operation
NOTE:
Some buttons you will find on both the device and the
remote control. Buttons with the same name result in
the same functions.
STANDBY/ON (1/16)
Press STANDBY/ON button to switch the device into
standby mode (display will show the time). Press this button
again to turn on the device.
NOTE:
• Press any button in standby mode to show the time for
10 seconds.
• If the device is in CD/USB/SD/iPOD mode, but is not in
operation, the device automatically switches to standby
mode after 15 minutes.
Volume (4/8)
Adjust to your preferred volume level. The display will show
“VOL SETTING”, “VOL”and a number. This will equal to the
set volume of “VOL MAX” or “VOL MIN”.
headphone jack (22)
When listening via headphones, please use headphones with
a 3.5 mm stereo jack plug which you will connect to the headphone jack. The speakers will be deactivated.
Infrared remote control
Wireless operation from a distance of up to 5 meters. If this
range gets less, please change the batteries. Make sure there
are no obstacles between the remote control and the sensor
(10) on the device during operation.
English
USB port
This device has been designed in accordance with the latest
USB state of the art technology. Due to the large variety of
different USB memory tools on the market it is not possible to
provide complete compatibility with all USB storage devices.
In some rare cases there might occur, for that reason, errors
when playing USB storage devices. That is not a malfunction
of this device.
1. Open the cover (3) on the top of the device.
2. Use the CD/iPOD/USB/CARD button (13/1) to select
USB mode. The display will show MODE.
3. Plug a USB storage directly into the port. USB READING
and then the total number of folders (F) and the number
of titles (T) are displayed.
4. If playback does not begin automatically: Please press
SCAN/ENTER (14/13) to start playback of the music
files.
Please refer to chapter “Playing CDs/MP3” for operation.
CAUTION:
Before removing the USB storage device, use DAB/FM/
AUX button to switch to RADIO mode.
SD/MMC card slot
1. Open the cover (3) on the top of the device.
2. If you wish to play files from a SD/MMC card, please
insert the card in the respective slot.
3. Now use the CD/iPOD/USB/CARD button (13/1) to select CARD mode. CARD MODE appears on the display.
CARD READING and then the total number of folders (F)
and the number of titles (T) are displayed.
4. If playback does not begin automatically: Press
SCAN/ENTER (14/13) to start playback of the music files.
Please refer to chapter “Playing CDs/MP3” for operation.
LINE IN jack
Connect analogue playback devices. When connecting to
this jack you may also listen to the audio of other devices,
such as MP3 or CD players etc., via the speakers.
1. Please connect the external device via 3.5 mm plug jack
to the LINE IN jack (23).
2. Now use DAB/FM/AUX button (12/2) to select AUX
mode. AUX MODE appears on the display.
3. Via the speakers you will listen to the audio of the external device; use VOLUME +/- buttons (4/8) to adjust the
volume. The CD buttons are not active.
4. For further functions please refer to the user manual of
the external audio device.
55
NOTE:
Set the volume of the external device to a proper audible
level.
Restore factory defaults
All preset radio stations and the time are deleted.
1. Switch the device to Standby mode.
2. Hold down the /MENU/INFO button (15/13) for around
3 seconds. ”SYSTEM RESET PLEASE WAIT” appears on
the display. If the reset was successful, “SYSTEM RESET
OK” appears on the display.
3. The device then searches for the time. SCAN TIME appears on the display.
Listening to the radio
Scan FM stations
1. Repeatedly press DAB/FM/AUX button (12/2) until the
display shows “RADIO INITIALIZE PLEASE WAIT”.
2. You have two options for tuning a station:
- Press the / SKIP/TUNE SEARCH buttons (16/13).
SCAN/ENTER (14/13) button, the
- If you press the
device scans up to the next station. Hold down this
button to scan to the previous station.
3. If the reception is too weak and there is static on the
received station, try to improve the reception by turning
and winding/unwinding the antenna. For FM stations,
you can toggle between AUDIO MODE: MONO and
AUTO (stereo) reception using the SELECT/MONO/ST
button (3 on the remote). When the reception is poor, we
recommend switching to MONO.
Scan DAB stations
Digital Audio Broadcasting (DAB) is a digital broad casing
standard for terrestrial reception of digital radio. A list of radio
stations which can be received in Germany is available on the
Internet at www.digitalradio.de.
1. Press the DAB/FM/AUX button (12/2) repeatedly until
“WELCOME TO DIGITAL RADIO” appears on the
display.
2. Press the
SCAN/ENTER (14/13) button to start
automatic scanning. “AUTOTUNE FULL SCAN” appears
briefly on the display. The device then searches for the
radio stations which can be received.
3. You can select the next or the previous station by using
the / SKIP/TUNE SEARCH buttons (16/13).
4. If the reception is too weak and the received station
“motorboats”, try to improve the reception by changing
the position of the antenna.
56
English
NOTE:
• For optimum DAB reception, we recommend that you
position the wire antenna vertically.
• You cannot toggle between Mono and Stereo during
DAB reception.
• To set a DAB frequency manually, hold down the
SELECT/MONO/ST button. The message MANUAL
TUNE briefly appears on the display. Use the /
SKIP/TUNE SEARCH buttons to set the desired
frequency. Then confirm with the SELECT/MONO/ST
button.
Display additional DAB information
In DAB mode, you can display the following additional information if broadcast by the radio station. To do so, press the
MENU/INFO button (15/13).
• <PROGRAMME TYP>
This indicates the station category
(e.g. Pop-Music, News etc.).
• <DLS>
Short for Dynamic Label Segment. This involves complementary data. This content may be e.g. information about
the station or the music title and artist being played.
• <Ensemble Name>
Displays the name of the station group
(e.g. DR Deutschland).
• <Ensemble Freq.>
Frequency of the current radio station.
• <Audio Bit Rate>
Displays the digital Audio Bit Rate.
• <Sig. Strenght>
Displays the received signal strength.
• <Time/Date>
Displays the time and current date.
NOTE:
If the “>” symbol is shown behind the station name, you
can briefly display the category when displaying other information. To do so, press the SELECT/MONO/ST button.
Save station
1. If you have found the desired station, hold down the ID3/
iPOD/MEM/C-ADJ. button (5/12).
For FM stations: The currently preset radio frequency
appears on the display and the preset location number
flashes.
For DAB stations: “Preset empty” appears on the
display if the preset locations are empty, and the preset
location number flashes.
2. For choosing the memory position, please press /
SKIP/TUNE SEARCH button (16/13).
3. Press ID3/iPOD/MEM/C-ADJ. to save the settings.
Select a preset station
1. Press the ID3/iPOD/MEM/C-ADJ. button.
2. Select the desired preset location with the / SKIP/
TUNE SEARCH buttons.
3. Press the ID3/iPOD/MEM/C-ADJ. button again to play
the desired radio station.
Music Playback from iPod/iPhone
(iPod/iPhone not supplied)
1. Press the CD/iPOD/USB/CARD button (13/1) repeatedly
until “NO iPOD” appears in the display.
2. Press the iPOD OPEN/CLOSE button (6 on the device)
to open the docking port compartment (18). The CD
drawer opens up to the left.
NOTE:
The docking port compartment cannot be opened in
CD mode.
3. Press the button (17), to open the docking port.
4. If an adapter has been supplied with your iPod, put it
onto the dock connector. You can only ensure that the
iPod fits correctly into the iPod port if the adapter is
plugged in.
5. Insert your iPod/iPhone into the dock.
CAUTION:
Make sure that your iPod/iPhone is plugged upright
into the port. Do not bend or tilt the iPod/iPhone whilst
it is plugged into the port. This may cause damage to
the dock or the iPod/iPhone.
6. Press the button (17), to close the docking port.
NOTE:
If the docking port is not retracted, the docking port
compartment cannot be closed. The message DOOR
KEY LOCK appears on the display.
7. Depending on the iPod/iPhone Model, firstly release the
button lock and start playing music if necessary with the
SCAN/ENTER button (14/13).
8. Close the docking port compartment again. To do so,
press the iPOD OPEN/CLOSE button again.
9. Follow your iPod/iPhone manual for further use of the
controls.
CAUTION:
Stop playback before unplugging the iPod/iPhone from the
port since the iPod/iPhone may otherwise be damaged.
NOTE:
If you have an incoming call when playing back music with
the iPhone docked, then playback stops and you can hear
the ring tone.
English
iPod/iPhone Charging
Your iPod/iPhone battery is charged as soon as the iPod/
iPhone is docked. To do this, the unit must be connected to
the mains.
NOTE:
• If the slot adapter has been supplied with your iPod,
use it to ensure that your iPod fits correctly.
• Not all iPod/iPhone generations support the charge
mode.
• The duration of the charging process depends on the
iPod/iPhone which is used and its operating condition.
Playing CDs/MP3
This is how to play a CD
1. Repeatedly press CD/iPOD/USB/CARD button (13/1)
until the display shows “CD MODE”.
2. Press CD OPEN/CLOSE (open/close) button (2 on the
device) to open the CD compartment (8). The CD drawer
opens up to the right.
NOTE:
The CD drawer cannot be opened in iPOD mode.
3. Place an audio CD with the label side facing to the front
on the spindle in the center, so that the CD locks mechanically. Then close the CD door by pressing the CD
OPEN/CLOSE button again.
4. AUDIO CD:
The display will show “DISC CD”, the number of tracks
and total playback time. If playback does not begin automatically: Press
SCAN/ENTER button (14/13) to start
playback of the CD. The playback starts from the first title
on the CD. The display will show the current track and the
lapsed playback time.
For MP3 or a CD in MP3 format:
The display will show “STOP”, the number of folder,
e.g. F--04, and the total number of tracks (e.g. T--126).
If playback does not begin automatically: Press the
SCAN/ENTER button to start CD playback. The playback starts from the first track and from the first folder
The current song, the current folder, the expired playing
time, and “DISC MP3” are shown in the display. Use the
FOLDER or FOLDER buttons (5 on the remote) to
select the individual folders.
5. To remove a CD, please press MENU/INFO button (15)
(13 on the remote), open the CD compartment with
CD OPEN/CLOSE (open/close) button and carefully lift
the CD.
57
Always keep the CD door closed.
NOTE:
• For CDs in MP3 format with a folder, 001 appears for
the first track of the new folder when switching to
another folder.
• If a disc is not properly or not at all inserted, “CD-READING” will light up and the display will show “NO
DISC” (no disc).
• Playback of CDs created by the user cannot be guaranteed due to the variety of available software and CD
media equipments.
Description of the control buttons
SCAN/ENTER (9/14)
You may temporarily stop playback and start again. The
lapsed playback time will flash in the display. Pressing the
button again will continue playback from the same position.
In iPOD mode:
• First press the ID3/iPOD/MEM/C-ADJ. button to activate
the iPod-Menu. iPOD MENU appears in the display.
• Now press the
SCAN/ENTER button to activate a
function or to display the next menu.
In DAB Mode:
Starts the automatic station scan (AUTOTUNE FULL SCAN).
/ SKIP/TUNE SEARCH (16/14)
If an Audio CD, MP3, a CD is running in MP3 Format or in
iPOD mode:
With the SKIP/TUNE SEARCH button you may skip to the
next or next but one track, etc. Press and hold this button to
quickly search music.
You may operate the SKIP/TUNE SEARCH button as followed:
Press 1 x =
Starts current track again from the beginning.
Press 2 x =
Skips back to previous track.
Press 3 x =
Plays track prior to that, etc. Press and hold
this button to quickly search music.
In iPOD mode:
• First press the ID3/iPOD/MEM/C-ADJ. button to activate
the iPod-Menu. iPOD MENU appears in the display.
• Now press the / SKIP/TUNE SEARCH buttons to
scroll up or down the iPod/iPhone menu.
During radio mode:
Tune the desired radio station and in connection with the
previously pressed button ID3/iPOD/MEM/C-ADJ. to select
the preset station.
58
English
MENU/INFO (15/13)
Pauses the CD or piece of music.
In iPOD Mode:
• First press the ID3/iPOD/MEM/C-ADJ. button to activate
the iPod menu. iPOD MENU appears in the display.
• Now press the MENU/INFO button to call up the iPod/
iPhone menu or to return to the previous menu.
NOTE:
The Music App must already be started to do this.
In DAB Mode:
Displays the additional information. See section “Listening to
the radio” “Display additional DAB information”.
MUTE (10 on the remote)
Quickly turn off the sound. The “MUTE ON” display flashes.
To cancel this function, press MUTE again.
EQ (11 on the remote)
(Preset equalizer function). There are different sound modes
available (FLAT, CLASSIC, ROCK, POP, JAZZ).
NOTE: During iPod/iPhone Music Playback
For optimum sound, change the EQ setting on your iPod/
iPhone as required.
SELECT/MONO/ST (3 on the remote)
During FM radio mode:
Switch between STEREO and MONO.
In DAB Mode:
Hold down the button to manually adjust a DAB station.
REPEAT (14 on the remote)
Press 1 x:
(REP_1 lights up) The current track will be
repeated entirely.
Press 2 x:
(REP_ALL lights up) The complete CD will
be repeated entirely.
Press 3 x:
All functions will be canceled. Normal playback will be continued.
Only for MP3s and CDs in MP3 format:
Press 1 x:
The current track will be repeated continuously (The display will show REP_1).
Press 2 x:
The complete CD will be repeated continuously (the display will show REP_ALL).
Press 3 x:
The selected folder of the MP3 CD will be
repeated continuously (the display will show
REP_ALBUM). Use FOLDER buttons
(4 on the remote) to select the individual
folders.
Press 4 x:
The function will be deactivated and the CD
will be played in normal mode.
RANDOM (15 on the remote)
The display will show “RANDOM” and the number of the
track that will be played first. All tracks will be played consecutively in random order.
FOLDER (4 on the remote)
For MP3 or a CD in MP3 format:
Press these buttons during playback to switch one folder up
or down. The display shortly shows a message, e.g. ALBUM
02. Then the system automatically starts playback of the MP3
CD. When pressing the buttons during stop mode, the message will also shortly be shown in the display. Then press
SCAN/ENTER to start playback.
SLEEP (7 on the remote)
When the device is switched on, you can set the time after
which the device will turn into standby mode; set the time in
10 minutes intervals from 90 to 10 minutes. Repeatedly press
this button until the display shows the desired time. When
the function is activated, the remaining time is displayed
about every 10 seconds. The device will turn off automatically
after the preset time.
To switch off the function again, press the SLEEP button
repeatedly until nothing is shown on the display.
TIMER (6 on the remote)
You may program the device for it to turn off and on again
after a certain preset time.
1. Use STANDBY ON button to switch into standby
mode (time will be displayed).
2. Hold down the TIMER button until the “ON TIME” appears on the display.
• Using the / SKIP/TUNE SEARCH buttons (16/13),
you can now set the turn-on hours, turn-on minutes,
turn-off hours, turn-off minutes, turn-on mode and
the turn-on volume.
• Confirm your input each time with the TIMER button.
The current display to be set flashes on the display.
NOTE:
If no button is pressed within around 5 seconds, the
device switches back to standby mode without saving
the input.
3. After you have selected the turn-on volume, press the
TIMER button again. The settings are shown one after the
other on the display. The device will switch into standby
mode. “ ” will be displayed and the timer is activated.
After the set time has been reached, the device switches
to the selected mode. The volume increases slowly to the
selected volume.
Press TIMER to deactivate the timer function. TIME OFF is
shown briefly on the display. “ ” will disappear from the
display.
English
NOTE:
If the timer is deactivated, press the TIMER button, TIME
ON appears briefly on the display. You will then see the current settings. The “ ” symbol then appears on the display
and the timer is activated
ID3/iPOD/MEM/C-ADJ. (5/12)
Set the clock, store stations and program playback.
For MP3‘s or a CD in MP3 format:
If ID-3 Tag Information is stored, it appears on the display as a
ticker. Press the button again to activate the function.
CLOCK DISP (5 on the remote)
Press the button to display the time for 10 seconds.
Program Playback
Program playback in desired sequence. (Only in CD/USB/
CARD mode)
1. Press MENU/INFO button (15/13).
2. Press ID3/iPOD/MEM/C-ADJ. button (5/12). MEMORY,
P-01 (Preset location) appears and T-000 (Title) flashes on
the display. Use the buttons / SKIP/TUNE SEARCH
(16/13) to select the desired track and press ID3/iPOD/
MEM/C-ADJ. button again. The display will change to
memory position P- 02.
3.
4.
5.
6.
7.
For MP3s or CDs in MP3 format:
The folder display “F-000” flashes on the display
alongside the MEMORY button. First select the desired
folder using the FOLDER buttons (4 on the remote).
Confirm the folder selection with the ID3/iPOD/MEM/
C-ADJ. button.
Use the / SKIP/TUNE SEARCH buttons to select
the next track and press ID3/iPOD/MEM/C-ADJ. again.
Repeat the steps until you have selected all tracks.
Press the
SCAN/ENTER button (14/13). Playback
starts. The display will show the first selected track number.
Press MENU/INFO button once to stop playback. The
memory will be kept.
To play the program again press the
SCAN/ENTER
button.
To delete memory, please press MENU/INFO button
twice. The MEM display switches off.
The device will stop automatically after all stored tracks have
been played. The program sequence will be kept in the
memory until you switch to another mode, remove the CD
from the compartment or switch off the device.
It is possible to combine program playback with the REPEAT
function. After programming and starting playback, please
press REPEAT button (14 on the remote) up to three times;
the functions can be applied as described under “REPEAT”.
59
Playback of music files in MP3 format
This device allows the playback of music files in MP3 format.
The device furthermore supports the common CD types: CD,
CD-RW, and CD-R.
Your device can play MP3 CDs. These are compressed CDs
that can store up to 200 tracks. Your device automatically
recognizes MP3 discs (the display will show total number of
tracks and folders). Please refer to chapter “Playing CD/MP3”
for playback of such CDs. You may program tracks as already
described under “Program playback”.
Please note:
There are many burning and compressing methods, as well
as differences in quality of CDs and burnt CDs.
Furthermore, the music industry does not apply fixed standards (copy protection).
For that reason there might, in rare cases, occur problems
when playing CDs and MP3 discs. That is not a malfunction
of this device.
Cleaning and maintenance
• Disconnect the mains plug before cleaning.
• You may wipe off external stains, using a slightly damp
cloth without any additives.
Trouble shooting
Problem
Cause
Solution
The unit cannot The unit is blocked Pull the mains plug
be operated and “hangs”
for approximately
5 seconds. Then connect the unit again
No DAB Radio Wire antenna not Position the wire
reception
positioned correctly antenna vertically
No Digital Radio
can be received in
your area
Technical Specifications
Model:..............................................................................MC 4456 iP
Voltage supply:....................................................230-240 V~ 50 Hz
Output power:............................................................100 W PMPO
Power consumption:.................................................................23 W
Protection class:.................................................................................II
Net weight:..............................................................................2.40 kg
Radio:
Frequency ranges:.......................VHF/FM 87.5 ~ 108.0 MHz
....................DAB/DAB+ 174 ~ 240 MHz
Specifications are subject to change!
60
English
This device complies with all current CE directives, such as
electromagnetic compatibility and low voltage directive and
is manufactured according to the latest safety regulations.
“Made for iPod” and “Made for iPhone” mean that an electronic accessory has been designed to connect specifically
to iPod or iPhone and has been certified by the developer to
meet Apple performance standards. Apple is not responsible
for the operation of this device or its compliance with safety
and regulators standards. Please note that the use of this accessory with iPod or iPhone may affect wireless performance.
Disposal
Meaning of the “Wheelie Bin” Symbol
Take care of our environment, do not dispose of electrical
applicances via the household waste.
Dispose of obsolete or defective electrical appliances via
municipal collection points.
Please help to avoid potential environmental and health
impacts through improper waste disposal.
You contribute to recycling and other forms of utilization of
old electric and electronic appliances.
Your municipality provides you with information about collecting points.
Stand 10/11
MC 4456 iP
Elektro-technische Vertriebsges. mbH
Industriering Ost 40
47906 Kempen
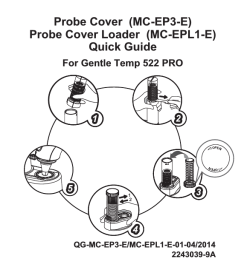

© Copyright 2026