
1 - Autodesk
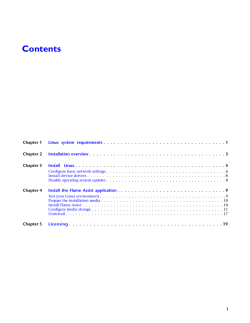
Contents
Chapter 1
Linux . . . . . . . . . . . . . . . . . . . . . . . . . . . . . . . . . . . . . . . . . . . . . . . 1
Install Linux . . . . . . . . . . . . . . .
Configure basic network settings .
Install device drivers . . . . . . .
Install the application . . . . . . . . . .
Configure media storage . . . . . . . .
Licensing . . . . . . . . . . . . . . . .
Uninstall . . . . . . . . . . . . . . . . .
Chapter 2
.
.
.
.
.
.
.
.
.
.
.
.
.
.
.
.
.
.
.
.
.
.
.
.
.
.
.
.
.
.
.
.
.
.
.
.
.
.
.
.
.
.
.
.
.
.
.
.
.
.
.
.
.
.
.
.
.
.
.
.
.
.
.
.
.
.
.
.
.
.
.
.
.
.
.
.
.
.
.
.
.
.
.
.
.
.
.
.
.
.
.
.
.
.
.
.
.
.
.
.
.
.
.
.
.
.
.
.
.
.
.
.
.
.
.
.
.
.
.
.
.
.
.
.
.
.
.
.
.
.
.
.
.
.
.
.
.
.
.
.
.
.
.
.
.
.
.
.
.
.
.
.
.
.
.
.
.
.
.
.
.
.
.
.
.
.
.
.
.
.
.
.
.
.
.
.
.
.
.
.
.
.
.
.
.
.
.
.
.
.
.
.
.
.
.
.
.
.
.
.
.
.
.
.
.
.
.
.
.
.
.
.
.
.
.
.
.
.
.
.
.
.
.
.
.
.
.
.
.
.
.
.1
.2
.4
.5
.5
.6
.7
OS X . . . . . . . . . . . . . . . . . . . . . . . . . . . . . . . . . . . . . . . . . . . . . . . 9
Install . . . . . . . . . . . . . . . . . . . . . . . . . . . . . . . . . . . . . . . . . . . . . . . . . . . . 9
Licensing . . . . . . . . . . . . . . . . . . . . . . . . . . . . . . . . . . . . . . . . . . . . . . . . . . 9
Configure the application . . . . . . . . . . . . . . . . . . . . . . . . . . . . . . . . . . . . . . . . . 11
Troubleshooting & support . . . . . . . . . . . . . . . . . . . . . . . . . . . . . . . . . . . . . . . . 13
i
ii
1
Linux
Install Linux
Prerequisites
■
Mouse, keyboard and graphics monitor are connected, and the graphics monitor is powered on.
■
If you are using a KVM switch, it is switched to the system on which you want to install Linux.
■
The DVD or CDROM drive is set as the primary boot device in the workstation BIOS. For information
on configuring your workstation BIOS, refer to the documentation for your hardware.
■
Get the installer. Major releases are distributed on a USB drive. Service packs or extensions are distributed
as a downloadable tar file.
Red Hat
1 Insert the installation disc and reboot the system. The system should boot to the Linux installation
disc. If not, check your BIOS settings to make sure the DVD / CDROM drive is set as the primary boot
device.
2 At the boot prompt in the installation menu, run linux ks=cdrom to launch the Linux installation.
The installer guides you through the rest of the process. If you experience problems with the graphical
Linux installer, reboot your computer and run the installer in low resolution VESA mode by typing
linux ks=cdrom xdriver=vesa. If you still experience problems, reboot again and start the installer in
text-only mode with linux ks=cdrom text.
3 If you are installing Red Hat Linux, enter your installation number when the Linux installer prompts
you to. The number should be included in the package you received from Red Hat, or in your account
profile on the Red Hat Web site. Do not skip entering the installation number at this point. If you do
not enter the installation number, the installation proceeds, but some important packages are not
installed by the Red Hat installer.
4 The installation process may ask you to initialize the system disk. Follow the prompts to initialize the
disk, if necessary. Autodesk recommends the following approach when partitioning your system disk:
remove all existing partitions, then manually create a /boot partition of at least 100MB, a Linux swap
partition of 2048MB, and use the rest of the drive for the root partition. Set the root partition to be a
primary partition.
5 The rest of the installation process is automated.
1
The default root password for a Linux installation on a node is password.
CentOS
Before installing CentOS distro for non-Autodesk hardware, you must add the Autodesk kickstart file to the
distribution so the Linux installer to install some packages. The custom Autodesk DVD of Red Hat Enterprise
Linux for Autodesk hardware already contains the Autodesk kickstart file. To copy the kickstart file to the
disc. Use the new disc as the DVD or first CD of the CentOS distribution you plan to install on the node.
1 On a Linux computer with a CD or DVD burner, log in as root.
2 If you did not download your distro as an ISO image:
1 Insert the DVD or first CD of your CentOS distribution into the drive.
2 In a terminal, get an ISO image of the disc by typing: dd if=/dev/ <CD/DVD device>
of=/<destination path for the extracted ISO image>. For example: dd if=/dev/cdrom
of=/tmp/ Centos5.iso
3 Eject the disc.
3 From the installation package, run dist/kickstart/build_kickstart_cd to add the kickstart file to
the ISO image of your Linux distribution DVD or first CD. For example:
dist/kickstart/build_kickstart_cd RHEL5_CentOS5_kickstart.cfg /tmp/Centos5.iso
/tmp/Centos5_KS.iso. Modify the example according to your OS.
4 Burn the updated ISO image to a blank disc. On RH6 or later, graphical burning tools are included. On
earlier OSs, use a command-line tool such as cdrecord
Configuration
After booting into your new Linux installation:
1 Change the default root password to secure the system. Log into your system as root, using the default
password password, and in a terminal run the passwd command.
2 OS updates may interfere with the application so it is strongly recommended to disable automatic
updates, and to decline any offered package upgrades.
3 Install device drivers (page 4).
4 By default the time zone is set to EST. To change it, log in as root. Right-click the clock, and select
Configure Clock from the context menu.
5 Configure basic network settings (page 2)
6 Optional: If you plan to install Autodesk Maya on the workstation, install the mesa-libGLw package,
that is not installed by default with your operating system. In a terminal, as root, type: yum install
mesa-libGLw
Configure basic network settings
Edit the files below as root. For changes to take effect, restart the network with etc/init.d/network restart.
You may need the following:
■ The static IP address and host name for your system.
■
The network gateway IP address.
■
The subnet mask of your network.
■
DNS server IP address(es).
2 | Chapter 1 Linux
■
Port configuration of any network interfaces.
sbin/connectx-port-config
Run this script to assign ports on the Mellanox FDR InfiniBand adapter. You can then use ethtool and ifconfig
to display settings and associated driver information.
/etc/sysconfig/network-scripts/ifcfg-ethn
Edit /etc/sysconfig/network-scripts/ifcfg-ethn, where n specifies the ethernet port number, usually 0 for the
first on-board port. If your workstation has an add-on ethernet card installed, the Linux operating system
may assign ports eth0 through eth3 to the add-on card. In this case, the on-board Ethernet ports become
eth4 and eth5. You may need to set thefollowing parameters:
■ Optionally set the GATEWAY if not set in /etc/sysconfig/network.
■
IPADDR
■
NETMASK
■
MTU
Sample snippet from ifcfg-ethn:
DEVICE="eth0"
BOOTPROTO="static"
IPADDR="192.168.1.100"
NETMASK="255.255.0.0"
ONBOOT="yes"
GATEWAY=192.168.0.1
/usr/discreet/cfg/network.cfg
This file is only available after the installation of the Autodesk product. Set the Metadata parameters.
/usr/discreet/sw/cfg/sw_framestore_map
This file is only available after the installation of the Autodesk product. You must set the NETWORKING
and HOSTNAME parameters. GATEWAY is used if it is not defined in a network port’s configuration file.
Sample snippet from sw_framestore_map:
NETWORKING=yes
HOSTNAME=workstation1
GATEWAY="10.1.0.25"
/etc/sysconfig/network
Sample snippet from /etc/sysconfig/network.
NETWORKING=yes
HOSTNAME=workstation1
GATEWAY="10.1.0.25"
The GATEWAY value is used if no GATEWAY is defined in a network port’s configuration file.
/etc/resolv.conf
Sample snippet from /etc/resolv.conf
nameserver 192.9.201.1
Install Linux | 3
/etc/hosts
You may need to edit the loopback setting which may look like 127.0.0.1 vxfhost.localhost.localdomain
localhost by default. Optionally add hostname / IP address pairs for other workstations on your network.
Sample snippet from file:
127.0.0.1 localhost.localdomain localhost
192.168.0.100 workstation1
Install device drivers
After Linux is installed, install the required device drivers. In a terminal run init 3 to shut down the graphical
environment and run in text mode. Reboot your workstation after installing drivers.
Install the NVIDIA graphics driver: Back up your X server configuration file with cp /etc/X11/xorg.conf
/etc/X11/xorg.conf.backup. From the directory where the driver installer is, run the installer with: sh
<installer_file>.
If necessary, update the Wacom tablet driver. See http://sourceforge.net/projects/linuxwacom/ for instructions
on compiling and installing the driver. To test, run: wacdump /dev/input/wacom. This should display a
number of parameters for the Wacom tablet. As you move the stylus on the tablet, various parameters, such
as POS_X and POS_Y should change.
Flare has the same AJA stereo broadcast capabilities as Flame (no NVIDIA SDI/RTD).
To use the SDI Preview on Flare Linux, you must have one of these AJA graphics cards: OEM2K, Kona 3G
Quad, Kona 4G, you must be running RedHat 6.3. Download and install the updated AJA driver from
Autodesk.
You must also update Xorg, even if you have an Autodesk certified workstation. The default monitor assigned
by Xorg is a Generic HD monitor. Select the proper monitor manually either through the Setup Utility or
by editing the Xorg.conf file, then restart Xorg with Ctrl + Alt + Backspace or by rebooting your workstation.
If you plan to use audio, test the ALSA sound driver:
1 Connect a pair of speakers or headphones to the audio output connector of your sound card.
2 Run alsamixer , unmute all sound channels, and set their volume to maximum.
3 Press Esc to quit alsamixer .
4 List the available sound devices by running: aplay -l.
5 Test the sound on one of the sound cards listed by aplay, for example: speaker-test
-D”plughw:<card>,<device>” -c2 -twav. Where <card> is the card number, and <device> is the device
number, as listed in the output of aplay. If your workstation has several sound cards, make sure you
test the one you have plugged your speakers into. If the sound system works properly, you hear a voice
in the speakers or headphones, and the command output contains several lines similar to the following:
0 - Front Left
1 - Front Right
Time per period = 2.730375
0 - Front Left
1 - Front Right
Time per period = 2.986758
4 | Chapter 1 Linux
Install the application
1 If you need to change your system date or time, do it before installing the application.
2 NO LABEL .
3 In a terminal, as root, cd to the directory where you downloaded the installer files and run the
pre-installation script: ./INSTALL_FIRST. This configures some required system settings for the
application.
4 Start the application installation but running the installer script which should look like
./INSTALL_PRODUCT.
5 If you are upgrading from a previous version, earlier versions are detected. You are prompted to select
one of those versions. Click None for a clean installation, or select one of the previous versions if you
want to copy its custom resource and setup directories to the new version.
6 If any changes are detected in the /etc/X11/xorg.conf, you are prompted to configure this file. If you
modify xorg.conf, you are prompted to restart the X server. When the installation script completes,
log out of the Linux desktop and then log in again to restart the X server.
■ To keep the old configuration settings, when the file appears in xxdiff, in the Global menu, choose
Select Left, and then, in the File menu, choose Save as Right. If prompted to overwrite, click OK.
■
To use the new configuration file without adding the settings from the old configuration file, just
close the program.
7 The application, as well as WiretapCentral, Wiretap Gateway, Backburner Server, Backburner Manager,
Backburner Media I/O Adapter) are installed. These are documented in the Flame Premium Installation
Guide.
Configure media storage
Media can be stored on any of the following hardware, as long as it is not the system drive: a direct attached
storage (DAS) device or a storage area network (SAN).
Configure a standard filesystem as media storage:
1 Ensure the disk array or SAN storage is connected to your workstation and powered up, and that a
UNIX-compatible filesystem exists on the storage. For best performance, it is recommended to use a
filesystem known for high-performance media playback, such as XFS or SNFS.
2 In a terminal, as root. Stop Stone and Wire with the command: /etc/init.d/stone+wire stop.
3 Create one or more Managed Media Cache directories:
■ If a mount point for your storage does not exist, create one, for example: mkdir -p /mnt/SAN1. Do
not use the reserved word “stonefs” as the name for your mount point directory. Mount the
filesystem to the newly-created directory. To mount it at boot, update /etc/fstab.
■
Create the Managed Media Cache directory on the mounted filesystem, in a directory named after
the workstation hostname. The Managed Media Cache directory should be named after the partition
name (by default, partition 7, or p7). For example, if the filesystem mount point is /mnt/SAN1, your
workstation hostname is adsk0, and the partition name is p7, type: mkdir -p /mnt/SAN1/adsk0/p7
■
Set the ownership for the directory to the root user. For example: chown -R root:users
/mnt/SAN1/adsk0/p7. Set permissions for the directory to be readable, writable, and searchable by
the owner and its group, and readable and searchable by all. For example: chmod -R 775
/mnt/SAN1/adsk0/p7
4 To make your application aware of the standard filesystem volumes, define the Managed Media Cache
of each volume as a partition in the Stone and Wire configuration file, and set its preferences in
Install the application | 5
/usr/discreet/sw/cfg/stone+wire.cfg. Update the keywords: Name, Path, Shared, and
SymlinkAcrossFilesystems.
5 If this is the first filesystem you are configuring for this workstation:
■ From /usr/discreet/sw/cfg/sw_framestore_map file get the FRAMESTORE value and use it to update
/usr/discreet/sw/cfg/sw_storage.cfg.
6 Restart Stone and Wire by typing: /etc/init.d/stone+wire restart.
7 Ensure the filesystem is mounted: /usr/discreet/sw/sw_df. Any project created in your application
after this point has the new standard filesystem partition as its primary partition. Any pre-existing
projects are unaffected by this setting and remain associated to their respective partitions.
Licensing
If you're on subscription, you have the choice of permanent node-locked or network licenses. Otherwise
only node-locked is available.
Node-locked
Node-locked licenses are locked to one computer. You receive a temporary node-locked license when you
purchase your software or when you get a subscription update. A four day temporary license is available via
the emergency license generator at http://melicensing.autodesk.com/templicensing/.
1 The License Wizard starts when you launch an unlicensed application. Click through it to request a
license code. Log in to support portal: https://edge.autodesk.com/LicenseAssignment and follow the links
to have a license emailed to you.
2 Relaunch the License Wizard and use it to insall the Node-Locked License. Copy and paste the license
from your email.
Network licensing
You can run a single license server on your Creative Finishing Linux workstation, or on a remote Linux
machine. The license server can run on any machine with the same specification as a current certified
Creative Finishing Linux workstation.
You can also set up redundant licensing with one server as the master and two backup servers on the same
subnet. In /usr/local/flexlm/licenses/DL_licenseNetwork.dat there would be three SERVER keywords.
For redundant license servers, reboot each server in close sequence to properly restart the license system. By
default, redundant license servers are set to port 27005.
1 The network server is installed with the script INSTALL_LICSERV which is found at the root of the
Creative Finishing installation package.
2 The license key is machine-dependent. Get the host ID of the license server: in a terminal run
/usr/local/bin/dlhostid.
3 Request license codes at https://edge.autodesk.com/LicenseAssignment. Follow the links to set up your
license server assets and select the software that you want to access using a network license. Your license
codes are emailed to you.
4 Create the license server file on a license server: as root, edit (create if necessary)
/usr/discreet/licserv/licenses/DL_license.dat, following the example in the email from Autodesk.
5 Start or restart the license server with /etc/init.d/license_server start or
/etc/init.d/license_server restart. You can stop it with /etc/init.d/license_server stop. Check
the boot.log file for the server status.
6 | Chapter 1 Linux
6 Create license files for the application on its workstation. Edit (create if necessary) as root
/usr/local/flexlm/licenses/DL_licenseNetwork.dat. Add the SERVER, VENDOR and USE_SERVER
strings provided by Autodesk. You can also use the License Wizard, which launches if you try to run
an unlicensed application.
To avoid conflicts with other applications or license servers on site, you may need to change the port setting
used by a license server:
1 Log in as root to the license server and open /usr/discreet/licserv/licenses/DL_license.dat for
editing.
2 Find the SERVER keyword, which by default has no port number specified. Enter another port at the
end of the line in the range of 27000-27009.
3 Restart the server: /etc/init.d/license_server restart.
4 Repeat for each workstation, using the same port as the one you set for the license server.
Uninstall
1 If you are logged in as the application user in KDE, log out and log back into KDE as root.
2 From the KDE menu, choose Autodesk > Remove Software.
3 Select the packages you want to uninstall in the RPM list on the left (click Select All to select all the
packages), then click the arrow to move them to the RPM uninstall list on the right then click Next.
4 In the Choose folders window choose the application directories you want to remove from the
/usr/discreet directory, and click Next.
5 In the confirmation dialog click Uninstall & Remove. The uninstallation starts and displays details on
the process.
6 Optionally delete the log files associated with a given application version in /usr/discreet/log, or
/var/log/ for Flame.
Uninstall | 7
8
2
OS X
Install
1 Open the DMG image file, and double click Install <product>, then click through the installer.
2 If your system has multiple drives, you may be prompted to choose a drive. For the media storage
device it is recommended, but not required, to use a drive other than your system drive. Wherever you
place the media cache, you can stop Spotlight indexing it from System Preferences > Spotlight > Privacy.
3 Once you exit the installer, the application is ready to use. A link to the app is in Applications/Autodesk.
The following is also installed. To see if the service is properly running, after installation go to:
Applications/Autodesk/<product>/Utilities/Service monitor.
■ Autodesk Wiretap Gateway: a background service used for media import.
■
Autodesk Backburner Manager & Server: background renderer.
■
Stone+Wire: tools installed with all Creative Finishing applications, except Lustre.
Uninstall
1 Run Applications/Autodesk/<product>/Utilities/Uninstall. This leaves directories containing
configuration files, project data and user preferences. This helps when reinstalling. All versions of the
application use /usr/discreet and it must be kept if you have other versions installed.
2 To optionally remove all files:
1 In a Terminal , run sudo rm -rf /usr/discreet /Applications/Autodesk/Smoke*
/Applications/Autodesk/Flare* /Applications/Autodesk/Flame\ Assist* according to which
applications you want to delete. This cannot be undone.
2 The installer shares /usr/discreet over the network.To disable that, comment out the line
/usr/discreet -network -maproot=root in /etc/exports, then restart the computer.
Licensing
If you're on subscription, you have the choice of permanent node-locked or network licenses. Otherwise
only node-locked is available.
9
Node-locked
Node-locked licenses are locked to one computer. You receive a temporary node-locked license when you
purchase your software or when you get a subscription update. A four day temporary license is available via
the emergency license generator at http://melicensing.autodesk.com/templicensing/.
1 The License Wizard starts when you launch an unlicensed application. Click through it to request a
license code. Log in to support portal: https://edge.autodesk.com/LicenseAssignment and follow the links
to have a license emailed to you.
2 Relaunch the License Wizard and use it to insall the Node-Locked License. Copy and paste the license
from your email.
Network licensing
You can run a single license server on your Creative Finishing Linux workstation, or on a remote Linux
machine. The license server can run on any machine with the same specification as a current certified
Creative Finishing Linux workstation.
You can also set up redundant licensing with one server as the master and two backup servers on the same
subnet. In /usr/local/flexlm/licenses/DL_licenseNetwork.dat there would be three SERVER keywords.
For redundant license servers, reboot each server in close sequence to properly restart the license system. By
default, redundant license servers are set to port 27005.
1 The network server is installed with the script INSTALL_LICSERV which is found at the root of the
Creative Finishing installation package.
2 The license key is machine-dependent. Get the host ID of the license server: in a terminal run
/usr/local/bin/dlhostid.
3 Request license codes at https://edge.autodesk.com/LicenseAssignment. Follow the links to set up your
license server assets and select the software that you want to access using a network license. Your license
codes are emailed to you.
4 Create the license server file on a license server: as root, edit (create if necessary)
/usr/discreet/licserv/licenses/DL_license.dat, following the example in the email from Autodesk.
5 Start or restart the license server with /etc/init.d/license_server start or
/etc/init.d/license_server restart. You can stop it with /etc/init.d/license_server stop. Check
the boot.log file for the server status.
6 Create license files for the application on its workstation. Edit (create if necessary) as root
/usr/local/flexlm/licenses/DL_licenseNetwork.dat. Add the SERVER, VENDOR and USE_SERVER
strings provided by Autodesk. You can also use the License Wizard, which launches if you try to run
an unlicensed application.
To avoid conflicts with other applications or license servers on site, you may need to change the port setting
used by a license server:
1 Log in as root to the license server and open /usr/discreet/licserv/licenses/DL_license.dat for
editing.
2 Find the SERVER keyword, which by default has no port number specified. Enter another port at the
end of the line in the range of 27000-27009.
3 Restart the server: /etc/init.d/license_server restart.
4 Repeat for each workstation, using the same port as the one you set for the license server.
10 | Chapter 2 OS X
Configure the application
OS X system preferences
These must be set for each user account:
■ The OS X firewall must be off (default setting), otherwise it blocks incoming network connections.
■
By default the application uses keyboard shortcuts that conflict with the OS X default settings. In Keyboard
> Keyboard Shortcuts, disable shortcuts using the function keys (F1, F2), control key, or option meta key.
If the Mac has an Apple keyboard enable Use F1, F2, etc. keys as standard function keys at Keyboard >
Keyboard tab.
■
Sharing: turn Web Sharing on to enable Wiretap Central and Backburner Web Monitor.
■
Spotlight: in the Privacy tab, add the media storage volume to the list of locations Spotlight does not
search.
■
Sound: if you are using an AJA I/O device, ensure it is not selected for sound output.
Configure the application with the Setup Utility
Run the Setup utility from /Applications/Autodesk/<product>/Utilities/.
If you have multiple versions installed, select the version you want to configure from the drop-down list at
the top of the window.
In the Preview and Vtr tabs, the Duplicate and Delete buttons apply to the selected entry, not the one checked
under Active.
To discard unsaved changes in all the tabs of the setup utility, click Reload.
To edit the parameters directly in the application configuration file, click Manual Edit. It can be backed up
at /usr/discreet/<product>/cfg/init.cfg.
General
Video Device The video output device to be used.
Audio Device The audio output device to be used. If your Mac is equipped with an AJA device, select AJA.
If it is equipped with a Blackmagic Design device, select BMD. Otherwise, select CoreAudio to use the default
sound card of your workstation. You can only use the audio device that matches the video device. Similarly,
you can only use CoreAudio if neither AJA nor BMD is set as the video device.
Reserved Application Memory The amount of memory allocated for frame buffers. In most cases, you
should leave this setting to Automatic. The default configuration is sufficient for most projects, regardless
of the different resolutions you may be working with.
Network Panel Display
ShowAll displays all known framestores in the Network panel without verifying their availability.
ShowMounted displays only available framestores.
Default Web Browser The Web browser used by the application. To use your Mac's default browser, set to
open.
Default Shortcut Profile Sets the keyboard shortcut configuration to be used.
Menu Bar Sets whether the menu bar is displayed in the application.
Table of Contents Location The path where online HTML and ASCII tables of contents are saved when
archiving. The default location is /usr/discreet/archive.
Configure the application | 11
Single Screen This option is shown only if multiple screens are detected on the system. When enabled, the
UI of the application is restricted to a single screen.
Preview
Specifies the device used for the broadcast monitor connected through an AJA or Blackmagic Design device.
Enable entries for the resolutions of your projects, as well as the resolutions supported by your hardware
configuration.
If you go from a Blackmagic Design to an AJA device after installation , or from an AJA to a BLackmagic
Design one, you must update. The following 1920x1080 timings are only supported when using an AJA
Kona 3G: 50p, 5994p, and 60p.
If you do not have a sync connected to your workstation, enable some free run timings for your broadcast
monitoring. Enable the timings with a SyncSource set to freesync.
Vtr
If you have an AJA or Blackmagic Design device connected to a VTR, enable the timings you plan on using
with the connected VTR. AJA devices support 3G-SDI connections. Blackmagic Design devices do not.
Media Storage
This is the path to where all imported and rendered frames are stored. It is recommended to use a fast drive,
and not to use your system drive. To define a new media storage volume, click Add. Click Manual Edit to
edit the configuration file in a text editor. You also need to use manual edit to delete a storage volume.
Parameters:
■ Name: a label to identify the media storage. Required.
■
Location: path to the media files on your storage device. Do not select the root of a drive as your media
storage folder. Create a subfolder to hold all your media files in one place. The recommended folder
name is Autodesk Media Storage/. Required.
■
8-bit Integer, 10-bit Integer, 12-bit Integer and 12-bit Packed Integer. The file formats used when writing
frames of those bit depths to the storage. Optional.
■
Jpeg Compression: can be set from 0 (lowest compression, highest quality) to 100 (highest compression,
lowest quality). Optional.
Backburner: configure background processing
Manager Hostname The hostname or IP address of the Backburner Manager system that will handle
background jobs. This enables the Background Wire and Background Proxies buttons in the application;
they are otherwise greyed out.
Licensing
License server The hostname or IP address of the system that serves the license.
Hostname Used to define the hostname.
Configure Wacom pen buttons
1 Open the System Preferences / Wacom Tablet panel.
2 If Grip Pen does not appear in the Tool section, touch the pen on the tablet.
3 Select the Pen tab.
4 Ensure the top pen button is assigned to the double-click function, and that the bottom pen button
is assigned to the right-click function.
12 | Chapter 2 OS X
Advanced network configuration
If your system is not using the correct network interface, for example wifi vs. ethernet, you can specify which
local interfaces it should use in /usr/discreet/cfg/network.cfg. Documentation about the syntax is in the file
itself. You can hard code a default device and a fallback device for data transfer and for multicasting.
Troubleshooting & support
Support and community
■
User forum on the Area
■
Smoke on Facebook
■
[email protected]
■
Smoke Learning Channel on YouTube
Media storage problems
■
You may need to reconfigure your media storage if it is trying to use hardware that is no longer available.
■
Repairing media storage mount points: if your Mac experiences a hard reboot (e.g. because of a power
outage), when it restarts the operating system may mount the media storage incorrectly (for example,
/Volumes/Storage1 instead of /Volumes/Storage). If media storage will be inaccessible. To delete an
incorrect mount point:
1 On your Mac, go to System Preferences / Sharing, and disable all the file services.
2 In Finder use command+shift+g to navigate to /Volumes.
3 In Volumes/, find the incorrect mount point folder. It should have the name of the original mount
point (for example, Storage), but its icon depicts a folder instead of a disk drive.
4 Delete the folder.
5 Restart the Mac. Restore System Preferences / Sharing settings.
6 If the media storage is still not available after restart, use the Mac application Disk Utility to repair
the media storage disk. See the Mac documentation for details.
Fix VOLUMEMGT and No Volume errors
Follow the steps below if you cannot select your framestore volume, or if you get the following error: Error:
VOLUMEMGT : Failed to initialize Stone+Wire connection.
1 Exit the application.
2 Open Applications / Autodesk / <product>/Utilities / Service Monitor.
3 Restart the Stone+Wire service and start the application.
Backburner
To restart Backburner Manager:
1 In a terminal, check that the Backburner Manager service is running: sudo ps -ef | grep -i backburner
2 If backburnerManager does not appear in the output of the command, restart the Backburner Manager
service: sudo /usr/discreet/backburner/backburner_manager restart
Troubleshooting & support | 13
3 To view details on the Manager's status, run the Console application from Applications / Utilities,
and look for entries containing com.autodesk.backburner_manager, or check the backburner log files
in the /usr/discreet/backburner/Network directory.
14 | Chapter 2 OS X


© Copyright 2026