
Centrally Managing Drive Encryption Keys for IBM
Front cover Draft Document for Review January 30, 2015 6:10 pm SG24-8247-00 Centrally Managing Access to Self-Encrypting Drives in System x Servers Using IBM Security Key Lifecycle Manager Understand self-encrypting drive technology and centralized key Deploy IBM Security Key Lifecycle Manager and SED Manage and troubleshoot your SED Ryan Bradley Angelo Parisi ibm.com/redbooks Draft Document for Review January 30, 2015 6:10 pm 8247edno.fm International Technical Support Organization Centrally Managing Access to SEDs in System x Servers Using IBM SKLM February 2015 SG24-8247-00 8247edno.fm Draft Document for Review January 30, 2015 6:10 pm Note: Before using this information and the product it supports, read the information in “Notices” on page vii. First Edition (February 2015) This edition applies to Version 2.5 of IBM Security Key Lifecycle Manager. For the latest levels of supported firmware for hardware components and drivers refer to Chapter 2, “Supported systems and sample configuration” on page 25. This document was created or updated on January 30, 2015. © Copyright International Business Machines Corporation 2014. All rights reserved. Note to U.S. Government Users Restricted Rights -- Use, duplication or disclosure restricted by GSA ADP Schedule Contract with IBM Corp. Draft Document for Review January 30, 2015 6:10 pm 8247TOC.fm Contents Notices . . . . . . . . . . . . . . . . . . . . . . . . . . . . . . . . . . . . . . . . . . . . . . . . . . . . . . vii Trademarks . . . . . . . . . . . . . . . . . . . . . . . . . . . . . . . . . . . . . . . . . . . . . . . . . . . viii Preface . . . . . . . . . . . . . . . . . . . . . . . . . . . . . . . . . . . . . . . . . . . . . . . . . . . . . . . ix Authors . . . . . . . . . . . . . . . . . . . . . . . . . . . . . . . . . . . . . . . . . . . . . . . . . . . . . . . . ix Now you can become a published author, too! . . . . . . . . . . . . . . . . . . . . . . . . . x Comments welcome . . . . . . . . . . . . . . . . . . . . . . . . . . . . . . . . . . . . . . . . . . . . . . x Stay connected to IBM Redbooks . . . . . . . . . . . . . . . . . . . . . . . . . . . . . . . . . . . xi Part 1. Technology and configuration. . . . . . . . . . . . . . . . . . . . . . . . . . . . . . . . . . . . . . . . . . . 1 Chapter 1. Technology primer . . . . . . . . . . . . . . . . . . . . . . . . . . . . . . . . . . . . 3 1.1 Self-encrypting drive technology . . . . . . . . . . . . . . . . . . . . . . . . . . . . . . . . . 4 1.1.1 Benefits of SED technology . . . . . . . . . . . . . . . . . . . . . . . . . . . . . . . . 5 1.1.2 Certification standards . . . . . . . . . . . . . . . . . . . . . . . . . . . . . . . . . . . . 6 1.1.3 How SED drives work . . . . . . . . . . . . . . . . . . . . . . . . . . . . . . . . . . . . . 7 1.2 IBM Security Key Lifecycle Manager. . . . . . . . . . . . . . . . . . . . . . . . . . . . . 11 1.2.1 SKLM components . . . . . . . . . . . . . . . . . . . . . . . . . . . . . . . . . . . . . . 11 1.2.2 Keys overview . . . . . . . . . . . . . . . . . . . . . . . . . . . . . . . . . . . . . . . . . . 12 1.2.3 SKLM creates, stores, and manages keys . . . . . . . . . . . . . . . . . . . . 12 1.2.4 SSL/TLS session security . . . . . . . . . . . . . . . . . . . . . . . . . . . . . . . . . 13 1.3 Deployment scenarios. . . . . . . . . . . . . . . . . . . . . . . . . . . . . . . . . . . . . . . . 13 1.3.1 Scenario 1 – no key required . . . . . . . . . . . . . . . . . . . . . . . . . . . . . . 13 1.3.2 Scenario 2 encrypted – unattended mode . . . . . . . . . . . . . . . . . . . . 15 1.3.3 Scenario 3 encrypted – attended mode . . . . . . . . . . . . . . . . . . . . . . 17 1.3.4 Scenario 4 encrypted – external key management . . . . . . . . . . . . . . 20 1.4 Conclusion. . . . . . . . . . . . . . . . . . . . . . . . . . . . . . . . . . . . . . . . . . . . . . . . . 23 Chapter 2. Supported systems and sample configuration . . . . . . . . . . . . 25 2.1 Supported systems and options . . . . . . . . . . . . . . . . . . . . . . . . . . . . . . . . 26 2.1.1 Supported servers . . . . . . . . . . . . . . . . . . . . . . . . . . . . . . . . . . . . . . 26 2.1.2 Supported RAID adapters . . . . . . . . . . . . . . . . . . . . . . . . . . . . . . . . . 27 2.1.3 Supported SEDs . . . . . . . . . . . . . . . . . . . . . . . . . . . . . . . . . . . . . . . . 28 2.1.4 Supported IBM Security Key Lifecycle Manager environments . . . . 30 2.2 Example configuration. . . . . . . . . . . . . . . . . . . . . . . . . . . . . . . . . . . . . . . . 34 2.2.1 Configuration overview . . . . . . . . . . . . . . . . . . . . . . . . . . . . . . . . . . . 34 2.2.2 Configuration details . . . . . . . . . . . . . . . . . . . . . . . . . . . . . . . . . . . . . 36 2.3 Conclusion. . . . . . . . . . . . . . . . . . . . . . . . . . . . . . . . . . . . . . . . . . . . . . . . . 40 © Copyright IBM Corp. 2014. All rights reserved. iii 8247TOC.fm Draft Document for Review January 30, 2015 6:10 pm Part 2. Hands-on configuration . . . . . . . . . . . . . . . . . . . . . . . . . . . . . . . . . . . . . . . . . . . . . . . 41 Chapter 3. IBM Security Key Lifecycle Manager setup . . . . . . . . . . . . . . . 43 3.1 Acquiring installation files . . . . . . . . . . . . . . . . . . . . . . . . . . . . . . . . . . . . . 44 3.1.1 Operating system packages . . . . . . . . . . . . . . . . . . . . . . . . . . . . . . . 44 3.1.2 SKLM installation package . . . . . . . . . . . . . . . . . . . . . . . . . . . . . . . . 44 3.1.3 Acquiring SKLM updates. . . . . . . . . . . . . . . . . . . . . . . . . . . . . . . . . . 44 3.2 SKLM installation. . . . . . . . . . . . . . . . . . . . . . . . . . . . . . . . . . . . . . . . . . . . 55 3.2.1 Operating system firewall and setting considerations . . . . . . . . . . . . 55 3.2.2 Installing pre-requisites . . . . . . . . . . . . . . . . . . . . . . . . . . . . . . . . . . . 56 3.2.3 Validate SKLM Windows installation files . . . . . . . . . . . . . . . . . . . . . 62 3.2.4 Executing installation and on-the-fly updates . . . . . . . . . . . . . . . . . . 63 3.2.5 Update SKLM with the latest fix pack . . . . . . . . . . . . . . . . . . . . . . . . 81 3.3 Validate SKLM installation. . . . . . . . . . . . . . . . . . . . . . . . . . . . . . . . . . . . . 94 3.3.1 Checking for errors . . . . . . . . . . . . . . . . . . . . . . . . . . . . . . . . . . . . . . 95 3.3.2 Accessing components . . . . . . . . . . . . . . . . . . . . . . . . . . . . . . . . . . . 96 3.4 Apply SKLM licensing . . . . . . . . . . . . . . . . . . . . . . . . . . . . . . . . . . . . . . . 100 3.5 Generate SKLM server certificate . . . . . . . . . . . . . . . . . . . . . . . . . . . . . . 101 3.6 Production environment considerations . . . . . . . . . . . . . . . . . . . . . . . . . 107 3.7 Conclusion. . . . . . . . . . . . . . . . . . . . . . . . . . . . . . . . . . . . . . . . . . . . . . . . 108 Chapter 4. Integrated Management Module configuration . . . . . . . . . . . 109 4.1 Introduction to IMM certificates . . . . . . . . . . . . . . . . . . . . . . . . . . . . . . . . 110 4.2 Configure the IMM using the web based interface . . . . . . . . . . . . . . . . . 110 4.2.1 Access the IMM Web Interface . . . . . . . . . . . . . . . . . . . . . . . . . . . . 110 4.2.2 Install the FoD key . . . . . . . . . . . . . . . . . . . . . . . . . . . . . . . . . . . . . 114 4.2.3 Create a self-signed certificate . . . . . . . . . . . . . . . . . . . . . . . . . . . . 117 4.2.4 Generate Certificate Signing Request. . . . . . . . . . . . . . . . . . . . . . . 120 4.2.5 Download Certificate Signing Request . . . . . . . . . . . . . . . . . . . . . . 122 4.2.6 Import a signed certificate . . . . . . . . . . . . . . . . . . . . . . . . . . . . . . . . 122 4.2.7 Import SKLM server certificate . . . . . . . . . . . . . . . . . . . . . . . . . . . . 122 4.2.8 Configure the device group . . . . . . . . . . . . . . . . . . . . . . . . . . . . . . . 123 4.2.9 Configure key repository (SKLM) servers . . . . . . . . . . . . . . . . . . . . 125 4.2.10 Test the connection to SKLM . . . . . . . . . . . . . . . . . . . . . . . . . . . . 125 4.2.11 Troubleshooting . . . . . . . . . . . . . . . . . . . . . . . . . . . . . . . . . . . . . . 126 4.3 Configure the IMM using the IMM Command Line Interface . . . . . . . . . . 127 4.3.1 Initial setup . . . . . . . . . . . . . . . . . . . . . . . . . . . . . . . . . . . . . . . . . . . 127 4.3.2 Install FoD key . . . . . . . . . . . . . . . . . . . . . . . . . . . . . . . . . . . . . . . . 128 4.3.3 Create a new key and self-signed certificate . . . . . . . . . . . . . . . . . 128 4.3.4 Generate a new key and Certificate Signing Request . . . . . . . . . . 130 4.3.5 Import a signed certificate . . . . . . . . . . . . . . . . . . . . . . . . . . . . . . . . 131 4.3.6 Import SKLM server certificate . . . . . . . . . . . . . . . . . . . . . . . . . . . . 131 4.3.7 Configure the device group . . . . . . . . . . . . . . . . . . . . . . . . . . . . . . . 132 iv Centrally Managing Access to SEDs in System x Servers Using IBM SKLM Draft Document for Review January 30, 2015 6:10 pm 8247TOC.fm 4.3.8 Configure key repository (SKLM) servers . . . . . . . . . . . . . . . . . . . . 132 4.3.9 Test the connection to SKLM . . . . . . . . . . . . . . . . . . . . . . . . . . . . . 133 4.4 Configure the IMM using the Advanced System Utility . . . . . . . . . . . . . 133 4.4.1 Create a new key and self-signed certificate . . . . . . . . . . . . . . . . . 133 4.4.2 Generate a new key and Certificate Signing Request . . . . . . . . . . 134 4.4.3 Import a signed certificate . . . . . . . . . . . . . . . . . . . . . . . . . . . . . . . . 135 4.4.4 Import SKLM server certificate . . . . . . . . . . . . . . . . . . . . . . . . . . . . 135 4.4.5 Configure key repository servers . . . . . . . . . . . . . . . . . . . . . . . . . . 135 4.4.6 Configure the device group . . . . . . . . . . . . . . . . . . . . . . . . . . . . . . . 136 4.5 Conclusion. . . . . . . . . . . . . . . . . . . . . . . . . . . . . . . . . . . . . . . . . . . . . . . . 136 Chapter 5. UEFI configuration . . . . . . . . . . . . . . . . . . . . . . . . . . . . . . . . . . 137 5.1 Enable storage controller encryption. . . . . . . . . . . . . . . . . . . . . . . . . . . . 138 5.1.1 Setting the adapter for an external key management server . . . . . 138 5.1.2 Accepting pending request on the SKLM server . . . . . . . . . . . . . . . 147 5.2 Configuring virtual disks . . . . . . . . . . . . . . . . . . . . . . . . . . . . . . . . . . . . . 148 5.2.1 Setup of basic RAID volume . . . . . . . . . . . . . . . . . . . . . . . . . . . . . . 149 5.2.2 Activate encryption on virtual drives . . . . . . . . . . . . . . . . . . . . . . . . 152 5.3 Conclusion. . . . . . . . . . . . . . . . . . . . . . . . . . . . . . . . . . . . . . . . . . . . . . . . 155 Chapter 6. Manage your System x Server SED deployment . . . . . . . . . . 157 6.1 Certificate exchange and device acceptance review . . . . . . . . . . . . . . . 158 6.1.1 Client server certificate exchange . . . . . . . . . . . . . . . . . . . . . . . . . . 158 6.1.2 Certificate acceptance options . . . . . . . . . . . . . . . . . . . . . . . . . . . . 164 6.2 SKLM backup and restore. . . . . . . . . . . . . . . . . . . . . . . . . . . . . . . . . . . . 170 6.2.1 SKLM data backup . . . . . . . . . . . . . . . . . . . . . . . . . . . . . . . . . . . . . 170 6.2.2 Restore SKLM data to existing install . . . . . . . . . . . . . . . . . . . . . . . 175 6.3 Conclusion. . . . . . . . . . . . . . . . . . . . . . . . . . . . . . . . . . . . . . . . . . . . . . . . 179 Part 3. Appendixes . . . . . . . . . . . . . . . . . . . . . . . . . . . . . . . . . . . . . . . . . . . . . . . . . . . . . . . . 181 Appendix A. Local key management alternatives . . . . . . . . . . . . . . . . . . 183 Using the UEFI based management utilities for new installs . . . . . . . . . . . . 184 Accessing the UEFI storage management tool . . . . . . . . . . . . . . . . . . . . . 184 Enabling controller based security (Scenario 2) . . . . . . . . . . . . . . . . . . . . 188 Enabling boot-time passphrase (Scenario 3) . . . . . . . . . . . . . . . . . . . . . . 191 Modifying the security key . . . . . . . . . . . . . . . . . . . . . . . . . . . . . . . . . . . . . 193 Creating and securing a virtual drive. . . . . . . . . . . . . . . . . . . . . . . . . . . . . 195 Enabling security on an existing virtual drive . . . . . . . . . . . . . . . . . . . . . . 199 Configuring a Security Key on a replacement RAID adapter . . . . . . . . . . 199 Using the graphical MegaRAID Storage Manager . . . . . . . . . . . . . . . . . . . . . 200 Enabling drive security on an installed RAID controller (Scenario 2) . . . . 200 Enabling boot-time passphrase (Scenario 3) . . . . . . . . . . . . . . . . . . . . . . 205 Modifying an existing controller security key . . . . . . . . . . . . . . . . . . . . . . . 207 Contents v 8247TOC.fm Draft Document for Review January 30, 2015 6:10 pm Creating a secured virtual drive . . . . . . . . . . . . . . . . . . . . . . . . . . . . . . . . 208 Securing an existing virtual drive . . . . . . . . . . . . . . . . . . . . . . . . . . . . . . . 212 Disabling security on a controller . . . . . . . . . . . . . . . . . . . . . . . . . . . . . . . 215 Replacing a controller with existing secured virtual drives . . . . . . . . . . . . 217 Summary . . . . . . . . . . . . . . . . . . . . . . . . . . . . . . . . . . . . . . . . . . . . . . . . . . . . 218 Appendix B. Troubleshooting . . . . . . . . . . . . . . . . . . . . . . . . . . . . . . . . . . 219 IBM SKLM installation, update, and login issues . . . . . . . . . . . . . . . . . . . . . . 220 Error message: Problems were found with the packages and fixes in package group IBM WebSphere Application Server V8.5 . . . . . . . . . . . . . . . . 220 SKLM web interface fails to load with JSP Processing Error . . . . . . . . . . 222 Unable to install Installation Manager on RHEL 6.0/6.1 (64-bit) . . . . . . . . 222 IMM configuration . . . . . . . . . . . . . . . . . . . . . . . . . . . . . . . . . . . . . . . . . . . . . . 223 Security certificate not trusted error . . . . . . . . . . . . . . . . . . . . . . . . . . . . . 223 Test Connection non-responsive . . . . . . . . . . . . . . . . . . . . . . . . . . . . . . . 224 IMM certificate upload error . . . . . . . . . . . . . . . . . . . . . . . . . . . . . . . . . . . 224 Error adding key management server . . . . . . . . . . . . . . . . . . . . . . . . . . . . 225 Unified Extensible Firmware Interface issues . . . . . . . . . . . . . . . . . . . . . . . . 227 UEFI boot error . . . . . . . . . . . . . . . . . . . . . . . . . . . . . . . . . . . . . . . . . . . . . 227 Conclusion . . . . . . . . . . . . . . . . . . . . . . . . . . . . . . . . . . . . . . . . . . . . . . . . . . . 228 Appendix C. Licenses and software . . . . . . . . . . . . . . . . . . . . . . . . . . . . . 229 SKLM for System x SEDs Feature on Demand . . . . . . . . . . . . . . . . . . . . . . . 230 Purchase the SKLM for System x SEDs - FoD option . . . . . . . . . . . . . . . 230 Activate the Feature on Demand . . . . . . . . . . . . . . . . . . . . . . . . . . . . . . . 231 IBM Security Key Lifecycle Manager Basic Edition . . . . . . . . . . . . . . . . . . . . 231 Purchase IBM Security Key Lifecycle Manager Basic Edition . . . . . . . . . 231 Related publications . . . . . . . . . . . . . . . . . . . . . . . . . . . . . . . . . . . . . . . . . . 233 IBM Redbooks . . . . . . . . . . . . . . . . . . . . . . . . . . . . . . . . . . . . . . . . . . . . . . . . 233 Online resources . . . . . . . . . . . . . . . . . . . . . . . . . . . . . . . . . . . . . . . . . . . . . . 233 Help from IBM . . . . . . . . . . . . . . . . . . . . . . . . . . . . . . . . . . . . . . . . . . . . . . . . 234 vi Centrally Managing Access to SEDs in System x Servers Using IBM SKLM Draft Document for Review January 30, 2015 6:10 pm 8247spec.fm Notices This information was developed for products and services offered in the U.S.A. IBM may not offer the products, services, or features discussed in this document in other countries. Consult your local IBM representative for information on the products and services currently available in your area. Any reference to an IBM product, program, or service is not intended to state or imply that only that IBM product, program, or service may be used. Any functionally equivalent product, program, or service that does not infringe any IBM intellectual property right may be used instead. However, it is the user's responsibility to evaluate and verify the operation of any non-IBM product, program, or service. IBM may have patents or pending patent applications covering subject matter described in this document. The furnishing of this document does not grant you any license to these patents. You can send license inquiries, in writing, to: IBM Director of Licensing, IBM Corporation, North Castle Drive, Armonk, NY 10504-1785 U.S.A. The following paragraph does not apply to the United Kingdom or any other country where such provisions are inconsistent with local law: INTERNATIONAL BUSINESS MACHINES CORPORATION PROVIDES THIS PUBLICATION "AS IS" WITHOUT WARRANTY OF ANY KIND, EITHER EXPRESS OR IMPLIED, INCLUDING, BUT NOT LIMITED TO, THE IMPLIED WARRANTIES OF NON-INFRINGEMENT, MERCHANTABILITY OR FITNESS FOR A PARTICULAR PURPOSE. Some states do not allow disclaimer of express or implied warranties in certain transactions, therefore, this statement may not apply to you. This information could include technical inaccuracies or typographical errors. Changes are periodically made to the information herein; these changes will be incorporated in new editions of the publication. IBM may make improvements and/or changes in the product(s) and/or the program(s) described in this publication at any time without notice. Any references in this information to non-IBM websites are provided for convenience only and do not in any manner serve as an endorsement of those websites. The materials at those websites are not part of the materials for this IBM product and use of those websites is at your own risk. IBM may use or distribute any of the information you supply in any way it believes appropriate without incurring any obligation to you. Any performance data contained herein was determined in a controlled environment. Therefore, the results obtained in other operating environments may vary significantly. Some measurements may have been made on development-level systems and there is no guarantee that these measurements will be the same on generally available systems. Furthermore, some measurements may have been estimated through extrapolation. Actual results may vary. Users of this document should verify the applicable data for their specific environment. Information concerning non-IBM products was obtained from the suppliers of those products, their published announcements or other publicly available sources. IBM has not tested those products and cannot confirm the accuracy of performance, compatibility or any other claims related to non-IBM products. Questions on the capabilities of non-IBM products should be addressed to the suppliers of those products. This information contains examples of data and reports used in daily business operations. To illustrate them as completely as possible, the examples include the names of individuals, companies, brands, and products. All of these names are fictitious and any similarity to the names and addresses used by an actual business enterprise is entirely coincidental. COPYRIGHT LICENSE: This information contains sample application programs in source language, which illustrate programming techniques on various operating platforms. You may copy, modify, and distribute these sample programs in any form without payment to IBM, for the purposes of developing, using, marketing or distributing application programs conforming to the application programming interface for the operating platform for which the sample programs are written. These examples have not been thoroughly tested under all conditions. IBM, therefore, cannot guarantee or imply reliability, serviceability, or function of these programs. You may copy, modify, and distribute these sample programs in any form without payment to IBM for the purposes of developing, using, marketing, or distributing application programs conforming to IBM's application programming interfaces. © Copyright IBM Corp. 2014. All rights reserved. vii 8247spec.fm Draft Document for Review January 30, 2015 6:10 pm Trademarks IBM, the IBM logo, and ibm.com are trademarks or registered trademarks of International Business Machines Corporation in the United States, other countries, or both. These and other IBM trademarked terms are marked on their first occurrence in this information with the appropriate symbol (® or ™), indicating US registered or common law trademarks owned by IBM at the time this information was published. Such trademarks may also be registered or common law trademarks in other countries. A current list of IBM trademarks is available on the Web at http://www.ibm.com/legal/copytrade.shtml The following terms are trademarks of the International Business Machines Corporation in the United States, other countries, or both: AIX® BladeCenter® DB2® IBM® Passport Advantage® POWER7® Redbooks® Redpaper™ Redbooks (logo) ServerProven® ® System x® System z® Tivoli® WebSphere® The following terms are trademarks of other companies: Intel, Intel logo, Intel Inside logo, and Intel Centrino logo are trademarks or registered trademarks of Intel Corporation or its subsidiaries in the United States and other countries. Linux is a trademark of Linus Torvalds in the United States, other countries, or both. Microsoft, Windows, and the Windows logo are trademarks of Microsoft Corporation in the United States, other countries, or both. Java, and all Java-based trademarks and logos are trademarks or registered trademarks of Oracle and/or its affiliates. UNIX is a registered trademark of The Open Group in the United States and other countries. Other company, product, or service names may be trademarks or service marks of others. viii Centrally Managing Access to SEDs in System x Servers Using IBM SKLM Draft Document for Review January 30, 2015 6:10 pm 8247pref.fm Preface Data security is one of the paramount requirements for organizations of all sizes. Although many companies invested heavily in protection from network-based attacks and other threats, few effective safeguards are available to protect against potentially costly exposures of proprietary data that results from a hard drive being stolen, misplaced, retired, or redeployed. Self-encrypting drives (SEDs) can satisfy this need by providing the ultimate in security for data-at-rest and can help reduce IT drive retirement costs in the data center. Self-encrypting drives are also an excellent choice if you need to comply with government or industry regulations for data privacy and encryption. In order to effectively manage a large deployment of SEDs in IBM® System x® servers an organization has to rely on a centralized key management solution. This IBM Redbooks® publication explains the technology behind SEDs and demonstrates how to deploy a key management solution using IBM Security Key Lifecycle Manager and properly setup your IBM System x servers. Authors This book was produced by a team of specialists from around the world working at the International Technical Support Organization, Austin Center. Ryan Bradley is an IT Consultant with System x Enterprise Solution Services (xESS), formerly known as Lab Based Services (LBS). After starting eight years ago at IBM in Tools Center development, Ryan now has more than four years experience architecting, implementing, and providing skills transfer on IBM hardware, software, cloud, and management solutions for clients. His areas of expertise include System x, Flex, and BladeCenter® hardware, as well as virtualization, system networking, and system storage. Angelo Parisi is a Certified I/T Specialist with the IBM System x Client Technical Sales (CTS) group. He started his career at IBM in 1995 with the Business Partner Support group. Several years later he moved to the newly formed x86 Server team where he has remained until present day. Currently he is the team lead for the North American Region where he tends to some of the largest IBM accounts in his territory. With over a decade of experience working with large enterprise customers, Angelo has experience with both large scale and © Copyright IBM Corp. 2014. All rights reserved. ix 8247pref.fm Draft Document for Review January 30, 2015 6:10 pm distributed systems, which he leverages as a regular presenter at IBM Tech Edge events. Thanks to the following people for their contributions to this project: EDITOR International Technical Support Organization, Austin Center Andy Ehrenzeller, Luis Giron, W. Craig Johnston IBM Now you can become a published author, too! Here’s an opportunity to spotlight your skills, grow your career, and become a published author—all at the same time! Join an ITSO residency project and help write a book in your area of expertise, while honing your experience using leading-edge technologies. Your efforts will help to increase product acceptance and customer satisfaction, as you expand your network of technical contacts and relationships. Residencies run from two to six weeks in length, and you can participate either in person or as a remote resident working from your home base. Find out more about the residency program, browse the residency index, and apply online at: ibm.com/redbooks/residencies.html Comments welcome Your comments are important to us! We want our books to be as helpful as possible. Send us your comments about this book or other IBM Redbooks publications in one of the following ways: Use the online Contact us review Redbooks form found at: ibm.com/redbooks Send your comments in an email to: [email protected] Mail your comments to: IBM Corporation, International Technical Support Organization Dept. HYTD Mail Station P099 x Centrally Managing Access to SEDs in System x Servers Using IBM SKLM Draft Document for Review January 30, 2015 6:10 pm 8247pref.fm 2455 South Road Poughkeepsie, NY 12601-5400 Stay connected to IBM Redbooks Find us on Facebook: http://www.facebook.com/IBMRedbooks Follow us on Twitter: http://twitter.com/ibmredbooks Look for us on LinkedIn: http://www.linkedin.com/groups?home=&gid=2130806 Explore new Redbooks publications, residencies, and workshops with the IBM Redbooks weekly newsletter: https://www.redbooks.ibm.com/Redbooks.nsf/subscribe?OpenForm Stay current on recent Redbooks publications with RSS Feeds: http://www.redbooks.ibm.com/rss.html Preface xi 8247pref.fm xii Draft Document for Review January 30, 2015 6:10 pm Centrally Managing Access to SEDs in System x Servers Using IBM SKLM 8247p01.fm Draft Document for Review January 30, 2015 6:10 pm Part 1 Part 1 Technology and configuration In this part we provide an overview of the underlying technology that is required to use self-encrypting drives in System x Servers and centrally manage the keys with an encryption key manager product, the IBM Security Key Lifecycle Manager. We then explain four different scenarios how this technology can be used in real world deployment. Finally we document the currently available system options you can use for this technology, and show you our lab layout that we used to test and document our hands-on configuration chapters in Part 2 of the book. © Copyright IBM Corp. 2014. All rights reserved. 1 8247p01.fm 2 Draft Document for Review January 30, 2015 6:10 pm Centrally Managing Access to SEDs in System x Servers Using IBM SKLM Draft Document for Review January 30, 2015 6:10 pm 8247ch Technology Primer.fm 1 Chapter 1. Technology primer In this chapter we provide a primer for the two technologies that can empower an organization to utilize self-encrypting drive technology and combine it with a centralized encryption key lifecycle management solution for their System x servers. We begin by looking into the SED drive technology and how it has been implemented in the System x servers. Next we take a good look at the IBM Security Key Lifecycle Manager solution that allows you to centrally manage your drive encryption keys (and more). We then close this chapter by providing a set of typical deployment scenarios for encrypted disks. © Copyright IBM Corp. 2014. All rights reserved. 3 8247ch Technology Primer.fm Draft Document for Review January 30, 2015 6:10 pm 1.1 Self-encrypting drive technology Data security is a growing requirement for organizations of all sizes. Although many companies invested heavily to protect themselves from network-based attacks and other threats, few effective safeguards are available to protect against potentially costly exposures of proprietary data that results from a hard drive being stolen, misplaced, retired, or redeployed. Self-encrypting drives (SEDs) can satisfy this need by providing the ultimate in security for data-at-rest and can help reduce IT drive retirement costs in the data center. When combined with the compatible RAID controllers, the Serial Attached SCSI (SAS) SEDs in System x servers can deliver superb performance per watt with a cost-effective, secure solution for organizations of all sizes. Self-encrypting drives are also an excellent choice if you need to comply with government or industry regulations for data privacy and encryption. IBM SAS SEDs have the following characteristics and capabilities: Interface speeds of 6 and 12 Gbps Rotational speeds of 7,200 RPM, 10,000 RPM, and 15,000 RPM Single hard disk drive capacities of 146 GB, 300 GB, 600 GB, 900 GB, 1.2 TB, 1.8 TB, 2 TB, 4 TB, or 6 TB Support for Native Command Queuing (NCQ) Support for Self-Monitoring, Analysis, and Reporting Technology (S.M.A.R.T.) 2.5-inch and 3.5 inch form-factor available Hot-swap HDDs Encrypt data dynamically at the drive level with no performance impact Provide instant secure erasure (cryptographic erasure, so data is no longer readable) Enable auto-locking to secure data if a drive is misplaced or stolen while in use When the self-encrypting drive is in normal use, its owner does not need to maintain authentication keys (otherwise known as credentials or passwords) to access the data on the drive. The self-encrypting drive encrypts data that is being written to the drive and decrypts data that is being read from it, all without requiring an authentication key from the owner. Self-encrypting drives eliminate the need to overwrite, destroy, or store retired drives. When it is time to retire or repurpose the drive, the owner sends a command to the drive to perform a cryptographic erasure. The process is nearly 4 Centrally Managing Access to SEDs in System x Servers Using IBM SKLM Draft Document for Review January 30, 2015 6:10 pm 8247ch Technology Primer.fm instantaneous, regardless of the capacity of the drive. Cryptographic erasure replaces the encryption key inside the encrypted drive, making it impossible to ever use the deleted key to decrypt the encrypted data. Self-encrypting drives reduce IT operating expenses by reducing asset control challenges and disposal costs. Data security with self-encrypting drives helps ensure compliance with privacy regulations without hindering IT efficiency. Using a self-encrypting drive when auto-lock mode is enabled requires securing the drive with an authentication key. When secured in this manner, the drive’s data encryption key is locked whenever the drive is powered down. In other words, the moment the self-encrypting drive is switched off or becomes unplugged, it automatically locks the drive’s data. When the self-encrypting drive is powered on again, it requires authentication before it can unlock the encryption key and read any data on the drive. This protects against mis-placement and theft. The hardware encryption engine on the drives matches the SAS port’s maximum speed and encrypts all data with no performance degradation. This performance scales linearly and automatically with each drive added to the system. No processor cycles from the host are necessary, and I/O operations occur without interruption. IBM ServeRAID M Series controllers offer SED support with any RAID 5 upgrade (with or without cache memory) therefore no additional licensing is required. For more information, see the IBM Redbooks Product Guide Self-Encrypting Drives for IBM System x, TIPS0761 at the following location: http://www.redbooks.ibm.com/abstracts/tips0761.html 1.1.1 Benefits of SED technology The threat of data exposure has increased over time. While most current protection efforts focus around securing the transmission of data, the abilities of protecting data-at-rest has changed very little. Software based encryption strategies have a serious impact on performance and require careful consideration of the operating system environment in which they are implemented. Any change in the operating system including service packs can result in having to re-test the entire solution or wait for the provider to certify new environments. Driven by the current state of cybercrime, government legislation and industry privacy requirements to safeguard data are on the rise in many countries. This includes not only data transmission but also the disposal of data when storage Chapter 1. Technology primer 5 8247ch Technology Primer.fm Draft Document for Review January 30, 2015 6:10 pm media has either failed or is being retired from active use. In a time where organizations try to drastically reduce their IT budgets on a yearly basis, physically destroying or degaussing devices are not only costly but also are not supported by the drive manufacturers. Alternate methods, such as multi-pass data overwrite are unsuitable in this age of rapidly increasing storage capacities. While a 4.51 GB drive may have only taken a couple of hours, today’s multi-terabyte drives can take days. Additionally, if the drive were to fail, there is no mechanism to destroy the data in a warranty approved manner. Self-encrypting drives protect confidential or proprietary information stored locally on the server by encrypting the data with an AES based cypher before it is physically written to the media. By performing this encryption at the last step before writing the data with a dedicated AES processor, SED drives provide scalable performance. This performance is due to the fact that each drive has a dedicated AES processor. This removes the encumbrance of encryption from being handled by a single processor on the RAID controller or adding CPU utilization at the operating system level. As drives are added to the system for capacity or performance growth, each new drive includes its own AES processor. Additionally, by having clear data access from the operating system to the hard disk, there is no requirement for operating system specific support for the encryption. This protects the organization’s investment by not limiting them to specific operating builds or new releases of agents to support the encryption. No unique steps are required to install an operating system on a server utilizing SED drive technology. In summary, SED drives reduce the vulnerability of data-at-rest to potentially costly exposures of proprietary data resulting from hard drive theft, misplacement or improper drive disposal. There is no need for time consuming wiping of drives that take even longer to complete as the capacity of the storage devices increase. 1.1.2 Certification standards The encryption capabilities of SED drives are implemented in a way that meets or exceeds the requirements for federal government standards to Federal Information Processing Standard (FIPS) level 2. This certification is the result of extensive testing by federal security specialists and it is a testament to the strength of the encryption being utilized on the device. Specifically, the SED drives have been validated according to the following: 6 Centrally Managing Access to SEDs in System x Servers Using IBM SKLM Draft Document for Review January 30, 2015 6:10 pm 8247ch Technology Primer.fm Trusted Computing Group (TCG) Enterprise SSC Revision 1.0 FIPS 140-2 Validated Self-Encrypting Drives are certified by the U.S. and Canadian governments to protect Sensitive but Unclassified and Protected class data. Encryption/FIPS — FIPS 140-2 Validated Self-Encrypting Drives (SEDs) have been certified by the U.S. National Institute of Standards and Technology (NIST) and Canadian Communications Security Establishment (CSE) as meeting the Level 2 security requirements for cryptographic modules as defined in the Federal Information Processing Standards (FIPS) 140-2 Publication. More detail on the FIPS compliance can be found at the following link: http://www.seagate.com/tech-insights/fips-140-2-standard-and-self-encry pting-drive-technology-master-ti/ Additional detail on the FIPS specification can be found at the link below: http://csrc.nist.gov/groups/STM/cmvp/standards.html 1.1.3 How SED drives work With SED drive technology, the configured storage capacity is presented to the operating system as regular block level storage like any typical disk based storage media. Using standard file management tools, it is not possible to differentiate between an encrypted volume and an unencrypted one as all of the encryption takes place at the individual drive level within the hardware. Once the encrypted data is read from the spinning disk inside the drive itself, it is then decrypted in the drive controller and sent to the RAID adapter as clear unencrypted data. This allows standard RAID drivers to be used with complete transparency at the operating system level. Regardless of whether or not a drive has been secured with the management tools, the data is always being encrypted on the physical disk. At the time of manufacture, each SED drive is configured with a random AES key that is used to encrypt all data being written. This is referred to as the Media Encryption Key (MEK) and is stored in a hidden section of the disk and is also referred to as Band 0 or the Global Band. If the drive has not been secured by a RAID adapter, it has access to this AES key at startup and simply loads this key at power-on to be able to read and write data to the disk platters. In this mode, it functions like any normal hard disk that you are familiar with, it just happens to be encrypting and decrypting the data in real time. Since all data being sent from and returned to the controller is unencrypted, there is no change to the standard install procedures for an operating system. Chapter 1. Technology primer 7 8247ch Technology Primer.fm Draft Document for Review January 30, 2015 6:10 pm The storage of the MEK key is shown in Figure 1-1. Figure 1-1 Illustration of SED disk usage Once the drive is configured as part of an array or virtual drive, the management tool can be used to secure the volume. This process encrypts the drive based AES MEK with another key that is managed by the RAID adapter or a dedicated key management server. This managed key, whether managed by the RAID controller or an external key management server, is referred to as the Key Encryption Key (KEK). In this scenario, the hard drive no longer has access to the MEK to decrypt the data stored on its platters unless paired up with a RAID adapter that passes the correct KEK on to the drives at boot time. It is this key encryption that prevents the drive from being accessed if the drive fails. 8 Centrally Managing Access to SEDs in System x Servers Using IBM SKLM Draft Document for Review January 30, 2015 6:10 pm 8247ch Technology Primer.fm Figure 1-2 illustrates how this exchange of keys occurs when the server is powered on. Figure 1-2 Secured SED drive boot process If the drives are removed or some change occurs where the drives are unable to obtain the KEK used to encrypt the data, the drives can no longer read the data and the disk is referred to as cryptographically sanitized. This is functionally equivalent to, or exceeds, the data disposal capability of a three pass data destruction tool. If the drives are reconnected to the same system or the key is restored to a new RAID adapter, as in the case of a service call, then the drives can regain access to the data. The important concept behind SED drives relative to controller or operating system based encryption is that since the encryption occurs at the last stage in the write process or the first stage of a read process, all data flowing in and out of the drive is clear or decrypted. This means that there is no impact to how the data is used or what operating system is employed since there are no specific drivers or agents required above the standard operating system driver for the Chapter 1. Technology primer 9 8247ch Technology Primer.fm Draft Document for Review January 30, 2015 6:10 pm RAID adapter in use. As long as the appropriate RAID adapter driver is supported by the intended operating system, no additional testing or configuration is required to make the storage available for use. Figure 1-3 illustrates what components of the data flow, visualized as Customer name, are encrypted vs. decrypted. Figure 1-3 SED drive encryption Data removal Equally important as how the data is encrypted is how the data on a disk is destroyed for either disposal, resale, or re-deployment. Standard methods of multi-pass overwrite are simply too time consuming to be viable given the increase in capacity of current storage devices. The alternatives of degaussing and/or physical destruction are not economical alternatives as they void any warranty associated with the device, are not supported by the vendors for data disposal, and destroy any resale value of the device. Since SEDs are always encrypting the data being written to the physical media with the MEK, they support a function called Secure Instant Erase. This function is a standards approved method to destroy the data on the device by randomizing the encryption key store (MEK) on the drive. Since the drive will no 10 Centrally Managing Access to SEDs in System x Servers Using IBM SKLM Draft Document for Review January 30, 2015 6:10 pm 8247ch Technology Primer.fm longer have the valid MEK required to decrypt the data, this renders all of the data on the device invalid instantly regardless of the capacity of the disk. This data disposal method is referred to as cryptographic sanitization. This cryptographic sanitization is both a FIPS and warranty approved method for data disposal. 1.2 IBM Security Key Lifecycle Manager You can use IBM Security Key Lifecycle Manager (SKLM) to create, back up, and manage the lifecycle of keys and certificates that an organization uses. You can manage encryption of symmetric keys, asymmetric key pairs, and certificates. IBM Security Key Lifecycle Manager provides a graphical user interface, command-line interface, and REST interface to manage keys and certificates. IBM Security Key Lifecycle Manager waits for and responds to key generation or key retrieval requests that arrive through TCP/IP communication. This communication can be from a tape library, tape controller, tape subsystem, device drive, or tape drive. This IBM Redbooks publication focuses on using SKLM with System x Servers and self-encrypting drives. IBM Security Key Lifecycle Manager provides the following features: Manage symmetric keys, asymmetric key pairs, and X.509 V3 certificates. Manage the creation and lifecycle of keys, which contain metadata on their intended usage. Provide protected backup of critical data for disaster recovery. For example, on distributed systems, backup includes cryptographic key data (actual keys and certificates that are managed), metadata about the keys, and configuration files. 1.2.1 SKLM components The IBM Security Key Lifecycle Manager solution on distributed systems includes the IBM Security Key Lifecycle Manager server, WebSphere® Application Server, and DB2®. The WebSphere Application Server runs a Java virtual machine that provides the runtime environment for the application code. The application server provides communication security, logging, messaging, and web services. Chapter 1. Technology primer 11 8247ch Technology Primer.fm Draft Document for Review January 30, 2015 6:10 pm To find out more about SKLM visit the folowing website: http://www.ibm.com/software/products/en/key-lifecycle-manager 1.2.2 Keys overview An encryption key is typically a random string of bits generated specifically to scramble and unscramble data. Encryption keys are created by using algorithms that are designed to ensure that each key is unique and unpredictable. The longer the key constructed this way, the harder it is to break the encryption code. IBM Security Key Lifecycle Manager uses two types of encryption algorithms: symmetric algorithms and asymmetric algorithms. Symmetric, or secret key encryption, uses a single key for both encryption and decryption. Symmetric key encryption is used to encrypt large amounts of data efficiently. Advanced Encryption Standard (AES) keys are symmetric keys that can be three different key lengths (128, 192, or 256 bits). AES is the encryption standard that is recognized and recommended by the US government. The 256-bit keys are the longest allowed by AES. By default, IBM Security Key Lifecycle Manager generates 256-bit AES keys. Asymmetric, or public/private encryption, uses a pair of keys. Data encrypted using one key can only be decrypted by using the other key in the public/private key pair. When an asymmetric key pair is generated, the public key is typically used to encrypt, and the private key is typically used to decrypt. IBM Security Key Lifecycle Manager uses both symmetric and asymmetric keys. Symmetric encryption enables high-speed encryption of user or host data. Asymmetric encryption, which is necessarily slower, protects the symmetric key. 1.2.3 SKLM creates, stores, and manages keys The IBM Security Key Lifecycle Manager creates key material using a random number generator. It stores the keys in a secure DB2 database. Requests for keys are serviced over a TCP/IP connection. For the System x self-encrypting drives, SKLM creates a key container used by external devices. The SED device stores its master encryption key (MEK) encrypted under the KEK provided by SKLM. At System x Server startup, the devices contact SKLM to obtain the key encrypting key (KEK). 12 Centrally Managing Access to SEDs in System x Servers Using IBM SKLM Draft Document for Review January 30, 2015 6:10 pm 8247ch Technology Primer.fm 1.2.4 SSL/TLS session security The connection between the System x Server and SKLM is secured through SSL/TLS protocols. In order to retrieve a KEK from SKLM, the device must authenticate the server. This authentication is performed using SSL protocols. Prior to initiating a key exchange operation, the proper security mechanisms must be in place. A digital certificate is generated at the SKLM key manager. This certificate is exported using the SKLM Command Line Interface. The exported certificate is then imported into each device that will use keys from SKLM. Additionally, each device generates and exports a digital certificate to be imported as a client certificate by the SKLM key manager. 1.3 Deployment scenarios Regardless of how the encryption keys are managed, whether they are configured on the local RAID adapter or provided from an external key management server, the manner in which the data is encrypted is identical. The component that does change is how the keys are managed by the end user and the level of protection and interaction involved in the deployment. In other words, the MEK is always used in the same manner, it is the management of the KEK that changes based on requirements of the end solution. To help explain the various manners in which SED drives can be deployed, we have created four sample scenarios that range from unsecured configurations to centrally managed key management servers. Each scenario describes the drawbacks and benefits of the implementation in addition to highlighting typical environments where it would be typically used. These are not industry standard scenarios, they are constructs developed by the authors to describe the various ways that SED drives can be implemented in an environment. Scenario 1 – no key required Scenario 2 encrypted – unattended mode Scenario 3 encrypted – attended mode Scenario 4 encrypted – external key management 1.3.1 Scenario 1 – no key required In the first scenario, SED drives are utilized in System x servers with no additional configuration beyond the standard array and virtual drive management used in the deployment of a typical server. Chapter 1. Technology primer 13 8247ch Technology Primer.fm Draft Document for Review January 30, 2015 6:10 pm Figure 1-4 illustrates an example configuration using this method. Figure 1-4 Scenario 1 Scenario 1 is based on the deployment of SEDs in the place of regular storage devices with no additional configuration steps performed beyond the standard creation of arrays and virtual disks. While this does not take advantage of the security features of the drives, it does allow for the use of the secure instant erase function of the SED technology. In this case, the data is not protected against theft, however, the devices can be securely erased instantly for data disposal. The major drawback of this implementation is that a failed drive cannot be erased since it cannot be accessed to randomize the MEK and requires alternate data disposal such as physical destruction of the device. This implementation is typically used where an organization is unsure of the technology or not ready for the deployment of a solution requiring key management. By deploying the SEDs in this manner, an organization can introduce the drives to their environment without any changes to their deployment or management methods. When ready, the organization can enable the additional functionality with no impact to the data stored on the devices. Pros: Understood technology that has been in practical use for years No O/S intervention required (transparent) No specialized service requirements 14 Centrally Managing Access to SEDs in System x Servers Using IBM SKLM Draft Document for Review January 30, 2015 6:10 pm 8247ch Technology Primer.fm Secure erase function No licensing requirements Cons: Data is not protected against physical theft of drives Failed drives cannot be erased 1.3.2 Scenario 2 encrypted – unattended mode Scenario 2 builds on the configuration of scenario 1 and takes it a step further by using the local KEK management of the RAID adapter to encrypt the MEK present on the installed SEDs. It is referred to as unattended mode because no user intervention is required during the regular boot cycle of the server. Figure 1-5 illustrates the implementation of scenerio 2. Figure 1-5 Scenario 2 Scenario 2 depicts a deployment where an organization is looking to take advantage of the encryption capability of secured virtual disks while minimizing the impact to the environment regarding key management. In this implementation, once the arrays and virtual disks are created, drive security is configured on the RAID controller, which generates a KEK and the virtual disks are secured by using this KEK to encrypt the MEK present on the drives within Chapter 1. Technology primer 15 8247ch Technology Primer.fm Draft Document for Review January 30, 2015 6:10 pm the target array. This effectively binds the disks to the controller rendering the data sanitized if removed because the drive would not have access to the required KEK to decrypt the drive MEK. This is an improvement over scenario 1 because the drives can not only be instantly erased, any drive that may fail will automatically have the data sanitized as another controller could not be used to recover the data. As soon as the appropriate KEK is unavailable to the drive, the MEK cannot be read. This protects against a failed drive having the controller board replaced since the KEK is not stored anywhere on the disk. Pros: No operating system intervention required (transparent) Drive data is protected against theft (data is encrypted) No boot time intervention required Instant secure data disposal Encryption can be activated at any point from local or remote GUI or command line without data loss Cons: Data is not protected against theft of the complete server as the controller provides the keys to the drives at boot time without intervention Additional service steps required for controller replacement to reset keys Additional setup to establish the initial keys Once encrypted, a volume cannot be decrypted without destroying data Impact to service and support The downside of this scenario is the impact to maintenance on the server. In this scenario, since the keys for the volumes are stored on the RAID controller, any impact to that RAID adapter would require additional steps to recover the data. Once a new controller is installed, any secured volumes would show as a foreign encrypted array. In order for the new controller to be able to access the data on this volume, the encryption key used to secure the volume on the original RAID controller would need to be restored to the new RAID controller. It is therefore imperative that whenever disk encryption is being configured, any security keys are backed up and tracked to minimize impact of service actions. 16 Centrally Managing Access to SEDs in System x Servers Using IBM SKLM Draft Document for Review January 30, 2015 6:10 pm 8247ch Technology Primer.fm Figure 1-6 depicts a flow chart of the different impact situations to a service call on the server. These situations address a drive failure and controller failure. Figure 1-6 Service and support impact 1.3.3 Scenario 3 encrypted – attended mode Scenario 3 takes the configuration in scenario 2 and adds to it a boot time pass phrase that must be provided to the controller at boot time to prevent the KEK being passed to the drives without proper authorization. This is why it is referred to as the attended mode, because intervention is required each time the server is booted. Chapter 1. Technology primer 17 8247ch Technology Primer.fm Draft Document for Review January 30, 2015 6:10 pm This scenario is illustrated in Figure 1-7. Figure 1-7 Scenario 3 Scenario 3 is identical to the configuration of Scenario 2 with the simple exception that the RAID controller is configured with a boot-time passphrase. While a simple change, this brings two large impacts to the implementation. The first change is that user level integration is required at any time that the server is restarted. During post, the server will pause at the RAID controller firmware initialization screen and prompt the operator for a valid passphrase. If one cannot be provided, any volumes that have been secured will not be accessible. If a valid passphrase is provided, whether via local keyboard or a remote KVM, the RAID controller will then pass the KEK to the disks to unlock the MEK and the boot process continues normally. The second change that this configuration introduces is the management of the passphrase. This is a significant change as the passphrase has to be manually entered by an operator at boot time. The main question this raises is who will have access to the passphrase and what is the plan of action if that individual is not available in an after-hours situation. The main benefit of scenario 3 over scenario 2 is the protection of the data in the event of theft or decommissioning of the server. In scenario 2, if someone can obtain the entire server, the encryption is rendered irrelevant as the keys are 18 Centrally Managing Access to SEDs in System x Servers Using IBM SKLM Draft Document for Review January 30, 2015 6:10 pm 8247ch Technology Primer.fm automatically passed to the disks at boot time. By introducing the passphrase in scenario 3, all data is rendered unreadable unless the passphrase can be provided. Pros: No operating system intervention required (transparent) Entire server is protected against data theft (data is encrypted) and requires boot-time intervention Instant secure data disposal Cons: Additional service steps required for controller replacement to reset keys Additional setup required to establish the initial keys Once encrypted, a volume cannot be decrypted without destroying data Passphrase must be entered when the server is restarted Impact to service and support The downside of this scenario is the impact to maintenance on the server. In this scenario, any impact to that RAID adapter requires additional steps to recover the data because the keys for the volumes are stored on the RAID controller. Once a new controller is installed, any secured volumes will show as a foreign encrypted array. In order for the new controller to be able to access the data on this volume, the encryption key that was used to secure the volumes on the original RAID controller need to be restored to the new RAID controller. It is therefore imperative that whenever disk encryption is being configured, any security keys are backed up and tracked to minimize impact of service actions. Chapter 1. Technology primer 19 8247ch Technology Primer.fm Draft Document for Review January 30, 2015 6:10 pm Figure 1-8 depicts a flow chart of the different impact situations to a service call on the server. These situations address a drive failure and controller failure. The service impact for scenario 3 is identical to scenario 2. Figure 1-8 Service and support impact 1.3.4 Scenario 4 encrypted – external key management The final scenario 4 is the most beneficial scenario for deployments of all sizes because it adds centralized KEK management to the environment. This provides the full benefit of SEDs to the organization while avoiding the need for boot time intervention or the manual input of passphrases to secure a server. 20 Centrally Managing Access to SEDs in System x Servers Using IBM SKLM Draft Document for Review January 30, 2015 6:10 pm 8247ch Technology Primer.fm Figure 1-9 shows the components that make up this solution. Figure 1-9 Scenario 4 In the final scenario 4, an external key management server is utilized to provide KEK keys to the server at boot time. This requires firmware support as the server must establish a trusted network connection to a key management server, like IBM Security Key Lifecycle Manager (SKLM), during boot and receive a KEK key that is used to decrypt the MEK before the server can complete the boot process. As in scenario 2 and 3, the volumes on the RAID controller are secured encrypting the MEK keys, however, the KEK keys are not stored locally on the controller. This allows for the central management of the KEK keys for larger deployments of servers, including remote branch offices, and removes the necessity of boot time intervention in the case of a server restart. Additionally, this automatically sanitizes all data on the server by either removing it from the corporate network where the key management server is located or by revoking the keys from the management server when a server is being retired or repurposed. Remote key management requires a number of components to be in place to support this boot time process. They are as follows: Integrated Management Module v2 firmware support The server must support external key management and must have an Integrated Management Module (IMM) firmware level at or greater than when the support was introduced for a product (for more details refer to Chapter 2, “Supported systems and sample configuration” on page 25). Chapter 1. Technology primer 21 8247ch Technology Primer.fm Draft Document for Review January 30, 2015 6:10 pm A supported external key management server must be configured and accessible on the IMM network. IMM v2 must be configured with a self-signed certificate or one that has been signed by a certificate authority. IMM v2 must have a key management server certificate installed. Key management server must have the target system certificate installed. RAID adapter must be configured to use an external key management source. While this does initially introduce some additional complexity to the network, the use of an external key management server allows for a simplification of key management over previous scenarios and provides for better scalability for larger or distributed environments. Many organizations already have key management servers in their data-centers to handle the needs of securing data-at-rest for formats such as tape, where the data is typically encrypted for off-site storage. This scenario represents the implementation that we discussed in depth within the scope of this book. Pros: No operating system intervention required (transparent) Entire server is protected against data theft (data is encrypted) No boot time intervention required (keys handled by SKLM) Instant secure data disposal Cons: Additional service steps required for controller replacement to reset keys Additional setup to establish the initial keys Once encrypted, it cannot be disabled without destroying data Central SKLM infrastructure must be created and maintained Impact to service and support The downside of this scenario is the impact to maintenance on the server. In this scenario, if the RAID controller is replaced, the new RAID controller must be configured to import the existing drive configuration and also must be set correctly to use an external key management server. If the system board is replaced, the following actions need to be taken: 1. Restore IMM configuration parameters to enable communication with the external key manager. a. Reapply needed FoD options 22 Centrally Managing Access to SEDs in System x Servers Using IBM SKLM 8247ch Technology Primer.fm Draft Document for Review January 30, 2015 6:10 pm b. Restore external key manager addresses c. Restore server and key manager certificates d. Restore original Server UUID 2. At the SKLM server, accept the System x server (if using a new certificate) In the case of external key management using SKLM, the server UUID is used to associate any given System x server with the existing KEK needed to decrypt the MEK. Consequently, when the system board is replaced, the Server UUID must be restored before the server will be able to obtain the existing KEK from the key manager and gain access to the SEDs at boot time. Any change in the key allocated to the repaired server will render all data inaccessible by design. Figure 1-10 depicts the recovery procedure for failed components in this scenario, including drive failure, controller failure, and planar failure. Figure 1-10 Service and support impact 1.4 Conclusion As illustrated in this chapter, there are a number of methods that SEDs can be deployed in. The best solution for a given implementation depends on many factors, including the level of security required, the number of systems deployed, and the availability of managed key servers. Chapter 1. Technology primer 23 8247ch Technology Primer.fm Draft Document for Review January 30, 2015 6:10 pm If it is feasible to have key management servers on the corporate network, the deployment of scenario 4 can provide the highest degree of central management and flexibility for the IT environment. It is the installation of scenario 4 that we document in detail in Part 2 of this document. We explain this approach in more detail in the following chapter. 24 Centrally Managing Access to SEDs in System x Servers Using IBM SKLM Draft Document for Review January 30, 2015 6:10 pm 8247ch Supported Systems and Config.fm 2 Chapter 2. Supported systems and sample configuration In this chapter we discuss the supported configurations and options for self-encrypting drives in System x servers. We also provide details for our example configuration that was used as a proof of concept to create the installation instructions for this book. © Copyright IBM Corp. 2014. All rights reserved. 25 8247ch Supported Systems and Config.fm Draft Document for Review January 30, 2015 6:10 pm 2.1 Supported systems and options The following is a list of all supported servers, RAID adapters, and drives as of the time of publication. The most current list of supported configurations can be found at the Server Proven site located here: http://www.ibm.com/systems/info/x86servers/serverproven/compat/us/ Additionally, the IBM Redbooks website is a valuable source of information on SED drives and can be located at the following URL: http://www.redbooks.ibm.com/redbooks.nsf/searchsite?SearchView&query=SE D 2.1.1 Supported servers As of the time of publication the following list of System x server systems shown in Table 2-1 are supported for external key management: Table 2-1 Supported servers 26 Server Machine Type System x3100 M5 5457 System x3250 M5 5458 System x3300 M4 7382 System x3500 M4 7383 System x3500 M4 (E5-xxxxV2) 7383, E5-xxxxV2 System x3530 M4 7160 System x3530 M4 (E5-xxxxV2) 7160, E5-xxxxV2 System x3630 M4 7158 System x3630 M4 (E5-xxxxV2) 7158, E5-xxxxV2 System x3550 M4 7914 System x3550 M4 (E5-xxxxV2) 7914, E5-xxxxV2 System x3550 M5 5463 System x3650 M4 7915 System x3650 M4 (E5-xxxxV2) 7915, E5-xxxxV2 Centrally Managing Access to SEDs in System x Servers Using IBM SKLM Draft Document for Review January 30, 2015 6:10 pm 8247ch Supported Systems and Config.fm Server Machine Type System x3650 M4 HD 5460 System x3650 M5 5462 System x3750 M4 8722/8733 System x3750 M4 8752/8718 System x3850 X6/x3950 X6 3837 NeXtScale nx360 M5 5465 2.1.2 Supported RAID adapters At the time of publication, M5110(e) and M5210(e) RAID adapters are supported for the use of external key management in combination with servers supported in the ServerProven® list, shown in 2.1.1, “Supported servers ” on page 26. The installation of any RAID 5, RAID 6, or supported cache modules automatically enables support for securing SED based virtual drives while external key management requires the purchase of a Features on Demand (FoD) license. Table 2-2 shows the list of supported RAID adapters and the corresponding upgrades. Table 2-2 Supported RAID controllers Option part number Description Supported RAID adapters M5110 81Y4481 ServeRAID M5110 SAS/SATA Controller for System x Onboard ServeRAID M5110e SAS/SATA Controller for System x One of the upgrades below is required to support SEDs with the M5110 RAID controller 81Y4544 ServeRAID M5100 Series Zero Cache/RAID 5 Upgrade for System x 81Y4484 ServeRAID M5100 Series 512MB Cache/RAID 5 Upgrade for System x 81Y4487 ServeRAID M5100 Series 512MB Flash/RAID 5 Upgrade for System x 81Y4559 ServeRAID M5100 Series 1GB Flash/RAID 5 Upgrade for System x Chapter 2. Supported systems and sample configuration 27 8247ch Supported Systems and Config.fm Draft Document for Review January 30, 2015 6:10 pm Option part number Description 47C8670 ServeRAID M5100 Series 2GB Flash/RAID 5 Upgrade for System x Supported RAID adapters M5210 46C9110 ServeRAID M5210 SAS/SATA Controller for System x Onboard ServeRAID M5210e SAS/SATA Controller for System x One of the upgrades below is required to support SEDs with the M5210 RAID controller 47C8708 ServeRAID M5200 Series Zero Cache/RAID 5 Upgrade for IBM Systems-FoD 47C8656 ServeRAID M5200 Series 1GB Cache/RAID 5 Upgrade for IBM Systems 47C8660 ServeRAID M5200 Series 1GB Flash/RAID 5 Upgrade for IBM Systems 47C8664 ServeRAID M5200 Series 2GB Flash/RAID 5 Upgrade for IBM Systems 47C8668 ServeRAID M5200 Series 4GB Flash/RAID 5 Upgrade for IBM Systems Supported RAID adapters M1215 46C9114 ServeRAID M1215 SAS/SATA Controller for System x The upgrade below is required to support SEDs with the M1215 RAID controller 46C9114 ServeRAID M1215 SAS/SATA Controller for IBM System x Please note that the most current list of supported controllers and options can be found at the ServerProven site located at the following URL: http://www.ibm.com/systems/info/x86servers/serverproven/compat/us/ 2.1.3 Supported SEDs Table 2-3 on page 29 represents the currently supported SEDs at the time of publication. This is a rapidly growing list of devices and should only be considered a sub-set of supported options. For the latest list of supported SED drives for a given server model, please consult the IBM ServerProven site located at the following URL: http://www.ibm.com/systems/info/x86servers/serverproven/compat/us/ 28 Centrally Managing Access to SEDs in System x Servers Using IBM SKLM Draft Document for Review January 30, 2015 6:10 pm 8247ch Supported Systems and Config.fm Table 2-3 Supported SEDs Option part number Description 90Y8944 IBM 146GB 15K 6Gbps SAS 2.5" SFF G2HS SED 00AJ116 IBM 146GB 15K 6Gbps SAS 2.5" G3HS SED 00NA281 IBM 300GB 15K 12Gbps SAS 2.5" G3HS 512e SED 00NA286 IBM 600GB 15K 12Gbps SAS 2.5" G3HS 512e SED 90Y8913 IBM 300GB 10K 6Gbps SAS 2.5" SFF G2HS SED 00AJ106 IBM 300GB 10K 6Gbps SAS 2.5" G3HS SED 90Y8908 IBM 600GB 10K 6Gbps SAS 2.5" SFF G2HS SED 00AJ101 IBM 600GB 10K 6Gbps SAS 2.5" G3HS SED 00NA291 IBM 600GB 10K 12Gbps SAS 2.5" G3HS 512e SED 81Y9662 IBM 900GB 10K 6Gbps SAS 2.5" SFF G2HS SED 00AJ076 IBM 900GB 10K 6Gbps SAS 2.5" G3HS SED 00NA296 IBM 900GB 10K 12Gbps SAS 2.5" G3HS 512e SED 00AD085 IBM 1.2TB 10K 6Gbps SAS 2.5'' G2HS SED 00AJ151 IBM 1.2TB 10K 6Gbps SAS 2.5'' G3HS SED 00NA301 IBM 1.2TB 10K 12Gbps SAS 2.5'' G3HS 512e SED 00NA476 IBM 1.8TB 10K 6Gbps SAS 2.5'' G2HS 512e SED 00NA306 IBM 1.8TB 10K 12Gbps SAS 2.5'' G3HS 512e SED 00W1533 IBM 2TB 7.2K 6Gbps NL SAS 3.5'' G2HS SED 00ML218 IBM 2TB 7.2K 6Gbps NL SAS 3.5" G2HS 512e SED 00FN238 IBM 2TB 7.2K 12Gbps NL SAS 3.5" G2HS 512e SED 00W1543 IBM 4TB 7.2K 6Gbps NL SAS 3.5'' G2HS SED 00ML223 IBM 4TB 7.2K 6Gbps NL SAS 3.5" G2HS 512e SED 00FN248 IBM 4TB 7.2K 12Gbps NL SAS 3.5" G2HS 512e SED 00ML228 IBM 6TB 7.2K 6Gbps NL SAS 3.5" G2HS 512e SED 00FN258 IBM 6TB 7.2K 12Gbps NL SAS 3.5" G2HS 512e SED Chapter 2. Supported systems and sample configuration 29 8247ch Supported Systems and Config.fm Draft Document for Review January 30, 2015 6:10 pm Please note that not all drives are supported in all servers. Please consult the ServerProven site for a list of supported drives. An alternate source of information about what drives are supported in a server is the IBM System x Configuration and Options Guide, which is published quarterly at the following URL: http://www.ibm.com/systems/xbc/cog/ 2.1.4 Supported IBM Security Key Lifecycle Manager environments Support for System x servers was included beginning with IBM Security Key Lifecycle Manager (SKLM) 2.5.0.2. This requires the base installation of SKLM 2.5 with a minimum of service pack 2 installed, which brings the final version to 2.5.0.2. Operating system support The currently supported operating systems (OS) for SKLM version 2.5 are listed below in Table 2-4. In this IBM Redbooks publication we focus on x86 environments, so they are listed first. Use the following link for the latest OS support: http://www.ibm.com/support/knowledgecenter/api/content/SSWPVP_2.5.0/com .ibm.sklm.doc_2.5/cpt/cpt_ic_release_oview_sw.html Table 2-4 SKLM operating system requirements Operating System 30 Use DB2 Workgroup Server Edition Version 10.1 Windows Server 2008 R2 (64-bit in 32-bit mode for all Intel and AMD processors), which includes these editions: Standard Edition Enterprise Edition X Windows Server 2012 (64-bit in 32-bit mode for all Intel and AMD processors) for: Standard Edition X RedHat Enterprise Linux Version 5.0 Update 6.0, and Version 6.0 Update 3 on x86 64-bit in 32-bit mode X SuSE Linux Enterprise Server Version 10 on x86 64–bit mode and Version 11 on x86 64–bit mode X Centrally Managing Access to SEDs in System x Servers Using IBM SKLM Draft Document for Review January 30, 2015 6:10 pm 8247ch Supported Systems and Config.fm Sun Server Solaris 10 (SPARC 64–bit in 32-bit mode) Note: If raw devices are used, apply patch 125100-07 Note: IBM Security Key Lifecycle Manager runs in a 32–bit JVM X AIX® version 6.1 and version 7.1 in 32-bit mode. POWER7® processor-based servers are supported. A 64-bit AIX kernel is required. Use AIX 6.1 Technology Level 2. The minimum C++ runtime level requires the xlC.rte 9.0.0.8 and xlC.aix61.rte 9.0.0.8 (or later) files. These files are included in the June 2008 IBM C++ Runtime Environment Components for AIX package. X RedHat Enterprise Linux Version 5.0 Update 6.0, and Version 6.0 Update 3 (System z®) on x86 64–bit mode X SuSE Linux Enterprise Server Version 11 (System z) on x86 64–bit mode X Important notice for Windows 2008 R2: The web interface of SKLM can be accessed either remotely from another system’s browser, or locally with a browser installed on your SKLM server. The default browser installed with Windows 2008 R2 is Internet Explorer 8, which must be updated to a newer version to support the SKLM interface. Refer to the browser support details later in this section for more information. Hardware requirements The current hardware requirements for SKLM version 2.5 are shown in Table 2-5. Use the following link for updated hardware requirements: http://www.ibm.com/support/knowledgecenter/api/content/SSWPVP_2.5.0/com .ibm.sklm.doc_2.5/cpt/cpt_ic_release_oview_hw.html Table 2-5 SKLM hardware requirements System components Minimum valuesa Suggested valuesb System memory (RAM) 4 GB 4 GB Processor speed Linux and Windows systems - 3.0 GHz dual processors AIX and Sun Solaris systems - 1.5 GHz (4-way) Linux and Windows systems 3.0 GHz dual processors AIX and Sun Solaris systems - 1.5 GHz (4-way) Chapter 2. Supported systems and sample configuration 31 8247ch Supported Systems and Config.fm Draft Document for Review January 30, 2015 6:10 pm System components Minimum valuesa Suggested valuesb Disk space free for IBM Security Key Lifecycle Manager and prerequisite products such as DB2 5 GB 5 GB Disk space free in /tmp or C:\temp 2 GB 2 GB Disk space free in /home directory for DB2 5 GB 6 GB Disk space free in /var directory for DB2 512 MB on Linux and UNIX operating systems 512 MB on Linux and UNIX operating systems a. Minimum values: These values enable a basic use of IBM Security Key Lifecycle Manager. b. Recommended values: You must use larger values that are appropriate for your production environment. The most critical requirements are to provide adequate system memory, and free disk and swap space. Processor speed is less important. In addition to the hardware requirements above, take into consideration: All file systems must be writable. On Windows operating systems, the following free space is required in addition to that of your DB2 product: – 40 MB in the system drive – 60 MB in the /temp folder that is specified by the temp environment variable On Linux and UNIX operating systems, you must install your DB2 product in an empty directory. If the directory that you specify as the installation path contains subdirectories or files, your DB2 installation can fail. On Linux and UNIX operating systems, 4 GB of free space is required in the $HOME directory. Installing into mapped network drives or mounted partitions is not supported. If installation locations of more than one system component fall on the same Windows drive or UNIX partition, the cumulative space to contain all those components must be available in that drive or partition. Browser requirements Supported browsers for SKLM are listed in Table x by OS. For the latest browser support visit the following link: 32 Centrally Managing Access to SEDs in System x Servers Using IBM SKLM Draft Document for Review January 30, 2015 6:10 pm 8247ch Supported Systems and Config.fm http://www.ibm.com/support/knowledgecenter/SSWPVP_2.5.0/com.ibm.sklm.do c_2.5/cpt/cpt_ic_release_oview_browserreqs.html?lang=en Table 2-6 SKLM browser support Browser Fix pack Microsoft Internet Explorer 9 none Microsoft Internet Explorer 10 none Mozilla Firefox ESR 17 none AIX X Sun Server Solaris SPARC Windows 2008 R2 Windows 2012 X X X X X X RedHat Enterprise Linux SuSE Linux Enterprise Server X X Additional information regarding Firefox ESR Notice that Mozilla Firefox is supported in the ESR (Extended Support Release) version. This is a different installation from the usual Firefox. ESR versions are supported and updated for about one year. This can help large organizations and software products to keep a version standard for longer than the normal browser release cycle. The update check for the ESR browser only provides security and patches to its ESR version. The browser does not prompt you for a major browser update until a new ESR version is available. For more information and the latest Firefox ESR downloads visit: https://ftp.mozilla.org/pub/mozilla.org/firefox/releases/ You may find that some software is not yet supported on the latest ESR version. If you are running into issues with the SKLM interface, or are looking for a supported ESR version of Firefox, find the desired version in the following link where all previous Firefox versions are hosted. https://ftp.mozilla.org/pub/mozilla.org/firefox/releases/ With Firefox ESR installed, your About Mozilla Firefox dialog displays information similar to Figure 2-1 on page 34. Chapter 2. Supported systems and sample configuration 33 8247ch Supported Systems and Config.fm Draft Document for Review January 30, 2015 6:10 pm Figure 2-1 ESR about screen 2.2 Example configuration In this section we document the equipment and test configuration that we assembled for the purpose of authoring this book. While it is representative of a possible deployment, it should not be considered an official reference architecture. The details of the configuration are shown as a point of reference when reviewing the sample command lines that were used and details that were populated in data fields as shown in the screen captures. 2.2.1 Configuration overview For the purposes of creating this document, we assembled a test configuration consisting of several target servers (x3850 X6, x3650 M4 HD, x3650 M4), a dedicated management network for IMM traffic, a pair of domain name servers, and two virtualized IBM Security Key Lifecycle Manager (SKLM) servers. The SKLM servers on the 192.168.90.x subnet were routed to the 192.168.254.x management network so that the SKLM servers and IMMs could communicate. Although the SKLM servers can be deployed as physical servers, our recommendation is to create virtual servers where possible. This allows an environment to not only have several redundant SKLM servers, but also to leverage the clustering capabilities of virtualized clusters for high availability and portability. 34 Centrally Managing Access to SEDs in System x Servers Using IBM SKLM Draft Document for Review January 30, 2015 6:10 pm 8247ch Supported Systems and Config.fm Figure 2-2 depicts a high level configuration of the environment used for testing and is provided as a reference. Figure 2-2 Example configuration The above diagram details a simple configuration that was assembled as a proof of concept for the creation of the install procedures for this document. For simplicity, we used an existing VMware ESXi cluster that already hosted the DNS servers for the lab and created two additional Windows 2012 virtual servers on which we would install the SKLM servers for the test environment. The ESXi cluster had access to two networks, one was an internal network to our lab, and the second was a connection to the IBM lab network that allowed for remote jump box capability for team members that were not local. This dual network topology is not a requirement for a typical SKLM installation. The target test systems for this exercise were an x3850 X6, x3650 M4, and x3650 M4 HD, which are all supported in the initial SKLM support announcement. Each of these servers’ IMMv2 adapter was connected to the lab Chapter 2. Supported systems and sample configuration 35 8247ch Supported Systems and Config.fm Draft Document for Review January 30, 2015 6:10 pm network. This is a critical connection because all configuration of the IMM and all communication and exchange of security keys is handled over this connection. The removal of the network connection from an IMM would result in key encryption keys (KEKs) not being available to the System x Server RAID controller at boot time. As a result, the server would be unable to unlock the drives and all data would be unavailable. If you are interested in a basic configuration for a proof of concept test, Figure 2-3 depicts a minimum configuration required to test the basic functionality. Figure 2-3 Basic configuration This configuration details the absolute minimum environment that is required as a proof of concept and does not represent the optimal configuration for a production based deployment of this solution. A production deployment needs to include a minimum of two SKLM servers for redundancy, because any loss of communication to an SKLM server results in any server using SEDs being unable to access data if they are restarted. 2.2.2 Configuration details In this section we provide some specifics on the hardware and software environment used in our proof of concept. You also want to check the links provided throughout the document for the latest SKLM requirements, and also use the latest server, RAID controller, and drive firmware where possible. 36 Centrally Managing Access to SEDs in System x Servers Using IBM SKLM Draft Document for Review January 30, 2015 6:10 pm 8247ch Supported Systems and Config.fm Hardware environment Table 2-7 details our hardware environment for purposes of this publication, including each server, its’ RAID controller, Integrated Management Module (IMM) firmware, Unified Extensible Firmware Interface (UEFI), drive type, and firmware levels. The UEFI code is especially important because it contains not only our boot code, but also drivers for the RAID controller and SKLM environment. Table 2-7 Proof of concept hardware details Server Model RAID Controller and firmware IMM Level UEFI level SEDs and firmware System x3650 M4 M5110-e Firmware package version 23.22.0-24, April 24, 2014 RAID 5 Upgrade Cache offload 1AOO58T, June 8, 2014 VVE142AUS, June 4, 2014 Two (2) 900 GB, 10,000 RPM 6Gbps 2.5” SAS SEDs, firmware E56B System x3650 M4 HD M5210-e, Firmware package version 24.2.1-0027, April 8, 2014 With advanced software options: RAID 5 Upgrade 1AOO58T, June 8, 2014 VVE142BUS, July 2, 2014 Twelve (12) 900 GB, 10,000 RPM 6Gbps 2.5” SAS SEDs, firmware E56B System x3850 X6 Firmware package version 24.2.1—027, April 8, 2014 1AOO58S, June 2014 A8E112B, August 2014 Four (4) 900 GB, 10,000 RPM 6Gbps 2.5” SAS SEDs, firmware E56B Other non-encrypting drives also installed. Chapter 2. Supported systems and sample configuration 37 8247ch Supported Systems and Config.fm Draft Document for Review January 30, 2015 6:10 pm Figure 2-4 depicts an example of the advanced upgrades from our x3650 M4 M5110-e controller, including FoD upgrades. These can be displayed by interrupting the boot of a System x server at the splash screen by pressing F1, then navigating to System Settings Storage Select your desired controller Controller Management Advanced Manage MegaRAID Advanced Software Options. Figure 2-4 MegaRAID advanced software options Hypervisor and virtual machine environment For simplicity, flexibility, and high availability we set up our proof of concept SKLM for this IBM Redbooks publication on a VMware environment. We based our SKLM VMware virtual machine (VM) resources off the normal physical hardware specifications. Using a virtualized environment is a good option as you can more easily add resources like memory and processors at a later date if you see performance issues. However, SKLM is not meant to be accessed on a regular basis by many users. It would likely be administered by a small team, and touched only for necessary tasks, such as adding, removing or replacing hardware, upgrading the software or verifying the setup. Other activities such as replication should be automated. The ability for migrating VMs between hosts with vMotion, and setting up high availability with cluster functionality is also crucial to keep your SKLM servers running whenever a system using SEDs needs a key exchange to access its drives while booting. If using VMware Distributed Resource Scheduler (DRS) or any other load balancing capacity on a virtualization cluster, no two SKLM servers should ever reside on the same physical host. This can increase the risk of hardware failure resulting in the loss SKLM access. 38 Centrally Managing Access to SEDs in System x Servers Using IBM SKLM Draft Document for Review January 30, 2015 6:10 pm 8247ch Supported Systems and Config.fm Table 2-8 provides the configuration details of the VMs we used for SKLM. Table 2-8 Proof of concept VM details Virtual Machine ESXi build Virtual CPU Virtual Memory Disk size SKLM Master, Windows 2012 5.5, build 1331820 2 total (1 processor with 2 cores each, or 2 processors with 1 core each) 4 GB 100 GB SKLM Clone #1, Windows 2012 5.5, build 1331820 2 total (1 processor with 2 cores each, or 2 processors with 1 core each) 4 GB 100 GB Operating system and software environment Table 2-9 provides some details of the operating systems and SKLM software installed and used during the creation of our book. The Windows 2008 R2 system was used mostly for testing and validating our SKLM work on that OS; most of the tasks and screen captures performed to create this publication were done on the Windows 2012 server. For a simplified setup, we disabled the Enhanced Security Configuration (ESC) in Microsoft Internet Explorer, and also turned off the Windows firewalls. Port information for SKLM and its’ components is supplied in the installation chapter to assist you with creating the correct firewall rules to allow the software to function in a production environment, for which we would recommend keeping the firewalls enabled. Table 2-9 Operating System and software details SKLM server SKLM version Operating System Browser(s) used Internet Explorer ESC Windows Firewalls Master 2.5.0.2 (SKLM 2.5.0.0 with fix pack 2 installed) Windows 2012 Firefox ESR 17.0.11 Internet Explorer 11 (build 11.0.9600.17239) Off Off Clone 2.5.0.2 (SKLM 2.5.0.0 with fix pack 2 installed) Windows 2012 Firefox ESR 17.0.11 Internet Explorer 11 (build 11.0.9600.17239) Off Off We connected to the SKLM web interface with Firefox 31 and Firefox ESR 24 without any issues, but left those out of the table since they are not explicitly supported browser versions. Chapter 2. Supported systems and sample configuration 39 8247ch Supported Systems and Config.fm Draft Document for Review January 30, 2015 6:10 pm IMM connection considerations To connect to each System x3650 M4 and System x3850 X6 system, we mostly used Firefox ESR 24 and Internet Explorer 11 with Java version 7 update 60 to utilize the IMM remote control feature for the configuring drives and RAID controllers. 2.3 Conclusion The information in this chapter detailed the current list of supported servers, RAID adapters, drives, and software that are instrumental in creating a working solution. Additionally, it details the environment used to create the materials for this publication in addition to serving as a template for a proof of concept system should you want to reproduce our configuration in your own environment. 40 Centrally Managing Access to SEDs in System x Servers Using IBM SKLM 8247p02.fm Draft Document for Review January 30, 2015 6:10 pm Part 2 Part 2 Hands-on configuration In this part we describe the detailed steps that are necessary to implement the lab setup that was introduced in Chapter 2, “Supported systems and sample configuration” on page 25. We cover the configuration of IBM Security Key Lifecycle Manager, the Integrated Management Console on System x Servers, and the Unified Extensible Firmware Interface (UEFI). © Copyright IBM Corp. 2014. All rights reserved. 41 8247p02.fm 42 Draft Document for Review January 30, 2015 6:10 pm Centrally Managing Access to SEDs in System x Servers Using IBM SKLM Draft Document for Review January 30, 2015 6:10 pm 8247ch SKLM Setup and Configuration.fm 3 Chapter 3. IBM Security Key Lifecycle Manager setup In this chapter we take you through a basic installation of IBM Security Key Lifecycle Manager (SKLM) on Windows Server 2012. For additional supported operating systems refer to the SKLM product documentation, which can be found at the IBM Knowledge Center: http://www.ibm.com/support/knowledgecenter/SSWPVP/welcome We cover the following sections: Acquiring installation files SKLM installation Validate SKLM installation Apply SKLM licensing Generate SKLM server certificate Production environment considerations © Copyright IBM Corp. 2014. All rights reserved. 43 8247ch SKLM Setup and Configuration.fm Draft Document for Review January 30, 2015 6:10 pm 3.1 Acquiring installation files This first section helps ensure that you have the necessary files for a successful IBM Security Key Lifecycle Manager (SKLM) installation. For more information on purchasing and acquiring SKLM refer to Appendix C, “Licenses and software” on page 231. 3.1.1 Operating system packages Some additional OS packages or features may be needed for components of the SKLM install. Keep in mind that installing additional features and packages may require an Internet connection or the OS installation media. Our Windows 2012 and Windows 2008 R2 proof of concept environments required the installation of the .NET feature on top of the basic operating system (OS) installation. 3.1.2 SKLM installation package SKLM is delivered in a package of approximately 4GB. The SKLM package includes all IBM software components needed for a complete SKLM environment. These main components are: IBM SKLM IBM DB2 IBM WebSphere Application Server (WAS) Important: SKLM modifies WebSphere Application Server during the installation process. For that reason, you must not install SKLM into a WebSphere Application Server instance that another product uses. In addition, you should not install SKLM into a WebSphere Application Server instance provided by another product or you may also run into issues. In 3.2.3, “Validate SKLM Windows installation files” on page 62 we help you validate your files before proceeding with the installation. 3.1.3 Acquiring SKLM updates SKLM version 2.5.0.0 requires fix pack 2 or newer to integrate IBM System x server support into the user interface. The installation of fix pack 2, as we outline in this chapter, brings your version to 2.5.0.2. 44 Centrally Managing Access to SEDs in System x Servers Using IBM SKLM Draft Document for Review January 30, 2015 6:10 pm 8247ch SKLM Setup and Configuration.fm To acquire fixes and updates for SKLM, you use the IBM Support Portal. We recommend you acquire the fix pack before starting the install process in order to have a fully updated instance of SKLM at the completion of this chapter. The SKLM fix pack download available at the time of our installation was approximately 250MB in size. We will instruct you to install the fix pack after completing the SKLM base installation. At that time the fix pack file needs to be available to the system on which you are installing SKLM. Locate and download updates using the IBM Support Portal To acquire the latest SKLM fix pack follow the steps listed below. 1. Navigate to the IBM Support Portal at the following location: http://www.ibm.com/support 2. If you have an IBM id, use it to log in as shown in Figure 3-1. If you do not have an IBM id, you need to select Create IBM id. Creating an account is free, and sign in is required to retrieve fixes. Figure 3-1 IBM Support Portal login or id creation Chapter 3. IBM Security Key Lifecycle Manager setup 45 8247ch SKLM Setup and Configuration.fm Draft Document for Review January 30, 2015 6:10 pm 3. As shown in Figure 3-2 on page 46 below, enter SKLM or begin typing Security Key Lifecycle Manager in the Product lookup field to locate the product, and select the Security Key Lifecycle Manager result to begin the update acquisition process. Figure 3-2 SKLM product lookup 46 Centrally Managing Access to SEDs in System x Servers Using IBM SKLM Draft Document for Review January 30, 2015 6:10 pm 8247ch SKLM Setup and Configuration.fm 4. When prompted to narrow your search, we recommend that instead you leave the options unselected and click Go as shown in Figure 3-3. It is better to list all fixes and choose your desired version as you may inadvertently limit a desired option. Figure 3-3 Product lookup popup Chapter 3. IBM Security Key Lifecycle Manager setup 47 8247ch SKLM Setup and Configuration.fm Draft Document for Review January 30, 2015 6:10 pm 5. The support page reloads and presents your selection of SKLM. In our case, the first choice listed below, IBM Fix Central – 2.5.0-1SS-SKLM-FP0002.README.html contains the latest fix pack we are looking for. However, we recommend getting a complete list. To do this, select Downloads (fixes & PTFs) as shown in Figure 3-4. Figure 3-4 Support Portal downloads link 48 Centrally Managing Access to SEDs in System x Servers Using IBM SKLM Draft Document for Review January 30, 2015 6:10 pm 8247ch SKLM Setup and Configuration.fm 6. Again, we do not recommend limiting your options by version level. When prompted to refine your list, select All for the version to get a complete picture, and select a specific OS if desired. Currently, SKLM fix packs are bundled and your download includes all supported operating systems anyway. Select Continue after making your selections in the Refine my fix list dialog as shown in Figure 3-5. Figure 3-5 Download refinement options Chapter 3. IBM Security Key Lifecycle Manager setup 49 8247ch SKLM Setup and Configuration.fm Draft Document for Review January 30, 2015 6:10 pm 7. The following page displays a list of fixes. If no results are shown on this screen, it is likely that your search was too narrow. For instance, if you are looking for the upgrade to version 2.5.0.1, you must select version 2.5.0.0 as the installed version you are searching on. Select your desired fix pack and click Continue as show in Figure 3-6. Figure 3-6 Selecting the fix pack 50 Centrally Managing Access to SEDs in System x Servers Using IBM SKLM Draft Document for Review January 30, 2015 6:10 pm 8247ch SKLM Setup and Configuration.fm 8. If you have already signed in with your IBM id, you are taken directly to the download page. In this example, we use the Download Director Java applet as our selected method for download. Select Download now as shown in Figure 3-7 to begin the download process. Figure 3-7 Downloading the fix pack Chapter 3. IBM Security Key Lifecycle Manager setup 51 8247ch SKLM Setup and Configuration.fm Draft Document for Review January 30, 2015 6:10 pm 9. The details of your download will reveal that fix packs for all support OS types are being downloaded as shown in Figure 3-8. Figure 3-8 Fix pack files 10.When your download completes, proceed to the SKLM installation in 3.2, “SKLM installation” on page 55. Later we instruct you to copy and install the appropriate fix pack to your SKLM server. Locate and download updates using the IBM Support Portal browse function or IBM Fix Central Instead of using the product search as outlined in the previous section, you may prefer to browse for your product fixes in the IBM Support Portal or IBM Fix Central. The following brief section outlines what selections you should make. 52 Centrally Managing Access to SEDs in System x Servers Using IBM SKLM Draft Document for Review January 30, 2015 6:10 pm 8247ch SKLM Setup and Configuration.fm 1. If you prefer to browse for your fixes in the IBM Support Portal, Figure 3-9 shows an example of the selections you need to make. Figure 3-9 Browse support for SKLM fixes Chapter 3. IBM Security Key Lifecycle Manager setup 53 8247ch SKLM Setup and Configuration.fm Draft Document for Review January 30, 2015 6:10 pm 2. Alternatively, if you prefer IBM Fix Central, Figure 3-10 shows the selections to make. Figure 3-10 SKLM selections in Fix Central 54 Centrally Managing Access to SEDs in System x Servers Using IBM SKLM Draft Document for Review January 30, 2015 6:10 pm 8247ch SKLM Setup and Configuration.fm 3.2 SKLM installation In this section we provide the steps for a basic setup of SKLM including: Operating system firewall and setting considerations Installing pre-requisites Validate SKLM Windows installation files Executing installation and on-the-fly updates Update SKLM with the latest fix pack 3.2.1 Operating system firewall and setting considerations Before starting the SKLM installation, keep in mind that some default OS and firewall settings need to be changed. In this section we outline some of those settings. Use the following “Services, ports, and processes” link in the IBM Knowledge Center: http://www.ibm.com/support/knowledgecenter/SSWPVP_2.5.0/com.ibm.sklm.do c_2.5/cpt/cpt_insguide_tklm_postinstall_processesrunning.html?lang=en Windows considerations Default Windows firewall settings do not allow remote connections to all SKLM component interfaces. To expedite your installation and validation turn off the Windows firewall temporarily. You should enable all Windows firewalls and create firewall rules for SKLM if you are setting up a production system that connects to the Internet. Table 3-1 shows the ports that have to be granted access for an SKLM environment on Windows. Table 3-1 Default ports required for Windows Component Port(s) required SKLM HTTPS access to UI and REST services 9080 WebSphere Appication Server integrated console HTTPS access 9083 DB2 50010 SSL port listening for KMIP messages at install time 5696 SSL port for device messages 441 Linux considerations For Linux installations, Security-Enhanced Linux (SELinux) should be disabled to allow the installer to make system changes. Chapter 3. IBM Security Key Lifecycle Manager setup 55 8247ch SKLM Setup and Configuration.fm Draft Document for Review January 30, 2015 6:10 pm By default, SKLM and its components use the ports shown in Table 3-2 when running on Linux or AIX. Table 3-2 Default ports required for Linux and AIX Component Port(s) required SKLM 9080-9099 DB2 50010 3.2.2 Installing pre-requisites In this section we take you through the prerequisites we completed before beginning the SKLM installation on Windows Server 2012. Understand that you may need an Internet connection or the installation media for your OS to complete this section. Please refer to the SKLM installation guide on the IBM Knowledge Center as well as the installation wizard and resulting messages for guidance with installations on any other OS. Operating system installation These prerequisite and SKLM installation instructions are intended to be executed after a system or virtual machine/virtual server has been loaded with a supported OS. In our case, they pertain to an installation on Windows Server 2012, a 64-bit OS. Linux prerequisites On Linux operating systems, IBM Security Key Lifecycle Manager requires the compat-libstdc++ package, which contains libstdc++.so.6. It also requires the libaio package, which contains the asynchronous library that is required for DB2 database servers. To determine whether you have the libstdc package available, run the following command: rpm -qa | grep -i "libstdc" If the package is not installed, locate the rpm file on your original installation media and install it, using the following commands: find installation_media -name compat-libstdc++* rpm -ivh full_path_to_compat-libstdc++_rpm_file To determine whether you have the libaio package, run the following command: rpm -qa | grep -i "libaio" 56 Centrally Managing Access to SEDs in System x Servers Using IBM SKLM Draft Document for Review January 30, 2015 6:10 pm 8247ch SKLM Setup and Configuration.fm If the package is not installed, locate the rpm file on your original installation media and install it using the following commands: find installation_media -name libaio* rpm -ivh full_path_to_libaio_rpm_file On Red Hat Enterprise Linux 64-bit systems, DB2 installation requires that two separate libaio packages must be installed before running db2setup. These packages are both named libaio. However, there are two different RPM files to install, one of which is an i386 RPM file, and the other is an x86_64 RPM file. Windows prerequisites On Windows operating systems, SKLM utilizes the .NET Framework. This section will take you through the installation of this prerequisite feature. .NET Framework installation Follow these instructions for installing the .NET Framework to avoid warnings during the SKLM install process, and issues with SKLM and its components during use. 1. Open the Windows Server Manager Dashboard and select Add roles and features as shown in Figure 3-11. Figure 3-11 Windows Server Manager Dashboard Chapter 3. IBM Security Key Lifecycle Manager setup 57 8247ch SKLM Setup and Configuration.fm Draft Document for Review January 30, 2015 6:10 pm 2. Click Next at the Before You Begin dialog. 3. Leave Role-based or feature-based installation checked by default, and click Next at the Installation Type dialog, shown in Figure 3-12. Figure 3-12 nstallation type screen 58 Centrally Managing Access to SEDs in System x Servers Using IBM SKLM Draft Document for Review January 30, 2015 6:10 pm 8247ch SKLM Setup and Configuration.fm 4. Select the Windows instance on which you are going to set up SKLM, and click Next at the Server Selection dialog, shown in Figure 3-13. Figure 3-13 Server selection screen 5. Click Next at the Server Roles dialog without making any selections. Chapter 3. IBM Security Key Lifecycle Manager setup 59 8247ch SKLM Setup and Configuration.fm Draft Document for Review January 30, 2015 6:10 pm 6. Select .Net Framework 3.5 Features in the Features dialog and click Next, as show in Figure 3-14. Figure 3-14 Feature selection screen 60 Centrally Managing Access to SEDs in System x Servers Using IBM SKLM Draft Document for Review January 30, 2015 6:10 pm 8247ch SKLM Setup and Configuration.fm 7. In the Confirmation screen you may have to specify an alternative source path to point to your installation media if you do not have an Internet connection. In our case, because we have an Internet connection, we confirm the .NET Framework selection and click Install, as shown in Figure 3-15. Figure 3-15 Confirmation screen Chapter 3. IBM Security Key Lifecycle Manager setup 61 8247ch SKLM Setup and Configuration.fm Draft Document for Review January 30, 2015 6:10 pm 8. Your results may vary based on several factors, including Internet connection speed, but in our case the .NET installation required less than 10 minutes. Upon successful completion, select Close at the Results page shown in Figure 3-16. Figure 3-16 Installation results Your system is now ready to proceed with the SKLM installation file validation. 3.2.3 Validate SKLM Windows installation files In this section we help you ensure that you have the correct installation files for SKLM. Your files may vary slightly by version or the package they were delivered in, but this gives you an idea of the files contained within the installation package. 1. Copy the SKLM installation package to the file system on which you will install SKLM. Our installation package for Windows version 2.5.0.0 was approximately 4GB in size, both compressed and extracted. 62 Centrally Managing Access to SEDs in System x Servers Using IBM SKLM Draft Document for Review January 30, 2015 6:10 pm 8247ch SKLM Setup and Configuration.fm 2. Extract your SKLM installation files and validate that the size and file structure looks correct. Our zip package filename is SKLM_2.5_WIN64_ML, but you will likely have an eAssembly for SKLM 2.5 named CIRX2ML. If the package is a .tar file instead of a .zip, you want to use a third party tool such as 7-zip that is capable of unpacking .tar files in Windows. 3. Once unpacked, navigate to the SKLM directory, and open the disk1 subdirectory. Figure 3-17 shows an example of the installation package file structure within the disk1 directory. Figure 3-17 SKLM installation package file structure 4. After validating your SKLM install files look correct, you may proceed to the installation process. 3.2.4 Executing installation and on-the-fly updates In this section we cover the steps to install SKLM on Windows Server 2012, and concurrently perform component updates with the install. Keep in mind that the update process requires an active Internet connection. If you do not have an active Internet connection, you want to ignore the options for updates during the installation process. Chapter 3. IBM Security Key Lifecycle Manager setup 63 8247ch SKLM Setup and Configuration.fm Draft Document for Review January 30, 2015 6:10 pm 1. Locate the Launchpad executable file in the disk1 subdirectory of your SKLM installation package. Right-click the file and select Run as administrator, as show in Figure 3-18. Figure 3-18 Launch SKLM install wizard 64 Centrally Managing Access to SEDs in System x Servers Using IBM SKLM Draft Document for Review January 30, 2015 6:10 pm 8247ch SKLM Setup and Configuration.fm 2. If you wish to change the language from English, select your preferred language on the launchpad screen and click OK. Next, under Product Overview, select Install IBM Security Key Lifecycle Manager to begin the installation process as shown in Figure 3-19. Figure 3-19 SKLM installer language selection and install launch Chapter 3. IBM Security Key Lifecycle Manager setup 65 8247ch SKLM Setup and Configuration.fm Draft Document for Review January 30, 2015 6:10 pm 3. Figure 3-20 shows an expanded view of the Install Packages dialog. If your system is connected to the Internet and you wish to get the latest updates for the components of your SKLM install, click Check for Other Versions, Fixes, and Extensions, as we did in our proof of concept. Figure 3-20 Optional update check for SKLM components 66 Centrally Managing Access to SEDs in System x Servers Using IBM SKLM Draft Document for Review January 30, 2015 6:10 pm 8247ch SKLM Setup and Configuration.fm 4. After selecting to check for other version, a progress window displays the Operation in progress…, then you are prompted by a Password Required dialog. To access IBM fixes, enter you IBM ID login information and click OK, as shown in Figure 3-21. Figure 3-21 IBM id login for downloads 5. Upon successful login, a Search Result window displays a notification that other versions have been found, shown in Figure 3-22. Figure 3-22 Found fixes notification Chapter 3. IBM Security Key Lifecycle Manager setup 67 8247ch SKLM Setup and Configuration.fm Draft Document for Review January 30, 2015 6:10 pm 6. Check the Show all versions option, as shown in Figure 3-23, to list any new updates that have been found. Note that only the latest versions are selected. Leave those selections at default; you want the latest code to be installed here, or fixes may conflict. Figure 3-23 Install package selection 7. Click Next when ready to proceed. A new progress window appears as the installer collects information and prepares for installation. 68 Centrally Managing Access to SEDs in System x Servers Using IBM SKLM Draft Document for Review January 30, 2015 6:10 pm 8247ch SKLM Setup and Configuration.fm 8. The next screen contains fixes and updates that may be applicable. Keep in mind that all of these may not be applicable to your install and some could result in errors if selected. Figure 3-24 shows the fixes that we selected for IBM WebSphere Application Server, in our case, the latest version 8.5.5.2. Figure 3-24 Install package selection for 64-bit Windows Be aware that we selected only the fixes applicable to our OS architecture. Selecting any packages denoted with WinX32 on a 64-bit OS like Windows Server 2012 will result in errors halting the installation. 9. During our proof of concept the installation did not find any available updates for DB2. SKLM related fix packs need to be installed after the installation of the base software. After selecting the applicable fixes for your installation select Next to continue. 10.Read and accept the license agreement, then click Next to proceed with the installation preparation. Chapter 3. IBM Security Key Lifecycle Manager setup 69 8247ch SKLM Setup and Configuration.fm Draft Document for Review January 30, 2015 6:10 pm 11.The next dialog allows you to change the install path for the resources shared between the IBM components of SKLM (Installation Manager, SKLM, WebSphere Application Server, and DB2) and the install path for IBM Installation Manager. We use IBM Installation Manager later to manage and install updates. Notice that we kept the default paths. Later you will also see that we execute Installation Manager and command line instructions with administrator privileges in Windows as instructed by the message on this screen. Click Next when you are satisfied with the installation paths. Our setup is shown below in Figure 3-25. Figure 3-25 First install directory screen 70 Centrally Managing Access to SEDs in System x Servers Using IBM SKLM Draft Document for Review January 30, 2015 6:10 pm 8247ch SKLM Setup and Configuration.fm 12.The following dialog provides the option to change where IBM Installation Manager and the other SKLM components will be installed. As shown in the DB2 example in Figure 3-26, you may highlight the root level of the Package Group Name tree and modify the installation directory. Again, we accepted all defaultsin this step. Figure 3-26 Second install directory screen, DB2 directory highlighted 13.When satisfied with the installation directories, click Next to continue. Chapter 3. IBM Security Key Lifecycle Manager setup 71 8247ch SKLM Setup and Configuration.fm Draft Document for Review January 30, 2015 6:10 pm 14.In the following dialog, shown in Figure 3-27, you can select any language translations you want to install. Keep in mind that all text in all components may not support translation. When complete, click Next to continue the installation preparation. Figure 3-27 Language translation options 72 Centrally Managing Access to SEDs in System x Servers Using IBM SKLM Draft Document for Review January 30, 2015 6:10 pm 8247ch SKLM Setup and Configuration.fm 15.When the next step of the installation process loads, a progress bar briefly displays indicating that some feature validation is being completed. Here you are able to expand and see all of the packages selected for install. If you previously installed the .NET Framework no components will show dependencies as shown by the SKLM example in Figure 3-28. Figure 3-28 Dependency check 16.When done reviewing the Features select Next to continue. 17.In the next dialog we accept the default configuration selection for our new instance of DB2 for our SKLM installation. Here you have to provide login credentials for the DB2 administrator account. The DB2 account will be created as a new user account for the OS. This means it must meet any password requirements for your OS accounts, but also password limitations for DB2. In our case, complex passwords were being enforced for Windows 2012. However, we did find during our fix pack installation that using an exclamation point (!) caused an error when attempting to validate DB2 credentials. For this Chapter 3. IBM Security Key Lifecycle Manager setup 73 8247ch SKLM Setup and Configuration.fm Draft Document for Review January 30, 2015 6:10 pm reason, we recommend limiting DB2 passwords to alphanumeric characters only if possible. Note that DB2 also has user ID restrictions, as outlined here: http://publib.boulder.ibm.com/infocenter/cmgmt/v8r3m0/index.jsp?topi c=%2Fcom.ibm.sysadmin.hlp%2Fmua10010.htm We elected to accept the default sklmdb2 suggestion, and default suggestions for home directory, database name, and port. After completing your DB2 configuration selections, click Next as shown in Figure 3-29. Figure 3-29 DB2 properties 18.In the following dialog you provide login credentials for the administration accounts of the remaining SKLM components. First, a password is required 74 Centrally Managing Access to SEDs in System x Servers Using IBM SKLM Draft Document for Review January 30, 2015 6:10 pm 8247ch SKLM Setup and Configuration.fm for WebSphere Application Server. Enter your desired password, then use the scroll bar to move the screen to the right as shown in Figure 3-30 on page 75. Figure 3-30 WebSphere Application Server credentials Chapter 3. IBM Security Key Lifecycle Manager setup 75 8247ch SKLM Setup and Configuration.fm Draft Document for Review January 30, 2015 6:10 pm 19.Scrolling to the right reviews the entries for SKLM login credentials. Enter a password and confirm the desired port. Again, we accepted the default, port 9080. After entering a password, the Next button becomes active. Select it to proceed as shown in Figure 3-31. Important: Make sure you record your login credentials for each software component listed below for your records. Figure 3-31 SKLM credentials 76 Centrally Managing Access to SEDs in System x Servers Using IBM SKLM Draft Document for Review January 30, 2015 6:10 pm 8247ch SKLM Setup and Configuration.fm 20.Click Next without making any selections in the next dialog, which provides you the option for Migrating Encryption Key Manager as shown in Figure 3-32. Encryption Key Manager is a product for managing encrypted drives and tape storage systems, and is not covered in this document. Figure 3-32 Migration option Chapter 3. IBM Security Key Lifecycle Manager setup 77 8247ch SKLM Setup and Configuration.fm Draft Document for Review January 30, 2015 6:10 pm 21.When you have reviewed your selection in the summary screen, click Install as shown in Figure 3-33 to initiate the download of the update and the installation process. Figure 3-33 Begin install 78 Centrally Managing Access to SEDs in System x Servers Using IBM SKLM Draft Document for Review January 30, 2015 6:10 pm 8247ch SKLM Setup and Configuration.fm 22.Throughout the installation process, the information at the bottom of the screen gives you an indication of the installation progress, download speeds, and general information about the task being performed as shown in Figure 3-34. Our download size totaled 2.2 GB, and the installation took about 17 minutes to complete. Your installation time may vary based upon your update selections, system performance, and network connection. Figure 3-34 Installation progress Chapter 3. IBM Security Key Lifecycle Manager setup 79 8247ch SKLM Setup and Configuration.fm Draft Document for Review January 30, 2015 6:10 pm 23.Upon completion a success page, such as the one shown in Figure 3-35, is displayed. Select None as the option to create a profile. We will install the latest fix pack (in 3.2.5, “Update SKLM with the latest fix pack” on page 81) before we configure properties of the SKLM server. Figure 3-35 Installation complete 24.Select Finish to close the installation wizard. You may minimize or leave the IBM Installation Manager window in the background because we will use it in the next section to install the fix pack. 80 Centrally Managing Access to SEDs in System x Servers Using IBM SKLM Draft Document for Review January 30, 2015 6:10 pm 8247ch SKLM Setup and Configuration.fm 3.2.5 Update SKLM with the latest fix pack In this section we explain the steps to install a fix pack to the SKLM component of your installation. In the example instructions below, a base installation of SKLM version 2.5.0.0 is updated to version 2.5.0.2 with the installation of fix pack 2. Version 2.5.0.2 is the first version with System x server options included in the user interface. Before you begin the process, ensure that you have acquired the files required for the fix pack installation as outlined in 3.1.3, “Acquiring SKLM updates” on page 44. For additional information regarding fix pack information and installation, please refer to the readme file that accompanies the fix pack download. In our case, that file was 2.5.0-ISS-SKLM-FP0002.README.html. 1. The fix pack files must be copied locally to the virtual or physical server on which SKLM was installed. As shown in Figure 3-36, we create a directory with a descriptive name, sklm_fixpack_repo_win, to copy our current and, possibly, future fix packs into. Figure 3-36 Create fix pack directory 2. Copy the fix pack zip file, in our case, 2.5.0-ISS-SKL-FP0002-Windows.zip, to the new SKLM server directory. For instance, this may be done for a remote Windows system by sharing a local drive or the local clipboard to your SKLM Chapter 3. IBM Security Key Lifecycle Manager setup 81 8247ch SKLM Setup and Configuration.fm Draft Document for Review January 30, 2015 6:10 pm server with a Windows Remote Desktop Connection, or by way of a network file share. 3. Extract the contents of the zip file into the fix pack directory you created in step 1. 4. Validate the size and contents of the fix pack. In our example the fix pack directory was approximately 100MB. 5. Next you need to launch the IBM Installation Manager. The default location on a Windows system is C:\Program Files (x86)\IBM\Installation Manager\eclipse\IBMIM. Locate this application on your SKLM system, right-click it, then select Run as administrator as shown in Figure 3-37. Figure 3-37 Launch Installation Manager 82 Centrally Managing Access to SEDs in System x Servers Using IBM SKLM Draft Document for Review January 30, 2015 6:10 pm 8247ch SKLM Setup and Configuration.fm 6. As your first step, you need to import the fix pack location as a repository in IBM Installation Manager. Begin this process by selecting File Preferences… as shown in Figure 3-38. Figure 3-38 Open preferences Chapter 3. IBM Security Key Lifecycle Manager setup 83 8247ch SKLM Setup and Configuration.fm Draft Document for Review January 30, 2015 6:10 pm 7. In the Preferences dialog, select Repositories from the left hand pane, as shown in Figure 3-39. Figure 3-39 Select repositories 8. Select Add Repository… on the right hand side, then click Browse in the Add Repository popup that opens next. 84 Centrally Managing Access to SEDs in System x Servers Using IBM SKLM Draft Document for Review January 30, 2015 6:10 pm 8247ch SKLM Setup and Configuration.fm 9. Navigate to the repository.config file within your fix pack directory, select it, and click Open as shown in Figure 3-40. On our system, this file was located in the C:\sklm_fixpack_repo_win\2.5.0-ISS-SKLM-FP0002-Windows\ directory. Figure 3-40 Open repository.config Chapter 3. IBM Security Key Lifecycle Manager setup 85 8247ch SKLM Setup and Configuration.fm Draft Document for Review January 30, 2015 6:10 pm 10.In the following Add Repository dialog select OK to import the directory as a fix pack repository, shown in Figure 3-41. Figure 3-41 Import repository 86 Centrally Managing Access to SEDs in System x Servers Using IBM SKLM Draft Document for Review January 30, 2015 6:10 pm 8247ch SKLM Setup and Configuration.fm 11.After importing the repository, ensure that the Search service repositories during installation and update option is unchecked. SKLM does not support using Internet based repositories. Next, select Apply, then OK, as shown in Figure 3-42, to finalize the import and changes, then close the Preferences window. Figure 3-42 Apply new repository Chapter 3. IBM Security Key Lifecycle Manager setup 87 8247ch SKLM Setup and Configuration.fm Draft Document for Review January 30, 2015 6:10 pm 12.Back at the Installation Manager welcome screen, select Update as shown in Figure 3-43. Figure 3-43 Launch update 88 Centrally Managing Access to SEDs in System x Servers Using IBM SKLM Draft Document for Review January 30, 2015 6:10 pm 8247ch SKLM Setup and Configuration.fm 13.In the Update Packages dialog, shown in Figure 3-44, select IBM Security Key Lifecycle Manager as the only package group to update, because we have not imported any update repositories for the other components at this time. Select Next to continue. Figure 3-44 Update Packages selection Chapter 3. IBM Security Key Lifecycle Manager setup 89 8247ch SKLM Setup and Configuration.fm Draft Document for Review January 30, 2015 6:10 pm 14.In the next dialog we only find one update package, even when unchecking Show recommended only. If we imported multiple fix packs, or had fix packs from a previous update, we would want to use the Show recommended only checkbox and/or the Select Recommend button. Click Next to continue, as shown in Figure 3-45. Figure 3-45 Package recommendations 15.Read and Accept the terms in the license agreement, then click Next to continue. 90 Centrally Managing Access to SEDs in System x Servers Using IBM SKLM Draft Document for Review January 30, 2015 6:10 pm 8247ch SKLM Setup and Configuration.fm 16.In the Summary dialog confirm the details of your fix pack installation and select Next, as shown in Figure 3-46, to continue the update preparation. Figure 3-46 Confirm summary Chapter 3. IBM Security Key Lifecycle Manager setup 91 8247ch SKLM Setup and Configuration.fm Draft Document for Review January 30, 2015 6:10 pm 17.In the following dialog, enter the login credentials for the administration account of each SKLM software component. Select Validate Credentials, as shown in Figure 3-47, and wait several seconds, up to one minute for IBM Installation Manager to test connectivity to each component. Figure 3-47 Validate Credentials While the validation is attempted, and hourglass appears as your mouse pointer. It may appear as if the application is frozen, but do not do anything until the process completes. If the validation succeeds, no error messages are returned and you can select Next to continue the update. If validation fails, an error message, such as CTGKM9070E The credentials could not be validated at the moment, is displayed. Likely this is because some login credentials were entered incorrectly. If this error reoccurs, it may be a result of a user name or password that does not meet your OS or software component requirements, or may not be passed correctly from IBM Installation Manager to your software component. 92 Centrally Managing Access to SEDs in System x Servers Using IBM SKLM Draft Document for Review January 30, 2015 6:10 pm 8247ch SKLM Setup and Configuration.fm 18.Next, review the information in the summary dialog and select Update when you are ready to install the fix pack, as shown in Figure 3-48. Figure 3-48 Begin updates Chapter 3. IBM Security Key Lifecycle Manager setup 93 8247ch SKLM Setup and Configuration.fm Draft Document for Review January 30, 2015 6:10 pm 19.When the process is complete, you are rpesented with a success message indicating that The packages are Updated. Select Finish as shown in Figure 3-49. Figure 3-49 Successful update 20.At this point, your SKLM installation and updates are complete. We recommend that you restart your SKLM server to ensure that all updates are incorporated, and all services begin correctly upon boot before beginning the SKLM configuration. For your reference, the command for an immediate reboot in Windows is: shutdown /r /t 0 Upon restart, your installation and update tasks for a basic IBM SKLM installation are complete. Proceed through the subsequent sections of this chapter to validate and configure your environment. 3.3 Validate SKLM installation In this section we take you through some basic validation of the SKLM installation. We also provide some outlines how to access the different components SKLM. 94 Centrally Managing Access to SEDs in System x Servers Using IBM SKLM Draft Document for Review January 30, 2015 6:10 pm 8247ch SKLM Setup and Configuration.fm 3.3.1 Checking for errors The SKLM instance can be verified at a basic level by requesting the version and build information from the command line following the steps below. Visit the following link for more details about what services should be running as well as the ports that should be active: http://www.ibm.com/support/knowledgecenter/SSWPVP_2.5.0/com.ibm.sklm.do c_2.5/cpt/cpt_insguide_tklm_postinstall_processesrunning.html?lang=en 1. Open a command prompt and navigate to the WebSphere Application Server bin directory. On our Windows Server 2012 with default directory locations this directory can be found at: C:\Program Files (x86)\IBM\WebSphere\AppServer\profiles\KLMProfile\bin 2. Enter the wsadmin shell using the following command: .\wsadmin.bat –lang jython –username <sklm administrator> –password <administrator password> where <sklm administrator> is an SKLM admin account, usually the default SKLMAdmin, and <administrator password> is the password for that account. The expected command output is depicted in Example 3-1, showing a successful connection to WebSphere Application Server. Example 3-1 Successful connection PS C:\Program Files(x86)\IBM\WebSphere\AppServer\profiles\KLMProfile\bin>.\wsadmin .bat -username SKLMadmin -password Passw0rd! -lang jython WASX7209I: Connected to process "server1" on node SKLMNode using SOAP connector; The type of process is: UnManagedProcess WASX7031I: For help, enter: "print Help.help()" 3. At the wsadmin prompt type issue the command: print AdminTask.tklmVersionInfo() The output should the following status: IBM Security Key Lifecycle Manager Version = 2.5.0.2 IBM Security Key Lifecycle Manager Build Level = 201405231453 4. If all commands execute and the version information is what is expected, your SKLM install was successful. Chapter 3. IBM Security Key Lifecycle Manager setup 95 8247ch SKLM Setup and Configuration.fm Draft Document for Review January 30, 2015 6:10 pm 3.3.2 Accessing components In this section we validate that you can access the user interface for each component of the SKLM install, including SKLM, WebSphere Application Server, and DB2. Access the IBM SKLM web interface To access the SKLM web interface follow these steps. 1. To connect to the IBM SKLM, navigate to https://<SKLM server address>:9080/ibm/SKLM/login.jsp where <SKLM server address> is the IP address or hostname of the SKLM server. 2. Add any browser connection exceptions and accept any warnings presented to get to the SKLM login screen shown in Figure 3-50. Figure 3-50 SKLM login screen 96 Centrally Managing Access to SEDs in System x Servers Using IBM SKLM Draft Document for Review January 30, 2015 6:10 pm 8247ch SKLM Setup and Configuration.fm 3. Log into the web interface of SKLM, and navigate to Help About as shown in Figure 3-51. In our case, we kept the default SKLM administrator account SKLMAdmin. The username is not case sensitive. You should have recorded your component passwords during the installation. Figure 3-51 Help menu - About 4. The about screen should reflect the SKLM version and fixpack you installed as shown in Figure 3-52. Figure 3-52 SKLM version Access the WebSphere Application Server web interface To access the WebSphere Application Server web interface follow these steps: 1. To connect to WebSphere Application Manager, navigate to https://<WAS server address>: 9083/ibm/console/logon.jsp where <WAS server address> is the IP address or hostname of the WebSphere Application Server. Chapter 3. IBM Security Key Lifecycle Manager setup 97 8247ch SKLM Setup and Configuration.fm Draft Document for Review January 30, 2015 6:10 pm 2. Add any browser connection exceptions and accept any warnings presented to get to the login screen shown in Figure 3-53. Figure 3-53 WebSphere Application Server login screen 98 Centrally Managing Access to SEDs in System x Servers Using IBM SKLM Draft Document for Review January 30, 2015 6:10 pm 8247ch SKLM Setup and Configuration.fm 3. Log into the WebSphere Application Server interface. In our case we used the default administrator account wasadmin. You should see the WebSphere Application Server version you selected or downloaded during the installation process as shown in Figure 3-54. Figure 3-54 WebSphere Application Server Welcome screen Likely you will use the WebSphere Application Server interface to set up user and group permission while you configure a production environment, although that will not be covered in this chapter. Browser sessions: You have to avoid shared browser sessions that use WebSphere Application Server and SKLM to prevent unpredictable results on the server. When you use multiple browser windows on the same client, the session might be shared. For example, the session is always shared when you use a Firefox browser. Depending on your registry settings, or how you opened your browser window, the session might also be shared in Internet Explorer. Chapter 3. IBM Security Key Lifecycle Manager setup 99 8247ch SKLM Setup and Configuration.fm Draft Document for Review January 30, 2015 6:10 pm Access the DB2 interface You should not access the SKLM DB2 instance directly. Instead, use the SKLM and WebSphere Application Server interfaces, and rely on them to interact with the DB2 database. If you see the DB2 welcome screen in Figure 3-55 after your installation completes, close it. The default database and DB2 settings for SKLM have already been configured. Figure 3-55 DB2 first steps screen 3.4 Apply SKLM licensing SKLM is licensed based on the number of instances installed. At this point we have completed the installation of one instance, our primary SKLM server. The SKLM license is currently built in, and no additional steps must be taken to apply our license to SKLM. If we were to install another SKLM instance for redundancy, another SKLM license must be purchased per the license agreement. 100 Centrally Managing Access to SEDs in System x Servers Using IBM SKLM Draft Document for Review January 30, 2015 6:10 pm 8247ch SKLM Setup and Configuration.fm 3.5 Generate SKLM server certificate The first step in preparing the SKLM configuration is to generate a certificate for the SKLM server. In our environment we access SKLM using a jumpbox behind our firewall, and therefore the SKLM web interface is not publicly broadcasted. For this reason, we explain how to generate a self-signed server certificate. This also provides a simpler and quicker example setup. You may wish to get a signed certificate from a certificate authority (CA) if your management network will be accessed from the Internet by your administrators. 1. Log in to the SKLM web interface and navigate to the Configuration tab. Then select SSL/KMIP as shown in Figure 3-56. Figure 3-56 SKLM configuration screen Chapter 3. IBM Security Key Lifecycle Manager setup 101 8247ch SKLM Setup and Configuration.fm Draft Document for Review January 30, 2015 6:10 pm 2. In the next dialog select Create self-signed certificate. Fill out the requested certificate information. As shown in Figure 3-57, we provided: Certificate label We provide a descriptive label that shows up in the SKLM interface. Certificate description We use plain text here, but you may want to use the IP or hostname of your SKLM server. Validity period We keep the 3 year default. Since this section covers a basic install, we do not address certificate expiration here. Algorithm We use the default certificate signature algorithm, RSA. Figure 3-57 Self-signed certificate parameters 102 Centrally Managing Access to SEDs in System x Servers Using IBM SKLM Draft Document for Review January 30, 2015 6:10 pm 8247ch SKLM Setup and Configuration.fm 3. You may also want to add your organization and location information into the certificate, as shown under Optional Certificate Parameters in Figure 3-58. Click OK when your certificate information is complete. Figure 3-58 Certificate organization and location Chapter 3. IBM Security Key Lifecycle Manager setup 103 8247ch SKLM Setup and Configuration.fm Draft Document for Review January 30, 2015 6:10 pm 4. After completing the certificate generation you see an overview of the configuration settings. Notice the text shown in Figure 3-59 indicating important messages. Since we do not have any System x servers with SEDs registered in SKLM yet, we do not perform a backup right now. Look for the SKLM backup process later in this document after we import keys for our first server. At that point, data backup is critical. Figure 3-59 Certificate created 104 Centrally Managing Access to SEDs in System x Servers Using IBM SKLM Draft Document for Review January 30, 2015 6:10 pm 8247ch SKLM Setup and Configuration.fm 5. Reboot your server to ensure the creation of the certificate. After the reboot, log back in to SKLM and navigate to Advanced Configuration Server Certifications, as shown in Figure 3-60. Figure 3-60 New server certificate in use As an alternative to using the Configuration tab, you can generate a server certificate by navigating to Advanced Configruation Server Certificates, and then select Add. That approach uses a wizard similar to the steps performed above. However, the wizard does not give you the option to import a signed certificate. Export the SKLM server certificate To use the new SKLM server certificate for an exchange with a System x servers, the certificate must be exported using the command line interface. To do this, follow the steps below. Chapter 3. IBM Security Key Lifecycle Manager setup 105 8247ch SKLM Setup and Configuration.fm Draft Document for Review January 30, 2015 6:10 pm 1. Navigate to the WebSphere Application Server bin directory. In our Windows Server 2012 setup with default directory locations, this directory is located at: C:\Program Files (x86)\IBM\WebSphere\AppServer\profiles\KLMProfile\bin 2. Enter the wsadmin shell using the following command: .\wsadmin.bat –lang jython –username <sklm administrator> –password <administrator password> where <sklm administrator> is an SKLM admin account, usually the default SKLMAdmin, and <administrator password> is the password for that account. The command returns feedback as shown in Example 3-2: Example 3-2 Starting the wsadmin shell PS C:\Program Files(x86)\IBM\WebSphere\AppServer\profiles\KLMProfile\bin>.\wsadmin .bat -username SKLMadmin -password Passw0rd! -lang jython WASX7209I: Connected to process "server1" on node SKLMNode using SOAP connector; The type of process is: UnManagedProcess WASX7031I: For help, enter: "print Help.help()" 3. To list all certificates and obtain the UUID of the server certificate, issue the command: print AdminTask.tklmCertList() The output containing your server certificate is depicted in Example 3-3: Example 3-3 Certificate list wsadmin>print AdminTask.tklmCertList() CTGKM0001I Command succeeded. uuid = CERTIFICATE-cb226137-577e-4f38-9fb4-6d31c803666c alias = ibm_sklm_server_ssl_cert key store name = defaultKeyStore key state = ACTIVE issuer name = CN=SKLMSSLCert, OU=IBM Redbook Publications, O=IBM, L=RTP, ST=NC, C=US subject name = CN=SKLMSSLCert, OU=IBM Redbook Publications, O=IBM, L=RTP, ST=NC, C=US creation date = 8/14/14 4:40:05 PM Eastern Daylight Time expiration date = 8/13/17 4:40:05 PM Eastern Daylight Time serial number = 197512119346104 106 Centrally Managing Access to SEDs in System x Servers Using IBM SKLM Draft Document for Review January 30, 2015 6:10 pm 8247ch SKLM Setup and Configuration.fm 4. After locating the UUID of your SKLM server, issue the following command to export the server certificate: print AdminTask.tklmCertExport('-uuid <server_UUID> -format DER -fileName <SKLM_Server_Certificate.der>') where <server_UUID> is the SKLM server UUID, and <SKLM_Server_Certificate.der> is the desired fully qualified filename for your exported certificate .der file. We created a new directory, C:\certs to contain our certificates. Your command output is shown in Example 3-4: Example 3-4 Exporting the certificate wsadmin>print AdminTask.tklmCertExport ('-uuid CERTIFICATE-cb226137-577e-4f38-9fb4-6d31c803666c -format base64 -fileName C:\certs\win2k12_sklm.der') CTGKM0001I Command succeeded. C:\certs\win2k12_sklm.der 5. You may want to record the location of your exported server certificate. Later it needs to be imported into the Integrated Management Module (IMM) of a server to configure your SED key management with SKLM. 3.6 Production environment considerations Keep in mind that this chapter has reviewed only a basic set up of one SKLM server. At this point your SKLM set up is not ready for production. Your SKLM server is a critical component of your drive encryption environment, and putting a single, basic instance of SKLM into production would expose you to a high risk of losing access to all of your encrypted data. Remember, if your SKLM server is lost and cannot be recovered, you will lose access to all encrypted data on the SEDs it is managing. Some strongly recommended practices for a production SKLM environment are: Create at least one additional SKLM server to act as a secondary key management server the initial primary SKLM instance. Up to 5 secondary servers are supported with SKLM, however, only up to 3 can be utilized by System x servers with the SKLM Feature on Demand key. For consistency with SKLM product documentation, in this document we refer to the primary SKLM server instance as the master, and all of the replicas or secondary instances as clones. Set up automatic replication to keep master and clones in sync when changes are made. Chapter 3. IBM Security Key Lifecycle Manager setup 107 8247ch SKLM Setup and Configuration.fm Draft Document for Review January 30, 2015 6:10 pm At minimum, keep master and clone on different physical hardware. The SKLM servers may be virtual, but those virtual servers should always reside on different physical hardware to minimize the possibility of an SKLM outage when hardware is offline. Where possible, also configure master and clone SKLM servers on different logical subnets for redundancy and security. The SKLM server must have network access to the IMMs of the System x servers it is managing, but is not required to be on the same layer 2 network. Where possible, also locate the SKLM master and clone servers in different datacenters. SKLM servers should be replicated to disaster recovery sites to ensure the best chance of recovering access to encrypted data in the event of a site-wide catastrophe. Perform regular backups of your master SKLM server. Record the passwords for each of those backups in a safe place. Do not leave backup files locally on the SKLM server; copy them to another storage device or devices. Especially when site replication of an SKLM server is not possible, you want to copy your SKLM backups to an offsite location or another datacenter. Do not encrypt your backup files, or store them on encrypted devices. 3.7 Conclusion After completing the installation, update, initial configuration, and export of certificates outlined in this chapter, you are now able to proceed with your System x server setup. Subsequent chapters in this document help you configure your System x servers and SEDs for management by the SKLM server you just set up. 108 Centrally Managing Access to SEDs in System x Servers Using IBM SKLM Draft Document for Review January 30, 2015 6:10 pm 8247ch IMM Configuration.fm 4 Chapter 4. Integrated Management Module configuration In this chapter we detail the configuration of the Integrated Management Module (IMM), including the import and export of certificates, and the IBM Security Key Lifecycle Manager (SKLM) target servers. Three options are presented to configure the IMM. The first option uses the graphical web based interface, the second uses the IMM command line, and the third option works with the Advanced Settings Utility (ASU). For a small deployment, the web interface is the simplest and most intuitive method. If deploying large numbers of servers however, our recommendation is to use the ASU method because it allows for scripting and automation for a lot of the common settings. The sections that we cover in this chapter are: Introduction to IMM certificates Configure the IMM using the web based interface Configure the IMM using the IMM Command Line Interface Configure the IMM using the Advanced System Utility © Copyright IBM Corp. 2014. All rights reserved. 109 8247ch IMM Configuration.fm Draft Document for Review January 30, 2015 6:10 pm 4.1 Introduction to IMM certificates To allow for the key management server to trust the source of a key request, a certificate mechanism is utilized to build a trusted relationship between the key management server and the IMM in the server being configured. First you export a certificate on both the key management server (in our case SKLM) and client (IMM) side. In the second step you import these certificates on the alternate device. The creation and export of the SKLM server certificate is covered in Chapter 3, “IBM Security Key Lifecycle Manager setup” on page 43. In that section we describe how to create and export either a self-signed certificate or a certificate that is signed by a signing authority. If a certificate has already been configured on the IMM to utilize HTTPS or encrypted communication with the adapter, it is not necessary to generate a separate certificate for the SKLM communication. The existing key can be used for both operations and a new certificate should only be generated if no existing certificate is present for the adapter. 4.2 Configure the IMM using the web based interface In this section we detail the configuration of the IMM for remote key management using the graphical web based interface. 4.2.1 Access the IMM Web Interface If you configure the IMM of the server using the web based interface, the first step to perform is to log into the web console. Use a supported web browser to connect to the IP address of the IMM, which needs to be configured. If the IMM has not been configured, it either is located at a DHCP provided address, if a DHCP server was available when power was applied to the server, or the default IP address of 192.168.70.125. We highly recommend that you set a static or reserved IP address for the IMM before you continue to the next steps because you need to use the IP address of the IMM in most of the following procedures. Detailed information on how to configure the IMM can be found in the IBM Integrated Management Module II User’s Guide at the following location: http://www.ibm.com/support/entry/portal/docdisplay?lndocid=MIGR-5086346 110 Centrally Managing Access to SEDs in System x Servers Using IBM SKLM Draft Document for Review January 30, 2015 6:10 pm 8247ch IMM Configuration.fm To access the IMM login page point a supported browser to the IP address or DNS name of the IMM to be configured as shown in Figure 4-1. Figure 4-1 Log in to the IMM interface After you provide the appropriate credentials, you are presented with the IMM home screen. Your certificates need to know what time it is: Before you continue with the rest of the procedure, it is critical that you set up the date and time for the IMM, whether it be manually or through a Network Time Protocol (NTP) server. This time must be correct or the certificates that are generated will not work, or at the very least, will provide problematic connections. It is important to note that if the CMOS settings on a server are cleared, or the system board is replaced on a server, this time must be verified to be accurate or the IMM will be unable to communicate with the SKLM server. This can result in the server becoming unable to access the encrypted drives until the issue is resolved. Please note that the date and time on the server Unified Extensible Firmware Interface (UEFI), which is reported to the operating system, does not use the Chapter 4. Integrated Management Module configuration 111 8247ch IMM Configuration.fm Draft Document for Review January 30, 2015 6:10 pm same clock as the IMM. The clock on the IMM is a separate device used by the IMM only. Figure 4-2 on page 112 shows the fields that have to be verified. Figure 4-2 Ensure correct time and date 112 Centrally Managing Access to SEDs in System x Servers Using IBM SKLM Draft Document for Review January 30, 2015 6:10 pm 8247ch IMM Configuration.fm Once the time and date have been verified, the next step is to verify that the appropriate license or Features on Demand (FoD) key has been installed on the server. For this verification navigate to the IMM Management pull down menu and select Security as illustrated in Figure 4-3. Figure 4-3 Access the Security configuration menu Chapter 4. Integrated Management Module configuration 113 8247ch IMM Configuration.fm Draft Document for Review January 30, 2015 6:10 pm If the Drive Access tab is missing from the IMM Security dialog as shown in Figure 4-4, then you need to install the FoD activation key for external key management on the server. This may be the case if the FoD activation key has not been installed on the IMM or has not been restored in the event of a system board replacement. Figure 4-4 Verify FoD key Installation If the Drive Access tab is already present, you can skip the following FoD key installation steps. and proceed to 4.2.3, “Create a self-signed certificate” on page 117. 4.2.2 Install the FoD activation key If the server does not have the appropriate FoD key installed to allow for the configuration of an external key management server, you need to provide this key to activate the functionality. If the server was previously licensed but has had the 114 Centrally Managing Access to SEDs in System x Servers Using IBM SKLM Draft Document for Review January 30, 2015 6:10 pm 8247ch IMM Configuration.fm IMM replaced due to a service action, the FoD activation key has to be recovered from a backup or you may need to contact support to have the key replaced. If you do not have experience with FoD key management, there are a number of resources available that cover this in depth, such as the IBM Redbooks publication Using IBM Features on Demand, REDP-4895. In addition there are a number of methods to assist with the management of FoD keys: Features on Demand website On this web site you can find help to install and manage FoD authorization codes and activation keys. http://ibm.com/systems/x/fod/ IBM Integrated Management Module II (IMM2) This server-based management interface allows users to install and remove FoD activation keys and can be accessed by web browser, command line, or Advanced Setting Utility (ASU). IBM Systems Director Centrally-managed FoD functionality that allows users to download, install, and manage activation keys. http://ibm.com/systems/software/director/ IBM ToolsCenter The IBM ToolsCenter is a collection of server management tools to help manage your System x and BladeServer environment. The IBM ToolsCenter provides a download portal for server management tools such as DSA and ASU. http://ibm.com/support/entry/portal/docdisplay?lndocid=TOOL-CENTER IBM Dynamic System Analysis (DSA) Operating system or pre-boot tool that allows you to install and manage FoD activation keys. http://ibm.com/support/entry/portal/docdisplay?lndocid=SERV-DSA Advanced Settings Utility (ASU) Command line based utility that allows users to install and manage FoD activation keys. http://ibm.com/support/entry/portal/docdisplay?lndocid=TOOL-ASU Chapter 4. Integrated Management Module configuration 115 8247ch IMM Configuration.fm Draft Document for Review January 30, 2015 6:10 pm After utilizing one of the above methods to install the FoD, select the Drive Access tab to continue, as shown in Figure 4-5. Figure 4-5 116 Accessing Drive Access tab Centrally Managing Access to SEDs in System x Servers Using IBM SKLM Draft Document for Review January 30, 2015 6:10 pm 8247ch IMM Configuration.fm 4.2.3 Create a self-signed certificate From the perspective of the SKLM key manager, endpoint devices (such as a System x Server) which request keys, are considered clients. The target System x Server with SEDs may have a client certficate already configured on the IMM. Servers that come from the manufacturing facility at the time of writing this document do not have a client certificate present. Adding a preloaded certificate at the point of manufacture may change in the future. If Download Certificate is grayed out, a certificate must be generated to continue. For a self-signed certificate, select Generate a New Key and a Self-signed Certificate to begin the creation process, as shown in Figure 4-6 on page 118. Nomenclature: The keys referenced in the IMM web interface are public/private key pairs as used with certificates. Chapter 4. Integrated Management Module configuration 117 8247ch IMM Configuration.fm Draft Document for Review January 30, 2015 6:10 pm Figure 4-6 Generate self-signed certificate Within the certificate generation panel, ensure that you fill out the fields as appropriate. Of special note is the IMM Host Name field. The IMM Host Name 118 Centrally Managing Access to SEDs in System x Servers Using IBM SKLM Draft Document for Review January 30, 2015 6:10 pm 8247ch IMM Configuration.fm needs to match the URL used to access the IMM (fully qualified name or IP address). In our example configuration, we specified the IP address of the server. Figure 4-7 shows how we filled out the fields on our test system. Figure 4-7 Self-signed certificate dialog box Once the certificate has been generated, select Download Certificate to create a local copy of the certificate file. This file needs to be uploaded to the SKLM server as documented in Chapter 3, “IBM Security Key Lifecycle Manager setup” on page 43. Chapter 4. Integrated Management Module configuration 119 8247ch IMM Configuration.fm Draft Document for Review January 30, 2015 6:10 pm Figure 4-8 shows the status field indicating that a certificate was successfully created. Figure 4-8 Client certificate created Please note that the downloaded certificate must be copied to a local file store on the SKLM server because SKLM does not support importing keys from non-local storage medium. For example, you cannot reference a network share from the SKLM server to import the certificate. In our test configuration, we created a network share on the SKLM server where we copied the certificates to as they were created. Additionally, you have to ensure that you provide relevant names to the certificate files when they are stored. In our configuration, we used the machine type and serial number of the server that created the certificate as the file name. Figure 4-9 shows the appropriate area of the configuration page on the IMM to select the certificate download option. Select Download Certificate. Figure 4-9 Downloading IMM Certificate 4.2.4 Generate a Certificate Signing Request If your environment requires the use of a certificate signing authority, use the Certificate Signing Request (CSR) request option instead of the self-signed certificate to create a CSR file that can be saved to the local system and authenticated with the signing authority. 120 Centrally Managing Access to SEDs in System x Servers Using IBM SKLM Draft Document for Review January 30, 2015 6:10 pm 8247ch IMM Configuration.fm As shown in Figure 4-10, the dialog box is identical to the self-signed certificate that we documented previously with the addition of the requirements for credentials to generate the CSR. Figure 4-10 CSR request form Chapter 4. Integrated Management Module configuration 121 8247ch IMM Configuration.fm Draft Document for Review January 30, 2015 6:10 pm 4.2.5 Download Certificate Signing Request Once the CSR request form has been completed, the option to download the CSR request becomes available. Select Download Certificate Signing Request to initiate the download of the file as shown in Figure 4-11. At this time you proceed to sign the certificate with the certification authority. Figure 4-11 Download CSR request file 4.2.6 Import a signed certificate This option is disabled by default and only becomes available once a CSR request has been generated. The signed certificate that you need to upload must correspond with the CSR that was generated as part of the earlier step. Once the CSR has been signed with the certificate authority, the next step is to take the resulting certificate file and upload it to the IMM. To do this select Import a Signed Certificate and follow the dialog to import the result of a CSR, as shown in Figure 4-12. The file that is being uploaded to the IMM at this step must be the same file that you upload to the SKLM server to ensure they are identical. Figure 4-12 Import signed certificate 4.2.7 Import SKLM server certificate Once a client side certificate has been created or uploaded to the IMM, the next step is to import the certificate that has been generated on the SKLM server. The steps to create this certificate are covered in Chapter 3, “IBM Security Key Lifecycle Manager setup” on page 43. 122 Centrally Managing Access to SEDs in System x Servers Using IBM SKLM Draft Document for Review January 30, 2015 6:10 pm 8247ch IMM Configuration.fm To import the certificate select the Import Certificate option in the Server Certificate section of the IMM interface configuration page as shown in Figure 4-13. Figure 4-13 Import Server Certificate In the following dialog chose Select Certificate File... and navigate to the appropriate SKLM certificate file. Then select OK to import the certificate as shown in Figure 4-14. Figure 4-14 Select Certificate File After the upload process is complete, the Server Certificate Status updates to reflect that the certificate is now installed as shown in Figure 4-15. Figure 4-15 Server Certificate Installed 4.2.8 Configure the device group Unless a custom group is created in SKLM, which is outside the scope of this document, you should use the default device group IBM_SYSTEM_X_SED, which is populated in the Device Group field as indicated in Figure 4-16 on page 124. Chapter 4. Integrated Management Module configuration 123 8247ch IMM Configuration.fm Draft Document for Review January 30, 2015 6:10 pm If you have created a new custom group within the SKLM server to manage groups of System x servers, you need to update the group name in this field in place of the default value, as shown in Figure 4-16. Figure 4-16 Default Device Group 124 Centrally Managing Access to SEDs in System x Servers Using IBM SKLM Draft Document for Review January 30, 2015 6:10 pm 8247ch IMM Configuration.fm 4.2.9 Configure key repository (SKLM) servers Once all other sections are complete, you need to configure the key repository servers that the IMM will connect to at boot time in order to request the required KEK key to unlock the SED drives. In our sample configuration we utilize a single SKLM server for simplicity. In a production environment it is recommended that, at the minimum, two SKLM servers are used in a redundant configuration. In the event that the IMM is unable to connect with a key management server during boot, the server will be unable to access any encrypted drives by design. This is to prevent access to data on a server that has been removed from the corporate network hosting the key management server. If two or more key management servers are present in the environment, up to a maximum of four, they need to be configured in the appropriate fields as detailed in Figure 4-17. Figure 4-17 Key Repository Server configuration 4.2.10 Test the connection to SKLM The last step in the process is to test the connection from the IMM to the key management server. You have to test each target server individually to ensure that all servers have the appropriate certificates installed and can be contacted through the network. Chapter 4. Integrated Management Module configuration 125 8247ch IMM Configuration.fm Draft Document for Review January 30, 2015 6:10 pm Before you test the connections, select Apply at the top of the web page to update all of the settings to the IMM. Once the apply process is complete, select the radio button to the left of the server connection you wish to test, then select Test Connection as indicated in Figure 4-18. Figure 4-18 Test connections If you receive no response, ensure you have selected Apply and the appropriate radio button before repeating the test. If you have correctly configured the IMM, you receive a success message as depicted in Figure 4-19. Figure 4-19 Successful connection test 4.2.11 Troubleshooting During our test we encountered the following error shown in Figure 4-20 on page 127 on one of our test systems. This error is the result of trying to upload a certificate file from the key management server to the IMM when the IMM has an invalid time and date configured. Correct the time and date as detailed previously in this chapter then try to upload the certificate again. 126 Centrally Managing Access to SEDs in System x Servers Using IBM SKLM Draft Document for Review January 30, 2015 6:10 pm 8247ch IMM Configuration.fm Figure 4-20 Certificate upload error If you receive an error when attempting to configure the key repository server where the settings fail to apply, the workaround is to configure the repository server entries as detailed in the IMM command line section of this chapter. Once all previous steps in this chapter have been completed successfully, reboot the Server to enter the UEFI configuration. 4.3 Configure the IMM using the IMM Command Line Interface In this section of the chapter we repeat the same configuration steps as detailed in the previous section. This time we use the command line capabilities of the IMM v2 adapter. 4.3.1 Initial setup If the IMM has not been manually configured, it either is located at a DHCP provided address, if a DHCP server was available when power was applied to the server, or the default IP address of 192.168.70.125. We highly recommend that you set a static or reserved IP address for the IMM at this point before you continue to the next steps as you need to use the IP address of the IMM in most of the following procedures. Detailed information on configuring the IMM can be found in the following user guides: http://www.ibm.com/support/entry/portal/docdisplay?lndocid=MIGR-5086346 Your certificates need to know what time it is: Before you continue with the rest of the procedure, it is critical that you set up the date and time for the IMM, whether it be manually or through a Network Time Protocol (NTP) server. This time must be correct or the certificates that are generated will not work, or at the very least, will provide problematic connections. Chapter 4. Integrated Management Module configuration 127 8247ch IMM Configuration.fm Draft Document for Review January 30, 2015 6:10 pm It is important to note that if the CMOS settings on a server are cleared or the system board is replaced on a server, this time must be verified to be accurate or the IMM will be unable to communicate with the SKLM server. This can result in the server becoming unable to access the encrypted drives until the issue is resolved. Please note that the date and time on the server UEFI, which is reported to the operating system, does not use the same clock as the IMM. The clock on the IMM is a separate device used by the IMM only. 4.3.2 Install FoD activation key If the server does not have the appropriate FoD key installed to allow for the configuration of an external key management server, you need to provide this key to activate the functionality. If the server was previously licensed but has had the IMM replaced due to a service action, the FoD activation key has to be recovered from a backup or you may need to contact support to have the key replaced. If you do not have experience with FoD key management, please refer to the additional resources listed in 4.2.2, “Install the FoD activation key” on page 114. To activate an FoD key using the IMM command line use the following keycfg command to display, add, or delete activation keys: keycfg -add -ip tftp ip address -pn port number (of tftp/sftp server - default 69/22) -u username (for sftp server) -pw password (for sftp server) -f filename -del n (where n is a valid ID number from listing) -deltype x (where x is a Type value) 4.3.3 Create a self-signed certificate From the perspective of the SKLM key manager, endpoint devices (such as a System x Server) which request keys, are considered clients. A System x Server with SEDs may have a client certificate already configured on the IMM. Servers that come from the manufacturing facility at the time of writing this document do not have a client certificate present. Adding a preloaded certificate at the point of manufacture may change in the future. 128 Centrally Managing Access to SEDs in System x Servers Using IBM SKLM Draft Document for Review January 30, 2015 6:10 pm 8247ch IMM Configuration.fm If the certificate is already present then you may choose to skip the section on creating certificates and proceed to 4.3.6, “Import SKLM server certificate” on page 131. You can check whether there is an IMM client certificate in place by using the following command: sslcfg –client If the result of the command indicates the status as enabled then a certificate is already installed. You can recreate the certificate even if one is already present. To create a self-signed certificate with the IMM command line, use the following sslcfg command: sslcfg [-options] options: -server: SSL Server status (enabled, disabled). Note: SSL can only be enabled if a certificate is in place -client: SSL Client status (enabled, disabled) Note: SSL can be enabled if a server or client certificate is in place -cim: CIM over HTTPS status (enabled, disabled) Note: SSL can be enabled if a server or client certificate is in place -cert: Generate a self-signed certificate (server, client, cim, storekey) -csr: Generate a CSR (server, client, cim, storekey) -csrform: The format of the CSR will be exported in (der, pem) -i: IP address for TFTP/SFTP server when uploading a certificate, To download a certificate or CSR use: -pn: port number (of tftp/sftp server - default 69/22) -u: username (for sftp server) -pw: password (for sftp server) -l: filename (when downloading or uploading a certificate or CSR) If not specified during download, the default name for that file will be used and displayed -dnld: Downloads the specified file Note: this option takes no arguments, but must be used with -cert/-csr (server/client/cim/storekey), as well as -i (and optionally -l) -upld: Imports the specified certificate Chapter 4. Integrated Management Module configuration 129 8247ch IMM Configuration.fm Draft Document for Review January 30, 2015 6:10 pm Note: this option takes no arguments, but must be used with -cert (server/client/cim/storekey) and -i and -l -tcx: Trusted certificate x for the ssl client (x = 1, 2, 3 or 4) (import, download, remove) Required options for generating a self-signed certificate or CSR: -c: Country (2 letter code) -sp: Quote-delimited State or Province (max 60 chars) -cl: Quote-delimited City or Locality (max 50 chars) -on: Quote-delimited Organization Name (max 60 chars) -hn: IMM hostname (max 60 chars) Optional options for generating a self-signed certificate or CSR: -cp: Quote-delimited Contact Person (max 60 chars) -ea: Email Address (max 60 chars) -ou: Quote-delimited Organizational Unit (max 60 chars) -s: Quote-delimited Surname (max 60 chars) -gn: Quote-delimited Given Name (max 60 chars) -in: Quote-delimited Initials (max 20 chars) -dq: Quote-delimited DN Qualifier (max 60 chars) Optional options for generating a CSR: -cpwd: Challenge Password (min 6 chars, max 30 chars) -un: Quote-delimited Unstructured Name (max 60 chars) In our example configuration, the following command was used: sslcfg –cert –c:US –sp:NC –cl:RTP –on:IBM –hn:192.168.254.87 Once you have created the self-signed certificate download it using the following command: sslcfg –dnld –ip <IP address of tftp server> -l <filename to save file> -cert 4.3.4 Generate a Certificate Signing Request If your environment requires the use of a certificate signing authority, use the CSR request option instead of the self-signed certificate to create a CSR file that can be saved to the local system and authenticated with the signing authority. To generate a CSR request file, we used the following sslcfg command: sslcfg –csr –c:US –sp:NC –cl:RTP –on:IBM –hn:192.168.254.87 –csrform:der 130 Centrally Managing Access to SEDs in System x Servers Using IBM SKLM Draft Document for Review January 30, 2015 6:10 pm 8247ch IMM Configuration.fm Once the CSR request file has been created use the following command to download it. Substitute the appropriate values: sslcfg –dnld –ip <IP address of tftp server> -l <filename to save file> -csr 4.3.5 Import a signed certificate This option can be used to upload a signed certificate to the IMM after the CSR that has been created in the previous step has been signed by a certificate authority. The signed certificate that you need to upload must correspond with the CSR that was generated as part of the earlier step. Once the CSR has been signed with the certificate authority, it has to be uploaded to the IMM using the following command: sslcfg –upld –ip <IP address of tftp server> -l <filename to upload> -cert 4.3.6 Import SKLM server certificate Once a client side certificate has been created or uploaded to the IMM, the next step is to import the certificate that has been generated on the SKLM server. The steps to create this certificate are covered in Chapter 3, “IBM Security Key Lifecycle Manager setup” on page 43. Use the storekeycfg command to upload the certificate generated by the key management server. It has the following syntax: storekeycfg -add -ip tftp/sftp ip address -pn port number of tftp/sftp server (default 69/22) -u username (for sftp server) -pw password (for sftp server) -f filename -del -dgrp <device group> (device group name) -sxip <host name/ip_addr> (server x host name/ip addr (x can be 1, 2, 3 or 4)) -sxpn <port_number> (server x port number (x can be 1, 2, 3 or 4)) -testx (test server x connection (x can be 1, 2, 3 or 4)) An example command to upload a server key to the IMM is as follows: Chapter 4. Integrated Management Module configuration 131 8247ch IMM Configuration.fm Draft Document for Review January 30, 2015 6:10 pm storekeycfg –add –ip <tftp or sftp server address> -u <username if sftp> -pw <username if sftp> -f <filename of certificate to upload> In our example we used the following: storekeycfg –add –ip 1.2.3.4 –u username –pw password –f certificate.der 4.3.7 Configure the device group Unless a custom group is created in SKLM, which is outside the scope of this document, you should use the default device group IBM_SYSTEM_X_SED, which is also populated using the storekeycfg command. If you have created a new custom group within the SKLM server to manage groups of System x servers, you need to update the group name using the following command: storekeycfg –dgrp NEW_DEVICE_GROUP 4.3.8 Configure key repository (SKLM) servers Once all other sections are complete, you need to configure the key repository servers that the IMM will connect to at boot time in order to request the required KEK key needed to unlock the SED drives. In our sample configuration we utilize a single SKLM server for simplicity. In a production environment it is recommended that, at the minimum, two SKLM servers are used in a redundant configuration. In the event that the IMM is unable to connect with a key management server during boot, the server will be unable to access any encrypted drives by design. This is to prevent the access of data on a server that has been removed from the corporate network hosting the key management server. If two or more key management servers are present in the environment, up to a maximum of four, they be configured by repeating the following steps for each of the key management target servers. This example command sets the first key management server to 192.168.90.88 as required by our sample configuration. storekeycfg –s1ip 192.168.90.88 If there are additional key management servers in the environment, repeat this command for each of the additional servers substituting the 1 with the server entry you wish to change. 132 Centrally Managing Access to SEDs in System x Servers Using IBM SKLM Draft Document for Review January 30, 2015 6:10 pm 8247ch IMM Configuration.fm For example to add a second key management server you use the following command: storekeycfg –s2ip 192.168.90.89 4.3.9 Test the connection to SKLM Once you have completed all of the preceding steps, you have to test the connection from the IMM to each of the configured key management servers with the following commands. To test the first connection, enter the following: storekeycfg –test1 To test any other configured key management servers just repeat the command substituting the 1 for the server entry you wish to test. For example, to test the connection to a second configured key management server use the following command: storekeycfg –test2 The result will be the following response: Operation completed successfully. 4.4 Configure the IMM using the Advanced System Utility In the following section we document the same procedures used in earlier sections of this chapter except using ASU commands that can be scripted for configuring the IMM’s of remote servers and automating a lot of the commands. For 64-bit operating systems, use the asu64 command in place of asu in the following command examples. Additionally, when using ASU commands to configure a remote host, add the following options to the command lines -host <IP address of IMM> -user <username (default: USERID)> -password <password (default: PASSSW0RD)> Chapter 4. Integrated Management Module configuration 133 8247ch IMM Configuration.fm Draft Document for Review January 30, 2015 6:10 pm 4.4.1 Create a self-signed certificate Before proceeding, verify whether the IMM of the target server has an existing client certificate or does not have one configured. Use the asu show command to view the status of a particular certificate. At the command line, enter: asu show IMM.SSL_HTTPS_SERVER_CERT The output is: IMM.SSL_HTTPS_SERVER_CERT=Private Key and CA-signed cert installed, Private Key stored, CSR available for download. If the result is that a certificate is installed, the certificate does not need to be re-created and can be simply downloaded as documented in the following section. If the result is that a certificate is not installed then one must be created using the following steps before continuing. You can use the asu command to generate a self-signed certificate, which is one that is already signed. At the command line enter: asu generate IMM.SSL_HTTPS_SERVER_CERT asu.xml The output is: Certificate was generated successfully! 4.4.2 Generate a Certificate Signing Request You can use the following command to generate a CSR request file that can be downloaded from the IMM and signed using a certificate signing authority if that is required. asu generate IMM.SSL_HTTPS_SERVER_CSR asu.xml The output is: Certificate was generated successfully! Once the CSR certificate request has been created successfully, the next step is to download it to make it available for signing against a signing authority. This is done using the following command: asu export IMM.SSL_HTTPS_SERVER_CSR asu_csr.der 134 Centrally Managing Access to SEDs in System x Servers Using IBM SKLM Draft Document for Review January 30, 2015 6:10 pm 8247ch IMM Configuration.fm The output is: Certificate was exported successfully! The asu_csr.der file is saved in the current working directory from which the asu command was executed. You can export a certificate or a certificate sign request. If a certificate sign request is signed by an independent certificate authority, it is referred to as a CA-signed certificate. 4.4.3 Import a signed certificate After you export a certificate as detailed in 4.4.2, “Generate a Certificate Signing Request” on page 134, you must sign it using an independent certificate authority. You can only import the CA-signed certificate, which is different than a self-signed one, into the IMM using the ASU tool. For example, to upload the results of signing a CSR, if you enter: asu import IMM.SSL_SKR_CLIENT_CERT asu_cert.der The output is: Certificate was imported successfully! If a signed certificate is already installed on the IMM as shown in 4.4.1, “Create a self-signed certificate” on page 134, then the existing certificate must be deleted before you can upload a new certificate. Note that asu_cert.der is a CA-signed certificate after asu_csr.der is signed using your own certificate authority. 4.4.4 Import SKLM server certificate To import the SKLM server certificate, all of the details documented above in ‘ 4.4.3, “Import a signed certificate” apply. The only difference in this instance is to specify that you are importing a certificate for the key management server. Therefore, you must substitute the IMM.SSL_CLIENT_TRUSTED_CERT_SKR in the command line used to import CSR signed certificate. asu import IMM.SSL_CLIENT_TRUSTED_CERT_SKR ISKLM_Server_Cert.der Chapter 4. Integrated Management Module configuration 135 8247ch IMM Configuration.fm Draft Document for Review January 30, 2015 6:10 pm 4.4.5 Configure key repository servers Within the IMM, up to four key repository servers can be configured. Use the following command to see what is currently configured on the target IMM. asu show –host <IP Address> -user <username> -password <password> In the resulting output you find the following fields: IMM.SKR_Server1_HostName_IPAddress=192.168.90.87 IMM.SKR_Server1_Port=5696 IMM.SKR_Server2_HostName_IPAddress= IMM.SKR_Server2_Port=5696 IMM.SKR_Server3_HostName_IPAddress= IMM.SKR_Server3_Port=5696 IMM.SKR_Server4_HostName_IPAddress= IMM.SKR_Server4_Port=5696 In this example, a single target key management server has been configured. To modify these settings use the following command asu set ASU IMM.SKR_Server1_HostName_IPAddress=<ip address> –host <IP Address> -user <username> -password <password> 4.4.6 Configure the device group To view the current device user group use the following command: asu show IMM.SKR_DEVICE_GROUP –host <IP Address> -user <username> -password <password> The result will be the following output : IMM.SKR_DEVICE_GROUP=IBM_SYSTEM_X_SED The default device user group is IBM_SYSTEM_X_SED and should be left at the default unless you have specifically configured a different group on the key management server. If required you can change the default group with the following command: asu set IMM.SKR_DEVICE_GROUP= <new group name> –host <IP Address> -user <username> -password <password> 136 Centrally Managing Access to SEDs in System x Servers Using IBM SKLM Draft Document for Review January 30, 2015 6:10 pm 8247ch IMM Configuration.fm 4.5 Conclusion In this chapter we covered three different methods to configure the IMM on the target server, which includes the web interface, IMM command line, and the ASU tool. We recommend that for any large deployment you consider using the ASU method as it provides the ability to script the configurations. This allows for the simplification of deployments of large distributed configurations and the automation of a lot of the settings, which often are consistent across servers, such as the addresses of the key management servers. Chapter 4. Integrated Management Module configuration 137 8247ch IMM Configuration.fm 138 Draft Document for Review January 30, 2015 6:10 pm Centrally Managing Access to SEDs in System x Servers Using IBM SKLM Draft Document for Review January 30, 2015 6:10 pm 8247ch UEFI configuration.fm 5 Chapter 5. UEFI configuration In this chapter we describe the configuration for the Unified Extensible Firmware Interface (UEFI) of the target server. This includes configuring a basic RAID set as an example and enabling the encryption functions of the RAID adapter. This chapter is split into the following sections: Enable storage controller encryption Configuring virtual disks © Copyright IBM Corp. 2014. All rights reserved. 139 8247ch UEFI configuration.fm Draft Document for Review January 30, 2015 6:10 pm 5.1 Enable storage controller encryption By default, encryption is disabled on IBM RAID adapters. There are two modes of encryption that can be enabled on the adapter. The first is local encryption key management where the RAID adapter manages and maintains the key encryption key (KEK) that is used to encrypt the local media encryption key (MEK), which is stored on the drive as described in Chapter 1, “Technology primer” on page 3. The second mode is to configure the adapter to request a KEK from an external key management server, like SKLM, at boot time. This is the mode that we discuss in this section of the document. We now focus on the following details: Setting the adapter for an external key management server Accepting pending request on the SKLM server 5.1.1 Setting the adapter for an external key management server To configure the adapter for an external key management server (EKMS) follow the steps listed below. 140 Centrally Managing Access to SEDs in System x Servers Using IBM SKLM Draft Document for Review January 30, 2015 6:10 pm 8247ch UEFI configuration.fm 1. At the initial power on of the server, select F1 when prompted to enter the UEFI configuration screen, as shown in Figure 5-1. Figure 5-1 Initial UEFI welcome screen Chapter 5. UEFI configuration 141 8247ch UEFI configuration.fm Draft Document for Review January 30, 2015 6:10 pm 2. Once selected, the server presents you with the main setup screen, called System Configuration and Boot Management. In this menu make sure you select System Settings as shown in Figure 5-2. Figure 5-2 System Configuration and Boot Management 142 Centrally Managing Access to SEDs in System x Servers Using IBM SKLM Draft Document for Review January 30, 2015 6:10 pm 8247ch UEFI configuration.fm 3. The System Settings menu presents you with the following list of options from which you select Storage, as shown in Figure 5-3. Figure 5-3 Selecting the Storage option 4. In the next section you need to select the appropriate RAID adapter that manages the SEDs. If several adapters are installed in the server and they are all managing SEDs, you need to repeat the following steps for each adapter installed in the system. Chapter 5. UEFI configuration 143 8247ch UEFI configuration.fm Draft Document for Review January 30, 2015 6:10 pm In our test configuration, we installed a single M5210 RAID adapter in an x3650 M4 HD server, which resulted in the following selection screen shown in Figure 5-4. Select the highlighted adapter. Figure 5-4 RAID adapter selection 5. On the next screen select the Controller Management option, as shown in Figure 5-5. It is in this next menu that you configure the selected adapter for an EKMS source. Figure 5-5 Selecting Controller Management 144 Centrally Managing Access to SEDs in System x Servers Using IBM SKLM Draft Document for Review January 30, 2015 6:10 pm 8247ch UEFI configuration.fm 6. Within the Controller Management menu you need to configure the selected adapter for an EKMS source. Scroll to the bottom of the list of options to select the Advanced... option, as shown in Figure 5-6. Figure 5-6 Advanced selection options Chapter 5. UEFI configuration 145 8247ch UEFI configuration.fm Draft Document for Review January 30, 2015 6:10 pm 7. Once selected, the Advanced Selection menu presents a number of options. For the purposes of this configuration, select Enable Drive Security as shown in Figure 5-7. This leads into the next dialog where you can select an EKMS source for the security keys. Figure 5-7 Enable Drive Security selection a. If you find that the Enable Drive Security option is greyed out in this menu, it means that the controller has already been set up for encryption. Any required changes should be done through the Change Security Key option, shown in Figure 5-8. Figure 5-8 Change Security Key menu 146 Centrally Managing Access to SEDs in System x Servers Using IBM SKLM Draft Document for Review January 30, 2015 6:10 pm 8247ch UEFI configuration.fm Only select this option if drive security is enabled and you need to change the settings. Attention: DO NOT disable drive encryption unless you are completely sure that there is no data to be retained on the attached drives. Disabling drive encryption will perform a secure wipe of all SED attached drives and you will not be able to recover the data. b. The next step is to select an EKMS as the key source for the controller. This is done by selecting External Key Management (EKM) in the menu highlighted in Figure 5-8 on page 146. Once selected, you return to the normal configuration flow to the Enable Drive Security menu, as if no Change Security Key step had been performed. 8. In the Enable Drive Security menu select External Key Management by pressing the space bar while the cursor is in the appropriate selection box, shown in Figure 5-9. Once done, select OK and follow the prompts to exit back to the main setup screen, where you are prompted to reboot the server to continue. Confirm the reboot action. Figure 5-9 Enable EKMS Chapter 5. UEFI configuration 147 8247ch UEFI configuration.fm Draft Document for Review January 30, 2015 6:10 pm 9. Once the server reboots, if you have configured Hold new device requests pending my approval as per Chapter 3, “IBM Security Key Lifecycle Manager setup” on page 43, you will see the following boot message shown in Figure 5-10. Figure 5-10 First Boot Error Message The reason for this message is due to the server having a trusted connection with the SKLM server, but not having an initial key accepted. The next step involves connecting to the SKLM server home screen. 148 Centrally Managing Access to SEDs in System x Servers Using IBM SKLM Draft Document for Review January 30, 2015 6:10 pm 8247ch UEFI configuration.fm 5.1.2 Accepting pending request on the SKLM server Navigate to your SKLM server home screen. Here you see a Pending Device Requests hyperlink at the top left of the page. Select this link to navigate to the Pending Accept page as shown in Figure 5-11. Figure 5-11 Pending Device Requests Chapter 5. UEFI configuration 149 8247ch UEFI configuration.fm Draft Document for Review January 30, 2015 6:10 pm The Pending Accept page lists a device entry for the system you just configured. This process allows the SKLM server to accept the key request from the target system. Select the corresponding device in the list with a left mouse click, then select Accept from the top of the page as shown in Figure 5-12. Figure 5-12 Accept pending device request One accepted, reboot the target machine one more time in order for the system to be able to obtain a key from the SKLM server. Accepting or responding to the First Boot Error Message is not required. On this next reboot the server continues to boot without error. At this point the target server is ready for further configuration. We now prepare the RAID configuration. 5.2 Configuring virtual disks In this section we describe the steps to configure the virtual disks on the RAID adapter and secure the resulting virtual disks using the UEFI configuration interface. We cover the following details: Setup of basic RAID volume Activate encryption on virtual drives 150 Centrally Managing Access to SEDs in System x Servers Using IBM SKLM Draft Document for Review January 30, 2015 6:10 pm 8247ch UEFI configuration.fm 5.2.1 Setup of basic RAID volume In this section we explain how to create a simple RAID volume using the UEFI text based RAID configuration tool. This is required because the operating system has not yet been installed, and therefore, there is no access to the graphical configuration utility. 1. The first step is to boot the server to the main UEFI screen as detailed in the beginning of 5.1, “Enable storage controller encryption” on page 140, using the F1 key at the startup splash screen. 2. From the main menu select the Storage option to open the RAID adapter configuration panel and select Configuration Management, as shown in Figure 5-13. Figure 5-13 Main RAID configuration menu Chapter 5. UEFI configuration 151 8247ch UEFI configuration.fm Draft Document for Review January 30, 2015 6:10 pm 3. In the Configuration Management menu select Create Virtual Drive as shown in Figure 5-14. Figure 5-14 Create Virtual Drive option If there are specific configuration requirements in your environment you may choose to select the Advanced option. For this example, all that is required is a base two drive RAID 1 volume for the operating system installation. The steps to create the volume are detailed here as a walkthrough. In the following menus you may select the options which match the requirements of your deployment as they do not impact the ability to perform the encryption steps to follow. If you do have a combination of SED and non-SED drives installed in the system you should select the advanced option to ensure the appropriate drives are configured for the volume. 152 Centrally Managing Access to SEDs in System x Servers Using IBM SKLM Draft Document for Review January 30, 2015 6:10 pm 8247ch UEFI configuration.fm 4. In the Create Virtual Drive menu we select the RAID type, as shown in Figure 5-15. Figure 5-15 RAID selection 5. For the sample configuration, we select RAID 1. Next we check all the settings in the Generic R1 menu. Ensure you scroll down to the bottom of the list to be able to select the Save Configuration option, as shown in Figure 5-16. Figure 5-16 Save Configuration Chapter 5. UEFI configuration 153 8247ch UEFI configuration.fm Draft Document for Review January 30, 2015 6:10 pm 6. Next you find yourself in the Data Loss warning panel. Be aware that you will lose any data on the selected drives for the array, so ensure that this is an acceptable action, and press the spacebar while highlighting Confirm. Then select Yes to create the virtual drive. 7. All of these steps will result in a success message indicating that the operation has been completed successfully, as shown in Figure 5-17. Figure 5-17 Successful completion At this point you can repeat these steps to create additional virtual drives as required providing you have sufficient SEDs installed for the additional requirements. For this example configuration only a single RAID 1 virtual drive is configured. Let us now activate the encryption for the new virtual drive. 5.2.2 Activate encryption on virtual drives In this section we activate the encryption on the virtual drive that was created in the previous steps. 154 Centrally Managing Access to SEDs in System x Servers Using IBM SKLM Draft Document for Review January 30, 2015 6:10 pm 8247ch UEFI configuration.fm 1. The first step is to navigate to the main menu for the UEFI storage devices as detailed in 5.2.1, “Setup of basic RAID volume” on page 151. Select Virtual Drive Management as shown in Figure 5-18. Figure 5-18 Virtual Drive Management 2. In the Virtual Drive Management menu you have a list of the available virtual drives. In the example configuration, only a single RAID 1 volume was created, so only a single entry is displayed. If you created different or additional volumes in the previous steps, those are presented here. Select the virtual drive that you wish to activate encryption on. In the sample configuration the selection window resembled the one shown in Figure 5-19. Figure 5-19 Virtual Drive Selection Chapter 5. UEFI configuration 155 8247ch UEFI configuration.fm Draft Document for Review January 30, 2015 6:10 pm 3. In the following Virtual Drive configuration panel select the Select Operation entry at the top of the list as shown in Figure 5-20. Figure 5-20 Select Operation 4. Next select Secure Virtual Drive to initiate the encryption of the selected virtual drive as shown in Figure 5-21. Figure 5-21 Secure Virtual Drive 156 Centrally Managing Access to SEDs in System x Servers Using IBM SKLM Draft Document for Review January 30, 2015 6:10 pm 8247ch UEFI configuration.fm 5. Once selected, the virtual drive will be encrypted utilizing the key provided at boot time via the SKLM server. If you return to the Virtual Drive properties again you can see the Secured entry listed as <Yes>. This is shown in Figure 5-22. Figure 5-22 Virtual Drive Secured 6. After the virtual drive has been verified as being secured, you can exit the UEFI completely and reboot the server. If you have created additional virtual drives as part of this exercise, you need to select each of the drives and repeat the steps to enable Secure Virtual Drive. 5.3 Conclusion At this point all necessary steps to secure the drives have been completed and the system is ready for operating system installation. Due to the fact that all encryption and key management is being performed in the system firmware, no additional steps are required when you install any operating system. Chapter 5. UEFI configuration 157 8247ch UEFI configuration.fm 158 Draft Document for Review January 30, 2015 6:10 pm Centrally Managing Access to SEDs in System x Servers Using IBM SKLM Draft Document for Review January 30, 2015 6:10 pm 8247ch Maintain and Manage.fm 6 Chapter 6. Manage your System x Server SED deployment In this chapter we provide more detail on managing the encryption keys and certificates needed for your IBM Security Key Lifecycle Manager (SKLM) and self-encrypting drive (SED) environment. This chapter builds upon the exchanges already made between the client server and SKLM, and outlines some additional administrative tasks such as backup and restore, which were not performed during the tasks in previous chapters, but are critical to preserving our encryption key management set up. We cover the following two major topics: Certificate exchange and device acceptance review SKLM backup and restore © Copyright IBM Corp. 2014. All rights reserved. 159 8247ch Maintain and Manage.fm Draft Document for Review January 30, 2015 6:10 pm 6.1 Certificate exchange and device acceptance review In previous chapters of this book we mentioned a certificate exchange between SKLM key manager and a client System x Server with SEDs, as well as registering a new device with SKLM. In this section we review and elaborate upon those steps. 6.1.1 Client server certificate exchange Chapter 4, “Integrated Management Module configuration” on page 109 included the instructions to create and download a System x Server certificate using the Integrated Management Module (IMM) of a System x Server with the SKLM Feature on Demand key activated. Before the System x Server connection to SKLM can be tested, the following steps must be performed to import its certificate into SKLM. 1. First, the certificate file that was downloaded from the IMM must be copied locally to the SKLM server so it can be imported. Our System x3650 M4 certificate is shown below in Figure 6-1. Figure 6-1 Client server certificate file 2. Log in to the SKLM web interface using the following link https://<SKLM server address>:9080/ibm/SKLM/login.jsp where <SKLM server address> is the IP address or hostname of the SKLM server. 3. Navigate to Advanced Configuration Server Certificates. In the SKLM installation steps in 3.5, “Generate SKLM server certificate” on page 101, you have already generated an SKLM server certificate, which is shown in Figure 6-2 on page 161. This also has been imported into the IMM of your client server per the instructions in 4.2.7, “Import SKLM server certificate” on page 122. 160 Centrally Managing Access to SEDs in System x Servers Using IBM SKLM Draft Document for Review January 30, 2015 6:10 pm 8247ch Maintain and Manage.fm Figure 6-2 Server certificate present 4. Navigate to Advanced Configuration Client Device Certificates, then click Import as shown in Figure 6-3. Figure 6-3 Import client certificate Chapter 6. Manage your System x Server SED deployment 161 8247ch Maintain and Manage.fm Draft Document for Review January 30, 2015 6:10 pm 5. Enter a display name in the Import SSL/KMIP Certificate popup dialog so you can identify this System x Server in SKLM, then select Browse, locate, and select the client server certificate to import as shown in Figure 6-4. Figure 6-4 Select client certificate 6. Verify your entries and check Allow the server to trust this certificate and communicate with the associated client device as shown in Figure 6-5, then select Import. Figure 6-5 Trust and import client certificate 162 Centrally Managing Access to SEDs in System x Servers Using IBM SKLM Draft Document for Review January 30, 2015 6:10 pm 8247ch Maintain and Manage.fm 7. A warning to back up your SKLM data is presented. Select Close at this time, shown in Figure 6-6. It is critical that you back up your SKLM data whenever new devices are added, and you should follow the backup steps in 6.2, “SKLM backup and restore” on page 172 to do so. Figure 6-6 Backup reminder Chapter 6. Manage your System x Server SED deployment 163 8247ch Maintain and Manage.fm Draft Document for Review January 30, 2015 6:10 pm 8. Your client server certificate is now imported and trusted in SKLM as shown in Figure 6-7. Figure 6-7 Certificate imported 164 Centrally Managing Access to SEDs in System x Servers Using IBM SKLM Draft Document for Review January 30, 2015 6:10 pm 8247ch Maintain and Manage.fm 9. At this point you can successfully test the connection with the IMM of your client server as shown in Figure 6-8. We explained those details in 4.2.10, “Test the connection to SKLM” on page 125. Figure 6-8 Successful IMM connection Chapter 6. Manage your System x Server SED deployment 165 8247ch Maintain and Manage.fm Draft Document for Review January 30, 2015 6:10 pm 6.1.2 Certificate acceptance options In Chapter 5, “UEFI configuration” on page 139 we described the process for configuring a System x Server to use external key management for drive security. We also provided instructions for accepting the device and its key request in SKLM. Using the following steps we verify that those tasks are complete and review the details around the process. Hold new devices for approval The first step is to change, or at least know, the settings for new devices that attempt to connect to SKLM. We highly recommend that when new devices attempt a connection to SKLM you hold them for approval. This allows you to acknowledge and control the connections without the additional effort to configure them manually. This also provides a reminder to back up the SKLM data whenever a new device is added, which is critical to keeping a valid backup that supports all client servers. To configure this, follow the steps below. 1. Connect to the SKLM web interface and navigate to the Welcome tab, as shown in Figure 6-9. On the Welcome screen under Key and Device Management right-click on the IBM_SYSTEM_X_SED Device Group. This is the default key group for all System x servers. 166 Centrally Managing Access to SEDs in System x Servers Using IBM SKLM Draft Document for Review January 30, 2015 6:10 pm 8247ch Maintain and Manage.fm Figure 6-9 Manage System x keys and devices Chapter 6. Manage your System x Server SED deployment 167 8247ch Maintain and Manage.fm Draft Document for Review January 30, 2015 6:10 pm 2. From the pop-up menu, select Hold new device requests for communication as shown in Figure 6-10. This setting is saved automatically. All future connection requests are held in a pending state. Figure 6-10 Hold new device requests for approval Accept new devices In this section we outline the process to accept a new device after it contacts the SKLM server, and allow it to retrieve a key encryption key for the controller to access SEDs on the next server boot. We already introduced this task briefly in Chapter 5, “UEFI configuration” on page 139. 168 Centrally Managing Access to SEDs in System x Servers Using IBM SKLM Draft Document for Review January 30, 2015 6:10 pm 8247ch Maintain and Manage.fm 1. Navigate to the Welcome tab. On the Action Items dashboard click the Pending devices hyperlink as shown in Figure 6-11. We previously configured the certificate exchange with the client server. This process will now add the server and its RAID controller as a new device, so that encryption key exchanges can be made. Figure 6-11 Device waiting acceptance Chapter 6. Manage your System x Server SED deployment 169 8247ch Maintain and Manage.fm Draft Document for Review January 30, 2015 6:10 pm 2. Select the new device based on the time stamp, device group, and machine information, and select Accept as shown in Figure 6-12. Figure 6-12 Accept device screen 3. In the Accept Device Request dialog, we recommend you select Modify and Accept, shown in Figure 6-13, to provide a description of your device. Notice the message that warns you to perform a backup after this procedure. Figure 6-13 Modify and accept device 170 Centrally Managing Access to SEDs in System x Servers Using IBM SKLM Draft Document for Review January 30, 2015 6:10 pm 8247ch Maintain and Manage.fm 4. Provide some short information about your server in the Device text field, and a more comprehensive Device Description, then select Add Device as shown in Figure 6-14. Figure 6-14 Describe and accept Chapter 6. Manage your System x Server SED deployment 171 8247ch Maintain and Manage.fm Draft Document for Review January 30, 2015 6:10 pm 5. You have now added the new device in SKLM where it is ready to exchange encryption keys. The Current Key field is not initially populated as it is shown in Figure 6-15. The server must be rebooted, and during the next boot phase it contacts the SKLM server for a key encryption key, and populate the field. The text in the Current Key field is not the actual encryption key, it is just a display name for it. You also notice that the display name rotates, or changes with each reboot of the server. Figure 6-15 Device added and key generated 6.2 SKLM backup and restore In this section we cover the backup and restore tasks for SKLM key manager server data using the SKLM web interface. It is very important to back up the SKLM server immediately after any changes or additions, especially if redundant SKLM servers are not configured. 6.2.1 SKLM data backup The following steps demonstrate how to create a backup of your SKLM server. Backup files are created locally on the SKLM server, although backups can be initiated with a web session from a remote system. We have created a local directory, C:\sklm_backups, for storing our proof of concept backup files. Backups should not remain solely on the loacl SKLM server. The password for the backup 172 Centrally Managing Access to SEDs in System x Servers Using IBM SKLM Draft Document for Review January 30, 2015 6:10 pm 8247ch Maintain and Manage.fm should be recorded, and the backup data should be copied to a separate system. If possible, copy the backup to a separate physical datacenter to eliminate the risk that all backups are destroyed if the SKLM server failed and the datacenter was lost. 1. Log into the SKLM web interface at the following URL https://<SKLM server address>:9080/ibm/SKLM/login.jsp where <SKLM server address> is the IP address or hostname of the SKLM server. 2. Navigate to the Backup and Restore tab, then select Create Backup as shown in Figure 6-16. Figure 6-16 Create backup Chapter 6. Manage your System x Server SED deployment 173 8247ch Maintain and Manage.fm Draft Document for Review January 30, 2015 6:10 pm 3. Enter a backup location, create and confirm a password for the backup, and provide a description for your backup. As soon as the backup is created successfully, be sure to record the password for that backup file. The password is required to restore the data, and cannot be recovered at a later time. Select Create Backup to start the backup process, shown in Figure 6-17. Figure 6-17 Backup location and password 4. Confirm your backup settings by selecting OK in the next dialog. 174 Centrally Managing Access to SEDs in System x Servers Using IBM SKLM Draft Document for Review January 30, 2015 6:10 pm 8247ch Maintain and Manage.fm 5. The following popup, shown in Figure 6-18, depicts that a backup has been successfully created. Figure 6-18 Backup created Chapter 6. Manage your System x Server SED deployment 175 8247ch Maintain and Manage.fm Draft Document for Review January 30, 2015 6:10 pm 6. Select Return home as shown in Figure 6-19 for a quick way to reference your backup(s). Figure 6-19 Return home 176 Centrally Managing Access to SEDs in System x Servers Using IBM SKLM Draft Document for Review January 30, 2015 6:10 pm 8247ch Maintain and Manage.fm 7. In the Action Items area on the home page (Figure 6-20), you can see when the last backup has been performed, and a link to get to the backup and restore page. Figure 6-20 Action Items dashboard 8. Ensure that your backup file has been created as expected by checking the location you saved it to. In our case, the backup file is named sklm_v2.5.0.2_20140814165327-0400_backup.jar, and it is approximately 15 MB in size. This, however, is a very small set up. Each managed client server can grow the database by up to a few MB, so account for much larger backups depending on your environment. 9. At this point you should record the password for your backup file and copy it to a secondary storage location for safety. 6.2.2 Restore SKLM data to existing install At some point you may need to roll back SKLM to an earlier backup, or try to recover data to a new SKLM install if an SKLM server fails. The following steps show you how to do this using the SKLM web interface. 1. Log into the SKLM web interface and navigate to the Backup and Restore tab. Select Browse. In this example, we actually restore backup data to a new installation of SKLM, which is intended for a secondary SKLM instance. The backup must be copied to the local SKLM file system to restore it, so we have copied it into a directory named C:\sklm_backups. The backup process, Chapter 6. Manage your System x Server SED deployment 177 8247ch Maintain and Manage.fm Draft Document for Review January 30, 2015 6:10 pm however, can be executed from a remote system with access to the SKLM web interface. In the Browse Directory dialog, select the local drive containing your backup from the drop-down. Then select the directory containing your backup(s) and click Select, as shown in Figure 6-21 on page 178. Figure 6-21 Browse directory 2. In the next dialog select Display Backups, as shown in Figure 6-22, to import the backup(s) in that directory to the web interface. Figure 6-22 Display backups 178 Centrally Managing Access to SEDs in System x Servers Using IBM SKLM Draft Document for Review January 30, 2015 6:10 pm 8247ch Maintain and Manage.fm 3. Select the backup you wish to restore and click Restore From Backup, as shown in Figure 6-23. Figure 6-23 Restore selected backup 4. Confirm your backup file and enter the associated password from when you created the backup. Then select Restore Backup, as shown in Figure 6-24, to bring up the final confirmation. Figure 6-24 Restore backup with password Chapter 6. Manage your System x Server SED deployment 179 8247ch Maintain and Manage.fm Draft Document for Review January 30, 2015 6:10 pm 5. Notice in the next dialog that the SKLM server will restart automatically after a restore due to the default SKLM properties. Keep in mind that your SKLM cannot be accessed during the restart; so a restore should not be executed if any servers are going to be rebooting and trying to contact SKLM for encryption keys at this time. When you are ready for the restore process and reboot, select OK, as shown in Figure 6-25. Figure 6-25 Confirm restore 6. During the restore process, a pop up with a progress indicator appears, and a progress bar appears on the Backup and Restore tab temporarily. Our very small back up took less than two minutes to restore. 7. After the restore process is successful, the SKLM web services, and related processes restart, but not your physical or virtual server. We recommend you wait three minutes for the restart to be safe, then log out of the SKLM interface if your session has not already timed out. Log back in and verify that your data has been restored. 180 Centrally Managing Access to SEDs in System x Servers Using IBM SKLM Draft Document for Review January 30, 2015 6:10 pm 8247ch Maintain and Manage.fm 6.3 Conclusion In this chapter we described how to add new System x server encryption devices and allow them access to SKLM to retrieve key encryption keys. We also highlighted the importance of creating SKLM backups, and outlined how to perform backup and restore processes. This represents only a portion of the configuration and education needed to implement a production SKLM environment. Several other concepts, such as SKLM server replication, user and group access control, and key expiration, should be reviewed and implemented for a robust SKLM environment. For more detail on configuration and administration of SKLM 2.5 refer to the product documentation on the IBM Knowledge Center at the following link: http://www.ibm.com/support/knowledgecenter/SSWPVP_2.5.0/com.ibm.sklm.do c_2.5/welcome.htm?lang=en Chapter 6. Manage your System x Server SED deployment 181 8247ch Maintain and Manage.fm 182 Draft Document for Review January 30, 2015 6:10 pm Centrally Managing Access to SEDs in System x Servers Using IBM SKLM Draft Document for Review January 30, 2015 6:10 pm 8247p03.fm Part 3 Part 3 Appendixes © Copyright IBM Corp. 2014. All rights reserved. 183 8247p03.fm 184 Draft Document for Review January 30, 2015 6:10 pm Centrally Managing Access to SEDs in System x Servers Using IBM SKLM Draft Document for Review January 30, 2015 6:10 pm 8247ax Local key management A Appendix A. Local key management alternatives In this appendix we detail the steps required to create virtual drives using encryption keys local to the RAID adapter to which the Self Encrypting Drives (SEDs) are attached. The intention of this simplified guide is to act as a primer for organizations looking to deploy in a local key management mode with the intention of switching to external or centralized management at a later date. It is important to note that localized key management does not require the purchase of any Feature on Demand keys to function. The controller does require having at least a cache or flash module installed to activate SED drive support. Two methods are covered in this section. The first method uses the UEFI based management interface to set up RAID security on a new system before the Operating System is installed. The second method uses the graphical management tool within the Operating System. Using the UEFI based management utilities for new installs Using the graphical MegaRAID Storage Manager © Copyright IBM Corp. 2014. All rights reserved. 185 8247ax Local key management alternatives.fm Draft Document for Review January 30, 2015 6:10 Using the UEFI based management utilities for new installs This section details the use of the text based management tools integrated into the UEFI of the System x server. Keeping your data safe: Activating this option does not destroy any data currently located on any configured virtual drives. Once a virtual drive is set to protected mode, however, disabling this option will result in the loss of access to the data and it will have to be restored from a backup source. Accessing the UEFI storage management tool Use the following procedure to access the UEFI based storage management tools 1. Power on or reboot the server using any preferred method. When you see the screen shown in Figure A-1 select F1 to boot the server to the UEFI setup menu. Figure A-1 Initial UEFI welcome screen 186 Centrally Managing Access to SEDs in System x Servers Using IBM SKLM Draft Document for Review January 30, 2015 6:10 pm 8247ax Local key management 2. At the main UEFI configuration screen select System Settings as shown in Figure A-2. Figure A-2 Main selection screen Appendix A. Local key management alternatives 187 8247ax Local key management alternatives.fm Draft Document for Review January 30, 2015 6:10 3. On the resulting screen titled System Settings select Storage to open the storage configuration panel as shown in Figure A-3. Figure A-3 Selecting Storage option 188 Centrally Managing Access to SEDs in System x Servers Using IBM SKLM Draft Document for Review January 30, 2015 6:10 pm 8247ax Local key management 4. Select the RAID controller you wish to configure for drive security. If there are multiple adapters installed in the server you need to configure each of the controllers that will be managing SED drives. On this screen select the RAID controller to be configured as shown in Figure A-4. Figure A-4 RAID adapter selection Appendix A. Local key management alternatives 189 8247ax Local key management alternatives.fm Draft Document for Review January 30, 2015 6:10 5. In the RAID Controller Management panel select Advanced ... as shown in Figure A-5. Figure A-5 Advanced management At this point, you need to complete the steps in the following sections which match the required implementation scenario. Enabling controller based security (Scenario 2) The following steps guide you through the configuration of the RAID adapter as detailed in 1.3.2, “Scenario 2 encrypted – unattended mode” on page 15. 190 Centrally Managing Access to SEDs in System x Servers Using IBM SKLM Draft Document for Review January 30, 2015 6:10 pm 8247ax Local key management 1. In the Advanced Management interface on the controller, select Enable Drive Security to navigate to the security settings panel as shown in Figure A-6. Figure A-6 Enable drive security 2. In the Choose Drive Security Mode dialog, ensure that Local Key Management is selected. Then select OK as shown in Figure A-7. Figure A-7 Choose Drive Security Mode Appendix A. Local key management alternatives 191 8247ax Local key management alternatives.fm Draft Document for Review January 30, 2015 6:10 3. In the Enable Drive Security configuration dialog there are a number of options that can be configured. Figure A-8 shows the list of options available. Figure A-8 UEFI – Enable Drive Security The following is a list of the available fields and their uses: Security Key identifier This is a simple text description for the key configuration on the adapter. Suggest Security Key This action, when pressed, will create a random security key for the adapter. Use this for the best security if a specific key is not required. Security Key This field is populated either by a random string generated by the Suggest Security Key action or can be created by the user if a specific value is preferred. Confirm This field has to be exactly the same as the Security Key field for verification. Pause for Password at Boot Time This must be unselected for Scenario 2 – Unattended Boot. Enforce Strong Password Security This option enforces strong password rules on the boot time password field 192 Centrally Managing Access to SEDs in System x Servers Using IBM SKLM Draft Document for Review January 30, 2015 6:10 pm Password 8247ax Local key management This field contains the boot-time passphrase if the Pause for password at boot time is selected. For Scenario 2 deployments, this field should remain blank. To configure the adapter for Scenario 2, ensure that a valid security key is entered and identically entered in the Confirm field. Next, ensure Pause for Password at Boot Time is not selected. 4. Ensure that the created security key is documented, then select I recorded the Security Settings for Future Reference, and then select Enable Drive Security. 5. Next you see a warning dialog to confirm that drive security is to be enabled. This is shown in Figure A-9. Figure A-9 UEFI - Warning 6. Select Confirm and then select Yes. 7. When you return to the Advanced Controller Management dialog, select Apply Changes at the bottom of the list. Enabling boot-time passphrase (Scenario 3) To set a RAID controller to conform to Scenario 3, described in 1.3.3, “Scenario 3 encrypted – attended mode” on page 17, perform the steps detailed in “Enabling controller based security (Scenario 2)” on page 190, then perform the following additional steps. Appendix A. Local key management alternatives 193 8247ax Local key management alternatives.fm Draft Document for Review January 30, 2015 6:10 1. Select Change Security Key as shown in Figure A-10. Figure A-10 UEFI – Change Security Key 2. Ensure that Change Current Security Settings is selected then select OK as shown in Figure A-11. Figure A-11 Change Current Security Settings 194 Centrally Managing Access to SEDs in System x Servers Using IBM SKLM Draft Document for Review January 30, 2015 6:10 pm 8247ax Local key management 3. Select Pause for Password at Boot Time in the Change Security Key dialog, then select Password and enter the boot time passphrase that must be supplied when the server boots. Next select I Recorded the Security Settings for Future Reference option to confirm that the documentation for the system has been updated. Finally, select Change Security Key at the bottom of the list to commit the changes, as shown in Figure A-12. Figure A-12 UEFI 0 Change Security Key Modifying the security key The security key can be changed on a controller at any time without data loss to existing secured virtual drives. To modify the security key of an existing configuration, perform the following steps. Appendix A. Local key management alternatives 195 8247ax Local key management alternatives.fm Draft Document for Review January 30, 2015 6:10 1. Navigate to the Advanced Controller Management screen and select Change Security Key, shown in Figure A-13. Figure A-13 UEFI - Change Security Key 2. Select Change Current Security Settings then select OK as shown in Figure A-14. Figure A-14 UEFI – Change Current Security Settings 196 Centrally Managing Access to SEDs in System x Servers Using IBM SKLM Draft Document for Review January 30, 2015 6:10 pm 8247ax Local key management 3. Create a new key by either selecting Suggest Security Key to generate a new random key or by entering a key manually in the Enter a New Security Key field, as shown in Figure A-15. Figure A-15 UEFI – Enter New Security Key 4. Ensure the security key documentation for the server has been updated, then select I Recorded the Security Settings for Future Reference and select Change Security Key to confirm the changes. Creating and securing a virtual drive Before attempting to secure a virtual drive, ensure that the steps to configure the controller Drive Security settings have been completed. To create a virtual drive and secure it with the controller security key, use the following procedure. Appendix A. Local key management alternatives 197 8247ax Local key management alternatives.fm Draft Document for Review January 30, 2015 6:10 1. Navigate to the RAID controller Main Menu and select Configuration Management as shown in Figure A-16. Figure A-16 UEFI – Controller Main Menu 2. In the Configuration Management dialog select Create Virtual Drive as shown in Figure A-17. Figure A-17 UEFI – Create Virtual Drive 3. Select the RAID type (RAID 0,1,5) and press enter. 198 Centrally Managing Access to SEDs in System x Servers Using IBM SKLM Draft Document for Review January 30, 2015 6:10 pm 8247ax Local key management 4. In the following Drive Selection Criteria option doalog ensure that SED drives are selected (if there are mixed drive types in the system) as shown in Figure A-18. Figure A-18 UEFI – Drive Selection Criteria 5. From the Main Menu for the RAID controller select Virtual Drive Management as shown in Figure A-19. Figure A-19 UEFI – Virtual Drive Management 6. If there are multiple virtual drives configured on the controller, select the drive that you want to secure and select Enter. Appendix A. Local key management alternatives 199 8247ax Local key management alternatives.fm Draft Document for Review January 30, 2015 6:10 7. From the Virtual Drive configuration menu select <Select Operation>, then choose Secure Virtual Drive as shown in Figure A-20. Figure A-20 UEFI – Secure Virtual Drive 8. In the Configure Virtual Drive properties dialog select GO as shown in Figure A-21. Figure A-21 UEFI – Apply Secure Virtual Drive 200 Centrally Managing Access to SEDs in System x Servers Using IBM SKLM Draft Document for Review January 30, 2015 6:10 pm 8247ax Local key management 9. Read and understand the warning that is presented, indicating that a Virtual Drive cannot be unsecured without the data on the array being lost. Select Confirm to continue, then select Yes as shown in Figure A-22. Figure A-22 UEFI – Secure Warning Enabling security on an existing virtual drive To secure a previously existing virtual drive, follow steps 5 on page 199 through 9 on page 201. Configuring a Security Key on a replacement RAID adapter In the event of a controller replacement due to a failure or problem determination procedure, it is critical that the security key, which was documented when Drive Security was activated, is entered on the new adapter to enable access to secured virtual drives. To set the previous security key on the new adapter, follow the steps for “Enabling controller based security (Scenario 2)” on page 190. When performing these steps, ensure that when the Drive Security Key is entered, the key used on the previous adapter is entered instead of generating a new key. Once these steps are completed, then use standard procedures to import the existing virtual drive group configurations, which will be listed as Secure Foreign Volumes. Appendix A. Local key management alternatives 201 8247ax Local key management alternatives.fm Draft Document for Review January 30, 2015 6:10 Using the graphical MegaRAID Storage Manager In this section we describe the use of the graphical MegaRAID Storage Manager (MSM). We assume that you are familiar with the installation and basic usage of the MSM tool to connect to an installed RAID controller. The scenario references for this section are described in detail in 1.3.2, “Scenario 2 encrypted – unattended mode” on page 15 and 1.3.3, “Scenario 3 encrypted – attended mode” on page 17. Enabling drive security on an installed RAID controller (Scenario 2) Activating this option does not destroy any data currently located on any of the configured virtual drives. Once a virtual drive is set to protected mode, disabling this option will result in the loss of access to the data and it will have to be restored from a backup source. Begin the setup process by launching the MSM utility and providing credentials to access the target system or local system as required. In a system with the RAID controller drive security set to disabled, the key icon next to the RAID adapter in the Physical tab will be grey in color, as shown in Figure A-23. Figure A-23 Controller Security Disabled 202 Centrally Managing Access to SEDs in System x Servers Using IBM SKLM Draft Document for Review January 30, 2015 6:10 pm 8247ax Local key management 1. Right-click the RAID controller in the MSM utility to display the configuration options panel as shown in Figure A-24. Figure A-24 RAID Adapter Options Appendix A. Local key management alternatives 203 8247ax Local key management alternatives.fm Draft Document for Review January 30, 2015 6:10 2. From the RAID adapter options, select Enable Drive Security, which invokes the following configuration panel shown in Figure A-25. In this configuration panel you create the security key for the controller. Figure A-25 Security Key Details Within the Security Key Details configuration panel, there are a number of options that can be configured. They are used as follows: 204 Security key identifier This is a simple text description for the key configuration on the adapter. Suggest Security Key This button, when pressed, will create a random security key for the adapter. Use this for the strongest security if a specific key is not required. Security key This field is populated either by a random string generated by the Suggest Security Key button or Centrally Managing Access to SEDs in System x Servers Using IBM SKLM Draft Document for Review January 30, 2015 6:10 pm 8247ax Local key management it can be filled by the user if a specific value is preferred. Confirm This field has to be exactly the same as the Security key field for verification. Pause for password at boot time This must be unselected for Scenario 2 – Unattended Boot. Enforce strong password security This option enforces strong password rules on the boot time password field. Password This field contains the boot-time passphrase if the Pause for password at boot time is selected. For Scenario 2 deployments, this field should remain blank. 3. In the Enable Drive Security configuration panel, generate a new controller key by either selecting Suggest Security Key or entering a Custom Security Key that meets the strong password rules documented in the configuration panel. 4. Confirm the security key to be used in the Confirm dialog box. 5. Document the key that is to be used in some manner, because this key is required to recover from a failed controller replacement. Failure to be able to provide this key will render any data on the secured virtual drives inaccessible. Ensure that the Pause for password at boot time does not have a checkmark. Appendix A. Local key management alternatives 205 8247ax Local key management alternatives.fm Draft Document for Review January 30, 2015 6:10 6. Scroll down in the Enable Drive Security dialog to expose the I recorded the security settings for future reference checkbox, as shown in Figure A-26. Figure A-26 Documentation Verification 7. Ensure that any documentation regarding the security key in use is updated and stored for recovery purposes. 8. Select Yes to finalize the procedure. 206 Centrally Managing Access to SEDs in System x Servers Using IBM SKLM Draft Document for Review January 30, 2015 6:10 pm 8247ax Local key management Once these steps have been completed, you return to the main configuration screen in MSM and a gold colored key is present beside the controller to indicate that security is enabled on that controller. Figure A-27 shows a controller with security enabled. Figure A-27 Controller Security Enabled Enabling boot-time passphrase (Scenario 3) If the installation requires the configuration of a boot time password, then the following steps need to be performed. 1. Complete all steps in “Enabling drive security on an installed RAID controller (Scenario 2)” on page 202 to enable drive security on an installed RAID adapter. Appendix A. Local key management alternatives 207 8247ax Local key management alternatives.fm Draft Document for Review January 30, 2015 6:10 2. Right-click the RAID controller in the MSM utility and select Change Security Settings as shown in Figure A-28. Figure A-28 RAID Controller Options 3. In the Change Security Key Details dialog, select the Pause for password at boot time checkbox as shown in Figure A-29. Figure A-29 Attended Mode Setup 4. In the Password field, enter the password that must be entered during the boot process to allow the system to boot and access the encrypted drives. This passphrase is not used to encrypt the drives, it is a passphrase that once 208 Centrally Managing Access to SEDs in System x Servers Using IBM SKLM Draft Document for Review January 30, 2015 6:10 pm 8247ax Local key management entered, allows the controller to then use the encryption key configured earlier to gain access to the encrypted drives. This passphrase is required every time the server is rebooted while the Pause for password at boot time option is selected. Selecting this option will not cause data loss to existing data stored on the drives. Select OK to complete the configuration process. Modifying an existing controller security key When Drive Security is enabled on a RAID controller, the security key can be modified at any time without any loss of data stored on the virtual drives. To modify the security key of an existing configuration, use the following steps. 5. Right-click the RAID controller in the MSM utility and select Change Security Settings as shown in Figure A-30. Figure A-30 RAID Adapter Options Appendix A. Local key management alternatives 209 8247ax Local key management alternatives.fm Draft Document for Review January 30, 2015 6:10 6. In the Change Drive Security configuration panel, select Enter a new security key identifier as shown in Figure A-31. Figure A-31 Enter new security key 7. Scroll down in the Enable Drive Security window to expose and select the I recorded the security settings for future reference checkbox as shown in Figure A-32. Figure A-32 Documentation Verification 8. Ensure that any documentation regarding the key in use on the server is updated to reflect the change in the security key. 9. Select Yes to close the dialog box and apply the changes. Creating a secured virtual drive To create a virtual drive that is automatically secured at the time of creation, follow these steps. 1. Enable drive security using either the UEFI or MSM method. 210 Centrally Managing Access to SEDs in System x Servers Using IBM SKLM Draft Document for Review January 30, 2015 6:10 pm 8247ax Local key management 2. From the Dashboard tab of the MSM utility, select Create virtual drive. This will launch the virtual drive configuration wizard as shown in Figure A-33. Figure A-33 Virtual Drive Creation Mode 3. For the purposes of this example select Simple, then select Next. Appendix A. Local key management alternatives 211 8247ax Local key management alternatives.fm Draft Document for Review January 30, 2015 6:10 4. Select Use unconfigured drives as shown in Figure A-34, then select Next. Figure A-34 Allocate Capacity 5. Choose the appropriate RAID level, select the Use drive security checkbox, and then select Next. In this example a simple RAID 1 virtual drive with 4 300 GB SED drives was created. 212 Centrally Managing Access to SEDs in System x Servers Using IBM SKLM Draft Document for Review January 30, 2015 6:10 pm 8247ax Local key management The completed dialog box is shown in Figure A-35. Figure A-35 Virtual Drive Settings 6. Once presented with the Create Virtual Drive Summary dialog, select Finish. The result of these steps will be the creation of a virtual drive that can be viewed in the Logical tab of the MSM utility. The drives that are selected as elements of the array will be present under the virtual drive with gold colored padlocks in the closed position next to them to indicate they are in secured mode as shown in Figure A-36. Figure A-36 Secured Virtual Drive Appendix A. Local key management alternatives 213 8247ax Local key management alternatives.fm Draft Document for Review January 30, 2015 6:10 Additionally, when you select the secured virtual drive in the properties window of the MSM you can see an indication that the drives are secured, shown in Figure A-37. Figure A-37 Secured Drive Properties Securing an existing virtual drive The following procedure is used to activate virtual drive encryption on an array that is already created. This existing virtual drive may have been created using any standard method of virtual drive management as documented in the MegaRAID user guide. Securing a virtual drive: Securing a Virtual Drive must be done at the Drive Group level. Securing a Virtual Drive in a Drive Group with multiple Virtual Drives configured is not supported. It is supported to have a mix of SED and non-SED Drive Groups on a single controller. Additionally, it is supported to have some SED Drive Groups secured while others are not secured on the same RAID controller. 214 Centrally Managing Access to SEDs in System x Servers Using IBM SKLM Draft Document for Review January 30, 2015 6:10 pm 8247ax Local key management 1. Verify that the drives in the target virtual drive are able to support drive encryption. This can be accomplished by validating the part numbers of the drives, or in the MSM utility. SED drives will appear with a gold colored padlock beside the disk as shown in Figure A-38. Figure A-38 Unsecured SED Drives Additionally, encryption capability can be validated by selecting the drives in the Virtual Drive and verifying their capability in the Drive Properties section of the MSM utility. An example of an SED drive that is unsecured is shown in Figure A-39. Figure A-39 SED Drive Properties 2. Right-click the Drive Group containing the Virtual Drive that is to be secured to present the options available. In this example, an unsecured 4 drive RAID 1 Virtual Drive was created. Figure A-40 shows the options that are available to the drive group. Figure A-40 Secure using FDE 3. Select Secure using FDE. FDE refers to Full Disk Encryption, which is the method used to enable the drive security on the Drive Group. Appendix A. Local key management alternatives 215 8247ax Local key management alternatives.fm Draft Document for Review January 30, 2015 6:10 4. Select the Confirm checkbox and then select OK, shown in Figure A-41, after taking note of the warning that you cannot remove drive security without a loss of data once committed. Figure A-41 Confirm Secure Drive Group 5. Verify that the Drive Group has been secured. This can be done by visually inspecting the status of the padlock icons next to the drives in the MSM utility as shown in Figure A-42. Figure A-42 Secured Virtual Drive 216 Centrally Managing Access to SEDs in System x Servers Using IBM SKLM Draft Document for Review January 30, 2015 6:10 pm 8247ax Local key management Additionally, the Virtual Drive properties will be updated to reflect that the drive has been secured. This is shown in Figure A-43. Figure A-43 Secured Drive Properties Disabling security on a controller Disabling drive security on a controller with secured virtual drives will result in the loss of data. Unsecuring a Virtual Drive: There is no method to unsecure a single Virtual Drive. If you need to remove encryption from a single Virtual Drive and preserve data on other Virtual Drives, do not disable controller security. The method to remove encryption from a single Virtual Drive is to delete that Drive Group. This will remove the data from that Virtual Drive and return the drives to an unsecured state and ready for configuration into a new Virtual Drive. 1. All secured Drive Groups configured on the controller must be deleted. This is done using standard procedures for deleting Virtual Drives as documented in the appropriate MegaRAID Controller Users Guide. Appendix A. Local key management alternatives 217 8247ax Local key management alternatives.fm Draft Document for Review January 30, 2015 6:10 2. Right-click the target controller in the MSM utility to present the controller options as shown in Figure A-44. Figure A-44 Disable Drive Security 218 Centrally Managing Access to SEDs in System x Servers Using IBM SKLM Draft Document for Review January 30, 2015 6:10 pm 8247ax Local key management 3. Select Disable Drive Security. This present the following warning shown in Figure A-45. Figure A-45 Confirm Disable Drive Security 4. Once you read the warning, select Yes. At this time the gold key next to the controller in the MSM utility will change from a gold color to a grey color indicating that the controller does not have Drive Security enabled. Replacing a controller with existing secured virtual drives If a RAID controller configured with secured Virtual Drives is replaced due to failure, the RAID controller must be configured with the same security key that was used to initially secure the drives. Failure to do so will render the drives inaccessible. Boot drive implications: If the boot drives for the operating system were attached to the replaced controller and were secured, then the MSM will be unavailable to configure the security key. The security key must be configured using the UEFI to be able to gain access to the boot drives. To set the security key on a controller, follow the steps outlined in “Enabling drive security on an installed RAID controller (Scenario 2)” on page 202. Ensure that the key configured in this process is identical to the key used when the drives were initially secured. Appendix A. Local key management alternatives 219 8247ax Local key management alternatives.fm Draft Document for Review January 30, 2015 6:10 Summary In this appendix we detailed the steps required to configure an installed M51xx or M5200 xx RAID controller in a System x server for use in local security key managed environments, which were documented as Scenario 2 and 3 in Chapter 1, “Technology primer” on page 3. For a more complete guide to managing the M series RAID adapters from System x, please refer to the Installation and User Guides for the respective adapters. 220 Centrally Managing Access to SEDs in System x Servers Using IBM SKLM Draft Document for Review January 30, 2015 6:10 pm 8247ax Troubleshooting.fm B Appendix B. Troubleshooting In this appendix we provide troubleshooting hints and tips. It is not a complete list of all possible errors and outcomes but does provide issues and resolutions that we encountered during testing for this publication. We cover the following topics: IBM SKLM installation, update, and login issues IMM configuration Unified Extensible Firmware Interface issues © Copyright IBM Corp. 2014. All rights reserved. 221 8247ax Troubleshooting.fm Draft Document for Review January 30, 2015 6:10 pm IBM SKLM installation, update, and login issues This section is intended to aid you with some errors, warnings, and issues you may run into while setting up your IBM Security Key Lifecycle Manager (SKLM) environment. The following sections reflect messages that you may receive when running into issues. Error message: Problems were found with the packages and fixes in package group IBM WebSphere Application Server V8.5 SKLM web interface fails to load with JSP Processing Error Unable to install Installation Manager on RHEL 6.0/6.1 (64-bit) Error message: Problems were found with the packages and fixes in package group IBM WebSphere Application Server V8.5 The update process during the SKLM installation displays all fixes available, and some of these may not be applicable to your installation. If you proceed with all packages, or some non-applicable packages selected, an error can occur, as depicted in Figure B-1 on page 223. Change your package selections to apply to the WebSphere Application Server version you wish to install, and the architecture of your operating system, WinX32 only for 32-bit Windows and WinX64 only for 64-bit operating systems. 222 Centrally Managing Access to SEDs in System x Servers Using IBM SKLM Draft Document for Review January 30, 2015 6:10 pm 8247ax Troubleshooting.fm Figure B-1 Package install error Appendix B. Troubleshooting 223 8247ax Troubleshooting.fm Draft Document for Review January 30, 2015 6:10 pm SKLM web interface fails to load with JSP Processing Error This error occurs when incorrect case is used in the SKLM URL. A common problem is using the link https://[SKLM IP address]:9080/ibm/sklm/login.jsp instead of https://[SKLM IP address]:9080/ibm/SKLM/login.jsp, as shown in Figure B-2. Figure B-2 URL case sensitivity Unable to install Installation Manager on RHEL 6.0/6.1 (64-bit) You may run into an issue where IBM Installation Manager cannot be installed or started on a 64-bit Linux machine. This is because Installation Manager is a 32-bit application. Use the following link to help you install the necessary 32-bit libraries on your RHEL system. https://www.ibm.com/support/docview.wss?uid=swg21459143 224 Centrally Managing Access to SEDs in System x Servers Using IBM SKLM Draft Document for Review January 30, 2015 6:10 pm 8247ax Troubleshooting.fm IMM configuration This section of the document highlights the following issues that can be encountered when configuring the Integrated Management Module (IMM) for external SED key management. Security certificate not trusted error Test Connection non-responsive IMM certificate upload error Error adding key management server Security certificate not trusted error When you connect to the IMM controller on a System x server using an https browser connection without using a properly signed certificate you will receive a security certificate not trusted error similar to the one displayed in Figure B-3. The exact format of the error can vary based on the browser in use. Figure B-3 Security certificate not trusted This is the result of using a self-signed certificate for the HTTPS communications. To resolve the problem, use a security certificate signed by a signing authority or select Proceed anyway to continue with the self-signed certificate. Appendix B. Troubleshooting 225 8247ax Troubleshooting.fm Draft Document for Review January 30, 2015 6:10 pm Test Connection non-responsive When you configure the external key management servers and attempt to test the connection, the resulting web page may appear to be non-responsive. This can be due to the radio button for the target server to be tested not being selected properly. This is shown in Figure B-4. Figure B-4 Test Connection To resolve this problem, select the appropriate radio button and select Test Connection. IMM certificate upload error You may receive the following Certificate upload error, shown in Figure B-5, during the import process of the key management server certificate to the IMM. Figure B-5 Certificate upload error 226 Centrally Managing Access to SEDs in System x Servers Using IBM SKLM 8247ax Troubleshooting.fm Draft Document for Review January 30, 2015 6:10 pm This is usually caused by the time and date being configured incorrectly on the IMM that you are trying to upload the certificate to. This can have a number of reasons: The server has not been correctly configured. The system board has been replaced and the server has not been re-configured correctly. The CMOS has been reset on the server and the server has not been re-configured correctly. The certificates have timestamps and finite lifespans associated to the file. If an IMM is at the default date of 2000, the certificate will be expired according to the IMM. The corrective action is to ensure that the time and date are set correctly on the IMM before continuing to configure the system. Refer to 4.2, “Configure the IMM using the web based interface” on page 110 for more information on how to correctly configure your servers. Error adding key management server During our proof of concept we encountered a scenario where the IMM would not accept the entries for the key management server and display a server addition error, shown in Figure B-6. Figure B-6 Server addition error The solution for this situation is to use the IMM command line utility to add the entries directly. This is achieved by logging into the command line telnet session to the IMM and using the following storekeycfg command: storekeycfg -sxip <host name/ip_addr> - server x host name/ip addr (x can be 1, 2, 3 or 4) An example of how to add a server with this command to position 1 of 4 would be as follows: storekeycfg –s1ip 1.2.3.4 Appendix B. Troubleshooting 227 8247ax Troubleshooting.fm Draft Document for Review January 30, 2015 6:10 pm To perform the same command except for position 2 of 4 the command would be as follows: storekeycfg –s2ip 1.2.3.4 Use the storekeycfg command with no additional parameters to retrieve a list of the currently configured servers, shown in Example B-1. Example B-1 List of currently configured servers storekey-server Trusted Certificate: Available. s1ip: 192.168.90.87 s1pn: 5696 s2ip: s2pn: 5696 s3ip: s3pn: 5696 s4ip: s4pn: 5696 Group device: IBM_SYSTEM_X_SED 228 Centrally Managing Access to SEDs in System x Servers Using IBM SKLM Draft Document for Review January 30, 2015 6:10 pm 8247ax Troubleshooting.fm Unified Extensible Firmware Interface issues This section describes issues that you may encounter when you configure the Unified Extensible Firmware Interface (UEFI) components of the solution. UEFI boot error During the early boot process, the server may experience the following communication error with the EKMS prompting the user for input, as shown in Figure B-7. Figure B-7 UEFI boot error This error message indicates that the server has been unable to communicate with the key management server. The main causes may be: The server certificate is still pending acceptance on the key management server. Fix: Accept the server connection from the key management server interface. Appendix B. Troubleshooting 229 8247ax Troubleshooting.fm Draft Document for Review January 30, 2015 6:10 pm The IMM network connection has been disconnected. Fix: Re-establish the network connection to the IMM adapter. The IMM network configuration is not configured properly. Fix: Ensure that the IMM network settings, including default gateway and DNS, if necessary, are configured correctly. If DHCP is in use, ensure that the IMM is able to communicate with the DHCP server. A RAID adapter with an existing configuration for external key management has been installed in a server not set up for remote key management. Fix: Ensure that the IMM and UEFI of the server are configured appropriately as detailed in Chapter 5, “UEFI configuration” on page 139 to allow the server to establish communications with a remote key management server. Conclusion In this troubleshooting guide we provided some basic tips for situations that you may encounter when you configure a System x server for remote key management. It is not intended as a general System x troubleshooting guide. 230 Centrally Managing Access to SEDs in System x Servers Using IBM SKLM Draft Document for Review January 30, 2015 6:10 pm 8247ax Licenses and software.fm C Appendix C. Licenses and software In this appendix we provide some details about the required products and features to successfully deploy centralized key management for System x servers with self-encrypting drives (SEDs) managed by IBM Security Key Lifecycle Manager (SKLM). SKLM for System x SEDs Feature on Demand IBM Security Key Lifecycle Manager Basic Edition © Copyright IBM Corp. 2014. All rights reserved. 231 8247ax Licenses and software.fm Draft Document for Review January 30, 2015 6:10 pm SKLM for System x SEDs Feature on Demand When you create a new environment or expand the capabilities of an existing one, you must verify that the selected server and RAID adapter are supported for the IBM SKLM for System x w/SEDs FoD option. The currently supported lists at time of publishing this document are included in Chapter 2, “Supported systems and sample configuration” on page 25. Please see the System x ServerProven website to insure you find the very latest compatibility information. The SKLM for System x SEDs - FoD is listed in ServerProven under System Management Upgrades, which is located at the following URL: http://www.ibm.com/systems/info/x86servers/serverproven/compat/us/xseri es/upgrades/smmatrix.html Please be aware that supported ServeRAID controllers require an upgrade to support the encryption functions of SEDs. The RAID upgrade options with SED support vary by controller and are listed in 2.1.2, “Supported RAID adapters” on page 27. Controllers without the upgrades still accept SED drives as regular devices, enabling them to be used as conventional drives. Purchase the SKLM for System x SEDs - FoD option The SKLM for System x SEDs – FoD option can be purchased for use with previously acquired servers or included on the order for a new server. The part numbers vary by geography and are shown in Table C-1. These part numbers are available with either one or three year subscriptions and support (there is no difference in functionality between the two parts). Table C-1 SKLM for System x SEDs – FoD options Description US & Canada and AP EMEA and LA Feature Code IBM SKLM for System x w/SEDs - FoD per Install w/1Yr S&S 00D9998 00FP648 A5U1 IBM SKLM for System x w/SEDs - FoD per Install w/3Yr S&S 00D9999 00FP649 AS6C The option is licensed on a per server basis. You need only purchase a quantity one of the listed part numbers for each server where you want to activate the FoD. 232 Centrally Managing Access to SEDs in System x Servers Using IBM SKLM Draft Document for Review January 30, 2015 6:10 pm 8247ax Licenses and software.fm The part numbers in Table C-1 on page 232 include authorization for the System x server to connect to the SKLM Basic Edition software product (described below) and receive key management services. No additional parts are required to deploy the solution. Activate the Feature on Demand If you purchase a new server and your configurator supports adding the SKLM for System x SEDs – FoD option to the server, the FoD will be activated as part of the server build process in manufacturing. If you purchase the SKLM for System x SEDs – FoD option separate from the server or your chosen configurator does not support adding the option to the server, you will receive a FoD authorization code and instructions for obtaining an FoD activation key to be applied at the IMM on your System x server. For additional detail on the Feature On Demand activation process, see the IBM Redpaper™ publication Using IBM Features on Demand, REDP-4895 at the following location: http://www.redbooks.ibm.com/abstracts/redp4895.html?Open IBM Security Key Lifecycle Manager Basic Edition IBM Security Key Lifecycle Manager Basic Edition (previously known as Tivoli® Key Lifecycle Manager) is the IBM key management software product that System x servers interact with to obtain the key (KEK) required to gain access to the SEDs. SKLM provides key management services to a wide range of endpoint devices beyond System x servers with SEDs. For more information on SKLM Basic Edition software and supported devices, please see the following web link: http://www.ibm.com/software/products/en/key-lifecycle-manager Purchase IBM Security Key Lifecycle Manager Basic Edition SKLM Basic Edition is available in the Passport Advantage® ordering system under the part numbers listed below. A single license allows for a primary and backup SKLM server to be deployed. An order page for that product can be found at: https://www.ibm.com/software/howtobuy/buyingtools/paexpress/Express?P0= E1&part_number=D0887LL&catalogLocale=en_US&Locale=en_US&country=USA&PT= jsp&CC=USA&VP=&TACTICS=&S_TACT=&S_CMP=&brand=none Appendix C. Licenses and software 233 8247ax Licenses and software.fm Draft Document for Review January 30, 2015 6:10 pm System x Servers with SEDs using SKLM for key management require a successful connection to the SKLM Basic Edition system in order to successfully boot and access the locally stored and encrypted data. Therefore, it is highly recommended that you implement redundant SKLM Basic Edition key managers. When you setup the SKLM for System x SEDs – FoD option on your servers you configure addresses for up to four SKLM Basic Edition key managers, one primary SKLM and up to three secondary systems. SKLM Basic Edition supports up to five secondary key managers, but the SKLM for System x SEDs – FoD option and Integrated Management Module (IMM) configuration only allow up to three. Table C-2 lists the part numbers required to purchase SKLM Basic Edition. Table C-2 SKLM Basic Edition part numbers Description Part number SKLM Basic Ed per Install LIC+SW S&S 12 Mo D0887LL SKLM Basic Ed per Install Annual SW S&S Rnwl E06JMLL SKLM Basic Ed per Install SW S&S Reinstate 12 Mo D0888LL You can obtain the downloadable installation images for IBM Security Key Lifecycle Manager from the IBM Passport Advantage website starting with the following link: http://www.ibm.com/software/lotus/passportadvantage/pao_customer.html In Passport Advantage you can download or request the following media packs, or eAssemblies, of your entitled software. Installation images for AIX systems http://www.ibm.com/support/knowledgecenter/api/content/SSWPVP_2.5.0/ com.ibm.sklm.doc_2.5/cpt/cpt_ic_download_aix.html Installation images for Solaris systems http://www.ibm.com/support/knowledgecenter/api/content/SSWPVP_2.5.0/ com.ibm.sklm.doc_2.5/cpt/cpt_ic_download_solaris.html Installation images for Windows systems http://www.ibm.com/support/knowledgecenter/api/content/SSWPVP_2.5.0/ com.ibm.sklm.doc_2.5/cpt/cpt_ic_download_windows.html In this book we performed the install based on the SKLM 2.5 installation images for Windows, which are contained in the eAssembly package filename CIRX2ML.tar. 234 Centrally Managing Access to SEDs in System x Servers Using IBM SKLM Draft Document for Review January 30, 2015 6:10 pm 8247bibl.fm Related publications The publications listed in this section are considered particularly suitable for a more detailed discussion of the topics covered in this book. IBM Redbooks The following IBM Redbooks publications provide additional information about the topic in this document. Note that some publications referenced in this list might be available in softcopy only. Self-Encrypting Drives for IBM System x, TIPS0761 Using IBM Features on Demand, REDP-4895 IBM Tivoli Key Lifecycle Manager for z/OS, REDP-4472 Using IBM Tivoli Key Lifecycle Manager: Business Benefits and Architecture Overview, REDP-4529 IBM DS8870 Disk Encryption, REDP-4500-04 Implementing the Storwize V7000 and the IBM System Storage SAN32B-E4 Encryption Switch, SG24-7977 IBM System Storage Data Encryption, SG24-7797 You can search for, view, download or order these documents and other Redbooks, Redpapers, Web Docs, draft and additional materials, at the following website: ibm.com/redbooks Online resources These websites are also relevant as further information sources: IBM Security Key Lifecycle Manager documentation on the IBM Knowledge Center: http://www.ibm.com/support/knowledgecenter/SSWPVP/welcome IBM Security Key Lifecycle Manager product page http://www.ibm.com/software/products/en/key-lifecycle-manager/ © Copyright IBM Corp. 2014. All rights reserved. 235 8247bibl.fm Draft Document for Review January 30, 2015 6:10 pm Help from IBM IBM Support and downloads ibm.com/support IBM Global Services ibm.com/services 236 Centrally Managing Access to SEDs in System x Servers Using IBM SKLM Draft Document for Review January 30, 2015 6:10 pm 237 (1.5” spine) 1.5”<-> 1.998” 789 <->1051 pages 8247spine.fm smooth which has a PPI of 526. Divided 250 by 526 which equals a spine width of .4752 . In this case, you would use the .5 spine. Now select the Spine width for the book and hide the others: Special>Conditional Text>Show/Hide>SpineSize(-->Hide:)>Set . Move the changed Conditional text settings to all files in your book by opening the book file with the spine.fm still open and File>Import>Formats the Conditional Text Settings (ONLY!) to the book files. Centrally Managing Access to SEDs in System x Servers Using IBM SKLM Centrally Managing Access to SEDs in System x Servers Using (1.0” spine) 0.875”<->1.498” 460 <-> 788 pages (0.5” spine) 0.475”<->0.875” 250 <-> 459 pages Centrally Managing Access to SEDs in System x Servers Using IBM SKLM Centrally Managing Access to SEDs in System x Servers Using IBM (0.2”spine) 0.17”<->0.473” 90<->249 pages Draft Document for Review January 30, 2015 6:10 pm 8247spine.fm 238 smooth which has a PPI of 526. Divided 250 by 526 which equals a spine width of .4752 . In this case, you would use the .5 spine. Now select the Spine width for the book and hide the others: Special>Conditional Text>Show/Hide>SpineSize(-->Hide:)>Set . Move the changed Conditional text settings to all files in your book by opening the book file with the spine.fm still open and File>Import>Formats the Conditional Text Settings (ONLY!) to the book files. Back cover ® Draft Document for Review January 30, 2015 6:11 pm Centrally Managing Access to Self-Encrypting Drives in System x Servers ® Using IBM Security Key Lifecycle Manager Understand self-encrypting drive technology and centralized key management systems Deploy IBM Security Key Lifecycle Manager and SED support in IBM System x Servers Manage and troubleshoot your SED based server Data security is one of the paramount requirements for organizations of all sizes. Although many companies invested heavily protection from network-based attacks and other threats, few effective safeguards are available to protect against potentially costly exposures of proprietary data that results from a hard drive being stolen, misplaced, retired, or redeployed. INTERNATIONAL TECHNICAL SUPPORT ORGANIZATION Self-encrypting drives (SEDs) can satisfy this need by providing the ultimate in security for data-at-rest and can help reduce IT drive retirement costs in the data center. Self-encrypting drives are also an excellent choice if you need to comply with government or industry regulations for data privacy and encryption. BUILDING TECHNICAL INFORMATION BASED ON PRACTICAL EXPERIENCE In order to effectively manage a large deployment of SEDs in IBM System x servers an organization has to rely on a centralized key management solution. This IBM Redbooks publication explains the technology behind SEDs and demonstrates how to deploy a key management solution using IBM Security Key Lifecycle Manager and properly setup your IBM System x servers. IBM Redbooks are developed by the IBM International Technical Support Organization. Experts from IBM, Customers and Partners from around the world create timely technical information based on realistic scenarios. Specific recommendations are provided to help you implement IT solutions more effectively in your environment. For more information: ibm.com/redbooks SG24-8247-00 ISBN


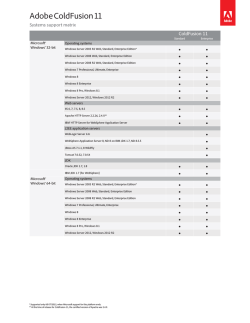


© Copyright 2026