
Advisor Getting Started PDF Guide
Getting Started: IB Advisor
January 2015
© 2015 Interactive Brokers LLC. All Rights Reserved
Any symbols displayed within these pages are for illustrative purposes only, and are not intended to portray any recommendation.
Contents
Contents
i
Getting Started as an Advisor
5
Must Consider:
5
May Want to Consider:
5
Log In to Account Management
7
Failed Login Attempts
8
Automatic Logoff
9
Secure Login System
11
Funding
13
Master Account Funding
14
Trading Account Funding
15
Direct Funding
16
Transferring Funds from the Master Account
18
Initial Funding for Client Accounts
20
Client Accounts
21
Client Applications
22
Fully Electronic Account Application
Adding IRA Trust Accounts
23
24
Semi-Electronic Account Application
25
Paper Account Application
26
Specify Client Fees
High Water Marking
27
29
Trading Permissions
30
Client Account Funds Status
31
Client Account Details
32
Getting Started: Professional Advisor
i
Contents
Additional Advisor Authorizations
34
Link Client Accounts
36
Starting to Trade
39
Subscribe to Market Data
40
Log in to TWS
41
Add Market Data
42
Define Allocation Groups and Methods
45
Account Groups
46
Create Allocation Profiles
48
Set Allocation Defaults
49
Trade and Allocate for ClientsFunds
51
Real-time Activity Monitoring
53
View Account Balances
56
Real-time Margin Monitoring
58
Monitor Margin Requirements
60
Try PM
60
Margin Warnings
60
View Available for Trading Values
62
View Market Value
64
View FX Portfolio Values
66
View Portfolio Values
68
The Right-Click Portfolio Menu
70
Statements and Reports
73
Activity Statements
74
Customized Activity Statements
76
Activity Downloads
Getting Started: Professional Advisor
77
ii
Contents
Trade Confirmations
78
Flex Queries
79
Margin Reports
80
Stress Test Report
81
Value at Risk Report
82
Advisor Fee Cap Report
83
Client Summary Report
84
P/L Markup Summary Report
85
PortfolioAnalyst
86
Statement Access for Clients
87
Opening a Paper Trading Account
89
Paper Trading Account Reset
91
Paper Trading Account Statements
92
Advisor White Branding
93
Enabling Additional Traders
95
Customer Activity Monitor
97
Using Money Managers
99
Money Manager Overview
Money Manager Marketplace
Adding Administrators
100
102
103
Administrator Overview
104
Administrator Marketplace
105
Managing Administrators
106
Investors' Marketplace
107
Advertise Your Services
108
Index
111
Getting Started: Professional Advisor
iii
1
Getting Started as an Advisor
This Getting Started guide provides an overview of the tasks you will want to complete as a new IB Advisor. This guide
is designed as a reference for new users and comprises a very small subset of the information and features available to
you through IB.
The guide assumes the following:
l
That the Master account has been approved and funded.
l
That you are the Advisor master.
l
That you opened a trading account for your own personal trading.
Must Consider:
l
Understand how to Log In to Account Management.
l
Activate your Secure Login System device.
l
Understand the process and timing of account funding, including:
l
l
o
Master Account Funding
o
Trading Account Funding
o
Initial Funding for Client Accounts
Client Accounts
o
Add Client Accounts by having your clients submit an application to IB.
o
Specify Client Fees
o
Set Trading Permissions
o
View Client Account Funds Status
Starting to trade
o
Subscribe to Market Data
o
Log in to TWS
o
Add Market Data Lines
o
Define Allocation Groups and Methods
o
Trade and Allocate for Clients
o
Use Real-time Activity Monitoring
May Want to Consider:
l
Using Money Managers
l
Statements and Reports
Getting Started: Professional Advisor
5
Chapter 1
l
l
Opening a Paper Trading Account
White Branding
l
Enabling Additional Traders
l
Additional Advisor Authorizations
l
Link Client Accounts
l
Adding Administrators
l
Customer Activity Monitor
l
Investors' Marketplace
Getting Started: Professional Advisor
6
2
Log In to Account Management
There are two ways to access Account Management:
l
Log in from the IB website.
l
Access the home page from the Trader Workstation.
To log in to Account Management from the IB website
1. From IB’s website, select Account Management from the Login dropdown list in the upper right corner.
2. Enter your IB Username and Password, and click Login. The Account Management home page opens.
To access Account Management from Trader Workstation
1. Log in to Trader Workstation.
2. From the Account menu, select Account Management Home. The Account Management home page opens.
For more information
l
Failed Login Attempts
l
Automatic Logoff
Getting Started: Professional Advisor
7
Chapter 2
Failed Login Attempts
Failed Login Attempts
After ten failed login attempts in 24 hours, your Account Management login will be disabled. If this happens, contact
Customer Service.
Getting Started: Professional Advisor
8
Chapter 2
Automatic Logoff
Automatic Logoff
If you are logged into Account Management and the system detects no activity for 30 minutes, your Account Management session will automatically expire and you will have to log back in. A message appears warning you that you
will automatically be logged out without further activity.
Once your session expires, another message appears informing you that your session has expired and you have been
logged out. You must re-login to start a new Account Management session.
Getting Started: Professional Advisor
9
3
Secure Login System
Once your account is approved and funded, IB will mail you a Secure Login Device at the address you specified in your
application. You will need to use this device anytime you log in to TWS or Account Management. This added level of
security helps to ensure that your IB account information remains secure. Please note that your device must be activated
before you can use it.
You have 14 days from the day we mail you your IB Security Device to activate the device in Account Management.
After 14 days, you are required to use the device to log into Account Management and Trader Workstation. If you
receive the device before 14 days, you can access Account Management and Trader Workstation without using the
device until you activate it or until 14 days have passed. Once you activate the device, you must use it to log into
Account Management and TWS.
To activate your Secure Login Device
1. Login to Account Management.
2. Click Manage Account > Security > Secure Login System.
3. Follow the instructions on the screen to activate your security device.
For more information
l
To learn more about our Secure Login System, including detailed instructions on how to use each type of security
device, see the Account Management Users’ Guide.
Getting Started: Professional Advisor
11
4
Funding
Your Advisor account structure contains multiple accounts at different levels, and can include multiple users who have
permissions to manage one or multiple accounts. The Master account is used to receive client fees, to receive and pay
commissions on allocated trades, and to pay market data and other fees.
This section includes the following topics:
l
Master Account Funding
l
Trading Account Funding
l
Initial Funding for Client Accounts
For more information
l
For complete information on account funding, see the Funding Reference on our website.
Getting Started: Professional Advisor
13
Chapter 4
Master Account Funding
While it is not mandatory to fund the master account, we recommend you do this because certain fees, including market
data fees, are withdrawn directly from the master account. Should your master account accrue a negative balance at any
time, market data will be terminated.
We suggest funding the master account with a minimum of $500.00, or the estimated amount of one year’s market data
fees.
To deposit funds into your IB account, log in to Account Management, then click Funding > Fund Transfers. For more
information on depositing funds, see the Depositing Funds topic in the Funding section of the Account Management
Users’ Guide.
For more information
l
For complete information on account funding, see the Funding Reference on our website.
Getting Started: Professional Advisor
14
Chapter 4
Trading Account Funding
Many Financial Advisors elect to open a 'trading account' during their master account application. There are two ways to
fund your trading account:
l
Fund the trading account directly (IB recommends this option).
l
Deposit funds into the master account, then transfer funds to the trading account.
For more information
l
For complete information on account funding, see the Funding Reference on our website.
Getting Started: Professional Advisor
15
Direct Funding
Chapter 4
Direct Funding
In order to fund your trading account, IB recommends funding the account directly through one of our available banking
methods, such as Wire, Check, etc.
To deposit funds directly into your trading account
1. Log in to your Master account via Account Management.
2. Click Funding > Fund Transfers.
3. Select your trading account in the Account Selector at the top of the page.
4. From the Transaction Type list, select Deposit.
5. Select your currency from the Currency list.
6. From the Method list, select a deposit type (Wire, Check, and so on).
7. Type the amount of your intended deposit in the Amount field. Note that you do not enter an amount when you
first set up an ACH Initiated At IB or Canadian EFT Initiated at IB deposit.
Select one of the following:
o
Yes - Use saved bank information for new transfer request
Select this option if you want to use previously saved bank information for this deposit request.
o
No - Create new transfer request with new bank information
Select this option if you want to save new bank information for this deposit request. This option is automatically selected if you do not have any saved any bank information.
o
No - Create new bank information only
Select this option if you only want to create new saved bank information without transferring any funds (for
example, if you are a non-US customer who is closing an account).
8. If you select either No option, complete all the fields that appear, which vary depending on the withdrawal
method you selected. The fields vary depending on your previous selections.
Be sure to enter a Name for the bank instruction that will be saved with your bank information. You will be able
to use this bank instruction for future deposit notifications without having to re-enter your bank information.
9. Verify that all deposit information is correct and make note of any special instructions that appear on the screen.
o
For example, for a wire deposit, you will have to instruct your bank to wire the funds to the institution shown
on the screen.
o
For a check deposit, you will have to mail your check with a copy of the confirmation screen to the address
shown on the screen.
Getting Started: Professional Advisor
16
Chapter 4
Direct Funding
10. Decide if you want to save the information as a recurring transaction.
If you would like to save this as a recurring transaction, click Yes, then complete all the fields and selections in
that section.
11. Click Continue to submit your deposit notification.
Or click Cancel to cancel the transaction.
Depending on the type of deposit notification you selected, a page appears with additional instructions that
describe what you need to provide to your bank to complete the actual deposit of funds.
For more information
l
For complete information on account funding, see the Funding Reference on our website.
Getting Started: Professional Advisor
17
Chapter 4
Transferring Funds from the Master Account
Transferring Funds from the Master Account
You can also use the Fund Transfers page in the Funding menu of Account Management to transfer cash from the Master
account to your personal trading account.
Note: Funds which are deposited to the master account are subject to our stated hold periods. This could
cause a delay in the processing of an internal transfer to your trading account. IB recommends funding the trading account directly
To transfer funds from the Master account to your trading account
1. Log in to your Master account via Account Management.
2. Click Funding > Fund Transfers.
3. Select the Master account in the Account Selector at the top of the page. The master account is identified with the
prefix “F” and sub accounts with the prefix “U.”
4. From the Transaction Type list, select Internal Transfer.
The Internal Funds Transfers section appears.
5. Select the source account number from the Source Account Number drop-down list.
If there are any destination accounts eligible to receive an internal funds transfer, the Destination Account Number drop-down list appears.
Getting Started: Professional Advisor
18
Chapter 4
Transferring Funds from the Master Account
6. Enter the amount of the transfer, the currency and select the Destination Account Number.
7. Click Continue.
Click Cancel at any time to cancel the transaction.
8. Verify that the details of the internal funds transfer are correct, then click Continue.
You will immediately receive an email notification containing a confirmation number. Enter the confirmation
number where indicated on the Internal Funds Transfer page, then click Confirm.
If you did not receive a confirmation number, click Resend Confirmation Number to receive a new one.
For more information
l
For complete information on account funding, see the Funding Reference on our website.
Getting Started: Professional Advisor
19
Chapter 4
Transferring Funds from the Master Account
Initial Funding for Client Accounts
The process of funding client accounts is the same as depositing funds into the master account. Fund deposits into client
accounts can be made in a number of ways, including Wire, Check, ACATS, and so on. To prevent any delays in an
account's funding, it is important that your clients complete the funding information portion of application. In addition, it
is important for both you and your client to understand the credit periods for deposits as this will determine when you
will be able to start trading. The credit period varies based on the deposit method. For example, checks require seven
business days after they are deposited, while a wire transfer may be credited as quickly as the same day.
While IB does not require that a client set up banking instructions at this time, we recommend that advisors encourage
their clients to do so. This will help prevent any potential future delays when clients want to withdraw funds. Once banking instructions have been created in Account Management, advisors can can use them to process withdrawals on the client’s behalf.
For more information
l
For complete information on account funding, see the Funding Reference on our website.
Getting Started: Professional Advisor
20
5
Client Accounts
This section details the steps that you will need to take to add client accounts, specify fees and configure trading permissions.
The following topics are included:
l
Add Client Accounts by having your clients submit an application to IB.
l
Specify Client Fees
l
Set Trading Permissions
l
View Client Account Funds Status
l
View Client Account Details
l
Additional Advisor Authorizations
l
Link Client Accounts
For more information
l
To learn more about adding and configuring client accounts, see the Account Management Users' Guide.
Getting Started: Professional Advisor
21
Chapter 5
Client Applications
To trade for your clients, you must first “add” them to your Advisor account. As the Advisor Master, you are the only
one who can add clients to your Advisor account. Adding a client requires that you:
Add an account by having the client apply for an IB account.
Configure client fees
Set trading permissions
Have the client fund the account
Check client account funds status
To add an existing IB customer as an advised client, the client needs to log into Account Management and select Link
Account to Advisor/Broker from the Account Administration menu. Note that requests to link accounts must be approved
by advisors prior to 2:00 PM on Friday. Those requests which are approved will be processed every Friday at 3:00 PM.
Most advisors will have three options for completing client applications; however, some may be limited to the fully electronic method due to regulatory and other considerations. Decide which method to use based on the characteristics and
preferences of you and your client:
Fully Electronic (for fastest processing) - You send an invitation to your client, who completes an electronic
application online. Advisors can create client account templates in Account Management to save and reuse certain information for new client account applications.
Semi-Electronic with paper signature - You and your client complete an electronic application online. At the
end of the process you print the application for your client to review and complete the deposit instructions and the security questions and answers section. The client then signs the application and sends it to
IB Account Processing.
Paper - You can print out a paper application, then send it to your client to complete and sign. The client
sends the completed application to IB Account Processing.
You can log into Account Management at any time to see the status of your clients' applications. Advisors who want to
open additional accounts for themselves at a later time must use one of the three methods listed above.
In all cases, the completed application must be sent to IB for processing.
For additional information on all of the application methods, see the Add an Account topic in the Account Management
Users’ Guide.
Getting Started: Professional Advisor
22
Chapter 5
Fully Electronic Account Application
Fully Electronic Account Application
As the Advisor, you initiate an email invitation to your potential client, who is then required to complete the application
online.
To initiate a client invitation email
1. Log in to Account Management.
2. Click Manage Clients > Add Accounts.
3. Click Client Invitation in the Fully Electronic Application row.
4. Specify Client Fees for the new account, and enter the name and email of the potential client.
5. Click Continue to send the client application invitation.
An email invitation is sent to the client inviting them to apply for an account at IB, with a link to the application
start page. The application will automatically be associated with your advisor account.
Getting Started: Professional Advisor
23
Chapter 5
Fully Electronic Account Application
Adding IRA Trust Accounts
U.S. Advisors can add IRA Trust accounts as client accounts. An IRA Trust Account is an IRA account held at a designated Third Party Trustee.
Adding an IRA Trust Account requires the following steps:
1. Add a Third Party Custodian from the Manage Account > Third Party Custodianpage in Account Management.
2. Complete a brief Third Party Custodian application.
3. Submit a letter or other form of documentation to Interactive Brokers that proves the relationship between the
Advisor and the Third Party Custodian.
4. While IB approves the letter or documentation, the new Third Party Custodian appears in the list on the Third
Party Custodian page.
5. Once the proof has been accepted by IB, send an invitation to an IRA Asset Trust client from the Manage Clients
> Add Accounts page to start a fully electronic account application.
Getting Started: Professional Advisor
24
Chapter 5
Semi-Electronic Account Application
Semi-Electronic Account Application
For clients who need some assistance completing an application, or if you prefer to meet with your clients for a personal
touch, you work with your client to complete the application. This process is completely electronic up until the point
that client reviews, completes and signs the application.
To complete a client application electronically
1. Log in to Account Management.
2. Click Manage Clients > Add Accounts.
3. Click Electronic Client Application in the Semi Electronic Application row.
4. Select Individual as the account type and Continue.
5. Complete the Advisor Client application following instructions shown.
6. Send the completed application via print or email to your potential client.
7. Click Client Disclosures to download and print the Client Disclosures.
8. Send all pages to your potential client.
9. Once complete, return the application to IB for processing.
Getting Started: Professional Advisor
25
Chapter 5
Paper Account Application
Paper Account Application
To print a paper client application
1. Log in to Account Management.
2. Click Manage Clients > Add Accounts.
3. Click Start Application in the Paper Application row.
4. Select the type of account (Individual, Hedge Fund, Institution), then click Continue.
5. Enter the client email address and any other requested information, then click Continue.
6. Print the application.
7. Click Client Disclosures to download and print the Client Disclosures.
8. Send all pages to your potential client.
9. Once complete, return the application to IB for processing.
Getting Started: Professional Advisor
26
Chapter 5
Paper Account Application
Specify Client Fees
You can elect to charge your clients for services rendered through one of our available billing methods. You specify
advisor fees at the time of your client’s registration, but you can modify or add them at any time on the Configure Fees
page Account Management. All fee modifications must first be submitted electronically in Account Management and
will become effective only after the signed PDF has been received and processed by us. Please note that fee changes are
not retroactive.
Client fee schedules can be applied to accounts individually or can be stored in templates. As an advisor, you can configure fees for one or more client accounts, or set up client fee schedules in templates, then assign the templates to client
accounts. The use of templates allows you to easily maintain different fee schedules for multiple client accounts. If you
are a new advisor (i.e., you just opened your IB account), then there will be a blank default client fee template, which
you can then configure with your own fee schedule.
You set client fees in Account Management using the Manage Clients > Fees > Configure page. On this page, you can:
l
l
View and sort all client accounts.
Select one or more client accounts, then view (and if necessary, modify) the current fee schedule for those
accounts.
l
Select one or more client accounts, then configure and apply a fee schedule to those accounts.
l
Select one or more client accounts, then apply a previously saved client fee template to those accounts.
l
Charge all commissions for a client account to the Advisor account by clicking the Charge Commissions to
Advisor Account check box. Note that if the Advisor Master account balance is below $1000 when the commissions need to be posted, then the commission will be charged to the client account.
Automatic billing is calculated and automatically billed to the client’s account by IB. We offer a variety of methods that
can be used, including Percentage of an account's value, Percentage of P&L, or a Flat Fee. You can also apply High
Water Marking to the billing period client fees to offset periods of losses in a volatile market.
If you choose to use Direct Billing, IB is not involved and you are responsible for billing your client(s) directly.
Getting Started: Professional Advisor
27
Chapter 5
Paper Account Application
You can also charge minimum monthly fees and IRA account fees for their clients to your Advisor Master account. Click
Manage Clients > Fees > Charge Fees to Master to select this option.
Electronic Invoices and Fee Reimbursements
For electronic invoices, you calculate the markup and submit an invoice electronically to IB on the Advisor Invoicing
page in Account Management, and that amount will automatically be transferred from the client account to your account.
Invoices submitted prior to 5:30 (17:30) PM EST will be processed the same day (U.S. night) and appear on that day's
statements. Invoices submitted after 5:30 (17:30) PM EST will be processed on the next business day. Submit invoices
for up to ten clients per day, but only one invoice per client account per day.
For client accounts that have been configured for electronic invoices, you can reimburse fees to client accounts up to a
maximum of 50% of invoices (net of any prior rebate) for the trailing 12-month period. Advisors can also modify or cancel pending fee reimbursements and view the details of fee reimbursements that have already been processed.
Click Manage Clients > Fees > Invoicing to configure client invoices and fee reimbursements.
For more information
l
For additional information about all our available billing methods, see the Electronic Invoices tab on the Advisor
Fees page.
Getting Started: Professional Advisor
28
Chapter 5
High Water Marking
High Water Marking
Advisors who select Percent of P&L for their client fees can apply High Water Marking to the billing period client fees
to offset periods of losses in a volatile market. You set up High Water Marking when you select Percentage of P&L in
Automatic Billing. High Water Marking lets an Advisor:
l
Specify a look-back period (in quarters or years, based on the period selection in the Percent of P&L fee schedule).
High Water Marking keeps track of cumulative losses per billing period within the specified look-back period. A
loss in any period will be added to the look-back period's cumulative losses. A gain in any period will decrease
the cumulative loss recorded to date. By default, the look-back period is zero, which means no High Water Marking.
l
Prorate for withdrawals. If an advisor chooses to prorate, withdrawals in the current period reduce any cumulative
losses that are carried over from previous periods. The losses are reduced in proportion to the percentage of equity
that was withdrawn.
Note that current period losses are never adjusted by current period withdrawals, gains are not prorated and deposits are not used to prorate losses.
l
Optionally initialize High Water Marking with previous periods' losses by entering the amount of the losses.
These losses may have been incurred for the client in another account or with another broker. Gains are applied to
the oldest losses first.
High Water Marking is effective on the day we process the approved client agreement.
Note: If you have assigned Money Managers to direct trading and investment activity for client accounts,
then you specify Wealth Manager fees as described above, and have separate fee schedules for
Money Managers. Wealth Manager fees are those fees paid to you when you trade for client
accounts. Money Manager fees are fees paid to a Money Manager when he or she trades for client
accounts, and you set those client fees on the Money Manager Assignment page in Account Management. For more information, see Using Money Managers.
Getting Started: Professional Advisor
29
Chapter 5
High Water Marking
Trading Permissions
Each client is responsible for configuring the Trading Permissions on their account. Trading permissions identify the
products the client wishes to trade and the countries in which he or she wants to trade them.
Clients configure their and trading permissions in Account Management by clicking Manage Clients > Trading > Permissions.
For more information
l
To learn more about trading permissions, see the Choosing and Configuring Your Account page on our website.
Getting Started: Professional Advisor
30
Chapter 5
High Water Marking
Client Account Funds Status
You can check the funds status of your client accounts at any time using the Funding > Fund Transfers page in
Account Management. Select the account whose status you want to check using the Account Selector.
The page displays the Cash Balance, Cash Available for Withdrawal, Withdrawable cash that is subject to any origination restrictions (including ACH deposits initiated by the customer via the IB website) and the amount of any
pending deposit that has not yet posted to the account.
Getting Started: Professional Advisor
31
Chapter 5
High Water Marking
Client Account Details
As an Advisor, you can view the details of any of your client accounts in from the Manage Clients > Accounts > View
menu in Account Management. Specifically, you can open the following pages:
l
Summary - View a list of all accounts, sorted by Open, Pending, Closed and Rejected accounts, and view a summary page for each listed account.
The following pages let you view detailed information about client accounts. You use the Account Selector on these
pages to select a different client account.
l
Open - View summary pages for any open client account.
l
Pending - View summary pages for any pending client account.
l
Closed - View summary pages for any closed client account.
l
Rejected - View summary pages for any rejected client account.
In addition, you can also:
l
Delete an application for a pending client account.
l
Download client information.
Here is an example of a Client Account detail page.
Getting Started: Professional Advisor
32
Chapter 5
Getting Started: Professional Advisor
High Water Marking
33
Chapter 5
High Water Marking
Additional Advisor Authorizations
An advisor can get specific authorization from a client to modify additional settings in the client account. These authorizations are listed on the Client Account Details page for open and pending client accounts.
Authorization Categories and Specific Tasks
Here is a list of all of the tasks that an advisor can be authorized to perform in a client's account. The list is organized
by category just as on the actual authorization form. Note that not all of these tasks affect an operation within Account
Management.
Authorization to Update or Change Account Information, Account Settings, Trading Permissions and Tax Forms:
l
Change Account Info (Name & Address, Email, Phone Number, Legal Residence, Mailing address, Personal Info,
Employment Info, Financial Information, Regulatory Information, Trading objectives,
l
Change trading permissions and products
l
Change account settings (Base Currency, Account Type)
l
View and change account forms and tax forms.
l
W8/W9 functions
l
Change Investor Category (QIB, Accredited Investor, etc)
l
Statement/Confirm Delivery Settings
l
Trading Configuration
l
Market Data
l
Market Data Subscriber Status
l
Alert Notification
l
Paper Trading Account
Authorization to Provide or Change Banking and Transfer Instructions
l
ACH deposit information
l
ACH and wire withdrawal bank information
l
Position instructions for ACATS and FOP inbound transfers
l
Settlement instructions
Authorization to Send Third Party Payments and Wires
l
Also allow withdrawals of cash and ACH to third parties in addition to named account holder using third-party
withdrawal system.
Authorization to Vote Shares and Make Elections Regarding Positions (does not affect Account Management)
l
Corporate Actions should be sent to the advisor not the client.
l
Proxy delivery and voting will be done by the advisor not the client.
Getting Started: Professional Advisor
34
Chapter 5
High Water Marking
Authorization for Special Programs and Alternative Investments
l
Hedge Fund Capital Introduction Program Agreement
l
Hedge Fund Capital Introduction Program investments and redemptions
l
Enroll or un-enroll in the Stock Yield Enhancement Program
Request to Send Electronic Notices, Confirmations and Account Statements only to Advisor
l
Used by our Compliance department in the event that an advisor wants to control the email address used for the
client account.
To grant and view additional advisor authorizations
1. The advisor client logs into Account Management and clicks Support > Paper Forms.
2. The advisor client prints, completes and mails the Supplemental Power of Attorney and Authorization form to
us to grant his or her advisor authorization to perform additional specific account configuration tasks for the client's account. Without this authorization, the advisor normally is not authorized to modify these account settings.
The advisor also has access to this form on the Support > Paper Forms page.
3. Once the authorizations are granted, the advisor can perform the additional tasks and can click Manage Clients >
Accounts > View to drill down to the Client Account Details page for the authorizing client.
There will be a section on the page that lists all of the client account tasks that have been authorized by the client.
Getting Started: Professional Advisor
35
Chapter 5
High Water Marking
Link Client Accounts
Advisors can link multiple individual and/or joint accounts for a client under a single username and password. Once
these client accounts are linked, they will be able to access Trader Workstation, WebTrader, mobileTWS and Account
Management for any of the linked accounts using a single username and password. For example, you might have a client
who maintains more than one account.
Linking multiple client accounts under a single username and password offers these benefits:
l
Single sign-on for all accounts;
l
Single Secure Login device;
l
Activity fee minimums based on consolidated commission;
l
Consolidated reporting of accounts.
To link existing client accounts
1. Log into Account Management with your username and password, then enter the codes from your Secure Login
Device as instructed on the login screen.
2. Click Manage Clients > Accounts > Link Existing Accounts.
3. From the drop-down, select the client whose multiple accounts you want to link. Note that only eligible client
accounts will appear in the drop-down.
A list of all accounts for this client appears.
Getting Started: Professional Advisor
36
Chapter 5
High Water Marking
4. Click the radio button next to the account whose username you want to use for all linked accounts. This will be
the username you use to log into Account Management and our trading platforms.
5. Click Link Accounts.
A page opens that displays the individual and financial information for the client accounts to be linked .
6. Review each of the line items below and, where differences exist, select the radio button next to the entry which
is correct. Note that this information must be identical across all accounts in or the account will not be linked.
If none of the entries provided are correct, your client can correct the information on the Manage Account ->
Account Information -> Details -> Profile page and the Manage Account -> Account Information -> Details ->
Financial Information page.
7. If there is saved bank information for both accounts being linked, you are prompted to select which bank information to save.
8. After you have entered the username, password and authentication values for each account to be linked, a screen
appears that displays the individual and financial information that you maintain for the accounts to be linked.
Click Continue.
A screen appears confirming your request. If you wish to cancel your link request, click the here link on the page.
Getting Started: Professional Advisor
37
6
Starting to Trade
The Trader Workstation (TWS) is a robust platform which allows access to a variety of powerful trading tools. Information about all of the tools which IB offers can be found on the Trader Workstation Highlights page on the IB web site.
This section of the guide will focus on TWS basics and will show you how to:
l
Subscribe to Market Data;
l
Log in to TWS;
l
Add Market Data Lines (ticker lines) to the TWS trading window;
l
Define Allocation Groups and Methods in TWS;
l
Trade and Allocate for Clients using the methods you defined;
l
Monitor clients’ trade activity, positions and P&L, and account balances using our Real-time Activity Monitoring
tools.
For more information
l
For complete information on Trader Workstation, see the Trader Workstation Users' Guide.
Getting Started: Professional Advisor
39
Chapter 6
Subscribe to Market Data
Subscribe to Market Data
Before you begin trading for your clients, you will want to subscribe to market data through Account Management.
Although you can trade without data, IB does not recommend it.
To subscribe to Market Data
1. Login to Account Management.
2. Click Manage Account > Trade Configuration > Market Data.
Your current market data subscriber status (Professional or Non-Professional) is displayed in the page title. Market
data subscriptions are organized by region (North America, Europe, Asia-Pacific).
3. Check the subscriptions you would like to receive on each tab.
Note: Market data fees are automatically withdrawn from the Master account monthly, and data may be
suspended if the master account does not have sufficient funds to cover market data expenses.
4. Click Continue.
5. Read and complete the necessary Subscriber Agreements, and then click Continue.
Most market data subscription requests and changes take effect immediately. Certain market data subscriptions,
such as the subscription to the NYSE data, require approval from the exchange and therefore will not take effect
immediately.
Getting Started: Professional Advisor
40
Chapter 6
Log in to TWS
Log in to TWS
The first time you log in to TWS, you’ll need to take a little time to populate your screens with data, understand the different allocation methods you can use, and finally practice creating orders.
Note: We strongly recommend that you open a paper trading account as described in Opening a Paper
Trading Account to familiarize yourself with Trader Workstation’s many features without accidentally submitting a trade.
You can run TWS directly from your Internet browser (recommended), or download the software to your PC and launch
it directly from your desktop as a standalone application. For more information, see the Trader Workstation page on the
IB web site.
To log in from your browser
1. In the Login box in the upper right corner of the homepage, select Trader Workstation from the drop-down list.
2. In the Login box, enter your username and password and click Login.
For more information
l
To learn more about using the browser-based TWS versus the standalone version, see the TWS Users’ Guide.
Getting Started: Professional Advisor
41
Chapter 6
Add Market Data
Add Market Data
Next, you’ll want to add market data, or ticker lines, for the products you want to trade. Although you can trade without
market data, we don’t recommend it.
To add market data lines to the Quote Monitor
1. Click in the Contract field in an empty row.
2. Enter an underlying symbol and press Enter.
3. Select an asset type from the picklist on the trading screen. For instruments that require an expiry, choose a month
and year, or select All to open the contract selection box.
Getting Started: Professional Advisor
42
Chapter 6
Add Market Data
If you choose Smart as the exchange (rather than selecting Directed and then picking a destination) the market
data is aggregated and the default order routing is Smart. From a display perspective, ticker lines that use aggregated Smart data do not display Smart in the data line. TWS will only show the exchange if you elect to direct
route. When you create an order, regardless of the market data selection you can modify the order routing destination on a per-order basis using the Destination field.
Getting Started: Professional Advisor
43
Chapter 6
Add Market Data
4. In the Contract Selection box, choose a contract(s) and click OK. You can limit the contracts displayed in the
right pane by selecting criteria from the Filter section. Choose Smart as the exchange to use SmartRouting.
For more information
l
For more information on market data in TWS, see the TWS Users’ Guide.
Getting Started: Professional Advisor
44
Chapter 6
Define Allocation Groups and Methods
Define Allocation Groups and Methods
IB offers advisors a number of ways to allocate trades across multiple accounts based on a single order entry. By using
our Account Groups, you can allocate to your accounts by allowing IB to calculate the distribution based on: a specified
percent change of an existing position, the amount of available equity with loan value per account, the net liquidation
value per account, or as an equal split between all accounts in a group.
Additionally, using our Profiles, you can manually define how a trade will allocate orders among a group of accounts, by
number or percent of shares.
For more information
l
Account Groups
l
Create Allocation Profiles
l
Set Allocation Defaults
Getting Started: Professional Advisor
45
Account Groups
Chapter 6
Account Groups
Account Groups will automatically calculate ratios and allocate order shares to a pre-defined group of accounts based on
the selected allocation method. When you create an order and choose a group, the order uses the default method to allocate shares amongst the accounts in the group.
To create an Account Group
1. On the Edit menu, select Global Configuration.
2. On the Configuration screen, click Advisor in the left pane to expand that selection, then select Account Groups.
3. Click the Create button on the right side of the window.
4. Enter a Group name. Do not use the name "All" since this is reserved by the system.
Note: You may want to include a prefix such as "AG" in the name to identify the choice as an Account
Group when it appears in the order selection list.
5. Select a default allocation method. You can change the allocation method for each order. Select from one of the
following:
PctChange - This method increases or decreases an already existing position by the specified percentage. Do not
specify an order size. The quantity is calculated by the system and is displayed in the Quantity field after the
order is acknowledged. Positive percents will increase a position, negative percents will decrease a position.
BUY
ORDER
Positive Percent
Negative Percent
Long Position
Increases position
No effect
Short Position
No effect
Decreases position
SELL
ORDER
Positive Percent
Negative Percent
Long Position
No effect
Decreases position
Short Position
Increases position
No effect
Example 1: Assume that three of the six accounts in this group hold long positions in stock XYZ. Client A has
100 shares, Client B has 400 shares, and Client C has 200 shares. You want to increase their holdings by 50%,
so you enter "50" in the percentage field. The system calculates that your order size needs to be equal to 350
shares. It then allocates 50 shares to Client A, 200 shares to Client B, and 100 shares to Client C.
Getting Started: Professional Advisor
46
Chapter 6
Account Groups
Example 2: You want to close out all long positions for three of the five accounts in a group. You create a sell
order and enter "-100" in the Percentage field. The system calculates 100% of each position for every account in
the group that holds a position, and sells all shares to close the positions.
AvailableEquity - This method distributes shares based on the amount of equity with loan value currently available in each account. Requires you to specify an order size. The system calculates ratios based on the Equity with
Loan value in each account and allocates shares based on these ratios.
Example: You transmit an order for 700 shares of stock XYZ. The account group includes three accounts, A, B
and C with available equity in the amounts of $25,000, $50,000 and $100,000 respectively. The system calculates a ratio of 1:2:4 and allocates 100 shares to Client A, 200 shares to Client B, and 400 shares to Client C.
NetLiq - This method distributes shares based on the net liquidation value of each account. Requires you to specify an order size. The system calculates ratios based on the Net Liquidation value in each account and allocates
shares based on these ratios.
Example: You transmit an order for 700 shares of stock XYZ. The account group includes three accounts, A, B
and C with Net Liquidation values of $25,000, $50,000 and $100,000 respectively. The system calculates a ratio
of 1:2:4 and allocates 100 shares to Client A, 200 shares to Client B, and 400 shares to Client C.
EqualQuantity - This method distributes shares equally between all accounts in the group. Requires you to specify an order size.
Example: You transmit an order for 400 shares of stock ABC. If your Account Group includes four accounts, each
account receives 100 shares. If your Account Group includes six accounts, each account receives 66 shares, and
then 1 share is allocated to each account until all are distributed.
6. The list of accounts in the Non Group Accounts section includes all accounts available to you. To add an account
to the group, select a Non Group account and click Add.
7. Click OK to save the group and its settings.
Getting Started: Professional Advisor
47
Create Allocation Profiles
Chapter 6
Create Allocation Profiles
Using our Profiles, you can manually specify how an order will allocate among a group of accounts by predetermining
the number of shares/contracts, or defining specific percentages or ratios at which a trade will allocate.
To create a share allocation profile
1. On the Edit menu, select Global Configuration.
2. On the Configuration screen, click Advisor in the left pane to expand that selection, then select Allocation Profiles.
3. Click Create and enter a profile name, preferably one based on the way you plan to allocate shares between clients.
Note: You may want to include a prefix such as "AP" in the name to identify the choice as an Allocation
Profile when it appears in the order selection list.
4. In the Allocation Profile specifies area, select a method of allocating shares between accounts:
o
Percentages - this method will split the total number of shares in the order between listed accounts based on
the percentages you indicate. For example, an order for 1000 shares using a profile with four accounts at 25%
each would allocate 250 shares to each listed account in the profile.
o
Ratios - this method calculates the allocation of shares based on the ratios you enter. For example, an order for
1000 shares using a profile with four accounts set to a ratio of 4, 2, 1, 1 would allocate 500, 250, 125 and 125
shares to the listed accounts, respectively.
o
Shares - this method allocates the absolute number of shares you enter to each account listed. If you use this
method, the order size is calculated by adding together the number of shares allocated to each account in the
profile.
5. Click in the Account field to view all accounts. Select an account and tab over to the Value field.
6. Enter the percent, ratio or number of shares to be allocated to the selected account (you may need to delete the
current value). Tab to create a new account line.
Note: If you use percentages to allocate shares, percentages allocated must equal 100. If you use ratios,
The system automatically calculates these percentages.
7. Continue until you have listed all the desired accounts for the current profile, and click OK.
Getting Started: Professional Advisor
48
Set Allocation Defaults
Chapter 6
Set Allocation Defaults
The default allocation refers to the allocation that will be used automatically when you create an order. You can modify
the allocation on a per trade basis, and change the default allocations at any time.
To set default allocations
1. On the Edit menu, select Global Configuration.
2. On the Configuration screen, click Advisor in the left pane to expand that selection, then select Default Allocation.
3. Select default settings, which are described below:
o
Use currently subscribed account - check this button to automatically allocate trades to the account or group
selected in the Select Account dropdown on the trading window, as shown in the image above.
o
Use specified default - check this button to set a specified absolute default allocation.
o
Automatic Allocation - choose a user-defined Account Group and method to use for default allocation.
o
Manual Allocation - choose an Allocation Profile to use as the default.
Getting Started: Professional Advisor
49
Set Allocation Defaults
Chapter 6
o
Single Account Allocation - choose an individual account to use as the default allocation. NOTE: To
allow the last selected individual account to be used for the default allocation going forward, select the
Use currently subscribed account radio button at the top of the page.
o
Preserve default - select to always use the default set up in the Default Allocation window regardless of
changes you make on a per-order basis. If this is checked, you will need to use this window to modify the
default allocation.
o
Use last submitted as a default - select if you want the default allocation to change to the allocation you set
on a per-order basis. If this is checked, the default allocation automatically changes when you change the allocation on an order.
o
If one or more accounts fails to meet the margin requirements when an order is submitted - For each order,
all accounts designated for order allocation are vetted before the order is submitted, to ensure that each
account has the capacity to support the designated allocation. In cases where one or some account(s) cannot
hold the allocation as specified, the advisor can elect to:
o
Reject the entire order - The entire order is rejected.
o
Reduce the size of the order - The order size is reduced by the quantity that cannot be held, and this quantity is deactivated.
Note: Note that once the order has been submitted and is working, the quantity of the working order may
still change. For example, if an unrelated fill results in one or more of the accounts no longer being
able to support the allocation, the order size will be reduced by that quantity. In an opposite scenario, if an account whose allocation was deactivated can now support the allocation, a quantity that
was deactivated during the initial order submission may be reactivated and submitted.
Getting Started: Professional Advisor
50
Chapter 6
Set Allocation Defaults
Trade and Allocate for ClientsFunds
Once you have ticker lines in Quote Monitor and defined your account groups and/or allocation profiles, you’re ready to
start trading. There are many different ways to create and send orders from within TWS, but at this point we will focus
on creating and sending orders directly from the ticker line in the Quote Monitor.
Generally in the Fully Disclosed Broker account structure, your clients will do their own trading. Trades can be placed
by the master users for any client account to which they are assigned. This can be done by selecting the account from the
drop-down menu in the Account column of the TWS. In addition, IB does offer Brokers access to our powerful allocation
algorithms which allow the entry of a single order which will allocate across multiple accounts. In order to gain access,
please contact your sales representative. For further detail on allocations, please refer to the TWS User's Guide.
You create an order from the Quote Monitor by clicking the bid or ask on the ticker line of the asset you want to trade.
TWS automatically creates the order directly beneath the related ticker. We call this a double-line display, and it’s helpful to understand that the double row of headers along the top of the window corresponds to the double-line market
data/order row display in the body of the window. The column headings in the top row correspond to data in ticker line.
Imagine now that I click the Ask price in the IBM ticker line. An order to buy 100 shares of IBM stock is created directly below the ticker, and the column titles on the bottom row apply to these fields, with the Allocation = Group 1,
Method = Avail, TIF = DAY and so on.
To create and transmit an order for multiple clients
1. Click the "Ask" or "Bid" price of an asset to create an Order Management line directly below the asset’s ticker.
o
Clicking the Ask will create a Buy order.
o
Clicking the Bid will create a Sell order.
2. Use the Allocation field drop-down list to select an Account Group, Account Profile, a single account or All
accounts.
or
Getting Started: Professional Advisor
51
Set Allocation Defaults
Chapter 6
Right-click on the order and select Modify then select Share Allocation.
3. In the Allocation dialog box, select an Account Group in the Automatic Allocation area, an Account Profile in
the Manual Allocation area, or select a single account..
o
For the Account Group, modify the allocation method if necessary. If you choose the PctChange method, enter
a positive or negative value in the Percentage field. All other automatic allocation methods are calculated
using the order size.
o
If you use an Allocation Profile, select a group name.
o
To allocate all shares to one account, select a single account.
4. Click OK to complete the order.
5. To Transmit, click the red "T" in the Transmit field.
Getting Started: Professional Advisor
52
Chapter 6
Real-time Activity Monitoring
Real-time Activity Monitoring
The Account window lets you monitor every aspect of your client account activity. The Account window displays,
among other things, the values of your positions, the funds available for trading and the amount of margin cushion an
account has before it may become subject to a liquidation, all with real-time values.
The Account window is divided into the following sections:
l
l
l
l
l
l
Balances, which shows your account balances for securities, commodities and in total. These balances don't
include margin requirements.
Margin Requirements, which show your initial and maintenance margin requirements based on your current portfolio.
Available for Trading, which tells you what you have for additional trades and cushion before liquidation, based
on your balance information and margin requirements.
Market Value, shows the total value of all positions, sorted by currency.
FX Portfolio, which shows activity for currency pair trades only. The value in the Position field only reflects
trades executed in the FX market. Please note that these do not reflect real-time FX positions, since the non-base
currency conversions are not included.
Portfolio, which lists all current positions sorted by underlying, and displays the total current market value for
each position.
To open the Account window
1. On the main trading Toolbar, click the Account icon, or select Account Window from the Account menu.
The first time you open the Account window, "key" account values display by default (this default view is shown in the
illustration below). The sections can be expanded and customized by clicking the green “+” sign to the right of each section and using the checkboxes to specify those fields you want set as your default view.
Getting Started: Professional Advisor
53
Chapter 6
Real-time Activity Monitoring
Advisors and other multi-client account holders will see a drop-down Select Account field on the Account and Summary
tabs to select either an individual account or an account group.
Getting Started: Professional Advisor
54
Chapter 6
Real-time Activity Monitoring
On the Account page, elect to display account information for All accounts, any individual account including the
Master, or a user-defined Account Group, which includes a subset of accounts (in the image above, Group 1 is a userdefined account groups).
On the Summary page, choose to view the account summary for All accounts, or for any Account Group.
Advisors can also print the summary page by selecting Print Summary from the File menu.
Getting Started: Professional Advisor
55
Real-time Activity Monitoring
Chapter 6
View Account Balances
The Balances section shows your account balances for securities, commodities and in total. These balances don't include
margin requirements.
To view all Balances values, expand the section using the green plus (+) sign. To customize this view to show only the
values you want to see, put a check next to these parameters and click the green minus (-) sign to contract the section.
The following table defines the fields available in the Balances section.
Parameter
Securities
Commodities
Net Liquidation
Value
Total cash value + stock value + securities
options value + bond value + fund value.
Total cash value + commodities options
value.
Cash Account: Settled Cash.
Cash Account: Total cash value + commodities option value - futures maintenance
margin requirement + minimum (0, futures
P&L).
Equity with Loan
Value
Margin Account: Total cash value + stock
value + bond value + fund value +
European & Asian options value.
Margin Account: Total cash value + commodities option value - futures maintenance
margin requirement.
Previous Day
Equity with Loan
Value
Marginable Equity with Loan Value as of
16:00 ET the previous day.
Not applicable.
Reg T Equity with
Loan Value
Cash Account: Settled Cash.
Cash Account: Total cash value + commodities option value - futures maintenance
margin requirement + minimum (0, futures
P&L).
Margin Account: Total cash value + stock
value + bond value + fund value + nonU.S. & Canadian securities options value.
Margin Account: Total cash value - futures
maintenance margin requirement.
Special Memorandum Account
Max ((EWL - US initial margin requirements)*, (Prior Day SMA +/- change in
day's cash +/- US initial margin requirements** for trades made during the day.))
Not applicable.
*calculated end of day under US Stock
rules, regardless of country of trading.
**at the time of the trade
Getting Started: Professional Advisor
56
Real-time Activity Monitoring
Chapter 6
Parameter
Securities
Commodities
Securities Gross Position Value (GPV)
Long Stock Value + Short Stock Value +
Long Option Value + Short Option Value
+ Fund Value
Cash
Settled cash + sales at the time of trade
Settled cash + sales at the time of trade +
futures P&L
Settled Cash
Cash recognized at the time of settlement purchases at the time of trade - commissions - taxes - fees.
Same as for Securities.
Futures Settlement: Trade date + 1 day
Stock Settlement: Trade date + 3 days
Options Settlement: Trade date + 1 day
Accrued Interest
Interest that has accumulated but has not
been paid or charged.
Getting Started: Professional Advisor
Same as for Securities.
57
Chapter 6
Real-time Activity Monitoring
Real-time Margin Monitoring
Use real-time margin monitoring to see your current margin requirements at a glance, and to understand the margin
implications of any transaction before you transmit an order.
To view real-time margin requirements
1. On the View menu, select Account.
The Account window shows your account details, including the current market value and portfolio.
2. Use the Margin Requirements and Trading Limits section to monitor your margin.
3. You can also see the margin impact for a single order using the right-click Preview Order command from an order
line on the trading window. An example of the Order Preview window is shown below.
To preview margin impact
Getting Started: Professional Advisor
58
Chapter 6
Real-time Activity Monitoring
1. Use the right-click menu from an order line to select Check Margin.
2. View the order details before you transmit, including commissions, margin impact and the order description.
3. Click Transmit to send the order from the Preview window, or Close to modify before sending.
Note: This feature is valid only for single-account orders. It does not work for allocated orders.
Getting Started: Professional Advisor
59
Monitor Margin Requirements
Chapter 6
Monitor Margin Requirements
Margin is calculated at three periods during the day: the market's open, the market's close, and overnight. The Margin
Requirements section shows your current margin, projected margin for the next period of margin calculation (Look
Ahead) and the Overnight calculation (valid for futures only).
l
l
The Current margin is your real-time requirement right now. If you happen to be viewing this screen at 1:00 AM,
your current and overnight margin values for your futures positions will be identical. If you're viewing this screen
during trading hours, your current margin requirements for futures will be less than or equal to the overnight
requirement.
The Look Ahead projects what your margin requirements will be at the next margin calculation, based on what
you have in your portfolio now. If you're viewing this screen at 2:00 PM, the next calculation will be at the close.
If you're viewing this screen at 1:00 AM, the next calculation will be at the open.
Overnight is the requirement after regular market hours and only applies to futures.
To view all Margin Requirements values, expand the section using the green plus (+) sign. To customize this view to
show only the values you want to see, put a check next to these parameters and click the green minus (-) sign to contract
the section.
Try PM
Click to see how your margin requirements would be different if you had a portfolio margin account instead of a RegT
margin account.
Margin Warnings
To help you stay on top of your margin requirements, we now provide pop-up messages and color-coded account information to notify you that you are approaching a serious margin deficiency. TWS will highlight the row whose value is in
the distress state. The colors on your account screen tell you the following:
Yellow - You have only a 5% cushion above the margin requirement
Orange - Your margin cushion is depleted and you have a short time to enter into margin-reducing trades before your
positions are liquidated. During this time you should be able to enter a trade that will decrease your margin requirement,
but not increase.
Red - Your positions will shortly start to be liquidated as necessary to bring your account back within the margin limits.
The following table defines the fields available in the Margin Requirements section.
Parameter
Securities Account
Commodities Account
Reg T Margin
Initial margin requirements calculated
under US Regulation T rules.
Initial margin requirements calculated
under US Regulation T rules.
Current Initial Margin
Initial margin requirement in the base currency of the account. The initial margin
requirement is what is required to open a
new position.
Initial margin requirement in the base currency of the account. The initial margin
requirement is what is required to open a
new position.
Getting Started: Professional Advisor
60
Monitor Margin Requirements
Chapter 6
Parameter
Securities Account
Commodities Account
Current Maintenance Margin
Maintenance margin requirement in the
base currency of the account. This is the
value required to maintain your current positions.
Maintenance margin requirement in the
base currency of the account. This is the
value required to maintain your current positions.
Look Ahead Initial
Margin
Initial margin requirement as of next
period's margin change in the base currency of the account.
Initial margin requirement as of next
period's margin change in the base currency of the account. This value depends
on when you are viewing your margin
requirements. If it is 3:00 pm ET, the next
calculation you're looking ahead to is after
the close, or the Overnight Initial Margin
(100%). If it's 3:00 am ET, the next calculation will be at the market's open
(50%).
Look Ahead Maintenance Margin
Maintenance margin requirement as of next
period's margin change in the base currency of the account.
Maintenance margin requirement as of next
period's margin change in the base currency of the account. This value depends
on when you are viewing your margin
requirements. If it is 3:00 pm ET, the next
calculation you're looking ahead to is after
the close, or the Overnight Initial Margin
(100%). If it's 3:00 am ET, the next calculation will be at the market's open
(50%).
Overnight Initial
Margin
Not applicable for securities.
Overnight initial margin requirement in the
base currency of the account. The
overnight calculation for futures is 100%.
Overnight Maintenance Margin
Not applicable for securities.
Overnight maintenance margin requirement
in the base currency of the account. The
overnight calculation for futures is 100%.
For more information
l
See the Margin pages on the IB website for details on margin calculations.
Getting Started: Professional Advisor
61
Monitor Margin Requirements
Chapter 6
View Available for Trading Values
If you look at nothing else on the Account Screen, the Available for Trading values let you know the state of your
account at a glance. Your Available Funds tells you if you can put on a trade. Your Excess Liquidity tells you whether
you have sufficient cushion to maintain your current positions, and your Buying Power tells you how much you have at
your disposal including your equity and IB's margin.
To view all Available for Trading values, expand the section using the green plus (+) sign. To customize this view to
show only the values you want to see, put a check next to these parameters and click the green minus (-) sign to contract
the section.
The following table defines the fields available in the Available for Trading section.
Parameter
Securities Account
Commodities Account
Current Available Funds
This value tells what you have available for trading.
Same.
Current Excess
Liquidity
This value shows your margin cushion, before liquidation.
Look Ahead
Available
Funds
This value reflects your available funds at the next margin
change. The next change is displayed in the Look Ahead
Next Change field.
Equity with Loan Value - Initial margin.
Same.
Equity with Loan Value - Maintenance margin.
Net Liquidation value - look
ahead initial margin.
Equity with loan value - look ahead initial margin.
Look Ahead
Excess Liquidity
Equity with loan value - look ahead maintenance margin.
Net Liquidation value - look
ahead maintenance margin.
Overnight
Available
Funds
Same as during regular trading hours.
Net Liquidation value Overnight Maintenance margin
Overnight
Excess Liquidity
Same as during regular trading hours.
Net Liquidation value Overnight Maintenance margin.
Getting Started: Professional Advisor
62
Monitor Margin Requirements
Chapter 6
Parameter
Securities Account
Commodities Account
Buying Power
Cash Account: (Minimum (Equity with Loan Value, Previous Day Equity with Loan Value)-Initial Margin)
Not applicable for futures.
Standard Margin Account: Available Funds*4
Leverage
Gross Position Value/Net Liquidation.
Same.
Look Ahead
Next Change
Shows you when the next margin period will begin.
Same.
Day Trades
Left
Number of day trades still available for 4-day pattern day
trader period.
Not applicable for futures.
Getting Started: Professional Advisor
63
Monitor Margin Requirements
Chapter 6
View Market Value
The Market Value section shows you total value for all assets sorted by currency. Accounts with the ability to make
transfers between brokers will also have an In Transit tab to monitor DVPs and other position transfers. In addition, the
Cash column of this section is where you can view your real-time FX position information.
The following table defines the fields in the Market Value section.
Parameter
Description
Currency
Open positions are grouped by currency.
Cash
Cash recognized at the time of trade + futures P&L.
This value reflects real-time current FX positions, including:
Trades executed directly through the FX market
Trades executed as a result of automatic IB conversions, which occur when you
trade a product in a non-base currency,
Trades deliberately executed to close non-base currency positions.
Accrued Interest
Reflects the current month's accrued debit and credit interest to date, updated daily.
Stock
Real-time mark-to-market value of stock.
Options
Real-time mark-to-market value of securities options.
Futures
Real-time change in futures value since last settlement.
FOPs
Real-time mark-to-market value of futures options.
Funds
Current funds balance.
Exchange Rate
The currency exchange rate to the base currency.
Net Liquidation
Value
Total cash value + stock value + options value + bond value.
Unrealized P&L
The difference between the current market value of your open positions and the average cost, or Value - Average Cost.
Getting Started: Professional Advisor
64
Monitor Margin Requirements
Chapter 6
Parameter
Description
Realized P&L
Shows your profit on closed positions, which is the difference between your entry
execution cost and exit execution cost, or
(execution price + commissions to open the position) - (execution price + commissions to close the position).
Getting Started: Professional Advisor
65
Monitor Margin Requirements
Chapter 6
View FX Portfolio Values
This section shows activity only for currency pair trades. The "Position" value reflects the sum of trades executed in the
FX market only, and consequently does not reflect a real-time FX position. Check the value in the Cash field of the Market Value section for real-time FX position information.
The following table defines the fields available for display in the FX Portfolio section.
Parameter
Description
Contract description
Symbol and description.
Exchange
An exchange on which the pair trades. This may not be the executing exchange for
the trade.
Position
The sum of trades executed in the FX market for the selected currency pair.
Unsettled Position
Unsettled currency trades.
Currency
Currency used to buy/sell the FX pair.
Market Value
(Position) x (market price).
Market Price
Real-time price of the position.
Average Price
Average price per contract.
Unrealized P&L
The difference between the trade price and the market price times position, including
commission.
Example: BUY 20,000 EUR.USD @ 1.54390
Trade Price = 1.54390
Market Price (current price) = 1.54385
1.54390 – 1.54385 = .00005
.00005 X 20,000 = 1
+ 2.5 commission = -3.50 Unrealized P&L
Realized P&L
Realized profit & loss for the pair.
Getting Started: Professional Advisor
66
Monitor Margin Requirements
Chapter 6
Parameter
Description
Liquidate Last
Last liquidation "Yes" or "No" tag. If set to "Yes" this position will be put at the end
of the queue to liquidate last in the case of margin requirements. To set, use the rightclick menu on the desired position.
While IB provides customers the opportunity to pre-request the order of liquidation in
the event of a margin deficiency in their account, such requests are not binding on IB.
In the event of a margin deficiency in customer’s IB account, IB retains the right, in its
sole discretion, to determine the assets to be liquidated, the amount of assets liquidated,
as well as the order and manner of liquidation. Customers are encouraged to consult the
IB Customer Agreement and the IB Disclosure of Risks of Margin Trading for further
information.
Getting Started: Professional Advisor
67
Monitor Margin Requirements
Chapter 6
View Portfolio Values
The Portfolio section shows the current value of each position and allows you to mark any position to be liquidated last
in the event of a margin call. Accounts with the ability to make transfers between brokers will also have an In Transit
tab to monitor DVPs and other position transfers.
The following table defines the fields in the Portfolio section.
Parameter
Description
Show Zero Position Rows - displays a line for all traded contracts even if the position was closed
out.
Contract description
Symbol and description.
Position
Quantity of long/short shares or contracts.
Currency
Currency of the contract.
Market Value
(Position) x (market price).
Market Price
Real-time price of the position.
Average Price
Average cost of stock and securities options opening positions, including
commissions.
Right click and select Show all values in base currency to have TWS convert
all non-base currency position values for display in your base currency. Converted values are displayed in italics for easy identification.
Unrealized P&L
(Market value of positions) - (average cost).
Realized P&L
(Market value of positions since close of period*) - (average cost for these
positions).
*Cut-off times for determining realized P&L for transactions are as follows:
20:30 ET for securities
Two periods for futures: 17:30 ET and 7:10 ET
Getting Started: Professional Advisor
68
Monitor Margin Requirements
Chapter 6
Parameter
Description
Liquidate Last
Last liquidation "Yes" or "No" tag. If set to "Yes" this position will be put
at the end of the queue to liquidate last in the case of margin requirements.
To set, use the right-click menu on the desired position.
While IB provides customers the opportunity to pre-request the order of
liquidation in the event of a margin deficiency in their account, such requests
are not binding on IB. In the event of a margin deficiency in customer’s IB
account, IB retains the right, in its sole discretion, to determine the assets to
be liquidated, the amount of assets liquidated, as well as the order and manner of liquidation. Customers are encouraged to consult the IB Customer
Agreement and the IB Disclosure of Risks of Margin Trading for further
information.
Getting Started: Professional Advisor
69
The Right-Click Portfolio Menu
Chapter 6
The Right-Click Portfolio Menu
If you select an asset in the Portfolio section and click your right mouse button, you will have access to a BUY and
SELL buttons as well as the following menu items.
Parameter
Description
Sort by Security Type
Sort positions alphabetically by security type.
Sort by Current Page
Order
Sort positions based on their location on a trading page.
Trade
Close Position - Transmits an appropriately sized opposite-side
order to close our the position.
Close All Positions - Transmits multiple opposite-side orders to
close out all positions in your portfolio.
Close Portion of Positions - In the text entry box that pops up,
enter the percentage which will be used to calculate the size of
each position's opposite-side order transmitted.
Transfer
For transfer-capable accounts - initiates a DVP/RVP, CMTA or
other transfer.
Create Ticker
Creates a market data line for the contract on the main trading
screen.
Adjust Position or Average Price
Only active for Forex positions. Use this feature to enter a hypothetical "new" position and "new" average cost. This feature
does not modify your forex positions but lets you create a
"what-if" to see total P&L including positions you may hold
elsewhere.
Getting Started: Professional Advisor
70
The Right-Click Portfolio Menu
Chapter 6
Parameter
Description
Adjust Average Price
Displayed for all products except cash. Select a position and
choose Adjust Average Price. Use the dialog box to enter a new
position or change the average price to include transfers and corporate actions.
Set Liquidate Last
Last liquidation "Yes" or "No" tag. If set to "Yes" this position
will be put at the end of the queue to liquidate last in the case
of margin requirements. To set, use the right-click menu on the
desired position.
While IB provides customers the opportunity to pre-request the
order of liquidation in the event of a margin deficiency in their
account, such requests are not binding on IB. In the event of a
margin deficiency in customer’s IB account, IB retains the right,
in its sole discretion, to determine the assets to be liquidated, the
amount of assets liquidated, as well as the order and manner of
liquidation. Customers are encouraged to consult the IB Customer Agreement and the IB Disclosure of Risks of Margin Trading for further information.
Unset Liquidate Last
Removes the “Liquidate Last” designation for a position.
Create Portfolio Page
Creates a trading page called Portfolio that includes market data
lines for all tickers in your Portfolio.
For more information
l
To learn more about other real-time activity monitoring tools, including the Trades window, Portfolio Rebalance
tool, Audit Trails, and Bulletins and System Status, see the TWS Users’ Guide.
Getting Started: Professional Advisor
71
7
Statements and Reports
This section describes the account statements and reports available to you from within Account Management, including
the following:
l
Activity Statements
l
Customized Statements
l
Activity Downloads
l
Trade Confirmations
l
Flex Queries
l
Margin Reports
l
Stress Test Report
l
Value at Risk Report
l
Client Summary Report
l
P/L Markup Report
l
Advisor Fee Cap Report
l
PortfolioAnalyst
l
Statement Access for Clients
For more information
l
For complete details on all of the statements and reports available, see the Reporting Guide.
Getting Started: Professional Advisor
73
Chapter 7
Activity Statements
Activity Statements
Activity statements contain information about account activity, such as positions, cash balances and transactions. Statements are generated daily, monthly, and yearly for all accounts. As a Advisor, you can view statements for your advisor
account, for individual client accounts, or a consolidated statement which can include some or all of your accounts. In
addition, clients also have the ability to access their statements electronically through Account Management.
l
Activity Statements include these features:
l
Expandable and contractible sections with click-down detail.
l
Performances summary by asset class for a quick view of an account's profitability.
l
Profit and loss across all transactions, positions, underlying instrument and asset class, under First In, First Out
(FIFO), Last In, First Out (LIFO), Maximize Losses and Mark-to-Market (MTM) calculation methods, depending
on the client’s selection.
l
Details of change in position value for the statement period.
l
Calculation of FX translation gains and losses for accounts with multiple currencies.
To generate an activity statement
1. Log in to your Master account via Account Management.
2. Click Reports > Activity > Statements.
3. Use the Account Selector at the top of the page to select one or more accounts on which to report. To include
activity from accounts you have recently closed, select the Include Closed Accounts check box. If you choose to
include closed accounts, those accounts appear in the Account Selector.
Getting Started: Professional Advisor
74
Chapter 7
Activity Statements
4. In the View Statements section of the page, make the following selections:
o
In the Statements list, select the statement you want to use for the statement.
o
In the Date(s) field, select the period (Daily, Custom Date Range, Monthly or Calendar Year). For Custom
Date Range, select the From and To dates, which define the period covered by the statement. For Daily statements, you can select a specific date or the last business day. For Monthly statements, you can select the last
month or a specific month. For Calendar Year (annual) statements, you can select a specific year.
o
In the Format field, select either HTML/WEB or PDF, depending on how you want to view the statement.
o
In the Language field, select your desired language.
5. Click View to generate the activity statement. If you selected PDF as the Format, you will be prompted to open
the generated report or save it to your computer.
Here is an example of an HTML-based Activity Statement.
For more information
l
To learn more about activity statements, including an explanation of each statement section, see the Reporting
Guide.
Getting Started: Professional Advisor
75
Chapter 7
Customized Activity Statements
Customized Activity Statements
For those who require a simpler statement format, IB allows you to create and save customized statement. These customized statements allow you to include or exclude specific statement sections as well as set a variety of additional statement options.
You create customized activity statements on the Activity Statements page Account Management.
For more information
l
For more information on how to create a customized activity statement, see Customized Statements in the Reporting Guide.
Getting Started: Professional Advisor
76
Chapter 7
Customized Activity Statements
Activity Downloads
IB offers a number of special download formats for activity statements so you can integrate your statements with thirdparty applications, including:
l
Microsoft Word
l
Microsoft Excel
l
Microsoft Money
l
Quicken
l
Captools (Legacy)
l
Tradelog
l
GainsKeeper
In addition, the following downloads are available upon request:
l
l
Daily Captools Downloads - Daily Captools downloads are available for customers upon request. Send your
request to enable Captools downloads to [email protected]. Note that Captools downloads are not available to Non-Disclosed Broker Clients. If you request Daily Captools Downloads, the Activity
Downloads page will contain an additional section for Daily Captools Downloads.
PortfolioCenter® (intended for institutional accounts; you must request downloadable files from your IB Sales
Representative first).
Access these download formats in Account Management by clicking Reports > Activity > Downloads .
For more information
l
l
For more information about activity downloads, see the Activity Downloads topic in the Reporting Guide.
For a complete list of offerings for institutional accounts, including PortfolioCenter®, open the Reference Menu in
Account Management (click Reference in the lower right corner of any screen in Account Management), then
click Reports > Third Party Integration.
Getting Started: Professional Advisor
77
Chapter 7
Customized Activity Statements
Trade Confirmations
Real-time trade confirmations are generated for all executions. The Trade Confirmation report will list trade executions
separately, by asset class. Trade confirmations are available for the entire previous calendar year and from the start of the
current calendar year.
Access Trade Confirmations in Account Management by clicking Reports > Trade Confirmations > Reports.
Here is an example of a Trade Confirmation report.
For more information
l
For detailed instructions on how to view trade confirmations, see the Trade Confirmations topic in the Reporting
Guide.
Getting Started: Professional Advisor
78
Chapter 7
Customized Activity Statements
Flex Queries
Flex Queries let you specify exactly which fields you want to view in your Activity Statement or Trade Confirmation
report, the time period you want the report to cover, the order in which you want the fields to display, and the display
format, TEXT or XML, in which you want to view your report.
You can create multiple templates with different fields for each statement. All of your templates are stored in and run
from Account Management. An Activity Flex Query is different from an Activity Statement customized template in that
you can customize a flex query at the field level, allowing you to include and exclude detailed field information. Activity Statement customized templates only let you include and exclude sections.
You generate and run Activity Flex Queries from the Activity Flex page. You generate and run Trade Confirms Flex
Queries from the Trade Confirmation Flex page. Both are accessible from the Reports menu in Account Management.
For more information
l
For detailed instructions, see the Reporting Guide.
Getting Started: Professional Advisor
79
Chapter 7
Customized Activity Statements
Margin Reports
While the real-time margin summary is displayed in the Account Window in Trader Workstation, our Margin Report
provides you with a detailed breakdown of your positions and their corresponding margin requirements. In order to view
this detail, you must generate the Margin Report from Account Management. The information contained in the Margin
Report is based on the margin and equity values which are obtained daily at approximately 16:15 ET for all positions
across all asset classes. Margin reports show the margin requirements for all open single and combination positions and
are available for the previous 90 days.
Margin Reports can be accessed from the Reports > Risk > Margin menu in Account Management.
Here is an example of a margin report for an Advisor client.
For more information
l
For detailed instructions on how to view a margin report, see the Margin Reports topic in the Reporting Guide.
Getting Started: Professional Advisor
80
Chapter 7
Customized Activity Statements
Stress Test Report
The Stress Test report lets you see the change in the Profit and Loss (PNL) of your positions if the underlying price of
each of your positions declines by 3%, 5%, 10%, 20% and 30% and independently increases by 3%, 5%, 10%, 20% and
30%.
You access the Stress Test report by clicking Reports > Risk > Stress Test in Account Management.
Here is an example of a Stress Test Report.
For more information
l
For detailed instructions, see the Stress Test Report topic in the Reporting Guide.
Getting Started: Professional Advisor
81
Chapter 7
Customized Activity Statements
Value at Risk Report
The Value at Risk Summary report calculates your Value at Risk (VAR) at a 99, 99.5 and 100% confidence levels using
Principle Component Analysis. Because of the complexity of the calculations required, this report is completed overnight
and is only available once a day. If you need real-time VAR, use the IB Risk NavigatorSM in Trader Workstation, which
uses a simpler calculation.
Access the Value at Risk report in Account Management by clicking Reports > Risk > Value at Risk.
Here is an example of a Value at Risk report.
For more information
l
For additional information on how to generate the report, see the Value at Risk topic in the Reporting Guide.
Getting Started: Professional Advisor
82
Chapter 7
Customized Activity Statements
Advisor Fee Cap Report
IB caps the amount of fees an advisor can charge a client, up to a maximum of 25% of the client’s average equity in a
given year. The Advisor Fee Cap report displays the amount of available fee cap by client.
Access this report by clicking Reports > Supplemental > Fee Cap in Account Management.
Here is an example of an Advisor Fee Cap report:
For more information
l
For additional information on how to generate the report, see the Advisor Fee Cap topic in the Reporting Guide.
Getting Started: Professional Advisor
83
Chapter 7
Customized Activity Statements
Client Summary Report
Advisors can run this snapshot of client balances and performance over a one-day period. Because information on client’s
statements is displayed “as of” the cut-off time for each individual exchange, it should be noted that information on your
client summary report may not equal information on your client’s statements.
Access this report by clicking Reports > Supplemental > Client Summary in Account Management.
Here is an example of a Client Summary report:
For more information
l
For additional information on how to generate the report, see the Client Summary Report topic in the Reporting
Guide.
Getting Started: Professional Advisor
84
Chapter 7
Customized Activity Statements
P/L Markup Summary Report
This report shows a summary of client profit and loss (P/L) used to determine quarterly and annual performance fees paid
to an Advisor for a single client account or for all client accounts.
Access this report by clicking Reports > Supplemental > P/L Markup in Account Management.
Here is an example of a Client Summary report:
For more information
l
For additional information on how to generate the report, see the P/L Markup Summary Report topic in the Reporting Guide.
Getting Started: Professional Advisor
85
Chapter 7
Customized Activity Statements
PortfolioAnalyst
PortfolioAnalyst allows you to evaluate the performance of your IB portfolio by creating and saving reports based on a
set of measurement criteria and optionally comparing their data to selected industry benchmarks. You can create Detailed
Reports, which let you select any combination of report sections for a variety of performance analyses, or Snapshot
Reports, which are one-page summaries of an account's return, NAV, asset allocation and distribution of returns. Once
you create and save reports, you can run, edit or delete them.
Advisors can also create and save cover letters called synopses and assign them to Detailed PDF reports.
Access PortfolioAnalyst in Account Management by clicking Reports > PortfolioAnalyst.
For more information
l
For detailed instructions on using PortfolioAnalyst, see the Reporting Guide.
Getting Started: Professional Advisor
86
Chapter 7
Customized Activity Statements
Statement Access for Clients
Management themselves, with their username and password:
l
Activity Statement
l
Trade Confirmation report
l
Margin report
l
Activity and Trade Confirmation Flex Queries
l
Value at Risk Summary report
l
Stress Test Summary report
l
PortfolioAnalyst
Advisors may also access their client's statements and reports through Account Management, print them, and send them
to the client.
Getting Started: Professional Advisor
87
8
Opening a Paper Trading Account
Once your regular trading account has been approved and funded, you are eligible to open a Paper Trading Account. All
paper trading accounts start with 1,000,000 USD of paper trading equity, which allows you experiment with the full
range of IB trading facilities in a simulated environment which uses real market conditions.
Once you complete the application, the paper trading account is available within 24 hours under normal business circumstances. You will be notified by email when the account is ready for trading.
To apply for a paper trading account
1. Log in to Account Management.
2. Click Manage Account > Settings > Paper Trading.
3. Click Continue.
The following page opens:
4. Type a five-character paper trading account username in the field provided.
5. Type a paper trading account password in the field provided. The password must be from six to eight characters
and must contain at least one number and no spaces.
Getting Started: Professional Advisor
89
Chapter 8
6. Re-type the password in the field provided, then click Continue. The system will generate a full username for you
when you click Continue.
7. You are prompted to click Yes to confirm your request for a paper trading account, or click No to cancel your
request.
Be sure to write down your username and password; your password will not be shown on the screen again.
For more information
l
For details on managing your PaperTrader account, see the Account Management User’s Guide.
Getting Started: Professional Advisor
90
Chapter 8
Paper Trading Account Reset
Paper Trading Account Reset
All paper trading accounts start with 1,000,000 USD of paper trading equity. You may reset this equity at any time using
the Paper Trading Account Reset page in Account Management.
Simply log in to Account Management with your paper trading account username and password, then click Trade >
Paper Trading Account Reset.
Getting Started: Professional Advisor
91
Chapter 8
Paper Trading Account Statements
Paper Trading Account Statements
The Paper Trading Account Statements page lets you view and print daily statements for your paper trading account, and
download trade information to Microsoft Word and Microsoft Excel. Daily statements cover the last 45 days.
Log into Account Management with your paper trading account username and password, then click Reports > Activity
> Statements.
Getting Started: Professional Advisor
92
9
Advisor White Branding
We provide Advisors with the ability to “White Brand” specific areas of our software and documentation. White Branding gives you the ability to display your own logos and company information on our trading platforms and reporting systems, including Trader Workstation, WebTrader, Account Management, statements, our registration system and the TWS
Users’ Guide.
You set up your White Branding from the White Branding page in the Account Administration section of Account Management.
To set up white branding
1. Log in to Account Management.
2. Click Manage Account > Settings > White Brand.
3. Follow the instructions on the screen to complete the form for the category or categories of White Branding you
require.
4. Click Submit. Note that each category of White Branding has its own Submit button.
Under normal circumstances, White Branding changes/requests made before 5:00 PM EST go into effect by 8:00
PM EST the same day. Changes made after 5:00 PM EST will take effect the following day 8:00 PM EST.
For more information
l
l
For additional information about White Branding for other systems and features, see the Account Management
Users’ Guide.
For issues regarding White Branding, send us an email at [email protected].
Getting Started: Professional Advisor
93
10
Enabling Additional Traders
You can add users to your Advisor account and grant them access to a subset of Account Management functions using
our User Access Rights system. For example, you can add grant trading access to additional traders, reporting access for
auditors, and so on.
To add a user to the account
1. Log In to Account Management.
2. Click Manage Account > Access Rights > Users.
3. Click Add User.
4. On the Add New User and Access Rights page, enter all required information, including name, five-character username prefix, password, and email address.
5. On the same page, assign Account Management functions to the user for the Master account by clicking the appropriate check boxes in the Functions section. If a function is not checked, the user will not be able to access the
function in Account Management.
6. On the same page, you can assign access rights to some or all sub/client accounts that you want the user to
access, and specify which functions you want the user to be able to access for the sub/client accounts.
7. Click Continue.
8. Verify that all the information is correct, then click Continue.
If you need to make further changes, click Back, then make corrections before submitting.
9. Enter the confirmation number sent to you via email, then click Continue.
Getting Started: Professional Advisor
95
Chapter 10
If you have not received a confirmation number, click Request Confirm # to have a confirmation number sent to
your email address on record.
10. Click Cancel to cancel your changes.
Once the user has been successfully created, the process is not complete until the new user completes additional
verification steps by logging into Account Management with the username and password which were created.
For more information
l
To learn more about user access rights, see the User Access Rights Guide.
Getting Started: Professional Advisor
96
11
Customer Activity Monitor
The IB Customer Activity Monitor (CAM) helps Advisors quickly find and view all client activities, including the complete order history and its routing sequence. Our robust user interface displays:
l
l
l
Real-time Queries: IB CAM communicates directly with the IB order routing system, which ensures real-time data
results for order and execution queries. Flexible search filters let you narrow your queries to include specific criteria, and you can view search results in ascending or descending order by date, underlying, price, and so on.
Audit Trails: Track up to five days' order history, from order initiation to order execution, including modified, cancelled and rejected orders. Also, export queries to any spreadsheet application.
Account Status: Find account information for any of your clients, including real-time account balances, margin
requirement and trading limits, market value and portfolio.
Access the IB CAM from the Customer Activity Monitor page on our website, or from the Reports menu in Account
Management. The username and password for accessing the CAM will be the same as the ones created during the master
account opening process.
For more information
l
For detailed instructions on how to use the Customer Activity Monitor, see our Customer Activity Monitor Users'
Guide.
Getting Started: Professional Advisor
97
12
Using Money Managers
This section describes how an Advisor, acting as a Wealth Manager, can assign Money Managers to trade for client
accounts.
The following topics are included:
l
Money Manager Overview
l
Money Manager Marketplace
For more information
l
For more information about Money Managers, see the Money Manager topic in the Account Management Users'
Guide.
Getting Started: Professional Advisor
99
Chapter 12
Money Manager Overview
All Professional Financial Advisors are considered to be Wealth Managers. As a Wealth Manager, you can optionally
add Money Managers to trade for your client accounts. Money Managers direct trading and investment activity in client
accounts. They cannot add client accounts, fund client accounts, set client fees or set client trading permissions.
A Money Manager must first complete a separate Money Manager account application. Once a Money Manager’s
account is activated, you can add him or her to your account, then assign client accounts to the Money Manager for trading purposes, set trading permissions and set client fees. Both Money Managers and Wealth Managers can trade for client
accounts. After the Money Manager’s account has been activated, you as a Wealth Manager perform the following steps:
1. Access the Money Manager Marketplace and shop for available Money Managers. Either contact a Money Manager directly or request that a Money Manager contact you.
2. Once you and the Money Manager have agreed to do business together, add the Money Manager to your account
by using the Add button in the Money Manager Marketplace. You can also add a Money Manager on the Manage Account > Money Manager > Administration page if you know the Money Manager's Account ID.
Registered Money Managers are Money Managers who have already opened their own IB Money Manager
accounts. Money Managers must log into Account Management with their username and password to accept
assignments from Wealth Manager on the Wealth Manager Assignment page (only Money Managers can view
this page).
3. Set Up a Client Fee Schedule - This fee schedule represents the fees that will be paid to you, the Wealth Manager, when you trade for client accounts. Typically, you will have already done this for your client accounts on
the Manage Clients > Fees > Configure page in Account Management.
You set up a separate fee schedule for a Money Manager when you set up the client accounts for the Money Manager in the next step.
4. Set Up Client Accounts - After a registered Money Manager accepts your assignment, you can set up the client
accounts for each Money Manager. This setup includes assigning client accounts to a Money Manager, setting
trading permissions for the Money Manager and setting Money Manager client fees (fees that will be paid when
the Money Manager trades for client accounts). The client setup process takes you through a series of pages in
Account Management. You start the setup process on the Manage Account > Money Manager > Administration page in Account Management.
Money Managers can start trading the next business day (client assignments and trading permissions require one
business day to take effect). But Money Manager client fees will be collected from client accounts and transferred
to the Money Manager only after the client signs the Money Manager client agreement.
Note that fee per trade unit is NOT available for Money Managers.
Note: Client accounts assigned to a Money Manager can only receive trading permissions for products
and countries that they already have permission to trade as Advisor clients. For example, if a client
account can trade stocks as an Advisor client, and you assign trading permissions for a Money Manager that gives the same client account trading permissions for stocks and options, then the Money
Manager will only be able to trade stocks for that client account.
5. Create a Client Fees Template - Optionally, create a common client fee schedule to for Money Managers
without having to set client fees separately for each Money Manager. You can create a client fees template on the
Manage Account > Money Manager > Administration page in Account Management.
Getting Started: Professional Advisor
100
Chapter 12
6. Fund Client Accounts - When you assign a client account to a Money Manager, we create a second version of
the client account that is linked to the Money Manager. When you fund or transfer positions into a client account
for a Money Manager, you are actually funding or moving positions into the linked client account.
In addition, Wealth Managers can perform the following optional steps, all available on the Money Manager Assignment
page in Account Management:
l
l
l
l
Modify Client Fees for a Money Manager - You can edit the client fees for one or more client accounts
assigned to a Money Manager. Note that any changes to Money Manager fees require approval from the client.
Modify Trading Permissions - You can edit the trading permissions for one or more client accounts assigned to a
Money Manager.
Change Money Manager Client Account Assignments - You change Money Manager client account assignments at any time by adding or removing client accounts from the Money Manager. Before you can remove a client account from a Money Manager, you must first move all cash and positions from the Money Manager-linked
client account back to the client account.
Remove a Money Manager -When you remove a Money Manager, all client accounts assigned to that Money
Manager will be closed. Remember to move all cash and positions from the Money Manager-linked client account
linked back to the client account before you remove a Money Manager.
The Manage Account > Money Manager > Administration page in Account Management is shown below.
Getting Started: Professional Advisor
101
Chapter 12
Money Manager Marketplace
Money Manager Marketplace
IB’s Money Manager Marketplace, available by clicking Investors’ Marketplace > Search Services > Investing >
Money Manager in Account Management, is an electronic forum designed to connect Wealth Managers with Money
Managers.
l
l
Advisors acting as Wealth Managers can view information about Money Managers, review their background
information and specify their preferred contact method.
Money Managers access the Investors' Marketplace > Advertise Services > Investing > Money Manager page
to enter information about themselves and their trading services, including their education, certification, assets and
products traded, which will be available to Wealth Managers who access the Money Manager Marketplace; and
to review contact requests from Wealth Managers.
For more information
l
To learn more about the Money Manager Marketplace, see the Account Management Users' Guide.
Getting Started: Professional Advisor
102
13
Adding Administrators
This section describes how you can link to an Administrator for the purpose of providing third-party administrative tasks
such as reporting for your client or sub accounts.
The following topics are included:
l
Administrator Overview
l
Administrator Marketplace
l
Managing Administrators
For more information
l
For more information about Administrators, see the Administrators topic in the Account Management Users'
Guide.
Getting Started: Professional Advisor
103
Chapter 13
Administrator Overview
Administrator Overview
Administrators are users who have registered with Interactive Brokers for the purpose of performing third-party administration such as reporting for other accounts. Administrators open their own accounts and you can shop for Administrators in the Administrator Marketplace.
l
An Administrator account applicant completes the Administrator registration process. Information entered into the
application is added to the Administrator Marketplace upon account approval.
l
The Administrator logs into Account Management and modifies his or her Marketplace information if necessary.
l
You open the Administrator Marketplace in Account Management to search for an Administrator.
l
You select an Administrator in the Marketplace and a request is sent to the Administrator.
l
You can also link directly to a selected Administrator by entering the Administrator's account number.
l
l
The Administrator is notified of the linking request and accepts (or rejects) the request in Account Management.
Once accepted, the Administrator is linked to the requesting account.
You assign client accounts to the linked Administrator.
For more information
l
To learn more about Administrators, see Administrators in the Account Management Users' Guide.
Getting Started: Professional Advisor
104
Chapter 13
Administrator Marketplace
Administrator Marketplace
Use the Administrator Marketplace to:
l
Browse available Administrators.
l
Select a preferred method of being contacted by selected Administrators and send contact requests.
l
Add Administrators (send link requests).
Access the Administrator Marketplace by clicking Investors’ Marketplace > Search Services > Administrators in
Account Management.
For more information
l
To learn more about the Administrator Marketplace, see Administrator Marketplace in the Account Management
Users' Guide.
Getting Started: Professional Advisor
105
Chapter 13
Managing Administrators
Managing Administrators
Use the Manage Administrator page in Account Management to:
l
Add an Administrator by entering his or her account number.
l
View active and pending Administrators.
l
Delink an Administrator from your account.
l
Assign client accounts to an Administrator.
l
Remove client accounts from an Administrator.
Access the Manage Administrators page by clicking Investors' Marketplace > Search Services > Administration >
Manage Administrators.
The following image shows the Manage Administrators page.
For more information
To learn more about Administrators, see the Account Management Users' Guide.
Getting Started: Professional Advisor
106
14
Investors' Marketplace
Investors' Marketplace is a free online forum where IB customers can form connections with service providers and do business together on Interactive Brokers' platform. Advisors can search for service providers on the IB website or within
Account Management. Advisors can advertise their own services to potential clients on Investors' Marketplace within
Account Management, or can advertise other third-party services that they offer, such as analyst research or software
tools.
From the IB website, Investors' Marketplace is available by clicking the link at the bottom of any page. Browse the different categories of service providers and, when you find a service provider with whom you want to do business, you can
contact the provider directly or log into Account Management to connect, depending on the type of service provider.
In Account Management, search for service providers from the Investors' Marketplace > Search Services menu.
Advisors can advertise their own services on the Advisor Marketplace, available from the Investors' Marketplace >
Advertise Services menu in Account Management.
In Account Management, service providers available to advisors are organized into categories:
l
l
l
l
l
Investing - Advisors can search for and link to Money Managers, and if they are Accredited Investors or Qualified
Purchasers under SEC rules, they can view information and about and invest in independent Hedge Funds.
Research -Search for and connect with third-party providers of institutional-caliber research directly in the Trader
Workstation trading platform; educators who have expertise in trading, specific products and other topics; and
news wires and research feeds for Trader Workstation.
Technology - Search for and connect with large and small third-party vendors who have potentially complementary software programs to expand the functionality of TWS, and programming consultants who may be
able to assist API and FIX CTCI customers by offering their programming expertise.
Administration - Search for and link to registered Administrators, third-party compliance firms, and manage your
linked Administrators.
Business Development - Search for and connect with third-party providers of advertising and marketing services,
business analysts, and individual job seekers.
Advisors who also provide research, technology, business development services or have open positions to fill can advertise those services on Investors' Marketplace from within Account Management.
Getting Started: Professional Advisor
107
Chapter 14
Advertise Your Services
Advisors can market their services on the Advisor Marketplace. Once an advisor adds information to the Broker Marketplace, other IB customers can log into Account Management and browse the marketplace and either request that the
advisor contact them or request that the advisor add them as a client.
The Advisor Marketplace lets you advertise your services as follows:
l
Modify your contact information
l
Add information about you and your business
l
Review contact requests by potential clients
l
Select whether or not you are open to new clients
l
Add PDF documents to your marketplace entry
l
Review PDF materials already posted to your marketplace entry
l
Approve new client requests
l
Add text-based articles to your marketplace entry
To join the Advisor Marketplace
1. In Account Management, click Investors' Marketplace > Advertise Services > Investing > Advisors.
2. An electronic agreement opens. Read the agreement, type your signature in the field provided, and then click Submit.
3. While you wait for us to approve the agreement, you can add information about yourself in the Upload Information Provided in Advisor Marketplace section, upload information or documents or add text-based articles. Your
contact information is added in the Advisor Contact Information section automatically.
Getting Started: Professional Advisor
108
Chapter 14
4. As soon as we approve your agreement, your information appears in the Advisor Marketplace and customers shopping for an advisor can request that you contact them or automatically add them as clients.
Getting Started: Professional Advisor
109
Index
A
Advisors Account Window 55
Account Balances 56
allocation defaults 49
account groups 46
allocation groups
Account Window
defining 45
Account Balances 56
allocation profiles 48
Available for Trading 62
automatic logoff 9
Margin Requirements 58
Automatically allocate trades 49
View FX Portfolio Values 66
Available for Trading section 62
View Market Value 64
View Portfolio Values 68
B
Broker Marketplace 108
Account window for Advisors 54
C
Account Window summary for Advisors 55
CAM 97
activity downloads 77
client account details 32
activity statements 74
client account funds status 31
adding Administrators 103
client accounts 21
adding IRA Trust accounts 24
fully electronic applications 23
adding users 95
semi-electronic applications 25
additional advisor authorizations 34
viewing details about 32
Administrator Marketplace 105
administrators
managing 106
client fees 27
high water marking 29
client statements 87
Administrators 103
Client Summary Report 84
advertising your services on Traders'
Marketplace 108
creating allocation profiles 48
creating an account group 46
Advisor Fee Cap Report 83
Getting Started: Professional Advisor
111
Index
Customer Activity Monitor 97
IRA Trust accounts 24
customized activity statements 76
D
L
link existing client accounts 36
define allocation groups and methods 45
linking advisor client accounts 36
direct funding 16
logging in 7
downloading statements 77
E
failed login attempts 8
logging in to TWS 41
enabling additional traders 95
login device 11
expiring sessions 9
login security 11
F
M
failed login attempts 8
managing administrators 106
Flex Queries 79
Margin reports 80
fully electronic client applications 23
margin requirements
funding 13
monitoring 60
client accounts 20
Margin Requirements 58
master account 14
Margining 58
trading account 15
market data
transferring funds from the master account 18
adding 42
funding your trading account directly 16
market data;subscribing to market data 40
funds status for client accounts 31
market date lines 42
G
Getting Started 5
master account funding 14
Money Manager Marketplace 102
H
high water marking 29
Money Managers 99-100
monitoring margin 60
I
initial funding for client accounts 20
P
P/L Markup Summary Report 85
Investors' Marketplace 107
Getting Started: Professional Advisor
112
Index
paper trading account 89
trade and allocate for funds 51
reset 91
trade confirmations 78
statements 92
Traders' Marketplace 108
PortfolioAnalyst 86
trading account funding 15
Preserve default allocation 50
trading permissions 30
Print account summary 55
trading;starting to trade; 39
Q
quick start 5
transferring funds from the master account 18
TWS
R
logging in 41
real-time activity monitoring 53
U
reporting 73
Use currently subscribed account 49
reports for clients 87
Use last submitted as a default allocation 50
requesting more paper trading equity 91
right-click Portfolio menu 70
S
V
Value At Risk report 82
View FX Portfolio Values 66
Secure Login System 11
View Market Value 64
semi-electronic client applications 25
View Portfolio Values 68
setting allocation defaults 49
viewing account balances 56
specifying client fees 27
statements 73-74
W
What if margin 58
customizing 76
white branding 93
for clients 87
statements for paper trading accounts 92
Stress Test Report 81
T
ticker lines 42
trade and allocate for clients 51
Getting Started: Professional Advisor
113
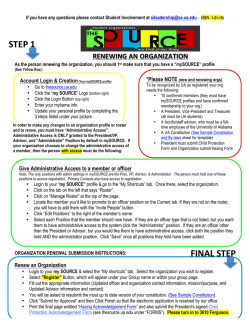

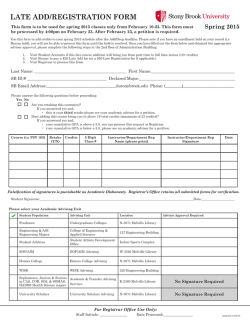
© Copyright 2026