
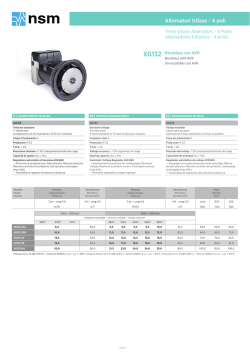
XG 132 - NSM Generators
02/12 Alternatori Trifase Brushless con AVR Three-phase Brushless Alternators with AVR Alternadores Trifasicos sin escobillas y con AVR XG 132 MANUALE D'USO E MANUTENZIONE USE AND MAINTENANCE MANUAL MANUEL POUR L'ENTRETIEN ET LA MANUTENTION HANDBUCH FÜR DIE BEDIENUNG UND WARTUNG MANUAL PARA EL USO Y MANTENIMIENTO Nuova Saccardo Motori Srl Via Lazio, 5 36015 Schio (Vicenza) - Italy tel: +39 0445 595888 fax: +39 0445 595800 www.nsmgenerators.com [email protected] Introduzione descrizione generale identificazione verifiche preliminari movimentazione immagazzinaggio Introduction general description identification preliminary checks handling storage Introducción descripción general identificación verificaciones preliminares manipulación almacenamiento p. 1 Installazione e messa in servizio Installation and start-up Instalación y puesta en servicio p .2 Manutenzione Maintenance Mantenimiento p .2 Accoppiamento meccanico istruzioni di montaggio Mechanical coupling assembling instructions Acoplamiento mecanico instrucciones de montaje p .3 Collegamento elettrico regolatore di tensione Electrical connections voltage regulator Conexion electrico regulador de tension p .5 Schemi di collegamento Wiring diagrams Diagrama de cableado p .6 Operazioni di smontaggio Disassembling operations Operaciónes de desmontaje p. 9 Ricerca guasti Trouble shooting Averías p .11 Dati tecnici Technical data Datos tecnicos p .12 Garanzia Warranty Garantía p .13 , , , , , , , , , , , , , , , , , , , , , INTRODUZIONE Lo scopo delle seguenti istruzioni è di indicare agli utilizzatori le corrette condizioni di impiego degli alternatori serie XG132. INTRODUCTION The purpose of the following instructions is to explain to the operators the proper use of the XG132 series of NSM alternators. INSTRUCCIONES DE USO El objeto de las presentes instrucciones es indicar a los usuarios las correctas condiciones de empleo de los alternadores XG132. ATTENZIONE! Le istruzioni fornite riportano informazioni atte ad essere utilizzate da personale tecnico qualificato; esse devono essere integrate dalle leggi e dalle normative vigenti. Le macchine elettriche rotanti presentano parti pericolose in quanto poste sotto tensione ed in rotazione. Pertanto un uso improprio, la carenza di manutenzione e lo scollegamento dei dispositivi di protezione possono essere causa di gravi danni a persone e cose. WARNING! The instructions given provide information to be used by qualified technicians; the information must be integrated with the applicable laws and regulations in force. Some parts of rotating electrical machines are hazardous, as they are live and rotate. Therefore, improper use of the same, failure to carry out maintenance and the removal of the safety devices may lead to serious personal injury or damage to property. ATTENCIONES! Las presentes instrucciones dan informaciones adecuadas para el personal cualificado; estas tienen que complementarse con las leyes y normas vigentes. Las màquinas elèctricas giratorias presentan piezas peligrosas ya que estàn bajo tensiòn o se mueven durante el funcionamiento. Por lo tanto: si se hace un uso indebido, si no se efectùan los mantenimientos indicados, si se desconectan los dispositivos de seguridad se pueden provocar daños graves a personas o cosas. DESCRIZIONE GENERALE I generatori della serie XG132 sono autoregolati, senza spazzole, a 4 poli, costruiti in conformità alle direttive 2006/95/CE, 2004/108/CE e alle norme EN60034-1, EN61000-6-1, EN61000-6-3. Il grado di protezione è IP 23, Gli isolamenti sono eseguiti in classe H. La conformità alle norme sopra citate fa sì che gli alternatori della serie XG132 non presentino pericolo per l'operatore se installati, usati e mantenuti secondo le istruzioni fornite da NSM, e a condizione che i dispositivi di sicurezza siano tenuti in perfetta efficienza. Per questa ragione occorre attenersi scrupolosamente alle istruzioni riportate in questo manuale. GENERAL DESCRIPTION The XG132 series of generators are self-regulating, brushless, with 4 poles, built in compliance with EEC directives 2006/95/CE, 2004/108/CE and in accordance with standards EN60034-1, EN61000-6-1, EN61000-6-3. The protection degree is IP 23. The insulation provided is class H. Compliance with the above-mentioned standards means that the XG132 series of generators does not present any danger for the operator if they are installed, used and maintained in accordance with the instructions provided by NSM and on condition that the safety devices are kept in perfect working order. For this reason, it is necessary to adhere strictly to the instructions given in this manual. DESCRIPCIÓN GENERAL Los generadores de la serie XG132 son autorregulados, sin escobillas (brushless) y de 4 polos, fabricados según las directivas 2006/95/CE, 2004/108/CE y según las normas EN60034-1, EN61000-6-1, EN61000-6-3. El grado de protección es IP 23, El aislamiento está efectuado en clase H. El respeto de las normas antes citadas hace que los alternadores de la serie XG132 no presenten peligro para el usuario siempre que se instalen , utilicen y se mantengan de acuerdo con las instrucciones suministradas por NSM, y siempre que los dispositivos de seguridad se mantengan en perfecto estado de uso. Por esta razón, se deben respetar escrupulosamente las instrucciones contenidas en este manual. IDENTIFICAZIONE La targhetta di identificazione è applicata esternamente all'alternatore. (vedi disegno a fondo pagina) Per qualsiasi comunicazione con NSM o con i centri di assistenza autorizzati, riferire sempre tipo, potenza e n° di matricola dell'alternatore in oggetto. IDENTIFICATION The identification label is attached on the generator frame.(check the picture at the bottom of this page) When contacting NSM or the authorized assistance centres, details must always be given of the type, power and serial number of the alternator in question. IDENTIFICACIÓN La tarjeta de identificación està puesta en la parte exterior del alternador. (se vea el dibujo) Para comunicar con NSM o los centros de asistencia autorizados, siempre se deberá indicar el tipo, potencia y n° de identificación del alternador en cuestión. PRELIMINARY CHECKS VERIFICHE PRELIMINARI Al momento della ricezione dell'alternatore si raccomanda di When the alternator is delivered, make sure that it has not been damaged during transportation. verificare che non abbia subito danni durante il trasporto. MOVIMENTAZIONE movimentare l’alternatore solo con mezzi adeguati, utilizzando le apposite staffe sulla carcassa dell’alternatore. Attenzione che la movimentazione effettuata con mezzi inadatti o senza le necessarie precauzioni può essere fonte di gravi danni alle persone e/o alle cose HANDLING handle the alternatore only with suitable equipment, using the brackets on the alternator frame. Be warned that a handling made with inadequate equipment or without the needed care for a safe handling may cause serious personal injuries or property damages VERIFICACIONES PRELIMINARES Cuando se reciba el alternador se recomienda verificar la total ausencia de daños producidos durante el transporte. MANIPULACIÓN manipular el alternador sólo por los medios adecuados, utilizando los soportes de la carcasa del alternador. Tener cuidado que la manipulación por los medios inadecuados o sin las debidas precauciones puede causar lesiones graves a personas y / o cosas movimentazione handling manipulación 1 IMMAGAZZINAGGIO, CONTROLLO ISOLAMENTO Nel caso l'alternatore non venga posto immediatamente in servizio, dovrà essere immagazzinato in luogo coperto, pulito e privo di umidità. Prima della messa in servizio dopo lunghi periodi di immagazzinamento, o in presenza di segni evidenti di umidità o condensa, verificare lo stato di isolamento tra gli avvolgimenti e verso massa. La prova di isolamento deve essere effettuata da un tecnico qualificato. Prima di eseguire tale prova è necessario sconnettere il regolatore di tensione ed il ponte raddrizzatore. Se le prove forniscono un risultato troppo basso (inferiore ad 1MOhm) è necessario provvedere ad asciugare l'alternatore in forno ad una temperatura di 60÷70°C per circa 6 ore. Ripetere quindi la prova di isolamento e verificare che i risultati forniti siano adeguati. INSTALLAZIONE E MESSA IN SERVIZIO Prima dell'installazione verificare che i dati di targa del generatore corrispondano alle caratteristiche dell'impianto. ATTENZIONE! ! A tensioni d'uscita diverse corrispondono potenze e correnti diverse: utilizzare cavi di sezione adeguata. ! Si consiglia di montare l'interruttore di protezione in prossimità del generatore. ! L'alternatore dovrà essere installato in un locale sufficientemente ampio, con possibilità di scambio d'aria direttamente con l'atmosfera. ! E' indispensabile che le aperture di aspirazione e di scarico dell'aria non siano ostruite e che il posizionamento sia tale da evitare l'aspirazione dell'aria calda prodotta dal motore primo. ! Prevedere la possibilità di effettuare ispezioni e manutenzioni. Prima del primo avviamento occorre verificare: ! che tutti i collegamenti elettrici siano eseguiti correttamente. ! che tutti i dadi dei morsetti siano ben serrati. ! che l'impianto sia dotato di opportune protezioni ! che le griglie di protezione siano montate MANUTENZIONE Attenzione! Prima di eseguire qualsiasi tipo di manutenzione o riparazione, assicurarsi che il gruppo non possa autoavviarsi tramite appositi quadri di comando. Verificare periodicamente: ! il serraggio di tutti i dadi di fissaggio compresi i dadi delle morsettiere che, se allentati possono provocare notevoli surriscaldamenti nei cavi ! che non ci siano rumori anomali o vibrazioni eccessive ! che le griglie di passaggio dell'aria sia in ingresso che in uscita siano sempre ben pulite ! che i gommini elastici dei giunti di accoppiamento tipo B34 non siano usurati I cuscinetti non necessitano di alcuna manutenzione poiché sono lubrificati a vita (circa 20000 ore in condizioni di normale impiego): si consiglia la sostituzione solo in corrispondenza di revisione completa del gruppo (dopo 20000 ore di funzionamento) o in seguito a rumori anomali. Attenzione! In caso di pulizia del gruppo non utilizzare acqua o solventi in quantità eccessiva, e comunque evitare il contatto fra questi e gli avvolgimenti al fine di evitare il loro danneggiamento STORAGE, CHECKING THE INSULATION If the alternator is not put into operation immediately, it must be stored in a covered, clean, damp-free room. Before putting it into operation after long periods of storage, or in the presence of obvious signs of damp or condensation, check the condition of the insulation between the windings and towards earth. The insulation must be tested by a qualified technician. Before carrying out this test, disconnect the voltage regulator and rotating rectifier. If the tests give an insufficiently low result (below 1MOhm) the alternator must be dried in an oven at a temperature of 60÷70°C for about 6 hours. The insulation test should then be repeated to check the results are adequate. ALMACENAMIENTO, CONTROL DEL AISLAMIENTO Si el alternador no se pone inmediatamente en servicio, se deberá almacenar en lugar cubierto, limpio y sin humedad. Antes de la puesta en servicio, después de prolongados períodos de almacenamiento o ante la presencia de signos evidentes de humedad o de condensación, es necesario verificar el estado del aislamiento de los bobinados entre ellos y entre bobinados y masa. La prueba de aislamiento la deberá efectuar un técnico cualificado. Antes de realizar dicha prueba es necesario desconectar el regulador de tensión y el puente rectificador Si las pruebas dan un resultado muy bajo (inferior a 1MOhm) será necesario efectuar el secado del alternador en un horno a una temperatura de 60÷70°C durante aproximadamente 6 horas. Después se deberá repetir la prueba de aislamiento y se controlará que los resultados obtenidos sean correctos INSTALLATION AND START-UP Before installation, check that the details on the generator rating plate correspond with the characteristics of the INSTALACIÓN Y PUESTA EN SERVICIO system. Antes de efectuar la instalación se debe verificar que los datos de la tarjeta del generador correspondan a las características WARNING! de la instalación. ! Different output voltages correspond to different powers and currents: use cables of an adequate cross ATENCIÓN! section. A las distintas tensiones de salida les corresponden potencias ! We recommend to assemble the circuit-breaker of e intensidades distintas: utilizar cables de sección adecuada. protection near the alternator. Se recomienda de montar el interruptor de protección cerca del ! The alternator should be installed in a sufficiently large alternador. room with the possibility of changing the air directly El alternador deberá instalarse en un local suficientemente from the atmosphere. amplio, con posibilidad de intercambio del aire directamente ! It is essential for the inlet and outlet air-grating not to be con la atmósfera. obstructed and the inlet of hot air produced by the drive Es indispensable que las aberturas de aspiración y de salida engine should be avoided. del aire no estén obstruidas y que su posicionamiento impida ! Provision should be made for inspections and la aspiración del aire caliente producido por el motor de maintenance to be carried out during operation life. arrastre. Se deberá prever la posibilidad de efectuar inspecciones y Before first starting up, check: mantenimientos. ! if all electrical connections are correctly performed. ! if all bolts of terminals are properly tightened Antes de arrancar la máquina por primera vez, verifique: ! that the plan is provided with the correct protection ! si todos los terminales están conectados correctamente. ! si todos los bornes están bien apretados devices ! si la instalación esta dotada de las protecciones ! that protection-screens are assembled indispensable ! si las rejillas protección están colocadas MAINTENANCE Warning! Before performing any type of maintenance or repair, make sure that the unit cannot be accidentally MANTENIMIENTO restarted from the control panels. Atención! Antes de efectuar cualquier tipo de mantenimiento o reparación, es necesario asegurarse que el grupo no pueda Regularly check the following: ponerse en marcha automáticamente mediante los ! the tightening of all the fixing nuts, including the nuts on respectivos cuadros de mando. the terminal boards that can create serious cable overheating if loose; Comprobar periódicamente: ! that there are no unusual noises or excessive ! El apriete de todas las tuercas de fijación, incluyendo las tuercas de la placa de bornes , que si se aflojasen podrían vibrations; ocasionar un notable calentamiento de los cables ! that the air passage vents at both the inlets and outlets ! La ausencia de ruidos anómalos o de vibraciones are always clean and free from obstruction; excesivas ! that the elastic washers on the B34-type coupling joints ! Que las rejillas para el paso del aire tanto en la entrada are not worn-out. como en la salida, estén siempre bien limpias The bearings require no maintenance because they have ! Que las juntas elásticas del acoplamiento tipo B 34 no estén gastadas been provided with lifelong lubrication (and last approximately 20,000 hours under normal working conditions): we recommend replacing the bearings only Los rodamientos no necesitan ningún mantenimiento porque whenever the unit is completely overhauled (after 20,000 están lubricados de por vida (aproximadamente 20000 horas working hours) or whenever unusual noises are heard. en condiciones normales de uso). Se recomienda su reemplazo sólo cuando se efectúe la revisión completa del Warning! Never use excessive quantities of solvents or grupo (después de 20000 horas de funcionamiento) o si se water when cleaning the unit, and protect the windings from detectan ruidos anómalos. contact with these substances in order to prevent damage. Atención! Si se necesita limpiar el grupo, no se debe utilizar agua o disolventes en exceso; de todos modos, se debe evitar el contacto entre éstos y los bobinados para que no se deterioren. 2 ACCOPPIAMENTO MECCANICO MECHANICAL COUPLING ACOPLAMIENTO MECANICO Importante! Prima del montaggio pulire le superfici d'accoppiamento. Allineare accuratamente il generatore ed il motore di trascinamento. Un allineamento impreciso può causare vibrazioni e danneggiamento dei cuscinetti. Important! Before assembling clean all coupling parts. Line up the generator and the drive motor with care. An inaccurate alignment may lead to vibrations and damage the bearings. ¡Importante! Antes del montaje limpiar las partes de acoplamiento. Alinear con cuidado el generador y el motor de accionamiento. Una alineación poco precisa puede provocar vibraciones y daños en los rodamientos. ACCORGIMENTI GENERALI Verificare la compatibilità dei dispositivi di accoppiamento fissare l'alternatore al telaio utilizzando supporti antivibranti adeguati collegamenti in morsettiera: coppia di serraggio: M6 - 5Nm / M8 - 8Nm GENERAL WARNINGS Check the compatibility of the coupling devices fasten the alternator to the frame using appropriate vibration-damping supports terminal board connections: coupling torque: M6 - 5Nm / M8 - 8Nm ADVERTENCIAS GENERALES Comprobar la compatibilidad de los dispositivos de acoplamiento fijar el alternador al bastidor utilizando soportes antivibrantes adecuados conexiones en bornera: par de cierre: M6 - 5Nm / M8 - 8Nm ISTRUZIONE DI MONTAGGIO FORMA B3/B9 (mono-supporto) 1) Togliere la cuffia posteriore C, e svitare i 4 dadi D1 che bloccano i tiranti esterni T1 2) Fissare lo scudo anteriore S (con i tiranti esterni avvitati) al motore di trascinamento (fig.1A) (coppia di serraggio: 30Nm) 3) Applicare il tirante T per il fissaggio assiale del rotore avvitandolo a fondo sulla sporgenza dell'albero motore (fig.1B). 4) Riposizionare il gruppo carcassa e lo scudo posteriore (fig.1C) 5) Riassemblare l'alternatore, avvitando nuovamente ai tiranti i 4 dadi di cui al punto 1 (coppia di serraggio 30Nm). 6) Bloccare assialmente il rotore applicando la rosetta e serrando il dado autobloccante D sul tirante T con chiave dinamometrica (1C) Coppia di serraggio: C30: 40Nm - J609B: 25Nm Attenzione: prima di applicare il dado osservare che la porzione filettata del tirante penetri nel rotore permettendo così un sicuro bloccaggio. 7) Rimontare la cuffia posteriore C ASSEMBLING INSTRUCTIONS B3/B9 FORM (single bearing) 1) Remove the rear protection casing C and unscrew the 4 D1 nuts that lock the external T1 tie-rods in place 2) Fasten the front shield S (with the external tie-rods screwed in) to the drive motor (fig.1A) (Tightening torque: 30Nm) 3) Apply the rod T for the axial clamping of the rotor, and screw it tight on the engine shaft. (fig.1B). 4) Re-position the casing unit and the rear shield (Fig.1C) 5) Re-assemble the alternator by screwing the 4 nuts in Point 1 back into the tie rods (Tightening torque 30Nm). 6) Lock axially the rotor by placing the washer and tight the self-locking nut D on the rod T, using a torque spanner (fig.1C) Tightening torque: C30: 40Nm - J609B: 25Nm Caution: before applying the nut, make sure that the threaded part of the rod enters the rotor, in order to obtain a tight lock. 7) Re-assemble the rear protection casing C ISTRUCCIONES PARA EL MONTAJE FORMA B3/B9 (mono-soporte) 1) Sacar la protección trasera C, y desenroscar las 4 tuercas D1 que bloquean los espárragos exteriores T1 2) Fijar el escudo delantero S (con los espárragos exteriores enroscados) al motor de arrastre (fig.1A) (par de apriete: 30Nm) 3) Montar el tirante T para la fijación axial del rotor atornillándolo a fondo sobre el saliente del cigüeñal del motor (fig.1B) 4) Volver a colocar el grupo carcasa y el escudo trasero (fig.1C) 5) Ensamblar de nuevo el alternador, enroscando de nuevo las 4 tuercas del punto 1 en los espárragos (par de apriete 30Nm) 6) Bloquear axialmente el rotor utilizando la arandela y apretando la tuerca autoblocante D sobre el tirante T con llave dinamométrica (fig.1C) Par de apriete: C30: 40Nm - J609B: 25Nm Atención : antes de montar la tuerca asegurarse de que la parte roscada del tirante entra en el rotor, permitiendo así un blocaje seguro. 7) Volver a montar la protección trasera C S T D1 T1 C D 3 FORMA B2 - (SAE) (monosupporto) 1) Rimuovere le fascette che bloccano il rotore alla flangia 2) Togliere la rete R di protezione della flangia dell'alternatore 3) Calettare la flangia F del generatore a quella del motore, centrando nello stesso tempo i fori del disco del giunto alternatore G con quelli della sede volano del motore 4) Fissare la flangia alternatore al motore (coppia di serraggio 30Nm) 5) Fissare il giunto alternatore al volano, accedendo dalle aperture della flangia 6) Rimontare la rete di protezione FORMA B3/B14 (bi-supporto) si raccomanda di realizzare l'allineamento con cura, verificando che lo scarto di concentricità e parallelismo dei due semi-giunti non sia superiore a 0.1mm. 1) Applicare all'alternatore il semigiunto di accoppiamento e la campana di allineamento 2) Applicare all'albero del motore l'altro semigiunto di accoppiamento 3) Accoppiare alternatore e motore, fissando la campana di allineamento con le apposite viti Verificare che per il cuscinetto posteriore esista uno spazio sufficiente a permettere la dilatazione assiale del rotore (almeno 1mm) B2 FORM (SAE) (single beairing) 1) Remove the clamps that block the rotor to the flange 2) Remove the R protection screen from the alternator flange 3) Key the F generator flange onto the motor flange while lining up the holes in the G alternator coupling disk with those in the motor flywheel seat at the same time 4) Fasten the alternator flange to the motor (tightening torque 30Nm) 5) Fasten the alternator coupling to the flywheel by gaining access through the openings in the flange 6) Re-assemble the protection screen B3/B14 FORM (double bearing) the alignment must be made with care, checking that the difference in concentricity and parallelism of the two half joints does not exceed 0.1mm 1) Apply the half-coupling and the adapter to the alternator 2) Apply the other half-coupling to the motor shaft 3) Couple the alternator and the motor and fasten the adapter with the screws Make sure that there is sufficient space for the rear bearing to permit the axial expansion of the rotor (at least 1 mm) 4 FORMA B2 - (SAE) (mono-soporte) 1) quitar las abrazaderas que bloquen el rotor a la brida 2) Sacar la rejilla de protección R de la brida del alternador 3) Ensamblar la brida del generador F con la del motor, centrando al mismo tiempo los agujeros del disco de la junta alternador G con los del asiento volante del motor 4) Fijar la brida alternador al motor (par de apriete 30Nm) 5) Fijar la junta alternador al volante, accediendo por las aberturas de la brida 6) Volver a montar la rejilla de protección FORMA B3/B14 (bi-soporte) se recomienda efectuar la alineación con cuidado, verificar que el error de concentricidad y paralelismo de los dos semi-acoplamientos no sea superior a 0,1mm 1) Aplicar al alternador la semijunta de acoplamiento y la campana de alineación 2) Aplicar la otra semijunta de acoplamiento al eje del motor 3) Acoplar alternador y motor, fijando la campana de alineación con los correspondientes tornillos Comprobar que para el cojinete trasero exista un espacio suficiente que permita la dilatación axial del rotor (como mínimo 1 mm) COLLEGAMENTO ELETTRICO Gli alternatori XG132 sono dotati di 6 oppure 12 terminali, e vengono consegnati, a meno di richiesta diversa, con collegamento a stella; lo schema elettrico e le possibili connessioni disponibili sono rappresentate nelle pagine che seguono. Per il collegamento a terra e' disponibile un morsetto sulla piastra AVR. Effettuare la messa a terra con un conduttore di rame di sezione adeguata, secondo le norme vigenti. ELECTRICAL CONNECTION Standard XG132 generators are supplied with 6 or 12-wire leads, and they are delivered, if there is no different request, in star connection; the wiring diagram and the available connection on the terminal board are described on the following pages. For the earth connection a terminal is available on the AVR plate. The earth connection should be made using a copper conductor of a suitable cross section according to the standards in force. REGOLATORE DI TENSIONE Il generatore è provvisto di regolatore automatico di tensione (AVR). Il regolatore è dotato di trimmer di regolazione per adattare il suo funzionamento alle diverse condizioni di utilizzo del generatore. In particolare l'AVR è dotato di circuiti anti-pendolamento adattabili per consentire l'utilizzo di una vasta gamma di carichi. Il regolatore è dotato inoltre di circuiti interni di protezione, che permettono il funzionamento a velocità inferiore a quella nominale. E' comunque sconsigliabile il funzionamento a carico ad una frequenza (n° giri) inferiore al valore nominale: questo tipo di servizio rappresenta una condizione di sovraccarico per tutta la parte di eccitazione del generatore. In tali condizioni interverrà la protezione di sottovelocità (vedi trimmer P4), con relativa accensione del LED giallo (se presente). In caso di forti sovraccarichi (come nel caso di un corto circuito) si accenderà il LED rosso, e l'AVR limiterà la corrente di eccitazione (e conseguentemente la tensione d'uscita): per ripristinare le normali condizioni di funzionamento spegnere il generatore e rimuovere la causa del sovraccarico In caso di leggero sovraccarico prolungato si accenderà il LED arancione, e l'AVR limiterà la corrente di eccitazione (e conseguentemente la tensione d'uscita e la potenza). Ad ulteriore protezione dell’ AVR è presente inoltre un fusibile VOLTAGE REGULATOR The generator is fitted with an automatic voltage regulator (AVR) . The regulator is provided with regulating trimmer to adapt its performance to the different generator operating conditions. In particular, AVR is provided with adjustable antioscillation circuits to allow for a vast range of loads. Furthermore, the regulator is provided with special internal protection circuits that allow the generator to be operated no-load at a lower than nominal speed. However, it is not advisable to operate the generator with a load at a frequency (RPM) lower than the nominal value: this type of operation represents an overload condition for the whole excitation system of the generator. Under these circumstances the underspeed protection will step in (see P4 trimmer) and the relevant yellow Led (if any) will light up as a consequence. In the event of heavy overloads (a short circuit, for example), the red led will light up and AVR will limit the excitation current (and consequently the output voltage): to reset the usual operating conditions, switch the generator off and remove the cause of the overload. In the event of prolonged slight overloads , the orange led will light up and AVR will limit the excitation current (and consequently the output voltage and the power) A fuse is also supplied as extra protection for the AVR Connessioni del regolatore: l'AVR è collegato ai terminali del generatore mediante connettori di tipo Faston, tra i morsetti che individuano la tensione nominale del generatore (come indicato negli schemi di connessione delle pagine a seguire). Trimmer di regolazione: P1 regolazione della tensione di uscita del generatore; tale trimmer interno consente una notevole escursione della tensione. In caso si voglia ottenere una regolazione più fine, oppure controllare la tensione a distanza, occorre aggiungere un potenziometro esterno Re (del valore di 22kOhm). P2 taratura della stabilità; in caso di pendolamenti (fluttuazioni) della tensione d’uscita agire su esso, ruotandolo leggermente in senso orario. P3 taratura dello statismo (per applicazioni particolari); normalmente tutto ruotato in senso anti-orario (statismo zero). P4 taratura di intervento della protezione per bassa frequenza, tarato in fase di collaudo; DA NON VARIARE, SE NON DOPO AVER CONTATTATO IL NOSTRO UFFICIO TECNICO. Normalmente è tarato per ridurre l'eccitazione quando la velocità di rotazione scende oltre il 5% al di sotto del valore nominale. Nel caso di il funzionamento a 60hz, verificare che il ponticello di figura sia stato rimosso. P5 max kVA (se presente): taratura di limitazione dei sovraccarichi, tarato in fase di collaudo; DA NON VARIARE, SE NON DOPO AVER CONTATTATO IL NOSTRO UFFICIO TECNICO. COLLEGAMENTO ELETTRICO Los alternadores XG132 tienen 6 o 12 terminales, y se entregan, a menos que se solicite otra cosa, con conexión en estrella; el esquema y las conexiones disponibles posibles se representan en las páginas siguientes. Para la conexión a tierra hay un terminal en una placa del regulador. Hacer la conexión a tierra con un conductor de cobre de sección adecuada, segun las normas vigentes REGULADOR DE TENSIÓN El generador está provisto de un regulador automático de tensión (AVR). El regulador está dotado de un trimmer de regulación para adaptar su funcionamiento a las distintas condiciones de utilización del generador. En particular el AVR está dotado de circuitos de antioscilamiento adaptables para permitir la utilización de una vasta gama de cargas. Además, el regulador está dotado de circuitos internos de protección que permiten el funcionamiento en vacío con velocidad inferior a la nominal. De todos modos se desaconseja el funcionamiento con carga a una frecuencia (n° de vueltas) inferior al valor nominal: este tipo de servicio representa una situación de sobrecarga para toda la parte de excitación del generador. En estas condiciones interviene la protección de subvelocidad (véase el trimmer P4) con el relativo encendido del led amarillo (si presente) En caso de grandes sobrecargas (un cortocircuito, por ejemplo), se encenderá la luz (LED) indicadora roja y el AVR860 limitará la corriente de excitación (y consecuentemente la tensión de salida): para restablecer las condiciones normales de funcionamiento se aconseja apagar el generador y eliminar la causa de la sobrecarga. En caso de prolongadas sobrecargas leves , se encenderá la luz (LED) indicadora anaranjado y el AVR limitará la corriente de excitación (y consecuentemente la tensión de salida y la potencia) Connecting the regulator: Además, para proteger ulteriormente el AVR se ha instalado un the AVR is connected to the terminals of the generator by fusible means of Faston type connectors between the terminals that identify the rated voltage of the generator (as shown in Conexiones del regulador: el AVR se ha conectado a los bornes del generador mediante the connection diagrams on the following pages). conectores de tipo Faston, entre los bornes que identifican la tensión nominal del generador (cómo se ha indicado en los Regulating trimmers: esquemas que se representan en las páginas siguientes). P1 regulation of the generator output voltage; this internal trimmer enables a considerable deviation in the Trimmer de regulación: voltage. If it is required a finer adjustment or the remote voltage control, an external potentiometer (with a value of P1 regulación de la tensión de salida del generador; dicho 22kOhm) must be added trimmer interior permite una notable variación de la tensión. Si se desea obtener una regulación más precisa o si se desea P2 setting the stability; in the event of oscillations controlar la tensión a distancia, será necesario agregar un (fluctuations) in the output voltage, use the trimmer, turning potenciómetro exterior (22kOhm). it slightly clockwise P2 calibración de la estabilidad; en caso de fluctuaciones de la tensión de salida, se aconseja intervenir sobre el mismo, P3 setting the static nature (for particular girándolo un poco en sentido horario applications); normally fully turned in an anti-clockwise direction (zero static nature). P3 calibración del estatismo (para aplicaciones P4 Setting of protection activation for low frequency, particulares); normalmente todo girado en sentido antihorario factory set during final testing; DO NOT MODIFY UNLESS (estatismo cero). AUTHORISED TO DO SO BY OUR TECHNICAL DEPARTMENT; it is normally set to reduce the excitation P4 calibración de intervención de la protección por baja when the speed of rotation falls below 5% of the nominal frecuencia, calibrada durante la fase de ensayo; NO SE DEBE value relating to 50Hz. Taking out the jumper connection VARIAR, SI NO DESPUÉS DE HABERSE PUESTO EN the regulation is suitable for operation at 60Hz (check) CONTACTO CON NUESTRA OFICINA TÉCNICA; normalmente está tarado para reducir la excitación cuando la P5 max kVA (if any): setting of overload limitation, set velocidad de rotación desciende más de un 5% por debajo del during final testing; DO NOT MODIFY UNLESS valor nominal. Abriendo el puente indicado en el dibujo, la AUTHORISED TO DO SO BY OUR TECHNICAL regulación es adecuada para el funcionamiento a 60Hz. DEPARTMENT P5 max kVA (si presente): calibración de limitación de las sobrecargas, calibrada durante la fase de ensayo; NO SE DEBE VARIAR, SI NO DESPUÉS DE HABERSE PUESTO EN CONTACTO CON NUESTRA OFICINA TÉCNICA 5 Schema di collegamento - Wiring diagram - Schema des connexions Anschlubschema - Esquema de conexiones Filter red black black led (exc stator) brown Ê blue AVR black black black X2 X1 black brown fuse Y 0V 115V 230V 400V R Orange 50Hz ò (AUX) sensing P5 P4 P3 P2 P1 60Hz Re (optional) connessioni: vedi pagine seguenti connections: check following pages conexiones: se ve en las páginas siguientes (AVR) (filter) (-E) (+E) XG 6f ñ ñ ñ 6 fili 6 wires U1 V1 W1 te red hi n stator U1 auxiliary V1 12 fili 12 wires W1 U2 te hi red 50Hz: yellow 60Hz: orange w n k w ac w o br te hi n k w ac bl rotor W2 o br bl diode bridge rotor V2 auxiliary exciter windings U5 black nero brown marrone noire marron white bianco blanc 50Hz: yellow 60Hz: orange main windings XG 12f black w ow rotor exciter windings stator W2 br k rotor ac stator V2 bl black U2 diode bridge yellow giallo red rosso blue blu jaune rouge bleu schwartz braun weiss gelb rot blau negro marron blanco amarillo rojo azul V5 W5 U6 V6 stator main windings 6 W6 Schema di collegamento - Wiring diagram - Schema des connexions Anschlubschema - Esquema de conexiones b la c k black b wn ro Filter check connections as in following diagrams; generators are delivered in ! connection black V1 U1 V2 U2 W2 ck d -E +E bl ac k bl ack white bl ac k AVR x) (au x) (au n brow n brow bla re W1 b ro wn verificare le connessioni in base agli schemi sotto riportati; gli alternatori vengono spediti con collegamento ! sensing i te wh b lue brown brown k blac (exciter stator) X1 X2 COM (XG 12f) Û 3 phase Voltage (L1 – L2 – L3) (XG 6f) L3 L2 L1 50Hz 380÷440V sensing L1 (W1) 400V (V1) 0 60Hz 220÷277V 380÷480V U1 N N U2 W1 V1 U1 W2 (V2) blue (W1) brown (V1) brown (U1) black W1 V2 L3 V1 U2 V2 L2 W2 1 phase Voltage (L1 – N) filter 50Hz 220÷254V 60Hz 110÷135V 220÷277V max Power 40% 3 phase Voltage (L1 – L2 – L3) (XG 6f) L3 L2 L1 W1 V1 U1 L1 U1 W2 U2 W1 U2 V2 L3 V2 (W1) 230V (V1) 0 (V2) blue (W1) brown (V1) brown (U1) black W2 L2 V1 50Hz 220÷254V sensing 60Hz 110÷135V 220÷270V 1 phase Voltage (L1 – L2) filter 50Hz 220÷254V 60Hz 110÷135V 220÷270V max Power 60% (XG 12f) L3 L1 L2 3 phase Voltage (L1 – L2 – L3) L1 sensing U1 N U2 W1 V1 U1 V2 V5 U2 U5 W2 W5 (W1) 400V (V1) 0 50Hz 380÷440V 60Hz 380÷440V U5 N U6 (U6) blue (W1) brown (V1) brown (U1) black W6 W5 W2 W1 L3 V6 U6 V6 W6 V5 V2 V1 1 phase Voltage (L1 – N) filter 50Hz 220÷254V 60Hz 220÷270V max Power 40% L2 7 Schema di collegamento - Wiring diagram - Schema des connexions Anschlubschema - Esquema de conexiones 3 phase Voltage (L1 – L2 – L3) (XG 12f) L3 L2 L1 W1 W5 V1 V5 U1 U5 V2 V6 U2 U6 W2 W6 L1 N U1 U5 U2 U6 W6 N V2 W5 (W1) 230V (V1) 0 (V2) blue (W1) brown (V1) brown (U1) black V1 W2 L3 50Hz 190÷220V sensing 1 phase Voltage (L1 – L2) 50Hz 190÷220V filter 60Hz 190÷240V 60Hz 190÷240V max Power 60% 1 phase Voltage (L1 – N) V6 L2 V5 W1 50Hz 110÷130V 60Hz 110÷140V max Power 40% 3 phase Voltage (L1 – L2 – L3) (XG 12f) L1 W6 L2 L1 M M U2 W1 V6 V1 U6 U1 W6 W2 U5 W1 V2 V5 U6 V6 V5 V2 U2 U5 50Hz 220÷254V sensing U1 W5 L2 L3 (W1) 230V (V1) 0 (V2) blue (W1) brown (V1) brown (U1) black W2 W5 filter 60Hz 220÷270V 1 phase Voltage (L1 – L2) 50Hz 220÷254V 60Hz 220÷270V max Power 60% L3 V1 1 phase Voltage (L1 – M) 50Hz 110÷127V 60Hz 110÷135V max Power 20% 3phase (XG 12f) L3 L1 U1 W2 W6 U5 W1 L3 L1 W1 W5 V1 V5 U1 U5 V2 V6 U2 U6 W2 W6 V6 V5 V2 V1 3 phase Voltage (L1 – L2 – L3) sensing (W1) (V1) U2 U6 W5 L2 (V2) blue (W1) brown (V1) brown (U1) black 115V 0 filter 50Hz 110÷127V 1 phase Voltage (L1 – L2) 50Hz 110÷127V L2 60Hz 110÷135V 60Hz 110÷135V max Power 60% 1phase (XG 12f) 1 phase Voltage (L1 – L2) L1 W6 U5 W5 U6 V6 L2 W2 W1 V5 W1 V2 V1 U2 U1 W2 U6 V5 W6 U5 V6 W5 sensing (W5) 230V (V1) 0 (V2) blue (W1) brown (V1) brown (U1) black U2 V2 M M U1 L2 V1 L1 filter 50Hz 220÷254V 60Hz 220÷270V max Power 60% 1 phase Voltage (L1 – M = L2 - M) 50Hz 110÷127V 60Hz 110÷135V max Power 30% + 30% 8 OPERAZIONI DI SMONTAGGIO ATTENZIONE! Prima di eseguire qualsiasi tipo d'intervento, assicurarsi che il gruppo non possa autoavviarsi tramite appositi quadri di comando. Tutte le operazioni di seguito riportate richiedono molta attenzione e devono per questo essere eseguite solo da personale tecnico qualificato: l'inosservanza di quanto descritto può essere causa di gravi danni alle persone e/o all'alternatore. Eventuali urti o sfregamenti sugli avvolgimenti possono provocare danni irreparabili all'isolamento degli stessi. DISASSEMBLYING OPERATIONS WARNING! Before performing any type of repair, make sure that the unit cannot be accidentally restarted from the control panels. All the operations below require careful attention and must only be performed by qualified personnel. The failure to respect the indications provided may cause serious damage to the people and/or the alternator. Scratches or impact to the windings may create irreparable damage to their insulation capacity. OPERACIÓNES DE DESMONTAJE ADVERTENCIA! Antes de realizar cualquier tipo de operacion, asegúrese de que el grupo no puede auto empezarse desde el panel de control. Todas las operaciones que siguen requieren atención, y por lo tanto deben ser realizado únicamente por personal técnico cualificado: ignorar estas advertencias puede causar daños graves a las personas y/o al alternador. Cualquier impacto o fricción en los bobinados puede causar daños irreparables en el aislamiento de los bobinados mismos. SMONTAGGIO DEL ROTORE 1. Disaccoppiare l'alternatore dal motore 2. rimuovere il coperchio posteriore C solo per versione Cono/B34: • svitare i 4 dadi D1 di bloccaggio dei tiranti T • rimuovere lo scudo anteriore Sa (unitamente ai tiranti) 3. colpire con una mazza il rotore nel lato posteriore, in modo da far uscire il cuscinetto dalla propria sede dello scudo posteriore 4. utilizzare un paranco per imbragare il rotore dal lato accoppiamento, in modo da sostenerlo durante la rimozione 5. estrarre con cautela il gruppo rotore, adattando man mano la posizione dell’imbragatura, al fine di mantenerlo in equilibrio ed evitare di danneggiare gli avvolgimenti ROTOR DISASSEMBLY 1. Uncouple the alternator from the prime mover 2. remove the rear cover C just for Cone/B34 version: • unscrew the 4 nuts D1 fixing the tie-rods T • remove the front frame Sa (joined to the tie-rods) 3. hit, by means of a hammer, the rotor on the rear side, in way the bearing leaves its seat on the rear frame. 4. use a hoist to sling the rotor on the coupling side, in way to support it during its removing 5. remove carefully the rotor assembly, adjusting step by step the position of the sling, in way to keep the rotor well-balanced and avoid to damage the windings DESMONTAJE DEL ROTOR 1. Desacoplar el alternador del motor 2. sacar la tapa posterior C sólo para la versión Cono/B34: • desenroscar las 4 tuercas D1 de fijación del tirante T • sacar el escudo frontal Sa (junto con tirantes) 3. golpear con un martillo en la parte posterior del rotor, a fin de liberar el rodamiento de su alojamiento del escudo posterior 4. utilizar un polipasto para eslingar el rotor en el lado de acoplamiento, en manera de sostenerlo durante la remoción 5. retirar con cuidado el ensamblaje de rotor, adaptando la posición de la eslinga con el fin de mantener el equilibrio y evitar daños en los bobinados D1 Sa T T e pir col C hit SOSTITUZIONE DEL REGOLATORE 1. allentare le 4 vite di fissaggio e rimuovere il coperchio superiore C1 2. Scollegare tutti i cavi connessi regolatore R 3. svitare le 4 viti che fissano il regolatore R alla piastra e rimuoverlo 4. posizionare il nuovo regolatore, e fissarlo alla piastra 5. ripristinare i collegamenti sull’AVR come da schema 6. avviare l'alternatore a vuoto e portarlo alla frequenza nominale; verificare che le tensioni siano corrette: eventualmente ritoccarne il valore agendo sul trimmer P1 (lasciando invariata la posizione di P5) 7. far funzionare l’alternatore a carico,verificando il valore della tensione. REPLACEMENT OF AVR 1. unscrew the 4 fixing screws and remove the top cover C1 2. disconnect all the cables to the AVR R 3. unscrew the 4 screws that fix the AVR R to the plate and remove it 4. set the new AVR in place, and fix it to the plate 5. make connections to the AVR (check the wiring diagram) 6. start the alternator in no-load condition, and set it to the nominal frequency; make sure that voltage is correct. If necessary, adjust voltage by acting on the P1 trimmer (without touching P5 trimmer). 7. load the alternator and check the line voltage again. SUSTITUCIÓN DEL REGULADOR 1. aflojar los 4 tornillos de fijación y sacar la cubierta superior C1 2. Desconectar todos los cables del regulador R 3. desenroscar los 4 tornillos que sujetan el regulador R a la placa y sacarlo 4. colocar el nuevo regulador, y fijarlo a la placa 5. volver a conectar el regulador, como en el esquema 6. arrancar el alternador en vacio, y llevarlo a la frecuencia nominal; comprobar que las tensiones son correctas: si es necesario, ajustar el valor regulando P1 (sin modificar la posición de P5) 7. operar el alternador bajo carga, y comprobar el valor de la tensión. 2 C1 R R 9 1 SMONTAGGIO STATORE ECCITATRICE 1. rimuovere le viti di fissaggio, e togliere coperchio superiore C1 e cuffia posteriore C2 2. rimuovere le 3 viti che bloccano la piastra AVR P allo scudo posteriore S 3. togliere i 4 dadi D1 che bloccano lo scudo posteriore ai tiranti T 4. scollegare i cavi sui morsetti +E e -E (statore eccitatrice), sollevare la piastra AVR (senza rimuovere altri collegamenti) e sfilare il gruppo scudo posteriore S (comprensivo di statore eccitatrice); 5. svitare le 4 viti di fissaggio allo scudo posteriore, e rimuovere lo statore eccitatrice Se 6. Per il rimontaggio effettuare le operazioni inverse. DISASSEMBLING THE EXCITER STATOR 1. unscrew the fixing screws, and remove top cover C1 and rear cover C2 2. unscrew the 3 screws that fix the AVR plate P to the rear frame S 3. remove the 4 nuts D1 that fix the rear frame to the tierods T 4. disconnect the cables to the +E and -E terminals (exciter stator), lift the AVR plate (no need to disconnect other cables), and pull out the rear frame assembly S (included the exciter stator) 5. unscrew the 4 fixing screws to the rear frame, and remove the exciter stator Se 6. to re-assemble it just perform the operations above in reverse order DESMONTAJE DEL ESTATOR DE EXCITADOR 1. quitar los tornillos de fijacion y sacar la cubierta superior C1 y las tapas posterior C2 2. sacar los 3 tornillos que sujetan la placa AVR P al escudo posterior S 3. sacar las cuatro tuercas D1 que sujetan el escudo posterior a los tirantes T 4. desconectar los cables de terminales +E y -E (estator de la excitatriz), levantar la placa AVR (sin desconectar otros cables) y extraer el ensamblaje del escudo posterior S (estator del excitador incluido); 5. desenroscar los 4 tornillos de fijacion al escudo posterior, y quitar el estator del excitador Se 6. Para el re-montaje, hacer las operaciones en orden contrario. T D1 C1 T C2 P D1 S Se Se S SOSTITUZIONE CUSCINETTO/DISCO DIODI 1-4 come per “SMONTAGGIO STATORE ECCITARICE” sopra 5. Estrarre il cuscinetto Cu (*) con l'ausilio di un estrattore, possibilmente a caldo per facilitare l’operazione. Attenzione! Durante questa operazione si presti cura nel non danneggiare il disco diodi. 6. disconnettere i cavi di collegamento al disco diodi Dd 7. Svitare i tre dadi di fissaggio al rotore eccitatrice Re e rimuovere il disco diodi 8. Sostituire il disco diodi e rimontare il tutto, eseguendo le operazioni in ordine inverso; serrare accuratamente tutte le viti e ripristinare i collegamenti (*) una volta rimosso il cuscinetto è consigliabile sostituirlo con uno nuovo. Per facilitare il rimontaggio, scaldare il cuscinetto. REPLACEMENT OF BEARING/ROTATING RECTIFIER 1-4. same as “DISASSEMBLING THE EXCITER STATOR” above 5. Remove the bearing Cu (*) by using an extractor, heating it if possible to help the operation Warning! During this operation, be careful to not damage the rotating rectifier. 6. Disconnect all connections to rotating rectifier bridge Dd 7. Unscrew the 3 fixing nuts to the exciter rotor Re and remove the rotating rectifier . 8. Replace rotating rectifier, and re-assemble by performing the operations above in reverse order; tight accurately all screws and make electrical connections. (*) after disassembling the bearing, we suggest to replace it with a new one. In order to help the re-assembling, the bearing should be heated. SUSTITUCIÓN DE RODAMIENTO/DISCO DE DIODOS 1-4 como para "DESMONTAJE DEL ESTATOR DE EXCITADOR” sobre 5. sacar el rodamiento Cu (*) con un extractor, calientandolo para facilitar la operación. ¡Atención! Durante esta operación poner cuidado en no dañar el disco de diodos. 6. desconectar los cables del disco de diodos Dd 7. Aflojar las tres tuercas de fijacion al rotor del excitador y sacar el disco de diodos 8. colocar el nuevo disco de diodos y montar todo, haciendo las opèeraciones en orden inverso; fijar todos los tornillos con cuidado y restablecer las conexiones (*) Después de sacar el rodamiento, se aconseja de sustituirlo por uno nuevo. Para facilitar el montaje, calentar el rodamiento. Dd Cu Re 10 RICERCA GUASTI TROUBLE SHOOTING ELIMINACION DE AVERIAS DIFETTO CAUSA - RIMEDIO FAULT CAUSES - REPAIR DEFECTO CAUSA - REMEDIO Manca tensione a vuoto - macchina smagnetizzata: con macchina in rotazione applicare tra +E e –E dell’avr per un secondo una tensione continua 4.5÷12v (mantenere le polarità!) - fusibile avr interrotto: sostituirlo - avr difettoso: sostituirlo - guasto negli avvolgimenti: controllare le resistenze (vedi tabella); sostituire il componente difettoso - difetto di isolamento: provvedere ad essicazione in forno - connessioni errate o male eseguite: verificare Lack of noload voltage - demagnetized machine: supply the rotating machine with a direct voltage from 4.5 to 12v for one second between +E and -E of avr (respect the polarity!) - avr fuse interrupted: replace it - faulty avr: replace it - winding failure: check the resistances (see table); replace the faulty component - insulation failure: dry in oven - wrong or incorrectly carried out connections: check Falta la tensión eléctrica en vacío - máquina desmagnetizada: con la máquina en rotación aplicar, entre +E y -E del avr y durante un segundo, una tensión eléctrica continua entre 4,5 y 12 v (¡mantener las polaridades!) - fusible avr interrumpido: sustituirlo - avr defectuoso: sustituirlo - avería en los bobinados: controlar las resistencias (véase la tabla); sustituir el componente defectuoso - defecto de aislamiento: proceder al secado en horno - conexiones equivocadas o ejecutadas mal: controlar Tensione a vuoto molto bassa - velocità del motore troppo bassa: tararla a 1575rpm (50hz) o 1875rpm (60hz). - trimmer p1 in posizione errata: regolarlo - avr difettoso: sostituirlo - guasto negli avvolgimenti: controllare le resistenze (vedi tabella); sostituire il componente difettoso Too low noload voltage - motor speed too low: set to 1575rpm (50hz) or 1875rpm (60hz) - incorrect position of p1 trimmer: adjust it - faulty avr: replace it - winding failure: check the resistances (see table); replace the faulty component Tensión eléctrica en vacío muy baja - velocidad del motor demasiado baja: calibrarla a 1575 revoluciones por minuto (50hz) o 1875 revoluciones por minuto (60hz). - trimmer p1 en posición equivocada: regularlo - avr defectuoso: sustituirlo - avería en los bobinados: controlar las resistencias (véase la tabla); sustituir el componente defectuoso Tensione a vuoto troppo alta - collegamenti avr mancanti od errati: verificare - trimmer p1 in posizione errata: regolarlo - avr difettoso: sostituirlo Too high noload voltage - missing or incorrect avr connections: check - incorrect position of p1 trimmer: adjust it - faulty avr: replace it Tensión eléctrica en vacío muy alta - conexiones avr que faltan o que son equivocadas: controlar - trimmer p1 en posición equivocada: regularlo - avr defectuoso: sustituirlo Tensione a carico molto bassa. - rallentamento del motore: motore sottodimensionato - possibile sovraccarico: controllare la corrente - trimmer p3 in posizione errata: ruotare completamente in senso antiorario - avr difettoso: sostituirlo Too low load voltage - motor slowing-down: undersized motor - possible overload: check the value of the load current - incorrect position of p3 trimmer: rotate anticlockwise completely - faulty avr: replace it Tensión eléctrica bajo carga muy baja - deceleración del motor: motor subdimensionado - posible sobrecarga: controlar la corriente de carga - trimmer p3 en posición equivocada: girar completamente hacia la izquierda - avr defectuoso: sustituirlo Tensione a carico molto alta. - avr difettoso: sostituirlo Too high load voltage - faulty avr: replace it Tensión eléctrica bajo carga muy alta - avr defectuoso: sustituirlo Tensioni non equilibrate - guasto negli avvolgimenti: controllare le resistenze (vedi tabella); sostituire il componente difettoso - carico squilibrato: verificarne le connessioni (fase di carico mancante) Unbalanced voltages - winding failure: check the resistances (see table); replace the faulty component - unbalanced load: check connections (loading phase missing) Tensiones eléctricas no equilibradas - avería en los bobinados: controlar las resistencias (véase la tabla); sustituir el componente defectuoso - carga desequilibrada: controlar las conexiones (falta la fase de carga) Tensione instabile - trimmer p2 (stabilità) in posizione errata: ruotarlo in senso orario poco oltre metà corsa - avr difettoso: sostituirlo - intervento delle protezioni: spegnere e riavviare il gruppo Unstable voltage - incorrect position of p2 trimmer: rotate clockwise a little farther than half a stroke - faulty avr: replace it - protections activated: turn off and restart the equipment Tensión eléctrica inestable - trimmer p2 en posición equivocada: girarlo hacia la derecha un poco más allá de mitad de carrera - avr defectuoso: sustituirlo - intervención de las protecciones: apagar y volver a arrancar el grupo Il fusibile si brucia - collegamento avr errato: verificare - impostazione di una tensione troppo elevata: tararla mediante trimmer p1 - avr difettoso: sostituirlo - possibile sovraccarico: controllare la corrente Fuse burns out - incorrect avr connections: check - voltage set too high: adjust using p1 trimmer - faulty avr: replace it - possible overload: check the value of the load current El fusible se quema - conexiones equivocadas: controlar - configuración de una tensión eléctrica demasiado elevada: calibrarla mediante trimmer p1 - avr defectuoso: sustituirlo - posible sobrecarga: controlar la corriente de carga Surriscaldamento della macchina - aperture di aspirazione/espulsione aria ostruite: smontare e pulire - possibile sovraccarico: controllare la corrente Overheating - suction/exhaust openings clogged: disassemble and clean - possible overload: check the value of the load current Sobrecalentamiento de la maquina - aperturas de aspiración/expulsión aire obstruidas: desmontar y limpiar - posible sobrecarga: controlar la corriente de carga Maquina ruidosa - rodamientos defectuosos: sustituirlos - acoplamiento defectuoso: verificar y reparar Macchina rumorosa - cuscinetti rovinati: sostituirli - accoppiamento difettoso: verificare e riparare Noisy generator - brocken bearings: replace - poor coupling: check and repair 11 Dati Tecnici - Technical Data - Données Techniques Technische Daten - Datos Técnicos 50Hz – 1500rpm Potenza Output Power Potencia 60Hz – 1800rpm Potenza assorbita Driving Power Potencia absorbida 3~ cosj 0,8 Potenza Output Power Potencia 4/4 cosf 0,8 [kVA] [kW] XG 132 XSA/4 8,0 8,0 XG 132 XSB/4 10,0 XG 132 SA/4 3~ cosj 0,8 Potenza assorbita Driving Power Potencia absorbida 4/4 cosf 0,8 Peso Weight Peso B34 [kg] [kg] [kg] 81 58 60 66 12,2 82 64 66 72 16,0 15,2 84 74 76 82 84 18,0 17,1 84,5 83 85 91 86 25,0 23,1 86,5 100 102 108 [kW] 80 10,0 9,9 9,9 81 12,5 13,0 12,5 83 XG 132 SB/4 15,0 14,3 XG 132 MA/4 20,0 18,6 [h %] Resistenze avvolgimenti (20°C) - Winding resistances (20°C) - Resistances des bobinage (20°C) - Wicklungswiderstande (20°C) - Resistencias de los bobinados (20°C) Generatore generator statore stator Eccitatrice exciter ausiliario auxiliary m m m m 50Hz 60Hz 50Hz 60Hz rotore rotor statore stator rotore rotor XG132 XSA4 770 770 18,8 5,53 4,95 XG132 XSB4 524 524 18,2 5,53 4,95 XG132 SA4 350 350 13,9 5,53 4,95 XG132 SB4 250 17,2 5,53 4,95 XG132 MA4 152 14,1 5,53 4,95 XG132 LB4 * 101 101 15,9 5,53 4,95 XG132 LC4 90 90 13,8 5,53 4,95 * SAE B3/B9 [kVA] [h %] 250 104 152 * solo P.T.O. (TBW 132 LB/LC) * only P.T.O. (TBW 132 LB/LC) 12 104 (4-7½) CONDIZIONI GENERALI DI GARANZIA GENERAL TERMS of WARRANTY CONDICIONES GENERALES deGARANTÍA 1) La NUOVA SACCARDO MOTORI garantisce la buona costruzione e qualità dei suoi prodotti per 12 mesi dalla data di ns. fatturazione. Durante il suddetto periodo la NSM si impegna a riparare o, a propria discrezione, a sostituire (a proprie spese) nella propria Sede quelle parti che si fossero avariate, senza altro tipo di responsabilità diretta o indiretta. 1) NUOVA SACCARDO MOTORI warrants a proper manufacturing and quality of its products for 12 months from NSM invoice date. During that period NSM obliges to repair or replace, at its option, at its cost, at its premises, all those parts which failed without any other liability of any type, direct or indirect. 1) NUOVA SACCARDO MOTORI garantiza la buena fabricación y calidad de sus productos durante 12 meses a partir de la fecha de nuestra facturación. Durante dicho período NSM reparará o, según su propia decisión, reemplazará (con gastos a su cargo) en la propia Fábrica de las piezas que pudieron averiarse, sin ninguna responsabilidad directa o indirecta. 2) La decisione sul riconoscimento o meno della garanzia è riservata esclusivamente alla NSM previo esame delle parti avariate, che dovranno pervenire in Porto Franco alla sua Sede di Schio (VI) Italia; In qualunque caso il giudizio della NSM è insindacabile e definitivo. 2) The decision for warranty approval is NSM's exclusive right and subjected to a previous examination of the failed parts which are to be forwarded free of charges (carriage paid) to NSM Schio (VI) Italy for analysis; In any case NSM decision is not subjected to appeal and definitive. 2) La decisión de reconocer o no la garantía es un derecho exclusivo de NSM, previo examen de las piezas averiadas, que deberán ser entregadas en Puerto Franco en la Fábrica de Schio (VI) Italia. De todos modos la decisión de NSM es indiscutible y definitiva. 3) Ogni reclamo deve contenere la descrizione della merce, la data fattura, una relazione completa del difetto riscontrato ed il Numero di Serie della/e macchina/e (vedi targhetta adesiva). 3) Any claim must contain the description of the goods, the date of invoice, a full report of the defect found and the Serial Number of the machine (available on the adhesive label). 3) Cualquier reclamación deberá tener la descripción de la mercancía , la fecha de la factura, una descripción completa del defecto encontrado y el Número de Serie de la/s máquina/s (véase tarjeta adhesiva). 4) Tutte le eventuali spese di viaggio, trasferta, trasporto, mano d'opera per lo smontaggio e rimontaggio dell'alternatore dall'apparecchiatura azionante sono sempre a carico dell'utente, anche in caso di verifica per preventivo. 4) All eventual expenses concerning travel, board, transport and labour for assembly or disassembly of alternator from the prime mover are always at the user's charge, also in case of inspection. 4) Todos los gastos eventuales de viaje, traslado, transporte, mano de obra para el desmontaje y remontaje del alternador en el equipo accionador serán siempre a cargo del usuario, también en caso de una verificación para un presupuesto. 5) An exception is for the continuous duty machines or for 5) Fanno eccezione le macchine per utilizzo continuato o per hire use, for which warranty to the final customer is limited noleggio, per i quali la garanzia al cliente finale è limitata a to 1.000 hours of working or to 6 months from date of 1.000 ore di funzionamento o a 6 mesi dalla data di ns. invoice, whichever comes first. fatturazione, secondo il limite raggiunto per primo. 6) It is excluded any other responsibly and liability of NSM 6) Rimane esclusa ogni altra responsabilità ed obbligazione for further damage or loss, direct or indirect, deriving from da parte della NSM per ulteriori danni o perdite dirette od use or from impossibility to use the machine, either partial indirette derivanti dall'uso o dall'impossibilità d'uso della or total. macchina sia parziale che totale. 7) Concerning machines and/or components sent to NSM 7) Relativamente alle macchine e/o ai componenti inviati in to be checked, in case we do not receive any answer from NSM per verifica, Trascorso un mese dalla comunicazione the customer after one month from written information scritta tramite “Scheda di Riparazione” da parte di NSM al through “Repairing Report” sent from NSM to the customer, cliente, nulla ricevendo in riscontro, NSM non si ritiene più NSM is not responsible anymore for the goods of the responsabile del bene del cliente in proprio possesso. customer in its possession. 5) Se exceptúan las máquinas para la utilización continua o para alquiler, para las cuales la garantía al cliente final se limita a 1.000 horas de funcionamiento o a 6 meses de la fecha de nuestra facturación, según el límite que antes se alcance. 6) Queda excluida cualquier otra responsabilidad y obligación por parte de NSM por ulteriores daños o pérdidas directas o indirectas que deriven del uso o de la imposibilidad de uso de la máquina tanto parcial como total. 7) En cuanto a las maquinas y/o los componentes enviados a NSM para comprobar, una vez transcurrido un mes de la comunicación escrita a través de la “Ficha de Reparación” por parte de NSM al cliente, y no habiendo recibido ninguna notificación, NSM no se responsabiliza del material del cliente en nuestra posesión. 8) La GARANZIA DECADE se durante il periodo predetto i prodotti NSM siano: A) immagazzinati in luogo non adatto; B) riparati o modificati da personale non autorizzato dalla NSM; C) usati o sottoposti a manutenzione non in base alle norme stabilite dalla NSM; D) sottoposti ad errata installazione o errata applicazione. E) usurati dal normale utilizzo. F) utilizzati in zone con condizioni climatiche particolari che richiedano l'adozione di modifiche agli apparati di raffreddamento. G) sovraccaricati od impiegati in prestazioni diverse da quelle per le quali sono stati forniti. 8) The warranty WILL BE VOID if during said period the following anomalies should occur: A) inadequate storage; B) repair or modification by unauthorised personnel; C) use or maintenance conditions which do not conform with norms established by NSM; D) overload or application other than what the product was meant for; E) worn by normal utilisation; F) used in zones with particularly climatic condition, that demand the adoption of modification to the cooling apparatus; G) overloaded or used in applications different from ones for which have been supplied for. 9) La garanzia cessa comunque qualora il cliente fosse inadempiente nei pagamenti per qualunque ragione. La presente garanzia annulla e sostituisce ogni altra garanzia. 9) Warranty coverage also expires whenever the client, for whatever reason, is late in payment. 9) De todos modos, la garantía cesa si el cliente no realiza los The present warranty cancel and replace any other pagos por cualquier razón. Esta garantía anula y sustituye cualquier otra garantía. warranty. PROCEDURA GENERALE DI GARANZIA GENERAL PROCEDURE OF WARRANTY 1) Segnalazione al Servizio Assistenza Tecnica, a mezzo fax, prima che la macchina o il particolare venga inviato presso la NSM per le verifiche del caso, comunicando: la descrizione della merce, la data di acquisto, una relazione completa del difetto riscontrato ed il Numero di Serie della/e macchina/e (vedi etichetta adesiva). 2) Invio in Porto Franco presso la Sede di Schio (VI) Italia, della NSM della/e macchina/e o del particolare per il quale si richiede l'intervento o la verifica. Nel caso in cui la macchina venga inviata per verifica dovrà essere completa di tutti i suoi pezzi originali. 3) Il Servizio Assistenza Tecnica verificherà la macchina od il particolare ricevuto e nel caso in cui venisse riconosciuta la garanzia, sarà cura della NSM far pervenire al cliente la macchina od il particolare, riparato o sostituito, gratuitamente, trasporto esclusi. 1) Report to the Service Department damage or defect by fax before that the machine or the part will be sent to NSM for checks, advising: the description of the goods, the date of invoice, a full report of the defect found and the Serial Number of the machine (available on the adhesive label). 2) Dispatch free of charge (carriage paid) to the Service Department of NSM, Schio (VI) Italy, the machine or part for which the intervention or the check it is requested. If the machine has been sent for check, it will have to be complete with all its original pieces. 3) The Service Dept. will check the machine or the part received and should the warranty be approved, will be NSM 's care to send to the customer the machine or the part, repaired or replaced, free of charge, transport charges excluded. 8) La GARANTÍA PIERDE SU VALIDEZ si durante el período antedicho los productos NSM son: A) almacenados en un lugar inadecuado; B) reparados o modificados por personal no autorizado por NSM; C) utilizados o sometidos a un mantenimiento que no respete las normas establecidas por NSM; D) sometidos a una instalación equivocada o aplicación errada; E) desgastados por la normal utilización; F) utilizados en zonas con condiciones climáticas particulares que requieran la realización de modificaciones de los aparatos de refrigeración . G) sobrecargados o utilizados en prestaciones distintas de aquellas para las cuales fueron entregados. PROCEDIMIENTO GENERAL DE GARANTÍA 13 1) Indicar al Servicio de Asistencia Técnica, mediante un fax, antes que la máquina o la pieza se envíe a NSM para efectuar las verificaciones pertinentes, comunicando: la descripción de la mercancía, la fecha de compra, una descripción completa del defecto encontrado y el Número de Serie de la/s máquina/s (véase la etiqueta adhesiva). 2) Envío Puerto Franco a la Fábrica de la empresa NSM situada en Schio (VI) Italia de la/s máquina/s o de la pieza para la cual se requiere la intervención o la verificación. Si la máquina se envía para una verificación, la misma deberá tener todas las piezas originales. 3) El Servicio de Asistencia Técnica verificará la máquina o la pieza recibida y, si se reconociera la garantía, NSM enviará al cliente la máquina o la pieza, reparada o reemplazada, gratuitamente, excluido el transporte. Nuova Saccardo Motori Srl Via Lazio, 5 36015 Schio (Vicenza) - Italy tel: +39 0445 595888 fax: +39 0445 595800 www.nsmgenerators.com [email protected]
© Copyright 2026