
Installation Instructions / Warranty
Installation Instructions / Warranty iBox Universal Plus Rough 01850181 Technical Information / Données techniques / Datos técnicos Recommended water pressure Pression de service conseillée Presión recomendada en servicio 15 - 75 psi Max. water pressure Pression de service max. Presión máximo en servicio 145 psi Recommended hot water temp. Température recommandée Temp. recomendada del agua caliente 120° - 140° F Max. hot water temp. Température max. d'eau chaude Temperatura max. del agua caliente 180° F Max. flow rate Capacité nominale Caudal máximo Axor thermostatic mixer mitigeur thermostatique Axor mezclador termostático 16 gpm @ 44 psi Thermostat with Volume control mitigeur thermostatique avec contrôle de débit mezclador termostático con llave de paso 8 gpm @ 44 psi Thermostat with Volume control /diverter mitigeur thermostatique avec contrôle de débit/ inverseur mezclador termostático con llave de paso / distribuidor 8 gpm @ 44 psi pressure balance valve Connections 4.5 gpm @ 44 psi Connexions Conexiones ¾" NPT female cold right / hot left *Please know and follow all applicable local plumbing codes when setting the temperature on the water heater. * Vous devez connaître et respecter tous les codes de plomberie locaux applicables pour le réglage de la température du chauffe-eau. *Debe conocer y cumplir todos los códigos locales aplicables para ajustar la temperatura del calentador de agua Installation Considerations • For best results, Hansgrohe recommends that • To prevent scald injury, the maximum output this unit be installed by a licensed, professional temperature of the shower valve must be no plumber. higher than 120°F. In Massachusetts the maximum output temperature of the shower • Please read over these instructions thoroughly valve can be no higher than 112°F. before beginning installation. Make sure that Know in advance what type of you have all tools and supplies needed to trim kit is to be used. Installation complete the installation. requirements vary. Additional • Do not remove the plastic installation box from valve(s) may be required. the valve. For correct function of the valve, • The cartridge is included with the trim kit. The the hot supply must be plumbed cartridge will vary, according to the type of to the hot inlet (left horizontal trim kit. side) and the cold supply must be plumbed to the cold inlet (right • The cartridge has an integrated high temperahorizontal side). ture limit stop which may be reset to comply with local plumbing codes. • Protect the rough from freeze damage. In the event of freezing temperatures, drain the pipes. À prendre en considération pour l’installation • Pour de meilleurs résultats, Hansgrohe recommande que ce produit soit installé par un plombier professionnel licencié. • Veuillez lire attentivement ces instructions avant de procéder à l’installation. Assurezvous de disposer de tous les outils et du matériel nécessaires pour l’installation. • Ne retirez pas la boîte d’installation en plastique du robinet. • La cartouche est comprise avec le jeu de garniture. La cartouche variera selon le type de jeu de garniture. • La cartouche dispose d’une butée de limite d’eau chaude qui peut être réglée de façon à satisfaire aux codes de plomberie locaux. • Pour empêcher des blessures par ébouillantement, la température de sortie maximale du robinet de douche ne doit pas excéder 120°F. Au Massachusetts, la température de sortie maximale du robinet de douche ne doit pas excéder 112°F. Déterminez à l’avance le type de jeu de garniture à utiliser. Les exigences d’installation varient. Il pourra être nécessaire d’utiliser des robinets supplémentaires. Pour que le robinet fonctionne correctement, la conduite d’alimentation de l’eau chaude doit être installée dans l’orifice d’arrivée prévu pour l’eau chaude (l’horizontale latérale gauche), et la conduite d’eau froide doit être installée dans l’orifice d’arrivée prévu pour l’eau froide (l’horizontale latérale droite). • Protégez la pièce intérieure des dommages occasionnés par le gel. Vidangez les tuyaux si les températures sont au-dessous du point de congélation. Consideraciones para la instalación • Para obtener mejores resultados, Hansgrohe recomienda que la instalación de esta unidad esté a cargo de un plomero profesional matriculado. • Antes de comenzar la instalación, lea estas instrucciones detenidamente. Asegúrese de tener las herramientas y los insumos necesarios para completar la instalación. • No retire la caja de instalación plástica de la válvula. • El cartucho está incluido en el juego de la pieza exterior. El cartucho varía de acuerdo al tipo de juego de pieza exterior. • El cartucho tiene un cierre de límite de alta temperatura que se puede reajustar para cumplir los códigos de plomería locales*. • Al prevnent escalda herida, la temperatura de salida máxima de la válvula de chapar- rón no debe ser más alto que 120°F. En Massachusetts: la temperatura de salida máxima de la válvula no puede ser más alto que 112°F. Conozca de antemano qué tipo de juego de pieza exterior va a usar. Los requisitos de instalación varían. Pueden requerirse una o más válvulas adicionales. Para que la válvula funcione correctamente, el suministro de agua caliente se debe conectar a la entrada de agua caliente (lado horizontal izquierdo) y el de agua fría a la entrada de agua fría (lado horizontal derecho). • Proteja la pieza interior contra los daños por congelamiento. En caso de temperaturas de congelamiento, drene las cañerías. Service Stops / Butées d’arrêt d’isolation / Cierres de servicio closed ferme cerrado open ouvert abierto Trim Kits / Jeux de Garnitures / Piezas Exteriores Thermostat with Volume Control Thermostat with Volume Control & Diverter Pressure Balance Valve C 04220XX0 04221XX0 04223XX0 E 04225XX0 04226 XX0 04228XX0 S 04230XX0 04231XX0 04233XX0 PuraVida 15775XX1 15771XX1 15407XX1 Thermostatic mixer Axor Starck 10407XX1 10715XX1 Axor Starck X 10404XX1 10717XX1 Axor Citterio – lever 39414XX1 Axor Citterio – cross 39711XX1 39716XX1 Axor Massaud 18978001 18741001 Axor Citterio M 34808XX1 34714001 Axor Uno 38418XX1 38715XX1 Axor Steel 35418801 37515801 Axor Montreux – lever 16508XX1 16824XX1 Axor Montreux – cross 16816XX1 Axor Terrano – lever 37404XX1 37711XX1 17414XX1 17383XX1 Axor Terrano – cross 37716XX1 Axor Phoenix – lever Axor Phoenix – cross 17382XX1 Axor Carlton – lever 17428XX1 Axor Carlton – cross Showerpipes / Showerpanels Raindance E Showerpanel 27100XX1 Raindance S Showerpipe 27192XX1 Showerheads Raindance Rainfall AIR 28411XX1 Raindance E 420 AIR 2-Jet 27373XX1 17712XX1 17716XX1 If you are using this type of trim kit: Si vous utilisez ce type de jeu de garniture: Si usa esta tipo de juego de pieza exterior: Thermostat with volume control Go to page: Allez à la page: Vaya a la página: 8 Thermostat with volume control and diverter 10 Pressure Balance Valve 12 Axor thermostatic mixer 14 Showerpipe / Showerpanel 17 Raindance E 420 AIR 2-Jet showerhead 19 Raindance Rainfall AIR 21 Hansgrohe Thermostat with volume control EN • This is suitable for a one-function installation, such as a single showerhead or handshower. • If a multiple function shower is desired, install in combination with a Quattro diverter (model 15930181) or with a Trio diverter (model 15984181). • Do not use in combination with a Trio Stop diverter (model 15981181), a volume control FR • Il convient à une installation à une fonction, comme une pomme de douche ou une douchette unique. • Si vous désirez une douche à plusieurs fonctions, installez en combinaison avec un inverseur Quattro (modèle 15930181) ou un inversuer Trio (modèle 15984181). • N'installez pas de dispositif d'arrêt sur une sortie quelconque de ce robinet. N’utilisez pas de concert avec un inverseur Trio (modèle (model 15974181 or 15977181) or with a Fix-fit wall outlet (many styles available) or any other valve with a positive shutoff. Do not use a diverter tub spout. Plumb from one outlet only. Seal the second outlet using a ¾" plug. 15981181), un contrôle de débit (modèle 15974181 ou 15977181) ni une décharge murale Fix-fit (plusieurs styles offerts). N’utilisez pas un bec de baignoire inverseur. N’installez qu’à une seule conduite de sortie. La seconde conduite de sortie doit être obstruée à l’aide d’un bouchon de ¾ po. ES • Esta pieza es adecuada para la instalación de una sola función, tal como un único cabezal de ducha o teleducha. • Si se desea una ducha con varias funciones, instálela en combinación con un distribuidor Quattro (modelo 15930181) o Trio (modelo 15984181). • No instale un aparato de corte o cierre en cualquiera de las tomas de esta válvula. No la use en combinación con un distribuidor Trio (modelo 15981181), un llave de paso (modelo 15974181 ó 15975181) o una toma de pared Fix-fit (hay muchos estilos disponibles). No use un surtidor de bañera tipo distribuidor. Conecte desde una toma solamente. Selle la segunda toma con un tapón de ¾ pulg. One-function Shower Two-function Shower Trio Diverter 15984181 Tub/Shower • Don't use a diverter spout. • N’utilisez pas un bec de baignoire inverseur. • No use un surtidor de bañera tipo distribuidor. Three-function Shower Trio Diverter 15984181 Quattro Diverter 15930181 Tub spout Bec Caño Hansgrohe Thermostat with volume control Hansgrohe Thermostat with volume control / diverter EN • This is suitable for a two-function installation only, such as a showerhead / tub spout or showerhead / handshower. Do not use this option for a single-function shower. Do not use a diverter tub spout. FR • Il convient à une installation à deux fonctions, comme une pomme de douche/bec pour baignoire ou pomme de douche/douchette. N’utilisez pas cette option pour une douche à une fonction. N’utilisez pas un bec de baignoire inverseur. • Do not use in combination with any valve that has a positive shutoff. Do not use in combination with a Trio Stop diverter (model 15981181), a volume control (model 15974181 or 15977181) or with a Fix-fit wall outlet (many styles available). • N'installez pas de dispositif d'arrêt sur une sortie quelconque de ce robinet. N’utilisez pas de concert avec un inverseur Trio (modèle 15981181), un contrôle de débit (modèle 15974181 ou 15977181) ni une décharge murale Fix-fit (plusieurs styles offerts). ES • Esta pieza es adecuada para una instalación de dos funciones solamente, tal como cabezal de ducha / surtidor de bañera o cabezal de ducha / teleducha. No use esta opción para duchas de una sola función. No use un surtidor de bañera tipo distribuidor. 10 • No instale un aparato de corte o cierre en cualquiera de las tomas de esta válvula. No la use en combinación con un distribuidor Trio (modelo 15981181), un llave de paso (modelo 15974181 ó 15975181) o una toma de pared Fix-fit (hay muchos estilos disponibles). Two-function Shower Tub/Shower • Don't use a diverter spout. • N’utilisez pas un bec de baignoire inverseur. • No use un surtidor de bañera tipo distribuidor. Tub spout Bec Caño Hansgrohe thermostat with volume control and diverter 11 Pressure Balance Valve EN • The pressure balance trim is suitable for a one-function installation, such as a single showerhead or handshower. • The pressure balance trim may be used in a tub/shower application using a diverter tub spout. • It is possible to install this unit in a back-toback installation as the cartridge is reversible (see instructions included with the trim kit). • This option may be used in combination with the Quattro diverter 15930181 or Trio diverter 15984181. • Do not use this option in combination with any valve that has a positive shutoff. This includes the Trio Stop diverter (15981181), volume control valve (15974181, 15977181), Fix-fit wall outlet, etc. FR • Il convient à une installation à deux fonctions, comme une pomme de douche/bec pour baignoire ou pomme de douche/douchette. • Si vous désirez une douche à plusieurs fonctions, installez en combinaison avec un inverseur Quattro 15930181 ou Trio 15984181. • Si vous désirez une douche/baignoire, installez en combinaison avec un bec de baignoire inverseur. • N'installez pas de dispositif d'arrêt sur une sortie quelconque de ce robinet. N’utilisez pas de concert avec un inverseur Trio (modèle 15981181), un contrôle de débit (modèle 15974181 ou 15977181) ni une décharge murale Fix-fit (plusieurs styles offerts). • C’est possible d’installer cette unité dans un dos-à-dos installation comme la cartouche est réversible (voir des instructions incluses avec le jeu de garniture). ES • Esta pieza es adecuada para la instalación de una sola función, tal como un único cabezal de ducha o teleducha. • Si se desea una bañera/ducha, instálela en combinación con un surtidor de bañera tipo distribuidor. • Es posible instalar esta válvula en una instalación dorso con dorso como que el cartucho es reversible (ver los instrucciones incluidos con la pieza exterior). 12 • Si se desea una ducha con varias funciones, instálela en combinación con un distribuidor Quattro (modelo 15930181) o Trio (modelo 15984181). • No instale un aparato de corte o cierre en cualquiera de las tomas de esta válvula. No la use en combinación con un distribuidor Trio (modelo 15981181), un llave de paso (modelo 15974181 ó 15975181) o una toma de pared Fix-fit (hay muchos estilos disponibles). One-function Shower Tub/Shower • diverter spout • bec de baignoire inverseur • surtidor de bañera tipo distribuidor Two-function Shower Trio Diverter 15984181 Pressure Balance Valve 13 Axor thermostatic mixer EN • This option is suitable for many installations. • There is no "off" position on this option. • This option must be used in combination with another valve or valves including volume control valve(s) (models 15974181 and 15977181), Trio Stop diverter (model 15981181), the Fix-fit wall outlet, etc. Provide volume control for each outlet. • If using the Quattro diverter (model 15930181), volume control valve 15977181 FR • Cette option ne convient pas à plusieurs installations. • Il n’y a pas de position « arrêt » (« off ») pour cette option. • Cette option doit être utilisée en combinaison avec un ou plusieurs robinets notamment les robinets d'arrêt (modèles 15974181 et 15977181), l’inverseur Trio (modèle 15981181), la décharge murale Fix-fit, etc. Fournit un contrôle de débit pour chaque orifice de sortie. ES • Esta opción es adecuada para muchas instalaciones. • No hay posición “off” en esta opción. • Esta opción se debe usar en combinación con otras válvulas, incluidas las válvulas de llave de paso (modelos 15974181 y 15975181), el distribuidor Trio (modelo 15981181), la toma de pared Fix-fit, etc. Proporcione llave de paso para cada toma. 14 must be installed between the 01850181 and the 15930181. Do not use a diverter tub spout. • The examples shown here are not the only possible installations. Please contact Hansgrohe Technical Service if you have questions regarding a specific installation. • Si vous utilisez un inverseur Quattro (modèle 15930181), un robinet de contrôle de débit 15977181 doit être installé entre le 01850181 et le 15930181. N’utilisez pas un bec de baignoire inverseur. • Les exemples illustrés ici ne représentent pas les seules installations possibles. Veuillez communiquer avec l’assistance technique de Hansgrohe si vous désirez poser des questions sur une installation particulière. • Si usa el distribuidor Quattro (modelo 15930181), se debe instalar la llave de paso 15977181 entre las piezas 01850181 y 15930181. No use un surtidor de bañera tipo distribuidor. • Los ejemplos aquí mostrados no son las únicas instalaciones posibles. Póngase en contacto con el Servicio Técnico de Hahsgrohe si tiene alguna pregunta relativa a una instalación específica. One-function Shower Two-function Shower Trio Diverter with Shut Off 15981181 volume control 15974181 or 15977181 Tub/Shower Two-function Shower volume control 15974181 or 15977181 • Don't use a diverter spout. • N’utilisez pas un bec de baignoire inverseur. • No use un surtidor de bañera tipo distribuidor. volume control 15974181 or 15977181 Tub spout Bec Caño volume control 15977181 volume control 15974181 or 15977181 Axor thermostatic mixer 15 Tub/Shower • Don't use a diverter spout. • N’utilisez pas un bec de baignoire inverseur. • No use un surtidor de bañera tipo distribuidor. Three-function Shower Quattro Diverter 15930181 Trio Diverter with Shut Off 15981181 volume control 15974181 or 15977181 Tub spout Bec Caño Three-function Shower Shower with Raindance Rainfall AIR volume control 15974181 or 15977181 Axor thermostatic mixer 16 volume control 15974181 or 15977181 Quattro Diverter 15930181 volume control 15977181 Showerpipe 27192XX1 and Showerpanel 27100XX1 EN • For correct operation of the thermostatic mixer valve, the hot supply must be plumbed to the hot (left horizontal) inlet, and the cold supply must be plumbed to the cold (right horizontal) inlet. Use ¾" plugs to seal both outlets. FR • Pour que le mitigeur thermostatique fonctionne correctement, la conduite d’alimentation de l’eau chaude doit être installée dans l’orifice d’arrivée prévu pour l’eau chaude (l’horizontale latérale gauche), et la conduite d’eau froide doit être installée dans l’orifice d’arrivée prévu pour l’eau froide (l’horizontale latérale droite). Les deux conduites de sortie doit être obstruée à l’aide d’un bouchon de ¾ po. ES • Para que la válvula del mezclador termostático funcione correctamente, el suministro de agua caliente se debe conectar a la entrada de agua caliente (lado horizontal izquierdo) y el de agua fría se debe conectar a la entrada de agua fría (lado horizontal derecho). plug bouchon tapón plug bouchon tapón Selle los dos tomas con tapónes de ¾ pulg. 17 27100XX1 Showerpipe / Showerpanel 18 27192XX1 27373XX1 Raindance E 420 AIR 2-Jet Showerhead EN • The Raindance E 420 AIR, #27373XX1, does not have integrated controls for the spray functions. Hansgrohe recommends installation with a thermostatic mixer and Trio Stop diverter. The Trio allows the bather to select the desired spray functions(s). • The installation shown in the diagram is a suggestion. It is not the only installation possible. FR • Le Raindance E 420 AIR, #27373XX1 ne dispose pas de réglages intégrés pour les modes de jet. Hansgrohe recommande l’installation d’un mitigeur thermostatique, d’un robinet de contrôle de débit et d’un inverseur Trio Stop. Le Trio permet au baigneur de sélectionner le(s) mode(s) de jet désiré(s). • L’installation illustrée dans le schéma est une suggestion. Ce n’est pas la seule installation possible. cap bouchon tapón support pipes cap bouchon tapón Trio Diverter with Shut Off 15981181 ES • La ducha Raindance E 420 AIR, #27373XX1 no tiene controles integrados para las funciones de rociado. Hansgrohe recomienda la instalación con un mezclador termostático, una válvula de llave de paso y el distribuidor Trio Stop. El distribuidor Trio permite al usuario seleccionar la o las funciones de rociado deseadas. • La instalación mostrada en el diagrama es una sugerencia. No es la única instalación posible. 19 cap bouchon tapón Reinforce the wall at this location Renforcement nécessairede la paroi Área refuerzo necesario de la pared ¾" iBox Universal Plus 01850181 Trio w/shut-off 15981181+ trim cap bouchon tapón ¾" iBox Universal Plus 01850181+ thermostatic mixer trim EN Strap the support pipes firmly. Volume Control 15977181 + trim FR Soutenez les tuyaux fermement. ES Apoye los tubos firmemente. Suggested Installation 27373XX1 Raindance E 420 AIR Showerhead 20 28411XX1 Raindance Rainfall AIR EN • When installed at the mounting height shown in the diagram, the spray face of the Rainfall is approx. 7' above the standing surface. • The Rainfall does not have integrated controls for the spray functions. Hansgrohe recommends installation with a thermostatic mixer, volume control valve, and Quattro diverter. The Quattro allows the bather to select the desired spray functions(s). • The installation shown in the diagram is a suggestion. It is not the only installation possible. FR • Lorsque l’installation est réalisée à la hauteur de montage illustrée dans le schéma, la face des jets du Rainfall se situe à une distance approximative de 7 pieds du plancher. • Le Rainfall ne dispose pas de réglages intégrés pour les modes de jet. Hansgrohe recommande l’installation d’un mitigeur thermostatique, d’un robinet de contrôle de débit et d’un inverseur Quattro. Le Quattro permet au baigneur de sélectionner le(s) mode(s) de jet désiré(s). • L’installation illustrée dans le schéma est une suggestion. Ce n’est pas la seule installation possible. volume control 15974181 or 15977181 Quattro Diverter 15930181 volume control 15977181 ES • Cuando se instala a la altura de montaje mostrada en el diagrama, la cara rociadora de la ducha Rainfall queda aproximadamente a 7 pies por arriba de la superficie donde se para el usuario. • La ducha Rainfall no tiene controles integrados para las funciones de rociado. Hansgrohe recomienda la instalación con un mezclador termostático, una válvula de llave de paso y el distribuidor Quattro. El distribuidor Quattro permite al usuario seleccionar la o las funciones de rociado deseadas. • La instalación mostrada en el diagrama es una sugerencia. No es la única instalación posible. 21 iBox for Rainfall / iBox pour Rainfall/ iBox para Rainfall iBox for Rainfall / iBox pour Rainfall/ iBox para Rainfall Quattro volume controls / robinet d'arrêts / llaves de paso iBox for thermostatic mixer / iBox pour mitigeur thermostatique / iBox para mezclador termostático 28411XX1 Raindance Rainfall AIR 22 cap bouchon tapón min. 6" support pipe EN Strap the inlet and support pipes firmly. FR Soutenez les tuyaux fermement. ES Apoye los tubos firmemente. 28411XX1 Raindance Rainfall AIR 23 Installation Options EN It is possible to support the iBox Plus Universal using a stringer and screws (not included). The stringer must be no thicker than ¾". FR C’est possible de soutenir le robinet utilisant un plaque arrière et vis (pas inclus). Le plaque arrière doit être non plus épais que ¾ po. ES Es posible apoyar la válvula que utiliza una placa trasera y tornillos (no incluido). La placa trasera no debe ser más grueso que ¾". EN The valve may also be supported using installation kit 96615000 (not included). FR C’est aussi possible à soutenir le robinet utilisant set d'installation 96615000 (pas inclus). ES Es también posible a apoyar la válvula que utiliza set de instalación 96615000 (no incluido). EN Optional: Install ½" NPT adapters. Tighten the adapter fully before installing the ½" pipe. FR En option: Installez le(s) ½ po adapteur(s). Serrez l’adaptateur complètement avant d’installer le ½ po tuyau. ES Opcional: Instale los ½" adaptadores. Apriete el adaptador completamente antes de instalar el tubo de ½". 24 Adjust the fixing ring EN The fixing ring may be repositioned to accommodate different wall thicknesses. FR L’anneau réparant pourrait être repositionné pour accommoder les épaisseurs de mur différentes. ES El anillo que fija puede ser recolocado acomodar los espesores diferentes de pared. press 25 Important / Avis / Aviso EN The outside surface of the finished wall must fall between the "min" and "max" markings on the iBox. FR Installez le robinet de façon à ce que la surface extérieure du mur fini se trouve entre les lignes « minimum » et « maximum ». ES Instale la válvula de modo que la superficie exterior de la pared terminada quede entre las marcas “min” y “max”. 26 Important / Avis / Aviso EN For correct operation of the thermostatic mixer valve, the hot supply must be plumbed to the hot (left horizontal) inlet, and the cold supply must be plumbed to the cold (right horizontal) inlet. FR Pour que le mitigeur thermostatique fonctionne correctement, la conduite d’alimentation de l’eau chaude doit être installée dans l’orifice d’arrivée prévu pour l’eau chaude (l’horizontale latérale gauche), et la conduite d’eau froide doit être installée dans l’orifice d’arrivée prévu pour l’eau froide (l’horizontale latérale droite). ES Para que la válvula del mezclador termostático funcione correctamente, el suministro de agua caliente se debe conectar a la entrada de agua caliente (lado horizontal izquierdo) y el de agua fría a la entrada de agua fría (lado horizontal derecho). 27 English Installation Install the valve so that the "top" marking faces upward. Install the hot and cold supplies on the hot inlet (left horizontal side) and cold inlet (right horizontal side). Do not solder within 4" of the rough, or damage to the rough may result. Install the outlet line(s). If an outlet is not to be used, seal it with a ¾" plug (included). plug bouchon tapón 28 Français Español Installation Instalación Installez le robinet de façon à ce que les faces de marquage soient dirigées vers le haut. Instale la válvula de modo que la marca “top” mire hacia arriba. Raccordez les conduites d’alimentation de l’eau chaude et de l’eau froide aux orifices d’arrivée chaude (l’horizontale latérale gauche) et froide (l’horizontale latérale droite). Instale los suministros de agua caliente y fría en las entradas caliente (lado horizontal izquierdo) y fría (lado horizontal derecho). Aucune soudure ne peut être réalisée si la pièce intérieure se trouve à moins de 4 po sans quoi des dommages pourraient survenir. No suelde a menos de 4 pulg. de la pieza interior puesto que puede dañarla. Installez le(s) conduite(s) de sortie. Instale una o dos líneas en las tomas. Si vous utilisez seulement un orifice de sortie, scellez l’orifice de sortie inutilisé à l’aide d’un bouchon de ¾ po (inclus). Si usa sólo una toma, selle la toma sin usar con un tapón de ¾ pulg. (incluido). 29 English Make sure that the valve is level. Install the valve so that the outside surface of the finished wall falls between the "min" and "max" markings. Flush the hot and cold supplies The hot supply will flush through the bottom outlet, and the cold supply will flush through the top outlet – see the arrows on the flushing block. If one outlet is plugged, flush one side. Turn the water off, then remove the flushing block. Turn it 90°, and reinstall. Flush the other side. 30 Français Assurez-vous que le robinet est de niveau. Español Asegúrese de que la válvula quede nivelada. Installez le robinet de façon à ce que la surface extérieure du mur fini se trouve entre les lignes « minimum » et « maximum ». Instale la válvula de modo que la superficie exterior de la pared terminada quede entre las marcas “min” y “max”. Rincez les conduites d’alimentation de l’eau chaude et de l’eau froide Lave los suministros frío y caliente L’eau chaude s’écoulera par l’orifice de sortie du bas et l’eau froide par l’orifice de sortie du haut – reportez-vous aux flèches sur le bloc de rinçage. Si un orifice est bouché, rincez l’autre côté. Coupez l’alimentation en eau, puis retirez le bloc de rinçage. Tournez-le à 90°, et réinstallez-le. Rincez l’autre côté. El suministro de agua caliente se lava a través de la toma inferior y el de agua fría a través de la toma superior —vea las flechas del bloque de lavado. Si una toma está taponada, lave un lado. Cierre el paso de agua y retire el bloque de lavado. Gírelo 90° y reinstálelo. Lave el otro lado. 31 English Install the finished wall Install the tile backing board. It should come up to the iBox. Seal the wall around the iBox with waterproof sealant. Failure to seal the wall can lead to possible water damage. Spread waterproof adhesive (not included) on the backing board around the iBox. Do not use hot glue as it will damage the gasket. Install the gasket. Install the tile over the gasket. 32 Français Español Installez le mur fini Instale la pared terminada Installez le panneau d’appui pour carrelage. Il doit atteindre la boîte d’installation (iBox). Instale el tablero de soporte de los azulejos. Debe llegar hasta la caja de instalación iBox. Scellez le mur autour de la iBox à l’aide d’un agent d’étanchéité. Selle la pared alrededor de la iBox con un sellador impermeable. Si le mur n’est pas scellé, l’eau pourrait éventuellement causer des dommages. Si no se sella la pared, pueden producirse daños debidos al agua. Appliquez un adhésif à l’épreuve de l’eau (non inclus) sur le panneau d’appui, autour de la boîte d’installation (iBox). N’utilisez pas de colle chaude car vous pourriez endommager le joint. Aplique adhesivo (no incluido) a la pared alrededor de la válvula. No use cola caliente, puesto que daña la junta. Installez le joint. Instale la junta. Installez les carreaux sur le joint. Instale el azulejo sobre la junta. 33 Replacement Parts / Pièces détachées / Repuestos 97739000 5x1.5 98560000 96445000 13595000 34 98797000 Limited Consumer Warranty This product has been manufactured and tested to the highest quality standards by Hansgrohe, Inc. (“Hansgrohe”). This warranty is limited to Hansgrohe products that are purchased by a consumer in the United States or Canada after March 1, 1996, and installed in either in the United States or in Canada. WHO IS COVERED BY THE WARRANTY This warranty extends to the original purchaser only. This warranty is non-transferable. WHAT IS COVERED BY THE WARRANTY The warranty covers only your Hansgrohe manufactured product. Hansgrohe warrants this product against defects in material or workmanship as follows: Hansgrohe will replace at no charge for parts only or, at its option, replace any product or part of the product that proves defective because of improper workmanship and/or material, under normal installation, use, service and maintenance. If Hansgrohe is unable to provide a replacement and repair is not practical or cannot be made in timely fashion, Hansgrohe may elect to refund the purchase price in exchange for the return of the product. LENGTH OF WARRANTY Replacement or repaired parts of products will be covered for the term of this warranty, as stated in the following two sentences. If you are a consumer who purchased the product for use primarily for personal, family or household purposes, this warranty extends for as long as you own the product and the home in which the product is originally installed. If you purchased the product for use primarily for any other purpose, including, without limitation, a commercial purpose, this warranty extends only (i) for 1 year, with respect to Hansgrohe & Commercial products, and (ii) for 5 years, with respect to Axor products. THIS WARRANTY DOES NOT COVER, AND HANSGROHE WILL NOT PAY FOR: A. Conditions, malfunctions or damage not resulting from defects in material or workmanship. B. Conditions, malfunctions or damage resulting from (1) normal wear and tear, improper installation, improper maintenance, misuse, abuse, negligence, accident or alteration; (2) the use of abrasive or caustic cleaning agents or “no-rinse” cleaning products, or the use of the product in any manner contrary to the product instructions; or (3) conditions in the home such as excessive water pressure or corrosion. C.Labor and other expenses for disconnection, deinstallation, or return of the product for warranty service (including but not limited to proper packaging and shipping costs), or for installation or reinstallation of the product. D. Accessories, connected materials and products, or related products not manufactured by Hansgrohe. E. Any Hansgrohe or Axor product sold for display purposes. F. Rubbed Bronze finish is subject to a 3-year limited warranty. Chrome and all PVD finishes are covered by the limited lifetime warranty. G.Hansgrohe Water Filtration System is subject to a 1-year limited warranty. Warranty does not include replacement filters. TO OBTAIN WARRANTY PARTS OR INFORMATION Contact your Hansgrohe retailer, or contact Technical Service at: Hansgrohe, Inc. 1492 Bluegrass Lakes Parkway Alpharetta, GA 30004 Toll-free 800-334-0455 In requesting warranty service, you will need to provide: 1. The sales receipt or other evidence of the date and place of purchase. 2. A description of the problem. 3. Delivery of the product or the defective part, postage prepaid and carefully packed and insured, to: Hansgrohe, Inc. 1492 Bluegrass Lakes Parkway Alpharetta, GA 30004 Toll-free 800-334-0455 35 When warranty service is completed, any repaired or replacement product or part will be returned to you postage prepaid. EXCLUSIONS AND LIMITATIONS REPAIR OR REPLACEMENT (OR, IN LIMITED CIRCUMSTANCES, REFUND OF THE PURCHASE PRICE) AS PROVIDED UNDER THIS WARRANTY IS THE EXCLUSIVE REMEDY OF THE PURCHASER. HANSGROHE NEITHER ASSUMES NOR AUTHORIZES ANY PERSON TO CREATE FOR IT ANY OTHER OBLIGATION OR LIABILITY IN CONNECTION WITH THIS PRODUCT. HANSGROHE SHALL NOT BE LIABLE TO PURCHASER OR ANY OTHER PERSON FOR ANY INCIDENTAL, SPECIAL OR CONSEQUENTIAL DAMAGES, ARISING OUT OF BREACH OF THIS WARRANTY OR ANY IMPLIED WARRANTY (INCLUDING BUT NOT LIMITED TO ANY IMPLIED WARRANTY OF MERCHANTABILITY). Some States do not allow the exclusion or limitation of incidental or consequential damages, so the above limitation or exclusion may not apply to you. This warranty gives you specific legal rights, and you may also have other rights that vary from state to state. TO THE EXTENT PERMITTED BY LAW, ANY IMPLIED WARRANTIES OF MERCHANTABILITY AND FITNESS FOR A PARTICULAR PURPOSE, ARE LIMITED TO THE DURATION OF THE EXPRESS WARRANTY. Some states do not allow limitations on how long an implied warranty may last, so the above limitations may not apply to you. You may be required by law to give us a reasonable opportunity to correct or cure any failure to comply before you can bring any action in court against us under the Magnuson-Moss Warranty Act. Hansgrohe, Inc. • 1490 Bluegrass Lakes Parkway • Alpharetta, GA 30004 Tel. 770-360-9880 • Fax 770-360-9887 www.hansgrohe-usa.com US - Installation Instructions • Part No. 90487901 • Revised 05/2010 PRODUCT INSTRUCTIONS AND QUESTIONS Upon purchase or prior to installation, please carefully inspect your Hansgrohe product for any damage or visible defect. Prior to installing, always carefully study the enclosed instructions on the proper installation and the care and maintenance of this product. If you have questions at any time about the use, installation or performance of your Hansgrohe product, or this warranty, please write us or call us toll-free at 800-334-0455. Installation Instructions / Warranty Raindance S 150 Air 3-jet Raindance S 150 Air 1-jet Raindance S 100 Air 3-jet Raindance S 150 Air 3-jet Showerhead 27495XX1 Rain AIR Balance AIR Whirl AIR Raindance S 150 Air 1-jet Showerhead 27486XX1 Rain AIR Raindance S 100 Air 3-jet Showerhead 27491XX1 Rain AIR Balance AIR Whirl AIR Technical Specification Maximum Flow Rate2.5 gpm 2 Installation Make sure that the black self-sealing filter gasket (already installed) is screwed firmly into the ball joint. self-sealing filter gasket ball joint Carefully install the showerhead on the shower arm. If the flow of water becomes less over time, remove and clean the filter gasket. Scale Removal The Raindance Air 3-jet showerhead incorporates the RubitTM cleaning system. If scale deposits are noticed in the spray channels, turn the water on lightly and rub the spray channels with a finger or a sponge. If scale deposits are noticed on the spray face, pour about 3/4” of a commercial scale remover, such as Lime-AwayTM or CLRTM ,into a shallow dish. Dilute the remover according to the label instructions. Soak only the spray face in the solution for the amount of time specified on the label. Rinse the showerhead with clear water. Reinstall the showerhead. Turn on the water and allow the showerhead to flush for at least one minute. User Instructions - Raindance Air 3-jet models only To change spray modes, push the selector lever until the desired spray is achieved. selector lever Rain AIR Balance AIR Whirl AIR Cleaning Recommendation for Hansgrohe Products Modern faucetry and shower products utilize a combination of materials to comply with the needs of the market with regard to design and functionality. To avoid damage, it is necessary to use some caution when cleaning. Damage caused by improper treatment is not covered under the Hansgrohe warranty. Cleaning Materials for Faucets and Showers • • • • To remove lime scale, use only products made specifically for that purpose. Always follow the manufacturer’s instructions when using. Do not use cleaners that contain hydrochloric, formic, acetic, or phosphoric acids, as these will cause considerable damage to finishes and to plastic components. Never mix cleaning materials. Never use cleaners containing abrasives. Do not use abrasive cleaning cloths, pads, or sponges. Cleaning Procedures • • • • Clean your faucets and shower products as and when required. Regular cleaning will prevent scale buildup and water spotting. Follow the label instructions. Do not allow any cleaner to remain on the product for longer than necessary. When using spray cleaners, spray first onto a sponge or cloth – do not spray directly onto the product. After cleaning, rinse thoroughly with clear water to remove any cleaner residue. Important • • Soap and shampoo residue can also cause damage to the product. Rinse well with clean water after use. If the surface is already damaged, harsh cleaning materials will cause further damage. Limited Lifetime Consumer Warranty This product has been manufactured and tested to the highest quality standards by Hansgrohe, Inc. (“Hansgrohe”). This warranty is limited to Hansgrohe products which are purchased by a consumer in the United States after March 1, 1996, and installed in either the United States or Canada. WHO IS COVERED BY THE WARRANTY This warranty extends to the original consumer purchaser only. WHAT IS COVERED BY THE WARRANTY This warranty covers only your Hansgrohe manufactured product. Hansgrohe warrants this product against defects in material or workmanship as follows: Hansgrohe will repair at no charge for parts only or, at its option, replace any product or part of the product which proves defective because of improper workmanship and/or material, under normal installation, use, service and maintenance. If Hansgrohe is unable to provide a replacement and repair is not practical or cannot be timely made, Hansgrohe may elect to refund the purchase price in exchange for the return of the product. LENGTH OF WARRANTY Replacement or repaired parts of products will be covered for the term of this warranty as stated in the following two sentences. If you are a consumer who purchased the product for use primarily for personal, family, or household purposes, this warranty extends for as long as you own the product and the home in which the product is installed. If you purchased the product for use primarily for any other purpose, including, without limitation, a commercial purpose, this warranty extends only (i) for 1 year, with respect to Interaktiv and Retroaktiv products, and (ii) for 5 years, with respect to AXOR, ShowerPower and Pharo products. THIS WARRANTY DOES NOT COVER, AND HANSGROHE WILL NOT PAY FOR: A. Conditions, malfunctions or damage not resulting from defects in material or workmanship. B. Conditions, malfunctions or damage resulting from (1) improper installation, improper maintenance, misuse, abuse, negligence, accident or alteration, or (2) the use of abrasive or caustic cleaning agents or “no rinse” cleaning products, or the use of the product in any manner contrary to the product instructions. C. Labor or other expenses for the disconnection or return of the product for warranty service, or for installation or reinstallation of the product. D. Accessories or related products not manufactured by Hansgrohe. TO OBTAIN WARRANTY SERVICE Contact your Hansgrohe retailer, or write to Technical Service at: Hansgrohe Inc. 1492 Bluegrass Lakes Parkway Alpharetta GA 30004 Or, call Hansgrohe toll-free at (800) 334-0455. In requesting warranty service, you will need to provide 1. 2. 3. The sales receipt or other evidence of the date and place of purchase. A description of the problem. Delivery of the product or the defective part, postage prepaid and carefully packed and insured, to Hansgrohe Inc. 1492 Bluegrass Lakes Parkway, Alpharetta, Georgia 30004, Attention: Technical Service, if required by Hansgrohe. When warranty service is completed, any repaired or replacement product or part will be returned to you postage prepaid. EXCLUSIONS AND LIMITATIONS REPAIR OR REPLACEMENT (OR, IN LIMITED CIRCUMSTANCES, REFUND OF THE PURCHASE PRICE) AS PROVIDED UNDER THIS WARRANTY IS THE EXCLUSIVE REMEDY OF THE PURCHASER. HANSGROHE NEITHER ASSUMES NOR AUTHORIZES ANY PERSON TO CREATE FOR IT ANY OBLIGATION OR LIABILITY IN CONNECTION WITH THIS PRODUCT. HANSGROHE SHALL NOT BE LIABLE TO PURCHASER OR ANY PERSON FOR ANY INCIDENTAL, SPECIAL, OR CONSEQUENTIAL DAMAGES, ARISING OUT OF BREACH OF THIS WARRANTY OR ANY IMPLIED WARRANTY (INCLUDING MERCHANTABILITY). Some States do not allow the exclusion or limitation of incidental or consequential damages, so the above limitation or exclusion may not apply to you. This warranty gives you specific legal rights, and you may have other rights which vary from State to State. You may be required by law to give us a reasonable opportunity to correct or cure any failure to comply before you can bring any action in court against us under the Magnuson-Moss Warranty Act. PRODUCT INSTRUCTIONS AND QUESTIONS Upon purchase or prior to installation, please carefully inspect your Hansgrohe product for any damage or visible defect. Prior to installing, always carefully study the enclosed instructions on the proper installation and the care and maintenance of the product. If you have questions at any time about the use, installation, or performance of your Hansgrohe product, or this warranty, please call or write to us at the toll-free number and address printed above. www.hansgrohe-USA.com US - Installation Instructions • Part No.90417203 • Revised 11/2006 Hansgrohe, Inc. • 1490 Bluegrass Lakes Parkway • Alpharetta, GA 30004 Tel. 770 360-9880 • Fax 770 360 9887 DE Gebrauchsanleitung / Montageanleitung FR Mode d'emploi / Instructions de montage EN Instructions for use / assembly instructions IT Istruzioni per l'uso / Istruzioni per Installazione ES Modo de empleo / Instrucciones de montaje NL Gebruiksaanwijzing / Handleiding DK Brugsanvisning / Monteringsvejledning PT Instruções para uso / Manual de Instalación PL Instrukcja obsługi / Instrukcja montażu CS Návod k použití / Montážní návod SK Návod na použitie / Montážny návod ZH 用户手册 / 组装说明 RU Руководство пользователя / Инструкция по монтажу HU Használati útmutató / Szerelési útmutató FI Käyttöohje / Asennusohje SV Bruksanvisning / Monteringsanvisning LT Vartotojo instrukcija / Montavimo instrukcijos HR Upute za uporabu / Uputstva za instalaciju TR Kullanım kılavuzu / Montaj kılavuzu RO Manual de utilizare / Instrucţiuni de montare EL Οδηγίες χρήσης / Οδηγία συναρμολόγησης SL Navodilo za uporabo / Navodila za montažo ET Kasutusjuhend / Paigaldusjuhend LV Lietošanas pamācība / Montāžas instrukcija SR Uputstvo za upotrebu / Uputstvo za montažu NOBruksanvisning / Montasjeveiledning BG Инструкция за употреба / Инструкция за употреба SQ Udhëzuesi i përdorimit / Udhëzime rreth montimit AR ﺗﻌﻠﻴﻤﺎت اﻟﺘﺠﻤﻴﻊ/ دﻟﻴﻞ اﻻﺳﺘﺨﺪام 2 3 4 5 6 7 8 9 10 11 12 13 14 15 16 17 18 19 20 21 22 23 24 25 26 27 28 29 30 Unica'S Puro 28631XXX / 28632XXX Raindance S Combi 27075000 / 27076000 27077000 Raindance S 100 AIR 3jet/ Unica'S Puro Set 27880000 /27882000 Raindance S 120 AIR 3jet/ Unica'S Puro Set 27884000 / 27886000 Raindance S 150 AIR 3jet/ Unica'S Puro Set 27895000 / 27898000 Deutsch Technische Daten Sicherheitshinweise Bei der Montage müssen zur Vermeidung von Quetsch- und Schnittverletzungen Handschuhe getragen werden. Kinder, sowie Erwachsene mit körperlichen, geistigen und / oder sensorischen Einschränkungen dürfen nicht unbeaufsichtigt das Duschsystem benutzen. Personen die unter Alkohol- oder Drogeneinfluss stehen, dürfen das Duschsystem nicht benutzen. Der Kontakt der Brausestrahlen mit empfindlichen Körperstellen (z. B. Augen) muss vermieden werden. Es muss ein ausreichender Abstand zwischen Brause und Körper eingehalten werden. Das Produkt darf nicht als Haltegriff benutzt werden. Es muss ein separater Haltegriff montiert werden. Das Duschsystem darf nur zur Bade-, Hygiene- und Körperreinigungszwecke eingesetzt werden. Brausenschläuche sind nur zum Anschluss von Brausen an Armaturen geeignet. Eine Absperrung nach dem Schlauch in Fließrichtung ist unzulässig! Betriebsdruck: Empfohlener Betriebsdruck: (1 MPa = 10 bar = 147 PSI) Heißwassertemperatur: max. 0,6 MPa 0,1 - 0,4 MPa max. 60°C Symbolerklärung Kein essigsäurehaltiges Silikon verwenden! Maße (siehe Seite 31 - 34) Durchflussdiagramm (siehe Seite 33) Bedienung (siehe Seite 36) Montagehinweise • Die Armatur muss nach den gültigen Normen montiert, gespült und geprüft werden. Reinigung (siehe Seite 37) und beiliegende Broschüre • Bei der Montage des Produktes durch qualifiziertes Fachpersonal ist darauf zu achten, dass die Befestigungsfläche im gesamten Bereich der Befestigung plan ist (keine vorstehenden Fugen oder Fliesenversatz), der Wandaufbau für eine Montage des Produktes geeignet ist und keine Schwachstellen aufweist. Die beigelegten Schrauben und Dübel sind nur für Beton geeignet. Bei anderen Wandaufbauten sind die Herstellerangaben des Dübelherstellers zu beachten. Serviceteile (siehe Seite 38) • Die der Brause beigepackte Siebdichtung muss eingebaut werden, um Schmutzeinspülungen aus dem Leitungsnetz zu vermeiden. Schmutzeinspülungen können die Funktion beeinträchtigen und/oder zu Beschädigungen an Funktionsteilen der Brause führen, für hieraus ergebende Schäden haftet Hansgrohe nicht. XXX 000 820 880 = Farbcodierung = chrom = brushed nickel = edelmatt Prüfzeichen (siehe Seite 39) Montage siehe Seite 35 Français Informations techniques Consignes de sécurité Lors du montage, porter des gants de protection pour éviter toute blessure par écrasement ou coupure Il est interdit aux enfants ainsi qu‘aux adultes ayant des insuffisantes physiques, psychiques et/ou motoriques d‘utiliser la douche sans surveillance. De même, il est interdit à des personnes sous influence d‘alcool ou de drogues d‘utiliser la douche. Éviter le contact du jet de la douchette avec les parties sensibles du corps (telles par ex. que les yeux). Veiller à respecter un écart suffisant entre la douchette et le corps Le produit ne doit pas servir de poignée. Monter pour cela une poignée séparée. Le système de douche ne doit servir qu’à se laver et à assurer l’hygiène corporelle. Les flexibles de douche ne doivent être utilisés que pour le raccordement d ’une douche à main à un robinet. Le montage d ’un système d ’arrêt après le flexible, en direction du courant d ’eau est strictement interdit. Instructions pour le montage • La robinetterie doit être installée, rincée et contrôlée conformément aux normes valables. • Lors du montage du produit par un ouvrier qualifié, il faut faire attention à ce que la surface de fixation soit plane sur toute son étendue (aucun dépassement de joint ni de carrelage), que la construction de la paroi soit adaptée à l’installation du produit et surtout ne présente aucun point faible. Les vis et les chevilles fournies sont uniquement apropriées au béton. Pour les autres constructions, il faudra tenir compte des préconisations du fabriquant de cheville. Pression de service autorisée: Pression de service conseillée: (1 MPa = 10 bar = 147 PSI) Température d’eau chaude: max. 0,6 MPa 0,1 - 0,4 MPa max. 60°C Description du symbole Ne pas utiliser de silicone contenant de l’acide acétique! Dimensions (voir page 31 - 34) Diagramme du débit (voir pages 33) Instructions de service (voir page 36) Nettoyage (voir pages 37) et brochure ci-jointe Pièces détachées (voir pages 38) XXX 000 820 880 = Couleurs = chromé = brushed nickel = satin chrome Classification acoustique et débit (voir pages 39) • Le joint à filtre fourni avec la pomme de douche à main doit être installé afin de retenir des impuretés du système de conduites. Ceux-ci pourraient influencer le fonctionnement de ce produit et même endommager des pieces mobiles. Des réclamations à la suite de l’usage de la pomme de douche sans joint-tamis de hansgrohe ne peuvent pas faire partie de notre garantie. Montage voir pages 35 English Technical Data Safety Notes Gloves should be worn during installation to prevent crushing and cutting injuries. Children as well as adults with physical, mental and/ or sensoric impairments must not use this shower system without proper supervision. Persons under the influence of alcohol or drugs are prohibited from using this shower system. Do not allow the streams of the shower touch sensitive body parts (such as your eyes). An adequate distance must be kept between the shower and you. The product may not be used as a holding handle. A separate handle must be installed. The shower system may only be used for bathing, hygienic and body cleansing purposes. Shower hoses are only suitable for a connection from the shower to the fitting. Never fit a shut-off device between the fitting and the hose. Installation Instructions • The fitting must be installed, flushed and tested after the valid norms. • Where the contractor mounts the product, he should ensure that the entire area of the wall to which the mounting plate is to be fitted, is flat (no projecting joints or tiles sticking out), that the structure of the wall is suitable for the installation of the product and has no weak points. The enclosed screws and dowels are only suitable for concrete. For another wall constructions the manufacturer’s indications of the dowel manufacturer have to be taken into account. • The mesh washer must be insert to protect the overhead shower against incoming dirt by pipework. Incoming dirt leads to defects or/and can damage parts of the shower; such caused faults voids all liability and guarantee claims. Operating pressure: Recommended operating pressure: (1 MPa = 10 bar = 147 PSI) Hot water temperature: max. 0,6 MPa 0,1 - 0,4 MPa max. 60°C Symbol description Do not use silicone containing acetic acid! Dimensions (see page 31 - 34) Flow diagram (see page 33) Operation (see page 36) Cleaning (see page 37) enclosed brochure Spare parts (see page 38) XXX 000 820 880 = Colors = chrome plated = brushed nickel = satin chrome Test certificate (see page 39) Assembly see page 35 Italiano Indicazioni sulla sicurezza Durante il montaggio, per pevitare ferite da schiacciamento e da taglio bisogna indossare guanti protettivi. I bambini e gli adulti affetti da menomazioni fisiche, psichiche e/osensoriali devono utilizzare il sistema della doccia solo sotto la supervisione di unaa persona responsabile. Bisogna evitare il contatto fra il getto della doccia e parti del corpo delicate (ad es. gli occhi). Fra il soffione ed il corpo va mantenuta una distanza sufficiente. Il prodotto non deve essere utilizzato come maniglia, questa deve essere motata separatamente. Il sistema doccia deve essere utilizzato esclusivamente per l’giene del corpo. I flessibili devono essere inseriti solo tra l ’uscita dell ’acqua e la doccetta. Non deve essere introdotta alcuna prolunga tra il flessibile e l ’uscita dell ’acqua. Dati tecnici Pressione d’uso: Pressione d’uso consigliata: (1 MPa = 10 bar = 147 PSI) Temperatura dell’acqua calda: max. 0,6 MPa 0,1 - 0,4 MPa max. 60°C Descrizione simbolo Non utilizzare silicone contenente acido acetico! Ingombri (vedi pagg. 31 - 34) Diagramma flusso (vedi pagg. 33) Procedura (vedi pagg. 36) Istruzioni per il montaggio • La rubinetteria deve essere installata, pulita e testata secondo le istruzioni riportate! • Quando il personale tecnico specializzato esegue il montaggio del prodotto è necessario assicurarsi che la superficie di fissaggio sia piana in tutta l’area di fissaggio (senza giunti sporgenti o spostamento delle piastrelle), che la struttura della parete sia adatta per il montaggio del prodotto e soprattutto che non ci siano dei punti deboli. Le viti e i tasselli in dotazione sono adatti solo per calcestruzzo. In caso di altre strutture della parete vanno osservare le indicazioni del produttore dei tasselli. • Per proteggere la soffione doccia da eventuali impurita provenienti dalle tubazioni dell’acqua, deve essere inserito il filtro nell’impugnatura della doccia stessa. Tali impurita possono infatti causare difetti e/o danneggiare parti della doccia; in questo caso la Hansgrohe non risponde dei danni. Pulitura (vedi pagg. 37) e brochure allegata Parti di ricambio (vedi pagg. 38) XXX 000 820 880 = Trattamento = cromato = brushed nickel = satinato Segno di verifica (vedi pagg. 39) Montaggio vedi pagg. 35 Español Indicaciones de seguridad Durante el montaje deben utilizarse guantes para evitar heridas por aplastamiento o corte. Niños, así como adultos con limitaciones corporales, mentales y/o sensoriales no deben utilizar el sistema de duchas sin vigilancia. Personas que se encuentran bajo el efecto de alcohol o drogas, no deben utilizar el sistema de duchas. Debe evitarse el contacto del chorro del pulverizador con partes sensibles del cuerpo (por ej. ojos). Debe mantenerse una distancia suficiente entre pulverizador y cuerpo. El producto no debe ser utilizado como un elemento de sujeción. Debe montarse un elemento de sujeción separado. El sistema de ducha solo debe ser utilizado para fines de baño, higiene y limpieza corporal. Los flexos deben usarse exclusivamente para la conexión entre grifería y teleducha. Cualquier función de cierre tras el flexo y en la dirección del flujo del agua no está permitida. Indicaciones para el montaje • El grifo tiene que ser instalado, probado y testado, según las normas en vigor. • En el momento del montaje del producto por parte de personal especializado y cualificado se deberá prestar una atención especial a que la superficie de fijación en toda el área de la fijación sea plana (sin juntas que sobresalen ni azulejos desplazados), que la estructura de la pared sea adecuada para un montaje del producto y que, ante todo, no presente puntos débiles. Los tornillos y tacos adjuntos son sólo apropiados para hormigón. En el caso de otras estructuras murales se deberán considerar las indicaciones del fabricante de tacos. Datos técnicos Presión en servicio: Presión recomendada en servicio: (1 MPa = 10 bar = 147 PSI) Temperatura del agua caliente: max. 60°C Descripción de símbolos No utilizar silicona que contiene ácido acético! Dimensiones (ver página 31 - 34) Diagrama de circulación (ver página 33) Manejo (ver página 36) Limpiar (ver página 37) y folleto anexo Repuestos (ver página 38) XXX 000 820 880 = Acabados = cromado = brushed nickel = satinado Marca de verificación (ver página 39) • La junta de filtración que se suministra con la ducha mural evita que las partículas de suciedad procedentes de las tuberías lleguen a la ducha mural. Debe colocarse entre el flexo y la ducha mural. Infiltraciones de suciedad deterioran el funcionamiento de la ducha mural y pueden causar daños en el interior de la misma que no están cubiertas por la garantía de Hansgrohe. max. 0,6 MPa 0,1 - 0,4 MPa Montaje ver página 35 Nederlands Technische gegevens Veiligheidsinstructies Bij de montage moeten ter voorkoming van knel- en snijwonden handschoenen worden gedragen. Kinderen en volwassenen met lichamelijke, geestelijke en/of sensorische beperkingen mogen het douchesysteem niet zonder toezicht gebruiken. Personen onder invloed van alcohol of drugs mogen het douchesysteem niet gebruiken. Het contact van de douchestraal met gevoelige lichaamsdelen (bijv. ogen) moet worden voorkomen. Er moet voldoende afstand tussen douche en lichaam aangehouden worden. Het product mag niet als handgreep worden gebruikt. Er moet een aparte handgreep gemonteerd worden. Het douchesysteem mag alleen voor het wassen, hygiënische doeleinden en voor de lichaamreiniging worden gebruikt. De doucheslangen zijn alleen geschikt voor de aansluiting van douches aan kranen. Een versperring ná de doucheslang in de stroomrichting is niet toelaatbaar. Montage-instructies • Leidingen doorspoelen volgens Norm. De mengkraan vervolgens monteren en controleren. • Bij de montage van het produkt door een vakkundige installateur moet men erop letten dat het bevestigingsoppervlak op één oppervlak zit (dus geen opliggende voegen of verspringende tegels), de wand geschikt is voor montage van produkten en zeker geen zwakke plekken bevat. De bijgevoegde schroeven en duvels zijn alleen geschikt voor beton. Bei andere wandsoorten dient u te letten op de voorschriften van de fabrikant van de schroeven en duvels. Werkdruk: max. Aanbevolen werkdruk: (1 MPa = 10 bar = 147 PSI) Temperatuur warm water: max. 0,6 MPa 0,1 - 0,4 MPa max. 60°C Symboolbeschrijving Gebruik geen zuurhoudende silicone! Maten (zie blz. 31 - 34) Doorstroomdiagram (zie blz. 33) Bediening (zie blz. 36) Reinigen (zie blz. 37) en bijgevoegde brochure Service onderdelen (zie blz. 38) XXX 000 820 880 = Kleuren = verchroomd = brushed nickel = mat Keurmerk (zie blz. 39) • Het bij de hoofddouche verpakte zeefje moet worden ingebouwd om vuil uit de waterleiding te weren. Vuil uit de leidingen kan de werking van de hoofddouche negatief beïnvloeden en/of de hoofddouche beschadigen. Voor deze schade is Hansgrohe niet verantwoordelijk. Montage zie blz. 35 Dansk Tekniske data Sikkerhedsanvisninger Ved monteringen skal der bruges handsker for at undgå kvæstelser og snitsår. Børn som også voksne med fysiske, mentale og / eller sensoriske begrænsninger må ikke bruge brusersystemet uden opsyn. Personer som er under indflydelse af alkohol eller narkotika må ikke bruge brusersystemet. Bruserstrålens kontakt med sensitive områder (f.eks. øjne) skal undgås. Der skal være en tilstrækkelig afstand mellem bruseren og kroppen. Produktet må ikke bruges som håndtag. Der skal monteres et separat håndtag. Brusersystemet må kun bruges til bade-, hygiejne og rengøringsformål. Bruserslanger bør kun anvendes i forbindelse med tilslutning mellem brusere og armatur. Det er ikke tilladt at montere en afspærringsventil mellem bruser og slange! max. 0,6 MPa 0,1 - 0,4 MPa max. 60°C Symbolbeskrivelse Der må ikke benyttes eddikesyreholdig silikone! Målene (se s. 31 - 34) Doorstroomdiagram (se s. 33) Brugsanvisning (se s. 36) Monteringsanvisninger • Ifølge gældende regler, skal armaturet monteres, skylles igennem og afprøves. • Ved montering er det vigtigt at sikre sig, at hele befæstigelsesfladen er plan (ingen ujævne fuger eller fliser), samt at væggen er egnet til montering af produktet og specielt, at væggen ikke har nogen svage punkter. De medfølgende skruer og dübler er kun egnet til beton. Ved anden vægopbygning bør producenten af dübler kontaktes for nærmere information. • Den vedlagte smudsfangssi skal indsættes i bruseren for at undgå snavs fra rørsystemet. Indskyllet snavs kan have indflydelse på bruserens funktion og/eller føre til beskadigelser på håndbruserens funktionsdele. Driftstryk: Anbefalet driftstryk: (1 MPa = 10 bar = 147 PSI) Varmtvandstemperatur: Rengøring (se s. 37) og vedlagt brochure Reservedele (se s. 38) XXX 000 820 880 = Overflade = Krom = Brushed nickel = Matkrom Godkendelse (se s. 39) Montering se s. 35 Português Dados Técnicos Avisos de segurança Durante a montagem devem ser utilizadas luvas de protecção, de modo a evitar ferimentos resultantes de entalamentos e de cortes. Crianças e adultos com deficiências motoras, mentais e/ou sensoriais não podem utilizar o sistema de duche sem monitorização. Pessoas que estejam sob a influência de álcool ou drogas não podem utilizar o sistema de duche. Deve-se evitar o contacto dos jactos de água com partes do corpo sensíveis (p. ex. olhos). É necessário manter uma distância suficiente entre o chuveiro e o corpo. O produto não pode ser utilizado como pega de apoio. Tem que ser montada uma pega separada. O sistema de duche só pode ser utilizado para fins de higiene pessoal. Os tubos flexíveis são apenas adequados para uma ligação do chuveiro à misturadora. Nunca instale uma válvula de corte entre a misturadora e o tubo flexível. Avisos de montagem • A misturadora deve ser instalada, purgada e testada de acordo com as normas em vigor. • Durante a montagem do produto por técnicos qualificados, deve ter-se em atenção que a superfície de fixação seja plana em toda a área da fixação (sem juntas sobrepostas/salientes ou ladrilhos deslocados), que o dispositivo de montagem na parede seja adequado para uma montagem na parede e que este não apresente nenhuns pontos fracos. Os parafusos e buchas incluídos no volume de fornecimento são apenas adequados para betão. Para outros métodos de montagem na parede devem ser respeitadas as indicações do fabricante das buchas. Pressão de funcionamento: Pressão de func. recomendada: (1 MPa = 10 bar = 147 PSI) Temperatura da água quente: max. 0,6 MPa 0,1 - 0,4 MPa max. 60°C Descrição do símbolo Não utilizar silicone que contenha ácido acético! Medidas (ver página 31 - 34) Fluxograma (ver página 33) Funcionamento (ver página 36) Limpeza (ver página 37) e brochura em anexo Peças de substituição (ver página 38) XXX 000 820 880 = Acabamentos = cromado = brushed nickel = cromado mate Marca de controlo (ver página 39) • O filtro de rede deve ser colocado para proteger o chuveiro de areias e resíduos rovenientes da tubagem. Resíduos e areias podem danificar componentes, ou provocar mau funcionamento do chuveiro; as avarias assim provocadas anulam a nossa responsabilidade e anulam a nossa garantia. Montagem ver página 35 Polski Wskazówki bezpieczeństwa Aby uniknąć zranień, takich jak zgniecenia czy przecięcia, podczas montażu należy nosić rękawice. Zarówno dzieci, jak i dorośli z fizycznymi, psychicznymi i/lub sensorycznymi ograniczeniami nie mogą korzystać z prysznica bez opieki. Osoby znajdujące się pod wpływem alkoholu lub narkotyków nie mogą korzystać z prysznica. Należy unikać kontaktu strumienia wypływającego z głowicy z wrażliwymi częściami ciała (np. oczami). Należy zachowywać odpowiednią odległość pomiędzy głowicą a ciałem. Produktu nie wolno używać jako uchwytu do trzymania się. Należy zamontować osobny uchwyt. Prysznic może być używany tylko w celach kąpieli, higieny i utrzymania czystości ciała. Węże prysznicowe przeznaczone są do podłączenia tylko z armaturą. Blokada za wężem w kierunku przepływu jest niedopuszczalna. Ciśnienie robocze: Zalecane ciśnienie robocze: (1 MPa = 10 bary = 147 PSI) Temperatura wody gorącej: maks. 0,6 MPa 0,1 - 0,4 MPa maks. 60°C Opis symbolu Nie stosować silikonów zawierających kwas octowy! Wymiary (patrz strona 31 - 34) Schemat przepływu (patrz strona 33) Obsługa (patrz strona 36) Wskazówki montażowe • Armatura musi być zamontowana, przepłukana i wypróbowana według obowiązujących norm. • Przy montażu produktu przez wykwalifikowany personel fachowy należy zważać na to, by powierzchnia mocowania na całym obszarze mocowania była równa (by nie było szczelin wzgl. wzajemnie przesuniętych płytek), rodzaj ściany nadawał się do montażu produktu i zwłaszcza, by nie było żadnych słabych stron. Umieszczone w dostawie śruby i kołki rozporowe są przeznaczone tylko do betonu. Przy innych rodzajach montażu ścianowego należy przestrzegać danych producenta kołków rozporowych. • Znajdujące się przy prysznicu sitko musi zostać zainstalowane, aby zatrzymać zanieczyszczenia z instalacji. Przedostające się zanieczyszczenia mogą mieć ujemny wpływ na działanie i/lub prowadzić do usterek w działaniu elementów prysznica. Za powstałe z tego tytułu szkody firma Hansgrohe nie ponosi odpowiedzialności. 10 Dane techniczne Czyszczenie (patrz strona 37) i dołączona broszura Części serwisowe (patrz strona 38) XXX 000 820 880 = kody wykończenia powierzchni = chrom = nikiel szorowany = chrom mat Znak jakości (patrz strona 39) Montaż patrz strona 35 Česky Technické údaje Bezpečnostní pokyny Pro zabránění řezným zraněním a pohmožděninám je nutné při montáži nosit rukavice. Děti a dospělé osoby s tělesným, duševním a / nebo smyslovým postižením nesmí sprchový systém používat bez dozoru. Osoby pod vlivem alkoholu nebo drog nesmí sprchový systém používat. Je nutné zabránit kontaktu vodních paprsků sprchy s měkkými částmi těla (např. očima). Je nutné dodržovat dostatečný odstup mezi sprchou a tělem. Produkt nesmí být používán jako madlo. Je nutné namontovat samostatné madlo. Sprchový systém smí být používán pouze ke koupání a za účelem tělesné hygieny. Rozmìry (viz strana 31 - 34) Sprchové hadice jsou vhodné pouze pro napojení sprch na armatury. Řazení uzavíracího ventilu za hadici po směru toku je nepřípustné! Diagram průtoku (viz strana 33) Provozní tlak: Doporučený provozní tlak: (1 MPa = 10 bar = 147 PSI) Teplota horké vody: • Armatura se musí montovat, proplachovat a testovat podle platných norem. • Při montáži produktu kvalifikovaným odborným personálem je třeba dbát na to, aby upevňovací plochy byly v celém rozsahu upevnění rovné (žádné vyčnívající spáry nebo navzájem přesazené obklady), aby konstrukce stěny byla pro montáž produktu vhodná a zvláště aby v ní nebyla žádná slabá místa. Přiložené vruty a hmoždinky jsou vhodné pouze pro beton. Při jiných konstrukčních materiálech stěny je třeba se řídit údaji výrobce hmoždinek. • Do přívodu musí být zabudováno se sprchou dodávané sítko, aby zachycovalo nečistoty vyplavené z vodovodní sítě. Vyplavené nečistoty mohou ovlivnit funkci sprchy a nebo mohou vést i k jejímu poškození. Na takto vzniké škody se nevztahuje záruka firmy Hansgrohe. max. 60°C Popis symbolů Nepoužívat silikon s obsahem kyseliny octové! Pokyny k montáži max. 0,6 MPa 0,1 - 0,4 MPa Ovládání (viz strana 36) Čištění (viz strana 37) a přiložená brožura Servisní díly (viz strana 38) XXX 000 820 880 = kód povrchové úpravy = chrom = brushed nickel = matný chrom Zkušební značka (viz strana 39) Montáž viz strana 35 11 Slovensky Technické údaje Bezpečnostné pokyny Pri montáži musíte nosiť rukavice, aby ste predišli pomliaždeninám a rezným poraneniam. Sprchovací systém nesmú bez dozoru používať deti, ako aj dospelé osoby s telesným, duševným a/alebo zmyslovým postihnutím. Sprchovací systém nesmú používať ani osoby, ktoré sú pod vplyvom alkoholu alebo drog. Vyhýbajte sa kontaktu vodného lúča sprchy s citlivými miestami tela (napr. oči). Dodržiavajte dostatočnú vzdialenosť medzi sprchou a telom. Výrobok sa nesmie používať ako držadlo. K tomu účelu sa musí namontovať samostatné držadlo. Sprchovací systém sa smie používať len na kúpanie a telesnú hygienu. Sprchové hadice sú vhodné iba pre napojenie spŕch na batérie. Umiestnenie uzatváracieho ventilu za hadicou v smere toku je neprípustne. Pokyny pre montáž • Armatúra sa musí montovať, preplachovať a testovať podľa platných noriem. • Pri montáži produktu kvalifikovaným odborným personálom je nutné dbať na to, aby upevňovacie plochy boli v celom rozsahu upevnenia rovné (žiadne vyčnievajúce škáry alebo navzájom predsadené obklady), aby konštrukcia steny bola pre montáž produktu vhodná a zvlášť aby v nej neboli žiadne slabé miesta. Priložené vruty a hmoždinky sú vhodné len pre betón. Pri iných konštrukčných materiáloch steny je nutné riadiť sa údajmi výrobcu hmoždiniek. • Do prívodu musí byt‘ zabudované so sprchou dodávané sítko, aby zachytilo nečistoty vyplavené z vodovodnej siete. Vyplavené nečistoty môžou ovlivnit‘ funkciu sprchy, alebo spôsobit‘ jej poškodenie. Na takto vzniknuté škody sa nevzt‘ahuje záruka firmy Hansgrohe. 12 Prevádzkový tlak: Doporučený prevádzkový tlak: (1 MPa = 10 bar = 147 PSI) Teplota teplej vody: max. 0,6 MPa 0,1 - 0,4 MPa max. 60°C Popis symbolov Nepoužívať silikón s obsahom kyseliny octovej! Rozmery (viď strana 31 - 34) Diagram prietoku (viď strana 33) Obsluha (viď strana 36) Čištění (viď strana 37) a priložená brožúra Servisné diely (viď strana 38) XXX 000 820 880 = kód povrchovej úpravy = chróm = brushed nickel = matný chróm Osvedčenie o skúške (viď strana 39) Montáž viď strana 35 中文 技术参数 安全技巧 装配时为避免挤压和切割受伤,必须戴上手 套。 不得让儿童和肢体、精神和/或意识有障碍的 成人在不受监管的情况下使用淋浴系统。受酒 精或毒品影响的人员不得使用淋浴系统。 必须避免让身体敏感部位(如眼睛)接触到莲 蓬头喷水。必须保持莲蓬头与人头之间有足够 的距离。 该产品不得作扶柄使用。必须安装单独的扶 柄。 淋浴系统只允许作为洗浴、卫生和洁身之用。 淋浴软管只适合从淋浴器连接到管接头。切勿 在管接头和软管之间安装截止装置。 工作压强: 推荐工作压强: (1 MPa = 10 bar = 147 PSI) 热水温度: 最大 0,6 MPa 0,1 - 0,4 MPa 最大 60°C 符号说明 请勿使用含有乙酸的硅! 大小 (参见第 31 - 34 页) 流量示意图 (参见第页 33) 安装提示 • 必须按照现行的规定安装,冲洗和测试产品。 • 在安装产品的位置,安装人员必须确保安装面的 墙面是平的(没有突出物或瓷砖没有突起),墙 体结构适合产品的安装并没有弱点。包装内的膨 胀螺丝只适用于混凝土墙体。对于其他墙体结构 必须咨询膨胀螺丝生产商的建议。 • 必须装上花洒所附带的滤网密封垫,以过滤管 道里的杂质污物。杂质污物会影响花洒的功能 和/或损坏花洒的功能部件,由此而产生的产品 损坏不属于汉斯格雅的保修范围。 操作 (参见第 36 页) 清洗 (参见第页 37) 并附有小手册 备用零件 (参见第 38 页) XXX= 000 = 820 = 880 = 颜色代码 镀铬 镍拉丝 铬压光 检验标记 (参见第页 39) 安装 参见第页 35 13 Русский Указания по технике безопасности Во время монтажа следует надеть перчатки во избежание прищемления и порезов. Дети, а также взрослые с физическими, умственными и/или сенсорными недостатками должны пользоваться душевой системой только под присмотром. Запрещается пользоваться душевой системой в состоянии алкогольного или наркотического опьянения. Не допускайте попадания струи воды из разбрызгивателя на чувствительные части тела (например, на глаза). Разбрызгиватель следует устанавливать на достаточном расстоянии от тела. Изделие запрещается использовать в качестве рукоятки. Следует устанавливать специальную рукоятку. Душевую систему разрешается использовать только в гигиенических целях для принятия ванны и личной гигиены. Душевые шланги подходят только для подсоединения душей к арматуре. Не устанавливайте дополнительных затворов между шлангом и арматурой! Указания по монтажу • Смеситель должен быть смонтирован по действующим нормам и в соответствии с настоящей инструкцией, проверен на геметичность и безупречность работы. • При монтаже изделия квалифицированным персоналом необходимо следить за тем, чтобы, поверхность крепления была плоской во всей зоне крепления (без выступающих швов или смещения плитки), структура стен подходила для монтажа изделия и, в частности, не имела слабых мест. Прилагаемые винты и дюбели предназначены только для бетона. При других типах стен необходимо соблюдать указания производителей дюбелей. Технические данные Рабочее давление: не более. 0,6 МПа Рекомендуемое рабочее давление: 0,1 - 0,4 МПа (1 МПа = 10 bar = 147 PSI) Температура горячей воды: не более. 60°C Описание символов Не применяйте силикон, содержащий уксусную кислоту. Размеры (см. стр. 31 - 34) Схема потока (см. стр. 33) Эксплуатация (см. стр. 36) Очистка (см. стр. 37) и прилагаемая брошюра Κомплеκт (см. стр. 38) XXX 000 820 880 = Код цвета поверхности = хром = brushed nickel = матовый Знак технического контроля (см. стр. 39) • Для предотворащения попадания частиц грязи из водопроводной сети необходимо установить фильтр, прилагаемый к ручному душу. Частицы грязи могут нарушить отдельные функции и/или привести к повреждению функциональных деталей ручного душа, Hansgrohe не несет ответственность за повреждения вследствие отсутствия фильтра. 14 Монтаж см. стр. 35 Magyar Műszaki adatok Biztonsági utasítások A szerelésnél a zúzódások és vágási sérülések elkerülése érdekében kesztyűt kell viselni. Gyermekek, valamint testileg, szellemileg fogyatékos vagy érzékelésben korlátozott személyek nem használhatják felügyelet nélkül a zuhanyrendszert. Alkohol és kábítószer befolyása alatt álló személyek nem használhatják a zuhanyrendszert. Kerülni kell a zuhanysugár érintkezését érzékeny testrészekkel (pl. szemek). Be kell tartani a megfelelő távolságot a zuhanyfej és a test között. A terméket nem szabad kapaszkodónak használni. Ehhez külön kapaszkodót kell felszerelni. A zuhanyrendszert csak fürdéshez, mosakodáshoz és egészségügyi tisztálkodáshoz szabad használni. A zuhanycsövek kizárólag zuhanyok csaptelepekkel való összekötésére alkalmasak. A zuhanycső után (folyásirány szerint) elzárás beszerelése nem engedélyezett! Üzemi nyomás: Ajánlott üzemi nyomás: (1 MPa = 10 bar = 147 PSI) Forróvíz hőmérséklet: max. 0,6 MPa 0,1 - 0,4 MPa max. 60°C Szimbólumok leírása Ne használjon ecetsavtartalmú szilikont! Méretet (lásd a 31 - 34. oldalon) Átfolyási diagramm (lásd a oldalon 33) Használat (lásd a 36. oldalon) Szerelési utasítások • A csaptelepet az érvényben lévő előírásoknak megfelelően kell felszerelni, átöblíteni és ellenőrizni. • Miközben szakképzett szakember végzi a termék felszerelését, ügyelni kell arra, hogy a rögzítési felületek a rögzítési terület teljes egészén síkok (nincsenek kiálló fugák vagy csempeszélek), a fal felépítése alkalmas a termék felszereléséhez, és különösképpen, hogy nincsenek benne gyenge pontok. A mellékelt csavarok és dűbelek csak betonhoz alkalmasak. Egyéb falazatoknál figyelembe kell venni a dűbelgyártó gyártói utasításait. • A kézi zuhanyhoz csomagolt szűrőtömítést be kell szerelni a vízhálózatból származó szennyeződések kiküszöbölésére. A beáramló szennyeződések akadályozhatják és / vagy teljesen tönkre is tehetik a zuhany funkcióit. Az ezekből adódó károkért a Hansgrohe nem felel. Tisztítás (lásd a oldalon 37) és mellékelt brossúrával Tartozékok (lásd a 38. oldalon) XXX 000 820 880 = Színkódok = króm = brushed nickel = mattkróm Vizsgajel (lásd a oldalon 39) Szerelés lásd a oldalon 35 15 Suomi Tekniset tiedot Turvallisuusohjeet Asennuksessa on käytettävä käsineitä puristumien ja viiltojen aiheuttamien tapaturmien estämiseksi. Lapset ja ruumiillisesti, henkisesti ja/tai aistillisesti rajoittuneet aikuiset eivät saa käyttää suihkujärjestelmää ilman valvontaa. Alkoholin tai huumeiden vaikutuksessa olevat henkilöt eivät saa käyttää suihkujärjestelmää. Suihkuveden kontaktia herkkien ruumiinosien (esim. silmien) kanssa on vältettävä.Suihkun ja vartalon välissä on oltava riittävä väli. Tuotetta ei saa käyttää kädensijana. On asennettava erillinen kädensija. Suihkujärjestelmää saa käyttää ainoastaan kylpy-, hygienia- ja puhdistustarkoituksiin. Suihkuletkut soveltuvat vain käsisuihkun liittämiseen armatuureihin. Letkun jälkeen virtaussuunnassa oleva sulkuventtiili ei ole sallittua! Asennusohjeet • Kaluste on asennettava, huuhdeltava ja tarkastettava voimassa olevien määräysten mukaisesti. • Kun pätevä ammattihenkilöstö suorittaa tuotteen asennusta, on huomioitava, että kiinnityspinta on koko kiinnityksen alueella tasainen (ei ulkonevia saumoja tai laattojen tasomuutoksia) ja, että seinän rakenne soveltuu tuotteen asentamiseen eikä siinä ole heikkoja kohtia. Mukana olevat kiinnitysruuvit ja kiinnitysankkurit soveltuvat betoniin kiinnittämiseen. Kiinnitettäessä tuotetta muihin seinärakenteisiin, noutata kiinnittimien valmistajan ohjeita. • Käsisuihkun mukana toimitettu sihtitiiviste on asennettava paikalleen, jotta lian huuhtoutuminen vesijohtoverkostosta käsisuihkuun estyy. Huuhtoutuvat likahiukkaset voivat häiritä suihkun toimintaa tai vahingoittaa toimintaosia, Hansgrohe ei vastaa tästä aiheutuneista vahingoista. 16 Käyttöpaine: Suositeltu käyttöpaine: (1 MPa = 10 bar = 147 PSI) Kuuman veden lämpötila: maks. 0,6 MPa 0,1 - 0,4 MPa maks. 60°C Merkin kuvaus Älä käytä etikkahappopitoista silikonia! Mitat (katso sivu 31 - 34) Virtausdiagrammi (katso sivu 33) Käyttö (katso sivu 36) Puhdistus (katso sivu 37) ja oheinen esite Varaosat (katso sivu 38) XXX 000 820 880 = Värikoodi = kromi = harjattu nikkeli = jalomatta kromi Koestusmerkki (katso sivu 39) Asennus katso sivu 35 Svenska Tekniska data Säkerhetsanvisningar Handskar ska bäras under monteringsarbetet så att man kan undvika kläm- och skärskadorgen werden. Barn samt vuxna med fysiska, psykiska eller sensoriska funktionshinder får inte använda duschsystemet ensamma. Personer som är påverkade av alkohol- eller droger får inte använda duschsystemet. Undvik att rikta duschstrålarna mot känsliga kroppsdelar (t. ex. ögonen. Det måste finnas ett tillräckligt stort avstånd mellan duschen och kroppen. Produkten får inte användas som handtag. Ett separat handtag måste monteras. Duschsystemet får bara användas till kroppshygien med bad och dusch. Duschslangar är endast avsedda till att ansluta duschar på blandare. Det är inte tillåtet att lägga in en spärr efter slangen och i flödesriktningen! Monteringsanvisningar • Armaturen måste installeras, genomspolas och testas enligt gällande föreskrifter. • När kvalificerad fackpersonal monterar produkten är det viktigt att tänka på att monteringsytan är plan i alla delar av arbetsytan (inga fogar som sticker ut eller klinkerförskjutningar), att väggkonstruktionen passar till montering av produkten samt att den inte har svaga punkter. Medföljande skruvar och plugg är endast avsedda för betong. Vid andra väggkonstruktioner skall anvisningarna från pluggtillverkaren beaktas. • Silpackningen som följer med duschen måste monteras för att undvika att smuts från ledningsnätet tränger in. Smuts som spolas in kan påverka funktionerna och/eller leda till skador på funktionsdelar i duschen. Hansgrohe frånsäger sig allt ansvar för skador som kan härledas till detta. Driftstryck: Rek. driftstryck: (1 MPa = 10 bar = 147 PSI) Varmvattentemperatur: max. 0,6 MPa 0,1 - 0,4 MPa max. 60°C Simbolio aprašymas Använd inte silikon som innehåller ättiksyra! Måtten (se sidan 31 - 34) Pralaidumo diagrama (se sidan 33) Hantering (se sidan 36) Rengöring (se sidan 37) och medföljande broschyr Reservdelar (se sidan 38) XXX 000 820 880 = Färgkodning = krom = borstad nickel = ädelmatt Testsigill (se sidan 39) Montering se sidan 35 17 Lietuviškai Saugumo technikos nurodymai Apsaugai nuo užspaudimo ir įsipjovimo montavimo metu mūvėkite pirštines. Dušo sistema uždrausta naudotis vaikams, taip pat suaugusiems su fizine, dvasine negale ir (arba) sensorikos sutrikimais. Dušo sistema taip pat uždrausta naudotis asmenims, apsvaigusiems nuo alkoholio arba narkotikų. Būtina vengti dušo vandens srovės kontakto su jautriomis kūno vietomis (pvz., akimis). Todėl būtina laikytis tinkamu atstumu nuo dušo. Gaminys neturi būti naudojamas kaip rankena. Rankena montuojama atskirai. Dušo sistema turi būti naudojama tik kūno higienai ir švarai palaikyti. Dušo žarnos yra pritaikytos tik prijungti dušo galvutę prie vandens maišytuvo. Negalima montuoti vandens uždarymo mechanizmo tarp maišytuvo ir žarnos. Darbinis slėgis: ne daugiau kaip 0,6 MPa Rekomenduojamas slėgis: 0,1 - 0,4 MPa (1 MPa = 10 barų = 147 PSI) Karšto vandens temperatūra: ne daugiau kaip 60°C Simbolio aprašymas Nenaudokite silikono, kurio sudėtyje yra acto rūgšties! Išmatavimai (žr. psl. 31 - 34) Pralaidumo diagrama (žr. psl. 33) Eksploatacija (žr. psl. 36) Montavimo instrukcija • Maišytuvas privalo būti montuojamas ir išbandomas pagal veikiančias normas ir šią instrukciją. • Montuojant produktą, specialistas privalo įsitikinti, kad sienos plotas, prie kurio dedama montavimo plokštė, yra lygus (jokių plytelių ar kitų nelygumų), kad sienos struktūra yra pritaikyta produkto montavimui ir neturi jokių silpnų vietų. Pakuotėje esantys varžtai ir kaiščiai yra skirti tik betonui. Esant kitokiai sienai, varžtus ir kaiščius reikia rinktis pagal paskirtį. • Tinklelis, kuris yra rankų dušass pakuotėje, privalo būti įstatytas, kad būtų apsaugota nuo išorės nešvarumų. Nešvarumai gali pakenkti rankų dušass funkcionalumui ir (arba) sugadinti rankų dušass funkcines dalis. Tokiu atveju „“Hansgrohe““ atsakomybės neprisiima. 18 Techniniai duomenys Valymas (žr. psl. 37) ir pridedama brošiūra Atsarginės dalys (žr. psl. 38) XXX 000 820 880 = Spalva = chrom = brushed nickel = chrominė matinė Bandymo pažyma (žr. psl. 39) Montavimas žr. psl. 35 Hrvatski Tehnički podatci Sigurnosne upute Prilikom montaže se radi sprječavanja prignječenja i posjekotina moraju nositi rukavice. Djeca, kao i tjelesno, mentalno i/ili senzorno hendikepirane odrasle osobe ne smiju se koristiti sustavom tuša bez nadzora. Osobe koje su pod utjecajem alkohola ili droga ne smiju se koristiti sustavom tuša. Mora se izbjegavati kontakt mlaza iz tuša s osjetljivim dijelovima tijela (npr. očima). Tijelo korisnika mora biti dovoljno udaljeno od tuša. Proizvod ne smije služiti za pridržavanje. U tu se svrhu mora postaviti zaseban rukohvat. Sustav tuša se smije primjenjivati samo za kupanje, tuširanje i osobnu higijenu. Crijeva tuša prikladna su jedino za spajanje tuševa na armature. Nije dopušteno zatvaranje crijeva u smjeru protoka vode! Upute za montažu • Cijevi moraju biti postavljene, isprane i testirane prema važećim normama. • Kada proizvod montira kvalificirano stručno osoblje treba paziti da čitava površina na koju se učvršćuje bude ravna (bez istaknutih fuga ili krivljenja pločica), da je zidna konstrukcija primjerena montaži proizvoda te osobito da nema slabih mjesta. Priloženi vijci i moždanici prikladni su samo za beton. Kod drugih zidnih nadgradnji treba obratiti pažnju na navode proizvođača moždanika. • Filter potrebno je ugraditi kako bi se regulirao protok vode i smanjio dotok prljavštine. Za eventualna oštećenja uzrokovana prljavštinom proizvođač Hansgrohe nije odgovoran. Najveći dopušteni tlak: Preporučeni tlak: (1 MPa = 10 bar = 147 PSI) Temperatura vruće vode: tlak 0,6 MPa 0,1 - 0,4 MPa tlak 60°C Opis simbola Nemojte koristiti silikon koji sadrži octenu kiselinu! Mjere (pogledaj stranicu 31 - 34) Dijagram protoka (pogledaj stranicu 33) Upotreba (pogledaj stranicu 36) Čišćenje (pogledaj stranicu 37) i priložena brošura Rezervni djelovi (pogledaj stranicu 38) XXX 000 820 880 = Boje = krom = brushed nickel = matirani krom Oznaka testiranja (pogledaj stranicu 39) Sastavljanje pogledaj stranicu 35 19 Türkçe Teknik bilgiler Güvenlik uyarıları İşletme basıncı: Tavsiye edilen işletme basıncı: (1 MPa = 10 bar = 147 PSI) Sıcak su sıcaklığı: azami 0,6 MPa 0,1 - 0,4 MPa Montaj esnasında ezilme ve kesilme gibi yaralanmaları önlemek için eldiven kullanılmalıdır. Bedensel, ruhsal ve/veya sensörik engelli çocuk ve yetişkinler gözetimsiz olarak duş sistemini kullanmamalıdırlar. Alkol veya uyuşturucu etkisinde olanlar duş sistemini kullanmamalıdır. Püskürtme başlıklarının hassas organlara teması (örn. gözler) önlenmelidir. Püskürtücü ile beden arasında yeterli mesafe bırakılmalıdır. Ürün tutma kolu olarak kullanılmamalıdır. Ayrı bir tutma kolu monte edilmelidir. Duş sistemi yalnızca banyo, hijyen ve beden temizliği amaçları doğrultusunda kullanılabilir. Ölçüleri (Bakınız sayfa 31 - 34) Sözü geçen duş boruları, duş parçalarını yalnız donanım takımlarına bağlamaya yarar. Hortumun arkasından sonra akış yönünde kesmek yasaktır! Akış diyagramı (Bakınız sayfa 33) Simge açıklaması Asetik asit içeren silikon kullanmayın! Montaj açıklamaları • Batarya monte edilmeli, geçerli normlardan sonra akis testi yapilmalidir. azami 60°C Kullanımı (Bakınız sayfa 36) • Müteahhit, ürünü monteleyeceği yer, yani montaj plakasının monte edileceği duvar alanının tümü düz (herhangi bir eklem yerinin ya da duvar fayansının çıkıntısıyla) engellenmemiş, yapısı ürünü montelemeye uygun bir şekilde ve herhangi zayıf noktası olamamasını sağlamalıdır. Kaplı vidalar ve çubuklar sadece beton için uygundur. Başka duvar yapıları için, imalatçının çubuk imal edenin bellirtiği hususlar dikkate alınmalıdır. Yedek Parçalar (Bakınız sayfa 38) • El duşu kafasına eklenmiş olan süzgeç contası, boru şebekesinden sızan kirlerin önüne geçmek için, yerine monte edilmelidir. İçeri sızan bu kirler duşun fonksiyonunu sekteleyebilir ve/veya duşun fonksiyon parçaları üzerinde hasarlara sebep olabilir, bu yüzden meydana gelen hasarlardan Hansgrohe sorumlu tutulamaz. Kontrol işareti (Bakınız sayfa 39) 20 Temizleme (Bakınız sayfa 37) ve birlikte verilen broşür XXX 000 820 880 = Renkler = krom = brushed nickel = mat/krom Montajı Bakınız sayfa 35 Română Instrucţiuni de siguranţă La montare utilizaţi mănuşi pentru evitarea contuziunilor şi tăierii mâinilor. Copiii şi adulţii cu dizabilităţi corporale, mintale şi senzoriale nu pot utiliza sistemul de duş nesupravegheaţi. De asemenea este interzisă utilizarea sistemului de duş de către persoane, care se află sub influenţa alcoolului sau a drogurilor. Evitaţi contactul jetului de apă cu părţile de corp sensibile (de ex. ochii). Ţineţi duşul la o distanţă corespunzătoare de corp. Nu este permisă utilizarea produsului pe post de mâner. este nevoie de montarea unui mâner corespunzător. Sistemul de duş poate fi utilizat doar pentru spălarea, menţinerea igienei şi curăţarea corpului. Furtunul de duş poate fi utilizat numai pentru conectarea telefonului de duş la baterie. Nu este permisă montarea unui opritor la capătul furtunului! Date tehnice Presiune de funcţionare: Presiune de funcţionare recomandată: (1 MPa = 10 bar = 147 PSI) Temperatura apei calde: max. 0,6 MPa 0,1 - 0,4 MPa max. 60°C Descrierea simbolurilor Nu utilizaţi silicon cu conţinut de acid acetic! Dimensiuni (vezi pag. 31 - 34) Diagrama de debit (vezi pag. 33) Utilizare (vezi pag. 36) Instrucţiuni de montare • Bateria trebuie montată, clătită şi verificată conform normelor în vigoare. • La montarea produsului de către un personal calificat trebuie să fiţi atenţi ca suprafaţa, unde se fixează produsul să fie plată pe toată suprafaţa utilizată (să nu existe rosturi sau faianţe proeminente), peretele să fie adecvat pentru montarea produsului şi să nu există zone de rezistenţă redusă. Şuruburile şi diblurile livrate sunt potrivite pentru ziduri de beton. La alte tipuri de zid respectaţi instrucţiunile producătorului diblului utilizat. • Montaţi garnitura de filtru livrată împreună cu capătul de duş de mână pentru evitarea pătrunderii impurităţilor din reţeaua de alimentare. Impurităţile pătrunse pot influenţa funcţionarea aparatului şi/sau provoca deteriorarea capătului de duş. Garanţia nu acoperă aceste daune. Curăţare (vezi pag. 37) şi broşura alăturată Piese de schimb (vezi pag. 38) XXX 000 820 880 = cod de culori = crom = nichel mat = crom mat Certificat de testare (vezi pag. 39) Montare vezi pag. 35 21 Ελληνικά Τεχνικά Χαρακτηριστικά Υποδείξεις ασφαλείας Για να αποφύγετε τραυματισμούς κατά τη συναρμολόγηση πρέπει να φοράτε γάντια. Παιδιά ή ενήλικες με μειωμένες σωματικές, διανοητικές και/ή αισθητήριες ανεπάρκειες δεν επιτρέπεται να χρησιμοποιούν το σύστημα ντους χωρίς επιτήρηση. Άτομα υπό την επήρεια οινοπνεύματος ή ναρκωτικών δεν επιτρέπεται να χρησιμοποιούν σε καμία περίπτωση το Η επαφή δέσμης νερού του ντους με ευαίσθητες περιοχές του σώματος (π.χ. μάτια) πρέπει να αποφεύγεται. Διατηρείτε επαρκή απόσταση ανάμεσα στο ντους και το σώμα. Το προϊόν δεν επιτρέπεται να χρησιμοποιείται σαν λαβή στήριξης. Για τον σκοπό αυτό πρέπει να τοποθετηθεί ξεχωριστή λαβή στήριξης. Το σύστημα ντους επιτρέπεται να χρησιμοποιείται μόνο σαν μέσο λουτρού, υγιεινής και καθαρισμού του σώματος. Το εύκαμπτο σπιράλ του καταιονιστήρα είναι κατάλληλο μόνο για τη σύνδεση του καταιονιστήρα χειρός με τη βάνα. Δεν επιτρέπεται καμία στρόφιγγα διακοπής μετά το σωλήνα στην κατεύθυνση ροής! Οδηγίες συναρμολόγησης • Η μπαταρία πρέπει να τοποθετηθεί, να πλυθεί και να ελεγχθεί με βάση τους ισχύοντες κανόνες υδραυλικής τέχνης • Κατά τη συναρμολόγηση του προϊόντος από καταρτισμένο και εξειδικευμένο προσωπικό θα πρέπει να δοθεί προσοχή, ώστε η επιφάνεια στερέωσης στη συνολική περιοχή στερέωσης να είναι επίπεδη (να μην υπάρχουν προεξέχοντες αρμοί ή λιθογόμωση πλακιδίων), ώστε η κατασκευή του τοίχου να είναι κατάλληλη για τη συναρμολόγηση του προϊόντος και ώστε η επιφάνεια να μην παρουσιάζει αδύναμα σημεία. Oι συνημμένες βίδες και οι στυλίσκοι ενδείκνυνται μόνο για σκυρόδεμα. Σε άλλες επίτοιχες κατασκευές θα πρέπει να δοθεί προσοχή στα δεδομένα του Κατασκευαστή των στυλίσκων. • Πρέπει να εγκατασταθεί το παρέμβυσμα φίλτρου που συνοδεύει τον καταιονιστήρα κατά τέτοιο τρόπο, ώστε να αποφεύγονται ρύποι που προέρχονται από το δίκτυο ύδρευσης. Οι ρύποι από το δίκτυο ύδρευσης μπορούν να επηρεάσουν αρνητικά και/ ή να προξενήσουν ζημία στα λειτουργικά τμήματα του καταιονιστήρα (ντους). Τέτοιου είδους ζημίες δεν καλύπτονται από την εγγύηση Hansgrohe. 22 Λειτουργία πίεσης: Συνιστώμενη λειτουργία πίεσης: (1 MPa = 10 bar = 147 PSI) Θερμοκρασία ζεστού νερού: έως 0,6 MPa 0,1 - 0,4 MPa έως 60°C Περιγραφή συμβόλων Μην χρησιμοποιείτε σιλικόνη που περιέχει οξικό οξύ! Διαστάσεις (βλ. σελίδα 31 - 34) Διάγραμμα ροής (βλ. Σελίδα 33) Χειρισμός (βλ. σελίδα 36) Καθαρισμός (βλ. Σελίδα 37) και συνημμένο φυλλάδιο Ανταλλακτικά ( βλ. σελίδα 38 ) XXX 000 820 880 = Χρώματα = Επιχρωμιωμένο = νίκελ ματ = ματ Σήμα ελέγχου (βλ. Σελίδα 39) Συναρμολόγηση βλ. Σελίδα 35 Slovenski Tehnični podatki Varnostna opozorila Pri montaži je treba nositi rokavice, da se preprečijo poškodbe zaradi zmečkanja ali urezov. Otroci kot tudi odrasle osebe z omejenimi telesnimi, duševnimi in/ali senzoričnimi sposobnostmi ne smejo nenadzorovano uporabljati sistema za prhanje. Osebe, ki so pod vplivom alkohola ali drog, sistema za prhanje ne smejo uporabljati. Éviter le contact du jet de la douchette avec les parties sensibles du corps (telles par ex. que les yeux). Veiller à respecter un écart suffisant entre la douchette et le corps Proizvoda ne smete uporabljati kot držalnega ročaja. V ta namen je treba montirati poseben ročaj. Sistem za prhanje se sme uporabljati le z namenom umivanja, vzdrževanja higiene in telesne nege. Gibke cevi za prho so primerne le za povezavo prhe in armature. Naprave za zapiranje pretoka vode nikoli ne nameščajte med armaturo in cev. Delovni tlak: Priporočeni delovni tlak: (1 MPa = 10 bar = 147 PSI) Temperatura tople vode: maks. 0,6 MPa 0,1 - 0,4 MPa maks. 60°C Opis simbola Ne smete uporabiti silikona, ki vsebuje ocetno kislino! Mere (glejte stran 31 - 34) Diagram pretoka (glejte stran 33) Upravljanje (glejte stran 36) Navodila za montažo • Armaturo je potrebno montirati, splakniti in testirati v skladu z veljavnimi predpisi. • Kamorkoli bo pogodbenik namestil izdelek, mora poskrbeti, da je celotno območje stene na katero bo plošča nameščena ravno (brez štrlečih fug ali robov ploščic), ter da je struktura stene primerna za namestitev in je brez šibkih točk. Priloženi vijaki in ležaji so primerni le za beton. Za ostale zidne konstrukcije je potrebno upoštevati proizvajalčeva navodila. • Filter, ki je priložen ročni prhi, je potrebno vgraditi, da prho zaščitimo pred umazanijo iz vodovodne napeljave. Umazanija lahko okvari ali poškoduje dele ročne prhe. Za tako nastalo škodo Hansgrohe ne odgovarja. Čiščenje (glejte stran 37) in priložena brošura Rezervni deli (glejte stran 38) XXX 000 820 880 = Barve = krom = brushed nickel = krom mat Preskusni znak (glejte stran 39) Montaža glejte stran 35 23 Estonia Tehnilised andmed Ohutusjuhised Töörõhk Soovitatav töörõhk: (1 MPa = 10 baari = 147 PSI) Kuuma vee temperatuur: maks. 0,6 MPa 0,1 - 0,4 MPa Kandke paigaldamisel muljumis- ja lõikevigastuste vältimiseks kindaid. Lapsed, samuti kehaliste, vaimsete või tajupiirangutega täiskasvanud ei tohi dušisüsteemi järelvalveta kasutada. Alkoholi või narkootikumide mõju all olevad isikud ei tohi dušisüsteemi kasutada. Duši veejoad ei tohi kokku puutuda tundlike kehaosadega (nt silmad). Jätke duši ja keha vahele piisav vahe. Toodet ei tohi kasutada käepidemena. Paigaldage eraldi käepide. Dušisüsteemi tohib kasutada ainult pesemis-, hügieeni- ja kehapuhastamiseesmärkidel. Mõõtude (vt lk 31 - 34) Dušivoolikud sobivad üksnes duši ühendamiseks segistitega. Mingil juhul ei tohi vooliku ja segisti vahele asetada sulgurit. Läbivooludiagramm (vt lk 33) • Seadmestiku paigaldamine, läbipesu ja kontrollimine peab toimuma vastavalt kehtivatele normidele. • Toote paigaldamisel peab töövõtja tagama, et kogu seinapind, kuhu paigaldusplaat kinnitatakse, on lame (ükski vuuk ega keraamiline plaat ei ulatu esile), ning et seina konstruktsioon on toote paigaldamiseks sobiv ja sellel puuduvad nõrgad kohad. Kaasasolevad kruvid ja tüüblid sobivad üksnes betoonile. Muude seinakonstruktsioonide puhul tuleb arvesse võtta tüüblitootja esitatud tooteandmeid. • Kaitsmaks dušši torust tuleva mustuse eest, on vaja paigaldada dušiga kaasasolev mustusesõel. Sissetulev mustus võib funktsioneerimist kahjustada ja/või rikkuda duši detaile. Sellest tulenevate kahjude eest Hansgrohe ei vastuta. 24 Sümbolite kirjeldus Ärge kasutage äädikhapet sisaldavat silikooni! Paigaldamisjuhised maks. 60°C Kasutamine (vt lk 36) Puhastamine (vt lk 37) ja kaasasolev brošüür Varuosad (vt lk 38) XXX 000 820 880 = Värvikood = kroom = brushed nickel = väärismatt Kontrollsertifikaat (vt lk 39) Paigaldamine vt lk 35 Latvian Tehniskie dati Drošības norādes Montāžas laikā, lai izvairītos no saspiedumiem un iegriezumiem, nepieciešams nēsāt cimdus. Bērni, kā arī pieaugušie ar fiziskiem, garīgiem un / vai sensoriskiem ierobežojumiem nedrīkst lietot šo dušas sistēmu bez uzraudzības. Personas, kas atrodas alkohola vai narkotisko vielu iespaidā, nedrīkst lietot šo dušas sistēmu. Nepieciešams izvairīties no dušas strūklas tieša kontakta ar jutīgām ķermeņa daļām (piem., acīm). Nepieciešams ievērot pietiekošu attālumu starp dušu un ķermeni. Šo produktu nedrīkst izmantot kā roku balstu. Nepieciešams uzmontēt atsevišķu roku balstu. Šo dušas sistēmu drīkst izmantot tikai, lai mazgātos, higiēnai un ķermeņa tīrīšanai. Dušas šļūtenes ir piemērotas tikai dušas pieslēgšanai pie jaucējkrāna. Nepieļaujama ir noslēgarmatūras pievienošana aiz šļūtenes plūsmas virzienā! Darba spiediens: Ieteicamais darba spiediens: (1 MPa = 10 bar = 147 PSI) Karstā ūdens temperatūra: maks. 0,6 MPa 0,1 - 0,4 MPa maks. 60°C Simbolu nozīme Neizmantot silikonu, kas satur etiķskābi! Izmērus (skat. 31 - 34. lpp.) Caurplūdes diagramma (skat. lpp. 33) Lietošana (skat. 36. lpp.) Norādījumi montāžai • Jaucējkrāns jāmontē, jāskalo un jāpārbauda atbilstoši spēkā esošajām normām. • Ja izstrādājuma montāžu veic kvalificēti speciālisti, jāseko, lai nostiprināšanas virsma visā nostiprināšanas zonā būtu gluda (šuves un flīzes nav izvirzītas uz āru), lai sienas konstrukcija būtu piemērota izstrādājuma montāžai un būtu pietiekami izturīga. Komplektā esošās skrūves un dībeļi ir paredzēti tikai šī izstrādājuma nostiprināšanai. Ja sienas konstrukcija ir citāda, jāievēro dībeļu ražotāja norādījumi. • Jāiemontē dušas komplektā esošais filtrs, lai novērstu netīrumu ieplūšanu no ūdens vada. Ieskalotie netīrumi var traucēt dušas funkciju un / vai arī izraisīt rokas dušas daļu bojājumus, par kuriem Hansgrohe nenes atbildību. Tīrīšana (skat. lpp. 37) un klāt pievienotais buklets Rezerves daļas (skat. 38. lpp.) XXX 000 820 880 = Krāsas = hroma = brushed nickel = hromēts matēts Pārbaudes zīme (skat. lpp. 39) Montāža skat. lpp. 35 25 Srpski Tehnički podaci Sigurnosne napomene Prilikom montaže se radi sprečavanja prignječenja i posekotina moraju nositi rukavice. Deca, kao i telesno, mentalno i/ili senzorno hendikepirane odrasle osobe ne smeju da koriste sistem tuša bez nadzora. Osobe koje su pod uticajem alkohola ili droga ne smeju da koriste sistem tuša. Mora se izbegavati kontakt mlaza iz tuša sa osetljivim delovima tela (npr. očima). Telo korisnika mora biti na dovoljnom odstojanju od tuša. Proizvod se ne sme koristiti za kao ručka za pridržavanje. U tu svrhu se mora postaviti zaseban rukohvat. Sistem tuša sme da se koristi samo za kupanje, tuširanje i ličnu higijenu. Creva tuša prikladna su jedino za spajanje tuševa na armature. Nije dopušteno blokiranje creva u smeru protoka vode! maks. 0,6 MPa 0,1 - 0,4 MPa maks. 60°C Opis simbola Nemojte koristiti silikon koji sadrži sirćetnu kiselinu! Mere (vidi stranu 31 - 34) Dijagram protoka (vidi stranu 33) Rukovanje (vidi stranu 36) Instrukcije za montažu • Armatura mora biti postavljena, isprana i testirana prema važećim normama. • Kada proizvod montira kvalifikovano stručno osoblje treba paziti da čitava površina na koju se učvršćuje bude ravna (bez istaknutih fuga ili krivljenja pločica), da je zidna konstrukcija primerena montaži proizvoda, i posebno da nema slabih mesta. Priloženi zavrtnji i tiplovi prikladni su samo za beton. Kod drugih zidnih nadgradnji treba obratiti pažnju na navode proizvođača tiplova. • Obavezno ugradite mrežicu upakovanu s tušem, čime sprečavate ulazak prljavštine iz vodovoda. Prljavština može dovesti do delimičnog ili potpunog oštećenja delova tuša. Za eventualna oštećenja uzrokovana prljavštinom proizvođač Hansgrohe nije odgovoran. 26 Radni pritisak: Preporučeni radni pritisak: (1 MPa = 10 bar = 147 PSI) Temperatura vruće vode: Čišćenje (vidi stranu 37) i priložena brošura Rezervni delovi (vidi stranu 38) XXX 000 820 880 = Oznake boja = hrom = brushed nickel = zagasita Ispitni znak (vidi stranu 39) Montaža vidi stranu 35 Norsk Tekniske data Sikkerhetshenvisninger Driftstrykk Anbefalt driftstrykk: (1 MPa = 10 bar = 147 PSI) Varmtvannstemperatur maks. 0,6 MPa 0,1 - 0,4 MPa Bruk hansker under montasjen for å unngå klem- og kuttskader. Barn og voksne med fysiske og psykiske og/eller sensoriske handicap skal ikke bruke dusjsystemet uten oppsyn. Personer som er påvirket av alkohol eller narkotika skal ikke bruke dusjsystemet. Dusjstrålen skal ikke komme i kontakt med ømfintlige kroppsdeler (f.eks. øynene). Overhold en tilstrekkelig avstand mellom dusjen og kroppen. Produktet skal ikke brukes som holdegrep. Det skal monteres en separat holdegrep. Dusjsystemet skal kun brukes for bade-, hygiene- og kroppsrengjøringsformål. Mål (se side 31 - 34) Dusj slanger er kun egnet for tilkobling av dusj til armaturer. Det er ikke tillatt med en avsperring etter slangen i gjennomstrømningsretning! Gjennomstrømningsdiagram (se side 33) Symbolbeskrivelse Ikke bruk silikon som inneholder eddiksyre! Montagehenvisninger • Armaturen skal monteres, spyles og sjekkes iht. gyldige standarder. • Når kvalifisert fagfolk monterer produktet, skal man påse at hele området der produktet monteres er plant (ingen fremstående fuger eller flisekanter), at oppbygging av veggen er egnet for montasje av produktet og at veggen ikke viser noen svakpunkter. Medleverte skruer og plugger egner seg kun for betong. Ved en annen veggoppbygging skal man ta hensyn til pluggprodusentens henvisninger. • Silpakningen som er levert med dusjen skal bygges inn for å forhindre at smuss spyles inn fra ledningsnettet. Innspylt smuss kan påvirke funksjonen negativt og/eller kan medføre skader på hånddusjens funksjonsdeler. Hansgrohe påtar seg inget ansvar for skader som resulteres av dette. maks. 60°C Betjening (se side 36) Rengjøring (se side 37) og vedlagt brosjyre Servicedeler (se side 38) XXX 000 820 880 = Oznake boja = hrom = brushed nickel = zagasita Prøvemerke (se side 39) Montasje se side 35 27 БЪЛГАРСКИ Указания за безопасност При монтажа трябва да се носят ръкавици, за да се избегнат наранявания поради притискане или порязване. Не е позволено деца, както и възрастни с физически, умствени и / или сензорни ограничения да използват системата на душа без надзор. Не е позволено използването на системата на душа от лица, употребили алкохол или дрога. Трябва да се избягва контакта на струите на разпръсквателя с чувствителни части на тялото (напр. очите). Между разпръсквателя и тялото трябва да се спазва достатъчно разстояние. Продуктът не бива да се използва като дръжка. Трябва да се монтира отделна дръжка. Позволено е използването на системата на душа само за къпане, хигиена и цели на почистване на тялото. Маркучите на разпръсквателите са подходящи само за свързване на разпръскватели към арматури. Не се допуска блокиране след маркуча по посоката на протичане! Указания за монтаж • Арматурата трябва да се монтира, промие и провери в съответствие с валидните норми. • При монтаж на продукта от квалифицирани специалисти да се внимава за това, закрепващата повърхност в целия диапазон на закрепването да бъде равна (без изпъкнали фуги или изместване на плочки), конструкцията на стената да е подходяща за монтаж на продукта и особено за това, да няма слаби места. Приложените винтове и дюбели са подходящи само за бетон. При други стенни конструкции да се спазват данните на производителя на дюбели. Технически данни Работно налягане: Препоръчително работно налягане: (1 МПа = 10 bar = 147 PSI) Температура на горещата вода: макс. 60°C Описание на символите Не използвайте силикон, съдържащ оцетна киселина! Размери (вижте стр. 31 - 34) Диаграма на потока (вижте стр. 33) Обслужване (вижте стр. 36) Почистване (вижте стр. 37) и приложена брошура Сервизни части (вижте стр. 38) XXX 000 820 880 = Oznake boja = hrom = brushed nickel = zagasita Контролен знак (вижте стр. 39) • Опакованото заедно с разпръсквателя уплътнение с цедка трябва да се монтира, за да се избегне натрупване на замърсявания от водопроводната мрежа. Натрупването на замърсявания може да наруши функцията и/или да доведе до увреждания на функционалните части на разпръсквателя, Hansgrohe не носи отговорност за получилите се по този начин щети. 28 макс. 0,6 МПа 0,1 - 0,4 МПа Монтаж вижте стр. 35 Shqip Të dhëna teknike Udhëzime sigurie Për të evituar lëndimet e pickimeve ose të prerjeve gjatë procesit të montimit duhet që të vishni doreza. Fëmijët dhe të rriturit me aftësi të kufizuara fizike, mendore dhe/ose ndijuese nuk duhet ta përdorin sistemin e dushit pa qenë nën mbikëqyrje. Personat që janë nën ndikimin e drogave ose të alkoolit nuk duhet ta përdorin sistemin e dushit. Kontakti i valëve të dushit me pjesët e ndjeshme të trupit (p.sh. me sytë) duhet që të shmanget. Midis dushit dhe trupit duhet që të mbahet një distancë e mjaftueshme. Produkti nuk duhet të përdoret si dorëze mbajtëse. Duhet të montohet një dorezë mbajtëse e veçantë Sistemi i dushit duhet të përdoret vetëm qëllimet e banjave, të higjienës dhe të larjes së trupit. Zorra e dushit mund të përdoren vetëm për lidhjen e spërkatëseve me armaturën. Ndalohet bllokimi pas zorrës në drejtim të rrjedhjes! Presioni gjatë punës Presioni i rekomanduar: (1 MPa = 10 bar = 147 PSI) Temperatura e ujit të ngrohtë maks. 0,6 MPa 0,1 - 0,4 MPa maks. 60°C Përshkrimi i simbolit Mos përdorni silikon që në përbërje ka acid acetik. Përmasat (shih faqen 31 - 34) Diagrami i qarkullimit (shih faqen 33) Përdorimi (shih faqen 36) Udhëzime për montimin • Armatura duhet montuar, shpërlarë dhe kontrolluar në bazë të normave të vlefshme. • Gjatë montimit të produktit nga ana e personit të kualifikuar duhet pasur parasysh që e gjithë sipërfaqja mbërthyese të jetë e drejtë (nuk duhet të ketë hapësira mes pllakave). Mbi të gjitha muri duhet të jetë i përshtatshëm për montim dhe nuk duhet të ketë pika të dobëta. Vidhat dhe kunjat e bashkangjitura janë të përshtatshme vetëm për beton. Te përbërja tjetër murore të merren parasysh të dhënat e prodhuesit të kunjave. • Sita që i kemi bashkëngjitur spërkatëses duhet përdorur për të evituar thithjen e papastërtive nga rrjeti i ujësjellësit. Ndotjet mund të dëmtojnë pjesë funksionale të spërkatëses. Hansgrohe nuk merr përgjegjësinë për dëmet e shkaktuara në këtë mënyrë. Pastrimi (shih faqen 37) dhe broshura bashkëngjitur Pjesë ndërrimi (shih faqen 38) XXX 000 820 880 = Oznake boja = hrom = brushed nickel = zagasita Shenja e kontrollit (shih faqen 39) Montimi shih faqen 35 29 ﻋﺮﺑﻲ ΔϴϨϔϟ ΕΎϔλϮϤϟ ϝΎϜδΑΎΠϴϣ 0,6 ϰμϗϷ ΪΤϟ :ϞϴϐθΘϟ ςϐο ϝΎϜδΑΎΠϴϣ0,4 - 0,1 :ϪΑ ϰλϮϤϟ ϞϴϐθΘϟ ςϐο ( PSI 147 = έΎΑ 10 = ϝΎϜδΑΎΠϴϣ 1) °C60 ϰμϗϷ ΪΤϟ :ϦΧΎδϟ ˯ΎϤϟ ΓέήΣ ΔΟέΩ ΰϣήϟ ϒλϭ ϰϠϋ ϱϮΘΤϳ ϱάϟ ϥϮϜϴϠδϟ ϡΪΨΘδΗ ϻ !ϡΎϫ !νΎϤΣ ( 34 - 31 ΔΤϔλ ϊΟέ) ΩΎόΑ ( 33 ΔΤϔλ ϊΟέ) ϑήμϠϟ Ϣγέ ( 36 ΔΤϔλ ϊΟέ) ϞϴϐθΘϟ ϖϓήϤϟ ΐϴΘϜϟϭ ( 37 ΔΤϔλ ϊΟέ) ϒϴψϨΘϟ ( 38 ΔΤϔλ ϊΟέ) έΎϴϐϟ ϊτϗ ϥϮϟϷ= ϡϭήϛ= ε˷ήϔ˵ϣ ϞϜϴϧ= βϠϣ ϡϭήϛ= XXX 000 820 880 ( 39 ΔΤϔλ ϊΟέ) έΎΒΘΧ ΓΩΎϬη 30 ϥΎϣϷ ΕΎϬϴΒϨΗ 6 έΎτΧ ΙϭΪΣ ΐϨΠΘϟ ΐϴϛήΘϟ ˯ΎϨΛ ΪϴϠϟ ΕίΎϔϗ ˯ΪΗέ· ΐΠϳ 6 .ΡϭήΠϟ ϭ έΎθΤϧϹ ˯Ϯγ ϦϴϐϟΎΑ Ϧϣ ΔψΣϼϣ ϥϭΪΑ εΪϟ ϡΎψϧ ϡΪΨΘγ· ωϮϨϤϣ 6 Ϧϣ ϥϮϧΎόϳ ϦϴϐϟΎΑ ϭ ϝΎϔσ ϑήσ Ϧϣ ϪϣΪΨΘγ· ΔϟΎΣ ϲϓ αΎδΣϹ Ϧϣ ϢϬόϨϤϳ ϲΒμϋ ϭ ϲϠϘϋ ϭ ϱΪδΟ έϮμϗ ήϴΛ΄Η ΖΤΗ κΨη ϱϷ Ϥδϳ ϻ .ϩΎϴϤϟ ΓέήΣ ΕΎΟέΪΑ .εΪϟ ϡΎψϧ ϡΪΨΘγ· Ϧϣ ΕέΪΨϤϟ ϭ ϝϮΤϜϟ ϝϭΎϨΗ αέ Ϧϣ ΝέΎΨϟ ˯ΎϤϟ ϦϴΑ ήηΎΒϣ ϝΎμΗ· ΙϭΪΣ ΐϨΠΗ ΐΠϳ 6 ΩϮΟϭ ΐΠϳ .(ϦϴϨϴόϟ ϞΜϣ) ΔγΎδΤϟ ϢδΠϟ ˯ΰΟ ϦϴΑϭ εΪϟ .ϢδΠϟϭ εΪϟ αέ ϦϴΑ ΔϴϓΎϛ ΔϓΎδϣ ξΒϘϣ ΐϴϛήΗ ΐΠϳ .ξΒϘϤϛ ΞΘϨϤϟ ϡΪΨΘγ· ωϮϨϤϣ 6 .ϞμϔϨϣ ϡΎϤΤΘγϹ νήϏϷ ςϘϓ εΪϟ ϡΎψϧ ϡΪΨΘγ· ΐΠϳ 6 .ϢδΠϟ ϒϴψϨΗ νήϏϭ ΔϴΤμϟ νήϏϷϭ .ΔϠλϮϟ ϰϟ· εΪϟ Ϧϣ ϞϴλϮΘϠϟ ϻ· εΪϟ ϢϴσήΧ ϠμΗ ϻ 6 .ϡϮσήΨϟϭ ΔϠλϮϟ ϦϴΑ ϕϼϏ· ίΎϬΟ ΐϴϛήΗ Ϧϣ ˶έάΣ ΐϴϛήΘϟ ΕΎϤϴϠόΗ ήϴϳΎόϤϠϟ Ύ˱Ϙϓϭ ΎϫέΎΒΘΧϭ ΎϬϣΪΨΘγϭ ΔϠλϮϟ ΐϴϛήΗ ΐΠϳ x .ΎϬΑ ϝϮϤόϤϟ ϞϤόϟ ϖϳήϓ ΔτγϮΑ ΞΘϨϤϟ ΐϴϛήΗ ΪϨϋ ϩΎΒΘϧϻ ΐΠϳ x ϥϭΩ ΖϴΒΜΘϠϟ ΓΰϫΎΟ ΖϴΒΜΘϟ ϊοϮϣ ϊϴϤΟ ϥ ϰϟ· κμΨΘϤϟ ΰϫΎΟ ςΎΤϟ ϥϭ ˬ(ΕΎϘμϠϤϟ ϭ ΕϼμϔϤϟ Ϧϣ ΔϴϟΎΧ) ϖϮϋ ΕΎΘϴΒϣ .Δϔϴόο ϦϛΎϣ Δϳ ϰϠϋ ϪϮΘΣ ϡΪϋ ϊϣ ΞΘϨϤϟ ΐϴϛήΘϟ ΔϴϧΎγήΨϟ ςϮΤϠϟ ΔΒγΎϨϣ ΎϬδϔϧ ήϴϣΎδϤϟϭ (ήθϴϔϟ) ήϴϣΎδϤϟ ήϴϣΎδϤϟ ΕΎΘϴΒϤϟ ΔόϨμϤϟ ΔϬΠϟ ΕΎϤϴϠόΘΑ ϡΰΘϟϻ ΐΠϳϭ ˬςϘϓ .ςϮΤϟ Ϧϣ ϯήΧ ωϮϧ ϲϓ ΖϴΒΜΘϟ ΪϨϋ ΥΎγϭϷ Ϧϣ ϱϭΪϴϟ εΪϟ ΔϳΎϤΤϟ ΔϴϜΒθϟ ΔϘϠΤϟ ϝΎΧΩ· ΐΠϳ x ϰϟ· ΓΩέϮϟ ΥΎγϭϷ ϱΩΆΗ ΚϴΣ .ήϴγϮϤϟ ΔϜΒη ΎϬϠϤΤΗ ϲΘϟ ˬεΪϟ Ϧϣ Ϧϣ ˯ΰΟ ϒϠΗ ϲϓ ΐΒδΘΗ Ϊϗ ϭ / ϭ ϝΎτϋ ΙϭΪΣ ϭ ΔϴϟϭΆδϤϟΎΑ ΔλΎΨϟ ΕΎΒϟΎτϤϟ ΔϓΎϛ ϲϐϠΗ ϝΎτϋϷ ϩάϫ ϞΜϣϭ .ϥΎϤπϟ 35 اﻟﺘﺮآﻴﺐ راﺟﻊ ﺻﻔﺤﺔ Unica’S Puro 28631XXX Unica’S Puro 28632XXX Raindance S 100 AIR 3jet / Unica'S Puro 27880000 Raindance S 100 AIR 3jet / Unica'S Puro 27882000 Raindance S 120 AIR 3jet / Unica'S Puro Set 27884000 Raindance S 120 AIR 3jet / Unica'S Puro Set 27886000 �������� 31 Raindance S 150 AIR 3jet / Unica'S Puro Set 27895000 Raindance S Combi 27075000 32 Raindance S 150 AIR 3jet / Unica'S Puro Set 27898000 Raindance S Combi 27076000 Raindance S Combi 27077000 Raindance S 100 AIR 3jet 28504000 Raindance S 150 AIR 3jet 28519000 Raindance S 120 AIR 3jet 28514000 Raindance S 100 AIR 3jet 28537000 Raindance S 120 AIR 3jet 28514000 Raindance S 150 AIR 3jet 28519000 33 34 1 2 1. 2. Ø 6 mm 4a 4b 97450XXX 5 Silicone Silicon e 3 97708000 94246000 35 2 1 2. 1. 36 3. 1 2 > 1 min 3 1 2 37 97709XXX 96275000 97450000 28276XXX (1,60 m) 28275002 (1,75 m) 96179000 Raindance S 100 AIR 3jet 28504000 97651XXX 28679000 98717000 94246000 97708000 38 Raindance S 120 AIR 3jet 28514000 Raindance S 150 AIR 3jet 28519000 P-IX 27075000 27076000 27077000 28631XXX 28632XXX 27880000 27882000 27884000 27886000 27895000 27898000 DVGW SVGW WRAS KIWA NF ACS ETA X X X X X 39 Hansgrohe · Postfach 1145 · D-77761 Schiltach · Telefon +49 (0) 78 36/51-1282 · Telefax +49 (0) 7836/511440 E-Mail: [email protected] · Internet: www.hansgrohe.com 11/2010 9.05646.08 40 Installation Instructions / Warranty 27458XX2 27454XX2 Wall Outlet with Vacuum Breaker 27458XX2 Wall Outlet 27454XX2 Installation Considerations • This unit requires a 1/2" male threaded nipple, extending 5/8" outside the surface of the finished wall. • Model 27458XX2 incorporates an atmospheric vacuum breaker. It is listed by Underwriters Laboratories. • Model 27454XX2 does not incorporate any type of backflow prevention. If required, use Hansgrohe external vacuum breaker 06510XX0. Installation Instructions Wrap the threads on the nipple with several layers of Teflon tape. Seal the wall around the nipple with a waterproof sealant. Push the black gasket over the nipple and firmly against the wall. Screw the elbow to the nipple. Install the decorative cover over the nipple. Press it firmly against the gasket - it should snap into place. Note on 27458XX2: It is normal for a few drops of water to appear in the vacuum breaker vent holes when the water is first turned on, and again when it is turned off. Cleaning Recommendation for Hansgrohe Products Modern lavatory faucets, kitchen faucets, and showers consist of very different materials to comply with the needs of the market with regard to design and functionality. To avoid damage and returns, it is necessary to consider certain criteria when cleaning. Cleaning Materials for Faucets and Showers Acids are a necessary ingredient of cleaning materials for removing lime, however please pay attention to the following points when cleaning faucets and showers: • Only use cleaning materials which are explicitly intended for this type of application. • Never use cleaning materials which contain hydrochloric, formic, phosphoric, or acetic acid, as they cause considerable damage. • Never mix one cleaning material with another. • Never use cleaning materials or appliances with an abrasive effect, such as unsuitable cleaning powders, sponge pads, or micro fiber cloths. Cleaning Instructions for Faucets and Showers Please follow the cleaning material manufacturer’s instructions. In addition, pay attention to the following points: • Clean the faucets and showers as and when required • Use the amount of cleaning product and the amount of time recommended by the manufacturer. Do not leave the cleaner on the fixture longer than necessary. • Regular cleaning can prevent calcification. • When using spray cleaners, spray first onto a soft cloth or sponge. Never spray directly onto the faucet as droplets can enter openings and gaps and cause damage. • After cleaning, rinse thoroughly with clean water to remove any cleaner residue. Important Residues of liquid soaps, shampoos, and shower foams can also cause damage, so rinse with clean water after using. Please note: if the surface is already damaged, the effect of cleaning materials will cause further damage. Components with damaged surfaces must be replaced or injury could result. Damage caused by improper treatment is not covered under the warranty. Limited Lifetime Consumer Warranty This product has been manufactured and tested to the highest quality standards by Hansgrohe, Inc. (“Hansgrohe”). This warranty is limited to Hansgrohe products which are purchased by a consumer in the United States after March 1, 1996, and installed in either the United States or Canada. WHO IS COVERED BY THE WARRANTY This warranty extends to the original consumer purchaser only. This warranty is non-transferable. WHAT IS COVERED BY THE WARRANTY This warranty covers only your Hansgrohe manufactured product. Hansgrohe warrants this product against defects in material or workmanship as follows: Hansgrohe will repair at no charge for parts only or, at its option, replace any product or part of the product that proves defective because of improper workmanship and/or material, under normal installation, use, service and maintenance. If Hansgrohe is unable to provide a replacement and repair is not practical or cannot be timely made, Hansgrohe may elect to refund the purchase price in exchange for the return of the product. LENGTH OF WARRANTY Replacement or repaired parts of products will be covered for the term of this warranty as stated in the following two sentences. If you are a consumer who purchased the product for use primarily for personal, family, or household purposes, this warranty extends for as long as you own the product and the home in which the product is originally installed. If you purchased the product for use primarily for any other purpose, including, without limitation, a commercial purpose, this warranty extends only (i) for 1 year, with respect to Hansgrohe and Commercial products, and (ii) for 5 years, with respect to AXOR products. THIS WARRANTY DOES NOT COVER, AND HANSGROHE WILL NOT PAY FOR: A. Conditions, malfunctions or damage not resulting from defects in material or workmanship. B. Conditions, malfunctions or damage resulting from (1) normal wear and tear, improper installation, improper maintenance, misuse, abuse, negligence, accident or alteration, or (2) the use of abrasive or caustic cleaning agents or “no-rinse” cleaning products, or the use of the product in any manner contrary to the product instructions. (3) Conditions in the home such as excessive water pressure or corrosion. C. Labor or other expenses for the disconnection, deinstallation, or return of the product for warranty service, or for installation or reinstallation of the product (including but not limited to proper packaging and shipping costs), or for installation or reinstallation of the product. D. Accessories, connected materials and products, or related products not manufactured by Hansgrohe. TO OBTAIN WARRANTY PARTS OR INFORMATION Contact your Hansgrohe retailer, or contact Technical Service at: Hansgrohe Inc. 1492 Bluegrass Lakes Parkway Alpharetta GA 30004 Toll-free (800) 334-0455. In requesting warranty service, you will need to provide 1. 2. 3. The sales receipt or other evidence of the date and place of purchase. A description of the problem. Delivery of the product or the defective part, postage prepaid and carefully packed and insured, to Hansgrohe Inc. 1492 Bluegrass Lakes Parkway, Alpharetta, Georgia 30004, Attention: Technical Service, if required by Hansgrohe. When warranty service is completed, any repaired or replacement product or part will be returned to you postage prepaid. EXCLUSIONS AND LIMITATIONS REPAIR OR REPLACEMENT (OR, IN LIMITED CIRCUMSTANCES, REFUND OF THE PURCHASE PRICE) AS PROVIDED UNDER THIS WARRANTY IS THE EXCLUSIVE REMEDY OF THE PURCHASER. HANSGROHE NEITHER ASSUMES NOR AUTHORIZES ANY PERSON TO CREATE FOR IT ANY OBLIGATION OR LIABILITY IN CONNECTION WITH THIS PRODUCT. HANSGROHE SHALL NOT BE LIABLE TO PURCHASER OR ANY PERSON FOR ANY INCIDENTAL, SPECIAL, OR CONSEQUENTIAL DAMAGES, ARISING OUT OF BREACH OF THIS WARRANTY OR ANY IMPLIED WARRANTY (INCLUDING MERCHANTABILITY). Some States do not allow the exclusion or limitation of incidental or consequential damages, so the above limitation or exclusion may not apply to you. This warranty gives you specific legal rights, and you may have other rights which vary from State to State. You may be required by law to give us a reasonable opportunity to correct or cure any failure to comply before you can bring any action in court against us under the Magnuson-Moss Warranty Act. Upon purchase or prior to installation, please carefully inspect your Hansgrohe product for any damage or visible defect. Prior to installing, always carefully study the enclosed instructions on the proper installation and the care and maintenance of the product. If you have questions at any time about the use, installation, or performance of your Hansgrohe product, or this warranty, please call or write to us or call us toll-free at 800 334 0455. Hansgrohe, Inc. • 1490 Bluegrass Lakes Parkway • Alpharetta, GA 30004 Tel. 770 360-9880 • Fax 770 360 9887 www.hansgrohe-USA.com US - Installation Instructions • Part No. 90571301 • Revised 06/2007 PRODUCT INSTRUCTIONS AND QUESTIONS
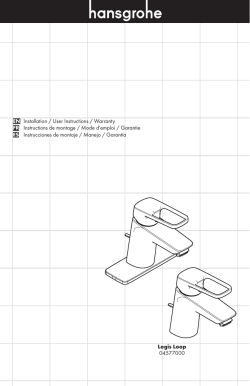
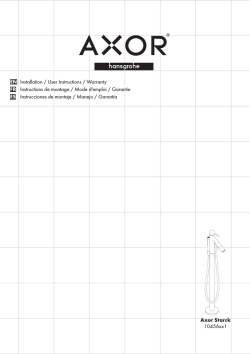
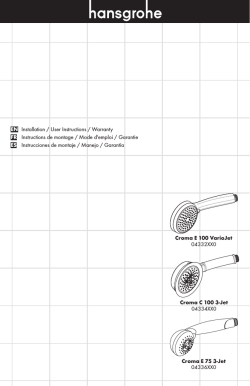

© Copyright 2026