instalar mmdvmhost para dvmega
MANUAL PARA INSTALAR MMDVMHOST PARA DVMEGA+RASPBERRY 3, 2 y B + Raspbian
Descargar la versión del raspbian desde el enlace siguiente:
https://www.raspberrypi.org/downloads/raspbian/
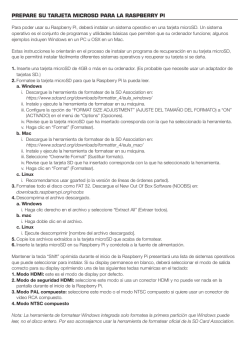
Manual para instalar un sistema operativo en tu Raspberry Pi
Instalación en la Raspberry Pi desde un ordenador con Windows:
- Descargarse el programa Win32DiskImager del enlace siguiente e instálalo
https://sourceforge.net/projects/win32diskimager/
- Insertar la MicroSD en tu lector de tarjetas.
- Ejecutalo y haz click en el icono de la tarjeta
- En la ventana emergente selecciona la imagen que te has descargado.
- Selecciona la letra que tu sistema ha asignado a tu MicroSD.
- Haz click en Write y la tarjeta comenzará a grabar el sistema operativo en la MicroSD
- Cuando termine de grabar, aparecerá una imagen pop-up indicando que la grabación ha terminado.
- Extraemos la tarjeta con seguridad.
- Si todo ha ido bien, ya podemos insertar nuestra MicroSD en la Raspberry pi y comenzar la configuración
Ponemos en marcha la Raspberry pi y procedemos a configurar el sistema según las imagenes siguientes:
Expandimos la tarjeta MicroSD
Marcamos Serial y SSH
Configuramos lenguaje, zona horaria y teclado
Y por último reiniciamos el sistema:
Pasos a seguir después de haber instalado y configurado el sistema operativo en la raspberry pi
Empezamos, y lo primero que hacemos es abrir un terminal y posicionarnos en el directorio home con el comando siguiente:
cd ~
Actualizamos la raspberry pi
sudo apt update -y
sudo apt upgrade -y
sudo apt-get install git nano screen
git clone https://github.com/g4klx/MMDVMHost
git clone https://github.com/g4klx/MMDVMCal
cd MMDVMHost
make
Copiamos el fichero MMDVM.ini en /etc y lo editamos
sudo cp MMDVM.ini /etc/MMDVM.ini
sudo nano /etc/MMDVM.ini
Copiamos el ejecutable en /bin/
sudo cp MMDVMHost /usr/local/bin/MMDVMHost
Editar el fichero siguiente y dejarlo tal cual sigue:
sudo nano /boot/cmdline.txt
dwc_otg.lpm_enable=0 console=tty1 root=/dev/mmcblk0p2 rootfstype=ext4 elevator=deadline fsck.repair=yes rootwait
Reiniciamos la raspberry pi iniciamos el MMDVHost y listo
sudo MMDVMHost
En el caso de utilizar una Raspberry pi 3 , hay que deshabiliatar el bluetooth
sudo nano /boot/config.txt
Añadir esto al final del fichero
dtoverlay=pi3-disable-bt
Cuando quieras actualizar el MMDVMHost, no debes hacer todo el proceso, solo haz lo siguiente:
Ponerse en la carpeta MMDVMHost y ejecutar los comandos siguientes:
sudo git pull
make
EA3EIZ
Proceso para que el MMDVMHost se ejecute automaticamente cuando iniciemos la Raspberry
sudo nano /lib/systemd/system/mmdvmhost.service
Copiamos y pegamos el texto siguiente:
[Unit]
Description=MMDVM Host Service
After=syslog.target network.target
[Service]
User=root
WorkingDirectory=/home/pi/MMDVMHost
ExecStart=/usr/bin/screen -S MMDVMHost -D -m /usr/local/bin/MMDVMHost /etc/MMDVM.ini
ExecStop=/usr/bin/screen -S MMDVMHost -X quit
[Install]
WantedBy=multi-user.target
Le damos los permisos
sudo chmod 755 /lib/systemd/system/mmdvmhost.service
Creamos link
sudo ln -s /lib/systemd/system/mmdvmhost.service /etc/systemd/system/mmdvmhost.service
Editamos el fichero siguiente
sudo nano /lib/systemd/system/mmdvmhost.timer
Copiamos y pegamos el texto siguiente:
[Timer]
OnStartupSec=25
[Install]
WantedBy=multi-user.target
Le damos los permisos
sudo chmod 755 /lib/systemd/system/mmdvmhost.timer
Creamos link
sudo ln -s /lib/systemd/system/mmdvmhost.timer /etc/systemd/system/mmdvmhost.timer
Cargamos los servicios
sudo systemctl daemon-reload
sudo systemctl enable mmdvmhost.timer
sudo reboot
FIN
FICHERO MMDVM.ini (solo cambiar lo marcado en verde para salir en DMR)
[General]
Callsign=EAxxx
Timeout=180
Duplex=0
# ModeHang=10
RFModeHang=10
NetModeHang=3
Display=None
Daemon=0
[Info]
RXFrequency=434400000
TXFrequency=434400000
Power=1
Latitude=0.0
Longitude=0.0
Height=0
Location=Barcelona
Description=Multi-Mode Repeater
URL=www.ea3eiz.com
[Log]
# Logging levels, 0=No logging
DisplayLevel=1
FileLevel=1
FilePath=.
FileRoot=MMDVM
[CW Id]
Enable=1
Time=60
[DMR Id Lookup]
File=DMRIds.dat
Time=24
EA3EIZ
[Modem]
# Port=/dev/ttyACM0
#Port=\\.\COM3
Port=/dev/ttyAMA0
TXInvert=0
RXInvert=0
PTTInvert=0
TXDelay=100
DMRDelay=0
RXLevel=50
TXLevel=50
# CWIdTXLevel=50
# D-StarTXLevel=50
# DMRTXLevel=50
# YSFTXLevel=50
# P25TXLevel=50
OscOffset=0
RSSIMultiplier=1
RSSIOffset=10
Debug=0
[UMP]
Enable=0
# Port=\\.\COM4
Port=/dev/ttyACM1
[D-Star]
Enable=1
Module=C
SelfOnly=0
[DMR]
Enable=1
Beacons=1
Id=123456
ColorCode=1
SelfOnly=0
# Prefixes=234,235
CallHang=3
TXHang=4
#Blacklist=
#DstIdBlackListSlot1RF=
#DstIdBlackListSlot2RF=
#DstIdWhiteListSlot1RF=
#DstIdWhiteListSlot2RF=
#DstIdBlackListSlot1NET=
#DstIdBlackListSlot2NET=
#DstIdWhiteListSlot1NET=
#DstIdWhiteListSlot2NET=
TGRewriteSlot1=0
TGRewriteSlot2=0
BMAutoRewrite=0
BMRewriteReflectorVoicePrompts=0
[System Fusion]
Enable=1
RemoteGateway=0
[P25]
Enable=1
NAC=293
[D-Star Network]
Enable=1
GatewayAddress=127.0.0.1
GatewayPort=20010
LocalPort=20011
Debug=0
[DMR Network] Enable=1
Address=master.spain-dmr.es
Port=62031
Jitter=300
# Local=3350
Password=passw0rd
# Options=
RSSI=0
Slot1=1
Slot2=1
Debug=0
[System Fusion Network]
Enable=1
LocalAddress=127.0.0.1
LocalPort=3200
GwyAddress=127.0.0.1
GwyPort=4200
Debug=0
[P25 Network]
Enable=1
GatewayAddress=127.0.0.1
GatewayPort=42020
LocalPort=32010
Debug=0
[TFT Serial]
# Port=modem
Port=/dev/ttyAMA0
Brightness=50
[HD44780]
Rows=2
Columns=16
# For basic HD44780 displays (4-bit connection)
# rs, strb, d0, d1, d2, d3
Pins=11,10,0,1,2,3
# Device address for I2C
I2CAddress=0x20
# PWM backlight
PWM=0
PWMPin=21
PWMBright=100
PWMDim=16
DisplayClock=1
UTC=0
[Nextion]
# Port=modem
Port=/dev/ttyAMA0
Brightness=50
DisplayClock=1
UTC=0
IdleBrightness=20
[OLED]
Type=3
Brightness=0
Invert=0
[LCDproc]
Address=localhost
Port=13666
#LocalPort=13667
DimOnIdle=0
DisplayClock=1
UTC=0
© Copyright 2026
