
STINGER G² EN_DE_FR_ES_IT_PL_17062015_JZ.indd
USER´S MANUAL
BEDIENUNGSANLEITUNG
MANUEL D`UTILISATION
MANUAL DE USUARIO
INSTRUKCJA OBSŁUGI
MANUALE D‘ USO
LD STINGER G² SERIES
ACTIVE & PASSIVE SYSTEMS
LDEB82(A)G² / LDEB102(A)G² / LDEB122(A)G² / LDEB152(A)G²
1
EN You‘ve made the right choice!
We have designed this product to operate reliably over many years. LD Systems stands for this with its name and many years of experience as
a manufacturer of high-quality audio products. Please read this User‘s Manual carefully, so that you can begin making optimum use of your LD
Systems product quickly.
You can find more information about LD-SYSTEMS at our Internet site WWW.LD-SYSTEMS.COM
DE Sie haben die richtige Wahl getroffen!
Dieses Gerät wurde unter hohen Qualitätsanforderungen entwickelt und gefertigt, um viele Jahre einen reibungslosen Betrieb zu gewährleisten.
Dafür steht LD Systems mit seinem Namen und der langjährigen Erfahrung als Hersteller hochwertiger Audioprodukte. Bitte lesen Sie diese
Bedienungsanleitung sorgfältig, damit Sie Ihr neues Produkt von LD Systems schnell optimal einsetzen können.
Mehr Informationen zu LD SYSTEMS finden Sie auf unserer Internetseite WWW.LD-SYSTEMS.COM
FR Vous avez fait le bon choix!
Cet appareil a été développé et fabriqué en appliquant des exigences de qualité très élevées : il garantit des années de fonctionnement sans
problème. Grâce à de nombreuses années d‘expérience, LD Systems est un nom connu dans le domaine des produits audio haut de gamme.
Veuillez lire attentivement ce Manuel Utilisateur : vous apprendrez rapidement à utiliser votre appareil LD Systems de façon optimale.
Pour plus d‘informations sur LD Systems, visitez notre site Web, WWW.LD-SYSTEMS.COM
ES ¡Gracias por elegir Cameo Light!
Este equipo está diseñado y fabricado con los estándares de calidad más exigentes, para garantizar un correcto funcionamiento durante muchos años.
Los productos de LD-Systems se caracterizan por su gran calidad, avalada por el prestigio de la marca y una dilatada experiencia como fabricante. Lea
atentamente este manual de usuario para poder aprovechar rápidamente toda la funcionalidad de su nuevo producto de LD Systems.
Si desea obtener información sobre LD-SYSTEMS, visite nuestro sitio web WWW.LD-SYSTEMS.COM
PL Gratulujemy wyboru!
To urządzenie zostało zaprojektowane i wyprodukowane przy zastosowaniu najwyższych kryteriów jakościowych w celu zapewnienia wieloletniej
bezawaryjnej eksploatacji. Firma LD Systems gwarantuje to swoją marką i wieloletnim doświadczeniem w wytwarzaniu wysokiej jakości produktów
audio. Proszę starannie przeczytać niniejszą instrukcję obsługi, aby móc jak najszybciej zacząć użytkować ten produkt marki LD Systems.
Dalsze informacje na temat firmy LD SYSTEMS dostępne są na naszej stronie internetowej WWW.LD-SYSTEMS.COM
IT Avete fatto la scelta giusta!
Quest‘apparecchio è stato sviluppato e prodotto secondo elevati standard qualitativi che garantiscono un funzionamento regolare per molti anni.
Per questo motivo LD Systems, con il suo nome e la pluriennale esperienza, rappresenta un‘azienda produttrice di prodotti audio di qualità. Leggete
attentamente questo manuale d‘uso per utilizzare al meglio il vostro nuovo prodotto LD Systems.
Per maggiori informazioni su LD SYSTEMS, consultate la nostra pagina web WWW.LD-SYSTEMS.COM
EN PREVENTIVE MEASURES
1. Please read these instructions carefully.
2. Keep all information and instructions in a safe place.
3. Follow the instructions.
4. Observe all safety warnings. Never remove safety warnings or other information from the equipment.
5. Use the equipment only in the intended manner and for the intended purpose.
6. Use only sufficiently stable and compatible stands and/or mounts (for fixed installations). Make certain that wall mounts are properly installed and secured.
Make certain that the equipment is installed securely and cannot fall down.
7. During installation, observ e the applicable safety regulations for your country.
8. Never install and operate the equipment near radiators, heat registers, ovens or other sources of heat. Make certain that the equipment is always
installed so that is cooled sufficiently and cannot overheat.
9. Never place sources of ignition, e.g., burning candles, on the equipment.
10. Ventilation slits must not be blocked.
11. This appliance is designed exclusively for indoor use, do not use this equipment in the immediate vicinity of water (does not apply to special
outdoor equipment - in this case, observe the special instructions noted below). Do not expose this equipment to flammable materials, fluids or
gases.
12. Make certain that dripping or splashed water cannot enter the equipment. Do not place containers filled with liquids, such as vases or drinking
vessels, on the equipment.
13. Make certain that objects cannot fall into the device.
14. Use this equipment only with the accessories recommended and intended by the manufacturer.
15. Do not open or modify this equipment.
16. After connecting the equipment, check all cables in order to prevent damage or accidents, e.g., due to tripping hazards.
17. During transport, make certain that the equipment cannot fall down and possibly cause property damage and personal injuries.
18. If your equipment is no longer functioning properly, if fluids or objects have gotten inside the equipment or if it has been damaged in anot her
way, switch it off immediately and unplug it from the mains outlet (if it is a powered device). This equipment may only be repaired by authorized,
qualified personnel.
19. Clean the equipment using a dry cloth.
20. Comply with all applicable disposal laws in your country. During disposal of packaging, please separate plastic and paper/cardboard.
21. Plastic bags must be kept out of reach of children.
FOR EQUIPMENT THAT CONNECTS TO THE POWER MAINS:
22. CAUTION: If the power cord of the device is equipped with an earthing contact, then it must be connected to an outlet with a protective ground.
Never deactivate the protective ground of a power cord.
2
23. If the equipment has been exposed to strong fluctuations in temperature (for example, after transport), do not switch it on immediately. Moisture
and condensation could damage the equipment. Do not switch on the equipment until it has reached room temperature.
24. Before connecting the equipment to the power outlet, first verify that the mains voltage and frequency match the values specified on the
equipment. If the equipment has a voltage selection switch, connect the equipment to the power outlet only if the equipment values and the
mains power values match. If the included power cord or power adapter does not fit in your wall outlet, contact your electrician.
25. Do not step on the power cord. Make certain that the power cable does not become kinked, especially at the mains outlet and/or power adapter
and the equipment connector.
26. When connecting the equipment, make certain that the power cord or power adapter is always freely accessible. Always disconnect the equipment
from the power supply if the equipment is not in use or if you want to clean the equipment. Always unplug the power cord and power adapter from the
power outlet at the plug or adapter and not by pulling on the cord. Never touch the power cord and power adapter with wet hands.
27. Whenever possible, avoid switching the equipment on and off in quick succession because otherwise this can shorten the useful life of the
equipment.
28. IMPORTANT INFORMATION: Replace fuses only with fuses of the same type and rating. If a fuse blows repeatedly, please contact an authorised
service centre.
29. To disconnect the equipment from the power mains completely, unplug the power cord or power adapter from the power outlet.
30. If your device is equipped with a Volex power connector, the mating Volex equipment connector must be unlocked before it can be removed.
However, this also means that the equipment can slide and fall down if the power cable is pulled, which can lead to personal injuries and/or other
damage. For this reason, always be careful when laying cables.
31. Unplug the power cord and power adapter from the power outlet if there is a risk of a lightning strike or before extended periods of disuse.
CAUTION
RISK OF ELECTRIC SHOCK
DO NOT OPEN
CAUTION:
To reduce the risk of electric shock, do not remove cover (or back). There are no user serviceable parts
inside. Maintenance and repairs should be exclusively carried out by qualified service personnel.
The lightning flash with arrowhead symbol within an equilateral triangle is intended to alert the user to the presence of uninsulated
“dangerous voltage” within the product’s enclosure that may be of sufficient magnitude to constitute a risk of electrical shock
The exclamation mark within an equilateral triangle is intended to alert the user to the presence of important operating and
maintenance instructions.
CAUTION – HIGH VOLUME LEVELS WITH AUDIO PRODUCTS!
This equipment is intended for professional use. Therefore, commercial use of this equipment is subject to the respectively applicable national accident
prevention rules and regulations. As a manufacturer, Adam Hall is obligated to notify you formally about the existence of potential health risks.
Hearing damage due to high volume and prolonged exposure: When in use, this product is capable of producing high sound-pressure levels (SPL) that
can lead to irreversible hearing damage in performers, employees, and audience members.
For this reason, avoid prolonged exposure to volumes in excess of 90 dB.
To prevent possible hearing damage, avoid listening at high volume levels over long periods of time.
Even exposure to short bursts of loud noise can result in hearing loss. Please keep the volume constantly at a comfortable level.
DE SICHERHEITSHINWEISE
1. Lesen Sie diese Anleitung bitte sorgfältig durch.
2. Bewahren Sie alle Informationen und Anleitungen an einem sicheren Ort auf.
3. Befolgen Sie die Anweisungen.
4. Beachten Sie alle Warnhinweise. Entfernen Sie keine Sicherheitshinweise oder andere Informationen vom Gerät.
5. Verwenden Sie das Gerät nur in der vorgesehenen Art und Weise.
6. Verwenden Sie ausschließlich stabile und passende Stative bzw. Befestigungen (bei Festinstallationen). Stellen Sie sicher, dass Wandhalterungen
ordnungsgemäß installiert und gesichert sind. Stellen Sie sicher, dass das Gerät sicher installiert ist und nicht herunterfallen kann.
7. Beachten Sie bei der Installation die für Ihr Land geltenden Sicherheitsvorschriften.
8. Installieren und betreiben Sie das Gerät nicht in der Nähe von Heizkörpern, Wärmespeichern, Öfen oder sonstigen Wärmequellen. Sorgen Sie dafür,
dass das Gerät immer so installiert ist, dass es ausreichend gekühlt wird und nicht überhitzen kann.
9. Platzieren Sie keine Zündquellen wie z.B. brennende Kerzen auf dem Gerät.
10. Lüftungsschlitze dürfen nicht blockiert werden.
11. Das Gerät wurde ausschließlich für die Verwendung in Innenräumen entwickelt, betreiben Sie das Gerät nicht in unmittelbarer Nähe von Wasser (gilt
nicht für spezielle Outdoor Geräte - beachten Sie in diesem Fall bitte die im Folgenden vermerkten Sonderhinweise). Bringen Sie das Gerät nicht mit
brennbaren Materialien, Flüssigkeiten oder Gasen in Berührung.
12. Sorgen Sie dafür, dass kein Tropf- oder Spritzwasser in das Gerät eindringen kann. Stellen Sie keine mit Flüssigkeit gefüllten Behältnisse wie
Vasen oder Trinkgefäße auf das Gerät.
13. Sorgen Sie dafür, dass keine Gegenstände in das Gerät fallen können.
14. Betreiben Sie das Gerät nur mit dem vom Hersteller empfohlenen und vorgesehenen Zubehör.
15. Öffnen Sie das Gerät nicht und verändern Sie es nicht.
16. Überprüfen Sie nach dem Anschluss des Geräts alle Kabelwege, um Schäden oder Unfälle, z. B. durch Stolperfallen zu vermeiden.
17. Achten Sie beim Transport darauf, dass das Gerät nicht herunterfallen und dabei möglicherweise Sach- und Personenschäden verursachen kann.
18. Wenn Ihr Gerät nicht mehr ordnungsgemäß funktioniert, Flüssigkeiten oder Gegenstände in das Geräteinnere gelangt sind, oder das Gerät
anderweitig beschädigt wurde, schalten Sie es sofort aus und trennen es von der Netzsteckdose (sofern es sich um ein aktives Gerät handelt).
Dieses Gerät darf nur von autorisiertem Fachpersonal repariert werden.
19. Verwenden Sie zur Reinigung des Geräts ein trockenes Tuch.
3
20. Beachten Sie alle in Ihrem Land geltenden Entsorgungsgesetze. Trennen Sie bei der Entsorgung der Verpackung bitte Kunststoff und Papier bzw.
Kartonagen voneinander.
21. Kunststoffbeutel müssen außer Reichweite von Kindern aufbewahrt werden.
BEI GERÄTEN MIT NETZANSCHLUSS:
22. ACHTUNG: Wenn das Netzkabel des Geräts mit einem Schutzkontakt ausgestattet ist, muss es an einer Steckdose mit Schutzleiter angeschlossen
werden. Deaktivieren Sie niemals den Schutzleiter eines Netzkabels.
23. Schalten Sie das Gerät nicht sofort ein, wenn es starken Temperaturschwankungen ausgesetzt war (beispielsweise nach dem Transport).
Feuchtigkeit und Kondensat könnten das Gerät beschädigen. Schalten Sie das Gerät erst ein, wenn es Zimmertemperatur erreicht hat.
24. Bevor Sie das Gerät an die Steckdose anschließen, prüfen Sie zuerst, ob die Spannung und die Frequenz des Stromnetzes mit den auf dem Gerät
angegebenen Werten übereinstimmen. Verfügt das Gerät über einen Spannungswahlschalter, schließen Sie das Gerät nur an die Steckdose an, wenn
die Gerätewerte mit den Werten des Stromnetzes übereinstimmen. Wenn das mitgelieferte Netzkabel bzw. der mitgelieferte Netzadapter nicht in Ihre
Netzsteckdose passt, wenden Sie sich an Ihren Elektriker.
25. Treten Sie nicht auf das Netzkabel. Sorgen Sie dafür, dass spannungsführende Kabel speziell an der Netzbuchse bzw. am Netzadapter und der
Gerätebuchse nicht geknickt werden.
26. Achten Sie bei der Verkabelung des Geräts immer darauf, dass das Netzkabel bzw. der Netzadapter stets frei zugänglich ist. Trennen Sie das
Gerät stets von der Stromzuführung, wenn das Gerät nicht benutzt wird, oder Sie das Gerät reinigen möchten. Ziehen Sie Netzkabel und Netzadapter
immer am Stecker bzw. am Adapter und nicht am Kabel aus der Steckdose. Berühren Sie Netzkabel und Netzadapter niemals mit nassen Händen.
27. Schalten Sie das Gerät möglichst nicht schnell hintereinander ein und aus, da sonst die Lebensdauer des Geräts beeinträchtigt werden könnte.
28. WICHTIGER HINWEIS: Ersetzen Sie Sicherungen ausschließlich durch Sicherungen des gleichen Typs und Wertes. Sollte eine Sicherung wiederholt
auslösen, wenden Sie sich bitte an ein autorisiertes Servicezentrum.
29. Um das Gerät vollständig vom Stromnetz zu trennen, entfernen Sie das Netzkabel bzw. den Netzadapter aus der Steckdose.
30. Wenn Ihr Gerät mit einem Volex-Netzanschluss bestückt ist, muss der passende Volex-Gerätestecker entsperrt werden, bevor er entfernt werden
kann. Das bedeutet aber auch, dass das Gerät durch ein Ziehen am Netzkabel verrutschen und herunterfallen kann, wodurch Personen verletzt
werden und/oder andere Schäden auftreten können. Verlegen Sie Ihre Kabel daher immer sorgfältig.
31. Entfernen Sie Netzkabel und Netzadapter aus der Steckdose bei Gefahr eines Blitzschlags oder wenn Sie das Gerät länger nicht verwenden.
CAUTION
RISK OF ELECTRIC SHOCK
DO NOT OPEN
ACHTUNG
Entfernen Sie niemals die Abdeckung, da sonst das Risiko eines elektrischen Schlages besteht. Im Inneren
des Geräts befinden sich keine Teile, die vom Bediener repariert oder gewartet werden können. Lassen Sie
Wartung und Reparaturen ausschließlich von qualifiziertem Servicepersonal durchführen.
Das gleichseitige Dreieck mit Blitzsymbol warnt vor nichtisolierten, gefährlichen Spannungen im Geräteinneren, die einen elektrischen
Schlag verursachen können.
Das gleichseitige Dreieck mit Ausrufungszeichen kennzeichnet wichtige Bedienungs- und Wartungshinweise.
ACHTUNG HOHE LAUTSTÄRKEN BEI AUDIOPRODUKTEN!
Dieses Gerät ist für den professionellen Einsatz vorgesehen. Der kommerzielle Betrieb dieses Geräts unterliegt den jeweils gültigen nationalen
Vorschriften und Richtlinien zur Unfallverhütung. Als Hersteller ist Adam Hall gesetzlich verpflichtet, Sie ausdrücklich auf mögliche Gesundheitsrisiken
hinzuweisen.
Gehörschäden durch hohe Lautstärken und Dauerbelastung: Bei der Verwendung dieses Produkts können hohe Schalldruckpegel (SPL) erzeugt
werden, die bei Künstlern, Mitarbeitern und Zuschauern zu irreparablen Gehörschäden führen können.
Um eine mögliche Schädigung des Hörsinns zu verhindern, vermeiden Sie das Hören bei großem Lautsärkepegel über lange
Zeiträume.
Lauter Schalleinfluss kann selbst bei kurzer Dauer zu Hörschäden führen. Bitte halten Sie die Laustärke immer auf einem
angenehmen Level.
FR MESURES PRÉVENTIVES
1. Veuillez lire attentivement ce manuel.
2. Rangez tous les documents d‘information et d‘instructions en lieu sûr.
3. Veuillez suivre toutes les instructions
4. Observez tous les messages d‘avertissement N‘enlevez pas de l‘appareil les étiquettes de sécurité ou autres informations.
5. N‘utilisez l‘appareil que pour des applications et de la façon appropriées.
6. Utilisez exclusivement des pieds et des dispositifs de fixation stables et adaptés lorsque l‘appareil est utilisé en installation fixe. Assurez-vous que les
fixations murales ont été montées correctement, et qu‘elles sont sécurisées. Vérifiez que l‘appareil est installé en toute sécurité, et qu‘il ne peut pas tomber.
7. Lors de l‘installation, observez les règlementations de sécurité en vigueur dans votre pays.
8. N‘installez et n‘utilisez pas l‘appareil à proximité de radiateurs, d‘accumulateurs de chaleur, de fours ou de toute autre source de chaleur. Vérifiez
que l‘appareil est installé de façon à bénéficier en permanence d‘un refroidissement efficace et qu‘il ne peut pas chauffer de façon excessive.
9. Ne placez aucune source de flamme sur l‘appareil – par exemple, une bougie allumée.
10. Ne bloquez pas les ouïes d‘aération.
11. Cet appareil a été exclusivement conçu pour une utilisation en intérieur. N‘utilisez pas l‘appareil à proximité immédiate d‘eau (à moins qu‘il ne
s‘agisse d‘un appareil conçu pour une utilisation en extérieur – dans ce cas, respectez les instructions correspondantes ci après) Ne mettez pas
l‘appareil en contact avec des matériaux, des liquides ou des gaz inflammables.
13. Vérifiez qu‘aucun petit objet ne puisse tomber à l‘intérieur de l‘appareil.
4
14. N‘utilisez avec cet appareil que des accessoires recommandés et approuvés par le fabricant.
15. N‘ouvrez pas l‘appareil, et n‘essayez pas de le modifier.
16. Lors du branchement de l‘appareil, sécurisez le passage du câble secteur, afin d‘éviter tout dommage ou accident, par exemple quelqu‘un qui
trébuche sur le câble.
17. Lors du transport, vérifiez que l‘appareil ne peut tomber, ce qui pourrait provoquer des dommages matériels et/ou corporels.
18. Si votre appareil ne fonctionne plus correctement, que de l‘eau ou des objets ont pénétré à l‘intérieur, ou qu‘il a été endommagé de quelque
façon que ce soit, éteignez-le immédiatement et débranchez sa prise secteur (s‘il s‘agit d‘un appareil alimenté). Cet appareil ne doit être réparé que
par un personnel autorisé.
19. Pour le nettoyage de l‘appareil, utilisez un chiffon sec.
20. Observez toutes les réglementations en vigueur dans votre pays pour mettre l‘appareil au rebut. Lorsque vous jetez l‘emballage de l‘appareil,
veuillez séparer plastique, papier et carton.
21. Les films plastique doivent être mis hors de portée des enfants.
APPAREILS RELIÉS AU SECTEUR :
22. ATTENTION : Si le câble de l‘appareil est muni d‘un fil de terre, il doit être relié à une prise murale avec terre. Ne désactivez jamais la mise à la
terre d‘un appareil.
23. N‘allumez pas l‘appareil immédiatement s‘il a subi une grande différence de température ambiante (par exemple, lors du transport). L‘humidité
et la condensation pourraient l‘endommager. Ne mettez l‘appareil sous tension que lorsqu‘il est parvenu à la température de la pièce.
24. Avant de relier l‘appareil à la prise murale, vérifiez que la valeur et la fréquence de tension secteur sur laquelle il est réglé correspondent bien
à la valeur et à la fréquence de la tension secteur locale. Si l‘appareil possède un sélecteur de tension, ne le branchez sur la prise murale qu‘après
avoir vérifié que la valeur réglée correspond à la valeur effective de la tension secteur. Si la fiche du cordon secteur ou du bloc adaptateur livré avec
votre appareil ne correspond pas au format de votre prise murale, veuillez consulter un électricien.
25. Ne piétinez pas le câble secteur. Assurez-vous que le câble secteur n‘est pas trop pincé, notamment au niveau de l‘arrière de l‘appareil (ou de
son adaptateur secteur) et de la prise murale.
26. Lors du branchement de l‘appareil, vérifiez que l‘accès au câble secteur ou au bloc adaptateur reste facile. Sortez la fiche secteur de la prise murale
dès que vous n‘utilisez pas l‘appareil pendant un certain temps, ou si vous désirez nettoyer l‘appareil. Pour ce faire, tirez toujours sur la fiche elle-même,
ou sur le bloc secteur lui-même ; ne tirez jamais sur le câble. Ne manipulez jamais le câble secteur ou l‘adaptateur secteur avec des mains mouillées.
27. N‘éteignez/rallumez pas l‘appareil rapidement plusieurs fois de suite : vosu risquez de réduire la longévité de ses composants internes.
28. CONSEIL IMPORTANT : Ne remplacez le fusible que par un fusible de même type et du même calibre. Si le fusible fond de façon répétée, veuillez
consulter un centre de réparations agréé.
29. Pour séparer complètement l‘appareil du secteur, débranchez le cordon secteur ou l‘adaptateur de la prise murale.
30. Si votre appareil est muni d‘un connecteur secteur verrouillable (Volex), il faut d‘abord déverrouiller le mécanisme avant d‘enlever le cordon
secteur. Attention, lorsque vous retirez le câble secteur, à ne pas faire bouger l‘appareil, ce qui pourrait se traduire par un risque de chute, de blesser
quelqu‘un, ou tout autre dommage. Manipulez toujours le cordon secteur avec soin.
31. Débranchez la fiche secteur ou l‘adaptateur de la prise murale en cas d‘orage, ou si vous n‘utilisez pas l‘appareil pendant une longue période.
CAUTION
RISK OF ELECTRIC SHOCK
DO NOT OPEN
ATTENTION :
Ne démontez jamais le couvercle de l‘appareil, vous risquez de recevoir un choc électrique. L‘appareil ne
renferme aucune pièce ni composant réparable ou remplaçable par l‘utilisateur. Ne confiez l‘entretien et la
réparation qu‘à un personnel qualifié.
Le pictogramme en forme de triangle équilatéral contenant un éclair terminé d‘une flèche avertit l‘utilisateur de la présence d‘une
tension dangereuse à l‘intérieur de l‘appareil, tension susceptible de provoquer un choc électrique.
Le pictogramme en forme de triangle équilatéral renfermant un point d‘exclamation signale à l‘utilisateur la présence d‘instructions
importantes concernant l‘utilisation ou l‘entretien de l‘appareil.
ATTENTION NIVEAUX SONORES ÉLEVÉS SUR LES PRODUITS AUDIO
Cet appareil a été conçu en vue d’une utilisation professionnelle. L’utilisation commerciale de cet appareil est soumise aux réglementations et
directives en vigueur dans votre pays en matière de prévention d’accident. En tant que fabricant, Adam Hall est tenu de vous avertir formellement
des risques relatifs à la santé. Risques provoqués par une exposition prolongée à des niveaux sonores élevés : Lors de l’utilisation de ce produit, il
est possible d’atteindre des niveaux de pression sonore (exprimés en dB SPL) élevés, susceptibles de provoquer des dommages auditifs irréparables
chez les artistes, les techniciens et le public. Évitez toute exposition prolongée à des niveaux de pression sonore élevés (supérieurs à 90 dB SPL).
Pour éviter tout risque de traumatisme auditif, évites d‘écouter à fort volume sonore pendant de longues périodes.
Un niveau d‘écoute trop élevé, même bref, peut provoquer des dommages aux oreilles. Veuillez maintenir le niveau d‘écoute à un
niveau raisonnable.
ES MEDIDAS DE SEGURIDAD
1. Lea atentamente las instrucciones de este manual.
2. Guarde toda la información en un lugar seguro para futuras consultas.
3. Siga las instrucciones indicadas.
4. Siga todas las advertencias. No quite las instrucciones de seguridad ni cualquier otra información indicada en el equipo.
5. Utilice el equipo únicamente según la finalidad prevista.
6. Utilice solo soportes y fijaciones que sean robustos y adecuados cuando instale el equipo en instalaciones fijas. Asegúrese de que los soportes de
pared están correctamente instalados y firmemente fijados. Asegúrese de que el equipo está sólidamente instalado y no se puede caer.
7. Al instalar el equipo, respete las normas de seguridad aplicables en su país.
5
8. Evite instalar el equipo cerca de radiadores, acumuladores de calor, estufas o cualquier otra fuente de calor. Asegúrese de que el equipo esté instalado en
un lugar con ventilación suficiente para evitar cualquier sobrecalentamiento.
9. No coloque sobre el equipo fuentes de llamas sin protección, por ejemplo, velas encendidas.
10. Evite bloquear las rejillas de ventilación.
11. El equipo está diseñado para uso en interiores; no lo utilice cerca del agua (excepto los equipos específicamente diseñados para uso en exterior,
en cuyo caso tenga en cuenta las indicaciones mencionadas a continuación). No exponga este equipo a materiales, líquidos o gases inflamables.
12. Evite exponer el equipo a gotas o salpicaduras que puedan caer dentro del mismo. No coloque recipientes llenos de líquido, como floreros o
vasos, sobre el equipo.
13. Asegúrese de no dejar caer ningún objeto dentro del equipo.
14. Emplee el equipo únicamente con los accesorios recomendados por el fabricante.
15. No abra el equipo ni intente modificarlo.
16. Una vez conectado el equipo, compruebe que en toda la longitud del cableado no hay peligro de que provoque una caída, por ejemplo.
17. Durante el transporte, asegúrese de que el equipo no se caiga y pueda causar daños personales o materiales.
18. Si el equipo no funciona correctamente, o si se ha vertido líquido sobre él, o si un objeto ha caído en su interior o si ha sufrido algún desperfecto,
apague inmediatamente el equipo y desenchufe el cable eléctrico (si se trata de un equipo activo). Únicamente un técnico especialista debe reparar
el equipo.
19. Para limpiar el equipo utilice un paño seco.
20. Procure seguir las normas vigentes en su país sobre reciclaje de desechos. Separe los componentes de plástico, papel y cartón del paquete para
reciclarlos en sus contenedores respectivos.
21. No deje las bolsas de plástico al alcance de los niños.
PARA LOS EQUIPOS CON TOMA ELÉCTRICA:
22. ADVERTENCIA: Si el cable eléctrico está provisto de un contacto de protección, debe conectarse a una toma eléctrica con conexión a tierra. No
desactivar nunca esta conexión de protección a tierra del cable eléctrico.
23. Si el equipo ha estado expuesto a un cambio brusco de temperatura (por ejemplo, después del transporte), no lo encienda inmediatamente. La
condensación o la humedad podrían dañar el equipo. Deje que el equipo alcance la temperatura ambiente antes de encenderlo.
24. Antes de conectar el cable eléctrico a la toma de corriente, compruebe si la tensión y la frecuencia del suministro eléctrico coinciden con las especificaciones
de este equipo. Si el equipo dispone de un selector de tensión, antes de enchufarlo a la red eléctrica, asegúrese de que el valor seleccionado coincide con la
tensión de suministro. Si el enchufe o el adaptador de corriente no encajan en la toma eléctrica, consulte a un electricista.
25. Asegúrese de que el cable eléctrico no está pinzado. Evite que el cable resulte pellizcado, sobre todo en los extremos de conexión al equipo y en
la toma eléctrica.
26. Al conectar el equipo, asegúrese de que el cable eléctrico o el adaptador de corriente estén siempre accesibles. Desconecte el equipo de la toma
de corriente cuando no esté en uso o antes de limpiarlo. Para ello, desconecte el cable eléctrico y el adaptador de corriente del conector del equipo
en vez de desenchufar el cable de la toma eléctrica. No tocar el cable eléctrico ni el adaptador de corriente con las manos húmedas.
27. No encienda y apague el equipo en cortos intervalos de tiempo, ya que se reduce así la vida útil del sistema.
28. NOTA IMPORTANTE: Sustituya los fusibles únicamente por otros del mismo tipo y de las mismas características. Si el fusible se funde
continuamente, póngase en contacto con un servicio técnico autorizado.
29. Para desconectar completamente el equipo de la tensión eléctrica, desenchufe el cable eléctrico o el adaptador de corriente de la toma eléctrica.
30. Si el equipo dispone de un enchufe eléctrico Volex, deberá desbloquearse el Volex del equipo para desenchufarlo. Esto implica que un tirón en el
cable eléctrico puede desplazar el equipo y provocar daños personales o materiales. Por tanto, asegúrese de instalar los cables con sumo cuidado.
31. Si es probable que caiga un rayo por una tormenta eléctrica o si no va a emplear el equipo durante mucho tiempo, desenchufe el cable eléctrico
y el adaptador de corriente.
CAUTION
RISK OF ELECTRIC SHOCK
DO NOT OPEN
ATENCIÓN:
Para evitar el riesgo de descarga eléctrica, no retire la tapa. El equipo no contiene elementos que el
usuario pueda reparar o sustituir. Para cualquier tarea de mantenimiento o reparación, acuda a un técnico
cualificado.
El símbolo de rayo dentro de un triángulo equilátero advierte al usuario de la presencia de tensiones peligrosas sin aislamiento dentro
del equipo que pueden causar una descarga eléctrica.
El símbolo de exclamación dentro de un triángulo equilátero advierte al usuario de la existencia de importantes instrucciones de uso
y mantenimiento.
ADVERTENCIA ¡ALTO VOLUMEN!
Este equipo se destina a un uso profesional. Por consiguiente, si se aplica a un uso comercial, estará sujeto a las normas y reglamentos de la
Asociación para la prevención de accidentes de su sector profesional. Como fabricante, Adam Hall tiene la obligación de informar formalmente a los
usuarios de la existencia de posibles riesgos para la salud.
Daños auditivos por exposición prolongada a un nivel SPL alto: este equipo puede generar fácilmente un nivel de presión sonora (SPL) lo
suficientemente elevado como para causar daños auditivos permanentes a los artistas, el personal de producción y el público. Deben tomarse
precauciones para evitar la exposición prolongada a un SPL de más de 90 dB.
Para evitar posibles daños auditivos, evite la exposición a volúmenes altos durante un tiempo prolongado.
Un volumen alto, incluso durante un breve espacio de tiempo, puede provocar pérdida de audición. Mantenga siempre el volumen a un
nivel que le resulte agradable.
6
PL ŚRODKI OSTROŻNOŚCI
1. Należy dokładnie przeczytać niniejszą instrukcję.
2. Wszystkie informacje i instrukcje przechowywać w bezpiecznym miejscu.
3. Należy przestrzegać zaleceń.
4. Należy przestrzegać wszystkich wskazówek ostrzegawczych. Nie wolno usuwać wskazówek bezpieczeństwa ani innych informacji znajdujących
się na urządzeniu.
5. Używać urządzenia wyłącznie w sposób zgodny z jego przeznaczeniem.
6. Stosować wyłącznie stabilne i pasujące statywy, ew. elementy mocujące (w przypadku instalacji stałych). Należy zadbać o prawidłową instalację
uchwytów ściennych i ich odpowiednie zabezpieczenie. Zapewnić bezpieczną instalację urządzenia i upewnić się, że urządzenie nie spadnie.
7. Podczas instalacji przestrzegać obowiązujących w danym kraju przepisów bezpieczeństwa.
8. Urządzenie instalować i eksploatować z dala od grzejników, zasobników ciepła, pieców i innych źródeł ciepła. Zadbać o zainstalowanie urządzenia w taki
sposób, aby zawsze było ono wystarczająco chłodzone i nie mogło ulec przegrzaniu.
9. Nie umieszczać na urządzeniu źródeł zapłonu, takich jak np. palące się świece.
10. Nie wolno blokować szczelin wentylacyjnych.
11. Urządzenie zostało zaprojektowane wyłącznie do użytku w pomieszczeniach. Nie używać urządzenia w bezpośrednim sąsiedztwie wody (nie
dotyczy specjalnych urządzeń do stosowania na zewnątrz – w takim przypadku należy przestrzegać podanych poniżej wskazówek specjalnych).
Urządzenie nie może mieć kontaktu z palnymi materiałami, płynami ani gazami.
12. Zabezpieczyć urządzenie przed wniknięciem kapiącej lub pryskającej wody. Nie wolno stawiać na urządzeniu pojemników napełnionych płynami,
takich jak wazony czy naczynia z piciem.
13. Należy zadbać o to, aby do urządzenia nie wpadały żadne przedmioty.
14. Urządzenie można eksploatować tylko przy użyciu akcesoriów zalecanych i przewidzianych przez producenta.
15. Nie otwierać urządzenia ani nie dokonywać w nim zmian.
16. Po podłączeniu urządzenia sprawdzić wszystkie ciągi kablowe, aby zapobiec szkodom lub wypadkom np. w wyniku potknięcia.
17. Podczas transportu zadbać o to, aby urządzenie nie upadło, gdyż może to spowodować uszkodzenie mienia i obrażenia ciała.
18. Jeśli urządzenie nie działa prawidłowo, do jego wnętrza dostały się płyny lub przedmioty lub jeśli urządzenie zostało uszkodzone w inny sposób,
należy je natychmiast wyłączyć i odłączyć od gniazda sieciowego (jeśli urządzenie jest aktywne). Naprawę takiego urządzenia może wykonać tylko
autoryzowany personel specjalistyczny.
19. Do czyszczenia urządzenia stosować suchą ściereczkę.
20. Przestrzegać obowiązujących w danym kraju przepisów dotyczących usuwania odpadów. Podczas utylizacji opakowania oddzielić tworzywo
sztuczne od papieru i tektury.
21. Worki z tworzywa sztucznego należy przechowywać w miejscu niedostępnym dla dzieci.
DOTYCZY URZĄDZEŃ Z ZASILANIEM SIECIOWYM:
22. UWAGA: jeśli kabel sieciowy urządzenia jest wyposażony w zestyk ochronny, należy go podłączyć do gniazda z przewodem uziemiającym. Nigdy
nie wolno dezaktywować przewodu uziemiającego kabla sieciowego.
23. Nie włączać urządzenia bezpośrednio po narażeniu go na silne wahania temperatury (np. po transporcie). Wilgoć i skropliny mogą uszkodzić
urządzenie. Włączyć urządzenie dopiero wtedy, gdy osiągnie temperaturę pokojową.
24. Przed podłączeniem urządzenia do gniazda elektrycznego należy sprawdzić, czy napięcie i częstotliwość sieci elektrycznej odpowiada
wartościom podanym na urządzeniu. Jeśli urządzenie jest wyposażone w przełącznik napięcia, należy podłączyć je do gniazda tylko wówczas,
gdy wartości urządzenia odpowiadają wartościom sieci elektrycznej. Jeśli dołączony kabel sieciowy lub dołączony adapter sieciowy nie pasuje do
gniazda elektrycznego, należy skontaktować się z elektrykiem.
25. Nie stawać na kablu sieciowym. Należy zadbać o to, aby kable przewodzące napięcie nie były zagięte przy gnieździe sieciowym, przy adapterze
sieciowym ani przy gnieździe urządzenia.
26. Przy podłączaniu urządzenia zawsze należy zadbać o to, aby kabel sieciowy lub adapter sieciowy był zawsze łatwo dostępny. Odłączyć
urządzenie od źródła zasilania, gdy nie jest ono używane lub gdy ma zostać poddane czyszczeniu. Zawsze należy wyjmować kabel sieciowy i adapter
sieciowy z gniazda, chwytając za wtyczkę lub adapter, a nie za kabel. Nigdy nie dotykać kabla sieciowego i adaptera sieciowego mokrymi dłońmi.
9. W miarę możliwości nie włączać i wyłączać urządzenia w krótkich odstępach czasu, gdyż może to mieć negatywny wpływ na jego żywotność.
28. WAŻNA INFORMACJA: bezpieczniki należy wymieniać wyłącznie na bezpieczniki tego samego typu i o takich samych wartościach. Jeśli bezpiecznik stale się
przepala, należy skontaktować się z autoryzowanym centrum serwisowym.
29. Aby całkowicie odłączyć urządzenie od sieci, należy wyjąć kabel sieciowy lub adapter sieciowy z gniazda.
30. Jeśli urządzenie jest wyposażone w przyłącze sieciowe Volex, konieczne jest odblokowanie odpowiedniej wtyczki urządzenia Volex, zanim
będzie możliwe jej odłączenie. Oznacza to także, iż w wyniku pociągnięcia za kabel urządzenie może się przesunąć i spaść, co może spowodować
obrażenia ciała i/lub inne szkody, dlatego ważne jest, aby przewody były odpowiednio poprowadzone.
31. W przypadku zagrożenia uderzeniem pioruna lub jeśli urządzenie przez dłuższy czas nie jest używane, należy wyjąć kabel sieciowy i adapter
sieciowy z gniazda.
CAUTION
RISK OF ELECTRIC SHOCK
DO NOT OPEN
UWAGA:
Nigdy nie zdejmować pokrywy, gdyż grozi to porażeniem prądem. We wnętrzu urządzenia nie ma żadnych
części, które mogłyby zostać naprawione bądź poddane czynnościom konserwacyjnym przez użytkownika.
Czynności konserwacyjne i naprawy może przeprowadzać wyłącznie wykwalifikowany personel serwisowy.
Trójkąt równoboczny z symbolem błyskawicy sygnalizuje nieizolowane, niebezpieczne napięcie we wnętrzu urządzenia, które może
spowodować porażenie prądem.
Trójkąt równoboczny z wykrzyknikiem oznacza ważne wskazówki dotyczące obsługi i konserwacji.
7
UWAGA NA WYSOKI POZIOM GŁOŚNOŚCI PRODUKTÓW AUDIO!
To urządzenie przewidziane jest do profesjonalnych zastosowań. Komercyjne stosowanie tego urządzenia podlega obowiązującym w danym kraju
przepisom i wytycznym dotyczącym zapobiegania wypadkom. Firma Adam Hall jest jako producent zobowiązana do wyraźnego informowania o
potencjalnym zagrożeniu dla zdrowia. Utrata słuchu w wyniku wysokiego poziomu głośności i długotrwałego narażenia: podczas stosowania tego
produktu może powstać wysoki poziom ciśnienia akustycznego (SPL), który może doprowadzić do nieodwracalnego uszkodzenia słuchu u artystów,
pracowników i widzów. Należy unikać długotrwałego narażenia na wysoki poziom głośności powyżej 90 dB.
Aby zapobiec ewentualnemu uszkodzeniu słuchu, unikać słuchania przy dużym poziomie głośności przez dłuższy czas.
Głośny dźwięk może prowadzić do uszkodzenia słuchu nawet przy krótkim okresie oddziaływania. Głośność należy zawsze
utrzymywać na przyjemnym dla ucha poziomie.
IT MISURE PRECAUZIONALI
1. Lesen S1. Leggere attentamente il presente manuale di istruzioni.
2. Conservare tutte le indicazioni e le istruzioni in un luogo sicuro.
3. Seguire le istruzioni.
4. Rispettare tutte le avvertenze. Non rimuovere dal dispositivo le indicazioni sulla sicurezza o altre informazioni.
5. Utilizzare il dispositivo solo nei modi previsti dal manuale.
6. Utilizzare esclusivamente stativi e fissaggi stabili e adatti (per installazioni fisse). Verificare che i supporti a parete siano installati e fissati a regola
d‘arte. Verificare che il dispositivo sia installato in modo stabile e non possa cadere.
7. Durante l‘installazione, osservare le normative sulla sicurezza in vigore nel proprio Paese.
8. Non installare né azionare il dispositivo in prossimità di radiatori, accumulatori termici, stufe o altre fonti di calore. Accertarsi che il dispositivo sia sempre
installato in modo che venga raffreddato a sufficienza e non possa surriscaldarsi.
9. Non appoggiare sul dispositivo fonti di combustione, quali candele accese.
10. Le fessure di areazione non devono essere bloccate.
11. Il dispositivo è destinato all‘impiego esclusivamente in ambienti chiusi; non deve essere utilizzato nelle immediate vicinanze di acqua (questo
punto non interessa i dispositivi specifici per l‘esterno, per i quali valgono le indicazioni speciali riportate di seguito). Non portare mai il dispositivo a
contatto con materiali, liquidi o gas infiammabili.
12. Accertarsi che all‘interno del dispositivo non possa penetrare acqua per gocciolamento o spruzzo. Non collocare sul dispositivo oggetti contenenti
liquidi, quali vasi, tazze o bicchieri.
13. Assicurarsi che non sia possibile la caduta di oggetti nel dispositivo.
14. Azionare il dispositivo esclusivamente con gli accessori appositamente consigliati e previsti dal produttore.
15. Non aprire né modificare il dispositivo.
16. Una volta collegato il dispositivo, verificare tutti i cavi per evitare danni o incidenti, ad esempio per inciampo.
17. Durante il trasporto, assicurarsi che il dispositivo non possa cadere e causare possibili danni a cose e/o persone.
18. Se il dispositivo non funzionasse più correttamente, vi fosse caduto sopra del liquido o un oggetto o fosse stato danneggiato in altro modo, spegnerlo
immediatamente e staccare la spina (se si tratta di un dispositivo attivo). La riparazione del dispositivo deve essere affidata esclusivamente a personale
qualificato autorizzato.
19. Per la pulizia del dispositivo utilizzare un panno pulito.
20. Rispettare le leggi sullo smaltimento in vigore nel Paese di installazione. Al momento di smaltire l‘imballo, separare la plastica dalla carta e dal
cartone.
21. I sacchetti di plastica devono essere tenuti lontani dalla portata dei bambini.
DISPOSITIVI CON ALLACCIAMENTO DI RETE:
22. ATTENZIONE: se il cavo di rete è dotato di contatto di protezione, deve essere collegato a una presa di rete con messa a terra. Non disattivare mai
la connessione di messa a terra di un cavo di rete.
23. Non accendere il dispositivo subito dopo essere stato sottoposto a forti variazioni di temperatura (ad esempio dopo il trasporto). Umidità e
condensa potrebbero danneggiare il dispositivo. Accendere il dispositivo solo dopo che ha raggiunto la temperatura ambiente.
24. Prima di collegare il dispositivo alla presa, controllare innanzitutto se la tensione e la frequenza della rete elettrica coincidono con i valori indicati
sul dispositivo stesso. Nel caso di dispositivo munito di selettore di tensione, collegarlo alla presa unicamente se i valori del dispositivo coincidono
con quelli della rete elettrica. Se il cavo di rete o l‘adattatore di rete forniti in dotazione non sono compatibili con la presa, rivolgersi a un elettricista.
25. Non calpestare il cavo di rete. Accertarsi che i cavi sotto tensione, in particolare della presa di rete o dell‘adattatore di rete, non vengano pizzicati.
26. Durante il cablaggio del dispositivo, verificare sempre che il cavo di rete e l‘adattatore di rete siano costantemente accessibili. Staccare sempre
il dispositivo dall‘alimentazione di rete quando non è utilizzato o durante la pulizia. Per staccare dalla presa il cavo di rete e l‘adattatore di rete, tirare
sempre dalla spina o dall‘adattatore e non dal cavo. Non toccare mai il cavo di alimentazione e l’alimentatore con le mani umide.
27. Evitare per quanto possibile di accendere e spegnere velocemente il dispositivo per non pregiudicarne la durata.
28. NOTA IMPORTANTE: Sostituire i fusibili esclusivamente con fusibili dello stesso tipo e valore. Se un fusibile continua a saltare, rivolgersi a un
centro di assistenza autorizzato.
29. Per staccare completamente il dispositivo dalla rete elettrica, rimuovere il cavo di rete o l‘adattatore di rete dalla presa.
30. Per staccare un dispositivo provvisto di presa Volex, è prima necessario sbloccare la relativa spina Volex del dispositivo stesso. Tirando il cavo di
rete, però, il dispositivo potrebbe spostarsi e cadere, provocando danni alle persone o di altro genere. Prestare quindi la più scrupolosa attenzione
durante la posa dei cavi.
31. In caso di pericolo di caduta di fulmine, o se il dispositivo rimane inutilizzato a lungo, staccare sempre il cavo di rete e l‘adattatore di rete dalla presa.
CAUTION
RISK OF ELECTRIC SHOCK
DO NOT OPEN
8
ATTENZIONE:
Non togliere mai il coperchio di protezione perché sussiste il pericolo di scosse elettriche. L‘interno del
dispositivo non contiene parti che possono essere riparate o sottoposte a manutenzione da parte dell‘utente.
Per gli interventi di manutenzione e di riparazione rivolgersi esclusivamente a personale qualificato.
Il triangolo equilatero con il simbolo del lampo segnala la presenza di tensioni pericolose non isolate all‘interno dell‘apparecchio che
possono causare scosse elettriche.
Il triangolo equilatero con punto esclamativo segnala la presenza di importanti informazioni relative all’uso e alla manutenzione.
ATTENZIONE: ELEVATI LIVELLI SONORI NEI PRODOTTI AUDIO!
Questo dispositivo è destinato a uso professionale. Di conseguenza, se viene destinato ad un uso commerciale, sarà soggetto alle norme e ai
regolamenti dell’Associazione per la prevenzione di infortuni del rispettivo settore professionale. In qualità di produttore, Adam Hall è tenuto per legge
a informare espressamente gli utenti degli eventuali rischi per la salute.
Danni all’udito provocati da un’esposizione prolungata a un livello SPL elevato: dall’utilizzo di questo prodotto si possono generare elevati livelli di
pressione sonora (SPL) che possono provocare danni irreparabili all’udito di artisti, collaboratori e spettatori. Evitare l’esposizione prolungata a livelli
sonori elevati, superiori a 90 dB.
Per evitare possibili danni all‘udito, evitare l‘ascolto ad un volume elevato per periodi prolungati.
L‘esposizione al volume elevato può causare danni all‘udito anche se è di breve durata. Mantenere sempre il volume ad un livello
gradevole.
INTRODUCTION / EINFÜHRUNG / INTRODUCTION / INTRODUCCIÓN / WPROWADZENIE /
INTRODUZIONE
EN Introduction
The LD Systems Stinger G² Series loudspeakers are designed for professional use. Brilliant sound at high SPL, reliable service and quality
components, all at a fair price are the characteristics of the LD Systems Stinger G² Series.
This series includes four active two-way loudspeaker cabinets of 8“, 10“, 12“ and 15“ size and four passive two-way loudspeaker cabinets of
similar size. Application flexibility and reliability make the loudspeakers of LD Systems Stinger G² Series the perfect choice for professional sound
reinforcement.
DE Einführung
Die Lautsprecher der LD Systems Stinger G² Serie sind für den professionellen Einsatz konzipiert. Brillanter Sound bei hohen Schalldruckpegeln
sowie eine hervorragende Zuverlässigkeit und hohe Komponentenqualität: Das alles bekommen Sie bei der Stinger G² Serie von LD-Systems zu
einem fairen Preis.
Die Serie besteht aus vier aktiven 2-Wege-Lautsprecherboxen in den Größen 8“, 10“, 12“ und 15“ sowie vier passiven 2-Wege-Lautsprechern in den
gleichen Größen. Dank ihrer flexiblen Anwendungsmöglichkeiten und der hohen Zuverlässigkeit eignet sich die LD Systems Stinger G² Serie perfekt
für professionelle Beschallungsaufgaben.
FR Indroduction
Les enceintes de la série LD Systems Stinger G² sont conçus pour un usage professionnel. Un son de qualité, un niveau de pression acoustique
élevé, une grande fiabilité, des composants sélectionnés avec soin, le tout à un prix abordable : voici les points forts des enceintes LD Systems
Stinger G².
Cette gamme propose quatre enceintes actives deux voies, équipées de boomers de diamètre 8“, 10“, 12“ et 15“, et quatre modèles passifs
deux voies de dimensions identiques. Grâce à leur souplesse de mise en place et leur fiabilité, les enceintes de la gamme LD Systems Stinger G²
constituent un choix parfait pour les sonorisateurs professionnels.
ES Introducción
Los altavoces de la serie LD Stinger G² están diseñados para uso profesional. La serie Stinger G² de LD Systems se caracteriza por un sonido
brillante a altos niveles de SPL, su fiabilidad y componentes de calidad, todo ello a un precio asequible.
Esta serie se compone de cuatro bafles de dos vías de 8“, 10“, 12“ y 15“ en versiones activas y pasivas. Gracias a su flexibilidad de aplicación y
fiabilidad, los altavoces de la serie Stinger G² de LD Systems son ideales para un refuerzo de sonido profesional.
PL Wprowadzenie
Głośniki serii LD Systems Stinger G² przeznaczone są do zastosowań profesjonalnych. Znakomity dźwięk przy wysokim poziomie ciśnienia
akustycznego, doskonały serwis oraz elementy najwyższej jakości, a wszystko to w dobrej cenie: to właśnie cechy głośników Stinger serii G2
firmy LD Systems.
Seria ta składa się z czterech aktywnych dwudrożnych kolumn o rozmiarach: 8, 10, 12 i 15 cali oraz czterech pasywnych kolumn o mniejszym
rozmiarze. Elastyczność zastosowań oraz niezawodność sprawiają, że głośniki Stinger serii G2 firmy LD Systems są doskonałym wyborem jeśli
masz na celu profesjonalne wzmacnianie dźwięku.
IT Introduction
Gli altoparlanti della serie LD Systems Stinger G² sono stati progettati per un uso professionale. La serie Stinger G² di LD Systems è caratterizzata da
un suono eccezionale ad alti livelli di SPL, affidabilità e componenti di qualità, il tutto a un prezzo accessibile.
La serie è costituita da quattro casse attive a due vie da 8“, 10“, 12“ e 15“ e da quattro casse passive a due vie di dimensioni simili. Grazie alla loro
flessibilità e affidabilità gli altoparlanti Stinger G² di LD Systems rappresentano la scelta perfetta per il ‚sound reinforcement‘ professionale.
9
ACTIVE BACKPANEL / AKTIVE SYSTEME BEDIEN-/ANSCHLUSSFELD / ENCEINTE ACTIVE
PANNEAU ARRIÈRE / PANEL POSTERIOR DE SISTEMAS ACTIVOS / GŁOŚNIK AKTYWNY PANEL
TYLNY / PANNELLO POSTERIORE DEI SISTEMI ATTIVI
LDEB122AG²
LDEB152AG²
2
1
4
3
6
5
7
15
8
9
10
11
12
13
14
10
ACTIVE SYSTEMS FEATURES / AKTIVE SYSTEME MERKMALE / FONCTIONNALITÉS ENCEINTES
ACTIVES / CARACTERÍSTICAS DE LOS SISTEMAS / GŁOŚNIK AKTYWNY ELEMENTY SYSTEMU /
CARATTERISTICHE DEI SISTEMI ATTIVI
1 MIC IN
EN Balanced microphone input XLR/6.3 mm jack (combo).
DE Symmetrischer Mikrofoneingang, XLR/6,3-mm-Combo-Buchse.
FR Entrée microphone, symétrique, sur connecteur Combo (mixte XLR/jack 6,35 mm).
ES Entrada de micrófono balanceada por XLR/jack de 6,3 mm (combo).
PL Zrównoważone złącze mikrofonowe XLR/6,3 mm jack (combo).
IT Entrata per microfono bilanciata con XLR/jack di 6,3 mm (combo).
2 MIC GAIN
EN Gain control for microphone input.
DE Gain-Regler für Mikrofoneingang.
FR Potentiomètre de réglage de gain de l’entrée microphone.
ES Ajuste de la ganancia de la entrada de micrófono.
PL Regulacja wzmocnienia dla złącza mikrofonowego.
IT Regolazione del guadagno per l’ingresso del microfono.
3 LINE IN
EN Balanced line input XLR/6.3 mm jack (combo).
DE Symmetrischer Line-Eingang, XLR/6,3-mm-Combo-Buchse.
FR Entrée ligne symétrique sur connecteur Combo (mixte XLR/jack 6,35 mm).
ES Entrada de línea balanceada por XLR/jack de 6,3 mm (combo).
PL Zrównoważone wejście liniowe XLR/6,3 mm jack (combo).
IT Entrata per linea bilanciata con XLR/jack di 6,3 mm (combo).
4 LINE GAIN
EN Gain control for line input.
DE Gain-Regler für Line-Eingang.
FR Potentiomètre de réglage de gain de l’entrée ligne.
ES Ajuste de la ganancia de la entrada de línea.
PL Regulacja wzmocnienia dla wejścia liniowego.
IT Regolazione del guadagno per l’entrata di linea.
5 LINE OUT
EN Balanced XLR output which allows you to connect another active loudspeaker or mixer. Signal mix of MIC IN and LINE IN.
DE Symmetrischer XLR-Ausgang zum Anschluss eines weiteren aktiven Lautsprechers oder eines Mischpults. Das Ausgangssignal enthält Anteile
der an MIC IN und LINE IN anliegenden Signalen.
FR Sortie (renvoi du signal) symétrique sur connecteur XLR, permettant la connexion à une autre enceinte active, à une table de mixage. Ce signal
est un mixage des signaux MIC IN et LINE IN.
ES Salida XLR balanceada para conectar un altavoz activo o una mesa de mezclas. Es una mezcla de las señales MIC IN y LINE IN.
PL Zrównoważone wyjście XLR, które pozwala na połączenie kolejnego aktywnego głośnika lub miksera. Połączenie sygnałów z wejść MIC IN i
LINE IN.
IT Uscita XLR bilanciata che consente di collegare un altro altoparlante attivo o un mixer. Mix dei segnali MIC IN e LINE IN.
6 VOLUME
EN Master volume control of the loudspeaker cabinet.
DE Gesamtlautstärkeregler der Lautsprecherbox.
FR Réglage de volume général de l’enceinte.
ES Control del volumen general del bafle.
PL Główny regulator głośności kolumn.
IT Controllo del volume generale delle casse.
11
7 TREBLE
EN Turn left to decrease high frequencies. Turn right to increase high frequencies.
DE Drehen Sie den Regler nach links, um hohe Frequenzen abzusenken. Drehen Sie den Regler nach rechts, um hohe Frequenzen anzuheben.
FR Tournez ce potentiomètre vers la gauche pour baisser les aigus. Tournez-le vers la droite pour les augmenter.
ES Girar a la izquierda para reducir las frecuencias altas. Girar a la derecha para aumentar las frecuencias altas.
PL Przekręć w lewo, aby zmniejszyć wysokie częstotliwości. Przekręć w prawo, aby zwiększyć wysokie częstotliwości.
IT Girare a sinistra per ridurre le frequenze alte. Girare a destra per aumentare le frequenze alte.
8 BASS
EN Turn left to decrease low frequencies. Turn right to increase low frequencies..
DE Drehen Sie den Regler nach links, um tiefe Frequenzen abzusenken. Drehen Sie den Regler nach rechts, um niedrige Frequenzen anzuheben.
FR Tournez ce potentiomètre vers la gauche pour baisser les graves. Tournez-le vers la droite pour les augmenter.
ES Girar a la izquierda para reducir las frecuencias bajas. Girar a la derecha para aumentar las frecuencias bajas.
PL Przekręć w lewo, aby zmniejszyć niskie częstotliwości. Przekręć w prawo, aby zwiększyć niskie częstotliwości.
IT Girare a sinistra per ridurre le frequenze basse. Girare a destra per aumentare le frequenze basse.
9 LIMIT LED
EN Lights up when the loudspeaker is operated at its limit. Short-term blinking of the LED is not critical. If the limiter LED lights up longer than a
brief moment or permanently (= over-driving the system), reduce the volume of the connected signal source. Non-compliance will lead to unpleasant
and distorted sound and may cause malfunction of the speaker system.
DE Die LED leuchtet auf, wenn der Lautsprecher im Grenzbereich betrieben wird. Ein kurzes Aufleuchten der LED ist unkritisch. Leuchtet die
Limiter-LED länger oder sogar dauerhaft (das System wird überlastet), reduzieren Sie den Pegel der angeschlossenen Audioquelle. Eine
Nichtbeachtung führt zu einer unangenehmen, verzerrten Klangwiedergabe und möglicherweise zur Beschädigung des Lautsprechersystems.
FR S’allume dès que l’enceinte approche de ses limites d’utilisation. Si cette LED ne clignote qu’occasionnellement, pas de problème. En
revanche, si la LED LIMIT reste allumée longtemps ou en permanence, le système est surchargé. Veuillez réduire le niveau du signal audio source.
Dans le cas contraire, vous obtiendrez un son déformé par la distorsion, désagréable à écouter, et vous risquez d’endommager le caisson.
ES Se ilumina cuando el altavoz se lleva al límite. No es crítico si el LED parpadea brevemente. Si el LED del limitador se ilumina durante más
tiempo o de forma continua (se está sobrecargando el sistema), reduzca el nivel de la señal conectada. De lo contrario, se obtendrá un sonido
distorsionado y puede que el altavoz se averíe.
PL Zapala się, gdy głośnik pracuje na granicy wytrzymałości. Krótkotrwałe błyski diody nie powodują niebezpieczeństwa. Jeśli dioda ogranicznika
świeci się dłużej niż przez krótką chwilę lub nieustannie (=przeciążanie systemu), należy zmniejszyć głośność podłączonego źródła sygnału.
Nieprzestrzeganie tego zalecenia może spowodować uszkodzenie urządzenia i emitowanie nieprzyjemnego, przesterowanego dźwięku.
IT Si accende quando l’altoparlante viene fatto funzionare al limite. Un lampeggio sporadico del LED non è critico. Se il LED del limitatore si
accende per più di un momento breve o in modo permanente (sovraccarico del sistema), ridurre il volume della fonte di segnale collegata. Altrimenti
il suono potrebbe risultare sgradevole e distorto e si potrebbe verificare un malfunzionamento del sistema di altoparlanti.
10 POWER LED
EN Lights up when power is switched on and mains cable is connected correctly.
DE Leuchtet, wenn das Gerät eingeschaltet und das Stromkabel richtig angeschlossen ist.
FR Cet indicateur s’allume lorsque l’enceinte est sous tension et que le câble secteur est connecté correctement.
ES Se ilumina cuando el equipo está encendido y el cable eléctrico está correctamente conectado.
PL Zapala się gdy podłączono zasilanie i gdy przewód zasilania sieciowego jest właściwie podłączony.
IT Si accende quando è acceso il dispositivo e il cavo di alimentazione è connesso correttamente.
11 POWER SWITCH / NETZSCHALTER / INTERRUPTEUR POWER / INTERRUPTOR DE ENCENDIDO (POWER) / WŁĄCZNIK ZASILANIA /
INTERRUTTORE DI ACCENSIONE
EN Before switching power on, all level controls should be set to minimum.
DE Drehen Sie vor dem Einschalten alle Lautstärkeregler herunter.
FR Avant d’allumer l’enceinte, vérifiez que tous les potentiomètres de niveau sont réglés au minimum.
ES Antes de encender el equipo, sitúe al mínimo todos los controles de nivel.
PL Przed włączeniem zasilania, wszystkie regulatory poziomów powinny być ustawione na minimum.
IT Prima di accendere il dispositivo, collocare al minimo tutti i controlli di livello.
12
12 MAINS SOCKET (VOLEX POWER PLUG) / NETZBUCHSE (VOLEX-NETZSTECKER) / EMBASE SECTEUR (CONNECTEUR VOLEX) / CONECTOR
DE TENSIÓN (VOLEX) / CONNETTORE DI ALIMENTAZIONE (VOLEX)
EN AC connection via IEC connector (220 - 240V AC). A power cord with a lockable Volex connector is supplied with this unit.
IMPORTANT: Replace fuse only by fuse of same type and rating! If fuse blows repeatedly please contact authorized service center!
DE Wechselstrom-Anschluss mit IEC-Anschluss (220 - 240V AC). Ein Kaltgerätekabel mit verriegelbarem Volex-Stecker liegt dem Gerät bei.
WICHTIGER HINWEIS: Ersetzen Sie die Sicherung ausschließlich durch eine Sicherung des gleichen Typs und mit gleichen Werten.
Sollte die Sicherung wiederholt auslösen, wenden Sie sich bitte an einen autorisiertes Servicezentrum.
FR Branchement secteur, connecteur IEC (tension 220 - 240 Volts 50 Hz). L’enceinte est livrée avec un cordon secteur muni d’un connecteur Volex
verrouillable.
IMPORTANT ! Ne remplacez le fusible que par un autre de même type et calibre. Si le fusible fond de façon répétée, veuillez contacter
un réparateur agréé.
ES Conexión eléctrica mediante un conector IEC (220 - 240 VAC). El equipo se suministra con un cable eléctrico con un conector bloqueable Volex.
IMPORTANTE: Al sustituir los fusibles, utilice únicamente fusibles del mismo tipo y características. Si el fusible se fundiera
continuamente, póngase en contacto con un servicio técnico autorizado.
PL Połączenie gniazda elektrycznego ze złączem IEC (220 - 240 V AC). Przewód zasilania wyposażony w złącze Volex z opcją blokowania jest
dostarczany wraz z tym urządzeniem.
WAŻNE: Bezpiecznik wymieniaj wyłącznie na bezpiecznik tego samego rodzaju i o tej samej wartości znamionowej. Jeśli
bezpiecznik wielokrotnie przepala się, należy skontaktować się z autoryzowanym serwisem.
IT Connessione elettrica attraverso un connettore IEC (220 - 240 V CA). Il dispositivo viene fornito con un cavo elettrico con un connettore
bloccabile Volex.
IMPORTANTE: Sostituire il fusibile solo con fusibili dello stesso tipo e potenza nominale! Se il fusibile dovesse saltare ripetutamente,
contattare un centro di assistenza autorizzato!
13
ACTIVE BACKPANEL / AKTIVE SYSTEME BEDIEN-/ANSCHLUSSFELD / ENCEINTE ACTIVE PANNEAU ARRIÈRE / PANEL POSTERIOR DE SISTEMAS ACTIVOS / GŁOŚNIK AKTYWNY PANEL TYLNY /
PANNELLO POSTERIORE DEI SISTEMI ATTIVI
LDEB122AG²
LDEB152AG²
2
1
4
3
6
5
7
15
8
9
10
11
12
13
14
14
ACTIVE SYSTEMS FEATURES / AKTIVE SYSTEME MERKMALE / FONCTIONNALITÉS ENCEINTES
ACTIVES / CARACTERÍSTICAS DE LOS SISTEMAS / GŁOŚNIK AKTYWNY ELEMENTY SYSTEMU /
CARATTERISTICHE DEI SISTEMI ATTIVI
1 MIC IN
EN Balanced microphone input XLR/6.3 mm jack (combo).
DE Symmetrischer Mikrofoneingang, XLR/6,3-mm-Combo-Buchse.
FR Entrée microphone, symétrique, sur connecteur Combo (mixte XLR/jack 6,35 mm).
ES Entrada de micrófono balanceada por XLR/jack de 6,3 mm (combo).
PL Zrównoważone złącze mikrofonowe XLR/6,3 mm jack (combo).
IT Entrata per microfono bilanciata con XLR/jack di 6,3 mm (combo).
2 MIC GAIN
EN Gain control for microphone input.
DE Gain-Regler für Mikrofoneingang.
FR Potentiomètre de réglage de gain de l’entrée microphone.
ES Ajuste de la ganancia de la entrada de micrófono.
PL Regulacja wzmocnienia dla złącza mikrofonowego.
IT Regolazione del guadagno per l’ingresso del microfono.
3 LINE IN
EN Balanced line input XLR/6.3 mm jack (combo).
DE Symmetrischer Line-Eingang, XLR/6,3-mm-Combo-Buchse.
FR Entrée ligne symétrique sur connecteur Combo (mixte XLR/jack 6,35 mm).
ES Entrada de línea balanceada por XLR/jack de 6,3 mm (combo).
PL Zrównoważone wejście liniowe XLR/6,3 mm jack (combo).
IT Entrata per linea bilanciata con XLR/jack di 6,3 mm (combo).
4 LINE GAIN
EN Gain control for line input.
DE Gain-Regler für Line-Eingang.
FR Potentiomètre de réglage de gain de l’entrée ligne.
ES Ajuste de la ganancia de la entrada de línea.
PL Regulacja wzmocnienia dla wejścia liniowego.
IT Regolazione del guadagno per l’entrata di linea.
5 LINE OUT
EN Balanced XLR output which allows you to connect another active loudspeaker or mixer. Signal mix of MIC IN and LINE IN.
DE Symmetrischer XLR-Ausgang zum Anschluss eines weiteren aktiven Lautsprechers oder eines Mischpults. Das Ausgangssignal enthält Anteile
der an MIC IN und LINE IN anliegenden Signalen.
FR Sortie (renvoi du signal) symétrique sur connecteur XLR, permettant la connexion à une autre enceinte active, à une table de mixage. Ce signal
est un mixage des signaux MIC IN et LINE IN.
ES Salida XLR balanceada para conectar un altavoz activo o una mesa de mezclas. Es una mezcla de las señales MIC IN y LINE IN.
PL Zrównoważone wyjście XLR, które pozwala na połączenie kolejnego aktywnego głośnika lub miksera. Połączenie sygnałów z wejść MIC IN i
LINE IN.
IT Uscita XLR bilanciata che consente di collegare un altro altoparlante attivo o un mixer. Mix dei segnali MIC IN e LINE IN.
6 VOLUME
EN Master volume control of the loudspeaker cabinet.
DE Gesamtlautstärkeregler der Lautsprecherbox.
FR Réglage de volume général de l’enceinte.
ES Control del volumen general del bafle.
PL Główny regulator głośności kolumn.
IT Controllo del volume generale delle casse.
15
7 TREBLE
EN Turn left to decrease high frequencies. Turn right to increase high frequencies.
DE Drehen Sie den Regler nach links, um hohe Frequenzen abzusenken. Drehen Sie den Regler nach rechts, um hohe Frequenzen anzuheben.
FR Tournez ce potentiomètre vers la gauche pour baisser les aigus. Tournez-le vers la droite pour les augmenter.
ES Girar a la izquierda para reducir las frecuencias altas. Girar a la derecha para aumentar las frecuencias altas.
PL Przekręć w lewo, aby zmniejszyć wysokie częstotliwości. Przekręć w prawo, aby zwiększyć wysokie częstotliwości.
IT Girare a sinistra per ridurre le frequenze alte. Girare a destra per aumentare le frequenze alte.
8 BASS
EN Turn left to decrease low frequencies. Turn right to increase low frequencies..
DE Drehen Sie den Regler nach links, um tiefe Frequenzen abzusenken. Drehen Sie den Regler nach rechts, um niedrige Frequenzen anzuheben.
FR Tournez ce potentiomètre vers la gauche pour baisser les graves. Tournez-le vers la droite pour les augmenter.
ES Girar a la izquierda para reducir las frecuencias bajas. Girar a la derecha para aumentar las frecuencias bajas.
PL Przekręć w lewo, aby zmniejszyć niskie częstotliwości. Przekręć w prawo, aby zwiększyć niskie częstotliwości.
IT Girare a sinistra per ridurre le frequenze basse. Girare a destra per aumentare le frequenze basse.
9 PROTECT LED
EN Lights up in case of unit overload/overheating. Amplifier switches to mute automatically. The unit will return to operation mode under normal
conditions after a few minutes.
DE Leuchtet auf, falls das System, überlastet/überhitzt. Der Verstärker wird automatisch stummgeschaltet. Das Gerät wechselt nach Erreichen
normaler Betriebsbedingungen nach einigen Minuten wieder in den normalen Betriebsmodus.
FR S’allume dès que l’enceinte est en surcharge ou en surchauffe. L’amplificateur passe alors automatiquement en mode Mute (signal coupé).
L’enceinte repasse à un fonctionnement normal au bout de quelques minutes.
ES Se ilumina en caso de sobrecarga o sobrecalentamiento del equipo. En este caso, el amplificador se silenciará de forma automática. El equipo
reanudará el funcionamiento normal al cabo de unos minutos.
PL Dioda zapala się w przypadku przeciążenia/przegrzewania się urządzenia. Wzmacniacz automatycznie przechodzi w tryb wyciszenia. W
normalnych warunkach urządzenie powróci do trybu działania po kilku minutach.
IT Si accende in caso di sovraccarico o surriscaldamento del dispositivo. L’amplificatore passa automaticamente al mute. Il dispositivo torna alla
modalità di funzionamento normale dopo qualche minuto.
10 LIMIT LED
EN Lights up when the loudspeaker is operated at its limit. Short-term blinking of the LED is not critical. If the limiter LED lights up longer than a
brief moment or permanently (= over-driving the system), reduce the volume of the connected signal source. Non-compliance will lead to unpleasant
and distorted sound and may cause malfunction of the speaker system.
DE Die LED leuchtet auf, wenn der Lautsprecher im Grenzbereich betrieben wird. Ein kurzes Aufleuchten der LED ist unkritisch. Leuchtet die
Limiter-LED länger oder sogar dauerhaft (das System wird überlastet), reduzieren Sie den Pegel der angeschlossenen Audioquelle. Eine Nichtbeachtung führt zu einer unangenehmen, verzerrten Klangwiedergabe und möglicherweise zur Beschädigung des Lautsprechersystems.
FR S’allume dès que l’enceinte approche de ses limites d’utilisation. Si cette LED ne clignote qu’occasionnellement, pas de problème. En
revanche, si la LED LIMIT reste allumée longtemps ou en permanence, le système est surchargé. Veuillez réduire le niveau du signal audio source.
Dans le cas contraire, vous obtiendrez un son déformé par la distorsion, désagréable à écouter, et vous risquez d’endommager le caisson.
ES Se ilumina cuando el altavoz se lleva al límite. No es crítico si el LED parpadea brevemente. Si el LED del limitador se ilumina durante más
tiempo o de forma continua (se está sobrecargando el sistema), reduzca el nivel de la señal conectada. De lo contrario, se obtendrá un sonido
distorsionado y puede que el altavoz se averíe.
PL Zapala się, gdy głośnik pracuje na granicy wytrzymałości. Krótkotrwałe błyski diody nie powodują niebezpieczeństwa. Jeśli dioda ogranicznika
świeci się dłużej niż przez krótką chwilę lub nieustannie (=przeciążanie systemu), należy zmniejszyć głośność podłączonego źródła sygnału.
Nieprzestrzeganie tego zalecenia może spowodować uszkodzenie urządzenia i emitowanie nieprzyjemnego, przesterowanego dźwięku.
IT Si accende quando l’altoparlante viene fatto funzionare al limite. Un lampeggio sporadico del LED non è critico. Se il LED del limitatore si
accende per più di un momento breve o in modo permanente (sovraccarico del sistema), ridurre il volume della fonte di segnale collegata. Altrimenti
il suono potrebbe risultare sgradevole e distorto e si potrebbe verificare un malfunzionamento del sistema di altoparlanti.
11 SIGNAL LED
EN Lights up when the unit receives an audio signal.
DE Leuchtet, wenn am Subwoofer ein Audiosignal anliegt.
FR Cet indicateur s’allume dès qu’un signal audio est reçu sur le caisson de basses.
ES Se ilumina cuando el equipo recibe señal de audio.
PL Świeci, gdy urządzenie odbiera sygnał audio.
IT Si accende quando riceve un segnale audio.
16
12 POWER LED
EN Lights up when power is switched on and mains cable is connected correctly.
DE Leuchtet, wenn das Gerät eingeschaltet und das Stromkabel richtig angeschlossen ist.
FR Cet indicateur s’allume lorsque l’enceinte est sous tension et que le câble secteur est connecté correctement.
ES Se ilumina cuando el equipo está encendido y el cable eléctrico está correctamente conectado.
PL Zapala się gdy podłączono zasilanie i gdy przewód zasilania sieciowego jest właściwie podłączony.
IT Si accende quando è acceso il dispositivo e il cavo di alimentazione è connesso correttamente.
13 POWER SWITCH / NETZSCHALTER / INTERRUPTEUR POWER / INTERRUPTOR DE ENCENDIDO (POWER) / WŁĄCZNIK ZASILANIA /
INTERRUTTORE DI ACCENSIONE
EN Before switching power on, all level controls should be set to minimum.
DE Drehen Sie vor dem Einschalten alle Lautstärkeregler herunter.
FR Cet indicateur s’allume lorsque l’enceinte est sous tension et que le câble secteur est connecté correctement.
ES Antes de encender el equipo, sitúe al mínimo todos los controles de nivel.
PL Przed włączeniem zasilania, wszystkie regulatory poziomów powinny być ustawione na minimum.
IT Prima di accendere il dispositivo, collocare al minimo tutti i controlli di livello.
14 MAINS SOCKET (VOLEX POWER PLUG) / NETZBUCHSE (VOLEX-NETZSTECKER) / EMBASE SECTEUR (CONNECTEUR VOLEX) / CONECTOR
DE TENSIÓN (VOLEX) / CONNETTORE DI ALIMENTAZIONE (VOLEX)
EN AC connection via IEC connector (220 - 240V AC). A power cord with a lockable Volex connector is supplied with this unit.
IMPORTANT: Replace fuse only by fuse of same type and rating! If fuse blows repeatedly please contact authorized service center!
DE Wechselstrom-Anschluss mit IEC-Anschluss (220 - 240V AC). Ein Kaltgerätekabel mit verriegelbarem Volex-Stecker liegt dem Gerät bei.
WICHTIGER HINWEIS: Ersetzen Sie die Sicherung ausschließlich durch eine Sicherung des gleichen Typs und mit gleichen Werten.
Sollte die Sicherung wiederholt auslösen, wenden Sie sich bitte an einen autorisiertes Servicezentrum.
FR Branchement secteur, connecteur IEC (tension 220 - 240 Volts 50 Hz). L’enceinte est livrée avec un cordon secteur muni d’un connecteur Volex
verrouillable.
IMPORTANT ! Ne remplacez le fusible que par un autre de même type et calibre. Si le fusible fond de façon répétée, veuillez contacter
un réparateur agréé.
ES Conexión eléctrica mediante un conector IEC (220 - 240 VAC). El equipo se suministra con un cable eléctrico con un conector bloqueable Volex.
IMPORTANTE: Al sustituir los fusibles, utilice únicamente fusibles del mismo tipo y características. Si el fusible se fundiera
continuamente, póngase en contacto con un servicio técnico autorizado.
PL Połączenie gniazda elektrycznego ze złączem IEC (220 - 240 V AC). Przewód zasilania wyposażony w złącze Volex z opcją blokowania jest
dostarczany wraz z tym urządzeniem.
WAŻNE: Bezpiecznik wymieniaj wyłącznie na bezpiecznik tego samego rodzaju i o tej samej wartości znamionowej. Jeśli bezpiecznik wielokrotnie przepala się, należy skontaktować się z autoryzowanym serwisem.
IT Connessione elettrica attraverso un connettore IEC (220 - 240 V CA). Il dispositivo viene fornito con un cavo elettrico con un connettore
bloccabile Volex.
IMPORTANTE: Sostituire il fusibile solo con fusibili dello stesso tipo e potenza nominale! Se il fusibile dovesse saltare ripetutamente,
contattare un centro di assistenza autorizzato!
15 SPEAKER OUT
EN Powered Speakon compatible output which allows you to connect a passive 8 Ohm speaker cabinet, for example LDEB122G² or LDEB152G².
DE Aktiver Speakon-kompatibeler Ausgang zum Anschluss einer passiven 8-Ohm-Lautsprecherbox wie z. B. LDEB122G² oder LDEB152G².
FR Sortie sur connecteur compatible Speakon, au niveau haut-parleur. Elle permet d’alimenter une enceinte supplémentaire, passive, d’impédance
nominale 8 Ohms : par exemple, une LDEB122G² ou LDEB152G².
ES Salida compatible Speakon activa que permite conectar un altavoz pasivo de 8 ohmios, por ejemplo un LDEB122G² o LDEB152G².
PL Zasilane wyjście Speakon kompatybilne, które umożliwia połączenie pasywnej kolumny o rezystancji 8 omów, na przykład: LDEB122G² or
LDEB152G².
IT Uscita compatibile Speakon attiva che consente di connettere un altoparlante passivo di 8 Ohm, ad esempio uno LDEB122G² o LDEB152G².
17
18
Active
8
"
mm
Type:
Woofer Size:
Woofer Size:
Custom Made
2
"
mm
Woofer Brand:
Woofer Voice Coil:
Woofer Voice Coil:
1
"
mm
HF Driver Size:
HF Driver Size:
W
W
Hz
Hz
dB
dB
Power (RMS):
Power (Peak):
Frequency Range:
Crossover Frequency:
Max SPL Continuous:
Max. SPL Peak:
Tweeter, short circuit, over
voltage
Mic Gain, Line Gain, Volume,
Treble, Bass, Power
Tweeter, short circuit,
over voltage
Mic Gain, Line Gain,
Volume, Treble, Bass,
Power
Limit, Power
XLR/jack (combo)
Protection:
Controls:
Indicators:
Input Connector Line:
XLR/jack (combo)
Tweeter, over current, over
voltage
134
120
1.800
50 - 19.000
1.600
400
100 x 55
Class D, Hypex Ucd400
25,4
1
BMS
Ferrit
25,4
1
CD Horn
70,6
3
Custom Made
Ferrit
381
15
Active
PA Loudspeaker
LDEB152AG2
XLR/jack (combo)
Protect, Limit, Signal, Power
XLR/jack (combo)
Protect, Limit, Signal,
Power
Mic Gain, Line Gain, Volume, Mic Gain, Line Gain, VoluTreble, Bass, Power
me, Treble, Bass, Power
Tweeter, over current, over
voltage
132
118
1.800
58 - 19.000
1.600
400
100 x 55
Class D, Hypex Ucd400
25,4
1
BMS
Ferrit
25,4
1
CD Horn
63,5
2,5
Custom Made
Ferrit
304,8
12
Active
PA Loudspeaker
LDEB122AG2
EN
Limit, Power
130
117
2.400
65 -19.000
800
129
116
2.200
70 -19.000
800
200
100 x 55
100 x 55
°
Dispersion (H x V):
200
Class D, ICEpower 50ASX2
Class D, ICEpower
50ASX2
mm
HF Driver Voice Coil:
1
Amplification:
1
"
HF Driver Voice Coil:
BMS
25,4
BMS
HF Driver Brand:
Ferrit
25,4
1
CD Horn
50,8
2
Custom Made
Ferrit
254
10
Active
PA Loudspeaker
LDEB102AG2
25,4
Ferrit
HF Driver Magnet:
25,4
CD Horn
Horn:
50,8
Ferrit
Woofer Magnet:
203,2
PA Loudspeaker
LDEB82AG2
Product sort:
ACTIVE SPECIFICATIONS / AKTIVE SYSTEME SPEZIFIKATIONEN / ENCEINTE ACTIVE CARACTÉRISTIQUES / ESPECIFICACIONES DEL MODELO ACTIVO / SPECYFIKACJE KOLUMNY AKTYWNEJ /
SPECIFICHE DEL MODELLO ATTIVO
19
220-240 V AC
15 mm plywood
Structure coating
Bassreflex
-
°
mm
kg
Output Connector Speaker:
Power Supply:
Cabinet Material:
Cabinet Surface:
Cabinet Design:
Monitor Angle:
Dimensions (W x H x D):
Weight:
12,7
ergonomic milled handles,
M10 threaded flange for
SuperClamp, Aluminium stand
support 36 mm
11
ergonomic milled
handles, M10 threaded
flange for SuperClamp,
Aluminium stand support
36 mm
320 x 500 x 290
54°
Bassreflex
Structure coating
15 mm plywood
220-240 V AC
-
XLR
XLR/jack (combo)
LD Systems Evolutive handles, SM707 stands support
36 mm, 6x M8 rigging point
21
390 x 570 x 370
54°
Bassreflex
Structure coating
15 mm plywood
LD Systems Evolutive
handles, stands support 36
mm, 6x M8 rigging point
28,5
480 x 650 x 460
54°
Bassreflex
Structure coating
15 mm plywood
220-240 V AC
Speakon compatible /
8 Ohm
220-240 V AC
XLR
Speakon compatible / 8
Ohm
XLR/jack (combo)
XLR
XLR/jack (combo)
Since all our products are constantly controlled and improved, technical changes are possible without prior notice.
Features:
XLR
Output Connector Line:
270 x 450 x 290
XLR/jack (combo)
Input Connector Mic:
20
Aktiv
8
"
mm
Typ:
Größe Tieftöner:
Größe Tieftöner:
Custom-Modell
2
"
mm
Marke Tieftöner:
Schwingspule Tieftöner:
Schwingspule Tieftöner:
1
"
mm
Größe HF Treiber:
Größe HF Treiber:
BMS
1
"
mm
Marke HF Treiber:
Schwingspule HF Treiber:
Schwingspule HF Treiber:
100 x 55
°
W
W
Hz
Hz
dB
dB
Abstrahlwinkel (H x V):
Ausgangsleistung (RMS):
Leistung (Peak):
Frequenzbereich:
Übernahmefrequenz
Max. Dauerschalldruck:
Max. Schalldruck (Peak):
Hochtöner, Kurzschluss, Überspannung
Mic Gain, Line Gain, Volume,
Treble, Bass, Power
Hochtöner, Kurzschluss, Überspannung
Mic Gain, Line Gain, Volume,
Treble, Bass, Power
Limit, Power
XLR/Klinke (Combo)
Bedienelemente:
Anzeigeelemente:
Line-Eingang:
XLR/Klinke (Combo)
Limit, Power
130
129
117
2.400
65 -19.000
800
200
100 x 55
Class D, ICEpower 50ASX2
25,4
1
BMS
Ferrit
25,4
1
CD-Horn
50,8
2
Custom-Modell
Ferrit
254
10
Aktiv
PA Lautsprecher
LDEB102AG2
Schutzschaltungen:
116
2.200
70 -19.000
800
200
Class D, ICEpower 50ASX2
Verstärker:
25,4
Ferrit
Magnet HF Treiber:
25,4
CD-Horn
Horn:
50,8
Ferrit
Magnet Tieftöner:
203,2
PA Lautsprecher
LDEB82AG2
Produktart:
Hochtöner, Kurzschluss,
Überspannung
134
120
1.800
50 - 19.000
1.600
400
100 x 55
Class D, Hypex Ucd400
25,4
1
BMS
Ferrit
25,4
1
CD-Horn
70,6
3
Custom-Modell
Ferrit
381
15
Aktiv
PA Lautsprecher
LDEB152AG2
XLR/Klinke (Combo)
Protect, Limit, Signal, Power
XLR/Klinke (Combo)
Protect, Limit, Signal, Power
Mic Gain, Line Gain, Volume, Mic Gain, Line Gain, Volume,
Treble, Bass, Power
Treble, Bass, Power
Hochtöner, Kurzschluss,
Überspannung
132
118
1.800
58 - 19.000
1.600
400
100 x 55
Class D, Hypex Ucd400
25,4
1
BMS
Ferrit
25,4
1
CD-Horn
63,5
2,5
Custom-Modell
Ferrit
304,8
12
Aktiv
PA Lautsprecher
LDEB122AG2
DE
21
220-240 V AC
15 mm Sperrholz
Strukturlack
Bassreflex
-
°
mm
kg
Lautsprecherausgang:
Stromversorgung:
Gehäusematerial:
Gehäuseoberfläche:
Gehäusebauart:
Monitorwinkel:
Abmessungen (B x H x T):
Gewicht:
12,7
Ergonomische Griffschalen,
M10 Gewinde für SuperClamp,
Aluminium Hochständerflansch
36 mm
11
Ergonomische Griffschalen,
M10 Gewinde für SuperClamp,
Aluminium Hochständerflansch
36 mm
320 x 500 x 290
54°
Bassreflex
Strukturlack
15 mm Sperrholz
220-240 V AC
-
XLR
XLR/Klinke (Combo)
LD Systems Evolutive Griffe,
SM707 Flansch 36 mm, 6x
M8 Flugpunkte
21
390 x 570 x 370
54°
Bassreflex
Strukturlack
15 mm Sperrholz
LD Systems Evolutive
Griffe, Flansch 36 mm, 6x M8
Flugpunkte
28,5
480 x 650 x 460
54°
Bassreflex
Strukturlack
15 mm Sperrholz
220-240 V AC
Speakon-kompatibel / 8 Ohm
220-240 V AC
XLR
Speakon-kompatibel / 8
Ohm
XLR/Klinke (Combo)
XLR
XLR/Klinke (Combo)
Da all unsere Produkte ständig geprüft und verbessert werden, können technische Änderungen ohne vorherige Ankündigung vorgenommen werden.
Merkmale:
XLR
Line-Ausgang:
270 x 450 x 290
XLR/Klinke (Combo)
Mikrofoneingang:
22
Active
8
203,2
"
mm
Type :
Diamètre boomer :
Fabrication spécifique
2
"
mm
Woofer Brand:
Woofer Voice Coil:
Woofer Voice Coil:
1
25,4
"
mm
HF Driver Size:
BMS
1
"
mm
HF Driver Brand:
HF Driver Voice Coil:
HF Driver Voice Coil:
65 -19.000
Mic Gain, Line Gain, Volume,
Treble, Bass, Power
Mic Gain, Line Gain, Volume,
Treble, Bass, Power
Limit, Power
Contrôles :
Indicateurs :
Limit, Power
Tweeter, short circuit, over
voltage
Tweeter, short circuit, over
voltage
Protections :
117
2.400
130
116
2.200
800
200
100 x 55
Class D, ICEpower 50ASX2
25,4
1
BMS
Ferrite
25,4
1
CD Horn
50,8
2
Fabrication spécifique
Ferrite
254
10
Active
Enceinte de sonorisation
LDEB102AG2
129
dB
dB
Max SPL Continuous:
Max. SPL Peak:
70 -19.000
Hz
Hz
Bande passante :
800
W
W
Puissance (eff.) :
Power (Peak):
Crossover Frequency:
100 x 55
°
Dispersion (H x V):
200
Class D, ICEpower 50ASX2
Amplification :
25,4
Ferrite
HF Driver Magnet:
HF Driver Size:
CD Horn
Horn:
50,8
Ferrite
Woofer Magnet:
Woofer Size:
Enceinte de sonorisation
LDEB82AG2
Type produit :
Tweeter, over current, over
voltage
134
120
1.800
50 - 19.000
1.600
400
100 x 55
Class D, Hypex Ucd400
25,4
1
BMS
Ferrite
25,4
1
CD Horn
70,6
3
Fabrication spécifique
Ferrite
381
15
Active
Enceinte de sonorisation
LDEB152AG2
Protect, Limit, Signal, Power
Protect, Limit, Signal,
Power
Mic Gain, Line Gain, Volume, Mic Gain, Line Gain, Volume,
Treble, Bass, Power
Treble, Bass, Power
Tweeter, over current, over
voltage
132
118
1.800
58 - 19.000
1.600
400
100 x 55
Class D, Hypex Ucd400
25,4
1
BMS
Ferrite
25,4
1
CD Horn
63,5
2,5
Fabrication spécifique
Ferrite
304,8
12
Active
Enceinte de sonorisation
LDEB122AG2
FR
23
XLR
220-240 V AC
15 mm plywood
Structure coating
Bassreflex
-
°
mm
kg
Output Connector Line:
Output Connector Speaker:
Alimentation :
Matériau coffrets :
Revêtement :
Cabinet Design:
Monitor Angle:
Dimensions (L x H x P) :
Poids :
12,7
ergonomic milled handles,
M10 threaded flange for
SuperClamp, Aluminium stand
support 36 mm
11
ergonomic milled handles,
M10 threaded flange for
SuperClamp, Aluminium stand
support 36 mm
320 x 500 x 290
54°
Bassreflex
Structure coating
15 mm plywood
220-240 V AC
-
XLR
XLR/jack (combo)
XLR/jack (combo)
LD Systems Evolutive
handles, SM707 stands
support 36 mm, 6x M8
rigging point
21
390 x 570 x 370
54°
Bassreflex
Structure coating
15 mm plywood
LD Systems Evolutive
handles, stands support 36
mm, 6x M8 rigging point
28,5
480 x 650 x 460
54°
Bassreflex
Structure coating
15 mm plywood
220-240 V AC
compatible Speakon /
8 Ohm
220-240 V AC
XLR
compatible Speakon / 8
Ohm
XLR/jack (combo)
XLR/jack (combo)
XLR
XLR/jack (combo)
XLR/jack (combo)
Comme tous nos produits sont constamment contrôlés et améliorés, des modifications techniques peuvent leur être apportées sans préavis.
Fonctionnalités :
XLR/jack (combo)
Input Connector Mic:
270 x 450 x 290
XLR/jack (combo)
Input Connector Line:
24
Activo
8
"
mm
Tipo:
Tamaño de bafle:
Tamaño de woofer:
Custom Made
2
"
mm
Marca del woofer:
Bobina del woofer:
Bobina del woofer:
1
"
mm
Tamaño motor agudos:
Tamaño motor agudos:
BMS
1
"
mm
Marca motor agudos:
Bobina motor agudos:
Bobina motor agudos:
100 x 55
°
W
W
Hz
Hz
dB
dB
Dispersión (H x V):
Potencia (RMS):
Potencia (pico)
Banda de frecuencias:
Frecuencia de corte:
Máx. SPL continuo:
Máx. SPL pico:
Tweeter, cortocircuito, sobretensión
Mic Gain, Line Gain, Volume,
Treble, Bass, Power
Tweeter, cortocircuito, sobretensión
Mic Gain, Line Gain, Volume,
Treble, Bass, Power
Limit, Power
XLR/jack (combo)
Protección:
Controles:
Indicadores LED:
Conector entrada de línea:
XLR/jack (combo)
Limit, Power
130
117
2.400
65 -19.000
800
200
100 x 55
Clase D, ICEpower 50ASX2
25,4
1
BMS
Ferrita
25,4
1
Bocina DC
50,8
2
Custom Made
Ferrita
254
10
Activo
Altavoz de PA
LDEB102AG2
129
116
2.200
70 -19.000
800
200
Clase D, ICEpower 50ASX2
Amplificación:
25,4
Ferrita
Imán motor agudos:
25,4
Bocina DC
Bocina:
50,8
Ferrita
Imán del woofer:
203,2
Altavoz de PA
LDEB82AG2
Producto:
Tweeter, sobreintensidad,
sobretensión
134
120
1.800
50 - 19.000
1.600
400
100 x 55
Clase D, Hypex Ucd400
25,4
1
BMS
Ferrita
25,4
1
Bocina DC
70,6
3
Custom Made
Ferrita
381
15
Activo
Altavoz de PA
LDEB152AG2
XLR/jack (combo)
Protect, Limit, Signal, Power
XLR/jack (combo)
Protect, Limit, Signal, Power
Mic Gain, Line Gain, Volume, Mic Gain, Line Gain, Volume,
Treble, Bass, Power
Treble, Bass, Power
Tweeter, sobreintensidad,
sobretensión
132
118
1.800
58 - 19.000
1.600
400
100 x 55
Clase D, Hypex Ucd400
25,4
1
BMS
Ferrita
25,4
1
Bocina DC
63,5
2,5
Custom Made
Ferrita
304,8
12
Activo
Altavoz de PA
LDEB122AG2
ES
25
220-240 VAC
Contrachapado de 15 mm
Texturizado
Bass reflex
-
°
mm
kg
Conector salida de altavoz:
Alimentación:
Material de la caja:
Acabado de la caja:
Diseño del bafle:
Ángulo de monitor:
Dimensiones (An x Al x F):
Peso:
12,7
Asas ergonómicas, rosca de
unión M10 para Super Clamp,
soporte de aluminio (36 mm)
11
Asas ergonómicas, rosca de
unión M10 para Super Clamp,
soporte de aluminio (36 mm)
320 x 500 x 290
54°
Bass reflex
Texturizado
Contrachapado de 15 mm
220-240 VAC
-
XLR
XLR/jack (combo)
28,5
480 x 650 x 460
54°
Bass reflex
Texturizado
Contrachapado de 15 mm
Asas Evolutive de LD
Asas Evolutive de LD SysSystems, soporte
tems, soporte SM707 (36
(36 mm), 6 puntos de
mm), 6 puntos de volado M8
volado M8
21
390 x 570 x 370
54°
Bass reflex
Texturizado
Contrachapado de 15 mm
220-240 VAC
compatible Speakon / 8
ohmios
220-240 VAC
XLR
compatible Speakon / 8
ohmios
XLR/jack (combo)
XLR
XLR/jack (combo)
Dado que trabajamos constantemente en mejorar nuestros productos, las especificaciones técnicas pueden variar sin previo aviso.
Características:
XLR
Conector salida de línea:
270 x 450 x 290
XLR/jack (combo)
Conector entrada de micro:
26
203,2
mm
mm
Rozmiar głośnika wysokotonowego:
200
800
70 -19,000
W
W
Moc wyjściowa (RMS):
Moc wyjściowa (szczytowa):
dB
dB
Maksymalny ciągły poziom ciśnienia
akustycznego:
Maksymalny szczytowy poziom
ciśnienia akustycznego:
Ochrona:
Hz
Hz
Zakres częstotliwości:
Częstotliwość graniczna:
200
130
głośnik wysokotonowy,
zwarcie, przepięcie
głośnik wysokotonowy,
zwarcie, przepięcie
117
2,400
65 -19,000
800
129
116
2,200
Klasa D, ICEpower 50ASX2
100 x 55
Klasa D, ICEpower 50ASX2
100 x 55
Wzmocnienie:
Dyspersja (H x V):
°
BMS
1
25,4
mm
Cewka drgająca głośnika
wysokotonowego:
25,4
Ferrytowy
25,4
BMS
1
Cali:
Rodzaj głośnika wysokotonowego:
Cewka drgająca głośnika
wysokotonowego:
Ferrytowy
Magnes głośnika wysokotonowego:
25,4
Tuba o stałej kierunkowości
1
Tuba o stałej kierunkowości
1
Tuba:
Rozmiar głośnika wysokotonowego:
2
50,8
Cali:
2
Produkowany na zamówienie
Ferrytowy
254
10
50,8
Cali:
mm
Cewka drgająca subwoofera:
Produkowany na zamówienie
Marka subwoofera:
Cewka drgająca subwoofera:
Ferrytowy
Magnes użyty w subwooferze:
Rozmiar subwoofera:
Aktywny
8
Cali:
Typ:
Aktywny
LDEB102AG2
Głośnik PA
LDEB82AG2
Głośnik PA
Rozmiar subwoofera:
Rodzaj produktu:
LDEB122AG2
LDEB152AG2
głośnik wysokotonowy,
przetężenie, przepięcie
132
118
1,800
58 - 19000
1.600
400
100 x 55
Klasa D, Hypex Ucd400
25,4
1
BMS
Ferrytowy
25,4
1
Tuba o stałej kierunkowości
63,5
głośnik wysokotonowy,
przetężenie, przepięcie
134
120
1,800
50 - 19000
1.600
400
100 x 55
Klasa D, Hypex Ucd400
25,4
1
BMS
Ferrytowy
25,4
1
Tuba o stałej kierunkowości
70,6
3
Produkowany na
zamówienie
Produkowany na
zamówienie
2,5
Ferrytowy
381
15
Aktywny
Głośnik PA
Ferrytowy
304,8
12
Aktywny
Głośnik PA
PL
27
kg
Waga:
Właściwości:
°
mm
Kąt monitora:
Wymiary (szer. x wys. x gł.):
12,7
ergonomiczne frezowane
uchwyty, kołnierz gwintowany
M10 dostosowany do statywu
SuperClamp, aluminiowy
wspornik stojaka 36 mm.
11
320 x 500 x 290
54°
Bass-reflex
Powłoka strukturalna
15 mm, sklejka
XLR
ergonomiczne frezowane
uchwyty, kołnierz gwintowany
M10 dostosowany do statywu
SuperClamp, aluminiowy
wspornik stojaka 36 mm.
270 x 450 x 290
-
Powłoka strukturalna
Bass-reflex
Powłoka obudowy:
Typ obudowy:
220-240 V AC
220-240 V AC
15 mm, sklejka
Zasilanie:
-
Złącze wyjścia głośnika:
Materiał obudowy:
-
XLR
Złącze wyjścia liniowego:
XLR/jack (combo)
XLR/jack (combo)
XLR/jack (combo)
XLR/jack (combo)
Złącze wejścia liniowego:
Złącze wejścia mikrofonowego:
Limit, Power
Limit, Power
Wskaźniki:
Mic Gain, Line Gain, Volume,
Treble, Bass, Power
Mic Gain, Line Gain, Volume,
Treble, Bass, Power
Regulacja:
Regulowane uchwyty LD
Systems, SM707 wsporniki
stojaka 36 mm, 6 x otwory
gwintowe M8
21
390 x 570 x 370
54°
Bass-reflex
Powłoka strukturalna
15 mm, sklejka
220-240 V AC
Regulowane uchwyty
LD Systems, wsporniki
stojaka 36 mm, 6 x otwory
gwintowe M8
28,5
480 x 650 x 460
54°
Bass-reflex
Powłoka strukturalna
15 mm, sklejka
220-240 V AC
XLR
Speakon kompatybilne /
8 Ohm
XLR
XLR/jack (combo)
XLR/jack (combo)
Protect, Limit, Signal,
Power
Speakon kompatybilne /
8 Ohm
XLR/jack (combo)
XLR/jack (combo)
Protect, Limit, Signal, Power
Mic Gain, Line Gain, Volume, Mic Gain, Line Gain, Volume,
Treble, Bass, Power
Treble, Bass, Power
28
1
"
mm
Dimensioni driver alte
frequenze:
Dimensioni driver alte
frequenze:
200
65 -19.000
Tweeter, corto circuito, sovratensione
Mic Gain, Line Gain, Volume,
Treble, Bass, Power
Tweeter, corto circuito, sovratensione
Mic Gain, Line Gain, Volume,
Treble, Bass, Power
Comandi:
117
2.400
Protezione:
116
200
800
130
dB
dB
Max SPL continuo:
Max. SPL Picco:
2.200
70 -19.000
800
129
Hz
Hz
Gamma di frequenza:
Frequenza di taglio:
W
W
Potenza (RMS):
Potenza (Picco):
Classe D, ICEpower 50ASX2
100 x 55
Classe D, ICEpower 50ASX2
100 x 55
°
Amplificazione:
Dispersione (H x V):
1
BMS
Ferrite
25,4
1
25,4
mm
Bobina voce driver alte
frequenze:
50,8
Tromba DC
25,4
BMS
1
"
Marca driver alte frequenze:
Bobina voce driver alte
frequenze:
Ferrite
Magnete driver alte
frequenze:
25,4
Tromba DC
50,8
mm
Bobina del woofer:
Tromba:
2
Custom Made
Custom Made
2
"
Marca del woofer:
Bobina del woofer:
Ferrite
254
10
Ferrite
203,2
mm
Dimensioni del woofer:
Magnete del woofer:
Attivo
8
"
Tipo:
Attivo
LDEB102AG2
Altoparlante di PA
LDEB82AG2
Altoparlante di PA
Dimensioni del woofer:
Prodotto:
LDEB122AG2
Mic Gain, Line Gain, Volume,
Treble, Bass, Power
Tweeter, sovracorrente,
sovratensione
132
118
1.800
58 - 19.000
1.600
400
100 x 55
Classe D, Hypex Ucd400
25,4
1
BMS
Ferrite
25,4
1
Tromba DC
63,5
2,5
Custom Made
Ferrite
304,8
12
Attivo
Altoparlante di PA
LDEB152AG2
Mic Gain, Line Gain, Volume,
Treble, Bass, Power
Tweeter, sovracorrente,
sovratensione
134
120
1.800
50 - 19.000
1.600
400
100 x 55
Classe D, Hypex Ucd400
25,4
1
BMS
Ferrite
25,4
1
Tromba DC
70,6
3
Custom Made
Ferrite
381
15
Attivo
Altoparlante di PA
IT
29
Limit, Power
kg
Peso:
-
54°
12,7
Maniglie ergonomiche, flangia
filettata M10 per Super Clamp,
supporto di alluminio (36 mm)
11
320 x 500 x 290
Maniglie ergonomiche, flangia
filettata M10 per Super Clamp,
supporto di alluminio (36 mm)
270 x 450 x 290
Bass reflex
Testurizzato
Legno compensato da 15 mm
Protect, Limit, Signal, Power
Protect, Limit, Signal, Power
28,5
Maniglie Evolutive di LD
Systems, supporto (36 mm),
6 punti di sollevamento M8
21
480 x 650 x 460
54°
Bass reflex
Testurizzato
Legno compensato da
15 mm
220-240 V CA
compatibile Speakon /
8 Ohm
XLR
XLR/jack (combo)
XLR/jack (combo)
Maniglie Evolutive di LD
Systems, supporto SM707 (36
mm), 6 punti di sollevamento
M8
390 x 570 x 370
54°
Bass reflex
Testurizzato
Legno compensato da 15 mm
220-240 V CA
compatibile Speakon / 8 Ohm
XLR
XLR/jack (combo)
XLR/jack (combo)
Dal momento che i nostri prodotti sono sottoposti costantemente a processi di controllo e miglioramento, le specifiche tecniche possono variare senza preavviso.
Caratteristiche:
°
mm
Angolo del monitor:
Dimensioni (L x H x P):
Testurizzato
Bass reflex
Superficie della cassa:
Design della cassa:
220-240 V CA
220-240 V CA
Legno compensato da 15 mm
Alimentazione:
Materiale della cassa:
-
-
Connettore uscita altoparlante:
XLR/jack (combo)
XLR
XLR/jack (combo)
XLR
Connettore uscita di linea:
XLR/jack (combo)
Connettore ingresso
microfono:
Limit, Power
XLR/jack (combo)
Indicatori:
Connettore entrata linea:
PASSIVE BACKPANEL / PASSIVE SYSTEME BEDIEN-/ANSCHLUSSFELD / FACE ARRIÈRE
VERSION PASSIVE / PANEL POSTERIOR SISTEMAS PASIVOS / GŁOŚNIK PASYWNY PANEL
TYLNY / PANNELLO POSTERIORE SISTEMI PASSIVI
LDEB82G2
LDEB102G2
LDEB122G2
LDEB152G2
1
2
1 INPUT / ENTRÉES
EN Speakon compatible input.
DE Speakon-kompatibler Eingang.
FR Entrées sur connecteur compatible Speakon.
ES Entrada compatible Speakon.
PL Wejście złącza Speakon kompatybilne.
IT Entrata compatibile Speakon.
2 OUTPUT / SORTIES
EN Speakon compatible output (parallel wired with Speakon compatible input 1+/1-)
DE Speakon-kompatibler Ausgang (parallel geschaltet mit Speakon-kompatiblem Eingang 1+/1-)
FR Sorties sur connecteur compatible Speakon (câblé en parallèle avec entrée Speakon 1+/1-)
ES Salida compatible Speakon (conectada en paralelo con la entrada compatible Speakon 1+/1-)
PL Wyjście złącza Speakon kompatybilne (równolegle połączone z wejściem złącza Speakon kompatybilne 1+/1-).
IT Uscita compatibile Speakon (collegata in parallelo con l’entrata compatibile Speakon 1+/1-)
30
PASSIVE SYSTEMS FEATURES / PASSIVE SYSTEME MERKMALE / FONCTIONNALITÉS ENCEINTES
ACTIVES / CARACTERÍSTICAS DE LOS SISTEMAS / GŁOŚNIK AKTYWNY ELEMENTY SYSTEMU /
CARATTERISTICHE DEI SISTEMI ATTIVI
EN
LDEB82G2
LDEB102G2
LDEB122G2
LDEB152G2
Product sort:
PA Loudspeaker
PA Loudspeaker
PA Loudspeaker
PA Loudspeaker
Type:
Passive
Passive
Passive
Passive
Woofer Size:
"
8
10
12
15
Woofer Size:
mm
203,2
254
304,8
381
Woofer Magnet:
Ferrit
Ferrit
Ferrit
Ferrit
Woofer Brand:
Custom Made
Custom Made
Custom Made
Custom Made
Woofer Voice Coil:
"
2
2
2,5
3
Woofer Voice Coil:
mm
50,8
50,8
63,5
70,6
CD Horn
CD Horn
CD Horn
CD Horn
Horn:
HF Driver Size:
"
1
1
1
1
HF Driver Size:
mm
25,4
25,4
25,4
25,4
HF Driver Magnet:
Ferrit
Ferrit
Ferrit
Ferrit
HF Driver Brand:
BMS
BMS
BMS
BMS
HF Driver Voice Coil:
"
1
1
1
1
HF Driver Voice Coil:
mm
25,4
25,4
25,4
25,4
Dispersion (H x V):
°
100 x 55
100 x 55
100 x 55
100 x 55
Power (RMS):
W
200
250
400
500
Power (Peak):
W
800
1000
1.600
2.000
Frequency Range:
Hz
70 -19.000
65 -19.000
58 - 19.000
50 - 19.000
Crossover Frequency:
Hz
2.200
2.400
1.800
1.800
SPL (1 W / 1 m):
db
95
96
99
100
Max SPL Continuous:
dB
118
120
125
127
Impedance:
Ohm
8
8
8
8
Tweeter
Tweeter
Tweeter
Tweeter
Protection:
Input Connector Speaker:
Speakon compatible
Output Connector
Speaker:
Cabinet Material:
15 mm plywood
15 mm plywood
15 mm plywood
15 mm plywood
Cabinet Surface:
Structure coating
Structure coating
Structure coating
Structure coating
Cabinet Design:
Bassreflex
Bassreflex
Bassreflex
Bassreflex
Monitor Angle:
°
-
54°
54°
54°
Dimensions (W x H x D):
mm
270 x 450 x 290
320 x 500 x 290
390 x 570 x 370
480 x 650 x 460
Weight:
kg
10 kg
11,5 kg
19 kg
25,5 kg
ergonomic milled
handles, M10 threaded
flange for SuperClamp,
Aluminium stand
support 36 mm
ergonomic milled
handles, M10 threaded
flange for SuperClamp,
Aluminium stand
support 36 mm
LD Systems Evolutive
handles, SM707 stands
support 36 mm, 6x M8
rigging point
LD Systems Evolutive
handles, stands support
36 mm, 6x M8 rigging
point
Features:
Since all our products are constantly controlled and improved, technical changes are possible without prior notice.
31
DE
LDEB82G2
LDEB102G2
LDEB122G2
LDEB152G2
Produktart:
PA Lautsprecher
PA Lautsprecher
PA Lautsprecher
PA Lautsprecher
Typ:
Passiv
Passiv
Passiv
Passiv
Größe Tieftöner:
"
8
10
12
15
Größe Tieftöner:
mm
203,2
254
304,8
381
Magnet Tieftöner:
Ferrit
Ferrit
Ferrit
Ferrit
Marke Tieftöner:
Custom-Modell
Custom-Modell
Custom-Modell
Custom-Modell
Schwingspule Tieftöner:
"
2
2
2,5
3
Schwingspule Tieftöner:
mm
50,8
50,8
63,5
70,6
CD-Horn
CD-Horn
CD-Horn
CD-Horn
Horn:
Größe HF Treiber:
"
1
1
1
1
Größe HF Treiber:
mm
25,4
25,4
25,4
25,4
Magnet HF Treiber:
Ferrit
Ferrit
Ferrit
Ferrit
Marke HF Treiber:
BMS
BMS
BMS
BMS
Schwingspule HF Treiber: "
1
1
1
1
Schwingspule HF Treiber: mm
25,4
25,4
25,4
25,4
Abstrahlwinkel (H x V):
100 x 55
100 x 55
100 x 55
100 x 55
Ausgangsleistung (RMS): W
200
250
400
500
Leistung (Peak):
W
800
1000
1.600
2.000
Frequenzbereich:
Hz
70 -19.000
65 -19.000
58 - 19.000
50 - 19.000
Übernahmefrequenz:
Hz
2.200
2.400
1.800
1.800
Schalldruck (1 W / 1 m):
dB
95
96
99
100
Max. Dauerschalldruck:
dB
118
120
125
127
Impedanz:
Ohm
8
8
8
8
Hochtöner
Hochtöner
Hochtöner
Hochtöner
°
Schutzschaltungen:
Lautsprechereingang:
Speakon-kompatibel
Lautsprecherausgang:
Gehäusematerial:
15 mm Sperrholz
15 mm Sperrholz
15 mm Sperrholz
15 mm Sperrholz
Gehäuseoberfläche:
Strukturlack
Strukturlack
Strukturlack
Strukturlack
Gehäusebauart:
Bassreflex
Bassreflex
Bassreflex
Bassreflex
Monitorwinkel:
°
-
54°
54°
54°
Abmessungen
(B x H x T):
mm
270 x 450 x 290
320 x 500 x 290
390 x 570 x 370
480 x 650 x 460
Gewicht:
kg
10 kg
11,5 kg
19 kg
25,5 kg
Ergonomische Griffschalen, M10 Gewinde
für SuperClamp,
Aluminium
Hochständerflansch
36 mm
Ergonomische Griffschalen, M10 Gewinde
für SuperClamp,
Aluminium
Hochständerflansch
36 mm
LD Systems Evolutive
LD Systems Evolutive
Griffe, SM707 Flansch 36 Griffe, Flansch 36 mm,
mm, 6x M8 Flugpunkte
6x M8 Flugpunkte
Merkmale:
Da all unsere Produkte ständig geprüft und verbessert werden, können technische Änderungen ohne vorherige Ankündigung vorgenommen
werden.
32
FR
Type produit :
Type :
LDEB82AG2
LDEB102AG2
LDEB122AG2
LDEB152AG2
Enceinte de sonorisation
Enceinte de sonorisation
Enceinte de sonorisation
Enceinte de sonorisation
Active
Active
Active
Active
Diamètre boomer :
"
8
10
12
15
Woofer Size:
mm
203,2
254
304,8
381
Woofer Magnet:
Ferrite
Ferrite
Ferrite
Ferrite
Woofer Brand:
Fabrication spécifique
Fabrication spécifique
Fabrication spécifique
Fabrication spécifique
Woofer Voice Coil:
"
2
2
2,5
3
Woofer Voice Coil:
mm
50,8
50,8
63,5
70,6
CD Horn
CD Horn
CD Horn
CD Horn
Horn:
HF Driver Size:
"
1
1
1
1
HF Driver Size:
mm
25,4
25,4
25,4
25,4
HF Driver Magnet:
Ferrite
Ferrite
Ferrite
Ferrite
HF Driver Brand:
BMS
BMS
BMS
BMS
HF Driver Voice Coil:
"
1
1
1
1
HF Driver Voice Coil:
mm
25,4
25,4
25,4
25,4
Class D, ICEpower
50ASX2
Class D, ICEpower
50ASX2
Class D, Hypex Ucd400
Class D, Hypex Ucd400
Amplification :
Dispersion (H x V):
°
100 x 55
100 x 55
100 x 55
100 x 55
Puissance (eff.) :
W
200
200
400
400
Power (Peak):
W
800
800
1.600
1.600
Bande passante :
Hz
70 -19.000
65 -19.000
58 - 19.000
50 - 19.000
Crossover Frequency:
Hz
2.200
2.400
1.800
1.800
Max SPL Continuous:
dB
116
117
118
120
Max. SPL Peak:
dB
129
130
132
134
Protections :
Tweeter, short circuit,
over voltage
Tweeter, short circuit,
over voltage
Tweeter, over current,
over voltage
Tweeter, over current,
over voltage
Contrôles :
Mic Gain, Line Gain,
Volume, Treble, Bass,
Power
Mic Gain, Line Gain,
Volume, Treble, Bass,
Power
Mic Gain, Line Gain,
Volume, Treble, Bass,
Power
Mic Gain, Line Gain,
Volume, Treble, Bass,
Power
Indicateurs :
Limit, Power
Limit, Power
Protect, Limit, Signal,
Power
Protect, Limit, Signal,
Power
Input Connector Line:
XLR/jack (combo)
XLR/jack (combo)
XLR/jack (combo)
XLR/jack (combo)
Input Connector Mic:
XLR/jack (combo)
XLR/jack (combo)
XLR/jack (combo)
XLR/jack (combo)
Output Connector Line:
XLR
XLR
XLR
XLR
compatible Speakon /
8 Ohm
Output Connector
Speaker:
-
-
compatible Speakon /
8 Ohm
Alimentation :
220-240 V AC
220-240 V AC
220-240 V AC
220-240 V AC
Matériau coffrets :
15 mm plywood
15 mm plywood
15 mm plywood
15 mm plywood
Revêtement :
Structure coating
Structure coating
Structure coating
Structure coating
Cabinet Design:
Bassreflex
Bassreflex
Bassreflex
Bassreflex
Monitor Angle:
°
-
54°
54°
54°
Dimensions (L x H x P) :
mm
270 x 450 x 290
320 x 500 x 290
390 x 570 x 370
480 x 650 x 460
Poids :
kg
11
12,7
21
28,5
ergonomic milled
handles, M10 threaded
flange for SuperClamp,
Aluminium stand
support 36 mm
ergonomic milled
handles, M10 threaded
flange for SuperClamp,
Aluminium stand
support 36 mm
LD Systems Evolutive
handles, SM707 stands
support 36 mm, 6x M8
rigging point
LD Systems Evolutive
handles, stands support
36 mm, 6x M8 rigging
point
Fonctionnalités :
Comme tous nos produits sont constamment contrôlés et améliorés, des modifications techniques peuvent leur être apportées sans
préavis.
33
ES
LDEB82G2
LDEB102G2
LDEB122G2
LDEB152G2
Producto:
Altavoz de PA
Altavoz de PA
Altavoz de PA
Altavoz de PA
Tipo:
Pasivo
Pasivo
Pasivo
Pasivo
Tamaño de woofer:
"
8
10
12
15
Tamaño de woofer:
mm
203,2
254
304,8
381
Imán del woofer:
Ferrita
Ferrita
Ferrita
Ferrita
Marca del woofer:
Custom Made
Custom Made
Custom Made
Custom Made
Bobina del woofer:
"
2
2
2,5
3
Bobina del woofer:
mm
50,8
50,8
63,5
70,6
Bocina DC
Bocina DC
Bocina DC
Bocina DC
Bocina:
Tamaño motor agudos:
"
1
1
1
1
Tamaño motor agudos:
mm
25,4
25,4
25,4
25,4
Imán motor agudos:
Ferrita
Ferrita
Ferrita
Ferrita
Marca motor agudos:
BMS
BMS
BMS
BMS
Bobina motor agudos:
"
1
1
1
1
Bobina motor agudos:
mm
25,4
25,4
25,4
25,4
Dispersión (H x V):
°
100 x 55
100 x 55
100 x 55
100 x 55
Potencia (RMS):
W
200
250
400
500
Potencia (pico)
W
800
1000
1.600
2.000
Banda de frecuencias:
Hz
70 -19.000
65 -19.000
58 - 19.000
50 - 19.000
Frecuencia de corte:
Hz
2.200
2.400
1.800
1.800
SPL (1 W a 1 m):
dB
95
96
99
100
Máx. SPL continuo:
dB
118
120
125
127
Impedancia:
Ohmios
8
8
8
8
Tweeter
Tweeter
Tweeter
Tweeter
Protección:
Conector entrada de
altavoz:
compatible Speakon
Conector salida de
altavoz:
Material de la caja:
Contrachapado de
15 mm
Contrachapado de
15 mm
Contrachapado de
15 mm
Contrachapado de
15 mm
Acabado de la caja:
Texturizado
Texturizado
Texturizado
Texturizado
Diseño del bafle:
Bass reflex
Bass reflex
Bass reflex
Bass reflex
Ángulo de monitor:
°
-
54°
54°
54°
Dimensiones (An x
Al x F):
mm
270 x 450 x 290
320 x 500 x 290
390 x 570 x 370
480 x 650 x 460
Peso:
kg
10 kg
11,5 kg
19 kg
25,5 kg
Asas ergonómicas,
rosca de unión M10
para Super Clamp,
soporte de aluminio
(36 mm)
Asas ergonómicas,
rosca de unión M10
para Super Clamp,
soporte de aluminio
(36 mm)
Asas Evolutive de
LD Systems, soporte
SM707 (36 mm), 6
puntos de volado M8
Asas Evolutive de LD
Systems, soporte
(36 mm), 6 puntos de
volado M8
Características:
Dado que trabajamos constantemente en mejorar nuestros productos, las especificaciones técnicas pueden variar sin previo aviso.
34
PL
LDEB82G2
LDEB102G2
LDEB122G2
LDEB152G2
Rodzaj produktu:
Głośnik PA
Głośnik PA
Głośnik PA
Głośnik PA
Typ:
Pasywny
Pasywny
Pasywny
Pasywny
Rozmiar subwoofera:
Cali:
8
10
12
15
Rozmiar subwoofera:
mm
203,2
254
304,8
381
Magnes użyty
wsubwooferze:
Ferrytowy
Ferrytowy
Ferrytowy
Ferrytowy
Marka subwoofera:
Produkowany na
zamówienie
Produkowany na
zamówienie
Produkowany na
zamówienie
Produkowany na
zamówienie
Cewka drgająca
subwoofera:
Cali:
2
2
2,5
3
Cewka drgająca
subwoofera:
mm
50,8
50,8
63,5
70,6
Tuba o stałej
kierunkowości
Tuba o stałej
kierunkowości
Tuba o stałej
kierunkowości
Tuba o stałej
kierunkowości
Tuba:
Rozmiar głośnika
wysokotonowego:
Cali:
1
1
1
1
Rozmiar głośnika
wysokotonowego:
mm
25,4
25,4
25,4
25,4
Magnes głośnika
wysokotonowego:
Ferrytowy
Ferrytowy
Ferrytowy
Ferrytowy
Rodzaj głośnika
wysokotonowego:
BMS
BMS
BMS
BMS
Cewka drgająca głośnika
wysokotonowego:
Cali:
1
1
1
1
Cewka drgająca głośnika
wysokotonowego:
mm
25,4
25,4
25,4
25,4
Dyspersja (H x V):
°
100 x 55
100 x 55
100 x 55
100 x 55
Moc wyjściowa (RMS):
W
200
250
400
500
Moc wyjściowa
(szczytowa):
W
800
1000
1.600
2.000
Zakres częstotliwości:
Hz
70 -19,000
65 -19,000
58 - 19000
50 - 19000
Częstotliwość graniczna:
Hz
2,200
2,400
1,800
1,800
Poziom ciśnienia
akustycznego (1W/ 1m):
dB
95
96
99
100
Maksymalny ciągły
poziom ciśnienia
akustycznego:
dB
118
120
125
127
Impedancja:
Om
8
8
8
8
Głośnik wysokotonowy
Głośnik wysokotonowy
Głośnik wysokotonowy
Głośnik wysokotonowy
Ochrona:
Złącze wejścia głośnika:
Speakon kompatybilne
Złącze wyjścia głośnika:
Materiał obudowy:
15 mm, sklejka
15 mm, sklejka
15 mm, sklejka
15 mm, sklejka
Powłoka obudowy:
Powłoka strukturalna
Powłoka strukturalna
Powłoka strukturalna
Powłoka strukturalna
Typ obudowy:
Bass-reflex
Bass-reflex
Bass-reflex
Bass-reflex
Kąt monitora:
°
-
54°
54°
54°
Wymiary (szer. x wys.
x gł.):
mm
270 x 450 x 290
320 x 500 x 290
390 x 570 x 370
480 x 650 x 460
Waga:
kg
10 kg
11,5 kg
19 kg
25,5 kg
ergonomiczne
frezowane uchwyty,
kołnierz gwintowany
M10 dostosowany do
statywu SuperClamp,
aluminiowy wspornik
stojaka 36 mm.
ergonomiczne
frezowane uchwyty,
kołnierz gwintowany
M10 dostosowany do
statywu SuperClamp,
aluminiowy wspornik
stojaka 36 mm.
Regulowane uchwyty
LD Systems, SM707
wsporniki stojaka
36 mm, 6 x otwory
gwintowe M8
Regulowane uchwyty
LD Systems, wsporniki
stojaka 36 mm,
6 x otwory gwintowe
M8
Właściwości:
Ponieważ wszystkie nasze produkty są nieustannie sprawdzane i poprawiane, istnieje możliwość zmiany specyfikacji bez uprzedzenia.
35
IT
LDEB82G2
LDEB102G2
LDEB122G2
LDEB152G2
Prodotto:
Altoparlante di PA
Altoparlante di PA
Altoparlante di PA
Altoparlante di PA
Tipo:
Passivo
Passivo
Passivo
Passivo
Dimensioni del woofer:
"
8
10
12
15
Dimensioni del woofer:
mm
203,2
254
304,8
381
Magnete del woofer:
Ferrite
Ferrite
Ferrite
Ferrite
Marca del woofer:
Custom Made
Custom Made
Custom Made
Custom Made
Bobina del woofer:
"
2
2
2,5
3
Bobina del woofer:
mm
50,8
50,8
63,5
70,6
Tromba DC
Tromba DC
Tromba DC
Tromba DC
Tromba:
Dimensioni driver alte
frequenze:
"
1
1
1
1
Dimensioni driver alte
frequenze:
mm
25,4
25,4
25,4
25,4
Magnete driver alte
frequenze:
Ferrite
Ferrite
Ferrite
Ferrite
Marca driver alte
frequenze:
BMS
BMS
BMS
BMS
Bobina voce driver alte
frequenze:
"
1
1
1
1
Bobina voce driver alte
frequenze:
mm
25,4
25,4
25,4
25,4
Dispersione (H x V):
°
100 x 55
100 x 55
100 x 55
100 x 55
Potenza (RMS):
W
200
250
400
500
Potenza (Picco):
W
800
1000
1.600
2.000
Gamma di frequenza:
Hz
70 -19.000
65 -19.000
58 - 19.000
50 - 19.000
Frequenza di taglio:
Hz
2.200
2.400
1.800
1.800
SPL (1 W / 1 m):
dB
95
96
99
100
Max SPL continuo:
dB
118
120
125
127
Impedenza:
Ohm
8
8
8
8
Tweeter
Tweeter
Tweeter
Tweeter
Protezione:
Connettore ingresso
altoparlante:
compatibile Speakon
Connettore uscita
altoparlante:
Materiale della cassa:
Legno compensato da
15 mm
Legno compensato da
15 mm
Legno compensato da
15 mm
Legno compensato da
15 mm
Superficie della cassa:
Testurizzato
Testurizzato
Testurizzato
Testurizzato
Design della cassa:
Bass reflex
Bass reflex
Bass reflex
Bass reflex
Angolo del monitor:
°
-
54°
54°
54°
Dimensioni (L x H x P):
mm
270 x 450 x 290
320 x 500 x 290
390 x 570 x 370
480 x 650 x 460
Peso:
kg
10 kg
11,5 kg
19 kg
25,5 kg
Caratteristiche:
Maniglie Evolutive di
Maniglie ergonomiche, Maniglie ergonomiche,
LD Systems, supporto
flangia filettata M10 per flangia filettata M10 per
SM707 (36 mm),
Super Clamp, supporto Super Clamp, supporto
6 punti di sollevamendi alluminio (36 mm)
di alluminio (36 mm)
to M8
Maniglie Evolutive di
LD Systems, supporto
(36 mm), 6 punti di
sollevamento M8
Dal momento che i nostri prodotti sono sottoposti costantemente a processi di controllo e miglioramento, le specifiche tecniche possono
variare senza preavviso.
36
HORN CONFIGURATION / HORN KONFIGURATION / CONFIGURATION PAVILLON / CONFIGURACIÓN
DE LA BOCINA / KONFIGURACJA TUBY / CONFIGURAZIONE DELLA TROMBA
For LDEB102(A)G2, LDEB122(A)G2
FRONT OF HOUSE CONFIGURATION / KONFIGURATION FRONT OF HOUSE / UTILISATION COMME ENCEINTE DE SONORISATION FAÇADE /
CONFIGURACIÓN PARA FRONT OF HOUSE / KONFIGURACJA GŁOŚNIKÓW Z PRZODU SALI / CONFIGURAZIONE PER FRONT OF HOUSE
100˚
STAGE MONITOR CONFIGURATION / KONFIGURATION BÜHNENMONITOR / UTILISATION COMME RETOUR DE SCÈNE /CONFIGURACIÓN PARA
MONITOR DE ESCENARIO / MONITOR SCENICZNY / CONFIGURAZIONE PER MONITOR DA PALCO
EN For Front of House configuration the narrow opening of the HF horn has to point downwards. For stage monitor configuration the HF horn has to be
turned by 90 degrees, narrow opening pointing upwards. Remove the front grille and loosen the 4 screws of the HF horn. Turn the HF horn by 90 degrees
and tighten the 4 screws. Then remount the front grille.
DE Für die Anwendung Front of House muss die schmalere Seite der HF-Horn-Öffnung nach unten zeigen. Für den Einsatz als Bühnenmonitor
muss das Horn um 90° gedreht werden, sodass die schmalere Seite der Öffnung nach oben zeigt. Entfernen Sie dazu das Frontgitter und lösen Sie
die vier Befestigungsschrauben des HF Horns. Drehen Sie das HF Horn um 90 Grad und ziehen Sie die vier Schrauben wieder fest. Bringen Sie nun
das Frontgitter wieder an.
FR En configuration retour de scène, l’ouverture étroite du pavillon du tweeter doit être orientée vers le bas. En configuration retour de scène, il
faut faire pivoter le pavillon
100˚du tweeter de 90°, l’ouverture étroite doit être orientée vers le bas. Démontez la grille avant et dévissez les 4 vis du
pavillon du tweeter. Faites pivoter le pavillon du tweeter de 90°, puis remettez en place les 4 vis. Remontez la grille avant.
ES En la configuración para Front of House, la pequeña abertura de la bocina de agudos deberá orientarse hacia abajo. En la configuración para
monitor de escenario, la bocina de agudos deberá girarse 90°, con la pequeña abertura orientada hacia arriba. Retire la rejilla frontal y afloje los 4
tornillos de la bocina de agudos. Gire 90° la bocina de agudos y apriete los 4 tornillos. Luego vuelva a colocar la rejilla frontal.
PL W konfiguracji z przodu sali, wąski otwór w tubie wysokotonowej musi być skierowane w dół. W konfiguracji monitora scenicznego, tuba
wysokotonowa musi być obrócona o 90 stopni, a wąski otwór powinien być skierowany ku górze. Usuń przednią kratkę i poluzuj 4 śruby tuby
wysokotonowej. Obróć tubę wysokotonową o 90 stopni i zaciśnij śruby. Następnie umieść przednią kratkę z powrotem na miejscu.
IT Nella configurazione per Front of House la piccola apertura della tromba delle alte frequenze deve essere orientata verso il basso.
Per la configurazione per monitor da palco la tromba delle alte frequenze deve essere ruotata di 90 gradi, con la piccola apertura rivolta verso
l’alto. Togliere la griglia frontale e allentare le 4 viti della tromba delle alte frequenze. Ruotare la tromba delle alte frequenze di 90 gradi e stringere
le 4 viti. Quindi collocare di nuovo la griglia frontale.
37
ACCESSORIES / INSTALLATION & MONTAGE / INSTALLATION & ORIENTATION / INSTALACIÓN Y
MONTAJE / MONTAŻ I UMIEJSCOWIENIE / INSTALLAZIONE E MONTAGGIO
FLYWARE COMPONENTS / FLYWARE-KOMPONENTEN / ACCESSOIRES D‘ACCROCHE / ACCESORIOS DE VOLADO / ELEMENTY SŁUŻACE DO
PODWIESZANIA / ACCESSORI DI SOLLEVAMENTO
EN We recommend the Adam Hall Universal Hook Clamp SCP710B + SS018 for LDEB82(A)G² and LDEB102(A)G². LDEB122(A)G² and LDEB152(A)G² are
equipped with 6 x M8 rigging points each. We recommend the LD Premium Screw Eye M8 LDVSE for installation.
DE Für die Box LDEB82(A)G² und die Box LDEB102(A)G² empfehlen wir die Universalhakenklammer SCP710B + SS018. Die Modelle LDEB122(A)
G² und LDEB152(A)G² sind mit je 6 x M8 Flugpunkten ausgestattet. Für die Installation empfehlen wir LD Premium LDVSE M8 Schraubösen.
FR Pour les enceintes LDEB82(A)G² LDEB102(A)G², nous recommandons la pince universelle Adam Hall SCP710B + SS018. Les enceintes
LDEB122(A)G² et LDEB152(A)G² sont équipées de 6 points d’accroche M8 chacune. Nous recommandons d’utiliser les vis/écrous LD Premium M8
LDVSE pour la fixation.
ES Se recomienda emplear el sargento universal y tornillo correspondiente Adam Hall SCP710B + SS018 para los modelos LDEB82(A)G² y
LDEB102(A)G². Los modelos LDEB122(A)G² y LDEB152(A)G² están equipados con 6 puntos de volado M8. Para instalarlos, se recomienda emplear
el cáncamo roscado macho M8 LDVSE de LD Premium.
PL Do głośników LDEB82(A)G² oraz LDEB102(A)G² polecamy docisk hakowy Adam Hall Universal SCP710B + SS018. Każdy głośniki LDEB122(A)
G² i LDEB152(A)G² posiada 6 otworów gwintowych M8. Do montażu zalecamy użycie wkręta z oczkiem Premium M8 LDVSE.
IT Si consiglia di utilizzare il Gancio Universale Hadam Hall SCP710B + SS018 per i modelli LDEB82(A)G² e LDEB102(A)G². I modelli LDEB122(A)
G² e LDEB152(A)G² sono dotati di 6 punti di sollevamento M8 ciascuno. Per installarli si consiglia di utilizzare l’occhiello a vite maschio M8 LDVSE
di LD Premium.
LDEB82(A)G² & LDEB102(A)G²
LDEB82G2B / LDEB102G2B
EN Protective Cover
DE Schutzhülle
FR Housse de protection
ES Funda protectora
PL Borsa di trasporto
IT Pokrowiec ochronny
LDEB82G2WB / LDEB102G2WB
EN Wall mounting Bracket
DE Wandhalterung
FR Fixation murale
ES Soporte de montaje mural
PL Staffa per fissaggio a parete
IT Uchwyt montażowy ścienny
SCP710B
EN Hook Clamp with Toggle
DE Universalhaken mit Knebel
FR Pince avec verrouillage
ES Sargento universal con empuñadura
PL Gancio con manopola
IT Docisk hakowy z dźwignią kolankową
SS018
EN 16mm bolt M10
DE Bolzen M10 (16 mm)
FR Boulon 16 mm, filetage M10
ES Tornillo M10 de 16 mm
PL Bullone M10 da 16mm
IT Śruba M10, 16mm
38
ACCESSORIES / ZUBEHÖR / ACCESSOIRES / ACCESORIOS / ACCESSORI / AKCESORIA
LDEB82(A)G² & LDEB102(A)G²
LDEB122G2B / LDEB152G2B
EN Protective Cover
DE Schutzhülle
FR Housse de protection
ES Funda protectora
PL Borsa di trasporto
IT Pokrowiec ochronny
LDEB122G2SB / LDEB152G2SB
EN Swing Bracket
DE Schwenkbügel
FR Fixation pivotante
ES Soporte de ajuste horizontal
PL Staffa girevole
IT Uchwyt wahadłowy
UNIVERSAL ACCESSORIES / UNIVERSAL-ZUBEHÖR / ACCESSOIRES UNIVERSELS / ACCESORIOS
UNIVERSALES / ACCESSORI UNIVERSALI / AKCESORIA UNIWERSALNE
SMBS5
EN Wall mounting Plate
DE Wandmontageplatte
FR Plaque de montage mural
ES Soporte de pared
PL Piastra di montaggio a parete
IT Płyta montażowa ścienna
SPS023S / SPS023
EN Speaker stand
DE Boxenständer
FR Pied d’Enceinte
ES Soporte de altavoz
PL Supporto per casse
IT Statyw głośnikowy
SPS023SET
EN 2 Speaker stands with bag
DE 2 Boxenständer mit Tasche
FR 2 trépieds pour enceintes, avec sac
ES Set 2 soportes de bafle con bolsa
PL 2 x Supporti per casse con borsa
IT 2 x statyw głośnikowy z pokrowcem
SPS023SET2
EN 2 Speaker stands with bag and 2x Speakon compatible Cables
DE 2 Boxenständer mit Tasche und 2 Speakon-kompatiblen Kabeln
FR 2 trépieds pour enceintes, avec sac et 2 câbles compatible Speakon
ES Set 2 soportes de bafle con bolsa y 2 cables compatible Speakon
PL 2 x Supporti per casse con borsa e 2x Cavi Speakon kompatybilne
IT 2 x statyw głośnikowy z pokrowcem i 2 x przewody kolumnowe
39
INSTALLATION & PLACEMENT / INSTALLATION & MONTAGE / INSTALLATION & ORIENTATION /
INSTALACIÓN Y MONTAJE / MONTAŻ I UMIEJSCOWIENIE / INSTALLAZIONE E MONTAGGIO
SM707 SPEAKER STAND FLANGE ADJUSTMENT (LDEB122(A)G2 ONLY) / EINSTELLUNG SM707 BOXENSTATIV-FLANSCH (NUR
LDEB122(A)G2) / RÉGLAGE DE L‘EMBASE SM707 (LDEB122(A)G2 ET LDEB152(A)G2 UNIQUEMENT) / AJUSTE DEL VASO DEL SOPORTE
DE BAFLE SM707 (SOLO LDEB122(A)G2) / REGULACJA GNIAZDA KOLUMNOWEGO SM707 (WYŁĄCZNIE LDEB122(A)G2) / REGOLAZIONE
FLANGIA SUPPORTO PER CASSE SM707 (LDEB122(A)G2 SOLAMENTE)
EN The integrated, patented speaker stand flange SM707 offers unparalleled possibilities for angle adjustments. The SM707 provides angles of
+/- 13,5 degrees in 4.5° steps. Lift the cabinet slightly and carefully from the latching mechanism (approximately 1/2 cm), turn into desired angle
and lower the cabinet.
DE Der integrierte patentierte Boxenstativ-Flansch SM707 lässt sich extrem flexibel einstellen. Mit dem SM707 sind Neigungswinkel zwischen +
und - 13,5 Grad in 4,5°Schritten möglich. Heben Sie die Box vorsichtig ein Stück (ca. 0,5 cm) an, um den Sperrmechanismus zu entriegeln, drehen
Sie die Box dann in die gewünschte Stellung und lassen Sie sie wieder herunter.
FR L’embase orientable brevetée SM707 offre des possibilités uniques et termes de réglage d’angle d’orientation. La SM707 permet une
orientation de +/- 13,5°, par pas de 4,5°. Soulevez légèrement l’enceinte afin de la dégager du mécanisme de verrouillage (environ 5 mm),
orientez-la selon l’angle désiré, puis laissez retomber l’enceinte.
ES El vaso integrado y patentado para soporte de bafle, modelo SM707, ofrece varias posibilidades para ajustar el ángulo. El SM707 permite
inclinaciones de +/-13,5° en pasos de 4,5°. Levante ligeramente el bafle para desbloquear el mecanismo de bloqueo (aproximadamente 1/2 cm),
inclínelo hasta el ángulo deseado y deje caer de nuevo suavemente el bafle en el soporte.
PL Zintegrowane, opatentowane gniazdo kolumnowe 2 pozycyjne SM707 oferuje niezrównane możliwości dostosowania kątów nachylenia.
SM707 umożliwia odchylenia do +/- 13,5 stopni w krokach po 4,5°. Ostrożnie i delikatnie unieś kolumnę z mechanizmu podtrzymującego (około
1/2 cm), obróć ją o pożądany kąt, a następnie ją opuść.
IT La flangia di supporto per casse integrata e brevettata SM707 offre delle possibilità senza pari per la regolazione dell’angolo. La SM707
consente di regolare angoli di +/-13,5 gradi in passi di 4,5°. Sollevare leggermente e facendo attenzione la cassa dal meccanismo di blocco (circa
1/2 cm), collocare nell’angolo desiderato e riporre la cassa.
Centre of Rotation / Drehpunkt / Amplitude d‘inclinaison / Centro de giro / Środek
rotacji / Centro di Rotazione
+/- 13,5°
Lift cabinet / Box anheben / Soulevez
l‘enceinte / Levante el bafle / Unieść
kolumnę / Sollevare la cassa
EN Attention! Please hold the cabinet firmly!
DE Vorsicht! Bitte halten Sie die Box ganz fest!
FR Attention : Tenez-la bien!
ES Atención: ¡Sujete firmemente el bafle!
PL Uwaga! Proszę solidnie trzymać kolumnę!
IT Attenzione! Tenere saldamente la cassa!
40
EN Turn the cabinet into the required angle.
DE Drehen Sie die Box in die gewünschte Stellung.
EN Lower the cabinet.
DE Lassen Sie die Box herunter.
FR Orientez l’enceinte selon l’angle désiré.
ES Incline el bafle hasta el ángulo deseado.
FR Laissez retomber l’enceinte.
ES Deje caer el bafle suavemente.
PL Przestawić kolumnę do pożądanego nachylenia.
IT Girare la cassa in base all’angolo desiderato.
PL Opuścić kolumnę.
IT Abbassare la cassa.
MANUFACTURER´S DECLARATIONS / HERSTELLERERKLÄRUNGEN / DECLARATIONS /
DECLARACIÓN DEL FABRICANTE / DEKLARACJE PRODUCENTA / DICHIARAZIONI DEL PRODUTTORE
EN MANUFACTURER‘S WARRANTY & LIMITATIONS OF LIABILITY
You can find our current warranty conditions and limitations of liability at: http://www.adamhall.com/media/shop/downloads/documents/
manufacturersdeclarations.pdf. To request warranty service for a product, please contact Adam Hall GmbH, Daimler Straße 9, 61267 Neu
Anspach / Email: [email protected] / +49 (0)6081 / 9419-0.
CORRECT DISPOSAL OF THIS PRODUCT
(valid in the European Union and other European countries with a differentiated waste collection system) This symbol on the product, or on its
documents indicates that the device may not be treated as household waste. This is to avoid environmental damage or personal injury due
to uncontrolled waste disposal. Please dispose of this product separately from other waste and have it recycled to promote sustainable economic
activity. Household users should contact either the retailer where they purchased this product, or their local government office, for details on where
and how they can recycle this item in an environmentally friendly manner. Business users should contact their supplier and check the terms and
conditions of the purchase contract. This product should not be mixed with other commercial waste for disposal.
DE HERSTELLERGARANTIE & HAFTUNGSBESCHRÄNKUNG
Unsere aktuellen Garantiebedingungen und Haftungsbeschränkung finden Sie unter: http://www.adamhall.com/media/shop/downloads/documents/
manufacturersdeclarations.pdf. Im Service Fall wenden Sie sich bitte an Adam Hall GmbH, Daimlerstraße 9, 61267 Neu Anspach /
E-Mail [email protected] / +49 (0)6081 / 9419-0.
KORREKTE ENTSORGUNG DIESES PRODUKTS
(Gültig in der Europäischen Union und anderen europäischen Ländern mit Mülltrennung) Dieses Symbol auf dem Produkt oder dazugehörigen
Dokumenten weist darauf hin, dass das Gerät am Ende der Produktlebenszeit nicht zusammen mit dem normalen Hausmüll entsorgt werden
darf, um Umwelt- oder Personenschäden durch unkontrollierte Abfallentsorgung zu vermeiden. Bitte entsorgen Sie dieses Produkt getrennt von
anderen Abfällen und führen es zur Förderung nachhaltiger Wirtschaftskreisläufe dem Recycling zu. Als Privatkunde erhalten Sie Informationen zu
umweltfreundlichen Entsorgungsmöglichkeiten über den Händler, bei dem das Produkt erwor¬ben wurde, oder über die entsprechenden regionalen
Behörden. Als gewerblicher Nutzer kontaktieren Sie bitte Ihren Lieferanten und prüfen die ggf. vertraglich vereinbarten Konditionen zur Entsorgung
der Geräte. Dieses Produkt darf nicht zusammen mit anderen gewerblichen Abfällen entsorgt werden.
FR GARANTIE FABRICANT & LIMITATION DE RESPONSABILITÉ
Nos conditions actuelles de garantie et de limitation de responsabilité sont disponibles à l‘adresse suivante : http://www.adamhall.com/media/shop/
downloads/documents/manufacturersdeclarations.pdf. Pour les réparations, veuillez contacter Adam Hall GmbH, Daimlerstraße 9,
61267 Neu Anspach / E-Mail [email protected] / +49 (0)6081 / 9419-0.
TRI ET MISE AUX DÉCHETS CORRECTE DE CE PRODUIT
(Applicable dans l‘Union Européenne et les autres pays européens pratiquant le tri des déchets) La présence de ce symbole sur le produit ou
sur la documentation correspondante indique qu‘en fin de vie, le produit ne doit pas être jeté avec les déchets normaux, afin d‘éviter tout
dommage à l‘environnement ou aux personnes consécutive à une élimination non contrôlée des déchets. Séparez-le des autres types de déchets et
recyclez-le, afin de promouvoir la réutilisation durable des ressources naturelles. Nous conseillons aux utilisateurs non professionnels de contacter le
revendeur chez qui ils ont acheté le produit, ou un représentant gouvernemental local, pour plus de détails sur le lieu de collecte et la façon de
recycler cet appareil dans le meilleur respect de l‘environnement possible.. Nous invitons les utilisateurs professionnels à contacter leur fournisseur
et à vérifier les termes et conditions de leur contrat d‘achat. Ce produit ne doit pas être mélangé à d‘autres déchets commerciaux lors de la collecte.
ES GARANTÍA DEL FABRICANTE Y LIMITACIÓN DE RESPONSABILIDAD
Consulte nuestras condiciones de garantía y limitaciones de responsabilidad en: http://www.adamhall.com/media/shop/downloads/documents/
manufacturersdeclarations.pdf. En caso de necesitar servicio técnico, póngase en contacto con Adam Hall GmbH, Daimlerstraße 9, 61267 Neu
Anspach (Alemania); correo electrónico [email protected]; +49 (0)6081 / 9419-0.
ELIMINACIÓN CORRECTA DE ESTE PRODUCTO
(Aplicable en la Unión Europea y en los países europeos que dispongan de un sistema de recogida selectiva) El símbolo que aparece sobre el
producto o en la documentación adjunta indica que al final de la vida útil del equipo, no deberá desecharlo con los demás residuos domésticos,
con el fin de evitar posibles efectos negativos en el medio ambiente y en la salud humana debidos al vertido incontrolado de desechos. La recogida
selectiva ayuda a su posterior reciclaje y fomenta la reutilización sostenible de los componentes de este equipo. Si es un particular, póngase en contacto
con el distribuidor donde adquirió este producto, o con el ayuntamiento, para informarse sobre el reciclaje adecuado de este equipo. Si es una empresa,
póngase en contacto con su proveedor para informarse sobre los términos y condiciones de su contrato de compra-venta. Este producto no debe
mezclarse con otros residuos industriales.
PL GWARANCJA PRODUCENTA I OGRANICZENIE ODPOWIEDZIALNOŚCI
Nasze aktualne warunki gwarancji i informacje dotyczące ograniczenia odpowiedzialności znajdą Państwo na stronie: http://www.adamhall.com/
media/shop/downloads/documents/manufacturersdeclarations.pdf. W razie konieczności skorzystania z serwisu proszę skontaktować się z firmą
Adam Hall GmbH, Daimlerstraße 9, 61267 Neu Anspach / e-mail [email protected] / +49 (0)6081 / 9419-0.
PRAWIDŁOWA UTYLIZACJA NINIEJSZEGO PRODUKTU
(Obowiązuje w Unii Europejskiej i innych krajach europejskich stosujących system sortowania odpadów) Niniejszy symbol na produkcie lub
związanych z nim dokumentach wskazuje, iż urządzenie po zakończeniu okresu użytkowania nie może być utylizowane razem ze standardowymi
41
odpadami domowymi, aby uniknąć szkód w środowisku lub szkód na osobie powstałych w wyniku niekontrolowanego usuwania odpadów. Niniejszy
produkt należy utylizować oddzielnie od innych odpadów i przekazać do punktu recyklingu w celu ponownego wykorzystania użytych w nim materiałów
w ramach idei zrównoważonego rozwoju. Klienci prywatni otrzymują informacje w zakresie przyjaznych dla środowiska możliwości usuwania odpadów
od sprzedawcy, u którego produkt został zakupiony, lub w odpowiednich placówkach regionalnych. Użytkownicy będący przedsiębiorcami proszeni
są o kontakt ze swoimi dostawcami i ewentualne sprawdzenie uzgodnionych umownie warunków utylizacji urządzeń. Niniejszy produkt nie może być
utylizowany razem z innymi odpadami przemysłowymi.
IT MANUFACTURER’S WARRANTY & LIMITATION OF LIABILITY
Le nostre attuali condizioni di garanzia e la limitazione di responsabilità sono consultabili alla pagina: http://www.adamhall.com/media/shop/downloads/
documents/manufacturersdeclarations.pdf. In caso di assistenza, rivolgersi a Adam Hall GmbH, Daimlerstraße 9, 61267 Neu Anspach /
E-mail [email protected] / +49 (0)6081 / 9419-0.
CORRETTO SMALTIMENTO DEL PRODOTTO
(In vigore nell‘Unione Europea e in altri Paesi europei in cui si attui la raccolta differenziata) Questo simbolo apposto sul prodotto o sui relativi
documenti indica che, per evitare danni all‘ambiente e alle persone causati da uno smaltimento incontrollato dei rifiuti, alla fine del suo ciclo di
vita l‘apparecchio non deve essere smaltito insieme ai normali rifiuti domestici. Il prodotto deve quindi essere smaltito separatamente da altri rifiuti
e riciclato nell‘ottica dell‘incentivazione di cicli economici sostenibili. I clienti privati possono richiedere informazioni sulle possibilità di smaltimento
ecosostenibile al rivenditore presso il quale è stato acquistato il prodotto o presso le autorità regionali competenti. I clienti aziendali devono invece
contattare il proprio fornitore e controllare le eventuali condizioni contrattuali inerenti allo smaltimento degli apparecchi. Questo prodotto non deve
essere smaltito assieme ad altri rifiuti industriali.
42
43
WWW.LD-SYSTEMS.COM
Adam Hall GmbH | Daimlerstrasse 9 | 61267 Neu-Anspach | Germany
Tel. +49(0)6081/9419-0 | Fax +49(0)6081/9419-1000
web : www.adamhall.com | e-mail : [email protected]
44
REV: 01


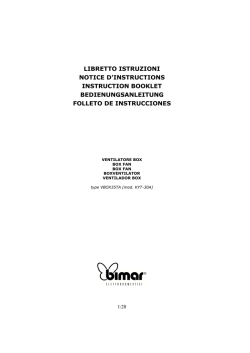


© Copyright 2026