
Manual de instrucciones - International Cooking Concepts
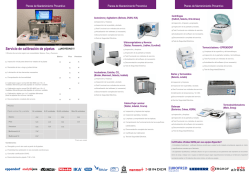
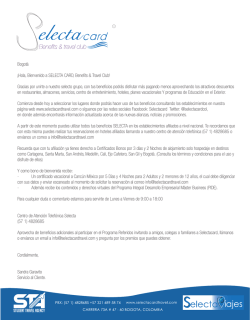
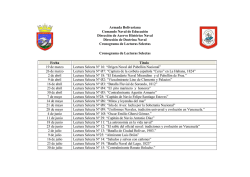
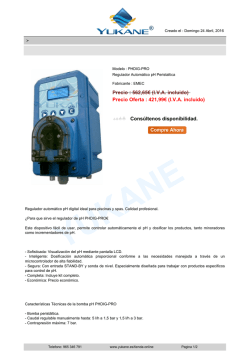
INSTRUCTION MANUAL
CODE 80184
REV A
Jul/2016
(It can be modified without notice)
Page.: 1
GASTROVAC
20000
SISTEMA DE COCCIÓN E IMPREGNACIÓN EN VACÍO
PATENTE 1057342U
VACUUM COOKING AND IMPREGNATION SYSTEM
PATENT 1057342U
J.P. SELECTA s.a.u.
Ctra. NII Km 585.1 Abrera 08630 (Barcelona) España
e-mail: [email protected] - www.jpselecta.es
Tel 34 937 700 877 Fax 34 937 702 362
MANUAL DE INSTRUCCIONES CODIGO 80184 REV A Jul/2016
(Sujetas a modificaciones sin previo aviso)
Pag.: 2
INDICE
1. COMPONENTES
2. INFORMACIÓN GENERAL Y SEGURIDAD
3. DESCRIPCIÓN DEL EQUIPO
4. LISTA DE EMBALAJE
5. INSTALACIÓN Y MONTAJE
6. OPERACIÓN
7. PUESTA EN MARCHA
8. MANTENIMIENTO / LIMPIEZA
9. DETALLES TÉCNICOS / RECAMBIOS
10. PROBLEMAS Y SOLUCIONES
11. GARANTÍA
3
4
4
4
5
5
5
7
7
8
8
INDEX
2. GENERAL INFORMATION & SAFETY
3. EQUIPMENT DESCRIPTION
4. PACKING LIST
5. INSTALLATION & ASSEMBLY
6. OPERATION
7. STARTING UP
8. MAINTENANCE / CLEANING
9. TECHNICAL SPECIFICATIONS / SPARE PARTS
10. TROUBLESHOOTING
11. WARRANTY
J.P. SELECTA s.a.u.
Ctra. NII Km 585.1 Abrera 08630 (Barcelona) España
e-mail: [email protected] - www.jpselecta.es
8
9
9
9
10
10
11
12
12
12
Tel 34 937 700 877 Fax 34 937 702 362
INSTRUCTION MANUAL
CODE 80184
REV A
Jul/2016
(It can be modified without notice)
Page.: 3
1. COMPONENTES
2
1
9
3
10
8
4
5
6
7
UNIDAD DE COCCIÓN:
COOKING UNIT:
1.
2.
3.
4.
5.
6.
7.
8.
9.
10.
1.
2.
3.
4.
5.
6.
7.
8.
9.
10.
Válvula vacío
Panel de control
Conector sonda
Plato calefactor
Vacuómetro
Conector salida condensados
Tubo salida condensados
Sonda Pt100
Mango elevador cesto
Palanca fijación cesto
J.P. SELECTA s.a.u.
Vacuum valve
Control panel
Probe connector
Hotplate
Vacuum measure gauge
Condensation outlet connector
Condensation outlet hose
Pt100 probe
Basket lifting handle
Fixing basket lever
Ctra. NII Km 585.1 Abrera 08630 (Barcelona) España
e-mail: [email protected] - www.jpselecta.es
Tel 34 937 700 877 Fax 34 937 702 362
MANUAL DE INSTRUCCIONES CODIGO 80184 REV A Jul/2016
(Sujetas a modificaciones sin previo aviso)
Pag.: 4
2. INFORMACIÓN GENERAL Y SEGURIDAD
1) Manipular el paquete con cuidado. Desembalarlo y comprobar
que el contenido coincide con lo indicado en el apartado de la
“Lista de embalaje”. Si se observa algún componente dañado
o la ausencia de alguno, avisar rápidamente al distribuidor.
2) No instalar ni utilizar el equipo sin leer, previamente, este manual
de instrucciones.
3) Estas instrucciones forman parte inseparable del aparato y
deben estar disponibles a todos los usuarios del equipo.
4) Cualquier duda puede ser aclarada contactando con su proveedor o el servicio técnico de ICC.
5) ¡ATENCIÓN! NO SE ADMITIRÁ NINGUNA MÁQUINA PARA
REPARAR QUE NO ESTÉ DEBIDAMENTE LIMPIA.
6) Toda modificación, eliminación o falta de mantenimiento de
cualquier dispositivo de la máquina, transgrede la directiva de
utilización 89/655/CEE y el fabricante no se hace responsable
de los daños que pudieran derivarse.
3. DESCRIPCIÓN DEL EQUIPO
La Gastrovac es un equipo compacto para cocinar e impregnar
en vacío. Al crear una atmósfera de baja presión y ausencia de
oxígeno, reduce considerablemente las temperaturas de cocción
y fritura, manteniendo así la textura, el color y los nutrientes de
los alimentos. Además la Gastrovac consigue el “efecto esponja”:
al restaurar la presión atmosférica, el alimento absorbe el líquido
que tiene alrededor, lo que permite infinitas combinaciones de
alimentos y sabores.
Básicamente es una olla sobre una placa calefactora, conectada
a una bomba de vacío. El recipiente dispone de un dispositivo que
permite subir y bajar el cestillo en el interior de la olla sin pérdida
de vacío.
El vacío máximo alcanzado es de aproximadamente -0,8 bar dependiendo de la temperatura de trabajo. La temperatura es regulada
a través de una sonda insertada en la parte inferior del interior de
la olla. El equipo consta de un contador de tiempo con avisador
acústico de 1 a 99 minutos.
4. LISTA DE EMBALAJE
El equipo estándar 20000 consta de los siguientes componentes:
Unidad de vacío y cocción
Tapa
Olla
Sonda de temperatura
Cesto con su tapa
Cesto con asa
Tubo salida condensados (silicona diámetro 10-6)
Racor salida condensados
Manual de instrucciones
J.P. SELECTA s.a.u.
Ctra. NII Km 585.1 Abrera 08630 (Barcelona) España
e-mail: [email protected] - www.jpselecta.es
31043
14177
43120
05920
05921
46042
34103
80184
Tel 34 937 700 877 Fax 34 937 702 362
INSTRUCTION MANUAL
CODE 80184
REV A
Jul/2016
(It can be modified without notice)
Page.: 5
5. INSTALACIÓN Y MONTAJE
Colocar el equipo sobre una superfície plana, horizontal y nivelada,
procurando dejar un espacio libre de 10 cm. por la parte posterior
y laterales del equipo.
Conectar la sonda de temperatura a su conector lateral. Ver foto.
Conectar el tubo de salida de condensados en el racor lateral
izquierdo. Ver foto.
Asegúrese que el equipo se conecta a una tensión de red que
coincide con la indicada en la placa de características.
No utilice el equipo sin estar conectada la toma de tierra.
Si cambia la clavija de enchufe tenga en cuenta lo siguiente:
Cable azul: Neutro.
Cable marrón: Fase.
Cable amarillo/verde: Tierra.
9
6. OPERACIÓN
8
10
PANEL DE CONTROL
7
11
2
6
3
5
1.
2.
3.
4.
5.
6.
7.
8.
9.
10.
11.
4
1
Interruptor general
Tecla selección temperatura/tiempo
Tecla aumentar valor
Tecla disminuir valor
Tecla marcha timer
Tecla marcha bomba
Led selección tiempo
Led selección temperatura
Display
Led marcha bomba
Led marcha tiempo
7. PUESTA EN MARCHA
NO PONER EN MARCHA EL EQUIPO HASTA
EL MOMENTO DE SU USO.
1. Llenar la olla con los alimentos a cocinar y el líquido correspondiente.
2. Verificar que la junta y el aro de fijación estén debidamente
encajados.
3. En el caso de frituras, colgar el cesto del dispositivo elevador.
Ver fotos.
J.P. SELECTA s.a.u.
Ctra. NII Km 585.1 Abrera 08630 (Barcelona) España
e-mail: [email protected] - www.jpselecta.es
Tel 34 937 700 877 Fax 34 937 702 362
MANUAL DE INSTRUCCIONES CODIGO 80184 REV A Jul/2016
(Sujetas a modificaciones sin previo aviso)
Pag.: 6
4. Colocar la tapa.
5. Colocar la olla encima de la placa calefactora.
6. Conectar la manguera de vacío al conector de la tapa (foto 6)
7. Insertar la sonda de temperatura en el alojamiento situado en
la base de la olla en caso de cocciones y frituras (foto 7). La
conexión de la sonda no es necesaria en caso de impregnaciones a temperatura ambiente. Coloque siempre la sonda en
la cubeta, en caso contrario aparecerá el error Err.
Foto 6. Conectar manguera de vacío
a la tapa
8. Accionar el interruptor general (1). En caso de impregnaciones
a temperatura ambiente asegurarse de que la temperatura del
display esté cercana a 10ºC.
9 Programar una temperatura. Pulsar la tecla (2) hasta que se
encienda el led (8) de temperatura. Mantener la tecla (2) pulsada
y con ayuda de las teclas (3) y (4) seleccionar una temperatura
en grados centígrados que se visualizará en el display (9).
10 Programar un tiempo. Pulsar la tecla (2) hasta que se encienda
el led (7) del reloj. Mantener la tecla (2) pulsada y las teclas (3)
y (4) seleccionar un tiempo en minutos que se visualizará en el
display (9).
Foto 7. Sonda colocada en alojamiento en la base de la olla
11 Para asegurar la estanqueidad, poner en marcha la bomba
con el pulsador (6). Presionar la tapa fuertemente con la mano
al iniciar el vacío.
12 Poner en marcha el contador de tiempo con el pulsador (5).
SI PARAMOS LA BOMBA UNA VEZ ÉSTA HAYA ALCANZADO UN VACÍO
ELEVADO Y LA VOLVEMOS A PONER EN MARCHA, ES NECESARIO
ACCIONAR LA VÁLVULA (12) PARA ROMPER EL VACÍO.
PARA ROMPER EL VACÍO DE LA OLLA UNA VEZ TERMINADO EL PROCESO,
DESCONECTAR LA MANGUERA DE VACÍO DEL CONECTOR DE LA TAPA
O ABRIR LA VÁLVULA DE ROTURA DE VACÍO (12)
HASTA QUE EL VACUÓMETRO INDIQUE 0.
J.P. SELECTA s.a.u.
Ctra. NII Km 585.1 Abrera 08630 (Barcelona) España
e-mail: [email protected] - www.jpselecta.es
Tel 34 937 700 877 Fax 34 937 702 362
INSTRUCTION MANUAL
CODE 80184
REV A
Jul/2016
(It can be modified without notice)
Page.: 7
8. MANTENIMIENTO / LIMPIEZA
Mantenimiento:
Antes de quitar la tapa trasera de la unidad para acceder a su
interior desconecte la toma de red.
La manipulación del circuito electrónico del equipo por personal no autorizado puede provocar daños de difícil reparación.
Asegúrese de llevar el equipo a uno de los servicios técnicos
autorizados por ICC.
Limpieza:
Para la limpieza de las diferentes piezas de los equipos, recomendamos los siguientes productos:
Limpieza del acero inoxidable: Vinagre diluido.
Limpieza de carátulas y plásticos: Vinagre diluido con un paño no
abrasivo.
Limpieza del interior de la olla: Usar un detergente líquido y vinagre diluido.
9. DETALLES TÉCNICOS / RECAMBIOS
Especificaciones técnicas:
- Capacidad de la olla:
- Vacío máximo:
- Rango de temperatura:
- Rango de tiempo:
- Resolución:
- Error de consigna:
- Potencia placa:
- Medidas:(cm) Alto:
Ancho:
Fondo:
- Peso:
- Tensión de alimentación:
10,5 litros
-0,8 bar
10-150ºC
1-99 min
1ºC
1ºC
2000W
40
47
47
20 kg
230V/50 Hz
Recambios:
Para garantizar la seguridad del equipo los recambios deben
adquirirse a ICC.
Vacuómetro
Bomba vacío
Sonda de temperatura
Plato calefactor
Cesto con tapa
Interruptor
Circuito de control
Solid relé
J.P. SELECTA s.a.u.
Ctra. NII Km 585.1 Abrera 08630 (Barcelona) España
e-mail: [email protected] - www.jpselecta.es
16012
24207
43120
32049
05920
20017
29304
36028
Tel 34 937 700 877 Fax 34 937 702 362
MANUAL DE INSTRUCCIONES CODIGO 80184 REV A Jul/2016
(Sujetas a modificaciones sin previo aviso)
Pag.: 8
10. PROBLEMAS Y SOLUCIONES
DESCRIPCION
CAUSA
RESOLUCIÓN
No calienta
La sonda no está instalada correctamente
Revise la colocación de la sonda tal
como se indica en el punto 7
La resistencia está fundida
Contacte con el servicio técnico para
su reemplazo
La sonda no está instalada correctamente
Revise la colocación de la sonda tal
como se indica en el punto 7
Asegúrese que la sonda está en
su alojamiento
Si no se usa la sonda debe estar en
su alojamiento
No ha realizado la conexión de la
sonda
Conéctela tal como se muestra en el
punto 7
El cable de la sonda está cortado
Revise el cable
Marca error “Err”
La bomba gira pero no genera Tiene alguna junta que no cierra
vacío
correctamente
Revise la junta de la tapa y de las
tuberías
Compruebe que la bomba succiona
aire
La bomba no funciona
La bomba no funciona correctamente
Contacte con el servicio técnico para
su reemplazo
11. GARANTÍA
Este producto tiene una garantía de un año. La garantía no cubre
los daños causados por un uso indebido o por causas ajenas a ICC.
Cualquier manipulación del equipo por personal no autorizado por
ICC, anula automáticamente los beneficios de la garantía.
ENGLISH VERSION
2. GENERAL INFORMATION & SAFETY
1) Handle the parcel with care. Unpack and check that the contents coincide with the packing-list. If any part is damaged or
missing, please advise the distributor immediately.
2) Do not install or use the equipment without reading this handbook before.
3) This handbook must always be attached to the equipment and
it must be available for all users.
4) If you have any doubts or enquiries, please contact with your
supplier or the ICC technical service.
5) IMPORTANT! WE WILL NOT ACCEPT ANY EQUIPMENT TO
BE REPAIRED IF IT IS NOT DULY CLEANED.
6) If any modification, elimination or lacking in maintenance of
any device of the equipment by the user transgress the directive 89/655/CEE , the manufacturer is not responsible for the
damage that can occur.
J.P. SELECTA s.a.u.
Ctra. NII Km 585.1 Abrera 08630 (Barcelona) España
e-mail: [email protected] - www.jpselecta.es
Tel 34 937 700 877 Fax 34 937 702 362
INSTRUCTION MANUAL
CODE 80184
REV A
Jul/2016
(It can be modified without notice)
Page.: 9
3. EQUIPMENT DESCRIPTION
The Gastrovac is a compact appliance for cooking and impregnating
in a vacuum. It functions as follows: by creating an artificial low
pressure, oxygen-free atmosphere, the Gastrovac considerably
reduces cooking and frying temperatures, maintaining the texture,
colour and nutrients of the food. Moreover, the Gastrovac creates
the “sponge effect”: when the atmospheric pressure is restored,
the food absorbs the liquid around it, allowing infinite combinations
of foods and flavours.
It is basically a pot on a hot plate, connected to a vacuum pump.
The pot has a device which allows the inner basket to be lifted,
without losing the vacuum.
Maximal vacuum level reached is approximately -0,8 bar depending
on working temperature.
The temperature is controlled by a probe placed on the bottom
of the pot.
This equipment has a time counter with an acoustic signal from 1
to 99 minutes.
4. PACKING LIST
The standard equipment 20000 consists of the following
components:
Vacuum cooking unit
Lid
31043
Cooking pot
14177
Temperature probe
43120
Basket with lid
05920
Condensed outlet pipe (silicone tube 10-6)
46042
Condensed outlet racord
34103
Instruction manual
80184
5. INSTALLATION & ASSEMBLY
Put the equipment on a horizontal and levelled surface leaving
a space of 10 cm at the back and on each side of the appliance.
Connect the probe in the lateral connector. See picture.
Connect the condensation outlet to the hose waste. See picture.
Be sure that the voltage supply is the same as the one
indicated on the characteristic plate of the equipment.
Do not use the equipment if it is NOT earthed.
If you have to change the plug, bear in mind the following:
Blue cable: Neutral.
Brown cable: Phase.
Yellow/green cable: Earth.
J.P. SELECTA s.a.u.
Ctra. NII Km 585.1 Abrera 08630 (Barcelona) España
e-mail: [email protected] - www.jpselecta.es
Tel 34 937 700 877 Fax 34 937 702 362
MANUAL DE INSTRUCCIONES CODIGO 80184 REV A Jul/2016
9
8
(Sujetas a modificaciones sin previo aviso)
Pag.: 10
6. OPERATION
10
7
11
2
6
3
5
4
CONTROL PANEL:
1. Main switch.
2. Temperature/time selection key
3. Increase value key
4. Decrease value key
5. Time counter start key
6. Vacuum pump start key
7. Time selection indicator led
8. Temperature selection indicator led.
9. Display
10.Run pump indicator led
11. Run time indicator led
1
7. STARTING UP
DO NOT START UP THE EQUIPMENT UNTIL YOU
ARE GOING TO USE IT
1. Fill up the pot with the food to cook and the liquid.
2. Check that the gasket and the fixing hoop are properly adjusted
to the lid. See picture.
3. If the case of frying, attach the basket to the lifting device. See
pictures.
4. Put the lid.
5. Put the pot on the hot plate.
6. Connect the vacuum hose to outlet on the lid. See picture
7. Fit temperature probe into the hole placed on the pot bottom
to cook or to fry (see picture). To do impregnations at room
temperature it is not necessary to connect the probe.
Pic 6. Connect vacuum hose to
the lid
J.P. SELECTA s.a.u.
Ctra. NII Km 585.1 Abrera 08630 (Barcelona) España
e-mail: [email protected] - www.jpselecta.es
Tel 34 937 700 877 Fax 34 937 702 362
INSTRUCTION MANUAL
CODE 80184
REV A
Jul/2016
(It can be modified without notice)
Page.: 11
8. Switch on the main switch (1). To do impregnations at room
temperature, be sure that the temperature on display is closed
to 10ºC.
9 . Set a temperature. Press (2) key until led of temperature (8)
lights up. Maintain the key (2) pressed while setting the desired
temperature with keys (3) and (4). The set temperature will be
shown on the display (9).
10. Set a time. Press (2) key until the led of the clock (7) lights up.
Maintain (2) pressed while setting the desired time expresed
in minutes with keys (3) and (4). The set time will be shown
on the display.
11. Start up vacuum pump with (6) key. To ensure tightness, press
firmly on the lid with the hand to start vacuum process.
Pic 7. probe placed in the housing at
the base of the pot
12. Start up time counter with (5) key.
IF WE STOP THE VACUUM PUMP WHEN THE POT HAS ALREADY REACHED
A HIGH VACUUM LEVEL AND WE NEED TO START IT AGAIN, IT WILL BE NECESSARY TO
OPEN THE VACUUM VALVE (12) TO BREAK THE VACUUM.
IN ORDER TO BREAK THE VACUUM ONCE THE COOKING PROCESS IS FINISHED,
DISCONNECT THE VACUUM HOSE FROM THE OUTLET OF THE LID, OR OPEN
THE VACUUM VALVE (12) UNTIL THE VACUUM MEASURE GAUGE INDICATES 0.
8. MAINTENANCE / CLEANING
MAINTENANCE:
Before removing the cover, disconnect the equipment from
the mains.
The manipulation of the internal electronic circuits of the oven
by unauthorized personnel can cause an irreparable damage.
Take it to one of the ICC’s authorized technical services.
CLEANING:
For the cleaning of the different parts, we recommend the following
products:
Cleaning of stainless steel: diluted vinegar.
Cleaning of plastic: diluted vinegar with a non abrasive cloth.
Cleaning inner pot: Use a liquid detergent and diluted vinegar.
J.P. SELECTA s.a.u.
Ctra. NII Km 585.1 Abrera 08630 (Barcelona) España
e-mail: [email protected] - www.jpselecta.es
Tel 34 937 700 877 Fax 34 937 702 362
MANUAL DE INSTRUCCIONES CODIGO 80184 REV A Jul/2016
(Sujetas a modificaciones sin previo aviso)
Pag.: 12
9. TECHNICAL SPECIFICATIONS
TECHNICAL SPECIFICATIONS:
- Capacity of the pot:
10.5 litros
- Maximal vacuum:
-0,8 bar
- Temperature range
10-150ºC
- Time range
1-99 min
- Resolution
1ºC
- Set error
1ºC
- Heating power
2000W
- Dimensions:(cm) High:
40
Width:
47
Depth:
47
- Weight:
20 kg
- Voltage supply
230V/50 Hz
SPARE PARTS
To guarantee the safety of the equipment, the spare parts must
be purchased from ICC.
Vacuum measure gauge
Vacuum pump
Temperature probe
Hotplate
Basket with lid
Switch
Control circuit board
Solid relay
16012
24207
43120
32049
05920
20017
29304
36027
10. TROUBLESHOOTING
DESCRIPTION
CAUSE
RESOLUTION
It does not heat
Probe is not correctly installed
Check the placement of the probe as indicated in paragraph 7
The heating element is melted
Contact the technical service for replacement
Probe is not correctly connected
Check the placement of the probe as indicated in paragraph 7
Error “Err”
Make sure the probe is in its place If the probe is not in use, it has to be in its
place
Probe is not connected
Connect it as shown in paragraph 7
The probe cable is cut
Check the cable
The pump rotates but
does not generate
vacuum
There’s a gasket that does not
close properly
Check the lid gaskets and the tubes
Pump does not work
Pump does not work correctly
Check that the pump sucks air
Contact the technical service for replacement
11. WARRANTY
This product is guaranteed for one year. The guarantee does not
cover damages caused by an incorrect use or causes beyond the
control of ICC.
Any manipulation of the equipment by unauthorized personnel by
ICC cancels the guarantee automatically.
J.P. SELECTA s.a.u.
Ctra. NII Km 585.1 Abrera 08630 (Barcelona) España
e-mail: [email protected] - www.jpselecta.es
Tel 34 937 700 877 Fax 34 937 702 362
© Copyright 2026