
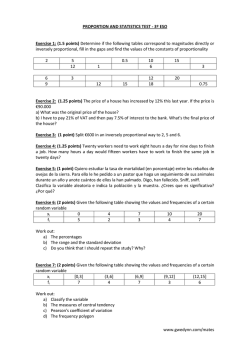
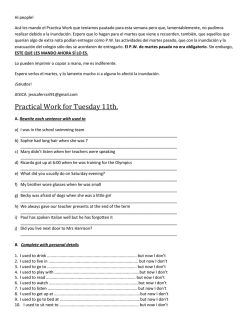
Tabla / Chart
Instrucciones para el material de práctica y uso del Reloj y La Hora para
utilizarse en centros.
1. Imprima todo el material siguiente en cartonite tamaño 8.5”x 11” y corte
las tarjetas en las líneas continuas
2. Pegue la página 1 (portada) en la portada de un folder o en el frente de un
sobre manila de por lo menos 10”x 13”.
3. Pegue la página 3 (Direcciones) en la contraportada del folder o en la
parte detrás del sobre manila.
4. Coloque el resto del material (54 cartones o tarjetas con relojes, dibujos y
tabla) dentro del folder o dentro del sobre manila, de manera que estén
listas para que los niños trabajen con las mismas cuando pasen por el
centro de actividades. Deberá tener en el centro lápices de carbón y
colores para colorear.
5. Tome la pagina 4 (Manecillas e instrucciones) y siga las instrucciones
dadas allí.
6. Los niños deberán mantener un registro, preferiblemente una libreta,
(libreta de Centros) de su trabajo en cada centro. Esta Libreta deberá ser
lo único que los niños llevarán de centro en centro cuando roten por los
mismos.
7. Los niños seguirán trabajando en sus centros hasta que usted de la señal
de parar, recoger su centro y proceder a cambiar al próximo centro, y así
sucesivamente hasta el final de la actividad de centros.
Instructions for the use and practice to work with The Clock and Time during
centers activities.
1. Print the entire following material preferably on 8.5”x 11” Cardstock and
cut the cards on the dotted line,
2. Glue page 1 (front cover) on the cover of a folder or the front of an
envelope at least 10”x 13”.
3. Glue page 3 (Directions) on the inside of the front cover folder or the back
of the envelope.
4. Place the rest of the material (54 cards with clocks, pictures and chart) in
the folder or in the envelope, so they are ready for the children to work
with them, as they go through the centers. Make sure you also have
pencils and colors as well.
5. Take page 4 (Clock Hands and Instructions) and follow the given
instructions there.
6. Children should keep record, preferably on a notebook (center notebook)
of their work in each center. This notebook should be all the children take
from center to center as they rotated.
7. The children will continue working at their centers until you give the
signal to stop, pick up the center and proceed to change to the next table
or center, and so on until the end of the center activities.
1.
2.
1.
2.
Direcciones:
Escoge y observa una tarjeta con diferentes tipos de
relojes.
a. Si es un reloj digital, verifica la hora y toma un
reloj con manecillas y ponle la hora. Dibuja ambos
relojes (digital y análogo) con la hora dada.
b. Si es un reloj análogo, verifica la hora. Dibuja el
reloj análogo y al lado la hora correspondiente en
un reloj digital.
c. Si es un dibujo de un reloj, verifica que clase de
reloj es y dibújalo con su nombre debajo.
Nota: Utiliza la tabla cuando sea necesario.
Luego, toma otra tarjeta y repite los pasos anteriores
hasta que te indiquen que pares.
Directions:
Choose and observe a card with different types of clock
and watches.
a. If it’s a digital clock, verify the time and take a
hand clock and set that time on it. Draw both
clocks (digital and analog) with the given time.
b. If it’s an analog clock, verify the time. Draw the
analog clock and beside it the corresponding time
on a digital clock.
c. If it’s a picture of a clock or watch, verify what
type is it. Draw and label (Type and/or name) it.
Note: Use the chart if necessary.
Then, take another picture card and repeat the above
steps until they ask you to stop.
Instructions for each and every clock from pages 5-7:
1. Please cut out the hour hand (red) and the minute hand (blue)
on the dotted line and a very small whole (needle size) on the
black dot, as well as on the clocks from pages 5-7.
2. Take a small button and place a 6” nylon thread through 2 holes
making a loop out of it.
3. Put the two ends of the nylon together and through the hole on
the hour hand (red) first, the hole on the minute (blue) hand
second and the hole on a clock printouts from pages 5-7.
4. Now, take a second small button and place the two end of the
nylon through 2 holes tiding them together with a double nut on
the other side of the button to make sure it doesn’t get loose.
Tiding with a double nut all together.
09:10
11:45
06:50
12:25
01:20
03:40
02:15
10:05
07:35
07:55
09:00
03:00
Tabla / Chart
Relojes Análogos de Pared
Analog Wall Clocks
Reloj de Trabajo (Ponchar)
Time-in and Time-out Clock
Relojes Análogos Romano de Pared
Roman Analog Wall Clocks
Relojes Análogos de Mesa y Romano
Analog Table Clocks and Roman
Relojes Análogos Cucú
Analog Coo coo Clocks
Reloj Digital de mesa
Digital Table Clock
Reloj Big Ben, Londres
Big Ben Clock, London
Reloj de Caja
Grandfather Clock
Relojes de Sol y Agua
Sun and Water Clocks
Reloj Militar Digital
Military Digital Clock
Reloj de Arena
Sand Clock
Reloj de Bolsillo Romano y Relojes de Pulsa Análogo y Digital
Pocket Roman Watch and Analog and Digital Wrist Watches


© Copyright 2026