
XF 1000KB Guida d`uso User guide
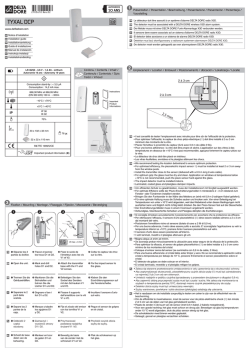
XF 1000KB Guida d’uso User guide ALTOPARLANTE AMPLIFICATO ALTA POTENZA CON TROLLEY Manuale d'uso e collegamento POWER PORTABLE SPEAKER WITH TROLLEY Connection and Operation Manual HAUT-PARLEUR PORTABLE AMPLIFIE AVEC TROLLEY Mode d'emploi et branchement BEWEGLICHER LAUTSPRECHER MIT TROLLEY Gebrauchs- und Anschlusshandbuch ALTAVOZ AMPLIFICADO PORTATIL CON TROLLEY Manual para el uso y la conexión BT BLUETOOTH DISCO LIGHT 100 W MAX USB CHARGE LCD DISPLAY Per informazioni integrative ed aggiornamenti su questo prodotto visita www.trevi.it For additional information and updates of this product see www.trevi.it XF 1000KB ITALIANO NOTE D'USO Questo apparecchio è uno strumento elettronico di alta precisione, evitate quindi di utilizzarlo nei seguenti casi: • Vicino a forti fonti di calore come caloriferi e stufe. • In luoghi molto umidi come stanze da bagno, piscine, ecc. • In luoghi molto polverosi. • In luoghi soggetti a forti vibrazioni. ■ Posizionate l'apparecchio in modo che ai suoi lati ci sia sempre abbastanza spazio per la libera circolazione di aria (almeno 5 cm). ■ Non ostruite le feritoie di ventilazione. ■ Se dei liquidi penetrano all'interno dell'apparecchio scollegate immediatamente la spina dalla presa e portate l'apparecchio al più vicino centro assistenza autorizzato TREVI. ■ Controllate sempre prima di accendere l'apparecchio che i cavi di alimentazione e di collegamento siano installati correttamente. CURA E MANUTENZIONE Per la pulizia si consiglia l’ uso di un panno morbido, leggermente inumidito. Evitate solventi o sostanze abrasive. IMPORTANTE Questo dispositivo e' progettato per uso domestico non professionale. La buona costruzione di questo apparecchio ne garantisce per lungo tempo il perfetto funzionamento. Se tuttavia dovesse presentarsi qualche inconveniente, sarà opportuno consultare il più vicino Centro Assistenza autorizzato TREVI. TREVI persegue una politica di continua ricerca e sviluppo. Pertanto i prodotti possono presentare caratteristiche diverse da quelle descritte. DESCRIZIONE CONNETTORI/COMANDI Comandi e prese sul dispositivo 1. Maniglia 2. Supporto microfono 3. Presa di alimentazione 4. Trolley 5. Equalizzatore 6. Display 7. Porta USB CHARGE 8. Ingresso MIC 2 9. Ingresso MIC 1 10. Ingresso GUITAR 11. Ingresso AUX IN 12. Spia led PAIR (accoppiamento BT) 13. Regolazione del segnale in ingresso GUITAR 14. Indicatore led di carica CHARGE 15. Regolazione ECHO 16. Regolazione del segnale in ingresso Mic1/2 17. Interruttore ON / OFF, accensione/spegnimento 18. Speaker 19. Regolazione toni alti 20. Regolazione toni bassi 21. Regolazione volume 22. Tasto :, selezione traccia successiva, ricerca avanzamento veloce 23. Tasto / / PAIR / STANBY 24. Tasto 9, selezione traccia precedente, ricerca indietro veloce 25. Tasto FUNC./LIGHT, selezione ingressi/attivazione effetto luce 26. Ingresso USB 27. Subwoofer 28. Barra di protezione subwoofer 29. Microfono 2 ITALIANO XF 1000KB TRASPORTO Premere il pulsante PUSH presente sulla maniglia del trolley, alzare il manico fino al blocco (si udira' uno scatto metallico). E' possibile regolare l'altezza in due posizioni. Per il trasporto, agendo sulla maniglia del trolley, piegare leggermente l'apparecchio e sfruttare le due ruote posteriori. Per lo sblocco e chiusura del trolley, premere di nuovo il pulsante PUSH ed abbassare completamente il manico. ALIMENTAZIONE Questa unità funziona con batteria ricaricabile al piombo 12V 7.2A e alimentazione di rete AC230V 50Hz. Quando la batteria e' in fase di esaurimento o l'apparecchio non si accende inserire il cavo di alimentazione nella presa sul dispositivo(3) e la spina in una presa di corrente per effettuare la ricarica. Stati della spia led CHARGE: - Spia CHARGE ROSSA fissa: il dispositivo e' collegato con il cavo di alimentazione e la batteria e' in carica. - Spia CHARGE VERDE fissa: operazione di ricarica terminata, la batteria e' carica. - Spia CHARGE ROSSA lampeggiante: con il dispositivo in uso, indica che la batteria e' in fase di esaurimento ed e' nacessario ricaricarla. Non collegare l'apparecchio a prese con tensione diversa da quella indicata. FUNZIONI DI BASE ACCENSIONE/SPEGNIMENTO Premere l'interruttore POWER e portarlo in posizione ON/OFF per accendere/spegnere l'apparecchio. NOTA: Dopo circa 15 minuti di inattivita', l'unità passa automaticamente in modalità standby. Per accendere nuovamente l'unità, premere il pulsante / / PAIR / STANBY (23) . In caso di funzionamento anomalo dell'apparecchio scollegare il cavo di alimentazione ed attendere alcuni minuti prima di ricollegarlo. IMPOSTAZIONE DEL MODO FUNZIONE Per cambiare la modalità di funzionamento, premere piu' volte il pulsante FUNC. / LIGHT (25) per selezionare USB(sul display compare -1-)/AUX/ BLUETOOTH(sul display compare BT). REGOLAZIONE DEL VOLUME 1. Ruotare la manopola del volume VOL.(21) per aumentare o diminuire il volume generale di riproduzione. 2. Ruotare la manopola GUITAR VOL(13) per regolare il volume del segnale sull'ingresso GUITAR(10). 3. Ruotare la manopola MIC VOL(16) per regolare il volume del segnale sugli ingressi MIC1(9) e MIC2(8). La regolazione agisce sui due ingressi contemporaneamente EQUALIZZATORE Questa unità ha un sistema di equalizzazione audio integrato. Agire sulle regolazioni presenti nel quadro EQ OPERATION(5) per selezionare un'impostazione che meglio si adatta alla riproduzione sonora in corso. REGOLAZIONE TONI ALTI E BASSI Ruotare la manopola TREEBLE(19) per regolare i toni alti. Ruotare la manopola BASS(20)per regolare i toni bassi. EFFETTO ECHO Ruotare la manopola ECHO(15) per aumentare o diminuire l'effetto eco sugli ingressi MIC1 e MIC2. Nota: l'effetto eco agisce unicamente sugli ingressi microfonici. EFFETTI DISCO-LIGHT Per attivare gli effetti Disco-Light premere a lungo il tasto FUNC./LIGHT(25). È possibile scegliere tra otto diversi effetti. Per disattivare l'effetto Disco-Light, premere e tenere premuto il pulsante FUNC./LIGHT(25) piu' volte fino a che il display mostra "OFF". PRESA USB CHARGE E' possibile utilizzare la presa USB CHARGE per la ricarica di dispositivi esterni USB. Nota1: non e' possibile utilizzare questa presa per la riproduzione di file audio da dispositivi esterni (utilizzare l'ingresso USB, vedi capitolo INGRESSO USB). Nota2: l'operazione di ricarica e' possibile solo ad apparecchio acceso. INGRESSO USB 1. Premere il tasto FUNC.(25) sull'unità e selezionare "-1-". 2. Inserire una memoria Usb nell'ingresso USB(26). La riproduzione viene avviata automaticamente. 3. Per mettere in pausa la riproduzione, premere il tasto / (23), sul display compare l'icona P. 4. Per riprendere la riproduzione, premere di nuovo il tasto /(23). 5. Premendo il tasto :(22) durante l’ascolto si passa alla traccia successiva, mentre con il tasto 9(24) ai brani precedenti. 6. Premere e tenere premuto il tasto :(22) o 9(24) durante l'ascolto per ricercare velocemente un particolare passaggio musicale. Rilasciare il tasto per tornare alla normale riproduzione. NOTE - Il lettore potrebbe non supportare alcuni dispositivi USB, questo è dovuto all'incompatibilità di alcuni processori. - Per evitare interferenze dannose, collegare sempre le periferiche USB direttamente all'unità, non utilizzare cavi di prolunga. 3 XF 1000KB BLUETOOTH FUNZIONAMENTO 1. 2. 3. 4. 5. 6. 7. Accendere l'apparecchio e premere il tasto FUNC.(25) per selezionare la funzione bluetooth, sul display compare la scritta BT. Nella modalità Bluetooth, il Led spia frontale (12, PAIR) comincerà a lampeggiare, il sistema entra automaticamente in ricerca. Attivare la funzionalità Bluetooth sul dispositivo esterno da accoppiare. Avviare la ricerca dei dispositivi. Al termine selezionare il dispositivo "XF1000KB". Inserire la password "0000" se richiesto. Premere il tasto//PAIR (23), per avviare la riproduzione e i tasti 9 (24) o : (22) per la selezione dei brani. Tenere premuto per qualche secondo il tasto //PAIR (23) per eliminare l'accoppiamento ed effettuare una nuova operazione di pairing. AUX-IN 1. Premere il tasto FUNC.(25) sull'unità per selezionare la modalità "AUX". 2. Collegare una qualsiasi unità provvista di uscita audio tramite apposito cavo Jack da 3,5mm (non incluso) all'ingresso AUX IN (11). 3. Regolare il dispositivo esterno dai propri comandi. UTILIZZO DEL MICROFONO 1. Collegare il microfono in dotazione nella presa MIC1(9) o MIC2 (8). 2. Accendere il microfono agendo sull'interruttore presente sul manico del microfono stesso portandolo in posizione ON. 3. Regolare il volume di ingresso del microfono e l'effetto eco come desiderato tramite gli appositi comandi. Nota: e' possibile utilizzare due microfoni contemporaneamente (secondo microfono non in dotazione). INGRESSO GUITAR Questo apparecchio e' dotato di ingresso per amplificare una chitarra (predisposta) o altro strumento preamplificato. 1. Collegare il cavo della chitarra (o di altro strumento preamplificato) inserendolo nell'ingresso GUITAR(10). 2. Regolare il volume dell'ingresso GUITAR come desiderato tramite l'apposito comando. CARATTERISTICHE TECNICHE GENERALI Alimentazione: Consumo: Potenza massima in uscita: Dimensioni Sound Bar: Peso: . ................................. AC 230V 50Hz - batteria interna al piombo 12V 7.2A ricaricabile . ........................................................................................... Max 30W . ................................................................................................. 100W . ............................................................................... 330x335x600mm �������������������������������������������������������������������������������������������������� 14 Kg INFORMATIVA SULLA RIMOZIONE E LO SMALTIMENTO DELLE BATTERIE Attenzione: Questa operazione è riservata esclusivamente al personale tecnico specializzato! PROCEDURA PER LA RIMOZIONE DELLA BATTERIA DALL’ALTOPARLANTE AMPLIFICATO Operare esclusivamente in assenza di collegamento dell’apparecchio alla rete elettrica! 1. Rimuovere le viti che serrano la struttura del trolley e smontarlo. 2. Rimuovere le viti che serrano il pannello posteriore dell'altoparlante amplificato e smontare il pannello; 3. Individuare la batteria; 4. Rimuovere le viti che serrano i sostegni della batteria, rimuovere i sostegni, scollegare la batteria e rimuoverla. Qualunque sia il tipo di batteria esaurita, essa non deve essere gettata tra i rifiuti domestici,nel fuoco o nell’acqua. Ogni tipo di batteria esaurita deve essere riciclata oppure smaltita presso gli appositi centri raccolta dedicati. 4 ENGLISH XF 1000KB NOTES ON USE This is a precision electronic appliance; avoid using it in the following cases: - Near strong heat sources, such as central heating plants or stoves. - In very humid places such as bathrooms, swimming pools, etc. - In very dusty places. - In places subject to strong vibrations. - Position the appliance in such a way that there is always enough room for free air circulation (at least 5 cm). - Do not block the air inlets. - If any liquid enters the appliance, unplug it immediately from the socket and take it to the nearest TREVI authorised service centre. - Before switching on the appliance, always check that the power cable and the connection cable are properly installed. CARE AND MAINTENANCE Use a slightly damp soft cloth for cleaning. Do not use solvents and abrasive substances. IMPORTANT This appliance has been carefully built to ensure long-lasting perfect performance. However, should any inconvenience occur, please contact your local authorised TREVI Service Centre. TREVI follows a policy of ongoing research and development. Therefore products may have different features from those described. LOCATION OF CONTROL Controls and sockets on the device 1. Handle 2. Mic holder 3. Power Socket 4. Trolley 5. Equalizer control 6. Display 7. USB CHARGE port 8. Input MIC 2 9. Input MIC 1 10. Input GUITAR 11. Input AUX IN 12. Indicator LED PAIR (BT pairing) 13. Adjusting the GUITAR input signal 14. Indicator LED CHARGE 15. Adjust ECHO 16. Adjusting the input signal Mic1 / 2 17. ON / OFF switch 18. Speaker 19. Treble Adjustment 20. Bass Adjustment 21. Volume Adjustment 22. Key:, select the next track, fast forward search 23. Key / / PAIR / STANDBY 24. Key 9, previous track selection, fast search back 25. FUNC. / LIGHT, input selection / activation light effect 26. USB Input 27. Subwoofer 28. Protection subwoofer bar 29. Microphone 5 XF 1000KB ENGLISH TRANSPORTATION Press the PUSH button present on the trolley handle, lift the handle up to lock (you will hear a metallic click). It's possible to adjust the height in two positions. For transport, using the handle of the trolley, slightly bend the box and use the two rear wheels. For unlocking and locking the trolley, press the PUSH button and fully lower the handle. POWER This unit works with rechargeable lead battery 12V 7.2A and mains supply AC230V 50Hz. When the battery is low or the device does not turn on insert the power cord into the socket on the device (3) and the plug into a power outlet to recharge, the CHARGE lamp (14) lights. Status LED CHARGE: - Led CHARGE RED fixed: the device is connected with the power cord and recharge the battery. - Led CHARGE GREEN fixed: charging operation ended, the battery is full charged. - Led CHARGE flashing RED: with the device in use, indicating that the battery is empty and it's nacessary recharging. Do not connect the device to voltage other than that indicated. BASIC FUNCTIONS POWER ON/OFF Press the POWER switch and turn it ON / OFF button to turn on / off the device. NOTE: After about 15 minutes of inactivity, the unit automatically switches to standby mode. To turn on the unit again, press the / / PAIR / STANDBY (23). MODE SETTING FUNCTION To change the operation mode, press more times the key FUNC. / LIGHT (25) to select USB (-1- on display) / AUX / BLUETOOTH (BT on display). ADJUSTING THE VOLUME 1. Turn the volume VOL. (21) to increase or decrease the overall volume of playback. 2. Turn the VOL GUITAR (13) to adjust the volume of the signal at the GUITAR (10). 3. Turn the MIC VOL (16) to adjust the volume of the signal inputs MIC1 (9) and MIC2 (8). The adjustment works on the two inputs simultaneously EQUALIZER This unit has a built-in audio equalizer system. Use the adjustments in the board EQ OPERATION (5) to select a good setting for sound. SETTING TONE TREBLE AND BASS Turn the knob TREEBLE (19) to adjust the treble. Turn the knob BASS (20) to adjust the bass. ECHO EFFECT Turn the knob ECHO (15) to increase or decrease the echo effect on the inputs MIC1 and MIC2. Note: the echo only works on microphone inputs. DISCO-LIGHT EFFECTS To activate the effects Disco Light-long press the FUNC. / LIGHT (25). You can choose from eight different effects. To cancel the effect Disco-Light, press and hold the FUNC. / LIGHT (25) more times until the display shows "OFF". USB CHARGE It's possible to use the USB CHARGE(7) slot for charging external USB devices. Note 1: not use this jack for playback of audio files from external devices (using the USB input, see chapter INPUT USB). Note2: the recharging operations is possible only when the device is switched on. INPUT USB 1. Press the FUNC. (25) on the unit and select "-1-". 2. Insert the USB memory into the USB port (26). Playback starts automatically. 3. To pause playback, press the / (23), the display shows the icon P. 4. To resume playback, press the button again / (23). 5. Press the key: (22) while listening to go to the next track, while the 9 key (24) to the previous tracks. 6. Press and hold the button: (22) or 9 (24) while listening to quickly search a particular musical passage. Release the button to resume normal playback. NOTES - The player may not support some USB devices, this is due to the incompatibility of some processors. - To avoid harmful interference, always connect USB devices directly to the unit, do not use extension cords. 6 ENGLISH XF 1000KB BLUETOOTH OPERATION 1. Turn on the machine and press the FUNC. (25) to select the Bluetooth function, the display shows BT. 2. In the Bluetooth mode, the PAIR LED (12) will start flashing, the system automatically enters search. 3. Activate the Bluetooth feature on the external device to be coupled. 4. Initiate a search for devices. After select the "XF1000KB". 5. Enter the password "0000" if required. 6. Press the tasto/ / PAIR (23), to start playing and the buttons 9 (24) or : (22) for the selection of songs. 7. Press and hold the button for a few seconds / / PAIR (23) to eliminate the paired device and make a new pairing operation. AUX-IN 1. Press the FUNC. (25) on the unit to select the "AUX" input. 2. Connect any unit equipped with audio output through a cable 3.5mm jack (not included) to the AUX IN (11). 3. Use the external device from their commands. USING THE MICROPHONE 1. Connect the supplied microphone into the jack MIC1 (9) or MIC2 (8). 2. Turn on the microphone using the switch on the handle of the microphone to the ON position. 3. Adjust the volume of the microphone input and the echo effect as desired using the appropriate commands. Note: you can use two microphones simultaneously (second microphone not included). INPUT GUITAR This device can amplify a guitar or other preamp music instrument. 1. Connect the cable of the guitar by inserting it into the GUITAR (10) input. 2. Adjust the volume of input GUITAR as desired using the appropriate command. SPECIFICATIONS Power Supply: Consumption: Maximum output power: Sound Bar Dimensions: Weight: . ................................ AC 230V 50Hz - internal lead acid rechargeable battery 12V 7.2A . ............................................................................................ Max 30W �������������������������������������������������������������������������������������������������� 100W . ............................................................................... 330x335x600mm ��������������������������������������������������������������������������������������������������� 14 kg INFORMATION NOTE ON THE REMOVAL AND DISPOSAL OF BATTERIES Warning: Only high-qualified personnel should perform this operation! BATTERY REMOVAL The appliance should not be plugged to the mains socket when performing this operation! 1. Remove the screws that secure the structure of the trolley and take it apart. 2. Remove the screws that secure the rear panel speaker amplified and remove the panel; 3. Locate the battery; 4. Remove the screws that secure the supports of the battery, remove the supports, disconnect the battery and remove it. Used batteries should not be disposed of with household waste or thrown into fire or water. Used batteries should be recycled or disposed of in separate waste collection centres. 7 XF 1000KB NOTES D’EMPLOI Cet appareil est un instrument électronique de haute précision ; évitez donc de l’utiliser dans les cas suivants : - Près de grosses sources de chaleur comme des radiateurs et des poêles. - Dans des endroits très humides comme les salles de bains, les piscines, etc. - Dans des endroits très poussiéreux. - Dans des endroits exposés à de fortes vibrations. - - - - Placez l’appareil de sorte qu’il y ait toujours assez d’espace sur ses côtés pour laisser circuler librement l’air (au moins 5 cm). Ne bouchez pas les fentes d’aération. Si des liquides pénètrent à l’intérieur de l’appareil, débranchez-le immédiatement et portez-le au centre d’assistance agréé TREVI le plus proche. Contrôlez toujours, avant d’allumer l’appareil, que les câbles d’alimentation et les câbles de branchement sont correctement installés. MANIEMENT ET ENTRETIEN Pour le nettoyage, il est conseillé d’utiliser un chiffon doux légèrement humide. Évitez l’emploi de solvants ou de substances abrasives. IMPORTANT La bonne fabrication de cet appareil garantit un fonctionnement parfait pour une longue période. Si toutefois quelques inconvénients devaient se présenter, adressez-vous au Centre d’Assistance agréé TREVI le plus proche. TREVI observe une politique de recherche et de développement continus. C’est pourquoi ses produits peuvent présenter des caractéristiques différentes par rapport à celles qui sont décrites. DESCRIPTION DES CONNECTEURS ET DES COMMANDES Commandes et prises 1. Poignée 2. Titulaire Mic 3. Prise d'alimentation 4. Trolley 5. Contrôle Equalizer 6. Affichage 7. Port USB CHARGE 8. Entrée MIC 2 9. Entrée MIC 1 10. Entrée GUITAR 11. Entrée AUX IN 12. Indicateur LED PAIR (BT appariement) 13. Réglage de signal d'entrée de entrée GUITAR 14. Indicateur LED CHARGE 15. Réglez ECHO 16. Réglage du signal d'entrée Mic1 / 2 17. ON / OFF 18. Speaker 19. Réglage des treble 20. Réglage des basses 21. Réglage du volume 22. Touche:, sélectionnez la piste suivante, recherche rapide vers l'avant 23. Key / / PAIR / VEILLE 24. Touche 9, sélection de la piste précédente, recherche rapide arrière 25. FUNC. / LIGHT, la sélection d'entrée / effet de la lumière d'activation 26. Entrée USB 27. Subwoofer 28. Barre de protection de subwoofer 29. Microphone 8 FRANCAIS XF 1000KB TRANSPORT Appuyez sur le bouton PUSH présent sur la poignée du chariot, soulevez la poignée pour verrouiller (vous entendrez un cliquetis métallique). Il est possible de régler la hauteur en deux positions. Pour le transport, l'aide de la poignée du chariot, pliez légèrement la boîte et utilisez les deux roues arrière. Pour déverrouiller et verrouiller le chariot, appuyez sur le bouton-poussoir et abaisser complètement la poignée. ALIMENTATION Cet appareil fonctionne avec une batterie au plomb rechargeable 12V 7.2A et alimentation AC230V 50Hz. Lorsque la batterie est faible ou l'appareil ne se allume pas insérer le cordon d'alimentation dans la prise sur l'appareil (3) et la fiche dans une prise de courant pour recharger, le témoin CHARGE (14) se allume. État de la lampe LED CHARGE: - Témoin CHARGE ROUGE fixe: l'appareil et «connecté avec le cordon d'alimentation et la batterie et 'dans le bureau. - Témoin CHARGE VERT fixe: opération de chargement est terminée, la batterie et «charge. - Témoin CHARGE clignote en rouge: avec l'appareil, indiquant que la batterie et 'étant éliminé et et «recharge nacessario. Ne pas connecter l'appareil à bout de tension autre que celle indicato. FONCTIONS DE BASE POWER ON / OFF Appuyez sur l'interrupteur POWER et tournez le bouton ON / OFF pour allumer / éteindre l'appareil. NOTE: Après environ 15 minutes d'inactivité, l'appareil passe automatiquement en mode standby. Pour allumer l'appareil, appuyez sur la / / PAIR / STANDBY (23). FONCTION MODE SETTING Pour changer le mode de fonctionnement, appuyez sur la touche FUNC./ LIGHT (25) pour sélectionner USB (-1- sur l'écran) / AUX / Bluetooth (BT à l'écran). AJUSTEMENT DU VOLUME 1. Tourner le volume VOL. (21) pour augmenter ou pour diminuer le volume global de la lecture. 2. Tournez GUITAR VOL (13) pour régler le volume du signal de la entree GUITAR (10). 3. Tournez la MIC VOL (16) pour régler le volume de la MIC1 entrées de signaux (9) et MIC2 (8). Le réglage agit sur les deux entrées simultanément EQUALIZER Cet appareil dispose d'un système d'égaliseur audio intégré. Utilisez les ajustements au sein du conseil EQ FONCTIONNEMENT (5) pour sélectionner un bon réglage pour le son. REGLAGE TONALITE AIGUS ET DES GRAVES Tournez le bouton treeble (19) pour régler les aigus. Tournez le bouton BASS (20) pour régler les basses. ECHO EFFET Tournez le bouton ECHO (15) ou d'augmenter pour diminuer l'effet d'écho sur les entrées MIC1 et MIC2. Remarque: l'écho ne fonctionne que sur les entrées micro. DISCO-LIGHT EFFETS Pour activer les effets Disco Light-pression longue sur la touche FUNC. / LIGHT (25). Vous pouvez choisir parmi huit effets différents. Pour annuler l'effet Disco-Light, appuyez et maintenez la touche FUNC. / LIGHT (25) plusieurs fois jusqu'à ce que l'écran affiche "OFF". USB CHARGE Il est possible d'utiliser la entree USB CHARGE(7) pour la recharge des périphériques USB externes. Note 1: utilisez pas cette prise pour la lecture de fichiers audio provenant d'appareils externes (via l'entrée USB, voir le chapitre ENTRÉE USB). Note 2: les opérations de recharge est possible seulement lorsque l'appareil est allumé. ENTRÉE USB 1. Appuyez sur la touche FUNC. (25) sur l'unité et sélectionnez "-1-". 2. Insérez la clé USB dans le port USB (26). La lecture démarre automatiquement. 3. Pour interrompre la lecture, appuyez sur la / (23), l'écran affiche l'icône P. 4. Pour reprendre la lecture, appuyez sur le bouton / (23). 5. Appuyez sur la touche: (22) tout en écoutant pour aller à la piste suivante, alors que la touche 9 (24) aux pistes précédentes. 6. Appuyez et maintenez enfoncé le bouton: (22) ou 9 (24) tout en écoutant une recherche rapide dans le passage musical particulier. Relâchez le bouton pour reprendre la lecture normale. NOTES - Le joueur peut ne pas supporter certains périphériques USB, ce est deux à l'incompatibilité de certains processeurs. - Pour éviter les interférences nuisibles, toujours connecter des périphériques USB directement à l'appareil, ne pas utiliser de rallonges. 9 XF 1000KB FRANCAIS BLUETOOTH FONCTIONNEMENT 1. Allumez la machine et appuyez sur la touche FUNC. (25) pour sélectionner la fonction Bluetooth, l'écran affiche BT. 2. Dans le mode Bluetooth, la LED PAIR (12) se met à clignoter, le système passe automatiquement en recherche. 3. Activez la fonction Bluetooth sur l'appareil externe pour être couplé. 4. Lancez une recherche des appareils. Après sélectionner "XF1000KB". 5. Entrez le mot de passe "0000" si nécessaire. 6. Appuyez sur la tasto/ / PAIR (23), pour commencer à jouer et les boutons 9 (24) ou: (22) pour la sélection des chansons. 7. Appuyez et maintenez le bouton pendant quelques secondes / / PAIR (23) pour supprimer l'appareil et faire une nouvelle opération d'appairage. AUX-IN 1. Appuyez sur la touche FUNC. (25) sur l'appareil pour sélectionner l'entrée "AUX". 2. Branchez une unité équipé d'une sortie audio via un câble jack 3,5 mm (non fourni) à la prise AUX IN (11). 3. Utilisez le périphérique externe de leurs commandes. UTILISATION DU MICROPHONE 1. Connectez le microphone fourni dans la prise MIC1 (9) ou MIC2 (8). 2. Allumez le microphone en utilisant l'interrupteur sur la poignée du microphone sur la position ON. 3. Réglez le volume de l'entrée microphone et l'effet d'écho que désiré en utilisant les commandes appropriées. Remarque: vous pouvez utiliser deux microphones simultanément (second microphone non inclus). ENTRÉE GUITARE Ce dispositif peut amplifier un préampli guitare ou un autre instrument de musique. 1. Branchez le câble de la guitare en l'insérant dans la entrée GUITAR(10). 2. Réglez le volume d'entrée GUITAR désiré en utilisant la commande appropriée. CARACTÉRISTIQUES Alimentation: Consommation: Puissance de sortie maximale: Sound Bar Dimensions: Poids: . ................................................ AC 230V 50Hz - rechargeable batterie au plomb 12V 7.2A . ............................................................................................ Max 30W �������������������������������������������������������������������������������������������������� 100W . ............................................................................... 330x335x600mm ��������������������������������������������������������������������������������������������������� 14 kg NOTE D'INFORMATION SUR LE RETRAIT ET ÉLIMINATION DES BATTERIES Attention: Seul le personnel de haute qualifié doit effectuer cette opération! RETRAIT DE LA BATERIE L'appareil ne doit pas être branché à la prise de courant lors de l'exécution de cette opération! 1. Retirer les vis qui fixent la structure du chariot et de le démonter. 2. Retirer les vis qui fixent le haut-parleur amplifié panneau arrière et retirez le panneau; 3. Repérez la pile; 4. Retirer les vis qui fixent les supports de la batterie, retirer les supports, débrancher la batterie et retirez-le. Les piles usagées ne doivent pas être jetés avec les déchets ménagers ou jetés dans le feu ou l'eau. Les batteries usagées doivent être recyclés ou éliminés dans les centres de collecte de déchets séparés. 10 DEUTSCH XF 1000KB GEBRAUCHSHINWEISE Dieses Gerät ist ein elektronisches Instrument höchster Präzision. Die Inbetriebnahme des Geräts sollte daher in den folgenden Fällen vermieden werden: • In der Nähe von Wärmequellen wie Heizkörpern und Öfen. • In sehr feuchten Räumen wie Badezimmern, Schwimmbädern usw. • In sehr staubigen Räumen. • An Orten, die starken Schwingungen ausgesetzt sind. - - - - Das Gerät sollte so aufgestellt werden, dass an den Seiten jeweils genügend Raum verbleibt, um eine freie Luftzirkulation zu ermöglichen (mindestens 5 cm). Die Ventilationsöffnungen dürfen nicht abgedeckt werden. Sollten Flüssigkeiten ins Innere des Geräts eindringen, den Stecker von der Steckdose unmittelbar abziehen und sich an die nächstgelegene autorisierte TREVI-Kundendienststelle wenden. Vor dem Einschalten des Geräts ist sicherzustellen, dass Netzkabel und Anschlusskabel korrekt installiert sind. PFLEGE UND WARTUNG Für die Reinigung wird die Verwendung eines leicht angefeuchteten, weichen Tuchs empfohlen. Der Einsatz von Lösungsmitteln oder scheuernden Substanzen sollte vermieden werden. WICHTIG Der fachgemäße Bau dieses Geräts gewährleistet langfristig einen einwandfreien Betrieb. Sollten dennoch Betriebsstörungen auftreten, wenden Sie sich bitte an nächstgelegene autorisierte TREVI-Kundendienststelle. Die Firma TREVI verfolgt eine Politik ständiger Forschung und Weiterentwicklung. Die Produkte können daher andere als die beschriebenen Eigenschaften aufweisen. BESCHREIBUNG DER ANSCHLÜSSE/BEDIENELEMENTE Kontrollen und Steckdosen am Gerät 1. Handgriff 2. Mic Halter 3. Netzanschluss 4. Trolley 5. Equalizer Steuer 6. Anzeige 7. USB CAHRGE-Port 8. Eingang MIC 2 9. Eingang MIC 1 10. Eingang GUITAR 11. Eingang AUX IN 12. Anzeige-LED PAIR(BT Paarung) 13. Einstellen des Eingangssignals GUITAR 14. Anzeige-LED CHARGE 15. Stellen Sie ECHO 16. Einstellen des Eingangssignals Mic1 / 2 17. Power On/Off 18. Lautsprecher 19. Höheneinstellung 20. Basseinstellung 21. Lautstärkeregelung 22. Taste: Wählen Sie den nächsten Titel, schneller Vorlauf Suche 23. Taste / / PAIR / STANDBY 24. Taste 9, vorheriger Titel Auswahl, schnelle Suche zurück 25. FUNC. / LIGHT, Eingangswahl / Aktivierungslichteffekt 26. USB-Eingang 27. Subwoofer 28. Schutz Subwoofer bar 29. Mikrofon 11 XF 1000KB DEUTSCH TRANSPORT Drücken Sie auf den Trolleygriff vorhanden PUSH drücken, heben Sie den Griff nach oben zu sperren (Sie werden ein metallisches Klicken zu hören ist). Es ist möglich, die Höhe in zwei Positionen eingestellt werden. Für den Transport mit dem Griff des Wagens, leicht zu biegen Sie das Feld und verwenden die beiden Hinterräder. Zum Entriegeln und Verriegeln des Wagens, drücken Sie die Drucktaste und ganz senken den Griff. LEISTUNG Dieses Gerät arbeitet mit Blei-Akku und Netzversorgung AC230V 50Hz. Wenn die Batterie schwach ist oder das Gerät nicht auf Einsatz in die Buchse am Gerät (3) und den Stecker drehen Sie das Netzkabel in eine Steckdose zum Aufladen, die Lampe CHARGE (14) leuchtet. Lampenstatus LED CHARGE: - Lampe CHARGE RED fest: das Gerät und im Büro mit dem Netzkabel und Batterie und 'verbunden. - Lampe CHARGE GREEN fest: Ladevorgang beendet ist, die Batterie und die Ladung. - Ladekontrollleuchte blinkt rot: mit dem Gerät, das anzeigt, dass die Batterie und wird auf die verzichtet werden und nacessario Aufladen. Schließen Sie das Gerät nicht in den Griff zu anderen Spannung angezeigt. GRUNDFUNKTIONEN POWER ON / OFF Drücken Sie die POWER-Schalter und drehen Sie ON / OFF-Taste zum Ein- / Ausschalten des Geräts. HINWEIS: Nach etwa 15 Minuten Inaktivität schaltet das Gerät automatisch in den Standby-Modus. Um das Gerät wieder einzuschalten, drücken Sie die / / PAIR / STANDBY (23). MODUS EINSTELLUNG FUNKTION Um den Betriebsmodus zu ändern, drücken Sie mehrmals die Taste FUNC. / LIGHT (25), um USB auszuwählen (-1- auf dem Display) / AUX / Bluetooth (BT auf dem Display). LAUTSTÄRKE 1. Drehen Sie die Lautstärke VOL. (21) zur Erhöhung oder Verringerung des Gesamtvolumens der Wiedergabe. 2. Drehen Sie den VOL GUITAR (13), um die Lautstärke des Signals an der GUITAR (10) einzustellen. 3. Drehen Sie den MIC VOL (16), um die Lautstärke der Signaleingängen MIC1 einstellen (9) und MIC2 (8). Die Einstellung wirkt auf die beiden Eingänge gleichzeitig EQUALIZER Dieses Gerät verfügt über einen eingebauten Audio-Equalizer-System. Verwenden Sie die Einstellungen in den Vorstand EQ BETRIEB (5), um eine gute Einstellung für Sound auswählen. EINSTELLUNG TONE HöHEN UND BäSSE Drehen Sie den Knopf TREEBLE (19), um die Höhen einzustellen. Drehen Sie den Regler BASS (20), um die Bässe einzustellen. ECHO EFFECT Drehen Sie den Knopf ECHO (15) zu erhöhen oder verringern die Echo-Effekt auf die Eingänge MIC1 und MIC2. Hinweis: das Echo funktioniert nur auf Mikrofoneingänge. DISCO-LICHTEFFEKTE Um die Auswirkungen Disco-Licht-lange drücken Sie die Taste FUNC aktivieren. / LIGHT (25). Sie können aus acht verschiedenen Effekten wählen. Um den Effekt Disco-Light abzubrechen, drücken und halten Sie die Taste FUNC. / LIGHT (25) mehrmals, bis die Anzeige "OFF". USB CHARGE Es ist möglich, die USB CHARGE (7) Steckplatz zum Laden externer USB-Geräte verwenden. Hinweis 1: Sie diese Buchse für die Wiedergabe von Audio-Dateien von externen Geräten nicht verwendet werden (mit dem USB-Eingang, siehe Kapitel INPUT USB). Hinweis 2: Die Ladebetrieb ist nur möglich, wenn das Gerät eingeschaltet ist. INPUT USB 1. Drücken Sie die Taste FUNC. (25) auf das Gerät und wählen Sie "-1-". 2. Stecken Sie den USB-Speicher in den USB-Port (26). Die Wiedergabe startet automatisch. 3. Um die Wiedergabe zu unterbrechen, drücken Sie die / (23), auf dem Display erscheint das Symbol P. 4. Um die Wiedergabe fortzusetzen, drücken Sie erneut die Taste / (23). 5. Drücken Sie die Taste: (22) während der Wiedergabe, um zum nächsten Titel zu springen, während die 9-Taste (24), um den vorherigen Titel. 6. Drücken und halten Sie die Taste : (22) oder 9 (24), während Sie schnell nach einem bestimmten Musikpassage. Lassen Sie die Taste, um die normale Wiedergabe fortzusetzen. HINWEISE - Der Spieler kann keine Unterstützung für USB-Geräte, ist dies aufgrund der Inkompatibilität einiger Prozessoren. - Zur Vermeidung funktechnischer Störungen, immer USB-Geräte direkt an das Gerät, verwenden Sie keine Verlängerungskabel. 12 DEUTSCH XF 1000KB BLUETOOTH-BETRIEB 1. Schalten Sie das Gerät ein und drücken Sie die Taste FUNC. (25), um die Bluetooth-Funktion zu wählen, zeigt das Display BT. 2. Klicken Sie im Bluetooth-Modus, die PAIR-LED (12) blinkt, geht das System automatisch suchen. 3. Aktivieren Sie die Bluetooth-Funktion auf dem externen Gerät gekoppelt werden. 4. Initiieren Sie eine Suche nach Geräten. Nach wählen Sie die "XF1000KB". 5. das Passwort "0000" eingeben, falls erforderlich. 6. Drücken Sie die tasto/ / PAAR (23), die Wiedergabe zu starten und die Tasten 9 (24) oder : (22) für die Auswahl der Lieder. 7. Drücken und halten Sie die Taste für einige Sekunden / / PAAR (23), um das gekoppelte Gerät zu beseitigen und einen neuen Pairing-Vorgang. AUX-IN 1. Drücken Sie die Taste FUNC. (25) auf dem Gerät, um das "AUX" auszuwählen. 2. Schließen Sie Geräte mit Audio-Ausgang über ein Kabel 3,5mm Klinke (nicht enthalten) ausgestattet, um die AUX IN (11). 3. Verwenden Sie das externe Gerät aus ihre Befehle. MIKROFON 1. Schließen Sie das mitgelieferte Mikrofon an die Buchse MIC 1 (9) oder MIC2 (8). 2. Schalten Sie das Mikrofon mit dem Schalter am Griff des Mikrofons in die Position ON. 3. Stellen Sie die Lautstärke des Mikrofon-Eingang und den Echoeffekt wie gewünscht mit den entsprechenden Befehlen. Hinweis: Sie können zwei Mikrofone gleichzeitig verwendet werden (zweites Mikrofon nicht im Lieferumfang enthalten). INPUT GUITAR Mit diesem Gerät können Sie eine Gitarre oder andere Vorverstärker Musikinstrument zu verstärken. 1. Schließen Sie das Kabel von der Gitarre, indem sie in der GUITAR (10) Eingang. 2. Stellen Sie die Lautstärke des Eingangs GUITAR wie gewünscht mit den entsprechenden Befehl. TECHNISCHE DATEN Stromversorgung: Verbrauch: Maximale Soundbar Gewicht: . ................................................ AC 230V 50Hz - internen Blei-Säure-Akku 12V 7.2A . ............................................................................................30W Max . .................................................................... Ausgangsleistung: 100W . ........................................................ Abmessungen: 330x335x600mm ��������������������������������������������������������������������������������������������������� 14 kg Informationen Hinweis auf die Entfernung und Entsorgung von Batterien Achtung: Nur qualitativ qualifiziertes Personal darf diese Operation durchzuführen! BATTERIE AUSBAUEN Das Gerät darf nicht an die Netzsteckdose angeschlossen werden um diesen Vorgang auszuführen! 1. Entfernen Sie die Schrauben, die die Struktur der Laufkatze sichern und zu zerlegen. 2. Entfernen Sie die Schrauben, die die Rückwand-Lautsprecher verstärkt zu sichern und entfernen Sie die Abdeckung; 3. Suchen Sie die Batterie; 4. Entfernen Sie die Schrauben, mit denen die Träger der Batterie zu sichern, entfernen Sie die Stützen, die Batterie abklemmen und ausbauen. Verbrauchte Batterien gehören nicht in den Hausmüll entsorgt werden oder in Feuer oder Wasser geworfen. Gebrauchte Batterien müssen recycelt oder in separaten Sammelstellen entsorgt werden. 13 XF 1000KB ESPANOL NOTAS PARA EL USO Este aparato es un instrumento electrónico de alta precisión; por lo tanto debe evitar utilizarlo en los siguientes casos: • Cerca de fuertes fuentes de calor como caloríferos y estufas. • En lugares muy húmedos como cuartos de baño, piscinas, etc. • En lugares muy polvorientos. • En lugares sujetos a fuertes vibraciones. ■ Posicione el aparato de manera que el espacio circundante sea amplio para la libre circulación del aire (por lo menos 5 cm). ■ No obstruya las ranuras de ventilación. ■ Si penetran líquidos dentro del aparato, desconecte inmediatamente el enchufe de la toma de corriente y lleve el aparato al centro de asistencia autorizado TREVI más cercano. ■ Siempre compruebe que los cables de alimentación y de conexión estén instalados correctamente antes de encender el aparato. CUIDADO Y MANTENIMIENTO Para efectuar la limpieza se aconseja utilizar un paño suave, ligeramente humedecido. Evite solventes o sustancias abrasivas. IMPORTANTE La buena construcción del aparato garantiza su perfecto funcionamiento durante mucho tiempo. Si se presentase algún inconveniente, será oportuno consultar al Centro de Asistencia autorizado TREVI más cercano. TREVI cultiva una política de investigación y desarrollo continuos. Por consiguiente, los productos pueden presentar características distintas a las descritas. DESCRIPCIÓN DE LOS CONECTORES/MANDOS Controles y conectores 1. Mango 2. Soporte del Mic 3. Toma de alimentación 4. Trolley 5. Control del ecualizador 6. Pantalla 7. Entrada USB CHARGE 8. Entrada MIC2 9. Entrada MIC 1 10. Entrada GUITAR 11. Entrada AUX IN 12. Indicador LED PAIR (emparejamiento BT) 13. Ajuste de la señal de entrada GUITAR 14. Indicador LED de carga 15. Ajuste ECHO 16. Ajuste de la señal de entrada Mic1 / 2 17. Interruptor ON / OFF 18. Altavoz 19. Ajuste de agudos 20. Ajuste de graves 21. Ajuste de volumen 22. Clave:, seleccione la siguiente pista, rápida búsqueda hacia adelante 23. Clave / / PAR / STANDBY 24. Clave 9, seleccióne de la pista anterior, búsqueda rápida hacia atrás 25. FUNC. / LIGHT, selección de entrada / efecto de luz 26. Entrada USB 27. Subwoofer 28. Protección de subwoofer 29. Micrófono 14 ELLEHNIKA ESPANOL XF 1000KB TRANSPORTE Pulsa el botón PUSH presente en el mango de la carretilla, levante la palanca hacia arriba para bloquear (escuchará un chasquido metálico). Es posible ajustar la altura en dos posiciones. Para el transporte, doble ligeramente la caja y usar las dos ruedas traseras. Para desbloquear y bloquear el trolley, presione el pulsador y baje completamente el mango. ALIMENTACION Esta unidad funciona con batería de plomo recargable y red eléctrica AC230V 50Hz. Cuando la batería está baja o el dispositivo no se enciende insertar el cable de alimentación en el enchufe en el dispositivo (3) y el enchufe en una toma de corriente para recargar, la luz CHARGE (14) se enciende. Estado de led de carga: - Led CHARGE ROJO fijo: el dispositivo esta conectado con el cable de alimentación y la batería esta en carga. - Led CHARGE VERDE fijo: operación de carga terminada, la batería esta carga. - Led CHARGE ROJO parpadea: con el dispositivo en uso, indica que la batería esta vacia y necessita recarga. No conecte el dispositivo a los apretones con voltaje distinto del indicado. FUNCIONES BÁSICAS POWER ON / OFF Pulse el interruptor principal ON / OFF para encender / apagar el dispositivo. NOTA: Después de unos 15 minutos de inactividad, la unidad cambia automáticamente al modo de espera. Para encender de nuevo la unidad, pulse el / / PAIR / STANDBY (23). SELECION DE LAS FUNCIÓN Para cambiar el modo de operación, pulse varias veces el botón FUNC./LIGHT (25) para seleccionar USB (-1- en la pantalla) / AUX / BLUETOOTH (BT en la pantalla). AJUSTE DEL VOLUMEN 1. Gire el volumen VOL. (21) para aumentar o disminuir el volumen global de la reproducción. 2. Gire el GUITAR VOL (13) para ajustar el volumen de la señal en la entrada GUITAR(10). 3. Gire el MIC VOL (16) para ajustar el volumen del las entradas de señal MIC1(9) y MIC2 (8). El ajuste funciona en las dos entradas simultáneamente ECUALIZADOR Esta unidad cuenta con un sistema de ecualizador de audio incorporado. Utilice los ajustes EQ OPERATION(5) para seleccionar una buena dinamica para el sonido. AJUSTE DE TONO AGUDOS Y BASS Gire el mando TREEBLE (19) para ajustar los agudos. Gire el mando BASS (20) para ajustar los graves. EFECTO ECHO Gire la perilla de ECHO (15) para aumentar o disminuir el efecto de eco en la entrada MIC1 y MIC2. Nota: el eco sólo funciona en las entradas de micrófono. EFECTO DISCO-LIGHT Para activar los efectos DISCO-LIGHT pulse por alguno secondos el boton FUNC. / LIGHT (25). Usted puede elegir entre ocho efectos diferentes. Para cancelar el efecto DISCO-LIGHT, mantenga pulsado el botón FUNC. / LUZ (25) más veces hasta que la pantalla muestre "OFF". CARGA USB Es posible utilizar el USB CHARGE (7) para cargar dispositivos USB externos. Nota 1: No utilice este conector para la reproducción de archivos de audio desde dispositivos externos (utilize la entrada USB, consulte el capítulo ENTRADA USB). Nota 2: las operaciones de recarga sólo es posible cuando el dispositivo está encendido. ENTRADA USB 1. Pulse el botón FUNC. (25) en la unidad y seleccione "-1-". 2. Inserte la memoria USB en el puerto USB (26). La reproducción se inicia automáticamente. 3. Para hacer una pausa en la reproducción, pulse el / (23), la pantalla muestra el icono P. 4. Para reanudar la reproducción, pulse el botón de nuevo / (23). 5. Pulse la tecla: (22) mientras se escucha para ir a la siguiente pista, mientras que la tecla 9 (24) a las pistas anteriores. 6. Mantenga pulsado el boton: (22) o 9 (24) mientras se escucha buscar rápidamente un pasaje musical en particular. Suelte el botón para reanudar la reproducción normal. NOTAS - El dispositivo puede no ser compatible con algunos dispositivos USB, esto se debe a la incompatibilidad de algunos procesadores. - Para evitar interferencias perjudiciales, siempre conecte los dispositivos USB directamente a la unidad, no utilice cables de extensión. 15 XF 1000KB ESPANOL OPERACIÓN BLUETOOTH 1. Encienda el dispositvo y pulse el botón FUNC. (25) para seleccionar la función Bluetooth, la pantalla muestra BT. 2. En el modo Bluetooth, el LED PAIR (12) comenzará a parpadear, el sistema entra automáticamente en la búsqueda. 3. Active la función Bluetooth en el dispositivo externo a acoplar. 4. Inicie una búsqueda de dispositivos. Después seleccionar el "XF1000KB". 5. Introduzca la contraseña "0000" si es necesario. 6. Pulse el tasto/ / PAIR (23), para empezar a jugar y los botones 9 (24) o : (22) para la selección de canciones. 7. Mantenga pulsado el botón durante unos segundos / / PAR (23) para eliminar el dispositivo emparejado y hacer una nueva operación de emparejamiento. AUX-IN 1. Pulse el botón FUNC. (25) en la unidad para seleccionar la entrada "AUX". 2. Conecte cualquier unidad equipada con salida de audio a través de un conector de 3,5 mm del cable (no incluido) a la toma AUX IN (11). 3. Utilice el dispositivo externo de sus comandos. USO DEL MICRÓFONO 1. Conecte el micrófono en la entrada MIC1 (9) o MIC2 (8). 2. Encienda el micrófono con el interruptor en el mango del micrófono en la posición ON. 3. Ajuste el volumen de la entrada de micrófono y el efecto de eco que desee utilizando los comandos apropiados. Nota: puede utilizar dos micrófonos al mismo tiempo (segundo micrófono no incluido). ENTRADA DE GUITARRA Este dispositivo puede amplificar una guitarra u otro instrumento musical preamplificado. 1. Conecte el cable de la guitarra insertándolo en la entrada GUITAR(10). 2. Ajuste el volumen de la entrada GUITAR como desee utilizando el comando apropiado. ESPECIFICACIONES Fuente de alimentación: Consumo: Potencia máxima de salida: Barra de sonido Dimensiones: Peso: . ................................................ AC 230V 50Hz - bateria plomo-ácido interna recargable 12V 7.2A . ............................................................................................ Max 30W . ................................................................................................ 100 W . ............................................................................... 330x335x600mm ��������������������������������������������������������������������������������������������������� 14 kg NOTA INFORMATIVA SOBRE LA ELIMINACIÓN Y TRATAMIENTO DE LAS PILAS Advertencia: Sólo el personal de alta cualificación deberían poder realizar esta operación! REMOCIÓN DE LA BATERÍA El aparato no debe estar enchufado a la toma de red para realizar esta operación! 1. Retire los tornillos que sujetan la estructura del carro y lo desarme. 2. Retire los tornillos que fijan el panel posterior del altavoz amplificado y retire el panel; 3. Localice la batería; 4. Retire los tornillos que fijan los soportes de la batería, quitar los soportes, desconecte la batería y retírela. Las pilas usadas no se deben tirar con la basura doméstica o arrojados al fuego o al agua. Las baterías usadas deben reciclarse o desecharse en centros de recogida de residuos separados. 16 WARNINGS XF 1000KB ATTENZIONE WARNING! RISCHIO DI SCOSSE ELETTRICHE! NON ESPORRE A PIOGGIA E UMIDITÀ DANGER OF ELECTRIC SHOCK! DO NOT EXPOSE TO RAIN OR HUMIDITY ATTENZIONE: NON APRITE L'APPARECCHIO. ALL'INTERNO NON VI SONO COMANDI MANIPOLABILI DALL'UTENTE NE PARTI DI RICAMBIO. PER TUTTE LE OPERAZIONI DI SERVIZIO RIVOLGERSI AD UN CENTRO DI ASSISTENZA AUTORIZZATO TREVI WARNING: DO NOT OPEN THE SET. NEITHER CONTROLS OR SPARE PARTS TO BE USED BY THE USER ARE TO BE FOUND INSIDE IT. APPLY TO AUTHORISED TREVI CENTERS FOR SERVICE OPERATIONS. ATTENTION ACHTUNG RISQUE DE DECHARGES ELECTRIQUES NE PAS EXPOSER A LA PLUIE ET A L’HUMIDITE GEFAHR ELEKTRISCHER SCHLÄGE NICHT DER FEUCHTIGKEIT UND DEM REGEN AUSSETZEN ATTENTION: NE PAS OUVRIR L’APPAREIL, A L’INTERIEUR IL N’Y A PAS DE COMMANDES A MANIPULER PAR L’UTILISATEUR OU DE PIECES DE RECHANGE. POUR TOUTES LES OPERATIONS DE SERVICE IL FAUT S’ADRESSER A UN SERVICE D’ASSISTANCE AUTORISE TREVI. ACHTUNG: DAS GERÄT NICHT ÖFFNEN. IM INNERN BEFINDEN SICH KEINE VOM BENUTZER SELBST INSTANDSETZBAREN TEILE UND AUCH KEINE ERSATZTEILE. FÜR JEGLICHE SERVICEARBEITEN, WENDEN SIE SICH BITTE AN EINE TREVI AUTORISIERTEN KUNDENDIENSTSTELLE. ATENÇÃO ATENCION PELIGRO DE CHOQUES ELECTRICOS NO EXPONER A LLUVIA Y HUMEDAD PERIGO DE CHOQUES ELÉTRICOS NÃO EXPOR A CHUVA E UMIDADE ATENÇÃO: NÃO ABRIR O APARELHO. NO INTERIOR DO MESMO NÃO EXISTEM COMANDOS OU PEÇAS DE SUBSTITUIÇÃO QUE POSSAM SER MANIPULADOS PELO USUÁRIO. EM CASO DE EVENTUAL OPERAÇÃO DE SERVIÇO, DIRIGIR-SE A UM CENTRO DE ASSISTÊNCIA AUTORIZADO TREVI ATENCION: NO ABRIR EL APARATO, EN SU INTERIOR NO HAY MANDOS QUE PUEDAN SER MANIPULADOS POR EL USUARIO NI PARTES DE REPUESTO. PARA TODAS LAS OPERACIONES DE SERVICIO DIRIGIRSE A UN CENTRO DE ASISTENCIA AUTORIZADO TREVI. UK PLUG ONLY WIRES CONNECTIONS TO A UK THREE-PIN PLUG PROSOCH The wires in this mains lead are coloured in accordance with the following wiring codes: Blue:.............................................................Neutral Brown:..........................................................Live The wires in this mains lead must be connected to the terminals in the plug as follows: Blue wire:.....................................................N or Black Brown wire:..................................................L or Red Neither wire is to be connected to the earth (E or W) terminal of three-pin plug. Should the fuse fail in the plug remove the plug form the wall socket and replace the fuse with a 3 Amp. ASTA approved BS 1362 fuse. KINDUNOS HLEKTROPLHXIAS MHN EKQETETE SE BROCH KAI UGRASIA PROSOCH. MHN ANOIGETE THN SUSKEUH. DEN UPARCOUN STO ESWTERIKO THS ENTOLES POU NA MPOREI NA CEIRISTEI O KATANALWTHS OUTE ANTALLAKTIKA TMHMATA. GIA OPOIADHPOTE EPISKEUH H¢ SUNTHRHSH APEUQUNQEITE SE ENA APO TA EXOUSIODOTHMENA KENTRA ANTIPROSWPEIAS TREVI. 17 CORRECT DISPOSAL WARNINGS XF 1000KB Avvertenze per il corretto smaltimento del prodotto. Il simbolo riportato sull'apparecchiatura indica che il rifiuto deve essere oggetto di "raccolta separata" pertanto il prodotto non deve essere smaltito insieme ai rifiutiurbani. L'utente dovrΰ consegnare il prodotto presso gli appositi "centri di raccolta differenziata" predisposti dalle amministrazioni comunali, oppure consegnarlo al rivenditore contro acquisto di un nuovo prodotto. La raccolta differenziata del rifiuto e le successive operazioni di trattamento, recupero e smaltimento favoriscono la produzione di apparecchiature con materiali riciclati e limitano gli effetti negativi sull'ambiente e sulla salute causati da una gestione impropria del rifiuto. Lo smaltimento abusivo del prodotto comporta l'applicazione di sanzioni amministrative. Precautions for correct disposal of the product. The symbol shown on the equipment indicates that waste must be disposed of in "separate collection" and so the product must not be disposed of together with urban waste. The user must take the product to special "separate waste collection centres" provided by local government, or deliver it to the retailer against the purchase of a new product. Separate collection of waste and subsequent treatment, recycling and disposal operations promotes the production of equipment with recycled materials and limits negative effects on the environment and on health caused by improper handling of waste. Illegal disposal of the product leads to the enforcement of administrative penalties. Recommandations pour l'élimination correcte du produit. Le symbole figurant sur l'appareil indique que le produit fait l'objet d'une " collecte sιparιe ". C'est pourquoi, le produit ne doit pas κtre ιliminι avec les dιchets urbains. L'utilisateur doit remettre le produit auprθs de " dιcharges spιcialisιes de collecte sιparιe " prιvues par les autoritιs locales, ou bien le rendre au revendeur quand il achθtera un nouvel appareil ιquivalent. La collecte sιparιe du produit et les opιrations successives de traitement, recyclage et ιlimination favorisent la production d'appareils composιs par des matιriaux recyclιs ainsi que permettent d'ιviter des effets nιgatifs sur l'environnement et sur la santι des personnes suite ΰ une gestion impropre du dιchet. Toute ιlimination abusive du produit entraξne l'application de sanctions administratives. Hinweise zur ordnungsgemäßen Entsorgung des Produkts. Das auf dem Gerδt angebrachte Symbol weist darauf hin, dass das Altgerδt "getrennt zu sammeln" ist und das Produkt daher nicht zusammen mit dem Gemeindeabfall entsorgt werden darf. Der Benutzer muss das Produkt zu den entsprechenden, von der Gemeindeverwaltung eingerichteten "Wertstoffsammelstellen" bringen oder dem Hδndler beim Kauf eines neuen Produkts όbergeben. Die getrennte Mόllsammlung und anschlieίende Aufbereitung, Wiederverwertung und Entsorgung fφrdern die Herstellung von Gerδten unter Verwendung wiederverwerteter Materialien und vermindern die negativen Auswirkungen auf die Umwelt und Gesundheit in Folge einer falschen Mόllverwaltung. Die widerrechtliche Entsorgung des Produkts fόhrt zur Auferlegung von Verwaltungsstrafen. Advertencias para la correcta eliminación del producto. El sνmbolo que aparece en el aparato indica que el residuo debe ser objeto de "recogida selectiva" por tanto el producto no se debe eliminar junto con residuos urbanos. El usuario deberα entregar el producto a los "centros de recogida selectiva" creados por las administraciones municipales o bien al distribuidor cuando adquiera un nuevo producto. La recogida selectiva del residuo y las sucesivas operaciones de tratamiento, recuperaciσn y eliminaciσn favorecen la fabricaciσn de aparatos con materiales reciclados y limitan los efectos negativos en el medio ambiente y la salud causados por una gestiσn incorrecta del residuo. La eliminaciσn abusiva del producto da lugar a la aplicaciσn de sanciones administrativas. 18 CORRECT DISPOSAL WARNINGS XF 1000KB Advertências para a correcta demolição do produto. O sνmbolo indicado na aparelhagem indica que o resνduo deve ser objecto de "recolha separada" portanto o produto nγo deve ser desmantelado junto dos resνduos urbanos. O utilizador deverα entregar o produto nos apropriados "centros de recolha diferenciada" predispostos pelas administraηυes comunais, ou entregα-lo ao revendedor em troca de uma compra de um novo produto. A recolha diferenciada do resνduo e as sucessivas operaηυes de tratamento, recuperaηγo e desmantelamento favorecem a produηγo de aparelhagens com materiais reciclados e limitam os efeitos negativos no ambiente e na saϊde causados por uma gestγo imprσpria do resνduo. O desmantelamento abusivo do produto comporta a aplicaηγo de sanηυes administrativas. Προειδοποιήσεις για τη σωστή διάθεση του προϊόντος. Το σύμβολο που απεικονίζεται επάνω στη συσκευή υποδεικνύει ότι το απόβλητο πρέπει να αποτελέσει αντικείμενο “χωριστής συλλογής” ως εκ τούτου το προϊόν δεν πρέπει να διατίθεται μαζί με τα αστικά απόβλητα. Ο χρήστης θα πρέπει να παραδώσει το προϊόν στα ειδικά “κέντρα διαφοροποιημένης συλλογής” που έχουν διευθετηθεί από τις δημοτικές διοικήσεις, ή να το παραδώσει στο κατάστημα πώλησης με την αγορά ενός νέου προϊόντος. Η διαφοροποιημένη συλλογή του αποβλήτου και οι ακόλουθες επεμβάσεις επεξεργασίας, ανάκτησης και διάθεσης βοηθούν την παραγωγή συσκευών με ανακυκλωμένα υλικά και περιορίζουν τις αρνητικές επιπτώσεις για το περιβάλλον και την υγεία που προκαλούνται από την ακατάλληλη διαχείριση του αποβλήτου. Η αυθαίρετη διάθεση του προϊόντος συνεπάγεται την εφαρμογή διοικητικών κυρώσεων. 19 PB Trevi S.p.A. Strada Consolare Rimini-San Marino, 62 47924 Rimini (Rn) Italia Tel. 0541/756420 Made in CHINA Fax 0541/756430 www.trevi.it e-mail: [email protected]


© Copyright 2026