
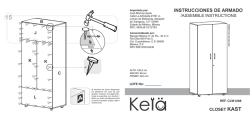
instrucciones para armar biblioteca archivador ref
35.0 Lbs.
15.8 Kg.
C
A
N
33.06 Lbs.
15.0 Kg.
J
33.06 Lbs.
15.0 Kg.
E
55.11 Lbs.
25.0 Kg.
E
B
INSTRUCCIONES PARA ARMAR
BIBLIOTECA ARCHIVADOR
REF.: B2AR 2705
HECHO EN COLOMBIA
ASSEMBLY INSTRUCTIONS
4-DRAWER STORAGE /
FILING CABINET
REF.: B2AR 2705
55.11 Lbs.
25.0 Kg.
MADE IN COLOMBIA
D
B2AR 2705 + BE 2704
Este manual contiene
información IMPORTANTE.
Por favor léalo y guardelo
para consultas en el
futuro.
This instruction manual
contains IMPORTANT
information. Please
read and keep for
future reference.
Lea detenidamente y siga
en orden consecutivo las
Instrucciones de Armado
Read the instructions
carefully and follow them
in consecutive order
Proteja el mueble del agua
y de la humedad. No use
el mueble al aire libre
Protect furniture from
water and moisture. This
piece of furniture must not
be used outdoors
No lo exponga al calor
Do not expose it to heat
No lo golpee ni lo martille
(sólo donde se le indica)
Do not hit or hammer the
structure (unless it is so
indicated)
ORDEN DE PRODUCCIÓN
PRODUCTION ORDER
CODIGO:
CODE:
FECHA:
DATE:
No pinte ni use elementos
abrasivos para limpiar el
mueble
Do not paint or use
abrasive elements to clean
your unit
No arrastre ni se suba al
mueble. Si necesita
moverlo, levántelo
Do not drag or cimb on
your furniture. If you need
to move it, lift it
IDENTIFICACIÓN DE PARTES
PARTS IDENTIFICATION
IDENTIFICACIÓN DE HERRAJES
DESPIECE
HARDWARE IDENTIFICATION
EXPLODED VIEW
A
O
O
K(x2)
M(x2)
J
P
L(x2)
B
I(x2)
F(x2)
E(x2)
H(x2)
D
P
G(x2)
TABLA DE PIEZAS
PARTS LIST
C
PIEZA
PARTS
A
B
C
D
E
F
G
H
I
J
K
L
M
N
O
P
CANTIDAD
QUANTITY
1
1
1
1
2
2
2
2
2
1
2
2
2
1
2
4
( # 5)
4 TOPES
4 STOPPERS
(#9)
1 BISEL
PLÁSTICO
1 PLASTIC BEVEL
M(x2)
(#3)
24 TUERCAS
24 CAM LOCKS
( #6)
4 TAPAS
TUERCA
4 CAM CAPS
(#7)
36 PUNTILLAS
36 NAILS
(#8)
4 DESLIZADORES
4 GLIDERS
( # 10 )
4 MANIJAS Y
8 TORNILLOS
4 HANDLES AND
8 SCREWS
( # 11 )
8 TUBOS
8 TUBES
( # 12 )
4 CORREDERAS
4 SLIDES
( #15 )
1 PLATINA
1 BRACKET
( # 16 )
4 CORREDERA FULL
EXTENSION
4 FULL EXTENSION SLIDE
( # 18B )
1 CHAPA
1 LOCK
( # 19 )
5 TORNILLOS
DESLIZADOR/CHAZO
5 GLIDERS/RAMPLUG
WALL ANCHOR
SCREWS
(#2)
24 PERNOS
24 CAM STUDS
½”
13 mm
( # 14 )
( # 13 )
48 TORNILLOS
4 CORREDERAS CORREDERA/CHAPA
4 DRAWER SLIDES 48 SCREWS SLIDES/LOCK
( #17 )
4 TAPONES
K(x2)
N
(#1)
36 TARUGOS
36 WOODEN DOWELS
( #4)
8 TORNILLO
DRYWALL
8 DRYWALL
SCREW
4 STOPPERS
( # 18A )
1 LISTON CHAPA
1 LOCK STRIP
5/8”
16 mm
P
L(x2)
( # 20 )
2 PLATINAS
2 BRACKETS
IMPORTANTE: antes de empezar a ensamblar el mueble, lea detenidamente las instrucciones. Arme el mueble
sobre su caja, para no rayarlo. Si falta una parte o piensa que está defectuosa no devuelva el mueble al almacén; le
agradecemos llamar a nuestra línea gratuita en Colombia 01800 09 33444. Venezuela 0212-238.7584 Guatemala 685
2401 al 05. o en USA 1-800-333-0665
IMPORTANT: Before proceeding to assemble the unit, read the intructions very carefully. Assemble the unit on top of
the empty box, to prevent scratches. If a part is missing, or you think is defective, do not return the unit to the store.
Please, call us toll-free, in Colombia 01800 09 33444. Venezuela 0212-238.7584. Guatemala 685 2401 to 05. or USA 1800-333-0665.
( # 21 )
5 TORNILLOS
PLATINAS
5 BRACKETS
SCREW
( # 22 )
1 CHAZO
1 RAMPLUG
WALL ANCHOR
Tenga precaución al abrir la bolsa de herrajes de no perder ninguno. Compruebe si el
contenido de las piezas es el correcto; separe los herrajes en grupos para facilitar su
identificación durante el armado.En caso de un faltante no devuelva el mueble al
almacén, le agradecemos llamar a la línea gratuita en Colombia 01800 09 33444.
Venezuela 0212-238.7584. Guatemala 685 2401 al 05. USA 1-800-333-0665.
Use caution when opening the bag containing the hardware parts so you do not lose
any. Verify that its contents are
correct; separate the hardware into groups for easier identification during assembly. If
any part is missing, do not return
the unit to the store, please call, toll-free: in Colombia 01800 09 33444, in Venezuela
0212-238-7584, in Guatemala 685 2401 to 05 and in the USA 1-800-333-0665.
RECOMENDACIONES DE ENSAMBLE ASSEMBLY SUGGESTIONS
INSTALACIÓN DE LA TUERCA Y EL PERNO DE EXPANSIÓN
La señal apunta
hacia la perforación
del canto sin acabado
Make sure the orientation mark
on the cam lock points to the hole
on the unfinished edge of
the panel
Perforación Amplia
Wide Hole
Canto sin acabado
Unfinished panel edge
Introdúzcalos
sólo hasta
la mitad
Insert them half
way only
En las perforaciones
de los cantos
NO INSERTE
pernos
DO NOT insert cam
studs into the holes
on the unfinished
edge of the panel.
Inserte solamente en las
perforaciones que más
adelante se indicarán
Insert only into the holes
that will be pointed out later on.
TARUGOS
AJUSTE DE PARTES
WOODEN DOWELS
ADJUSTING THE PARTS
¿Cuánto debe girar?
En las perforaciones
que conducen a los
orificios de las caras
NO INSERTE
tarugos
DO NOT insert wooden dowels
into the holes that lead to
the wide holes on the sides.
How much should it be turned?
Golpée
suavemente
Carefully tap
Señal de
Dirección
Orientation
Mark
De un correcto armado del mueble depende su buen funcionamiento.
Properly assembled furniture provides proper performance.
Señal de dirección
Orientation Mark
IMPORTANTE / IMPORTANT
INSTALLING THE CAM LOCKS AND CAM STUD EXPANSION
1
PASOS PARA ENSAMBLAR / ASSEMBLY STEPS
PREPARACIÓN DE PIEZAS
PARTS SET UP
CORREDERA FULL EXTENSION
FULL EXTENSION SLIDE
Paso # 1. Para poder separar las partes, halar la extensión (figura A)
hasta el tope y mueva el seguro hacia abajo (figura B).
Step # 1. To be able to separate the parts, pull the extension (figure A)
to the end and move the lock down (figure B)
Paso # 2 remover toda la pieza.
Step # 2. Remove the entire piece.
B
A
Para que haya un buen funcionamiento de la chapa (#18-A y #18B) en el mueble, el Listón Chapa (#18-A) debe de estar recto.
Antes de instalarlo tenga en cuenta que no se encuentre doblado
o torcido Si se encuentra doblado o torcido por favor enderécelo
e instálelo en el mueble (pieza B).
In order for the Lock (#18-A and #18-B) to function properly, the Lock Strip (#18-A)
must not be bent or twisted. Before installing it to Panel “B”, please check and
make sure that the Lock Strip (#18-A) is not bent or twisted. If it is, straighten it out
and install it.
B
B
(#14)
Coloque un tornillo corredera (#14) en la perforación que
señala la flecha, ubique los otros dos tornillos donde
coincida con las perforaciones guías de las parte A/B.
Deslice el riel para ubicar las
perforaciones en las pieza B
como muestra en las Gráficas
Place a Drawer Slide Screw (#14) in the hole indicated by the arrow,
place the other two screws to coincide with the pre-drilled holes in Parts
A/B.
Slide rail to locate the holes in
parts B as shown in the diagram.
EN ESTE PASO NECESITA:
MARTILLO
/HAMMER
ATORNILLADOR DE ESTRELLA
/ PHILLIPS SCREWDRIVER
HERRAJES
HARDWARE
HERRAMIENTAS
TOOLS
FOR THIS STEP, YOU WILL NEED:
1/2”
13 mm
CORREDERA FULL
LISTON CHAPA
EXTENSION
FULL EXTENSION SLIDE
LOCK STRIP
( # 16 )
( # 18A )
PERNOS
CAM STUDS
(#2)
TORNILLOS
DESLIZADORES
CORREDERA/CHAPA
GLIDERS
SCREWS SLIDES/LOCK
(#8)
( # 14 )
CORREDERAS
SLIDES
( # 12 )
TORNILLOS
DESLIZADOR/ CHAZO
GLIDERS/RAMPLUG
WALL ANCHOR SCREWS
( # 19 )
2
PASOS PARA ENSAMBLAR / ASSEMBLY STEPS
PREPARACIÓN DE PIEZAS
PARTS SET UP
F(x2)
E(x2)
C
J
A
F(x2)
G(x2)
Deslice el riel para ubicar las
perforaciones en las pieza A
como muestra en las Gráficas
G(x2)
Slide rail to locate the holes in
parts A as shown in the diagram.
EN ESTE PASO NECESITA:
MARTILLO
/HAMMER
ATORNILLADOR DE ESTRELLA
/ PHILLIPS SCREWDRIVER
HERRAJES
HARDWARE
HERRAMIENTAS
TOOLS
FOR THIS STEP, YOU WILL NEED:
TOPES
STOPPERS
( # 5)
TORNILLOS DESLIZADOR/ CHAZO
GLIDERS/RAMPLUG WALL ANCHOR SCREWS
( # 19 )
TARUGOS
WOODEN DOWELS
(#1)
PERNOS
CAM STUDS
(#2)
TUERCAS
CAM LOCKS
(#3)
1/2”
13 mm
CORREDERAS
SLIDES
( # 12 )
TORNILLOS
CORREDERA/CHAPA
SCREWS SLIDES/LOCK
( # 14 )
CORREDERA FULL
EXTENSION
FULL EXTENSION SLIDE
( # 16 )
MANIJAS Y
TORNILLOS
HANDLES AND
SCREWS
( # 10 )
DESLIZADORES
GLIDERS
(#8)
3
PASOS PARA ENSAMBLAR / ASSEMBLY STEPS
PREPARACIÓN DE PIEZAS
PARTS SET UP
1
A
C
H(x2)
D
D
B
K(x2)
I(x2)
2
L(x2)
L(x2)
O
O
C
BISEL PLASTICO
PLASTIC BEVEL
O
N
N
O
B
N
Pin
Antes de asegurar la chapa (#18B)
en la parte N, compruebe que el pin
este hacia abajo y la chapa (#18B)
gire hacia la izquierda.
Before installing Lock (#18B) to Part
N, make sure that the pin is in the
down position and that the Lock
(#18B) turns to the left.
EN ESTE PASO NECESITA:
MARTILLO
/HAMMER
ATORNILLADOR DE ESTRELLA
/ PHILLIPS SCREWDRIVER
HERRAJES
HARDWARE
HERRAMIENTAS
TOOLS
FOR THIS STEP, YOU WILL NEED:
TARUGOS
WOODEN DOWELS
(#1)
½”
13 mm
TOPES
STTOPERS
( # 5)
PERNOS
CAM STUDS
(#2)
TUERCAS
CAM LOCKS
(#3)
BISEL
PLÁSTICO
PLASTIC BEVEL
(#9)
PUNTILLAS
NAILS
(#7)
CHAPA
LOCK
( # 18B )
TORNILLOS
CORREDERA/CHAPA
SCREWS SLIDES/LOCK
( # 14 )
MANIJAS Y
TORNILLOS
HANDLES AND
SCREWS
( # 10 )
4
PASOS PARA ENSAMBLAR / ASSEMBLY STEPS
K(x2)
5
4
Dependiendo la carpeta que usted emplee
ajustar según la gráfica
M(x2)
L(x2)
According to the file folder size, adjust as shown
in the image insert
P(x2)
J/N
Carpetas tamaño Carta / A4
Letter / A4 size Folders
Carpetas tamaño Oficcio
Legal size Folders
K(x2)
I(x2)
L(x2)
3
I(x2)
6
7
A
C
C
F(x2)
I(x2)
F/G/K/L
N
J
H(x2)
B
N
P(x2)
G(x2)
G(x2)
A
E(x2)
E(x2)
B
G(x2)
D
EN ESTE PASO NECESITA:
MARTILLO
/HAMMER
ATORNILLADOR DE ESTRELLA
/ PHILLIPS SCREWDRIVER
HERRAJES
HARDWARE
HERRAMIENTAS
TOOLS
FOR THIS STEP, YOU WILL NEED:
½”
13 mm
TUBOS
TUBES
( # 11 )
TORNILLO
DRYWALL
DRYWALL
SCREW
( #4)
TAPAS
TUERCA
CAM CAPS
( #6)
TORNILLOS
CORREDERA/CHAPA
SCREWS SLIDES/LOCK
( # 14 )
CORREDERAS
DRAWER SLIDES
( # 13 )
B
5
PASOS PARA ENSAMBLAR / ASSEMBLY STEPS
4
ESTE MUEBLE “B2AR 2705” LO PUEDE USAR SOLO COMO
ARCHIVADOR O COMO BIBLIOTECA/ARCHIVADOR
ADQUIRIENDO EL MUEBLE “BE 2704”
THE 4-DRAWER STORAGE FILING CABINET “B2AR 2705” CAN BE
USED BY ITSELF OR AS A BOOKCASE /STORAGE/FILING CABINET
BY ACQUIRING THE BOOKCASE/HUTCH “BE 2704”.
5
BE 2704
A
Inserte los tarugos (#1) en las perforaciones de las partes A y B
del mueble B2AR 2705 según se muestra en el Paso 3.
Insert the Wooden Dowels (#1) in the holes on Parts “A” and “B” of
cabinet “B2AR 2705” as shown on Step 3.
B
F
F
A/B
F
A/B
O
A
B2AR 2705
3
A
O
B
O
Secure model BE 2704 and B2AR 2705 by
screwing the Brackets (#20) using the Bracket
Screws (#21) as shown in the diagram. The
Brackets (#20) and Bracket Screws (#21) are
included with model “B2AR 2705”.
B
6
C
TAPONES
STOPPERS
Si usted decidió usar este mueble
“B2AR 2705”solo como archivador
coloque los tapones (#17) en las
perforaciones de la parte A y B en vez
de los Tarugos (#1).
(#21)
(#22)
(#19)
C
C
If you decide to use the “B2AR 2705”
only as a 4-Drawer Storage Filing
Cabinet then place the Stoppers (#17)
in the holes of Parts “A” and “B” instead
of the Wooden Dowels (#1).
Asegure los muebles BE 2704 y B2AR 2705 con
los tornillos platinas (#21) a través de las
platinas (#20)según muestra el diagrama.
Las platinas (#20) y tornillos platinas (#21),
están incluidos en la referencia B2AR 2705.
Para fijar el Mueble a la pared tenga en cuenta que
la pared sea solida de ladrillo y concreto o a un
taco de madera, luego con ayuda de una broca
para pared (tungsteno) 1/4”, perforela. Después
introduzca el chazo plástico (#22). Asegure la
platina (#15) al chazo con un tornillo chazo (#19).
Luego asegure el mueble , parte “C”, a la platina
(#15) con un tornillo platina (#21).
Attach the furniture to the wall, to either a solid
concrete block wall or to a wall stud, by first drilling
a hole, using a ¼” tungsten drill bit. Then, tap the
plastic Ramplug wall anchor (#22) into the hole
until it is flush with the wall. Fasten Bracket (#15)
to the wall by inserting a Ramplug Wall Anchor
Screw (#19) into the Ramplug wall anchor (#22).
Then fasten the furniture, Part “C”, to the Bracket
(#15) using a Bracket Screw (#21).
MARTILLO
/HAMMER
ATORNILLADOR DE ESTRELLA
/ PHILLIPS SCREWDRIVER
HERRAJES
HARDWARE
HERRAMIENTAS
TOOLS
EN ESTE PASO NECESITA:
FOR THIS STEP, YOU WILL NEED:
5/8”
16 mm
TARUGOS
WOODEN DOWELS
(#1)
PLATINAS
BRACKETS
( # 20 )
TORNILLOS
CHAZOS
PLATINAS
RAMPLUG
BRACKETS
WALL ANCHOR
SCREW
( # 22 )
( # 21 )
1 9/16
40 mm
TORNILLOS
DESLIZADORES/CHAZO
GLIDERS/RAMPLUG WALL PLATINA
BRACKET
ANCHOR SCREWS
( # 19)
( #15 )
TAPONES
STOPPERS
( #17 )
MANUAL DEL BUEN USO
GARANTÍA
USER'S GUIDE
-Please read carefully the instructions and follow the assembly steps.
-Do not drag furniture, please lift slightly with the help of another person.
-Cleaning should be with a mild household cleaner.
-In case a liquid spills please dry immediately.
-Dry the furniture with an absorbent cloth lightly moistened..
-Protect the furniture from water and humidity.
-This furniture is not for outdoor use.
-Do not place hot objects on furniture surfaces.
-Do not paint or use abrasives to clean the furniture.
-Do not hit or hammer the structure (only lightly tap as indicated)
-Dust as needed with a clean, lint-free absorbent cloth.
-For more information please call our customer service line.
RANT
GA
5A
IA
-Lea detenidamente y siga en orden consecutivo las instrucciones
de armado.
-No arrastre el mueble, levántelo ligeramente con ayuda de otra
persona para desplazarlo de un lugar a otro.
-Limpie el mueble con su producto limpiador favorito.
-Si se riega un liquido séquelo de inmediato.
-Seque el mueble con un trapo absorbente ligeramente
humedecido.
-Proteja el mueble del agua y de la humedad.
-No use el mueble al aire libre.
-Evite colocar objetos calientes sobre las superficies.
-No pinte ni use elementos abrasivos para limpiar el mueble.
-No lo golpee ni lo martille (sólo donde se indica).
-Limpie el mueble con un paño seco en caso de eliminar el polvo.
-Acuda a la línea de Servicio al Cliente cuando lo crea necesario
para aclarar dudas sobre el mueble.
INVAL le da garantía al comprador
original, por un periodo de cinco años
desde la fecha de la compra, contra
defectos en el material y/o mano de
obra de las partes del mueble. La
palabra defecto es definida en la
garantía como imperfecciones que
perjudican la utilidad del producto. Esta
se limita al reemplazo de partes o herrajes
del mueble que tengan defectos o que falten.
Si la
parte o herraje del mueble es defectuosa, INVAL la reemplazará
sin ningún costo. La labor de ensamble NO está incluida.
ÑOS
Esta garantía aplica bajo condiciones de uso normal, pero no por
defectos que resulten de averías intencionales, negligencia, uso
indebido, exposición a la intemperie o al agua, armado
inadecuado. Las instrucciones de armado deben ser leídas
detenidamente y el armado del mueble debe ser en orden
consecutivo con respecto al manual, para así evitar daños en las
partes o herrajes del mueble.
Como una condición para el reemplazo de una parte por estar
defectuosa, INVAL puede requerir una confirmación del defecto
solicitando la parte averiada.
SERVICIO AL CLIENTE
Para INVAL su satisfacción es lo más importante.
Nuestro departamento de Servicio al Cliente tiene disponible las
siguientes líneas en diferentes países para recibir sus
inquietudes, reclamos e ideas que nos permitan mejorar nuestros
productos y servicio.
Colombia
01 800 09 33444
[email protected]
Guatemala
685 2401 al 05
Venezuela
0212-238.7584
[email protected]
Perú
336 7986
[email protected]

© Copyright 2026