
Wired Doorbell Use and Care Guide
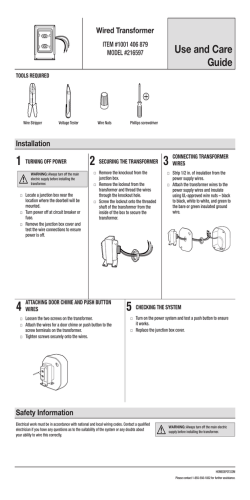
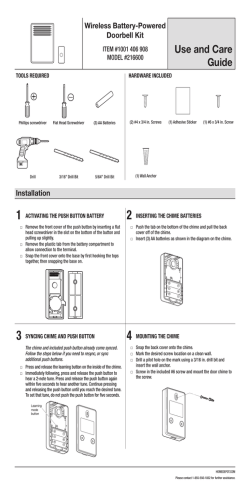
Wired Doorbell
#4x3/4
ITEM #1001 406 912
MODEL #216590
TOOLS REQUIRED
#6x3/4
HARDWARE
INCLUDED
Flat Head Screwdriver
Long Nose Pliers
#4x1 White Zinc
#6x1 Self Tapping
(4) #6 x 1 in. Self-Tapping Screws
FRONT
TRANS
REAR
Phillips screwdriver
Use and Care
Guide
Installation
FRONT
□□ “F” – Front push button wire
□□ “T” – Transformer wire
□□ “R” – Rear push button wire
□□ Disconnect the wires from the
existing chime base and remove the
base from the wall.
REAR
□□ Remove the chime cover from the
chime base.
□□ Place the chime base in the desired
location against the wall, ensure it
is level, and mark the screw hole
mounting locations.
□□ Thread the labeled wires through the
wire entrance hole in the new chime
base.
□□ Drive the included screws through
the screw holes on each mark to
mount the chime.
FRONT
TRANS
REAR
□□ Locate the transformer to determine
the power rating.
□□ Power must be supplied from a 16
Volt AC, 10 Watt transformer.
□□ Remove the chime cover from the
existing chime base.
□□ Using tape, label all wires before
disconnecting them:
TRANS
TRANS
WARNING: Always turn off the main
electric supply before beginning this
procedure.
THE NEW CHIME
3 MOUNTING
BASE
ScrewHardware.ai
FRONT
REAR
THE TRANSFORMER
THE EXISTING
1 VERIFYING
2 REMOVING
POWER RATING
CHIME
216590Inst.ai
4 CONNECTING THE WIRES
5 ATTACHING THE CHIME COVER
□□ Connect the labeled wires to the screw terminals on the
chime base:
□□ Attach the chime cover to the chime base by pressing the
cover firmly onto the base.
□□ “F” to “FRONT screw terminal
□□ “T” to “TRANS” screw terminal
□□ “R” to “REAR” screw terminal
□□ To select a tune for a front door push button, flip the switch on
the base to the left position for 2-note tune or right position for
8-note tune. The back door push button tune will be 1-note.
FRONT
TRANS
REAR
FRONT
TRANS
REAR
21659
HOMEDEPOT.COM
Please contact 1-855-556-1852 for further assistance.
Safety Information
Electrical work must be in accordance with national and local wiring codes. Contact a qualified
electrician if you have any questions as to the suitability of the system or any doubts about
your ability to wire this correctly.
WARNING: Always turn off the main electric
supply before installing the transformer.
Specifications
Package Contents
Wired Door Chime and Mounting Hardware
Finished Product Dimensions
5 in. Height x 8.5 in. Width x 1.75 in. Depth
Doorbell Type
Wired
Number of Tunes
3
Number of Zones
2
Adjustable Volume
Yes
Troubleshooting
Problem
Possible Cause
Solution
Chime does not sound when push button is pressed.
Power to chime is turned off.
Turn on the power to the chime.
Volume control knob is turned down. Verify that the volume control knob on the base is
turned up.
Wires are not securely fastened to
the chime.
Check the screw terminals on the chime base and
tighten screws if necessary.
Transformer does not work.
Test the transformer with a voltage meter. If it
does not read the appropriate voltage, turn off
main power supply and replace the transformer.
Warranty
WHAT IS COVERED
The Warrantor is pleased to extend this Warranty to you, the original consumer/end user (“Consumer”) of the doorbell products and listed by model
number below (“Doorbell Product”). This Warranty is valid for any Doorbell Product used in standard residential applications, and may not be assigned or
transferred by you.
Only doorbell products with the following model numbers are covered by this Warranty: 216589, 216590, 216591, 216592, 216593, 216594, 216595,
216596, 216597, 216598, 216599, 216600, 216601, 216602, 216603, 216604 and 216605.
For a period of one (1) year from the date of purchase, Warrantor, at its sole option, will repair, replace or refund the purchase price for any Doorbell Product
used in a standard residential application that malfunctions due to factory defective parts or defective workmanship in the manufacture or assembly of the
Doorbell Product.
WHAT IS NOT COVERED
Warrantor shall have no further liability or obligation except as expressly stated herein.
This Warranty does not apply to any Doorbell Product that has been abused, misused, modified, subjected to abnormal use conditions, stored improperly
prior to installation, or otherwise used in any way not intended by Warrantor.
This Warranty is limited to repair, replacement or refund as set forth above and any additional reimbursement is expressly excluded from this Warranty,
including but not limited to reimbursement for inconvenience, installation costs, loss of use, return shipping charges, and batteries or other expendable
items.
If a claim is made under this Warranty on a product that is no longer available, Warrantor reserves the right to provide a similar product of comparable
quality and value.
To make a claim under this Warranty, the Consumer must, within ninety (90) days of actual or constructive knowledge of damage covered by this Warranty,
return the product to your local The Home Depot store, or call Customer Service at 1-855-556-1852.
Warrantor does not make any implied warranty of merchantability or fitness of the product for a particular purpose. There are no other warranties that
extend beyond the description on the face hereof.
This Warranty gives you specific legal rights and you may have additional rights under applicable law.
Contact the Customer Service Team at 1-855-556-1852 or visit www.HomeDepot.com.
HOMEDEPOT.COM
Please contact 1-855-556-1852 for further assistance.
Timbre con cable
#4x3/4
TEMA #1001 406 912
MODELO #216590
HERRAMIENTAS NECESARIAS
#6x3/4
HERRAJES
INCLUIDOS
#4x1 White Zinc
Alicates de punta larga
#6x1 Self Tapping
(4) Tornillos Autorroscantes
Núm. 6 X 1 Plg
REAR
Destornillador de
cabeza plana
FRONT
TRANS
Destornillador Phillips
Guía de uso y
mantenimiento
Instalación
VERIFICAR LA
1 CÓMO
POTENCIA NOMINAL DEL
QUITAR LA CAMPANILLA
INSTALAR LA BASE DE
2 CÓMO
3 CÓMO
EXISTENTE
LA NUEVA CAMPANILLA
ScrewHardware.ai
ADVERTENCIA: Corta siempre el
suministro principal de electricidad antes
de comenzar este procedimiento.
TRANS
REAR
□□ Quita la cubierta de campanilla
de su base.
□□ Coloca la base de campanilla en
el lugar deseado contra la pared,
asegúrate de que está nivelada y
marca los lugares de los orificios
para tornillos de instalación.
□□ Inserta los cables etiquetados
a través del orificio de entrada
correspondiente en la base de
la campanilla nueva.
□□ Inserta los tornillos (incluidos)
a través de los orificios
correspondientes en cada marca
para instalar la campanilla.
FRONT
TRANS
REAR
□□ Localiza el transformador para
determinar la potencia nominal.
□□ La energía debe suministrarse
desde un transformador de CA
de 16 V y 10 W.
□□ Quita la cubierta de campanilla
de su base.
□□ Usando cinta adhesiva, etiqueta
todos los cables antes de
desconectarlos:
□□ “F” – cable frontal del botón
□□ “T” – cable del transformador
□□ “R” – cable posterior del botón
□□ Desconecta los cables de la base
de campanilla y retira la base de la
pared.
FRONT
FRONT
TRANS
REAR
TRANSFORMADOR
216590Inst.ai
4 CÓMO CONECTAR LOS CABLES
□□ Fija la cubierta de la campanilla a la base presionando
aquella firmemente sobre esta.
216590Inst
FRONT
TRANS
REAR
FRONT
TRANS
REAR
□□ Conecta los cables etiquetados a las terminales de tornillos
en la base de la campanilla.
□□ “F” a la terminal de tornillo “FRONTAL”
□□ “T” a la terminal de tornillo del “TRANSFORMADOR”
□□ “R” a la terminal de tornillo “POSTERIOR”
□□ Para seleccionar una melodía del botón de una puerta
de entrada, lleva el interruptor de la base hacia la izquierda
para una melodía de 2 notas o hacia la derecha para una
de 8 notas. La melodía del botón de la puerta trasera será
de 1 nota.
5 CÓMO INSTALAR LA CUBIERTA DE LA CAMPANILLA
HOMEDEPOT.COM
Para más asistencia, llama al 1-855-556-1852.
Información de seguridad
El trabajo eléctrico debe realizarse conforme a los códigos de cableado nacionales y locales.
Contacta a un electricista calificado si tienes alguna pregunta sobre la idoneidad del sistema o
dudas sobre tu capacidad para realizar el cableado correctamente.
ADVERTENCIA: Corta siempre el suministro
principal de electricidad antes de instalar el
transformador.
Especificaciones
Contenido del paquete
Campanilla de puerta con cable y herrajes de instalación
Dimensiones del producto terminado
5 Plg Alto x 8.5 Plg Ancho x 1.75 Plg Profundidad
Tipo de timbre de puerta
Con cable
Número de Melodías
3
Número de Zonas
2
Volumen ajustable
Sí
Solución de problemas
Problema
Causa posible
Solución
La campanilla no suena cuando se presiona el botón.
No hay suministro de electricidad a
la campanilla.
Enciende el suministro de electricidad a la
campanilla.
La perilla de control de volumen
está en nivel bajo.
Comprueba que la perilla de control de volumen
en la base esté en nivel alto.
Los cables no están bien conectados Verifica las terminales de los tornillos en la base
a la campanilla.
de la campanilla y aprieta los tornillos si es
necesario.
El transformador no funciona.
Comprueba el transformador con un voltímetro.
Si la lectura de voltaje no es la adecuada, corta
el suministro principal de electricidad y
reemplaza el transformador.
Garantía
QUÉ CUBRE LA GARANTÍA
El Garante se complace en extender esta Garantía a usted, el consumidor original/usuario final (“Consumidor”) de los timbres enumerados más abajo
por número de modelo (“Timbre”). Esta garantía es válida para cualquier Timbre usado en aplicaciones residenciales estándar y no puede ser cedida
ni transferida por usted.
Sólo los timbres con los siguientes números de modelo están cubiertos por esta Garantía: 216589, 216590, 216591, 216592, 216593, 216594, 216595,
216596, 216597, 216598, 216599, 216600, 216601, 216602, 216603, 216604 y 216605.
Por un período de un (1) año después de la fecha de compra, el Garante, a su entera discreción, reparará, reemplazará o reembolsará el precio de la
compra de cualquier Timbre, usado en aplicaciones residenciales estándar, que no funcione bien debido a piezas, fabricación o ensamblaje defectuoso.
QUÉ NO CUBRE LA GARANTÍA
El Garante no tendrá más responsabilidad u obligación salvo aquellas enunciadas aquí.
Esta Garantía no cubre cualquier Timbre que haya sido objeto de uso indebido o abusivo, alteraciones, uso bajo condiciones anormales, almacenamiento
inadecuado antes de la instalación, ni que haya sido usado de alguna manera diferente a las establecidas por el Garante.
Esta Garantía se limita a la reparación, reemplazo o reembolso como se dispone más arriba, y cualquier reembolso adicional está expresamente excluido
de esta Garantía, por ejemplo, pero sin limitarse a, los reembolsos por inconvenientes, costos de instalación, pérdida por uso, cargos por envíos de
devoluciones, y baterías u otros artículos perecederos.
Si se hace un reclamo bajo esta Garantía sobre un producto que ya no está disponible, el Garante se reserva el derecho a reemplazar con un producto
similar de calidad y valor equivalente.
Para hacer una reclamación al amparo de esta Garantía, el Consumidor tiene que, en un plazo de noventa (90) días desde la detección de un daño real o
constructivo cubierto por esta Garantía, contactar al Servicio al Cliente por el 1-855-886-1852 o devolver el producto a su tienda local de The Home Depot.
EL GARANTE NO DA NINGUNA GARANTÍA IMPLÍCITA DE COMERCIALIZACIÓN NI DE IDONEIDAD DEL PRODUCTO PARA UN PROPÓSITO PARTICULAR. NO HAY
OTRA GARANTÍA MÁS ALLÁ DE LA DESCRITA POR ESTE MEDIO.
Esta garantía otorga derechos legales específicos y usted pudiera gozar de otros derechos según la ley aplicable.
Comuníquese con el Equipo de Servicio al Cliente por el 1-855-556-1852, o visite www.HomeDepot.com.
HOMEDEPOT.COM
Para más asistencia, llama al 1-855-556-1852.


© Copyright 2026