
Rev Ultima pagina - La Nordica
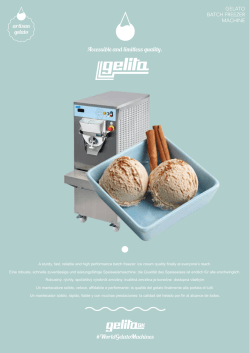
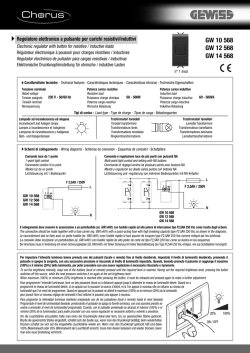
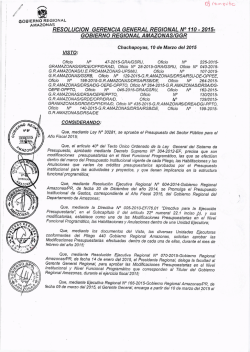
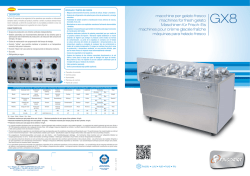
ISTRUZIONI PER L’INSTALLAZIONE, L’USO E LA MANUTENZIONE - IT
INSTRUCTIONS FOR INSTALLATION, USE AND MAINTENANCE - EN
ANWEISUNGEN FÜR DIE AUFSTELLUNG, DEN GEBRAUCH UND DIE WARTUNG - DE
INSTRUCTIONS POUR L’INSTALLATION, L’UTILISATION ET L’ENTRETIEN – FR
INSTRUCCIONES PARA LA INSTALACIÓN, EL USO Y EL MANTENIMIENTO - ES
6018090 KIT VENTILAZIONE OPTIONALE
MONOBLOCCHI
|
NORME DI SICUREZZA SUGLI APPARECCHI - Per il rispetto delle norme di sicurezza è obbligatorio installare e utilizzare i nostri
prodotti seguendo scrupolosamente le indicazioni fornite nel presente manuale.
SAFETY REGULATIONS ON THE APPLIANCES- To meet safety regulations, it is compulsory to install and use our products
carefully following the instructions contained in this manual.
SICHERHEITSVORSCHRIFTEN BEI DEN AUSRÜSTUNGEN - Um die Sicherheitsvorschriften zu beachten, ist es notwendig,
unsere Produkte vorsichtig nach den in diesem Handbuch enthaltenen Anweisungen zu installieren und anzuwenden.
RÉGLÉS DE SÉCURITÉ SUR LES APPAREILS - Selon les normes de sécurité sur les appareils l’acheteur et le commerçant sont
contraints de s’informer sur le fonctionnement correct sur la base des instructions d’emploi.
NORMAS DE SEGURIDAD DE LOS APARATOS - Según las normas de seguridad de los aparatos, el comprador y el comerciante
tienen la obligación de informarse sobre el correcto funcionamiento según las instrucciones de uso.
6018090 KIT VENTILAZIONE OPTIONALE
ITALIANO - INDICE
1. COLLEGAMENTO E MANUTENZIONE VENTILAZIONE (OPZIONALE)...................................................................................... 3
2. REGOLATORE ELETTRICO VENTILATORE..................................................................................................................................3
3.
4.
5.
6.
2.1. FUNZIONAMENTO console............................................................................................................................................................................3
2.2. Funzionamento telecomando:..........................................................................................................................................................................4
2.3. CARATTERISTICHE........................................................................................................................................................................................4
MONOBLOCCO 600-750-900 .......................................................................................................................................................15
MONOBLOCCO 1000 - 1300.........................................................................................................................................................18
Monoblocco GHISA - IRONKER...................................................................................................................................................21
MONOBLOCCO 800 Angolo.........................................................................................................................................................23
EN - CONTENTS
1. CONNECTION AND MAINTENANCE OF VENTILATION (OPTIONAL)......................................................................................... 5
2. FAN ELECTRIC CONTROLLER......................................................................................................................................................5
2.1. CONSOLE OPERATION..................................................................................................................................................................................5
2.2. REMOTE CONTROL OPERATION:................................................................................................................................................................6
2.3. SPECIFICATIONS...........................................................................................................................................................................................6
3. MONOBLOCCO 600-750-900........................................................................................................................................................15
4. MONOBLOCCO 1000 - 1300.........................................................................................................................................................18
5. Monoblocco GHISA - IRONKER..................................................................................................................................................21
6. MONOBLOCCO 800 Angolo.........................................................................................................................................................23
DE - INHALTSVERZEICHNIS
1. LÜFTUNGSVERBINDUNG UND – WARTUNG (OPTIONAL).........................................................................................................7
2. REGLER FÜR GERÄTE...................................................................................................................................................................7
3.
4.
5.
6.
2.1. BETRIEB DER KONSOLE...............................................................................................................................................................................7
2.2. BETRIEB MIT FERNBEDIENUNG:.................................................................................................................................................................8
2.3. TECHNISCHE DATEN.....................................................................................................................................................................................8
MONOBLOCCO 600-750-900........................................................................................................................................................15
MONOBLOCCO 1000 - 1300.........................................................................................................................................................18
Monoblocco GHISA - IRONKER...................................................................................................................................................21
MONOBLOCCO 800 Angolo.........................................................................................................................................................23
FR - TABLE DES MATIÈRES
1. CONNEXION ET ENTRETIEN (OPTIONNEL).................................................................................................................................9
2. RÉGULATEUR ÉLECTRONIQUE VENTILATEURS.......................................................................................................................9
3.
4.
5.
6.
2.1. FONCTIONNEMENT CONSOLE.....................................................................................................................................................................9
2.2. FONCTIONNEMENT TÉLÉCOMMANDE:.....................................................................................................................................................10
2.3. CARACTÉRISTIQUES...................................................................................................................................................................................10
MONOBLOCCO 600-750-900........................................................................................................................................................15
MONOBLOCCO 1000 - 1300.........................................................................................................................................................18
Monoblocco GHISA - IRONKER...................................................................................................................................................21
MONOBLOCCO 800 Angolo.........................................................................................................................................................23
SP - ÍNDICE
1. COLLEGAMENTO E MANUTENZIONE VENTILAZIONE (OPZIONALE)...................................................................................... 3
2. REGOLATORE ELETTRICO VENTILATORE..................................................................................................................................3
3.
4.
5.
6.
2
2.1. FUNZIONAMENTO console............................................................................................................................................................................3
2.2. Funzionamento telecomando:..........................................................................................................................................................................4
2.3. CARATTERISTICHE........................................................................................................................................................................................4
MONOBLOCCO 600-750-900 .......................................................................................................................................................15
MONOBLOCCO 1000 - 1300.........................................................................................................................................................18
Monoblocco GHISA - IRONKER...................................................................................................................................................21
MONOBLOCCO 800 Angolo.........................................................................................................................................................23
6098090
6018090 KIT VENTILAZIONE OPTIONALE
IT
INFORMAZIONI AL UTENTE SULLO SMALTIMENTO DELLE APPARECCHIATURE DA PARTE DEI PRIVATI
NEL TERRITORIO DELL’UNIONE EUROPEA
Ai sensi dell’art.13 del decreto legislativo 25 luglio 2005, n.151 «attuazione delle direttive 2002/95/CE
e 2003/1 08/CE, relative sostanze alla riduzione dell’uso di sostanze pericolose nelle apparecchiature
elettriche ed elettroniche, nonché allo smaltimento dei rifiuti». il simbolo del cassonetto barrato riportato
sull’apparecchiatura o sulla confezione indica che il prodotto alla fine della propria vita utile deve essere
raccolto separatamente dagli altri rifiuti. l’utente dovrà, pertanto, conferire l’apparecchiatura giunta a fine
vita agli idonei centri di raccolta differenziata dei rifiuti elettronici ed elettrotecnici, oppure riconsegnarla al
rivenditore al momento dell’acquisto di una nuova apparecchiatura di tipo equivalente, in ragione di uno a
uno. L’adeguata raccolta differenziata per l’awio successivo dell’apparecchiatura e dismessa al riciclaggio, al trattamento
e allo smaltimento ambientalmente compatibile, contribuisce ad evitare possibili effetti negativi sull’ambiente e sulla salute
e favorisca il reimpiego e/o riciclo dei materiali di cui è composta l’apparecchiatura. Lo smaltimento abusivo del prodotto
da parte dell’utente comporta l’applicazione delle sanzioni amministrative previste dalla normativa vigente, di cui al digs n.
22/1997 (articolo 50 e seguenti del digs n. 22/1997).
1. COLLEGAMENTO E MANUTENZIONE VENTILAZIONE (OPZIONALE)
La centralina e l’impianto dovranno essere installate e collegate da personale abilitato secondo le norme vigenti
(vedi capitolo AVVERTENZE GENERALI).
ATTENZIONE: La centralina e il cavo di alimentazione NON deve essere a contatto con parti calde.
Sui nostri prodotti possono essere installati dei kit di ventilazione OPZIONALI adatti a migliorare la distribuzione del calore
attraverso la ventilazione del solo ambiente di installazione oppure del locale adiacente (vedi capitolo PRESA ARIA
ESTERNA).
Per l’installazione del Kit di ventilazione forzata seguire le istruzioni indicate (vedi capitolo VENTILAZIONE CAPPA O LOCALE
ADIACENTE). Il Kit è composto da un ventilatore centrifugo, una centralina di accensione e regolazione e da un termostato
(TM) che fa avviare il ventilatore quando l’apparecchio è adeguatamente riscaldato e lo arresta quando è parzialmente
freddo.
L’accensione e la regolazione viene effettuata tramite l’apposita centralina in dotazione la quale dovrà essere installata
lontana da fonti di calore dirette.
COLLEGAMENTO (vedi Figura 1 a pagina 13):
Collegare il cavo di alimentazione della centralina ad un interruttore bipolare con distanza tra i contatti di almeno 3 mm
(Alimentazione 230V~ 50 Hz, indispensabile il corretto collegamento all’impianto di messa a terra).
AVVERTENZA: Il COMANDO deve essere alimentato in rete con a monte un interruttore generale differenziale di linea come
dalle vigenti normative. Il corretto funzionamento del comando è garantito solamente per l’apposito motore per il quale è
stato costruito. L’uso improprio solleva il costruttore da ogni responsabilità.
2. REGOLATORE ELETTRICO VENTILATORE
2.1. FUNZIONAMENTO console.
Il regolatore elettronico per ventilatore, controlla e gestisce il flusso di aria di ventilazione, led 9.
L’accensione e lo spegnimento del dispositivo avviene tramite pressione prolungata del tasto 1 .
Durante il funzionamento il display visualizza alternativamente la velocità impostata e lo stato del dispositivo. A dispositivo
spento il display rimane spento. La regolazione del dispositivo può essere Manuale o Automatica.
Modalità MANUALE.
Per accedere alla modalità MANUALE premere il tasto 2 quando la spia 3 si
accende la funzione è attiva. Per mezzo dei tasti 4 - 5 si seleziona una delle
3 7
9 8 6
cinque velocità di ventilazione, che funzionano anche a camino freddo. L’avvio
del motore in funzione automatico è subordinato all’azione di un termostato
A
meccanico (nel display viene visualizzata la scritta ATTESA) che interviene
dopo avere rilevato una temperatura di almeno 45°C (taratura fissa e non
2
4
5
1
modificabile). Il led 6 indica la chiusura del contatto del termostato.
Modalità AUTOMATICA.
A
Per accedere alla modalità AUTOMATICA premere il tasto 2 quando la spia 7
si accende la funzione è attiva, per mezzo del pulsante 5 si entra nel settaggio
velocità.
Per mezzo dei tasti 4 - 5 si seleziona una delle cinque velocità di ventilazione. In modalità automatica è inoltre possibile
selezionare la temperatura CONFORT. Premendo il pulsante 4 è possibile entrare e regolare tramite i tasti 4 - 5 il set della
OK
TM
6098090 5
6
3
6018090 KIT VENTILAZIONE OPTIONALE
temperatura CONFORT. Questa impostazione permette all’utente di ridurre la rumorosità della ventola una volta che la
temperatura ambiente rilevata dalla sonda interna del dispositivo supera il set confort impostato; il motore scala una marcia
(questa modalità non ha effetto sulla prima velocità) ed è segnalata dal led 8.
Menù LINGUA.
Con la pressione prolungata del tasto 2 si entra nel menu LINGUA dove è possibile, modificare mediante i tasti 4 - 5, la lingua
visualizzata (IT, EN, DE, FR). Con la successiva pressione breve del tasto 2 si entra nel menu DISPLAY dove è possibile
regolare la luminosità (tra 10 e 150). Con un‘ulteriore pressione breve del tasto 2 si entra nel menu GRADI dove è possibile
cambiare la visualizzazione della temperatura in °C o °F.
Menu BUZZER
Con l’ultima pressione breve del tasto 2 si accede al menu BUZZER dove è possibile attivare o disattivare il buzzer sonoro.
2.2. Funzionamento telecomando:
Il regolatore elettronico per monoblocchi può essere gestito da un telecomando ir.
L’accensione e lo spegnimento del dispositivo avviene tramite pressione prolungata dei due tasti 11 - 12.
Il passaggio da regolazione MANUALE ad AUTOMATICA con il telecomando ir si ottiene mediante
10
la pressione dei tasti 13 - 14. II led relativo al funzionamento manuale 3 o automatico 7 si accende.
In modalità MANUALE sono attivi solamente i tasti del gruppo 11-13 per selezionare una delle cinque
velocità.
In modalità AUTOMATICA sono attivi i tasti del gruppo 12-14 per selezionare una delle cinque velocità 11
e i tasti del gruppo 11-13 per regolare il set COMFORT.
Ogni pressione sul telecomando viene segnalata dal rispettivo led 10, se questo non avviene
controllare le batterie.
2.3. CARATTERISTICHE
13
ALIMENTAZIONE
230 V~ +15-10% 50Hz
POTENZA ASSORBITA
Max 2VA
MAX TEMPERATURA SONDA INTERNA
60°C
TEMPERATURA DI ESERCIZIO
0 – 60°C
DIMENSIONI INGOMBRO
120x74x51 (scatola incasso 3 moduli)
CONTENITORE
Placca RAL9001
GRADO DI PROTEZIONE
IP40
COMANDO VENTOLA
Max 300 W
TIPO BATTERIA TELECOMANDO
12V 23AE (12V-28x10)
4
12
14
6098090
6018090 KIT VENTILAZIONE OPTIONALE
EN
This symbol appearing on a product or its packaging indicates that the product must not be considered
os normal household waste, but must be token to a special waste collection centre for recycling electric
and electronic appliances. Disposing of this product appropriately helps ovoid any potentially negative
consequences which could arise from its incorrect disposal. For more detailed information on recyding of
this product, contact your local council, the local waste disposal service or the shop where you bought the
product.
1. CONNECTION AND MAINTENANCE OF VENTILATION (OPTIONAL)
The control unit and the plant must be installed and connected by authorized personnel according to the standards
in force. (see chapter GENERAL REMARKS).
ATTENTION: the control unit and the feeding cable must not be in contact with hot parts.
On our products, it is possible to install Optional ventilation kits suitable to improve the distribution of heat by ventilation only
either of the installation room or of the adjacent local (see chapter EXTERNAL AIR INTAKE).
For the installation of the Forced Ventilation Kit, follow the given instructions. (see chapter VENTILATION HOOD OR
ADJACENT LOCAL).
The Kit is made up of a centrifugal fan, a lighting and adjustment control unit, and a (TM) thermostat that lets the fan start
when the device is properly heated and lets it stop when the fan is partially cold.
The lighting and the adjustment is carried out through the proper standard supplied control unit that has to be installed far
from any direct heat source.
CONNECTION (see Picture 1 at page 13):
Connect the feeding cable of the switchboard with an electronic bipolar switch respecting at least a 3 mm distance between
the contacts (power supply 230V~ 50 Hz, it is necessary to provide for the correct connection to the grounding plant).
WARNING: The COMMAND must be connected to the mains with a differential line cut-off switch according to the regulations
in force. Correct operation of the command is assured only for the proper motor for which it has been manufactured. Improper
use relieves the manufacturer from each responsibility.
2. FAN ELECTRIC CONTROLLER
2.1. CONSOLE OPERATION
This electronic controller for packaged units manages ventilation air flows. The controller is switched on or off by pressing
and holding the 1 button. During operation the display shows the set speed alternating with unit status, led 9.
When the unit is off, the display also remains off.
The unit can be controlled MANUALLY or AUTOMATICALLY.
MANUAL mode
3 7
9 8 6
To access MANUAL mode, press the 2 button; when the 3 light comes on
the function is active. The 4-5 buttons are used to select one of the five fan
A
speeds, also active when the flue is cold.
The motor is started in automatic mode by a mechanical thermostat (the
2
4
5
1
display shows WAIT), which is activated when the temperature is at least 45°C
(fixed value, not modifiable). The 6 led indicates that the thermostat contact
A
is closed.
AUTOMATIC mode
To access AUTOMATIC mode, press the 2 button; when the 7 light comes on the function is active. Use the 5 button to set
the speed.
The 4-5 buttons are used to select one of the five fan speeds.
In automatic mode the COMFORT temperature can also be selected.
Press the 4 button to access the COMFORT temperature setting and then set the value using 4-5. This setting allows the user
5
to reduce fan noise when the room temperature measured by the probe inside the controller exceeds the comfort set point;
6
the motor operates one speed lower (this mode has no effect in first speed) and is signalled by the 8 led.
LANGUAGE menu
Pressing and holding the 2 button accesses the LANGUAGE menu, where the display language can be changed using the
7
4-5 buttons (IT, EN, DE, FR). Pressing the 2 button briefly again accesses the 8DISPLAY menu, where the brightness can
be adjusted (between 10 and 150). Pressing the 2 button briefly another time accesses the DEGREES menu, where the
temperature display can be set as °C or °F.
1 2 3 4
OK
TM
6098090 O1
5
6018090 KIT VENTILAZIONE OPTIONALE
BUZZER menu
Pressing the 2 button briefly a final time accesses the buzzer menu, where audible buzzer can be enabled or disabled.
2.2. REMOTE CONTROL OPERATION:
The electronic controller for packaged units can be managed by an IR remote control.
The controller is switched on or off by pressing and holding the 11-12 buttons.
To switch from MANUAL to AUTOMATIC on the IR remote control press the 13-14 buttons. The LED
corresponding to the operating mode comes on, manual 3 or automatic 7.
In MANUAL mode only the buttons in the 11-13 group are enabled for selecting one of the five speeds.
In AUTOMATIC mode, the buttons in the 12-14 group are enabled for selecting one of the five speeds,
as well as the buttons in the 11-13 group for changing the COMFORT set point.
The 10 LED comes on whenever a button is pressed on the remote control; if this does not happen,
check the batteries.
10
11
12
13
14
2.3. SPECIFICATIONS
POWER SUPPLY
230 V~ +15-10% 50Hz
POWER INPUT
Max 2VA
MAX PROBE TEMPERATURE
60°C
OPERATING TEMPERATURE
0 – 60°C
OVERALL DIMENSIONS
120x74x51 (3-gang switch box)
CONTAINER
RAL9001 faceplate
INDEX OF PROTECTION
IP40
FAN CONTROLLED
Max 300 W
REMOTE CONTROL BATTERY
12V 23AE (12V-28x10)
6
6098090
6018090 KIT VENTILAZIONE OPTIONALE
DE
Das auf dem Produkt oder derVerpackung angebrachte Symbol besagt, dass das Produkt nicht als normaler
Hausmull anzusehen ist, sondern bei speziellen Sammelstellen für das Recycling von Elelktro- und
Elektronik-Altgeraten abzugeben ist. Durch die ordnungsgemäße Entsorgung dieses Produktes werden
mögliche negative Folgen vermieden, die aus einer unsachgemäßen Entsorgung. des Produktes entstehen
konnten. Ausführlichere Informationen zum Recycling, dieses Produktes liefern das Gemeindeamt, der
örtliche Müllentsorgungsdienst oder der Händler, bei dem das Produkt gekauft wurde.
1. LÜFTUNGSVERBINDUNG UND – WARTUNG (OPTIONAL)
Die Steuereinheit und die Anlage müssen von nach den geltenden Vorschriften zugelassenem Personal aufgestellt
und verbunden werden. (Siehe KAP. ALLGEMEINE ANWEISUNGEN)
ACHTUNG: die Steuereinheit und die Stromzuführung darf nicht in Kontakt mit warmen Teilen werden sein.
Unsere Produkts können mit OPTIONAL Gebläse Sätze versehen werden, die dafür geeignet sind, die Wärmeverteilung durch
die Lüftung des einzelnen Aufstellungsraumes oder des naheliegenden Raumes zu verbessern (siehe Kap. LUFTEINLASS).
Für die Aufstellung vom Bausatz der Zwangskonvektion bitte die Vorschriften befolgen, die auf dem Bausatz angegeben
sind. Der Bausatz besteht aus einem zentrifugalen (siehe Kap. ELÜFTUNG HAUBE ODER ANLIEGENDEN RAUM) Lüfter,
eine Zündvorrichtung, eine Steuereinheit und aus einem Thermostat. Der Thermostat (TM) schaltet den Lüfter an, wenn die
Ausrüstungen angemessen geheizt ist und er schaltet den Lüfter aus, wenn die Ausrüstung teilweise kalt ist.
Die Anfeuerung und die Einstellung werden durch eine standardgelieferte zweckmäßige Steuereinheit ausgeführt, die weit
von direkten Wärmequellen aufzustellen ist.
VERBINDUNG (siehe Abbildung 1 auf Seite13):
Verbinden Sie den Zuführungskabel des Steuergehäuses mit einem bipolaren Schalter beim Beachten einen 3 mm
Mindestabstand zwischen den Kontakten (Stromversorgung 230V WS 50 Hz - Die richtige Verbindung zur Beerdigungsanlage
ist unentbehrlich).
WARNUNG: Die STEUERUNG muss durch das Netz gespeist werden und muss ein Leitungsdifferentialnetzschalter
stromabwärts laut den geltenden Vorschriften haben. Der richtige Betrieb der Steuerung ist ausschließlich für den
zweckmäßigen Motor gesichert, für den sie hergestellt worden ist. Der Missbrauch befreit den Hersteller von jeder
Verantwortung.
2. REGLER FÜR GERÄTE
2.1. BETRIEB DER KONSOLE
Der elektronische Regler für kgeräte steuert und regelt den Gebläse-Luftstrom.
Die Vorrichtung wird durch anhaltendes Drücken der Taste 1- und ausgeschaltet, led 9.
Während des Betriebs werden am Display abwechselnd die eingestellte Drehzahl und der Betriebszustand der Vorrichtung
angezeigt.
Wenn die Vorrichtung ausgeschaltet ist, bleibt auch das Display ausgeschaltet.
Die Regelung der Vorrichtung erfolgt von HAND oder AUTOMATISCH.
3 7
9 8 6
HANDBETRIEB
Um den Handbetrieb einzustellen, die Taste 2 drücken. Wenn die
A
Kontrolllampe 3 aufleuchtet, ist die Funktion aktiv. Mit den Tasten 4-5 wird eine
der fünf Drehzahlstufen des Gebläses gewählt, die auch bei kaltem Kamin
2
4
5
1
funktionieren.
Im Automatikbetrieb ist der Motorstart an das Auslösen eines mechanischen
A
Thermostats gebunden (auf dem Display wird WARTEN angezeigt), der
anspricht, sobald eine Temperatur von mindestens 45 °C (feste, nicht
veränderbare Einstellung) gemessen wird. Die LED 6 zeigt das Schließen des Thermostats an.
AUTOMATIKBETRIEB
Um den Automatikbetrieb einzustellen, die Taste 2 drücken. Wenn die Kontrolllampe 7 aufleuchtet, ist die Funktion aktiv und
mit der Taste 5 wird die Einstellung der Drehzahlstufe geöffnet.
Mit den Tasten 4-5 kann eine der fünf Drehzahlstufen gewählt werden. Im Automatikbetrieb kann außerdem die KOMFORT5
Temperatur gewählt werden. Mit Tastendruck auf 4 kann der Sollwert der KOMFORT-Temperatur
aufgerufen und mit
6 des Lüfters reduzieren, wenn die vom
4-5 eingestellt werden. Mit dieser Einstellung kann der Bediener das Geräusch
Innentemperaturfühler der Vorrichtung gemessene Temperatur den eingestellten Komfort-Sollwert übersteigt: der Motor
schaltet einen Gang herunter (diese Betriebsart hat keine Auswirkungen auf die erste Drehzahlstufe), was mit der LED 8
7
angezeigt wird.
8
Menü „SPRACHE“
OK
TM
6098090 1 2 3 4
O1
7
6018090 KIT VENTILAZIONE OPTIONALE
Durch anhaltendes Drücken der Taste 2 wird das Menü „Sprache“ geöffnet, in dem mit den Tasten 4-5, die Anzeigesprache
(IT, EN, DE, FR) gewählt werden kann.
Durch erneutes kurzes Drücken der Taste 2 wird das Menü „DISPLAY“ geöffnet, in dem die Helligkeit geregelt werden kann
(zwischen 10 und 150). Mit einem weiteren kurzen Tastendruck auf 2 wird das Menü „GRAD“ geöffnet, in dem zwischen
Temperaturanzeige in °C oder °F gewechselt werden kann.
Menü „BUZZER“
Mit dem letzten Tastendruck auf 2 wird das Menü „Buzzer“ geöffnet, in dem der akustische Signalgeber aktiviert bzw.
deaktiviert werden kann.
2.2. BETRIEB MIT FERNBEDIENUNG:
Der elektronische Regler kann mit einer IR-Fernbedienung gesteuert werden.
Das Ein- und Ausschalten der Vorrichtung erfolgt durch anhaltendes Drücken der zwei Tasten 11-12.
Um mit der IR-Fernbedienung zwischen Hand- und Automatikbetrieb zu wechseln, die Tasten 13-14
drücken. Die LED des Handbetriebs 3 bzw. des Automatikbetriebs 7 leuchtet auf.
Im HANDBETRIEB sind nur die Tasten des Gebläses 11-13 aktiv, um eine der fünf Drehzahlstufen
zu wählen.
Im AUTOMATIKBETRIEB sind die Tasten des Gebläses 12-14 für die Wahl einer der fünf
Drehzahlstufen aktiv, sowie die Tasten des Thermostats 11-13 für die Einstellung des KOMFORTSollwerts.
Jeder Tastendruck an der Fernbedienung wird mit der entsprechenden 10, LED angezeigt. Andernfalls
muss die Batterie kontrolliert werden.
10
11
12
13
14
2.3. TECHNISCHE DATEN
SPANNUNGSVERSORGUNG
230 V~ +15-10% 50Hz
LEISTUNGSAUFNAHME
Max 2VA
MAX. FÜHLERTEMPERATUR
60°C
BETRIEBSTEMPERATUR
0 – 60°C
ABMESSUNGEN
120x74x51 (Unterputzgehäuse 3 Module)
GEHÄUSE
Platte RAL 9001
SCHUTZART
IP40
STEUERUNG DES LÜFTERS
Max 300 W
BATTERIETYP FÜR FERNBEDIENUNG
12V 23AE (12V-28x10)
8
6098090
6018090 KIT VENTILAZIONE OPTIONALE
FR
Le symbole en question appliqué sur le produit ou sur l’emballage indique que le produit ne doit pas
être considéré comme un déchet domestique normal, mais doit être déposé dans un point de collecte
différenciée approprié au recyclage d’appareils électriques et électroniques.
Le respect de cette norme permet d’éviter toute conséquence négative qui pourrait dériver d’une
élimination du produit de manière non adéquate. Pour des informations plus détaillées sur le recyclage
de ce produit, contacter le service de la mairie compétent, le service local d‘élimination des déchets ou le
magasin auprès duquel le produit a été acheté.
1. CONNEXION ET ENTRETIEN (OPTIONNEL)
La centrale et l’installation devront être installées et connectées par personnel habilité selon les normes en vigueur
(voir chapitre AVERTISSEMENT GÉNÉRAL).
ATTENTION: la centrale et le câble d’alimentation ne doit pas entrer en contact avec des parts chaudes.
Nos produits sont préparés pour un kit de ventilation OPTIONNEL, approprié pour améliorer la distribution de la chaleur à
travers la ventilation du seul environnement d’installation (voir chapitre PRISE D’AIR EXTERNE).
Pour l’installation du Kit de ventilation forcée il faut suivre les instructions indiquées. (voir chapitre VENTILATION HOTTE
OU LOCAL
ADJACENT). Le kit se compose d’un ventilateur centrifuge, une centrale d’allumage et réglage et par un thermostat (TM) qui
fait démarrer le ventilateur lorsque l’appareil est bien chauffé et l’arrête quand il est partiellement froid.
L’allumage et le réglage est effectué à travers la centrale appropriée en dotation qui doit être installée loin de sources de
chaleur directes.
CONNEXION (voir Figure 1 page 13):
Connecter le câble d’alimentation du tableau de distribution à une interrupteur bipolaire et respecter une distance minimale
de 3 mm (Alimentation 230V~ 50 Hz, indispensable la correcte connexion à l’installation de mise à terre).
AVERTISSEMENT: La COMMANDE doit être alimentée en réseau avec en amont un interrupteur général différentiel de
ligne selon les normatives en vigueur. Le correct fonctionnement de la commande est garantie seulement pour le moteur
approprié pour lequel elle a été construite. L’emploi non approprié libère le constructeur de toute responsabilité.
2. RÉGULATEUR ÉLECTRONIQUE VENTILATEURS
2.1. FONCTIONNEMENT CONSOLE
Le régulateur électronique commande et régule le débit d’air.
Pour mettre en marche ou arrêter le dispositif appuyer de façon prolongée sur la touche 1.
Pendant le fonctionnement l’écran affiche en alternance la vitesse programmée et l’état du dispositif, led 9.
L’écran n’est pas allumé quand le dispositif est éteint.
Le réglage du dispositif peut être Manuel ou Automatique.
Mode MANUEL
3 7
9 8 6
Pour accéder au mode MANUEL appuyer sur la touche 2 quand le voyant 3
s’allume la fonction est activée. Les touches 4-5 permettent de sélectionner
A
une des cinq vitesses de ventilation qui fonctionnent également lorsque la
cheminée est froide. Le démarrage du moteur en mode automatique est
2
4
5
1
lié à l’action d’un thermostat mécanique (l’écran affiche ATTENTE) qui se
déclenche dès qu’il relève une température de 45°C au moins (réglage fixe et
A
non modifiable. La LED 6 indique la fermeture du thermostat.
Mode AUTOMATIQUE
Pour accéder au mode AUTOMATIQUE appuyer sur la touche 2 quand le voyant 7 est allumé la fonction est activée, la
touche 5 permet de régler la vitesse.
Choisir une des cinq vitesses à l’aide des touches 4-5. En mode automatique il est en outre possible de sélectionner
la température CONFORT. La touche 4 permet d’accéder au réglage de la consigne CONFORT, qu’il est possible de
programmer à l’aide des touches 4-5 Cette programmation permet de réduire le bruit de la ventilation quand la température
5
ambiante relevée par la sonde du dispositif est supérieure à la consigne de température
confort programmée; le moteur
tourne moins vite (ce mode n’a pas d’effet sur la première vitesse) et est signalé6par la led 8.
MENU LANGUE
Une pression prolongée sur la touche 2 permet d’entrer dans le menu langue où il est possible de choisir, à l’aide des touches
7
4-5, la langue d’affichage (IT, EN, DE, FR).
8
Une pression brève sur la touche 2 permet d’entrer dans le menu AFFICHAGE où il est possible de régler la luminosité
OK
TM
1 2 3 4
6098090 O1
9
6018090 KIT VENTILAZIONE OPTIONALE
(entre 10 et 150). Une nouvelle pression sur la touche 2 permet d’entrer dans le menu DEGRÉS qui permet de choisir °C
ou °F.
MENU BUZZER
Une dernière pression sur la touche 2 permet d’accéder au menu BUZZER où il est possible d’activer ou de désactiver le
BUZZER sonore.
2.2. FONCTIONNEMENT TÉLÉCOMMANDE:
Le régulateur électronique pour monoblocs peut être piloté à l’aide d’une télécommande IR.
Pour mettre en marche ou arrêter le dispositif appuyer de façon prolongée sur les touches11-12.
Les touches 13-14 de la télécommande IR permettent de basculer de MANUEL à AUTOMATIQUE. La
led correspondant au fonctionnement MANUEL 3 ou AUTOMATIQUE 7 s’allume.
En mode MANUEL seules les touches du groupe 11-13 permettent de sélectionner une des cinq
vitesses.
En mode AUTOMATIQUE les touches du groupe 12-14 permettent de sélectionner une des cinq
vitesses et les touches du groupe 11-13 de régler la consigne CONFORT.
Chaque pression sur la télécommande est signalée par la led 10, si ce n’est pas le cas contrôler les
piles.
10
11
12
13
14
2.3. CARACTÉRISTIQUES
ALIMENTATION
230 V~ +15-10% 50/60Hz
PUISSANCE ABSORBÉE
Max 2VA
TEMPÉRATURE SONDE
60°C
TEMPÉRATURE DE SERVICE
0 – 60°C
DIMENSIONS
120x74x51 (boîte 3 modules)
COFFRET
platine RAL9001
DEGRÉ DE PROTECTION
IP40
COMMANDE VENTILATEUR
Max 300 W
TYPE PILE TÉLÉCOMMANDE
12V 23AE (12V-28x10)
10
6098090
6018090 KIT VENTILAZIONE OPTIONALE
ES
El símbolo del contenedor tachado, aplicado en el embalaje o en el producto, indica que éste no debe
desecharse junto a los residuos domésticos sino depositarse en un punto de recogido específico para
aparatos eléctricos y electrónicos. El reciclaje y. La eliminación eco compatible del producto contribuyen
a proteger el medio ambiente y la salud de la población. Por a más información sobre el reciclaje de este
producto, consulte con el Ayuntamiento de su ciudad, con el servicio local de eliminación de residuos o
con el comercIo donde te, ha adquirido.
1. CONEXIÓN Y MANTENIMIENTO VENTILACIÓN (OPCIONAL)
La centralita y la instalación deben ser instaladas y conectadas por personal cualificado según las normas vigentes
( Ver Capítulo ADVERTENCIAS GENERALES).
ATENCIÓN la centralita y el cable de alimentación NO debe entrar en contacto con partes calientes.
En nuestros productos se pueden ser instalar kits de ventilación OPCIONAL adecuados para mejorar la distribución del
calor ventilando solamente el ambiente de instalación o el local adyacente (Ver Capítulo TOMA DE AIRE EXTERIOR).
Para la instalación del Kit de ventilación forzada, seguir las instrucciones indicadas (Véase Capítulo VENTILACIÓN DE LA
CAMPANA O DEL AMBIENTE ADYACENTE).
El kit incluye un ventilador centrífugo, una centralita de encendido y regulación, y un termostato (TM) que activa el ventilador
cuando el aparato se encuentra calentado oportunamente y lo detiene cuando está parcialmente frío.
El encendido y la regulación se efectúan a través de la centralita que viene con el producto, que deberá instalarse lejos de
fuentes de calor directas.
CONEXIÓN (Ver Figura 1 a pagina 13).
Conecte el cable de alimentación de la centralita a un interruptor bipolar con distancia entre los contactos de al menos 3 mm
(Alimentación 230 V~ 50 Hz, es indispensable la correcta conexión a tierra de la instalación).
ADVERTENCIA: El MANDO debe ser alimentado en red con un interruptor general diferencial de línea, en la parte anterior,
según las normativas vigentes. El correcto funcionamiento del mando se garantiza únicamente para el motor para el cual ha
sido fabricado. El uso impropio exime al fabricante de toda responsabilidad.
2. REGULADOR PARA VENTILACIÓN
2.1. FUNCIONAMIENTO CONSOLA
El regulador electrónico controla y maneja el flujo de aire de ventilación.
El encendido y el apagado del dispositivo se produce mediante una pulsación prolongada de la tecla 1.
Durante el funcionamiento, el visualizador muestra alternativamente la velocidad programada y el estado del dispositivo,
led 9.
Cuando el dispositivo está apagado el visualizador permanece apagado.
La regulación del dispositivo puede ser Manual o Automática.
Modo MANUAL
Para acceder al modo MANUAL pulsar la tecla 2 cuando el piloto 3 se enciende la función está activa. Mediante las teclas
4-5 se selecciona una de las cinco velocidades de ventilación que funcionan también con la chimenea fría. La puesta en
marcha del motor en función automática está subordinada a la acción de un termostato mecánico (en le visualizador aparece
la inscripción ESPERA) que interviene después de haber registrado una temperatura de como mínimo 45 ºC (regulación fija
y no modificable. El led 6 indica el cierre del termostato.
Modo AUTOMÁTICO
Para acceder al modo AUTOMÁTICO pulsar la tecla 2 cuando el piloto 7 se enciende la función está activa, mediante el
botón 5 se entra en la configuración de la velocidad.
Mediante los botones 4-5 se puede elegir una de las cinco velocidades.
En modo automático se puede además seleccionar la temperatura COMFORT. Pulsando el botón 4 se puede entrar y
regular, mediante 4 - 5 el ajuste de la temperatura COMFORT. Esta programación permite al usuario reducir el ruido de
la turbina cuando la temperatura ambiente detectada por la sonda interna del dispositivo supera el ajuste COMFORT
programado, el motor sube una marcha (este modo no tiene efecto en la primera velocidad) y viene indicada por el led 8.
Menú IDIOMA
Al pulsar un rato la tecla 2 se entra en el menú idioma, desde donde se puede modificar, mediante los botones 4-5, el idioma
visualizado (IT, EN, DE, FR). Con una pulsación posterior breve de la tecla 2 se entra en el menú VISUALIZADOR desde
donde se puede regular la luminosidad (entre 10 y 150). Con una pulsación breve posterior de la tecla 2 se entra en el menú
GRADOS, donde se puede cambiar la visualización de la temperatura en ºC o ºF.
6098090 11
6018090 KIT VENTILAZIONE OPTIONALE
Menú TIMBRE
Con la última pulsación breve de la tecla 2 se enciende el menú TIMBRE, donde se puede activar o desactivar el timbre.
2.2. FUNCIONAMIENTO MANDO A DISTANCIA:
El regulador electrónico para monobloques puede ser manejado por un mando a distancia IR.
El encendido y el apagado le dispositif appuyer de façon prolongée sur les touches 11-12.
El paso de regulación MANUAL a AUTOMÁTICA con mando a distancia ir se obtiene pulsando los
botones 13-14. El led correspondiente al funcionamiento manual 3 o automático 7 se enciende.
En modo MANUAL sólo están activas las teclas del grupo 11-13 para seleccionar una de las cinco
velocidades.
En modo AUTOMÁTICO están activas las teclas del grupo 12-14 para seleccionar una de las cinco
velocidades y las teclas del grupo 11-13 para regular el ajuste COMFORT.
Cada pulsación en el mando a distancia viene señalada por el led 10, correspondiente, en caso de
que no se encienda compruebe las pilas.
10
11
12
13
14
2.3. CARACTÉRISTIQUES
SUMINISTRO ELÉCTRICO
230 V~ +15-10% 50Hz
POTENCIA ABSORBIDA
Max 2VA
TEMPERATURA MÁX
60°C
TEMPERATURA DE FUNCIONAMIENTO
0 – 60°C
MEDIDAS
120x74x51 (caja empotramiento 3 módulos)
CONTENEDOR
chapa RAL 9001 bastidor NEGRO
GRADO DE PROTECCIÓN
IP40
MANDO TURBINA
Max 300 W
TIPO `PILA MANDO A DISTANCIA
12V 23AE (12V-28x10)
12
6098090
6018090 KIT VENTILAZIONE OPTIONALE
1
6012024
80
0020803
0020800
125
0020800
A
45
1
Blu - Alimentazione
Blue - Power supply
Blau – Stromversorgung
Blue - Alimentation
Azul - Alimentación
2
Marrone - Alimentazione
Brown - Power supply
Braun – Stromversorgung
Brown - Alimentation
Marrón - Alimentación
3
Blu - Motore
Blue - Motor
Blau – Motorkabel
Blue - Moteur
Azul - Motor
4
Marrone - Motore
Brown -Motor
Braun – Motorkabel
Brown -Moteur
Marrón - Motor
5
Blu - Termostato
Blue - Thermostat
Blau – Thermostatkabel
Blue - Thermostat
Azul - Termostato
6
Marrone - Termostato
Brown - Thermostat
Braun – Thermostatkabel
Brown - Thermosta
Marrón - Termostato
7
Giallo/verde - Alimentazione
Yellow/green - Power supply
Gelb /Grün – Stromversorgung
Jaune/vert - Alimentation
Amarillo/verde - Alimentación
8
Giallo/verde - Motore
Yellow/green - Motor
Gelb /Grün – Motorkabel
Jaune/vert - Moteur
Amarillo/verde - Motor
OK
A
TM
5
6
7
8
1 2 3 4
O1
INTERRUTTORE BIPOLARE
BIPOLAR SWITCH
ZWEIPOLIGER SCHALTER
INTERRUPTEUR BIPOLAIRE
INTERRUPTOR BIPOLAR
6098090 20 mm
230 V~ 50Hz
13
6018090 KIT VENTILAZIONE OPTIONALE
0020007 SILVER
0020007 BLACK
4
4
3
5
5
3
0020802
TM
14
6098090
6018090 KIT VENTILAZIONE OPTIONALE
3. MONOBLOCCO
3. MONOBLOCCO
3. MONOBLOCCO
3.
600-750-900
MONOBLOCCO
600-750-900
600-750-900
600-750-900
3. MONOBLOCCO 600-750-900
1
2
3
4
6098090 15
6018090 KIT VENTILAZIONE OPTIONALE
5
6
7
TM
8
OBBLIGATORIO: cavo non visibile!
MANDATORY: cable out of seeing !
VERBINDLICH: außer Sicht Kabel !
OBLIGATOIRE: câble hors de vue !
Obligatorio: cable no a la vista !
ATTENZIONE : COLLEGARE ERMETICAMENTE
ATTENTION : HERMETIC CONNECT
ACHTUNG : HERMETISCH VERBINDEN
ATTENTION : JOINDRE HERMETIQUEMENT
ATENCION : JUNTAR HERMETICAMENTE
16
NON FORNITO
NOT SUPPLIED
NICHT IM LIEFERUMFANG
PAS FOURNIS
NO SUMINISTRADO
6098090
466
40
184
130
A
36
A
243
40
315
36
A-A
130.5
SEZ.
263
386
VENTILATORE
17
6098090 130.5
DIMENSIONI INGOMBRO COD.6018090 KIT VENTILAZIONE MONOBLOCCO SU:
COD.6019750 MONOBLOCCO GHISA 750 PIANO
COD.6018760 MONOBLOCCO IRONKER 750 PIANO
6018090 KIT VENTILAZIONE OPTIONALE
40
8760-CHECK_dft 191115
6018090 KIT VENTILAZIONE OPTIONALE
4.
4. MONOBLOCCO
MONOBLOCCO
4. MONOBLOCCO
1000
1000-1000
-1300
1300
- 1300
4. MONOBLOCCO
4. MONOBLOCCO
1000 1000
- 1300
1. - MONOBLOCCO
1300
1000 - 1300
1
2
3
4
TM
5
18
6
6098090
6018090 KIT VENTILAZIONE OPTIONALE
7
8
9
10
NON FORNITO
NOT SUPPLIED
NICHT IM LIEFERUMFANG
PAS FOURNIS
NO SUMINISTRADO
NÃO FORNECIDO
ATTENZIONE : COLLEGARE ERMETICAMENTE
ATTENTION : HERMETIC CONNECT
ACHTUNG : HERMETISCH VERBINDEN
ATTENTION : JOINDRE HERMETIQUEMENT
ATENCION : JUNTAR HERMETICAMENTE
6098090 19
6018090 KIT VENTILAZIONE OPTIONALE
20
6098090
6018090 KIT VENTILAZIONE OPTIONALE
5. Monoblocco
5. Monoblocco
5.GHISA
Monoblocco
GHISA
- IRONKER
- GHISA
IRONKER
- IRONKER
5.5. Monoblocco
Monoblocco
2.
GHISA
GHISA
Monoblocco
- IRONKER
- IRONKER
GHISA - IRONKER
1
2
3
4
TM
5
6
6098090 21
6018090 KIT VENTILAZIONE OPTIONALE
6
NON FORNITO
NOT SUPPLIED
NICHT IM LIEFERUMFANG
PAS FOURNIS
NO SUMINISTRADO
ATTENZIONE : COLLEGARE ERMETICAMENTE
ATTENTION : HERMETIC CONNECT
ACHTUNG : HERMETISCH VERBINDEN
ATTENTION : JOINDRE HERMETIQUEMENT
ATENCION : JUNTAR HERMETICAMENTE
NI INGOMBRO COD.6018090 KIT VENTILAZIONE MONOBLOCCO SU:
50 MONOBLOCCO GHISA 750 PIANO
60 MONOBLOCCO IRONKER 750 PIANO
130.5
A
22
36
263
315
A
SEZ.
40
130
184
243
386
A-A
6098090
6018760-CHECK_dft 191115
466
36
40
130.5
40
VENTILATORE
6018090 KIT VENTILAZIONE OPTIONALE
6. MONOBLOCCO
6. MONOBLOCCO
6. MONOBLOCCO
800 Angolo
800 Angolo
6. MONOBLOCCO
800 Angolo
6. MONOBLOCCO
3.800
MONOBLOCCO
Angolo 800 Angolo
800 Angolo
1
3
2
TM
4
6098090 5
23
6018090 KIT VENTILAZIONE OPTIONALE
6
NON FORNITO
NOT SUPPLIED
NICHT IM LIEFERUMFANG
PAS FOURNIS
NO SUMINISTRADO
7
ATTENZIONE : COLLEGARE ERMETICAMENTE
ATTENTION : HERMETIC CONNECT
ACHTUNG : HERMETISCH VERBINDEN
ATTENTION : JOINDRE HERMETIQUEMENT
ATENCION : JUNTAR HERMETICAMENTE
24
6098090
Dati e modelli non sono impegnativi: la ditta si riserva di apportare
modifiche e migliorie senza alcun preavviso.
Data and models are not binding: the company reserves the right to perform
modifications and improvements without notice.
Daten und Modelle sind nicht bindend. Die Firma behält sich vor, ohne Vorankündigung
Änderungen und Verbesserungen vorzunehmen.
La Maison constructrice n’est pas tenue à respecter ces données et ces modèles:
elle se réserve le droit d’apporter des modifications et des améliorations sans préavis.
Los datos y los modelos no suponen un compromiso para el fabricante: la empresa
se reserva el derecho de aportar modificaciones y mejoras sin previo aviso.
La NORDICA S.p.A.
Via Summano, 104 – 36030 Montecchio Precalcino – VICENZA – ITALIA
Tel: +39 0445 804000 – Fax: +39 0445 804040
email: [email protected] - http: www.lanordica-extraflame.com
6098090
- Rev.05

© Copyright 2026