
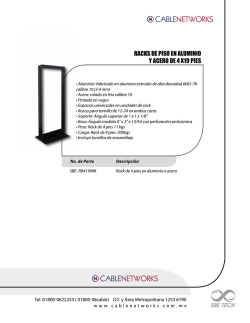
quick tips for using your oster® countertop oven
QUICK TIPS FOR USING YOUR
OSTER® COUNTERTOP OVEN
Model:
Mod
Mo
del:l: T S S T T V C G 0 3
del
B E F O R E U S I N G YO U R
C O U N T E RTO P OV E N
TO U S E T H E T U R B O C O N V E C T I O N
H E AT F U N C T I O N
t 3FNPWFBOZTUJDLFSTBOEQBQFSTJOBOEPOUIFDPVOUFSUPQPWFO
t $MFBOUhe wire oven rack and baking/cookie pan with soap and water.
t %VSJOHJOJUJBMTUBSUVQBTMJHIUTNFMMBOEPSTNPLFNBZCFEFUFDUFEUIJTJTOPSNBM
Turn the temperature to max and let run for approximately 5 minutes to allow for
any residue to burn off.
Warning: Make sure there is a 6-inch (15.24 cm) clearance between the
countertop oven and any other surface, including cords.
Before using, please refer to the Instruction Manual for Important Safeguards.
Do not cover crumb tray or any part of the oven with metal foil. This will cause
overheating of the oven.
The Turbo Convection Heat Function turns on a built in fan that circulates hot air
in the oven chamber.
1
Preheat oven 5-7 minutes at desired
temperature with oven rack in place.
TO U S E T H E TOA S T F U N C T I O N
2
Place baking pan with food inside on
wire rack.
We simplified toasting for more precise, consistent results with less hassle.
CAUTION: Door and handle could be hot,
1
2
use protection when opening door and
placing the food inside.
Place food on Wire Rack.
(use top rack for best results)
3
Close glass door completely.
4
3
4
5
6
Close glass door completely.
Turn Function dial to Toast.
Turn the temperature control knob to the
450º/TOAST setting.
5
6
7
To set the timer, turn the timer past the 20
minute mark to engage timer switch and
set back to desired toast time.*
Turn the Function dial to Turbo.
Reset the timer after preheating by
turning the temperature dial to
desired setting.
Turn the Timer to desired cook time.
When baking is complete a bell will
sound. Open door completely and
remove food.
WARNING: Cooked food and metal rack can
be very hot, handle with care. Never leave
Countertop Oven unattended while in use.
When toasting is complete, a bell will
sound. Open door completely and
remove food. For best toasting results,
position the rack in the upper position.
* NOTE: Different types of bread require different settings. Lighter breads and waffles
require lighter setting. Darker breads, muffins and English muffins require a darker setting.
© 2014 Sunbeam Products, Inc. doing business as Jarden Consumer Solutions. All rights reserved.
Printed in China. P.N.175418
CBA-042814
User Manual
Manual de Instrucciones
MODEL/MODELO
Countertop Oven
Horno para
Mostrador
TSSTTVCG03
Visit us at www.oster.com
P.N. 174223
English-2
t 3&"%"--*/4536$5*0/4130%6$5-"#&-4"/%8"3/*/(4#&'03&ø64*/(5)&
$06/5&350107&/
t %POPUUPVDIIPUTVSGBDFT"MXBZTVTFPWFONJUUTXIFOIBOEMJOHIPUNBUFSJBMTBOEBMMPX
NFUBMøQBSUTUPDPPMCFGPSFøDMFBOJOH"MMPXUIFVOJUUPDPPMUIPSPVHIMZCFGPSFøQVUUJOHJO
PSøUBLJOHPGGQBSUT"MXBZTVTFUIFøPWFOøIBOEMFTXIFONPWJOHUIFVOJU
/05&8IFOPQFOJOHUIFPWFOCFTVSFUPHSBTQUIFDFOUFSPGUIFIBOEMFBTUIFFOETPG
UIFIBOEMFBSFIPU
t 8IFOUIFVOJUJTOPUJOVTFBOECFGPSFDMFBOJOHVOQMVHUIFDPVOUFSUPQPWFOGSPNøUIF
XBMMøPVUMFU/05&.BLFTVSFUIFPWFOJTøUVSOFEPGGCFGPSFVOQMVHHJOH
t 5PQSPUFDUBHBJOTUSJTLPGFMFDUSJDBMTIPDLEPOPUJNNFSTFUIFBQQMJBODFJOXBUFSPS
BOZPUIFSMJRVJET
t $MPTFTVQFSWJTJPOJTBMXBZTOFDFTTBSZXIFOUIJTPSBOZBQQMJBODFJTVTFE
OFBSøDIJMESFO5IJTøBQQMJBODFøJTOPUGPSVTFCZDIJMESFO
t %POPUPQFSBUFUIJTPSBOZBQQMJBODFXJUIBGSBZFEPSEBNBHFEDPSEPSQMVHPSBGUFSUIF
BQQMJBODFNBMGVODUJPOTPSøJTESPQQFEPSIBTCFFOEBNBHFEJOøBOZøNBOOFS3FUVSOøUIF
DPVOUFSUPQPWFOUPUIFøOFBSFTU"VUIPSJ[FE4VOCFBN"QQMJBODF4FSWJDF$FOUFS
GPSøFYBNJOBUJPOSFQBJSPSFMFDUSJDBMPSøNFDIBOJDBMBEKVTUNFOU
t %POPUVTFBUUBDINFOUTOPUSFDPNNFOEFECZUIFNBOVGBDUVSFSUIFZøNBZøDBVTFøGJSF
FMFDUSJDøTIPDLPSøQFSTPOBMøJOKVSZ
t %POPUVTFPVUEPPSTPSGPSDPNNFSDJBMQVSQPTFT
t %POPUVTFUIJTBQQMJBODFGPSøPUIFSUIBOJUTJOUFOEFEøVTF
t %POPUMFUUIFDPSEEBOHMFPWFSUIFFEHFPGBUBCMFUPQPSøDPVOUFSUPQ
PSøUPVDIøIPUøTVSGBDFT
t %POPUQMBDFUIFBQQMJBODFOFBSBIPUHBTPSFMFDUSJDCVSOFSPSøJOBIFBUFEPWFO
t &YUSFNFDBVUJPOTIPVMECFVTFEXIFOVTJOHDPOUBJOFSTDPOTUSVDUFEPGNBUFSJBMPUIFS
UIBONFUBMPSHMBTT
READ AND SAVE THESE
INSTRUCTIONS
When using electrical appliances, basic safety precautions should always
be followed, including the following:
IMPORTANT SAFEGUARDS
English-3
SAVE THESE INSTRUCTIONS
5PSFEVDFUIFSJTLPGFMFDUSJDBMTIPDLUIJTBQQMJBODFIBTBQPMBSJ[FEQMVHone blade
is wider than the other
5IJTQMVHGJUTBøQPMBSJ[FEPVUMFUPOMZPOFXBZJGUIFQMVH
EPFTOPUGJUGVMMZJOUPøUIFPVUMFUSFWFSTFUIFQMVH*GJUTUJMMEPFTOPUGJUDPOUBDUB
RVBMJGJFEFMFDUSJDJBO Do not attempt to defeatUIJTTBGFUZGFBUVSF
For Products Purchased in the United States and Canada Only
"øTIPSUøQPXFSTVQQMZDPSEJTQSPWJEFEUPSFEVDFUIFSJTLSFTVMUJOHGSPNCFDPNJOH
FOUBOHMFEJOPSUSJQQJOHPWFSBMPOHFSDPSE"OFYUFOTJPODPSENBZCFVTFEJGDBSF
JTFYFSDJTFEJOJUTVTF*GBOFYUFOTJPODPSEJTVTFEUIFFMFDUSJDBMSBUJOHPGUIFDPSE
NVTUCFBUMFBTUBTHSFBUBTUIFFMFDUSJDBMSBUJOHPGUIFBQQMJBODF5IFFYUFOTJPODPSE
TIPVMECFBSSBOHFETPUIBUJUXJMMOPUESBQFPWFSUIFDPVOUFSUPQPSUBCMFUPQXIFSFJU
DBOCFQVMMFEPOCZDIJMESFOPSUSJQQFEPWFSVOJOUFOUJPOBMMZ
This Unit Is for Household Use Only
Short Power Supply Cord Instructions
t "GJSFNBZPDDVSJGUIFDPVOUFSUPQPWFOJTDPWFSFEPSUPVDIJOHGMBNNBCMFNBUFSJBMT
JODMVEJOHDVSUBJOTESBQFSJFTXBMMTFUDXIFOJOPQFSBUJPO%POPUTUPSFBOZøJUFNTPO
UPQPGUIFBQQMJBODFXIFOJOPQFSBUJPO
t 8IFOVTJOHDPVOUFSUPQPWFOQVMMUIFVOJUPVUBNJOJNVNPGJODIFTBXBZGSPNUIF
XBMMPSPUIFSDPSET
t %POPUTUPSFBOZNBUFSJBMTPUIFSUIBONBOVGBDUVSFSTSFDPNNFOEFEBDDFTTPSJFT
JOøUIJTVOJUXIFOOPUJOVTF
t %POPUQMBDFBOZGMBNNBCMFNBUFSJBMTJOPWFOTVDIBTQBQFSDBSECPBSE
QMBTUJDøPSøBOZøNBUFSJBMTUIBUNBZDBUDIGJSFPSNFMU
t %POPUDPWFSDSVNCUSBZPSBOZQBSUPGUIFPWFOXJUINFUBMGPJM5IJTXJMMDBVTF PWFSIFBUJOHPGUIFPWFO
t 0WFSTJ[FEGPPETPSNFUBMVUFOTJMTNVTUOPUCFJOTFSUFEJOUIFBQQMJBODFBTøUIFZøNBZ
DSFBUFBøGJSFPSøSJTLPGFMFDUSJDBMTIPDL
t %POPUDMFBOXJUINFUBMTDPVSJOHQBET1JFDFTDBOCSFBLPGGUIFQBE
BOEøUPVDIøFMFDUSJDBMQBSUTJOWPMWJOHBSJTLPGFMFDUSJDBMøTIPDL
t 6TFFYUSFNFDBVUJPOXIFOSFNPWJOHQBOPSøEJTQPTJOHPGøIPUøHSFBTFPSPUIFSIPU
MJRVJET
t 5PUVSOUIJTBQQMJBODFPGGSFUVSOBMMDPOUSPMTUPUIFi0''wøQPTJUJPOBOESFNPWFDPSE
GSPNPVUMFU
5
6
7
4
3
2
1
English-4
1. Function Selector Knob – Select cooking function by turning knob to desired
setting. (See Figure 1)
2. Temperature Control Knob – Adjust the dial thermostat to the desired
temperature. (See Figure 2)
3. Timer Control Knob with Bell Signal – Set cooking time up to 60 minutes.
Will automatically turn the oven OFF at the end of the cooking time. (See
Figure 3)
4. Removable Crumb Tray – For crumb or fallen food particles collection. Pulls
out for easy cleaning.
5. Removable Wire/Broil Rack – Use for all your broiling and grilling needs. See
“Positioning Rack” and “Positioning Pan” sections.
6. Tempered Glass Door – For front viewing of food.
7. Two Rack Positions
8
9
LEARNING ABOUT YOUR COUNTERTOP OVEN
Figure 2
Figure 3
English-5
NOTE: During initial start up you may detect a slight smell and/or smoke.
Turn the temperature to max and let run for approximately 5 minutes.
If you are using your Countertop oven for the first time, please be sure to:
UÊ,iÛiÊ>ÞÊÃÌViÀÃÊvÀÊÌ
iÊÃÕÀv>ViÊvÊÌ
iÊÛi°
UÊÊ"«iÊÛiÊ`ÀÊ>`ÊÀiÛiÊ>Ê«ÀÌi`Ê`VÕiÌÃÊ>`Ê«>«iÀÊvÀÊ
inside the Countertop Oven.
UÊÊ
i>ÊÌ
iÊÀ>VÊ>`Ê«>ÊÜÌ
Ê
ÌÊÜ>ÌiÀ]Ê>ÊÃ>Ê>ÕÌÊvÊ`Ã
Ü>Ã
}Ê
liquid and a non-abrasive cleaning pad.
UÊ"Ê "/Ê,-Ê/Ê"9Ê"Ê/Ê1 /Ê Ê7/,°
UÊÀÞÊÌ
iÊÕÌÊÌ
ÀÕ}
ÞÊLivÀiÊÕÃ}°
UÊÊ-iiVÌÊ>ÊV>ÌÊvÀÊÌ
iÊ
ÕÌiÀÌ«Ê"Ûi°Ê/
iÊV>ÌÊÃ
Õ`ÊLiÊÊ
an open area on a flat counter where the plug will reach an outlet.
UÊ*Õ}ÊÌ
iÊ
ÕÌiÀÌ«Ê"ÛiÊÌÊ>Ê£ÓäÊ6ÌÊ
ÊiiVÌÀV>ÊÕÌiÌ°
WARNING: When Countertop Oven is in use or cooling down, please be
sure there is a 6-inch clearance between the Countertop Oven and any other
ÃÕÀv>ViÊVÕ`}ÊVÀ`ðÊiÊÃÕÀiÊÌ
iÊVÀ`ÊÃÊÌÊÀiÃÌ}Ê>}>ÃÌÊÌ
iÊL>VÊvÊÌ
iÊ
Countertop Oven.
PREPARING TO USE YOUR COUNTERTOP OVEN FOR THE FIRST TIME
8. Baking Pan & Cookie sheet in one – Use for all your baking needs.
See “Positioning Pan” section.
9. Easy Clean Interior Walls – Allows fast clean up.
Figure 1
English-6
/
iÊ/ÕÀLÊ
ÛiVÌÊi>ÌÊÕVÌÊÌÕÀÃÊÊ>ÊLÕÌÊÊ
fan that circulates hot air in the oven chamber cooking
your food faster and more evenly. Preheat oven 5-7
minutes at desired temperature with oven rack in place.
Step 1. Place baking pan with food inside on
wire rack.
Step 2. Close glass door completely.
Step 3. Turn the Function dial to Turbo.
Step 4. Turn the Temperature dial to desired setting.
Step 5. Turn the Timer to desired cook time.*
Step 6. When baking is complete, open door completely
and remove food.**
TO USE THE TURBO CONVECTION HEAT FUNCTION
(SEE FIG. 5)
Select desired rack position. (See “Positioning Rack”
Section)
NOTE: Different types of bread require different settings.
Lighter breads and waffles require lighter setting. Darker
breads, muffins and English muffins require a darker
setting.
Step 1. Place food on Wire Rack. For best toasting
results, position the rack in the upper position. **
Step 2. Close glass door completely.
Step 3. /ÕÀÊÌ
iÊÕVÌÊ`>ÊÌÊ/>ÃÌ°ÊÌ
ÊÌ
iÊÌ«Ê>`Ê
bottom heater elements will operate.
Step 4. Turn the temperature control knob to the 450º/
TOAST setting.
Step 5. To set the timer, turn the timer past the 20 minute
mark to engage timer switch and set back to
desired toast time.
Step 6. When toasting is complete, a bell will sound.
Open door completely and remove food.
TO USE THE TOAST FUNCTION (SEE FIG. 4)
Figure 5
Figure 4
English-7
Step 1. Place baking pan with food inside on
wire rack.
Step 2. Close glass door completely.
Step 3.Ê/ÕÀÊÌ
iÊÕVÌÊ`>ÊÌÊ>i°
Step 4. Turn the Temperature dial to desired setting.
Step 5. Turn the Timer to desired cook time.*
Step 6. When baking is complete, open door completely
and remove food.**
* Special note: If cook time is less than 20 minutes, you
must turn Timer past the 20 minute mark
to engage the timer then back to desired
time.
** WARNING: Cooked food and metal rack can be
very hot, handle with care. Do not leave
Countertop Oven unattended.
TO USE THE BAKE FUNCTION (SEE FIG. 6)
What is Turbo Convection Heat?
Answer: In your Countertop Oven there is a built in fan
that circulates the hot air in the oven chamber cooking
your food faster and more evenly.
How do I adjust the time for Turbo Convection?
Answer: On average, the Turbo function will shorten the
cooking time, but it varies by food. It is suggested to go
with a shorter cooking time to start with and then add
time if it is needed.
What are the best foods to use with Turbo?
Answer: While a shorter cook time is often desirable,
baked goods in particular benefit from Turbo cooking
as the circulating air keeps oven temperature consistent
throughout.
FAQS ABOUT TURBO CONVECTION HEAT
Figure 6
English-8
`ÕÃÌ>LiÊÀÊ>ÜÃÊÌ
iÊÛiÊÌÊLÀÊ>ÌÊ>ÞÊ
temperature. Great for melting cheese at 150º F
or cooking fish at 400º F. Adjust as needed.
Step 1. Place food on broil rack or on baking pan if
needed. See “Positioning Rack” and “Positioning
Pan” sections.
Step 2. Close glass door leaving approximately
a 3-inch opening at the top of the Countertop
Oven.
Step 3.Ê/ÕÀÊÌ
iÊÕVÌÊ`>ÊÌÊÀ°
Step 4. Turn the Temperature dial to desired
temperature.
Step 5. Turn the Timer to desired cook time.*
Step 6.Ê7
iÊÀ}ÊÃÊV«iÌi]Ê«iÊ`À
completely and remove food.**
* Special note: If cook time is less than 20 minutes, you
must turn Timer past the 20 minute mark
to engage the timer then back to desired
time.
** WARNING: Cooked food and metal rack can be
very hot, handle with care. Do not leave
Countertop Oven unattended.
Figure 8
Figure 7
R ACK G UIDE
O PTIONS
English-9
UÊÊ/Ê>VV`>ÌiÊ>ÊÜ`iÊÛ>ÀiÌÞÊvÊv`ÃÊÌ
iÊÛiÊ
>ÃÊÌÜÊÀ>VÊ«ÃÌðÊ
The rack can be inserted in the oven in the upper or lower rack guides. The
rack will fit into either of the rack guides inside of the Countertop Oven.
-iiÊ}ÕÀiÊiÜ®
UÊivÀiÊÀiÛ}ÊÌ
iÊÀ>VÊ>ÜÊÌ
iÊÕÌÊÌÊV°
UÊÊ/ÊÀiÛiÊÌ
iÊÀ>V]Ê«iÊÌ
iÊÛiÊ`ÀÊ>`Ê«ÕÊÌ
iÊÀ>VÊÌÜ>À`ÃÊÌ
iÊvÀÌÊ
of the oven. The rack will slide on the rack guides on the inside of the oven.
PLEASE NOTE: the oven rack may tilt downward causing food to shift when
the rack is pulled out, proceed with caution.
UÊÊ*ÃÌ}ÊvÊÌ
iÊÛiÊÀ>VÊÜÊ`i«i`ÊÊÌ
iÊÃâiÊvÊÌ
iÊv`Ê>`Ê
`iÃÀi`ÊLÀÜ}°ÊÛiÊÌ
iÊÀ>VÊÌÊÌ
iÊÜiÀÊÀ>VÊ«ÃÌÊÌÊ«ÀiÛiÌÊÌ«Ê
browning and move the rack to the upper rack position to prevent bottom
burning.
U ÀÊLiÃÌÊÌ>ÃÌ}ÊÀiÃÕÌÃ]Ê«ÃÌÊÌ
iÊÀ>VÊÊÌ
iÊÕ««iÀÊÀ>VÊ}Õ`i°
Step 1. Place baking pan with food inside on
wire rack.
Step 2. Close glass door completely.
Step 3. Turn the Function dial to Warm.
Step 4. Turn the Temperature dial past “Warm”.
Step 5. Turn the Timer to desired warming time.*
Step 6. When Warming is complete, open door
completely and remove food.**
TO USE THE BROIL FUNCTION (SEE FIG. 8)
POSITIONING RACK
TO USE THE WARM FUNCTION (SEE FIG. 7)
F OR
G RILLING OR
B ROILING
English-10
Allow the appliance to cool completely before storing. If storing the
Countertop Oven for long periods of time make certain that the Countertop
Oven is clean and free of food particles. Store the Countertop Oven in a dry
location such as on a table or countertop or cupboard shelf. Other than the
recommended cleaning, no further user maintenance should be necessary.
STORING YOUR COUNTERTOP OVEN
"Ê "/Ê,-Ê Ê+1-°
Step 1. Turn all knobs to “OFF” position and remove plug from electrical
outlet. Allow to cool.
Step 2.ÊÊ7«iÊÕÌÊ`ÜÊÜÌ
Ê`>«ÊVÌ
°Ê"Ê "/Ê,-Ê Ê7/,°Ê
>iÊÃÕÀiÊÌÊÞÊÕÃiÊ`]ÊÃ>«ÞÊÜ>ÌiÀ°ÊLÀ>ÃÛiÊVi>iÀÃ]ÊÃVÀÕLL}Ê
brushes and chemical cleaners will damage the coating on this unit.
Step 3. Remove crumb tray by pulling out of Countertop Oven.
Step 4. Shake off crumbs from crumb tray. Cleaning the crumb tray often will
avoid any accumulations.
Step 5. Remove wire rack and clean with damp cloth or place in top rack of
dishwasher.
CLEANING YOUR COUNTERTOP OVEN
F OR
B AKING
UÊÊ/Ê>VV`>ÌiÊ>ÊÜ`iÊÛ>ÀiÌÞÊvÊv`ÃÊÌ
iÊÛiÊ
>ÃÊÌÜÊ«>Ê«ÃÌðÊ
The pan can be placed on top of the rack or inserted into the guide rails
LiÜÊÌ
iÊÀ>V°Ê-iiÊ}ÕÀiÊiÜ®
UÊivÀiÊÀiÛ}ÊÌ
iÊ«>Ê>ÜÊÌ
iÊÕÌÊÌÊV°Ê
UÊÊ*ÃÌ}ÊvÊÌ
iÊÛiÊ«>ÊÜÊ`i«i`ÊÊÌ
iÊ`iÃÀi`ÊV}ÊiÌ
`°Ê
For baking, place the pan on top of the rack. For grilling or broiling, insert
the pan into the guide rails below the rack and place the food on top of the
rack.
POSITIONING PAN
1 tablespoon chopped garlic
2 tablespoons balsamic vinegar
ÈÊâ°ÊLÀi
1 tablespoon chopped fresh mint
1 tablespoon chopped fresh basil
1/4 cup parmesan shavings
¼ teaspoon ground cinnamon
2 slices whole wheat or multigrain
bread
English-11
Combine the sugar, margarine and cinnamon in a small bowl with a fork until
well blended. Spread each bread slice with equal portions of the mixture.
In an Oster® Toaster Oven, toast until the sugar is melted and the bread is
browned to your preference.
1 tablespoon brown sugar
2 teaspoons margarine, at room
temperature
CINNAMON TOAST
Set Oster® Toaster Oven to broil and pre-heat. Arrange bread in one layer
on a baking pan, then brush tops with 2 tablespoons oil and season with
Ã>ÌÊ>`Ê«i««iÀ°ÊÀÊÕÌÊ}`iÊLÀÜÊ>`ÊÌÀ>ÃviÀÊÌÊ>ÊÀ>V°Ê-«Ài>`ÊÌ
Ê
>ÞiÀÊvÊÀiÊÊÌ>ÃÌi`ÊLÀi>`°Ê
ÕÌÊ>ÀÌV
iÃÊi}Ì
ÜÃiÊÌÊ£É{V
Ì
VÊ
ÃViÃÊ>`ÊVÕÌÊ«ÀÃVÕÌÌÊÌÊ>ÌV
ÃÌVðÊi>ÌÊ£ÊÌ>LiëÊÊÊ>Ê£äV
Ê
heavy bottom skillet on moderately high heat. Add the onions and garlic. Stir
frequently until they become transparent. Add the artichokes and prosciutto,
cook the artichokes until golden (about 4 minutes) then add the balsamic
vinegar. Add the basil and mint, salt and pepper to taste. Spoon the mixture
over the toast. Top with Parmesan and serve immediately.
6 (1/3-inch-thick) slices of
round country loaf
6 tablespoons extra-virgin olive oil
ÓÊÊÈʤⰮÊ>ÀÃÊ>À>Ìi`Ê
artichoke hearts, drained
£ÊÓÊⰮʫiViÊ«ÀÃVÕÌÌÊÀÊ
>
1 small red onion, chopped
BRIE AND ARTICHOKE BRUSCHETTA
RECIPES
1 package pork tenderloin,
1 ½ - 2 pounds
5 cloves garlic, peeled and minced
3 tablespoons Dijon mustard
ÈÊÊÃ>Ê9ÕÊ`Ê«Ì>ÌiÃ]Ê
quartered
3 tablespoons fresh rosemary,
stemmed and chopped
Chili powder
1 small onion, cut into ¼ inch dice
Kosher salt and pepper
3 small carrots cut into ¼ inch dice
1 ½ cups chicken broth
English-12
Preheat Oster®Ê/>ÃÌiÀÊ"ÛiÊÌÊ{xäc°Ê-«ÀiÊÛi}iÌ>LiÃÊÊLÌÌÊvÊ>Ê
11 inch baking pan with 1 ½ - 2 inches sides and top with turkey breast.
/ÕVÊ}>ÀVÊ>`Ê
iÀLÃÊÕ`iÀÊLÀi>ÃÌ°Ê-µÕiiâiÊiÊÊÌ«ÊvÊÌÕÀiÞÊ>`Ê
season with chili powder, salt and pepper. Cook for 25 minutes. Reduce oven
Ìi«iÀ>ÌÕÀiÊÌÊÎÓxcÊ>`Ê«ÕÀÊLÀÌ
ÊÌÊLÌÌÊvÊ«>]Ê>LÕÌÊ£ÊV
ÊÕ«ÊÌ
iÊ
sides of the pan. Continue cooking until turkey juices run clear and it reaches
ÌiÀ>ÊÌi«iÀ>ÌÕÀiÊvÊ£näc°
1 small turkey breast
2 stalks celery, cut into ¼ inch dice
2 cloves garlic, peeled
1 lemon, halved
1 or 2 sprigs each of fresh rosemary
and fresh thyme
ROASTED TURKEY BREAST WITH AROMATIC VEGETABLES
ÝÊÌ
iÊÕÃÌ>À`Ê>`Ê
iÞÊÌ}iÌ
iÀÊÊ>Êi`ÕÊÃ
>ÜÊLÜ°Ê/
ÀÕ}
ÞÊ
coat the chicken on both sides. Combine cayenne pepper, cornflakes and pecans
in another shallow bowl. Spray baking pan with nonstick spray and place
V
ViÊÊ«>°ÊÀââiÊÌ«ÊÜÌ
ÊÛiÊ°Ê>iÊ>ÌÊÎÇxcÊvÀÊ{äÊÕÌiÃÊÀÊÕÌÊ
V
ViÊÀi>V
iÃÊÌiÀ>ÊÌi«iÀ>ÌÕÀiÊvÊ£ÇäcÊ>`ÊÃÊÊ}iÀÊ«ÊÊViÌiÀ°
English-13
Preheat Oster®Ê/>ÃÌiÀÊ"ÛiÊÌÊÎÇxc°Ê
>ÌÊ«ÀÊÜÌ
ÊÊÕÃÌ>À`°ÊÊ
a small bowl, combine 2 tablespoons of rosemary, 2 tablespoons of thyme,
salt, pepper and garlic. Spread over pork tenderloins and place in a large
baking dish that fits comfortably inside toaster oven. Spread potatoes around
«ÀÊ`ÀââiÊÜÌ
ÊÛiÊ°Ê-«ÀiÊ«Ì>ÌiÃÊÜÌ
ÊÃ>ÌÊ>`Ê«i««iÀÊ>`Ê
remaining 1 tablespoon of rosemary and thyme. Cook for ½ hour or until
pork tenderloin is no longer pink in the center. Remove pork, cover with foil
and set aside. Check potatoes by piercing with fork to see if tender and cook
for an additional 15-20 minutes if necessary.
2 tablespoons olive oil
3 tablespoons fresh thyme, stemmed
1 tablespoon Kosher salt, plus
additional for potatoes
1 teaspoon freshly cracked black
pepper, plus additional for
potatoes
MUSTARD AND HERB PORK TENDERLOIN WITH ROASTED POTATOES
"ÛiÊÊvÀÊ`Àââ}
1 teaspoon cayenne pepper
1 18-ounce box cornflake cereal,
pulsed in food processor until
flakes are crumbs
1 cup Dijon mustard
½ cup chopped pecans
1 cup honey
Nonstick pan spray
3 pounds of skinless chicken thighs
and/or breasts
RECIPES
HONEY MUSTARD CHICKEN WITH SPICY PECAN CORNFLAKE CRUST
RECIPES
t)FBUJOHFMFNFOUTXJMM
DZDMF0/BOE0''UP
NBJOUBJOQSPQFSIFBU
)FBUJOHFMFNFOUTEPøOPU
TUBZ0/
English-14
t'VODUJPOTFUUJOH
TFMFDUJPOEFUFSNJOFT
XIJDIIFBUJOH
FMFNFOUXJMMPQFSBUF
0OMZPOFIFBUJOHFMFNFOUJT
IFBUJOHVQ
t$POGJSNGVODUJPOTFUUJOHJTUIF
DPSSFDUPOFPGDIPJDF
t$IFDLUPTFFJGUIF#SPJMTFUUJOH
PSXBSNTFUUJOHXBSNJT
MPXFSPOMZ
JTTFMFDUFE
t3FGFSUPi$MFBOJOH:PVS
$PVOUFSUPQ0WFOw4FDUJPO
1BHF&OHMJTI
t'PPECVJMEVQJOTJEF
PWFOPOIFBUJOH
FMFNFOUTPSJODSVNC
USBZ
SOLUTION
#VSOU4NFMM
POTENTIAL CAUSE
t*ODPSSFDUUFNQFSBUVSF t:PVNBZIBWFUPBEKVTUUIF
PSUJNFTFUUJOH
UJNFBOEUFNQFSBUVSFUP
EFTJSFEUBTUF
t#FDBVTFZPVS$PVOUFSUPQ0WFO
JTTNBMMFSUIBOZPVSSFHVMBS
PWFOJUXJMMIFBUVQGBTUFSBOE
HFOFSBMMZDPPLJOTIPSUFSQFSJPET
PGUJNF
t3FGFSUPi1PTJUJPOJOH3BDLw
t3BDLQMBDFNFOU
4FDUJPO1BHFø&OHMJTI3BDL
NBZOFFEUPCFBEKVTUFE
UPøBDDPNNPEBUFGPPE
0WFSDPPLFE6OEFSDPPLFE
'PPET
PROBLEM
HELPFUL TIPS / TROUBLESHOOTING
English-15
NOTES
English-16
Sunbeam Products, Inc. doing business as Jarden Consumer Solutions or if in
Canada, Sunbeam Corporation (Canada) Limited doing business as Jarden
Consumer Solutions (collectively “JCS”) warrants that for a period of one year
from the date of purchase, this product will be free from defects in material
and workmanship. JCS, at its option, will repair or replace this product or any
component of the product found to be defective during the warranty period.
Replacement will be made with a new or remanufactured product or component.
If the product is no longer available, replacement may be made with a similar
product of equal or greater value. This is your exclusive warranty. Do NOT
attempt to repair or adjust any electrical or mechanical functions on this product.
Doing so will void this warranty.
This warranty is valid for the original retail purchaser from the date of initial retail
purchase and is not transferable. Keep the original sales receipt. Proof of purchase
is required to obtain warranty performance. JCS dealers, service centers, or retail
stores selling JCS products do not have the right to alter, modify or any way
change the terms and conditions of this warranty.
This warranty does not cover normal wear of parts or damage resulting from any
of the following: negligent use or misuse of the product, use on improper voltage
or current, use contrary to the operating instructions, disassembly, repair or
>ÌiÀ>ÌÊLÞÊ>ÞiÊÌ
iÀÊÌ
>Ê
-ÊÀÊ>Ê>ÕÌ
Àâi`Ê
-ÊÃiÀÛViÊViÌiÀ°ÊÕÀÌ
iÀ]Ê
the warranty does not cover: Acts of God, such as fire, flood, hurricanes and
tornadoes.
What are the limits on JCS’s Liability?
JCS shall not be liable for any incidental or consequential damages caused by the
breach of any express, implied or statutory warranty or condition.
Except to the extent prohibited by applicable law, any implied warranty or
condition of merchantability or fitness for a particular purpose is limited in duration
to the duration of the above warranty.
JCS disclaims all other warranties, conditions or representations, express, implied,
statutory or otherwise.
JCS shall not be liable for any damages of any kind resulting from the purchase,
use or misuse of, or inability to use the product including incidental, special,
consequential or similar damages or loss of profits, or for any breach of contract,
fundamental or otherwise, or for any claim brought against purchaser by any
other party.
Some provinces, states or jurisdictions do not allow the exclusion or limitation
of incidental or consequential damages or limitations on how long an implied
warranty lasts, so the above limitations or exclusion may not apply to you.
1 Year Limited Warranty
English-17
PLEASE DO NOT RETURN THIS PRODUCT TO ANY OF THESE
ADDRESSES OR TO THE PLACE OF PURCHASE.
This warranty gives you specific legal rights, and you may also have other rights
that vary from province to province, state to state or jurisdiction to jurisdiction.
How To Obtain Warranty Service
In the U.S.A.
If you have any question regarding this warranty or would like to obtain warranty
service, please call 1-888-233-3214 and a convenient service center address will be
provided to you.
In Canada
If you have any question regarding this warranty or would like to obtain warranty
service, please call 1-800-667-8623 and a convenient service center address will be
provided to you.
In the U.S.A., this warranty is offered by Sunbeam Products, Inc. doing business as
>À`iÊ
ÃÕiÀÊ-ÕÌÃÊV>Ìi`ÊÊV>Ê,>Ì]ÊÀ`>ÊÎÎ{Σ°ÊÊ
>>`>]ÊÌ
ÃÊ
warranty is offered by Sunbeam Corporation (Canada) Limited doing business as
>À`iÊ
ÃÕiÀÊ-ÕÌÃ]ÊV>Ìi`Ê>ÌÊÓäÊÊiÀivÀ`Ê-ÌÀiiÌ]ÊÀ>«Ì]Ê"Ì>ÀÊ
È9Ê䣰ÊvÊÞÕÊ
>ÛiÊ>ÞÊÌ
iÀÊ«ÀLiÊÀÊV>ÊÊViVÌÊÜÌ
ÊÌ
ÃÊ«À`ÕVÌ]Ê
please write our Consumer Service Department.
Español-18
t - &"50%"4-"4*/4536$$*0/&4-"4&5*26&5"4&/&-130%6$50:-"4
"%7&35&/$*"4"/5&4%&64"3&-)03/0ø5045"%03
t /PUPRVFMBTTVQFSGJDJFTDBMJFOUFT4JFNQSFVTFHVBOUFTDVBOEPNBOFKFNBUFSJBMFT
DBMJFOUFTZQFSNJUBRVFMBTQBSUFTNFUÈMJDBTTFFOGSÓFOBOUFTEFMJNQJBS1FSNJUBRVFMB
VOJEBETFFOGSÓFDPNQMFUBNFOUFBOUFTEFQPOFSPRVJUBSQBSUFT4JFNQSFVTFMBTBTBTEFM
IPSOPDVBOEPNVFWBMBVOJEBE
/05"$VBOEPBCSBFMIPSOPBTFHÞSFTFEFBHBSSBSMBNBOJMMBQPSFMDFOUSPZBRVFMPT
FYUSFNPTFTUÈODBMJFOUFT
t %FTDPOFDUFFMIPSOPUPTUBEPSEFMUPNBDPSSJFOUFDVBOEPMBVOJEBEOPFTUÏFOVTPZBOUFT
EFøMJNQJBSMB/05"7FSJGJRVFRVFFMIPSOPUPTUBEPSFTUÏBQBHBEPBOUFTEFEFTDPOFDUBS
t 1BSBQSPUFHFSTFDPOUSBVOBEFTDBSHBFMÏDUSJDBOPTVNFSKBFMBQBSBUPFOBHVBPFO
PUSPTMÓRVJEPT
t 4VQFSWJTJØODPOUJOVBFTOFDFTBSJBDVBOEPÏTUFPDVBMRVJFSPUSPBQBSBUPTFBVTBEPDFSDB
EFMPTøOJ×PT&TUFBQBSBUPOPEFCFTFSVTBEPQPSMPTOJ×PT
t /PPQFSFÏTUFOJOJOHÞOPUSPBQBSBUPDPOVODPSEØOEB×BEPPRVFNBEPPEFTQVÏTEF
RVFFMBQBSBUPIBGVODJPOBEPJOBEFDVBEBNFOUFPIBTJEPEB×BEPFODVBMRVJFSGPSNB
%FWVFMWBFMBQBSBUPBM$FOUSPEF4FSWJDJP"VUPSJ[BEP4VOCFBNNÈTDFSDBOPQBSBRVFMP
SFWJTFOSFQBSFOPQBSBVOBKVTUF
t /PVUJMJDFBDDFTPSJPTPBEJUBNFOUPTOPSFDPNFOEBEPTQPSFMGBCSJDBOUFZBRVFQVFEFO
DBVTBSJODFOEJPTEFTDBSHBTFMÏDUSJDBTPMFTJPOFTQFSTPOBMFT
t /PVUJMJDFFTUFBQBSBUPFOFYUFSJPSFTPDPOQSPQØTJUPTDPNFSDJBMFT
t /PVUJMJDFFTUFBQBSBUPNÈTRVFQBSBMPRVFIBTJEPEJTF×BEP
t /PQFSNJUBRVFFMDPSEØODVFMHVFTPCSFMBPSJMMBEFMBNFTBPEFMNPTUSBEPSPUPRVF
TVQFSGJDJFTDBMJFOUFT
t /PMPDPMPRVFTPCSFPDFSDBEFRVFNBEPSFTEFFTUVGBTEFHBTPFMÏDUSJDBTUBNQPDP
EFOUSPEFøVOøIPSOPDBMJFOUF
t 5FOHBFYUSFNPDVJEBEPDVBOEPVTFDPOUFOFEPSFTRVFOPFTUÏOGBCSJDBEPTEFWJESJP
PEFNFUBM
LEA Y GUARDE ESTAS
INSTRUCCIONES
Cuando use aparatos eléctricos, siempre deben tomarse algunas
precauciones básicas de seguridad, incluyendo las siguientes:
PRECAUCIONES IMPORTANTES
Español-19
GUARDE ESTAS INSTRUCCIONES
1BSBSFEVDJSFMSJFTHPEFDIPRVFFMÏDUSJDPFTUFBQBSBUPUJFOFVOFODIVGFQPMBSJ[BEP
(una cuchilla es más ancha que la otra)$ØNPVOBNFEJEBEFTFHVSJEBEFTUFFODIVGF
FOUSBSÈFOVOBUPNBEFDPSSJFOUFQPMBSJ[BEBEFVOBTØMBGPSNB4JFMFODIVGFOPFOUSB
DPNQMFUBNFOUFFOVOUPNBDPSSJFOUFWPMUÏFMP4JBÞOBTÓOPFOUSBDPOUBDUFBVO
FMFDUSJDJTUBDBMJGJDBEPNo intente modificarFTUBNFEJEBEFTFHVSJEBE
Sólo para Productos Comprados en los Estados Unidos y Canadá
4FJODMVZFVODBCMFEFUFOTJØODPSUPQBSBFWJUBSRVFTFFOSFEFPRVFDBVTF
USPQJF[PT6ODBCMFEFFYUFOTJØOQVFEFVTBSTFDPODVJEBEP4JTFVTBVOBDBCMF
EFFYUFOTJØOMBQPUFODJBFMÏDUSJDBNBSDBEBFOFMDBCMFEFFYUFOTJØOEFCFTFSQPS
MPNFOPTJHVBMPNBZPSBMBQPUFODJBFMÏDUSJDBEFMBQBSBUP&MDBCMFEFFYUFOTJØO
EFCFDPMPDBSTFEFNBOFSBRVFOPDVFMHVFEFMNPTUSBEPSPEFMBNFTBEPOEF
QVFEBDBVTBSUSPQJF[PTBDDJEFOUBMNFOUF
Esta Unidad Es Sólo para Uso Doméstico
Uso de un Cable Eléctrico Corto
t 1 VFEFPDVSSJSVOJODFOEJPTJFMIPSOPUPTUBEPSFTUÈFOPQFSBDJØOZFTUÈFODPOUBDUP
PDVCJFSUPDPONBUFSJBMFTJOGMBNBCMFTJODMVZFOEPDPSUJOBTUBQJDFSÓBQBSFEFTFUD
/PDPMPRVFOJOHÞOPCKFUPTPCSFFMBQBSBUPDVBOEPFTUÏFOPQFSBDJØO
t "MVTBSIPSOPTQBSBNPTUSBEPSBTFHVSBSEFQPTJDJPOBSMPBVONÓOJNPEFQVMHBEBT
EFEJTUBODJBEFMBQBSFEVEFPUSPTDBCMFT
t $VBOEPFTUBVOJEBEOPFTUÏFOPQFSBDJØOOPBMNBDFOFEFOUSPEFÏMOJOHÞONBUFSJBM
RVFOPTFBVOBDDFTPSJPSFDPNFOEBEPQPSFMGBCSJDBOUF
t /PDPMPRVFEFOUSPEFMIPSOPOJOHÞONBUFSJBMJOGMBNBCMFDPNPQBQFMDBSUØOQMÈTUJDP
PDVBMRVJFSNBUFSJBMRVFTFQVFEBJODFOEJBSPEFSSFUJS
t /PDVCSBMBDIBSPMBQBSBNJHBKBTPOJOHVOBQBSUFEFMIPSOPDPOQBQFMBMVNJOJP
PNFUÈMJDP&TUPøQVFEFDBVTBSFMTPCSFDBMFOUBNJFOUPEFMBQBSBUP
t -PTBMJNFOUPTHSBOEFTPVUFOTJMJPTNFUÈMJDPTOPEFCFOTFSJOUSPEVDJEPTFOFMIPSOP
UPTUBEPSZBøRVFQVFEFODBVTBSJODFOEJPTPEFTDBSHBTFMÏDUSJDBT
t /PMJNQJFDPOFTQPOKBTPGJCSBTNFUÈMJDBT4FQVFEFOEFTQSFOEFSUSP[PTEFMBFTQPOKB
PGJCSBZUPDBSQBSUFTFMÏDUSJDBTDSFBOEPFMSJFTHPEFEFTDBSHBTFMÏDUSJDBT
t 6TFFYUSFNBQSFDBVDJØODVBOEPSFUJSFMBTBSUÏOPDVBOEPEFTFDIFMBHSBTBDBMJFOUF
VPUSPMÓRVJEPDBMJFOUF
t 1BSBBQBHBSFTUFBQBSBUPSFHSFTFUPEPTMPTDPOUSPMFTBMBQPTJDJØOEF"1"("%0
i0''w
ZSFNVFWBFMDPSEØOEFMUPNBDPSSJFOUF
5
6
7
Español-20
1. Perilla selectora de función - Seleccione la función de cocción girando la
«iÀ>Ê>Ê>Ê}À>`Õ>VÊ`iÃi>`>°Ê6iÀÊ>Ê}ÕÀ>Ê£®
2. Perilla de control de temperatura - Ajusta el termostato a la temperatura
`iÃi>`>°Ê6iÀÊ>Ê}ÕÀ>ÊÓ®
3. Perilla de control de tiempo con campanilla indicadora - Fija el tiempo de
cocción hasta un máximo de 60 minutos. Apaga automáticamente el
ÀÊ>Êv>â>ÀÊiÊÌi«Ê`iÊVVV°ÊÊ6iÀÊ>Ê}ÕÀ>Êή
4. Bandeja recolectora removible - Para recolectar las migajas o restos de
V`>ʵÕiÊV>}>°Ê-iÊÃ>V>Ê«>À>Êv>VÌ>ÀÊÃÕÊ«iâ>°
5. Rejilla removible para asar - Use para asar. Consulte las secciones de
º*ÃV>iÌÊ`iÊ>ÊÀi>»ÊÞʺ*ÃV>iÌÊ`iÊ>Ê>`i>»°
6. Puerta de vidrio templado - Para ver los alimentos desde el frente.
7. Dos posiciones para colocar la rejilla
8
9
Español-21
NOTA: Durante el primer uso usted podría detectar un ligero olor y/o humo.
Gire la temperatura al máximo y deje prendido por aproximadamente
xÊÕÌðÊ-ÊiÃÌ?ÊÕÃ>`ÊÃÕÊ
ÀÊ«>À>ÊÃÌÀ>`ÀÊ«ÀÊ«ÀiÀ>ÊÛiâÊ>Ãi}ÖÀiÃiÊ`i\
UÊ,iÌÀ>ÀÊÌ`ÃÊÃÊ>`
iÃÛÃÊ`iÊ>ÊÃÕ«iÀvViÊ`iÊ
À°
UÊÊLÀÀÊ>Ê«ÕiÀÌ>Ê`iÊ
ÀÊÞÊÀiÌÀ>ÀÊÌ`ÃÊÃÊ`VÕiÌÃÊ«ÀiÃÃÊ
y los papeles de la parte interior del horno para mostrador.
UÊÊ«>ÀÊ>ÊÀi>ÊÞÊ>ÊL>`i>ÊVÊ>}Õ>ÊV>iÌi]ÊÕ>Ê«iµÕi>ÊV>Ì`>`Ê
de líquido lavavajillas y una esponja no abrasiva.
UÊ "Ê-1,,ÊÊ
1,*"ÊÊÊ1 Ê Ê1°
UÊ-iµÕiÊ>ÊÕ`>`Ê«ÀÊV«iÌÊ>ÌiÃÊ`iÊÕÃ>À>°
UÊÊ-iiVViÊÕ>ÊÕLV>VÊ«>À>ÊiÊ
ÀÊ«>À>ÊÃÌÀ>`À°ÊiLiÀ?Ê
ubicarse en un área abierta sobre una mesa en la que el enchufe llegue
hasta el tomacorriente.
UÊV
ÕviÊiÊ
ÀÊ«>À>ÊÃÌÀ>`ÀÊiÊÕÊÌ>VÀÀiÌiÊ`iÊ£ÓäÊÛÌÃÊ
°
ADVERTENCIA\Ê
Õ>`ÊiÊ
ÀÊiÃÌjÊiÊÕÃÊÊÃiÊiÃÌjÊivÀ>`]Ê>Ãi}ÖÀiÃiÊ
de que haya un espacio de 6 pulgadas entre el horno y cualquier otra
ÃÕ«iÀvViÊVÕÞi`ÊÃÊV>LiðÊÃi}ÖÀiÃiÊ`iʵÕiÊiÊV>LiÊÊiÃÌjÊ>«Þ>`Ê
contra la parte trasera del horno para mostrador.
4
2
PREPARACIÓN PARA USAR SU HORNO PARA MOSTRADOR POR PRIMERA VEZ
Figura 3
3
Figura 2
8. Combinación de bandeja para hornear y bandeja para galletas - Úselas
para todas sus tareas de horneado y asado. Consulte la sección de
º*ÃV>iÌÊ`iÊ>Ê>`i>»°
9. Paredes interiores fáciles de limpiar -Ê*iÀÌiÊ>Ê«iâ>ÊÀ?«`>°
Figura 1
1
INFORMACIÓN SOBRE SU HORNO PARA MOSTRADOR
Español-22
Español-23
*Nota especial: Si el tiempo de cocción es menor a 20
minutos, debe girar el relojprogramador
más allá de la marca de 20 minutos
y luego retroceder hasta el tiempo
deseado.
**ADVERTENCIA: Los alimentos cocidos y la rejilla de
metal pueden estar muy calientes,
manipule con cuidado. No deje
el horno para mostrador sin
supervisión.
La función de Turbo (horneado por convección) enciende
un ventilador incorporado que circula el aire caliente en
la cámara del horno cocinando su comida más rápido
y más parejo. Precaliente el horno de 5 a 7 minutos a la
temperatura deseada con la rejilla del horno en su lugar.
Paso 1. Coloque una bandeja para horneado con
alimento en la rejilla de alambre.
Paso 2. Cierre completamente la puerta de vidrio.
Paso 3. Gire la perilla de funciones a Turbo (horneado
por convección).
Paso 4. Gire la perilla de la temperatura hasta la
posición deseada.
Paso 5. Gire la perilla del reloj programador hasta el
tiempo de cocción deseado.*
Paso 6. Cuando termine de hornear, abra por completo
la puerta del horno y retire los alimentos.**
Elija la posición deseada para la rejilla. (Consulte la
sección “Posicionamiento de la rejilla”)
NOTA: la graduación variará dependiendo del tipo de
pan. Los panes más blancos y los gofres (waffle)
requieren graduaciones de tostado más claro. Los
panes más oscuros, panecillos y molletes requieren
una graduación de tostado más oscuro.
Paso 1. Coloque los alimentos en la rejilla.
Paso 2. Cierre completamente la puerta de vidrio.
Paso 3. Gire la perilla selectora a la función de tostar.
El elemento térmico superior e inferior se
encenderán.
Paso 4. Gire la perilla de control de la temperatura a la
graduación 450º/TOSTAR.
Paso 5. Para fijar el cronómetro de cuenta regresiva,
gírelo hasta sobrepasar la marca de 20 minutos
para activar el interruptor del cronómetro y
fíjelo en el tiempo de tostado deseado.
Paso 6. Cuando haya terminado de tostar sonará una
campanilla. Abra completamente la puerta y
saque los alimentos. Para obtener los mejores
resultados al tostar, coloque la rejilla en la
posición superior. **
Figure 4
PARA USAR LA FUNCIÓN DE TURBO
(HORNEADO POR CONVECCIÓN) (VER LA FIG. 5)
USO DE LA FUNCIÓN DE TOASTAR
(VER LA FIG. 4)
Figure 5
Español-24
Paso 1. Coloque una bandeja para horneado con
alimento en la rejilla de alambre.
Paso 2. Cierre completamente la puerta de vidrio.
Paso 3.ÊÊÀiÊ>Ê«iÀ>Ê`iÊvÕViÃÊ>Ê>iÊÀi>À®°
Paso 4. Gire la perilla de la temperatura hasta la posición
deseada.
Paso 5. Gire la perilla del reloj programador hasta el
tiempo de cocción deseado.*
Paso 6. Cuando termine de hornear, abra por completo la
puerta del horno y retire los alimentos.**
PARA USAR LA FUNCIÓN DE HORNEAR
(VER LA FIG. 6)
¿Qué es Turbo (horneado por convección)?
Respuesta: En su horno para mostrador existe un
ventilador incorporado que circula el aire caliente en la
cámara del horno cocinando su comida más rápido y más
parejo.
¿Cómo ajusto el tiempo para Turbo (horneado por
convección)?
Respuesta: En promedio, la convección acortará el
Ìi«Ê`iÊVVV]Ê«iÀÊÛ>À>ÊÃi}ÖÊ>ÊV`>°Ê-iÊÃÕ}iÀiÊ
establecer un tiempo de cocción más corto para iniciar el
proceso y luego agregar tiempo si es necesario.
¿Qué alimentos se cocinan mejor con Turbo (horneado
por convección)?
Respuesta: Siempre será deseable un tiempo de cocción
?ÃÊVÀÌ°Ê>ÞÊÕÊLiivVÊiÊ«>ÀÌVÕ>ÀÊ«>À>ÊÃÊ
alimentos que se hornean, pues el aire que circula
mantiene constante la temperatura del horno durante
todo el proceso.
PREGUNTAS FRECUENTAS SOBRE LA FUNCIÓN TURBO
(HORNEADO POR CONVECCIÓN)
Figure 6
Español-25
La función ajustable de asar permite al horno asar a
cualquier temperatura. Fabuloso para derretir queso
>Ê£xä¨ÊÊÊVV>ÀÊ«iÃV>`Ê>Ê{ää¨Ê°ÊÕÃÌiÊÃi}ÖÊÃi>Ê
necesario.
Paso 1. Coloque la comida en la rejilla para asar o en
una bandeja de hornear si es necesario. Consulte
las secciones de “Posicionamiento de la rejilla” y
º*ÃV>iÌÊ`iÊ>Ê>`i>»°
Paso 2. Cierre la puerta de vidrio dejando una abertura
de aproximadamente 3 pulgadas en la parte
superior del horno.
Paso 3. Gire la perilla de función a la posición
ºÀ»ÊÃ>À®°
Paso 4. Gire la perilla de control de la temperatura hasta
la posición de la temperatura deseada.
Paso 5. Gire la perilla del reloj programador hasta el
tiempo de cocción deseado.*
Paso 6. Cuando termine de asar, abra por completo la
puerta del horno y retire los alimentos.**
*Nota especial: Si el tiempo de cocción es menor a 20
minutos, debe girar el relojprogramador
más allá de la marca de 20 minutos y
luego retroceder hasta el tiempo deseado.
**ADVERTENCIA: Los alimentos cocidos y la rejilla de
metal pueden estar muy calientes,
manipule con cuidado. No deje
el horno para mostrador sin
supervisión.
USO DE LA FUNCIÓN DE ASAR (VER LA FIG. 8)
Paso 1. Coloque una bandeja para horneado con
alimento en la rejilla de alambre.
Paso 2. Cierre completamente la puerta de vidrio.
Paso 3. Gire la perilla de función a la posición “Warm”
(Calentar).
Paso 4. Gire el control de temperatura pasando la
posición de “Warm”.
Paso 5. Gire la perilla del reloj programador hasta el
tiempo de calentamiento deseado.*
Paso 6. Cuando termine de calentar, abra por completo la
puerta del horno y retire los alimentos.**
USO DE LA FUNCIÓN DE CALENTAR
(VER LA FIG. 7)
Figure 8
Figure 7
OPCIONES DE GUÍAS
PARA REJILLAS
Español-26
ASAR
Español-27
Deje que el electrodoméstico se enfríe por completo antes de guardarlo. Si
}Õ>À`>ÊiÊ
ÀÊ«>À>ÊÃÌÀ>`ÀÊ«ÀÊ«iÀ`ÃÊ>À}ÃÊ>Ãi}ÖÀiÃiÊ`iʵÕiÊiÃÌjÊ
limpio y libre de partículas de comida. Guarde el horno para mostrador en un
lugar seco como por ejemplo en una mesa o mostrador o armario. Además de
>Ê«iâ>ÊÀiVi`>`>ÊÊiÃÊiViÃ>ÀÊ}ÖÊÌÀÊÌ«Ê`iÊ>ÌiiÌ°
PARA GUARDAR EL HORNO PARA MOSTRADOR
"Ê"Ê-1,Ê Ê+1"-°
Paso 1. Gire todas las perillas a la posición de Apagado (OFF) y desenchufe
del tomacorriente. Deje que se enfríe.
Paso 2.ÊÊ«iÊ>ÊÕ`>`ÊVÊÕÊ«>Ê
Öi`°Ê "Ê"Ê-1,Ê Ê
1ÊÃi}ÖÀiÃiÊ`iÊÕÃ>ÀÊÃÊ>}Õ>ÊVÊ>LÊÃÕ>Ûi°ÊÃÊ«>`ÀiÃÊ
abrasivos, cepillos para fregar y limpiadores químicos dañan el
ÀiÛiÃÌiÌÊ`iÊ«iâ>ÊVÌÕ>Ê`iÊiÃÌ>ÊÕ`>`°
Paso 3. Retire la bandeja para migas del horno para mostrador.
Paso 4.ÊÊ->VÕ`>Ê>ÊL>`i>Ê«>À>ʵÕÌ>ÀÊ>ÃÊ}>ðÊ>Ê«iâ>ÊÀi}Õ>ÀÊ`iÊ>Ê
bandeja para migas evitará las acumulaciones.
Paso 5.ÊÊ,iÌÀiÊ>ÊÀi>Ê`iÊ>>LÀiÊÞÊ«iÊVÊÕÊ«>Ê
Öi`ÊÊVµÕiÊ
la rejilla superior en el lavavajillas.
LIMPIEZA DEL HORNO PARA MOSTRADOR
HORNEAR
P ARA
UÊÊ
ÀÊ«ÃiiÊ`ÃÊ«ÃViÃÊ«>À>ÊVV>ÀÊ>ÊL>`i>ÊÊVÕ>ÊiÊ«iÀÌiÊÊÊÊ
adaptarse a una amplia variedad de alimentos. La bandeja puede colocarse
ÊÊÊÃLÀiÊ>ÊÀi>ÊÊÌÀ`ÕVÀÃiÊ«ÀÊ>ÃÊ}Õ>ÃÊ`iL>Ê`iÊ>ÊÀi>°Ê6iÀÊ>Êv}ÕÀ>
abajo)
UÊiiʵÕiÊ>ÊÕ`>`ÊÃiÊivÀiÊ>ÌiÃÊ`iÊÃ>V>ÀÊ>ÊL>`i>°
UÊÊ>ÊVV>VÊ`iÊ>ÊL>`i>Ê`iÊ
ÀÊ`i«i`iÀ?Ê`iÊjÌ`Ê`iÊVVVÊ
deseado. Para hornear, coloque la bandeja para hornear encima de la rejilla.
Para asar, inserte la bandeja en los rieles ubicados por debajo de la rejilla y
coloque los alimentos en la parte superior de la rejilla.
UÊÊ*>À>Ê«`iÀÊVÌiiÀÊÕ>Ê>«>ÊÛ>Ài`>`Ê`iÊ>iÌÃÊiÊ
ÀÊÌiiÊÕ>Ê
rejilla reversible y dos posiciones para la rejilla. La rejiilla se puede insertar
en el horno en las guías superior e inferior de la rejilla. La rejilla encajará en
VÕ>µÕiÀ>Ê`iÊ>ÃÊ}Õ>ÃÊ«>À>ÊÀi>Ê`iÌÀÊ`iÊ
ÀÊ«>À>ÊÃÌÀ>`À°Ê6i>Ê>Ê
figura abajo)
UÊÌiÃÊ`iÊÀiÌÀ>ÀÊ>ÊÀi>Ê«iÀÌ>ʵÕiÊÃiÊivÀiÊ>ÊÕ`>`°
UÊÊ*>À>ÊÀiÌÀ>ÀÊ>ÊÀi>]Ê>LÀ>Ê>Ê«ÕiÀÌ>Ê`iÊ
ÀÊÞÊiÛiÊ>ÊÀi>Ê
>V>ÊiÊvÀiÌiÊ
`iÊ
À°Ê>ÊÀi>ÊÃiÊ`iÃâ>À?ÊiÊ>ÃÊ}Õ>ÃÊ`iÌÀÊ`iÊ
À°Ê
TENGA EN CUENTA QUE: la rejilla del horno puede inclinarse hacia
adelante haciendo que los alimentos se muevan cuando se saca la rejilla;
proceda con cuidado.
UÊÊ>Ê`iÊ>ÊÀi>Ê`i«i`iÀ?Ê`iÊÌ>>Ê`iÊÃÊ>iÌÃÊÞÊ`iʵÕjÊÌ>Ê`À>`ÃÊ
los desee. Coloque la rejilla abajo para evitar que se dore la parte superior
y en la posición elevada para evitar que se queme la parte inferior.
UÊ*>À>ÊLÌiiÀÊiÀiÃÊÀiÃÕÌ>`ÃÊ>ÊÌÃÌ>À]ÊVµÕiÊ>ÊÀi>ÊiÊ>Ê}Õ>ÊÃÕ«iÀÀÊ
de la rejilla.
P ARA
POSICIONAMIENTO DE LA BANDEJA
POSICIONAMIENTO DE LA REJILLA
Español-28
Fije el horno tostador Oster® a “broil” (asar) y pre caliente. Arregle el pan
en una capa en un molde para hornear, luego unte los lados de arriba con
`ÃÊVÕV
>À>`>ÃÊ`iÊ>ViÌiÊ`iÊÛ>ÊÞÊÃ>âiÊVÊÃ>ÊÞÊ«iÌ>°ÊÀiiÊ
>ÃÌ>Ê
que queden color marrón dorado y pase a la rejilla. Unte una capa ligera
`iʵÕiÃÊÀiÊiÊiÊ«>ÊÌÃÌ>`°Ê
ÀÌiÊ>ÃÊ>V>V
v>ÃÊ>ÊÊ>À}ÊiÊÀ`>>ÃÊ
de ¼ de pulgada (0.6 cm) de ancho y corte el prosciutto en tiras. Caliente 1
cucharada de aceite en una sartén de 10 pulgadas (25 cm) de fondo pesado
>ÊvÕi}Êi`Ê>Ì°Ê>`>Ê>ÊViL>ÊÞÊiÊ>°ÊÕiÛ>ÊvÀiVÕiÌiiÌiÊ
>ÃÌ>Ê
que queden transparentes. Añada las alcachofas y el prosciutto, cocine las
alcachofas hasta que estén doradas (por unos 4 minutos) y luego añada el
vinagre balsámico. Añada la albahaca y la menta, sal y pimienta al gusto.
-ÀÛ>Ê>ÊiâV>ÊÃLÀiÊ>ÃÊÌÃÌ>`>ðÊ
ÕLÀ>ÊVʵÕiÃÊ«>ÀiÃ>ÊÞÊÃÀÛ>Ê
inmediatamente.
£Ê
ÕV
>À>`>Ê`iÊ>âÖV>ÀÊÀÕL>Ê
2 Cucharaditas de margarina a
temperatura ambiente
¼ Cucharadita de canela en polvo
2 Tajadas de pan integral o multi
granos
RECETAS
Aceite de oliva para rociar
1 cucharadita de pimienta de cayena
1 caja de cereal de hojuelas de
>âÊ`iÊ£nÊâ>Ã]Ê«V>`ÊiÊiÊ
procesador hasta que quede en
migas
Español-29
iâViÊ>ÊÃÌ>â>ÊÞÊ>ÊiÊÕÌ>ÃÊiÊÕÊÌ>âÊi`>Ê«VÊ
`°Ê
ÕLÀ>Ê
el pollo completamente por ambos lados. Combine la pimienta de cayena, las
Õi>ÃÊ`iÊ>âÊÞÊ>ÃÊ«iV>>ÃÊiÊÌÀÊÌ>âÊi`>Ê«VÊ
`°Ê,ViÊiÊ
molde para hornear anti-adherente con el aceite en spray y coloque el pollo en
iÊ`i°Ê,ViÊ«ÀÊiV>ÊVÊ>ViÌiÊ`iÊÛ>°ÊÀiiÊ>ÊÎÇxcÊ«ÀÊ{äÊÕÌÃÊ
Ê
>ÃÌ>ʵÕiÊiÊ«Ê>V>ViÊÕ>ÊÌi«iÀ>ÌÕÀ>ÊÌiÀ>Ê`iÊ£ÇäcÊÞʵÕiÊÊiÃÌjÊ
rosado en el centro.
£ÊÌ>â>Ê`iÊÃÌ>â>Ê
¤ÊÌ>â>Ê`iÊ«iV>>ÃÊ«V>`>Ã
£ÊÌ>â>Ê`iÊi
Spray para molde anti-adherente
3 libras de muslos de pollo y/o
pechugas sin piel
POLLO A LA MIEL Y MOSTAZA CON CAPA PICANTE DE PECANAS Y
HOJUELAS DE MAÍZ
LiÊiÊ>âÖV>À]Ê>Ê>À}>À>ÊÞÊ>ÊV>i>ÊiÊÕÊÌ>âÊ«iµÕiÊVÊÕÊ
Ìii`ÀÊ
>ÃÌ>ʵÕiʵÕi`iÊLiÊiâV>`ðÊ1ÌiÊV>`>ÊÌ>>`>Ê`iÊ«>ÊVÊ
«ÀViÃÊ}Õ>iÃÊ`iÊ>ÊiâV>°ÊÊÕÊÀÊ/ÃÌ>`ÀÊ"ÃÌiÀ]Ê«}>Ê>ÊÌÃÌ>ÀÊ
>ÃÌ>ʵÕiÊiÊ>âÖV>ÀÊÃiÊ`iÀÀÌ>ÊÞÊiÊ«>ʵÕi`iÊ`À>`Ê`iÊ>VÕiÀ`Ê>ÊÃÕÊ}ÕÃÌ°Ê
CINNAMON TOAST
6 rodajas de pan redondo campesino
(de 1/3 de pulgada de ancho, 0.8 cm)
1 cucharada de ajo picado
2 cucharadas de vinagre balsámico
6 cucharadas de aceite de oliva
extra virgen
ÈÊâ>ÃÊ`iʵÕiÃÊÀi
1 cebolla pequeña picada
ÓÊÊvÀ>ÃVÃÊ`iÊÈʤÊâ>îÊ`iÊVÀ>âiÃÊ
de alcachofas marinados escurridos
1 cucharada de menta fresca picada
1 cucharada de albahaca fresca picada
1 rodaja de prosciutto o jamón
ÓÊâ>î
¥Ê`iÊÌ>â>Ê`iʵÕiÃÊ«>ÀiÃ>ÊÀ>Þ>`
BRUSCHETTA DE BRIE Y ALCACHOFA
RECETAS
1 cebolla pequeña, cortada en
cubitos de
Chili en polvo
Sal Kosher y pimienta
ÎÊÊâ>>
À>ÃÊ«iµÕi>Ã]ÊVÀÌ>`>ÃÊiÊ
cubitos de ¼ de pulgada (0.6cm)
£Ê¤ÊÌ>â>Ê`iÊV>`Ê`iÊ}>>
Español-30
Precaliente el horno tostador Oster®Ê>Ê{xäc°Êë>Àâ>ÊÃÊÛi}iÌ>iÃÊ>Êv`Ê
de un molde para hornear de 11 pulgadas (28 cm) por 1 ½ a 2 pulgadas (3.5
>ÊxÊV®Ê`iÊ>ÌÊÞÊ«}>ÊiV>Ê>Ê«iV
Õ}>Ê`iÊ«>Û°ÊiÌ>ÊiÊ>ÊÞÊ>ÃÊ
iÀL>ÃÊ
`iL>Ê`iÊ>Ê«iV
Õ}>°ÊÝ«À>ÊiÊÊÃLÀiÊiÊ«>ÛÊÞÊÃ>âiÊVÊV
ÊiÊ
«Û]ÊÃ>ÊÞÊ«iÌ>°Ê
ViÊ«ÀÊÓxÊÕÌðÊ>iÊ>ÊÌi«iÀ>ÌÕÀ>Ê`iÊ
ÀÊ
>ÊÎÓxcÊÞÊÛiÀÌ>ÊiÊV>`Ê>Êv`Ê`iÊ`i]Ê
>ÃÌ>ʵÕiÊi}ÕiÊ>ʣʫÕ}>`>Ê
Ó°xV®Ê>ÊÃÊ>`ÃÊ`iÊ`i°Ê
ÌÖiÊVV>`]Ê
>ÃÌ>ʵÕiÊiÊÕ}Ê`iÊ«>ÛÊ
ÃiÊÛi>ÊÌÀ>ë>ÀiÌiÊÞÊ>V>ViÊÕ>ÊÌi«iÀ>ÌÕÀ>ÊÌiÀ>Ê`iÊ£näc°
1 pechuga de pavo pequeña
2 tallos de apio, cortados en cubitos
de ¼ de pulgada (0.6cm)
2 dientes de ajo pelados
1 o 2 ramitos de romero y tomillo
frescos
1 limón, cortado por la mitad
PECHUGA DE PAVO ASADA CON VEGETALES AROMÁTICOS
RECETAS
2 cucharadas de aceite de oliva
3 cucharadas de tomillo fresco,
cocido al vapor
1 cucharadita de pimienta fresca
molida, más un adicional para
las papas
1 cucharada de sal Kosher, y un
adicional para las papas
Español-31
Precaliente el horno tostador Oster®Ê>ÊÎÇxc°Ê
ÕLÀ>ÊiÊViÀ`ÊVÊ>ÊÃÌ>â>Ê
°ÊÊÕÊÌ>âÊ«iµÕi]ÊVLiÊÓÊVÕV
>À>`>ÃÊ`iÊÀiÀ]ÊÓÊVÕV
>À>`>ÃÊ
`iÊÌ]ÊÃ>]Ê«iÌ>ÊÞÊ>ðÊë>Àâ>ÊÃLÀiÊ>ÃÊV
ÕiÌ>ÃÊ`iÊViÀ`ÊÞÊVµÕiÊ
iÊÕÊ`iÊ}À>`iÊ«>À>Ê
Ài>ÀʵÕiÊiÌÀiÊv?ViÌiÊiÊiÊ
À°Êë>Àâ>Ê
las papas alrededor del cerdo y rocíe el aceite de oliva. Espolvoree sal,
pimienta y la cucharada restante de romero y tomillo sobre las papas. Cocine
por ½ hora o hasta que la chuleta de cerdo no estén rosadas en el centro.
Retire el cerdo, cubra con papel aluminio y deje aparte. Pinche las papas
con un tenedor para verificar si están suaves y cocine por 15 a 20 minutos
adicionales si es necesario.
1 paquete de chuleta de cerdo,
1 ½ – 2 libras
5 dientes de ajo, pelados y molidos
ÎÊVÕV
>À>`>ÃÊ`iÊÃÌ>â>Ê
ÈÊÊ«>«>ÃÊ«iµÕi>ÃÊ9ÕÊ`]Ê
en cuartos
3 cucharadas de romero fresco,
cocido al vapor y picado
CHULETAS DE CERDO A LA MOSTAZA Y HIERBAS CON PAPAS ASADAS
RECETAS
POSIBLES CAUSAS
t-BTFMFDDJØOEFMB
GVODJØOEFUFSNJOB
RVÏFMFNFOUP
DBMFOUBEPSGVODJPOB
t-PTFMFNFOUPT
DBMFOUBEPSFT
DBNCJBSÈOEF
FODFOEJEP0/
ZBQBHBEP0''
QBSBNBOUFOFS
MBUFNQFSBUVSB
BQSPQJBEB
4PMPVOFMFNFOUP
DBMFOUBEPSFTUÈ
DBMFOUBOEP
-PTFMFNFOUPT
DBMFOUBEPSFTOPTF
NBOUJFOFOFODFOEJEPT
Español-32
t"MJNFOUPTBUBTDBEPT
EFOUSPEFMIPSOP
FOMPTFMFNFOUPT
DBMFOUBEPSFTPFOMB
CBOEFKBQBSBNJHBT
t6CJDBDJØOEFMBSFKJMMB
t5FNQFSBUVSBP
QSPHSBNBDJØOEFM
UJFNQPJODPSSFDUBT
0MPSBRVFNBEP
"MJNFOUPTDSVEPT
QBTBEPTEFDPDDJØO
PROBLEMA
t$POGJSNFRVFMBTFMFDDJØOEFMB
GVODJØOTFBMBDPSSFDUB
t3FWJTFTJTFTFMFDDJPOØMBPQDJØO
"TBSPEF$BMFOUBS
t7FBMBTFDDJØOi-JNQJF[BEFM
IPSOPQBSBNPTUSBEPSwQÈHJOB
FTQB×PM
t5BMWF[UFOHBRVFBKVTUBSFMUJFNQP
ZMBUFNQFSBUVSBBHVTUP
t%FCJEPBRVFTVIPSOPQBSB
NPTUSBEPSFTNÈTQFRVF×PRVF
TVIPSOPDPNÞOTFDBMFOUBSÈNÈT
SÈQJEPZHFOFSBMNFOUFDPDJOBSÈFO
QFSÓPEPTNÈTDPSUPT
t7FBMBTFDDJØOi$PMPDBDJØOEFMB
SFKJMMBwFOMBQÈHJOBFTQB×PM
-BSFKJMMBQVFEFOFDFTJUBSBKVTUFT
QBSBDPOUFOFSMPTUJQPTEF
BMJNFOUPT
SOLUCIÓN
CONSEJOS ÚTILES / DIAGNÓSTICO DE PROBLEMAS
Español-33
NOTAS
Español-34
JCS queda exenta de toda otra garantías, condiciones o manifestaciones,
iÝ«ÀiÃ>]Ê«VÌ>]Êi}>ÊÊ`iÊVÕ>µÕiÀÊÌÀ>Ê>ÌÕÀ>iâ>°
Excepto en la medida en que lo prohíba la ley aplicable, cualquier garantía o
condición implícita de comerciabilidad o aptitud para un fin determinado se
Ì>]ÊiÊVÕ>ÌÊ>ÊÃÕÊ`ÕÀ>V]Ê>Ê«>âÊ`iÊ>Ê}>À>Ì>Ê>ÌiÃÊiV>`>°
¿Cuál es el límite de responsabilidad de JCS?
JCS no será responsable de daños incidentales o emergentes causados por el
incumplimiento de alguna garantía o condición expresa, implícita o legal.
ÃÌ>Ê}>À>Ì>ÊÊVÕLÀiÊiÊ`iÃ}>ÃÌiÊÀ>Ê`iÊ>ÃÊ«iâ>ÃÊÊÃÊ`>ÃʵÕiÊÃiÊ
«À`ÕâV>ÊVÊÀiÃÕÌ>`Ê`iÊÕÃÊi}}iÌiÊÊ>ÊÕÃÊ`iÊ«À`ÕVÌ]ÊÕÃÊ`iÊ
voltaje incorrecto o corriente inapropiada, uso contrario a las instrucciones
operativas, y desarme, reparación o alteración por parte de un tercero ajeno
>Ê
-ÊÊ>ÊÕÊ
iÌÀÊ`iÊ-iÀÛVÊ>ÕÌÀâ>`Ê«ÀÊ
-°ÊÃÃ]Ê>Ê}>À>Ì>Ê
no cubre actos fortuitos tales como incendios, inundaciones, huracanes y
tornados.
La garantía es válida para el comprador minorista original a partir de la fecha
de compra inicial y la misma no es transferible. Conserve el recibo de compra
original. Para solicitar servicio en garantía se requiere presentar un recibo de
compra. Los agentes y centros de servicio de JCS o las tiendas minoristas que
venden productos de JCS no tienen derecho a alterar, modificar ni cambiar de
}ÖÊÌÀÊ`ÊÃÊÌjÀÃÊÞÊ>ÃÊV`ViÃÊ`iÊiÃÌ>Ê}>À>Ì>°Ê
Sunbeam Products, Inc. operando bajo el nombre de Jarden Consumer
Solutions, o en Canadá, Sunbeam Corporation (Canada) Limited operando
bajo el nombre de Jarden Consumer Solutions, (en forma conjunta, “JCS”),
}>À>Ìâ>ʵÕiÊ«ÀÊÕÊ«iÀ`Ê`iÊÕÊ>Ê>Ê«>ÀÌÀÊ`iÊ>ÊviV
>Ê`iÊV«À>]ÊiÃÌiÊ
producto estará libre de defectos de materiales y mano de obra. JCS, a su
iiVV]ÊÀi«>À>À?ÊÊÀii«>â>À?ÊiÃÌiÊ«À`ÕVÌÊÊVÕ>µÕiÀÊV«iÌiÊ`iÊ
ÃʵÕiÊ«ÀiÃiÌiÊ`iviVÌÃÊ`ÕÀ>ÌiÊiÊ«iÀ`Ê`iÊ}>À>Ì>°ÊÊÀii«>âÊÃiÊ
Ài>â>À?Ê«ÀÊÕÊ«À`ÕVÌÊÊV«iÌiÊÕiÛÊÊÀi«>À>`°Ê-ÊiÊ«À`ÕVÌÊÞ>Ê
ÊiÃÌÕÛiÀ>Ê`ëLi]ÊÃiÊÊÀii«>â>À?Ê«ÀÊÕÊ«À`ÕVÌÊÃ>ÀÊ`iÊÛ>ÀÊ
igual o superior. Ésta es su garantía exclusiva. No intente reparar o ajustar
ninguna función eléctrica o mecánica de este producto. Al hacerlo elimínará
ésta garantía.
Garantía Limitada de 1 Año
Español-35
FAVOR NO DEVUELVA ESTE PRODUCTO A NINGUNA DE
ESTAS DIRECCIONES NI AL LUGAR DE COMPRA.
En los Estados Unidos, esta garantía es ofrecida por Sunbeam Products, Inc.
«iÀ>`ÊL>ÊiÊLÀiÊ`iÊ>À`iÊ
ÃÕiÀÊ-ÕÌÃ]ÊV>Ê,>Ì]ÊÀ`>Ê
33431. En Canadá, esta garantía es ofrecida por Sunbeam Corporation
(Canada) Limited operando bajo el nombre de Jarden Consumer Solutions,
ÓäÊÊiÀivÀ`Ê-ÌÀiiÌ]ÊÀ>«Ì]Ê"Ì>ÀÊÈ9Ê䣰Ê-ÊÕÃÌi`ÊÌiiÊÌÀÊ
problema o reclamo en conexión con este producto, por favor escriba al
Departamento de Servicio al Consumidor.
En Canadá
Si tiene alguna pregunta sobre esta garantía o desea recibir servicio de
garantía, llame al 1-800-667-8623 y podrá obtener la dirección del centro de
servicio que le resulte más conveniente.
En los Estados Unidos
Si tiene alguna pregunta sobre esta garantía o desea recibir servicio de
garantía, llame al 1-888-233-3214 y podrá obtener la dirección del centro de
servicio que le resulte más conveniente.
Cómo solicitar el servicio en garantía
Esta garantía le otorga derechos legales específicos y es posible que usted
tenga otros derechos que varían de un estado, provincia o jurisdicción a otro.
Algunas provincias, estados o jurisdicciones no permiten la exclusión o
limitación de los daños incidentales o emergentes ni las limitaciones a la
duración de las garantías implícitas, de modo que es posible que la exclusión
o las limitaciones antes mencionadas no se apliquen en su caso.
-ÊÊÃiÀ?ÊÀiëÃ>LiÊ`iÊ}ÖÊÌ«Ê`iÊ`>ʵÕiÊÀiÃÕÌiÊ`iÊ>ÊV«À>]Ê
uso o mal uso del producto, o por la imposibilidad de usar el producto,
incluidos los daños incidentales, especiales, emergentes o similares, o la
«jÀ``>Ê`iÊ}>>V>Ã]ÊÊ`iÊ}ÖÊVÕ«iÌÊVÌÀ>VÌÕ>]ÊÃi>Ê`iÊÕ>Ê
L}>VÊiÃiV>ÊÊ`iÊÌÀ>Ê>ÌÕÀ>iâ>]ÊÊ`iÊ}ÖÊÀiV>ÊV>`ÊVÌÀ>Ê
el comprador por un tercero.
For product questions contact:
Jarden Consumer Service
USA: 1.888.233.3214
Canada: 1.800.667.8623
www.oster.com
© 2014 Sunbeam Products, Inc. doing business as Jarden Consumer
Solutions. All rights reserved. Distributed by Sunbeam Products, Inc. doing
LÕÃiÃÃÊ>ÃÊ>À`iÊ
ÃÕiÀÊ-ÕÌÃ]ÊV>Ê,>Ì]ÊÀ`>ÊÎÎ{Σ°Ê
Para preguntas sobre los productos llame:
Jarden Consumer Service
EE.UU.: 1.888.233.3214
Canadá: 1.800.667.8623
www.oster.com
© 2014 Sunbeam Products, Inc. operando bajo el nombre de
Jarden Consumer Solutions. Todos los derechos reservados.
Distribuido por Sunbeam Products, Inc. operando bajo el nombre de
>À`iÊ
ÃÕiÀÊ-ÕÌÃ]ÊV>Ê,>Ì]ÊÀ`>ÊÎÎ{Σ°Ê
ÊäxÓ£{
Printed in China
Impreso en China
© Copyright 2026