
AL/23-AF/21 - Fantini USA
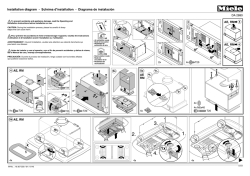
AL/23-AF/21
Instructions / Instrucciones
ART. B036AU
ART. B036BU
ART. A036AU
ART. A036BU
ART. A580BU
ART. A536BU
Installation / Instalación.
Tools needed / Instrumentos necesarias
8 mm
4 mm
2 mm
TEFLON
30 mm
24 mm
02
AL/23-AF/21
Index / Índice
B036AU Built-in pieces / Pedazos incorporados4
B036BU Parte esterna / Parte externa8
Cartridge replacement / Sustitucion del cartucho10
Substitute aerator / Sustitucion el aireador11
A036AU Built-in pieces / Pedazos incorporados12
A036BU Parte esterna / Parte externa16
Cartridge replacement / Sustitucion del cartucho18
A536BU Parte esterna / Parte externa20
Cartridge replacement / Sustitucion del cartucho22
A580BU Parte esterna / Parte externa24
Cartridge replacement / Sustitucion del cartucho26
Substitute aerator / Sustitucion el aireador27
Technical data / Datos Tècnicos28
03
Installation / Instalación.
ART. B036AU
04
Built-in pieces / Pedazos incorporados
AL/23-AF/21
•Sample installation and water outlet (use Teflon on the pipe threads):
•Ejemplo de cableado entrada y salida de agua (utilizar teflón en las roscas de las tuberías):
INPUT
ENTRADA - 1/2”
TEFLON
INPUT
ENTRADA - 1/2”
1.
•With the help of a level, correctly position the built-in body both horizontally and vertically according to the
specifications of the following indications, paying particular attention to the minimum and maximum mounting
depth information on labels on the protective covering.
•Con la ayuda de un nivel, posicionar correctamente el cuerpo a empotrar de manera horizontal y vertical
siguiendo las indicaciones de las figuras a continuación prestando especial atención a la profundidad del
empotrado mínimo y máximo indicada en las etiquetas ubicadas en la protección.
2A.
2B.
•Tighten the screws if the body is
hung with plugs.
•Aprietar los tornillos si el cuerpo está
fijado por clavijas.
05
Installation / Instalación.
3A.
3B.
4 mm
B
4.
A
5.
•Exercise pressure on the equipment to test the hold and the correct installation.
Then remove the plugs “B”, and insert and screw in the pins “C” (Ill. 6).
•Poner bajo presión el sistema para verificar que no haya pérdidas y la correcta instalación.
A continuación quitar las tapas “B”, colocar y atornillar los pernos “C” (fig.6).
06
AL/23-AF/21
4 mm
C
6.
C
7.
07
Installation / Instalación.
ART. B036BU
08
External pieces / Parte externa
AL/23-AF/21
B
4 mm
A
1.
2.
Adjustments / Ajustes
1.
09
Installation / Instalación.
Cartridge replacement / Sustitucion del cartucho
For art. B036BU
B
A
2 mm
30 mm
1.
2.
3.
4.
Replace following the instructions in reverse order (4-3-2-1)
Colocar según el procedimiento inverso (4-3-2-1)
10
AL/23-AF/21
Substitute aerator / Sustituir el aireador
For art. B036BU
1.
2.
Replace following the instructions in reverse order (2-1)
Colocar según el procedimiento inverso (2-1)
11
Installation / Instalación.
ART. A036AU
12
Built-in pieces / Pedazos incorporados
AL/23-AF/21
•Sample installation and water outlet (use Teflon on the pipe threads):
•Ejemplo de cableado entrada y salida de agua (utilizar teflón en las roscas de las tuberías):
TEFLON
INPUT
ENTRADA - 1/2”
INPUT
ENTRADA - 1/2”
1.
•With the help of a level, correctly position the built-in body both horizontally and vertically according to the
specifications of the following indications, paying particular attention to the minimum and maximum mounting
depth information on labels on the protective covering.
•Con la ayuda de un nivel, posicionar correctamente el cuerpo a empotrar de manera horizontal y vertical
siguiendo las indicaciones de las figuras a continuación prestando especial atención a la profundidad del
empotrado mínimo y máximo indicada en las etiquetas ubicadas en la protección.
2A.
2B.
•Tighten the screws if the body is
hung with plugs.
•Aprietar los tornillos si el cuerpo está
fijado por clavijas.
13
Installation / Instalación.
3A.
3B.
8 mm
B
4.
A
5.
•Exercise pressure on the equipment to test the hold and the correct installation.
Then remove the plugs “B”, and insert and screw in the pins “C” (Ill. 6).
•Poner bajo presión el sistema para verificar que no haya pérdidas y la correcta instalación.
A continuación quitar las tapas “B”, colocar y atornillar los pernos “C” (fig.6).
14
AL/23-AF/21
8 mm
6.
C
C
7.
15
Installation / Instalación.
ART. A036BU
16
External pieces / Parte externa
AL/23-AF/21
B
4 mm
A
1.
2.
Adjustments / Ajustes
1.
17
Installation / Instalación.
Cartridge replacement / Sustitucion del cartucho
For art. A036BU
2 mm
2 mm
A
A
C
B
C
B
D
1.
2.
3.
A
24 mm
B
C
A
D
B
E
4.
5.
Replace following the instructions in reverse order (6-5-4-3-2-1)
Colocar según el procedimiento inverso (6-5-4-3-2-1)
18
AL/23-AF/21
19
Installation / Instalación.
ART. A536BU
20
External pieces / Parte externa
AL/23-AF/21
B
4 mm
A
1.
2.
Adjustments / Ajustes
1.
21
Installation / Instalación.
Cartridge replacement / Sustitucion del cartucho
For art. A536BU
2 mm
3 mm
A
A
C
B
B
1.
2.
2 mm
3.
A
A
B
B
C
4.
5.
6.
Replace following the instructions in reverse order (6-5-4-3-2-1)
Colocar según el procedimiento inverso (6-5-4-3-2-1)
22
AL/23-AF/21
23
Installation / Instalación.
ART. A580BU
24
External pieces / Parte externa
AL/23-AF/21
B
4 mm
A
1.
D
C
A
B
2.
3.
Adjustments / Ajustes
1.
2.
25
Installation / Instalación.
Cartridge replacement / Sustitucion del cartucho
For art. A580BU
A
30 mm
2 mm
B
A
C
1.
2.
3.
4.
Replace following the instructions in reverse order (4-3-2-1)
Colocar según el procedimiento inverso (4-3-2-1)
26
AL/23-AF/21
Substitute aerator / Sustituir el aireador
For art. A036BU-A536BU-A580BU
1.
2.
Replace following the instructions in reverse order (2-1)
Colocar según el procedimiento inverso (2-1)
27
Installation / Instalación.
Technical data
Minimum pressure
14 PSI
Maximum pressure
145 PSI
Reccomended working pressure 30-70 PSI
Maximum water temperature
176°F
Maximum water temperature
reccomended 150°F
Maximum in-let pressure difference
(hot - cold)
22 PSI
Operating instructions
These mixers can be used with cumulos boilers or instantaneous water heaters.
Warning
The supplying pipes must be carefully cleaned before
installation.
Remember that the hot water supply must ALWAYS be
connected to the tube on the LEFT.
Datos Técnicos
Pression mínima
14 PSI
Pression máxima
145 PSI
Pression de trabajo aconsejada 30-70 PSI
Temperatura máxima
176°F
Temperatura máxima aconsejada 150°F
Diferencial maxìma de
presiûn de entrada (caliente - fria) 22 PSI
Aplicacìones
Estos monomandos pueden ser utilizados con
acumuladores de agua caliente a presión.
Advertencias
Antes de conectar el monomando es necesario purgar
correctamente la instalaciún hidráulica de alimentaciún de
cualquier impureza que pueda tener.
Recuerde que el agua caliente debe ser SIEMPRE
conectada al tubo o flexo de Ia IZQUIERDA.
ENGLAND.
SPAIN.
28
AL/23-AF/21
Advice on product care
To clean the surface use a soap and water solution.
Never use for any reason cleaning solutions containing
abrasive substances, chloric acids, ammonia, vinegar,
bleach, domestic acids, disinfectants, or anytype of abrasive
pad.
WARNING! Incorrect cleaning may permanently ruin the
surface of the products and in such case the manufacturer
may not be held liable for damage.
The Manufacturer reserves the right to modify product and
accessories at any time without prior notice. Datas, products
and sketches included in this document are just for
information and do not bind the producer.
Consejos para el cuidado del producto
La limpieza de las superficies se hace utilizando un jabón
liquido diluido en agua.
No usar en ningún caso detergentes liquidos que
contengan sustancias abrasivas ó a base de ácido
clorhídrico, estropajossabrasivos, amoniaco, acetona, lejía,
ácidos de uso doméstico, desinfectantes varios.
ATENCÍON! El uso de productos desaconsejados puede
danãr irremediablemente las superficies de los elementos,
de lo cual el fabricante no se hará responsable en ningún
caso.
La sociedad se reserva el derecho de modificar sus
productos y accessorios en cualquier momento y sin
previo aviso.
ENGLAND.
SPAIN.
29
Installation / Instalación.
Notes / Notas
30
AL/23-AF/21
31
Disegni e grafica: www.dipi-designs.com
112700020000000U Rev. 0


© Copyright 2026