
easy 8-cup coffeemaker cafetera fácil de usar de 8 tazas cafetière
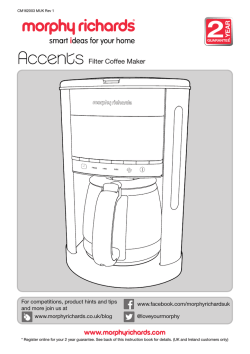
TM
EASY 8-CUP COFFEEMAKER
CAFETERA F
ÁCIL DE U SAR
DE 8
TAZAS
CAFETIÈRE DE 8
TASSES FACILE À
U TILISER
CM4500BD
Thank you for your purchase!
Gracias por su compra!
Merci de votre achat!
Should you have any questions or concerns with your new product,
please call our Customer Service Line at 1-800-231-9786 (US and
Canada). Please do not return to the store.
Si usted tiene alguna inquietud o pregunta con su producto, por
favor llame a nuestra línea de servicio al cliente una atención
inmediata 1-800-231-9786 (EE.UU/Canadá) 01-800-714-2503
(México). No devuela a la tienda.
Si vous avez des questions ou des préoccupations à propos de
votre nouveau produit, veuillez communiquer avec notre Service à
la clientèle au 1 800 231-9786 (États-Unis et Canada). Veuillez ne
pas rapporter le produit au magasin.
2
Please Read and Save this Use and Care Book.
IMPORTANT SAFEGUARDS.
When using electrical appliances, basic safety precautions should always be followed to
reduce the risk of fire, electric shock, and/or injury, including the following:
• Read all instructions prior to use.
• Do not touch hot surfaces. Use handles or knobs.
• To protect against fire, electrical shock and
injury to persons, do not immerse cord, plugs or
appliance in any liquids.
• Close supervision is necessary when any appliance
is used by or near children.
• Unplug appliance from outlet when not in use.
• Allow appliance to cool before cleaning and adding
or removing parts.
• Do not operate any appliance with a damaged cord
or plug, or after the appliance malfunctions or has
been damaged in any manner. Contact consumer
support at the number listed in this manual.
• The use of accessory attachments that have
not been recommended by the appliance
manufacturer may result in fire, electric shock or
injury to persons.
• Do not use outdoors.
• Do not let cord hang over edge of table or counter,
or touch hot surfaces.
• Do not place appliance on or near a hot gas or
electric burner, or in a heated oven.
• To disconnect, turn the unit OFF, then remove plug
from wall outlet.
• Do not use this appliance for anything other than
its intended use.
• Keep lid on the carafe when it use.
• Scalding and/or burns may occur if the carafe
lid is removed or unit cover is opened during the
brewing cycle.
• The unit’s carafe is designed for use only with this
appliance. It must never be used to a range top.
• Do not set a hot carafe on a wet or cold surface.
• Do not use a cracker carafe or a carafe having a
loose or weakened handle.
• Do not clean carafe with harsh cleansers, steel
wool or other abrasive material.
• This appliance is not intended for use by persons
(including children) with reduced physical, sensory
or mental capabilities, or lack of experience
and knowledge, unless they have been given
supervision or instruction concerning use of the
appliance by a person responsible for their safety.
• Children should be supervised to ensure that they
do not play with the appliance.
SAVE THESE INSTRUCTIONS.
This product is for household use only.
POLARIZED PLUG (120V models only)
This appliance has a polarized plug (one
blade is wider than the other). To reduce
the risk of electric shock, this plug is
intended to fit into a polarized outlet only
one way. If the plug does not fit fully into
the outlet, reverse the plug. If it still does
not fit, contact a qualified electrician. Do
not attempt to modify the plug in any way.
TAMPER-RESISTANT SCREW
Warning: This appliance is equipped
with a tamper-resistant screw to prevent
removal of the outer cover. To reduce
the risk of fire or electric shock, do not
attempt to remove the outer cover. There
are no user-serviceable parts inside.
Repair should be done only by authorized
service personnel.
ELECTRICAL CORD
1. A short power-supply cord is provided
to reduce the risk resulting from becoming
entangled in or tripping over a longer cord.
2. Extension cords may be used if care is
exercised in their use.
3. If a long detachable extension cord is used:
a) The marked electrical rating of the
power cord or extension cord should
be at least as great as the electrical
rating of the appliance.
b) If the appliance is of the grounded
type, the extension cord should be a
grounding-type 3-wire cord.
c) The cord should be arranged so that
it will not drape over the countertop
or tabletop where it can be pulled on
by children or tripped over.
Note: If the power cord is damaged,
please contact the warranty department
listed in these instructions.
3
WE LCO M E!
Congratulations on your purchase of the Black & Decker Easy 8- Cup
Cof feemaker. We have developed this guide to ensure optimal product
performance and your complete satisfaction. Save this use and care manual and
be sure to register your appliance online at www.prodprotect.com/applica.
CO NTE NTS
Important Safeguards
3
Table of Contents
4
Getting to know your Cof fee Maker
5
Before Brewing
6
Using your Choice of Cof fee Filter
6
Brewing Cof fee
7
Care and Cleaning
8-9
Troubleshooting
9
Warranty and Customer
Ser vice Information
10
SAV E THE SE IN STR UC T I ONS.
This product is for household use only.
4
GE T T IN G TO KN OW YO UR
EASY 8 - C UP COF F E E MA K E R
2
2
3
1
4
6
5
10
9
8
7
1.
Removable Water Reservoir
(Part #CM4500-01)
6. Carafe Lid (Part #CM4500-04)
7.
Nonstick “keep hot” carafe plate
2. Reservoir lid with dual openings
8. Coffee Scoop (Part #CM4500-05)
3. Brew basket lid
9. Illuminated On/Off Button
4. Washable Brew Basket
(Part #CM4500-02)
10. Illuminated Cup Selector Lights
5. 8-Cup Glass Carafe
(Part #CM4500-03)
5
BE FO R E B R E WIN G
1.
Register your product at www.prodprotect.com/applica
2.
Carefully unpack your coffeemaker, removing all packaging materials, labels, and/or
stickers.
3. Remove the plastic band around1the power plug
using
4 scissors.
3
3
7
5
4. Clean all removable parts of your coffeemaker in warm, soapy water.6 Rinse and dry
these parts prior to placing them back into your coffeemaker.
5.
8
To clean the inside of your coffeemaker, run2 two full brewing cycles using only water,
no coffee.
10
a.Make sure your coffeemaker is plugged in.
12
14 cool
0 water and place
b.Fill the reservoir to the 8 cup mark with fresh,
4
carafe onto the carafe plate.
13
15
c.Press the Power button.
12
11
2
17
d.Once the cycle is finished, discard water.
16
e.Turn off appliance, unplug and allow to cool down for 15 minutes before
repeating.
18
18
U SIN G YOUR C HO IC E
O F CO F F EE F I LTE R
• If using a basket shaped coffee filter,
lower both plastic tabs into the brew
basket so they rest horizontally. Place
the basket filter on top of the tabs
inside the brew basket (fig. A).
• If using a cone style filter to brew 8 cups
of coffee, lift both plastic tabs so they
rest flush against the back of the brew
basket. Open a #4 cone filter and place
it directly into the brew basket (fig. B) .
• If using a cone style filter to brew 2 or
4 cups of coffee, lower only the tab
containing an oval shaped cut out
(fig. C). Place a #4 paper cone filter,
folded in half or a #2 cone filter into
the opening in the tab
6
fig. A
fig. C
fig. B
BRE WI NG COF F E E
1
3
4
3
1.
5
Plug in coffeemaker. The On/Off button will illuminate and remain illuminated,
6
indicating the coffeemaker has power.
2.
Remove water reservoir and fill with water up to at least
the marking that is equal to
2
the number of cups of coffee to be brewed.
7
3. Place the paper filter of your choice into the brew basket (see USING YOUR CHOICE
12
OF COFFEE FILTER section for assistance).
14
4. Use the built in scoop to add ground coffee into the paper
15
filter. We suggest one scoop per cup of coffee.
12 Adjust for your
personal taste.
0
4
13
2
5. Close filter basket lid tightly to ensure coffee 16
flows smoothly into
the carafe. Overflows may occur if the filter basket lid is not properly closed.
6. Place the carafe on the carafe plate with lid closed or secured
tightly. Coffee may run 18
18
over if carafe lid is not correctly in place.
7.
Press the illuminated On/Off button once to brew 2 cups,
twice to brew 4 cups or three times to brew 8 cups of
coffee. The brew cycle will automatically start. There is no
need to push the illuminated On/Off button again.
8. While brewing, the Sneak-A-Cup™ feature will stop coffee
flow into the carafe, allowing you to pour a cup of coffee before the brew cycle
finishes. Always return the carafe on to the carafe plate within 20 seconds to prevent
coffee overflow.
9.
To stop your coffeemaker’s brew cycle at any time, press the illuminated On/Off button.
10. When the brew cycle is complete:
• 2 or 4 Cups: The unit will automatically shut off.
• A full 8-cup carafe: the warming plate will remain on for 1 hour before
automatically shutting off. CAUTION: Do not touch the carafe plate. It will be hot!
11. When coffee grounds are cool, carefully remove and dispose of the used grounds and
filter.
12. Clean your coffeemaker according to the instruction in the “CARE AND CLEANING”
section.
7
10
1
C A RE AN D C LE A N IN G
Cleaning your coffeemaker, following the directions below is recommended
after every use.
Cleaning
1. Make sure your coffeemaker is unplugged and cool.
2.Open your coffeemaker’s filter basket lid and remove the brew basket.
3.If remaining, throw away the used paper filter and coffee grounds.
4.Wash the brew basket and carafe by hand in warm, soapy water or on the top rack of your
dishwasher (ensure carafe is applicable below).
5.Wipe the outside of the coffeemaker, power cord and carafe plate with a soft, damp cloth.
6.To clean the inside of the filter basket lid, open the filter basket lid and wipe any surfaces
with a damp cloth.
Note: Do not use abrasive cleansers or scouring pads on this product. Never
immerse the coffeemaker in water.
COFFEEMAKER PART
CLEANING INSTRUCTIONS
Housing
Carafe Plate
Wipe with a soft, damp cloth.
Power Cord
Carafe Lid
Brew Basket
Wash by hand in warm soapy water, or in the
dishwasher (top rack only).
Glass Carafes
Thermal Carafes
Wash by hand in warm soapy water
Descaling with Vinegar
To remove mineral build up that can affect the taste and quality of your coffee,
descaling your coffeemaker with vinegar every 3 to 6 months is recommended.
To descale, follow the instructions below:
1. Open the filter basket lid and fill the water reservoir approximately half way with white
vinegar. Fill the remaining half of the water reservoir with cool water.
2.Place a paper filter into the brew basket, close the lid and check to ensure the empty
carafe is placed on the carafe plate.
3.Push the POWER button to start the brewing cycle.
4.After approximately half the cleaning mixture has brewed into the carafe, press the
POWER button again to turn OFF the unit.
5.Let soak for a minimum of 15 minutes and then press POWER again to turn the
coffeemaker on.
6.Brew the remaining cleaning mixture into the carafe.
7. Following ‘Cleaning’ instructions from above.
8.Run a full brew cycle using only water. You may want to repeat this step more than once.
9.Wash the brew basket and carafe as instructed above.
8
T RO U B L ES HO OTIN G
PROBLEM
POSSIBLE CAUSE
SOLUTION
Coffeemaker does
not turn on.
Coffeemaker is not
plugged in.
Make sure appliance
is plugged into a
working outlet.
Coffeemaker
is leaking.
Water reservoir may be
overfilled.
Make sure water
reservoir has not
been filled beyond
the 12-cup MAX line.
Cover may not be
correctly placed on
carafe
Make sure cover is
correctly placed and
tightened on carafe
Carafe may not be
correctly placed on the
carafe plate
Make sure carafe is
placed correctly on the
carafe plate.
The carafe has been
removed for longer than
20 seconds when using
the Sneak-A-Cup™ feature.
Make sure to replace
the carafe within 20
seconds during the
brewing cycle.
Excessive amount of
coffee is used.
Reduce the amount
of coffee used to
eliminate brew basket
overflows.
Coffee sediment in
brewed cup of coffee.
The paper filter and/or
the brew basket are not
properly placed.
Insert basket-shaped
paper filter into brew
basket and insert
basket properly into
holder.
The coffeemaker
brews slowly.
The coffee maker needs
cleaning.
Follow the instructions
in the “Descaling with
Vinegar” section.
The brew basket
overflows.
If additional assistance is needed, please contact our consumer service team at
1-800-231-9786.
9
WA RR AN T Y AN D C USTO M E R
SE RVI C E I NFO R MATIO N
For service, repair or any questions regarding your appliance, call the
appropriate 800 number listed within this section. Please DO NOT return the
product to the place of purchase. Also, please DO NOT mail product back to
manufacturer, nor bring it to a service center. You may also want to consult
the website listed on the cover of this manual.
Two-Year Limited Warranty
(Applies only in the United States and Canada)
What does it cover?
•Any defect in material or workmanship provided; however, Spectrum Brands,
Inc.’s liability will not exceed the purchase price of product.
For how long?
•Two years from the date of original purchase with proof of purchase.
What will we do to help you?
•Provide you with a reasonably similar replacement product that is either new or
factory refurbished.
How do you get service?
•Save your receipt as proof of date of sale.
•Visit the online service website at www.prodprotect.com/applica, or call toll-free
1-800-231-9786, for general warranty service.
•If you need parts or accessories, please call 1-800-738-0245.
What does your warranty not cover?
•Damage from commercial use
•Damage from misuse, abuse or neglect
•Products that have been modified in any way
•Products used or serviced outside the country of purchase
•Glass parts and other accessory items that are packed with the unit
•Shipping and handling costs associated with the replacement of the unit
•Consequential or incidental damages (Please note, however, that some states do
not allow the exclusion or limitation of consequential or incidental damages, so
this limitation may not apply to you.)
How does state law relate to this warranty?
•This warranty gives you specific legal rights. You may also have other rights that
vary from state to state or province to province.
10
Por favor lea este instructivo antes de usar el producto.
INSTRUCCIONES IMPORTANTES
DE SEGURIDAD
Al utilizar cualquier aparato eléctrico siempre deben tomarse precauciones básicas de
seguridad, incluyendo las siguientes:
• Lea todas las instrucciones antes de utilizar.
• No toque las superficies calientes. Use las asas o las
perillas.
• A fin de protegerse contra un incendio, descarga
eléctrica y lesiones a las personas, no sumerja el
cable, los enchufes ni el aparato en agua ni en
ningún otro líquido.
• Todo aparato eléctrico utilizado cerca de la
presencia de los niños o por ellos mismos, requiere
la supervisión de un adulto.
• Desenchufe el aparato del tomacorriente cuando no
esté en uso.
• Espere a que el aparato se enfríe antes de instalarle
o retirarle piezas y antes de limpiarlo.
• No opere ningún aparato eléctrico que tenga
el cable o el enchufe averiado, que presente un
problema de funcionamiento o que esté dañado.
Devuelva el aparato al centro de servicio autorizado
más cercano para que lo examinen, reparen o le
hagan los ajustes necesarios.
• El uso de accesorios no recomendados por el
fabricante para ser utilizados con este aparato
puede ocasionar incendio, descarga eléctrica o
lesiones a las personas.
• No utilice este aparato a la intemperie.
• No permita que el cable cuelgue del borde de la
mesa o del mostrador ni que entre en contacto con
las superficies calientes.
• No coloque el aparato sobre ni cerca de una hornilla
de gas o eléctrica ni adentro de un horno caliente.
• Para desenchufar, ajuste todo control a la posición
de apagado (OFF) y después retire el enchufe del
tomacorriente.
• Este aparato se debe usar únicamente con el fin
previsto.
• La tapa debe mantenerse sobre la jarra cuando el
aparato está en uso.
• El retirar o abrir la tapa durante el ciclo de colado
puede ocasionar quemaduras.
• La jarra está diseñada para ser utilizada con este
aparato. Jamás se deberá utilizar sobre una estufa.
• Nunca coloque una jarra caliente sobre una
superficie fría ni mojada.
• No utilice la jarra si el vidrio se ha rajado o si el asa
está floja o débil.
• No limpie la jarra con limpiadores abrasivos, con
almohadillas de fibra de metal ni demás limpiadores
abrasivos.
•Este aparato no está diseñado para ser usado por
personas (incluyendo los niños) con su capacidad física,
psíquica o sensorial reducida, o con falta de experiencia
o sabiduria, a menos que sean supervisadas o instruidas
acerca del uso del aparato por una persona responsable
de su seguridad.
•Los niños deben ser supervisados para asegurar que no
jueguen con el aparato.
CONSERVE ESTAS INSTRUCCIONES.
Este aparato eléctrico es para uso doméstico solamente.
ENCHUFE POLARIZADO (Solamente
para los modelos de 120V)
CABLE ÉLECTRICO
Este aparato cuenta con un enchufe polarizado (un
contacto es más ancho que el otro). A fin de reducir
el riesgo de un choque eléctrico, este enchufe
encaja en un tomacorriente polarizada en un solo
sentido. Si el enchufe no entra en el tomacorriente,
inviértalo y si aun así no encaja, consulte con
un electricista. Por favor no trate de alterar esta
medida de seguridad.
TORNILLO DE SEGURIDAD
Advertencia: Este aparato cuenta con un tornillo
de seguridad para evitar la remoción de la cubierta
exterior del mismo. A fin de reducir el riesgo de
incendio o de choque eléctrico, por favor no trate
de remover la cubierta exterior. Este producto no
contiene piezas reparables por el consumidor. Toda
reparación se debe llevar a cabo únicamente por
personal de servicio autorizado.
1. El producto se debe de proporcionar con un
cable eléctrico corto, a fin de reducir el riesgo de
tropezar o de enredarse en un cable más largo.
2. Si se utiliza un cable separable o de extensión,
a) El régimen nominal del cable separable o del
cable de extensión debe ser, como mínimo, igual
al del régimen nominal del aparato.
b) Si el aparato es de conexión a tierra, el cable de
extensión debe ser un cable de tres alambres de
conexión a tierra.
c) Uno debe de acomodar el cable más largo de
manera que no cuelgue del mostrador o de la
mesa, para evitar que un niño tire del mismo o
que alguien se tropiece.
Nota: Si el cordón de alimentación es dañado,
en América Latina debe sustituirse por personal
calificado o por el centro de servicio autorizado.
11
¡BIE N V EN I D O!
Felicitaciones por su compra de la Cafetera de 8 Tazas Fácil de Usar de Black
& Decker. Hemos diseñado esta guía para asegurar un rendimiento óptimo
del producto y garantizar su satisfacción completa. Conser ve este manual de
uso y cuidado y asegúrese de registrar su producto en línea, visitando www.
prodprotect.com/applica.
TA BL A D E CON TE N IDO
INSTRUCCIONES IMPORTANTES DE SEGURIDAD
11
TABL A DE CONTENIDO
12
CONOZCA SU CAFETER A
13
ANTES DE COL AR CAFÉ
14
CONOZCA SU CAFETER A DE 8 TAZAS FÁCIL DE USAR
14
PREPAR ACIÓN DE CAFÉ
15
CUIDADO Y LIMPIEZA
16-17
RESOLUCIÓN DE FALL AS
18
INFORMACIÓN DE GAR ANTÍA Y SERVICIO AL
CLIENTE
19
CO N S E RVE E STAS IN STR UCCI ONES.
Este aparato eléctrico es para uso doméstico solamente.
12


© Copyright 2026